Category: Festival & Holiday Recipes

Indian Festival Foods: A Celebration of Tradition and Taste
Indian festivals are a time of joy, togetherness, and, most importantly, a feast of flavors. Indian festival foods are an integral part of the celebrations, bringing families and communities together to enjoy delicious and diverse dishes. From sweet to savory, these foods are deeply rooted in tradition and offer a taste of India’s rich culinary heritage. Let’s explore some of the best Indian festival recipes that you can prepare to make your festivities even more special.
Popular Indian Festival Recipes
Gulab Jamun
Gulab Jamun is one of the most cherished Indian festival foods. These soft, spongy balls made from khoya (dried milk) are deep-fried and soaked in a fragrant sugar syrup. They are a must-have during festivals like Diwali and Holi. As a favorite Indian dessert, Gulab Jamun is beloved by all ages and adds a sweet touch to any celebration. Other popular Indian desserts for festivals include Shakar Paare and Namkeen Paare, which are enjoyed during various celebrations.
Samosa
Samosas are another staple in Indian festival recipes. These crispy, savory pastries are filled with a spiced mixture of potatoes and peas, making them a perfect indian snack for any festive gathering. Samosas are versatile and can be enjoyed as part of a meal or as a standalone treat. They are often served with tangy chutneys, adding a burst of flavor to your festive spread. Samosas are also popular Indian street food recipes and can be part of your party recipes collection.
Puran Poli
Puran Poli is a traditional sweet flatbread from Maharashtra, commonly prepared during festivals like Holi and Ganesh Chaturthi. This Indian festival food is made by stuffing a dough with a sweet filling made from chana dal (split chickpeas), jaggery, and cardamom. The result is a delicious, aromatic bread that is enjoyed by everyone. Puran Poli is one of the best Indian festival recipes that embodies the spirit of Indian festivals. It can also be enjoyed as part of Indian breakfast recipes on festive mornings.
Kheer
Kheer is a classic Indian dessert made with rice, milk, and sugar, flavored with cardamom, saffron, and nuts. This creamy and rich pudding is a staple at many Indian festivals, including Eid and Raksha Bandhan. Kheer is easy to prepare and can be served either warm or chilled, making it a versatile addition to any festive menu. It is also a delightful addition to traditional Indian recipes and gluten-free dessert recipes.
Chole Bhature
Chole Bhature is a popular North Indian dish often enjoyed during festivals and special occasions. This combination of spicy chickpea curry (chole) and deep-fried bread (bhature) is hearty and satisfying. Chole Bhature is one of the best Indian festival recipes for those who love bold, robust flavors. It is commonly served with pickles, and yogurt, enhancing the overall experience. This dish can also be included in dinner recipes for festive feasts.
Enhance Your Festival Feast
To make your festival feast even more delightful, consider exploring related categories that complement these Indian festival foods. Adding Indian snacks like pakoras and vadas can provide a variety of flavors and textures. For a sweet ending, explore Indian desserts such as barfi and jalebi. Incorporating healthy recipes like roasted nuts and fruit chaat can offer lighter options for your guests. Hosting a large gathering? The popular party recipe category is filled with dishes that are sure to impress your guests and make your celebration memorable. Including fusion dishes like Indo-Chinese Manchurian can add a unique twist to your festival spread.
Frequently Asked Questions (FAQs)
Q: What are some popular Indian festival foods? 
A: Some popular Indian festival foods include Gulab Jamun, Samosas, Puran Poli, Kheer, and Chole Bhature.
Q: What types of festivals are celebrated in India? 
A: India celebrates a wide variety of festivals including Diwali, Holi, Eid, Christmas, Raksha Bandhan, Navratri, and Ganesh Chaturthi. Each festival has its own unique traditions and foods.
Q: How can I make my festival feast healthier? 
A: To make your festival feast healthier, you can include healthy Indian snacks like roasted nuts, fruit chaat, and baked samosas. Opting for desserts made with natural sweeteners and using less oil in savory dishes can also help.
Q: What is the significance of food in Indian festivals? 
A: Food plays a central role in Indian festivals, symbolizing prosperity, togetherness, and cultural heritage. Each festival has its own traditional dishes that are prepared and enjoyed with family and friends.
Q: Can I prepare these recipes in advance? 
A: Yes, many Indian festival recipes can be prepared in advance. For example, Gulab Jamun and Kheer can be made a day ahead and stored in the refrigerator. Samosas can be prepped and frozen, then fried fresh on the day of the festival.
Q: Are there vegetarian options for Indian festival foods? 
A: Absolutely! Most Indian festival foods are vegetarian. From savory dishes like Samosas and Chole Bhature to sweet treats like Puran Poli and Kheer, there are plenty of vegetarian options to choose from.
Conclusion
Indian festival foods are a testament to the rich culinary traditions of India. Whether you’re celebrating Diwali, Holi, Eid, or any other festival, these best Indian festival recipes will add flavor and joy to your festivities. So, gather your ingredients, try out these Indian festival recipes, and create unforgettable memories with your loved ones. Don’t forget to find vegetarian recipes for more delightful recipes from Manjula’s Kitchen!

By incorporating these dishes into your festival celebrations, you’ll be able to enjoy a wide variety of delicious and traditional foods. Whether you’re looking for a quick snack, a hearty meal, or a sweet treat, there’s an Indian festival food to suit every occasion. Happy cooking and happy festivities!

  • Bread Pudding with Chocolate Sauce

    Bread Pudding with Chocolate Sauce

    Chocolate Drizzled Dessert in a Glass Dish

    Bread Pudding (With Chocolate Sauce)

    It was my daughter-in-law's birthday this past weekend, and I wanted to do something nice for her. For me, the thing that gives me the most joy is making food for the people that I love, and so I decided that I would prepare something for her to drop off. Due to the quarantine, this was the best that I could do for her, so I wanted what I made to be special. I asked my husband if he had any suggestions, and he said that I should make a dessert that my daughter-in-law, son, and grandkids would all enjoy. After talking to him, I was on the search for a dessert recipe that would be easy to prepare and also not too sweet.
    This made me think of a bread pudding in a magazine that had caught my eyes just a little while ago. I had been wanting to experiment with bread pudding since then but had found nothing that I fell in love with. I decided to try again, but this time I randomly decided to use a French Baguette for the bread pudding. The texture was exactly the way I wanted it to be a little chewy in some areas while stilling melting in your mouth in other areas. After finalizing the recipe, I had my husband taste test it and he suggested that I should find a way to add chocolate as well because my grandkids love it. In order to incorporate chocolate in a way that wasn't overpowering, I decided to add a chocolate drizzle on top instead of adding it into the bread pudding. It was perfect! If desired, this dish could be given a Indian touch. For example, you can substitute the vanilla extract for cardamom powder and replace the chocolate drizzle with sliced almonds and pistachios. Give it a try!
    This recipe will serve 6
    No ratings yet
    Prep Time 15 minutes
    Cook Time 45 minutes
    Total Time 1 hour
    Course Dessert
    Cuisine Indian
    Servings 6 people

    Ingredients
      

    • 20 slices French bruschetta cut into about ¼ in thick
    • 3 cup whole milk
    • 6 Tbsp sugar
    • 2 Tbsp corn starch
    • 4 Tbsp butter at room temperature, use as needed
    • 2 tsp vanilla extract
    • tsp cinnamon powder dalchini powder

    For Chocolate Sauce (optional)

    • cup chocolate chips semi-sweet
    • cup heavy cream
    • 1 tsp vanilla extract

    Optional

    • 1 Tbsp crystal sugar for garnishing

    Instructions
     

    For chocolate sauce

    • Place chocolate in a bowl and add the vanilla essence. Heat the heavy cream do nit boil I did in microwave for 25 seconds. Pour the cream over chocolate and stir until chocolate completely dissolve and become glossy. As chocolate sauce cool it will become little thick. Set aside.

    Making Pudding

    • In a small bowl take 1/2 cup of milk and add corn starch mix it well to smooth paste and set aside.
    • In a saucepan, take remaining milk, and cook over medium high heat stirring occasionally after milk comes to boil let it boil for 10 more minutes. Lower the heat to medium and add sugar and corn starch mix making sure no lumps.
    • Let it boil for about 5 more minutes over low medium heat. Stir the mixture continually making sure mixture is smooth and no lumps. Mixture will become thick consistency of batter. Add vanilla and cinnamon powder mix it well.
    • Preheat oven to 350 degrees F.
    • I am using 5×7 Pyrex pan to make Bread Pudding. Grease the pan.
    • Butter the bread slices lightly. Arrange the bread slanted and butter the edges. Pour the milk mixture and pour over bread slices evenly.
    • Bake in a preheated oven at 350 degrees F for about 20 to 25 minutes, till the pudding is bubbling and the top get browned.
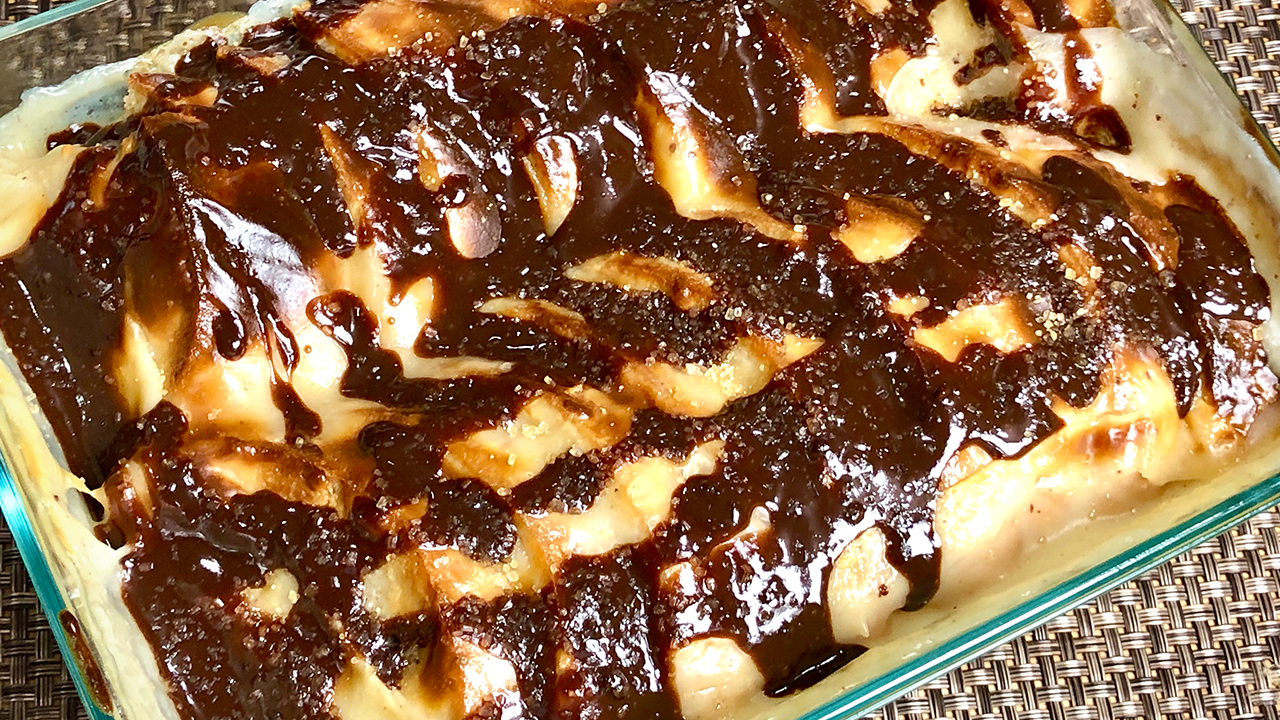
    • Take it out from oven. For best taste Bread Pudding should be served warm. Before serving drizzle the chocolate Sauce over and sprinkle the sugar.

    Notes

    • Chocolate sauce and sugar is optional, but for me it adds to the flavor and make more enjoyable.
    • If you are not fond of chocolate, you can garnish with sliced almonds and pistachios.
    • This is an easy recipe to make my family loved it. Give it a try.
    Also try Pineapple Sandesh, No Bake Cheesecake, Potato Soup, Quinoa salad
    Keyword Apple Bread Rolls, Baked Dessert, Chocolate Sauce, Delicacy, delicious, Easy Recipe, Eggless, Fusion, Homemade, Jain Food, Kid Friendly, No Bake Cheesecake, Party Food, Pineapple Sandesh, Sweet, Tea Time, Vegetarian
    Tried this recipe?Let us know how it was!
  • Dahi Puri Chaat (Street Food)

    Dahi Puri Chaat (Street Food)

    A plate of Dahi Puri Chaat, topped with yogurt, tamarind chutney, sev, and finely chopped green chilies.

    Dahi Puri, Chaat, Street Food

    Dahi Puri is a very commonly found Indian street food! I have been wanting to do this recipe for my channel for quite some time, but I wanted to put my own twist on it. After experimenting with different fillings, I was finally able to come up with a combination that my family approved of – ahealthy and delicious salad style filling.
    5 from 2 votes
    Prep Time 15 minutes
    Cook Time 15 minutes
    Course Appetizer, Snack
    Cuisine Indian
    Servings 4 people

    Ingredients
      

    • 16 crispy puffed puries golgpa available in India grocery store

    Filling

    • ½ cup yellow moong dal
    • ½ cup potatoes boiled peeled and cut into small pieces
    • ½ cup tomatoes chopped in small pieces
    • ½ cup cucumber chopped in small pieces
    • 1 tbsp green chili finely chopped
    • 1 tsp ginger finely chopped
    • ½ tsp salt
    • ½ tsp roasted cumin seed powder
    • 1 tsp lemon juice

    For Garnishing

    • 1 cup yogurt whipped
    • ¼ cup tamarind chutney find the recipe on web site
    • 1 tbsp soy sauce
    • ¼ cup boondi
    • 1 tbsp green chili finely chopped
    • ¼ tsp red chili powder

    Instructions
     

    • Spread the puries on microwave safe plate and microwave
      for about 20 seconds, this will make the puries crispier and give the
      freshness. Set aside.
    • Wash moong dal changing water 3-4 times and boil it in
      2 cups of water over low medium heat until dal is very soft and tender but not
      mushy.
    • After dal is at room temperature mix all the filling ingredients together, dal, potatoes, tomatoes, cucumber, green chili, ginger, salt, cumin powder, lemon juice

    Assemble Dahi Puri

    • Whip the yogurt and add the water as needed to make it consistency of thick batter.
    • Mix tamarind sauce and soy sauce together.
    • First make a hole with you thumb center of the golgapa, fill with 1 tablespoon of filling. drizzle with yogurt tamarind chutney, few pieces of green chili, and few boondi, red chili powder and drizzle some more tamarind chutney.

    Notes

    Assemble Dahi Puries just before serving. You can have every thing ready day before.
    Filling also can be served as salad.
    Dahi Puri with salad like filling is very light and refreshing. 
    I have done the recipe for Tamarind Chutney Before. you will also like to see some other easy chaat recipes, like Bread Dahi Vada, Aloo Chana Chaat, Sabudana Bhel.  
    Keyword Appetizer, Party Food, Street Food, Tea Time Snack
    Tried this recipe?Let us know how it was!

    Introduction to Dahi Puri Chaat

    Dahi puri chaat is a beloved Indian street food that tantalizes taste buds with its burst of flavors and textures. Dahi puri chaat combines crispy puris (hollow fried bread), tangy yogurt, spicy chutneys, and various toppings to create a harmonious symphony of sweet, sour, and savory flavors. Dahi Puri Chaat, a delightful combination of crispy puris filled with tangy yogurt, savory chutneys, and fresh toppings, embodies the essence of appetizers, chaat, quick & easy snacks, street food recipes, and summer delights.

    This delightful snack is perfect for any occasion, whether it’s a casual evening at home or a festive gathering with friends and family. In this article, we will explore the recipe for dahi puri chaat, offering step-by-step guidance on how to recreate this iconic dish in your own kitchen.

    Step 1: Prepare the Ingredients

    Before diving into the preparation process, it’s essential to gather all the necessary ingredients. The key components include puris (hollow fried bread), yogurt, tamarind chutney, green chutney, boiled potatoes, sprouted mung beans, and sev (crunchy chickpea flour noodles). You can easily find these ingredients at your local Indian grocery store or prepare them at home using basic pantry staples. For those who prefer a spicy kick, finely chopped green chilies can be added to the mix. Once you have all the ingredients assembled, you’re ready to embark on your dahi puri chaat recipe journey.

    Step 2: Prepare the Yogurt Mixture

    The recipe for dahi puri chaat hinges on the creamy and tangy yogurt mixture that serves as the base for this delectable snack. To prepare the yogurt mixture, whisk together fresh yogurt, sugar, and a pinch of salt until smooth and creamy. Adjust the sweetness and tanginess according to your preference by adding more sugar or lemon juice as needed. The yogurt mixture should have a velvety texture that coats the back of a spoon. Once prepared, set aside the yogurt mixture while you assemble the remaining components of the chaat.

    Step 3: Assemble the Dahi Puri Chaat

    Now comes the fun part – assembling the dahi puri chaat! Start by gently tapping a hole in the center of each puri to create a cavity for the fillings. Place a spoonful of boiled potatoes and sprouted mung beans inside each puri, followed by a generous dollop of the prepared yogurt mixture. Drizzle tamarind chutney and green chutney over the yogurt, ensuring a balanced distribution of sweet and spicy flavors. Top off the chaat with a generous sprinkle of sev and finely chopped cilantro for added crunch and freshness. Repeat this process for each puri until all are assembled and ready to be devoured.

    Step 4: Serve and Enjoy

    Once assembled, dahi puri chaat should be served immediately to preserve its crispiness and freshness. Arrange the chaat on a serving platter and garnish with additional sev and cilantro for visual appeal. Encourage your guests to dig in and savor the explosion of flavors with each bite. Whether enjoyed as a standalone snack or as part of a larger meal, dahi puri chaat is sure to be a crowd-pleaser that leaves everyone craving for more.

    Tips for Perfect Dahi Puri Chaat

    • To enhance the flavor profile of the dahi puri chaat recipe, consider adding finely tomatoes, and grated carrots as additional toppings.
    • For a healthier twist, opt for baked puris instead of fried ones. You can find baked puris at specialty grocery stores or make them at home using whole wheat flour.
    • Experiment with different chutney variations to customize the flavor profile of the chaat. Mango chutney, mint chutney are excellent options to explore.
    • For a refreshing twist, add a handful of pomegranate arils to the chaat for bursts of juicy sweetness.
    • If you’re short on time, you can prepare the components of the chaat in advance and assemble them just before serving to ensure maximum freshness and crunchiness.

    Variations of Dahi Puri Chaat

    • Ragda Puri Chaat: Replace the boiled potatoes and sprouted mung beans with ragda (spiced yellow peas) for a heartier version of dahi puri chaat.
    • Bhel Puri Chaat: Substitute puris with crispy puffed rice (bhel) and toss them with chopped vegetables, chutneys, and spices for a crunchy and flavorful snack.
    • Papdi Chaat: Swap puris with bite-sized pieces of papdi (crispy fried dough) and layer them with yogurt, chutneys, and toppings for a delicious twist on the classic chaat.

    Benefits of Dahi Puri Chaat

    • Rich in Flavor: Dahi puri chaat is bursting with a myriad of flavors, ranging from tangy and spicy to sweet and savory, making it a delight for the taste buds.
    • Nutrient-Rich: This iconic street food is packed with essential nutrients from various ingredients such as yogurt, sprouted mung beans, and vegetables, offering a wholesome snacking option.
    • Easy to Customize: With endless possibilities for customization, dahi puri chaat can be tailored to suit individual preferences and dietary restrictions, making it suitable for all palates.

    FAQs (Frequently Asked Questions)

    Can I make dahi puri chaat in advance?

    • While it’s best to assemble dahi puri chaat just before serving to maintain its crispiness, you can prepare the individual components such as yogurt mixture, chutneys, and toppings in advance and store them separately in the refrigerator.

    Can I use store-bought puris for this recipe?

    • Yes, you can use store-bought puris for convenience. However, if you prefer homemade puris, you can find recipes online or explore Manjula’s Kitchen for a step-by-step guide.

    How long does dahi puri chaat stay fresh?

    • Dahi puri chaat is best enjoyed immediately after assembly to prevent the puris from becoming soggy. If you have leftovers, store them in an airtight container in the refrigerator and consume them within a day for the best taste and texture.

    Can I make this recipe vegan-friendly?

    • Yes, you can make dahi puri chaat vegan-friendly by using dairy-free yogurt and omitting any dairy-based toppings such as sev. You can also explore Manjula’s Kitchen for vegan alternatives and recipes.

    By following this comprehensive guide, you can master the art of making dahi puri chaat at home and impress your friends and family with this flavorful and indulgent street food favorite. Don’t forget to explore more tantalizing recipes on Manjula’s Kitchen, ranging from appetizers and beverages to desserts, to elevate your culinary repertoire and embark on a gastronomic adventure.

    Explore more appetizer recipes on Manjula’s Kitchen: Vegetable Samosas, Paneer Tikka, Crispy Spinach Pakoras, Mango Lassi, Masala Chai, Gulab Jamun, Kheer (Rice Pudding)

  • Sabudana (Tapicoa) Bhel, Chaat

    Sabudana (Tapicoa) Bhel, Chaat

    A vibrant plate of Sabudana (Tapioca) Bhel Chaat, garnished with crispy toppings and drizzled with tamarind chutney.

    Sabudana (Tapicoa) Bhel, Chaat

    Sabudana Bhel this is a delicious appetizer or also can be served with afternoon tea. Sabudana Bhel or I like to call this chaat is an elegant looking dish, that will sure to impress all your family and friends.
    4 from 1 vote
    Prep Time 10 minutes
    Cook Time 10 minutes
    Total Time 20 minutes
    Course Appetizer
    Cuisine Indian
    Servings 4 people

    Ingredients


    For Sabudana – Tapioca

    • 1/2 cup sabudana tapioca, use the larger pearls
    • 2 tsp oil
    • 1/4 tsp cumin seeds jeera
    • 1/4 tsp mustard seeds rai
    • pinch turmeric haldi
    • 1/2 tsp salt
    • few drops lemon juice

    For Serving

    • 1 cup potato boiled peeled and cut into small cubes
    • 1 Tbsp green chili finely chopped
    • 1/2 tsp salt
    • 1/2 cup peanuts roasted and crushed
    • 2 tsp chaat masala
    • 1/2 cup aloo lacha check existing recipe
    • 1/4 cup tamarind chutney check existing recipe

    Instructions
     

    • Wash sabudana (tapioca) changing the water 2-3 time and soak with one cup of water, soak 8 hours or more. Sabudana will become all most four time in volume and will be soft.
    • Heat the oil in a frying pan on medium heat. Test the heat by adding one cumin seed to the oil; if seed cracks right away oil is ready. Add cumin seeds and mustard seeds after seeds crack add turmeric, lower the heat to low. Add sabudana, and salt. Keep stir frying until sabudana becomes translucence, looks like pearls. This should take about another 4-5 minutes. Stir gently and making sure tapioca doesn’t get sticky and stuck to each other. Turn off the heat, and drizzle 3-4 drops of lemon juice and stir.
    • Transfer sabudana to a wide bowl stir for few minutes with fork making sure sabudana pearls are separated and not sticky. Serve the sabudana at room temperature.
    • Add 1/2 teaspoon of salt and green chilies to cubed potatoes, mix it well and set aside.
    • Assembling the Sabudana Bhel, in a serving platter spread the cooked sabudana, sprinkle the roasted peanuts, over peanuts sprinkle the potatoes, then aloo lacha, some more peanuts and drizzle the chutney.

    Notes

    Suggestion, this is a easy recipe, you can prepare every thing in advance, cooked sabudana can be refrigerator for up to a week. Aloo Lacha and tamarind chutney can be stored for months.  
    Tried this recipe?Let us know how it was!

    Introduction to Sabudana Bhel Chaat

    Sabudana Bhel is a quick & easy, gluten-free, and vegan snack with flavors reminiscent of chaat, perfect for Krishna Janmashtami and Navaratri celebrations, offering a delightful appetizer option. In this recipe, we’ll learn how to make sabudana bhel chaat, a delightful and crunchy snack that’s perfect for any occasion. Sabudana, also known as tapioca pearls, is the star ingredient here, lending its unique texture and taste to create a mouthwatering dish. This sabudana bhel recipe combines the traditional flavors of bhel with the subtle nuttiness of sabudana, resulting in a tantalizing treat that’s sure to please your taste buds. Whether you’re looking for a tasty snack to enjoy with your evening tea or planning a party menu, this crispy sabudana bhel is sure to be a hit.

    Preparing the Sabudana Mixture

    To begin making the sabudana bhel, start by soaking the sabudana pearls in water for a few hours until they turn soft and plump. Once the sabudana pearls have soaked well, drain any excess water and spread them out on a clean kitchen towel to remove any excess moisture. Now, heat oil in a pan and fry the sabudana pearls until they turn crispy and golden brown. This step is crucial for achieving that perfect crunch in your sabudana bhel chaat.

    Adding Crunchy Elements

    Next, it’s time to add some crunchy elements to our sabudana bhel mixture. You can use a variety of ingredients such as roasted peanuts, tomatoes, and crunchy sev. These ingredients not only add texture to the dish but also enhance its flavor profile. Feel free to adjust the quantities according to your preference, but make sure to include a good mix of flavors and textures for the best results.

    Seasoning the Bhel

    Once you’ve assembled all the crunchy elements, it’s time to season your sabudana bhel mixture. You can use a combination of spices such as chaat masala, red chili powder, roasted cumin powder, and black salt to add a burst of flavor to the dish. Additionally, you can squeeze some fresh lemon juice over the mixture to give it a tangy twist. Mix everything together until well combined, ensuring that the sabudana pearls are evenly coated with the seasoning.

    Garnishing and Serving

    Finally, garnish your sabudana bhel chaat with some fresh coriander leaves and a sprinkle of nylon sev for an extra crunch. You can also add some pomegranate arils or grated coconut for a pop of color and flavor. Serve the crispy sabudana bhel immediately in individual serving bowls or plates, garnished with some more sev on top for added crunchiness. Pair it with a cup of hot tea or your favorite chutney for a truly satisfying snacking experience.

    Tips for Perfect Sabudana Bhel

    • Soak the sabudana pearls in water for at least 4-5 hours or overnight to ensure they become soft and plump.
    • Drain the soaked sabudana pearls well and spread them out on a kitchen towel to remove excess moisture before frying.
    • Fry the sabudana pearls in batches to ensure they cook evenly and become crispy.
    • Adjust the seasoning according to your taste preferences. You can make the sabudana bhel spicier by adding more red chili powder or tangier by squeezing extra lemon juice.
    • Garnish the sabudana bhel chaat with fresh ingredients like coriander leaves, pomegranate arils, or grated coconut to enhance its visual appeal and flavor.

    Variations of Sabudana Bhel

    • Fruit Bhel: Add diced fruits such as apples, bananas, and grapes to the sabudana bhel mixture for a refreshing twist.
    • Sprouts Bhel: Incorporate sprouted moong beans or chickpeas into the sabudana bhel for added protein and crunch.
    • Vegetable Bhel: Include finely chopped vegetables like cucumber, carrots, and bell peppers to make the sabudana bhel more nutritious and colorful.
    • Sweet Bhel: For a sweet variation, skip the savory seasonings and instead toss the sabudana pearls with honey, yogurt, and chopped fruits for a delicious dessert option.

    Benefits of Sabudana Bhel

    • Gluten-Free: Sabudana is naturally gluten-free, making this sabudana bhel recipe suitable for individuals with gluten intolerance or celiac disease.
    • Rich in Carbohydrates: Sabudana is a rich source of carbohydrates, providing a quick and sustainable source of energy.
    • Easy to Digest: Sabudana is light on the stomach and easy to digest, making it an ideal ingredient for people with digestive issues or those following a bland diet.
    • Versatile: You can customize the sabudana bhel recipe with your favorite ingredients to suit your taste preferences and dietary requirements.
    • Satisfying Snack: This crispy sabudana bhel is not only delicious but also quite filling, making it a satisfying snack option for any time of the day.

    FAQs about Sabudana Bhel

    Q: Can I make sabudana bhel ahead of time?

    A: While it’s best to serve sabudana bhel chaat immediately after preparing it to enjoy its crispiness, you can prepare the sabudana mixture in advance and assemble the bhel just before serving to prevent it from becoming soggy.

    Q: Can I store leftover sabudana bhel?

    A: It’s not recommended to store leftover sabudana bhel as it tends to lose its crispiness over time. However, if you have any leftover mixture, you can refrigerate it in an airtight container for up to a day and reheat it in the oven before serving.

    Q: Is sabudana bhel suitable for fasting days?

    A: Yes, sabudana bhel is a popular dish consumed during fasting days, especially during festivals like Navratri. Just ensure that you use sendha namak (rock salt) instead of regular salt if you’re making it for fasting purposes.

    Q: Can I make sabudana bhel without frying the sabudana pearls?

    A: While frying the sabudana pearls adds a crispy texture to the sabudana bhel, you can try alternative cooking methods such as roasting or air-frying for a healthier version of the dish.

    Q: Can I serve sabudana bhel as a main dish?

    A: While sabudana bhel chaat is typically served as a snack or appetizer, you can definitely enjoy it as a light meal, especially when paired with some yogurt or a side salad for added nutrition.

    Other Recipes on Manjula’s Kitchen

    If you’re looking to explore more Indian recipes, appetizers, beverages, and desserts, be sure to check out the following links on Manjula’s Kitchen. Here are some links to recipes on Manjula’s Kitchen official website:

    Paneer Tikka Masala Recipe

    Chana Chaat (Spicy Chickpea Salad) Recipe

    Pav Bhaji (Spicy Vegetable Hash with Buns) Recipe

    Raj Kachori (Crunchy Chaat) Recipe

    Vegetable Biryani Recipe

    These recipes should offer you a flavorful experience straight from Manjula’s Kitchen.

  • Gur Para (Punjabi Sweet Snack)

    Gur Para (Punjabi Sweet Snack)

    A plate of crispy Gur Para, a traditional Indian sweet snack made with jaggery and flour.

    Gur Para, Punjabi Sweet Snack

    Gur Para is a traditional Punjabi treat. This is made in preparation for festivals such as Holi, Makarshakrantri, and Diwali. Gur Para makes for a great homemade gift because of its long shelf life. It can be stored for up to 2 months in an airtight container. This is a super simple recipe that only requires a few ingredients.  
    5 from 1 vote
    Prep Time 10 minutes
    Cook Time 30 minutes
    Total Time 40 minutes
    Course Snack
    Cuisine Indian
    Servings 6 people

    Ingredients


    For Dough

    • 1 cup all-purpose flour plain flour, maida
    • 2 Tbsp sooji fine samolina
    • 2 Tbsp oil
    • 1/3 cup water, use as needed

    For Syrup

    • 3/4 cup gur jaggery
    • 1 tsp oil
    • 1/4 cup water

    Instructions
     

    Making Para

    • Mix flour, sooji, and oil, and mix it well to get consistency of breadcrumb. Add water as needed to make firm but smooth dough. Cover with damp cloth and set aside at least for ten minutes.
    • Knead the dough for another minute and divide in two equal parts.
    • Take each part of the dough and make a flat ball shape. Roll them into 8-inch circles and thickness of salted crackers.
    • Cut each of the rolled dough into about half inch wide and 2 inch long pieces. Note: you can cut them in your desire shape.
    • Heat the oil in a frying pan on medium heat. The frying pan should have about 1 inch of oil. To check if the oil is ready, put little piece of dough in the oil. The dough should make the oil sizzle and come up slowly.
    • Fry the paras until both sides are light golden-brown. Let them cool off to room temperature before coating them.

    Making Sugar Syrup

    • Put the water and gur in a frying-pan and bring to a boil on medium heat. Keep stirring till gur is dissolve, syrup should be about 1 thread, to check the right consistency of syrup drop the syrup in cold water and you should be able to roll into ball. Close the heat.
    • Put all the paras to the syrup and mix it well, making sure all the paras are coated with syrup. Keep stirring every few minutes and keep separating them. After they are just warm, take them out on a greased plate, making sure that paras are not clumped together.
    • Allow them to cool. Gur paras can be stored for several weeks in airtight container.

    Notes

    Notes: If Syrup consistency is not right paras will be sticky, if paras are little sticky let them dry for longer.
    You will also like to see these recipes they are good for gifting and easy to make Moong dal Ladoo, Apple Coconut Burfi, Besan Save
    Tried this recipe?Let us know how it was!

  • Roasted Caramelized Makhana

    Roasted Caramelized Makhana

    Roasted Caramelized Makhana

    Roasted Caramelize Makhana Snack

    Caramelized Makhana is the perfect snack for all ages, especially kids. My grandchildren absolutely love this recipe and my youngest even calls it kettle corn. This is not just quick and easy to make, but it is a healthy snack because it is high in protein and has many nutritional values. This recipe is the perfect tea time munchie and will be a hit with everyone who enjoys a sweet and crunchy snack.
    No ratings yet
    Prep Time 5 minutes
    Cook Time 15 minutes
    Total Time 20 minutes
    Course Appetizer
    Cuisine Indian
    Servings 4 people

    Ingredients


    • 4 cup makhana fox nuts, lotus seeds
    • 3 Tbsp oil
    • 1 tsp salt
    • 6 Tbsp sugar
    • 2 Tbsp almonds sliced

    Instructions
     

    • Use a larger frying pan then you think you need, because it makes it easy to roast otherwise when you are roasting makhana will be dropping all over. Use heavy frying pan.
    • In a frying pan take the makhana and drizzle with the oil, (save 2 teaspoons of oil and set this oil aside we will use later) and sprinkle the salt. Using your fingers mix it well until makhanas are coated well with oil and salt.
    • Open the heat to medium low keep stirring till they are very light gold this should take about 6-8 minutes, try one makhana to make sure they are crispy. As they cool of, they will become crunchier.
    • Remove them from frying pan, you will notice most of the salt will remain in the frying pan, wipe the frying pan, we will use it again.
    • Use the same pan, heat over low medium heat. Put the oil we have saved in the frying pan, and sprinkle all the sugar, wait till you see sugar has start melting, now stir the sugar and keep stirring till the sugar has melted turn off the heat quick otherwise sugar will burn.
    • Add almonds and roasted makhana, keep stirring till all the makhanas are coated with caramelize sugar and almonds. Spread it over non-stick surface and with spatula keep separating or separate with your fingers. Carnalized Makhanas are ready.

    Notes

    Notes: keep them air tight container they will stay good for month or more.
    I make them for holiday season, because they also make good homemade gift.
    Keyword High In Protien, Kid Friendly, Kurmura Makhana
    Tried this recipe?Let us know how it was!

    Roasted Caramelized Makhana Recipe

    Roasted Caramelized Makhana is a delectable snack perfect for winter recipes and festive occasions like Krishna Janmashtami and Navaratri, offering a gluten-free, high-protein option that satisfies both vegan and non-vegan appetizers cravings. Roasted Caramelized Makhana is a delightful treat that combines the earthy crunch of makhana (fox nuts) with the sweet allure of caramel. This Caramel Makhana Recipe transforms simple ingredients into a gourmet snack that’s perfect for any occasion.

    Step 1: Preparing the Makhana

    To begin this Caramel Roasted Makhana Recipe, start by heating a pan over medium heat. Add a tablespoon of ghee, allowing it to melt and warm up. Then, add the makhana to the pan, ensuring they are in a single layer. Roast them gently, stirring occasionally to ensure even cooking. This step helps to enhance the nutty flavor of the makhana and prepare them for the caramel coating.

    Step 2: Making the Caramel

    Now, let’s move on to the star of this Caramel Roasted Makhana Recipe: the caramel. In a separate pan, melt butter over low heat. Once the butter has melted, add in sugar and stir continuously until the sugar dissolves completely. Keep a close eye on the mixture to prevent it from burning. As the sugar melts, it will gradually turn into a golden brown caramel, infusing the butter with its rich flavor.

    Step 3: Coating the Makhana

    Once the caramel reaches a beautiful golden hue, carefully pour it over the roasted makhana. Use a spatula to gently toss the makhana, ensuring that each piece is coated evenly with the caramel. Work quickly but cautiously, as the caramel will begin to harden upon contact with the makhana.

    Step 4: Allowing to Cool

    After coating the makhana with caramel, spread them out on a parchment-lined baking sheet to cool. Allow them to sit undisturbed for at least 10-15 minutes, giving the caramel ample time to set. Once cooled, the makhana will form a delectable caramelized crust, adding an irresistible sweetness to every bite.

    Step 5: Serving and Enjoying 

    Your Caramel Roasted Makhana is now ready to be enjoyed! Serve them as a standalone snack or incorporate them into your favorite dishes for a touch of sweetness and crunch. These caramelized makhana make for a perfect accompaniment to tea or coffee, or simply enjoy them as a guilt-free indulgence anytime you crave a delicious treat.

    Tips for Perfect Caramelized Makhana:

    • Ensure that the makhana are roasted until they are crisp but not browned before adding the caramel. This helps to prevent them from becoming too crunchy or overcooked.
    • Work quickly when coating the makhana with caramel, as it can harden rapidly upon contact with the cooler makhana. Use a spatula to toss them gently and evenly coat each piece.
    • Allow the caramelized makhana to cool completely before serving to ensure that the caramel has fully set and formed a crunchy crust.

    Variations of Caramel Makhana:

    • For a savory twist, you can add a pinch of salt or your favorite spices to the caramel mixture before coating the makhana. This adds depth of flavor and balances out the sweetness of the caramel.
    • Experiment with different coatings such as melted chocolate or flavored syrups for a unique twist on this classic recipe. Drizzle the melted chocolate over the cooled makhana and allow it to set before serving.

    Benefits of Caramel Makhana:

    Makhana, or fox nuts, are not only delicious but also offer a range of health benefits. They are low in calories and fat, making them an ideal snack for those looking to maintain a healthy diet. Makhana are also rich in protein, fiber, and antioxidants, which can help support overall health and well-being. Additionally, they are gluten-free and hypoallergenic, making them suitable for individuals with dietary restrictions or food sensitivities.

    FAQs:

    Q: Can I store caramelized makhana for later use?

    A: Yes, you can store caramelized makhana in an airtight container at room temperature for up to a week. Just make sure they are completely cooled and the caramel has set before storing them.

    Q: Can I use other nuts instead of makhana for this recipe?

    A: Absolutely! While this recipe specifically calls for makhana, you can easily substitute other nuts such as almonds, cashews, or peanuts for a different flavor and texture.

    Q: Can I reheat caramelized makhana if they become soft?

    A: Yes, if the caramelized makhana become soft or lose their crunchiness, you can reheat them in a low oven (around 250°F) for a few minutes until they become crisp again. Be sure to keep an eye on them to prevent burning.

    Other Recipes on Manjula’s Kitchen

    If you’re looking to explore more Indian recipes, appetizers, beverages, and desserts, be sure to check out the following links on Manjula’s Kitchen. Here are some links to recipes on Manjula’s Kitchen official website:

    Paneer Tikka Masala Recipe

    Chana Chaat (Spicy Chickpea Salad) Recipe

    Pav Bhaji (Spicy Vegetable Hash with Buns) Recipe

    Raj Kachori (Crunchy Chaat) Recipe

    Vegetable Biryani Recipe

    These recipes should offer you a flavorful experience straight from Manjula’s Kitchen.

  • Grilled Paneer

    Grilled Paneer

    Grilled Paneer

    Grilled Paneer (Indian Cottage Cheese Appetizer)

    Grilled Paneer makes for a great appetizer that compliments any main course dish. Grilled paneer is quick and easy to put together, making it the perfect party appetizer. I will be preparing this appetizer a lot this holiday season because it is perfect to serve at get together and bring to potlucks.
    5 from 1 vote
    Prep Time 5 minutes
    Cook Time 15 minutes
    Total Time 20 minutes
    Course Appetizer
    Cuisine Indian
    Servings 4 people

    Ingredients


    • 1 1/2 cup paneer cubed in 1” square and 1/2” thick
    • 1/2 cup bell pepper cubed, yellow and green to give the color
    • 1/2 cup cherry tomatoes
    • 2 tsp oil
    • 1 Tbsp green chili finely chopped, optional
    • 2 Tbsp cilantro finely chopped, hara dhania
    • 1 tsp fresh lemon juice

    Spice Mix

    • 1/2 tsp salt
    • 1/2 tsp black salt
    • 1/2 tsp roasted cumin seed powder
    • 1/8 tsp black pepper
    • 1/8 tsp red chili powder

    Instructions
     

    • Mix the spice mix and keep aside. you can make this spice mix in a large quantity and keep it ready to go whenever you need it.
    • Heat heavy flat frying pan on low medium heat, add the oil in to warm frying pan. Spread the paneer cubes don’t over lap them. Grill the paneer from both sides, this should take about 2 minutes. Take them out from frying pan.
    • Use the same pan and grill the bell pepper, for about 2 minutes stirring occasionally, bell pepper will have some brown spots. Take them out from frying pan.
    • Use the same pan and grill the tomatoes for about 1-2 minutes, tomatoes will have some blisters. Take them out from frying pan.
    • In a bowl toss the paneer with spice mix, use the spice mix about in half the quantity, adjust for you taste, cilantro, green chili and lemon juice.
    • Serve the grilled paneer with side of bell pepper and tomatoes and sprinkle little spice mix over bell pepper and tomatoes.
    • A healthy and delicious appetizer is ready to serve.

    Notes

    Note: This spice mix known as chaat masala can also be used to spice up any food. It especially tastes good when it is sprinkled over sliced cucumber and tomato or over pakoras. You can make the chaat masala in a larger quantity and keep it ready to go whenever you need it.
    Keyword Appetizer, Grilled Paneer and Veggies, Masala Paneer, Party Food
    Tried this recipe?Let us know how it was!

    Grilled Paneer Recipe 

    Grilled paneer recipe is a delightful way to enjoy the rich flavors of Indian cuisine. Grilled paneer is a versatile dish that is kid friendly, quick & easy, party recipe that can be served as an appetizer, side dish, or even a main course. This recipe combines the creaminess of paneer with the smoky char of the grill, resulting in a dish that is both flavorful and satisfying. Whether you’re hosting a backyard barbecue or simply craving a taste of India, this Indian grilled paneer recipe is sure to please your palate.

    Indian Grilled Paneer: A Flavorful Delight 

    When it comes to Indian cuisine, grilled paneer holds a special place in the hearts of many food enthusiasts. The process of grilling adds a depth of flavor to the paneer, while still allowing its creamy texture to shine through. This paneer grilled recipe is perfect for those looking to add a touch of Indian flair to their meals. By marinating the paneer in a blend of spices and yogurt, you’ll create a dish that is bursting with flavor from the very first bite.

    Preparation 

    To begin, place the cubed paneer in a large bowl and set aside. In a separate bowl, whisk together the yogurt, olive oil, lemon juice,  ground cumin, ground coriander, turmeric, salt, and pepper. Pour the marinade over the paneer, making sure to coat each piece evenly. Cover the bowl and let the paneer marinate in the refrigerator for at least 30 minutes, allowing the flavors to meld together.

    Grilling the Paneer 

    Once the paneer has finished marinating, preheat your grill to medium-high heat. Thread the paneer cubes onto skewers, leaving a small amount of space between each piece. This will allow the heat to circulate evenly around the paneer, ensuring that it cooks evenly on all sides. Place the skewers on the grill and cook for 2-3 minutes per side, or until the paneer is lightly charred and heated through.

    Tips for Perfect Grilled Paneer 

    Use firm or extra-firm paneer for grilling, as softer varieties may crumble on the grill.

    Soak wooden skewers in water for at least 30 minutes before threading the paneer to prevent them from burning.

    Experiment with different marinade ingredients, such as ginger, chili powder, or garam masala, to customize the flavor of your grilled paneer.

    Variations on Grilled Paneer

    While this Indian grilled paneer recipe is delicious as is, feel free to get creative with your marinade and seasoning choices. For a spicy kick, add chopped green chilies or a dash of cayenne pepper to the marinade. You can also incorporate fresh herbs like cilantro or mint for a burst of freshness. Serve the grilled paneer with a side of mint chutney or tamarind sauce for an extra layer of flavor.

    Benefits of Grilled Paneer

    Grilled paneer is not only delicious, but it also offers several health benefits. Paneer is a good source of protein, calcium, and phosphorus, making it an excellent addition to a balanced diet. Grilling the paneer helps to retain its nutrients while adding a smoky flavor that enhances its overall taste. Additionally, paneer is low in carbohydrates, making it a suitable option for those following a low-carb or keto diet.

    Frequently Asked Questions (FAQs)

    Can I grill paneer without skewers?

    Yes, you can grill paneer directly on the grill grates or use a grill basket to prevent it from falling through.

    How long does grilled paneer last?

    Grilled paneer can be stored in the refrigerator for up to 3-4 days. Simply reheat it in the microwave or on the grill before serving.

    Can I freeze grilled paneer?

    While you can freeze grilled paneer, its texture may change slightly upon thawing. It’s best to freeze the paneer before grilling and marinating it.

    Can I make grilled paneer in the oven?

    Yes, you can bake paneer in the oven at 400°F for 15-20 minutes, or until it is lightly browned and heated through.

    Other Recipes on Manjula’s Kitchen

    If you’re looking to explore more Indian recipes, appetizers, beverages, and desserts, be sure to check out the following links on Manjula’s Kitchen. Here are some links to recipes on Manjula’s Kitchen official website: Paneer Tikka Masala, Chana Chaat (Spicy Chickpea Salad), Pav Bhaji (Spicy Vegetable Hash with Buns), Raj Kachori (Crunchy Chaat), Vegetable Biryani. These recipes should offer you a flavorful experience straight from Manjula’s Kitchen.

  • Paneer Malai Ladoo

    Paneer Malai Ladoo

    Paneer Malai Ladoo

    Paneer Malai Ladoo

    Paneer Malai Ladoo is a rich and delicious homemade sweet dessert. Paneer Ladoos have a creamy texture and they taste amazing! This dessert is perfect for people with a sophisticated palette and is super easy to prepare. 
    5 from 1 vote
    Prep Time 5 minutes
    Cook Time 20 minutes
    Making Paneer 15 minutes
    Total Time 25 minutes
    Course Dessert
    Cuisine Indian
    Servings 10 people

    Ingredients


    • 1 cup home made paneer
    • 1 cup whole milk
    • 1 cup milk powder
    • 1 Tbsp clarified butter ghee
    • 1/2 cup sugar
    • 1/4 tsp cardamom powder
    • 2 Tbsp sliced pistachios for garnishing

    Instructions
     

    • I used 4 cups of whole milk to make 1 cup of paneer. I have done the recipe earlier how to make Paneer.
    • Use heavy bottom flat frying pan, add paneer, milk and milk powder, mix it well.
    • Cook the paneer mixture over low heat stirring continually, because of the milk powder mix can burn easily. Also keep scrapping the sides. Mix will come together and will be the texture of soft dough, this should take about 10-12 minutes.
    • Add clarified butter mix it well and cook for one minute. Turn off the heat. Transfer the paneer mix on a plate, and let it come to room temperature.
    • Add sugar and cardamom powder, mix it well and knead, for a minute. this should be like a soft dough. Make them in about one-inch balls. Paneer Ladoos should be soft in texture. Garnish with pistachios.

    Notes

    Paneer Ladoos taste best when they are served chilled.
    Notes: if ladoo mix is dry add warm milk before adding the sugar.
    Tried this recipe?Let us know how it was!

  • Crispy Shakarpara (Almond Biscuit) Recipe

    Crispy Shakarpara (Almond Biscuit) Recipe

    Crispy Shakarpara

    Crispy Shakarpara

    A traditional tea-time biscuit-like snack often made during festive occasions, shakarpara is the perfect sweet for any party like gathering. They are deep-fried sugar crisps with almonds and hint of cardamom, which adds to their unique flavor. This is one of those snacks that you won’t be able to stop munching on. 
    3.34 from 3 votes
    Prep Time 5 minutes
    Cook Time 20 minutes
    Resting Time 15 minutes
    Total Time 25 minutes
    Course Dessert
    Cuisine Indian
    Servings 8 people

    Ingredients


    • 1 cup all-purpose flour maida, plain flour
    • 2 Tbsp fine sooji semolina
    • 1/8 tsp salt
    • 1/8 tsp baking soda
    • 2 Tbsp oil
    • 1/4 tsp cardamom powder ilachi
    • 3 Tbsp sliced almonds
    • 4 Tbsp sugar
    • 1/4 cup water use as needed

    Instructions
     

    • Mix flour, sooji, sugar, salt, baking soda, cardamom powder, almonds and oil in a bowl and make a stiff dough adding water slowly as needed. Knead it well. Cover the dough and set aside for 15 minutes or more.
    • Take the dough and make a flat ball shape. Rolling into about 9-inch square, then with fingers try to give a square shape. Fold in fours, roll it again and fold, do this three times. Use dry four as needed to help rolling.
    • Cut the rolled dough into about inch square. Note: you can cut them in your desire shape.
    • Heat the oil in a frying pan on low medium heat.
    • The frying pan should have at least 1 inch of oil. To check if the oil is ready, put a small piece of dough in the oil. The dough should make the oil sizzle and come up slowly. Don’t over crowed the frying pan, you should be able to turn them easily.
    • Keep stirring occasionally, fry the shakkar paras until both sides are golden-brown. Frying time should be about 6-8 minutes.
    • Let the shakkar paras comes to the room temperature,  they should be crisp.

    Notes

    Notes: don’t fry shakerparas on high heat otherwise they will be soft. 
    Shakarpara are a perfect gifting idea for the holiday season since they have a long shelf life.
    Keyword Almond Biscuit, Crispy Biscuit, Homemade, Kid Friendly, Shakarpali, Snack, Tea Time Snack, Vegan
    Tried this recipe?Let us know how it was!

  • Gobi Pakoras (Crispy Cauliflower Fritters)

    Gobi Pakoras (Crispy Cauliflower Fritters)

    Gobi Pakora

    Gobi Pakoras (Crispy Cauliflower Fritters)

    Gobi Pakoras or Crispy Cauliflower fritters are a mouthwatering appetizer. Crispy on the outside and soft on the inside, these pakoras are addicting! These work as a tasty pairing with your afternoon tea or a spicy delicious snack before any meal.
    5 from 2 votes
    Prep Time 10 minutes
    Cook Time 20 minutes
    Total Time 30 minutes
    Course Appetizer
    Cuisine Indian
    Servings 4 people

    Ingredients
      

    • 3 cup cauliflower florets cut into about 1 inch florets
    • 1/3 cup besan gram flour
    • 3 Tbsp corn starch arrow root
    • 2 tsp coriander powder dhania
    • 1/2 tsp cumin seeds jeera
    • 1/4 tsp red chili powder
    • 1/8 tsp baking soda
    • 1/2 tsp salt
    • 1 tsp ginger paste
    • 1 green chili finely chopped
    • 2 Tbsp cilantro finely chopped, hara dhania

    Instructions
     

    • Boil the cauliflowers, add just enough water to cover the cauliflowers. After water comes to boil, cook for about 5 minutes over medium heat. Turn off the heat and drain the water. Let cauliflowers come to room temperature. Cauliflower should be just little tender, not soft.
    • In a bowl mix all the ingredients together, besan, corn starch, coriander powder, cumin seeds, red chili powder, salt, baking soda, ginger, green chili and cilantro. Mix it well.
    • Sprinkle the dry mix over cauliflower, gently mix it coating all the cauliflower with spices, add water little at a time as needed, I used about ¼ cup of water.
    • Heat the oil in a frying pan on medium high heat. The frying pan should have about 1 inch of oil. To check if the oil is ready, put little batter in the oil. The batter should raise to the top but not change color right away.
    • Drop the cauliflower slowly in the oil making sure don’t overlap them.
    • Fry the cauliflowers until they turn golden brown, turning them occasionally. This should take about 6-8 minutes.
    • When they are golden brown, take them out with a slotted spoon. Place them on a paper towel to absorb the extra oil.  

    Notes

    Note: We are not making a batter, use just enough water to coat the cauliflower florets evenly with spice mix.
    If you fry them on high heat Pakoras will not be crispy and if they are fried on very low heat Pakoras will be greasy.
    They especially taste delicious when they are served with Tamarind Chutney and hot cup of tea. They are also easy and quick to make. Surprise your guests and treat them with these mouthwatering crispy gobi pakoras.
    You will also like to see the recipe for Paneer Pakora and Chai.
    Enjoy!
    Keyword Appetizer, Party Food, Tea Time Snack
    Tried this recipe?Let us know how it was!

    Gobi Pakora Recipe: A Crispy Delight

    Introduction to Gobi Pakora:

    Gobi Pakora, also known as cauliflower pakoda, is a delectable Indian snack that boasts a perfect blend of crispiness and flavor. These crunchy fritters are made by coating cauliflower florets in a spiced chickpea flour batter and then deep-frying them to golden perfection. Whether you’re hosting a party or simply craving a savory snack, gobi pakoras are sure to satisfy your taste buds. Let’s delve into the delightful world of gobi pakora and learn how to make this irresistible snack.

    How to Make Gobi Pakora: A Step-by-Step Guide

    Preparing the Cauliflower:

    Before diving into the preparation process, it’s essential to start with fresh cauliflower. Rinse the cauliflower thoroughly under running water to remove any dirt or impurities. Next, cut the cauliflower into bite-sized florets, ensuring they are uniform in size. This step is crucial as it ensures even cooking and allows the pakora batter to coat each floret evenly.

    Making the Pakora Batter:

    The key to achieving crispy and flavorful gobi pakoras lies in the preparation of the batter. In a mixing bowl, combine chickpea flour (besan), rice flour, and a selection of aromatic spices such as turmeric, cumin, coriander, and garam masala. Whisk the dry ingredients together until well combined. Gradually add water to the mixture, whisking continuously to form a smooth and thick batter. The consistency of the batter should coat the back of a spoon without dripping off.

    Coating the Cauliflower:

    Once the batter is ready, gently toss the cauliflower florets into the bowl, ensuring each piece is evenly coated with the spicy chickpea flour mixture. For an extra kick of flavor, you can also add finely chopped cilantro or mint leaves to the batter. Allow the cauliflower to marinate in the batter for a few minutes to absorb the flavors fully.

    Frying the Pakoras:

    In a deep frying pan or kadai, heat oil over medium-high heat. To check if the oil is hot enough for frying, drop a small amount of batter into the oil – if it sizzles and rises to the surface immediately, the oil is ready. Carefully place the coated cauliflower florets into the hot oil, ensuring not to overcrowd the pan. Fry the pakoras in batches, if necessary, to maintain the oil temperature and ensure even cooking.

    Cooking Until Golden Brown:

    Allow the gobi pakoras to fry undisturbed for a few minutes, allowing them to develop a golden brown crust. Use a slotted spoon to flip the pakoras occasionally, ensuring they cook evenly on all sides. Once the pakoras are crisp and golden brown, carefully remove them from the oil and transfer them to a plate lined with paper towels to drain off any excess oil.

    Serving Gobi Pakoras:

    Gobi pakoras are best enjoyed hot and crispy, straight out of the fryer. Serve them alongside your favorite chutneys or sauces, such as mint chutney, tamarind chutney, or spicy tomato ketchup, for dipping. These addictive cauliflower fritters make for a perfect appetizer or tea-time snack, guaranteed to please both kids and adults alike.

    Tips for Perfect Gobi Pakoras:

    • Ensure the cauliflower florets are dried thoroughly before coating them in the batter to prevent the pakoras from becoming soggy.
    • Adjust the spices in the batter according to your taste preferences. You can increase or decrease the amount of chili powder for a milder or spicier flavor.
    • For a gluten-free version, substitute rice flour with cornstarch or any gluten-free flour of your choice.
    • Add a tablespoon of hot oil to the batter for extra crispiness.
    • Serve the pakoras immediately to retain their crunchiness.

    Variations of Gobi Pakora:

    • Cheese-Stuffed Gobi Pakora: Add a cube of cheese to the center of each cauliflower floret before coating them in the batter for a gooey and indulgent twist.
    • Masala Gobi Pakora: Sprinkle chaat masala or amchur (dried mango powder) over the fried pakoras for a tangy flavor boost.
    • Palak Gobi Pakora: Incorporate finely chopped spinach leaves into the batter for a nutritious spin on traditional gobi pakoras.

    Benefits of Gobi Pakoras:

    • Cauliflower is a nutrient-rich vegetable that is high in fiber, vitamins, and antioxidants.
    • Chickpea flour (besan) used in the batter is a good source of protein and gluten-free, making gobi pakoras suitable for individuals with gluten sensitivities.
    • Gobi pakoras are a satisfying and wholesome snack option that can be enjoyed as part of a balanced diet when consumed in moderation.

    Frequently Asked Questions (FAQs) About Gobi Pakoras:

    Q: Can I make gobi pakoras ahead of time?

    A: While gobi pakoras are best enjoyed fresh and crispy, you can prepare the batter and coat the cauliflower in advance and fry them just before serving to ensure maximum crunchiness.

    Q: Can I bake gobi pakoras instead of frying them?

    A: While traditional gobi pakoras are deep-fried for a crispy texture, you can certainly try baking them in the oven for a healthier alternative. However, the texture may differ slightly, and they may not be as crunchy as the fried version.

    Q: How long do gobi pakoras stay fresh?

    A: Gobi pakoras are best consumed immediately for optimal taste and texture. If you have leftovers, store them in an airtight container in the refrigerator for up to 2-3 days and reheat them in the oven or air fryer before serving.

    For more appetizer recipes, you can explore Manjula’s Kitchen website. Here are some recommendations: Paneer Tikka, Vegetable Samosa, Spinach Pakora, Dahi Vada, Aloo Tikki. Whether you’re a fan of spicy appetizers, refreshing beverages, or indulgent desserts, Manjula’s Kitchen offers a wide range of authentic Indian recipes to suit every palate.

  • Nariyal Burfi (Coconut Fudge)

    Nariyal Burfi (Coconut Fudge)

    Nariyal Burfi

    Nariyal Burfi (Coconut Fudge)

    Nariyal Burfi is simple and delicious dessert that only requires a few ingredients! It is super easy to make, and you can serve this as sweet snack in the form of candy. I make this burfi with caramelized sugar which gives a nice twist to the burfi itself. 
    No ratings yet
    Prep Time 5 minutes
    Cook Time 20 minutes
    Total Time 25 minutes
    Course Dessert
    Cuisine Indian
    Servings 6 people

    Ingredients


    • 1-3/4 cup milk
    • 3/4 cup coconut powder
    • 1/2 cup sugar
    • 1/8 tsp cardamom powder
    • 4 tsp butter
    • 1 Tbsp pistachios sliced

    Instructions
     

    • Soak the coconut in boiling milk for about 30 minutes.
    • In a flat heavy bottom pan, over medium high heat melt one teaspoon of butter, add sugar, spread evenly in pan.
    • After sugar start melting, keep stirring the sugar continuously till sugar start melting and changing the color to light brown. Turn off the heat as soon it comes to golden brown in color. This should take 4 minutes. Note: when sugar starts melting it changes the color very quickly and it can easily burn.
    • Slowly add milk mixture sugar will become lumpy open the heat to medium and keep stirring sugar will dissolve and will give nice light brown color.
    • Keep stirring and scraping the sides about 15 minutes mixture will become lumpy add the remaining butter and keep stirring until mixture become soft dough consistency.
    • Pour it over greased plate and flatten with the greased back side of the spoon. Garnish with sliced pistachios.
    • Leave for 3-4 hours before cutting them into pieces. Cut them into your desired shape. I like to cut them in 1’ squares.

    Notes

    Notes
    Caramelizing the sugar adds a very unique taste to Burfi, something every one talk about.
    Leave for 3-4 hours before cutting them into pieces. Cut them into your desired shape. I like to cut them in 1 inch squares.
    You will also enjoy few of these recipes, they are easy, has a long shelf life and also great gift ideas, Moong Dal Ladoo, Almond Brittle, Spicy Cashews, 
    Keyword Coconut Candy, Gola Ki Burfi, Kid Friendly
    Tried this recipe?Let us know how it was!

  • Paneer Methi (Methi Malai Paneer) Recipe by Manjula

    Paneer Methi (Methi Malai Paneer) Recipe by Manjula

    Paneer Methi

    Paneer Methi (Methi Malai Paneer)

    Paneer Methi is a delicacy of Northern India. This recipe is paneer with creamy gravy flavored with dry fenugreek leaves known as Fasoori Methi. Paneer Methi is a perfect side dish for formal dinner or even a quiet dinner where you want to impress someone. Any way or time you serve this, it is delicious.
    4.60 from 20 votes
    Prep Time 10 minutes
    Cook Time 20 minutes
    Total Time 30 minutes
    Course Main Course
    Cuisine Indian
    Servings 3 people

    Ingredients
      

    • 1-1/2 cups paneer cubed in about 1/2 inch pieces used 8oz paneer
    • 1-1/2 cups tomatoes chopped
    • 1 Tbsp ginger chopped
    • 1 green chili chopped
    • 2 Tbsp oil
    • 1/2 tsp cumin seeds jeera
    • 1/8 tsp asafetida hing
    • 1/4 tsp turmeric haldi
    • 1/4 tsp red chili powder lal mirch
    • 2 Tbsp cashew powder kaju
    • 2 tsp coriander powder dhania
    • 1 tsp fennel seed powder saunf
    • 1 Tbsp dry fenugreek leaves kasoori methi
    • 1 tsp salt
    • 1-1/2 cup milk
    • 1/4 tsp garam masala

    Instructions
     

    • Rub the kasoori methi between your palms and remove the stems if there is any, set aside.
    • Blend tomatoes, ginger, green chili to fine paste. Set aside.
    • Heat one teaspoon of oil in a pan on low heat stir fry the paneer until they are light gold in color, take them out.
    • Heat the remaining oil in a sauce pan on medium heat. When the oil is moderately hot add cumin seeds. (Cumin seeds should crack right of way). Lower the heat too low, add asafetida, turmeric, chili powder, and cashew powder stir for a minute.
    • Add tomato paste, coriander, fennel seed powder, salt and kasoori methi, keep stirring till tomato start leaving the side of the pan, this should take 3-4 minutes. Add milk, and cook for 2-3 minutes. Add paneer and let it cook over low heat for 2-3 minutes. This is the time you can add water as needed if gravy is too thick. Add garam masala stir and turn off the heat.
    • Paneer Methi is ready. 

    Notes

    To make vegan, Substitute paneer with tofu and milk with coconut milk
    Serve Paneer Methi with Naan, or Lacha Paratha.
    Keyword Gluten Free, No Garlic, No Onion, Paneer In Creamy Gravy, Paneer With Fenugreek, Party Food
    Tried this recipe?Let us know how it was!

    Methi Paneer Recipe: A Palate-Pleasing Dish 

    Methi Malai Paneer Recipe is a popular party recipe in Indian cuisine. This flavorful veg gravy dish is rich in high protein and gluten-free combining the richness of paneer (Indian cottage cheese) with the distinct taste of kasuri methi (fenugreek leaves), creating a harmonious blend of textures and aromas.

    Kasuri Methi Preparation: Unlocking Aromatic Richness 

    To commence the Methi Malai Paneer recipe start with the preparation of kasuri methi. This involves a tactile step of rubbing fenugreek leaves between the palms to unlock their aromatic flavors, carefully removing any stems present. Once this initial step is completed, the kasuri methi takes center stage, ready to infuse its unique essence into the dish.

    Tomato-Based Foundation: Crafting Depth and Color 

    The methi malai paneer recipe continues by creating a robust base for the dish. Tomatoes, ginger, and green chili unite in a harmonious blend, resulting in a fine paste that serves as a fundamental component. This tomato-based paste contributes not only vibrant color but also imparts a deep, layered flavor profile to the Methi Paneer. After blending, the mixture patiently awaits its turn to seamlessly integrate into the unfolding cooking process.

    Paneer’s Golden Prelude: A Textural Symphony Begins 

    Transitioning to the cooking phase as we go further in the methi malai paneer recipe add a teaspoon of oil is heat in a pan over low flame. Paneer cubes take center stage as we gently stir-fry until achieving a light golden hue. This initial culinary dance ensures that the paneer attains a delightful texture, priming it to absorb the forthcoming flavors with grace and precision.

    Spiced Elevation: Building a Fragrant Foundation 

    Post-paneer preparation, add the remaining oil in a saucepan over medium heat. Include Cumin seeds as they start to crackle and release their earthy aroma. Lower the heat, while a symphony of asafetida, turmeric, chili powder, and cashew powder join the stage, creating a fragrant and flavorful foundation for the paneer methi.

    Tomato Tapestry: Melding Flavors with Precision 

    The tomato paste, a star player prepared earlier, enters the culinary arena as part of the methi paneer recipe. Coriander, fennel seed powder, salt, and the patiently waiting kasuri methi are added. The ensemble is stirred diligently until tomatoes gracefully release from the pan’s sides, a visual and flavorful indication of the meticulous incorporation of diverse elements. This nuanced cooking process takes approximately 3-4 minutes, allowing flavors to intertwine and harmonize.

    Creamy Symphony: Milk’s Contribution to Indulgence

    To further elevate the dish, milk makes its entrance, contributing a creamy texture that enhances the overall indulgence of paneer methi. The mixture is allowed to simmer, a gentle dance of flavors taking place over 2-3 minutes. The paneer absorbs the creamy richness of the sauce, with the flexibility to adjust the consistency by adding water if the gravy proves too thick.

    Paneer’s Reunion: Absorbing Creamy Richness 

    The previously stir-fried paneer cubes re-enter the pan, allowing them to luxuriate in the creamy tomato and spice-infused gravy. Over low heat, this reunion lasts for an additional 2-3 minutes, ensuring the paneer absorbs the full spectrum of flavors, resulting in a well-balanced and delectable paneer methi.

    Garam Masala Finale: Aromatic Culmination 

    As a grand finale, garam masala is introduced to the dish, enhancing the overall aromatic profile and weaving together the diverse flavors into a harmonious conclusion. A final stir marks the end of the culinary symphony, and the heat is turned off, signaling the completion of the Methi Paneer recipe. The result is a tantalizing masterpiece that marries the succulence of paneer with the unique bitterness of fenugreek leaves, promising to delight the fortunate taste buds that savor this culinary creation of paneer methi.

    If you liked this recipe, try our other recipes such as Shahi Paneer, Paneer Sandwich, Masala Bell Pepper, Masala Paneer & Mattar Paneer


  • Crispy Vegetable Pakoras

    Crispy Vegetable Pakoras

    A plate of crispy vegetable pakoras served with a bowl of tamarind chutney.

    Crispy Vegetable Pakoras

    Crispy Vegetable Pakoras are probably my all-time favorite and satisfying appetizer. They are perfect for any occasion, not to mention they are a favorite with all –young or old! These bite-sized snacks are fried to crispy golden-brown perfection. I serve pakoras with tamarind or cilantro chutney. When cooked right they are crispy on the outside and soft on the inside. These pakoras also have the added benefits of being vegan and gluten-free.
    I have many fond memories of my mother cooking pakoras when I was a child. There was no special occasion that warranted her whipping up a batch of pakoras. Sometimes she would just come up with an excuse – be it the weather (especially if it was cold & rainy!) or if she simply wanted something savory and spicy. Pakoras were also a staple in our household when guests would unexpectedly show up at our house.
    Vegetable Pakoras are easy and quick to make, not to mention you can use a variety of vegetables to make them. I can tell you from personal experience that these pakoras are extremely addicting! Try pairing these pakoras with your afternoon tea or as a spicy delicious snack!
    This recipe will serve 4.
    5 from 1 vote
    Prep Time 10 minutes
    Cook Time 15 minutes
    Total Time 25 minutes
    Course Appetizer, Snack
    Cuisine Indian
    Servings 4 people

    Ingredients
      

    • 4 okras cut vertically into 4 slices
    • 12 green beans cut into half then cut them vertically
    • ½ red bell pepper sliced into about quarter inch thick
    • cup besan Bengal gram flour
    • 2 Tbsp corn starch arrow root
    • 2 Tbsp rice flour
    • 2 tsp coriander powder dhania
    • ¼ tsp mango powder amchoor
    • ¼ tsp red chili powder
    • tsp baking soda
    • ½ tsp salt

    Instructions
     

    • First prepare the vegetables: okras, wash and pat dry, cut off the tops and bottom. Then cut the okras vertically into four slices. Bell pepper slice into about quarter inch thick, making julienne, and cut the green beans into half then cut them vertically.
    • Next! Prepare pakora mix, mix all the dry ingredients together, besan, corn starch rice flour, and baking soda, mix them well. Rice flour, corn starch and baking soda will add the extra crispness to pakoras.
    • Now add the other spices, coriander powder, mango powder, red chili powder and salt. Mix all the ingredients well.
    • Sprinkle the dry mix over vegetables mix them well add water little at a time as needed to coat the vegetables nicely with besan spice mix, vegetables should be coated well. I added about 1/4th cup of water.
    • Heat at least one inch of oil in a frying pan over medium high heat. To test, put one drop of batter in the oil. The batter should come up slowly. Drop the pakoas slowly one at a time. Put few pakoras at a time don’t overlap the pakoras.
    • Fry the pakoras until they turn golden brown, turning them occasionally. This should take about 6 minutes.
    • Take them out over paper towel to absorb the extra oil.
    • Fry all the pakoras same way.

    Notes

    Also check out the recipe for Chai Masala Tea. Gulab Jamun, Vegetable Kathi Roll
    Keyword Appetizer, Balushahi, Bhartia Khana, Burfi, Cooking Video, Crispy, Crusty, Delightful, Homemade, Indian Vegetarian, Jain Food, Mandir Food, North Indian Recipes, Onion Garlic Free Cooking, Punjabi Cuisine, Snack, Street Food, Veshno Cooking
    Tried this recipe?Let us know how it was!
  • Aloo ki Kachori

    Aloo ki Kachori

    Aloo ki Kachori

    Aloo Ki Kachori (Kachori With Potato Stuffing)

    Aloo Ki kachori is a delicious, spicy, fried puff bread. Aloo Ki kachori can be part of the main meal or it can even be served for breakfast with a hot cup of chai. This kachori also makes a mouthwatering appetizer that can be served with Green Chutney as chaat.
    5 from 7 votes
    Prep Time 15 minutes
    Cook Time 30 minutes
    boiling potatoes 15 minutes
    Total Time 45 minutes
    Course Main Course
    Cuisine Indian
    Servings 4 people

    Ingredients


    For Dough

    • 1 cup all-purpose flour maida, plain flour
    • 2 Tbsp sooji samolina
    • 1/4 tsp salt
    • 2 Tbsp oil canola, vegetable
    • 3 drops lemon juice
    • 1/3 cup chilled water approximately

    For Filling

    • 1 cup boiled peeled potatoes roughly mashed
    • 1 Tbsp oil canola, vegetable
    • 1/2 tsp cumin seeds jeera
    • 1/2 tsp red chili powder
    • 1 tsp coriander powder dhania
    • 1/2 tsp mango powder amchoor
    • 1/2 tsp salt
    • 1 Tbsp green chili finely chopped
    • 2 Tbsp chopped cilantro hara dhania

    Instructions
     

    To Make Dough

    • Mix the flour, sooji, salt, lemon drops and oil. note lemon should be just 3-4 drops, we are not adding to flavor, lemon is added to give the crispness.
    • Add the chilled water slowly, mixing with your fingers as you pour.
    • Do not knead the dough. The dough should be soft.
    • Cover the dough and let it sit for at least fifteen minutes.

    Make Filling

    • Heat the oil in a frying pan on medium high heat. Test the heat by adding one cumin seed to the oil; if it cracks right away oil is ready.
    • Add cumin seeds as cumin seeds crack, add all the ingredients, potatoes, red pepper, green chilies, cilantro, and coriander powder, mix it well while stirring the mix keep pressing.
    • Filling should be not very dry, this should take about 5 minutes.
    • Stir in garam masala and amchur. Add more salt or amchur according to taste.
    • Let the filling cool to room temperature, mix it well this should have texture of firm dough.

    To make Kachoris

    • Take the dough and knead it for a minute. Divide the dough in twelve equal parts.
    • Mash the dough lightly and divide in 12 parts filling should be about same size as dough.
    • Take one part of the dough and with your fingers flatten the edges and make into 3-inch circle. Leaving center little thicker then edges.
    • Mold the dough into a cup and place filling in the center. Pull the edges of the dough to wrap the dal filling. Proceed to make all 12 balls.
    • Let the filled ball sit for three to four minutes before rolling. It helps spreading the filling evenly.
    • Set the kachoris on a surface with the seams facing up. Using the base of your palm, slowly flatten them into about three inches in diameter, or use the rolling pin roll the kachori with light hand.
    • Heat the oil in frying pan over medium heat frying pan should have about one inch of oil. To check if oil is ready put a little piece of dough in the oil. Dough should sizzle and come up very slow without changing the color.
    • Fry them on medium-low heat. After they start to puff, slowly turn them over. Fry until golden-brown on both sides. If the kachoris are fried on high heat, they will get soft and will not be crispy.

    Notes

    Serve the kachories with cilantro chutney or tamarind chutney.
    Tried this recipe?Let us know how it was!

    Introduction to Aloo Kachori

    Aloo kachori is a popular Indian snack that perfectly fits into various occasions and dietary preferences. It serves as a delightful addition to appetizers, party recipes, and festive menus like Diwali, Ganesh Chaturthi, Holi, Karwa Chauth, and Krishna Janmashtami. It’s also a great option for breakfast and lunch box suggestions. This delectable dish consists of deep-fried bread stuffed with a savory mixture of spiced mashed potatoes, making it a satisfying choice for vegans and anyone craving a flavorful treat.

    Preparing the Dough for Aloo Kachori

    To begin making aloo kachori, we first prepare the dough. In a mixing bowl, combine all-purpose flour, salt, and a splash of oil. Gradually add water and knead the mixture until you achieve a smooth, pliable dough. Cover the dough and let it rest for about 15-20 minutes. This resting period allows the gluten to relax, making the dough easier to work with and resulting in softer kachoris.

    Making the Aloo Kachori Filling

    While the dough rests, let’s prepare the flavorful filling for our aloo kachori. Start by boiling potatoes until they are tender. Once cooled, peel and mash them coarsely. In a pan, heat oil and add mustard seeds, cumin seeds, and hing (asafoetida) for added flavor. Add ginger, green chilies, and spices like turmeric, red chili powder, coriander powder, and garam masala to the pan. Mix well and cook for a minute before adding the mashed potatoes. Stir the mixture until the spices are well incorporated and cook for a few minutes. Finally, add chopped cilantro for a fresh burst of flavor. Allow the filling to cool completely before proceeding.

    Assembling and Frying Aloo Kachori

    Now, let’s assemble our aloo kachori. Divide the rested dough into small portions and roll them out into small circles. Place a spoonful of the prepared potato filling in the center of each circle. Gently gather the edges of the dough to enclose the filling and pinch them together to seal. Flatten the filled dough balls slightly.

    Next, heat oil in a deep pan for frying. Once the oil is hot, carefully slide the prepared aloo kachoris into the oil. Fry them in batches until they turn golden brown and crisp on all sides. Remove them from the oil using a slotted spoon and place them on paper towels to drain excess oil.

    Serving Aloo Kachori

    Once fried to perfection, aloo kachoris are ready to be served. They can be enjoyed on their own as a snack or paired with a variety of chutneys and dips. For an extra indulgence, you can also turn them into a delicious aloo kachori chaat by topping them with yogurt, tamarind chutney, green chutney, sev. The combination of crispy kachori and flavorful toppings creates a tantalizing blend of textures and flavors that will surely satisfy your taste buds.

    Tips for Making Perfect Aloo Kachori

    • Ensure the dough is well rested to achieve a soft and pliable texture.
    • Keep the filling mixture relatively dry to prevent the kachoris from becoming soggy.
    • Seal the edges of the filled dough balls properly to prevent the filling from leaking out during frying.
    • Fry the kachoris in hot oil to ensure they cook evenly and become crispy.
    • Serve the kachoris hot for the best taste and texture.

    Variations of Aloo Kachori

    While the classic aloo kachori is a favorite, there are endless variations you can try to add your own twist to this beloved snack. You can experiment with different fillings such as paneer, peas, or lentils to create unique flavors. Additionally, you can adjust the spice level according to your preference by adding more or less chili powder or green chilies. Get creative and tailor the recipe to suit your taste buds.

    Benefits of Aloo Kachori

    Aloo kachori is not only delicious but also offers some nutritional benefits. Potatoes, the main ingredient in the filling, are a good source of vitamins and minerals, including vitamin C, potassium, and B vitamins. When enjoyed in moderation as part of a balanced diet, aloo kachori can be a satisfying and wholesome snack option.

    FAQs about Aloo Kachori

    Can I make aloo kachori ahead of time?
    • Yes, you can prepare the dough and filling ahead of time and assemble the kachoris just before frying. This can save you time, especially when serving them for parties or gatherings.
    Can I bake aloo kachori instead of frying?
    • While traditionally fried, you can certainly try baking the kachoris for a healthier alternative. Brush them with oil and bake in a preheated oven until golden brown and crisp.
    How do I store leftover aloo kachori?
    • Allow any leftover kachoris to cool completely before storing them in an airtight container. They can be refrigerated for a couple of days and reheated in a toaster oven or microwave before servin

    If you’re looking to explore more Indian recipes, appetizers, beverages, and desserts, be sure to check out the following links on Manjula’s Kitchen. Here are some links to recipes on Manjula’s Kitchen official website: Vegetable Pakoras Recipe

    Kaju Katli (Cashew Burfi) Recipe, Baingan Bharta (Roasted Eggplant) Recipe, Matar (Green Peas) Paneer Recipe, Besan Ladoo Recipe

  • Ram Ladoo

    Ram Ladoo

    A plate of Ram Ladoo topped with green chutney and shredded radish.

    Ram Ladoo (Delhi Street Food)

    Ram Ladoo is a popular Delhi street food. Ram Ladoo is a delicious snack. Moong dal pakoras served with cilantro chutney and topped with shredded radish. These ladoos takes on the flavor of chutney and radish, this is what makes this dish a yummy and lip-smacking chaat.
    5 from 6 votes
    Prep Time 10 minutes
    Cook Time 10 minutes
    Total Time 20 minutes
    Course Appetizer
    Cuisine Indian
    Servings 4 people

    Ingredients
      

    • ½ cup washed moong dal
    • ¼ cup chana dal Bengal gram
    • tsp asafetida hing
    • ½ tsp cumin seeds jeera
    • 1 tsp salt
    • 1 Tbsp green chili chopped
    • 1 Tbsp ginger grated
    • 2 Tbsp cilantro chopped, green coriander
    • Oil for deep frying

    For Garnish

    Instructions
     

    • Wash and Soak moong and chana dal in three cups of water for about 4 hours after soaking this will become about twice in volume.
    • Drain the water, and grind dal without adding any water, do not grind dal to fine paste, dal should be little grainy.
    • Take out the dal in a mixing bowl and beat the batter for couple of minutes, till it is fluffy. This will aerate the batter to make soft ladoos. Laddos are crispy outside and soft inside. Add all the ingredients, asafetida, cumin seeds, salt, ginger, green chili, and cilantro. Whip it again. The more air is incorporated in the batter the fluffier ladoos will be.
    • Heat the oil in a frying pan on medium high heat. The frying pan should have about 1 inch of oil. To check if the oil is ready, put one drop of batter in oil. The batter should sizzle and come up but not change color right away. If oil is very hot Ram Ladoo will not cook through and will not be crispy.
    • Place about 1 tablespoon of batter into the oil. Fry the Ram Ladoos in small batches. Fry them until golden-brown all around.
    • Ram Ladoo should be crispy from outside and should be soft inside.
    • Take them out over paper towel, this absorb the access oil.
    • Ram Ladoos should be served hot, to serve the Ram Ladoos, drizzle the chaat masala, cilantro chutney, and grated radish and little chat masala again.

    Notes

    Preparation time does not include soaking time.
    Keyword Chaat, Chana Dal Pakoras, Easy To Make, Gluten Free, Homemade, Jain Food, Moong Dal Pakoras, Party Food, Sattvik Food, Snack, Tea Time Snack, Vegan, Vegetarian
    Tried this recipe?Let us know how it was!
  • Pineapple Sandesh (Bengali Sweet)

    Pineapple Sandesh (Bengali Sweet)

    Pineapple Sandesh

    Pineapple Sandesh (Bengali Sweet)

    Pineapple Sandesh is a popular Bengali sweet. This is healthy and delicious dessert and a great dessert for sophisticated people and so easy to make. 
    5 from 3 votes
    Prep Time 5 minutes
    Cook Time 24 minutes
    Total Time 29 minutes
    Course Dessert
    Cuisine Indian
    Servings 8 people

    Ingredients


    • 4 cup whole milk
    • 3 Tbsp lemon juice
    • 3 Tbsp fine sugar
    • 1/4 tsp cardamom
    • 6 slice pineapple canned
    • 2 Tbsp sliced pistachios for garnishing

    Instructions
     

    • Making paneer: Boil the milk in a heavy bottomed pan over medium high heat, stirring occasionally.
    • As the milk comes to a boil, add the lemon juice gradually and stir the milk gently. The curd will start separating from the whey, turn off the heat.
    • Once the milk fat has separated from the whey, drain the whey using a strainer line with cheesecloth, or muslin cloth.
    • Wrap the curds in a muslin cloth, rinse under cold water, and squeeze well. 
    • Making Sandesh: Once the paneer is drained, place on a dry, clean surface and knead the paneer until the paneer is almost rolls into smooth soft dough.
    • Add the sugar and cardamom powder into the paneer and knead the paneer again until sugar is mixed well. Now this paneer known Sandesh.
    • Spread the pineapple slices on a dry surface and pat dry using the muslin cloth or paper towel.
    • Spread the Sandesh covering the pineapple slices evenly and garnish with slice pistachios. I prefer cutting them in four.
    • Refrigerate the Sandesh for about 1 hours before serving. Pineapple Sandesh taste best when it is served chilled and refrigerating the Sandesh also helps to set over pineapple.

    Notes

    After kneading the sugar with paneer it is known as Sandesh. This is a basic Sandesh you can use this for making many variation of Sandesh. I also I have 2 more recipe of Sandesh, you will be interested Sandesh, and Chocolate Sandesh
    Tried this recipe?Let us know how it was!