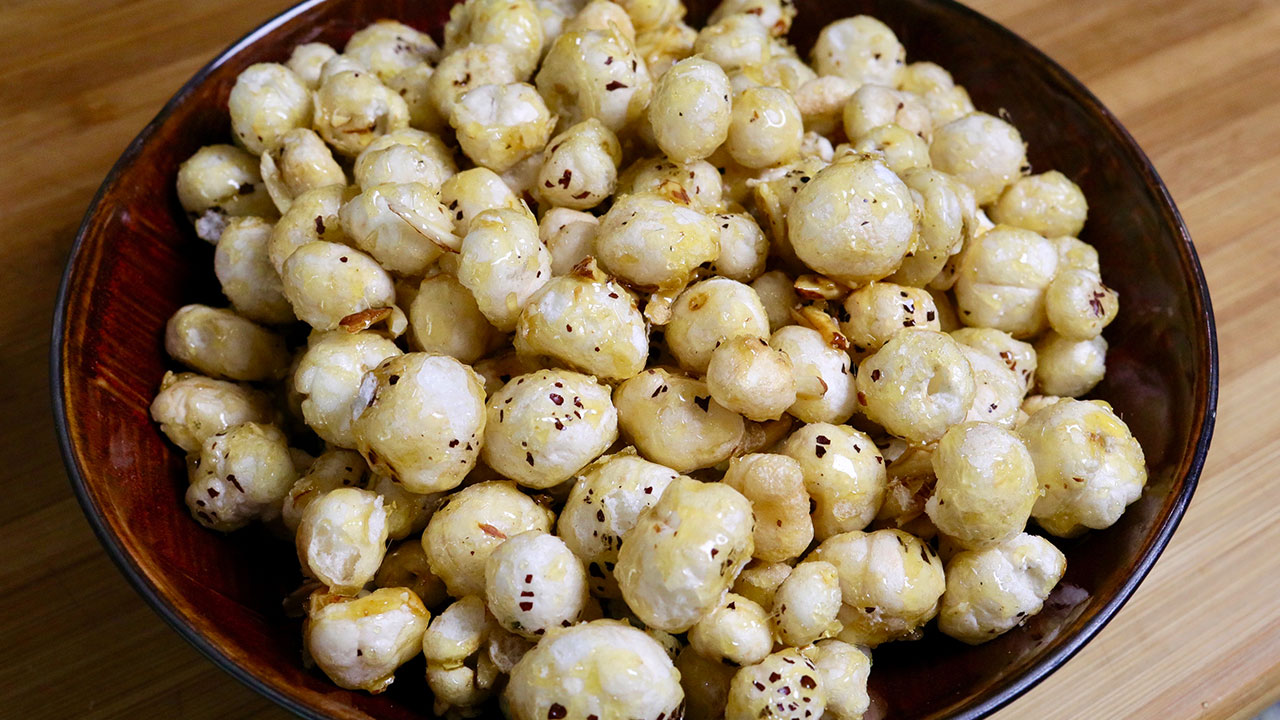
Category: High Protein Recipes

High Protein Vegetarian Meals: Power-Packed Indian Recipes

Eating a high-protein diet is essential for maintaining muscle mass, supporting metabolism, and overall health. For vegetarians, finding delicious and nutritious high protein vegetarian meals can sometimes be challenging. 

However, Indian cuisine offers a variety of high protein vegetarian recipes that are both flavorful and fulfilling. Let’s explore some fantastic vegetarian high protein recipes that you can incorporate into your diet.

Moong Dal Chilla

Moong Dal Chilla, or lentil pancakes, is a protein-rich indian breakfast ideas. Made with ground moong dal and spices, this dish is perfect for those looking for high protein vegetarian meals. It is also a great example of high protein vegetarian meals Indian style, providing a nutritious start to your day.

Paneer Bhurji

Paneer Bhurji is a scrambled paneer dish cooked with tomatoes, and spices. This dish is an excellent choice for high protein indian vegetarian recipes, offering a substantial amount of protein. It’s quick to prepare and can be enjoyed with whole wheat toast or parathas.

Rajma (Kidney Bean Curry)

Rajma is a popular north indian recipes made with red kidney beans cooked in a spiced tomato gravy. This dish is a staple in high protein Indian food and pairs well with rice or roti. It’s an ideal choice for vegetarian high protein recipes that are hearty and satisfying.

Chana Masala

Chana Masala is a chickpea curry that is rich in protein and flavor. This dish is a favorite in many Indian households and is a fantastic addition to your collection of high protein vegetarian meals Indian style. Serve it with basmati rice or naan for a complete meal.

Palak Paneer

Palak Paneer is a nutritious dish made with spinach and paneer. Rich in protein and iron, this dish fits perfectly within high protein vegetarian meals. It can be paired with whole wheat roti or brown rice, making it one of the best high protein vegetarian recipes for dinner.

Dal Tadka

Dal Tadka is a flavorful lentil dish cooked with a variety of spices. This dish is a staple in high protein Indian food and is often enjoyed with rice or chapati. It’s a simple yet protein-packed option for dinner.

Roasted Chickpeas

Roasted Chickpeas are a crunchy and satisfying snack that fits well within vegetarian high protein recipes. High in protein and fiber, this snack helps manage hunger and maintain energy levels. It’s also a great addition to a salad or enjoyed on its own.

Sprouted Moong Salad

Sprouted Moong Salad is a refreshing and nutritious snack made with sprouted green gram, fresh vegetables, and a tangy dressing. This salad is perfect for those seeking high protein vegetarian meals Indian style and is an excellent example of healthy recipes.

Moong Dal Halwa

Moong Dal Halwa is a sweet dish made from ground yellow lentils, ghee, and sugar. This dessert is a delightful example of high protein vegetarian recipes that can be enjoyed as a treat. It’s rich, flavorful, and provides a good amount of protein.

Quinoa Kheer

Quinoa Kheer is a creamy dessert recipe made with quinoa, milk, and sugar, flavored with cardamom and garnished with nuts. This dessert is an innovative twist on traditional kheer and fits well within high protein vegetarian meals.

Elevating Your High-Protein Menu

To make your high-protein recipes even more delightful, consider adding dishes from related categories that complement these high-protein vegetarian meals. Indian snacks like roasted chickpeas and sprouted moong salad can offer a delightful variety of flavors and textures.

For a sweet ending, explore Indian desserts such as moong dal halwa and quinoa kheer, made with high-protein ingredients. Incorporating healthy recipes like chana masala and paneer bhurji can provide lighter meal options.

Planning a large gathering? The popular party recipe category is filled with dishes that are sure to impress your guests and make your celebration memorable. Including North Indian recipes like rajma or palak paneer can add a touch of authenticity to your meal.

Frequently Asked Questions (FAQs)

Q: What are some popular high protein vegetarian meals? 

A: Some popular high protein vegetarian meals include Moong Dal Chilla, Paneer Bhurji, Rajma, Chana Masala, Palak Paneer, Dal Tadka, Roasted Chickpeas, Sprouted Moong Salad, Moong Dal Halwa, and Quinoa Kheer.

Q: How can I make traditional Indian food high in protein? 

A: To make traditional Indian food high in protein, try recipes like Moong Dal Chilla, Rajma, and Palak Paneer. These recipes are modified to include high-protein ingredients while retaining their authentic flavors.

Q: What are some vegetarian high protein recipes for a party? 

A: Some vegetarian high protein recipes for a party include Paneer Bhurji, Chana Masala, Sprouted Moong Salad, and Roasted Chickpeas. These dishes are flavorful and perfect for gatherings while being mindful of protein content.

Q: Can I prepare high protein vegetarian meals in advance? 

A: Yes, many high protein vegetarian recipes can be prepared in advance and stored. Snacks like Roasted Chickpeas and Sprouted Moong Salad can be made ahead of time, while dishes like Rajma and Chana Masala can be prepped and refrigerated.

Q: What are some healthy options for high protein vegetarian food? 

A: Some healthy options for high protein vegetarian meals Indian style include Quinoa Salad, Vegetable Stir Fry, Oats Upma, and Moong Dal Cheela. These dishes are high in fiber and protein, helping to maintain energy levels effectively.

Conclusion

High protein vegetarian meals are a celebration of healthy and flavorful foods. Whether you’re looking for high protein vegetarian recipes or vegetarian high protein recipes, these dishes will bring variety and nutrition to your meals. So, gather your ingredients, try out these recipes, and create delicious meals that are mindful of your health needs. Don’t forget to explore related categories for more delightful recipes from Manjula’s Kitchen!

By incorporating these dishes into your diet, you’ll be able to enjoy a wide variety of delicious and nutritious foods. Whether you’re looking for breakfast, snacks, main courses, or desserts, there’s a high protein vegetarian recipe to suit every taste. Happy cooking and healthy eating!

  • Palak Paneer Pakora

    Palak Paneer Pakora

    A plate of crispy Palak Paneer Pakoras served with chutney

    Palak Paneer Pakora

    Spinach and Paneer Pakoras are crispy and delicious. I also enjoy using these pakoras to make chaat. These two spicy, delicious popular street food items—Pakoras and Chaat—are loved by all. When it rains, most Indians think about Pakoras served with a hot cup of chai; what a treat. These spinach and paneer pakoras are crispy and mouthwatering. You can serve them as pakoras, or I enjoy serving them also as chaat (chaat is a snack served with yogurt and spicy chutney).
    But Pakoras are enjoyed year-round. I've used baby spinach for this recipe, trimming all the stems. I have done different spinach pakora recipes over time; (Crispy Spinach Pakoras, Spinach Chaat, Spinach Potato Pakora, Palak Pakora), this is also a good way to have spinach, especially for those who don’t enjoy spinach. I also used cubed paneer, which makes this recipe different.
    The good thing is you can make these pakoras in advance because they stay crisp for two days. You should not refrigerate them. To make these spinach and paneer pakoras, you don’t need to make Besan batter to dip the pakoras for frying. Mix all the ingredients slowly drop a spoonful into medium-hot oil and fry them until they are light brown.
    Serve them with your choice of homemade chutney, like cilantro chutney, mint chutney, or tamarind sweet and sour chutney. These Spinach and Paneer Pakoras are very easy to make and can satisfy cravings for pakoras and spicy chaat.
    5 from 1 vote
    Course Appetizer, Snack, snacks
    Cuisine Indian
    Servings 4 people

    Ingredients
      

    • 2 cups packed baby spinach leaves after removing stems
    • 1-1/2 cups cubed paneer Vegans replace paneer with firm tofu cubes
    • 1 cup gram flour use as needed
    • 1 tsp salt
    • 1 tsp cumin seeds
    • 1 tbsp coriander powder
    • 1/8 tsp asafetida

    Instructions
     

    • In a bowl, add the spinach, cubed paneer, salt, cumin seeds, coriander, asafetida, and about 3/4 cup of besan. Mix well; don’t crumble the paneer, but some of it will break.
    • Add water slowly; the batter should be lumpy. If the spinach leaves and paneer are not covered with besan, add more besan and water as needed to make a lumpy batter.
    • Heat the oil in a frying pan over medium-high heat. The frying pan should have at least 1 inch of oil. To check if the oil is ready, put one drop of batter in the oil. The batter should come up but not change color right away.
    • Slowly drop spoonful into the medium-hot oil and fry them until they are light brown. Turn them a few times. If fried in hot oil, pakoras will brown quickly but remain uncooked inside and will not be crispy.
    Keyword palak paneer pakora, palak paneer pakora recipe, paneer palak pakora, paneer spinach pakora, spinach paneer pakora
    Tried this recipe?Let us know how it was!

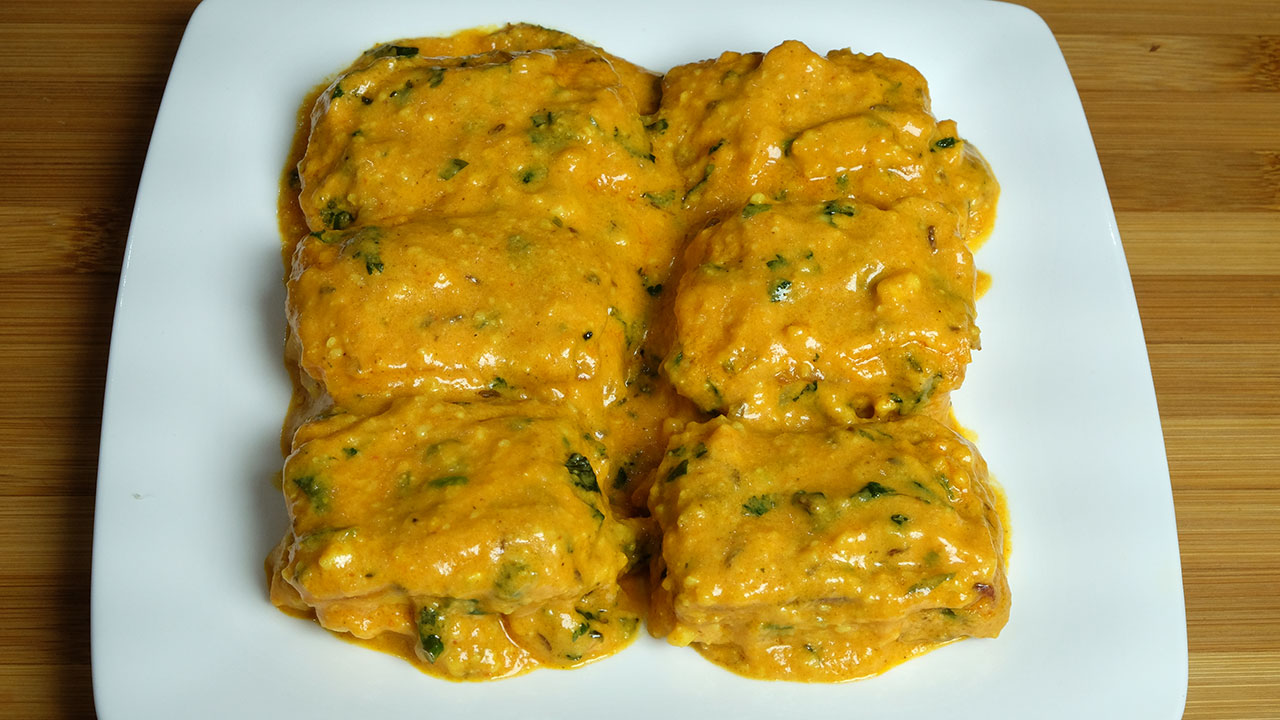
    How to make Palak Paneer Pakora 

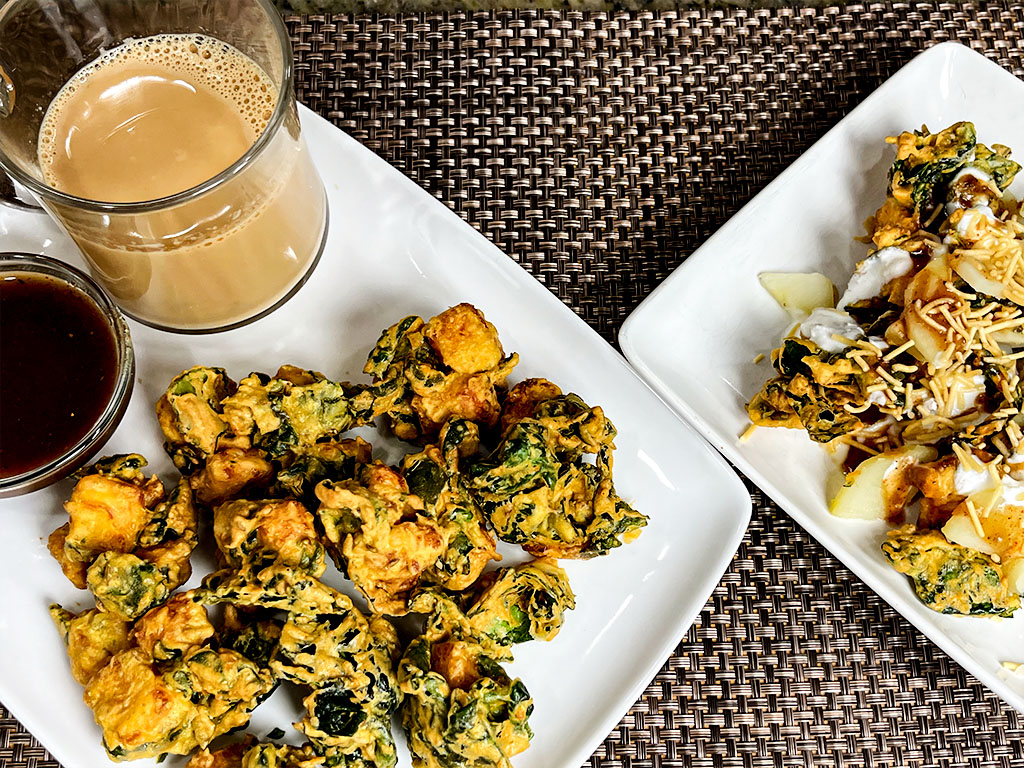
    Palak Paneer Pakora, also known as paneer palak pakora or spinach paneer pakora, is a delectable and crispy appetizer that perfectly marries the flavors of spinach and paneer. These savory delights are not only a popular street food item but also a beloved snack enjoyed by many. Whether served as pakoras or transformed into a tantalizing palak paneer pakora chaat, this dish never fails to delight the taste buds.

    Palak paneer pakora is a versatile dish that can be enjoyed year-round, but it holds a special place in the hearts of many Indians, especially during rainy days when paired with a steaming cup of chai—a true indulgence. This recipe offers a unique twist by incorporating cubed paneer, adding a rich and creamy texture to the crispy pakoras.

    Using baby spinach ensures tender leaves, and by trimming away the stems, we ensure a smoother texture. The batter for these palak paneer pakoras is simple yet flavorful, eliminating the need for a separate besan dipping mixture. A blend of besan, salt, cumin seeds, coriander powder, and a hint of asafetida coats the spinach and paneer, creating a lumpy batter that adds to the crunchiness.

    To prepare these delightful spinach paneer pakoras, begin by mixing the spinach, cubed paneer, spices, and besan in a bowl. Slowly add water until the mixture forms a lumpy batter, ensuring that the spinach leaves and paneer are well coated.

    Heat oil in a frying pan and carefully drop spoonful of the batter into the hot oil. Fry the pakoras until they turn light brown, ensuring they are crispy on the outside and cooked through. It’s crucial to fry them in medium-hot oil to achieve the perfect balance of crispiness and tenderness.

    These paneer palak pakoras can be served with your choice of homemade chutneys, such as cilantro chutney, mint chutney, or tamarind sweet and sour chutney, enhancing their flavor profile. They can also be enjoyed as a standalone snack or transformed into a delightful chaat by adding yogurt and spicy chutney.

    One of the advantages of this recipe is that these paneer palak pakoras can be prepared in advance, as they retain their crispness for up to two days. However, it’s essential not to refrigerate them, as this can affect their texture.

    In summary, palak paneer pakoras are a delightful fusion of spinach and paneer, offering a burst of flavors and textures in every bite. Whether enjoyed as a snacks served as chaat, or paired with a comforting cup of chai, these crispy treats are sure to satisfy your cravings for spicy delights. So why not treat yourself and your loved ones to the irresistible goodness of paneer spinach pakoras today?

    And remember, if you enjoy this recipe, don’t hesitate to share it with your friends, subscribe to the YouTube channel for more culinary delights, and leave your comments and suggestions. Your feedback is always appreciated. Thank you for joining me on this flavorful journey!

    Variations:

    1. Aloo Palak Pakora: Add finely chopped boiled potatoes to the batter for an extra burst of flavor and texture.
    2. Palak Pakora: Skip the paneer and make classic spinach pakoras by using only baby spinach leaves in the batter.
    3. Broccoli Pakora: Replace spinach with blanched broccoli florets for a unique twist on this traditional recipe.
    4. Aloo Bread Pakora: Sandwich a mixture of mashed potatoes and spices between two slices of bread, dip in batter, and fry until golden brown.
    5. Cabbage Pakora: Shred cabbage finely and mix it with the batter for crunchy and delicious cabbage pakoras.

    Health Benefits:

    • Spinach: Packed with vitamins A, C, and K, as well as iron and calcium, spinach is a nutritional powerhouse known for its antioxidant properties.
    • Paneer: Rich in protein and calcium, paneer provides essential nutrients for bone health and muscle development.
    • Besan (Gram Flour): A gluten-free alternative to wheat flour, besan is high in protein and fiber, making it a healthy choice for pakora batter that makes it diabetic friendly.
    • Cumin Seeds: Known for their digestive benefits, cumin seeds add a distinctive flavor and aroma to the pakoras.
    • Coriander Powder: Rich in antioxidants and essential nutrients, coriander powder lends a fragrant and citrusy flavor to the dish.
    • Asafetida: Used in traditional medicine for its digestive properties, asafetida adds a subtle umami flavor to the pakoras.

    Incorporate these variations and enjoy the health benefits of spinach and other nutritious ingredients while indulging in the crispy goodness of pakoras. Whether you’re looking for a quick snack or planning a party menu, these versatile pakoras are sure to be a hit with friends and family. So why not get creative in the kitchen and explore the endless possibilities of pakora recipes?

    FAQs: Frequently Asked Questions

    Q: Can I use frozen spinach for this recipe?

    A: No, you can not substitute frozen spinach for fresh baby spinach

    Q: Can I make this recipe vegan?

    A: Absolutely! You can replace paneer with firm tofu cubes to make vegan spinach paneer pakoras.

    Q: Can I refrigerate the leftover pakoras?

    A: It’s best not to refrigerate them, as they may lose their crispiness. However, you can store them in an airtight container at room temperature for up to two days.

  • Banana Rice Bowl

    Banana Rice Bowl


    Banana Rice Bowl

    How did I come up with this unique Banana Rice Bowl combination? At lunchtime, I craved something spicy yet easy. I decided to make banana chat, but it didn't seem filling enough. I remembered I had some cooked rice in the fridge. While taking it out, I noticed moong sprouts, and grilled tofu so I decided to add those as well. However, it looked very bland. I decided to add cucumber and tomatoes. Now it looked colorful, tempting, and healthy. To my surprise, the combination turned out delicious. It was a delightful and tasty meal.
    My son, who is a picky eater, tried and enjoyed it, also added crushed pecans to give a crunch and suggested that this should be your new recipe.
    Banana Rice Bowl is also gluten free and vegan.
    This recipe also gives you the choice to add or take out some ingredients, some suggestions replace tofu with paneer or bell pepper, apple.
    5 from 1 vote
    Course Appetizer
    Cuisine Indian
    Servings 0

    Ingredients
      

    Ingredients:

    • 1 banana, sliced.
    • 1 cup cooked rice
    • ¼ cup moong dal sprouts
    • ¼ cup cucumber, chopped into small pieces
    • ¼ cup tomatoes, chopped into small pieces
    • ¼ cup tofu in small cubed, grilled
    • ½ tsp salt
    • ½ tsp roasted cumin seed powder
    • 2 tsp sugar
    • 1 tbsp finely chopped cilantro.
    • 1 tsp finely chopped green chili (adjust to taste)
    • 2 tsp lemon juice
    • 2 tbsp broken pecans 

    Instructions
     

    Method:

    • In a wide serving bowl, we will add all the ingredients one at a time cup of cooked rice, sliced banana, tofu, sprouts, cucumber, and tomatoes.
    • Sprinkle salt, roasted cumin seed powder, sugar, cilantro, green chilies, and lemon juice. Toss it all together.
    • Finally, top with pecans.
    • Simple, flavorful, and healthy, your Banana Rice Vegetable Bowl is now ready to enjoy!

    Notes

    If you liked the recipe, share with your friends the video recipe.
    Tried this recipe?Let us know how it was!

    Banana Rice Bowl Recipe 

    Craving a satisfying yet easy meal that packs a punch of flavor? Look no further than this unique banana rice recipe! Inspired by a desire for something spicy and filling, this Banana with Rice Bowl combines the sweetness of bananas with the savory goodness of rice and a variety of vegetables and spices. Whether you’re vegan, gluten-free, or simply looking for a delicious and nutritious dish, this banana rice recipe is sure to become a favorite in your kitchen.

    Assembling the Ingredients

    To begin preparing the Banana Rice Bowl, gather all the necessary ingredients listed in the banana rice recipe. You’ll need bananas, cooked rice, moong dal sprouts, cucumber, tomatoes, grilled tofu, salt, roasted cumin seed powder, sugar, cilantro, green chilies, lemon juice, and pecans. Having everything ready and prepped will make the cooking process smooth and efficient.


    Creating the Flavorful Layers

    In a wide serving bowl, start assembling the Banana Rice Bowl by adding each ingredient one at a time. Begin with a generous layer of cooked rice as the base, followed by slices of ripe banana for a touch of sweetness. Next, add the grilled tofu, moong dal sprouts, chopped cucumber, and tomatoes. This layering technique ensures that every bite is bursting with a variety of textures and flavors, from creamy to crunchy.

    Seasoning for Depth of Flavor

    Once all the ingredients are layered in the bowl, it’s time to season them with a combination of spices and herbs. Sprinkle salt, roasted cumin seed powder, and sugar over the top of the bowl to enhance the flavors and balance the sweetness of the bananas. Add finely chopped cilantro and green chilies for a pop of freshness and a hint of heat. Drizzle freshly squeezed lemon juice over the top to brighten up the dish with a tangy citrus flavor.


    Adding a Crunchy Finishing Touch

    To elevate the texture of the Banana with Rice Bowl, top it off with broken pecans. The pecans not only add a satisfying crunch but also contribute a rich, nutty flavor that complements the other ingredients beautifully. Feel free to adjust the amount of pecans according to your preference, or substitute them with your favorite nuts or seeds for variety.

    Tips

    • Choose ripe but firm bananas for this banana rice recipe to ensure they hold their shape when mixed with the other ingredients.
    • Experiment with different vegetables and proteins to customize the Banana Rice Bowl to your liking. Try substituting tofu with paneer or adding bell peppers or apples for added crunch and sweetness.
    • For a burst of freshness, garnish the finished dish with a sprinkle of freshly chopped herbs like mint or parsley.

    Variations

    • Get creative with your choice of grains by substituting rice with quinoa, couscous, or bulgur for a different texture and flavor profile.
    • For a spicy kick, add a dash of your favorite hot sauce or chili flakes to the Banana Rice Bowl before serving.

    Benefits

    • Bananas are a good source of potassium, fiber, and vitamins, making them a nutritious addition to any meal.
    • Rice provides carbohydrates for energy and is a staple food in many cuisines around the world.
    • The variety of vegetables and sprouts in this banana rice recipe add vitamins, minerals, and antioxidants to support overall health.

    FAQs

    • Can I prepare the Banana with Rice Bowl in advance?

    • Yes, you can pre-cook the rice and prep the other ingredients in advance, then assemble the bowl just before serving for maximum freshness and flavor.


    • Are there any substitutions I can make for the ingredients listed in the recipe?

    • Absolutely! Feel free to customize the Banana Rice Bowl with your favorite ingredients and flavors. You can swap out the tofu for your protein of choice or adjust the seasoning to suit your taste preferences.


    • Is this recipe suitable for meal prep?

    • Yes, you can prepare a batch of Banana Rice Bowls ahead of time and store them in individual containers in the refrigerator for quick and easy meals throughout the week. Just be sure to store the pecans separately to maintain their crunchiness.

    Other Recipes If you enjoyed this banana rice recipe, you might also like to try these other recipes from Manjula’s Kitchen:

    1. Vegetable Pulao
    2. Mango Lassi
    3. Chickpea Salad
    4. Coconut Chutney
    5. Vegetable Pakoras
    6. Paneer Tikka Masala
    7. Fruit Chaat

    These recipes are perfect and are sure to satisfy your cravings. Happy cooking!

  • Mango Pickle (Aam ka Achar)

    Mango Pickle (Aam ka Achar)

    Mango Pickle

    Mango Pickle (Aam ka Achar)

    Mango pickle is a spicy and tangy gluten free condiment. Almost every Indian household has their own favorite recipes for Mango Pickle. It is a popular condiment adds the extra "oomph" to every meal.
    5 from 1 vote
    Course Pickle
    Cuisine Indian
    Servings 12 oz pickle

    Ingredients
      

    • 1 large green mango raw pickling mango/about 2-1/2 cup cubed mango (they are available at Indian and Asian grocery store)
    • 1 tablespoons salt
    • 1 teaspoon red chili powder, adjust to taste (lal mirch)
    • 1/4 teaspoons turmeric (haldi)
    • 1 tablespoons coriander seeds crushed(dhania)
    • 1 tablespoon fennel seeds crushed(Saunf)
    • 1 teaspoon fenugreek seeds (sabut mathi)
    • 1 teaspoon nigella seeds/kalonji
    • 2 tablespoons mustard oil or olive oil

    Instructions
     

    • Wash and dry the mango, cut in small cubes with skin.
    • In a glass bowl put the mango with salt and mix it well.
    • Set aside for about 3-4 hour. Mix and by this time there will be some salt water. Squeeze the mango, and save the water, as we will use later.
    • Spread the mango slices over dry surface and let it dry out preferably in sun light for 4-5 hours. Mango slices should be little dry but still moist. Note: Mangoes will reduce in volume.
    • Add all the spices to salt water and keep it aside.
    • Mix spices, water and oil to mango slices.
    • Keep the Mango pickle in glass jar with lid on. Pickle should be ready in 4-7 days. Mango slices are nicely marinated with spices.
    Keyword Pickle
    Tried this recipe?Let us know how it was!
  • Basil Pesto Sauce

    Basil Pesto Sauce

    A bowl of vibrant green Basil Pesto Sauce

    Basil Pesto Sauce

    Lately pesto has become one of my favorite condiments to keep. Basil Pesto is an Italian delicacy. It is super easy to make, and you can use it in so many ways, making variations of dishes. My grandkids enjoy pesto pasta, my son's favorite is making pesto sandwiches, and I like salad and roasted vegetables with pesto. Pesto has a vibrant color and brightens up any dish you make. Basil is a very aromatic herb. I have basil plants in my backyard. Because basil is the main ingredient for this recipe, I am always prepared. This is also vegan and gluten free recipe.
    This recipe will make about 8 oz of Pesto.
    5 from 2 votes
    Prep Time 10 minutes
    Cook Time 0 minutes
    Total Time 10 minutes
    Course Chutney
    Cuisine Italian
    Servings 8 oz

    Ingredients
      

    • ½ cup toasted pine nuts
    • 2 cup fresh basil leaves
    • ½ cup spinach
    • 1 tsp lemon juice
    • ½ tsp salt
    • ¼ tsp fresh black pepper
    • ¼ cup olive oil

    Instructions
     

    • In a food processor, pulse the basil, spinach, pine nuts, black pepper, lemon juice, and salt.
    • Blend until the mixture is well blended but still has some texture, pausing to scrape down the sides, as necessary.
    • Now add the olive oil in the food processor and pulse for a few seconds, scrape the sides, and pulse it again.
    • I like to use a rubber spatula to scrape the sides. Pesto is now ready.
    • Adjust the ingredients to your taste.

    Notes

    Notes:
    I usually will make pesto in a larger quantity for later use. Freeze the pesto in an ice cube tray and make sure a few hours later to transfer the frozen cubes of pesto out and place in freezer zip lock baggies.
    Serving Suggestions:
    Toss with pasta as a sauce, over baked potatoes or grilled vegetables, toss it with salad, or spread it onto crackers or toasted slices of bread.
    You will also enjoy these related recipes, Grilled Caprese Sandwich, Vegan Macaroni and Cheese, Zucchini Pasta, Creamy Butternut squash, Creamy Spinach Pasta
    Tried this recipe?Let us know how it was!
  • Sattu Paratha, Bihari Recipe, Spicy Paratha

    Sattu Paratha, Bihari Recipe, Spicy Paratha

    Close-up view of Sattu Paratha served with a bowl of yogurt garnished with green chilies.

    Sattu Paratha

    Sattu Paratha, Sattu Ka Paratha is made with spicy sattu filling, sattu is roasted chana flour. This is a popular paratha in state of Bihar. Sattu Paratha is a great breakfast treat and a good lunch box option.
    5 from 1 vote
    Prep Time 15 minutes
    Cook Time 15 minutes
    Course Breakfast, Main Course
    Cuisine Indian
    Servings 3 people

    Ingredients
      

    For Dough

    • 1 cup whole wheat flour roti ka atta
    • 1 tbsp oil
    • ½ tsp salt
    • cup water to make dough use as needed

    Filling

    • 1 ½ cup sattu, dailya, roasted chana flour
    • 2 tbsp oil
    • 1 ¼ tsp salt
    • ½ tsp cumin seeds jeera
    • 1/8 tsp asafetida hing
    • 1/8 tsp nigella seeds kalonji
    • ½ tsp mango powder amchoor
    • ¼ tsp red chili powder
    • 1 tbsp green chili finely chopped
    • cup water to make crumbly dough use as needed

    Also Need

    • 2 tbsp whole wheat flour to roll the paratha
    • 2 tbsp oil to cook the paratha

    Instructions
     

    Making Dough

    • Mix flour, salt, and oil add water as needed to make a soft dough. Knead dough for about two minutes on a lightly greased surface to make the dough soft, smooth and pliable. Cover the dough and let the dough rest for at least ten minutes.

    Filling

    • Mix all the filling ingredients together, sattu, salt, asafetida, cumin seeds, kalonji, mango powder and green chili, well. Add water as needed to bind all the ingredients together. Use just enough water, it should hold everything together.

    Making Paratha

    • Divide the dough and filling into six equal parts and form into balls. Filling balls will be little bigger than dough.
    • Roll dough into a 3” circle. Place a filling in the center. Pull the edges of the dough to wrap it around the sattu filling. Repeat to make all six balls. Let the filled balls settle three to four minutes.
    • Meanwhile heat a heavy skillet on medium high heat until moderately hot. To test, sprinkle water on the skillet. If the water sizzles right away, the skillet is ready.
    • Press the filled ball lightly on dry whole wheat flour from both sides. Using a rolling pin, roll the balls lightly to make six-inch circles, keeping the sealed side up. If the dough sticks to the rolling pin or rolling surface, lightly dust the parathas with dry flour.
    • Place the paratha on the skillet. When the paratha starts to change color and begins to puff up, flip it over. You will notice some golden-brown spots.
    • After a few seconds, drizzle one teaspoon of oil over the paratha. Flip the paratha again and lightly press the puffed areas with a spatula.
    • Flip again and press with a spatula making sure the paratha is golden-brown from both sides. Repeat for the remaining parathas. Paratha are best served hot and crispy.

    Notes

    Parathas can be kept at room temperature for up to two days wrapped in aluminum foil or in a covered container.  For later use, parathas can be refrigerated three to four days or frozen for up to a month. Re-heat using a skillet or oven.
    Serving Suggestions Parathas can be served with Plain Yogurt, Mango pickle, or with Aloo Tamatar ki Sabji , (Potatoes with spicy tomato gravy) a classic combination.
    What is Sattu
    The difference between  besan and sattu because they both look about the same. The difference being that whereas besan is the flour of raw gram, and sattu is the flour of the roasted gram. Roasting the besan it is not same as the flour of roasted chana. Sattu is also high in protein.
    Tried this recipe?Let us know how it was!

    Sattu Paratha: A Nutritious and Flavorful Stuffed Flatbread

    Sattu Paratha is a traditional Indian flatbread stuffed with a filling made from sattu, which is roasted gram flour. This nutritious and flavorful dish is popular in the states of Bihar, Jharkhand, and Uttar Pradesh, where it is enjoyed as a wholesome breakfast, lunch, or dinner option. 

    Sattu, the main ingredient in Sattu Paratha, is known for its high protein and fiber content, making it a healthy and satisfying choice.

    Benefits of Sattu Paratha:

    • High in Protein: Sattu, the roasted gram flour filling used in Sattu Paratha, is rich in protein, making it an excellent source of plant-based protein for vegetarians and vegans. Protein is essential for muscle repair and growth, as well as for supporting overall bodily functions.
    • Rich in Fibre: Sattu is also high in dietary fiber, which aids in digestion, promotes satiety, and helps regulate blood sugar levels. Fiber-rich foods like Sattu Paratha can help prevent constipation, reduce the risk of chronic diseases, and support weight management.
    • Vitamins and Minerals: Sattu contains essential vitamins and minerals such as iron, calcium, magnesium, and B vitamins, which are important for maintaining overall health and well-being. 

    Variations of Sattu Paratha:

    • Spicy Sattu Paratha: Add chopped green chilies, ginger, and spices such as cumin powder, coriander powder, and garam masala to the Sattu filling to create a spicy version of Sattu Paratha. Spicy Sattu Paratha is flavorful and aromatic, with a kick of heat that’s perfect for spice lovers.
    • Vegetable Sattu Paratha: Mix grated vegetables such as tomatoes, carrots, and spinach into the Sattu filling to create a nutritious and colorful Vegetable Sattu Paratha. The addition of vegetables adds texture, flavor, and extra nutrients to the paratha, making it a wholesome meal option.
    • Paneer Sattu Paratha: Combine crumbled paneer (Indian cottage cheese) with Sattu to create a rich and creamy Paneer Sattu Paratha. Paneer adds a soft and creamy texture to the filling, while Sattu provides protein and fiber, making it a filling and satisfying option for vegetarians.
    • Sweet Sattu Paratha: For a sweet twist on Sattu Paratha, mix Sattu with jaggery (unrefined cane sugar), chopped nuts, and spices such as cardamom and nutmeg to create a sweet filling. Sweet Sattu Paratha is a delicious dessert or snack option that’s sure to satisfy your sweet tooth.

    Tips for Making Perfect Sattu Paratha:

    • Use Fresh Sattu: Use freshly roasted and ground Sattu for the best flavor and texture in Sattu Paratha. You can either roast the gram flour at home or purchase ready-made Sattu from the store. Fresh Sattu has a nutty aroma and a rich flavor that enhances the taste of the paratha.
    • Roll the Parathas Thin: Roll out the dough for Sattu Paratha into thin discs to ensure even cooking and a flaky texture. Use a rolling pin and a dusting of flour to roll the dough evenly without sticking. Aim for a thickness similar to that of a tortilla or chapati.
    • Cook on Medium Heat: Cook the Sattu Parathas on a hot griddle or tawa over medium heat to ensure they cook through evenly without burning. Brush the parathas with ghee or oil on both sides while cooking to enhance the flavor and achieve a golden-brown color.

    FAQs about Sattu Paratha:

    • Can I make Sattu Paratha gluten-free?

    • Yes, you can make gluten-free Sattu Paratha by using gluten-free flours such as chickpea flour (besan) or sorghum flour (jowar) for the dough. Ensure that the Sattu filling and any additional ingredients are also gluten-free.
    • Is Sattu Paratha suitable for weight loss?

    • Yes, Sattu Paratha can be a suitable option for weight loss when included as part of a balanced diet. Sattu is low in calories and high in protein and fiber, which can help keep you feeling full and satisfied for longer, reducing the likelihood of overeating.
    • Can I freeze Sattu Paratha dough?

    • Yes, you can freeze Sattu Paratha dough for future use. Divide the dough into portions, wrap them tightly in plastic wrap or aluminum foil, and store them in an airtight container or freezer bag. Thaw the dough in the refrigerator overnight before rolling and cooking.
    • What can I serve with Sattu Paratha?

    • Sattu Paratha pairs well with a variety of accompaniments such as yogurt, pickle, chutney, or raita (yogurt dip). You can also serve Sattu Paratha with dal (lentil curry), vegetable curry, or salad for a complete and satisfying meal.

    In conclusion, Sattu Paratha is a nutritious and flavorful Indian flatbread that’s perfect for any meal of the day. Whether enjoyed for breakfast, lunch, or dinner, Sattu Paratha offers a delicious combination of protein, fibre, and essential nutrients that’s sure to keep you feeling satisfied and energized. With its versatile filling options, simple preparation, and wholesome ingredients, Sattu Paratha is a must-try dish for anyone looking to explore the diverse flavors of Indian cuisine.

  • Roasted Caramelized Makhana

    Roasted Caramelized Makhana

    Roasted Caramelized Makhana

    Roasted Caramelize Makhana Snack

    Caramelized Makhana is the perfect snack for all ages, especially kids. My grandchildren absolutely love this recipe and my youngest even calls it kettle corn. This is not just quick and easy to make, but it is a healthy snack because it is high in protein and has many nutritional values. This recipe is the perfect tea time munchie and will be a hit with everyone who enjoys a sweet and crunchy snack.
    No ratings yet
    Prep Time 5 minutes
    Cook Time 15 minutes
    Total Time 20 minutes
    Course Appetizer
    Cuisine Indian
    Servings 4 people

    Ingredients


    • 4 cup makhana fox nuts, lotus seeds
    • 3 Tbsp oil
    • 1 tsp salt
    • 6 Tbsp sugar
    • 2 Tbsp almonds sliced

    Instructions
     

    • Use a larger frying pan then you think you need, because it makes it easy to roast otherwise when you are roasting makhana will be dropping all over. Use heavy frying pan.
    • In a frying pan take the makhana and drizzle with the oil, (save 2 teaspoons of oil and set this oil aside we will use later) and sprinkle the salt. Using your fingers mix it well until makhanas are coated well with oil and salt.
    • Open the heat to medium low keep stirring till they are very light gold this should take about 6-8 minutes, try one makhana to make sure they are crispy. As they cool of, they will become crunchier.
    • Remove them from frying pan, you will notice most of the salt will remain in the frying pan, wipe the frying pan, we will use it again.
    • Use the same pan, heat over low medium heat. Put the oil we have saved in the frying pan, and sprinkle all the sugar, wait till you see sugar has start melting, now stir the sugar and keep stirring till the sugar has melted turn off the heat quick otherwise sugar will burn.
    • Add almonds and roasted makhana, keep stirring till all the makhanas are coated with caramelize sugar and almonds. Spread it over non-stick surface and with spatula keep separating or separate with your fingers. Carnalized Makhanas are ready.

    Notes

    Notes: keep them air tight container they will stay good for month or more.
    I make them for holiday season, because they also make good homemade gift.
    Keyword High In Protien, Kid Friendly, Kurmura Makhana
    Tried this recipe?Let us know how it was!

    Roasted Caramelized Makhana Recipe

    Roasted Caramelized Makhana is a delectable snack perfect for winter recipes and festive occasions like Krishna Janmashtami and Navaratri, offering a gluten-free, high-protein option that satisfies both vegan and non-vegan appetizers cravings. Roasted Caramelized Makhana is a delightful treat that combines the earthy crunch of makhana (fox nuts) with the sweet allure of caramel. This Caramel Makhana Recipe transforms simple ingredients into a gourmet snack that’s perfect for any occasion.

    Step 1: Preparing the Makhana

    To begin this Caramel Roasted Makhana Recipe, start by heating a pan over medium heat. Add a tablespoon of ghee, allowing it to melt and warm up. Then, add the makhana to the pan, ensuring they are in a single layer. Roast them gently, stirring occasionally to ensure even cooking. This step helps to enhance the nutty flavor of the makhana and prepare them for the caramel coating.

    Step 2: Making the Caramel

    Now, let’s move on to the star of this Caramel Roasted Makhana Recipe: the caramel. In a separate pan, melt butter over low heat. Once the butter has melted, add in sugar and stir continuously until the sugar dissolves completely. Keep a close eye on the mixture to prevent it from burning. As the sugar melts, it will gradually turn into a golden brown caramel, infusing the butter with its rich flavor.

    Step 3: Coating the Makhana

    Once the caramel reaches a beautiful golden hue, carefully pour it over the roasted makhana. Use a spatula to gently toss the makhana, ensuring that each piece is coated evenly with the caramel. Work quickly but cautiously, as the caramel will begin to harden upon contact with the makhana.

    Step 4: Allowing to Cool

    After coating the makhana with caramel, spread them out on a parchment-lined baking sheet to cool. Allow them to sit undisturbed for at least 10-15 minutes, giving the caramel ample time to set. Once cooled, the makhana will form a delectable caramelized crust, adding an irresistible sweetness to every bite.

    Step 5: Serving and Enjoying 

    Your Caramel Roasted Makhana is now ready to be enjoyed! Serve them as a standalone snack or incorporate them into your favorite dishes for a touch of sweetness and crunch. These caramelized makhana make for a perfect accompaniment to tea or coffee, or simply enjoy them as a guilt-free indulgence anytime you crave a delicious treat.

    Tips for Perfect Caramelized Makhana:

    • Ensure that the makhana are roasted until they are crisp but not browned before adding the caramel. This helps to prevent them from becoming too crunchy or overcooked.
    • Work quickly when coating the makhana with caramel, as it can harden rapidly upon contact with the cooler makhana. Use a spatula to toss them gently and evenly coat each piece.
    • Allow the caramelized makhana to cool completely before serving to ensure that the caramel has fully set and formed a crunchy crust.

    Variations of Caramel Makhana:

    • For a savory twist, you can add a pinch of salt or your favorite spices to the caramel mixture before coating the makhana. This adds depth of flavor and balances out the sweetness of the caramel.
    • Experiment with different coatings such as melted chocolate or flavored syrups for a unique twist on this classic recipe. Drizzle the melted chocolate over the cooled makhana and allow it to set before serving.

    Benefits of Caramel Makhana:

    Makhana, or fox nuts, are not only delicious but also offer a range of health benefits. They are low in calories and fat, making them an ideal snack for those looking to maintain a healthy diet. Makhana are also rich in protein, fiber, and antioxidants, which can help support overall health and well-being. Additionally, they are gluten-free and hypoallergenic, making them suitable for individuals with dietary restrictions or food sensitivities.

    FAQs:

    Q: Can I store caramelized makhana for later use?

    A: Yes, you can store caramelized makhana in an airtight container at room temperature for up to a week. Just make sure they are completely cooled and the caramel has set before storing them.

    Q: Can I use other nuts instead of makhana for this recipe?

    A: Absolutely! While this recipe specifically calls for makhana, you can easily substitute other nuts such as almonds, cashews, or peanuts for a different flavor and texture.

    Q: Can I reheat caramelized makhana if they become soft?

    A: Yes, if the caramelized makhana become soft or lose their crunchiness, you can reheat them in a low oven (around 250°F) for a few minutes until they become crisp again. Be sure to keep an eye on them to prevent burning.

    Other Recipes on Manjula’s Kitchen

    If you’re looking to explore more Indian recipes, appetizers, beverages, and desserts, be sure to check out the following links on Manjula’s Kitchen. Here are some links to recipes on Manjula’s Kitchen official website:

    Paneer Tikka Masala Recipe

    Chana Chaat (Spicy Chickpea Salad) Recipe

    Pav Bhaji (Spicy Vegetable Hash with Buns) Recipe

    Raj Kachori (Crunchy Chaat) Recipe

    Vegetable Biryani Recipe

    These recipes should offer you a flavorful experience straight from Manjula’s Kitchen.

  • Grilled Paneer

    Grilled Paneer

    Grilled Paneer

    Grilled Paneer (Indian Cottage Cheese Appetizer)

    Grilled Paneer makes for a great appetizer that compliments any main course dish. Grilled paneer is quick and easy to put together, making it the perfect party appetizer. I will be preparing this appetizer a lot this holiday season because it is perfect to serve at get together and bring to potlucks.
    5 from 1 vote
    Prep Time 5 minutes
    Cook Time 15 minutes
    Total Time 20 minutes
    Course Appetizer
    Cuisine Indian
    Servings 4 people

    Ingredients


    • 1 1/2 cup paneer cubed in 1” square and 1/2” thick
    • 1/2 cup bell pepper cubed, yellow and green to give the color
    • 1/2 cup cherry tomatoes
    • 2 tsp oil
    • 1 Tbsp green chili finely chopped, optional
    • 2 Tbsp cilantro finely chopped, hara dhania
    • 1 tsp fresh lemon juice

    Spice Mix

    • 1/2 tsp salt
    • 1/2 tsp black salt
    • 1/2 tsp roasted cumin seed powder
    • 1/8 tsp black pepper
    • 1/8 tsp red chili powder

    Instructions
     

    • Mix the spice mix and keep aside. you can make this spice mix in a large quantity and keep it ready to go whenever you need it.
    • Heat heavy flat frying pan on low medium heat, add the oil in to warm frying pan. Spread the paneer cubes don’t over lap them. Grill the paneer from both sides, this should take about 2 minutes. Take them out from frying pan.
    • Use the same pan and grill the bell pepper, for about 2 minutes stirring occasionally, bell pepper will have some brown spots. Take them out from frying pan.
    • Use the same pan and grill the tomatoes for about 1-2 minutes, tomatoes will have some blisters. Take them out from frying pan.
    • In a bowl toss the paneer with spice mix, use the spice mix about in half the quantity, adjust for you taste, cilantro, green chili and lemon juice.
    • Serve the grilled paneer with side of bell pepper and tomatoes and sprinkle little spice mix over bell pepper and tomatoes.
    • A healthy and delicious appetizer is ready to serve.

    Notes

    Note: This spice mix known as chaat masala can also be used to spice up any food. It especially tastes good when it is sprinkled over sliced cucumber and tomato or over pakoras. You can make the chaat masala in a larger quantity and keep it ready to go whenever you need it.
    Keyword Appetizer, Grilled Paneer and Veggies, Masala Paneer, Party Food
    Tried this recipe?Let us know how it was!

    Grilled Paneer Recipe 

    Grilled paneer recipe is a delightful way to enjoy the rich flavors of Indian cuisine. Grilled paneer is a versatile dish that is kid friendly, quick & easy, party recipe that can be served as an appetizer, side dish, or even a main course. This recipe combines the creaminess of paneer with the smoky char of the grill, resulting in a dish that is both flavorful and satisfying. Whether you’re hosting a backyard barbecue or simply craving a taste of India, this Indian grilled paneer recipe is sure to please your palate.

    Indian Grilled Paneer: A Flavorful Delight 

    When it comes to Indian cuisine, grilled paneer holds a special place in the hearts of many food enthusiasts. The process of grilling adds a depth of flavor to the paneer, while still allowing its creamy texture to shine through. This paneer grilled recipe is perfect for those looking to add a touch of Indian flair to their meals. By marinating the paneer in a blend of spices and yogurt, you’ll create a dish that is bursting with flavor from the very first bite.

    Preparation 

    To begin, place the cubed paneer in a large bowl and set aside. In a separate bowl, whisk together the yogurt, olive oil, lemon juice,  ground cumin, ground coriander, turmeric, salt, and pepper. Pour the marinade over the paneer, making sure to coat each piece evenly. Cover the bowl and let the paneer marinate in the refrigerator for at least 30 minutes, allowing the flavors to meld together.

    Grilling the Paneer 

    Once the paneer has finished marinating, preheat your grill to medium-high heat. Thread the paneer cubes onto skewers, leaving a small amount of space between each piece. This will allow the heat to circulate evenly around the paneer, ensuring that it cooks evenly on all sides. Place the skewers on the grill and cook for 2-3 minutes per side, or until the paneer is lightly charred and heated through.

    Tips for Perfect Grilled Paneer 

    Use firm or extra-firm paneer for grilling, as softer varieties may crumble on the grill.

    Soak wooden skewers in water for at least 30 minutes before threading the paneer to prevent them from burning.

    Experiment with different marinade ingredients, such as ginger, chili powder, or garam masala, to customize the flavor of your grilled paneer.

    Variations on Grilled Paneer

    While this Indian grilled paneer recipe is delicious as is, feel free to get creative with your marinade and seasoning choices. For a spicy kick, add chopped green chilies or a dash of cayenne pepper to the marinade. You can also incorporate fresh herbs like cilantro or mint for a burst of freshness. Serve the grilled paneer with a side of mint chutney or tamarind sauce for an extra layer of flavor.

    Benefits of Grilled Paneer

    Grilled paneer is not only delicious, but it also offers several health benefits. Paneer is a good source of protein, calcium, and phosphorus, making it an excellent addition to a balanced diet. Grilling the paneer helps to retain its nutrients while adding a smoky flavor that enhances its overall taste. Additionally, paneer is low in carbohydrates, making it a suitable option for those following a low-carb or keto diet.

    Frequently Asked Questions (FAQs)

    Can I grill paneer without skewers?

    Yes, you can grill paneer directly on the grill grates or use a grill basket to prevent it from falling through.

    How long does grilled paneer last?

    Grilled paneer can be stored in the refrigerator for up to 3-4 days. Simply reheat it in the microwave or on the grill before serving.

    Can I freeze grilled paneer?

    While you can freeze grilled paneer, its texture may change slightly upon thawing. It’s best to freeze the paneer before grilling and marinating it.

    Can I make grilled paneer in the oven?

    Yes, you can bake paneer in the oven at 400°F for 15-20 minutes, or until it is lightly browned and heated through.

    Other Recipes on Manjula’s Kitchen

    If you’re looking to explore more Indian recipes, appetizers, beverages, and desserts, be sure to check out the following links on Manjula’s Kitchen. Here are some links to recipes on Manjula’s Kitchen official website: Paneer Tikka Masala, Chana Chaat (Spicy Chickpea Salad), Pav Bhaji (Spicy Vegetable Hash with Buns), Raj Kachori (Crunchy Chaat), Vegetable Biryani. These recipes should offer you a flavorful experience straight from Manjula’s Kitchen.

  • Paneer Sandwich

    Paneer Sandwich

    Paneer Sandwich

    Paneer Sandwich

    Paneer Sandwich is a quick and easy to make. Paneer Sandwich is healthy and tastes delicious. This is a perfect lunch box option, especially for the kids.
    5 from 2 votes
    Prep Time 5 minutes
    Cook Time 10 minutes
    Total Time 15 minutes
    Course Main Course
    Cuisine Indian
    Servings 2 people

    Ingredients


    • 4 slice white firm bread
    • 1/2 cup paneer crumble I used 3 cups of milk
    • 1/2 cup bell peppers finely chopped, I am using green and red just to give color
    • 1/2 tsp salt
    • 1/8 tsp black pepper
    • 1/2 tsp ginger paste
    • 1 tsp green chili finely chopped
    • 2 Tbsp cilantro finely chopped, hara dhania
    • 2 Tbsp soft butter

    Instructions
     

    • Knead the paneer, add all the ingredients and mix it well.
    • Spread paneer mix over 2 slice of bread and cover with other slice of bread.
    • spread the butter lightly on top side of the sandwich, other side we will put the butter after putting the sandwich in sandwich maker. I am using stove top sandwich maker you can use electric, or make it over skillet.
    • Cook over medium heat from both sides until golden brown this should take about 1-1/2 minutes, each side.

    Notes

    Notes
    Paneer Sandwich can be served for breakfast, lunch or as a snack. Served any which way, it tastes delicious.
    Some more ideas for lunch box Masala Idli, Masala Khichdi, Chickpea Pulav
    Tried this recipe?Let us know how it was!

    How to make Paneer Sandwich – Manjula’s Kitchen 

    Paneer Sandwich is a quick & easy snacks to make. Paneer Sandwich is healthy and tastes delicious. It’s a perfect lunch box option, especially for the kids.

    Conquer Your Cravings: Unveiling the Perfect Paneer Sandwich Recipe 

    Step into the vibrant world of Indian cuisine with a culinary gem – the paneer sandwich. More than just a simple snack, this versatile dish is a symphony of textures and flavors, perfect for satisfying hungry hearts and adventurous palates. Today, we delve into the paneer sandwich recipe, unlocking its secrets and guiding you towards crafting your own cheese paneer sandwich masterpiece.

    1. The Foundation: Crafting the Paneer Filling (Paneer Sandwich Recipe) 

    The journey begins with the heart of the sandwich, the paneer. Crumble fresh paneer with gentle hands, preserving its delicate texture. Then, comes the magic – a medley of carefully chosen ingredients. Aromatic cumin, vibrant coriander, warm turmeric, and the depth of garam masala weave their magic, creating a flavor-packed paneer mixture. Don’t forget the zing of fresh ginger and cilantro, adding a burst of brightness that awakens the senses. As you knead, imagine these flavors uniting, forming the foundation of your unforgettable paneer sandwich experience.

    1. Layering Perfection: Assembling the Cheese Paneer Sandwich

    Now, onto the stage where artistry meets appetite. Select two slices of your favorite bread – fluffy white, rustic whole wheat, or even toasted sourdough. Generously spread your flavor-packed paneer mixture onto one slice, creating the heart of your cheese paneer sandwich. Choose your cheese wisely! A creamy mozzarella adds richness, while a sharp cheddar brings a delightful tang. Experiment with Gouda, Monterey Jack, or even paneer itself for a truly unique twist. Finally, bring the two slices together, gently pressing them to form a harmonious marriage of textures and flavors. This step encapsulates the essence of a well-balanced paneer cheese sandwich, setting the stage for a symphony of culinary delight.

    1. The Art of Heat: Mastering the “How to Make Paneer Sandwich” Technique 

    The moment of truth arrives! To transform your creation into golden perfection, heat up a pan or your trusty griddle. Butter one side of your sandwich – remember, fat is flavor! Carefully place it on the hot surface, letting the sizzling magic begin. As the bread gets crisp and golden brown, resist the urge to peek – let the anticipation build! Flip the sandwich, spreading butter on the other side for even more deliciousness. Cook until both sides are kissed by heat, achieving that irresistible crispy-yet-soft texture. This is where the art of sandwich-making shines, and you’re the maestro!

    1. The Grand Finale: Elevating Your Paneer Cheese Sandwich 

    The final flourish! Take your masterpiece off the heat and let it rest for a moment. As you do, spread a thin layer of butter on the untouched side, allowing it to melt and mingle with the golden crust. This adds a touch of luxurious richness, elevating your paneer cheese sandwich to a level of indulgence that is hard to resist. Now, the grand unveiling: cut your creation in half, releasing the enticing aroma of warm bread, spiced paneer, and melty cheese. Each bite is a symphony of textures and flavors, a delightful interplay between the creamy paneer, the tangy cheese, the crisp bread, and the burst of spices. Savor each mouthful, knowing you’ve conquered the art of the paneer sandwich.

    Beyond the Recipe: Exploring Your Culinary Canvas 

    Remember, the paneer sandwich recipe is just a starting point. Don’t be afraid to experiment with different spices, cheeses, and even vegetables like chopped bell peppers, or sliced cucumbers. Add a dollop of mint chutney for a burst of freshness, or a drizzle of tamarind chutney for a tangy twist. Explore the endless possibilities and create your own signature paneer sandwich masterpiece.

    With each bite, you’ll not only be satisfying your hunger but also embarking on a delicious journey of culinary discovery. So, grab your ingredients, unleash your creativity, and conquer the world of the paneer sandwich, one flavorful creation at a time!

    If you liked this recipe you must try these quick & easy recipe too: Grilled Caprese Sandwich, Spicy Chickpea Patty Sandwich, Grilled Potato Sandwich, Dabeli Spicy Potato Sandwich & Falafel Sandwich

  • Paneer Methi (Methi Malai Paneer) Recipe by Manjula

    Paneer Methi (Methi Malai Paneer) Recipe by Manjula

    Paneer Methi

    Paneer Methi (Methi Malai Paneer)

    Paneer Methi is a delicacy of Northern India. This recipe is paneer with creamy gravy flavored with dry fenugreek leaves known as Fasoori Methi. Paneer Methi is a perfect side dish for formal dinner or even a quiet dinner where you want to impress someone. Any way or time you serve this, it is delicious.
    4.64 from 19 votes
    Prep Time 10 minutes
    Cook Time 20 minutes
    Total Time 30 minutes
    Course Main Course
    Cuisine Indian
    Servings 3 people

    Ingredients
      

    • 1-1/2 cups paneer cubed in about 1/2 inch pieces used 8oz paneer
    • 1-1/2 cups tomatoes chopped
    • 1 Tbsp ginger chopped
    • 1 green chili chopped
    • 2 Tbsp oil
    • 1/2 tsp cumin seeds jeera
    • 1/8 tsp asafetida hing
    • 1/4 tsp turmeric haldi
    • 1/4 tsp red chili powder lal mirch
    • 2 Tbsp cashew powder kaju
    • 2 tsp coriander powder dhania
    • 1 tsp fennel seed powder saunf
    • 1 Tbsp dry fenugreek leaves kasoori methi
    • 1 tsp salt
    • 1-1/2 cup milk
    • 1/4 tsp garam masala

    Instructions
     

    • Rub the kasoori methi between your palms and remove the stems if there is any, set aside.
    • Blend tomatoes, ginger, green chili to fine paste. Set aside.
    • Heat one teaspoon of oil in a pan on low heat stir fry the paneer until they are light gold in color, take them out.
    • Heat the remaining oil in a sauce pan on medium heat. When the oil is moderately hot add cumin seeds. (Cumin seeds should crack right of way). Lower the heat too low, add asafetida, turmeric, chili powder, and cashew powder stir for a minute.
    • Add tomato paste, coriander, fennel seed powder, salt and kasoori methi, keep stirring till tomato start leaving the side of the pan, this should take 3-4 minutes. Add milk, and cook for 2-3 minutes. Add paneer and let it cook over low heat for 2-3 minutes. This is the time you can add water as needed if gravy is too thick. Add garam masala stir and turn off the heat.
    • Paneer Methi is ready. 

    Notes

    To make vegan, Substitute paneer with tofu and milk with coconut milk
    Serve Paneer Methi with Naan, or Lacha Paratha.
    Keyword Gluten Free, No Garlic, No Onion, Paneer In Creamy Gravy, Paneer With Fenugreek, Party Food
    Tried this recipe?Let us know how it was!

    Methi Paneer Recipe: A Palate-Pleasing Dish 

    Methi Malai Paneer Recipe is a popular party recipe in Indian cuisine. This flavorful veg gravy dish is rich in high protein and gluten-free combining the richness of paneer (Indian cottage cheese) with the distinct taste of kasuri methi (fenugreek leaves), creating a harmonious blend of textures and aromas.

    Kasuri Methi Preparation: Unlocking Aromatic Richness 

    To commence the Methi Malai Paneer recipe start with the preparation of kasuri methi. This involves a tactile step of rubbing fenugreek leaves between the palms to unlock their aromatic flavors, carefully removing any stems present. Once this initial step is completed, the kasuri methi takes center stage, ready to infuse its unique essence into the dish.

    Tomato-Based Foundation: Crafting Depth and Color 

    The methi malai paneer recipe continues by creating a robust base for the dish. Tomatoes, ginger, and green chili unite in a harmonious blend, resulting in a fine paste that serves as a fundamental component. This tomato-based paste contributes not only vibrant color but also imparts a deep, layered flavor profile to the Methi Paneer. After blending, the mixture patiently awaits its turn to seamlessly integrate into the unfolding cooking process.

    Paneer’s Golden Prelude: A Textural Symphony Begins 

    Transitioning to the cooking phase as we go further in the methi malai paneer recipe add a teaspoon of oil is heat in a pan over low flame. Paneer cubes take center stage as we gently stir-fry until achieving a light golden hue. This initial culinary dance ensures that the paneer attains a delightful texture, priming it to absorb the forthcoming flavors with grace and precision.

    Spiced Elevation: Building a Fragrant Foundation 

    Post-paneer preparation, add the remaining oil in a saucepan over medium heat. Include Cumin seeds as they start to crackle and release their earthy aroma. Lower the heat, while a symphony of asafetida, turmeric, chili powder, and cashew powder join the stage, creating a fragrant and flavorful foundation for the paneer methi.

    Tomato Tapestry: Melding Flavors with Precision 

    The tomato paste, a star player prepared earlier, enters the culinary arena as part of the methi paneer recipe. Coriander, fennel seed powder, salt, and the patiently waiting kasuri methi are added. The ensemble is stirred diligently until tomatoes gracefully release from the pan’s sides, a visual and flavorful indication of the meticulous incorporation of diverse elements. This nuanced cooking process takes approximately 3-4 minutes, allowing flavors to intertwine and harmonize.

    Creamy Symphony: Milk’s Contribution to Indulgence

    To further elevate the dish, milk makes its entrance, contributing a creamy texture that enhances the overall indulgence of paneer methi. The mixture is allowed to simmer, a gentle dance of flavors taking place over 2-3 minutes. The paneer absorbs the creamy richness of the sauce, with the flexibility to adjust the consistency by adding water if the gravy proves too thick.

    Paneer’s Reunion: Absorbing Creamy Richness 

    The previously stir-fried paneer cubes re-enter the pan, allowing them to luxuriate in the creamy tomato and spice-infused gravy. Over low heat, this reunion lasts for an additional 2-3 minutes, ensuring the paneer absorbs the full spectrum of flavors, resulting in a well-balanced and delectable paneer methi.

    Garam Masala Finale: Aromatic Culmination 

    As a grand finale, garam masala is introduced to the dish, enhancing the overall aromatic profile and weaving together the diverse flavors into a harmonious conclusion. A final stir marks the end of the culinary symphony, and the heat is turned off, signaling the completion of the Methi Paneer recipe. The result is a tantalizing masterpiece that marries the succulence of paneer with the unique bitterness of fenugreek leaves, promising to delight the fortunate taste buds that savor this culinary creation of paneer methi.

    If you liked this recipe, try our other recipes such as Shahi Paneer, Paneer Sandwich, Masala Bell Pepper, Masala Paneer & Mattar Paneer


  • Chole Rajma Curry

    Chole Rajma Curry

    Chole Rajma Curry

    Chole Rajma Curry

    Chole Rajma Curry is a healthy and delicious main course meal. This is a popular north Indian cuisine which consists of boiled beans cooked with spicy tomato gravy. It goes well with roti, naan or rice.
    4.78 from 9 votes
    Prep Time 10 minutes
    Cook Time 50 minutes
    Total Time 1 hour
    Course Main Course
    Cuisine Indian
    Servings 4 people

    Ingredients


    • 1 cup chick peas, chole, kabuli chana, garbanzo beans,
    • 1/2 cup kidney beans rajma
    • 2 cup diced tomatoes about I used 3 Tomatoes
    • 1 Tbsp chopped ginger adrak
    • 1 Tbsp chopped green chili
    • 3 Tbsp oil prefer canola or vegetable
    • 1/4 tsp asafetida hing
    • 1 tsp cumin seeds jeera
    • 2 Tbsp coriander powder dhania
    • 1/2 tsp turmeric haldi
    • 1/2 tsp red chili powder
    • 1/2 tsp black pepper
    • 1-1/4 tsp salt
    • 1/2 tsp garam masala

    Instructions
     

    • Wash and soak chick peas and kidney beans in about six cups of water for at least 6 hours, preferably overnight (the beans will double in volume).
    • Cook the chick peas and kidney beans in pressure cooker with 3 cups of water. Close the cooker and put the pressure on.
    • Cook on medium high heat.
    • As pressure cooker starts steaming turn the heat down to medium and cook for about 30 minutes.
    • Close the heat and wait until steam has stopped before opening the pressure cooker. Beans should be soft and tender.
    • Cut the tomatoes and green chili in small pieces, and blend tomatoes, green chili, and ginger to make a pure.
    • Heat the oil in a sauce pan, test the heat by adding one cumin seed. If the seed cracks right away, the oil is ready. Add asafetida and cumin seeds, as the cumin seeds crack add tomato paste, coriander, turmeric, chili powder, and black pepper.
    • Stir-fry for two to three minutes, until the oil begins to separate from the mixture. Add beans, salt, and more water as needed. Cover the pan and cook over medium high heat, for about 10 minutes.
    • Turn off the heat. Chole Rajma Curry is ready to serve. 

    Notes

    Serve hot, with rice, or your choice of bread.
    Tried this recipe?Let us know how it was!

    Rajma Chole Ki Recipe: A Hearty Indian Delight

    Chole Rajma is a popular Indian dish made with a combination of two types of legumes: chickpeas (Chole) and kidney beans (Rajma). It is a hearty and flavorful curry/gravy dish that is commonly enjoyed as a main course. The dish is naturally gluten-free and high in protein, making it suitable for those with dietary restrictions or preferences. Chole Rajma typically includes a rich tomato-based gravy seasoned with various spices like cumin, coriander, turmeric, and garam masala. 

    It is often served with rice or flat bread (such as roti or naan) and is a favorite at parties or gatherings. Additionally, it can be made vegan by omitting any dairy-based ingredients like ghee or yogurt commonly used in some variations of the recipe. Overall, Chole Rajma is a delicious and nutritious dish that showcases the versatility of lentils and beans in Indian cuisine. 

    Chole Rajma Curry is a flavorful and hearty Indian dish that combines two popular legumes – chickpeas (chole) and kidney beans (rajma) – in a rich and aromatic gravy. This Chole Rajma Curry recipe is a favorite among vegetarians and vegans alike for its delicious taste and nutritious ingredients. With its perfect balance of spices and textures, Chole Rajma Curry is a comforting meal that’s perfect for any occasion.

    Step 1: Soaking and Cooking Legumes

    Begin by soaking dried chickpeas and kidney beans in water separately for at least 8 hours or overnight. Soaking helps soften the legumes and reduce cooking time. Once soaked, drain the water and rinse the chickpeas and kidney beans thoroughly. Cook them separately in a pressure cooker or large pot until they are tender and cooked through. Ensure that the chickpeas and kidney beans are well-cooked but not mushy.

    Step 2: Preparing the Gravy Base

    In a deep pan or skillet, heat oil or ghee over medium heat. Add cumin seeds and let them sizzle until fragrant. Then, add finely sauté until they turn golden brown and translucent. Next, add minced ginger, and green chilies, stirring well to combine. Cook until the raw smell of ginger disappears, infusing the base with aromatic flavors.

    Step 3: Adding Tomatoes and Spices

    Add finely chopped tomatoes to the pan along with ground spices such as turmeric powder, coriander powder, cumin powder, garam masala, and red chili powder. Stir well to combine the spices with the tomatoes and cook until the tomatoes break down and release their juices, creating a thick and flavorful gravy base.

    Step 4: Combining Chickpeas and Kidney Beans

    Once the tomatoes are cooked and the gravy base is well-flavored, add the cooked chickpeas and kidney beans to the pan, stirring gently to coat them with the gravy. Allow the legumes to simmer in the gravy for a few minutes to absorb the flavors and thicken the consistency. Adjust the seasoning with salt and sugar to balance the flavors.

    Step 5: Garnishing and Serving

    Before serving, garnish the Chole Rajma Curry with freshly chopped cilantro leaves for a burst of freshness and color. You can also drizzle a squeeze of lemon juice over the curry for an extra tangy kick. Serve the curry hot with steamed rice, roti, or naan bread for a wholesome and satisfying meal.

    Tips for Perfect Chole Rajma Curry

    Consistency of Gravy: Adjust the amount of water added to the gravy to achieve the desired consistency. The gravy should be thick and coat the legumes evenly without being too watery.

    Mashing Legumes: For a creamier texture, mash some of the chickpeas and kidney beans with the back of a spoon or a potato masher before adding them to the gravy. This helps thicken the curry and enhances its richness.

    Balancing Flavors: Taste the curry and adjust the seasoning according to your preference. You can add more spices for extra heat or sweetness to balance the flavors.

    Variations of Chole Rajma Curry

    Creamy Coconut Curry: Add coconut milk or grated coconut to the gravy for a creamy and indulgent twist. Coconut adds a hint of sweetness and richness to the curry, elevating its flavor profile.

    Spinach and Paneer Curry: Enhance the nutritional value of the curry by adding chopped spinach and cubed paneer (Indian cottage cheese) to the gravy. Spinach adds a pop of color and nutrients, while paneer provides protein and texture.

    Benefits of Chole Rajma Curry

    High in Protein: Chickpeas and kidney beans are rich sources of plant-based protein, essential for muscle repair and growth.

    Rich in Fiber: Legumes are high in dietary fiber, promoting digestive health and keeping you feeling full and satisfied.

    Nutrient-Dense: Chole Rajma Curry is packed with essential vitamins, minerals, and antioxidants, making it a nourishing and balanced meal option for vegetarians and non-vegetarians alike.

    Frequently Asked Questions (FAQs)

    Can I use canned chickpeas and kidney beans for this recipe?

    Yes, you can use canned legumes for convenience. Rinse them well before adding them to the curry.

    Can I make Chole Rajma Curry ahead of time?

    Yes, the flavors of the curry develop even more when allowed to sit for a few hours or overnight. Reheat it gently before serving.

    Is Chole Rajma Curry gluten-free?

    Yes, Chole Rajma Curry is naturally gluten-free as it contains no wheat or gluten-containing ingredients.

    Explore more delightful Indian recipes on Manjula’s Kitchen, such as Palak Paneer for another culinary adventure. 

  • Chana Chaat (Spicy Snack)

    Chana Chaat (Spicy Snack)

    Chana Chaat

    Chana Chaat

    Chana Chaat is a healthy and delicious snack. I am using kala chana for this recipe. Kala chana looks like chickpeas, but brown in color. This is a delightfully sweet and tangy snack. Channa Chaat will also make a very enjoyable lunch box meal.
    3.75 from 4 votes
    Prep Time 10 minutes
    Cook Time 20 minutes
    Total Time 30 minutes
    Course Appetizer
    Cuisine Indian
    Servings 6 people

    Ingredients
      

    • 1 cup kala chana
    • 2 Tbsp oil Canola, or vegetable oil
    • 1 Tbsp ginger finely shredded
    • 1 Tbsp green chili finely chopped
    • 1 Tbsp coriander powder dhania
    • 1/4 cup tamarind pulp this is available in India grocery store or you can make it at home soaking the tamarind and squeeze the pulp. But not the concentrated tamarind
    • 1 tsp red chili powder
    • 1 tsp salt
    • 1 tsp black salt
    • 1 Tbsp sugar
    • 2 tsp roasted cumin seed powder bhuna jeera
    • 1 cup potato boiled peeled and cut in small pieces
    • 1/2 cup cucumber chopped in small pieces
    • 1/2 cup tomatoes chopped in small pieces

    For garnishing

    • 1 Tbsp ginger finely chopped
    • 1 Tbsp green chilies finely chopped
    • 5-6 wedges of lemon

    Instructions
     

    • Wash and soak kala chana in approx. 4 cups of water, for at least 4 hours. The kala chana will double in volume after soaking.
    • In pressure cooker cook kala chana with 2 cups of water over medium high heat. As pressure cooker starts steaming turn the heat down to low medium and cook for about 15 minutes. Close the heat and wait until steam has stopped before opening the pressure cooker. Chana should be soft and tender.
    • Drain the water and save it for later use, this water is high in protein and can be used for making the soup or dals.
    • Heat the oil in a sauce pan over medium high heat. Add the chana, stir for few seconds. Add ginger and green chili, coriander powder, sauté for about 1 minutes.
    • Add salt, black salt, red chili powder, and sugar, add tamarind pulp. Cook for 3-4 minutes over low heat. If needed use few spoons of water, Chana mix should be moist. Turn off the heat.
    • Assemble the Kala Chana Chaat, add chopped potatoes, tomatoes, and cucumber, drizzle the roasted cumin seeds powder and mix it well. If desired garnish with sliced ginger, green chilies and drizzle the lemon juice.

    Notes

    Prep Time of 10 minutes does not include soaking time.
    Suggestions
    You can serve chana chaat without adding the veggies, it tastes delicious. You can always adjust quantity of veggies to your choice. Also adjust the green chili and red pepper to your choice. After spicing the chana mix with cooked plain rice to make spicy delicious meal.
    Tried this recipe?Let us know how it was!

    Recipe for Chana Chaat: Elevate Your Snack Game with This Delicious Dish

    Chana chaat is a quintessential Indian street food known for its burst of flavors and satisfying crunch. This recipe for chana chaat brings together the wholesome goodness of kala chana (black chickpeas) with an array of spices and fresh vegetables, creating a dish that’s both nutritious and delicious. Whether enjoyed as a snack, appetizer, or light meal, chana chaat is sure to tantalize your taste buds and leave you craving for more.

    To begin your culinary journey with chana chaat, start by washing and soaking kala chana in water for at least 4 hours. This step is crucial as it helps the chana soften and swell, enhancing its texture and flavor. Once soaked, cook the kala chana in a pressure cooker until tender and soft. The aroma of freshly cooked chana will fill your kitchen, setting the stage for the flavorful dish that is to come.

    Now, it’s time to infuse the cooked chana with a medley of spices. Heat oil in a saucepan and sauté ginger, green chili, and coriander powder until fragrant. Then, add the cooked chana along with salt, black salt, red chili powder, sugar, and tangy tamarind pulp. Allow the spices to meld together, coating the chana in a burst of savory and tangy flavors. Adjust the seasoning according to your taste preferences, adding more spice for a fiery kick or dialing it down for a milder flavor profile.

    Once the chana is well-coated with the spice mixture, it’s time to assemble the chana chaat. Add chopped potatoes, tomatoes, and cucumber to the chana mixture, creating a colorful and vibrant medley of flavors and textures. For an extra burst of flavor, sprinkle roasted cumin seeds powder over the chaat, adding a depth of earthy aroma to the dish. Finally, garnish with sliced ginger, green chilies, and a squeeze of fresh lemon juice to brighten up the flavors.

    Variations:

    • Sprouted Chana Chaat: For a healthier twist, use sprouted chana instead of cooked chana. Sprouted chana is rich in nutrients and adds a delightful crunch to the chaat.
    • Fruit Chaat: Incorporate seasonal fruits like apples, grapes, and pomegranate seeds into the chaat for a refreshing and fruity twist.
    • Yogurt Chaat: Drizzle some creamy yogurt over the chana chaat for a creamy and tangy variation. Top it off with some mint chutney and tamarind chutney for an extra burst of flavor.

    Tips:

    • Save the Cooking Water: The water leftover from cooking the chana is rich in protein and can be used to make soups or dals, adding a nutritious boost to your meals.
    • Adjust Seasoning: Feel free to adjust the spices and seasoning according to your taste preferences. Experiment with different combinations to create your perfect flavor profile.
    • Serve with Rice: For a hearty meal, serve the spiced chana mixture with cooked plain rice, creating a satisfying and flavorful dish that’s perfect for lunch or dinner.

    Benefits:

    • High in Protein: Kala chana is rich in protein, making chana chaat a nutritious and filling snack option.
    • Rich in Fiber: The addition of fresh vegetables like tomatoes, cucumbers, and potatoes adds fiber to the dish, aiding in digestion and promoting overall gut health.
    • Packed with Flavor: The blend of spices and tangy tamarind pulp creates a flavor explosion in every bite, making chana chaat a truly irresistible snack option.

    FAQ:

    Can I Make Chana Chaat Ahead of Time? 

    Yes, you can prepare the chana mixture ahead of time and refrigerate it. Simply assemble the chaat with fresh vegetables and spices before serving.

    Can I Skip Adding Veggies to Chana Chaat? 

    While vegetables add freshness and texture to the chaat, you can certainly enjoy chana chaat without them. Adjust the recipe according to your taste preferences.

    How Long Does Chana Chaat Last in the Refrigerator? 

    Chana chaat can be stored in the refrigerator for 2-3 days. Make sure to store it in an airtight container to maintain its freshness.

    In conclusion, chana chaat is a delightful dish that combines the goodness of kala chana with a burst of spices and fresh vegetables. With this recipe of chana chaat mastered, you’ll have a versatile snack that’s perfect for any occasion. So, roll up your sleeves, gather your ingredients, and embark on a flavorful culinary adventure with chana chaat.

    Explore more recipes on Manjula’s Kitchen: Vegetable Samosas, Paneer Tikka, Crispy Spinach Pakoras, Mango Lassi, Masala Chai, Gulab Jamun, Kheer (Rice Pudding)

  • Paneer Pasanda (Paneer Curry)

    Paneer Pasanda (Paneer Curry)

    Paneer Pasanda (Curry)

    Paneer Pasanda

    Paneer Pasanda is a delicacy consisting of stuffed paneer with rich creamy gravy. Paneer Pasanda is a delicious and perfect dish for formal get-togethers or when you simply want to indulge yourself. This is the ultimate Paneer dish.
    5 from 5 votes
    Prep Time 25 minutes
    Cook Time 25 minutes
    Total Time 50 minutes
    Course Main Course
    Cuisine Indian
    Servings 4 people

    Ingredients
      

    For Pasanda

    • 8 oz Paneer 9 thin slices of paneer, they are about 1×3 inch of slices, I am using store bought paneer
    • 2 Tbsp fresh shredded coconut I am using frozen shredded coconut
    • 1/4 tsp salt
    • 1 Tbsp cilantro finely chopped, hara dhania
    • 2 tsp green chili finely chopped, adjust to taste

    For Batter

    • 1/4 cup corn starch or arrowroot power
    • 3 Tbsp water
    • 3 Tbsp oil to shallow fry

    For Gravy

    • 2 cups chopped tomatoes about 3 medium size tomatoes
    • 1 Tbsp ginger chopped
    • 1 Tbsp coriander powder dhania
    • 1 Tbsp oil
    • 1/2 tsp cumin seeds jeera
    • 1/8 tsp asafetida hing
    • 1/4 tsp turmeric haldi
    • 1 tsp red chili powder adjust to taste
    • 1/4 cup cashew powder
    • 1 tsp salt
    • 1/4 cup heavy cream or cream
    • 1/4 tsp garam masala
    • 2 Tbsp cilantro chopped, hara dhania

    Instructions
     

    • Mash one of the paneer piece, and mix it well with coconut, salt, cilantro, and green chili.
    • Spread this mixture on 4 paneer slices and cover them with remaining 4 slices. Cut them inti two, and press it lightly. Set aside.
    • Mix corn starch in 2-3 tablespoons of water to make a thick batter.
    • Heat the flat frying pan with about 3 tablespoons of oil over medium heat. When oil is moderately hot dip the stuffed paneer pieces one at a time, gently dip in the batter and put in the frying pan, leaving some space in between. Shallow fried the paneer until they are light golden brown, from both sides.
    • Take them out over paper towel, to drain the extra oil. Set aside.

    Making Gravy

    • Blend tomatoes, ginger, coriander powder to fine paste, and strain the tomato mix. Set aside.
    • Heat the oil in a sauce pan on medium heat. When the oil is moderately hot add cumin seeds. (Cumin seeds should crack right of way). Lower the heat too low, add asafetida, turmeric, chili powder and cashew powder stir for a minute.
    • Add tomato paste cook for 3-4 minutes stirring till tomato start leaving the side of the pan. Add salt and cream and about half cup of water. Cook for 2-3 minutes. Add cilantro and garam masala stir and turn off the heat. Gravy should be pouring consistency.
    • Pour the gravy over Paneer Pasanda.

    Notes

    Paneer Pasanda is delicious. For my upcoming holiday dinner I will be serving Paneer Pasanda with Punjabi Chole, Jeera Aloo, Boondi Ka Raita, Cumin Rice and Naan.
    The one good thing with this dish you can prepare this in pieces and assemble when ready to serve.
    Enjoy!
    Tried this recipe?Let us know how it was!

    Paneer Pasanda Recipe: How to make Paneer Pasanda

    Paneer Pasanda, a gourmet delight, features sumptuously stuffed paneer immersed in a luscious creamy gravy. Ideal for formal gatherings or when you crave indulgence, Paneer Pasanda stands as the ultimate paneer dish. Elevate your party with this delectable and easy-to-make vegetable curry, making it a perfect addition to your repertoire of party recipes.

    Prepare the Paneer Filling: Mash one piece of paneer cheese and combine it thoroughly with desiccated coconut, salt, chopped cilantro, and chopped green chili. Spread this mixture evenly over four paneer slices. Carefully top these slices with the remaining four paneer slices to create a sandwich. Cut each sandwich in half and gently press down to secure the filling.

    Create the Coating: In a separate bowl, whisk cornstarch with 2-3 tablespoons of water until a thick batter forms.

    Shallow Fry the Paneer: Heat approximately 3 tablespoons of oil in a flat pan over medium heat. Once the oil reaches moderate heat, carefully dip each stuffed paneer piece into the cornstarch batter. Gently transfer the coated paneer to the pan, ensuring enough space between them. Shallow fry the paneer until they turn a light golden brown on both sides. Drain any excess oil by placing the fried paneer on a paper towel-lined plate.

    Make the Gravy: Blend chopped tomatoes, ginger, and coriander powder into a smooth paste. Strain the tomato mixture and set it aside.

    Cook the Aromatics: Heat oil in a saucepan over medium heat. Once moderately hot, add cumin seeds and wait for them to crackle. Reduce heat to low and add asafetida, turmeric powder, chili powder, and cashew powder. Sauté the spices for one minute.

    Simmer the Tomato Base: Introduce the strained tomato paste and cook for 3-4 minutes, stirring constantly until the tomato mixture separates from the sides of the pan. Season with salt and cream, then add approximately half a cup of water. Allow the gravy to simmer for 2-3 minutes.

    Finalize the Gravy: Stir in chopped cilantro and garam masala before turning off the heat. The finished gravy should have a pouring consistency.

    Assemble the Dish: Pour the prepared gravy over the fried paneer pieces.

  • Mediterranean Quinoa Salad

    Mediterranean Quinoa Salad

    Quinoa Salad

    Mediterranean Quinoa Salad

    Quinoa salad is a healthy and delicious salad. This bright and colorful salad is also a great summertime recipe. For this particular salad, I made my own homemade dressing with ginger. Ginger gives a refreshing kick to the salad. Quinoa is naturally gluten free and also high in protein.
    No ratings yet
    Prep Time 10 minutes
    Cook Time 20 minutes
    Course Salad, Soup
    Cuisine Indian
    Servings 4 people

    Ingredients
      

    • 1/2 cup quinoa
    • 1 cup water
    • 1 large romaine lettuce chopped, discard the outside leaves
    • 2 cup arugula
    • 1 cup English cucumber cut into 1/4-inch cubes
    • 1 medium size tomato diced
    • 1 orange peeled and diced
    • About 1/4 cup feta cheese

    Dressing

    • 1 tablespoon vinegar, I am using rice vinegar
    • 2 tablespoons lemon juice
    • 2 tablespoons olive oil
    • 1 teaspoon sugar
    • 1/2 teaspoon salt
    • 1/4 teaspoon black pepper
    • 1/4 teaspoon mustard (rai) powder
    • 1 teaspoon ginger juice*

    Instructions
     

    • For dressing: add all the dressing ingredients together mix it well making sure sugar is dissolved. Set aside. * To make ginger juice shred the ginger using fine shredder or zester, and squeeze the juice with fingers.
    • Bring quinoa and water to a boil in a saucepan. Reduce heat to medium-low, cover, and simmer until all the water has been absorbed, this will take about 12 minutes. Set aside to cool.
    • In a salad bowl layered all the ingredients, spread the lettuce, arugula, quinoa save about 1/4 cup, then cucumber, tomatoes, and orange. Drizzle the salad dressing, sprinkle the saved quinoa and the last spread the feta cheese.
    Tried this recipe?Let us know how it was!

  • Paneer Jalfrezi

    Paneer Jalfrezi

    Paneer Jalfrezi

    Paneer Jalfrezi

    Paneer Jalfrezi is an Indian-style stir-fry dish that tastes delicious and looks beautiful. This is also a popular restaurant dish. Paneer Jalfrezi is a quick and easy recipe to make. Serve Paneer Jalfrezi with paratha, naan, or plain rice.
    5 from 2 votes
    Prep Time 15 minutes
    Cook Time 15 minutes
    Course paneer
    Cuisine Indian
    Servings 3 people

    Ingredients
      

    • About 1 cup paneer cut in long strips about 1/4”
    • About 1 cup bell pepper cut in long strips about 1/4” – capsicum (I am using different color bell pepper for color)
    • About 1 cup of carrots cut into long strips
    • About 1 cup green beans cut into about 1” pieces
    • 1 tomato medium size cut into bite-size pieces
    • 3 tablespoons Oil
    • 1 teaspoon cumin seeds
    • 1/2 teaspoon nigella seeds, kalonji
    • 1 tablespoon ginger thinly sliced
    • 1 tablespoon green chili chopped
    • 1/4 teaspoon turmeric
    • About 3/4 teaspoon salt
    • 1/4 teaspoon garam masala
    • 2 tablespoons Cilantro chopped

    Instructions
     

    Paneer jalfrezi vegetables should not be very soft, to taste best vegetables should be a little crisp. Vegetables are added in steps as all the vegetables take different time in cooking.

    • Heat the oil in a frying pan over medium-high heat. Oil should be moderately hot, add cumin seeds, and nigella as the seeds crack, add carrots, beans, and salt. Stir-fry for three to four minutes.
    • Add bell pepper, ginger, green chili, turmeric, and red chili powder, and stir fry for two to three minutes. Add paneer and tomatoes stir gently and cook until all the vegetables are tender.
    • Add garam masala and cilantro and stir gently until everything is mixed well. vegetables should be crisp, do not overcook.
    • Turn off the heat.
    Tried this recipe?Let us know how it was!

    Paneer Jalfrezi Recipe Unveiled for a Flavorful Veg Experience 

    Delight in the flavorful experience of Paneer Jalfrezi, a quick & easy Indian stir-fry dish. This vegetable-sautéed party recipe not only tastes delicious but also presents a beautiful culinary creation.

    1. Mastering the Art of Veg Paneer Jalfrezi: 

    Embark on a tantalizing journey as you delve into the intricacies of mastering the “Veg Paneer Jalfrezi Recipe.” Achieve a symphony of flavors and textures by exploring the artistry behind this exquisite dish. To perfect the ideal crispness, introduce a medley of vegetables in stages, ensuring each one acknowledges its distinct cooking time within the veg paneer jalfrezi recipe.

    In this culinary adventure, the meticulous orchestration of vegetable introduction contributes to the harmonious balance that defines the Veg Paneer Jalfrezi. Each step is an integral part of a carefully choreographed dance, ensuring that every element is brought to perfection, creating a delightful sensory experience.

    1. Sautéing Vegetables for Paneer Jalfrezi Perfection: 

    Elevate your cooking prowess by immersing yourself in the intricacies of sautéing vegetables for the perfect “Paneer Jalfrezi.” Begin this gastronomic escapade by heating a frying pan with oil over medium-high heat, a pivotal step in the Paneer Jalfrezi Recipe. Let the oil attain a moderately hot state before introducing the symphony of cumin seeds and nigella.

    As these seeds crackle, the infusion of carrots, beans, and a pinch of salt initiates a transformative three to four-minute stir-fry. This culinary alchemy ensures the vegetables retain their crispiness, unveiling a sensory delight in every bite of the paneer jalfrezi. The sizzle in the pan becomes a testament to the artful creation of a dish that transcends ordinary flavors.

    1. Elevating Flavors with Spice Blend in Veg Paneer Jalfrezi:

    Transform your kitchen into a haven of aromatic delights with the artful crafting of “Veg Paneer Jalfrezi.” Elevate the flavor profile by infusing a burst of spices into this captivating recipe. Add bell pepper, ginger, green chili, turmeric, and red chili powder, stirring this aromatic blend for an additional two to three minutes. This nuanced process sets the stage for the introduction of paneer and tomatoes, an essential act in the Veg Paneer Jalfrezi Recipe.

    Stir gently to orchestrate a dance of flavors and succulence, ensuring that every vegetable attains a tender state. The amalgamation of spice and succulence in the veg paneer jalfrezi recipe is an artful creation, promising a culinary experience that transcends the ordinary.

    1. Achieving Harmony with Garam Masala and Cilantro in Paneer Jalfrezi: 

    In the pursuit of culinary excellence, achieve a harmonious symphony in your “Paneer Jalfrezi.” Introduce the enchanting notes of garam masala and cilantro, stirring gently to ensure a uniform distribution. With a keen focus on preserving the crispiness of the vegetables, this meticulous step guarantees that every bite is a delightful balance of flavors.

    The interplay of garam masala and cilantro in the veg paneer jalfrezi recipe becomes the crescendo of a flavorful masterpiece. The result is a dish that not only tantalizes the taste buds but also showcases the expertise needed for a delectable paneer jalfrezi experience.

    1. Culmination and Perfection in Veg Paneer Jalfrezi:

    As you approach the culmination of your culinary endeavor, revel in the zenith of flavors in your perfectly crafted “Veg Paneer Jalfrezi.” A culmination was achieved by turning off the heat, marking the completion of this flavorful dish. This delightful creation, guided by a meticulous approach at every step, not only delights the senses but also exemplifies the expertise needed for an unparalleled paneer jalfrezi experience. Every detail, from the sizzling pan to the final turn of the heat, contributes to the creation of a dish that transcends ordinary expectations.

    If you liked this recipe. You must also try: Mirchi Vada, Kachori with Kadi, Palak Kadhi, Palak & Spinach Kofta Curry