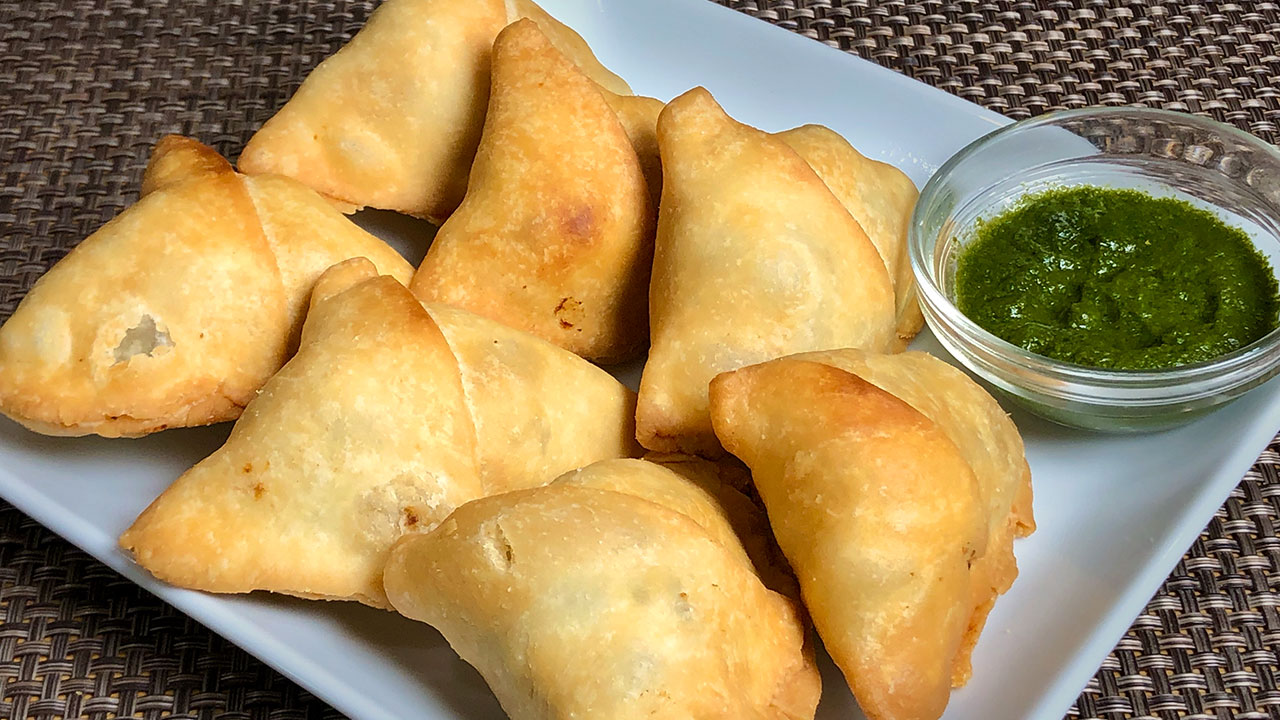
Category: Special Occasion Recipes

Special Occasion Recipes: Celebrate with Delicious Indian Vegetarian Dishes

In Indian culture, food is an integral part of every celebration, festival, and special occasion. Whether it’s a grand wedding, a religious festival, or a simple family get-together, the menu is always elaborate, reflecting the richness of the Indian culinary heritage. Special occasions call for special dishes, and when it comes to Indian cuisine, the options are endless. From mouth-watering appetizers to sumptuous main courses and decadent desserts, Indian vegetarian recipes can make any celebration truly unforgettable.

The Importance of Food in Indian Celebrations

Food plays a central role in Indian celebrations, symbolizing prosperity, happiness, and togetherness. Each dish is thoughtfully prepared, using ingredients that are in harmony with the occasion’s significance. Traditional recipes passed down through generations often take center stage, with a focus on flavors, textures, and presentation.

Indian vegetarian cuisine, in particular, offers a wide range of options that cater to various dietary preferences and religious practices. These recipes are not only delicious but are also steeped in cultural and regional significance, making them ideal for special occasions.

Must-Try Indian Vegetarian Recipes for Special Occasions

Paneer Lababdar

Paneer Lababdar is a rich and creamy dish made with paneer (Indian cottage cheese) cooked in a tomato-based gravy. The addition of cream and butter gives it a luxurious texture, making it perfect for a festive meal. Serve it with naan or pulao for a complete experience.

Dum Aloo

Dum Aloo is a popular dish from North India, where baby potatoes are cooked slowly in a spicy yogurt-based gravy. The slow cooking process, known as “dum,” ensures that the flavors are deeply infused into the potatoes, making it a favorite for special occasions.

Malai Kofta

Malai Kofta is a classic dish that features soft, melt-in-the-mouth koftas (dumplings) made from paneer, potatoes, and nuts, simmered in a creamy tomato gravy. It’s a dish that’s sure to impress your guests and is often served at weddings and celebrations.

Pulao with Nuts and Raisins

A fragrant and flavorful rice dish, pulao is often prepared with a variety of spices, nuts, and raisins. This dish is a staple at Indian weddings and festivals, offering a delightful combination of sweet and savory flavors.

Gajar Ka Halwa

No Indian celebration is complete without dessert, and Gajar Ka Halwa (carrot pudding) is a must-have. Made with grated carrots, milk, sugar, and ghee, this dessert is garnished with nuts and is often served during Diwali and other festive occasions.

Puran Poli

Puran Poli is a traditional Maharashtrian sweet flatbread stuffed with a filling made from chana dal (split chickpeas) and jaggery. This delicacy is commonly prepared during festivals like Holi and Ganesh Chaturthi and is enjoyed by people of all ages.

Kofta Biryani

Biryani is synonymous with celebration, and Kofta Biryani adds a vegetarian twist to this classic dish. Made with spiced koftas, basmati rice, and aromatic spices, this dish is layered and slow-cooked to perfection, making it ideal for festive gatherings.

Dahi Bhalla

Dahi Bhalla is a popular North Indian snack made from deep-fried lentil balls soaked in yogurt and topped with chutneys and spices. This dish is a favorite during festivals like Holi and Diwali and is loved for its tangy and sweet flavors.

Shahi Paneer

Shahi Paneer is a royal dish that lives up to its name. “Shahi” means royal, and this dish is made with paneer cooked in a rich and creamy gravy of cashews, almonds, and cream. It’s a dish that is often reserved for the most special occasions.

Kheer

Kheer, a rice pudding, is one of the most beloved Indian desserts, often prepared for festivals and celebrations. Made with rice, milk, sugar, and flavored with cardamom and saffron, kheer is garnished with nuts and dried fruits, making it a fitting end to a celebratory meal.

Tips for Planning a Special Occasion Menu

Balance the Menu: Ensure that your menu has a good mix of appetizers, main courses, and desserts. Include a variety of flavors and textures to keep your guests engaged.

Consider Dietary Preferences: Indian cuisine offers a range of vegetarian options, but it’s also important to consider other dietary needs, such as vegan or gluten-free preferences.

Plan Ahead: Special occasion meals often require elaborate preparation. Plan your menu in advance and do as much prep work as possible the day before the event.

Presentation Matters: The way you present your food can enhance the dining experience. Use garnishes, elegant serving dishes, and thoughtful plating to make your dishes visually appealing.

Conclusion

Indian vegetarian cuisine offers a rich tapestry of flavors and dishes that are perfect for any special occasion. Whether you’re celebrating a wedding, a festival, or just gathering with loved ones, these recipes will add a touch of festivity and joy to your table. From creamy paneer dishes to decadent desserts, each dish is crafted to make your celebration memorable.

For more special occasion recipes, visit Manjula’s Kitchen – Special Occasion Recipes. Explore a world of flavors and find the perfect dishes to make your celebration truly special.

  • Punjabi Samosa

    Punjabi Samosa

    Golden Brown Samosas with Green Chutney

    Punjabi Samosa

    Samosas are probably the most popular Indian snack, and street food. Samosas when paired with cilantro chutney are simply out of this world. I think they are universally loved and hard to resist. I have made variations and minor changes to my samosa recipe over the years. Check out my new and improved recipe for this family favorite!
    This recipe will serve 4.
    5 from 1 vote
    Prep Time 10 minutes
    Cook Time 30 minutes
    Total Time 40 minutes
    Course Appetizer
    Cuisine Indian
    Servings 4 people

    Ingredients
      

    For Crust

    • 1 cup all-purpose flour plain flour, maida
    • 1 Tbsp fine sooji samolina
    • ½ tsp salt
    • 1 ½ Tbsp oil
    • 2 drops of lemon juice
    • ¼ cup water Adjust as needed

    For the Filling

    • 3 medium size potatoes boiled, peeled and chopped into small pieces, will make about 2 cups
    • ½ cup green peas I am using frozen peas
    • 1 ½ Tbsp oil
    • 1 tsp cumin seeds jeera
    • 1 Tbsp coriander powder dhania
    • 1 Tbsp green chilies chopped
    • 2 Tbsp cilantro chopped, hara dhania
    • ¼ tsp red chili powder
    • ½ tsp garam masala
    • 1 tsp mango powder amchoor
    • 1 tsp salt

    Instructions
     

    Making the Dough

    • Mix the flour, sooji, salt, oil and 2 drops pf lemon juice, mix it well rubbing with your fingers. Note: lemon juice should be just 2 drops, we are not adding to flavor, lemon is added to give the crispness. Add the water slowly, to make stiff dough and knead well. Cover the dough and let it sit for at least fifteen minutes.

    Making the Filling

    • Heat the oil in a frying pan on medium high heat. Test the heat by adding one cumin seed to the oil; if it cracks right away oil is ready. Add cumin seeds as cumin seeds crack, add green peas, and turn heat to medium and stir until tender.
    • Add all the spices coriander powder, green chilies, mango powder, garam masala, cilantro and salt mix it well. Add the potatoes and stir-fry for about 4 minutes. Potato mix should not be very dry. Add more salt or amchur according to taste.
    • Let the filling cool to room temperature.

    Making Samosa

    • Take 2 Tbsps of water and keep aside.
    • Knead the dough again well. Divide the dough into 5 equal parts and make into balls. Roll each ball into 6-inch diameter circles, circle will not be very clean, that is fine. Cut each circle in half.
    • Spread the water lightly all along the edge of one semicircle. Pick this semicircle up with both hands and fold it into a cone shape. Pinch the side of this cone so that it is completely sealed.
    • Fill the cone with about 2 Tbsps of filling, do not over fill. Press this filling down with your fingers. Now close the top of this cone into a triangle shape, pinching the top edge so that it is completely sealed. Continue filling the rest of the samosas.
    • Heat about 1 inch of the oil in a frying pan on low medium heat. To check if oil is hot enough place a small piece of dough in oil and dough should sizzle and come to the surface slowly.
    • Place the samosas in the frying pan a few at a time. After samosas are floating on top of the oil turn them slowly. Fry the samosas until the samosas turn a light golden-brown color on all sides, this should take about 10 to 12 minutes. If you use a high heat, the samosa crust will be soft and not crispy.

    Notes

    Tips
    • Do not over boil the potatoes.
    • Be careful not to poke the potatoes multiple times while they are cooking, as they will absorb the water.
    • Drain immediately and keep aside until cool off.
    • If the filled samosas sit for too long, they will dry. To avoid this, cover with a damp cloth.
    You will also enjoy Gulab Jamun, Jalebi, Aloo Tikki, Khasta Kachori
    Suggestions
    • Samosa can be prepared ahead of time and can be freeze for a month.
    • Before freezing, fry them enough until samosa changes the color to light gold brown.
    • After samosas are on room temperature bag them in zip lock bags and freeze them.
    • To use frozen samosas, take out as many you need and fry them on medium heat, make sure do not defrost the samosa before frying.
    Keyword Chaat, Cilantro Chutney, Cocktail Samosa, Cooking Video, delicious, Delicious Aloo Samosa, Gulab Jamuns, Homemade, Jain Food, jalebi, Khana, Kid Friendly, No Garlic, No Onion, Popular Snack, Potato Pastry, Potato Pattie, Punjabi Style, Puri, Satvik, Street Food, Stuffed Puri, Swaminarayan, Tamarind Chutney, Vegan, Veshno Cooking, Yogurt
    Tried this recipe?Let us know how it was!
  • Scalloped Potatoes

    Scalloped Potatoes

    A glass baking dish filled with golden brown scalloped potatoes topped with a creamy, bubbly cheese sauce.

    Scalloped Potatoes (Spicy Baked Potatoes) in Creamy Sauce

    Scalloped Potatoes are a classic dish with layers of potatoes topped with a delicious creamy sauce! It is the perfect comfort food and side dish to any meal.
    A little background to the origin to this dish: When I first came to the United State, I was fortunate enough to meet a very kind elderly woman named Helen. She was so kind and helped me a lot when I first came to this country. She was the same age as my grandmother, but she wanted me to simply refer to her as Helen. We became so close that she eventually became another grandmother for my kids when I was away from my family and country. She truly was a blessing to our family. Scalloped potatoes was one of her favorite vegetarian favorite dishes to make for us. She would make this as a side dish for Easter and Thanksgiving. The ingredients are simple, and the dish is easy to make. I got inspired to make this dish while going through old photos. It has been 30 years since Helen passed away, but she will never be forgotten. I decided to add a variation to this recipe by adding some veggies and making it little spicy.
    This recipe will serve 4.
    4.50 from 2 votes
    Course Side Dish
    Cuisine American
    Servings 4 people

    Ingredients
      

    • 3 medium sized potatoes peeled and sliced about 1/8 inch thick
    • ¼ cup green peas
    • ¼ cup corn kernels
    • ¼ cup bell pepper chopped
    • ¼ cup carrots shredded
    • 1 Tbsp green chilies finely chopped (this is optional)
    • 2 Tbsp cilantro chopped

    For white sauce

    • 2 Tbsp olive oil
    • 2 Tbsp all-purpose flour plain flour, maida
    • tsp black pepper
    • ½ tsp red chili flakes adjust to taste
    • ½ cup heavy cream
    • 1 ½ cup milk
    • ½ tsp salt

    Instructions
     

    Sauce

    • In a small frying pan, heat the oil over low medium heat and add all-purpose flour, stir for a minute. Add black pepper, chili flakes, and salt, stir for another minute.
    • Reduce heat to low. While stirring slowly add cream making sure there are no lumps. Add a small amount of milk at a time. The mixture will start becoming thick, continue adding a little milk at a time whisking until smooth.

    Assembly

    • Preheat oven to 350 degrees F (190 degrees C). I am using 5” x 7” Pyrex pan to make the Scalloped Potatoes. Grease the pan.
    • layer the potatoes evenly in the pan.
    • Pour cream sauce just covering the potatoes. Now spread the vegetables, bell pepper, carrots, green peas, corn, green chilies and cilantro. Layer the potato again over the vegetables. Pour the sauce making sure covering the potatoes evenly.
    • Bake it for about 40-45 minutes, potatoes should be tender and should be brown from the top.
    • Scalloped Potatoes are ready, nice color. Enjoy.

    Notes

    I prefer Yukon gold or Russet potatoes for this dish. You can use different vegetables of your choice, like broccoli, cauliflower, green beans, spinach.
    You might also like Vegetable Kathi Rolls, Mexican Bhel, Vegan Macaroni and Cheese
    Keyword Baked Potatoes, Baked Vegetable, Cream Sauce, Creamy Butternut squash, Homemade, Main Dish, Quick And Easy, Side Dish, Spicy Baked Potatoes, Spinach Pasta, Vegetable Pasta, Vegetarian, Video Recipe, Zucchini pasta
    Tried this recipe?Let us know how it was!
  • Sweet and Sour Guava Curry

    Sweet and Sour Guava Curry

    A bowl of vibrant yellow Sweet and Sour Guava Curry, garnished with fresh herbs, with whole guavas placed beside the bowl on a patterned tablecloth.

    Amrood Ki khati Methi Sabji (Sweet and Sour Guava Curry)

    Guavas, or "amrood" in Hindi, are simply delicious and probably one of my favorite fruits! This year I have an abundance of guavas growing in my backyard. I like to sprinkle chaat masala on guavas. The spiciness really brings out its flavor. Since I have so many delicious guavas, I decided it was time for me to make Guava Sweet and Sour Curry (Amrood Ki khati Methi Sabji). In case you are not familiar, this is a popular North Indian dish which I believe tastes best with fresh hot puris or parathas.

    This was a staple sabji when I was a child growing up in India, provided guavas were in season. My brother especially enjoyed this dish. He simply relished this sabji and could enjoy eating it every day. However, there was catch – he would only eat this dish with puris! Rotis or parathas simply did not do this dish justice! My brother would pretend to read a book while eating so no one would disturb him so he could truly enjoy eating in peace! Whenever I make this recipe, I remember our sweet, innocent childhood memories. Guava Sweet and Sour Curry has the best flavors – spicy, sweet and sour – all in one dish!

    This recipe will serve 2.
    5 from 1 vote
    Prep Time 5 minutes
    Cook Time 15 minutes
    Total Time 20 minutes
    Course Main Course
    Cuisine Indian
    Servings 2 people

    Ingredients
      

    • 2 cups guavas amrood, cut into bite size pieces
    • 2 Tbsp oil
    • ½ tsp cumin seeds jeera
    • ¼ tsp fenugreek seeds mathi dana
    • tsp asafetida hing
    • 2 tsp coriander powder dhania
    • 1 tsp fennel seed powder saunf
    • ¼ tsp turmeric haldi
    • ½ tsp red chili powder
    • ½ tsp salt
    • 1 Tbsp ginger adrak, thinly sliced
    • ½ tsp mango powder amchor
    • 1 tsp lemon juice
    • 2 Tbsp sugar adjust to the taste
    • 2 Tbsp chopped cilantro hara dhania

    Instructions
     

    • Heat the oil in a saucepan. Oil should be moderately hot. Test the heat by adding one cumin seed to the oil. If the cumin seed cracks right away, the oil is ready.
    • Add the cumin seeds, asafetida, fenugreek seeds, fennel seeds powder, coriander powder, turmeric, and red chili powder stir for few seconds. Add ginger and guava mix it well add 1 cup of water and cover the pan.
    • Lower the heat and cover the pan cook for about 5-8 minutes until guavas are tender. Add mango powder, lemon juice and sugar stir and add cilantro. Turn off the heat and cover the pan for few minutes.
    • Amrood Ki khati Methi Sabji is ready to serve.

    Notes

    If Guava seeds are hard then remove them, adjust the sugar to taste depends how sweet are guava.
    Keyword Amrood, cooking shows, Gourmet food, Guava Fruit, Home Cooking, Homemade, Indian food, Jain Food, Kadoo Ki Subji, Khatta Meetha, Main Dish, Mandir Food, No Garlic, No lahsun, No Onion, No Pyaj, North Indian Recipes, Recipe videos, Sattvik Food, Spicy, Swaminarayan, Tropical Fruit, Vegetarian, Veshno Cooking
    Tried this recipe?Let us know how it was!
  • Pithla

    Pithla

    A bowl of creamy yellow Pithla, garnished with chopped fresh cilantro, served alongside traditional Indian accompaniments on a textured surface.

    Pithla (Besan Curry)

    Pithla, a variation of Kadhi, comes in many forms. In North India, Kadhi resembles a thick soup with pakoras, while Gujarati Kadhi offers a sweet and sour, watery consistency. Pithla, on the other hand, is notably thicker, often referred to as Besan Ki Sabji, and is quick and easy to prepare with few ingredients. Traditionally served with hot ghee, Pithla offers a complete and satisfying meal.
    Despite my initial belief that Pithla originated from Bihar, I've learned it's also popular in Maharashtra. Growing up in North India with roots in Bihar, my mom's cooking blended traditional Bihari simplicity with the spiciness of North Indian cuisine. Fond memories of enjoying Pithla with family persist, and when I visit my sisters in India, they recreate these cherished moments with a spread of dishes, including Pithla served with rice. Truly, it's comfort food at its finest. This recipe serves 2.
    4.80 from 5 votes
    Prep Time 5 minutes
    Cook Time 10 minutes
    Total Time 15 minutes
    Course Main Course
    Cuisine Indian
    Servings 2 people

    Ingredients
      

    • 1 cup besan Bengal gram flour
    • 2 Tbsp oil
    • 1 tsp cumin jeera
    • ½ tsp mustard seeds rai
    • tsp asafetida hing
    • ½ tsp turmeric haldi
    • ½ tsp red chili powder
    • 1 tsp salt
    • 1 ½ tsp mango powder aam choor
    • 2 Tbsp cilantro finely chopped, hara dhania
    • 4 cup water

    For Garnishing

    • 2 Tbsp ghee clarified butter, this is optional
    • ¼ tap red chili powder

    Instructions
     

    • In a bowl add the 1-1/2 cups of water slowly to besan to make a smooth batter (batter should be consistency of pancake batter or dosa batter).
    • Open the heat on medium high, oil should be moderately hot, when you add the cumin seeds to oil seeds should crack right of way.
    • Add cumin seeds, mustard seeds, asafetida, turmeric, and chili powder to oil, stir and turn off the heat.
    • Add the besan batter and open the heat to medium heat. Keep whipping the batter and batter will start thickening. Add salt and keep adding the water slowly and keep mixing about 2-1/2 cups of water. After Pithla comes to boil besan will start splattering. Reduce the heat to low, cover the pan and let it simmer for about 5 to 8 minutes.
    • Pithla will become thick, add chopped cilantro and mango powder mix and let it cook for 2 more minutes. Pithla should be quite thick in consistency that’s why sometimes I will call Pithla Besa ki Sabji.
    • Pithla is served hot before serving, traditionally Pithla is served garnished with hot ghee (clarified butter). And sprinkle of red chili powder. If you are vegan skip ghee, clarified butter.

    Notes

    Serving suggestions:
    Serve Pithla with Rice, Roti, Kurkuri Bhindi.
    Keyword Besan Kadhi, Bihari Kadhi, Cooking Video, Curry Recipe, Gatte Ke Kadhi, Gluten Free, Gujrati Kadhi, Homemade, Jain Food, Maharashtrian Dish, Main Dish, Mandir Food, No Garlic, No Onion, Panjabi Kadhi, Quick And Easy, Sattvik Food, Swaminarayan, Vegan, Veshno Cooking
    Tried this recipe?Let us know how it was!

    How to make Besan Curry Recipe – Manjula’s Kitchen

    Pithla Besan curry, a savory gram flour dish, is a testament to the rich culinary heritage of India. The besan gravy recipe combines simple ingredients to create a dish that is not only delicious but also a showcase of culinary prowess. This pitla recipe explores precision and technique coming together to create a symphony of flavors.

    Pithla Besan, a savory delight hailing from the heart of Indian cuisine, is a testament to the versatility of besan (gram flour). This besan recipe, also known as Pitla, transforms this humble ingredient into a flavorful and comforting dish that can be relished with various accompaniments. Let’s embark on a detailed exploration of how to make besan curry recipe, unraveling the secrets and nuances that make this besan curry a culinary masterpiece.

    1. Setting the Stage: Creating the Besan Batter

    Begin besan curry recipe by preparing the besan batter, the foundation of Pithla Besan. In a bowl, slowly add 1-1/2 cups of water to the besan, ensuring a gradual and consistent pouring to avoid lumps. The goal is to achieve a smooth batter, akin to the consistency of pancake or dosa batter. This step sets the tone for the entire dish, ensuring a velvety texture that will coat each element in the curry.

    2. The Culinary Prelude: Heating the Oil and Sizzling Seeds

    As the besan batter rests, open the heat on medium-high, readying the oil for the symphony of spices. The oil should reach a moderate heat, and a crucial test involves adding cumin seeds. The immediate crackling of the seeds signifies the optimal temperature. Into this aromatic canvas, introduce cumin seeds, mustard seeds, asafetida, turmeric, and chili powder. Stir this spice medley, infusing the oil with a fragrant blend that will define the character of the besan curry.

    3. Besan Ballet: Whipping and Simmering

    With the spice-infused oil taking center stage, it’s time to introduce the besan batter. Open the heat to medium, and as you add the besan batter, the whipping action begins. This constant stirring is key as the batter thickens, absorbing the flavors of the spices. In this delicate dance, add salt, and slowly incorporate about 2-1/2 cups of water. The besan curry begins to take shape, and as it comes to a boil, be prepared for the besan to splatter, a sign that the magic is happening. Reduce the heat to low, cover the pan, and let it simmer for 5 to 8 minutes, allowing the flavors to meld and the besan to achieve its desired consistency.

    4. The Grand Finale: Flavorful Additions and Simmering

    As the Pithla reaches its zenith, add the final touches. The besan will have thickened substantially by now, creating a hearty base for additional ingredients. Introduce chopped cilantro and mango powder, elevating the besan curry to new heights. Let it simmer for an additional 2 minutes, allowing the flavors to meld seamlessly. The besan curry should now be thick and rich as part of the besan gravy recipe.

    5. The Presentation: Serving Tradition on a Plate

    Pithla Besan is best served piping hot, capturing the essence of its freshly-cooked perfection. Traditionally, it is garnished with hot ghee (clarified butter), adding a luxurious richness to the dish. A sprinkle of red chili powder adds a final touch, not just for aesthetics but to introduce a subtle kick that complements the other flavors. For those adhering to a vegan lifestyle, the ghee can be skipped without compromising the integrity of the dish.

    In conclusion, the journey to create Pithla Besan is a delicate ballet of flavors, textures, and culinary finesse. From the creation of the besan batter to the sizzling symphony of seeds, the besan curry recipe is a testament to the artistry involved in Indian cuisine. With its rich, aromatic profile and velvety consistency, Pithla Besan invites you to savor a dish that celebrates the simple yet profound beauty of besan. Enjoy this besan curry with steamed rice, Indian bread: roti, naan, missa paratha, or as your heart desires, and revel in the joy of crafting a culinary masterpiece in the comfort of your kitchen.

  • Chocolate Ganache Toast

    Chocolate Ganache Toast

    Four slices of toasted bread topped with chocolate ganache and various toppings: sliced almonds, shredded coconut, banana slices, and strawberry halves.

    Chocolate Ganache Toast

    Chocolate Ganache Toast is a delicious rich chocolate ganache spread over buttery toasted bread. The chocolate ganache is so simple to make with heavy cream and a hint of vanilla. This is a mouthwatering treat which can be served as a snack or even a dessert. You can even make this recipe with your children as it is so easy! You can make this treat in a variety of different ways, even with fresh fruit. This recipe has wonderful flavor combinations that appeals to all ages.
    5 from 2 votes
    Prep Time 5 minutes
    Cook Time 10 minutes
    Total Time 15 minutes
    Course Dessert, Snack
    Cuisine Fusion
    Servings 4 people

    Ingredients
      

    For Toast

    • 8 thin slices of French bread
    • 2 Tbsp melted butter

    For Chocolate Ganache

    • ½ cup chocolate chips semi-sweet
    • cup heavy cream
    • 1 tsp vanilla essence

    For Topping

    • 2 Tbsp sliced almonds
    • 2 Tbsp coconut powder
    • Few pieces thinly slice strawberries
    • Few pieces thinly sliced banana
    • 1 tsp sea salt

    Instructions
     

    For Toast

    • Lightly butter the bread from both sides and toast to make them crisp.

    For Ganache

    • Place chocolate in a bowl and add the vanilla essence.
    • Bring the heavy cream to boil and turn off the heat. Pour the cream over chocolate and stir until chocolate completely dissolve and become glossy.
    • As ganache cool it will become little thick in consistency.

    For Serving

    • Spread Chocolate Ganache generously over toasted bread and garnish with your choice of topping.
    • Sprinkle a pinch of salt, this adds a sophisticated touch.
    • Sample a few of these suggested ways to make chocolate toast and find your favorite.

    Notes

    You will also enjoy some of these simple recipes, Homemade Hot Chocolate, Palak Puri, Baked vegetable Idli
    Keyword Chocolate Ganache Bites, Dessert, Homemade, Kid Friendly, Party Snack, Quick And Easy, Sophisticated, Tea Time Snack, World Class Recipe
    Tried this recipe?Let us know how it was!
  • Sauteed Cauliflower

    Sauteed Cauliflower

    A plate of sautéed cauliflower garnished with sliced almonds and red pepper strips.

    Sautéed Cauliflower

    Sautéed cauliflower is a simple and delicious side dish. This is my favorite way to serve cauliflower because its simple, quick, and delicious.
    5 from 6 votes
    Course Side Dish
    Cuisine Indian
    Servings 3 people

    Ingredients
      

    • 4 cup Cauliflower cut into florets
    • 1 ½ Tbsp Oil
    • ½ tsp Cumin seeds
    • 3 Tbsp Yogurt
    • 1 tsp Salt
    • tsp Black pepper
    • ½ tsp Sugar
    • 1 tsp Ginger juice
    • 1 Tbsp Green chili finely chopped
    • 1 Tbsp Cilantro finely chopped

    For Garnishing

    • 1 Tbsp sliced almonds
    • few thin slices red bell pepper

    Instructions
     

    • In a bowl mix the yogurt, salt, black pepper, sugar, ginger juice (shred the ginger using fine shredded and squirgreen chili, and cilantro, mix it well and keep aside.
    • Boil cauliflower in a large pot, boil them until cauliflower crisp and tender; drain well.
    • In a large skillet over medium heat, heat the oil. When oil is moderately hot add cumin seeds after seeds crack add cauliflowers Sauté’ the cauliflower and cook a few minutes, stirring, until it becomes lightly golden brown in color.
    • Turn off the heat and add the yogurt mix and mix it well. Add the spice mix just before serving.
    • Sprinkle with almonds and sliced red bell pepper
    Keyword Bhoona Phool Gobhi, Gluten Free, Healthy, Homemade, No Onion Garlic, Phool Gobhi, Quick And Easy, Sattvik Food, Side Dish, Vegetarian
    Tried this recipe?Let us know how it was!
  • Custard Toast Bites

    Custard Toast Bites

    Slices of toasted bread topped with custard and garnished with sliced pistachios, served with extra custard and a bowl of pistachios on the side.

    Custard Toast Bites

    Custard Toast Bites is custard flavored with saffron and cardamom and served over toasted bread. This recipe is definitely un-traditional but nonetheless a delicious approach. This is super easy to make and you can call this Custard Bruschetta. Custard Toast Bites can be served as a dessert or tea time snack.
    No ratings yet
    Course Appetizer
    Servings 4 people

    Ingredients


    • 12 thin slices of French bread bruschetta or use the regular size bread and cut them to size you will like
    • 2 Tbsp melted butter
    • 1 ¼ cup milk
    • ¼ cup heavy cream
    • ¼ cup sugar
    • 1 ½ Tbsp corn starch
    • Pinch saffron
    • tsp cardamom powder
    • 1 Tbsp sliced almond for garnishing
    • 1 Tbsp sliced pistachios for garnishing

    Instructions
     

    • In a heavy bottom pan; stir in the milk, cream, cornstarch, sugar, cardamom powder and saffron. Make sure the corn flour has dissolved completely, no lumps.
    • Turn the heat to medium and bring the milk mixture to a boil, stirring continuously. Turn the heat to low. Keep stirring until the mixture thickens. It is important to keep stirring continuously to avoid burning and the lumps.
    • Milk mixture should be consistency of thick batter. This should take about 3-4 minutes. Remember as custard will cool of it will become thicker. Turn off the heat and sliced almonds mix it well. The custard is ready.
    • Lightly butter the bread from both sides and toast to make them crisp.

    Notes

    For Serving
    Spread custard generously over toasted bread and garnish with pistachios.
    Keyword Bruschetta, Custard, Dessert, Eggless, Homemade, Quick And Easy, Saffron Custard, Snack, Vegetarian
    Tried this recipe?Let us know how it was!
  • Mojito Mocktail

    Mojito Mocktail

    Refreshing Mojito Mocktail served in tall glasses with cucumber slices, lemon, and mint leaves.

    Mojito Mocktail, Non-Alcoholic

    Cucumber Mojito is a very refreshing drink that is perfect for the spring and summer. It just started warming up this weekend in San Diego, so I was inspired to prepare this for my friends. This recipe is super easy, simple and is a delicious combination of flavors.  
    5 from 1 vote
    Prep Time 5 minutes
    Cook Time 5 minutes
    Total Time 10 minutes
    Course Drinks
    Cuisine Indian
    Servings 2 people

    Ingredients


    • 1 cup cucumber peeled deseeded and cubed
    • 2 Tbsp mint leaves chopped, just the leaves
    • 4 Tbsp simple syrup
    • 4 Tbsp lime juice
    • 1/2 tsp ginger paste

    For Garnishing

    • cucumber slices
    • lime wedges
    • mint leaves for garnish

    Also need

    • ice cubes
    • soda water

    Instructions
     

    • Simple syrup is easy to make take sugar and water equal parts. Take 1 cup sugar and 1 cup water Stir and place the saucepan over medium heat. By the time the edges start to simmer, the liquid should be completely clear, not cloudy. Turn off the heat. Simple syrup can be made in advance and can be refrigerated.
    • Blend cucumber, mint leaves, simple syrup, lime juice and salt together. Taste the mix if needed add more lime juice and simple syrup to taste.
    • Fill the serving glass half the way with ice, pour cucumber mixture over top, and fill glass with club soda. Garnish with cucumber slices, lime wedges or mint leaves, to your choice.
    Tried this recipe?Let us know how it was!

    Mojito Mocktail: How to make Mojito Mocktail without Alcohol

    Mojito Mocktail is a non-alcoholic beverage of classic Mojito cocktail, featuring a refreshing blend of lime, mint, sugar, and soda water. Bursting with citrus and herbal flavors, this mocktail is the perfect thirst-quencher for any occasion, whether hosting a summer party or just casually craving to get some sweet cold drinks to beat the heat.

    Why Drink Mojito Mocktail at the first place at all:

    1. Its Refreshing and Hydrating: The Mojito Mocktail is incredibly refreshing and hydrating, thanks to its combination of lime juice, mint, and soda water. It’s the perfect drink for staying cool and hydrated on hot summer days or after a workout.
    2. Citrusy Boost of Vitamin C: The lime juice in the Mojito Mocktail provides a tangy burst of flavor and a boost of vitamin C. Vitamin C is essential for immune function, skin health, and wound healing, making this mocktail nutritious.
    3. Herbal Infusion: Fresh mint leaves add a burst of herbal freshness to the Mojito Mocktail, providing a cooling sensation and a pleasant aroma. Mint is also known for its digestive properties, making this mocktail a soothing option for after meals.
    4. Versatile and Adaptable: The Mojito Mocktail is incredibly versatile and can be customised according to personal taste preferences. You can adjust the sweetness, tartness, and mintiness to suit your palate, making it a crowd-pleaser for guests of all ages.

    Variations of Summer Beverages:

    1. Aam ka Panna: Aam ka Panna (Raw Green Mango Drink) is a refreshing mango drink that is made from raw green mangoes and some mild spices.
    2. Fruit Smoothie: This great smoothie consists of cantaloupes, strawberries, and yogurt with a touch of ginger giving a nice and tangy taste.
    3. Kale and Spinach Smoothie: Kale and spinach smoothie, is a healthy way to start your day! This is a delicious and refreshing drink. 
    4. Mango Smoothie: This recipe for Mango Smoothie is simply delicious, not to mention a perfect summer drink. This is a very easy and quick recipe. Mango smoothie can also make a very refreshing dessert when served in a bowl.

    Tips for Making Perfect Mojito Mocktail:

    1. Use Fresh Ingredients: For the best flavor, use fresh lime juice, mint leaves, and high-quality soda water in your Mojito Mocktail. 
    2. Muddle Gently: When mixing the mint leaves and lime wedges, be sure to do so gently to release their flavors without crushing them into a pulp. Muddling too vigorously can result in bitter flavors from the mint stems and pith of the lime.
    3. Adjust Sweetness to Taste: Taste the mocktail as you go and adjust the sweetness to your liking. You can more or less use simple syrup or sugar depending on how sweet you prefer your mocktail.
    4. Serve Chilled: Serve the Mojito Mocktail over ice in a chilled glass for maximum refreshment. Garnish with a sprig of fresh mint and a slice of lime for a beautiful presentation.

    FAQs about Mojito Mocktail:

    Can I make Mojito Mocktail in advance? 

    While it’s best to prepare Mojito Mocktail fresh to enjoy its vibrant flavors, you can pre-mix the lime juice, mint leaves, and simple syrup in advance and store them in the refrigerator until ready to serve. Add soda water and ice just before serving.

    Can I make Mojito Mocktail without sugar? 

    Yes, you can make Mojito Mocktail without sugar by using a sugar-free sweetener such as stevia or monk fruit sweetener. Adjust the sweetness to your taste preference, keeping in mind that the sugar helps balance the tartness of the lime juice.

    Can I make Mojito Mocktail with other herbs?

     While mint is the traditional herb used in Mojito Mocktail, you can experiment with other herbs such as basil, cilantro, or thyme for a unique twist. Be mindful of the flavor profile of the herbs and adjust the quantities accordingly.

    Whether enjoyed as a refreshing summer cooler or a festive party drink, its citrusy and herbal flavors are sure to delight your taste buds. With endless variations to explore and simple tips to follow, you can easily master the art of making perfect Mojito Mocktails at home and impress your family and friends with your mixology skills.

    Stay tuned for more culinary delights at Manjula’s Kitchen!

  • Hyderabadi Bagara Baingan

    Hyderabadi Bagara Baingan

    Hyderabadi Bagara Baingan

    Hyderabadi Bagara Baingan

    Bagara Baingan is a popular Hyderabadi dish. It is made with small eggplants that are cooked in a rich masala curry. Hyderabadi baingan is the perfect party dish to serve to guests with a sophisticated palette because of the mixture of nutty spices.
    4.75 from 4 votes
    Prep Time 15 minutes
    Cook Time 30 minutes
    Total Time 45 minutes
    Course Main Course
    Cuisine Indian
    Servings 4 people

    Ingredients


    • 12 small Indian Eggplant if they are not available, use Japanese eggplant and slice them in long 8 long pieces
    • 2 Tbsp oil to stir fry the eggplants

    For Spice Mix

    • 1 tsp cumin seeds jeera
    • 1/4 tsp fenugreek seeds mathi
    • 1 Tbsp coriander seeds sabut dhania
    • 10 cashews crushed kaju
    • 1 Tbsp sesame seeds til
    • 2 Tbsp coconut powder gola

    For Gravy

    • 2 Tbsp oil
    • 1/2 tsp black mustard seeds rai
    • 1/8 tsp asafetida hing
    • 1/2 tsp turmeric haldi
    • 1 tsp red chili powder
    • 1 tsp sugar
    • 1-1/2 tsp salt
    • 1 Tbsp tamarind paste
    • 2 tomatoes cut them in small pieces will make 1-1/2 cup puree
    • 1 tsp chopped ginger
    • 2 Tbsp chopped cilantro for garnish

    Instructions
     

    • Make a slit into eggplants, but not cutting them into half. If you are using Japanese eggplant slice them in 8 long pieces.
    • Heat the oil in flat frying pan over low medium heat and stir-fry eggplant rotating occasionally till they are tender not mushy. Set them aside.
    • For the spice mix take all the ingredients, cumin seeds, fenugreek seeds, coriander seeds, cashews, sesame seeds, and coconut powder, and grind them in fine powder. Set it aside.
    • Blend tomatoes and ginger together to make into fine puree. Set it aside.
    • Heat the flat frying pan over low medium heat, I am using the same pan I stir fry the eggplants. When the oil is moderately hot add the mustard seeds as they crack turn off the heat. Add all the spices asafetida, turmeric, red chili powder and dry spice mix stir for about 2 minutes, all the spices should be roasted.
    • Add tomato puree, sugar, salt, and about 1 tablespoon of tamarind paste. Stir fry the gravy until the mix becomes a little thick and start leaving the oil from the sides. Add 1/2 cup of water and bring it to a boil.
    • Add the eggplant spreading in the frying pan, stir gently cover the pan lower the heat to low and let it simmer for about 7-8 minutes stirring occasionally.
    • Eggplant should be soft and tender not mushy and coated well with the spices. Adjust the gravy thickness to your choice. Add the cilantro stir gently.
    Tried this recipe?Let us know how it was!

    Bagara Baingan | Bagara Baingan Hyderabadi Recipe | Manjula’s Kitchen 

    Indulge in the rich flavors of Hyderabadi Vegetables Curry cuisine with this authentic Hyderabadi Bagara Baingan recipe. A Gluten free and vegan delight with rich flavours offering spicy tantalizing savoury in every bite. Begin by making a careful slit into the eggplants, ensuring not to cut them in half. If you opt for Japanese eggplants, slice them into 8 long pieces for an elegant presentation, enhancing the visual appeal of this Hyderabadi baingan dish.

    In the initial steps of crafting the Hyderabadi Bagara Baingan, take a flat frying pan and heat oil over a gentle low-medium flame. This crucial stage sets the foundation for the distinctive flavors of the bagara baingan recipe, ensuring a perfect balance of aromas.

    As the oil warms embark on the preparation of the eggplants, a key element in the Hyderabadi baingan recipe. Stir-fry the eggplants with precision, delicately rotating them occasionally to evenly expose each side to the heat. The goal is to achieve the ideal tenderness without allowing them to become mushy, preserving the integrity of the eggplants in the bagara baingan.

    The careful execution of this step is vital to the success of the Hyderabadi bagara baingan recipe, as it lays the groundwork for the subsequent infusion of flavors. Once the eggplants have reached the desired level of tenderness, take a moment to appreciate the beautifully cooked result. Set aside these meticulously prepared eggplants, ready to absorb the forthcoming aromatic spices that define the distinctive taste of the Hyderabadi bagara baingan.

    This meticulous stir-frying process not only ensures the perfect texture of the eggplants but also sets the stage for the symphony of flavors that will unfold in the later stages of the bagara baingan Hyderabadi preparation. As you proceed with the hyderabadi baingan recipe, the memory of these beautifully cooked eggplants will linger, enhancing the overall culinary experience of savoring this Hyderabadi classic.

    Now, let’s prepare the spice mix that will elevate the Bagara Baingan Hyderabadi to new heights. Gather cumin seeds, fenugreek seeds, coriander seeds, cashews, sesame seeds, and coconut powder. Grind them into a fine powder, creating a fragrant and flavorful blend. This spice mix will play a crucial role in the distinctive taste of this Hyderabadi delicacy.

    Moving on, blend tomatoes and ginger into a fine puree, setting it aside for later use. In the same flat frying pan used for stir-frying eggplants, heat it over low-medium heat. Once the oil is moderately hot, add mustard seeds. As they crack, turn off the heat and introduce the spices – asafetida, turmeric, red chili powder, and the previously prepared dry spice mix. Stir this aromatic blend for about 2 minutes, ensuring the spices are well-roasted.

    Add the tomato puree, along with sugar, salt, and a tablespoon of tamarind paste to the mix. Stir-fry the gravy until it thickens slightly, allowing the oil to separate from the sides. Pour in 1/2 cup of water and bring it to a gentle boil.

    Now, carefully add the stir-fried eggplants into the pan, ensuring they are well-coated with the aromatic spices. Stir gently, cover the pan, lower the heat to simmer, and let it cook for about 7-8 minutes. The eggplants should be soft and tender, not mushy, absorbing the flavors of the rich Hyderabadi Bagara Baingan.

    Adjust the thickness of the gravy to your preference and finish by adding fresh cilantro, stirring gently. Your Hyderabadi Bagara Baingan is now ready to be savored, offering a symphony of flavors that characterize this classic dish.

    You may also like: Navratan Korma, Butter Paneer Masala, Mushroom with Peas, Aloo Matar & Kela ki Sabji

  • Potato And Cauliflower Gnocchi

    Potato And Cauliflower Gnocchi

    Potato and Cauliflower Gnocchi

    Potato and Cauliflower Gnocchi

    Gnocchi (pronounced No-chee) is a classic Italian dish. This vegan and gluten free Gnocchi is made with potato and Cauliflower. I have topped it off with a pear sauce to add my own twist to the recipe. This is Crispy on the outside and fluffy on the inside, this recipe is absolutely mouth-watering. This dish was a request from my granddaughter and I’m so glad I gave it a try.
    4.38 from 8 votes
    Prep Time 10 minutes
    Cook Time 20 minutes
    boiling time 20 minutes
    Total Time 30 minutes
    Course Side Dish
    Cuisine Fusion
    Servings 6 people

    Ingredients


    For Gnocchi

    • 2 cup cauliflower florets approximately
    • 1 cup potatoes boiled, peeled and shredded
    • 2 Tbsp corn starch arrow root
    • 2 Tbsp rice flour
    • 1/2 tsp ginger paste
    • 1/2 tsp salt
    • 1/8 tsp black pepper
    • 2 Tbsp oil

    For Pear Sauce

    • 1 pear peeled and sliced
    • 1/4 cup sugar
    • 1 Tbsp olive oil
    • 1/8 tsp black paper
    • 1/4 tsp salt
    • 1 Tbsp lemon juice
    • 1 tsp ginger paste

    Instructions
     

    To make the Pear Sauce

    • Heat the pan on low medium heat, I prefer nonstick pan, cook all the sauce ingredients together, olive oil, pear, sugar, black pepper, salt, lemon juice, ginger, mix it well and cook over medium high heat.
    • Keep stirring until sugar is melted and start caramelizing while stirring keep scraping the sides. This should take about 3-4 minutes.
    • Caramelize sugar has nice aroma and gives sauce a good golden color. Transfer to small bowl and mash it. 

    To make Gnocchi (NOK-EE)

    • Make sure remove the stems, boiled them till they are tender, drain the water squeeze the cauliflower to remove the access water, and pat dry.
    • In a bowl add the cauliflower and potatoes and mash it well, add corn starch, rice flour, salt, black pepper, and ginger paste, mix it well, and knead to make a smooth dough.
    • Divide the dough in 2 equal parts and roll them in one-inch calendar shape, if it is sticking to surface sprinkle some rice flour this will help rolling.
    • Take the sharp knife and slice them about half inch thick
    • Heat the non-stick flat frying pan over medium heat and oil it generously. Spread the Gnocchi do not overcrowd them it will be hard to flip, wait for about two minutes and turn them over, they should be light golden brown, and cook from other side same, Gnocchi should be golden brown both sides.
    • Serve them pear sauce, 

    Notes

    It is important to pat dry the cauliflower or air dry.
    Tried this recipe?Let us know how it was!

  • Crispy Potato Balls

    Crispy Potato Balls

    Crispy Potato Balls

    Crispy Potato Balls, Potato Nuggets

    These bite-sized appetizers are the perfect snack to serve as a tea time snack or starter at a dinner party. Crispy on the outside and soft on the inside, these potato balls are just what you need to satisfy your taste buds. This recipe is my younger sister Kumkum’s recipe, and I am so glad to be sharing it today.
    4.75 from 8 votes
    Prep Time 10 minutes
    Cook Time 20 minutes
    Boiling Potatoes 20 minutes
    Total Time 30 minutes
    Course Appetizer
    Cuisine Indian
    Servings 4 people

    Ingredients


    • 2 cup potatoes boiled, peeled and finely shredded
    • 3 Tbsp corn starch
    • 1/2 tsp salt
    • 1 tsp ginger finely shredded
    • 1 Tbsp green chili finely chopped
    • 2 tsp oil

    Instructions
     

    • In a bowl mix potato, about 2-1/2 tablespoons corn starch, and salt. Oil your palm and knead the potatoes, making into very smooth dough, if needed oil your palm again. Add the ginger and green chili and knead it again to incorporate all the ingredients together. If needed oil your palm again and dust the corn starch over the dough as needed.
    • Divide the dough into 20 pieces and roll them between your palms, making them into smooth balls.
    • Heat the oil in a frying pan on medium heat. The frying pan should have about 1 inch of oil. To check if the oil is ready, put little batter in the oil. The batter should raise to the top but not change color right away.
    • Drop the potato balls slowly in the oil making sure don’t overlap them.
    • Fry the potato balls until they turn golden brown, turning them occasionally. This should take about 6-8 minutes.
    • When they are golden brown, take them out with a slotted spoon. Place them on a paper towel to absorb the extra oil.
    • Crispy Potato balls will be crispy outside and soft inside, that is texture you are looking for this recipe.

    Notes

    Serving Suggestion, 
    Serve with tamarind chutney, recipe is on my website.
    Tried this recipe?Let us know how it was!

    How to make Crispy Potato Balls Recipe 

    Crispy Potato Balls is a culinary masterpiece that combines the crispiness of a golden exterior with an irresistibly soft interior. Elevate your snacking experience with this easy-to-follow How to Make Crispy Potato Balls recipe formulated at Manjula’s kitchen that transforms humble potatoes into crunchy delights. In the world of culinary delights, few snacks match the universal appeal of Crispy Crunchy Potato Balls. This appetizer recipe is a testament to simplicity and sophistication, as simple ingredients transform into a crispy exterior enveloping a soft, flavorful core. 

    Step 1: Preparing the Potato Dough: 

    In the first step of how to make crispy potato balls recipe, we work on crafting the foundation of our Crispy Crunchy Potato Balls. Potatoes, boiled to perfection and finely shredded, lay the groundwork for the following gastronomic delight. To this, we add enigmatic corn starch. This culinary secret weapon bestows the coveted crunchiness upon our crispy potato balls.

    The process begins with a harmonious mingling of potato cornstarch with a dash of salt in a mixing bowl. Facilitate the cohesion of these elements with a touch of oil to our palms. Kneading the potatoes with the gentle guidance of oiled hands, we sculpt them into a velvety-smooth dough, a canvas ready to absorb the nuanced flavors we will introduce.

    The stage is set, and with meticulous care, we incorporate the finely shredded ginger and finely chopped green chili into the potato dough. Each addition contributes to a symphony of flavors, infusing the dough with layers of complexity and a subtle kick that promises to tantalize the taste buds. 

    Step 2: Shaping into Smooth Balls: 

    With our potato dough now a harmonious blend of textures and tastes, we move to the second act of our culinary performance. Dividing the dough into twenty equal portions, shaping them into uniform balls. The palms become the instrument, delicately rolling each part to perfection, ensuring a seamless and consistent experience with every bite. As the balls form, anticipation builds, for they are destined for the sizzling embrace of hot oil.

    Step 3: Frying the Potato Balls 

    Put oil in the frying pan generously filled with approximately one inch of oil. As we gently release a tiny droplet of batter into the oil, we see the silent cues of readiness – the batter should ascend to the surface. The potato balls descend into the oil with precision and care, a symphony of sizzles marking their journey to golden perfection. The medium-intensity heat caresses the balls, coaxing them to transform into golden brown perfection. Occasional turns in the oil ensure an even, golden-brown hue.

    Step 4: Golden Brown Perfection: 

    Our potato balls appear transformed after a brief time in the hot embrace of oil. The once unassuming dough has metamorphosed into golden, crispy, crunchy potato balls on the outside and lusciously soft within. This moment, marked by a divine golden-brown hue, signals the culmination of our culinary alchemy. With the grace of a culinary maestro, we retrieve the golden orbs from the pan, employing a slotted spoon as our instrument. Placing them on a paper towel-lined stage, we allow the excess oil to gracefully exit the scene, leaving only the essence of crispy perfection.

    Step 5: Serving Crispy Potato Balls 

    Finally, the Crispy Potato Balls, now adorned in their golden glory, await their moment on the dining table. With a promise of a crispy exterior and a soft, flavourful interior, each ball invites us to savor the fruits of our culinary endeavors. The symphony of textures and tastes, meticulously crafted through each step, culminates in a dish that transcends the ordinary and is best served with tamarind chutney, hari chutney, or mint chutney

  • Khasta Mathri

    Khasta Mathri

    Khasta Mathri

    Khasta Mathri – Indian Savory Crackers

    Khasta Mathri is a popular, classic savory snack. You can serve these Mathries with pickle at tea time or you can enjoy as is! For all the upcoming holidays, Mathries make a good snack to have around to serve to all guests. They also make for a simple but special homemade gift.
    4.67 from 6 votes
    Prep Time 10 minutes
    Cook Time 20 minutes
    Total Time 30 minutes
    Course Appetizer
    Cuisine Indian
    Servings 6 people

    Ingredients


    • 1 cup all-purpose flour maida or plain flour
    • 2 Tbsp sooji semolina flour
    • 1/2 tsp salt
    • 1/4 tsp black pepper crushed
    • 1/4 tsp cumin seeds jeera
    • 2 Tbsp oil canola or vegetable oil
    • 1/2 cup chilled water
    • 2 drops lemon juice
    • oil to fry

    Instructions
     

    • Mix the flour, sooji, salt, black pepper, cumin seeds, lemon drops and oil. Note lemon should be just 2-3 drops, we are not adding this to flavor, lemon is added to give the crispness, also Mathries will absorbed less oil.
    • Add the chilled water slowly, mixing with your fingers as you pour. Do not knead the dough. The dough should be soft.
    • Cover the dough and let it sit for at least fifteen minutes. Divide the dough into about 20 equal parts, I decided to make 14.
    • Take each part of the dough and make a flat ball shape. Roll them into 2-inch circles. Prick each mathri with a fork about 6-8 places, both sides each, to prevent puffing the mathri when frying.
    • Heat the oil in a frying pan on low medium heat. The frying pan should have at least 1 inch of oil. To check if the oil is ready, put a small piece of dough in the oil. The dough should make the oil sizzle and come up slowly.
    • Fry mathri in batches, making sure to place just enough mathri to cover the frying oil. Fry them until both sides are a light golden-brown. This should take about 5-7 minutes. Take them out over paper towel, which will absorb the extra oil

    Notes

    Suggestions
    Serve the Khasta Mathri with cranberry pickle, or Chatpata Aloo
    Khasta Mathris can be stored for a couple of months in airtight containers.
    If the mathris are cooked on high heat, they will be soft.
    Keyword Mathri, Salted Crackers, Tea Time Snack
    Tried this recipe?Let us know how it was!

    Khasta Mathri Recipe: How to make Khasta Mathri

    Khasta Mathri is a popular Indian savory snack enjoyed across India, particularly during festivals, tea-time, or as a crunchy accompaniment to meals. 

    These golden-brown, flaky crackers are known for their irresistible crispiness and rich flavour, making them a favorite among snack lovers of all ages. 

    Made from a simple dough of all-purpose flour, ghee (clarified butter), and spices, Khasta Mathri is deep-fried to perfection, resulting in a crunchy texture and aromatic taste.

    Khasta Mathri for Festive Season

    Crunchy Texture: Khasta Mathri’s signature feature is the crunchy and flaky texture, which provides a delightful snacking experience with every bite. The layers of dough create a light and airy interior, while the deep-frying process gives the crackers a golden-brown exterior that’s irresistibly crispy.

    Rich Flavor: Despite its simple ingredients, Khasta Mathri is packed with flavor, thanks to the addition of aromatic spices such as ajwain (carom seeds), black pepper, and cumin seeds. These spices lend a warm and fragrant aroma to the crackers, enhancing their overall taste and appeal.

    Long Shelf Life: Khasta Mathri has a long shelf life and can be stored in an airtight container for several weeks without losing its crispiness or flavor. This makes Khasta Mathri an ideal snack for travel, picnics, and gatherings, as it can be prepared in advance and enjoyed on-the-go.

    Versatile Snack: Khasta Mathri is a versatile snack that can be enjoyed on its own or paired with various accompaniments. Serve Khasta Mathri with a cup of hot tea or chai for a classic tea-time snack, or pair it with chutney, pickle, or yogurt for added flavor and contrast.

    Other Variations of Mathri:

    • Namkeen Mathri: Mathri (Salted Crackers) are similar to salted crisp crackers and are a very popular afternoon snack. Traditionally, mathris are served with spicy pickles.
    • Aachari Mathri: Achari Mathries, is a traditional staple snack in North India. They are usually served with spicy pickles, but in this recipe we have added mango pickle spices in the dough instead to add a tangy flavor to the mathri itself.
    • Masala Mathri: Enhance the flavor of Mathri by adding a blend of spices and herbs such as garam masala, turmeric, and coriander powder to the dough. Masala Mathri has a complex and aromatic taste that’s sure to impress your taste buds.

    Tips for Making Perfect Khasta Mathri:

    Rest the Dough: Allow the Khasta Mathri dough to rest for at least 15 minutes before rolling and shaping to relax the gluten and improve the texture of the crackers. Resting the dough allows the flavors to meld together, resulting in a more flavorful Khasta Mathri.

    Roll Evenly: Roll out the Khasta Mathri dough into thin, even discs to ensure uniform cooking and crispiness. Use a rolling pin and a dusting of flour to prevent sticking and achieve the desired thickness.

    Fry at the Right Temperature: Fry the Khasta Mathri in hot oil at the correct temperature to ensure that they cook evenly and become golden brown and crispy. Avoid overcrowding the frying pan or kadai to maintain the temperature of the oil.

    FAQs about Khasta Mathri:

    How do I store Khasta Mathri? 

    Store Khasta Mathri in an airtight container at room temperature for up to 2-3 weeks. Line the container with parchment paper or tissue paper to absorb any excess moisture and maintain the crispiness of the crackers.

    Can I freeze Khasta Mathri dough? 

    Yes, you can freeze Khasta Mathri dough for future use. Shape the dough into a ball, wrap it tightly in plastic wrap or aluminium foil, and store it in an airtight container or freezer bag. Thaw the dough in the refrigerator overnight before rolling and shaping.

    What can I serve with Khasta Mathri? 

    Khasta Mathri pairs well with a variety of accompaniments such as chutney, pickle, yogurt, or tea. Serve Khasta Mathri alongside your favorite dipping sauces or enjoy them on their own as a crunchy and flavorful snack.

    Khasta Mathri is a delicious and versatile snack that’s perfect for any occasion. Whether enjoyed as a tea-time treat, party snack, or crunchy accompaniment to meals, Khasta Mathri offers a delightful combination of crispy texture and bold flavors. With its customizable variations, long shelf life, and simple preparation, Khasta Mathri is sure to become a favorite in your snack preparation.

  • Aam ka Panna

    Aam ka Panna

    Raw Green Mango Drink

    Aam Ka Panna (Raw Green Mango Drink)

    Aam ka Panna (Raw Green Mango Drink) is a refreshing healthy mango drink that is made from raw green mangoes and some mild spices. This chilled drink is great for hot summer days as it has a very nice cooling effect.
    3 from 3 votes
    Prep Time 10 minutes
    Cook Time 15 minutes
    Total Time 25 minutes
    Course Drinks
    Cuisine Indian
    Servings 4 people

    Ingredients


    • 2 cup raw cooking mango peeled and cubed,
    • 3/4 cup sugar adjust as needed
    • 1/2 tsp salt
    • 1/2 tsp black salt
    • 1 tsp dry roasted cumin seed powder
    • 1/4 tsp black pepper
    • 1/4 cup mint leaves

    For Serving

    • Few fresh mint leaves for garnishing
    • 2 cup crushed ice

    Instructions
     

    • Peel the mango, slice it into large pieces and remove the seed.
    • Boil the mango slices in about 2 cups of water until the mango slices are well cooked. It should take about 10 minutes.
    • After the mango cools off, blend the mango with all the ingredients except use ½ cup of sugar we will add the sugar as needed.
    • Add about 2 cups of water, taste the panna and adjust the salt and sugar. Panna should have the consistency of orange juice. 
    • Serve over ice and use fresh mint leaves as a garnish.
    Keyword Aamras, Amchora, Kairi Panna, Raw Mango Drink, Raw Mango Juice, Refreshing, Summer Drink
    Tried this recipe?Let us know how it was!

    Raw Mango Drink | Aam Panna Recipe

    Instructions:

    As the summer sun intensifies, the quest to satisfy our thirst for beverages that beats the heat becomes paramount, prompting us to seek refuge from its relentless heat. An array of choices presents itself, from invigorating mojito mocktails and Jal Jeera to the soothing allure of salted lassi. Amidst these options, a particular favorite emerges – the cherished Aam ka Panna or raw mango juice. 

    Discover a recipe to satisfy your summer cravings with this delightful blend. Enjoying the delicious combination of sweet and tangy raw mangoes in the hot summer days is a beloved tradition for numerous individuals. An excellent method to relish the tropical fruit’s essence is by making a revitalizing green mango juice, commonly referred to as raw mango drink.

    Follow this detailed tutorial to assist you in making this invigorating drink that harmoniously combines the sharpness of raw mangoes, the sweetness of sugar, and the crispness of mint leaves.

    Step 1: Preparing the Raw Mango 

    To embark on this gastronomic journey, opt for ripe but still firm raw mangoes. The objective is to peel the mango, cut it into sizable chunks, and gently extract the seed. The mango’s lively green color guarantees a delightful explosion of taste, rendering it perfect for our green mango juice recipe. The mango pieces should be sufficiently substantial to ensure a strong mango essence with each sip.

    Step 2: Cooking the Mango Slices

    In the subsequent phase, the raw mango’s delightful flavor is obtained by simmering the slices in about 2 cups of water. This step typically lasts for approximately 10 minutes, during which the mango slices undergo a remarkable transformation from their initial firmness to a tender and succulent state. As the water gently simmers and the mango slices gradually soften, the kitchen becomes infused with an enticing fragrance that promises a refreshing experience.

    Step 3: Blending the Mango

    After the mango slices have reached a suitable temperature, proceed to transfer them into a blender. Combine a thoughtfully selected array of ingredients, reserving half of the sugar for later use – we will incorporate it gradually to attain the ideal harmony of flavors. Through the blending procedure, the mango slices will be converted into a rich puree enriched with the flavors of the additional ingredients, establishing the foundation of our fresh mango juice.

    Step 4: Adjusting the Consistency and Flavor

    As the mixture reaches its final stage, add approximately 2 cups of water. This step serves a twofold purpose: it helps achieve a texture similar to that of orange juice, ensuring the right consistency for the raw mango juice, while also balancing the flavors to perfection. Now, it is time to embark on a delightful taste-testing adventure. Take a sip of the raw mango juice, evaluate its saltiness and sweetness, and make any necessary adjustments. The objective is to create a harmonious fusion of flavors that captures the essence of summer in every delightful mouthful.

    Step 5: Presentation and Garnish

    With the green mango juice now attaining its peak deliciousness, it’s time to elevate the experience further. Serve the concoction over ice, transforming it into a chilled elixir that promises to quench the most formidable thirst. Consider garnishing your raw mango drink with fresh mint leaves to add a touch of sophistication and visual appeal. The vibrant greenery enhances the aesthetic and contributes a subtle herbal note, complementing the overall flavor profile.

    Crafting the perfect raw mango juice recipe, or raw mango drink, is an artful journey that intertwines the raw vitality of mangoes with the subtle nuances of complementary ingredients. This recipe encapsulates the essence of summer in a glass – a symphony of flavors that dance on the palate, providing a momentary escape to tropical bliss. So, peel, boil, blend, and savor the magic of green mango juice, a testament to the beauty of seasonal indulgence.

  • Khatta Meetha Chivda

    Khatta Meetha Chivda

    Khatta Meetha Chivda

    khatta Meetha chivda

    Khatta Meetha chivda is a popular tea time snack. This delicious sweet and salty snack can be enjoyed by all ages. Chivda is a flat rice, also known as poha.
    5 from 3 votes
    Prep Time 5 minutes
    Cook Time 20 minutes
    Total Time 40 minutes
    Course Snack
    Cuisine Indian
    Servings 8 people

    Ingredients


    • 2 cup chivda or poha available in different thickness, thick, medium, thin or nylon poha, I am using medium
    • 1/2 cup peanuts
    • 1/2 cup sugar
    • 1/4 tsp turmeric
    • 1/2 tsp salt
    • 1/8 tsp citric acid
    • 1/4 tsp red chili powder
    • About 18 curry leaves
    • Also need oil to fry

    Instructions
     

    • Grind sugar, salt, citric acid and red chili powder together making sugar in to powder. And all the ingredients will be mixed evenly. Set aside.
    • Wash and pet dry curry leaves and let it air dry for at least 10 minutes or more.
    • In a frying pan take about 1” of oil and heat on medium heat. Oil should be moderately hot. Put about 1/4 cup of chivda in an oil, chivda should come up right away, (otherwise oil is not hot enough) as soon chivda comes up over oil, lower the heat to low and stir fry chivda till it doubles in size but remains white in color. Take out fried chivda in a strainer to drain out excess oil. Repeat the process and fry the remaining chivda.
    • In the same oil fry peanuts over low heat till they are light brown.
    • Fry the curry leaves until they are crisp.
    • Take another frying pan large enough to hold all the ingredients, put I teaspoon of oil in the pan over low heat. put turmeric stir and put chivda, keep mixing till it is mixed well and chivda will be light yellow turn off the heat and let the chivda come to room temperature.
    • Add peanuts, sugar mix, and crush the curry leaves over. Mix it gently until all the ingredients are incorporated well.

    Notes

    You can store the Khatta Meetha Chivda, in a air tight container for a month. Store it in an air-tight container and enjoy this scrumptious snack for up to 2 months…!!
    Tried this recipe?Let us know how it was!

  • Vegetable Cheela Rolls

    Vegetable Cheela Rolls

    Vegetable Cheela Rolls recipe by Manjula

    Vegetable Cheela Rolls

    Vegetable Cheela Rolls is a healthy and delicious any-time meal. Cheela Rolls is a treat for people who are vegan and gluten free. Cheela is like a besan dosa, and can be used as a wrap and this cheela wrap with vegetables makes a wholesome meal. Cheela Rolls can be used as a snack and also for good a lunch box meal.
    4.41 from 5 votes
    Prep Time 10 minutes
    Cook Time 20 minutes
    Total Time 30 minutes
    Course Appetizer, Snack
    Cuisine Indian
    Servings 2 people

    Ingredients
      

    For Cheela

    • 1 cup besan Gram flour
    • 2 Tbsp rice flour
    • 1 tsp salt
    • 1/2 tsp cumin seeds jeera
    • 3/4 cup water to make batter
    • 4 tsp oil

    For Filling

    • 3 cup cabbage thinly sliced
    • 1/2 cup carrots shredded
    • 1/2 cup bell pepper thinly sliced
    • 2 tsp oil Canola or vegetable oil
    • 1/2 tsp cumin seeds jeera
    • 1/2 tsp mustard seeds rai
    • 2 tsp coriander powder dhania
    • 1/4 tsp chili powder
    • 1/2 tsp salt
    • 1/2 tsp sugar
    • 1 tsp lemon juice

    Instructions
     

    • Mix all the dry ingredients together, besan, rice flour, cumin seeds, and salt. Add the water slowly to make a smooth batter, consistency of Dosa batter. Set aside.
    • To make the filling: Heat the oil in frying pan over medium high heat. Oil should be moderately hot, add cumin seeds and mustard seeds, as the seeds crack. Add cabbage, carrots, and bell pepper. Stir-fry for about one minutes add all the other ingredients, coriander powder, chili powder, salt, sugar and lemon juice. Stir- fry for about three to four minutes, vegetables should be still crisp. Turn off the heat.
    • To make the Cheele: Use a heavy skillet and place on medium-high heat. Test by sprinkling a few drops of water on it. Water should sizzle right away.
    • Pour about 1/4 cup of the batter into the skillet and spread evenly with a back of spoon. Starting from the center, spiral the batter outward evenly to form a circle.
    • When batter starts to dry, gently spread one teaspoon of oil over it. Wait about 30 seconds; flip the cheela using a flat spatula.
    • Press the cheela lightly all around with the spatula to make cheela cook evenly. Turn the cheela and in the center of the cheele put about ½ cup of stir-fry diagonally and roll it.
    • Vegetable Cheela Roll is ready to serve. I like to serve this with Mango Pickle or Cilantro Chutney.
    • Enjoy!

    Notes

    In the ingredients, we need about 4 cups total of sliced vegetable (this includes the cabbage, bell pepper, and carrots)
    Suggestions
    Use or preferred vegetables and also works good with any leftover vegetables.
    Tried this recipe?Let us know how it was!

    A Comprehensive Guide to Besan Cheela Recipe with Vegetables

    Welcome to Manjula’s Kitchen, your ultimate destination for authentic Indian recipes and culinary inspiration. Today, we embark on a flavorful journey to explore the delightful world of Vegetable Cheela Rolls, a versatile and nutritious dish that is perfect for any meal of the day. Made with besan (gram flour) and a colorful assortment of vegetables, these cheelas are not only delicious but also packed with vitamins, minerals, and fibre. 

    Join us as we unravel the secrets to creating the perfect Besan Cheela Recipe with Vegetables, along with tips, variations, benefits, and answers to frequently asked questions. Vegetable cheela is a delectable gluten-free and vegan snack, perfect for appetizers or as a bread alternative, offering a flavorful option for those seeking tasty and wholesome options.

    Preparing the Batter for Vegetable Cheela 

    • Begin by preparing the batter for the besan Vegetable Cheela, the foundation of this delectable dish. In a mixing bowl, combine besan (gram flour) with water to create a smooth and lump-free batter. Add finely chopped vegetables such as carrots, bell peppers, spinach, and green chilies to the batter, along with spices like turmeric powder, cumin powder, and salt. Mix well to ensure that the vegetables are evenly distributed throughout the batter, imparting their vibrant colors and flavors.

    Cooking the Vegetable Cheela 

    • Once the batter is ready, it’s time to cook the Vegetable Cheela to perfection. Heat a non-stick skillet or tawa over medium heat and lightly grease it with oil or ghee. Pour a ladleful of the batter onto the skillet and spread it evenly in a circular motion to form a thin layer. Cook the cheela for a few minutes until the edges start to crisp up and bubbles appear on the surface. Flip the cheela using a spatula and cook the other side until golden brown and crisp. Repeat the process with the remaining batter, adjusting the heat as needed to ensure even cooking.

    Assembling the Vegetable Cheela Rolls 

    • Once all the cheelas are cooked, it’s time to assemble the besan Vegetable Cheela Rolls, adding an extra layer of flavor and texture. Place a cooked cheela on a clean surface and spread a generous layer of mint chutney or yogurt sauce over it. Add a filling of thinly sliced cucumber, tomatoes and fresh coriander leaves on one side of the cheela. Roll the cheela tightly into a cylindrical shape, securing the filling inside. Repeat the process with the remaining cheelas to create a batch of delicious besan Vegetable Cheela Rolls.
    • Tips for Perfect Vegetable Cheela Rolls Every Time 

    • Use a non-stick skillet or tawa to cook the cheelas to prevent sticking and ensure easy flipping.
    • Add a pinch of baking soda to the batter to make the cheelas light and fluffy.
    • Experiment with different vegetables and spices to customize the flavor of your cheelas according to your taste preferences.
    • Serve the besan Vegetable Cheela Rolls hot with a side of green chutney or ketchup for dipping.

    Variations of Besan Cheela Recipe with Vegetables 

    • Paneer Cheela: Add crumbled paneer (Indian cottage cheese) to the vegetable filling for added protein and richness.
    • Masala Cheela: Sprinkle chaat masala or garam masala over the cooked cheelas for an extra burst of flavor.
    • Cheese Cheela: Grate some cheese over the filling before rolling the cheelas for a gooey and indulgent twist.

    Health Benefits of Vegetable Cheela Rolls: 

    Vegetable Cheela Rolls are not only delicious but also nutritious, offering a range of health benefits:

    • Besan (gram flour) is rich in protein, fiber, and essential nutrients, making it a healthy alternative to refined flour.
    • Vegetables add vitamins, minerals, and antioxidants to the dish, promoting overall health and well-being.
    • Cheelas are low in calories and high in satiety, making them a filling and satisfying option for weight management.

    Frequently Asked Questions (FAQs) About Vegetable Cheela Rolls 

    Q: Can I make the batter for Vegetable Cheela in advance?

    A: Yes, you can prepare the batter in advance and store it in the refrigerator for up to 24 hours. Just give it a quick stir before cooking the cheelas.

    Q: Can I freeze Vegetable Cheela Rolls for later use?

    A: While it’s best to enjoy besan Vegetable Cheela Rolls fresh, you can freeze them for up to 1 month. Wrap them individually in plastic wrap or foil and store them in an airtight container. Thaw and reheat in a skillet or microwave before serving.

    Q: What other fillings can I use for Vegetable Cheela Rolls?

    A: You can get creative with the fillings for Vegetable Cheela Rolls. Try adding cooked beans, grated cheese, or leftover cooked vegetables for added flavor and variety.

    Congratulations! You have now mastered the art of making besan Vegetable Cheela Rolls, a wholesome and delicious dish that is sure to impress your family and friends. Whether enjoyed as a snack, appetizer, or light meal, these flavorful rolls are a testament to the rich culinary heritage of India. Explore more recipes and culinary inspirations on Manjula’s Kitchen and continue your culinary adventures with confidence and creativity.

    If you liked the recipe here are some other recipes that you may like too 

    Vegetable Cheela: A savory Indian pancake made with mixed vegetables and chickpea flour.

    Palak (Spinach) Paneer: A classic North Indian dish made with spinach and paneer cheese cooked in a creamy tomato-based sauce.

    Shahi Pulao (Vegetable Pulao): A flavorful rice dish made with spiced basmati rice and vegetables.

    Gobi (Cauliflower) Manchurian: Crispy cauliflower florets tossed in a tangy and spicy Indo-Chinese sauce.

    Aloo (Potato) Paratha: Whole wheat flatbread stuffed with spiced mashed potatoes and cooked on a griddle.

    Mango Lassi: A refreshing yogurt-based drink flavored with ripe mangoes and a hint of cardamom.

    Besan Ladoo: Traditional Indian sweet made with roasted chickpea flour, ghee, and sugar.