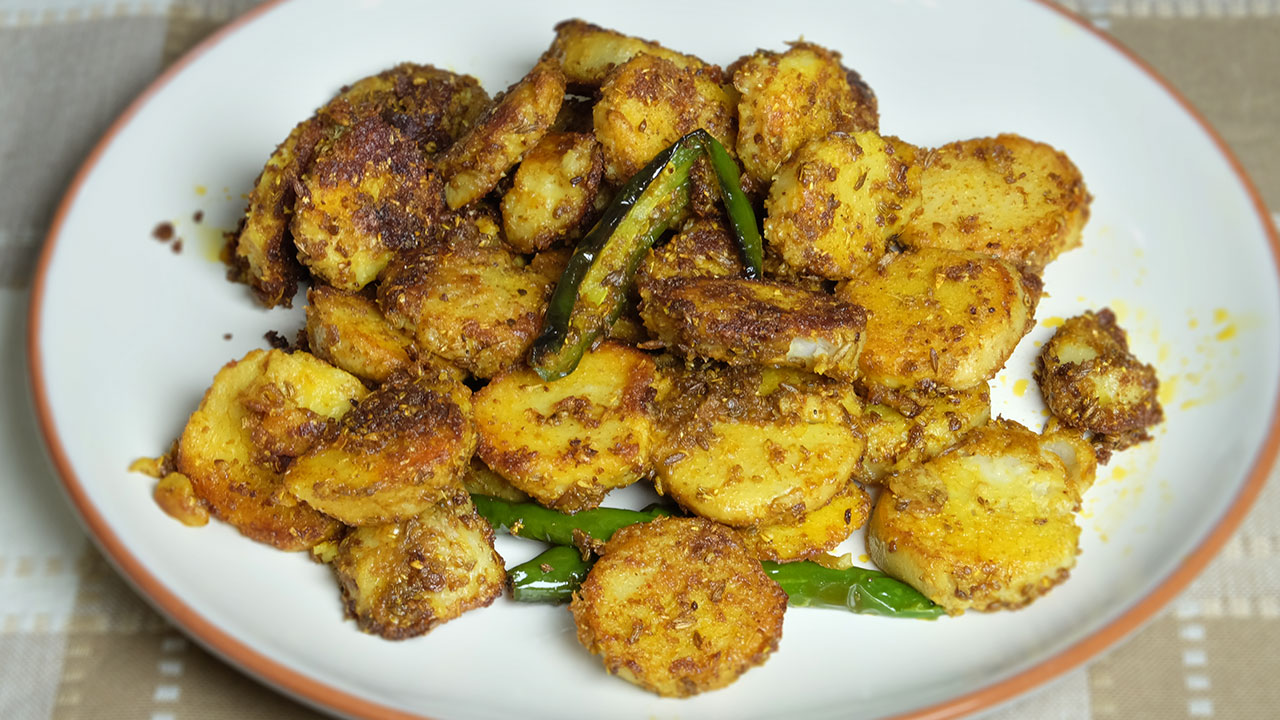
Arbi is also known as Taro root. Masala Arbi with a great blend of spices makes a very enjoyable side dish. This can complement any meal. Masala Arbi can be served with paratha or roti.
Wash arbi before boiling and do not over boil the arbi as they become very slimy. I prefer to boil arbi in a pot so that it is easy to check if they are cooked. Arbi should be firm, and knife should go through effortless.
Peel the skin and slice them into about 1/8” thick rounds. Set aside.
In a small bowl mix turmeric, coriander powder, and red chili powder with 1/4 cup of water to make a paste. Set aside.
Heat the oil in wide pan over medium heat, oil should be moderately hot, (when you add the cumin seed to oil it should crack right away).
Add carom seeds, and cumin seeds as cumin seeds crack add asafetida,
Stir and add spice paste stir for about 30 seconds till oil start separating from oil.
Add green chili stir for few seconds.
Add arbi spreading over the pan, sprinkle the salt, and mango powder gently fold the arbi with spice mix, all the arbies should be coated well with spices. Making sure arbies are not sticking to each other.
Sautée them over medium heat till they are lightly brown both sides. Turning them occasionally gently. This should take about 8-10 minutes.
Tadka Urad Dal was a favored lentil dish in my family while I was growing up. Dal is a staple dish in Indian meals and, for most Indian vegetarians, a frequent source of protein. This delicious, nourishing dish can accompany any number of different meals be it lunch or dinner.
Wash and soak urad dal for at least 20 minutes. Dal will be double in volume after soaking. Drain the water.
Put dal with 2 cups water into a pressure cooker and add salt, turmeric, and ginger. Close the cover and cook on medium high heat.
When the pressure cooker starts to steam, turn the heat down to low and cook for five minutes.
Turn off the heat and wait until all the steam has escaped before opening the pressure cooker. Dal should be soft. If needed add more water, dal should be not very mushy you should be able to see the grains. You should be able to scoop the dal with roti. Dal will thicken as it sits after cooking. So leave it more liquid than you want it to be.
Add garam masala, and mango powder mix it well.
Seasoning
Heat ghee in a small saucepan. Test the heat by adding one cumin seed to the ghee; if it cracks immediately, the oil is ready. Add the cumin seeds. When they begin to crack, add the asafetida, ginger, and green chilies. Stir for a few seconds. Add red chili powder and 1 tablespoon of water to prevent the spices from burning. Pour spiced chaunk over hot dal, before serving.
Urad Dal Tadka, also known as Urad Dal Ka Tadka or Black Urad Dal Tadka, is a flavorful and comforting lentil dish that hails from North India. This urad dal tadka recipe features split black gram lentils cooked to perfection and tempered with aromatic spices, creating a dish that’s gluten free, healthy, hearty and satisfying. Whether served with steamed rice, roti, or naan bread, urad dal tadka is sure to delight your taste buds and leave you craving more of its irresistible flavors.
To commence the preparation, it is imperative to first ensure that all the vegetables are meticulously dried, a step crucial in achieving the desired texture and consistency in the final dish. This entails patting dry each vegetable, thereby mitigating excess moisture which could potentially alter the outcome of the recipe.
Once the vegetables are suitably dried, the next step entails assembling all the ingredients within a food processor. This multifunctional kitchen appliance serves as the cornerstone in amalgamating the disparate elements into a cohesive mixture. However, it is imperative to exercise caution during this stage, as over-processing the ingredients can lead to an undesired homogeneity akin to a paste. The objective here is to achieve a harmonious blend wherein the individual components remain discernible, imparting both visual appeal and varied texture to the final product.
Upon achieving the desired consistency, the mixture is then transferred from the confines of the food processor. At this juncture, it should embody the texture of a chunky yet pliable dough, indicative of a successful amalgamation of ingredients. This textured amalgam serves as the canvas upon which the ensuing steps of the recipe unfold.
With the mixture at hand, the next course of action involves portioning it into individual servings. This is accomplished by dividing the mixture into 16 equal portions, each to be fashioned into flat patties approximately half an inch in thickness. This meticulous shaping process not only ensures uniformity in size but also facilitates even cooking, thereby contributing to the overall gustatory experience.
As the patties take shape, attention shifts towards the culinary medium responsible for their transformation—hot oil. In a frying pan preheated to medium-high heat, a liberal amount of oil is introduced, its shimmering surface a harbinger of the culinary alchemy about to unfold. With utmost care, the patties are then gently lowered into the oil, ensuring that they are evenly spaced and devoid of any overlap. This deliberate approach not only prevents overcrowding but also promotes uniformity in cooking, allowing each cutlet to attain a golden brown hue, indicative of its culinary readiness.
Throughout the frying process, periodic rotation of the cutlets ensures uniformity in color and texture, with a total cooking time averaging between 5 to 6 minutes. Once the desired golden hue is achieved, the cutlets are carefully removed from the frying pan, their journey culminating on a bed of absorbent paper towels. This final step serves the dual purpose of draining any residual oil while preserving the inherent crispiness of the cutlets.
In culmination, the fruition of this culinary endeavor is best savored when the cutlets are served piping hot, their delectable aroma tantalizing the senses. Paired with the refreshing zest of cilantro chutney, each bite is a symphony of flavors and textures—a testament to the meticulous preparation and artistry inherent in this timeless recipe.
Tips for Perfect Urad Dal Tadka
Soak Urad Dal: Soaking the urad dal before cooking helps reduce the cooking time and ensures that the lentils cook evenly and become tender.
Control Spice Level: Adjust the amount of dried red chilies and red chili powder according to your spice tolerance. For a milder dal, reduce the amount of spice used or remove the seeds from the dried red chilies.
Enhance Flavor with Ghee: For an extra layer of richness and flavor, consider using ghee (clarified butter) instead of oil for tempering the spices. Ghee adds a distinctive nutty flavor and aroma to the dish.
Variations of Urad Dal Tadka
Urad Chana Dal Tadka: Combine black urad dal with chana dal (split chickpeas) for a nutritious and flavorful variation of the dish. The combination of lentils adds texture and depth to the dal tadka.
Creamy Urad Dal Tadka: For a creamy texture, blend a portion of the cooked urad dal before adding it back to the tempering mixture. This creates a velvety sauce that coats the lentils, resulting in a luxurious and indulgent dal tadka.
Benefits of Urad Dal Tadka
Rich in Protein: Urad dal is a excellent source of plant-based protein, essential for muscle repair and growth.
High in Fiber: Urad dal is also high in dietary fiber, promoting digestive health and keeping you feeling full and satisfied.
Packed with Nutrients: Urad dal is rich in essential nutrients such as iron, magnesium, and potassium, supporting overall health and well-being.
Frequently Asked Questions (FAQs)
Can I make urad dal tadka without soaking the lentils?
While soaking the lentils helps reduce the cooking time, you can still cook urad dal tadka without soaking, although it may take longer for the lentils to become tender.
Can I make urad dal tadka ahead of time?
Yes, urad dal tadka tastes even better when allowed to sit for a few hours or overnight, allowing the flavors to meld together. Reheat it gently before serving.
Is urad dal tadka vegan-friendly?
Yes, urad dal tadka is inherently vegan as it contains no animal products. It’s a perfect option for those following a vegan or plant-based diet.
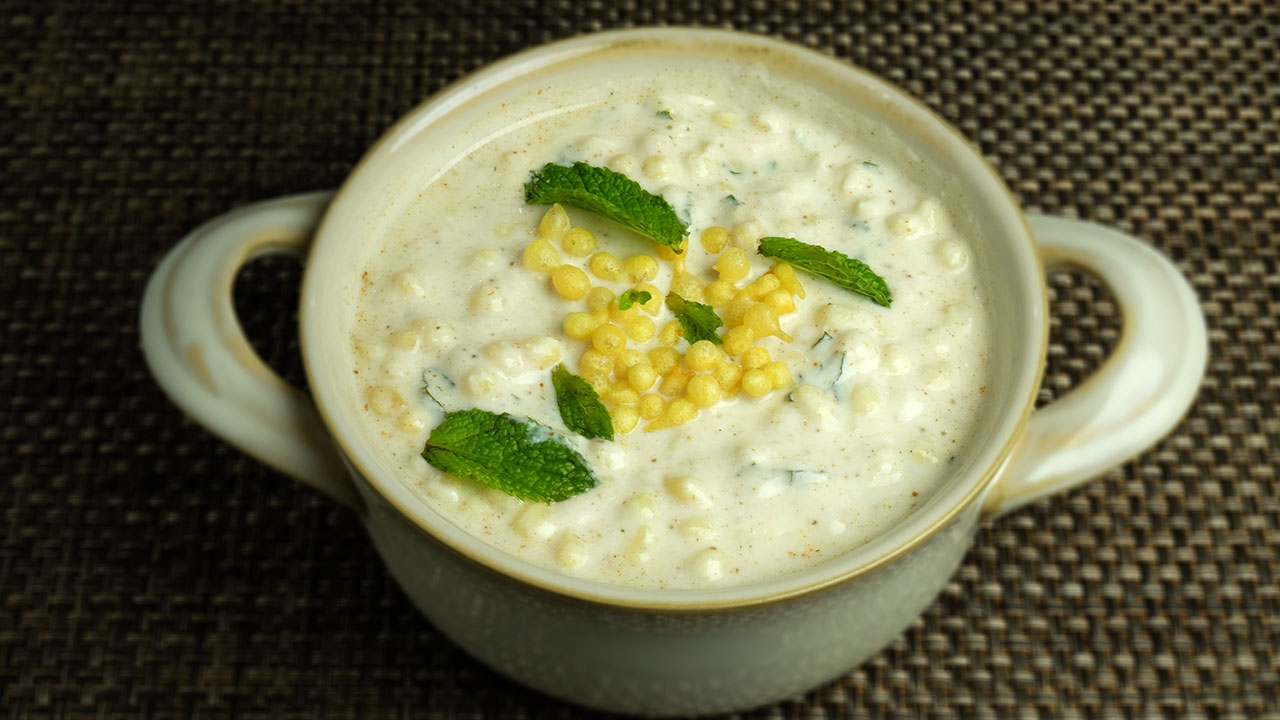
Boondi Ka Raita is a delicious and easy to make side dish which compliments any meal. Boondi ka raita is a yogurt based Indian condiment. Raita is an integral part of Indian cuisine.
Soaking Boondi: The Essential First Step in Boondi Raita Recipe
Embark on creating the best Boondi Raita by beginning with a crucial step: soaking boondi in warm water for approximately 10 minutes. This ensures the boondi achieves the ideal texture for a delectable raita. Allow the boondi to absorb the water, undergoing a softening process that enhances its ability to meld seamlessly with the yogurt.
Gently Squeezing Boondi: Preserving Texture for Perfect Boondi Raita
Following the soaking period, delicately squeeze the boondi in your palms, emphasising the importance of preserving its individual texture. Avoid mashing the boondies, ensuring they retain a distinct shape and a pleasant, slightly chewy consistency. This step contributes to the overall appeal and mouthfeel of the boondi raita.
Whisking Yogurt: Achieving the Right Consistency for Boondi Raita Recipe
In a bowl, whisk the yogurt, a pivotal step in mastering the art of the best Boondi Raita. Adjust the yogurt’s thickness by adding water as needed, aiming for a consistency resembling pancake or dosa batter. This meticulous process ensures that the yogurt provides the perfect base, allowing the other ingredients to harmonise in creating a flavorful raita.
Seasoning with Spices: Elevating Flavour in Boondi Raita Recipe
Once the yogurt reaches the desired consistency, add a medley of spices to elevate the flavour profile of your Boondi Raita. Incorporate salt, black salt, cumin seed powder, chilli powder, and finely chopped mint leaves. The combination of these spices creates a symphony of tastes, enhancing the overall richness and depth of the raita.
Mixing Boondi with Yogurt: Creating the Perfect Boondi Raita Blend
With the spices seamlessly integrated into the yogurt, introduce the soaked and gently squeezed boondi into the mixture. Thoroughly mix the boondi with the flavoured yogurt, ensuring an even distribution of spices and a cohesive blend. This step is crucial in achieving a balanced and well-infused Boondi Raita.
Garnishing with Mint Leaves: Final Touch to Boondi Raita Recipe
Elevate the visual appeal and freshness of your Boondi Raita by garnishing it with additional mint leaves. This final touch not only adds a burst of colour but also enhances the aromatic quality of the raita. The mint leaves serve as a delightful finishing touch, making your Boondi Raita an inviting and flavorful addition to any meal.
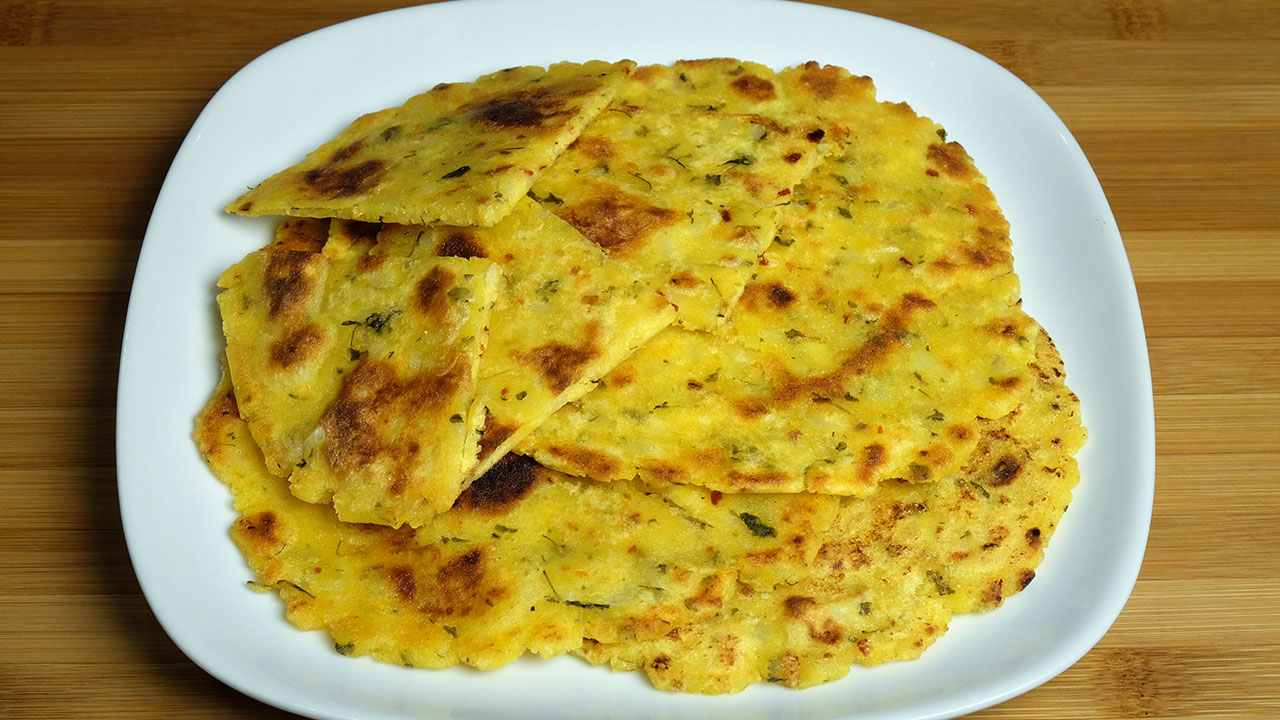
3tbspof ghee or clarified butter for cooking rotis
We also need a plastic sheet about 8” x 12” to roll the rotis I am using a zip lock bag.
Instructions
Combine all the dry ingredients in a bowl, corn flour, salt chili flakes, fenugreek leaves, and asafetida mix it well. Add potato to the mixture and mix. This will become very crumbly. Add water as needed to make the firm dough. Knead the dough for a minute. For Makki ki roti make the dough when ready to make roti.
Note: Makki ki roti is little hard to roll, that is the reason I decided to use potatoes. Potatoes help to bind the dough.
Divide the dough into 6 equal parts. Make them in smooth balls.
Take one ball press it between the plastic sheet plastic sheet help rolling the roti, roll the roti into about 6-inch circle. Note: maybe the edges will not be as clean as other rotis.
Heat the skillet over medium heat. Skillet should not be very hot. Otherwise rotis will not cook through.
Place the roti in the skillet. As it cooks, the dough will change color and have a dryer look. Turn the roti over using a spatula. You should see golden-brown spots on the semi-cooked side.
After a few seconds, spread 1 teaspoon ghee onto the roti using a spatula. Turn the roti over. Using your spatula, lightly press the entire surface of the roti to help it cook all the way through. Put the ghee on both sides of the roti while cooking. Grill the roti from both sides making sure it is golden-brown on both sides. Remove from heat.
Repeat with the remaining dough, until they are all done.
Notes
Serve them hot. Makki ki roti is traditionally served with sarson ka saag or dal makhani. If you are vegan use the oil for cooking the rotis.
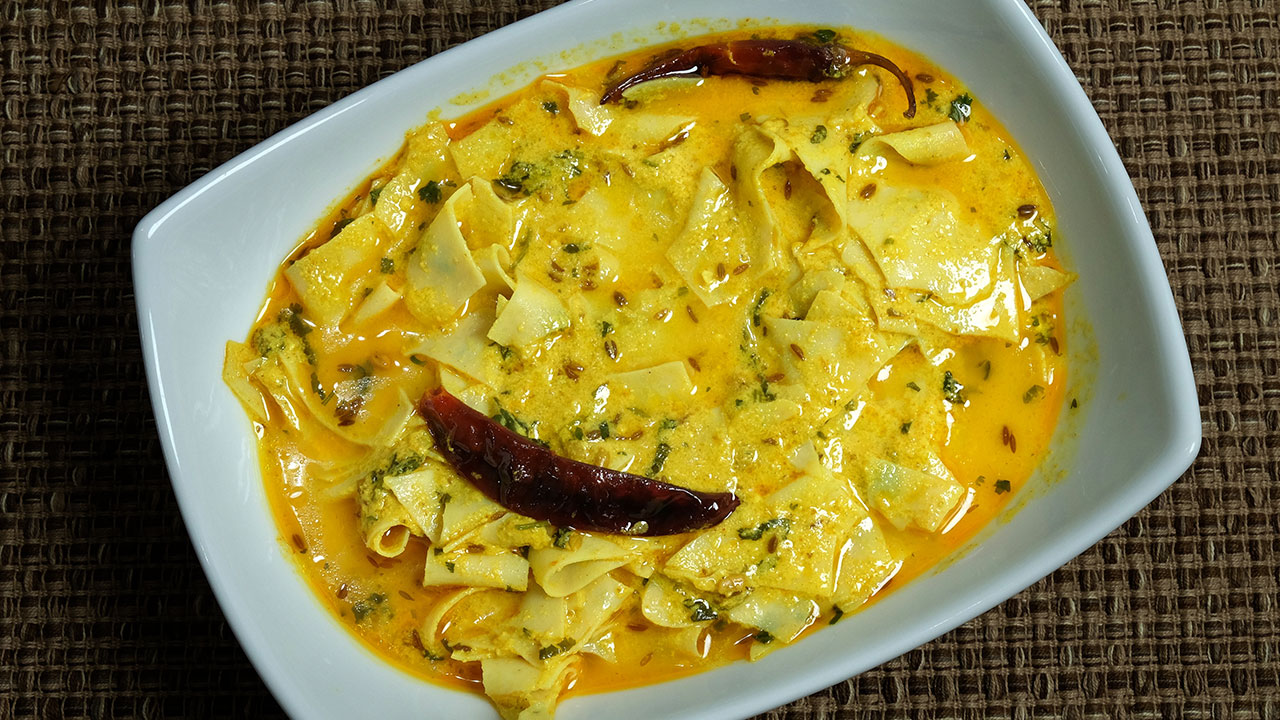
Papad ki sabzi this is a traditional Rajasthani dish. Papad ki subji is delicious and flavorful. Papad ki sabji has a distinct flavor and easy to make. Serve this hot with roti, paratha or plain rice.
4 plain papad I am using plain urad dal 8” diameter- Papadam
2tbspoil
1tbspcumin seeds – jeera
1/8tbspasafetida – hing
2 whole red chili dried
2cup of plain yogurt, sour yogurt works better – curd, dahi
2tbspfinely shredded ginger
1 tbspred chili powder – lal mirch
1/2tbspturmeric – haldi
2tbspcoriander powder – dhania
1/2tbspfenugreek seeds – mathi dana
1 tbspsalt
2 tbspfinely chopped cilantro – hara dhania
Instructions
Wash and soak fenugreek seeds for about 5 minutes, and change the water 3-4 times, this will reduce the bitterness from the fenugreek seeds. Drain the water and set aside.
Break the papad in small pieces. Set aside.
In a bowl beat the yogurt until it is smooth. Add ginger, chili powder, turmeric, coriander powder, and fenugreek seeds and mix it well.
Heat the oil in a sauce pan over medium heat, oil should be moderately hot. Add cumin seeds as seeds crack add asafetida and whole red chilies, lower the heat.
Add yogurt mix and cook over low heat stir continuously. Let it boil for 2-3 minutes. Add about 1 cup of water and cook for 3-4 minutes after gravy comes to boil.
Add salt and papad mix it and let it cook for 3-4 minutes. Turn off the heat add cilantro. Papad ki sabji is ready to serve.
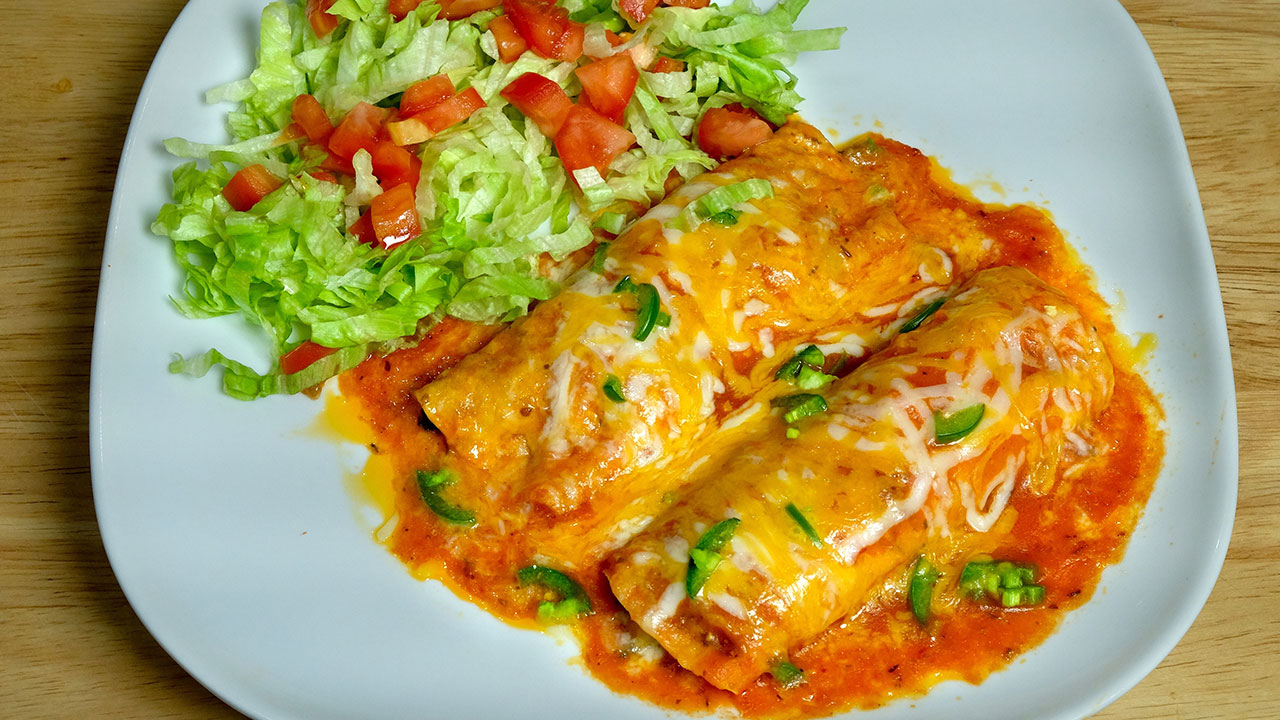
Vegetarian enchilada is a popular Mexican appetizer with my family. This mix of veggies with homemade enchilada sauce is such a tasty treat. This is my fusion twist to the classic Mexican dish, which is very delicious and exotic.
Blend the tomatoes, make a smooth puree. Heat the sauce pan over medium heat. Add the oil and all-purpose flour, stir for one minute until flour is light golden brown. Add tomato puree, oregano, salt, sugar, black pepper, red chili powder, and cumin. Mix it well making sure there is no lumps. Add 1 cup of water and boil over medium heat about 2-3 minutes, sauce should be pouring consistency. Set aside.
Filling
Heat the oil in a sauce pan over medium heat, add the vegetables. Corn, mushrooms and spinach. Cook stirring until moisture has evaporated but mix should be still moist. Remove from heat add about 1/4 cup of enchilada sauce, mix it well. When vegetable mix comes to room temperature add the cheese and mix it well. Set aside.
Making Enchilada:
I am using microwave.
Mix both cheese and set aside. Heat the skillet over medium heat and grease the skillet generously. Toast the tortillas about one minute from both sides.
Top each tortilla with about 1/4 cup of filling; roll up tightly and arrange, two rolled tortilla seam side down, in microwaveable plates. I prefer to make enchiladas in microwave it is fast and it is easy to personalize how much filling, how much cheese and also mild or hot. Sprinkle enchiladas with about 3 tablespoons of sauce and sprinkle the cheese.
Microwave for about one and half minutes, cheese should be melted and little bubbly.
Ah, vegetarian enchiladas, a dish close to my heart and a staple in many kitchens around the world. These cheesy, saucy parcels of goodness are a celebration of all things veggie, wrapped snugly in a warm tortilla blanket and baked to perfection. Whether you’re a seasoned cook or a novice in the kitchen, vegetarian enchiladas are a surefire crowd-pleaser that will leave everyone coming back for seconds. These appetizers are sure to entice you into its rich delight
Tips for Making Perfect Vegetarian Enchiladas:
Choose the Right Tortillas: When it comes to vegetarian enchiladas, the type of tortillas you use can make all the difference. Opt for soft, pliable tortillas that are sturdy enough to hold the filling without falling apart during baking. Corn or flour tortillas both work beautifully, so use whichever you prefer or have on hand.
Prep Your Fillings: The beauty of vegetarian enchiladas lies in their versatility. Get creative with your fillings by incorporating a variety of vegetables, beans, and cheeses. Sautéed bell peppers, mushrooms, and spinach are all excellent options, while black beans or refried beans add protein and heartiness to the mix. Don’t forget the cheese—whether it’s gooey melted cheddar, creamy Monterey Jack, or tangy feta, cheese adds that irresistible indulgence to every bite.
Don’t Skimp on the Sauce: The key to delicious vegetarian enchiladas is a flavorful sauce that coats every inch of the tortillas. Whether you opt for a homemade enchilada sauce or a store-bought variety, make sure it’s rich, robust, and packed with spices. Pour a generous amount of sauce over the assembled enchiladas before baking, and reserve some extra for drizzling over the top when serving.
Get Creative with Toppings: The fun doesn’t stop with the filling and sauce—toppings are where you can really let your creativity shine. Fresh cilantro, diced tomatoes, sliced avocado, and a dollop of sour cream or Greek yogurt are all classic choices that add freshness and tanginess to each bite. For an extra kick of flavor, try sprinkling some crumbled cotija cheese or pickled jalapeños on top before serving.
Suggestions for Serving Vegetarian Enchiladas:
Serve with Sides: Vegetarian enchiladas are delicious on their own, but they’re even better when served alongside some tasty sides. A crisp green salad dressed with a zesty lime vinaigrette or a bowl of Mexican rice and beans make perfect accompaniments that round out the meal.
Make it a Meal: Turn vegetarian enchiladas into a full-fledged feast by adding some complementary dishes to the table. Fresh salsa and guacamole with crunchy tortilla chips make for fantastic appetizers, while a pitcher of homemade margaritas or agua fresca adds a festive touch to any gathering.
Benefits of Enjoying Vegetarian Enchiladas:
Nutritious and Flavorful: Vegetarian enchiladas are packed with nutritious ingredients like vegetables, beans, and cheese, making them a wholesome and satisfying meal option for vegetarians and omnivores alike.
Customizable and Versatile: One of the greatest things about vegetarian enchiladas is their adaptability. You can easily customize the filling to suit your taste preferences or dietary restrictions, making them a versatile option for any occasion.
Family-Friendly Fare: Whether you’re cooking for a crowd or just feeding your family, vegetarian enchiladas are a hit with kids and adults alike. With their cheesy goodness and irresistible flavors, they’re sure to please even the pickiest of eaters.
Variations of Vegetarian Enchiladas:
While the classic vegetarian enchilada recipe is a timeless favorite, there are endless variations and adaptations to explore. Here are a few ideas to get you started:
Vegan Enchiladas: For a dairy-free option, simply omit the cheese or use a plant-based cheese alternative. You can also swap out the sour cream for a vegan-friendly alternative like coconut yogurt or cashew cream.
Enchiladas Verdes: Green enchiladas are made with a tangy and spicy green salsa made from tomatillos, green chilies, and cilantro. Fill your tortillas with your favorite vegetables and beans, then smother them in green salsa for a delicious twist on the classic recipe.
Double Corn Tortillas: If you love corn, you will love double corn tortillas. These tortillas are not only healthy for you, but also delicious. The great is that you can add additional items for the filling.
Mexican Bhel: To make this dish unique and interesting I am using all classic Mexican ingredients – such as tortilla chips, salsa, Mexican cheese and more! Mexican Bhel Puri can be served as a snack or light lunch for your next get together.
FAQs (Frequently Asked Questions) about Vegetarian Enchiladas:
Q: Can I make vegetarian enchiladas ahead of time?
A: Yes, you can assemble the enchiladas ahead of time and refrigerate them until you’re ready to bake. Just be sure to cover them tightly with foil or plastic wrap to prevent them from drying out. When you’re ready to serve, simply pop them in the oven and bake until heated through.
Q: Can I freeze vegetarian enchiladas for later?
A: Absolutely! Vegetarian enchiladas freeze beautifully, making them an excellent option for meal prep. Once they’re baked and cooled, wrap them tightly in foil or plastic wrap and store them in the freezer for up to three months. To reheat, simply thaw them in the refrigerator overnight and bake them in the oven until heated through.
Q: Are vegetarian enchiladas spicy?
A: The level of spiciness in vegetarian enchiladas can vary depending on the type of salsa or enchilada sauce you use. If you prefer a milder flavor, opt for a mild salsa or sauce, and adjust the amount of chili powder or jalapeños accordingly. Conversely, if you love heat, feel free to amp up the spice factor to suit your taste buds.
In conclusion, vegetarian enchiladas are a delicious and satisfying meal option that’s perfect for any partyoccasion. With their customizable fillings, flavorful sauces, and endless topping options, they’re a versatile dish that’s sure to please everyone at the table. So, gather your ingredients, roll up your sleeves, and get ready to indulge in a fiesta of flavor with these easy vegetarian enchiladas
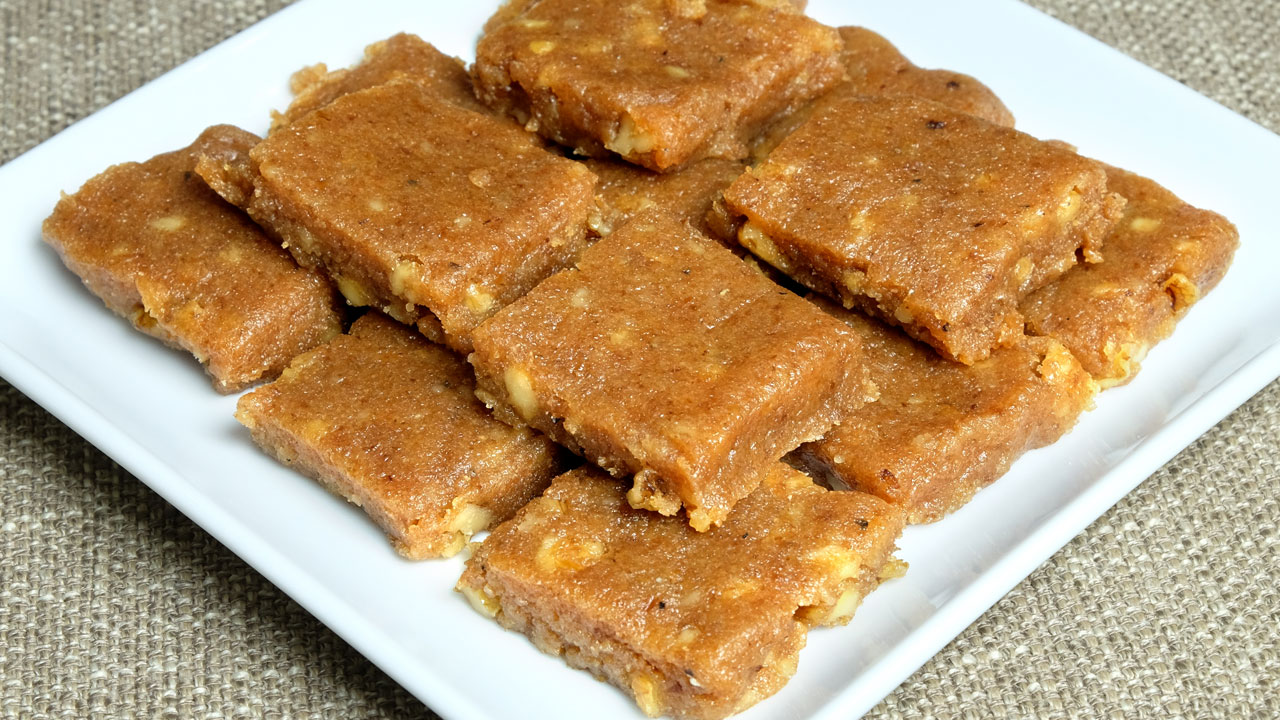
Bread Burfi is sweet snack like candy and has a fudge like consistency. Most of us think that making burfi takes a lot of time and effort. This recipe is actually quite simple and of course very delicious! This recipe is definitely one dessert to try! In an Indian household, Burfies are served as cookies or chocolate.
2cup of fresh white bread crumb, I used 4 slices of bread
3 tbspclarified butter or ghee
1 cup milk
1cup sugar
1cup crushed walnuts
1/4tbspcardamom crushed
Instructions
Make the bread crumb, cut the bread in small pieces, and do not remove the edges. I use food processor to make crumb.
Dry roast the bread crumb over medium heat in a frying pan, stirring continuously, this will take about 5-6 minutes. Roasted bread crumb will be light golden in color.
Sprinkle the sugar and keep roasting. Sugar will be caramelized with bread crumb and will be light brown in color. This process will take about 4 minutes.
Add cardamom and milk keep stirring, mixture will be in texture of soft dough.
Add butter and roast the mix with butter for another minute, until mix will start leaving the edges. Add the walnuts and fold it with mix. Turn off the heat. And pour it over greased plate.
Spread it in square shape 8” x 8” let it sit for about half until it comes to room temperature. Cut them in one inch squares.
Delicious burfi is ready. You can store the burfi outside for a week and refrigerate for a month.
Notes
You will also like other bread related recipes Bread Paneer Rolls, Dabeli Spicy Potato Sandwich, Paneer Burfi
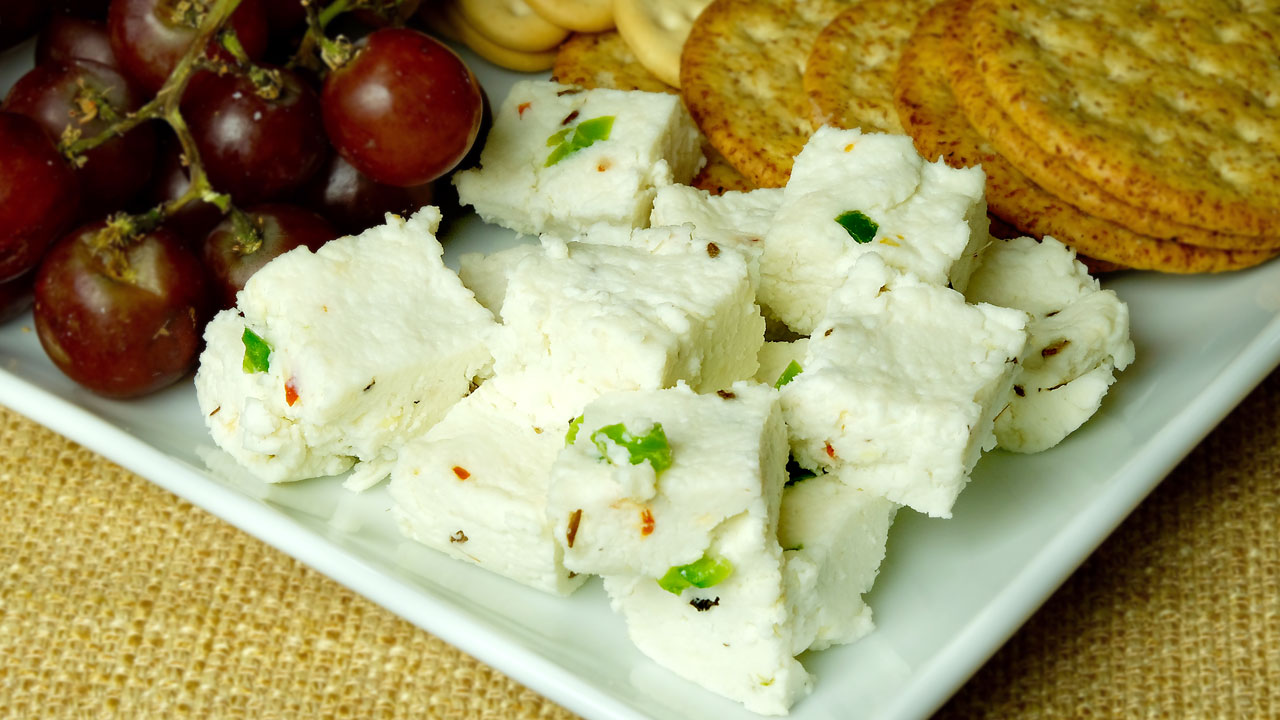
Need a simple healthy appetizer that is sure to be enjoyed by all? Try serving my "Masala Paneer Cubes" at your next get together! It is homemade paneer mixed with a variety of spices. Serve with crackers, or fruit plate. Masala paneer can be used for many different ways, like paneer pakoras, paneer paratha.
Boil the milk in a heavy-bottomed pan over medium heat, first wet the pan to ensure the milk will not burn. Stir occasionally.
When the milk comes to a boil, add the lemon juice gradually and stir gently. The curd will start separating from the whey. Turn off the heat.
Once the milk fat has separated from the whey, drain the whey using a strainer lined with muslin cloth.
Wrap the curds in a muslin cloth, rinse under cold water, and squeeze well.
To test whether enough water has been removed from the paneer, rub a little piece of paneer on your palm with your fingers. After rubbing the paneer 15-20 seconds, you should be able to make a firm, smooth ball.
In a small frying pan heat the clarified butter (ghee) over medium heat. When ghee is moderately hot add cumin seeds as seeds crack add green chili and ginger, turn off the heat. Stir fry for few seconds and set aside.
In a mixing bowl mix the paneer with all the ingredients fried cumin mix, salt, black pepper, chili flakes, black pepper and lemon juice.
Mix it well, do not knead the paneer. Put the paneer in a flat bowl and press it to spread evenly. Cover it and refrigerate for at least two hours.
Notes
Notes For this recipe full fat milk works better otherwise paneer will be too dry.Do not knead the paneer that will make paneer little chew.
Explore the perfect fusion of flavors with our delectable masala paneer appetizers and snacks. Satisfy your cravings for gluten-free delights featuring the rich essence of paneer. Indulge in these flavorful snacks that redefine the joy of snacking.
Preparing Masala Paneer at Home:
Indulge in the culinary art of crafting masala paneer by following this easy step-by-step guide on how to make paneer masala at home. Begin the process by boiling milk in a heavy-bottomed pan over medium heat, ensuring the pan is wet to prevent burning. Stir occasionally as the milk comes to a boil. Gradually introduce lemon juice to curdle the milk, separating the curd from the whey. This initial step sets the foundation for a delightful paneer butter masala.
Draining and Squeezing the Curds for Paneer Butter Masala:
After successfully curdling the milk, the next crucial step in the paneer butter masala recipe involves draining the whey. Employ a strainer lined with muslin cloth to filter out excess liquid. Wrap the curds in the cloth, rinse under cold water, and squeeze thoroughly. Testing the paneer’s water content is key; a firm, smooth ball should form after rubbing it on your palm for 15-20 seconds. This meticulous process ensures the perfect texture for your homemade paneer butter masala.
Flavor Infusion with Cumin Mix for Masala Paneer:
Enhance the taste of your paneer butter masala by preparing a flavorful cumin mix. Heat clarified butter (ghee) in a small pan, adding cumin seeds until they crack. Introduce green chili and ginger, stir-frying for a few seconds. This aromatic blend serves as a crucial ingredient in the masala, imparting a distinct and savory touch to your how to make paneer butter masala adventure.
Mixing and Chilling for the Best Paneer Butter Masala:
In a mixing bowl, combine the prepared paneer with the cumin mix, salt, black pepper, chili flakes, and lemon juice. It’s essential to achieve a thorough mix without kneading the paneer. Place the paneer in a flat bowl, press it evenly, and cover it. Allow it to refrigerate for a minimum of two hours. This cooling period not only solidifies the paneer but also intensifies the flavors for an extraordinary paneer butter masala recipe.
Savoring the Delight of Homemade Paneer Butter Masala:
Once refrigerated, your homemade masala paneer is ready to elevate your culinary experience, especially when preparing the tantalizing paneer butter masala. Explore the rich flavors and follow a simple how to make paneer butter masala recipe to create a dish that delights your taste buds and showcases your culinary prowess. Relish the satisfaction of crafting a delectable paneer butter masala from scratch, bringing the authentic taste of Indian cuisine to your dining table.
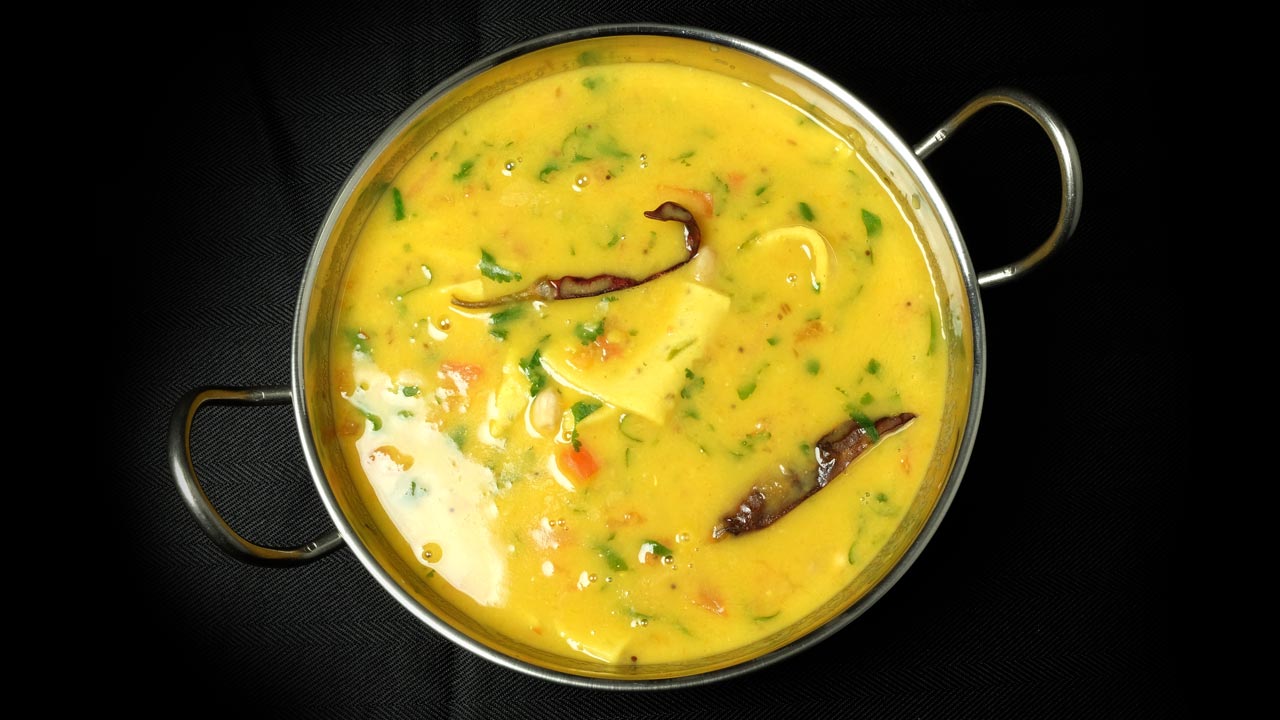
Dal Dhokli is a traditional Gujarati dish. This recipe consists of spicy whole wheat uncooked roti pieces simmered into dal and cooked to perfection. Dal dhokli has a mild sweet and spicy flavor. Dal dhokli also makes a delightful one pot one dish meal.
Combine all the ingredients in a bowl, whole wheat flour, besan, turmeric, green chili, asafetida, carom seeds, salt, and oil and mix it well. Add the water as needed to make firm dough, this should take about ¼ cup of water.
Divide the dough into 2 equal parts and roll out each portion into about 7 inch in diameter. If needed use little whole wheat flour for dusting the rolling surface that will help in rolling.
Cut each roti into about 1-1/2 inch squares and set aside.
For the dal
Clean, wash and drain the dal. In pressure cooker add dal, salt, turmeric, and 3 cups of water. Cook over medium high heat.
When the pressure cooker starts to steam, lower the heat to medium and cook seven minutes.
Turn off the heat and allow the steam to escape before opening the lid.
Combine the cooked dal and 1 cup of hot water, whip the dal so it becomes creamy texture, you can use the hand blender to mix dal. Dal will be consistency of thick batter. Add about 3-4 cups of boiling water. Dal should be very liquidey, consistency of runny batter.
Add peanuts, chili powder, tomatoes, ginger, and jiggery to dal, mix well and cook on a medium flame for 2-3 minutes, stirring occasionally.
Prepare the seasoning, heat the oil in a small pan, when oil is moderately hot add the cumin seeds and mustard seeds, asafetida, and red chilies and allow them to crack.
Add this tempering to the dal, mix well, add dhokli and cook on a low medium heat for about 15 minutes, stirring occasionally.
Add cilantro and cook for another 2 minutes on low medium heat.
Notes
Serving suggestionsServe with plain rice, drizzle some ghee and lemon juice on top right before serving dal dhokli. Dal dhokli should be served hot.You will also enjoy other one dish meal like, masala khichdi, Vegetable rice, and Quinoa vegetable pilaf
How To Make Traditional Gujarati Dal Dhokli Recipe: A Comforting Gujarati Delicacy
Dal Dokli is a traditional Gujarati vegan gluten free dish that combines the richness of dal (lentils) with the heartiness of dhokli (wheat flour dumplings). This Dal Dhokli recipe is a beloved comfort vegan food in Gujarati households, cherished for its wholesome flavors and nourishing qualities. With its perfect blend of spices and textures, Dal Dhokli offers a delightful culinary experience that’s both satisfying and comforting.
Step 1: Preparing traditional Gujarati dal dhokli recipe
To start, prepare the dough for the dhokli by combining wheat flour, besan (gram flour), turmeric powder, red chili powder, ajwain (carom seeds), salt, and oil in a mixing bowl. Gradually add water and knead the ingredients into a smooth and pliable dough. Allow the dough to rest for a few minutes to ensure it’s well-hydrated and easy to work with.
Step 2: Rolling and Cutting Dhokli
Divide the rested dough into small portions and roll them out into thin, flat discs resembling chapatis. Use a knife or a pizza cutter to cut the rolled-out dough into small diamond or square-shaped pieces, known as dhokli. Ensure that the dhokli are uniform in size to ensure even cooking and a consistent texture.
Step 3: Cooking Dhokli in Dal
In a large pot or pressure cooker, prepare the dal base by cooking soaked tur dal (pigeon peas) with water, turmeric powder, salt, and a pinch of asafoetida until soft and mushy. Once the dal is cooked, add the prepared dhokli to the pot, gently stirring to ensure they’re submerged in the dal. Allow the dhokli to cook in the dal until they’re tender and cooked through.
Step 4: Tempering and Flavoring the Dal Dokli
In a separate pan, heat ghee or oil and add mustard seeds, cumin seeds, cloves, cinnamon, dried red chilies, and curry leaves. Allow the spices to sizzle and release their aromas. Sauté the aromatics until they’re golden brown and fragrant, enhancing the flavor of the tempering.
Step 5: Incorporating the Tempering into the Dal
Once the tempering is ready, pour it over the cooked dal dokli, stirring gently to combine. The tempering adds layers of flavor and aroma to the dal, elevating its taste profile and making it even more delicious. Allow the dal dhokli to simmer for a few more minutes, allowing the flavors to meld together.
Step 6: Garnishing and Serving
Before serving, garnish the dal dokli with freshly chopped cilantro leaves and a sprinkle of garam masala for added flavor and aroma. Serve the piping hot dal dhokli with a dollop of ghee on top, alongside steamed rice or roti for a wholesome and satisfying meal that’s sure to delight your taste buds.
Tips for Perfect Dal Dhokli
Consistency of Dhokli Dough: Ensure that the dough for the dhokli is neither too soft nor too firm. It should be smooth, pliable, and easy to roll out into thin discs.
Even Cooking of Dhokli: Cut the dhokli into uniform-sized pieces to ensure they cook evenly and have a consistent texture throughout.
Balancing Flavors: Adjust the amount of spices and seasoning in the dal according to your taste preferences. You can increase or decrease the spice level to suit your palate.
Tempering Technique: Take care not to burn the spices while tempering. The tempering should be aromatic and flavorful without any burnt taste.
Variations of Dal Dhokli
Mixed Dal Dhokli: Use a combination of different lentils such as moong dal, masoor dal, and chana dal to add variety and depth of flavor to the dish.
Vegetable Dal Dokli: Enhance the nutritional value of the dish by adding diced vegetables such as carrots, potatoes, and peas along with the dal dhokli.
Spicy Dal Dhokli: Increase the heat level of the dish by adding green chilies or red chili powder to the tempering for an extra kick of spice.
Benefits of Dal Dokli
Rich in Protein: The combination of lentils and wheat flour in dal dhokli provides a good amount of protein, essential for muscle repair and growth.
High in Fiber: The presence of lentils and whole wheat flour in dal dhokli makes it rich in dietary fiber, promoting digestive health and aiding in weight management.
Balanced Meal: Dal dhokli is a complete meal in itself, providing a balanced combination of carbohydrates, protein, and fats along with essential vitamins and minerals.
Frequently Asked Questions (FAQs)
Can I use store-bought dhokli instead of making it from scratch?
Yes, you can use store-bought dhokli as a time-saving alternative. However, homemade dhokli has a fresher flavor and texture.
Can I make dal dhokli ahead of time?
Yes, dal dhokli tastes even better when allowed to sit for a few hours or overnight, allowing the flavors to meld together. Reheat it gently before serving.
Is dal dhokli gluten-free?
No, dal dhokli contains wheat flour, so it’s not suitable for those following a gluten-free diet.
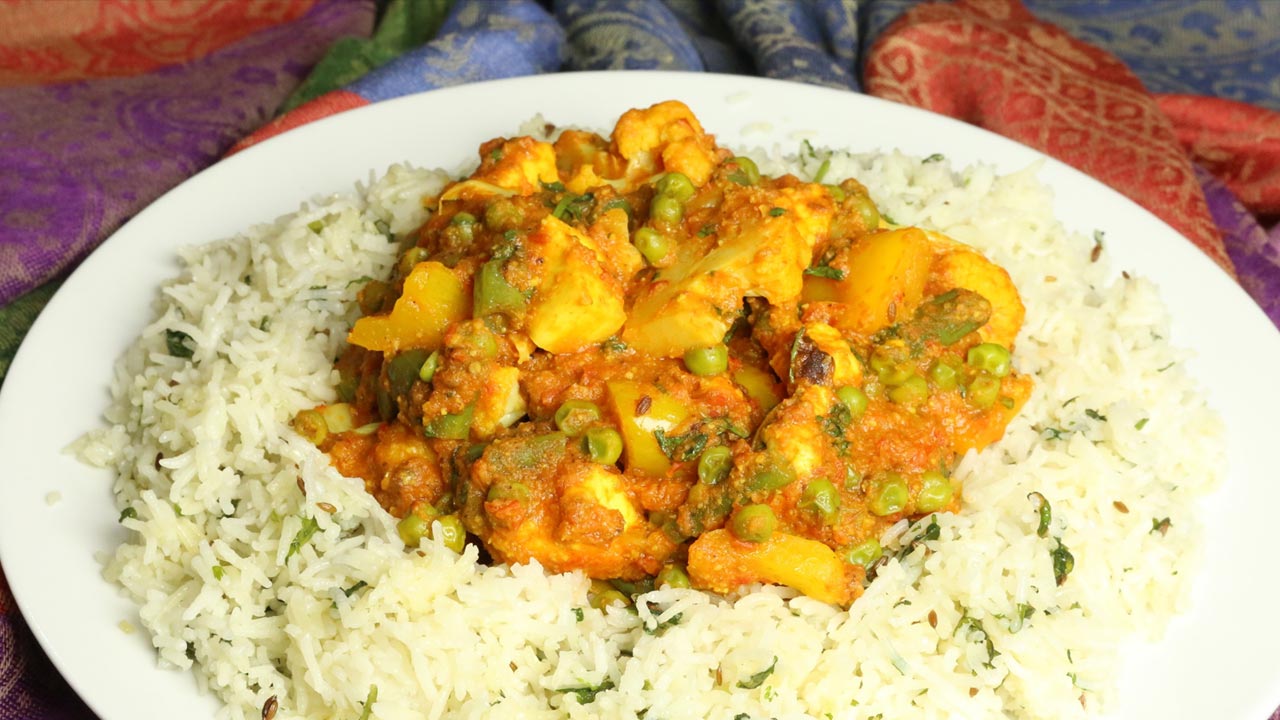
Shahi Pulao or Vegetable Pulao is an exotic rice dish made for parties that combines spicy and aromatic vegetables served over rice. Rich with flavor, this is an extraordinary dish. You may also call this Biryani. This dish is made in two parts. First I prepare the rice with cumin seeds and cilantro. Then the vegetables are cooked separately with tomatoes, cashews, beans, green peas, cauliflower, and paneer. Top these vegetables over the rice and you have a mouth-watering dish!
1cup rice preferred basmati rice available in Indian grocery stores
2tbspclarified butter or ghee
1/2tbspcumin seeds (jeera)
About 1 inch piece cinnamon stick (dal chini)
1/2tbspsalt
About 1/4cup cilantro finely chopped (hara dhania)
2cup water
For vegetables
About 3cup mix vegetables I am using cauliflower cut into small floret, green beans cut into small pieces, bell pepper cut into cubes, and frozen green peas,
1/2cup paneer cut into about 1/2 inch cubes
4cup tomatoes chopped
1 green chili cut into pieces
About 2tbspginger cut into small pieces
3tbspoil
1 tbspcumin seeds (jeera)
1/8tbspasafetida (hing)
2tbspcoriander powder (dhania)
1/2tbspturmeric
1/2tbspred chili powder
1-1/2tbspsalt
1tbspsugar
1/4cup cashew powder
1/4cup cilantro chopped
1/4tbspgaram masala
Instructions
Rice:
Wash rice gently changing water several times until the water appears clear.
For fluffier rice, the rice should be soaked for at least 15 minutes prior to cooking.
Heat the oil in a saucepan. Oil is the right temperature when one cumin seed dropped into the oil cracks immediately.
Add the cumin seeds. When they crack, add the cinnamon stick and stir for a few seconds. Add the rice, cilantro, and salt. Stir-fry one minute.
Add the water and bring to a boil, turn the heat to low. Cover the pan, and Cook 15 minutes, or until the rice is tender and the water has evaporated. Turn off the heat and fluff the rice with a fork.
Vegetables
Blend tomatoes, green chilies and ginger to make a puree. If you prefer mild take the seeds out of green chili before blending.
Heat the oil in a saucepan. Over medium high heat oil should be moderately hot, add the cumin seeds, and asafetida, as seeds crack add tomato puree, coriander, turmeric, sugar and salt.
Lower the heat to medium, stir the spice paste occasionally when it start thickening add cashew powder and cook until paste become the thick and start leaving the oil from side.
Add all the vegetables and 1/4 cup of water, mix it well. Cover the pan and let it cook for about 5-6 minutes over medium heat stir few times in between. Add paneer mix and cover the pan, cook for another 3-4 minutes. Vegetables should be tender not mushy.
Turn off the heat add garam masala and cilantro, stir and cover the pan for few minutes before serving.
Savour the Essence of Shahi Pulao: Mixed Vegetable Pulao or Biryani Pulav
Shahi pulao is a fragrant and rich rice dish from Indian cuisine. “Shahi” translates to “royal,” indicating the dish’s royal and luxurious nature. It is typically made with basmati rice cooked with a blend of aromatic spices, such as cardamom, cloves, and cinnamon, along with saffron for a distinctive golden color and aroma.
Rice Preparation: Creating the Perfect Base for Pulav
Washing and Soaking Rice to Enhance Texture
Kickstart your culinary journey of biryani pulav or mixed vegetable pulao by ensuring the rice is immaculately clean and primed for cooking. Begin by delicately washing the rice, changing the water multiple times until it achieves crystal clarity. For an impeccable fluffiness characteristic of pulav Indian dishes, soak the rice grains for a minimum of 15 minutes before cooking, allowing them to absorb moisture and expand, ready to absorb the delightful flavors of your shahi pulao recipe.
Tempering Oil with Aromatic Spices
In a saucepan, elevate the essence of your pulav by heating the oil to the perfect temperature. Gauge the oil’s readiness by dropping a cumin seed – it should crackle instantaneously upon contact, signalling the ideal heat level for infusing flavors. Once the oil reaches the desired temperature, introduce cumin seeds and a cinnamon stick, allowing them to crackle and permeate the oil with their delightful aroma, setting the stage for a tantalizing pulav experience.
Incorporating Rice and Seasonings for Flavorful Base
After the spices have crackled to perfection, introduce the washed and soaked rice into the saucepan, along with freshly chopped cilantro and a dash of salt. Stir-fry the rice for about a minute, ensuring each grain is enveloped in the aromatic oil and spices, laying the foundation for a flavorful shahi pulao base that will elevate your biryani pulav or mixed vegetable pulao to new heights of deliciousness.
Cooking Rice to Perfection for Pulav Indian Delight
Pour water into the saucepan, ensuring the rice is fully immersed, and bring it to a gentle boil. Once the water reaches a steady boil, reduce the heat to low and cover the pan, allowing the rice to simmer gently for approximately 15 minutes or until it reaches the desired tenderness and the water has evaporated. This slow and meticulous cooking process ensures that each grain of rice is cooked to perfection, ready to absorb the rich flavors of the accompanying vegetables in your mix vegetable pulao recipe.
Fluffing Rice to Achieve Light Texture
Once the rice has achieved the ideal level of tenderness, turn off the heat and delicately fluff the grains with a fork. This crucial step helps to separate the rice and prevent it from clumping together, ensuring a light and fluffy texture that is characteristic of a delectable pulav Indian masterpiece like biryani pulav or mixed vegetable pulao.
Vegetable Preparation: Infusing Flavor into Mixed Vegetable Pulao
Creating a Flavorful Tomato Puree
Begin the vegetable preparation for your mix vegetable pulao by blending fresh tomatoes, green chilies, and ginger into a smooth puree. For a milder flavor, remove the seeds from the green chilies before blending, adjusting the spice level to your preference.
Tempering the Oil with Aromatic Spices
In a separate saucepan, heat oil over medium-high heat until moderately hot. Add cumin seeds and a pinch of asafetida, allowing them to crackle and release their flavors into the oil.
Cooking the Spices and Creating the Base
Once the cumin seeds crackle, add the freshly prepared tomato puree to the saucepan, along with ground coriander, turmeric powder, a hint of sugar, and salt to taste. Stir the spice paste occasionally until it thickens and the oil starts to separate from the sides of the pan.
Adding Vegetables and Cooking Until Tender
Incorporate a variety of vegetables into the spice paste, along with a quarter cup of water, ensuring they are evenly coated with the flavorful mixture. Cover the saucepan and allow the vegetables to cook over medium heat for about 5-6 minutes, stirring occasionally to prevent sticking. Add paneer mix and cook for another 3-4 minutes until the vegetables are tender yet firm.
Flavoring the Vegetable Mixture and Allowing to Rest
Once the vegetables are cooked to perfection, turn off the heat and sprinkle garam masala and freshly chopped cilantro over the mixture. Stir gently to incorporate the spices, then cover the pan and let the flavors meld together for a few minutes before serving atop the hot, fluffy rice.
This meticulous step-by-step approach ensures that each component of your biryani pulav or mixed vegetable pulao is prepared with care and attention, resulting in a flavorful and aromatic dish that will delight your senses. If you loved this mix vegetable pulao recipe then you must also check out other variants of Rice: Vegetable Biryani, Masala Khichdi, Chhole Biryani, Quinoa Vegetable Pilaf and Lemon Rice.
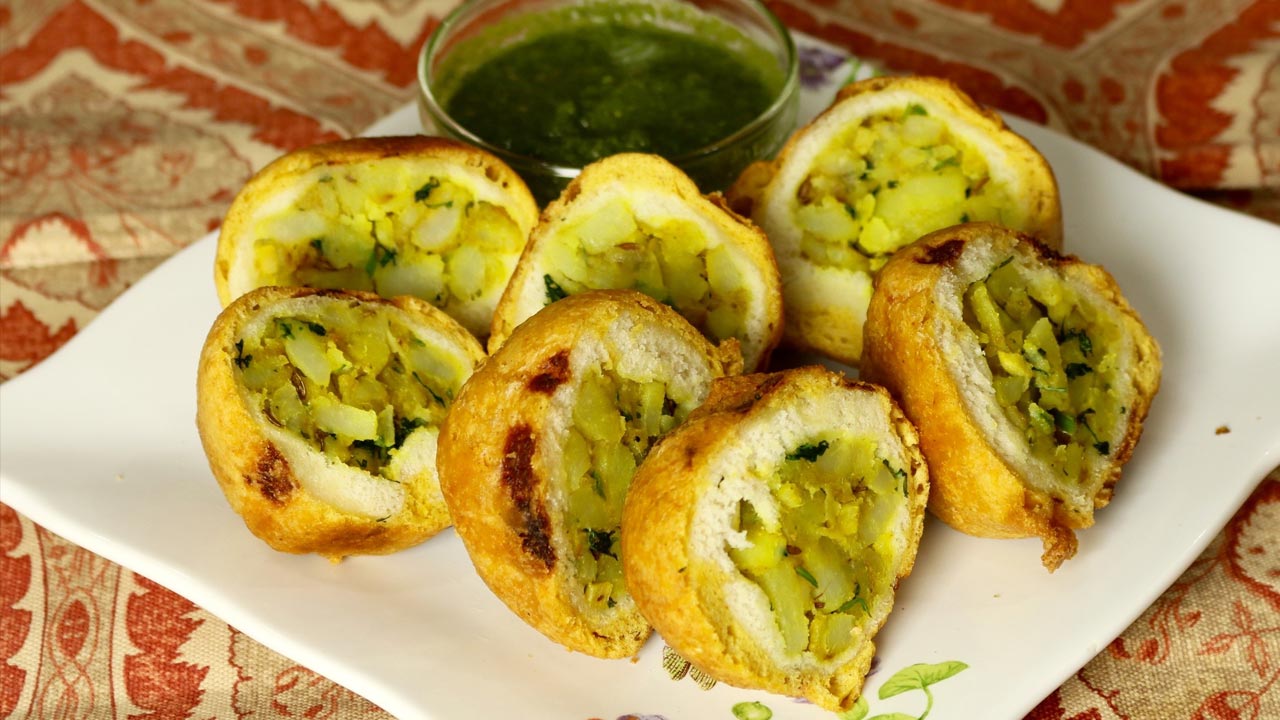
Aloo bread pakora, bread stuffed with spicy potatoes, coated with gram flour and deep fry. Spicy hot aloo bread pakora is a tasty compliment for afternoon tea or served as an appetizer. Aloo bread pakora is crunchy outside, spicy and soft inside.
8 bread slices, I have already trim the edges of the bread slices
3 medium potatoes boiled peeled and finely chopped (this will make 2 cups of chopped potatoes)
1tbspoil
1/2tbspcumin seeds (jeera)
1/8tbspturmeric (haldi)
1/4tbspmango powder (amchoor)
1tbspfinely chopped ginger
1 green chili finely chopped adjust to taste
2tbspchopped cilantro (hara dhania)
1/2 tbspsalt adjust to taste
For Batter
3/4cup besan, gram flour
1/8tbspasafetida (hing)
1/4tbspbaking soda
1/4tbspred pepper
1/2tbspsalt adjust to taste
1tbspoil
About 3/4cup of water
Instructions
Batter
In a bowl mix besan, salt, asafetida, pepper, baking powder and oil. Add water slowly to make a thick and smooth batter. Set aside.
Filling
Heat oil in a frying pan on medium heat moderately.
Add cumin seeds as the seeds crack add potatoes, ginger, green chili, turmeric, mango powder, and salt.
Stir fry for about 3 minutes over medium heat. Add cilantro mix it well. Turn of the heat.
Making the Pakoras
Trim the edges of the bread slices.
Wet your palms with water, place the slice between your palms and press lightly making sure bread is moist, not wet.
Roll 1½ tablespoons of the mixture at a time into round balls. (The size of the potato balls will depend on the size of the bread.)
Place the filling in the center of the bread and mold the bread to completely cover the potatoes all around, giving a round shape. Repeat to make all the rolls. Before frying.
Heat about 1 inch of oil in a frying pan on medium high heat moderately. To check if the oil is ready, put one drop of batter in oil. The batter should come up but not change color right away.
Dip the potato balls into the batter one at a time, making sure the potato balls are completely covered with batter. Then, slowly drop them into the frying pan.
Turn them occasionally. Fry the pakoras until all sides are golden-brown.
Aloo bread pakoras will take about four minutes to cook.
Cut them in half before serving. Serve them with mint chutney.
Bread Potato Pakora: A Delicious Snack for Any Occasion
Bread potato pakora is a popular vegan Indian snack made by coating bread slices with a spiced potato mixture and then deep-frying them until crispy and golden brown. It’s a versatile dish that can be enjoyed as a tea-time snack or as an appetizer for parties and gatherings. In this recipe, we’ll explore how to make delicious bread potato pakoras at home.
How to Make Potato Bread Pakora
To make potato bread pakora, start by preparing the potato stuffing. Boil potatoes until they are soft, then mash them and mix them with spices such as turmeric, cumin, coriander, and salt. Next, take slices of bread and spread a layer of the potato mixture between two slices to form sandwiches. Cut the sandwiches into triangles or rectangles. Prepare a batter using gram flour (besan), water, salt, and spices such as chili powder and ajwain. Dip the potato-stuffed bread sandwiches into the batter, ensuring they are fully coated. Deep fry the pakoras until they are golden brown and crispy. Serve hot with chutney or ketchup.
Potato Stuffed Bread Pakora Recipe: Tips for Success
Use fresh bread: Fresh bread works best for making bread potato pakoras as it holds its shape better during frying.
Adjust the spices: Feel free to adjust the spices in the potato mixture and batter according to your taste preferences. You can make it spicier by adding more chili powder or milder by reducing the amount of spices.
Ensure even frying: Make sure the oil is hot enough before frying the pakoras to ensure they cook evenly and become crispy.
Serve immediately: Bread potato pakoras are best enjoyed hot and crispy, so serve them immediately after frying for the best taste and texture.
Variations of Bread Potato Pakora
Cheese-filled: For an indulgent twist, you can add a slice of cheese along with the potato mixture between the bread slices before frying.
Vegetable-packed: Add finely chopped vegetables such as bell peppers, or spinach to the potato mixture for added flavor and nutrition.
Sauce-dipped: Serve the pakoras with a tangy tamarind chutney or mint yogurt sauce for a burst of flavor.
How to Make Potato Bread Pakora: Serving Suggestions
Bread potato pakoras can be served as a standalone snack with green chutney, tamarind chutney, or ketchup. They also pair well with a hot cup of tea or coffee, making them perfect for afternoon gatherings or rainy-day munching. Additionally, you can serve them alongside other Indian snacks such as samosas, pakoras, or chaat for a complete spread.
Benefits of Bread Potato Pakora
Quick and easy: Bread potato pakoras can be made in a relatively short amount of time, making them perfect for when you need a quick snack or appetizer.
Kid-friendly: Children tend to love the crispy texture and flavorful filling of bread potato pakoras, making them a great way to sneak in some veggies.
Customizable: You can customize the spices and fillings in bread potato pakoras to suit your taste preferences or dietary restrictions.
FAQs about Bread Potato Pakora
Q: Can I make bread potato pakoras ahead of time?
A: While bread potato pakoras are best enjoyed fresh, you can prepare the potato stuffing and batter ahead of time and assemble and fry the pakoras just before serving.
Q: Can I bake bread potato pakoras instead of frying them?
A: While traditionally bread potato pakoras are deep-fried for a crispy texture, you can try baking them in the oven for a healthier alternative. Simply brush them with oil and bake at a high temperature until they are golden brown and crispy.
Q: Can I freeze bread potato pakoras?
A: While bread potato pakoras are best enjoyed fresh, you can freeze them after frying. Allow them to cool completely, then place them in an airtight container or freezer bag and freeze for up to one month. To reheat, simply bake them in a preheated oven until heated through.
If you’re interested in exploring more recipes similar to aloo bread pakora, be sure to check out Manjula’s Kitchen for a wide range of Indian snacks, appetizers, and main courses. From samosas to chaat to curries, you’ll find delicious and authentic Indian recipes to try at home.
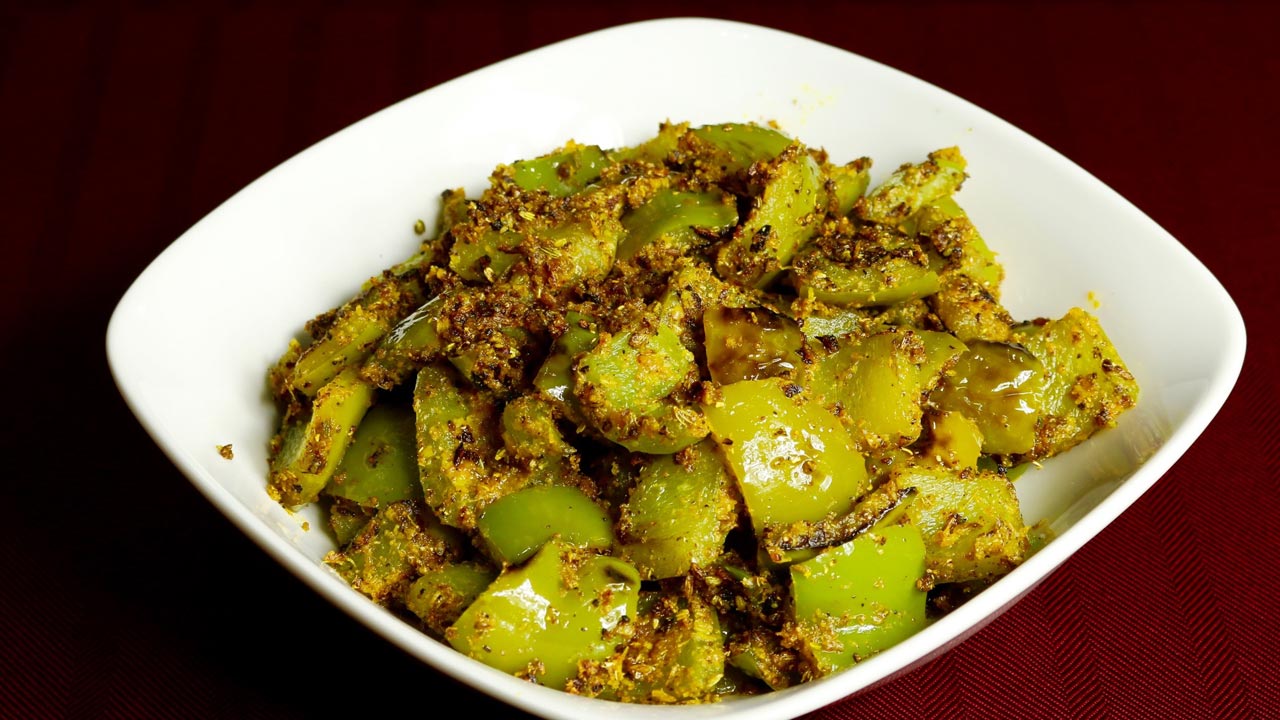
Bell pepper is also known as capsicum or shimla mirch. Masala bell pepper with great blend of spices, makes a very enjoyable side dish. This can complement any meal. Masala bell pepper can be served with roti, paratha or puries. I enjoy this with side of dal fry and plain rice.
3 medium Green bell pepper seeded and cubed in 1/2” pieces this will make about 3 cup cubed bell pepper (capsicum, shimla mirch)
2tbspoil
1/2tbspcumin seeds (jeera)
1/8tbspasafetida (hing)
1-1/2 tbspcoconut powder (gola)
1-1/2tbspsesame Seed powder (til)
2 tbspteaspoons coriander powder (dhania)
2 tbspfennel seeds powder (saunf)
1/2tbspRed Chili Powder (lal mirch)
1/4 tbspTurmeric Powder (haldi)
3/4 tbspsalt
1tbspsugar
1/2tbspmango powder (amchoor)
1tbspLemon Juice
Instructions
In a small bowl mix most of the spices, coconut powder, sesame powder, coriander powder, fennel seeds powder, red chili, turmeric, salt, and sugar. Set aside.
In a wide frying pan heat the oil moderately over medium high heat, add cumin seeds as seeds crack add asafetida. Add bell pepper mix well lower the heat to low medium. Cover the pan and let it cook for about 3 minutes.
Sprinkle the spice mix. Mix it well coating all the bell pepper. Let it cook about 3-4 minutes covered, do stir in between. Cook the bell peppers until they are tender but still little crisp.
Turn off the heat, add the mango powder and lemon juice mix well.
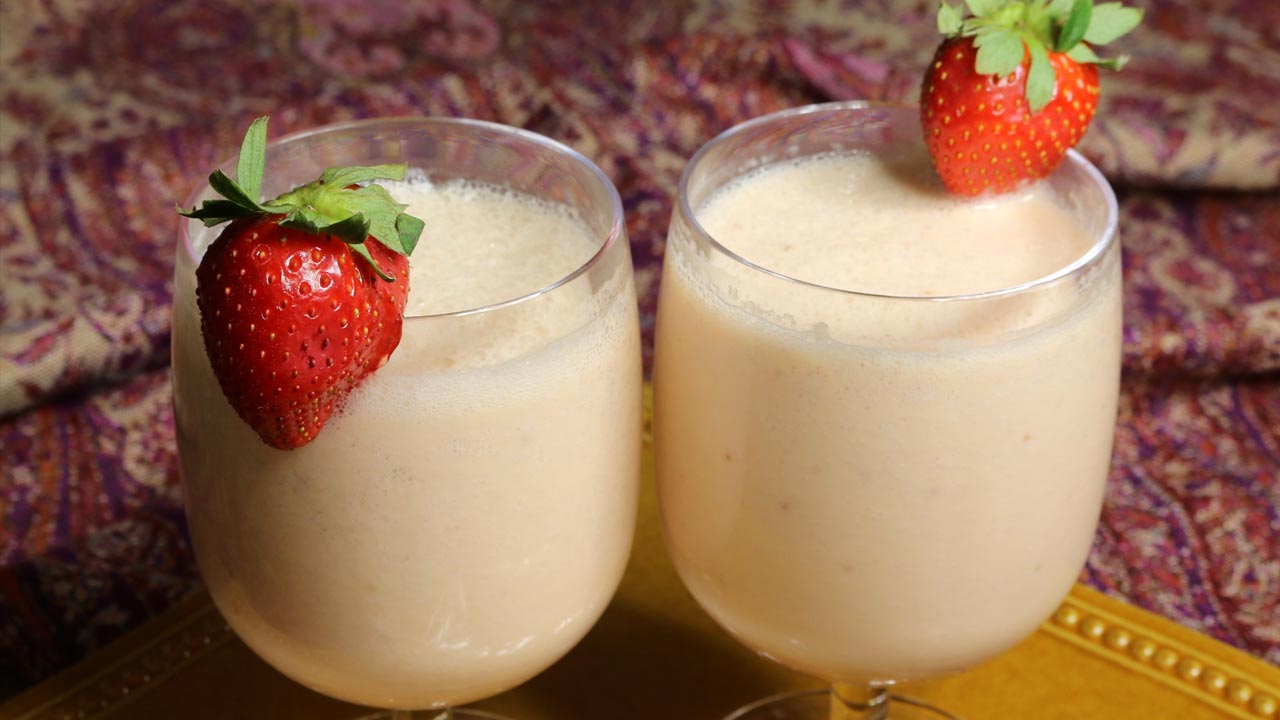
This Fruit smoothie is a delicious and healthy drink, and also quick and easy to make. Fruit smoothie is one of my favorite summer drinks. This great smoothie consists of cantaloupes, strawberries, and yogurt with a touch of ginger giving a nice and tangy taste. Try this recipe for the perfect almost-summer drink.
Put the cantaloupes and strawberries in a blender and process on high speed until smooth, add yogurt, orange juice, ginger juice and sugar blend until everything mixed well. Add ice blend on high speed until there is no ice and smoothie is little frothy. Pour into glasses and serve.
Notes
NotesFruits should be ripe but do not use overripe fruits. Sugar needs to be adjusted depending on the fruits.You will also like to try Arugula and Melon Salad and Chilled Melon Soup
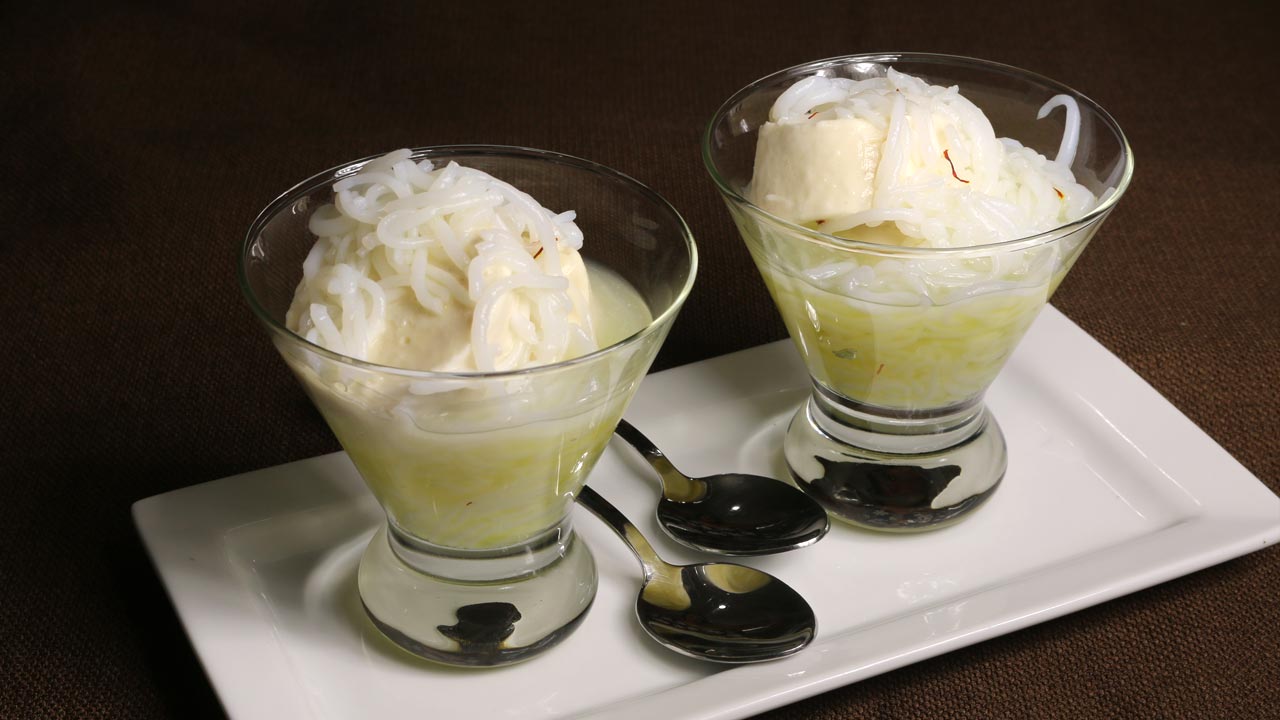
Falooda Kulfi is a refreshing dessert. "Falooda" looks like rice noodles and they are made with cornstarch or arrowroot. "Kulfi" is an Indian ice cream. This is a delicacy with street vendors all over India. One has to experience this delightful dessert to appreciate it. You can also serve Falooda with any ice cream of your choice. Try this recipe to enjoy as one of my favorite summertime treats!
1/2cup kulfi for each serving, check my web site for kulfi recipe
Wide bowl of ice cold water with some ice
Instructions
For syrup boil sugar, water and saffron together, as it comes to boil turn of the heat and stir the syrup making sure sugar has dissolved. Syrup needs to be chilled before serving, keep it in refrigerator.
Add water to corn starch slowly making sure there is no lumps, batter will look like consistency of milk.
Over low medium heat in a frying pan add the batter and cook stirring continuously till corn starch become translution and consistency of thick batter or soft lumpy dough. This will take about 10-12 minutes. Turn off the heat and remove from stove.
Let the mix cool off little bit and pour the hot mixture into sev maker using fine sev attachment. Press the sev maker over ice cold water, and let the sev string drop into the bowl.
Leave the falooda in ice cold water at least for 2 hours before using.
Falooda will stay good for about a week in refrigerator, but make sure falooda stays in chilled water.
Notes
Serving the Falooda KulfiUse individual serving bowl, first layer the bowel with falooda, drizzle about 1 tablespoon of syrup. Put the kulfi then over the kulfi put some more faluda and finish off drizzling 1 tablespoon of syrup. Falooda kulfi is ready to serve! This just taste great.
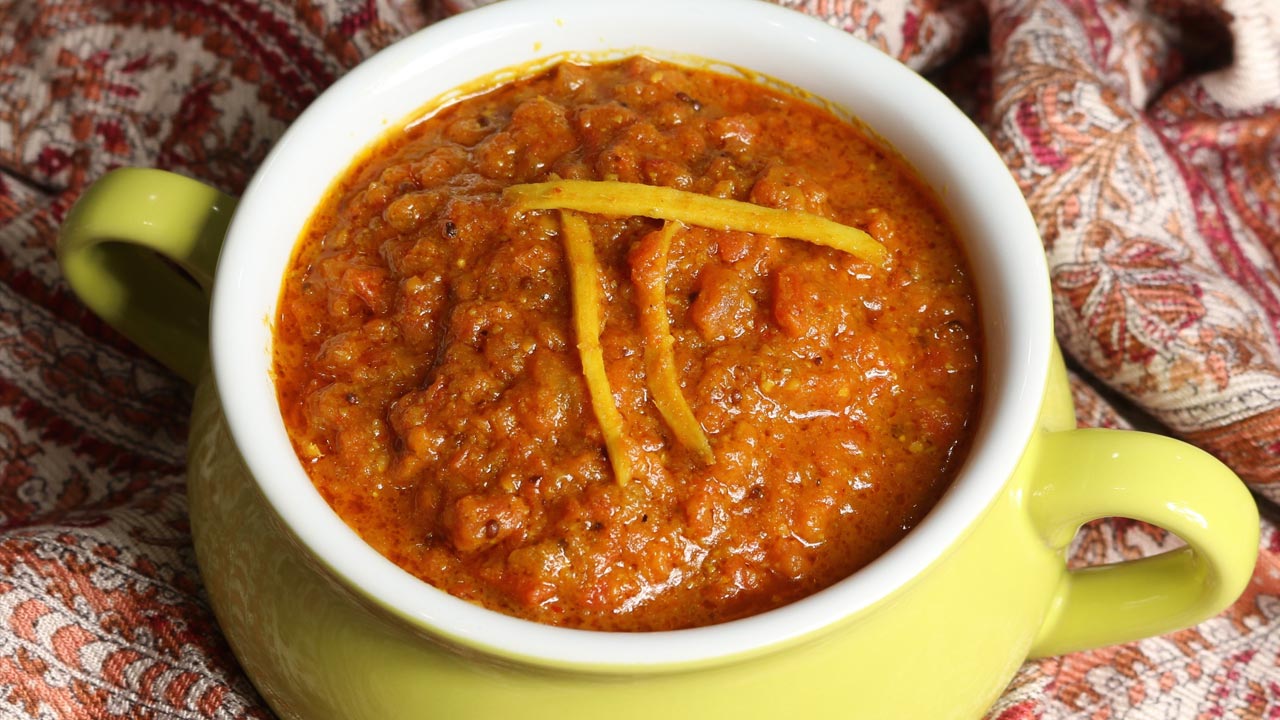
Tomato Chutney is tangy and spicy. I was inspired to make this particular tomato chutney from the south Indian cuisine. Chutneys and pickles are a common component of Indian meals. This unique blend of spices gives an amazing unforgettable flavor to chutney. It goes well with breads and rice or can be used as a spread for sandwiches. Tomato chutney is very easy to make and can be refrigerated for up to a month.
In a small frying pan dry roast red chilies, over low medium heat, stirring continuously to cook evenly till they are darker in color, this should take about 2 minutes. Remove from the frying pan.
In the same pan, dry roast sesame seeds, coriander seeds, and fenugreek seeds over low medium heat individually stirring continuously to cook evenly for about less than a minutes. Don’t over roast.
In a same pan add 2 teaspoons of oil when oil is moderately hot add ginger and stir-fry on low medium heat for about 3 minutes until ginger start catching the light brown color from the sides. Set aside.
After spices cool of grind them into the powder. Set aside.
In a blender crush the tomatoes do not make a paste. Set aside.
In a pan heat remaining oil over medium high heat, oil should be moderately hot add mustard seeds, after they crack add asafetida. Now add tomatoes, and tamarind paste. Stir and cook for about 10 minutes semi covered (after tomato comes to boil start splattering) or until oil start separating.
Add the roasted spice powder, ginger, turmeric, salt and sugar, reduce the heat to low medium and cook for about another 8 minutes or until chutney is thick and oil is separated.
Notes
I like to serve tomato chutney with rava dosa, vada or spread on sandwich.