After giving it much thought, I finally decided to get an air fryer. I checked out many of them and eventually decided to get the Air Fryer Convection Toaster Oven: it includes a toaster, oven, and air fryer all in one. Another reason I decided to buy this one is to save kitchen countertop space. I replaced the toaster oven with this air fryer. So far, I am enjoying it. As a toaster oven, it does a better job than any toaster or toaster oven I have used. I am very happy with the oven feature: it is big enough to bake a cake, small batches of cookies, and a medium size pizza. I don’t do much baking, but I have started baking more because the air fryer is easy to use and needs less time to bake it preheats in 2-3 minutes easily. It is also easy to clean.
When using it as an air fryer (the reason I purchased this new gadget), it so far has not produced very satisfactory results except in grilling vegetables, tofu, paneer, and roasting nuts. I also use this to dry roast poha (flat rice) and makhana (fox nuts) half the way and then finish roasting in a frying pan, which saves some time but more importantly because for both things you need constant stirring which becomes too much for my shoulder. I do make both items very often. I have tried making French fries, pakora, samosa, katchori, and salteen crackers. If you eat these items as soon as they come out from the air fryer, they taste just okay, in my opinion. Also, using the air fryer did not save any time and the items lost the flavor. One of my friends suggested she liked heating the frozen snacks like samosas, katchories. I decided to try this; I got frozen samosa and katchories from the grocery store, and yes they came out good when I heated them. The question is why I needed the Air Fryer for that since I could have done the same in the toaster oven or in a conventional oven.
I am looking for help and suggestions. If you have any vegetarian recipe you were happy with, I will try and do the recipe.
I will like you to share your suggestions. Thanks!
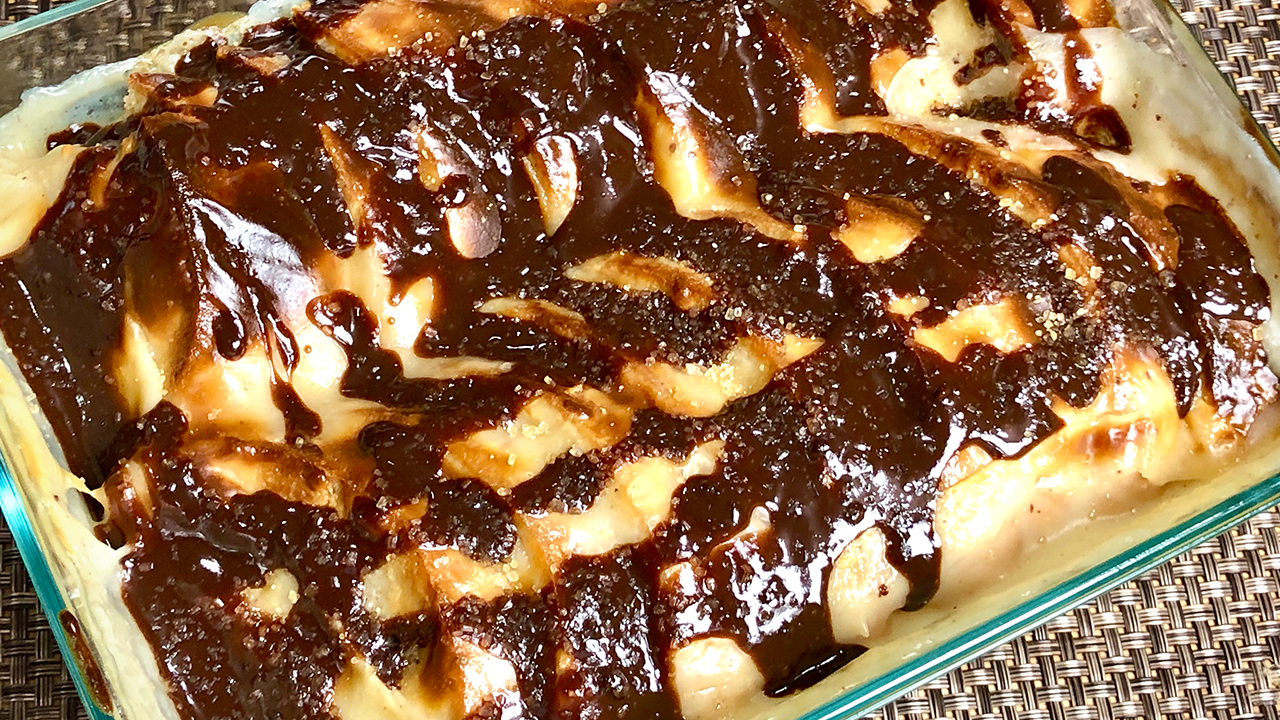
It was my daughter-in-law's birthday this past weekend, and I wanted to do something nice for her. For me, the thing that gives me the most joy is making food for the people that I love, and so I decided that I would prepare something for her to drop off. Due to the quarantine, this was the best that I could do for her, so I wanted what I made to be special. I asked my husband if he had any suggestions, and he said that I should make a dessert that my daughter-in-law, son, and grandkids would all enjoy. After talking to him, I was on the search for a dessert recipe that would be easy to prepare and also not too sweet.This made me think of a bread pudding in a magazine that had caught my eyes just a little while ago. I had been wanting to experiment with bread pudding since then but had found nothing that I fell in love with. I decided to try again, but this time I randomly decided to use a French Baguette for the bread pudding. The texture was exactly the way I wanted it to be a little chewy in some areas while stilling melting in your mouth in other areas. After finalizing the recipe, I had my husband taste test it and he suggested that I should find a way to add chocolate as well because my grandkids love it. In order to incorporate chocolate in a way that wasn't overpowering, I decided to add a chocolate drizzle on top instead of adding it into the bread pudding. It was perfect! If desired, this dish could be given a Indian touch. For example, you can substitute the vanilla extract for cardamom powder and replace the chocolate drizzle with sliced almonds and pistachios. Give it a try!This recipe will serve 6
20slicesFrench bruschettacut into about ¼ in thick
3cupwhole milk
6Tbspsugar
2Tbspcorn starch
4Tbspbutterat room temperature, use as needed
2tspvanilla extract
⅛tspcinnamon powderdalchini powder
For Chocolate Sauce (optional)
⅓cupchocolate chipssemi-sweet
⅓cupheavy cream
1tspvanilla extract
Optional
1Tbspcrystal sugarfor garnishing
Instructions
For chocolate sauce
Place chocolate in a bowl and add the vanilla essence. Heat the heavy cream do nit boil I did in microwave for 25 seconds. Pour the cream over chocolate and stir until chocolate completely dissolve and become glossy. As chocolate sauce cool it will become little thick. Set aside.
Making Pudding
In a small bowl take 1/2 cup of milk and add corn starch mix it well to smooth paste and set aside.
In a saucepan, take remaining milk, and cook over medium high heat stirring occasionally after milk comes to boil let it boil for 10 more minutes. Lower the heat to medium and add sugar and corn starch mix making sure no lumps.
Let it boil for about 5 more minutes over low medium heat. Stir the mixture continually making sure mixture is smooth and no lumps. Mixture will become thick consistency of batter. Add vanilla and cinnamon powder mix it well.
Preheat oven to 350 degrees F.
I am using 5×7 Pyrex pan to make Bread Pudding. Grease the pan.
Butter the bread slices lightly. Arrange the bread slanted and butter the edges. Pour the milk mixture and pour over bread slices evenly.
Bake in a preheated oven at 350 degrees F for about 20 to 25 minutes, till the pudding is bubbling and the top get browned.
Take it out from oven. For best taste Bread Pudding should be served warm. Before serving drizzle the chocolate Sauce over and sprinkle the sugar.
Notes
Chocolate sauce and sugar is optional, but for me it adds to the flavor and make more enjoyable.
If you are not fond of chocolate, you can garnish with sliced almonds and pistachios.
This is an easy recipe to make my family loved it. Give it a try.
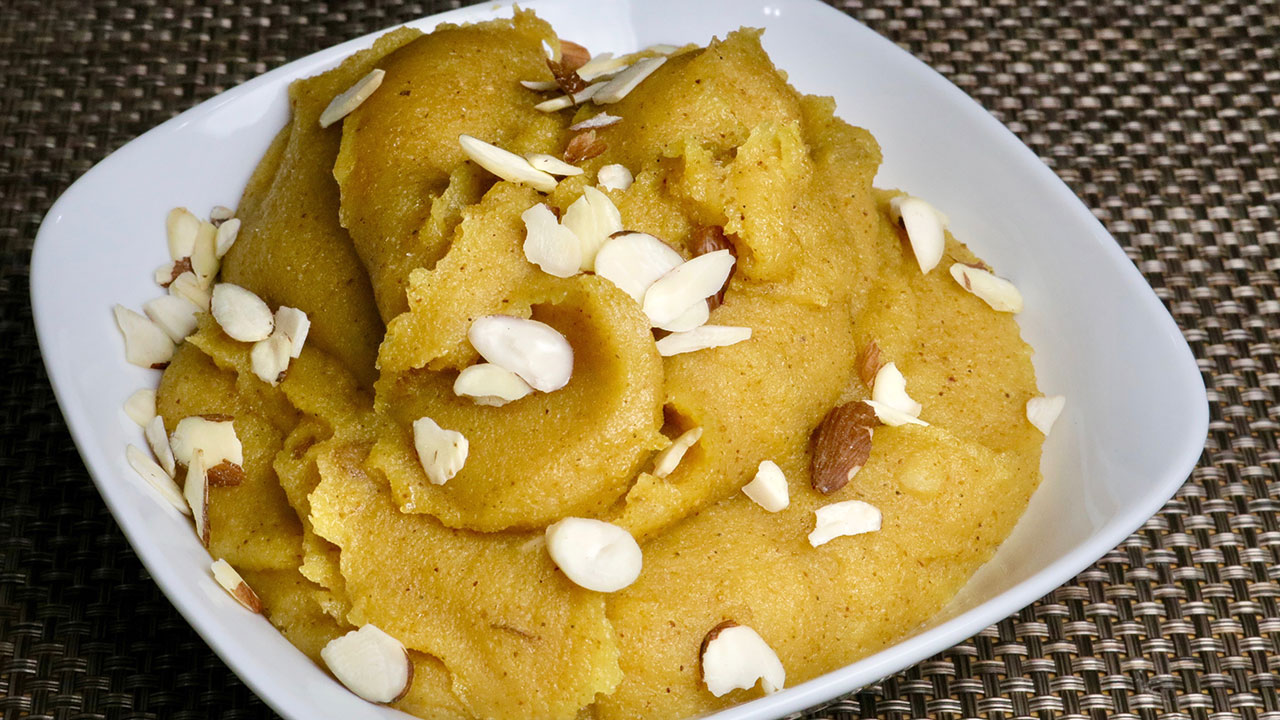
Besan Ka Halwa is a traditional Indian dessert and made using different flour, lentils, nuts and vegetables. Besan Ka Halwa is one of my favorite Halwas. This is delicious and also quick and easy to make. When you roast the besan, the house is full of sweet aroma. Besan Ka Halwa is also gluten free.
Boil the water with sugar, and cardamom powder in a sauce pan over low medium heat. Bring to a boil and Set aside.
Melt the clarified butter in a frying pan on low medium heat. Add besan and roast to golden brown color; stirring constantly this will take about 5 to 8 minutes. Besan will be golden brown in color and will have a light sweet aroma.
Add the syrup slowly, as you add the syrup to besan water will splatter.
Turn down the heat to low and let it cook for about 2-3 minutes.
Besan will absorb the water, as the Halwa cools so keep Halwa a little softer then you like.
Garnish with cashews.
Notes
Serving suggestion Serve hot for best taste. If you like, garnish with shaved pistachio, almonds or shredded coconut.Variations Instead of water add 1 cup of milk and 1/2 cup of water and keep Halwa a little thicker. Pour the Halwa on a greased plate, keep it about 1/2 inch thick. Garnish with shaved almonds or pistachio or shredded coconut, and let it cool for about a half an hour. Cut the Halwa in square or diamond shapes like burfi.
Besan ka Halwa is a classic Indian dessert made from besan (gram flour), ghee (clarified butter), sugar, and aromatic spices. This sweet treat is loved for its rich flavor, creamy texture, and irresistible aroma.
Whether served warm or at room temperature, Besan ka Halwa is a delightful dessert that’s perfect for celebrating special occasions such as a party recipe or even festive occasions such as diwali, holi, ganesh chaturthi or janmashtami or simply made to satisfy one’s sweet tooth.
Variations of Halwa:
Although Besan ka Halwa can be considered to be one of the most savoury and fulfilling desserts amongst all halwas, here we have a list of some halwas that can be savoured and enjoyed all along with friends and family.
Gajar ka Halwa: Gajar Ka Halwa is a classical Indian dessert, this is also known as gajraula. Gajar ka Halwa is a delicious and popular sweet made with few ingredients, carrots, milk, sugar and flavoured with cardamom.
Atta Ka Halwa: Atta ka Halwa, is a delicious sweet dessert. This is easy to make and with few ingredients. Atta ka halwa is made with whole wheat flour, sugar, and clarified butter, flavoured with cardamom.
Sooji ka Halwa: Sooji Halwa is a very popular sweet dish all over India and is made on religious occasions, as prasad.
Sweet Potato Halwa: Sweet Potato Halwa, an eggless pudding, stands out as one of the simplest Halwa recipes to prepare. Infused with the delicate and distinctive flavors of cardamom and cinnamon, it serves as a deliciously warm dessert ideal for chilly winter evenings.
Tips for Making Perfect Besan ka Halwa:
Use Good Quality Gram Flour: Use fresh and high-quality gram flour (besan) to make Besan ka Halwa for the best flavor and texture. Fresh besan has a nutty aroma and a smooth texture, which enhances the taste of the halwa.
Roast the Gram Flour Well: Roast the gram flour in ghee until it turns golden brown and fragrant. Properly roasting the gram flour is crucial for developing the rich and nutty flavor of the halwa.
Control the Sweetness: Adjust the amount of sugar according to your taste preferences. Some people prefer Besan ka Halwa to be sweeter, while others prefer it less sweet. Start with a smaller amount of sugar and add more if needed.
Garnish with Nuts and Saffron: Garnish Besan ka Halwa with chopped nuts such as almonds, pistachios, and cashews, as well as a few strands of saffron for a luxurious touch. The nuts add crunch and texture, while saffron adds color and aroma to the halwa.
FAQs about Besan ka Halwa:
Can I make Besan ka Halwa ahead of time?
Yes, Besan ka Halwa can be made ahead of time and stored in an airtight container in the refrigerator for up to 3-4 days. Reheat the halwa gently on the stovetop or in the microwave before serving.
Can I freeze Besan ka Halwa?
While Besan ka Halwa can be frozen, its texture may change slightly upon thawing. If freezing, allow the halwa to cool completely before transferring it to a freezer-safe container. Thaw the halwa in the refrigerator overnight before reheating.
Is Besan ka Halwa vegan-friendly?
Traditional Besan ka Halwa is made with ghee (clarified butter), which is not vegan. However, you can make a vegan version of Besan ka Halwa by using plant-based ghee or oil instead of dairy ghee.
Is Besan ka Halwa gluten-free?
Yes, Besan ka Halwa is gluten-free as it is made from gram flour, which is naturally gluten-free. However, be cautious of cross-contamination if you have a severe gluten allergy or celiac disease.
Besan ka Halwa is a luxurious and aromatic dessert that’s perfect for indulging in on special occasions or as a sweet treat for your loved ones.
With its rich flavor, creamy texture, and endless variations, Besan ka Halwa is sure to become a favorite in your dessert repertoire. Whether enjoyed warm or at room temperature, this halwa is guaranteed to satisfy your sweet cravings and leave you feeling content and happy.
Besan ka Halwa goes best even at marriage and big events hence its often served as people’s favorite choice of sweet dessert after every celebration and is a great hit among family gatherings and unions.
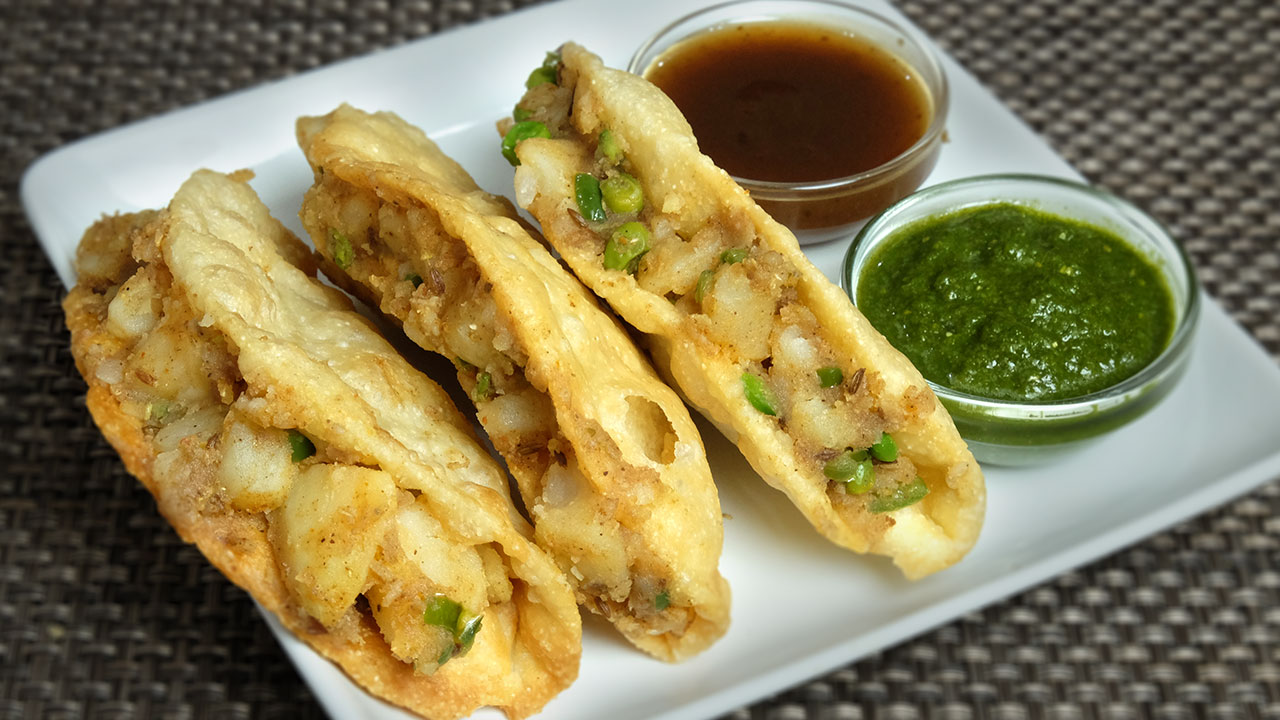
This exciting recipe for Taco Samosa is exactly what it sounds like – a twist to the traditional Samosa. Taco Samosas are delicious and savory with the perfect crisp. When I had my family do the initial taste test, the reaction was WOW! These Taco Samosas should be in your must try list. Not only are these snacks delicious, but will be the conversation piece for your next party or get together. One thing good about these Samosas is that you can prepare them in advance and simply assemble before serving.This recipe will make 8 Taco Samosas.
Mix the flour, sooji, salt, and oil add water as needed to make a firm dough.
knead the dough for about 1 minutes to make the dough smooth and pliable.
Let the dough sit for at least 15 minutes.
Making the Filling
Heat the oil in a frying pan on medium heat. Test the heat by adding one cumin seed to the oil; if it cracks right away oil is ready.
Add cumin seeds as cumin seeds crack, add green peas stir-fry for about 2 minutes.
Add all the other ingredients, potatoes, coriander powder, red chili powder, garam masala, mango powder, salt and green chili. Stir-fry for about 2 minutes, potato filling should be moist not very dry.
Making Taco Shells
Knead the dough for few seconds. Divide the dough into 8 equal parts, and roll them into balls.
Roll each dough ball into about 4-inch diameter. Prick each rolled up Taco with a fork in several places both sides, this will prevent Taco from puffing and make them crisp.
Heat the oil in a frying pan over medium heat. The frying pan should have about 1 inch of oil. To check if the oil is ready, put a small piece of dough in the oil. The dough should sizzle and come up slowly.
Place one rolled Taco in the frying pan and press with a skimmer, turn and fold in half. Doing this it will become taco shape. Do not press, between the fold there should be space to fill the potatoes filling. Gently do the next one same way do not over crowd the frying pan. Fry them until light golden brown on both sides. This should take about 2-3 minutes. Take the Taco out and place them on paper towels to absorb the excess oil. Repeat the process for remaining Taco.
You can prepare the taco shells in advance and store them in air tight container.
Assembling the Tacos
Fill the taco shell with potato filling (filling should be hot) and drizzle with chutney.
Notes
SuggestionsTaco Samosa you can prepare in advance and assemble before serving. Taco shells should be good for two weeks or more. Potato filling also can be refrigerated for 3-4 days just heat the filling before serving. Chutneys I always have ready.
How to make Fried Taco Samosas – Manjula’s Kitchen
Instructions:
Start on a culinary adventure with this innovative fried taco samosas recipe that transforms the beloved samosa into a delightful fusion appetizer – introducing fried tacos samosas! These savory treats boast a perfect crispiness that will surely captivate your taste buds. Impress your family and friends with a unique twist of mexican indian cuisine into samosa taco that is not only delicious but also a guaranteed conversation starter at your next gathering. The best part? You can prepare these fried taco samosas ahead of time and simply assemble before serving, making them a convenient yet impressive addition to your menu.
Dough Preparation:
The inception of fried taco samosas recipe involves the careful assembly of flour, sooji, salt, and oil in a mixing bowl. The combination of these elements lays the groundwork for a versatile and flavorful dough that will contribute to the overall texture and taste of the fried tacos samosas. Gradually add water, kneading the ingredients for about 1 minute until a firm and pliable dough is formed. Allow the dough to rest for a minimum of 15 minutes, allowing the flavors to meld and the texture to become more workable.
Filling Creation:
Heat oil in a frying pan over medium heat. Confirm the oil’s readiness by adding a cumin seed – if it cracks immediately, the oil is ready. Introduce cumin seeds to the hot oil, followed by green peas. Stir-fry for approximately 2 minutes. Add potatoes, coriander powder, red chili powder, garam masala, mango powder, salt, and green chili to the pan. Stir-fry for an additional 2 minutes, ensuring the potato filling maintains a moist consistency without becoming overly dry.
Taco Shell Crafting:
Knead the dough briefly and divide it into 8 equal portions, rolling each into a ball.
Roll out each dough ball into a 4-inch diameter circle. Use a fork to prick both sides of the rolled taco to prevent puffing during frying, ensuring a crisp texture.
Heat oil in a frying pan with approximately 1 inch of oil. To check readiness, drop a small piece of dough into the oil – it should sizzle and rise slowly.
Place a rolled taco in the pan, pressing with a skimmer, turning, and folding it in half to create a taco shape. Ensure there is space between the folds for the potato filling. Fry until light golden brown on both sides, taking about 2-3 minutes per taco. Drain excess oil by placing the fried tacos on paper towels. Repeat the process for the remaining tacos.
Assembling the Tacos:
The final step in crafting these delectable Fried Taco Samosas is the art of assembling.
While the taco shells are still warm, fill each with the hot potato filling.
Drizzle with your favorite chutney to add a burst of flavor to the taco samosas.
Notes and Suggestions:
Prepare taco shells and potato filling in advance for a convenient assembly before serving.
Taco shells can be stored in an airtight container for up to two weeks or more.
Potato filling can be refrigerated for 3-4 days; reheat before serving.
Keep chutneys ready to enhance the flavor of your fried taco samosas.
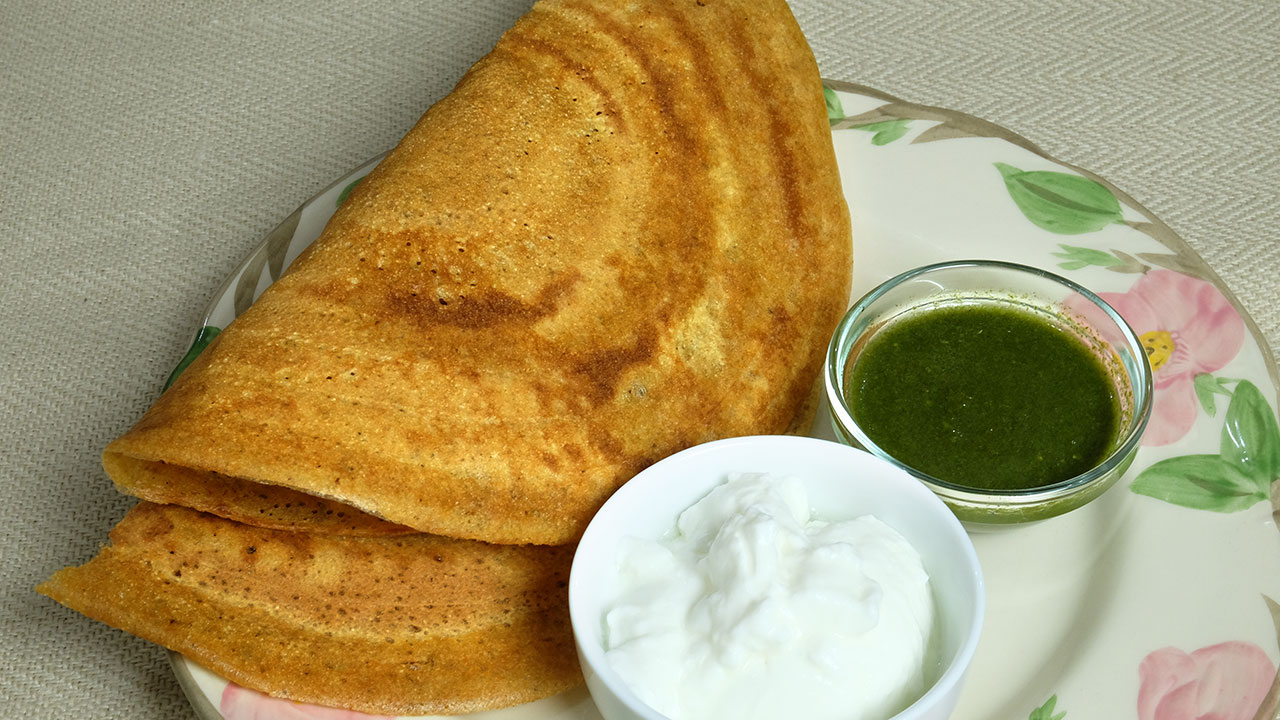
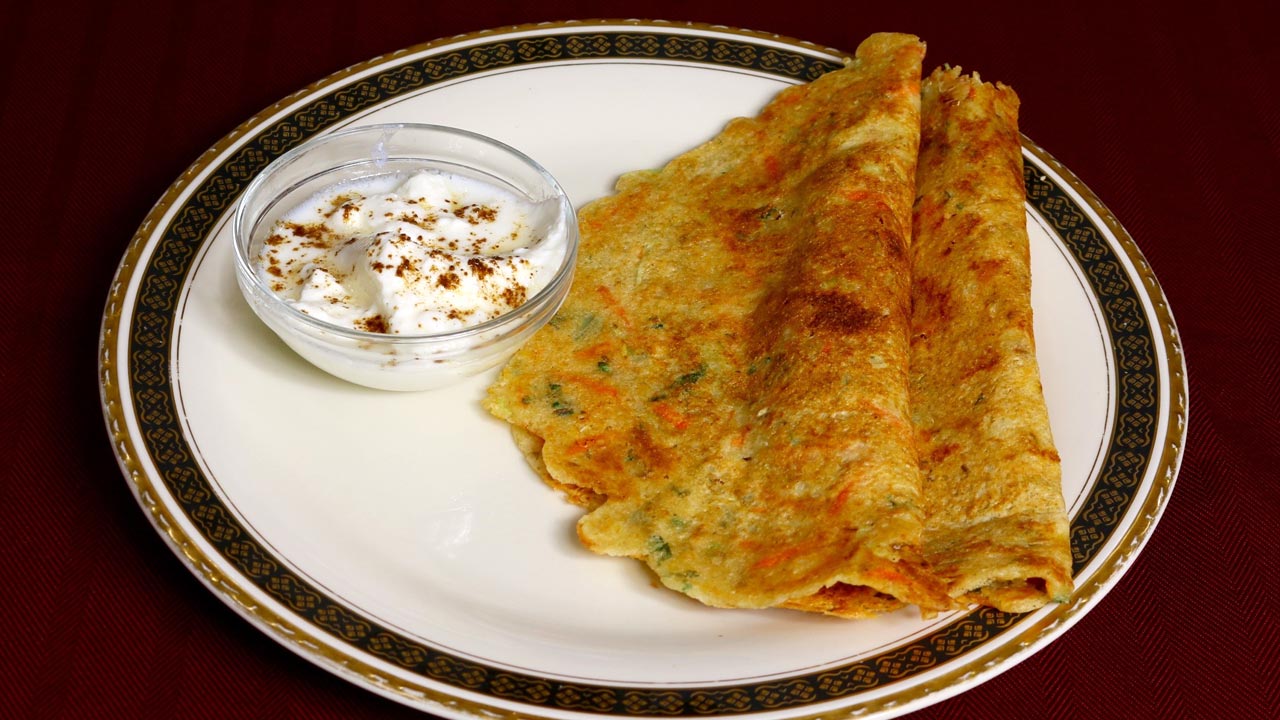
Whole Wheat Dosa is a super quick and easy recipe. It is another version of the South Indiandosa. This recipe is a special one as it was my mother’s favorite, although this was known as Atta Ka Cheela in my home. Whole wheat dosa is tasty with the perfect amount of crispy deliciousness! You can serve this as my mother did, as Roti. She liked to pair it with her favorite side dishes of mint chutney, and Lauki Chana Dal. This recipe will make 8 dosa and will serve 4.
Mix all the dry ingredients together, whole wheat, sooji, salt, black pepper, carom seeds, and baking soda, mix it well. Add water slowly to make a smooth batter, add water as needed, batter should be pouring consistency.
Use a non-stick skillet and place on medium heat. Test by sprinkling a few drops of water on it. Water should sizzle right away. Wipe the skillet with moist towel.
Pour 1/4 cup of the batter mixture into the center of the skillet and spread evenly with the back of a spoon. Starting from the center, spiral outward until evenly spread, about 7” inches in diameter thin circle.
When the batter starts drying, smear about 2 teaspoons of oil over dosa, and cook till dosa turns golden brown in color. Flip dosa using a flat spatula, and cook for about 1 minute from other side until dosa is golden brown.
Crispy Whole Wheat Dosa is ready, repeat with remaining batter. Every time wipe the skillet. that helps spreading the dosa.
Elevate Your Culinary Experience with Our Whole Wheat Dosa Recipe
Dosa is a popular South Indian delicacy that looks like a crepe. It’s like a crisp and thin pancake made of rice and urad dal batter. Traditionally Dosa is served with sambar, aloo masala, and coconut chutney. It is an Indian crepe made usually through rice batter, but here we have experimented and made many alternative dosa such as Oat Dosa, Besan Dosa, Rava Dosa, Sorghand um Dosa. This preparation uses whole wheat dosa and is a bread-basedbreakfast recipe that is vegan. The preparation entails skillfully combining pan techniques and manual dexterity to achieve the perfect bread cooked on non-stick skillets.
Creating the Whole Wheat Dosa Batter:
In the first step of the whole wheat dosa recipe, begin by meticulously blending all the dry components – whole wheat, sooji, salt, black pepper, carom seeds, and baking soda. Achieve a seamless amalgamation to ensure a well-balanced flavor profile. Gradually incorporate water into the mixture, stirring continuously until a smooth batter with a pourable consistency is attained.
Setting the Skillet for Whole Wheat Dosa:
The second step of the recipe for wheat dosa for making optimum whole wheat dosa requires initiating the cooking process with a non-stick skillet placed over medium heat. To gauge its readiness, conduct a water test – if droplets sizzle upon contact, the skillet is primed. To prevent sticking during cooking, maintain a skillet surface free of residue by wiping it with a moist towel.
Pouring and Spreading the Whole Wheat Dosa Batter:
The next step in the recipe for wheat dosa is the artistic phase of crafting a perfect whole wheat dosa by taking 1/4 cup of the batter and pouring it gracefully into the skillet’s center. Utilize the back of a spoon to delicately spread the batter, commencing from the center and spiraling outward. Strive for a delicate, 7-inch diameter circle to ensure the desired thinness and crispiness in the final whole wheat dosa.
Cooking and Flipping the Whole Wheat Dosa:
As the whole wheat dosa batter begins to set, introduce about 2 teaspoons of oil, spreading it evenly over the surface. Allow the dosa to cook until it transforms into a luscious golden brown. Employ a flat spatula to skillfully flip the dosa, ensuring an additional minute of cooking on the other side until a uniform golden brown hue is achieved. Repeat this process with each dosa, while adhering to the essential skillet-wiping ritual for consistent dosa spreading.
Finalizing the Whole Wheat Dosa Delight:
Celebrate the fruition of your culinary endeavors with the satisfying crunch of a well-prepared whole wheat dosa. Replicate the cooking process with the remaining batter, guaranteeing each dosa mirrors the deliciousness of the initial ones. Keep in mind the importance of diligently wiping the skillet after each use to facilitate uniform spreading.
Observations on Whole Wheat Dosa:
Appreciate the aesthetic appeal and delectable crispiness that the whole wheat dosa brings to the table, making it an ideal choice for a wholesome and delightful meal. Explore the versatility of this whole wheat dosa by incorporating it seamlessly into your culinary repertoire as an eggless crepe alternative, enhancing your dining experiences with its wholesome goodness.
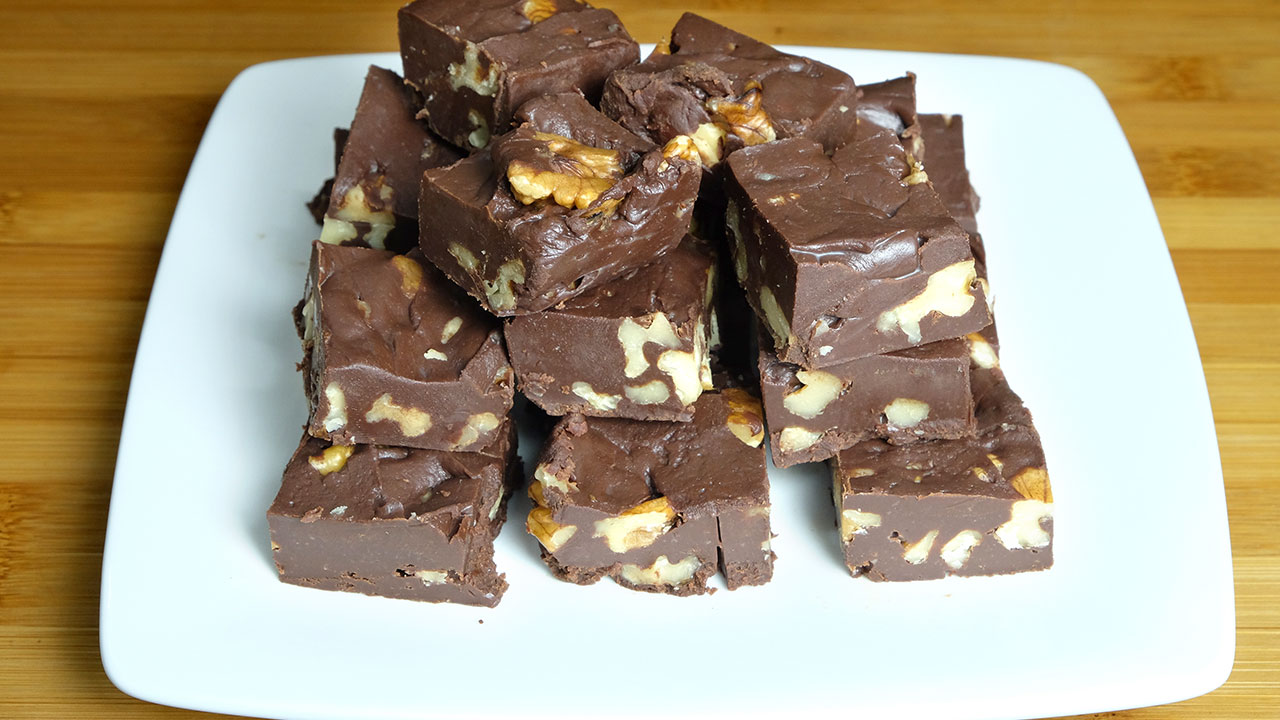
This Chocolate Fudge recipe is a huge hit with my grandchildren! Who doesn’t love rich creamy chocolate? I like this dessert because it allows me to let my grand-kids take the role of lead chef. I get to be the sous chef for the day! This recipe is super simple and delicious!
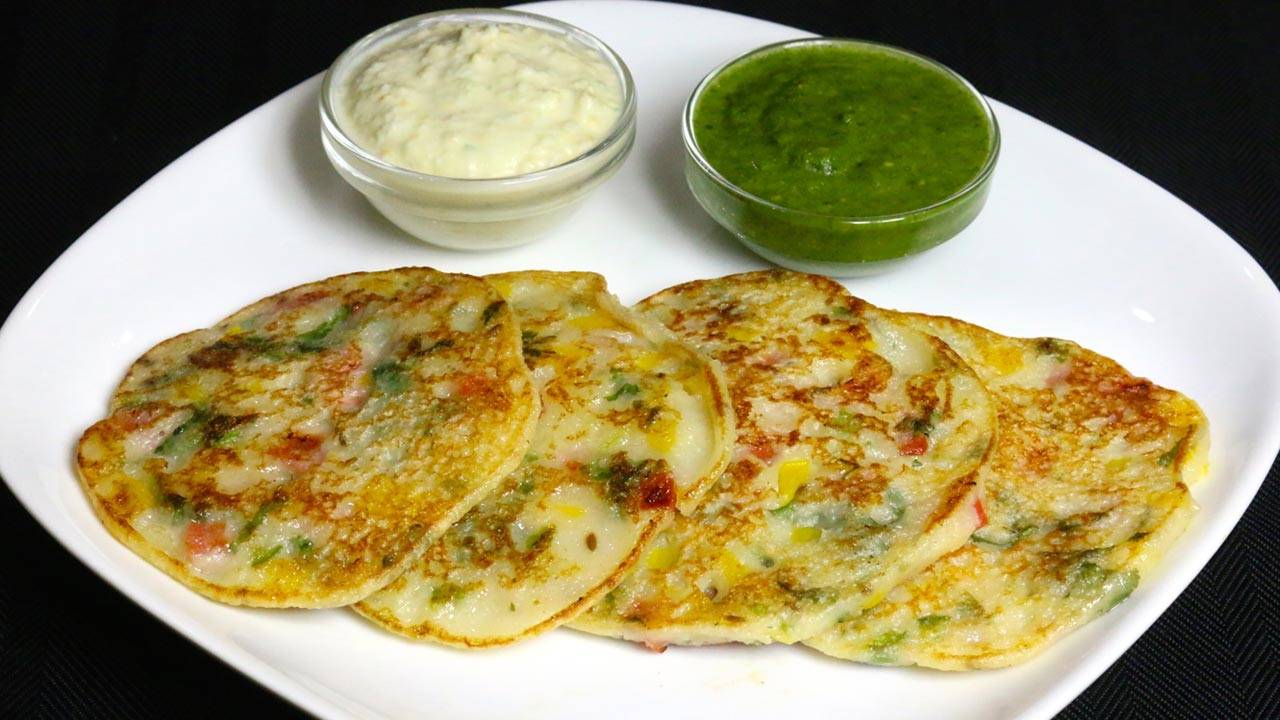
Instant Oat dosa is an easy recipe that is perfect for busy families. Sometimes you want to make something that is easy and hassle-free and of course healthy. Oat dosas are instant dosas and make a great breakfast or anytime snack. This gluten-free dish is made with oats, rice flour, yogurt, and a few spices. I am also adding cabbage and carrots for texture. This will be a staple in my house.
Grind oats to make fine powder. Add all the dry ingredients except ENO rice flour, asafetida, salt, and cumin seeds and mix it well. Notes: ENO is added just before making dosa.
Add yogurt mix, add water as needed to make batter consistency of dosa or pancake mix. Set aside for about fifteen minutes.
Add green chilies, cilantro, cabbage, and carrots mix it well.
Place a non-stick skillet over medium-high heat. Grease the skillet lightly. Test by sprinkling a few drops of water on it. The water should sizzle right away.
In a small bowl take about ½ cup of batter and add ¼ teaspoon of ENO mix it well batter will become a little frothy.
Pour the batter mixture into the skillet and spread evenly with the back of a spoon, about seven inches in diameter.
When the batter begins to dry, gently spread one teaspoon of oil over it. Wait about 30 seconds, then flip the dosa using a flat spatula.
Press the dosa lightly with the spatula all around to ensure even cooking, turning two to three times. The dosa should be golden brown on both sides.
Repeat for the remaining dosas.
Serve oat dosa with your choice of chutney, I like it with tomato chutney.
Oats Dosa Recipe: Crispy and Healthy Dosas with a Nutritious Oats Twist
Dosa is a popular south Indian delicacy that looks like a crepe. It’s like a crisp and thin pancake made of rice and urad dal batter. Traditionally Dosa is served with sambar, aloo masala, and coconut chutney. It is an Indian crepe made usually through rice batter, but here we have experimented and made many alternative dosa such as Oat Dosa, Besan Dosa, Rava Dosa, Sorghand um Dosa. This preparation uses oats dosa and is a bread-basedbreakfast recipe that is vegan. The preparation entails skillfully combining pan techniques and manual dexterity to achieve the perfect bread cooked on non-stick skillets.
1. Grind Oats to Make Fine Powder: Elevating Texture with Oats Dosa
Start the oats dosa preparation by grinding oats into a fine powder. This step not only enhances the nutritional profile but also contributes to the unique texture of the dosa. The combination of finely ground oats with other dry ingredients, excluding ENO, rice flour, asafetida, salt, and cumin seeds, ensure a harmonious blend of flavors. It’s essential to note that ENO is introduced just before making the dosa, adding a special touch to the preparation.
Create the Dosa Batter: Blending Nutrients and Flavors with Oats
Building on the groundwork laid in the first step, proceed to create the dosa batter. Integrate yogurt into the dry mixture, adjusting the consistency with water to achieve a batter reminiscent of dosa or pancake mix. Allowing the batter to rest for fifteen minutes is a crucial step in enhancing the overall flavor profile. This brief resting period ensures that the oats absorb the flavors, resulting in a more palatable and delicious end product.
Enhance with Vegetables: Burst of Colors and Nutrients in Oats Dosa
Take your oats dosa to the next level by introducing a medley of vegetables. Finely chopped green chilies, cilantro, cabbage, and carrots bring not only vibrant colors but also a variety of nutrients to the dosa. This step adds a delightful crunch and freshness, transforming the oats dosa into a visually appealing and nutrition-packed dish that is as wholesome as it is flavorful.
Heat the Skillet: Perfecting the Cooking Surface for Oats Dosas
Achieving the ideal dosa requires a properly heated skillet. Place a non-stick skillet over medium-high heat and lightly grease it. To test readiness, sprinkle a few drops of water on the skillet – the water should sizzle right away. This ensures that the dosa cooks evenly and attains the desired crispiness while preventing sticking to the surface.
Prepare the Frothy Batter: Enhancing Texture for Irresistible Oats Dosas
Before pouring the batter onto the skillet, take a small portion (about ½ cup) and introduce ¼ teaspoon of ENO. Mixing this well creates a frothy consistency in the batter, adding a light and airy texture to the dosa. This step is crucial for achieving the perfect balance between softness and crispiness in each bite.
Spread the Batter: Crafting Perfectly Shaped Oats Dosas
Once the skillet is ready, pour the batter onto it, spreading it evenly with the back of a spoon to form a dosa of about seven inches in diameter. This step requires a bit of finesse to ensure an even thickness throughout the dosa, contributing to the overall enjoyable texture.
Flip and Oil: Locking in Flavor with Precision
As the batter begins to dry, delicately spread one teaspoon of oil over the dosa. Waiting for about 30 seconds before flipping with a flat spatula ensures that the dosa achieves a golden brown hue on both sides. This careful process locks in the flavors and adds a subtle yet essential touch of crispiness.
Ensure Even Cooking: Perfecting the Golden Brown Finish
To guarantee even cooking, lightly press the dosa with the spatula all around, turning it two to three times. This step is vital in achieving the desired golden brown color, indicating that the dosa is cooked to perfection. The interplay of textures, from the soft interior to the crispy edges, creates a delightful culinary experience.
Repeat for More Dosas: Scaling Up the Oats Dosa Feast
The joy of oats dosa doesn’t end with just one. Repeat the cooking process for the remaining batter, creating a batch of these tasty dosas. This step allows you to share the wholesome goodness and unique flavors with family and friends, turning the dosa-making experience into a communal celebration of culinary delight.
Serve with Chutney: Pairing Oats Dosa with Flavorful Companions
Finally, elevate your oats dosa experience by serving it with your choice of chutney. The versatility of oats dosa makes it a perfect companion for various chutney options. Whether you prefer the tanginess of tomato chutney or the spiciness of coconut chutney, the pairing enhances the overall dining experience, making each bite a harmonious blend of flavors. Enjoy this nutritious twist on a classic dish, savoring the delicious combination of oats dosa and flavorful chutneys.
Uttapam is a popular South Indian dish. Traditionally uttapam is made with rice and lentil batter, which can be a long process. Bread Uttapam, on the other hand, is instant and easy to make. Not to mention it tastes delicious. Uttapam is a thick dosa, or pancake, with vegetables cooked over skillet. It tastes divine served hot and with a side of coconut chutney.
Remove the crest from bread and cut them in small pieces.
In a blender add bread, sooji, all-purpose flour, salt, yogurt, and water, and blend to a thick and smooth paste.
Take out the batter in a bowl and add the remaining ingredients, cumin seeds, bell pepper, tomatoes, ginger, green chili, and cilantro, mix it well. Batter should be thick in consistency add more water if needed, batter should not be too thick but should not be runny.
Heat the skillet over medium heat and lightly grease the skillet. Pour about 2 tablespoons of batter and spread consistency should be of thick pancake.
Pour little oil around uttapam. Let it cook for about 2 minutes and turn them over, bread uttapam should be golden brown from both sides and this should take about four minutes. Notes: do not cook on high heat, uttapam will not cook through.
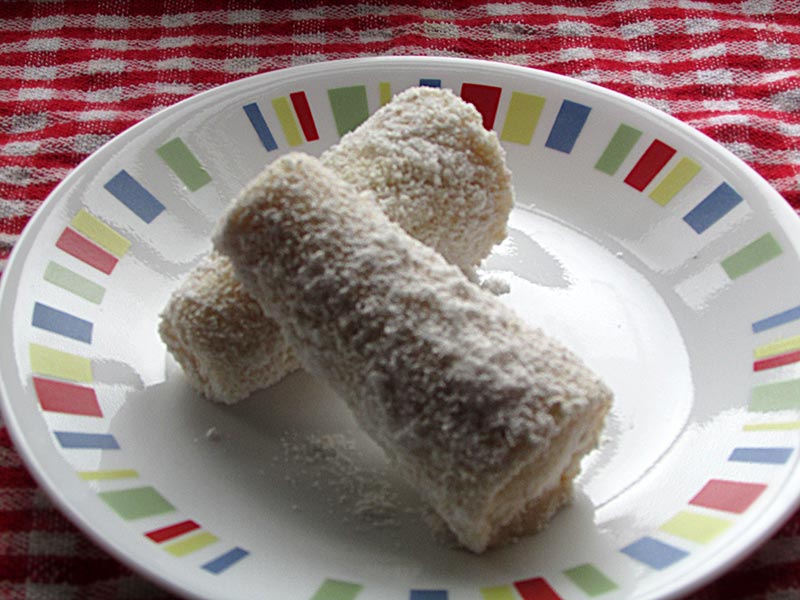
In a blender, combine sweetened condensed milk, all of the fruit, and the milk. Blend to combine thoroughly.
Add almonds and pulse 4-5 times, just enough to chop and mix in the nuts.
Pour this mixture into molds or a shallow freezer-safe dish. Cover and freeze at the lowest temperature possible.
To unmold, let containers sit for a few minutes at room temperature. Run a knife around the edges of the molds, or dampen an ice cream scoop or strong spoon.
Pry or scoop out the delicious cream; top with more fruit or nuts if desired.
There were many entries this month for June. I went through all of them and these five really stood out to me. Here are the winners this month and the top five entries. Congratulations to the winners and all participants:
1st Place:Honeydew Melon Kulfi by Anu Saxena
2nd Place:Cantaloupe Rice Pudding by Nisha
**Update: Original 1st place winner was disqualified after receiving note and verifying that recipe was copied from the internet. 1st place now goes to Anu Saxena and 2nd place now goes to Nisha.
Congratulations to both of you!!
Honeydew Melon Kulfi by Anu Saxena
Cantaloupe Rice Pudding by Nisha
Watermelon Cream Jello Cake by Sree
Eggless Melon Cake by Prachi Agarwal
Thank you to everyone else that also participated in the contest:
Honeydew Melon Kulfi is a great way to cool off from the summer heat. The sweetness of the melon makes this even more delicious. It's a simple quick and easy recipe with a fusion involving honeydew melon and kulfi.
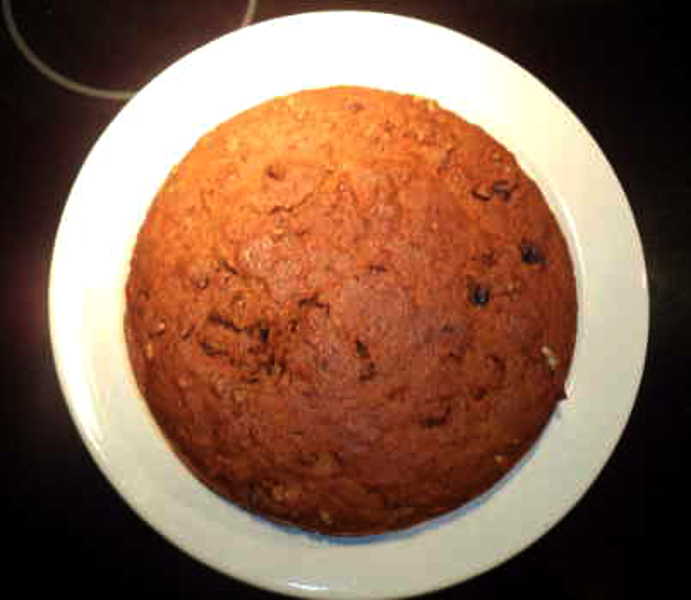
I’m excited to share with you a divinely delicious whole-wheat cake recipe. It’s my signature recipe for birthdays, Christmas, holidays, parties, or dessert with a western twist. You’ll be charmed by the winsome nutty wholesomeness of this simple eggless cake. I urge you to bake the cake with your heart and enjoy the creation. After all, love is the most important ingredient that Moms put into their cooking. Treat yourself, your friends, and your family this holiday season with this delicious dish. Enjoy!
In a big bowl, combine carrots, sugar and melted butter.
Pour the boiling water to this.
In another bowl, mix all the other ingredients (chopped walnuts, pitted dates, whole wheat flour, nutmeg powder, sodium bicarbonate, salt & vanilla essence).
Add the flour mixture to the carrot mixture. Mix together the dry & wet ingredients well.
Pour this to a greased 9" round cake pan. Bake for 40 to 45 minutes.
Bake till a toothpick inserted in the center of the cake comes out clean.
Turn off the oven. Take it out. Let it cool for 4-5 hours.
Coconut Kulfi is a great take on the traditional kulfi. If you love coconuts, then this recipe is a must try. Its a nice summer recipe and a cold dessert
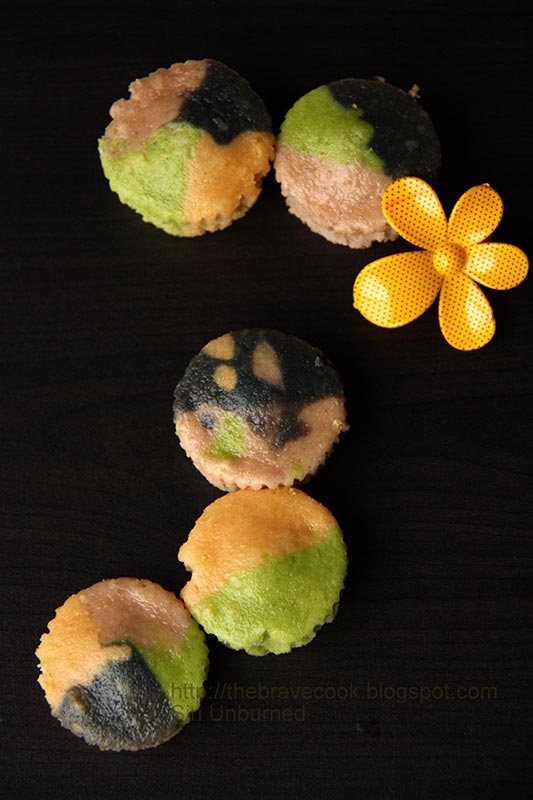
Rainbow cupcakes are colorful cakes perfect for spring time. The colors are all natural made with real fruit juice. My daughter loved them. Its a healthydessert option made with love and passion.
Stir together milk and vinegar and set aside for 5 minutes. The milk should be curdled by the end of it.
Sift together the flour, baking powder, baking soda and salt and set aside.
Once milk is curdled, whisk oil, vanilla extract and sugar into it till well combined and runny.
Make a well in the center of the dry ingredients and pour the wet ingredients into it. Mix till smooth. Do not overmix. A little lumpy is fine as long as everything is mixed well.
Making the colours (Orange Colour)
Juice the grated carrot with 1 tbsp of water. I used a regular Indian mixer to do this.
Strain the carrot juice to get the fibrous part out.
Keep 2 tbsp of orange juice aside.
Making the colours (Green Colour)
Juice the spinach leaves with 1 tbsp of water
Strain the spinach juice.
Keep 2 tbsp of green juice aside.
Making the colours (Red/Pink Colour)
Juice the strawberries with 1 tbsp of water
Keep 2 tbsp of red/pink juice aside.
Making the colours (Blue Colour)
Place frozen blueberries in a microwave safe bowl and microwave in 30 second intervals till the blueberries burst and the juice starts oozing out. It took me 3 intervals.
Allow it to cool.
Strain the blueberries juice.
Keep 2 tbsp of blue juice aside.
Putting it all together
Method
Divide the basic Vanilla cupcake batter into 5 cups. I scooped out 4 heaped tsps per cup.
To the batter in the first cup add 1 tbsp of carrot juice and mix well to get orange coloured batter.
To the batter in the second cup add 1 tbsp of spinach juice and mix well to get green coloured batter.
To the batter in the third cup add 1 tbsp of strawberry juice and mix well to get pink coloured batter.
To the batter in the fourth cup add 1 tbsp of blueberry juice and mix well to get blue coloured batter.
Keep the batter in the fifth cup uncoloured. This can be used to improve consistency in the other batters or to get a cream layer in the cupcake.
Add more juice to improve colour adjusting the consistency so that it doesnt become watery.
There are many ways of making the cupcakes clourful.
The easiest method is to layer different coloured batters one on top of the other in the cupcake liner.
Alternatively place separators in the paper liner and pour different coloured batters in each section.
I started out making the separators using card. I made a 4 section one and a 3 section like that. But I found it problematic because the batters bled into other sections easily.
Then the hubby gave an idea which turned out to be brilliant. Use crackers/biscuits as dividers. I had Parle-G gluco biscuits on hand and used them. I got 2 sections and 4 section ones using this method.
Preheat the oven to 350°F
Whatever the method fill the liners to 3/4 full and bake at 350°F for 18 minutes.
Cool the cupcakes in the pan for 5 minutes before removing them onto a wire rack and allowing them to cool completely.
Decorate with frosting or ganache as desired. The cupcakes turned out so wonderfully coloured that I did not want to cover that up at all.
It was really nice to see so many entries this month and it was great for me to see many creative ideas for plating dishes. The contest is now over – The top final winners are below. Thank you everyone for participating.
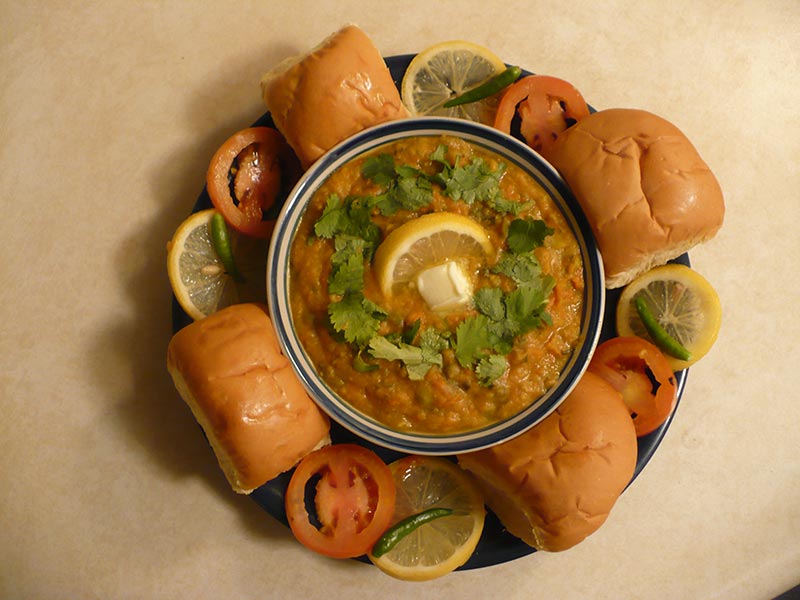
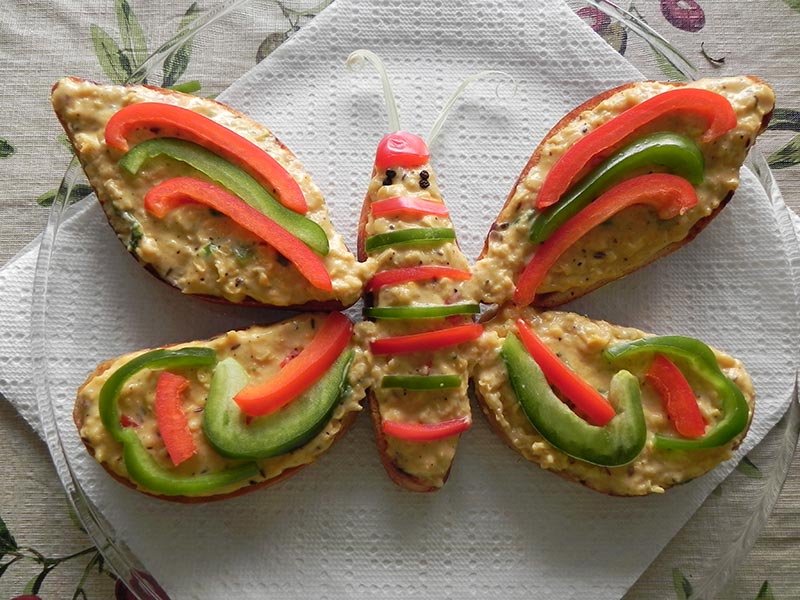
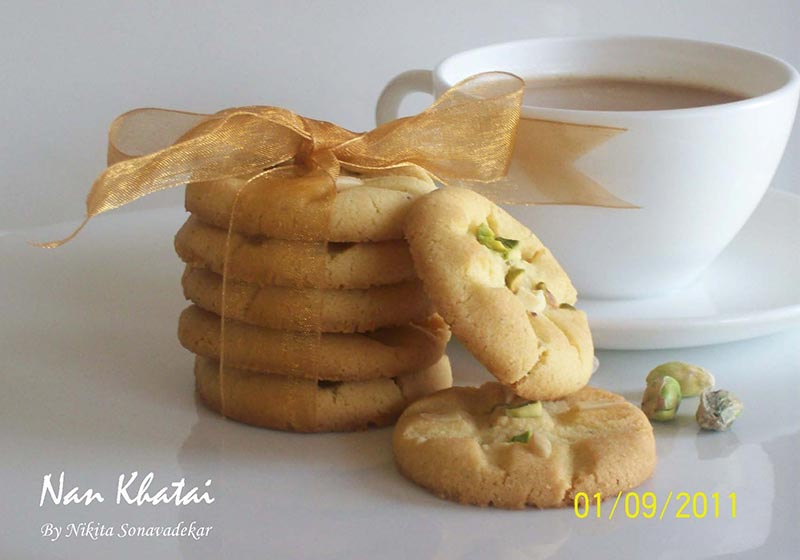
For anyone just visiting this page for the first time, this contest is about presentation only – the recipes are all created by Manjula (Corn Bruschetta, Chum Chum, Nan Khatai, Eggless Pineapple Cake, Pan Bhaji) and can be all found on this site.
1st Place: Asha Krishnan’s presentation of Pav Bhaji 2nd Place: Vijaya Laxmi’s presentation of Corn Bruscetta
Corn Bruscetta
Eggless Pineapple Cake
Nan Khatai
Chum Chum
Pav Bhaji
[poll id=”6″]
I would like to very much thank the other participants this month: