Category: Party Recipes

Best Indian Dishes for a Party: Delicious and Easy Party Foods

Hosting a party is all about creating memorable experiences, and what better way to do that than with delicious food? Indian cuisine offers some of the best Indian dishes that are perfect for any celebration. Whether you’re looking for easy party foods, party food ideas, or the best Indian dishes for a party, Manjula’s Kitchen has a range of recipes to impress your guests. Let’s explore some fantastic dishes that will make your next gathering a hit.

Classic Indian Party Food Ideas

Samosas

Samosas are one of the best Indian dishes that you can serve at a party. These crispy pastries filled with spiced potatoes and peas are a favorite among many. They are easy to make and can be prepared in advance, making them one of the best Indian dishes for a party. Serve them with indian chutney such as mint and tamarind sauce for an added burst of flavor.

Pakoras

Pakoras are another popular choice for easy party foods. These deep-fried fritters made with vegetables like spinach, and potatoes are perfect for any occasion. The crunchy exterior and flavorful interior make them a hit with guests. Pair them with a spicy chutney for the perfect party snack.

Easy Party Foods: Indian Style

Paneer Tikka

Paneer Tikka is a delicious and healthy Indian veg appetizer that fits well within easy party foods. Marinated paneer cubes are grilled to perfection, creating a smoky and flavorful dish. This dish is not only easy to prepare but also a crowd-pleaser, making it one of the best Indian dishes for a party.

Vegetable Biryani

Vegetable Biryani is a fragrant and flavorful rice dish cooked with a variety of vegetables and aromatic spices. This dish is perfect for large gatherings as it can be made in large quantities. Biryani is always a hit at parties, making it one of the top party food ideas.

Best Indian Dishes for a Party

Chole Bhature

Chole Bhature is a classic North Indian dish that is perfect for parties. Spicy chickpea curry served with fluffy deep-fried bread is a combination that is hard to resist. This dish is filling and delicious, making it one of the best Indian dishes for a party. Serve it with a side of pickles and yogurt for a complete meal.

Aloo Tikki

Aloo Tikki are spiced potato patties that are crispy on the outside and soft on the inside. These are perfect as appetizers or snacks at a party. They are easy to prepare and can be served with various chutneys, making them one of the top party food ideas.

Vegetarian Party Food Ideas

Hara Bhara Kabab

Hara Bhara Kabab is a nutritious and delicious vegetarian kabab made with spinach, peas, and potatoes. These kababs are a great addition to your list of best Indian dishes for a party. They are healthy, tasty, and easy to make, making them perfect for any gathering.

Dahi Puri

Dahi Puri is a popular Indian street food that is perfect for parties. Crisp puris are filled with spiced potatoes, chickpeas, yogurt, and chutneys, creating a burst of flavors in every bite. This dish is easy to assemble and always a hit with guests, making it one of the best Indian dishes for a party.

Indian Desserts for Parties

Gulab Jamun

Gulab Jamun are soft, deep-fried balls made from khoya (dried milk) soaked in a sweet syrup flavored with cardamom and rose water. This Indian dessert is a favorite among many and is perfect for any celebration. The melt-in-your-mouth texture and sweet flavor make it one of the best party food ideas for dessert.

Kheer

Kheer is a creamy rice pudding flavored with cardamom and garnished with nuts and raisins. This dessert is a classic in Indian cuisine and is easy to prepare in large quantities, making it one of the best Indian dishes for a party.

Elevating Your Party Menu

To enhance your party menu, consider incorporating dishes from related categories that complement these best Indian dishes. Adding Indian snacks like samosas and pakoras can offer a delightful variety of flavors and textures.

For a sweet ending, explore Indian desserts such as gulab jamun and kheer. Including healthy options like hara bhara kabab and paneer tikka can provide lighter choices for your meals.

Planning a large gathering? The popular party recipe category is filled with dishes that are sure to impress your guests and make your celebration memorable. Adding North Indian recipes like chole bhature or vegetable biryani can bring an authentic touch to your meal.

Frequently Asked Questions (FAQs)

Q: What are some popular easy party foods? 

A: Some popular easy party foods include Samosas, Pakoras, Paneer Tikka, Aloo Tikki, and Vegetable Biryani. These dishes are flavorful, easy to prepare, and perfect for any gathering.

Q: How can I make traditional Indian dishes suitable for a party? 

A: To make traditional Indian dishes suitable for a party, try recipes like Chole Bhature, Hara Bhara Kabab, and Dahi Puri. These recipes are modified to be easy to serve and can be made in large quantities.

Q: What are some vegetarian Indian dishes for a party? 

A: Some vegetarian Indian dishes for a party include Hara Bhara Kabab, Dahi Puri, Paneer Tikka, and Aloo Tikki. These dishes are healthy, delicious, and sure to impress your guests.

Q: Can I prepare Indian party recipes in advance? 

A: Yes, many Indian party recipes can be prepared in advance and stored. Dishes like Vegetable Biryani and Chole Bhature can be made ahead of time and refrigerated, while appetizers like Samosas and Pakoras can be prepped and frozen.

Q: What are some sweet Indian dishes for a party? 

A: Some sweet Indian dishes for a party include Gulab Jamun and Kheer. These desserts are classic, easy to prepare, and perfect for any celebration.

Conclusion

Best Indian dishes for a party are a celebration of diverse flavors and nutritious ingredients. Whether you’re looking for easy party foods, party food ideas, or the best Indian dishes for a party, these recipes will bring variety and flavor to your celebrations. So, gather your ingredients, try out these recipes, and enjoy the rich and diverse world of Indian party foods. Happy cooking and happy entertaining!

By incorporating these dishes into your party menu, you’ll be able to enjoy a wide variety of delicious and nutritious foods. Whether you’re hosting a small gathering or a large celebration, there’s an Indian party recipe to suit every taste. Don’t forget to check out Manjula’s Kitchen for more inspiration and culinary delights. Happy cooking and happy eating!

  • Chole Rajma Curry

    Chole Rajma Curry

    Chole Rajma Curry

    Chole Rajma Curry

    Chole Rajma Curry is a healthy and delicious main course meal. This is a popular north Indian cuisine which consists of boiled beans cooked with spicy tomato gravy. It goes well with roti, naan or rice.
    4.50 from 10 votes
    Prep Time 10 minutes
    Cook Time 50 minutes
    Total Time 1 hour
    Course Main Course
    Cuisine Indian
    Servings 4 people

    Ingredients


    • 1 cup chick peas, chole, kabuli chana, garbanzo beans,
    • 1/2 cup kidney beans rajma
    • 2 cup diced tomatoes about I used 3 Tomatoes
    • 1 Tbsp chopped ginger adrak
    • 1 Tbsp chopped green chili
    • 3 Tbsp oil prefer canola or vegetable
    • 1/4 tsp asafetida hing
    • 1 tsp cumin seeds jeera
    • 2 Tbsp coriander powder dhania
    • 1/2 tsp turmeric haldi
    • 1/2 tsp red chili powder
    • 1/2 tsp black pepper
    • 1-1/4 tsp salt
    • 1/2 tsp garam masala

    Instructions
     

    • Wash and soak chick peas and kidney beans in about six cups of water for at least 6 hours, preferably overnight (the beans will double in volume).
    • Cook the chick peas and kidney beans in pressure cooker with 3 cups of water. Close the cooker and put the pressure on.
    • Cook on medium high heat.
    • As pressure cooker starts steaming turn the heat down to medium and cook for about 30 minutes.
    • Close the heat and wait until steam has stopped before opening the pressure cooker. Beans should be soft and tender.
    • Cut the tomatoes and green chili in small pieces, and blend tomatoes, green chili, and ginger to make a pure.
    • Heat the oil in a sauce pan, test the heat by adding one cumin seed. If the seed cracks right away, the oil is ready. Add asafetida and cumin seeds, as the cumin seeds crack add tomato paste, coriander, turmeric, chili powder, and black pepper.
    • Stir-fry for two to three minutes, until the oil begins to separate from the mixture. Add beans, salt, and more water as needed. Cover the pan and cook over medium high heat, for about 10 minutes.
    • Turn off the heat. Chole Rajma Curry is ready to serve. 

    Notes

    Serve hot, with rice, or your choice of bread.
    Tried this recipe?Let us know how it was!

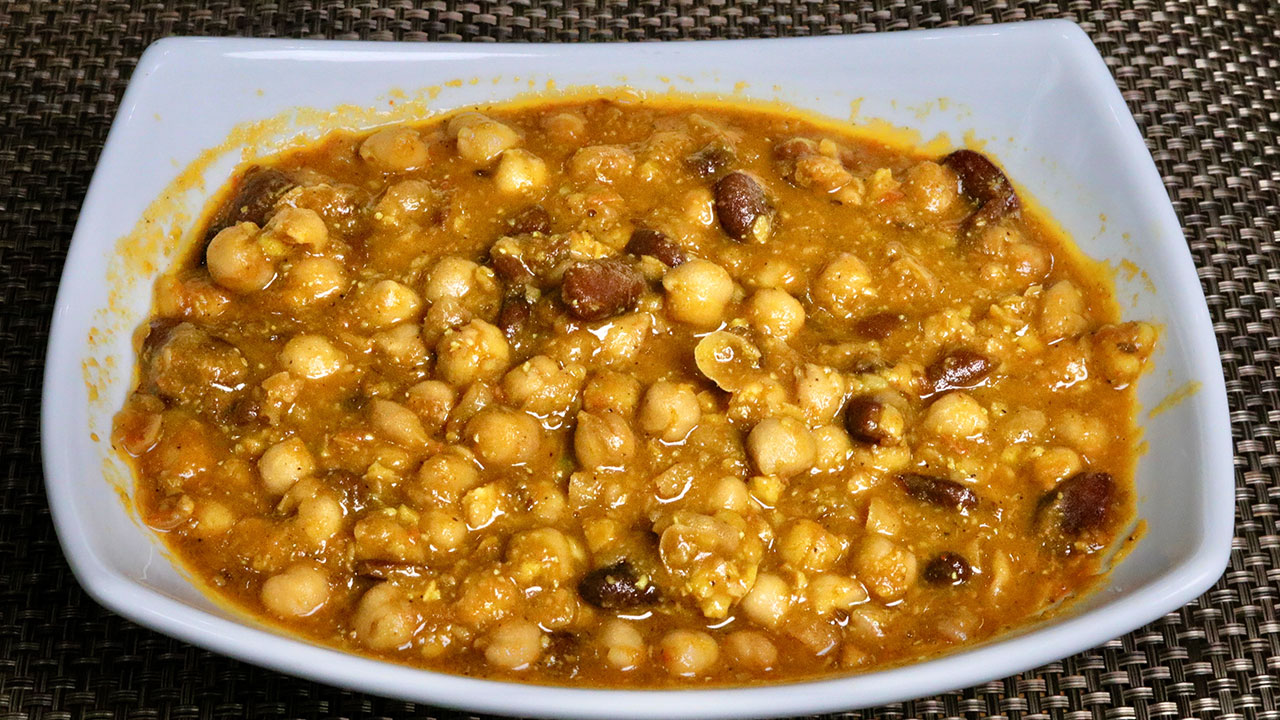
    Rajma Chole Ki Recipe: A Hearty Indian Delight

    Chole Rajma is a popular Indian dish made with a combination of two types of legumes: chickpeas (Chole) and kidney beans (Rajma). It is a hearty and flavorful curry/gravy dish that is commonly enjoyed as a main course. The dish is naturally gluten-free and high in protein, making it suitable for those with dietary restrictions or preferences. Chole Rajma typically includes a rich tomato-based gravy seasoned with various spices like cumin, coriander, turmeric, and garam masala. 

    It is often served with rice or flat bread (such as roti or naan) and is a favorite at parties or gatherings. Additionally, it can be made vegan by omitting any dairy-based ingredients like ghee or yogurt commonly used in some variations of the recipe. Overall, Chole Rajma is a delicious and nutritious dish that showcases the versatility of lentils and beans in Indian cuisine. 

    Chole Rajma Curry is a flavorful and hearty Indian dish that combines two popular legumes – chickpeas (chole) and kidney beans (rajma) – in a rich and aromatic gravy. This Chole Rajma Curry recipe is a favorite among vegetarians and vegans alike for its delicious taste and nutritious ingredients. With its perfect balance of spices and textures, Chole Rajma Curry is a comforting meal that’s perfect for any occasion.

    Step 1: Soaking and Cooking Legumes

    Begin by soaking dried chickpeas and kidney beans in water separately for at least 8 hours or overnight. Soaking helps soften the legumes and reduce cooking time. Once soaked, drain the water and rinse the chickpeas and kidney beans thoroughly. Cook them separately in a pressure cooker or large pot until they are tender and cooked through. Ensure that the chickpeas and kidney beans are well-cooked but not mushy.

    Step 2: Preparing the Gravy Base

    In a deep pan or skillet, heat oil or ghee over medium heat. Add cumin seeds and let them sizzle until fragrant. Then, add finely sauté until they turn golden brown and translucent. Next, add minced ginger, and green chilies, stirring well to combine. Cook until the raw smell of ginger disappears, infusing the base with aromatic flavors.

    Step 3: Adding Tomatoes and Spices

    Add finely chopped tomatoes to the pan along with ground spices such as turmeric powder, coriander powder, cumin powder, garam masala, and red chili powder. Stir well to combine the spices with the tomatoes and cook until the tomatoes break down and release their juices, creating a thick and flavorful gravy base.

    Step 4: Combining Chickpeas and Kidney Beans

    Once the tomatoes are cooked and the gravy base is well-flavored, add the cooked chickpeas and kidney beans to the pan, stirring gently to coat them with the gravy. Allow the legumes to simmer in the gravy for a few minutes to absorb the flavors and thicken the consistency. Adjust the seasoning with salt and sugar to balance the flavors.

    Step 5: Garnishing and Serving

    Before serving, garnish the Chole Rajma Curry with freshly chopped cilantro leaves for a burst of freshness and color. You can also drizzle a squeeze of lemon juice over the curry for an extra tangy kick. Serve the curry hot with steamed rice, roti, or naan bread for a wholesome and satisfying meal.

    Tips for Perfect Chole Rajma Curry

    Consistency of Gravy: Adjust the amount of water added to the gravy to achieve the desired consistency. The gravy should be thick and coat the legumes evenly without being too watery.

    Mashing Legumes: For a creamier texture, mash some of the chickpeas and kidney beans with the back of a spoon or a potato masher before adding them to the gravy. This helps thicken the curry and enhances its richness.

    Balancing Flavors: Taste the curry and adjust the seasoning according to your preference. You can add more spices for extra heat or sweetness to balance the flavors.

    Variations of Chole Rajma Curry

    Creamy Coconut Curry: Add coconut milk or grated coconut to the gravy for a creamy and indulgent twist. Coconut adds a hint of sweetness and richness to the curry, elevating its flavor profile.

    Spinach and Paneer Curry: Enhance the nutritional value of the curry by adding chopped spinach and cubed paneer (Indian cottage cheese) to the gravy. Spinach adds a pop of color and nutrients, while paneer provides protein and texture.

    Benefits of Chole Rajma Curry

    High in Protein: Chickpeas and kidney beans are rich sources of plant-based protein, essential for muscle repair and growth.

    Rich in Fiber: Legumes are high in dietary fiber, promoting digestive health and keeping you feeling full and satisfied.

    Nutrient-Dense: Chole Rajma Curry is packed with essential vitamins, minerals, and antioxidants, making it a nourishing and balanced meal option for vegetarians and non-vegetarians alike.

    Frequently Asked Questions (FAQs)

    Can I use canned chickpeas and kidney beans for this recipe?

    Yes, you can use canned legumes for convenience. Rinse them well before adding them to the curry.

    Can I make Chole Rajma Curry ahead of time?

    Yes, the flavors of the curry develop even more when allowed to sit for a few hours or overnight. Reheat it gently before serving.

    Is Chole Rajma Curry gluten-free?

    Yes, Chole Rajma Curry is naturally gluten-free as it contains no wheat or gluten-containing ingredients.

    Explore more delightful Indian recipes on Manjula’s Kitchen, such as Palak Paneer for another culinary adventure. 

  • Corn Cutlets (Corn Fritters)

    Corn Cutlets (Corn Fritters)

    Corn Cutlets

    Corn Cutlets (Corn Fritters)

    Corn Cutlets are a mouthwatering appetizer which can be served as starters for a party or even as an evening snack. Corn Cutlets are crispy outside and soft inside. This is one of those snacks you can serve without any sauce and they taste delicious. They are also gluten free, and vegan.
    This recipe will make 12 cutlets.
    4.63 from 8 votes
    Prep Time 10 minutes
    Cook Time 15 minutes
    Total Time 25 minutes
    Course Appetizer, Snack
    Cuisine Indian
    Servings 4 People

    Ingredients


    • 2 cup yellow corn I am using frozen corn
    • 1 tsp fennel seeds coarsely ground, saunf
    • 1/2 tsp salt
    • 1 tsp ginger grated, adrak
    • 1 Tbsp green chili finely chopped, hari mirch
    • 1 Tbsp cilantro finely chopped, hara dhania
    • 1 tsp mango powder amchoor
    • 1/4 cup rice flour chawal ka atta

    Also Need

    • oil to fry

    Instructions
     

    • Defrost the corn, and pat dry. Then blend the corn to coarse paste without adding any water. 
    • Transfer the paste to a large mixing bowl. Add all the spices, ginger, fennel, coriander, green chili, mango powder and salt, mix it well. 
    • Add rice flour to the corn mixture, mix it well. Mixture should hold together, and consistency should be like a soft dough. If needed add little more rice flour.
    • Wash and grease your palm lightly, divide the dough into 12 equal parts and shape the into bullets.
    • Heat the oil in a frying pan on medium heat. Oil should be moderately hot. To check the oil, drop a little piece of mixture, mixture should sizzle and come up. Drop the rolls slowly into it, taking care not to overlap them. 
    • Fry the cutlets until they are golden brown, turning occasionally. This should take about 6-7 minutes. Take them out over a paper towel.

    Notes

    Suggestions
    Serve them hot! If you have prepared them beforehand, heat them in a toaster oven or in oven to bring the crispness back. But they taste good even at room temperature.
    Tried this recipe?Let us know how it was!

    How to Make Corn Cutlet: A Delicious Recipe

    Corn Cutlet is a versatile appetizer perfect for Holi, Krishna Janmashtami, or any party occasion, offering a quick and easy gluten-free snack option that’s also suitable for vegans, showcasing the delightful flavors of corn in every bite. These crispy treats are perfect for any occasion, whether it’s a party, a family gathering, or simply a cozy evening at home. In this recipe, we’ll explore how to make corn cutlet step by step, ensuring a perfect result every time.

    Step 1: Preparing the Ingredients

    To start making corn cutlet, gather the following ingredients: canned corn kernels, boiled potatoes, bread crumbs, chopped cilantro, minced green chilies, ginger paste, garam masala, amchur (dry mango) powder, salt, and oil for frying. These simple ingredients come together to create a delicious blend of flavors and textures in every bite.

    Step 2: Mashing the Potatoes and Corn

    Begin by draining the canned corn kernels and boiling the potatoes until they are soft. Once they’re cooked, mash them together in a large bowl until you have a smooth mixture. This forms the base of your corn cutlet, providing both substance and binding for the other ingredients.

    Step 3: Adding Flavorful Ingredients

    Now it’s time to add the flavorings to your corn and potato mixture. Mix in chopped cilantro, minced green chilies, ginger paste, garam masala, amchur powder, and salt according to your taste preferences. These spices add depth and complexity to the corn cutlet, elevating it from simple to sensational.

    Step 4: Forming the Cutlets

    Once all the ingredients are well combined, shape the mixture into small patties or cutlets. You can make them any size you like, but smaller cutlets are easier to handle and cook more evenly. Coat each cutlet in bread crumbs, ensuring that they’re thoroughly coated on all sides for maximum crispiness.

    Step 5: Frying to Perfection

    Heat oil in a deep frying pan or skillet over medium heat. Carefully place the breaded cutlets into the hot oil, making sure not to overcrowd the pan. Fry them until they’re golden brown and crispy on the outside, flipping them occasionally to ensure even cooking. Once they’re done, remove the corn cutlets from the oil and place them on a paper towel-lined plate to drain off any excess oil.

    Step 6: Serving and Enjoying

    Your corn cutlets are now ready to be served! Arrange them on a platter with your favorite dipping sauces or chutneys for added flavor. These cutlets are best enjoyed hot and crispy, straight from the frying pan. Serve them as an appetizer, snack, or even as a side dish alongside your favorite main course. However you choose to enjoy them, these corn cutlets are sure to be a hit with family and friends alike.

    Tips for Making Perfect Corn Cutlets

    • Ensure that the mashed potato and corn mixture is well combined to create a uniform texture.
    • Adjust the amount of green chilies and spices according to your preference for heat and flavor.
    • For extra crunch, you can add finely chopped bell peppers to the mixture.
    • If you’re short on time, you can use frozen corn kernels instead of canned ones, just make sure to thaw them before using.
    • To make these cutlets healthier, you can bake them in the oven instead of frying them. Simply place them on a baking sheet lined with parchment paper and bake at 375°F (190°C) for 20-25 minutes, or until golden brown and crispy.

    Variations on Corn Cutlets

    • Cheese Corn Cutlets: Add grated cheese to the corn and potato mixture for a gooey, cheesy twist.
    • Spicy Corn Cutlets: Increase the amount of green chilies or add red chili powder for an extra kick of heat.
    • Corn and Paneer Cutlets: Mix crumbled paneer (Indian cottage cheese) with the corn and potato mixture for added richness and protein.
    • Corn Tikki Chaat: Serve the cutlets topped with yogurt, tamarind chutney, and chaat masala for a delicious Indian street food-inspired treat.

    Benefits of Corn Cutlets

    • Rich in fiber: Corn is a good source of dietary fiber, which aids in digestion and helps keep you feeling full for longer.
    • Nutrient-dense: Corn is packed with essential vitamins and minerals, including vitamin C, vitamin B6, and potassium.
    • Versatile: Corn cutlets can be customized with a variety of spices and ingredients to suit your taste preferences.
    • Crowd-pleaser: Whether you’re serving them at a party or a family dinner, corn cutlets are sure to be a hit with guests of all ages.

    FAQs about Corn Cutlets

    Can I make corn cutlets ahead of time and reheat them later?

    • Yes, you can prepare the cutlets in advance and store them in the refrigerator for up to 2-3 days. When ready to serve, simply reheat them in a preheated oven at 350°F (175°C) for 10-15 minutes, or until heated through.


    Can I freeze corn cutlets?

    • Yes, you can freeze uncooked corn cutlets for up to 1 month. Place them on a baking sheet lined with parchment paper and freeze until firm, then transfer them to a freezer-safe bag or container. When ready to cook, fry them directly from frozen, adding a few extra minutes to the cooking time.


    Can I make corn cutlets without bread crumbs?

    • While bread crumbs help to bind the cutlets and create a crispy exterior, you can substitute crushed cornflakes or panko breadcrumbs for a similar effect.


    Are corn cutlets gluten-free?

    • If you use gluten-free breadcrumbs or omit them altogether, corn cutlets can be made gluten-free. Just be sure to check the labels of all ingredients to ensure they are gluten-free.


    Other Recipes on Manjula’s Kitchen

    If you’re looking to explore more Indian recipes, appetizers, beverages, and desserts, be sure to check out the following links on Manjula’s Kitchen. Here are some links to recipes on Manjula’s Kitchen official website:

    Paneer Tikka Masala Recipe

    Chana Chaat (Spicy Chickpea Salad) Recipe

    Pav Bhaji (Spicy Vegetable Hash with Buns) Recipe

    Raj Kachori (Crunchy Chaat) Recipe

    Vegetable Biryani Recipe

    These recipes should offer you a flavorful experience straight from Manjula’s Kitchen.

  • Rice and Potato Cutlets

    Rice and Potato Cutlets

    Rice and Potato Cutlets

    Rice and Potato Cutlets

    These Rice and Potato Cutlets are a tasty treat as a tea time snack or you can also serve them as an appetizer. They are crispy outside and soft inside. This is a quick and easy recipe and a good way to use left over rice.
    4.80 from 5 votes
    Prep Time 5 minutes
    Cook Time 10 minutes
    Total Time 15 minutes
    Course Appetizer
    Cuisine Indian
    Servings 3 people

    Ingredients


    • 1 cup rice cooked
    • 1 cup potatoes boiled, peeled, and shredded
    • 1/2 tsp salt
    • 1/2 tsp cumin seeds jeera
    • 1 Tbsp green chili chopped
    • 1 tsp ginger finely chopped
    • 2 Tbsp cilantro finely chopped, hara dhania
    • 1/4 tsp fresh lemon juice

    Instructions
     

    • In a bowl mash the rice, rice should be semi mashed add potatoes mix it well now add all the other ingredients, salt, cumin seeds, green chilies, ginger, cilantro and lemon juice. Mix should be firm and will be consistency of a sticky dough.
    • Grease your palm and divide them into 12 pieces I wanted to make them in small size. Roll them in patties.
    • Heat the oil in a frying pan on medium high heat. Frying pan should have about 1” of oil. Oil should be moderately hot. Test the oil putting a small piece of mix, this should up right of way. Drop the cutlets slowly into it, taking care not to overlap them.
    • Fry the cutlets until they are golden brown, turning occasionally. This should take about 5 minutes. Take them out over a paper towel.
    • For best taste serve them hot. Cutlets taste great with cilantro chutney.

    Notes

    1. Potatoes should be not over cooked, that will make mix soft and cutlets can break in the oil while frying.
    2. If oil is not hot enough cutlets will be greasy. Rice and potato min should not be very soft otherwise cutlets will break in oil.
    Tried this recipe?Let us know how it was!

    Rice and Potato Cutlets Recipe Expansion

    Introduction to Rice Potato Cutlet Recipe

    Welcome to an expanded version of the Rice Potato Cutlets recipe from Manjula’s Kitchen! These delightful cutlets are a perfect way to make the most of your leftover rice while indulging in a crispy, flavorful snack. If you’ve been wondering how to transform your surplus rice into something delicious, look no further. Let’s dive into the expanded recipe, exploring tips, variations, benefits, and frequently asked questions along the way.

    Tips for Perfect Rice Cutlets

    • Choosing the Right Rice: For the best results, opt for cooked leftover rice that is slightly dry. This texture helps in binding the ingredients together, resulting in firmer cutlets.
    • Flavor Enhancement: Enhance the flavor of your cutlets by adding various spices like cumin powder, garam masala, or chaat masala to the mixture. You can also incorporate finely chopped herbs like cilantro or mint for a refreshing twist.
    • Crispy Coating: Achieve a crispy exterior by coating the cutlets in breadcrumbs or semolina before frying. This not only adds texture but also prevents them from becoming soggy.
    • Oil Temperature: Maintain the oil at a moderate temperature while frying to ensure even cooking and a golden-brown crust. Avoid overcrowding the pan, which can lower the oil temperature and lead to greasy cutlets.
    • Make-Ahead Option: Prepare the cutlets ahead of time and refrigerate them for up to a day. This makes them perfect for parties or quick snacks whenever cravings strike.


    Variations of Rice Potato Cutlet

    • Vegetable Medley: Incorporate finely diced vegetables like carrots, peas, or bell peppers into the mixture for added color and nutrition. Sauté them briefly before mixing with the rice and potatoes.
    • Cheesy Delight: Add grated cheese to the mixture for a gooey, indulgent filling. Cheddar, mozzarella, or paneer are excellent choices that melt beautifully when fried.
    • Spicy Kick: Boost the heat by including chopped green chilies or a dash of chili powder in the mixture. Adjust the spiciness according to your preference for a flavorful kick.
    • Protein Power: Amp up the protein content by adding cooked lentils, chickpeas, or tofu to the mixture. This not only enhances the nutritional value but also adds a satisfying texture.
    •  

    Benefits of Rice Cutlets

    • Utilizes Leftovers: This recipe provides a creative solution for using up leftover rice, minimizing food waste while creating a delicious snack or appetizer.
    • Budget-Friendly: With simple ingredients that are often already available in the kitchen, rice cutlets offer an economical way to enjoy a satisfying dish without breaking the bank.
    • Customizable: The versatility of this recipe allows for endless variations to suit individual tastes and dietary preferences. Whether you prefer a mild flavor or crave something spicy, you can customize the cutlets to your liking.
    • Kid-Friendly: Children tend to love the crispy texture and mild flavors of rice cutlets, making them a convenient option for family meals or lunchboxes.


    FAQs about Leftover Rice Cutlet Recipe

    • Can I freeze the uncooked cutlets? 

    • Yes, you can freeze the uncooked cutlets for later use. Place them in a single layer on a baking sheet and freeze until solid, then transfer to a freezer-safe container. When ready to cook, thaw them in the refrigerator overnight before frying.


    • Can I bake the cutlets instead of frying them? 

    • While frying yields the crispiest results, you can bake the cutlets for a healthier alternative. Arrange them on a baking sheet lined with parchment paper and bake in a preheated oven at 375°F (190°C) for 25-30 minutes, flipping halfway through, until golden brown.


    • Can I use brown rice instead of white rice? 

    • Yes, you can substitute brown rice for white rice in this recipe. Keep in mind that brown rice has a firmer texture, so you may need to adjust the amount of potato or binding agent accordingly.


    • What dipping sauces pair well with rice cutlets? 

    • Rice cutlets pair well with a variety of dipping sauces, such as mint chutney, tamarind chutney, or ketchup. Get creative and experiment with different flavors to find your favorite combination.


    Exploring Other Recipes on Manjula’s Kitchen

    If you’re looking to explore more Indian recipes, appetizers, beverages, and desserts, be sure to check out the following links on Manjula’s Kitchen. Here are some links to recipes on Manjula’s Kitchen official website: Paneer Tikka Masala, Chana Chaat (Spicy Chickpea Salad), Pav Bhaji (Spicy Vegetable Hash with Buns), Raj Kachori (Crunchy Chaat), Vegetable Biryani

  • Chilli Paneer (Indo-Chinese Dish)

    Chilli Paneer (Indo-Chinese Dish)

    Chilli Paneer

    Chilli Paneer

    Chilli Paneer is a popular Indo-Chinese dish. Chilli Paneer makes a spicy flavorful starter at parties especially for many of my friends who enjoy the spicy food. Chilli Paneer can also be served as a side dish. This is absolutely delicious and easy to make spicy snack savored by all.
    5 from 5 votes
    Prep Time 5 minutes
    Cook Time 10 minutes
    Total Time 15 minutes
    Course Appetizer
    Cuisine Indian, Indochinese
    Servings 6 people

    Ingredients
      

    • 6 oz paneer cut into bite sized pieces
    • 1 cup bell pepper sliced, capsicum, Shimla mirch, I am using yellow and green bell pepper for color

    For Batter

    • 2 Tbsp all-purpose flour plain flour, maida
    • 2 Tbsp corn starch or arrow root powder
    • 1/2 tsp salt

    For Sauce

    • 2 Tbsp oil canola or vegetable oil
    • 1 Tbsp ginger shredded, adrak
    • 1 Tbsp green chili chopped
    • 1 tsp chili flakes
    • 2 Tbsp soy sauce
    • 1 Tbsp vinegar
    • 1 Tbsp tomato paste
    • 1-1/2 tsp corn starch or arrow root powder
    • 1/2 cup water

    Instructions
     

    • I am using store bought paneer, texture is not very soft to give the paneer softer texture soak the paneer for at least 10 minutes in hot water with few drops of lemon juice.
    • To make batter mix flour, corn starch, and salt in a bowl. Add the water slowly to make a smooth batter (batter should be consistency of pancake batter or dosa batter).
    • Heat at least 1/2 inch of oil in a frying pan over medium high heat. Oil should be moderately hot.
    • Dip the paneer into the batter, making sure it is completely covered by the batter. Then drop the paneer pieces slowly into oil in the frying pan. (do not overlap them)
    • Fry the paneer in small batches. Fry them turning occasionally, until they are very light golden brown. Take them out over paper towel.
    • Do same with bell pepper.
    • For sauce heat the oil in sauce pan over medium heat; add ginger, and green chili stir for about one minutes. Add all the ingredients for sauce except corn starch, (soy sauce, vinegar, chili flakes, and tomato paste), Stir for 1 minutes. mix water and corn starch and add to the sauce. Cook for another two minutes, sauce should be thick consistency. Sauce gets thicker as it sits.
    • Add paneer, and bell pepper into sauce and serve hot.
    Tried this recipe?Let us know how it was!

    Chilli Paneer Recipe: Irresistible Appetizer Chilli Paneer:

    Chilli Paneer is a delectable appetizer commonly found in party recipes and snack menus. It’s a savory Indo-Chinese dish that combines the succulence of paneer (Indian cottage cheese) with a flavorful chili-infused sauce. The dish typically involves frying paneer cubes until they’re golden brown and then tossing them in a tantalizing sauce made from chili peppers, ginger, soy sauce, and other spices

    The result is a mouthwatering fusion of textures and flavors, with the paneer offering a creamy contrast to the spicy kick of the sauce. Chilli Paneer is a perfect addition to any gathering, offering a delightful combination of heat, sweetness, and tanginess that’s sure to please any palate.

    Indulge in the delectable flavors of chilli paneer with this easy-to-follow recipe paneer chilli. Whether you’re a fan of Indo-Chinese cuisine or simply looking to add a spicy twist to your meal, this dish is sure to satisfy your taste buds. Made with succulent cubes of paneer (Indian cottage cheese) and a flavorful blend of spices, this chilli paneer recipe is a crowd-pleaser.

    Step 1: Preparing the Ingredients

    Before diving into the cooking process, gather all the necessary ingredients for making chilli paneer. You’ll need fresh paneer, vibrant bell peppers, ginger, green chilies, soy sauce, chili sauce, ketchup, cornstarch, and a few pantry staples like salt and oil. Ensure that your ingredients are prepped and ready to go before you start cooking.

    Step 2: Marinating the Paneer

    Begin by marinating the paneer cubes in a tantalizing mixture of soy sauce, chili sauce, and cornstarch. This step allows the paneer to absorb the flavors, resulting in a more vibrant and flavorful dish. Let the paneer marinate for at least 15-20 minutes to ensure maximum flavor infusion.

    Step 3: Stir-frying the Ingredients

    Heat oil in a pan or wok over medium-high heat. Add finely chopped garlic, ginger, and green chilies to the hot oil, and sauté until fragrant. Then, toss in the diced bell peppers, stirring constantly until they’re slightly softened yet still retain their crunch. This colorful medley of vegetables adds both flavor and texture to the paneer chilli.

    Step 4: Adding the Marinated Paneer

    Once the vegetables are cooked to perfection, gently add the marinated paneer cubes to the pan. Be careful not to overcrowd the pan, as you want the paneer to brown evenly. Allow the paneer to cook undisturbed for a few minutes, allowing it to develop a golden crust before flipping each piece to ensure even cooking.

    Step 5: Sauce Preparation

    In a separate bowl, mix together soy sauce, chili sauce, and ketchup to create a savory and tangy sauce for the chilli paneer. Adjust the quantities according to your preference for spiciness and sweetness. Once combined, pour the sauce over the cooked paneer and vegetables, tossing everything together until evenly coated.

    Step 6: Garnishing and Serving

    To finish off this mouthwatering dish, garnish the chilli paneer and fresh coriander leaves. These vibrant greens not only add a pop of color but also enhance the overall flavor profile of the dish. Serve the cheese chilli paneer hot with steamed rice or crispy noodles for a complete and satisfying meal experience.

    Tips for Perfect Chilli Paneer:

    • For extra heat, add more green chilies or a dash of hot sauce to the dish.
    • To make the chilli paneer more indulgent, sprinkle some grated cheese on top just before serving for a cheesy twist.
    • Experiment with different vegetables like mushrooms, broccoli, or baby corn to customize the dish to your liking.

    Variations of Chilli Paneer:

    • Dry Chilli Paneer: If you prefer a drier version of chilli paneer, simply reduce the amount of sauce added to the dish. This results in a more intense flavor and a slightly crispy texture.
    • Gravy Chilli Paneer: To create a saucier version of chilli paneer, add more water or vegetable broth to the sauce mixture and simmer until it reaches your desired consistency. This is perfect for drizzling over steamed rice or noodles.

    Benefits of Chilli Paneer:

    • High Protein: Paneer is a rich source of protein, making it an excellent choice for vegetarians and vegans looking to increase their protein intake.
    • Rich in Calcium: Paneer is also loaded with calcium, which is essential for maintaining strong and healthy bones.
    • Versatile: Chilli paneer can be enjoyed as a standalone dish or paired with other Indian or Chinese favorites like fried rice or noodles.

    FAQs about Chilli Paneer:

    Q: Can I use tofu instead of paneer in this recipe?

    A: Yes, you can easily substitute tofu for paneer if you’re looking for a vegan alternative. Just make sure to press the tofu to remove excess moisture before marinating and cooking.

    Q: How spicy is this dish?

    A: The spiciness of chilli paneer can be adjusted according to your preference. Feel free to increase or decrease the amount of green chilies or chili sauce to suit your taste buds.

    Q: Can I make this dish ahead of time?

    A: While chilli paneer is best enjoyed fresh, you can prepare the ingredients ahead of time and store them separately in the refrigerator. Simply stir-fry everything together just before serving for optimal flavor and texture.

    Other Recipes on Manjula’s Kitchen

    If you’re looking to explore more Indian recipes, appetizers, beverages, and desserts, be sure to check out the following links on Manjula’s Kitchen. Here are some links to recipes on Manjula’s Kitchen official website:

    Paneer Tikka Masala Recipe

    Chana Chaat (Spicy Chickpea Salad) Recipe

    Pav Bhaji (Spicy Vegetable Hash with Buns) Recipe

    Raj Kachori (Crunchy Chaat) Recipe

    Vegetable Biryani Recipe

    These recipes should offer you a flavorful experience straight from Manjula’s Kitchen.

  • Stuffed Bell Peppers (Stuffed Capsicum)

    Stuffed Bell Peppers (Stuffed Capsicum)

    Stuffed Bell Peppers

    Stuffed Bell Peppers

    For these mouthwatering Stuffed bell peppers, I decided to make them into rings, which makes it easier and quicker to make. Bell peppers provide a very nice vibrant color to any dish. Stuffed bell peppers are delicious and can be served as appetizers or as a side dish. I hope you enjoy this recipe as much as I enjoy!
    4.41 from 5 votes
    Course Appetizer, Side Dish
    Cuisine Indian, Italian
    Servings 4 people

    Ingredients
      

    • 2 bell peppers capsicum, pahadi mirch
    • 2 1/2 potatoes boiled, peeled and roughly mashed
    • 1 1/2 tsp salt
    • 1 tsp cumin seeds jeera
    • 3 tsp coriander powder dhania
    • 1/2 tsp red chili powder
    • 1/2 tsp mango powder amchoor
    • 1/2 tsp garam masala
    • 1 Tbsp green chili finely chopped
    • 1 Tbsp oil canola or vegetable

    Instructions
     

    • Add all the spices to mash potatoes to make filling, salt, cumin seeds, coriander powder, red chili powder, mango powder, garam masala, and green chilies.
    • Cut tops and bottoms of bell peppers; discard seeds and membranes.
    • Stuffed the bell peppers and slice them in half inch thick, use sharp knife. Depends the size of bell peppers how many slices you will make.
    • Press them gently to make sure potatoes stays inside the bell pepper rings.
    • Heat the heavy flat bottom sauce pan on medium heat and generously grease the pan.
    • Spread the bell pepper rings into skillet, do not overlap. Cover the pan and let it cook for about 1-2 minutes.
    • Remove the cover and turn the rings gently and press them lightly to ensure potatoes stays into the bell pepper rings. I cover the pan to make sure bell peppers are cooked, make sure they are not mushy. Cook the bell peppers from each side till they are golden brown. Stuffed bell peppers ready to serve.
    • Stuffed bell peppers are ready, this is a very enjoyable dish, serve them as an appetizers or side dish. I like to serve them with stir-fry cherry tomatoes.

    Notes

    Stuffed bell peppers are ready, this is a very enjoyable dish, serve them as an appetizers or side dish. I like to serve them with stir-fry cherry tomatoes.
    You can also use stuffed bell peppers to make sandwich, I like to use kaiser rolls with lettuce leaves, cheese, and slices of tomatoes.
    Tried this recipe?Let us know how it was!

    Stuffed Bell Peppers Recipe

    Stuffed bell peppers are a versatile option for appetizers or party recipes, suitable for a variety of dietary needs including gluten-free and vegan preferences, featuring a flavorful filling of sautéed vegetables. In this stuffed bell peppers recipe, we’ll infuse vibrant flavors into bell peppers, creating a delightful dish that’s both visually appealing and satisfying. Stuffed bell peppers offer a medley of textures and tastes, making them a versatile addition to any meal. Let’s delve into how to make stuffed bell peppers that will impress even the most discerning palates.

    Preparation and Assembly

    To start, gather the necessary ingredients for the stuffing mixture. While the original recipe focuses on corn chaat, we’ll repurpose it to create a flavorful filling for our stuffed bell peppers. Begin by finely chopping tomatoes and green chilies. Sauté them in a pan until they turn golden brown, adding spices like cumin powder, coriander powder, and red chili powder for an extra kick of flavor. Then, mix in boiled corn kernels and season with salt to taste.

    Filling the Bell Peppers

    With the stuffing ready, it’s time to prepare the bell peppers for filling. Slice the tops off the bell peppers and remove the seeds and membranes from the insides, creating a hollow cavity perfect for holding the stuffing. Be sure to choose bell peppers that are firm and vibrant in color for the best results.

    Stuffing and Baking

    Carefully spoon the prepared stuffing mixture into each bell pepper, ensuring they are evenly filled. Place the stuffed bell peppers on a baking tray and bake them in a preheated oven until the peppers are tender and the filling is heated through. This process allows the flavors to meld together, resulting in a harmonious blend of tastes with every bite.

    Presentation and Serving

    Once baked to perfection, remove the stuffed bell peppers from the oven and let them cool slightly before serving. Garnish with fresh cilantro leaves for a pop of color and a burst of freshness. These stuffed bell peppers can be enjoyed as a standalone dish or paired with your favorite sides for a complete meal.

    Variations

    Experiment with different fillings to customize your stuffed bell peppers to suit your taste preferences. Try incorporating ingredients like cooked quinoa, black beans, or diced tofu for added protein and texture. You can also top the stuffed bell peppers with cheese before baking for a cheesy twist on this classic dish.

    Tips

    • When selecting bell peppers for stuffing, choose ones that are uniform in size and shape to ensure even cooking.
    • To save time, you can prepare the stuffing mixture in advance and store it in the refrigerator until ready to use.
    • For a spicy kick, add finely chopped jalapeños or serrano peppers to the stuffing mixture.
    • If you prefer a vegetarian option, omit the corn chaat and use a combination of vegetables like carrots, peas, and potatoes for the filling.

    Benefits

    Stuffed bell peppers are not only delicious but also packed with nutrients. Bell peppers are rich in vitamins A and C, as well as antioxidants that help boost immunity and promote overall health. By filling them with a variety of wholesome ingredients, you can create a nutritious meal that’s as satisfying as it is flavorful.

    FAQs

    Q: Can I use different colored bell peppers for this recipe?

    A: Yes, feel free to mix and match different colored bell peppers for a visually stunning presentation. Each color offers a slightly different flavor profile, adding depth to the dish.

    Q: How long will the stuffed bell peppers keep in the refrigerator?

    A: Stuffed bell peppers can be stored in an airtight container in the refrigerator for up to 3 days. Simply reheat them in the oven or microwave before serving.

    Q: Can I freeze stuffed bell peppers for later?

    A: Yes, stuffed bell peppers can be frozen for future meals. Wrap them individually in plastic wrap and aluminum foil before placing them in the freezer. To reheat, thaw them overnight in the refrigerator and bake them in the oven until heated through.

    Other Recipes on Manjula’s Kitchen

    If you’re looking to explore more Indian recipes, appetizers, beverages, and desserts, be sure to check out the following links on Manjula’s Kitchen. Here are some links to recipes on Manjula’s Kitchen’s official website:

    Paneer Tikka Masala Recipe

    Chana Chaat (Spicy Chickpea Salad) Recipe

    Pav Bhaji (Spicy Vegetable Hash with Buns) Recipe

    Raj Kachori (Crunchy Chaat) Recipe

    Vegetable Biryani Recipe

    These recipes should offer you a flavorful experience straight from Manjula’s Kitchen.

  • No Bake Cheesecake

    No Bake Cheesecake

    No Bake Cheesecake

    No Bake Cheesecake

    This  Cheese cake recipe requires absolutely no cooking or baking. This is a delicious and perfect, quick and easy dessert for hot summer days. I like to use the fresh seasonal fruits over cheese cake. This is an amazing recipe and everyone will enjoy.
    4.67 from 3 votes
    Prep Time 10 minutes
    Cook Time 15 minutes
    Total Time 25 minutes
    Course Dessert
    Servings 4

    Ingredients
      

    • 1 cup graham crackers fine crumbs, I used 12 gram crackers
    • 4 Tbsp unsalted butter at room temperature
    • 8 oz cream cheese at room temperature
    • 1/3 cup sugar
    • 1/2 cup heavy cream chilled
    • 1 tsp lemon juice
    • Few slices of fresh fruit of your choice I am using, mango, kiwi, strawberry, and few black berry

    Instructions
     

    • First line 4×7 inch pan with wax paper or parchment paper.
    • Mix cookie crumbs and butter well to combine.
    • Transfer the mix to prepared pan and press evenly to make it very firm. Refrigerate for at least 30 minutes.
    • Using the electric mixer beat the cream cheese and sugar in a large bowl on medium high speed until smooth. Reduce the mixer speed and gradually add the cream, and lemon juice increase the speed to medium high until stiff peak forms.
    • Spread the cream cheese evenly over crust, refrigerate for at least 4 hours or up to 3 days.
    • Just before serving top with fruits.

    Notes

    Finishing time 15 minutes not including refrigeration time.
    Tried this recipe?Let us know how it was!

  • Dahi Bhindi (Okra with Yogurt Gravy)

    Dahi Bhindi (Okra with Yogurt Gravy)

    Dahi Bhindi

    Dahi Bhindi

    Dahi Bhindi is a great way to enjoy okra in tangy creamy sauce. Dahi Bhindi is simply delicious, and easy to make. This goes well with Jeera (Cumin) Rice, or roti-paratha.
    4.43 from 7 votes
    Prep Time 10 minutes
    Cook Time 20 minutes
    Total Time 30 minutes
    Course Main Course
    Cuisine Indian
    Servings 4 people

    Ingredients
      

    • 40 medium size okra (bhindi) after cutting them in half it should be about 2 cups.
    • 3 Tbsp oil canola or vegetable oil
    • 1/2 tsp cumin seeds jeera
    • 1/4 tsp mustard seeds rai
    • 1/8 tsp asafetida hing
    • 1 Tbsp besan gram flour
    • 2 tsp coriander powder dhania
    • 1 tsp Red Chili Powder
    • 1/4 tsp Turmeric Powder
    • 1 cup yogurt dahi, curd
    • 1 cup water approximately
    • 1/2 tsp salt

    Instructions
     

    • Wash and pat dry the okra cut both ends, and cut them into about 1-inch pieces. I have used about 35 medium size okra after cutting, they are about 2 cups.
    • Heat 2 tablespoons of oil in a frying pan over medium heat and stir fry the okra till they are tender. This should take about 7-8 minutes.
    • Take them out in a bowl and use the same pan for making gravy.
    • Heat 1 tablespoon of oil, over medium heat. After the oil is moderately hot add the cumin seeds, mustard seeds and asafetida as the seeds crack, turn down the heat to low.
    • Add the besan and stir fry for about 1 minute until it has a light aroma, and is golden brown in color. Besan gives the thickness to gravy.
    • Add yogurt, turmeric, chili powder and coriander powder. Mix it well. And cook until the spice mix comes together, and you should be able to see the oil leaving the sides of spice mix. This should take about 2-3 minutes.
    • Spice mix is ready add about 1/2 cup of water and salt, bring it to boil. Add okra and let it cook for 3-4 minutes, on low heat.
    • Suggestions: You can make so many different dishes using this gravy. Instead of okra use potatoes, paneer, green peas, mixed vegetables, or any vegetable you have. 

    Notes

    Enjoy with plain white rice or any Indian flat bread, like Roti, Paratha, Puri
    Tried this recipe?Let us know how it was!

  • Mango Mousse with Raspberry Pearls

    Mango Mousse with Raspberry Pearls

    Mango Mousse with Strawberry Pearls

    Mango Mousse with raspberry pearls

    My new recipe is called Mango Mousse with raspberry pearls. This is a delicious, delicate dessert that is sure to be enjoyed by all. Mangoes are my favorite fruit so I like to incorporate them in my various recipes. This was my first time making Raspberry pearls for the garnish. I did this with a special guest, Avani, who is currently a participant on Master Chef Junior! These delicate looking pearls are simply gorgeous on desserts!
    4.80 from 5 votes
    Prep Time 10 minutes
    Cook Time 30 minutes
    Total Time 40 minutes
    Course Dessert
    Servings 4 people

    Ingredients
      

    For Mousse

    • 2 cup Mango pulp
    • 1/2 tsp lemon juice
    • 1/4 cup fine sugar
    • 2 1/2 tsp Agar-Agar
    • 1/4 cup water
    • 3/4 cup whipping cream

    For Raspberry Pearls

    • 2 cups fresh raspberries
    • 2 Tbsp sugar
    • 1 Tbsp lemon juice
    • 1 1/4 tsp agar-agar powder
    • 1/2 cup oil

    Instructions
     

    Mousse

    • Whip the whipping cream on low speed until it forms stiff peaks. Make sure cream is cold. Set aside.
    • In a sauce pan add the mango puree, sugar and lemon juice and bring it to boil over medium heat. Boil for about one minutes, until sugar is dissolve.
    • Dissolve agar-agar in 1/4 cup of water, add agar-agar to the mango pulp, bring it boil mixing continuously. Turn off the heat, and whisk for few minutes, making sure there are no lumps.
    • Pour the mango puree in a bowl and bring it to room temperature. Fold the cream gently, do not whip you should be able to see both colors. Refrigerate for about two hours before serving.

    For Raspberry pearls

    • Put 1/2 cup of oil in a small bowl and keep it in freezer till it is very chill it should take about half an hour.
    • In a sauce pan add raspberries, 1-1.2 tablespoons of sugar, lemon juice and about half cup of water bring to simmer over low medium heat till all the berries are soft. Note: do not overcook the berries they will become little bitter.
    • Strain the berry mixture through sieve to get raspberry sauce.
    • Add agar-agar and remaining sugar to half cup of water and bring it to boil over low medium heat for few minutes, keep stirring making sure there is no lumps and agar-agar do not stick to bottom of the pan.
    • Add agar-agar to raspberry sauce. Note: raspberry should be warm.
    • Fill in pipette, or oral syringe, or straw, or squeezed bottle with juice. Drop, one drop at a time, into the cold oil. Little caviar orbs will form on contact with the cold oil and fall to the bottom.
    • Strain caviar using a fine mesh strainer. Rinse well with water.
    • Store caviar in water until ready to use.
    • Lay on a paper towel-lined plate and pat dry

    Notes

    This looks complicated but it is not.
    Enjoy!
    Tried this recipe?Let us know how it was!


  • Apple Coconut Barfi

    Apple Coconut Barfi

    Apple Coconut Barfi

    Apple Coconut Barfi

    Apple Coconut Barfi is a delicious treat. This fudge-like barfi super easy to make. It's also vegan and gluten-free. The fruity taste makes for a great sweet snack without the guilt!
    4.63 from 8 votes
    Prep Time 10 minutes
    Cook Time 30 minutes
    Total Time 30 minutes
    Course Dessert
    Cuisine Indian
    Servings 6 people

    Ingredients
      

    • 3 cup apple peeled and shredded
    • 1 cup freshly grated coconut I am using frozen coconut
    • 1 1/2 cup sugar
    • 1/2 cup chopped walnuts
    • 1/4 tsp crushed cardamom
    • 1 Tbsp sliced pistachios for garnishing

    Instructions
     

    • In a non-stick frying pan add coconut, apple, and sugar, cook over medium heat, until mixture start coming together and apples should be very tender. This should take about 7-10 minutes.
    • Add cardamom powder and walnut, mix it well cook stirring continually until mix should becomes consistency of soft dough, this should take about 2-3 minutes, turn of the heat.
    • Pour the mixture into greased plate while Burfi mixture is still hot spread it evenly about 3/4-inch-thick in a square shape. Press the mixture with spatula to make it firm. Sprinkle the pistachios and lightly press.
    • While Burfi is still warm cut them in about one inch square.
    • Allow the Burfi to cool for about two hours to dry and hold its shape. Now you can remove the burfi from the plate.

    Notes

    Burfi can be stored for 2 weeks in air tight container.
    Tried this recipe?Let us know how it was!

  • Kachori with Kadhi

    Kachori with Kadhi

    Kachori topped with Kadhi

    Kachori topped with Kadhi

    Kachori topped with Kadhi this is a Rajasthani specialty appetizer that is simply delicious. There are times that we like to indulge ourselves or want to make a special treat for guests at parties, but there is not enough time in the day to prepare such dishes. For times like this, I like to make semi-homemade recipes. This dish is perfect for this and can be presented beautifully.
    5 from 2 votes
    Prep Time 10 minutes
    Cook Time 30 minutes
    Total Time 40 minutes
    Course Appetizer, Snack
    Cuisine Indian
    Servings 2 people

    Ingredients
      

    For Kachori

    • 4 peices Dal Kachori Using frozen Kachori, which are readily available in Indian grocery stores.

    For Kadhi

    • 1 cup yogurt
    • 1/4 cup besan gram flour
    • 2 Tbsp oil canola or vegetable oil
    • 1/2 tsp cumin seeds jeera
    • 1/8 tsp asafetida hing
    • 1/2 tsp fenugreek seeds mathi
    • 1/2 tsp turmeric haldi
    • 1/2 tsp red chili powder
    • 1 tsp salt
    • 2 Tbsp cilantro finely chopped, hara dhania
    • 1/4 tsp gram masala
    • 4 cups water

    For garnishing

    • 1 Tbsp ginger thinly sliced
    • 1 Tbsp green chilies thinly sliced
    • 2 tsp lemon juice
    • 1/4 tsp salt

    Instructions
     

    • For garnishing mix all the ingredients together before we start the Kadhi, this will get enough time to marinate ginger and green chili. Set aside.
    • Mix besan and turmeric with yogurt until smooth, this should be lump free. Add three cups of water slowly and mix well.
    • Heat the oil in a saucepan. Test the heat by adding one cumin seed to the oil. If the cumin seeds crack right away, the oil is ready. Add cumin seeds and asafetida.
    • When the cumin seeds crack, turn off the heat and add fenugreek seeds, and red chili powder. Stir for a few seconds. Add the yogurt mixture and turn the heat to medium. Keep stirring until the kadhi comes to a boil.
    • Add remaining water and let it come to boil. Add salt. Turn the heat to medium low. Let the kadhi cook about 20-30 minutes, stir occasionally. If needed to adjust thickness, add boiled water. Kadhi should be pourable consistency. Add garam masala, and cilantro, mix and turn off the heat.
    • While the Kadhi is cooking bake, or fry the kachories per the instructions on the box. I have baked the kachori. Let them cool of then break it open.
    • Serve Kadhi over Kachori and garnish with marinated green chili and ginger pieces.

    Notes

    Instead of frozen kachori, you can also make these fresh Kachori at home using my recipe.
    Tried this recipe?Let us know how it was!

    Rajasthani Kadhi Kachori Recipe: A Delectable Fusion Dish Rajasthani semi-homemade

    Kachori Kadhi is a versatile dish perfect for various occasions, whether as an appetizer, a flavorful addition to a lunch box suggestion, a delightful option for party recipes, or a quick & easy chaat. Rajasthani kadhi kachori is a beloved delicacy that combines the richness of kadhi with the crispiness of kachori. This recipe brings together the tangy flavors of the kadhi gravy with the spicy and aromatic kachoris, creating a symphony of taste that will tantalize your taste buds. Let’s delve into how to prepare this mouthwatering dish step by step.

    Preparing the Kadhi for Kachori Kadhi: A Flavorful Base

    To begin with, let’s prepare the kadhi kachori base, the kadhi. In a mixing bowl, whisk together yogurt, gram flour, and water until smooth. This mixture forms the base of the kadhi gravy, providing a creamy texture and tangy flavor.

    Next, heat oil in a pan and add mustard seeds, cumin seeds, fenugreek seeds, and asafoetida. These tempering ingredients infuse the kadhi with aromatic flavors and add depth to the dish. Stir in chopped ginger, green chilies, and curry leaves for an extra kick of spice and fragrance.

    Now, pour the yogurt mixture into the pan and let it simmer over medium heat. Stir continuously to prevent lumps from forming and to ensure that the kadhi thickens evenly. As it cooks, the kadhi will develop a rich consistency and absorb the flavors of the spices.

    Frying the Kachoris: Adding Crunch to the Kadhi Kachori

    While the kadhi simmers, let’s move on to preparing the kachoris. Heat oil in a separate pan for deep frying. Meanwhile, take the kachori dough and divide it into small balls. Flatten each ball with your palms to form discs, then fill them with a spicy lentil mixture made of soaked and ground lentils mixed with spices like rajasthani kachori with kadhi.

    Once the oil is hot, carefully slide the stuffed kachoris into the pan and fry until golden brown and crisp. The kachoris will puff up beautifully as they cook, creating a delightful contrast of textures when paired with the creamy kadhi gravy.

    Serving the Rajasthani Kadhi Kachori: A Gastronomic Delight

    Once both the kadhi and kachoris are ready, it’s time to assemble this divine dish. Ladle the hot kadhi into serving bowls and place a couple of freshly fried kachoris on the side. Garnish with chopped cilantro and serve hot.

    The combination of the tangy, creamy kadhi and the crispy, flavorful kachoris is sure to impress your taste buds and leave you craving more. Enjoy this Rajasthani delicacy with steamed rice or as a standalone meal for a truly satisfying culinary experience.

    Tips for Perfect Kadhi Kachori: Enhancing Flavor and Texture

    • Ensure that the yogurt is fresh and not too sour for a balanced flavor in the kadhi.
    • Fry the kachoris on medium heat to ensure they cook through evenly without burning.
    • You can customize the spice level of the kadhi and kachoris according to your preference by adjusting the amount of green chilies and red chili powder.

    Variations of Kadhi Kachori: Experimenting with Flavors

    • For a healthier twist, you can bake the kachoris instead of deep frying them.
    • Add finely chopped vegetables like carrots, and peas to the kachori filling for added nutrition and flavor.
    • Experiment with different types of lentils for the kachori stuffing, such as moong dal or chana dal, to create unique variations of this dish.

    Benefits of Kadhi Kachori: Nutritious and Delicious

    • Yogurt, the main ingredient in kadhi, is rich in probiotics that promote gut health and digestion.
    • Gram flour used in the kadhi is a good source of protein and fiber, making this dish filling and nutritious.
    • Lentils used in the kachori filling provide a healthy dose of plant-based protein and essential nutrients.

    FAQs About Kadhi Kachori: Answering Your Queries

    Q: Can I make the kadhi ahead of time?

    A: Yes, you can prepare the kadhi in advance and reheat it before serving. Just make sure to adjust the consistency by adding water if it thickens too much upon reheating.

    Q: Can I freeze leftover kachoris?

    A: Yes, you can freeze leftover kachoris for up to a month. Reheat them in a preheated oven until crispy before serving.

    Q: Can I use store-bought kachoris instead of making them from scratch?

    A: While homemade kachoris are ideal for the best flavor and texture, you can certainly use store-bought ones as a time-saving option.

    If you’re looking to explore more Indian recipes, appetizers, beverages, and desserts, be sure to check out the following links on Manjula’s Kitchen. Here are some links to recipes on Manjula’s Kitchen’s official website: Vegetable Pakoras, Kaju Katli (Cashew Burfi), Baingan Bharta (Roasted Eggplant), Matar (Green Peas) Paneer, Besand and Ladoo.

  • Taco Samosa

    Taco Samosa

    Taco Samosa

    Taco Samosa

    This exciting recipe for Taco Samosa is exactly what it sounds like – a twist to the traditional Samosa. Taco Samosas are delicious and savory with the perfect crisp. When I had my family do the initial taste test, the reaction was WOW! These Taco Samosas should be in your must try list. Not only are these snacks delicious, but will be the conversation piece for your next party or get together. One thing good about these Samosas is that you can prepare them in advance and simply assemble before serving.
    This recipe will make 8 Taco Samosas.
    4.82 from 11 votes
    Prep Time 10 minutes
    Cook Time 30 minutes
    Total Time 40 minutes
    Course Appetizer, Snack
    Cuisine Fusion, Indian, Mexican
    Servings 4 people

    Ingredients
      

    For Shell

    • 1 cup all-purpose flour plain flour, maida
    • 1/4 cup fine sooji semolina
    • 1/4 tsp salt
    • 1 1/2 Tbsp oil
    • 1/3 cup lukewarm water

    for the Filling

    • 2 cups Potatoes boiled, peeled and chopped into very small cubes
    • 1/2 cup green peas I am using frozen green peas
    • 2 Tbsp oil canola or vegetable oil
    • 1/2 tsp cumin seeds
    • 1 tsp coriander powder
    • 1/4 tsp red chili powder
    • 1/4 tsp garam masala
    • 1 tsp mango powder amchur
    • 1 tsp salt
    • 2 Tbsp green chilies chopped, adjust to taste
    • Oil to Fry

    For Serving

    Instructions
     

    Making the Dough

    • Mix the flour, sooji, salt, and oil add water as needed to make a firm dough.
    • knead the dough for about 1 minutes to make the dough smooth and pliable.
    • Let the dough sit for at least 15 minutes.

    Making the Filling

    • Heat the oil in a frying pan on medium heat. Test the heat by adding one cumin seed to the oil; if it cracks right away oil is ready.
    • Add cumin seeds as cumin seeds crack, add green peas stir-fry for about 2 minutes.
    • Add all the other ingredients, potatoes, coriander powder, red chili powder, garam masala, mango powder, salt and green chili. Stir-fry for about 2 minutes, potato filling should be moist not very dry.

    Making Taco Shells

    • Knead the dough for few seconds. Divide the dough into 8 equal parts, and roll them into balls.
    • Roll each dough ball into about 4-inch diameter. Prick each rolled up Taco with a fork in several places both sides, this will prevent Taco from puffing and make them crisp.
    • Heat the oil in a frying pan over medium heat. The frying pan should have about 1 inch of oil. To check if the oil is ready, put a small piece of dough in the oil. The dough should sizzle and come up slowly.
    • Place one rolled Taco in the frying pan and press with a skimmer, turn and fold in half. Doing this it will become taco shape. Do not press, between the fold there should be space to fill the potatoes filling. Gently do the next one same way do not over crowd the frying pan. Fry them until light golden brown on both sides. This should take about 2-3 minutes. Take the Taco out and place them on paper towels to absorb the excess oil. Repeat the process for remaining Taco.
    • You can prepare the taco shells in advance and store them in air tight container.

    Assembling the Tacos

    • Fill the taco shell with potato filling (filling should be hot) and drizzle with chutney.

    Notes

    Suggestions
    Taco Samosa you can prepare in advance and assemble before serving. Taco shells should be good for two weeks or more. Potato filling also can be refrigerated for 3-4 days just heat the filling before serving. Chutneys I always have ready.
    Tried this recipe?Let us know how it was!

    How to make Fried Taco Samosas – Manjula’s Kitchen

    Instructions:

    Start on a culinary adventure with this innovative fried taco samosas recipe that transforms the beloved samosa into a delightful fusion appetizer – introducing fried tacos samosas! These savory treats boast a perfect crispiness that will surely captivate your taste buds. Impress your family and friends with a unique twist of mexican indian cuisine into samosa taco that is not only delicious but also a guaranteed conversation starter at your next gathering. The best part? You can prepare these fried taco samosas ahead of time and simply assemble before serving, making them a convenient yet impressive addition to your menu.

    Dough Preparation:

    The inception of fried taco samosas recipe involves the careful assembly of flour, sooji, salt, and oil in a mixing bowl. The combination of these elements lays the groundwork for a versatile and flavorful dough that will contribute to the overall texture and taste of the fried tacos samosas. Gradually add water, kneading the ingredients for about 1 minute until a firm and pliable dough is formed. Allow the dough to rest for a minimum of 15 minutes, allowing the flavors to meld and the texture to become more workable.

    Filling Creation:

    Heat oil in a frying pan over medium heat. Confirm the oil’s readiness by adding a cumin seed – if it cracks immediately, the oil is ready. Introduce cumin seeds to the hot oil, followed by green peas. Stir-fry for approximately 2 minutes. Add potatoes, coriander powder, red chili powder, garam masala, mango powder, salt, and green chili to the pan. Stir-fry for an additional 2 minutes, ensuring the potato filling maintains a moist consistency without becoming overly dry.

    Taco Shell Crafting:

    Knead the dough briefly and divide it into 8 equal portions, rolling each into a ball.

    Roll out each dough ball into a 4-inch diameter circle. Use a fork to prick both sides of the rolled taco to prevent puffing during frying, ensuring a crisp texture.

    Heat oil in a frying pan with approximately 1 inch of oil. To check readiness, drop a small piece of dough into the oil – it should sizzle and rise slowly.

    Place a rolled taco in the pan, pressing with a skimmer, turning, and folding it in half to create a taco shape. Ensure there is space between the folds for the potato filling. Fry until light golden brown on both sides, taking about 2-3 minutes per taco. Drain excess oil by placing the fried tacos on paper towels. Repeat the process for the remaining tacos.

    Assembling the Tacos:

    The final step in crafting these delectable Fried Taco Samosas is the art of assembling.

    While the taco shells are still warm, fill each with the hot potato filling.

    Drizzle with your favorite chutney to add a burst of flavor to the taco samosas.

    Notes and Suggestions:

    Prepare taco shells and potato filling in advance for a convenient assembly before serving.

    Taco shells can be stored in an airtight container for up to two weeks or more.

    Potato filling can be refrigerated for 3-4 days; reheat before serving.

    Keep chutneys ready to enhance the flavor of your fried taco samosas.

    Embark on a culinary journey with this Fried Taco Samosas Recipe, blending the best of samosas and tacos for a delightful fusion experience!
    You may also like: Whole Wheat Almond Eggless Cookies, Mango Salsa, Mint Lemonade, Dhokla (Suji – Semolina)

  • Shahi Kheer – Makhana Pudding

    Shahi Kheer – Makhana Pudding

    Shahi Kheer

    Shahi Kheer (Makhana Pudding)

    Shahi Kheer, also called Makahana Pudding is a very traditional pudding-like dessert. Makhana is puffed lotus flower seed and looks like popcorn. Shahi means rich and royal and this dish is a royal sweet snack. The textures of the nuts, and the creaminess of the milk makes this a super dessert. Adding the caramelize sugar with saffron and cardamom adds a very subtle and unique taste to the kheer.
    5 from 1 vote
    Prep Time 10 minutes
    Cook Time 30 minutes
    Total Time 40 minutes
    Course Dessert
    Cuisine Indian
    Servings 6 people

    Ingredients
      

    • 4 cups whole milk
    • 1 1/2 cups makhana puffed lotus seeds
    • 1/2 cup rice cooked and mashed
    • 1/2 cup sugar
    • 2 Tbsp almonds blanched and sliced, approx. 2 Tbsp
    • 2 Tbsp pistachios blanched and sliced, approx. 2 Tbsp
    • 1/4 Tsp cardamom crushed
    • saffron Few strands
    • 2 teaspoons ghee clarified butter

    Instructions
     

    • Microwave the makhana for 1/2-minute. Makhana will become crisp. After microwave slice them in 2-3 pieces.
    • In a heavy bottom pan over low medium heat melt the ghee, add the makhana and sliced almonds and roast them for about 2 minute.
    • Add the milk, and rice, turn the heat to medium high, bring the milk to boil. After milk comes to boil lower the heat to medium. let it boil for about 18-20 minutes, stir the milk and scrape the sides occasionally.
    • Add cardamom. Saffron and half the pistachios other half we will use for garnishing.
    • To caramelize the sugar, in a heavy bottom sauce pan, over medium heat grease the pan generously, add sugar. Keep stirring the sugar continuously till sugar start melting and change the color to light brown. Turn off the heat as soon it comes to golden brown in color. This should take 4-6 minutes. Note: when sugar starts melting it changes the color very quickly and it can easily burn.
    • Add the caramelize sugar to the hot kheer and put the kheer back over the low medium heat, keep stirring the kheer making sure caramelized sugar has mixed completely. Caramelizing the sugar adds a unique taste to Kheer.
    • Add the caramelize sugar to the hot kheer and put the kheer back over the low medium heat, keep stirring the kheer making sure caramelized sugar has mixed completely. Caramelizing the sugar adds a unique taste to Kheer. Boil for 2-3 more minutes, Shahi Kheer should be consistency of soft pudding. Garnish with pistachios, 
    • Serve warm.

    Notes

    You will also like, Kheer (Rice Pudding), Pineapple Coconut Kheer – Pina Colada Pudding, Laucki Kheer (Bottle Gourd Pudding)
    Tried this recipe?Let us know how it was!

  • Idli Manchurian

    Idli Manchurian

    Idli Manchurian

    Idli Manchurian

    Idli Manchurian is a popular Indo-Chinese dish, and made several different ways. Idli Manchurian is a super delicious appetizer or main dish. I prepare this dish when I have leftover idlies. Idli Manchurian satisfies your savory and spicy cravings!
    4.75 from 4 votes
    Prep Time 10 minutes
    Cook Time 20 minutes
    Total Time 30 minutes
    Course Appetizer, Breakfast
    Cuisine Indian
    Servings 3 people

    Ingredients
      

    • 4 idlies I am using left over idlies, I do have the recipe for idli
    • 2 cups sliced yellow and green bell pepper use any color bell pepper
    • ¼ tsp salt
    • 2 Tbsp oil for stir-frying idlies and bell pepper

    For Sauce

    • 6 whole red chilies
    • 2 Tbsp oil canola or vegetable oil
    • 2 Tbsp soy sauce
    • 1 Tbsp vinegar
    • 1 Tbsp ginger paste or finely grated ginger adrak
    • 1 Tbsp tomato paste
    • ½ tsp sugar
    • 2 tsp corn starch or arrow root powder
    • 1 cup water

    Instructions
     

    • Boil the red chilies in about 1/2 cup of water until they are tender. Let them cool off. In a blender blend all the sauce ingredients together oil, soy sauce, vinegar, ginger, tomato paste, sugar, and corn starch if needed add more water.
    • Boil the sauce over medium heat. Sauce should be pouring consistency. Set aside.
    • Cut the idlies into bite size pieces, I have cut the idlies in 6 pieces. Heat the oil in frying pan over medium high heat. Add idlies and sprinkle the salt. Stir-fry for 2-3 minutes until idlies are lightly golden brown, take them out and set aside.
    • In the same pan stir fry bell pepper 2-3 minutes, do not overcook the bell pepper, they taste better when they are still crisp. Add the stir-fry idlies to bell peppers. Pour the sauce and stir gently making sure idlies are coated well. Turn off the heat.
    • Idli Manchurian is ready. Take them out in a serving bowl.

    Notes

    Manchurian makes a delicious lunch box meal. Also, try Gobi Manchurian, Masala Idli, and Rava Idli.
    Tried this recipe?Let us know how it was!

    How to Make Idli Manchurian: A Flavorful Fusion Delight

    Idli Manchurian is a delightful fusion dish that combines the softness of idlis with the zingy flavors of Indo-Chinese Manchurian sauce. If you’re looking to tantalize your taste buds with a unique twist on traditional idlis, this recipe is perfect for you. Here’s how to make idli manchurian at home, transforming simple idlis into a mouthwatering delicacy.

    Step 1: Preparing Idlis

    Start by making idlis using your preferred method. You can either use leftover idlis or make fresh ones specifically for this recipe. Idlis are a staple South Indian dish made from fermented rice and lentil batter. Their soft and fluffy texture serves as an excellent base for absorbing the flavors of the Manchurian sauce.

    Step 2: Cutting Idlis into Bite-sized Pieces

    Once the idlis are ready, cut them into small, bite-sized pieces. This step ensures that the idlis are evenly coated with the Manchurian sauce, allowing for maximum flavor infusion in every bite. The size of the idli pieces can vary based on your preference, but smaller pieces tend to work best for this dish.

    Step 3: Making Manchurian Sauce

    Next, prepare the Manchurian sauce. This tangy and spicy sauce is the highlight of the dish, adding depth and complexity to the idlis. The sauce typically consists of a combination of ingredients such as soy sauce, ginger, green chilies, and cornstarch for thickening. You can adjust the spice level according to your taste preferences, making it as mild or as fiery as you like.

    Step 4: Frying Idli Pieces

    Heat oil in a pan and gently fry the idli pieces until they turn golden brown and crispy on the outside. Frying the idlis adds a delicious crunch to the dish, contrasting with the softness of the idlis and complementing the texture of the Manchurian sauce.

    Step 5: Tossing Idlis in Manchurian Sauce

    Once the idlis are fried to perfection, add them to the prepared Manchurian sauce. Toss the idlis gently until they are evenly coated with the sauce, ensuring that each piece is infused with the delicious flavors of the sauce.

    Step 6: Garnishing and Serving

    Garnish the Idli Manchurian wor cilantro for a pop of freshness and color. Serve hot and enjoy this tantalizing fusion dish as a snack or appetizer.

    Tips for Perfect Idli Manchurian:

    • Adjust Spice Level: If you prefer a milder flavor, reduce the amount of green chilies or chili sauce in the Manchurian sauce. For those who enjoy a spicier kick, feel free to increase the quantity of these ingredients.
    • Experiment with Additions: Get creative with your Idli Manchurian by adding diced bell peppers or other vegetables to the sauce for added texture and flavor.
    • Serve Immediately: Idli Manchurian is best enjoyed fresh and hot, so serve it immediately after tossing the idlis in the Manchurian sauce to preserve its crispy texture.
    • Use Leftover Idlis: This recipe is a great way to use up leftover idlis from previous meals, giving them a delicious makeover with the flavors of Manchurian sauce.
    •  

    Variations to Explore:

    • Paneer Idli Manchurian: Substitute paneer cubes for idlis to create a delectable Paneer Manchurian dish with a twist.
    • Gobi Idli Manchurian: Replace idlis with crispy cauliflower florets for a vegetarian version of Gobi Manchurian with a South Indian flair.

    Benefits of Idli Manchurian:

    • Rich in Flavor: Idli Manchurian combines the best of South Indian and Chinese cuisines, offering a burst of flavors in every bite.
    • Versatile Dish: This dish can be served as a snack, appetizer, or even a main course, making it perfect for any occasion.
    • Easy to Make: With simple ingredients and straightforward steps, Idli Manchurian is easy to prepare at home, even for beginners in the kitchen.
    • Customizable: You can adjust the ingredients and spice levels according to your taste preferences, making it a versatile dish that everyone can enjoy.

    Frequently Asked Questions (FAQs):

    Can I use store-bought idlis for this recipe?

    • Yes, you can use store-bought idlis if you don’t have time to make them from scratch. Simply cut them into pieces and proceed with the recipe as directed.

    Is Idli Manchurian spicy?

    • The spice level of Idli Manchurian can be adjusted according to your preference. You can make it mild or spicy by controlling the amount of green chilies or chili sauce added to the Manchurian sauce.

    Can I make Idli Manchurian ahead of time?

    • While Idli Manchurian is best enjoyed fresh, you can prepare the components ahead of time and assemble them just before serving to maintain the crispy texture of the idlis.

    Can I freeze leftover Idli Manchurian?

    • It’s not recommended to freeze Idli Manchurian as the texture of the idlis may become soggy upon reheating. It’s best to enjoy it fresh for the best taste and texture.

    Explore More Delectable Recipes

    For more mouthwatering recipes and culinary inspiration, explore the following links from Manjula’s Kitchen:Crispy Spinach Pakoras, Vegetable Biryani, Paneer Tikka Masala, Vegetable Pakoras Recipe, Baingan Bharta (Roasted Eggplant) Recipe & Matar (Green Peas) Paneer Recipe. Dive into the world of authentic Indian cuisine and elevate your cooking skills with these delightful recipes.