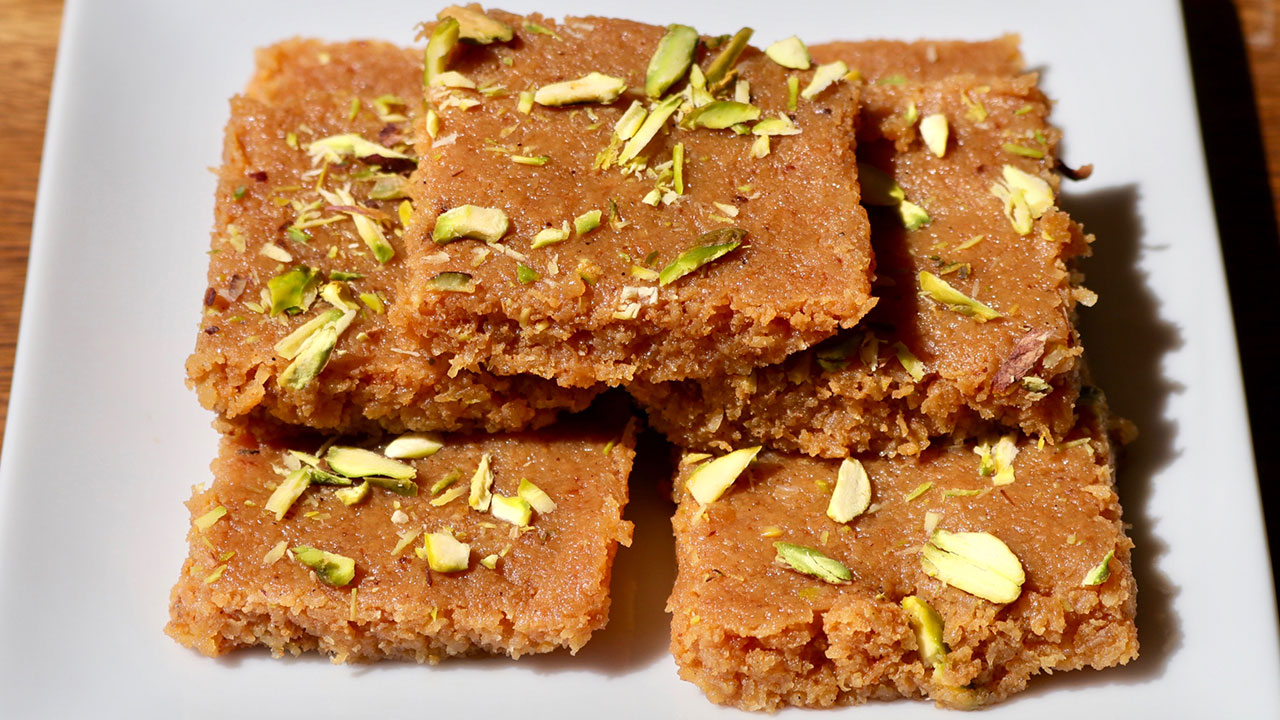
Nariyal Burfi is simple and delicious dessert that only requires a few ingredients! It is super easy to make, and you can serve this as sweet snack in the form of candy. I make this burfi with caramelized sugar which gives a nice twist to the burfi itself.
Soak the coconut in boiling milk for about 30 minutes.
In a flat heavy bottom pan, over medium high heat melt one teaspoon of butter, add sugar, spread evenly in pan.
After sugar start melting, keep stirring the sugar continuously till sugar start melting and changing the color to light brown. Turn off the heat as soon it comes to golden brown in color. This should take 4 minutes. Note: when sugar starts melting it changes the color very quickly and it can easily burn.
Slowly add milk mixture sugar will become lumpy open the heat to medium and keep stirring sugar will dissolve and will give nice light brown color.
Keep stirring and scraping the sides about 15 minutes mixture will become lumpy add the remaining butter and keep stirring until mixture become soft dough consistency.
Pour it over greased plate and flatten with the greased back side of the spoon. Garnish with sliced pistachios.
Leave for 3-4 hours before cutting them into pieces. Cut them into your desired shape. I like to cut them in 1’ squares.
Notes
NotesCaramelizing the sugar adds a very unique taste to Burfi, something every one talk about.Leave for 3-4 hours before cutting them into pieces. Cut them into your desired shape. I like to cut them in 1 inch squares.You will also enjoy few of these recipes, they are easy, has a long shelf life and also great gift ideas, Moong Dal Ladoo, Almond Brittle, Spicy Cashews,
Keyword Coconut Candy, Gola Ki Burfi, Kid Friendly
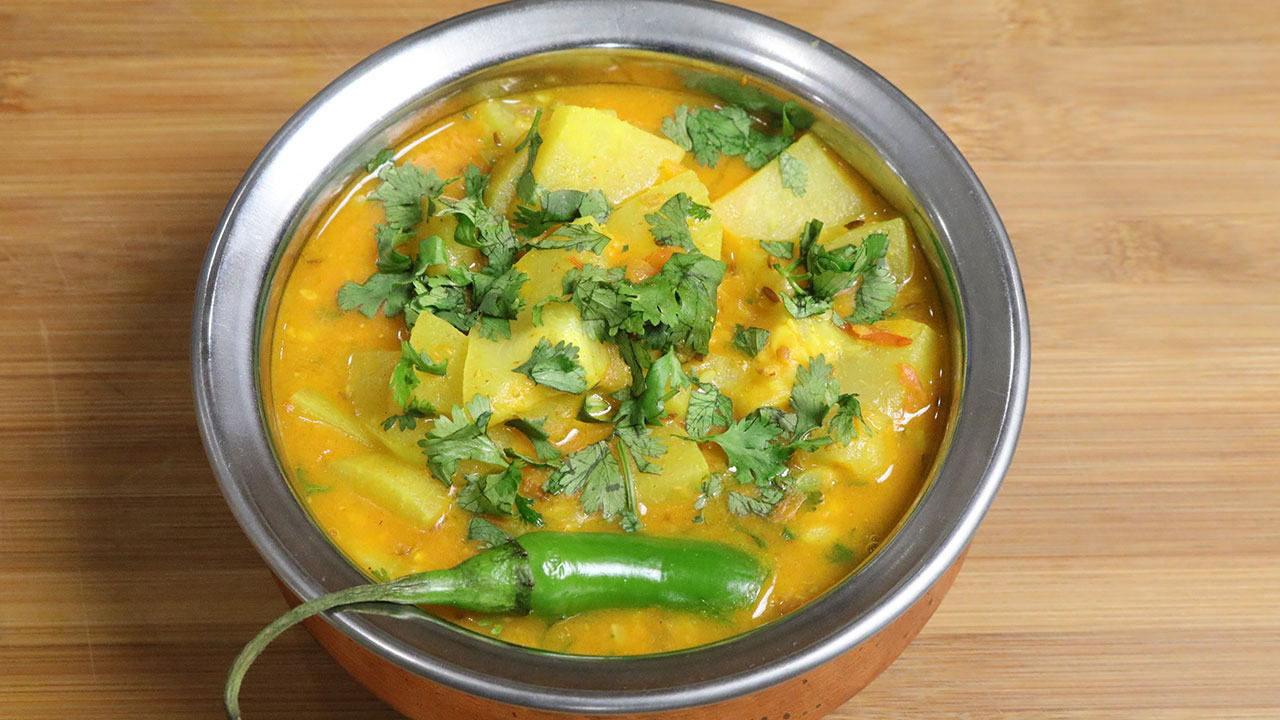
Lauki is a simple and healthy vegetable side dish that is also known as opo squash, or Bottle Gourd. Lauki is a staple vegetable in most Indian homes because of its many known health benefits. The vegetable itself is rather bland, so I love manipulating its flavor.
1medium sizelauki peeled and cut into bite-sized pieceswill make about 4 cups
2medium sizetomatoesfinely chopped – will make about 1 cup
2Tbspoilcanola or vegetable
1tspcumin seedsjeera
1/8tspasafetidahing
2Tbspbesangram flour
1/8tspfenugreek seedsmethi
2tspcoriander powderdhania
1/2tspred chili powder
1/2tspturmerichaldi
1tspshredded gingeradrak
1Tbspfinely chopped green chili
1tspsalt
2Tbspfinely chopped cilantrohara dhania
Instructions
Heat the oil in a saucepan. Oil should be moderately hot. Test the heat by adding one cumin seed to the oil. If the cumin seed cracks right away, the oil is ready.
Add the cumin seeds, asafetida, and fenugreek seeds stir for few seconds. Lower the heat add the besan (besan gives the light aroma and thickness to the gravy) and stir for few seconds. Add coriander powder, red chili powder, turmeric, ginger and green chili stir for few seconds then add tomatoes and salt. Increase the heat medium high. Cook stirring until spices start leaving the oil this should take about 3-4 minute.
Last add lauki and about 1 cup of water and let it cook until lauki is tender. This should take about 10 to 12 minutes.
Notes
Notes: lauki can take longer in cooking and more water depends how tender the lauki.Serving suggestion: Masala Lauki can be served with Roti or paratha, or dal paratha
Khasta kachori is a delicacy from north India. Khasta kachori is a spicy puffed pastry. Kachories are made with a variety of different filling, and I have many recipes for Khasta Kachori. They are my favorite over samosa. Maybe one of the reasons is I can prepare them even a few days before and can be served at room temperature and served many different ways, even serving as chaat. Traditionally kachori is sold at HALWAI (a sweet and snack shop). Today, I am using spicy besan filling. These mouthwatering Kachories can be served as a snack, chaat or part of the main meal, making the meal exotic.This recipe will make 12 kachories and will serve 4.
In a bowl mix the flour, salt and oil rubbing together, this help making crust crispy. Add the warm water slowly dough should be firm, let the dough sit for at least 10 minutes. In mean time we can make the filling.
To make filling
Heat the oil over low heat add besan and all the spices for filling fennel, coriander, red chili, mango powder, ginger powder, asafetida, and salt.
Roast the besan over low heat stirring continuously, for 2-3 minutes until spice mix becomes aromatic. Turn of the heat and take out the mix in a bowl add about 3 tablespoons of warm water and mix it well, this will make sticky dough and let it sit for five minutes. Besan will absorb the water and will become crumbly.
To make the Kachoris
Take the dough and knead it for a minute. Divide the dough in twelve equal parts.
Take one part of the dough and with your fingers flatten the edges and make into 3-inch circle. Leaving center little thicker than edges.
Mold the dough into a cup and place about 1-1/2 teaspoons of filling in the center. Pull the edges of the dough to wrap the dal filling. Proceed to make all 12 balls.
Let the filled ball sit for three to four minutes before rolling.
Set the filled ball on a flat surface with the seam facing up. Roll it pressing with your palm evenly, in about three inches in diameter.
Heat the oil in frying pan over medium heat frying pan should have about one inch of oil. To check if oil is ready put a little piece of dough in the oil. Dough should sizzle and come up very slow.
Fry them on medium-low heat. After they start to puff, slowly turn them over. Fry until golden-brown on both sides. This should take about five minutes. If the kachoris are fried on high heat, they will get soft and will not be crispy.
Notes
Kachories can be stored for at least a week in an airtight container. If kachories get soft warm up the kachoris in an oven on 200-degree F for about 7 to 10 minutes, this will bring back the freshness and crispness.Serving Suggestion: Serve the Khasta Kchories plain, or with tamarind chutney and yogurt as chaat, or serve the kachories as main meal and serve them with aloo dum, Boondi Raita
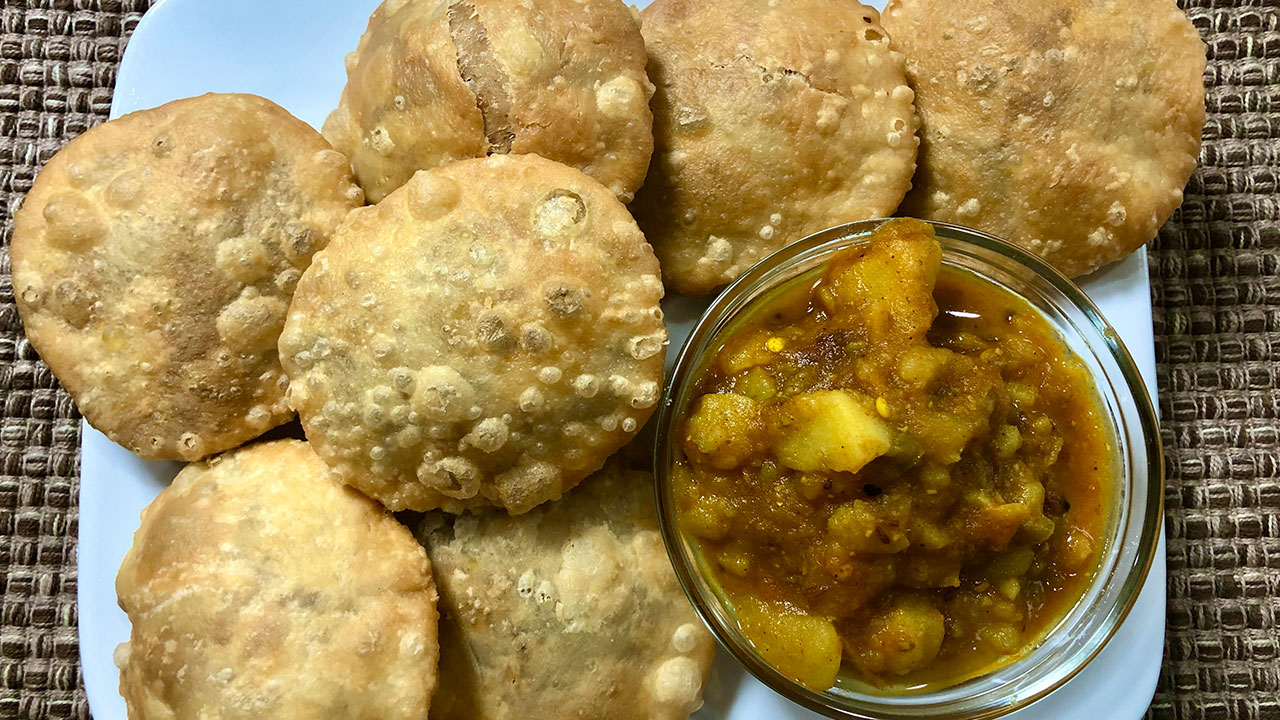
Aloo Ki kachori is a delicious, spicy, fried puff bread. Aloo Ki kachori can be part of the main meal or it can even be served for breakfast with a hot cup of chai. This kachori also makes a mouthwatering appetizer that can be served with Green Chutney as chaat.
Mix the flour, sooji, salt, lemon drops and oil. note lemon should be just 3-4 drops, we are not adding to flavor, lemon is added to give the crispness.
Add the chilled water slowly, mixing with your fingers as you pour.
Do not knead the dough. The dough should be soft.
Cover the dough and let it sit for at least fifteen minutes.
Make Filling
Heat the oil in a frying pan on medium high heat. Test the heat by adding one cumin seed to the oil; if it cracks right away oil is ready.
Add cumin seeds as cumin seeds crack, add all the ingredients, potatoes, red pepper, green chilies, cilantro, and coriander powder, mix it well while stirring the mix keep pressing.
Filling should be not very dry, this should take about 5 minutes.
Stir in garam masala and amchur. Add more salt or amchur according to taste.
Let the filling cool to room temperature, mix it well this should have texture of firm dough.
To make Kachoris
Take the dough and knead it for a minute. Divide the dough in twelve equal parts.
Mash the dough lightly and divide in 12 parts filling should be about same size as dough.
Take one part of the dough and with your fingers flatten the edges and make into 3-inch circle. Leaving center little thicker then edges.
Mold the dough into a cup and place filling in the center. Pull the edges of the dough to wrap the dal filling. Proceed to make all 12 balls.
Let the filled ball sit for three to four minutes before rolling. It helps spreading the filling evenly.
Set the kachoris on a surface with the seams facing up. Using the base of your palm, slowly flatten them into about three inches in diameter, or use the rolling pin roll the kachori with light hand.
Heat the oil in frying pan over medium heat frying pan should have about one inch of oil. To check if oil is ready put a little piece of dough in the oil. Dough should sizzle and come up very slow without changing the color.
Fry them on medium-low heat. After they start to puff, slowly turn them over. Fry until golden-brown on both sides. If the kachoris are fried on high heat, they will get soft and will not be crispy.
Notes
Serve the kachories with cilantro chutney or tamarind chutney.
Aloo kachori is a popular Indian snack that perfectly fits into various occasions and dietary preferences. It serves as a delightful addition to appetizers, party recipes, and festive menus like Diwali, Ganesh Chaturthi, Holi, Karwa Chauth, and Krishna Janmashtami. It’s also a great option for breakfast and lunch box suggestions. This delectable dish consists of deep-fried bread stuffed with a savory mixture of spiced mashed potatoes, making it a satisfying choice for vegans and anyone craving a flavorful treat.
Preparing the Dough for Aloo Kachori
To begin making aloo kachori, we first prepare the dough. In a mixing bowl, combine all-purpose flour, salt, and a splash of oil. Gradually add water and knead the mixture until you achieve a smooth, pliable dough. Cover the dough and let it rest for about 15-20 minutes. This resting period allows the gluten to relax, making the dough easier to work with and resulting in softer kachoris.
Making the Aloo Kachori Filling
While the dough rests, let’s prepare the flavorful filling for our aloo kachori. Start by boiling potatoes until they are tender. Once cooled, peel and mash them coarsely. In a pan, heat oil and add mustard seeds, cumin seeds, and hing (asafoetida) for added flavor. Add ginger, green chilies, and spices like turmeric, red chili powder, coriander powder, and garam masala to the pan. Mix well and cook for a minute before adding the mashed potatoes. Stir the mixture until the spices are well incorporated and cook for a few minutes. Finally, add chopped cilantro for a fresh burst of flavor. Allow the filling to cool completely before proceeding.
Assembling and Frying Aloo Kachori
Now, let’s assemble our aloo kachori. Divide the rested dough into small portions and roll them out into small circles. Place a spoonful of the prepared potato filling in the center of each circle. Gently gather the edges of the dough to enclose the filling and pinch them together to seal. Flatten the filled dough balls slightly.
Next, heat oil in a deep pan for frying. Once the oil is hot, carefully slide the prepared aloo kachoris into the oil. Fry them in batches until they turn golden brown and crisp on all sides. Remove them from the oil using a slotted spoon and place them on paper towels to drain excess oil.
Serving Aloo Kachori
Once fried to perfection, aloo kachoris are ready to be served. They can be enjoyed on their own as a snack or paired with a variety of chutneys and dips. For an extra indulgence, you can also turn them into a delicious aloo kachori chaat by topping them with yogurt, tamarind chutney, green chutney, sev. The combination of crispy kachori and flavorful toppings creates a tantalizing blend of textures and flavors that will surely satisfy your taste buds.
Tips for Making Perfect Aloo Kachori
Ensure the dough is well rested to achieve a soft and pliable texture.
Keep the filling mixture relatively dry to prevent the kachoris from becoming soggy.
Seal the edges of the filled dough balls properly to prevent the filling from leaking out during frying.
Fry the kachoris in hot oil to ensure they cook evenly and become crispy.
Serve the kachoris hot for the best taste and texture.
Variations of Aloo Kachori
While the classic aloo kachori is a favorite, there are endless variations you can try to add your own twist to this beloved snack. You can experiment with different fillings such as paneer, peas, or lentils to create unique flavors. Additionally, you can adjust the spice level according to your preference by adding more or less chili powder or green chilies. Get creative and tailor the recipe to suit your taste buds.
Benefits of Aloo Kachori
Aloo kachori is not only delicious but also offers some nutritional benefits. Potatoes, the main ingredient in the filling, are a good source of vitamins and minerals, including vitamin C, potassium, and B vitamins. When enjoyed in moderation as part of a balanced diet, aloo kachori can be a satisfying and wholesome snack option.
FAQs about Aloo Kachori
Can I make aloo kachori ahead of time?
Yes, you can prepare the dough and filling ahead of time and assemble the kachoris just before frying. This can save you time, especially when serving them for parties or gatherings.
Can I bake aloo kachori instead of frying?
While traditionally fried, you can certainly try baking the kachoris for a healthier alternative. Brush them with oil and bake in a preheated oven until golden brown and crisp.
How do I store leftover aloo kachori?
Allow any leftover kachoris to cool completely before storing them in an airtight container. They can be refrigerated for a couple of days and reheated in a toaster oven or microwave before servin
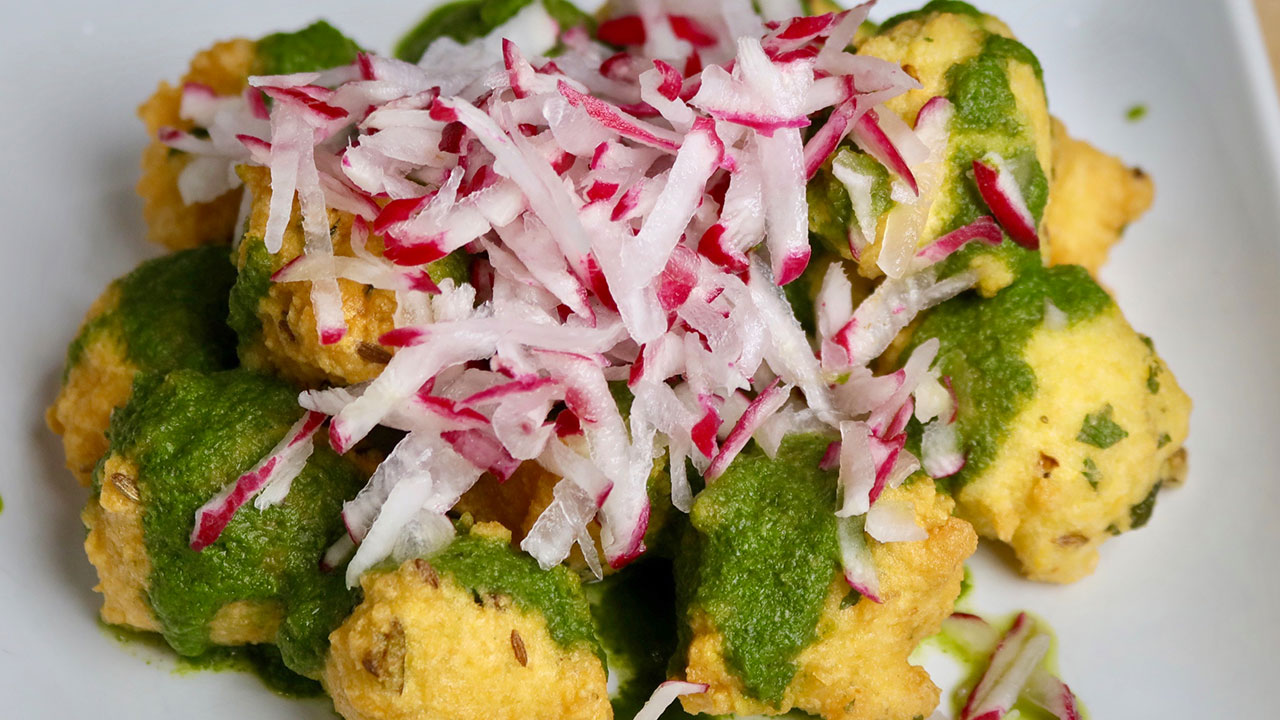
Ram Ladoo is a popular Delhi street food. Ram Ladoo is a delicious snack. Moong dal pakoras served with cilantro chutney and topped with shredded radish. These ladoos takes on the flavor of chutney and radish, this is what makes this dish a yummy and lip-smacking chaat.
Wash and Soak moong and chana dal in three cups of water for about 4 hours after soaking this will become about twice in volume.
Drain the water, and grind dal without adding any water, do not grind dal to fine paste, dal should be little grainy.
Take out the dal in a mixing bowl and beat the batter for couple of minutes, till it is fluffy. This will aerate the batter to make soft ladoos. Laddos are crispy outside and soft inside. Add all the ingredients, asafetida, cumin seeds, salt, ginger, green chili, and cilantro. Whip it again. The more air is incorporated in the batter the fluffier ladoos will be.
Heat the oil in a frying pan on medium high heat. The frying pan should have about 1 inch of oil. To check if the oil is ready, put one drop of batter in oil. The batter should sizzle and come up but not change color right away. If oil is very hot Ram Ladoo will not cook through and will not be crispy.
Place about 1 tablespoon of batter into the oil. Fry the Ram Ladoos in small batches. Fry them until golden-brown all around.
Ram Ladoo should be crispy from outside and should be soft inside.
Take them out over paper towel, this absorb the access oil.
Ram Ladoos should be served hot, to serve the Ram Ladoos, drizzle the chaat masala, cilantro chutney, and grated radish and little chat masala again.
Notes
Preparation time does not include soaking time.
Keyword Chaat, Chana Dal Pakoras, Easy To Make, Gluten Free, Homemade, Jain Food, Moong Dal Pakoras, Party Food, Sattvik Food, Snack, Tea Time Snack, Vegan, Vegetarian
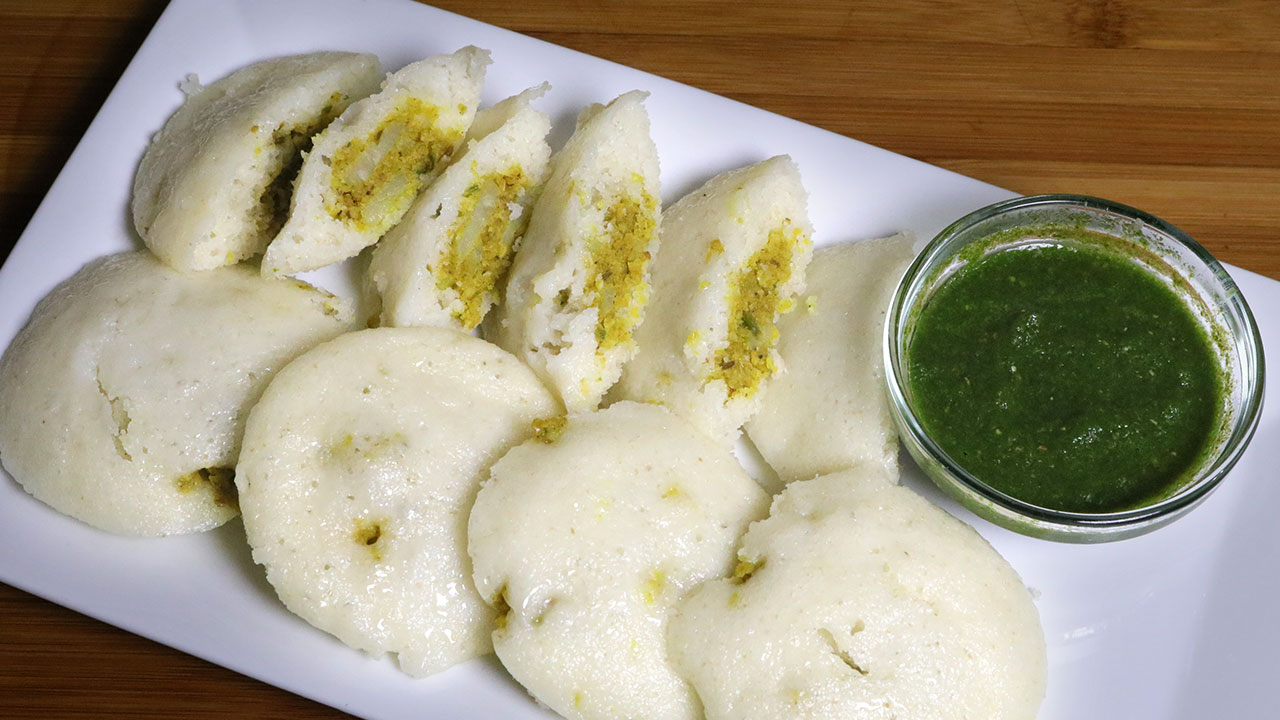
Stuffed Masala Rava Idli, Spicy Chana Dal Stuffing, Healthy Snack, Easy Idli Recipe
Stuffed Idli is a delicious and healthy snack. For the filling, I used spicy chana dal stuffing which makes it unique and also flavorful. I like to serve stuffed Idli with tea or as an appetizer with a side of cilantro chutney. This also makes a great lunch box meal as it is very healthy and satisfying.This recipe will make about 14 Idlies.
Utensils for Making Idlis, Idli stand, or Alternatively, an egg poacher can work just as well, if you do not have an Idli stand.
Instructions
For stuffing soak dal for at least 3 hours, drain the water.
Grind all the stuffing mix except potato in a grinder to make coarse paste, do not use any water I like to use food processer. Stuffing should be moist. Add potatoes and mix it well, Set aside.
Mix sooji, salt, and yogurt, add water as needed to make a pancake-like batter. Set aside for at least 30 minutes.
To make stuffed idli, grease the idly plate. Add Eno Fruit Salt to the batter and mix well. The mixture will begin foaming. Immediately begin pouring into the Idli trays.
pour about 1 tablespoon of batter and spread evenly. Now add 2 teaspoons of masala and pour over about one tablespoon idly batter covering the filling. Repeat the process. Place the stand into the steaming pot.
Cover the pot and steam idles for about 12 minutes on medium heat. Insert a fork in the center of one idli. If the fork comes out clean, remove the stand from the pot. Do not overcook idles, as they will lose their softness and dry out as they cool.
Cool for just a few minutes before removing each individual idli. They should come out easily and not stick to the mold. Idles should be spongy and soft.
Notes
SuggestionsStuffed Idli can be refrigerated for a week or freeze them for about a month. I like to brush the Idli lightly with butter before serving. Serve them your choice of chutney, Coconut Chutney, Hari Cilantro Chutney, Peanut Chutney
Masala Stuffed Idli Recipe: A Delicious Twist on Traditional Idlis
Indulge in the delightful fusion of flavors with this masala stuffed idli recipe. These stuffed masala idlis offer a tantalizing twist to the traditional South Indian favorite snacks. Bursting with aromatic spices and savory fillings, these idlis are sure to be a hit at your dining table.
Prepare the Stuffing: First, soak the dal for at least 3 hours. This allows the dal to soften and become easier to grind. After soaking, drain the water completely. Next, grind all the ingredients for the stuffing mix (except the potatoes) in a grinder or food processor. Aim for a coarse paste consistency, and avoid adding any water during grinding. The natural moisture from the ingredients should be enough. Once you have a coarse paste, add the boiled and mashed potatoes to the mix. Combine everything well by hand until the stuffing is evenly distributed and moist. Set the stuffing aside while you prepare the batter.
Make the Batter: In a separate bowl, combine the sooji (semolina), salt, and yogurt. Start by mixing these dry ingredients together. Then, gradually add water while mixing. You want the batter to reach a pancake-like consistency, thick enough to coat the back of a spoon but still pourable. Once you achieve the desired consistency, set the batter aside to rest for at least 30 minutes. This resting time allows the sooji to soften and absorb the liquids, resulting in fluffier idlis.
Assemble and Steam the Idlis: Now it’s time to assemble your stuffed idlis. Begin by greasing your idli plates to prevent sticking. Next, add Eno Fruit Salt to the batter and mix it in quickly and gently. The Eno will cause the batter to foam and rise. This is why it’s important to work quickly after adding it. Immediately spoon the batter into the greased idli molds.
Fill and Steam: Here comes the stuffing! Add about 1 tablespoon of batter to each idli mold and spread it evenly to create a base. Now, place 2 teaspoons of your prepared stuffing mixture in the center of the batter. Finally, top the stuffing with another 1 tablespoon of batter, covering the filling completely. Repeat this process for all the idli molds. Once filled, carefully place the idli stand into a steamer pot.
Steaming and Checking for Doneness: Cover the steamer pot with a lid and turn on the heat to medium. Steam the idlis for approximately 12 minutes. To check for doneness, insert a fork into the center of one idli. If the fork comes out clean without any batter residue, your idlis are cooked through. Be mindful not to overcook them, as they can become dry and lose their soft texture as they cool.
Serve and Enjoy: Once cooked, remove the idli stand from the steamer and let the idlis cool for just a few minutes before attempting to remove them from the molds. They should come out easily without sticking. Now you can enjoy your delicious homemade stuffed idlis!
Variations to Try
For a spicy kick, consider adding a teaspoon of red chili powder or finely chopped green chilies to the masala filling. You can also experiment with different vegetables such as bell peppers, cauliflower, or spinach to create your unique variations of masala stuffed idli.
Tips for Perfect Stuffed Idlis
Ensure that the idli batter is well-fermented for soft and fluffy idlis.
Use a non-stick idli mold or grease the molds lightly with oil to prevent sticking.
Be gentle while stuffing the idlis to avoid breaking them.
Steam the idlis on medium heat for the best results.
Benefits of Masala Stuffed Idlis
Provides a wholesome and nutritious meal, packed with the goodness of vegetables and spices.
Offers a creative twist to traditional idlis, appealing to both kids and adults alike.
Can be customized to suit individual taste preferences and dietary requirements.
Makes for a convenient and portable meal option for on-the-go consumption.
FAQs (Frequently Asked Questions)
Q: Can I make the masala filling in advance?
A: Yes, you can prepare the masala filling ahead of time and store it in the refrigerator for up to 2 days. Simply reheat it before stuffing the idlis.
Q: Can I freeze stuffed idlis for later use?
A: Yes, you can freeze leftover stuffed idlis in an airtight container for up to a month. Thaw them in the refrigerator overnight and steam them again before serving.
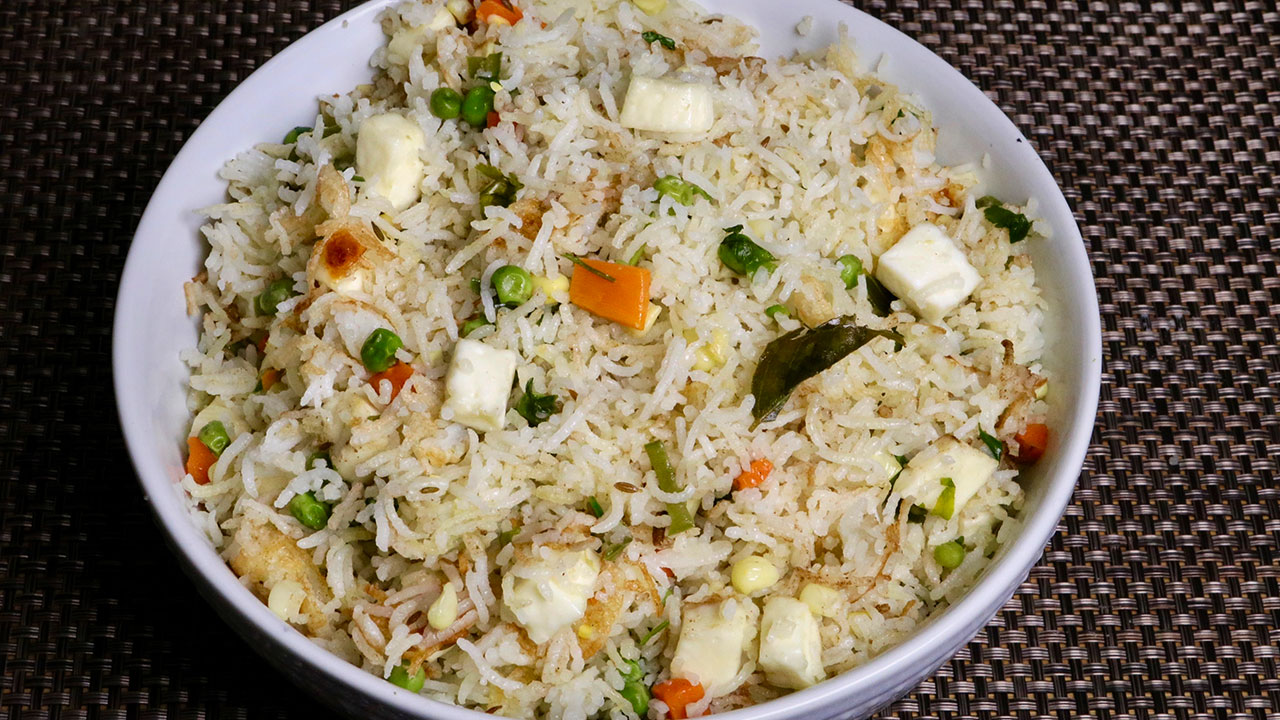
Paneer Pulao, Vegetable Pulav, Rice with Indian Cottage Cheese Pulao
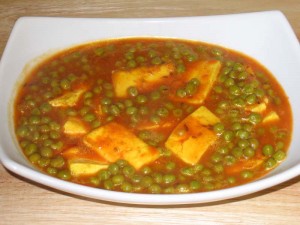
Paneer Pulao is an exotic rice dish, super easy to make and tastes delicious. This is a great side dish for party and get-togethers. Paneer Pulao goes well with yogurt or soup. This is also a satisfying lunch box meal. Recipe will serve 4.
For fluffier rice, the rice should be soaked for at least 15 minutes prior to cooking.
Heat the oil in a saucepan over medium heat. Oil should be moderately hot. Add the cumin seeds. When they crack, add curry leaves, ginger, and green chili, stir for few seconds.
Add green peas, carrots, and corn, stir and add paneer, and salt stir for about one minute, add the rice and water. Increase the heat to high and bring it to boil. Turn the heat to low and cover the pan and cook for 15 minutes or until rice is tender and water has evaporated.
Turn off the heat add cilantro, and garam masala and fluff the pulao with a fork. Cover the pan for few minutes before serving.
Delicious Paneer Pulao: A Flavorful Blend of Paneer and Rice Recipes
Paneer pulao is a delightful and flavorful gluten free, quick & easy dish that originates from Indian cuisine. It is a popular variation of traditional rice dishes, blending the rich, creamy texture of paneer (Indian cottage cheese) with fragrant basmati rice and an array of aromatic spices. As a beloved recipe of paneer pulao, this dish offers a harmonious combination of flavors and textures, making it a favorite among vegetarians and paneer enthusiasts alike.
Whether enjoyed as a standalone meal or served alongside other Indian delicacies, such as dal or raita, paneer pulao stands out as a versatile and delicious addition to any dining table. Its aromatic essence and delightful blend of paneer and rice make it a quintessential choice for those seeking a comforting and flavorful dish, earning its place among cherished paneer and rice recipes in Indian cuisine.
Preparing the Rice: Washing and Soaking
To commence the preparation of this enticing paneer pulao recipe, it is essential to start with the rice. Gently washing the rice is the initial step, ensuring thorough rinsing to eliminate any impurities that may compromise the flavor and texture of the paneer pulao. It is recommended to change the water 2-3 times during this process to guarantee optimal cleanliness. Moreover, to achieve the desired fluffiness in the paneer and rice recipe, it is advisable to soak the rice in water for a minimum of 15 minutes before proceeding with the cooking process. This soaking period allows the rice grains to absorb moisture, resulting in even cooking and a delightful texture in the final paneer pulav dish.
Heating the Oil and Spices: Flavorful Aromatics
In a saucepan set over medium heat, begin the process of preparing the flavorful paneer pulao by heating the oil until it achieves a moderate temperature, ensuring it’s adequately hot before incorporating the aromatic spices essential for this enticing recipe of paneer pulao. Introduce the vibrant cumin seeds to the oil, and patiently wait for them to crackle, signifying the initiation of the flavor infusion process characteristic of authentic paneer and rice recipes. Once the cumin seeds crackle, it’s time to add the delightful trio of fragrant curry leaves, finely chopped ginger, and vibrant green chilies to the pan, enhancing the aroma and taste of the paneer pulao. Stir the aromatic blend gently for a few seconds, allowing the spices to intermingle harmoniously, releasing their distinct flavors and permeating the oil with their essence. This crucial step ensures that every bite of the paneer rice recipe is imbued with the rich and aromatic flavors characteristic of traditional paneer pulav, promising a delightful culinary experience for all who partake.
Adding Vegetables and Paneer: Creating a Colorful Medley
Incorporate an assortment of vibrant vegetables such as green peas, carrots, and corn into the saucepan, stirring them alongside the paneer cubes and a pinch of salt. Sauté the mixture for about a minute, allowing the vegetables and paneer to absorb the aromatic flavors of the spices.
Cooking the Pulao: Simmering to Perfection
After introducing the soaked rice into the pan, carefully measure and add the appropriate amount of water to ensure the perfect consistency of the paneer pulao. With the heat turned up too high, bring the flavorful mixture to a vigorous boil, allowing the aromatic spices and tender paneer to infuse every grain of rice with its delectable essence. As the mixture reaches its boiling point, reduce the heat to low and gently cover the pan, allowing the paneer pulao to simmer gently. This crucial step allows the rice to absorb the rich flavors of the spices and vegetables, while the paneer adds a creamy texture to the dish. Patiently let the paneer pulao simmer for approximately 15 minutes, ensuring that the rice cooks to perfection and absorbs all the flavors of the aromatic spices. As the cooking process unfolds, the water gradually evaporates, leaving behind a fragrant and flavorful dish that embodies the essence of this beloved paneer and rice recipe. With each forkful, savor the delicate balance of flavors and textures, knowing that you’ve created a culinary masterpiece that perfectly captures the essence of paneer pulav.
Final Touches: Garnishing and Fluffing
Upon completion of cooking, turn off the heat and add freshly chopped cilantro and a dash of garam masala to the paneer pulao, enhancing its aroma and flavor profile. Using a fork, gently fluff the pulao to ensure the ingredients are evenly distributed. Cover the pan for a few minutes to allow the flavors to meld together before serving this delicious and aromatic paneer and rice recipe.
Many of you have expressed interest in my suggestions for daily meals. Below are some suggestions for dinner for the week. These suggestions are efficient and time-saving, as I know how hectic it can get with busy schedules!
Saturday is a good day to begin planning meals for the upcoming week so you can plan to do your grocery shopping and make sure you have all the necessary ingredients on hand. Then on Sunday, you can begin preparations by chopping all the vegetables (aside from potatoes as they do not hold up too well). Another time-saving tip is to freeze hari cilantro chutney in ice cube trays. This is a convenient way to store chutney. Also, tamarind chutney can be refrigerated for about two months.
There are some dishes that can be prepared well in advance (about two days prior to serving). You can always make changes to dishes prepared ahead of time so it does not seem like leftovers.
One challenge I’ve faced in preparing meals is making dishes suitable to each person’s taste. For example, I prefer spicy food, while my husband enjoys mild dishes. What I do is prepare mild dishes, but then will also serve with ginger relish, green chili pickle, or any pickle or chutney.
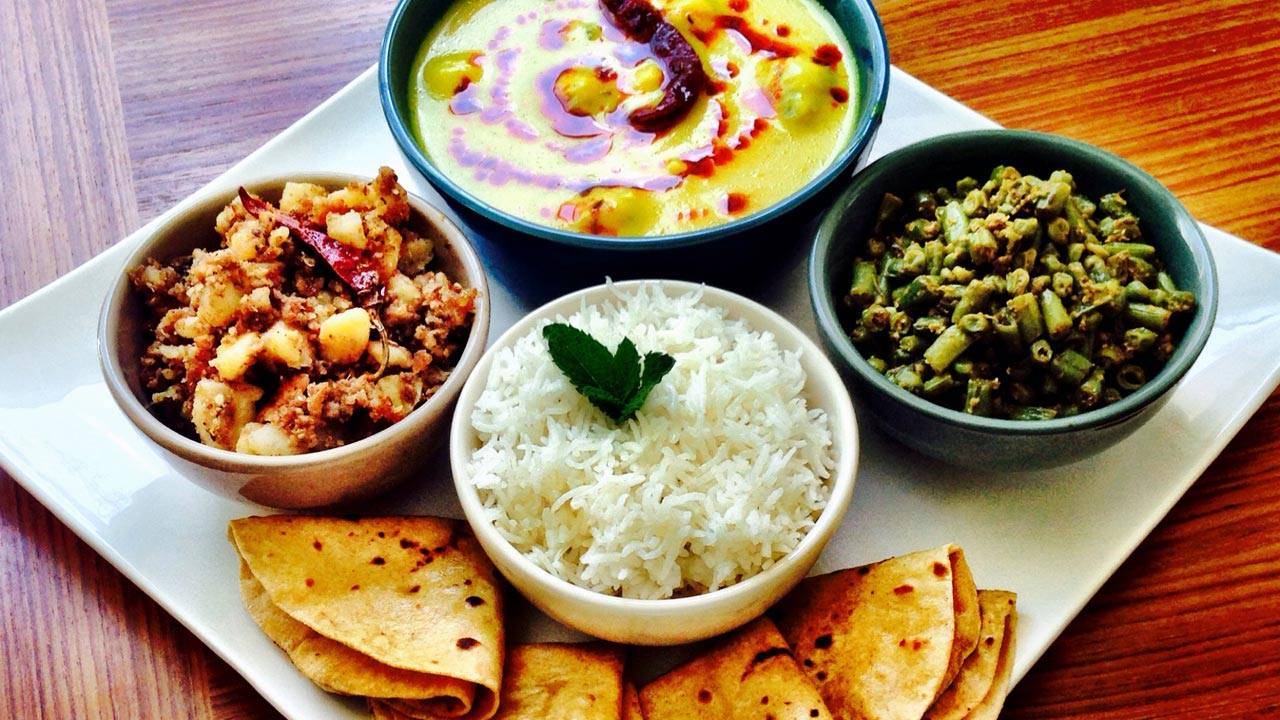
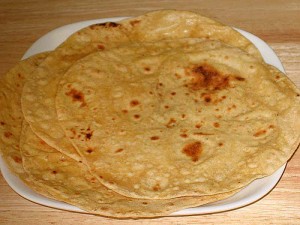
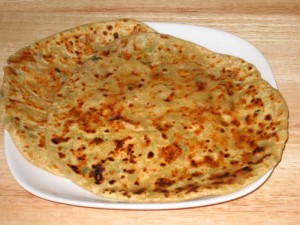
For daily meals I prefer one gravy dish with another vegetable dish. I also serve with plain yogurt or raita, roti or paratha. For your convenience, you can always serve ready-made parathas.
Sample Menu #1
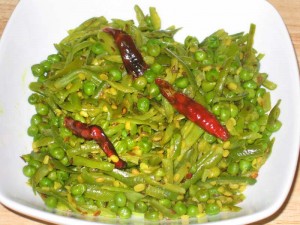
For this menu, you can prepare enough dal and beans to last two days. The first day you can serve dal with just tempering. You can change the daal up the second day by adding zucchini tadka. With green beans, on the second day, you can add them to make a sandwich or wrap, using the left over rotis or parathas.
Toor Dal
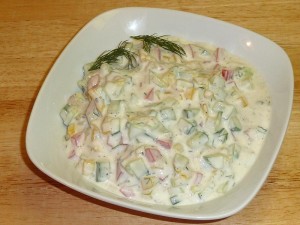
Green Beans and Peas
Vegetable Raita
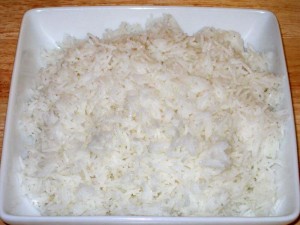
Plain White Rice
Ginger Relish
Roti
Toor dal (arhar dal)
Green beans with Peas
plain rice
raita
ginger relish
rotis
Sample Menu #2
You can make enough sprouted moong and aloo gobi for two days. You can change the sprouts by adding in plain rice by tempering the oil with asafetida, cumin seeds and whole red chili. You can use the left over aloo gobi by making a sandwich or wrap using the left over parathas.
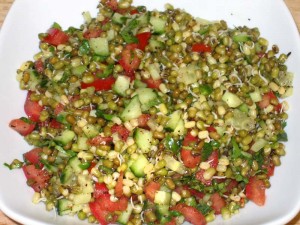
Sprouted Moong Salad
Mattar Paneer
Aloo Gobi
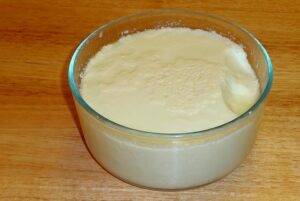
Homemade Yogurt Recipe
Aloo Paratha
Sprouted moong salad
Matar paneer
Aloo gobi
plain yogurt with salt and dry roasted cumin powder
plain parathas
Sample Menu #3
For this menu, you can prepare enough dal and cabbage with peas last two days. You can mix cabbage with plain rice this combination taste great.
Moong Dal Spinach
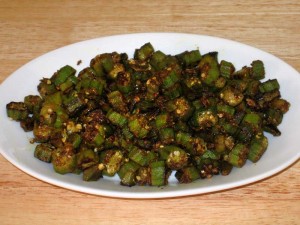
Bhindi Masala
Cabbage With Peas
Plain White Rice
Roti
Moong dal with spinach
bhindi masala
cabbage with peas
plain rice
roti
Sample Menu #4
This is good for a weekend meal and can be served as a lunch or dinner.
Pav Bhaji
Lentil Vegetable Soup
Pav bhaji
Lentil vegetable soup
Sample Menu #5
This is great for a weekend brunch.
Aloo Paratha
Homemade Yogurt Recipe
Tomato Chutney
Aloo paratha
plain yogurt
tomato chutney
These are some easy and healthy suggestions for quick convenient meals.
Next time I can give some suggestions for get together hoping this will be a help.
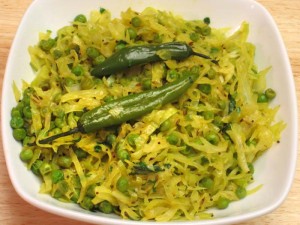
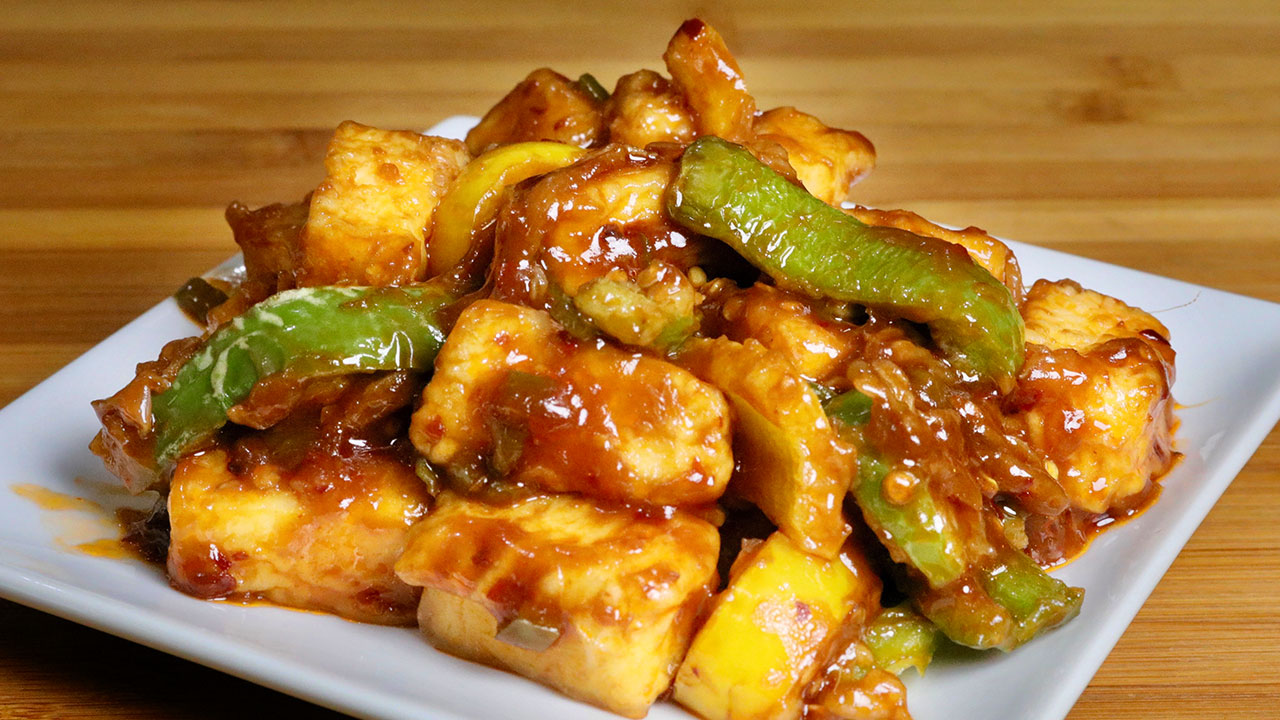
Chilli Paneer is a popular Indo-Chinese dish. Chilli Paneer makes a spicy flavorful starter at parties especially for many of my friends who enjoy the spicy food. Chilli Paneer can also be served as a side dish. This is absolutely delicious and easy to make spicy snack savored by all.
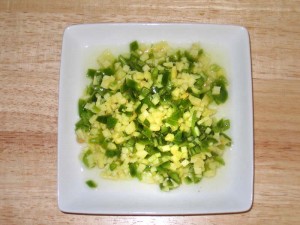
1cupbell peppersliced, capsicum, Shimla mirch, I am using yellow and green bell pepper for color
For Batter
2Tbspall-purpose flourplain flour, maida
2Tbspcorn starch or arrow root powder
1/2tspsalt
For Sauce
2Tbspoilcanola or vegetable oil
1Tbspgingershredded, adrak
1Tbspgreen chilichopped
1tspchili flakes
2Tbspsoy sauce
1Tbspvinegar
1Tbsptomato paste
1-1/2tspcorn starch or arrow root powder
1/2cupwater
Instructions
I am using store bought paneer, texture is not very soft to give the paneer softer texture soak the paneer for at least 10 minutes in hot water with few drops of lemon juice.
To make batter mix flour, corn starch, and salt in a bowl. Add the water slowly to make a smooth batter (batter should be consistency of pancake batter or dosa batter).
Heat at least 1/2 inch of oil in a frying pan over medium high heat. Oil should be moderately hot.
Dip the paneer into the batter, making sure it is completely covered by the batter. Then drop the paneer pieces slowly into oil in the frying pan. (do not overlap them)
Fry the paneer in small batches. Fry them turning occasionally, until they are very light golden brown. Take them out over paper towel.
Do same with bell pepper.
For sauce heat the oil in sauce pan over medium heat; add ginger, and green chili stir for about one minutes. Add all the ingredients for sauce except corn starch, (soy sauce, vinegar, chili flakes, and tomato paste), Stir for 1 minutes. mix water and corn starch and add to the sauce. Cook for another two minutes, sauce should be thick consistency. Sauce gets thicker as it sits.
Add paneer, and bell pepper into sauce and serve hot.
Chilli Paneer is a delectable appetizer commonly found in party recipes and snack menus. It’s a savory Indo-Chinese dish that combines the succulence of paneer (Indian cottage cheese) with a flavorful chili-infused sauce. The dish typically involves frying paneer cubes until they’re golden brown and then tossing them in a tantalizing sauce made from chili peppers, ginger, soy sauce, and other spices.
The result is a mouthwatering fusion of textures and flavors, with the paneer offering a creamy contrast to the spicy kick of the sauce. Chilli Paneer is a perfect addition to any gathering, offering a delightful combination of heat, sweetness, and tanginess that’s sure to please any palate.
Indulge in the delectable flavors of chilli paneer with this easy-to-follow recipe paneer chilli. Whether you’re a fan of Indo-Chinese cuisine or simply looking to add a spicy twist to your meal, this dish is sure to satisfy your taste buds. Made with succulent cubes of paneer (Indian cottage cheese) and a flavorful blend of spices, this chilli paneer recipe is a crowd-pleaser.
Step 1: Preparing the Ingredients
Before diving into the cooking process, gather all the necessary ingredients for making chilli paneer. You’ll need fresh paneer, vibrant bell peppers, ginger, green chilies, soy sauce, chili sauce, ketchup, cornstarch, and a few pantry staples like salt and oil. Ensure that your ingredients are prepped and ready to go before you start cooking.
Step 2: Marinating the Paneer
Begin by marinating the paneer cubes in a tantalizing mixture of soy sauce, chili sauce, and cornstarch. This step allows the paneer to absorb the flavors, resulting in a more vibrant and flavorful dish. Let the paneer marinate for at least 15-20 minutes to ensure maximum flavor infusion.
Step 3: Stir-frying the Ingredients
Heat oil in a pan or wok over medium-high heat. Add finely chopped garlic, ginger, and green chilies to the hot oil, and sauté until fragrant. Then, toss in the diced bell peppers, stirring constantly until they’re slightly softened yet still retain their crunch. This colorful medley of vegetables adds both flavor and texture to the paneer chilli.
Step 4: Adding the Marinated Paneer
Once the vegetables are cooked to perfection, gently add the marinated paneer cubes to the pan. Be careful not to overcrowd the pan, as you want the paneer to brown evenly. Allow the paneer to cook undisturbed for a few minutes, allowing it to develop a golden crust before flipping each piece to ensure even cooking.
Step 5: Sauce Preparation
In a separate bowl, mix together soy sauce, chili sauce, and ketchup to create a savory and tangy sauce for the chilli paneer. Adjust the quantities according to your preference for spiciness and sweetness. Once combined, pour the sauce over the cooked paneer and vegetables, tossing everything together until evenly coated.
Step 6: Garnishing and Serving
To finish off this mouthwatering dish, garnish the chilli paneer and fresh coriander leaves. These vibrant greens not only add a pop of color but also enhance the overall flavor profile of the dish. Serve the cheese chilli paneer hot with steamed rice or crispy noodles for a complete and satisfying meal experience.
Tips for Perfect Chilli Paneer:
For extra heat, add more green chilies or a dash of hot sauce to the dish.
To make the chilli paneer more indulgent, sprinkle some grated cheese on top just before serving for a cheesy twist.
Experiment with different vegetables like mushrooms, broccoli, or baby corn to customize the dish to your liking.
Variations of Chilli Paneer:
Dry Chilli Paneer: If you prefer a drier version of chilli paneer, simply reduce the amount of sauce added to the dish. This results in a more intense flavor and a slightly crispy texture.
Gravy Chilli Paneer: To create a saucier version of chilli paneer, add more water or vegetable broth to the sauce mixture and simmer until it reaches your desired consistency. This is perfect for drizzling over steamed rice or noodles.
Benefits of Chilli Paneer:
High Protein: Paneer is a rich source of protein, making it an excellent choice for vegetarians and vegans looking to increase their protein intake.
Rich in Calcium: Paneer is also loaded with calcium, which is essential for maintaining strong and healthy bones.
Versatile: Chilli paneer can be enjoyed as a standalone dish or paired with other Indian or Chinese favorites like fried rice or noodles.
FAQs about Chilli Paneer:
Q: Can I use tofu instead of paneer in this recipe?
A: Yes, you can easily substitute tofu for paneer if you’re looking for a vegan alternative. Just make sure to press the tofu to remove excess moisture before marinating and cooking.
Q: How spicy is this dish?
A: The spiciness of chilli paneer can be adjusted according to your preference. Feel free to increase or decrease the amount of green chilies or chili sauce to suit your taste buds.
Q: Can I make this dish ahead of time?
A: While chilli paneer is best enjoyed fresh, you can prepare the ingredients ahead of time and store them separately in the refrigerator. Simply stir-fry everything together just before serving for optimal flavor and texture.
Other Recipes on Manjula’s Kitchen
If you’re looking to explore more Indian recipes, appetizers, beverages, and desserts, be sure to check out the following links on Manjula’s Kitchen. Here are some links to recipes on Manjula’s Kitchen official website:
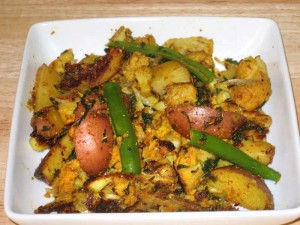
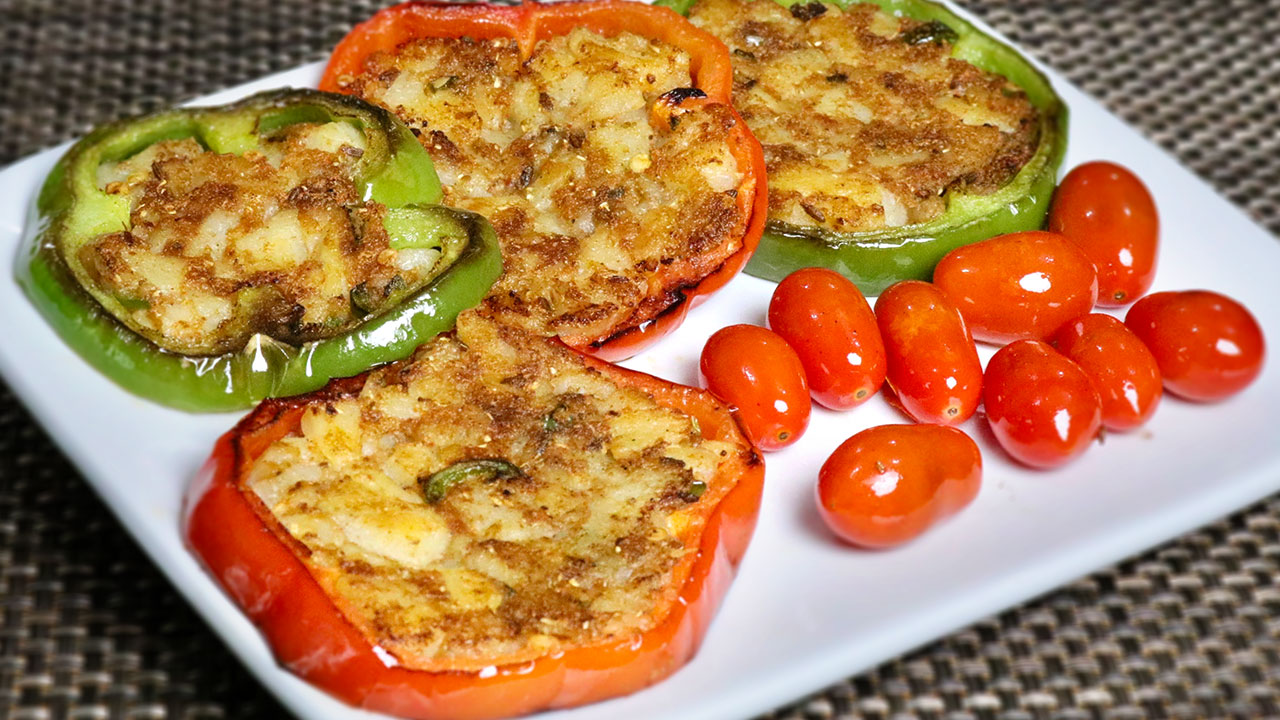
For these mouthwatering Stuffed bell peppers, I decided to make them into rings, which makes it easier and quicker to make. Bell peppers provide a very nice vibrant color to any dish. Stuffed bell peppers are delicious and can be served as appetizers or as a side dish. I hope you enjoy this recipe as much as I enjoy!
Add all the spices to mash potatoes to make filling, salt, cumin seeds, coriander powder, red chili powder, mango powder, garam masala, and green chilies.
Cut tops and bottoms of bell peppers; discard seeds and membranes.
Stuffed the bell peppers and slice them in half inch thick, use sharp knife. Depends the size of bell peppers how many slices you will make.
Press them gently to make sure potatoes stays inside the bell pepper rings.
Heat the heavy flat bottom sauce pan on medium heat and generously grease the pan.
Spread the bell pepper rings into skillet, do not overlap. Cover the pan and let it cook for about 1-2 minutes.
Remove the cover and turn the rings gently and press them lightly to ensure potatoes stays into the bell pepper rings. I cover the pan to make sure bell peppers are cooked, make sure they are not mushy. Cook the bell peppers from each side till they are golden brown. Stuffed bell peppers ready to serve.
Stuffed bell peppers are ready, this is a very enjoyable dish, serve them as an appetizers or side dish. I like to serve them with stir-fry cherry tomatoes.
Notes
Stuffed bell peppers are ready, this is a very enjoyable dish, serve them as an appetizers or side dish. I like to serve them with stir-fry cherry tomatoes.You can also use stuffed bell peppers to make sandwich, I like to use kaiser rolls with lettuce leaves, cheese, and slices of tomatoes.
Stuffed bell peppers are a versatile option for appetizers or party recipes, suitable for a variety of dietary needs including gluten-free and vegan preferences, featuring a flavorful filling of sautéed vegetables. In this stuffed bell peppers recipe, we’ll infuse vibrant flavors into bell peppers, creating a delightful dish that’s both visually appealing and satisfying. Stuffed bell peppers offer a medley of textures and tastes, making them a versatile addition to any meal. Let’s delve into how to make stuffed bell peppers that will impress even the most discerning palates.
Preparation and Assembly
To start, gather the necessary ingredients for the stuffing mixture. While the original recipe focuses on corn chaat, we’ll repurpose it to create a flavorful filling for our stuffed bell peppers. Begin by finely chopping tomatoes and green chilies. Sauté them in a pan until they turn golden brown, adding spices like cumin powder, coriander powder, and red chili powder for an extra kick of flavor. Then, mix in boiled corn kernels and season with salt to taste.
Filling the Bell Peppers
With the stuffing ready, it’s time to prepare the bell peppers for filling. Slice the tops off the bell peppers and remove the seeds and membranes from the insides, creating a hollow cavity perfect for holding the stuffing. Be sure to choose bell peppers that are firm and vibrant in color for the best results.
Stuffing and Baking
Carefully spoon the prepared stuffing mixture into each bell pepper, ensuring they are evenly filled. Place the stuffed bell peppers on a baking tray and bake them in a preheated oven until the peppers are tender and the filling is heated through. This process allows the flavors to meld together, resulting in a harmonious blend of tastes with every bite.
Presentation and Serving
Once baked to perfection, remove the stuffed bell peppers from the oven and let them cool slightly before serving. Garnish with fresh cilantro leaves for a pop of color and a burst of freshness. These stuffed bell peppers can be enjoyed as a standalone dish or paired with your favorite sides for a complete meal.
Variations
Experiment with different fillings to customize your stuffed bell peppers to suit your taste preferences. Try incorporating ingredients like cooked quinoa, black beans, or diced tofu for added protein and texture. You can also top the stuffed bell peppers with cheese before baking for a cheesy twist on this classic dish.
Tips
When selecting bell peppers for stuffing, choose ones that are uniform in size and shape to ensure even cooking.
To save time, you can prepare the stuffing mixture in advance and store it in the refrigerator until ready to use.
For a spicy kick, add finely chopped jalapeños or serrano peppers to the stuffing mixture.
If you prefer a vegetarian option, omit the corn chaat and use a combination of vegetables like carrots, peas, and potatoes for the filling.
Benefits
Stuffed bell peppers are not only delicious but also packed with nutrients. Bell peppers are rich in vitamins A and C, as well as antioxidants that help boost immunity and promote overall health. By filling them with a variety of wholesome ingredients, you can create a nutritious meal that’s as satisfying as it is flavorful.
FAQs
Q: Can I use different colored bell peppers for this recipe?
A: Yes, feel free to mix and match different colored bell peppers for a visually stunning presentation. Each color offers a slightly different flavor profile, adding depth to the dish.
Q: How long will the stuffed bell peppers keep in the refrigerator?
A: Stuffed bell peppers can be stored in an airtight container in the refrigerator for up to 3 days. Simply reheat them in the oven or microwave before serving.
Q: Can I freeze stuffed bell peppers for later?
A: Yes, stuffed bell peppers can be frozen for future meals. Wrap them individually in plastic wrap and aluminum foil before placing them in the freezer. To reheat, thaw them overnight in the refrigerator and bake them in the oven until heated through.
Other Recipes on Manjula’s Kitchen
If you’re looking to explore more Indian recipes, appetizers, beverages, and desserts, be sure to check out the following links on Manjula’s Kitchen. Here are some links to recipes on Manjula’s Kitchen’s official website:
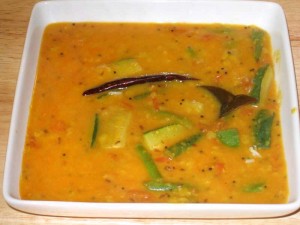
Gatte Ki Sabji is a traditional dish from Rajasthan. These steamed gram-flour dumplings are cooked in a spicy gravy. This mouth-watering dish will complement any meal. Enjoy Gatte Ki sabji with roti or plain rice. The recipe is also vegan and gluten free.
1/8tspasafetidahing, asafetida is gluten free spice, but asafetida powder contains some wheat flour, gluten free asafetida, is available on amazon.
For Gravy
3Tbspoil
1/8tspasafetidahing
1tspfennel seedssaunf
2bay leavestejpat
2dry red chilies
½tspred chili powder
1/2tspturmerichaldi
1tablespooncoriander powderdhania
1tspsalt
1TbspKasuri Methi
1tspmango powderamchoor
1/2tspgaram masala
Instructions
Mix all the ingredients for gatte together and make a stiff dough, using water as needed. You will need about 1/3 cup of water. Knead the dough well, let it rest for 10 minutes. Divide the dough into 8 parts and roll them in calendar about half inch thick.
Bring about 4 cups of water to boil in a pan on medium high heat. Gently drop the Gatte logs in boiling water. After it comes to boil, cover the pan and reduce the heat to medium low, and cook them cover for about 12-15 minutes’ gate should be floating on the top and will have bubbles all around.
Take them out from water and save the water, this will be used for making gravy. let them cool for few minutes and cut them in about half inch-thick slices.
Heat the oil in heavy bottom pan over medium heat, add fennel seeds, asafetida, red chilies stir and add Gattes, stir-fry for about 4-5 minutes until they are light golden brown.
Add bay leaves, chili powder, turmeric, coriander powder, and salt, stir-fry for about 2 minutes.
Add the water we saved, and Kasuri Methi boil for about 10 minutes over low medium heat, covered. This is the time add more water to adjust the thickness of the gravy. As Gatte Ki Sabji will cool off it gravy will become thick.
Turn off the heat and add mango powder, and garam masala, Gatte Ki Sabji is ready to serve.
Authentic Rajasthani Gatte Ki Sabji: A Savory Besan Gatte ki Sabji
Gatte ki sabji is a traditional Rajasthani dish popularly enjoyed during festivals like Karwa Chauth and Navaratri. It’s a gluten-free and vegan delicacy that features dumplings made from chickpea flour (besan) cooked in a flavorful vegetable curry or gravy. Along with the lentil-based dumplings, the curry typically includes a variety of vegetables, enhancing its nutritional value and taste.
Embark on a gastronomic odyssey through the vibrant flavors of Rajasthan as we delve into the intricate world of Besan Gatte Ki Sabji. This iconic dish, steeped in tradition and brimming with aromatic spices, offers a tantalizing glimpse into the culinary heritage of the region. Join us as we unravel the secrets behind crafting this delectable delicacy, offering tips, benefits, suggestions, and answers to frequently asked questions along the way.
Crafting the Perfect Gatte:
The journey begins with the meticulous preparation of the gatte, the cornerstone of this flavorful dish. Start by mixing besan (gram flour) with a carefully curated selection of spices, such as cumin, coriander, and ajwain, to infuse the dough with a burst of flavor. Gradually add water to form a stiff dough, ensuring it is kneaded well to achieve the desired consistency. Allow the dough to rest for at least 10 minutes to allow the flavors to meld before dividing it into equal portions and rolling them into cylindrical logs.
Infusing Flavor into the Gravy:
As the gatte take shape, it’s time to prepare the fragrant gravy that will elevate them to culinary perfection. Bring a pot of water to a gentle boil and gently drop the gatte logs into the simmering water. Allow them to cook until they float to the surface, indicating that they are ready to be incorporated into the savory gravy. Remember to reserve the cooking water, as it will serve as the base for the flavorful gravy, infused with the essence of besan.
The Aromatic Symphony of Spices:
In a heavy-bottomed pan, heat oil over medium heat and add a medley of aromatic spices, including fennel seeds, asafetida, and dried red chilies. Allow the spices to release their fragrant oils, infusing the kitchen with an irresistible aroma. Add the cooked gatte to the pan and stir-fry them until they acquire a golden-brown hue, enhancing their nutty flavor and crisp texture.
Fine-Tuning the Consistency and Flavor Profile:
To achieve the perfect balance of flavors, it’s essential to pay attention to the consistency of the gravy. Add bay leaves, chili powder, turmeric, and coriander powder to the pan, allowing them to bloom in the oil before incorporating the reserved cooking water. Adjust the thickness of the gravy by adding more water as needed, ensuring it coats the gatte evenly and imparts a luscious mouthfeel.
Tips for Success:
Use freshly ground spices for maximum flavor impact.
Don’t rush the cooking process; allow the gatte to cook until they float to the surface for optimal texture.
Adjust the spice levels according to your preference, adding more or less chili powder as desired.
For an extra layer of richness, substitute some of the water with milk or cream when making the gravy.
Benefits of Besan Gatte Ki Sabji:
Rich in protein: Gram flour is a good source of plant-based protein, making this dish a nutritious option for vegetarians and vegans.
High in fiber: Besan gatte are packed with dietary fiber, which promotes digestive health and keeps you feeling full and satisfied.
Versatile and customizable: This dish can be adapted to suit individual tastes and dietary preferences, allowing for endless variations and creative twists.
Budget-friendly: Made with simple, pantry staples, Besan Gatte Ki Sabji is an affordable yet satisfying meal option for families on a budget.
Suggestions for Serving:
Garnish with freshly chopped cilantro and a squeeze of lemon juice for a burst of freshness.
Serve hot with steamed rice or fluffy roti for a wholesome and satisfying meal.
Pair with tangy pickle, creamy raita, or crunchy papad for a well-rounded dining experience.
Frequently Asked Questions (FAQs):
Q: Can I make Besan Gatte Ki Sabji in advance?
A: Yes, you can prepare the gatte and gravy ahead of time and assemble them just before serving. Simply store the cooked gatte and gravy separately in airtight containers in the refrigerator for up to 2-3 days.
Q: Can I freeze Besan Gatte Ki Sabji?
A: While you can freeze the cooked gatte, the texture may change slightly upon reheating. It’s best to freeze the gatte and gravy separately and thaw them in the refrigerator overnight before reheating and assembling.
Q: Can I substitute besan with any other flour?
A: While besan lends a distinct flavor and texture to this dish, you can experiment with other flours such as chickpea flour or wheat flour for a different twist. Keep in mind that the flavor and consistency may vary.
Conclusion:
Besan Gatte Ki Sabji encapsulates the essence of Rajasthan’s rich culinary heritage, offering a tantalizing blend of flavors and aromas that delight the senses. With a bit of patience, creativity, and a dash of spice, you can recreate this iconic dish in your own kitchen, savoring the warmth and vibrancy of Rajasthani cuisine with every mouthful. So, gather your ingredients, unleash your inner chef, and embark on a culinary journey that celebrates the timeless allure of Besan Gatte Ki Sabji.
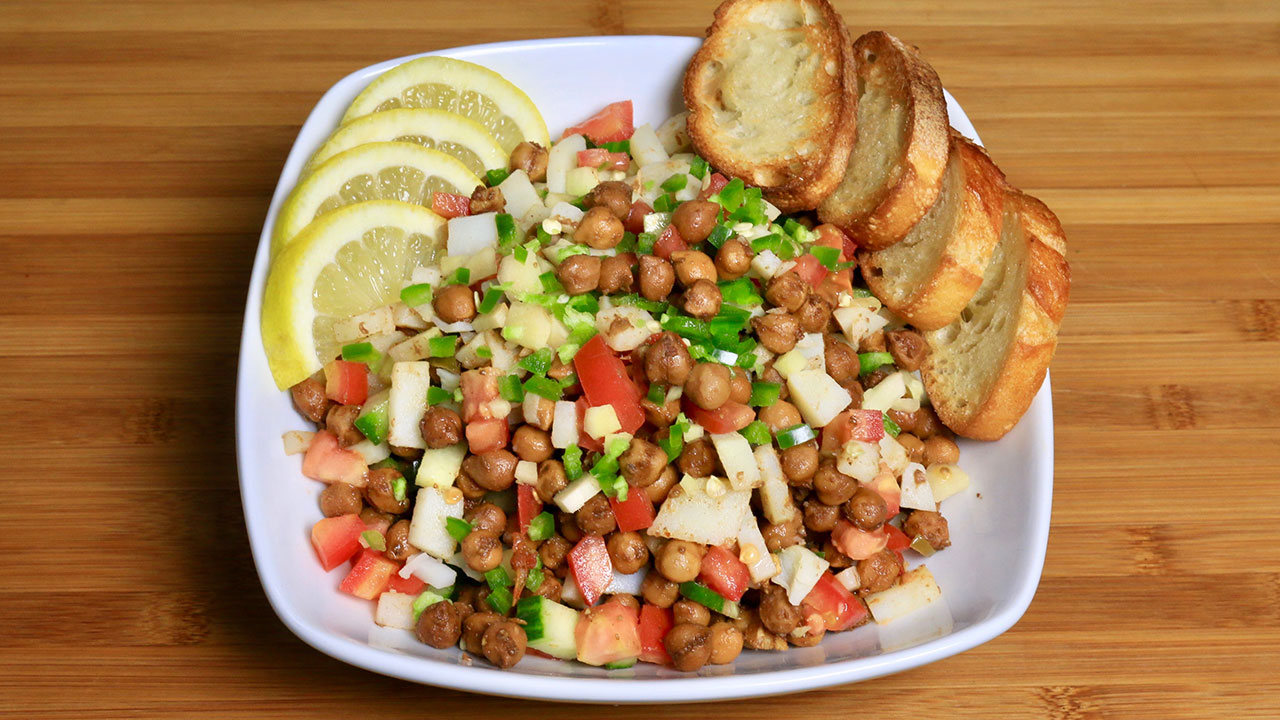
Chana Chaat is a healthy and delicious snack. I am using kala chana for this recipe. Kala chana looks like chickpeas, but brown in color. This is a delightfully sweet and tangy snack. Channa Chaat will also make a very enjoyable lunch box meal.
1/4cuptamarind pulpthis is available in India grocery store or you can make it at home soaking the tamarind and squeeze the pulp. But not the concentrated tamarind
1tspred chili powder
1tspsalt
1tspblack salt
1Tbspsugar
2tsproasted cumin seed powderbhuna jeera
1cuppotatoboiled peeled and cut in small pieces
1/2cupcucumberchopped in small pieces
1/2cuptomatoeschopped in small pieces
For garnishing
1Tbspgingerfinely chopped
1Tbspgreen chiliesfinely chopped
5-6wedges of lemon
Instructions
Wash and soak kala chana in approx. 4 cups of water, for at least 4 hours. The kala chana will double in volume after soaking.
In pressure cooker cook kala chana with 2 cups of water over medium high heat. As pressure cooker starts steaming turn the heat down to low medium and cook for about 15 minutes. Close the heat and wait until steam has stopped before opening the pressure cooker. Chana should be soft and tender.
Drain the water and save it for later use, this water is high in protein and can be used for making the soup or dals.
Heat the oil in a sauce pan over medium high heat. Add the chana, stir for few seconds. Add ginger and green chili, coriander powder, sauté for about 1 minutes.
Add salt, black salt, red chili powder, and sugar, add tamarind pulp. Cook for 3-4 minutes over low heat. If needed use few spoons of water, Chana mix should be moist. Turn off the heat.
Assemble the Kala Chana Chaat, add chopped potatoes, tomatoes, and cucumber, drizzle the roasted cumin seeds powder and mix it well. If desired garnish with sliced ginger, green chilies and drizzle the lemon juice.
Notes
Prep Time of 10 minutes does not include soaking time.Suggestions You can serve chana chaat without adding the veggies, it tastes delicious. You can always adjust quantity of veggies to your choice. Also adjust the green chili and red pepper to your choice. After spicing the chana mix with cooked plain rice to make spicy delicious meal.
Recipe for Chana Chaat: Elevate Your Snack Game with This Delicious Dish
Chana chaat is a quintessential Indian street food known for its burst of flavors and satisfying crunch. This recipe for chana chaat brings together the wholesome goodness of kala chana (black chickpeas) with an array of spices and fresh vegetables, creating a dish that’s both nutritious and delicious. Whether enjoyed as a snack, appetizer, or light meal, chana chaat is sure to tantalize your taste buds and leave you craving for more.
To begin your culinary journey with chana chaat, start by washing and soaking kala chana in water for at least 4 hours. This step is crucial as it helps the chana soften and swell, enhancing its texture and flavor. Once soaked, cook the kala chana in a pressure cooker until tender and soft. The aroma of freshly cooked chana will fill your kitchen, setting the stage for the flavorful dish that is to come.
Now, it’s time to infuse the cooked chana with a medley of spices. Heat oil in a saucepan and sauté ginger, green chili, and coriander powder until fragrant. Then, add the cooked chana along with salt, black salt, red chili powder, sugar, and tangy tamarind pulp. Allow the spices to meld together, coating the chana in a burst of savory and tangy flavors. Adjust the seasoning according to your taste preferences, adding more spice for a fiery kick or dialing it down for a milder flavor profile.
Once the chana is well-coated with the spice mixture, it’s time to assemble the chana chaat. Add chopped potatoes, tomatoes, and cucumber to the chana mixture, creating a colorful and vibrant medley of flavors and textures. For an extra burst of flavor, sprinkle roasted cumin seeds powder over the chaat, adding a depth of earthy aroma to the dish. Finally, garnish with sliced ginger, green chilies, and a squeeze of fresh lemon juice to brighten up the flavors.
Variations:
Sprouted Chana Chaat: For a healthier twist, use sprouted chana instead of cooked chana. Sprouted chana is rich in nutrients and adds a delightful crunch to the chaat.
Fruit Chaat: Incorporate seasonal fruits like apples, grapes, and pomegranate seeds into the chaat for a refreshing and fruity twist.
Yogurt Chaat: Drizzle some creamy yogurt over the chana chaat for a creamy and tangy variation. Top it off with some mint chutney and tamarind chutney for an extra burst of flavor.
Tips:
Save the Cooking Water: The water leftover from cooking the chana is rich in protein and can be used to make soups or dals, adding a nutritious boost to your meals.
Adjust Seasoning: Feel free to adjust the spices and seasoning according to your taste preferences. Experiment with different combinations to create your perfect flavor profile.
Serve with Rice: For a hearty meal, serve the spiced chana mixture with cooked plain rice, creating a satisfying and flavorful dish that’s perfect for lunch or dinner.
Benefits:
High in Protein: Kala chana is rich in protein, making chana chaat a nutritious and filling snack option.
Rich in Fiber: The addition of fresh vegetables like tomatoes, cucumbers, and potatoes adds fiber to the dish, aiding in digestion and promoting overall gut health.
Packed with Flavor: The blend of spices and tangy tamarind pulp creates a flavor explosion in every bite, making chana chaat a truly irresistible snack option.
FAQ:
Can I Make Chana Chaat Ahead of Time?
Yes, you can prepare the chana mixture ahead of time and refrigerate it. Simply assemble the chaat with fresh vegetables and spices before serving.
Can I Skip Adding Veggies to Chana Chaat?
While vegetables add freshness and texture to the chaat, you can certainly enjoy chana chaat without them. Adjust the recipe according to your taste preferences.
How Long Does Chana Chaat Last in the Refrigerator?
Chana chaat can be stored in the refrigerator for 2-3 days. Make sure to store it in an airtight container to maintain its freshness.
In conclusion, chana chaat is a delightful dish that combines the goodness of kala chana with a burst of spices and fresh vegetables. With this recipe of chana chaat mastered, you’ll have a versatile snack that’s perfect for any occasion. So, roll up your sleeves, gather your ingredients, and embark on a flavorful culinary adventure with chana chaat.
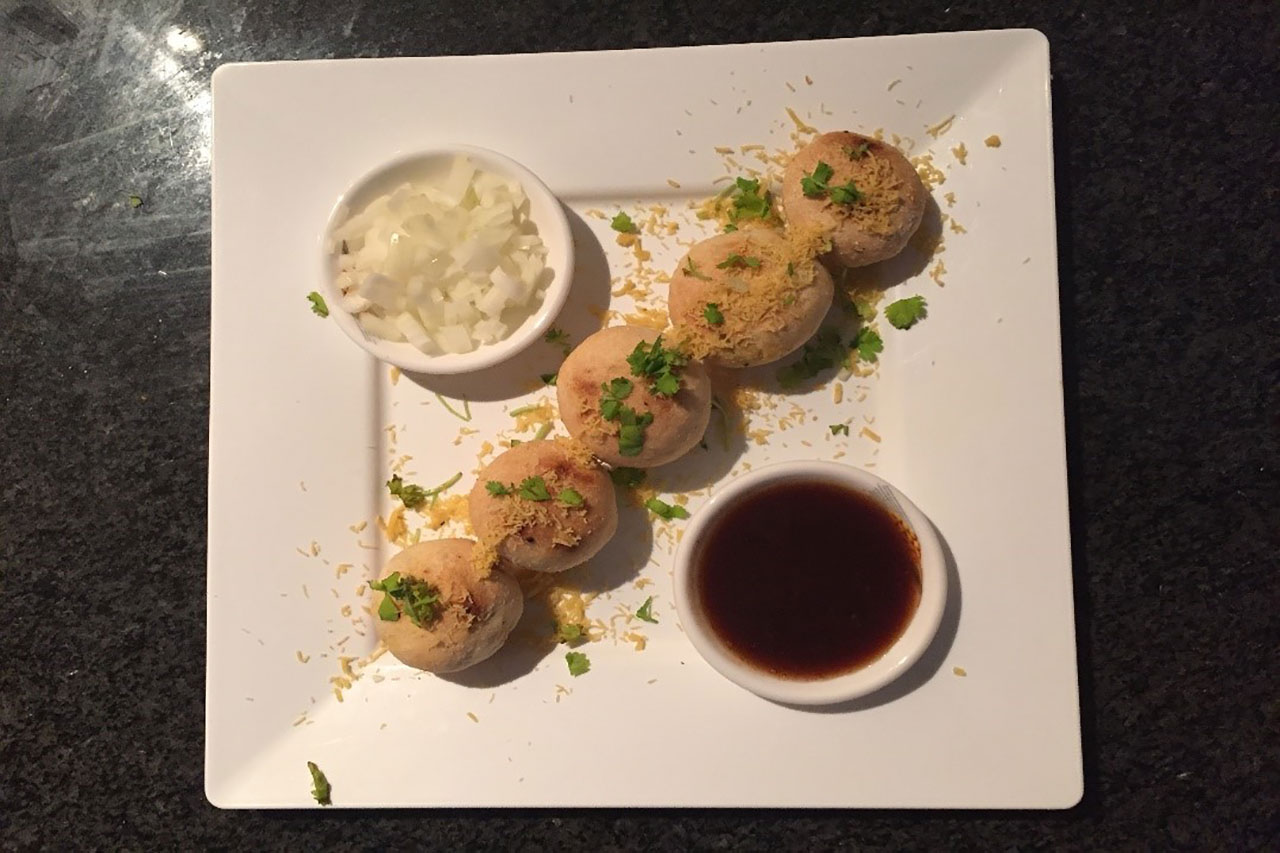
Heat oil in a non-stick pan, add coriander seeds, coriander powder, cumin powder, red chilli powder, fennel powder, garam masala powder and salt and mix well and sauté for 2 minutes add little water to avoid over cooking, Add soaked moong daal , ½ half cup water, dry mango powder and chat masala mix well and cook till moong daal is fully cooked
When daal mixture becomes dry, transfer it into another bowl and let it cool.
Preheat oven to 180° C
Put refined flour in a bowl, add salt, baking powder, ghee and carom seeds and mix well. Add sufficient water and knead into a stiff dough. Cover the bowl with cloth and rest the dough for 20 minutes.
Divide the dough into equal portions and shape into balls. Apply a little oil to each ball, press them slightly and roll out into small puris with the edges being thinner than the centre. Place some of the daal mixture in the centre, dampen the edges, bring them together and press to seal.
Press slightly and roll into small puris ensuring that the filling is evenly spread.
Grease a baking tray, place the kachoris in it, brush them with a little ghee and bake in the preheated oven at 200° C for about 15 minutes or till the kachoris are cooked and golden.
Arrange them on a serving plate and serve hot with tamarind chutney and chopped onion
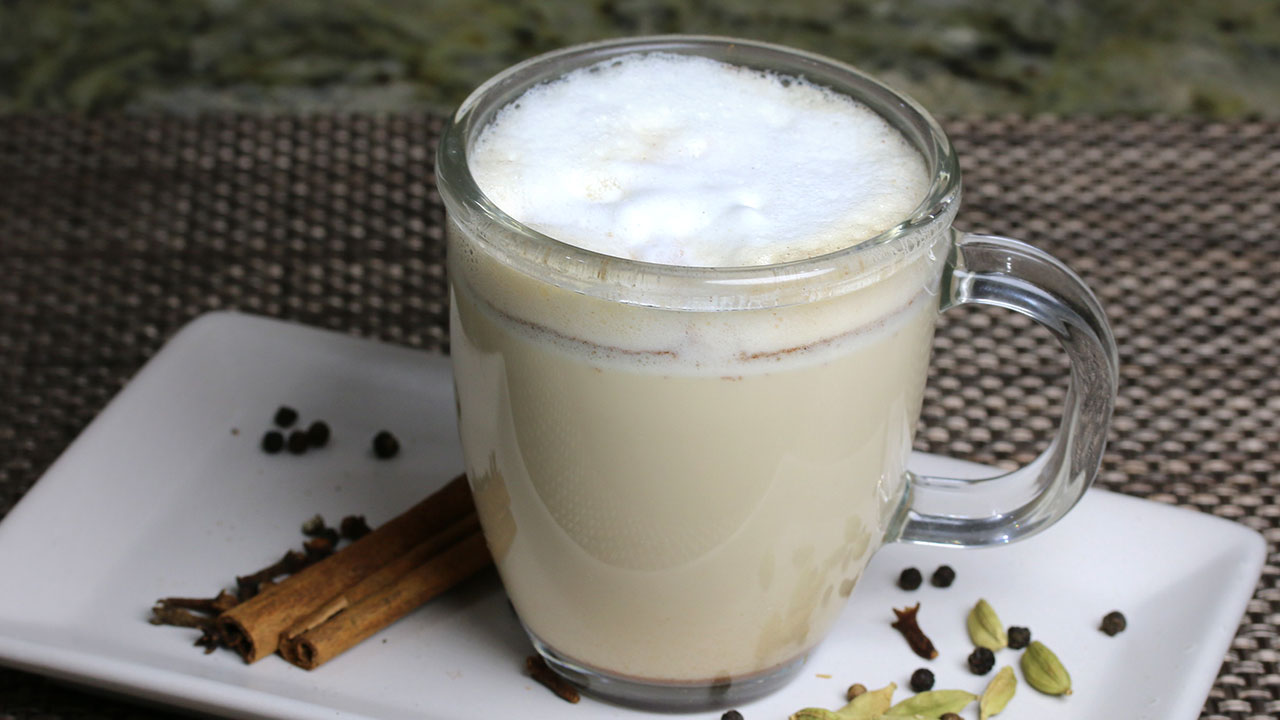
Don’t have time to stop at your favorite coffee shop for some Chai Latte? Let’s try making my delicious and easy to prepare Chai Tea Latte at home instead! It's a great way to start off your morning! As the beverage is refreshing and goes along with all kinds of munchy snacks
In a medium saucepan, bring all the chai ingredient to boil over medium high heat, water, cloves, black pepper, cinnamon, ginger, cardamom, sugar, and teabags. Once boiling, let it boil for 1 minute, turn off the heat, cover the pot and let it sit for about five minutes. Remove the tea bags and strain the tea through a fine mesh strainer.
For the latte
In a medium-size saucepan, note: (I boil the milk in microwave ovebring the milk, sugar, and pinch of cinnamon to a boil Using an immersion blender (this is the trick to a frothy homemade latte), blend the milk until it’s frothy.
Pour 1/2 cup of chai tea in a mug. Slowly add half of the warm, frothy milk to the tea. Sprinkle the top of the chai latte with an extra pinch of cinnamon, if desired.