Search results for: “dal”

  • Sorghum Dosa (Jowar)

    Sorghum Dosa (Jowar)

    A plate of crispy Sorghum Dosa served with spiced potato filling

    Sorghum Jowar Dosa

    Sorghum Jowar Dosa a tasty twist to Rava Dosa. Lately, I am trying gluten free recipes and exploring the grains I rarely used. Sorghum Dosa is one of those recipes. This is a good alternative to regular dosa it is quick and easy to make. Sorghum Dosa batter does not need to be fermented. Sorghum dosa also vegan and gluten free. It is crispy and has a lacy look like Rava Dosa. You can serve this with traditional Samber and coconut Chutney or serve for a snack with cilantro Chutney.This recipe will serve 3.
    4 from 1 vote

    Ingredients
      

    • ½ cup sorghum Jowar flour
    • ¼ cup rice flour Chawal ka atta
    • ½ tsp cumin seed jeera
    • tsp asafetida hing
    • ¼ tsp salt
    • tsp crushed black pepper
    • 1 Tbsp finely chopped cilantro hara dhania
    • 1 ½ cup water
    • 3 Tbsp of oil for cooking dosa

    Instructions
     

    • Mix all the dry ingredients together, sorghum flour ( Jowar), rice flour, cumin seeds, asafetida, salt, black pepper.
    • Add water slowly to make a thin batter and avoiding any lumps. Batter should have pouring consistency like buttermilk. Let the batter stand for about 30 minutes.
    • Before making dosa add cilantro. Mix it well.
    • Heat the skillet on medium high. To check if the skillet is ready sprinkle a few drops of water over the skillet water should sizzle. Wipe the skillet with few drops of oil.
    • Pour the batter with a ladle, keep the ladle about 4 inches high from the skillet in a circular motion starting from the center. Keep pouring the batter till it is the size you will like the dosa. Notes: dosa will no be perfectly round.
    • Do not try to spread the batter, Dosa should have holes like swiss cheese or have lacy look.
    • Drizzle 1 teaspoon of oil around dosa.
    • Cook Dosa over medium heat for about 2 minutes or until Dosa becomes golden brown. Turn the Dosa using spatula.
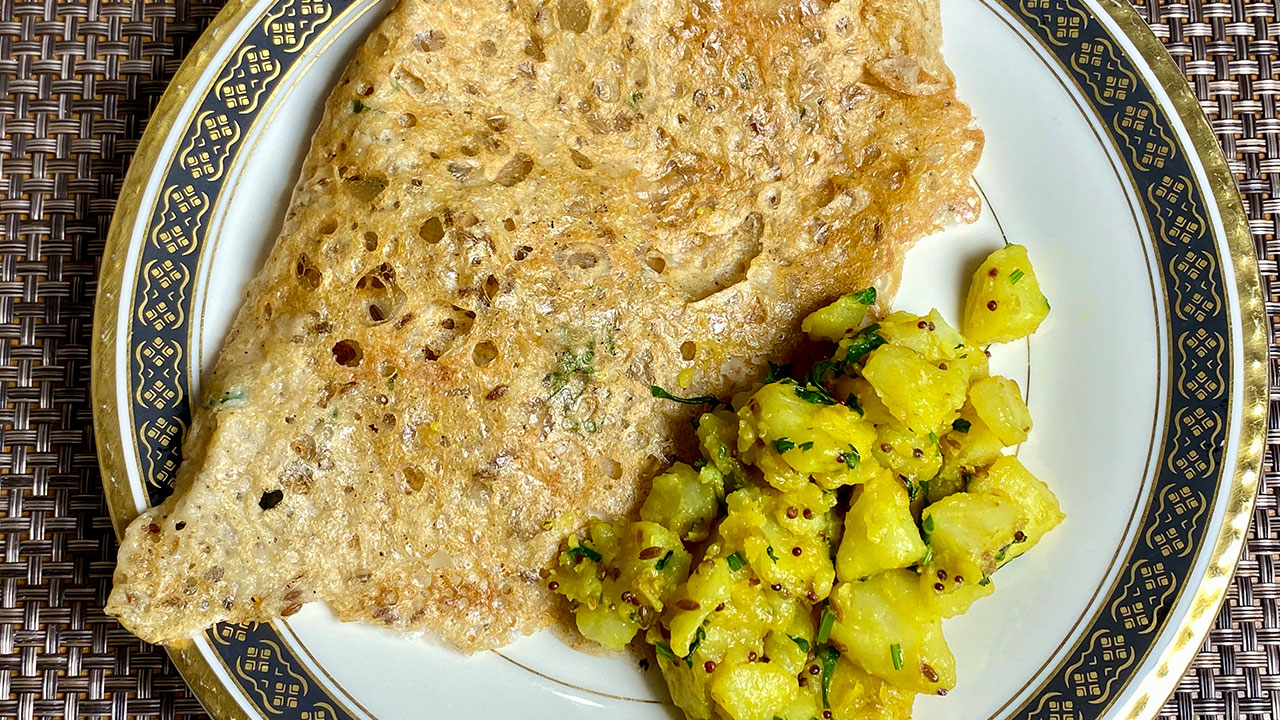
    • Let Dosa cook for about 1 minute from another side. Dosa will be golden brown on one side and light color on other side. Thin and crispy Sorghum Dosa is ready to serve.
    • Dosa has a look of Rava dosa but Sorghum Dosa is also gluten free and vegan.

    Notes

    Serving Suggestions
    Traditionally Rava Dosa is served with Sambar (lentil soup cooked with vegetables), and coconut chutney, or serve for snack with cilantro Chutney. I have the recipes for Sambar, Coconut Chutney, and Hari Cilantro Chutney on my web site.
    Tried this recipe?Let us know how it was!

    How to make Instant Sorghum Dosa by Manjula’s Kitchen

    Dosa is a popular south indian delicacy which looks like a crepe. It’s like a crisp and thin pancake made of rice and urad dal batter. Traditionally Dosa is served with sambar, aloo masala and coconut chutney. It is an Indian crepe made usually through rice batter, but here we have experimented and made many alternative dosa such as Oat Dosa, Besan Dosa, Rava Dosa, Sorghum Dosa. This preparation is using sorghum dosa and is a bread based breakfast recipe that is vegan. The preparation entails skillfully combining pan techniques and manual dexterity to achieve the perfect bread cooked on non-stick skillets.

    1. Mixing Dry Ingredients: Crafting the Base for Jowar Dosa

    Embark on the journey of creating an Instant Jowar Dosa by combining all the dry ingredients – sorghum flour (Jowar), rice flour, cumin seeds, asafetida, salt, and black pepper. This harmonious blend sets the foundation for a gluten-free and vegan dosa that promises a delightful culinary experience. Ensure the dry ingredients are well-integrated, setting the stage for the dosa batter.

    2. Creating the Dosa Batter: Achieving the Perfect Consistency

    Gradually add water to the dry mix, creating a thin batter with a pouring consistency akin to buttermilk. The key is to avoid any lumps, ensuring a smooth texture. Let the batter stand for approximately 30 minutes, allowing it to settle and develop optimal flavours. This patient step contributes to the success of your Jowar Dosa, enhancing its taste and texture.

    3. Adding Cilantro: Elevating the Flavor Profile of Jowar Dosa

    Before transforming the batter into dosas, introduce a burst of freshness by adding cilantro. This step not only enhances the flavor profile but also adds a visual appeal to your Jowar Dosa. Gently mix the cilantro into the batter, ensuring an even distribution of this aromatic herb.

    4. Pouring and Cooking Dosa: The Art of Creating Jowar Dosa

    Heat the skillet on medium-high, a crucial step before creating your Jowar Dosa. To test the skillet’s readiness, sprinkle a few drops of water – a sizzle should confirm its optimal temperature. Wipe the skillet with a few drops of oil, creating the perfect non-stick surface. With a ladle, pour the batter in a circular motion, starting from the centre, allowing the dosa to take shape naturally. Resist the urge to spread the batter, as Jowar Dosa is intended to have holes, resembling a swiss cheese or possessing a lacy appearance.

    5. Drizzling Oil and Flipping Dosa: Achieving the Perfect Golden Brown

    Enhance the crispiness and flavour by drizzling a teaspoon of oil around the dosa. Cook the Jowar Dosa over medium heat for about 2 minutes until it attains a golden brown hue. Using a spatula, gently flip the dosa, revealing a light colour on one side and the golden brown perfection on the other. This intricate dance of heat and ingredients results in a thin, crispy, and visually appealing Sorghum Dosa.

    6. Serving Your Gluten-Free Creation: Enjoying the Instant Jowar Dosa

    Your Instant Jowar Dosa, with its distinctive swiss cheese-like appearance, is now ready to grace your table. Savour the gluten-free and vegan goodness of this delectable creation. While reminiscent of Rava dosa in appearance, the uniqueness of Sorghum Dosa shines through. Thin, crispy, and utterly satisfying, this dosa promises a delightful culinary experience that caters to a diverse range of dietary preferences.

  • Jowar (Sorghum) Dosa Recipe coming soon

    I am one of those who enjoys cooking and eating, a real foodaholic. About three months back when our family got together, Alex, my husband, was given the challenge to see if he can go on a gluten free diet for 10 days. He agreed to do so if I also joined him. They knew for me and Alex no meal is complete without any kind of bread: my favorites are roti and paratha. I decided to take the challenge with him anyway. After ten days, Alex went back to his normal diet, but I decided to continue. I was feeling better and more energetic. But after 10 days when my challenge time was over, I decided occasionally I will cheat a little bit. Surprisingly, I am glad I did that; it was difficult in the beginning, but now I am liking it.

    Being gluten free has opened a wide selection of grains for me to experiment with new recipes. I knew about them but did not use them much. I started reading about these grains my grandmother raved about and learning about their nutritional values. Knowing all that has made it easy for me to try these grains in my recipes. I do have many gluten free recipes of bread like Dosa, Oat Dosa, Moong Dal Dosa, Besan Puda, but these were part of our regular diet anyway. When making them, I never considered that I was making these recipes because they were gluten free.

    One of the gluten-free grains I began using was millet. My last recipe for millet (bajri) soup was one of those recipes. My family enjoyed this soup and suggested millet soup can be a part of our winter menu.

    My next recipe that is coming up is Sorghum (jowar) Dosa. I have already tried this recipe a few times. It is quick, easy, and tasty. Sorghum Dosa is also a good alternative to regular dosa because this dosa batter does not need to be fermented. An added benefit is that Sorghum Dosa is also vegan and gluten free.

  • Happy Karva Chauth to all the lovely married folks!

    Happy Karva Chauth to all the lovely married folks!

    Karva Chauth is a traditional Hindu festival in some parts of India. Married women fast all day, wishing for their husband’s health and long life. In some cases, and for those who wish to make this holiday more modern, both husbands and wives may fast together. This is pretty new and I’ve seen this only occasionally! My elder daughter-in-law is very traditional and really enjoys this special festival. She takes pleasure in all the rituals associated with Karva Chauth. This year’s menu is simple but delicious. I plan on making Gatte ki sabji (which is a Rajasthani dish and my daughter-in-law’s favorite!), Aloo Methi, Puris, Rice, and of course Gulgula. It will be a satisfying meal for all of the fasting married women! 

  • Celebrating Navratri!

    Celebrating Navratri!

    Hello all! I hope everyone is doing well and getting used to our new normal.  I know this year our holiday celebrations don’t feel the same.  We are used to celebrating with large numbers of people and celebrating the festival season. I know it may not be ideal, but we can still make the most of the season by getting together in our backyards with small groups.  

    Some of our friends have planned to enjoy garba with three or four families.  That way they can still enjoy dressing up in nice clothes.  Of course, they plan on wearing masks and practicing social distancing. I don’t know about you, but I feel like masks have become a fashion statement and they are just a part of our daily life and just another accessory!

    I would love to hear about how you all are celebrating the holiday season.  Here are some of my suggestions for dishes to prepare for a Navratri feast:

    Makhana Matar Curry

    Sabudana (Tapioca) Bhel

    Paneer Malai Ladoo

    Nariyal Ka Ladoo

    Dal Puri

    Dal Puri

    Aloo Chaat


  • Story Behind Recipes

    Story Behind Recipes

    Manjula's Kitchen ebook

    Don’t you think it is true? Most of us have some story behind our favorite dishes. Most of the dishes I make have a story behind them. This may sound silly but this is the fact. My grand kids will vouch for me saying our dadima is full of stories.

    We all have some dishes we have enjoyed and admired. It makes a difference where and with who we dined. The presentation can inspire you, and that becomes the story behind that dish.

    I remember my first lentil dal I made: I used at least double the salt yet still my dad enjoyed it. I rolled my first roti into world map shape and my mom smiled and complimented it saying that was a piece of art. I gave the same compliment to my granddaughter when she rolled her first roti at five years old. She loved the idea of a world map. When my boys were young, I would make them puries; when they saw the puries being puffed, their eyes opened wide and they had so many questions. This happened every time they saw the puries, for I never came up with a good answer to satisfy their curiosity.

    Bengali Rasgullas are my favorite dessert. They are made with homemade paneer: round paneer balls soaked in sugar syrup. This is a delicacy from the state of Bengal. I will say one can never go wrong with this dish. When I was first learning to cook Rasgullas, they would turn out hard, not the right shape, or break in pieces. I learned quickly how to fix this, making them into different desserts in whichever way the imperfect Rasgullas would allow. My friends would ask me for the recipe. I tried explaining, but no one believed me. I decided to serve them differently and each time they were a hit amongst my friends.

    The bottom line is to enjoy your creation!

    I think I take every incident in my life as a story. Life is easier and more beautiful that way for me. It puts a smile on my face. Many of my viewers will ask how to make a certain dish restaurant style, but I like and enjoy simple home-made food. I don’t even try to make restaurant style, but it does not mean I don’t get inspired when I see some dish that is eye-catching; I will always see how I can make such a dish in homemade style. That’s how I came up with the recipe for Taco Samosa: I saw it made in the restaurant and then I put my own twist to it.

    A recent recipe I have cooked is Gulab Jamun Cake. My daughter-in-law wanted me to make it and asked me to add my own twist. I googled for the recipe; I was not happy with any of them, so I decided to create my own. After a few attempts to do so, I was very happy with the results.

    Sorry! I am the last person who can follow the recipes. It is strange then that I want you to follow mine. I enjoy it when I read the comments where you have made your own changes to the recipe. When we go out for dinner, visit friends and family, go to restaurants or I see some magazine that has a beautiful looking dish that catches my eye, I want and will try to make it.

    I think cooking is an art; instead of colors, you play with ingredients. Painters are inspired by something before they paint. I see cooking in the same way.

  • Vegetable Biryani (Instant Pot)

    Vegetable Biryani (Instant Pot)

    A bowl of Vegetable Biryani garnished with fresh mint leaves

    Vegetable Biryani (Instant Pot)

    This next recipe is due to many of you requesting I do a tasty and delicious recipe using the Instant Pot. I decided to try a recipe for "Vegetable Biryani". I have been a little hesitant to do recipes using the Instant Pot. Maybe it's because I have been cooking for so long and I'm set in my habits, or maybe it's my age! I will say I have loved using my Instant Pot more as a pressure cooker and love using it for that purpose! I make lentils and legumes using the Instant Pot and think it's great. Once I use the Instant Pot more and get used to the timings, I think it will allow me to give more precise times for my recipes.
    Vegetable Biryani is a complete, satisfying, one-dish meal. My mother would often say this dish is a fancy name for vegetable pulao. However, I think it is more than that. The secret behind this flavorful Vegetable Biryani is a spice mixture that creates the perfect balance of flavors. Basmati rice with a mix of fresh vegetables combined with this spice mixture turns into a dish of perfection! If you follow my steps, you'll see I try to make this recipe as simple as possible. Vegetable Biryani also makes a great lunch box meal. Make sure to check out the footnotes to see how you can make this dish vegan.
    Hope you enjoy!
    This recipe will serve 3
    5 from 3 votes
    Prep Time 10 minutes
    Cook Time 30 minutes
    Total Time 40 minutes
    Course Main Course
    Cuisine Indian
    Servings 3 people

    Ingredients
      

    • 1 cup long grain rice I preferred Basmati Rice
    • 3 Tbsp Milk
    • 1 pinch Saffron Kesar few strands
    • 2 Tbsp oil or ghee
    • ¼ cup cashews
    • 15 Raisins
    • 1 Tbsp ginger thinly sliced
    • 2 cup mixed vegetables cubed potatoes, carrots, bell pepper, green beans cut into 1-inch pieces, cauliflower florets
    • ¼ cup Plain Yogurt whisked
    • ¼ cup Mint leaves Pudhina finely chopped
    • 1 ¼ cup Water

    Spices

    • 3 whole Green Cardamom Elaichi
    • 6 Cloves Laung
    • 8 Black Peppercorns
    • 1 inch long cinnamon stick Dalchini
    • 2 Bay leaf Tej Patta
    • 1 tsp Cumin seeds Jeera
    • 1 tsp coriander powder
    • 1 tsp fennel seed powder
    • 1 tsp red chili powder adjust to taste
    • ¼ tsp Turmeric Haldi
    • 1 tsp Salt adjust to taste

    Instructions
     

    • In warm milk soak the saffron and keep aside.
    • Soak the rice for about 10 minutes, then drain the water and keep aside.
    • Use the instant pot on sauté mode add ghee after half a minute add cashews and raisins and sauté lightly roast them for about 1 minutes.
    • Add all the whole spices and sauté for 30 seconds, they will become aromatic.
    • Add all the dry spices, coriander powder, fennel seed powder, turmeric, red chili powder and salt stir for few seconds, add vegetables and yogurt mix it well, cleaning sides and making sure vegetable mix spread evenly in the pot.
    • Next spread the rice evenly over the veggies. Spread the mint leaves evenly over rice. Sprinkle saffron milk on top of the rice.
    • Add the water for cooking on top of the rice. Rice should be just immersed under water.
    • You are layering the ingredients do not stir in between the steps. Close the lid with vent in sealing position.
    • Change the instant pot setting to pressure cook mode. Secure the lid, close the pressure valve and cook for 9 minutes at high pressure.
    • After the instant pot beeps, on the instant pot panel you will notice keep warm mode. Cancel the keep warm mode and wait until it releases the pressure and open the pot, that will take about 12 minutes.
    • Open the pot and fluff the rice gently with a fork.

    Notes

    Serve hot with Plain yogurt, Spinach Raita, and my favorite is Salted Mint Lassi
    Making Vegan:
    This is a easy recipe to make vegan, soak saffron in water instead of milk and yogurt you can replace with vegan yogurt or tomato puree.
    Keyword Bhojan, Bondi Raita, cooking shows, Cooking Video, Delicacy, delicious, Desi Khana, Gluten Free, Gourmet food, Homemade, Instant Pot, Jain Cooking, Khana, Lunch Box, Mint Lassi, One Pot Meal, Onion Garlic Free Cooking, Recipe videos, Rice Dish, Sattvic Food, Swaminarayan
    Tried this recipe?Let us know how it was!
  • Bread Pudding with Chocolate Sauce

    Bread Pudding with Chocolate Sauce

    Chocolate Drizzled Dessert in a Glass Dish

    Bread Pudding (With Chocolate Sauce)

    It was my daughter-in-law's birthday this past weekend, and I wanted to do something nice for her. For me, the thing that gives me the most joy is making food for the people that I love, and so I decided that I would prepare something for her to drop off. Due to the quarantine, this was the best that I could do for her, so I wanted what I made to be special. I asked my husband if he had any suggestions, and he said that I should make a dessert that my daughter-in-law, son, and grandkids would all enjoy. After talking to him, I was on the search for a dessert recipe that would be easy to prepare and also not too sweet.
    This made me think of a bread pudding in a magazine that had caught my eyes just a little while ago. I had been wanting to experiment with bread pudding since then but had found nothing that I fell in love with. I decided to try again, but this time I randomly decided to use a French Baguette for the bread pudding. The texture was exactly the way I wanted it to be a little chewy in some areas while stilling melting in your mouth in other areas. After finalizing the recipe, I had my husband taste test it and he suggested that I should find a way to add chocolate as well because my grandkids love it. In order to incorporate chocolate in a way that wasn't overpowering, I decided to add a chocolate drizzle on top instead of adding it into the bread pudding. It was perfect! If desired, this dish could be given a Indian touch. For example, you can substitute the vanilla extract for cardamom powder and replace the chocolate drizzle with sliced almonds and pistachios. Give it a try!
    This recipe will serve 6
    No ratings yet
    Prep Time 15 minutes
    Cook Time 45 minutes
    Total Time 1 hour
    Course Dessert
    Cuisine Indian
    Servings 6 people

    Ingredients
      

    • 20 slices French bruschetta cut into about ¼ in thick
    • 3 cup whole milk
    • 6 Tbsp sugar
    • 2 Tbsp corn starch
    • 4 Tbsp butter at room temperature, use as needed
    • 2 tsp vanilla extract
    • tsp cinnamon powder dalchini powder

    For Chocolate Sauce (optional)

    • cup chocolate chips semi-sweet
    • cup heavy cream
    • 1 tsp vanilla extract

    Optional

    • 1 Tbsp crystal sugar for garnishing

    Instructions
     

    For chocolate sauce

    • Place chocolate in a bowl and add the vanilla essence. Heat the heavy cream do nit boil I did in microwave for 25 seconds. Pour the cream over chocolate and stir until chocolate completely dissolve and become glossy. As chocolate sauce cool it will become little thick. Set aside.

    Making Pudding

    • In a small bowl take 1/2 cup of milk and add corn starch mix it well to smooth paste and set aside.
    • In a saucepan, take remaining milk, and cook over medium high heat stirring occasionally after milk comes to boil let it boil for 10 more minutes. Lower the heat to medium and add sugar and corn starch mix making sure no lumps.
    • Let it boil for about 5 more minutes over low medium heat. Stir the mixture continually making sure mixture is smooth and no lumps. Mixture will become thick consistency of batter. Add vanilla and cinnamon powder mix it well.
    • Preheat oven to 350 degrees F.
    • I am using 5×7 Pyrex pan to make Bread Pudding. Grease the pan.
    • Butter the bread slices lightly. Arrange the bread slanted and butter the edges. Pour the milk mixture and pour over bread slices evenly.
    • Bake in a preheated oven at 350 degrees F for about 20 to 25 minutes, till the pudding is bubbling and the top get browned.
    • Take it out from oven. For best taste Bread Pudding should be served warm. Before serving drizzle the chocolate Sauce over and sprinkle the sugar.

    Notes

    • Chocolate sauce and sugar is optional, but for me it adds to the flavor and make more enjoyable.
    • If you are not fond of chocolate, you can garnish with sliced almonds and pistachios.
    • This is an easy recipe to make my family loved it. Give it a try.
    Also try Pineapple Sandesh, No Bake Cheesecake, Potato Soup, Quinoa salad
    Keyword Apple Bread Rolls, Baked Dessert, Chocolate Sauce, Delicacy, delicious, Easy Recipe, Eggless, Fusion, Homemade, Jain Food, Kid Friendly, No Bake Cheesecake, Party Food, Pineapple Sandesh, Sweet, Tea Time, Vegetarian
    Tried this recipe?Let us know how it was!
  • Healthy and Delicious Food for your Kids

    Many of my viewers have requested food ideas and suggestions for their children.  I will share with you what I did with my two sons and now my grandchildren. When my kids were babies, the most common solid food was in jars sold at the grocery store.  Being a vegetarian and wanting to raise my family similarly, I wanted to select the ingredients and then prepare it in a way that made sense to me.   When traveling, I sometimes did use jarred baby food for convenience.  I had no one to really guide me as my mother was in India and there was no Internet back then! Also, phone calls were very expensive at that time.

    Lentils

    Preparing lentils was something I did almost daily for my husband and myself.  Once I had children, I also boiled large pieces of vegetables such as zucchini, carrots, beans, different squashes and potatoes with lentils. When the vegetables were tender, I would take them out from the lentil-dal and mash them with a blender, adding a spoonful of lentils.  I mixed fruits with small amounts of yogurt or milk and blended them as well.  Some fruits are soft and easy to blend such as bananas.  Some, such as apples, need to be cooked to soften them.

    Steamed Vegetables

    When my sons started teething, I steamed vegetables in larger pieces which they could hold onto after a little cooling.  This accomplished several things, they were entertained and enjoyed feeding themselves and the foods provided teething comfort.  As they grew older, I started adding just a bit of traditional Indian spices so they could get used to our customary spices.  I mashed Roti (Indian flat bread) and rice with lentils and vegetable from Indian dishes. I would also give them different cereals of their choice. Slowly, I introduced the same foods my husband and I were eating but with less spices.  As always, children will have their favorites.

    Sandwiches

    Once they began school, I made a variety of sandwiches for them.  Peanut butter & jelly was a favorite.  I also made cream cheese or cheese sandwiches with a bit of mango pickle or sautéed vegetables.  Of course, raw vegetables and fruit could also be added to their lunches. They also enjoyed taking slices of pizza and different pastas.  Now my grandkids don’t mind and enjoy taking rice with dal (lentils) and wraps with sautéed vegetable.  Every child is different so remember to prepare what works for your child’s tastes.  Make sure to try different dishes and start introducing meals you make for yourself.

    Also, check out my lunch box suggestions on my website!

  • Sattu Paratha, Bihari Recipe, Spicy Paratha

    Sattu Paratha, Bihari Recipe, Spicy Paratha

    Close-up view of Sattu Paratha served with a bowl of yogurt garnished with green chilies.

    Sattu Paratha

    Sattu Paratha, Sattu Ka Paratha is made with spicy sattu filling, sattu is roasted chana flour. This is a popular paratha in state of Bihar. Sattu Paratha is a great breakfast treat and a good lunch box option.
    5 from 1 vote
    Prep Time 15 minutes
    Cook Time 15 minutes
    Course Breakfast, Main Course
    Cuisine Indian
    Servings 3 people

    Ingredients
      

    For Dough

    • 1 cup whole wheat flour roti ka atta
    • 1 tbsp oil
    • ½ tsp salt
    • cup water to make dough use as needed

    Filling

    • 1 ½ cup sattu, dailya, roasted chana flour
    • 2 tbsp oil
    • 1 ¼ tsp salt
    • ½ tsp cumin seeds jeera
    • 1/8 tsp asafetida hing
    • 1/8 tsp nigella seeds kalonji
    • ½ tsp mango powder amchoor
    • ¼ tsp red chili powder
    • 1 tbsp green chili finely chopped
    • cup water to make crumbly dough use as needed

    Also Need

    • 2 tbsp whole wheat flour to roll the paratha
    • 2 tbsp oil to cook the paratha

    Instructions
     

    Making Dough

    • Mix flour, salt, and oil add water as needed to make a soft dough. Knead dough for about two minutes on a lightly greased surface to make the dough soft, smooth and pliable. Cover the dough and let the dough rest for at least ten minutes.

    Filling

    • Mix all the filling ingredients together, sattu, salt, asafetida, cumin seeds, kalonji, mango powder and green chili, well. Add water as needed to bind all the ingredients together. Use just enough water, it should hold everything together.

    Making Paratha

    • Divide the dough and filling into six equal parts and form into balls. Filling balls will be little bigger than dough.
    • Roll dough into a 3” circle. Place a filling in the center. Pull the edges of the dough to wrap it around the sattu filling. Repeat to make all six balls. Let the filled balls settle three to four minutes.
    • Meanwhile heat a heavy skillet on medium high heat until moderately hot. To test, sprinkle water on the skillet. If the water sizzles right away, the skillet is ready.
    • Press the filled ball lightly on dry whole wheat flour from both sides. Using a rolling pin, roll the balls lightly to make six-inch circles, keeping the sealed side up. If the dough sticks to the rolling pin or rolling surface, lightly dust the parathas with dry flour.
    • Place the paratha on the skillet. When the paratha starts to change color and begins to puff up, flip it over. You will notice some golden-brown spots.
    • After a few seconds, drizzle one teaspoon of oil over the paratha. Flip the paratha again and lightly press the puffed areas with a spatula.
    • Flip again and press with a spatula making sure the paratha is golden-brown from both sides. Repeat for the remaining parathas. Paratha are best served hot and crispy.

    Notes

    Parathas can be kept at room temperature for up to two days wrapped in aluminum foil or in a covered container.  For later use, parathas can be refrigerated three to four days or frozen for up to a month. Re-heat using a skillet or oven.
    Serving Suggestions Parathas can be served with Plain Yogurt, Mango pickle, or with Aloo Tamatar ki Sabji , (Potatoes with spicy tomato gravy) a classic combination.
    What is Sattu
    The difference between  besan and sattu because they both look about the same. The difference being that whereas besan is the flour of raw gram, and sattu is the flour of the roasted gram. Roasting the besan it is not same as the flour of roasted chana. Sattu is also high in protein.
    Tried this recipe?Let us know how it was!

    Sattu Paratha: A Nutritious and Flavorful Stuffed Flatbread

    Sattu Paratha is a traditional Indian flatbread stuffed with a filling made from sattu, which is roasted gram flour. This nutritious and flavorful dish is popular in the states of Bihar, Jharkhand, and Uttar Pradesh, where it is enjoyed as a wholesome breakfast, lunch, or dinner option. 

    Sattu, the main ingredient in Sattu Paratha, is known for its high protein and fiber content, making it a healthy and satisfying choice.

    Benefits of Sattu Paratha:

    • High in Protein: Sattu, the roasted gram flour filling used in Sattu Paratha, is rich in protein, making it an excellent source of plant-based protein for vegetarians and vegans. Protein is essential for muscle repair and growth, as well as for supporting overall bodily functions.
    • Rich in Fibre: Sattu is also high in dietary fiber, which aids in digestion, promotes satiety, and helps regulate blood sugar levels. Fiber-rich foods like Sattu Paratha can help prevent constipation, reduce the risk of chronic diseases, and support weight management.
    • Vitamins and Minerals: Sattu contains essential vitamins and minerals such as iron, calcium, magnesium, and B vitamins, which are important for maintaining overall health and well-being. 

    Variations of Sattu Paratha:

    • Spicy Sattu Paratha: Add chopped green chilies, ginger, and spices such as cumin powder, coriander powder, and garam masala to the Sattu filling to create a spicy version of Sattu Paratha. Spicy Sattu Paratha is flavorful and aromatic, with a kick of heat that’s perfect for spice lovers.
    • Vegetable Sattu Paratha: Mix grated vegetables such as tomatoes, carrots, and spinach into the Sattu filling to create a nutritious and colorful Vegetable Sattu Paratha. The addition of vegetables adds texture, flavor, and extra nutrients to the paratha, making it a wholesome meal option.
    • Paneer Sattu Paratha: Combine crumbled paneer (Indian cottage cheese) with Sattu to create a rich and creamy Paneer Sattu Paratha. Paneer adds a soft and creamy texture to the filling, while Sattu provides protein and fiber, making it a filling and satisfying option for vegetarians.
    • Sweet Sattu Paratha: For a sweet twist on Sattu Paratha, mix Sattu with jaggery (unrefined cane sugar), chopped nuts, and spices such as cardamom and nutmeg to create a sweet filling. Sweet Sattu Paratha is a delicious dessert or snack option that’s sure to satisfy your sweet tooth.

    Tips for Making Perfect Sattu Paratha:

    • Use Fresh Sattu: Use freshly roasted and ground Sattu for the best flavor and texture in Sattu Paratha. You can either roast the gram flour at home or purchase ready-made Sattu from the store. Fresh Sattu has a nutty aroma and a rich flavor that enhances the taste of the paratha.
    • Roll the Parathas Thin: Roll out the dough for Sattu Paratha into thin discs to ensure even cooking and a flaky texture. Use a rolling pin and a dusting of flour to roll the dough evenly without sticking. Aim for a thickness similar to that of a tortilla or chapati.
    • Cook on Medium Heat: Cook the Sattu Parathas on a hot griddle or tawa over medium heat to ensure they cook through evenly without burning. Brush the parathas with ghee or oil on both sides while cooking to enhance the flavor and achieve a golden-brown color.

    FAQs about Sattu Paratha:

    • Can I make Sattu Paratha gluten-free?

    • Yes, you can make gluten-free Sattu Paratha by using gluten-free flours such as chickpea flour (besan) or sorghum flour (jowar) for the dough. Ensure that the Sattu filling and any additional ingredients are also gluten-free.
    • Is Sattu Paratha suitable for weight loss?

    • Yes, Sattu Paratha can be a suitable option for weight loss when included as part of a balanced diet. Sattu is low in calories and high in protein and fiber, which can help keep you feeling full and satisfied for longer, reducing the likelihood of overeating.
    • Can I freeze Sattu Paratha dough?

    • Yes, you can freeze Sattu Paratha dough for future use. Divide the dough into portions, wrap them tightly in plastic wrap or aluminum foil, and store them in an airtight container or freezer bag. Thaw the dough in the refrigerator overnight before rolling and cooking.
    • What can I serve with Sattu Paratha?

    • Sattu Paratha pairs well with a variety of accompaniments such as yogurt, pickle, chutney, or raita (yogurt dip). You can also serve Sattu Paratha with dal (lentil curry), vegetable curry, or salad for a complete and satisfying meal.

    In conclusion, Sattu Paratha is a nutritious and flavorful Indian flatbread that’s perfect for any meal of the day. Whether enjoyed for breakfast, lunch, or dinner, Sattu Paratha offers a delicious combination of protein, fibre, and essential nutrients that’s sure to keep you feeling satisfied and energized. With its versatile filling options, simple preparation, and wholesome ingredients, Sattu Paratha is a must-try dish for anyone looking to explore the diverse flavors of Indian cuisine.

  • Dahi Puri Chaat (Street Food)

    Dahi Puri Chaat (Street Food)

    A plate of Dahi Puri Chaat, topped with yogurt, tamarind chutney, sev, and finely chopped green chilies.

    Dahi Puri, Chaat, Street Food

    Dahi Puri is a very commonly found Indian street food! I have been wanting to do this recipe for my channel for quite some time, but I wanted to put my own twist on it. After experimenting with different fillings, I was finally able to come up with a combination that my family approved of – ahealthy and delicious salad style filling.
    5 from 2 votes
    Prep Time 15 minutes
    Cook Time 15 minutes
    Course Appetizer, Snack
    Cuisine Indian
    Servings 4 people

    Ingredients
      

    • 16 crispy puffed puries golgpa available in India grocery store

    Filling

    • ½ cup yellow moong dal
    • ½ cup potatoes boiled peeled and cut into small pieces
    • ½ cup tomatoes chopped in small pieces
    • ½ cup cucumber chopped in small pieces
    • 1 tbsp green chili finely chopped
    • 1 tsp ginger finely chopped
    • ½ tsp salt
    • ½ tsp roasted cumin seed powder
    • 1 tsp lemon juice

    For Garnishing

    • 1 cup yogurt whipped
    • ¼ cup tamarind chutney find the recipe on web site
    • 1 tbsp soy sauce
    • ¼ cup boondi
    • 1 tbsp green chili finely chopped
    • ¼ tsp red chili powder

    Instructions
     

    • Spread the puries on microwave safe plate and microwave
      for about 20 seconds, this will make the puries crispier and give the
      freshness. Set aside.
    • Wash moong dal changing water 3-4 times and boil it in
      2 cups of water over low medium heat until dal is very soft and tender but not
      mushy.
    • After dal is at room temperature mix all the filling ingredients together, dal, potatoes, tomatoes, cucumber, green chili, ginger, salt, cumin powder, lemon juice

    Assemble Dahi Puri

    • Whip the yogurt and add the water as needed to make it consistency of thick batter.
    • Mix tamarind sauce and soy sauce together.
    • First make a hole with you thumb center of the golgapa, fill with 1 tablespoon of filling. drizzle with yogurt tamarind chutney, few pieces of green chili, and few boondi, red chili powder and drizzle some more tamarind chutney.

    Notes

    Assemble Dahi Puries just before serving. You can have every thing ready day before.
    Filling also can be served as salad.
    Dahi Puri with salad like filling is very light and refreshing. 
    I have done the recipe for Tamarind Chutney Before. you will also like to see some other easy chaat recipes, like Bread Dahi Vada, Aloo Chana Chaat, Sabudana Bhel.  
    Keyword Appetizer, Party Food, Street Food, Tea Time Snack
    Tried this recipe?Let us know how it was!

    Introduction to Dahi Puri Chaat

    Dahi puri chaat is a beloved Indian street food that tantalizes taste buds with its burst of flavors and textures. Dahi puri chaat combines crispy puris (hollow fried bread), tangy yogurt, spicy chutneys, and various toppings to create a harmonious symphony of sweet, sour, and savory flavors. Dahi Puri Chaat, a delightful combination of crispy puris filled with tangy yogurt, savory chutneys, and fresh toppings, embodies the essence of appetizers, chaat, quick & easy snacks, street food recipes, and summer delights.

    This delightful snack is perfect for any occasion, whether it’s a casual evening at home or a festive gathering with friends and family. In this article, we will explore the recipe for dahi puri chaat, offering step-by-step guidance on how to recreate this iconic dish in your own kitchen.

    Step 1: Prepare the Ingredients

    Before diving into the preparation process, it’s essential to gather all the necessary ingredients. The key components include puris (hollow fried bread), yogurt, tamarind chutney, green chutney, boiled potatoes, sprouted mung beans, and sev (crunchy chickpea flour noodles). You can easily find these ingredients at your local Indian grocery store or prepare them at home using basic pantry staples. For those who prefer a spicy kick, finely chopped green chilies can be added to the mix. Once you have all the ingredients assembled, you’re ready to embark on your dahi puri chaat recipe journey.

    Step 2: Prepare the Yogurt Mixture

    The recipe for dahi puri chaat hinges on the creamy and tangy yogurt mixture that serves as the base for this delectable snack. To prepare the yogurt mixture, whisk together fresh yogurt, sugar, and a pinch of salt until smooth and creamy. Adjust the sweetness and tanginess according to your preference by adding more sugar or lemon juice as needed. The yogurt mixture should have a velvety texture that coats the back of a spoon. Once prepared, set aside the yogurt mixture while you assemble the remaining components of the chaat.

    Step 3: Assemble the Dahi Puri Chaat

    Now comes the fun part – assembling the dahi puri chaat! Start by gently tapping a hole in the center of each puri to create a cavity for the fillings. Place a spoonful of boiled potatoes and sprouted mung beans inside each puri, followed by a generous dollop of the prepared yogurt mixture. Drizzle tamarind chutney and green chutney over the yogurt, ensuring a balanced distribution of sweet and spicy flavors. Top off the chaat with a generous sprinkle of sev and finely chopped cilantro for added crunch and freshness. Repeat this process for each puri until all are assembled and ready to be devoured.

    Step 4: Serve and Enjoy

    Once assembled, dahi puri chaat should be served immediately to preserve its crispiness and freshness. Arrange the chaat on a serving platter and garnish with additional sev and cilantro for visual appeal. Encourage your guests to dig in and savor the explosion of flavors with each bite. Whether enjoyed as a standalone snack or as part of a larger meal, dahi puri chaat is sure to be a crowd-pleaser that leaves everyone craving for more.

    Tips for Perfect Dahi Puri Chaat

    • To enhance the flavor profile of the dahi puri chaat recipe, consider adding finely tomatoes, and grated carrots as additional toppings.
    • For a healthier twist, opt for baked puris instead of fried ones. You can find baked puris at specialty grocery stores or make them at home using whole wheat flour.
    • Experiment with different chutney variations to customize the flavor profile of the chaat. Mango chutney, mint chutney are excellent options to explore.
    • For a refreshing twist, add a handful of pomegranate arils to the chaat for bursts of juicy sweetness.
    • If you’re short on time, you can prepare the components of the chaat in advance and assemble them just before serving to ensure maximum freshness and crunchiness.

    Variations of Dahi Puri Chaat

    • Ragda Puri Chaat: Replace the boiled potatoes and sprouted mung beans with ragda (spiced yellow peas) for a heartier version of dahi puri chaat.
    • Bhel Puri Chaat: Substitute puris with crispy puffed rice (bhel) and toss them with chopped vegetables, chutneys, and spices for a crunchy and flavorful snack.
    • Papdi Chaat: Swap puris with bite-sized pieces of papdi (crispy fried dough) and layer them with yogurt, chutneys, and toppings for a delicious twist on the classic chaat.

    Benefits of Dahi Puri Chaat

    • Rich in Flavor: Dahi puri chaat is bursting with a myriad of flavors, ranging from tangy and spicy to sweet and savory, making it a delight for the taste buds.
    • Nutrient-Rich: This iconic street food is packed with essential nutrients from various ingredients such as yogurt, sprouted mung beans, and vegetables, offering a wholesome snacking option.
    • Easy to Customize: With endless possibilities for customization, dahi puri chaat can be tailored to suit individual preferences and dietary restrictions, making it suitable for all palates.

    FAQs (Frequently Asked Questions)

    Can I make dahi puri chaat in advance?

    • While it’s best to assemble dahi puri chaat just before serving to maintain its crispiness, you can prepare the individual components such as yogurt mixture, chutneys, and toppings in advance and store them separately in the refrigerator.

    Can I use store-bought puris for this recipe?

    • Yes, you can use store-bought puris for convenience. However, if you prefer homemade puris, you can find recipes online or explore Manjula’s Kitchen for a step-by-step guide.

    How long does dahi puri chaat stay fresh?

    • Dahi puri chaat is best enjoyed immediately after assembly to prevent the puris from becoming soggy. If you have leftovers, store them in an airtight container in the refrigerator and consume them within a day for the best taste and texture.

    Can I make this recipe vegan-friendly?

    • Yes, you can make dahi puri chaat vegan-friendly by using dairy-free yogurt and omitting any dairy-based toppings such as sev. You can also explore Manjula’s Kitchen for vegan alternatives and recipes.

    By following this comprehensive guide, you can master the art of making dahi puri chaat at home and impress your friends and family with this flavorful and indulgent street food favorite. Don’t forget to explore more tantalizing recipes on Manjula’s Kitchen, ranging from appetizers and beverages to desserts, to elevate your culinary repertoire and embark on a gastronomic adventure.

    Explore more appetizer recipes on Manjula’s Kitchen: Vegetable Samosas, Paneer Tikka, Crispy Spinach Pakoras, Mango Lassi, Masala Chai, Gulab Jamun, Kheer (Rice Pudding)

  • Lauki Vadi Ki Sabji

    A bowl of Lauki Vadi Ki Sabji, a traditional Indian dish made with bottle gourd and spiced gram flour dumplings, garnished with fresh cilantro.

    Lauki Vadi Ki Sabji

    Laucki is also known as Bottle gourd. This is a healthy and wholesome lentil and vegetable main dish. I like making Lauki as it is mild in taste and easy to digest. I usually will serve this with plain rice or rotis.
    5 from 3 votes
    Prep Time 10 minutes
    Cook Time 10 minutes
    Course Main Course
    Cuisine Indian
    Servings 4 people

    Equipment

    Instant Pot

    Ingredients
      

    • 4 cup laucki

      bottle gourd, peeled and cut into byte size cubes

    • 1/3 cup

      moong dal vadi

      broken into small pieces

    • 3/4 cup tomato puree
    • 1 tsp ginger paste
    • 2 tbsp oil
    • 1 tsp cumin seeds jeera
    • 1/8 tsp asafetida hing
    • 1 tbsp coriander powder dhania
    • 1/4 tsp turmeric haldi
    • 1/2 tsp red chili powder
    • 1 tsp salt
    • 1/4 tsp garam masala
    • 1/2 cup water

    Instructions
     

    • I am using instant pot; I am using the instant pot instead of pressure-cooker. Not
      for saving time but ease of use.
    • Heat one tablespoon of oil in instant pot on sautéed mode. Oil should be moderately hot, add moong dal vadi stir-fry till they are light golden brown this should take about 1minute. take out the vadies from instant pot.
    • Add remaining 1 tablespoon of oil, in instant pot keeping on sautéed mode oil should be moderately hot and add cumin seeds. When seeds start to crack, add the asafetida, stir and add tomato puree, ginger, coriander powder, turmeric, salt and chili powder and cook stirring occasional till spice mix start leaving the oil.
    • Add bottle gourd, vadies and 1/2 cup of water. Change the setting to pressure cook on high mode. Set the time for 6 minutes. (At this time instant pot is working just like pressure cooker, it will take same time building the pressure and after cooking releasing the pressure as pressure cooker, advantage is you can take care other work you have to do or even if you have to go out.)
    • Open the instant pot when you are ready. After you open the instant pot adjust the water if you need more, add garam masala.

    Video

    Notes

    I like to serve this with roti or rice. This makes a very satisfying meal.
    Enjoy! Thank you
    Tried this recipe?Let us know how it was!

    Lauki Vadi Ki Sabji: A Flavorful Indian Delight

    Lauki Vadi Ki Sabji is a traditional Indian dish made primarily with bottle gourd (Lauki), lentil nuggets (Vadi), and a variety of spices cooked in a curry or gravy. It is a popular dish among individuals following a vegan, gluten-free, and low-fat diet, making it suitable for those with dietary restrictions such as diabetes.

    The dish typically involves cooking lentil nuggets with bottle gourd and various vegetables in a flavorful curry or gravy made with spices such as cumin, coriander, turmeric, and ginger. It can be easily prepared in an Instant Pot for a quicker cooking process while retaining its nutritional value and flavors.

    Lauki Vadi Ki Sabji provides a wholesome meal option packed with protein from lentils, fibre from vegetables, and essential nutrients, making it a nutritious and satisfying choice for individuals seeking a balanced diet.

    Lauki Vadi Ki Sabji is a traditional Indian dish made with bottle gourd (lauki) and sun-dried lentil dumplings (vadi). This Lauki Vadi Ki Sabji recipe combines the subtle flavors of lauki with the richness of vadi to create a hearty and nutritious dish that’s bursting with flavor. With its simple yet satisfying taste, Lauki Vadi Ki Sabji is a popular choice for everyday meals in Indian households. 

    Step 1: Preparing the Vadi

    To begin, soak the sun-dried lentil dumplings (vadi) in water for about 15-20 minutes until they become soft and pliable. Once softened, squeeze out any excess water from the vadi and set them aside. This step helps ensure that the vadi cook evenly and absorb the flavors of the dish.

    Step 2: Preparing the Lauki

    Peel the bottle gourd (lauki) and cut it into small cubes or slices, depending on your preference. Lauki tends to cook quickly, so it’s essential to cut it into uniform pieces to ensure even cooking. Rinse the chopped lauki under cold water to remove any dirt or impurities before using it in the recipe.

    Step 3: Tempering and Cooking

    In a pan, heat oil or ghee over medium heat and add cumin seeds, mustard seeds, and asafoetida (hing) to the hot oil. Allow the seeds to crackle and release their aroma before adding finely chopped green chilies adding minced ginger for added flavor.

    Step 4: Adding Spices and Lauki

    Once the spices such as turmeric powder, coriander powder, red chili powder, and garam masala to the pan, stirring well to coat with the aromatic spices. Add the chopped lauki to the pan, stirring to combine with the spices. Cover the pan and let the lauki cook until it becomes tender but still retains its shape.

    Step 5: Incorporating the Vadi

    Once the lauki is cooked, add the soaked and squeezed vadi to the pan, gently mixing them with the cooked lauki and spices. Allow the vadi to simmer in the gravy for a few minutes, allowing them to absorb the flavors of the dish. Adjust the consistency of the gravy by adding water as needed to achieve the desired thickness.

    Step 6: Garnishing and Serving

    Before serving, garnish the Lauki Vadi Ki Sabji with freshly chopped cilantro leaves for a burst of freshness and color. Serve the sabji hot with steamed rice or roti for a wholesome and satisfying meal that’s sure to please your taste buds.

    Tips for Perfect Lauki Vadi Ki Sabji

    • Soaking Vadi: Ensure to soak the vadi in water until they become soft and pliable before adding them to the sabji. This step helps prevent the vadi from being too hard or chewy after cooking.
    • Cutting Lauki: Cut the bottle gourd into uniform pieces to ensure even cooking. Avoid overcooking the lauki as it can become mushy and lose its texture.
    • Adjusting Spice Level: Customize the spice level of the sabji according to your taste preferences by adjusting the amount of red chili powder and green chilies used in the recipe.

    Variations of Lauki Vadi Ki Sabji

    • Adding Tomatoes: Enhance the flavor of the sabji by adding chopped tomatoes along with the Tomatoes add a tangy twist to the dish and complement the earthy flavors of the lauki and vadi.
    • Coconut Gravy: For a richer and creamier gravy, add coconut milk or grated coconut to the sabji. Coconut adds a hint of sweetness and depth to the dish, making it more indulgent.

    Benefits of Lauki Vadi Ki Sabji

    • Nutrient-Rich: Lauki is low in calories and rich in essential nutrients such as vitamins, minerals, and dietary fiber, making it a healthy addition to your diet.
    • Protein-Packed: Vadi provides a good source of plant-based protein, essential for muscle repair and growth, making Lauki Vadi Ki Sabji a nutritious meal option for vegetarians.
    • Digestive Aid: Lauki is known for its digestive properties and is often included in Indian cuisine to aid in digestion and promote gut health.

    Frequently Asked Questions (FAQs)

    Can I use store-bought vadi for this recipe?

    • Yes, you can use store-bought sun-dried lentil dumplings (vadi) for convenience. However, homemade vadi may have a fresher flavor and texture.

    Can I make Lauki Vadi Ki Sabji ahead of time?

    • Yes, you can prepare the sabji in advance and store it in the refrigerator for up to 2-3 days. Reheat it gently before serving.

    Is Lauki Vadi Ki Sabji vegan-friendly?

    • Yes, Lauki Vadi Ki Sabji can be made vegan by using oil instead of ghee for tempering and omitting any dairy-based garnishes.

    Explore more delightful Indian recipes on Manjula’s Kitchen, such as Aloo Baingan for another culinary adventure.

  • Gur Para (Punjabi Sweet Snack)

    Gur Para (Punjabi Sweet Snack)

    A plate of crispy Gur Para, a traditional Indian sweet snack made with jaggery and flour.

    Gur Para, Punjabi Sweet Snack

    Gur Para is a traditional Punjabi treat. This is made in preparation for festivals such as Holi, Makarshakrantri, and Diwali. Gur Para makes for a great homemade gift because of its long shelf life. It can be stored for up to 2 months in an airtight container. This is a super simple recipe that only requires a few ingredients.  
    5 from 1 vote
    Prep Time 10 minutes
    Cook Time 30 minutes
    Total Time 40 minutes
    Course Snack
    Cuisine Indian
    Servings 6 people

    Ingredients


    For Dough

    • 1 cup all-purpose flour plain flour, maida
    • 2 Tbsp sooji fine samolina
    • 2 Tbsp oil
    • 1/3 cup water, use as needed

    For Syrup

    • 3/4 cup gur jaggery
    • 1 tsp oil
    • 1/4 cup water

    Instructions
     

    Making Para

    • Mix flour, sooji, and oil, and mix it well to get consistency of breadcrumb. Add water as needed to make firm but smooth dough. Cover with damp cloth and set aside at least for ten minutes.
    • Knead the dough for another minute and divide in two equal parts.
    • Take each part of the dough and make a flat ball shape. Roll them into 8-inch circles and thickness of salted crackers.
    • Cut each of the rolled dough into about half inch wide and 2 inch long pieces. Note: you can cut them in your desire shape.
    • Heat the oil in a frying pan on medium heat. The frying pan should have about 1 inch of oil. To check if the oil is ready, put little piece of dough in the oil. The dough should make the oil sizzle and come up slowly.
    • Fry the paras until both sides are light golden-brown. Let them cool off to room temperature before coating them.

    Making Sugar Syrup

    • Put the water and gur in a frying-pan and bring to a boil on medium heat. Keep stirring till gur is dissolve, syrup should be about 1 thread, to check the right consistency of syrup drop the syrup in cold water and you should be able to roll into ball. Close the heat.
    • Put all the paras to the syrup and mix it well, making sure all the paras are coated with syrup. Keep stirring every few minutes and keep separating them. After they are just warm, take them out on a greased plate, making sure that paras are not clumped together.
    • Allow them to cool. Gur paras can be stored for several weeks in airtight container.

    Notes

    Notes: If Syrup consistency is not right paras will be sticky, if paras are little sticky let them dry for longer.
    You will also like to see these recipes they are good for gifting and easy to make Moong dal Ladoo, Apple Coconut Burfi, Besan Save
    Tried this recipe?Let us know how it was!

  • Roasted Caramelized Makhana

    Roasted Caramelized Makhana

    Roasted Caramelized Makhana

    Roasted Caramelize Makhana Snack

    Caramelized Makhana is the perfect snack for all ages, especially kids. My grandchildren absolutely love this recipe and my youngest even calls it kettle corn. This is not just quick and easy to make, but it is a healthy snack because it is high in protein and has many nutritional values. This recipe is the perfect tea time munchie and will be a hit with everyone who enjoys a sweet and crunchy snack.
    No ratings yet
    Prep Time 5 minutes
    Cook Time 15 minutes
    Total Time 20 minutes
    Course Appetizer
    Cuisine Indian
    Servings 4 people

    Ingredients


    • 4 cup makhana fox nuts, lotus seeds
    • 3 Tbsp oil
    • 1 tsp salt
    • 6 Tbsp sugar
    • 2 Tbsp almonds sliced

    Instructions
     

    • Use a larger frying pan then you think you need, because it makes it easy to roast otherwise when you are roasting makhana will be dropping all over. Use heavy frying pan.
    • In a frying pan take the makhana and drizzle with the oil, (save 2 teaspoons of oil and set this oil aside we will use later) and sprinkle the salt. Using your fingers mix it well until makhanas are coated well with oil and salt.
    • Open the heat to medium low keep stirring till they are very light gold this should take about 6-8 minutes, try one makhana to make sure they are crispy. As they cool of, they will become crunchier.
    • Remove them from frying pan, you will notice most of the salt will remain in the frying pan, wipe the frying pan, we will use it again.
    • Use the same pan, heat over low medium heat. Put the oil we have saved in the frying pan, and sprinkle all the sugar, wait till you see sugar has start melting, now stir the sugar and keep stirring till the sugar has melted turn off the heat quick otherwise sugar will burn.
    • Add almonds and roasted makhana, keep stirring till all the makhanas are coated with caramelize sugar and almonds. Spread it over non-stick surface and with spatula keep separating or separate with your fingers. Carnalized Makhanas are ready.

    Notes

    Notes: keep them air tight container they will stay good for month or more.
    I make them for holiday season, because they also make good homemade gift.
    Keyword High In Protien, Kid Friendly, Kurmura Makhana
    Tried this recipe?Let us know how it was!

    Roasted Caramelized Makhana Recipe

    Roasted Caramelized Makhana is a delectable snack perfect for winter recipes and festive occasions like Krishna Janmashtami and Navaratri, offering a gluten-free, high-protein option that satisfies both vegan and non-vegan appetizers cravings. Roasted Caramelized Makhana is a delightful treat that combines the earthy crunch of makhana (fox nuts) with the sweet allure of caramel. This Caramel Makhana Recipe transforms simple ingredients into a gourmet snack that’s perfect for any occasion.

    Step 1: Preparing the Makhana

    To begin this Caramel Roasted Makhana Recipe, start by heating a pan over medium heat. Add a tablespoon of ghee, allowing it to melt and warm up. Then, add the makhana to the pan, ensuring they are in a single layer. Roast them gently, stirring occasionally to ensure even cooking. This step helps to enhance the nutty flavor of the makhana and prepare them for the caramel coating.

    Step 2: Making the Caramel

    Now, let’s move on to the star of this Caramel Roasted Makhana Recipe: the caramel. In a separate pan, melt butter over low heat. Once the butter has melted, add in sugar and stir continuously until the sugar dissolves completely. Keep a close eye on the mixture to prevent it from burning. As the sugar melts, it will gradually turn into a golden brown caramel, infusing the butter with its rich flavor.

    Step 3: Coating the Makhana

    Once the caramel reaches a beautiful golden hue, carefully pour it over the roasted makhana. Use a spatula to gently toss the makhana, ensuring that each piece is coated evenly with the caramel. Work quickly but cautiously, as the caramel will begin to harden upon contact with the makhana.

    Step 4: Allowing to Cool

    After coating the makhana with caramel, spread them out on a parchment-lined baking sheet to cool. Allow them to sit undisturbed for at least 10-15 minutes, giving the caramel ample time to set. Once cooled, the makhana will form a delectable caramelized crust, adding an irresistible sweetness to every bite.

    Step 5: Serving and Enjoying 

    Your Caramel Roasted Makhana is now ready to be enjoyed! Serve them as a standalone snack or incorporate them into your favorite dishes for a touch of sweetness and crunch. These caramelized makhana make for a perfect accompaniment to tea or coffee, or simply enjoy them as a guilt-free indulgence anytime you crave a delicious treat.

    Tips for Perfect Caramelized Makhana:

    • Ensure that the makhana are roasted until they are crisp but not browned before adding the caramel. This helps to prevent them from becoming too crunchy or overcooked.
    • Work quickly when coating the makhana with caramel, as it can harden rapidly upon contact with the cooler makhana. Use a spatula to toss them gently and evenly coat each piece.
    • Allow the caramelized makhana to cool completely before serving to ensure that the caramel has fully set and formed a crunchy crust.

    Variations of Caramel Makhana:

    • For a savory twist, you can add a pinch of salt or your favorite spices to the caramel mixture before coating the makhana. This adds depth of flavor and balances out the sweetness of the caramel.
    • Experiment with different coatings such as melted chocolate or flavored syrups for a unique twist on this classic recipe. Drizzle the melted chocolate over the cooled makhana and allow it to set before serving.

    Benefits of Caramel Makhana:

    Makhana, or fox nuts, are not only delicious but also offer a range of health benefits. They are low in calories and fat, making them an ideal snack for those looking to maintain a healthy diet. Makhana are also rich in protein, fiber, and antioxidants, which can help support overall health and well-being. Additionally, they are gluten-free and hypoallergenic, making them suitable for individuals with dietary restrictions or food sensitivities.

    FAQs:

    Q: Can I store caramelized makhana for later use?

    A: Yes, you can store caramelized makhana in an airtight container at room temperature for up to a week. Just make sure they are completely cooled and the caramel has set before storing them.

    Q: Can I use other nuts instead of makhana for this recipe?

    A: Absolutely! While this recipe specifically calls for makhana, you can easily substitute other nuts such as almonds, cashews, or peanuts for a different flavor and texture.

    Q: Can I reheat caramelized makhana if they become soft?

    A: Yes, if the caramelized makhana become soft or lose their crunchiness, you can reheat them in a low oven (around 250°F) for a few minutes until they become crisp again. Be sure to keep an eye on them to prevent burning.

    Other Recipes on Manjula’s Kitchen

    If you’re looking to explore more Indian recipes, appetizers, beverages, and desserts, be sure to check out the following links on Manjula’s Kitchen. Here are some links to recipes on Manjula’s Kitchen official website:

    Paneer Tikka Masala Recipe

    Chana Chaat (Spicy Chickpea Salad) Recipe

    Pav Bhaji (Spicy Vegetable Hash with Buns) Recipe

    Raj Kachori (Crunchy Chaat) Recipe

    Vegetable Biryani Recipe

    These recipes should offer you a flavorful experience straight from Manjula’s Kitchen.

  • Tawa Pulao Mumbai Style (Pav Bhaji Pulao)

    Tawa Pulao Mumbai Style (Pav Bhaji Pulao)

    Tawa Pulao Mumbai Style

    Tawa Pulao Mumbai Style, Pav Bhaji Pulao

    Tawa Pulao is a popular street dish of Mumbai that is very similar in style to Pav Bhaji. The secret behind this flavorful Tawa Pulao is that it’s mixture of spices that creates the perfect balance of flavors. The recipe incorporates vegetables that are still crunchy and not mushy like Pav Bhaji. This is a one dish meal and also a good lunch box meal.
    5 from 5 votes
    Prep Time 10 minutes
    Cook Time 20 minutes
    Total Time 30 minutes
    Course Main Course
    Cuisine Indian
    Servings 4 people

    Ingredients


    • 3 cup plain rice cooked
    • 2 cup tomatoes chopped
    • 1 cup potatoes cubed into small pieces
    • 1 cup cauliflower floret in small pieces
    • 1/2 cup green peas I am using frozen peas
    • 1/4 cup carrots cubed into small pieces
    • 1 Tbsp ginger thinly sliced
    • 1 Tbsp green chili cut into small pieces
    • 3 Tbsp oil
    • 1 tsp cumin seeds jeera
    • 1/2 tsp red chili powder
    • 1/4 tsp turmeric haldi
    • 1-1/2 tsp salt
    • 1-1/2 Tbsp fennel seed powder saunf
    • 2 tsp garam masala
    • 1 Tbsp lemon juice
    • 1/4 cup cilantro chopped, hara dhania

    Instructions
     

    • Boil the vegetables, potatoes, cauliflower, carrot, and green peas in 2 cups of water till they are tender and not mushy. Drain the water and set aside.
    • Heat the oil in a wide flat frying pan, on medium heat, oil should be moderately hot add cumin seeds, as cumin seeds crack add tomatoes, and cook till they are very soft and tender.
    • Add all the spices except garam masala, add turmeric, red chili powder, fennel seeds, ginger, green chili, and salt mix it well.
    • Add the vegetables, mix it and let it cook for few minutes.
    • Add the cooked rice mix it well, if it looks dry add little water and mix it very gently and let it cook for few minutes, keep stirring.
    • Turn off the heat, add garam masala, cilantro, and lemon juice, and stir gently making sure rice and vegetables are coated with spices evenly. 

    Notes

    Notes: I said I am making Pav Bhaji Pulao, then where is Pav Bhaji masala, fennel seed powder and garam masala together makes a Pav Bhaji Masala.
    Most of the time I add garam masala in the end, I don’t like to add the garam masala in beginning and cook with. When you add garam masala in the end it gives batter taste and aroma. 
    I like to serve Tawa Pulao with yogurt.
    This recipe is so convenient that you can even use left over rice to make it.
    Tried this recipe?Let us know how it was!

    Mumbai Style Tawa Pulao Recipe: Mastering Art of Pav Bhaji Pulao

    Tawa Pulao, a beloved street food from Mumbai, bears a resemblance to Pav Bhaji but stands out with its unique blend of spices, offering a perfect balance of flavors. Tawa Pulao is a gluten-free, quick & easy rice-based vegan street food that is ideal as a lunch box option.

    1. Vegetable Preparation: Boiling and Draining for Perfect Tawa Pulao

    To embark on your journey of how to make pav bhaji pulao, start by boiling a medley of vegetables – potatoes, cauliflower, carrot, and green peas – in 2 cups of water until they reach a tender yet firm consistency, ensuring they don’t become mushy. Once cooked to perfection, drain the water and set the vegetables aside, ready to infuse their flavors into the tantalizing tawa pulao.

    2. Flavorful Sauté: Tawa Pulao Recipe Mumbai Style

    In a wide flat frying pan, heat oil over medium heat until moderately hot. Infuse the essence of Mumbai into your tawa pulao by adding cumin seeds to the sizzling oil. As the cumin seeds crackle, introduce tomatoes and cook until they reach a soft and tender state, releasing their rich flavors into the mix.

    3. Spiced Symphony: Seasoning Your Tava Pulao with Mumbai’s Flavors

    Elevate the aroma and taste of your tawa pulao by adding an array of spices. Sprinkle turmeric, red chili powder, and fennel seeds into the pan, along with ginger, green chilli, and salt. Stirring well, ensure the spices coat the ingredients evenly, infusing the pulao with Mumbai’s signature spice profile.

    4. Vegetable Fusion: Introducing the Cooked Vegetables into Tava Pulao

    Once the spices have melded into a fragrant blend, introduce the boiled vegetables into the pan. Mix them gently with the spice-infused base and allow them to cook together for a few minutes, allowing the flavors to intermingle and elevate the essence of Mumbai-style tawa pulao.

    5. Rice Integration: Blending Cooked Rice for the Perfect Tawa Pulav Texture

    Add the cooked rice to the pan, gently folding it into the vegetable-spice mixture. If the pulao appears dry, add a splash of water to achieve the desired consistency. Allow the rice and vegetables to cook together for a few minutes, stirring continuously to ensure even distribution of flavors.

    6. Final Touch: Infusing Mumbai’s Essence with Garam Masala and Fresh Herbs

    As the aroma of your tawa pulao fills the air, turn off the heat and add a dash of garam masala, freshly chopped cilantro, and a squeeze of lemon juice. Gently stir the pulao, ensuring every grain of rice and every vegetable is coated with the aromatic blend of spices. This final touch infuses your pav bhaji pulao with Mumbai’s essence, ready to tantalize your taste buds.

    Unlock the flavors of Mumbai with this authentic tawa pulao recipe, perfect for any occasion. Whether you call it tava pulao, tawa pulav, or tawa pulao, this Mumbai-style delicacy is sure to become a favorite in your culinary repertoire. Enjoy the convenience of this versatile recipe, perfect for using leftover rice and satisfying your craving for Mumbai’s street food delights. 

    If you loved this tawa pulao recipe mumbai style then you must also check out other variants of Rice: Vegetable Biryani, Masala Khichdi, Chhole Biryani, Quinoa Vegetable Pilaf and Lemon Rice

  • Baked Vegetable Idli

    Baked Vegetable Idli

    Baked Vegetable Idli Recipe by Manjula

    Baked Vegetable Idli

    Baked vegetable Idli makes for a healthy and delicious appetizer or side dish. They are very eye-catching and great to present at a gathering for guests to pop into their mouth. They are the perfect addition to any menu because they are so easy to make. Idlies have a unique texture because they are soft but also slightly crisp on the bottom. Baked vegetable idli are best served with coconut chutney if served as an appetizer or with sambar if served with the main meal.
    4.84 from 12 votes
    Prep Time 10 minutes
    Cook Time 20 minutes
    Fermenting Time 30 minutes
    Total Time 30 minutes
    Course Side Dish
    Cuisine Indian
    Servings 6 people

    Ingredients


    • 1 cup coarse sooji semolina
    • 1/2 cup yogurt dahi, curd
    • 1/2 cup bell pepper finely chopped, capsicum, I am using green and yellow for color
    • 1 green chili finely chopped
    • 1 piece ginger finely grated
    • 2 Tbsp cilantro chopped, hara dhania
    • 1 cup water as needed
    • 1 tsp ENO fruit salt
    • 1 tsp salt

    For Seasoning

    • 1 Tbsp oil
    • 1/4 tsp cumin seeds jeera
    • 1/4 tsp mustard seeds rai

    Instructions
     

    • Preheat the oven at 350 degrees (F).
    • Seasoning: heat the oil moderately in a saucepan. Add mustard and cumin seeds, as the seeds crack turn off the heat and set aside.
    • I am using mini cupcake tray, will make 24 idli, oil it and set aside.
    • Mix sooji, salt, yogurt, and water (as needed) to make a pancake-like batter. Set aside for at least 30 minutes.
    • Add the vegetables bell pepper, carrots, ginger, green chili, and cilantro. Add the seasoning and mix. The batter thickens as the semolina absorbs the water. At this point, add a little more water if it is too thick.
    • Add Eno Fruit Salt to the batter and mix well. The mixture will begin foaming. Immediately begin pouring into the cupcake tray. Place the tray in oven.
    • Bake the idlies for five minutes, then lay over the aluminum foil. Bake it again for 15 minutes. Idlies should be lightly brown from the sides.
    • Cool for few minutes before removing each individual idli. They should come out easily and not stick to the tray. The idlis should be spongy, and light golden color from the sides and bottom.

    Notes

    Notes: 
    First, I baked the idlies without covering, then after 5 minutes I covered the Idlies, if you don’t cover Idlies, they will be dry and will lose the softness and texture.
    you can prepare Idlies 2-3 days in advance, after they cool of refrigerate them in air tight container.
    Before serving heat the Idlies in microwave for about two minutes. Idlies will be soft. Baked vegetable idli are best served with coconut chutney if served as an appetizer or with sambar if served with the main meal.
    Keyword Kid Friendly, Rava Idli, Snack, South Indian Cuisine
    Tried this recipe?Let us know how it was!

    Baked Vegetable Idli Recipe: A Healthy Twist to Classic South Indian Cuisine

    Baked Vegetable Idli is a versatile dish that perfectly fits various occasions and preferences. It serves as an ideal choice for appetizers, breakfast recipes, and even as a lunch box suggestion. During festive seasons like Diwali and Navaratri, it can be a delightful addition to the menu. Its kid-friendly nature makes it a hit among children, while its ease of preparation qualifies it as a quick and easy snack option. Additionally, its nutritious blend of vegetables adds a healthy touch, making it suitable for party recipes as well.

    Introduction to Baked Vegetable Idli Recipe

    If you’re looking to add a nutritious twist to your traditional South Indian breakfast, look no further than this delightful baked vegetable idli recipe. Vegetable idli is a beloved dish in Indian cuisine, cherished for its soft texture and aromatic flavors. In this rendition, we’ll explore how to make vegetable idli even healthier by baking it instead of the traditional steaming method. Packed with the goodness of assorted vegetables and aromatic spices, these baked vegetable idlis are not only delicious but also a wholesome treat for the entire family.

    Step-by-Step Guide on How to Make Vegetable Idli

    Preparing the Batter for Baked Vegetable Idli

    To start making baked vegetable idli, begin by soaking idli rice and split urad dal separately for about 4-6 hours. Once soaked, drain the water and grind them separately to a smooth consistency. Mix both the batters together in a large bowl and add some salt. Allow the batter to ferment overnight, ensuring it doubles in volume. Fermentation is crucial for the characteristic fluffy texture of idlis.

    Incorporating Assorted Vegetables for Added Nutrition

    While the batter ferments, prepare your choice of vegetables. Carrots, peas, bell peppers, and corn work wonderfully in this recipe. Finely chop or grate the vegetables and sauté them lightly with some mustard seeds, curry leaves, and green chilies for a burst of flavor. Once the vegetables are tender, mix them into the fermented idli batter.

    Baking the Vegetable Idlis to Perfection

    Preheat your oven to 350°F (175°C) and grease an idli tray with some oil. Pour the vegetable-laden batter into the idli molds, filling them about three-fourths of the way. Place the tray in the preheated oven and bake for 20-25 minutes or until the idlis are cooked through and have a golden hue on top. Once done, remove the tray from the oven and allow the idlis to cool slightly before unmolding them.

    Serve and Enjoy the Baked Vegetable Idlis

    Once cooled, gently remove the baked vegetable idlis from the molds and serve them warm with a side of coconut chutney or sambar for an authentic South Indian experience. These idlis make for a nutritious breakfast option or a wholesome snack any time of the day. Their vibrant colors and enticing aroma are sure to make them a hit with your family and friends.

    Tips for Making Perfect Baked Vegetable Idlis

    • Ensure the batter is well-fermented for soft and fluffy idlis.
    • Don’t overmix the batter after adding vegetables to retain their crunchiness.
    • Adjust the baking time according to your oven as the temperature may vary.

    Variations of Baked Vegetable Idli Recipe

    • Cheese-Stuffed Baked Vegetable Idlis: Add a surprise element by stuffing the idlis with cheese before baking for a gooey, indulgent twist.
    • Spinach and Fenugreek Baked Idlis: Boost the nutritional value by adding finely chopped spinach and fenugreek leaves to the batter for an extra dose of vitamins and minerals.
    • Masala Baked Idlis: Infuse the idlis with the flavors of garam masala, cumin, and coriander for a spicier variation.

    Benefits of Including Baked Vegetable Idlis in Your Diet

    • Nutrient-Rich: Packed with vitamins, minerals, and fiber from assorted vegetables, baked vegetable idlis make for a wholesome and balanced meal.
    • Low in Calories: Baking eliminates the need for excess oil, making these idlis a healthier alternative to their fried counterparts.
    • Suitable for All Ages: From toddlers to seniors, everyone can enjoy these soft and easily digestible idlis as part of a well-rounded diet.

    Frequently Asked Questions (FAQs) About Baked Vegetable Idlis

    Q: Can I use any other vegetables apart from the ones mentioned in the recipe?

    A: Absolutely! Feel free to experiment with your favorite vegetables or whatever you have on hand. Just ensure they are finely chopped or grated for even distribution.

    Q: Can I make the batter in advance and store it for later use?

    A: Yes, you can prepare the batter in advance and store it in the refrigerator for up to 2-3 days. Remember to bring it to room temperature before baking the idlis.

    Q: Can I freeze the baked vegetable idlis?

    A: While it’s best to consume them fresh, you can freeze the baked idlis in an airtight container for up to a month. Reheat them in the microwave or oven before serving.

    Explore More Recipes from Manjula’s Kitchen

    • Appetizers: Try out the flavorful Spinach Cheese Balls for a delectable appetizer that’s sure to impress your guests.
    • Beverages: Quench your thirst with the refreshing Mango Lassi, a classic Indian yogurt-based drink bursting with tropical flavors.
    • Desserts: Indulge your sweet tooth with the decadent Gulab Jamun, soft and spongy milk dumplings soaked in a fragrant sugar syrup.

    With this comprehensive guide, you’re all set to whip up a batch of wholesome baked vegetable idlis that are as nutritious as they are delicious. Whether enjoyed for breakfast, as a snack, or even as part of a meal, these idlis are sure to become a favorite in your culinary repertoire.

    If you enjoyed making these masala peanuts, why not try your hand at some other mouthwatering recipes from Manjula’s Kitchen? Vegetable Pakoras, Paneer Tikka, Aloo Gobi (Potato Cauliflower), Samosa, Mango Lassi

    Explore these recipes and more for a culinary journey through the vibrant and diverse flavors of Indian cuisine.