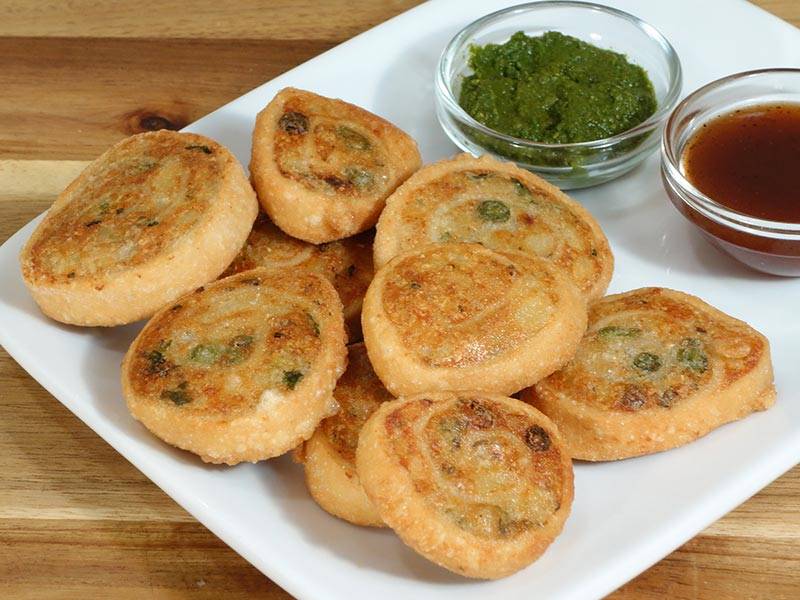
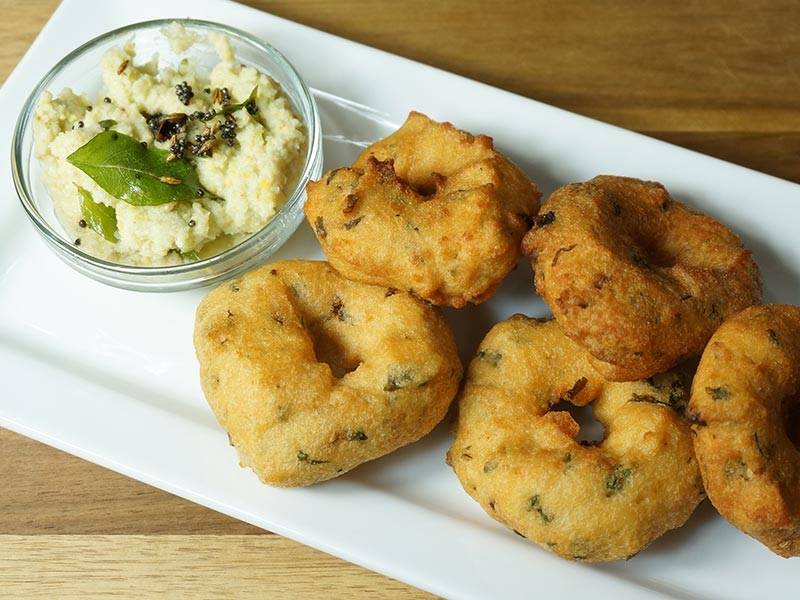
Batata Vada – Aloo Bonda (Fried Potato Dumpling)
Ingredients
- 3 medium potatoes boiled peeled and roughly chopped (this will make 2 cups of chopped potatoes)
- 1 tablespoon oil
- 1/2 teaspoon black mustard seeds (rai)
- 7-10 curry leaves chopped, optional
- 1/4 teaspoon turmeric (haldi)
- 1 tablespoon finely chopped ginger
- 1 green chili finely chopped adjust to taste
- 2 tablespoons chopped cilantro (hara dhania)
- 1/2 teaspoon salt adjust to taste
For Batter
- 1/2 cup besan, gram flour (available in Indian grocery stores)
- 1 tablespoon rice flour
- 1/8 teaspoon asafetida (hing)
- 1/4 teaspoon baking soda
- 1/4 teaspoon red pepper
- 1/2 teaspoon salt adjust to taste
- About 1/4 cup of water
- Oil to fry
Instructions
Batter
- In a bowl mix besan, rice flour, salt, asafetida, pepper, and baking powder. Add water slowly to make a thick and smooth batter. Set aside.
Vada
- Heat oil in a frying pan on medium heat moderately.
- Add mustard seeds as the seeds crack add curry leaves, (curry leaves splatters) potatoes, ginger, green chili, turmeric, and salt.
- Stir fry for about 3 minutes over medium heat. Add cilantro mix it well. Turn of the heat.
- Let the potato mix cool off, divide them into about 12 pieces and make them into smooth round ball, they will be little smaller then golf ball.
- Heat about 1”of oil in a frying pan on medium high heat. To check if the oil is ready, put one drop of batter in oil. The batter should come up but not change color right away.
- Dip the potato balls into the batter one at a time, making sure the potato balls are completely covered with batter. Then, slowly drop them into the frying pan.
- Turn them occasionally. Fry the batata vadas until all sides are golden-brown.
- Batata vadas will take about four minutes to cook.
- Serve them hot with cilantro chutney.
Notes
Batata Vada Recipe – An Authentic Indian Delight
Aloo bonda, a popular Indian street food, is a delectable appetizer consisting of spiced mashed potato balls coated in chickpea flour batter and fried to crispy perfection.
Introduction to Batata Vada and Aloo Bonda
Batata Vada, also known as Aloo Bonda, is a popular Indian street food that originated in the state of Maharashtra. This delightful snack consists of spiced mashed potatoes coated in a gram flour batter and deep-fried until golden brown. Loved for its crispy exterior and soft, flavorful interior, batata vada is a beloved snack enjoyed across the country. In this batata vada recipe, we will guide you through the process of making this delicious treat at home.
How to Make Batata Vada – Step by Step Guide
- Preparation of Potato Filling: To begin making batata vada, start by boiling potatoes until they are tender. Once boiled, peel and mash them in a bowl. Heat oil in a pan and add mustard seeds, cumin seeds, asafoetida, and curry leaves. Sauté until fragrant, then add mashed potatoes, turmeric powder, red chili powder, salt, and chopped coriander leaves. Mix well and cook for a few minutes. Let the filling cool down.
- Making the Gram Flour Batter: In a separate bowl, prepare the gram flour batter by mixing gram flour, rice flour, baking soda, salt, and water. Ensure a smooth consistency without any lumps. Let the batter rest for 10-15 minutes.
- Assembly of Batata Vada: Take a portion of the potato filling and shape it into small balls. Dip each ball into the prepared gram flour batter, ensuring it is evenly coated.
- Deep Frying the Vadas: Heat oil in a deep frying pan over medium heat. Once the oil is hot, carefully drop the coated potato balls into the oil and fry until they turn golden brown and crisp. Remove from oil and place them on paper towels to drain excess oil.
- Serve Hot: Your crispy and delicious batata vada or aloo bonda is ready to be served. Enjoy them hot with green chutney or tamarind chutney.
Tips for Perfect Batata Vada
- Ensure that the potato filling is well-spiced to enhance the flavor of the batata vada.
- Make sure the gram flour batter is of the right consistency; it should coat the potato filling evenly.
- Fry the vadas in hot oil to achieve a crispy exterior.
- Serve the vadas hot for the best taste and texture.
Variations of Batata Vada
- You can add crushed peanuts or cashews to the potato filling for added crunch.
- For a spicy kick, add finely chopped green chilies to the potato mixture.
- Experiment with different spices and herbs to customize the flavor according to your preference.
Benefits of Batata Vada
- Batata vada is a filling and satisfying snack that can be enjoyed any time of the day.
- Potatoes are a good source of carbohydrates, making batata vada an excellent energy booster.
- This snack is vegetarian and can be enjoyed by people of all ages.
Frequently Asked Questions (FAQs)
Q: Can I make batata vada ahead of time?
A: While batata vada is best enjoyed fresh, you can prepare the potato filling and gram flour batter in advance and fry the vadas just before serving for optimal crispiness.
Q: Can I bake batata vada instead of deep-frying?
A: While traditionally batata vada is deep-fried for that crispy texture, you can try baking them in the oven for a healthier alternative. However, the texture may vary slightly.
Other Recipes on Manjula’s Kitchen
If you’re looking to explore more Indian recipes, appetizers, beverages, and desserts, be sure to check out the following links on Manjula’s Kitchen. Here are some links to recipes on Manjula’s Kitchen official website:
Chana Chaat (Spicy Chickpea Salad) Recipe
Pav Bhaji (Spicy Vegetable Hash with Buns) Recipe
Raj Kachori (Crunchy Chaat) Recipe
These recipes should offer you a flavorful experience straight from Manjula’s Kitchen.