Tag: Vegan Appetizers

Exploring Vegan Appetizers
Introduction
Vegan appetizers are a delightful way to start any meal, providing a burst of flavor without any animal products. Whether you’re hosting a party, looking for an Indian snack, or starting a multi-course meal, these vegan appetizers will impress your guests and satisfy your cravings. This guide explores some of the best vegan appetizers and offers ideas for easy vegan appetizers that anyone can make.
What Are Vegan Appetizers?
Vegan appetizers are small dishes or snacks made entirely from plant-based ingredients. They exclude any animal products such as meat, dairy, and eggs. These appetizers are not only cruelty-free but also often healthier and lighter than their non-vegan counterparts. We got a list of vegan Indian recipes that are surely going to be tasty and amazing. 
Benefits of Vegan Appetizers

Healthier Options: Vegan appetizers are typically lower in saturated fats and cholesterol, making them a healthier choice.
Inclusive: They cater to a variety of dietary restrictions, including lactose intolerance and egg allergies.
Sustainable: Choosing plant-based options reduces the environmental impact associated with animal farming.

Popular Vegan Appetizers
1. Stuffed Mushrooms
Stuffed mushrooms are a classic appetizer that can be easily veganized. Fill them with a mixture of breadcrumbs, herbs, and vegan cheese for a delicious bite-sized treat.
2. Veggie Spring Rolls
Veggie spring rolls are fresh, crunchy, and packed with flavor. Filled with julienned vegetables and herbs, they are often served with a tangy dipping sauce. They are among the best vegan appetizers for their refreshing taste and ease of preparation. It’s a part of indian veg appetizers recipe. 
3. Hummus and Veggie Platter
Hummus, made from chickpeas, tahini, lemon, is a protein-rich dip that pairs perfectly with fresh veggies. This easy vegan appetizer is quick to assemble and always a hit at gatherings.
Easy Vegan Appetizers
4. Avocado Toast Bites
Avocado toast is a popular snack that can be turned into an easy vegan appetizer. Top small pieces of toast with mashed avocado, a sprinkle of salt, pepper, and a dash of lime juice for a simple yet delicious starter.
5. Tomato Basil Bruschetta
Bruschetta, topped with diced tomatoes, fresh basil, and a drizzle of balsamic vinegar, is a light and flavorful appetizer. It’s quick to prepare and always a crowd-pleaser.
6. Spicy Chickpea Salad Cups
Spicy chickpea salad cups are both fun and nutritious. Spoon a mixture of chickpeas, spices, and diced vegetables into small lettuce cups for a crunchy and satisfying appetizer.
Best Vegan Appetizers
7. Mini Falafel Balls
Falafel balls made from ground chickpeas, herbs, and spices are a favorite in Middle Eastern cuisine. Serve them with a tahini dipping sauce for one of the best vegan appetizers that are sure to impress.
8. Sweet Potato Bites
Sweet potato bites, topped with avocado or a spicy black bean mixture, are delicious and nutritious. They combine the sweetness of the potato with the savory toppings, creating a perfect balance of flavors.
9. Vegan Sushi Rolls
Vegan sushi rolls, filled with avocado, cucumber, and carrots, offer a refreshing and light option. Serve with soy sauce and wasabi for an authentic experience.
Vegan Appetizers Easy to Make
10. Roasted Chickpeas
Roasted chickpeas are a crunchy, protein-packed snack. Season them with your favorite spices and bake until crispy. This vegan appetizer recipe is easy to prepare and can be customized to your taste. Its one of those easy Indian recipes that are light, healthy and yet nutritious. 
11. Spinach Artichoke Dip
A creamy spinach artichoke dip, made with cashews or vegan cream cheese, is a rich and satisfying appetizer. Serve with crackers or bread for dipping.
12. Cucumber Bites with Vegan Cream Cheese
Top cucumber slices with a dollop of vegan cream cheese and a sprinkle of herbs for a light and refreshing appetizer. These are perfect for hot summer days.
How to Make Vegan Appetizers
Making vegan appetizers is straightforward and requires only a few basic steps:

Choose Fresh Ingredients: Fresh vegetables, herbs, and high-quality vegan substitutes are key to delicious appetizers.
Simple Seasonings: Use herbs, spices, and citrus to enhance flavors without overpowering the natural taste of the ingredients.
Presentation: Arrange your appetizers beautifully to make them more appealing. Bite-sized portions are usually more attractive and easier to handle.

FAQs about Vegan Appetizers
What are vegan appetizers? 
Vegan appetizers are small dishes made without any animal products, perfect for starting a meal or enjoying as snacks.
How to make easy vegan appetizers? 
To make easy vegan appetizers, choose simple recipes that require minimal ingredients and preparation time, such as avocado toast bites or tomato basil bruschetta.
What are the best vegan appetizers? 
The best vegan appetizers include stuffed mushrooms, veggie spring rolls, hummus and veggie platter, mini falafel balls, and sweet potato bites.
Are vegan appetizers healthy? 
Yes, vegan appetizers are generally healthier as they are lower in saturated fats and cholesterol, and rich in vitamins, minerals, and fiber.
What is a simple vegan appetizer recipe? 
A simple vegan appetizer recipe is roasted chickpeas. Season chickpeas with spices and bake until crispy for a quick and tasty snack.
Conclusion
Vegan appetizers offer a delicious and healthy start to any meal. From easy vegan appetizers to the best vegan appetizers, there are endless possibilities to explore. 

Whether you prefer something light and fresh like veggie spring rolls or something hearty like mini falafel balls, there is a vegan appetizer recipe for everyone. 

Try these ideas and enjoy the flavors and benefits of plant-based eating. For more vegan appetizer recipes and tips, visit Manjula’s Kitchen and discover the joy of Indian vegetarian and vegan cooking. Enjoy the process of creating and sharing these delightful appetizers!

  • Gobi (Cauliflower) Manchurian

    Gobi (Cauliflower) Manchurian

    Gobi (Cauliflower) Manchurian

    Gobi (Cauliflower) Manchurian

    Gobi or cauliflower Manchurian is a popular Indo Chinese dish. This is a super delicious appetizer or main dish. Gobi manchurian satisfies both your savory and spicy cravings! It consists of fried gobi (cauliflower) simmered in a flavorful gravy made with soy sauce and red chili sauce.
    3.50 from 6 votes
    Course Appetizer
    Cuisine Indian
    Servings 4 people

    Ingredients
      

    • 20 cauliflower pieces cut into medium size florets

    For Sauce

    • 2 tbsp oil
    • 1 tbsp ginger paste or finely shredded ginger (adrak)
    • 1 green chili chopped
    • 1/4 cup celery finely chopped
    • 2 tbsp red chili sauce
    • 2 tbsp soy sauce
    • 1 tbsp vinegar
    • 2 tbsp tomato paste
    • 1/2 tbsp sugar
    • 2 tbsp corn starch or arrow root powder
    • Approx. ½ cup water

    For Batter

    • 1/3 cup all purpose flour (plain flour, maida)
    • 3 tbsp corn starch or arrow root powder
    • 1/2 tbsp salt
    • 1/8 tbsp black pepper
    • Approx. ½ cup water

    Instructions
     

    • Mix the corn starch with water and set aside.
    • Heat the oil in sauce pan over medium high heat; add ginger, celery and green chili stir for about two minute. Add all the ingredients for sauce except corn starch, (chili sauce, soy sauce, vinegar, tomato paste, and sugar).
    • Stir for 2 minutes add corn starch and cook for another two minutes, sauce should be thick, consistency of a dosa or pancake batter. If needed add more water, sauce gets thicker as it sits.
    • Sauce is ready, set aside.
    • To make batter mix flour, corn starch, salt and pepper in a bowl. Add the water slowly to make a smooth batter (batter should be consistency of pancake batter or dosa batter).
    • Heat at least one inch of oil in a frying pan over medium high heat. Oil should be moderately hot. (If oil is not hot cauliflower will be greasy).
    • Dip the cauliflower into the batter one at a time, making sure it is completely covered by the batter. Then drop the cauliflowers slowly into oil in the frying pan. (do not overlap them)
    • Fry the cauliflowers in small batches, four to five minutes per batch. Fry them turning occasionally, until they are all sides golden brown. Take them out over paper towel.
    • Repeat this process for the remaining cauliflowers.
    • Fold fried cauliflower/ gobies into gravy and serve hot.

    Notes

    Notes
    Manchurian tastes best when cauliflower has some crunch. If you have fried them earlier, refry them before dipping in the sauce as fried cauliflower becomes soft as they cool off.
    Tried this recipe?Let us know how it was!

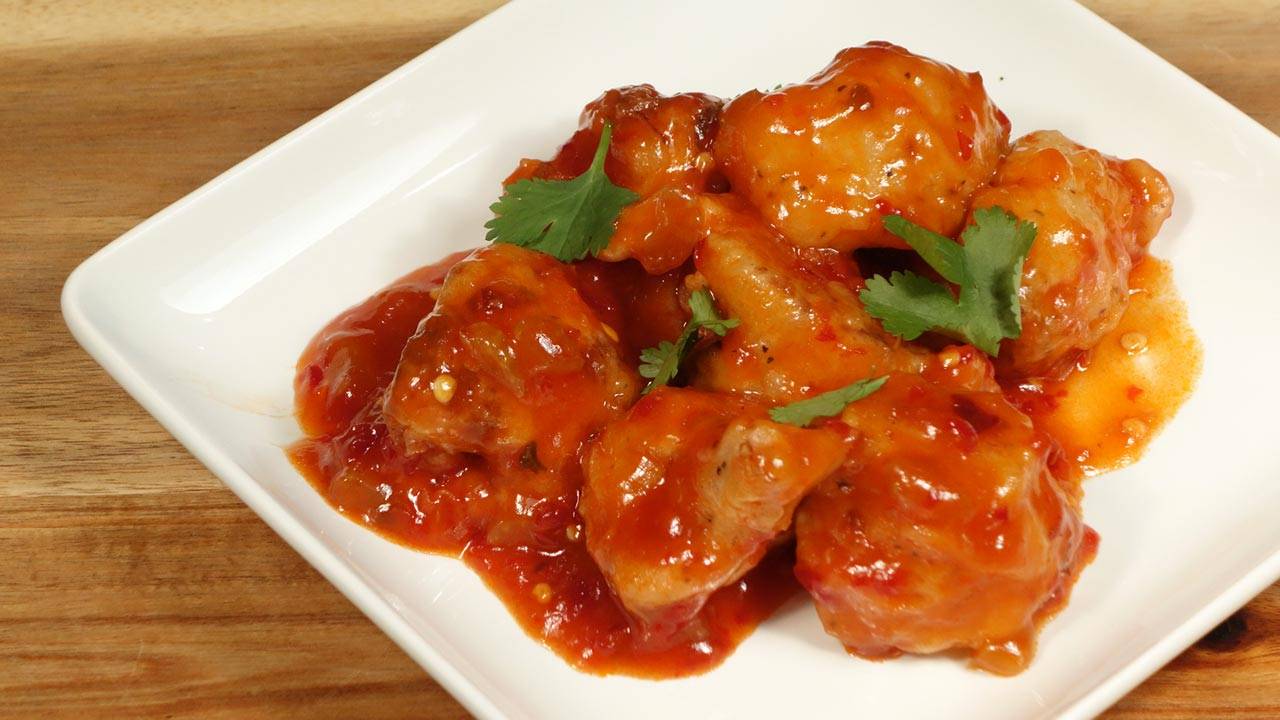
    Gobi Manchurian Recipe: A Delicious Indo-Chinese Delight 

    Gobi Manchurian is a beloved Indo-Chinese dish that combines the crispiness of cauliflower with a tangy, spicy sauce. It is a delectable fusion appetizer featuring crispy cauliflower florets coated in a savory vegan curry/gravy infused with aromatic vegetables.If you’re craving this flavorful dish and want to recreate it at home, look no further than this gobi manchurian recipe. With simple ingredients and easy-to-follow steps, you’ll be able to whip up a batch of delicious cauliflower manchurian in no time.

    Preparation: 

    Begin by preparing the cauliflower florets. Make sure they are clean and dry before proceeding with the recipe. You can blanch the florets in hot water for a few minutes to soften them slightly, or you can proceed with frying them directly for a crispier texture.

    Frying the Cauliflower (cauliflower manchurian recipe):  

    In a bowl, prepare a batter using all-purpose flour, cornflour, salt, pepper, ginger, and water. Coat each cauliflower floret in the batter, ensuring they are evenly coated.

    Heat oil in a deep pan or wok over medium heat. Once the oil is hot, carefully add the battered cauliflower florets in batches. Fry them until they turn golden brown and crispy. Remove them from the oil and place them on a paper towel-lined plate to drain excess oil.

    Making the Manchurian Sauce (recipe for manchurian cauliflower): 

    In another pan, heat oil over medium heat. Add finely chopped ginger, and green chilies. Sauté them until fragrant.

    Next, add bell peppers. Cook until they turn soft and translucent.

    Now, it’s time to add the sauces. Pour in soy sauce, chili sauce, ketchup, vinegar, and a pinch of sugar. Stir well to combine all the ingredients.

    In a small bowl, prepare a slurry using cornflour and water. Add this slurry to the pan to thicken the sauce. Stir continuously to avoid lumps.

    Once the sauce reaches your desired consistency, add the fried cauliflower florets to the pan. Toss them gently in the sauce until they are well coated.

    Tips for Perfect Gobi Manchurian: 

    • Make sure the cauliflower florets are dry before coating them in the batter to prevent the batter from becoming soggy.
    • Adjust the amount of chili sauce and green chilies according to your spice preference.
    • For a healthier version, you can bake the cauliflower florets instead of frying them. Simply coat them in the batter and place them on a baking sheet lined with parchment paper. Bake in a preheated oven at 400°F (200°C) for 20-25 minutes or until crispy.

    Variations to Try: 

    • Add diced carrots, cabbage, or other vegetables of your choice to make the dish more colorful and nutritious.
    • For a vegan version, use tamari instead of soy sauce and skip the vinegar or use apple cider vinegar.
    • Garnish the gobi manchurian or cilantro for an extra burst of flavor and freshness.

    Benefits of Gobi Manchurian 

    Gobi Manchurian is not only delicious but also packed with nutrients. Cauliflower is a rich source of vitamins, minerals, and antioxidants, making it beneficial for overall health. Additionally, by controlling the ingredients used in the recipe, you can make it healthier compared to the restaurant version.

    FAQs (cauliflower manchurian): 

    Q: Can I use frozen cauliflower for this recipe?

    A: While fresh cauliflower is preferred for its crisp texture, you can use frozen cauliflower if that’s what you have on hand. Make sure to thaw and pat dry the cauliflower before using it in the recipe.

    Q: How can I make the sauce less spicy?

    A: To reduce the spice level of the sauce, you can decrease the amount of chili sauce and green chilies used in the recipe. You can also omit the green chilies altogether for a milder flavor.

    With this comprehensive gobi manchurian recipe, you’ll be able to recreate the flavors of your favorite Indo-Chinese dish right in your own kitchen. Whether you’re cooking for a special occasion or simply craving a tasty snack, this dish is sure to satisfy your cravings. Enjoy the crispy texture of the cauliflower combined with the savory and tangy flavors of the Manchurian sauce—it’s a winning combination that’s sure to become a favorite in your household.

    Other Recipes If you enjoyed this banana rice recipe, you might also like to try these other recipes from Manjula’s Kitchen:

    1.   Vegetable Pulao
    2.   Mango Lassi
    3.   Chickpea Salad
    4.   Coconut Chutney
    5.   Vegetable Pakoras
    6.   Paneer Tikka Masala
    7.   Fruit Chaat

    These recipes are perfect and are sure to satisfy your cravings. Happy cooking!

  • Lauki ka Raita Recipe

    Lauki ka Raita Recipe

    Lauki Ka Raita

    Lauki ka Raita – Bottle Gourd with Yogurt

    Lauki raita is a refreshing yogurt-based dish made with spiced lauki and yogurt. Lauki is also known as bottle gourd, doodhi, or ghia. Lauki raita is healthy and tastes delicious. Serve this as a side dish with any Indian flatbread or over the rice.
    No ratings yet
    Course Raita
    Cuisine Indian
    Servings 2 people

    Ingredients
      

    • 1 cup yogurt (curd, dahi)
    • Approx. ½ cup milk, use as needed
    • 1 cup lauki grated (bottle gourd, doodhi, ghia)
    • 2 tbsp oil
    • 1 tbsp cumin seeds (jeera)
    • 1/8 tbsp asafetida (hing)
    • 2 whole red chilies (lal mirch)
    • 1 tbsp ginger finely chopped (adrak)
    • 1 tbsp green chilies finely chopped
    • 3 tbsp cilantro finely chopped (hara dhania)
    • 1/2 tbsp salt

    Instructions
     

    • Whip the yogurt and add the milk as needed to make the consistency of pancake batter, set aside.
    • Heat the oil in a saucepan on medium-high heat.
    • Add the cumin seeds and asafetida. After the cumin seeds crack, add red chilies. Stir-fry a few seconds.
    • Add lauki, ginger, green chilies, and cilantro, and stir-fry until most of the water has evaporated and the lauki is tender. This should take about four to five minutes.
    • After the lauki cools, mix it well into the yogurt.
    • Add more milk if needed.
    • For best results, serve chilled.
    Keyword lauki, raita
    Tried this recipe?Let us know how it was!

    How To Make Lauki Ka Raita Manjula’s Kitchen 

    What is Raita: Raita is an accompaniment for any Indian meal and can be created in the form of Vegetable Raita, Spinach Raita, Boondi ka Raita, Cucumber Raita & Lauki ka Raita. Here we are focussing on making lauki ka raita, it’s a simple, quick & easy, gluten free, kid friendly and nutritious yogurt-based recipe featuring lauki and a selection of Indian spice powders. 

    Embark on a culinary journey through the vibrant flavors of India with the creation of lauki ka raita, a delightful yogurt-based dish infused with the subtle essence of bottle gourd. As you delve into the intricacies of preparing this luscious accompaniment, each step unveils a symphony of flavors and textures, culminating in a harmonious blend that tantalizes the taste buds. Let’s explore the art of making lauki raita in the following steps, from whipping the yogurt to adjusting the consistency and serving it chilled.

    Step 1: Preparing the Creamy Base 

    Begin the culinary adventure by whipping the yogurt to perfection, creating a creamy base that serves as the canvas for the upcoming infusion of flavors. Adjust the consistency with milk, aiming for a texture resembling pancake batter—smooth and velvety, yet with a slight thickness that holds its form. This foundational process is key to understanding how to make lauki raita, setting the stage for the transformative journey ahead.

    Step 2: Heating Oil and Infusing Flavors 

    In a saucepan, the culinary symphony commences as the oil sizzles to life over medium-high heat, signaling the start of a flavorful escapade. Introduce cumin seeds and asafetida to the shimmering oil, allowing their fragrant essence to permeate the air—a prelude to the aromatic dance of lauki. As the spices release their captivating aroma, add red chilies, igniting a fiery overture in the process of how to make lauki raita. This flavorful blend sets the stage for the starring ingredient, the humble bottle gourd.

    Step 3: Stir-Frying Lauki and Aromatic Elements 

    Harmonize the flavors within the saucepan by adding lauki, ginger, green chilies, and cilantro, each ingredient adding its unique melody to the culinary composition. Stirring diligently, allow the ingredients to intertwine, coaxing out their inherent flavors as the lauki tenderizes and most of its water evaporates. In just four to five minutes, this vibrant medley becomes a pivotal step in the process of making lauki ka raita, infusing the dish with the rich essence of bottle gourd.

    Step 4: Blending Lauki into Yogurt 

    Once the stir-fried lauki has cooled to a gentle warmth, seamlessly blend it into the whipped yogurt—a transformative moment in the journey of how to make lauki raita. This integration forms the heart of lauki ka raita, marrying creamy textures with vibrant flavors in a harmonious union. Ensure a seamless amalgamation by thoroughly mixing the cooled lauki into the yogurt, allowing the flavors to meld and evolve.

    Step 5: Adjusting Consistency and Chilling 

    Fine-tune the lauki raita’s consistency to perfection by adding more milk if necessary, a meticulous detail in perfecting the lauki ka raita recipe. This adjustment ensures a harmonious blend of ingredients, resulting in a delectable texture that is neither too thick nor too thin. For an optimal dining experience, allow the flavors to meld and intensify by serving the raita chilled—a refreshing conclusion to the culinary journey of how to make lauki raita.

    In conclusion, the art of crafting the perfect lauki raita transcends mere culinary skill—it is a testament to the harmony of flavors and textures, the balance of spices and aromatics, and the meticulous attention to detail. Each step in the process, from whipping the yogurt to adjusting the consistency and serving it chilled, contributes to the creation of a dish that delights the senses and nourishes the soul. So, gather your ingredients, ignite the flames of your culinary creativity, and embark on a flavorful voyage through the enchanting world of lauki ka raita.

  • Spicy Bread Pakora

    Spicy Bread Pakora

    A plate of Spicy Bread Pakora

    Spicy Bread Pakora

    Spicy Bread Pakoras, Pakoras are all time favorite snack, at least for me. Bread Pakoras are made so many different ways, but this time I have layered the bread with spicy sweet and sour potatoes like chutney. Before I decided to do this recipe, I have served these pakoras to many friends, the only thig they could say wow. They could not figure out what I have used for filling. Bread Pakora is all time favorite snack; at least for me. I have made these bread pakoras so many ways, but this recipe is different, and taste great. I have layered these pakoras with spicy sweet and sour potato like chutney. Before I decided to do this recipe, I have served these pakoras to many friends, the only thig they could say wow. They could not figure out what I have used for filling. You don’t need any chutney or dipping sauce, but green cilantro or mint chutney enhance the flavor.Recipe will serve 4.
    5 from 1 vote
    Prep Time 10 minutes
    Cook Time 20 minutes
    Total Time 30 minutes
    Course Appetizer
    Cuisine Indian
    Servings 4 people

    Ingredients
      

    • 4 slices of while bread

    For Batter

    • 1 ½ cup besan gram flour
    • 2 Tbsp corn starch
    • ¼ tsp baking soda
    • tsp asafetida hing
    • ½ tsp salt
    • 1 tsp oil
    • About ¾ cup of water

    For Filling

    • 1 cup potato boiled and mashed
    • 1 ½ Tbsp oil
    • 1 tsp cumin seeds jeera
    • tsp asafetida hing
    • 2 tsp coriander powder dhania
    • 1 Tbsp ginger finely chopped
    • 1 Tbsp green chili chopped
    • ½ tsp red chili powder
    • ½ tsp salt
    • ½ tsp black salt
    • 2 Tbsp mango powder amchoor
    • 1 ½ Tbsp sugar
    • ¼ tsp garam masala
    • ¼ cup cilantro chopped

    Instructions
     

    Batter

    • In a bowl mix all the dry ingredients together, besan, corn starch, salt, asafetida and baking soda, mix it well. Add oil and add water slowly to make a thick and smooth batter. Set aside.

    Filling

    • In a frying pan heat the oil over medium heat. When oil is moderately hot add cumin seeds, asafetida, coriander powder, ginger, green chili, and red chili powder stir fry for few seconds.
    • Next add potatoes, salt, black salt, mango powder, garam masala and sugar stir for about 2 minutes, add ½ cup of water keep stirring and keep mashing the mix if needed add little more water. Mix should be very mushy and soft like a spread. Add cilantro and mix it well.
    • Taste the potato mix it should be spicy after you spread the mix to bread and fry with batter spice level will go down. I always keep the mix extra spicy. Mix is ready keep aside.

    Making Pakoras

    • Spread the mix generously on two slices of bread, then close sandwiches with other slices of bread.
    • Remove the crest from the bread all sides and slice them in the shape you like. I am slicing them in 6 pieces because the bread I am using have big slices.
    • Heat about 1 inch of oil in a frying pan on medium high heat moderately. To check if the oil is ready, put one drop of batter in oil. The batter should come up but not change color right away.
    • Dip the bread into the batter one at a time, making sure bread are completely covered with batter. Then, slowly drop them into the frying pan.
    • Turn them quick and take them out quick. We are going to double fry these pakoras. Fry them all then put them back in frying pan and fry the pakoras until they are golden-brown both sides.

    Notes

    Pakoras can be serve with your choice of chutney:
    Off course hot cup of Chai Masala Tea.
    Tried this recipe?Let us know how it was!

    Introduction to Spicy Bread Pakora

    Spicy Bread Pakora is a popular vegan Indian street food snack loved for its crispy exterior and flavorful filling. This spicy bread pakora recipe offers a tantalizing twist to the traditional version, making it a perfect choice for those who enjoy a bit of heat in their appetizers. If you’re wondering how to make spicy bread pakora, look no further! Follow along for a step-by-step guide to creating this delicious treat.

    Step 1: Prepare the Filling

    To start making spicy bread pakora, prepare the filling mixture. Combine mashed potatoes, finely chopped green chilies, chopped cilantro, grated ginger, garam masala, amchur (dry mango) powder, and salt in a bowl. Mix well to ensure all the ingredients are evenly incorporated. This flavorful filling adds a delightful kick to the bread pakora. If you prefer a milder version, you can adjust the amount of green chilies according to your taste preferences.

    Tip: For a variation in filling, you can add crumbled paneer or shredded cheese to the potato mixture for added richness and texture. Check out Manjula’s recipe for Paneer Pakora for inspiration.

    Step 2: Prepare the Batter

    Next, it’s time to prepare the batter for coating the bread slices. In a separate bowl, combine chickpea flour (besan), rice flour, salt, ajwain (carom seeds), turmeric powder, cumin seeds, and red chili powder. Gradually add water to the dry ingredients while whisking to form a smooth, lump-free batter. The consistency should be thick enough to coat the bread slices evenly. This flavorful batter is what gives spicy bread pakora its signature crunchy coating.

    Variation: For a gluten-free option, you can substitute rice flour with cornflour or a gluten-free flour blend. Manjula offers a recipe for Gluten-Free Rice Flour Pakoras that you might find useful.

    Step 3: Assemble the Bread Pakoras

    Now, it’s time to assemble the spicy bread pakoras. Take a slice of bread and spread a generous amount of the prepared potato filling mixture on one side. Place another slice of bread on top to form a sandwich. Carefully cut the sandwich into desired shapes, such as triangles or rectangles. Dip each sandwich piece into the prepared batter, ensuring it is coated evenly on all sides.

    Tip: To enhance the flavor and aroma, you can add a pinch of chaat masala to the batter before dipping the bread slices. Manjula shares her recipe for Chaat Masala, which you can make at home with a blend of aromatic spices.

    Step 4: Fry the Pakoras

    Heat oil in a deep frying pan over medium heat. Once the oil is hot, carefully place the coated bread pakoras into the oil, making sure not to overcrowd the pan. Fry the pakoras until they turn golden brown and crispy on all sides, flipping them occasionally for even cooking. Once done, remove the pakoras from the oil and drain excess oil on paper towels.

    Benefit: While spicy bread pakoras are undoubtedly indulgent and delicious, they are best enjoyed in moderation as a treat due to their deep-fried nature. Pair them with a fresh salad or chutney for a balanced snack.

    Step 5: Serve and Enjoy!

    Once fried to perfection, serve the spicy bread pakoras hot and crispy alongside your favorite chutney or dipping sauce. They make for a delightful appetizer or tea-time snack, perfect for sharing with friends and family. The combination of crunchy exterior and flavorful filling is sure to tantalize your taste buds and leave you craving for more.

    By incorporating these tips and variations, you can elevate the classic bread pakora into a spicy and irresistible snack that’s bound to impress your guests. Check out more appetizer recipes on Manjula’s Kitchen for further culinary inspiration, such as her Vegetable Pakoras or Samosas. Cheers to delicious snacking!

    Explore more appetizer recipes on Manjula’s Kitchen: Vegetable Samosas, Paneer Tikka, Crispy Spinach PakorasMango Lassi, Masala Chai, Gulab Jamun, Kheer (Rice Pudding)

  • Masala Popcorn, Spicy Popcorn, Indian Style

    Masala Popcorn, Spicy Popcorn, Indian Style

    Masala Popcorn

    Masala Popcorn, Spicy Popcorn, Indian Style

    Masala Popcorn is a spicy and flavorful snack. Enjoy low calorie snack masala popcorn while watching a movie or your favorite TV show.
    4.50 from 10 votes
    Prep Time 5 minutes
    Cook Time 5 minutes
    Total Time 10 minutes
    Course Snack
    Cuisine Indian
    Servings 4 People

    Ingredients


    • 1 pack microwave popcorn about 3 ounce pack plain
    • 3 Tbsp oil canola, or vegetable
    • 1 tsp fennel seeds saunf
    • 1 tsp coriander seeds dhania
    • 1/4 tsp asafetida hing
    • 2 Tbsp green chili finely chopped
    • 12 curry leaves
    • 1/2 tsp salt
    • 1/3 tsp sugar

    Instructions
     

    • Make the popcorn using the instruction over popcorn bag. Keep aside.
    • Heat a large frying pan over low heat, put all the ingredients except popcorn, oil, fennel seeds, coriander seeds, asafetida, green chili, curry leaves, salt, and sugar. 
    • Keep stirring till green chili and curry leaves are dry this should take about 2 minutes. Add the popcorn stir till popcorns are coated with spices. Turn off the heat.
    • Enjoy!
    Tried this recipe?Let us know how it was!

  • Cocktail Green Peas Samosa

    Cocktail Green Peas Samosa

    Cocktail Samosa

    Cocktail Green Peas Samosa

    Cocktail green peas samosas are tasty snack. These bite-sized crispy samosas are filled with spicy green peas. This was my mother's go-to appetizer for special occasions, and she received many compliments. My cooking style is greatly influenced by my mother, a true inspiration!  Of course they taste out of this world when served hot. Serve with tamarind chutney.
    5 from 1 vote
    Prep Time 15 minutes
    Cook Time 30 minutes
    Course snacks
    Cuisine Indian
    Servings 24 samosa

    Ingredients
      

    For crust

    • 1 cup All Purpose flour (plain flour or maida)
    • 1 tablespoon sooji fine (semolina)
    • 1/4 teaspoon salt
    • 2 tablespoons oil
    • Approximately 1/3 cup look warm water

    For filling

    • 2 cups boiled green peas I am using frozen green peas
    • 2 tablespoons oil
    • 3 teaspoons coriander powder (dhania)
    • 1 teaspoon red chili powder
    • 1 teaspoon mango powder (amchoor)
    • 1/4 teaspoon garam masala
    • 3/4 teaspoon salt (adjust to your taste)

    Instructions
     

    for Dough

    • Mix flour, sooji, salt, oil and water together to make soft dough (add water as needed).
    • Knead the dough to make it smooth and pliable.
    • Cover the dough and let it sit least ten minutes.

    To Make Filling

    • Boil the green peas over medium heat with 1 cup of water, until peas are tender. Drain the water, squeeze the excess water, and pat dry. Mix all the dry ingredients to the peas, coriander, chili powder, garam masala, mango powder and salt.
    • Heat the oil in a frying pan over medium heat, and put the green peas mix, stir fry and keep mashing, stir fry until no moisture left, but it should not be powdery.. This should take about 10-12 minutes.
    • Turn off the heat and let the let the filling cool to room temperature.

    Making samosas

    • Knead the dough for a minute.
    • Divide the dough into 12 equal parts and roll into balls.
    • Roll each ball about 4-1/2-inch diameter and cut each circle in half.
    • Take one semicircle and wet the sides lightly all around and fold it into a cone shape. Pinch the side of this cone so that it is completely sealed.
    • Fill the cone with about 1 teaspoon of filling. Press this filling down.
    • Close the top of the cone to form a triangular shape, pinching the top edge to seal it completely.
    • Continue filling the rest of the samosas.
    • Heat about 1 inches of oil in a frying pan on medium heat. To check if oil is hot enough place a small piece of dough in oil and dough should sizzle and come to the surface slowly.
    • Place the samosas in the frying pan a few at a time, they should not overlap.
    • After samosas are floating on top of the oil turn them slowly. Fry the samosas until the samosas are golden-brown color on all sides. This should take about 8 minutes. If you use a high heat, the samosa crust will be too soft and not cook properly.
    • Take the Samosas out over paper towel; it will absorb extra oil.
    • Cocktail Samosa goes well with tamarind chutney.
    Tried this recipe?Let us know how it was!

    Cocktail Samosa Recipe: A Delicious Twist on a Classic Snack 

    Introduction: 

    In this article, we’ll explore how to make cocktail samosa, specifically focusing on the delightful cocktail green peas samosa. This appetizing vegan snack is perfect for any occasion, whether you’re hosting a party or simply craving a savory treat. With its crispy exterior and flavorful filling, cocktail samosas are sure to be a hit with family and friends. Let’s dive into the recipe and discover the steps to create these irresistible snacks.

    Step 1: Preparing the Dough 

    To begin making cocktail samosas, start by preparing the dough. You’ll need all-purpose flour, salt, carom seeds, and oil. Combine the flour, salt, and carom seeds in a mixing bowl, then gradually add the oil while mixing the ingredients together. Knead the dough until it’s smooth and firm, then cover it and let it rest for about 30 minutes. This step ensures that the dough is pliable and easy to work with when shaping the samosas. For a detailed recipe on making the dough, you can refer to Manjula’s Kitchen’s samosa dough recipe.

    Step 2: Making the Green Peas Filling 

    Next, let’s prepare the flavorful green peas filling for our cocktail samosas. Heat oil in a pan over medium heat, then add cumin seeds and let them sizzle. Add finely chopped green chilies, ginger paste, and crushed coriander seeds, sautéing until fragrant. Stir in boiled and mashed green peas, along with salt, mango powder, and garam masala for seasoning. Cook the mixture for a few minutes until the flavors meld together, then let it cool. This delectable filling adds a burst of flavor to the cocktail samosas, making them truly irresistible.

    Step 3: Shaping and Filling the Samosas 

    Now comes the fun part – shaping and filling the samosas! Divide the rested dough into small balls and roll each one into a thin circle. Cut each circle in half to form semi-circles, then fold each semi-circle into a cone shape, sealing the edges with a water-flour paste. Fill each cone with a spoonful of the green peas filling, then seal the top to enclose the filling completely. Repeat this process until all the dough and filling are used up, creating a batch of perfectly shaped cocktail samosas ready for frying.

    Step 4: Frying to Golden Perfection 

    Once all the samosas are shaped and filled, it’s time to fry them to golden perfection. Heat oil in a deep frying pan or kadhai over medium-high heat until hot but not smoking. Carefully add the filled samosas to the hot oil, ensuring not to overcrowd the pan. Fry them in batches until they turn crispy and golden brown, flipping them occasionally for even cooking. Once fried, remove the samosas from the oil and drain them on paper towels to remove any excess oil. Serve the hot and crispy cocktail samosas with your favorite chutney or dipping sauce.

    Step 5: Serving and Enjoying 

    Now that your cocktail samosas are ready, it’s time to serve and enjoy this delicious snack with your loved ones. Arrange them on a platter alongside some mint chutney, tamarind chutney, or yogurt dip for dipping. These bite-sized treats are perfect for parties, gatherings, or even as a mid-day snack. Enjoy the crispy exterior and flavorful filling of these homemade cocktail samosas, and watch them disappear within minutes!

    Tips for Perfect Cocktail Samosas: 

    • Ensure the dough is rolled thinly for crispy samosas.
    • Seal the edges of the samosas tightly to prevent the filling from leaking out during frying.
    • Fry the samosas in hot oil for a crispy texture.
    • Serve the samosas hot for the best taste and texture.

    Variations to Try: 

    • Substitute the green peas filling with mashed potatoes or minced meat for different flavor options.
    • Add chopped vegetables like carrots, bell peppers, or beans to the filling for added texture and nutrition.
    • Experiment with different spices and seasonings to customize the flavor of the samosas according to your preference.

    Benefits of Cocktail Samosas: 

    • Cocktail samosas are a great appetizer or snack option for parties and gatherings.
    • They can be easily customized with different fillings to suit various tastes and dietary preferences.
    • Homemade cocktail samosas are healthier than store-bought ones, as you can control the quality and quantity of ingredients used.

    FAQs (Frequently Asked Questions): 

    • Can I make cocktail samosas ahead of time? 

    Yes, you can prepare the samosas ahead of time and store them in an airtight container in the refrigerator. When ready to serve, reheat them in the oven until crispy and hot.

    • Can I bake cocktail samosas instead of frying them? 

    While frying gives the samosas a crispy texture, you can bake them in the oven for a healthier alternative. Simply brush the samosas with oil and bake them at 375°F (190°C) until golden brown and crispy.

    • How long do cocktail samosas stay fresh? 

    Cocktail samosas are best enjoyed fresh on the day they are made. However, you can store any leftovers in the refrigerator for up to 2-3 days and reheat them before serving.

    Other Recipes on Manjula’s Kitchen 

    If you’re looking to explore more Indian recipes, appetizers, beverages, and desserts, be sure to check out the following links on Manjula’s Kitchen. Here are some links to recipes on Manjula’s Kitchen official website:

    Paneer Tikka Masala Recipe

    Chana Chaat (Spicy Chickpea Salad) Recipe

    Pav Bhaji (Spicy Vegetable Hash with Buns) Recipe

    Raj Kachori (Crunchy Chaat) Recipe

    Vegetable Biryani Recipe

    These recipes should offer you a flavorful experience straight from Manjula’s Kitchen.

  • Aloo Tikki (Potato Patties)

    Aloo Tikki (Potato Patties)

    Aloo Tikki (Potato Patties)

    Aloo Tikki (Potato Patties)

    Aloo tikki or potato patties are popular snack, traditionally when any snack is served with yogurt and chutney it is known as chaat. This is very popular with road side vendors, the aroma of the hot tikkis are enough to make you hungry.
    No ratings yet
    Course street food
    Cuisine Indian
    Servings 8 tikki

    Ingredients
      

    • 3 medium size potatoes boiled and shredded, this will make 2 cups of shredded potato
    • 2 tablespoon bread crumbs
    • 1 teaspoon salt
    • Oil for cooking

    for Filling

    • 1/3 cup green peas boiled and drained
    • 1 teaspoon chopped ginger
    • 1 tablespoon green chili minced
    • 1 tablespoon minced cilantro (hara dhania)
    • ¼ teaspoon salt
    • 1 teaspoon oil

    for Serving

    Instructions
     

    Making Filling

    • Boil and drain the water from the peas and lightly mash.
    • Heat the oil in a small pan over medium heat; add all the filling ingredients, stir fry for about two minutes. Keep the filling little moist. Set aside.

    Making tikkis

    • Add the salt and bread crumb into the potatoes and knead to make the dough.
    • Divide the potatoes into 8 equal parts.
    • Takes one part of the potato dough, make a ball and flatten over the oiled palm.  Put about 1 teaspoon of filling in the center and wrap around with potato. Lightly flatten the filled balls to patties. Make all the patties.
    • Heat non stick heavy skillet on medium high heat, generously greased the skillet.  Place the tikkies on the skillet, making sure they are not touching each other and has some space all around. Oil the tikkies from the top.
    • Cook them for about 1 minute and turn them over, tikkies should be light golden brown. Oil the tikkies from the top and lightly press with spatula.
    • Turn the tikkies 3-4 times as needed to make sure tikkies are nice and crispy. Brush the oil lightly every time when you turn the tikkies over and also press with spatula.
    • Aloo tikkies taste best when they are served right from over the skillet.
    • You can prepare them in advance, up to five steps and brown them just before serving.
    • Tikkies are served along with tamarind chutney, cilantro chutney and yogurt. You can also serve them with spicy chole.
    Tried this recipe?Let us know how it was!

    Aloo Tikki: A Delectable Indian Potato Patties Recipe 

    In this aloo tikki recipe, we delve into the art of creating these beloved potato patties, a staple in Indian cuisine. These aloo tikkis are not only flavorful but also versatile, making them perfect for various dishes like aloo tikki chaat. Aloo Tiki, a delightful vegan appetizer inspired by street food recipes. If you’re craving a delightful snack or appetizer, look no further than this tikki aloo recipe.

    Preparation: Crafting the Perfect Aloo Tikki 

    To start this aloo tikki recipe, begin by boiling potatoes until they are tender. Once cooled, peel and mash them thoroughly. Now, let’s infuse these mashed potatoes with flavor. Add green chili, ginger, salt, cumin seeds, mango powder, and garam masala to the mashed potatoes. Mix these ingredients well, ensuring they are evenly distributed, creating the base for our aloo tikkis.

    Cooking: Shaping and Pan-Frying the Aloo Tikki 

    Now comes the fun part – shaping the aloo tikkis! Take a portion of the potato mixture and roll it into a ball, then gently flatten it to form a patty. Repeat this process until all the mixture is used. Heat oil in a skillet over medium heat. Once hot, carefully place the aloo tikkis in the skillet, ensuring they don’t overlap. Cook each side until golden brown and crisp, creating a delightful texture that enhances the flavor of the tikki aloo.

    Serving: Enjoying Aloo Tikki in Various Forms 

    Now that your aloo tikkis are ready, it’s time to enjoy them in different ways. One popular option is aloo tikki chaat, where the tikki aloo is topped with a medley of chutneys, yogurt, and spices, creating a burst of flavors with every bite. You can also serve aloo tikkis with a side of mint chutney or tamarind chutney for a refreshing twist. Whether enjoyed as a snack, appetizer, or part of a meal, these aloo tikkis are sure to delight your taste buds.

    Tips for Perfect Aloo Tikki: 

    • Use starchy potatoes: Opt for potatoes like russets or Yukon Gold, as they have a higher starch content, resulting in fluffier aloo tikkis.
    • Keep the oil hot: Ensure the oil is sufficiently hot before frying the aloo tikkis to achieve a crispy exterior.
    • Don’t overcrowd the skillet: Cook the tikki aloo in batches, giving them enough space in the skillet to fry evenly.
    • Add breadcrumbs: If the potato mixture feels too wet, incorporate breadcrumbs to help bind it together.

    Variations of Aloo Tikki: 

    • Paneer-stuffed Aloo Tikki: Elevate your aloo tikki experience by adding a layer of paneer stuffing before shaping and frying them.
    • Vegetable-loaded Aloo Tikki: Mix finely chopped vegetables like carrots, peas, and bell peppers into the potato mixture for added texture and flavor.
    • Spicy Aloo Tikki: Increase the heat by adding extra green chilies or a dash of red chili powder to the potato mixture.

    Benefits of Aloo Tikki: 

    • Rich in carbohydrates: Potatoes are a great source of carbohydrates, providing energy to fuel your day.
    • Versatile: Aloo tikkis can be enjoyed on their own, as part of a meal, or as a base for various chaat dishes, offering endless culinary possibilities.
    • Comfort food: The warm and comforting flavors of aloo tikkis make them a favorite comfort food for many.

    FAQs about Aloo Tikki: 

    Q: Can I make aloo tikkis ahead of time? 

    A: Yes, you can prepare the potato mixture and shape the aloo tikkis in advance. Store them in the refrigerator until ready to fry.

    Q: Can I bake aloo tikkis instead of frying them? 

    A: While frying gives aloo tikkis their characteristic crispiness, you can bake them in the oven for a healthier alternative. Brush them with oil and bake at 400°F (200°C) until golden brown.

    Q: Are aloo tikkis gluten-free? 

    A: Yes, aloo tikkis are naturally gluten-free. However, if you’re adding breadcrumbs for binding, ensure they are gluten-free certified.

    Other Recipes on Manjula’s Kitchen 

    If you’re looking to explore more Indian recipes, appetizers, beverages, and desserts, be sure to check out the following links on Manjula’s Kitchen. Here are some links to recipes on Manjula’s Kitchen official website:

    Paneer Tikka Masala Recipe

    Chana Chaat (Spicy Chickpea Salad) Recipe

    Pav Bhaji (Spicy Vegetable Hash with Buns) Recipe

    Raj Kachori (Crunchy Chaat) Recipe

    Vegetable Biryani Recipe

    These recipes should offer you a flavorful experience straight from Manjula’s Kitchen.

  • Spicy Corn Patties – Fritters

    Spicy Corn Patties – Fritters

    Spicy Corn Patties

    Spicy Corn Patties – Fritters

    Spicy corn Patties makes a healthy and delicious snack. They are also vegan and gluten free. This is a quick and easy recipe.
    No ratings yet
    Course Appetizer
    Cuisine Indian
    Servings 10 patties

    Ingredients
      

    • 2 cups corn frozen
    • 1/2 cup corn meal
    • 2 tablespoons rice flour
    • 1 chopped green chili adjust to taste
    • 2 teaspoon finely chopped ginger
    • 2 tablespoons chopped cilantro (hara dhania)
    • 2 teaspoon lemon juice
    • 1/2 teaspoon cumin seeds (jeera)
    • 1/2 teaspoon salt
    • 2 teaspoons oil

    Instructions
     

    • Thaw the corn in hot water and drain. Blend the corn texture will be creamy and coarse. I like to use food processor.
    • Add all the ingredients to corn, corn meal, rice flour, chili, cilantro, ginger, lemon juice, cumin seeds, and salt, and mix it well. Mixture should be consistency of thick batter. Add little water if needed.
    • Heat a heavy non stick skillet on medium heat and greased the skillet generously.
    • Drop about 2 spoons of batter to make four to five patties into the skillet and flatten with greased back of the spoon lightly, making the patties about 1/4 inch thick and two to three inch circle.
    • Cook for about two minutes until bottom turns golden brown. Flip over and cook from other side both side of the patties should be cook until golden brown.
    • Serve them hot or at room temperature they taste delicious.
    Tried this recipe?Let us know how it was!

  • Meethi Matri (Indian Sweet Cracker)

    Meethi Matri (Indian Sweet Cracker)

    Meethi Matri

    Meethi Matri (Indian Sweet Cracker)

    Meethi matries are delightful crispy and sweet snack made during festivals like Holi and Diwali. You can also serve them as biscuit or cookie. Fennel and cardamom gives very nice and sweet flavor to them.
    No ratings yet
    Course Dessert
    Cuisine Indian
    Servings 14 Meethi Matri

    Ingredients
      

    • 1 cup all purpose flour (maida, plain flour)
    • 1 tablespoon sooji (rava, semolina)
    • 1/4 teaspoon salt
    • 1/2 teaspoon fennel seeds crushed
    • 2 tablespoon oil
    • Approx. 1/3 cup of lukewarm water
    • Oil to fry

    Syrup

    • 3/4 cup sugar
    • 1/4 cup water

    Garnish

    • 1/2 teaspoon crushed cardamom
    • 2 teaspoons pistachios crushed

    Instructions
     

    • Mix flour, sooji, salt, fennel seeds and oil in a bowl. Add water as needed to make soft dough. Don’t knead the dough. Cover the dough with a damp cloth. Let it rest at least 15 minutes.
    • Divide the dough into 14 equal parts. Rolling the dough between your palms form into balls.
    • Roll the dough balls into three inch circles. Prick each matri with a fork 8-10 places on both sides. This will prevent matri not to puff when frying.
    • Heat at least one inch of oil in a frying pan over medium heat. To check if oil is ready put a little piece of dough in the oil. It should make oil lightly sizzle, if dough float instantly oil is too hot.
    • Fry a few matri at a time. Fry the matries until both sides are a light golden-brown. It should take six to eight minutes. If the matries are fried on high heat, they will not be cooked inside.
    • Take them out over paper towel so it can absorb the extra oil.
    • For syrup, in a sauce pan add water, and sugar over medium heat, bring it to a boil. Let it boil for about 2 minutes until syrup is sticky, on candy thermometer it should be 230 degree.
    • Dip the matri one at a time into the syrup making sure it is coated with syrup all around.
    • Place the matries on a wire rack to allow the extra syrup drain or over greased plate.
    • Garnish the matries with cardamom and sliced pistachios while the matries are still moist with syrup.
    • Matries will be dry in an hour.
    • Matries can be stored in airtight container up to a month.
    Tried this recipe?Let us know how it was!

  • Samosa Pinwheels

    Samosa Pinwheels

    Samosa Pinwheels

    Samosa Pinwheels

    Samosa pinwheels are great party snack. This is an interesting fusion on the popular Indian snack samosas. They make a mouthwatering appetizer or can be served as a chaat.
    4.34 from 6 votes
    Prep Time 15 minutes
    Cook Time 20 minutes
    boiling potatoes 25 minutes
    Total Time 35 minutes
    Course Appetizer
    Cuisine Indian
    Servings 4 people

    Ingredients
      

    Filling

    • 4 medium potatoes, boiled, peeled and roughly mashed will be about 2-1/2 cup mashed potatoes
    • 1/2 cup green peas boiled and drain using frozen green peas
    • 1 tsp cumis seeds jeera
    • 1 tbsp green chili finely chopped
    • 2 tsps coriander powder dhania
    • 1/2 tsp red chili powder lal mirch
    • 1/2 tsp garam masala
    • 1 tsp mango powder amchoor
    • 1-1/4 tspa salt
    • 2 tbsps cilantro finely chopped hara dhania

    Dough

    • 1 cup all-purpose flour maida, plain flour
    • 2 tbsps fine sooji samolina
    • 1/2 tsp salt
    • 3 tbsps oil canola, vegetable
    • 1/3 cup cold water, approx.

    Also Need

    • 3 tbspa all-purpose flour maida, plain flour
    • 1/4 cup water
    • oil to fry

    Instructions
     

    Dough

    • Mix flour, sooji, salt, and oil. Add water as needed to make soft dough. Don’t knead the dough. Cover the dough with a damp cloth. Let it rest at least 15 minutes.

    Filling

    • Squeeze the water from the green peas. Mix all the ingredients for filling: potatoes, cumin seeds, coriander, green chili, mango powder, salt, and cilantro.
      Divide the filling in 2 parts and set aside

    Making Pinwheels

    • Mix the 3 tablespoons all purpose flour and ¼ cup water to make a thin batter. Set aside.
    • Knead the dough for a minute before rolling. Divide dough into two equal parts and make them into patties and roll each one into about 11 inch diameter.
    • Spread one part of the filling evenly over one of the rolled dough, slightly pressing.
    • Roll the sheet gently, but firmly until you have a nice firm log. Use a little water to seal the end of the sheet firmly, roll the log gently 6-7 times this helps keeping together.
    • With a sharp knife slice the both ends about 1 inch long then slice the log into ½ inch thick, this should make about 14 -16 pinwheels. Press each pinwheel lightly. Do the same with second sheet, you will have about 30 pinwheels.
    • Heat at least one inch of oil in a frying pan over medium high heat. To test, put a small piece of dough into the oil; dough should sizzle and come up slowly, but not change color.
    • Fry the pinwheels in small batches. Dip them in the batter one at a time and drop them slowly into the hot oil. Fry the pinwheels until both sides are golden-brown, turning occasionally. Each batch will take three to four minutes to cook. Repeat this process until all the pinwheels are cooked.
    • The crisp, delicious pinwheels are now ready to serve.

    Notes

    Samosa pinwheels can be frozen five to six weeks. To freeze, fry them halfway. Once they reach room temperature, layer them in a container between sheets of waxed paper. When ready to use, re-fry them or heat them in the oven at 350° F until golden brown.
    You can also refrigerate them three to four days.
    Serving Suggestions
    Serve Samosa Pinwheels With Hari Cilantro Chutney and or Tamarind Chutney.
    Serve them as a chaat with drizzling whipped yogurt and tamarind chutney.
    Also can be served with chola .
    Keyword Appetizer, Party Food, Tea Time Snack
    Tried this recipe?Let us know how it was!

    Pinwheel Samosa Recipe: How to Make Potato Samosa Pinwheel 

    Samosa pinwheels are savory vegan appetizers reminiscent of traditional chaat, perfect for parties with their delightful fusion of flavors and convenient bite-sized format. Samosa pinwheels are a delightful twist on the traditional samosa, offering all the flavor and crunch in a fun, bite-sized package. In this pinwheel samosa recipe, we’ll guide you through the process of creating these savory treats step by step. Whether you’re hosting a party, looking for a unique appetizer, or simply craving a delicious snack, these samosa pinwheels are sure to impress.

    Step 1: Prepare the Filling for Samosa Pinwheels 

    Begin by preparing the filling for your samosa pinwheels. Heat oil in a pan over medium heat and add cumin seeds, letting them sizzle for a few seconds. Add boiled and mashed potatoes to the pan, along with green peas, finely chopped green chilies, ginger paste, salt, red chili powder, mango powder, and garam masala. Mix the ingredients well and cook for a few minutes until the flavors meld together. Once done, set the filling aside to cool.

    Step 2: Prepare the Dough for Samosa Pinwheels 

    While the filling cools, it’s time to prepare the dough for your samosa pinwheels. In a large mixing bowl, combine all-purpose flour, salt, and carom seeds (ajwain). Gradually add water and knead the ingredients into a smooth, pliable dough. Cover the dough with a damp cloth and let it rest for about 15-20 minutes.

    Step 3: Assemble the Samosa Pinwheels 

    Now comes the fun part – assembling the samosa pinwheels! Divide the rested dough into small equal-sized balls and roll each ball into a thin circle, similar to a chapati or tortilla. Spread a thin layer of mint chutney evenly over each circle of dough, followed by a generous portion of the prepared potato filling. Carefully roll each circle into a tight log, similar to a Swiss roll, ensuring the filling is enclosed within the dough.

    Step 4: Shape and Bake the Samosa Pinwheels 

    Once you’ve rolled all the circles into logs, it’s time to shape and bake your samosa pinwheels. Using a sharp knife, slice each log into smaller pieces, about 1 inch in width. Place the sliced pinwheels on a baking tray lined with parchment paper, leaving some space between each piece. Preheat your oven to 375°F (190°C) and bake the samosa pinwheels for 20-25 minutes, or until they turn golden brown and crispy.

    Step 5: Serve and Enjoy Your Samosa Pinwheels 

    Once baked to perfection, remove the samosa pinwheels from the oven and let them cool slightly. Transfer them to a serving platter and garnish with fresh coriander leaves and a drizzle of mint chutney. These delightful samosa pinwheels are best enjoyed warm with your favorite dipping sauce or chutney. Serve them as appetizers at your next gathering or enjoy them as a tasty snack any time of day.

    Variations and Tips for Samosa Pinwheels 

    • Vegetarian Variation: This recipe for samosa pinwheels is completely vegetarian, making it suitable for those following a plant-based diet. However, feel free to customize the filling according to your preferences. You can add ingredients like paneer, tofu, or even a medley of vegetables for added texture and flavor.
    • Spice Level: Adjust the amount of green chilies and red chili powder according to your preferred spice level. If you prefer a milder flavor, you can reduce or omit these ingredients altogether.
    • Make-Ahead Option: You can prepare the filling and dough for the samosa pinwheels in advance and store them separately in the refrigerator. When ready to serve, simply assemble, shape, and bake the pinwheels for a quick and convenient snack or appetizer.
    • Serve with Dips: These samosa pinwheels pair perfectly with a variety of dips and chutneys, such as tamarind chutney, mint chutney, or yogurt-based sauces. Get creative with your dipping options to enhance the flavors of this delicious snack.

    FAQs about Samosa Pinwheels 

    • Can I Freeze Samosa Pinwheels?

      • Yes, you can freeze unbaked samosa pinwheels for later use. Simply assemble the pinwheels and place them on a baking tray lined with parchment paper. Once frozen, transfer them to a freezer-safe bag or container. When ready to bake, place the frozen pinwheels directly in the oven and adjust the baking time as needed.
    • Can I Air Fry Samosa Pinwheels? 

      • Absolutely! To air fry samosa pinwheels, preheat your air fryer to 375°F (190°C) and place the assembled pinwheels in the basket, making sure they are not overcrowded. Cook for 10-12 minutes, or until golden brown and crispy, shaking the basket halfway through to ensure even cooking.
    • Can I Make Mini Samosa Pinwheels? 

    • Yes, you can make mini samosa pinwheels by rolling the dough into smaller circles and cutting them into thinner slices. Adjust the baking time accordingly to ensure they cook evenly and become crispy.

    For more delightful Indian recipes, be sure to check out Manjula’s Kitchen. Explore our collection of appetizers, main courses, desserts, and more to add a touch of flavor to your culinary adventures. Some of the recipes here: Aloo Gobi (Potato and Cauliflower) Recipe, Vegetable Pakoras Recipe, Kaju Katli (Cashew Burfi) Recipe

  • Medu Vada

    Medu Vada

    Medu Vada

    Medu Vada

    Medu Vadas are a traditional South Indian dish which can be served as a main course, side dish, or snack. This crispy deliciousness is made with spiced urad dal batter and fried in donut shape dumplings. They are crispy on the outside and soft on the inside. They are served with Sambar and Coconut Chutney.
    No ratings yet
    Course Snack
    Cuisine Indian
    Servings 10 Vadas

    Ingredients
      

    • 1 cup split washed urad dal (available in Indian stores)
    • 1/8 teaspoon asafetida (hing)
    • 2 teaspoon whole coriander seeds (sabut dhania)
    • 1 tablespoon green chili chopped
    • 2 tablespoons cilantro chopped (hara dhania)
    • 1 teaspoon salt
    • Oil to fry

    Instructions
     

    • Wash and soak dal in about 3 cups of water for about 4-6 hours.
    • Drain the water and grind dal to smooth paste using very little water just enough to grind, food processor works good for this. Blend for another 2 minutes to whip dal to make fluffy. Take dal batter out in a wide bowl.
    • Add all the ingredients to the dal batter, cilantro, green chili, coriander, asafetida and salt, beat the batter for 2-3 minutes this will make the batter light and fluffy. To make sure batter is ready put one drop of batter in a bowl of water, batter should float.
    • Keeping the right consistency of batter is very important; add water as needed batter should not be soft but not runny. When you put the batter on your palm batter should hold its shape. Make the Vadas batter when you are ready to fry them, as the batter sit will get soft if you are not ready to fry keep batter refrigerated.
    • Heat the oil in a frying pan over medium high heat.
    • The frying pan should have about 1 inch of oil. To check if the oil is ready, put one drop of batter in oil. The batter should sizzle and come up but not change color right away. If oil is very hot Vadas will not cook through and will not be crispy.
    • Wet the palms and take golf size batter and place over your palm, flatten to round shape and make hole in the center looking like donut now with other hand wet fingers slowly slide Vada into the hot oil.
    • Fry the Vadas from both sides to golden brown. Take them out over a paper towel to drain access oil.
    • Traditionally Medu Vada is served with Coconut Chutney, and sambar (aromatic lentil soup with vegetables).

    Notes

    Notes
    1. If the Medu Vada Batter is too thick: The Vada will shape nicely but they will be hard inside after frying.
    2. If the batter is too soft: it will not be able to hold the shape and will absorb too much oil.
    3. It’s the consistency of the batter that determines how soft and shapely the Vadas turn out.
    Tried this recipe?Let us know how it was!

    Medu Vada: A South Indian Delicacy 

    Medu Vada is a South Indian delicacy often served as an appetizer or snack, especially during festive occasions like Yugadi. It is a gluten-free and vegan dish made primarily from urad dal (black gram lentils) batter, seasoned with spices like cumin seeds, black pepper, and curry leaves. The batter is shaped into round doughnuts and deep-fried until golden brown, resulting in a crispy exterior and a soft, fluffy interior. 

    Medu Vada is commonly enjoyed with coconut chutney or sambar, enhancing its flavor profile and making it a popular choice for those seeking gluten-free and vegan snack options. Medu Vada is a popular South Indian snack known for its crispy exterior and soft interior texture. Originating from the state of Tamil Nadu, it has gained widespread popularity across India and beyond. This medu vada recipe offers a step-by-step guide on how to make this delectable treat right in your kitchen.

    How to Make Medu Vada: Step-by-Step Recipe 

    Preparing the Batter 

    To start making medu vada, you’ll need to prepare the batter first. Begin by soaking urad dal in water for at least 4-5 hours or preferably overnight. The soaked dal should be soft enough to easily break when pressed between your fingers. Once soaked, drain the water and transfer the dal to a blender. Grind it to a smooth paste, adding minimal water as needed. The consistency should be thick, similar to that of a pancake batter. This step is crucial in achieving the perfect texture for your medu vada.

    Shaping the Vadas 

    Once the batter is ready, transfer it to a mixing bowl. Add finely chopped green chilies, ginger, curry leaves, cumin seeds, asafoetida, and salt to taste. Mix all the ingredients thoroughly to ensure an even distribution of flavors. Now, heat oil in a deep frying pan or kadhai on medium heat. To shape the vadas, wet your palms with water to prevent sticking. Take a small portion of the batter and flatten it slightly to form a disc shape with a hole in the center, resembling a donut. Carefully slide the shaped vada into the hot oil and fry until golden brown and crispy on both sides. Repeat the process with the remaining batter, frying a few vadas at a time to avoid overcrowding the pan.

    Frying to Perfection 

    Achieving the perfect medu vada requires frying them to crispy perfection. Make sure the oil is adequately heated before adding the vadas to ensure they cook evenly and develop a crunchy exterior. It’s essential to maintain the oil at a consistent temperature throughout the frying process. Avoid overcrowding the pan, as this can lower the oil temperature and result in soggy vadas. Fry the vadas in small batches, flipping them occasionally to ensure uniform browning on all sides. Once done, remove the vadas from the oil using a slotted spoon and drain the excess oil on paper towels.

    Serving Suggestions

    Medu vada is best enjoyed hot and crispy, served with coconut chutney and sambar. You can also pair it with a tangy tomato chutney or spicy mint chutney for added flavor. Some prefer to enjoy medu vada with a cup of hot filter coffee, making it a perfect breakfast or evening snack option. Experiment with different dipping sauces and accompaniments to find your favorite combination.

    Tips for Making Perfect Medu Vada 

    • Ensure the urad dal is soaked well to achieve a smooth batter texture.
    • Maintain the oil temperature while frying to achieve crispy vadas.
    • Wet your palms with water to prevent the batter from sticking while shaping the vadas.
    • Add chopped green chilies and ginger for an extra kick of flavor.
    • Serve medu vada hot for the best taste and texture.

    Variations of Medu Vada 

    While the traditional medu vada recipe calls for basic ingredients like urad dal, spices, and herbs, you can experiment with variations to suit your taste preferences. Some popular variations include:

    • Masala Medu Vada: Add coriander leaves and grated carrots to the batter for an extra burst of flavor.
    • Rava Medu Vada: Mix semolina (rava) with the urad dal batter to add a crunchy texture to the vadas.
    • Vegetable Medu Vada: Incorporate grated vegetables like carrots, cabbage, and spinach into the batter for a nutritious twist.
    • Cheese Medu Vada: Stuff the vadas with a cheesy filling or sprinkle grated cheese on top before frying for a gooey, indulgent treat.

    Benefits of Medu Vada 

    Medu vada is not only delicious but also offers several health benefits when consumed in moderation. Here are some of the benefits:

    • Rich in Protein: Urad dal, the main ingredient in medu vada, is a good source of protein, essential for muscle repair and growth.
    • Nutrient-Dense: It contains essential nutrients like iron, magnesium, and potassium, which are vital for overall health and well-being.
    • Gluten-Free: Since medu vada is made from urad dal, it is naturally gluten-free, making it suitable for individuals with gluten sensitivities or celiac disease.
    • Good Source of Fiber: Including medu vada in your diet can help improve digestion and promote gut health due to its fiber content.
    • Energizing Snack: It provides a quick energy boost, making it an ideal snack option for busy days or post-workout refueling.

    FAQs about Medu Vada 

    Q: Can I make the batter ahead of time?

    A: Yes, you can soak the urad dal and grind the batter ahead of time. Store it in the refrigerator for up to 1-2 days and fry the vadas when ready to serve.

    Q: Can I freeze the vadas?

    A: While it’s best to consume medu vada fresh for optimal taste and texture, you can freeze the shaped vadas and fry them directly from frozen when needed. However, freshly fried vadas are recommended for the best flavor.

    Q: Can I bake instead of frying?

    A: While traditional medu vada is deep-fried for that crispy texture, you can try baking them in a preheated oven at 375°F (190°C) for 20-25 minutes or until golden brown for a healthier alternative.

    Q: Can I use split urad dal instead of whole urad dal?

    A: Yes, you can use split urad dal (white or black) to make medu vada. However, the texture may vary slightly compared to using whole urad dal.

    Q: Can I make gluten-free medu vada?

    A: Yes, medu vada is naturally gluten-free since it’s made from urad dal. Just ensure that all ingredients used are gluten-free, especially if adding any additional flavorings or seasonings.

    Explore more Indian recipes on Manjula’s Kitchen:

    In conclusion, medu vada is a versatile and flavorful snack that can be enjoyed on its own or paired with a variety of chutneys and dips. With this detailed recipe and helpful tips, you can recreate this South Indian delicacy at home and impress your family and friends with your culinary skills. So, roll up your sleeves, gather your ingredients, and get ready to savor the crispy goodness of homemade medu vada!

  • Peanut Chaat

    Peanut Chaat

    Peanut Chaat

    Peanut Chaat

    Peanut Chaat is a combination of peanuts, tomatoes, cucumbers and spices. It is a delicious and satisfying snack-not to mention healthy and low-fat! It is easy to make. It can be served as an appetizer or anytime spicy snack.
    No ratings yet
    Course Appetizer, Chaat
    Cuisine Indian
    Servings 4 people

    Ingredients
      

    Ingredients:

    • 1/2 cup raw peanuts
    • 1/2+1/2 teaspoon salt adjust to taste
    • 1/8 teaspoon turmeric (haldi)
    • 3/4 cup tomatoes seeded cut in small cubes
    • 3/4 cup cucumber cut in small cubes
    • 1 tablespoon ginger finally chopped
    • 1 green chili finally chopped adjust to taste
    • 1/2 teaspoon roasted cumin seed powder (bhuna jeera)
    • 1/8 teaspoon red chili powder
    • 1/8 teaspoon black pepper
    • 1/4 teaspoon sugar
    • 1/2 teaspoon  mango powder (amchoor)
    • tablespoon lemon juice

    Instructions
     

    Method

    • In a sauce pan add peanuts with 2 cups of water turmeric and 1/2 teaspoon of salt. Cook over medium high heat for about 25 minutes until peanuts are soft.
    • Drain the water and let it cool to room temperature.
    • Mix ginger, chili, 1/2 teaspoon salt, cumin seed powder, red chili powder, black pepper, sugar, mango powder and lemon juice together.
    • Mix the peanuts with tomatoes and cucumbers, add the spice mix and toss.
    • Peanut Chaat is ready to serve.
    Tried this recipe?Let us know how it was!

    Peanut Chaat Recipe 

    Peanut chaat is a delightful appetizer that caters to various dietary preferences, offering a gluten-free and vegan option packed with high protein, yet low in fat, making it an ideal snack choice. Peanut chaat is a delightful and flavorful snack that is popular across India. This peanut chaat recipe combines the nuttiness of peanuts with the tanginess of various spices and chutneys, creating a mouthwatering dish that is perfect for any occasion. Here’s how to make peanut chaat at home.

    • Boiling the Peanuts: Begin by placing the peanuts in a saucepan. Add 2 cups of water, turmeric, and ½ teaspoon of salt. Bring the pot to a medium-high heat. Once boiling, reduce the heat slightly and simmer the peanuts for about 25 minutes. The key here is to cook the peanuts until they are tender and soft throughout. You can test for doneness by taking a peanut out and splitting it in half. If the center is firm, continue cooking for a few more minutes.

    • Cooling and Draining: Once the peanuts are cooked, drain the water from the pot using a colander. It’s important to drain the peanuts thoroughly to prevent a watery chaat. Spread the cooked peanuts on a plate or baking sheet to cool completely. This will take about 30 minutes to an hour, depending on the amount of peanuts. Cooling the peanuts is necessary before adding the other ingredients to ensure they don’t become soggy.

    • Making the Spice Mix: While the peanuts cool, prepare the flavor base for your chaat. In a separate bowl, combine grated ginger, chopped chili pepper (adjust the amount depending on your spice preference), ½ teaspoon of salt, cumin seed powder, red chili powder, black pepper, sugar, mango powder, and lemon juice. Mix all these ingredients into a fragrant and flavorful spice mix. This will be what brings the chaat to life!

    • Assembling the Chaat: Once the peanuts are cool, transfer them to a large mixing bowl. Add chopped tomatoes and cucumbers to the peanuts. Then, pour the prepared spice mix over the peanuts and vegetables. Using a spoon or spatula, gently toss everything together until well combined. This ensures each peanut gets a good coating of the flavorful spice mix.

    • Serving: Your Peanut Chaat is now ready to be enjoyed! Serve immediately for the freshest flavor and best textural contrast between the soft peanuts and the crisp vegetables. You can garnish with chopped fresh cilantro for an extra pop of color and freshness.

    Tips:  

    • You can customize the peanut chaat by adding other ingredients such as boiled potatoes, diced cucumber, or grated carrots for added texture and flavor.
    • For a healthier version, you can use roasted peanuts without any added salt or oil.
    • Adjust the spice levels according to your preference by increasing or decreasing the amount of red chili powder and green chilies.

    Variations: 

    • For a tangier flavor, drizzle some tamarind chutney or mint chutney over the peanut chaat before serving.
    • Experiment with different toppings such as pomegranate seeds, grated cheese, or yogurt for a unique twist on this classic snack.

    Benefits: 

    • Peanuts are a good source of protein, fiber, and essential nutrients such as vitamins and minerals, making peanut chaat a nutritious snack option.
    • This dish is vegetarian and gluten-free, making it suitable for individuals with dietary restrictions.

    FAQs: 

    Can I use pre-roasted peanuts for this recipe? 

    • Yes, you can use pre-roasted peanuts if you prefer. However, roasting the peanuts yourself adds an extra layer of flavor to the chaat.

    How long can I store peanut chaat? 

    • Peanut chaat is best enjoyed fresh but can be stored in an airtight container in the refrigerator for up to 2 days. However, keep in mind that the peanuts may lose their crunchiness over time.

    Can I make peanut chaat ahead of time?

    • While it’s best to assemble the chaat just before serving to maintain its freshness, you can prepare the ingredients in advance and assemble them when ready to serve.

    For more delicious Indian recipes, you can explore other recipes on Manjula’s Kitchen, such as Vegetable Pakoras, Aloo Tikki Chaat, and Pani Puri. These recipes are perfect for any occasion and are sure to impress your family and friends. Enjoy cooking!

  • Masala Papad (Papad Salad)

    Masala Papad (Papad Salad)

    Masala Papad

    Masala Papad (Papad Salad)

    Crispy papad topped with spicy salad makes a very refreshing appetizer. Masala Papad is full of flavors and very tempting. This is a very simple and easy recipe to make.
    Papad is a round, flat, dry cracker made with a variety of lentils. They are sold uncooked in Indian grocery stores. You can deep-fry them or dry-roast them.
    No ratings yet
    Course Salad
    Cuisine Indian
    Servings 2 people

    Ingredients
      

    Ingredients:

    • 2 plain papad, (available in Indian grocery stores)
    • 2 medium tomatoes, seeded and diced very small to make a approx. 1cup
    • 1/2  English or deseeded cucumber, cut in very small pieces to make it about ½  cup
    • 2 tablespoons cilantro finely chopped
    • 1 teaspoon ginger finely shredded, optional
    • 1 green chili finely chopped, optional
    • ½ lemon
    • 2 teaspoon 2 teaspoon oil

    Spice Mix for Garnishing

    • 1/2 teaspoon salt
    • 1/4 teaspoon black salt
    • 1/2 teaspoon dry roasted cumin seeds powder
    • 1/8 teaspoon black pepper
    • Pinch red chili 

    Instructions
     

    Method

    • Mix all the dry ingredients to make a spice mix, set aside.
    • Mix tomatoes, cucumbers, cilantro, ginger, and green chili, set aside
    • Lightly oil the papads from both sides, set aside.
    • Preheat the skillet over medium high heat. Roast the papads on both sides in the skillet one at a time, pressing with spatula. The papads will change to a light yellow with a few brown spots. Be careful not to over-roast. Fold the Papads in quarters while they are hot, making triangles right on the skillet.
    • Remove the papads from the skillet and break on the folds, creating four triangles from each one.
    • Take one piece of papad and top it with cucumber, tomato, ginger, green chili, and cilantro. Drizzle with lemon juice and sprinkle the spice mix on top.

    Notes

    Notes
    1. Removing the seeds from the tomatoes keeps the papads crunchy.
    2. English cucumber is crisper on the outside and tender on the inside.
    3. You can prepare  the masala papad in advance, and add the toppings just before serving.
    Tried this recipe?Let us know how it was!

    Crunchy Delight: How to Make Delicious Masala Papad at Home 

    Masala Papad is a flavorful appetizer perfect for parties, offering a low-fat, vegan option that delights snack enthusiasts with its crunchy texture and spicy seasoning. Masala Papad is a delightful Indian appetizer that combines the crunchiness of papad with a burst of spicy, tangy flavors. If you’re wondering how to make masala papad, you’re in for a treat! This masala papad recipe brings together a harmonious blend of ingredients to create a dish that’s not only delicious but also incredibly easy to prepare at home. Let’s dive into the steps to prepare this mouthwatering delicacy.

    1. Making the Spice Mix:

    First, we’ll create a flavorful spice blend to add a kick to your masala papad. Gather all the dry ingredients like cumin, coriander powder, chili powder, and maybe even some chaat masala (a tangy and savory spice blend commonly used in Indian street food). In a bowl, carefully measure and combine these dry spices. Once everything is incorporated, set the bowl aside for later.

    2. Preparing the Veggie Topping:

    Next, we’ll create a refreshing and vibrant topping for the papad. Start by chopping the tomatoes, cucumbers, cilantro, ginger, and green chili. Aim for a fine chop to ensure even distribution on the papad. You can remove the seeds from the tomatoes if you prefer a drier topping, as the seeds can release moisture and make the papad soggy. After chopping, combine all the veggies in a separate bowl and set it aside with the spice mix.

    3. Oiling and Roasting the Papads:

    Now it’s time to prepare the base of our dish – the papad itself! Take each papad and lightly brush or drizzle a thin layer of oil on both sides. This will help them crisp up nicely during roasting. Once oiled, set the papads aside on a plate.

    4. Roasting and Folding the Papads:

    Heat up your skillet over medium-high heat. It’s important to have the pan hot enough to ensure the papads roast quickly and evenly. Carefully place one papad at a time in the hot skillet. Use a spatula to gently press down on the papad as it cooks. You’ll see the color change from its original white to a light yellow with a few brown spots. This is your cue to flip the papad and cook the other side. Be mindful not to overcook them, as they can become burnt and brittle. While the papad is still hot and pliable, fold it in half to create a semi-circle shape. Then, fold it in half again to form a small triangle. This folding technique not only creates a nice presentation but also helps cradle the toppings when assembled.

    5. Assembling and Serving the Masala Papad:

    Finally, it’s time to put everything together! Take one of the folded papad triangles and carefully break it along the folds to create four smaller triangles. Now you have a crispy base ready for the toppings. Place a dollop of the prepared vegetable mixture on each papad triangle. Don’t forget a squeeze of fresh lemon juice for a touch of tanginess! Lastly, sprinkle the reserved spice mix over the top for a burst of flavor.

    Tips for Perfect Masala Papad 

    Using English cucumbers is recommended for their crisp texture, but regular cucumbers will work too.
    You can prepare the masala papad in advance for a quick and easy snack. Just store the roasted papad triangles in an airtight container and assemble them with fresh toppings right before serving.

    Experiment with different toppings such as grated cheese, finely chopped bell peppers, or even crumbled paneer to create your own unique variations of masala papad.

    For a healthier alternative, opt for baked papads instead of the traditional fried ones.

    If you’re short on time, you can prepare the masala mixture in advance and store it in the refrigerator until ready to use.

    Variations of Masala Papad 

    Paneer Masala Papad: Top your papads with a spicy paneer mixture for a creamy twist on this classic recipe. Check out the recipe here.

    Corn Masala Papad: Add a sweet and savory element to your masala papad by incorporating corn kernels into the masala mixture. Find the recipe here.

    Schezwan Masala Papad: Give your masala papad an Indo-Chinese twist by drizzling it with spicy Schezwan sauce. Learn how to make Schezwan sauce here.

    Benefits of Masala Papad

    Masala papad is a low-calorie snack that’s perfect for those watching their weight.

    The combination of spices in masala papad aids digestion and stimulates the appetite.

    Papads are rich in dietary fiber, making them a healthy option for snacking.

    FAQs about Masala Papad 

    Can I make masala papad in advance? 

    Yes, you can prepare the masala mixture ahead of time and store it in an airtight container in the refrigerator. Simply assemble the papads right before serving.

    Can I use store-bought papads for this recipe? 

    Absolutely! Store-bought papads work just as well as homemade ones for making masala papad.

    Can I customize the spice level of masala papad? 

    Of course! Adjust the amount of green chilies and chaat masala according to your preference for spiciness.

    With these simple steps and tips, you’ll be able to whip up a batch of delicious masala papad that’s sure to be a hit at your next gathering or as a quick snack for yourself. Enjoy experimenting with different toppings and flavors to create your own signature version of this beloved Indian appetizer!

    Other Recipes on Manjula’s Kitchen

    If you’re looking to explore more Indian recipes, appetizers, beverages, and desserts, be sure to check out the following links on Manjula’s Kitchen. Here are some links to recipes on Manjula’s Kitchen official website: Paneer Tikka Masala Recipe, Chana Chaat (Spicy Chickpea Salad), Pav Bhaji (Spicy Vegetable Hash with Buns), Raj Kachori (Crunchy Chaat), Vegetable Biryani