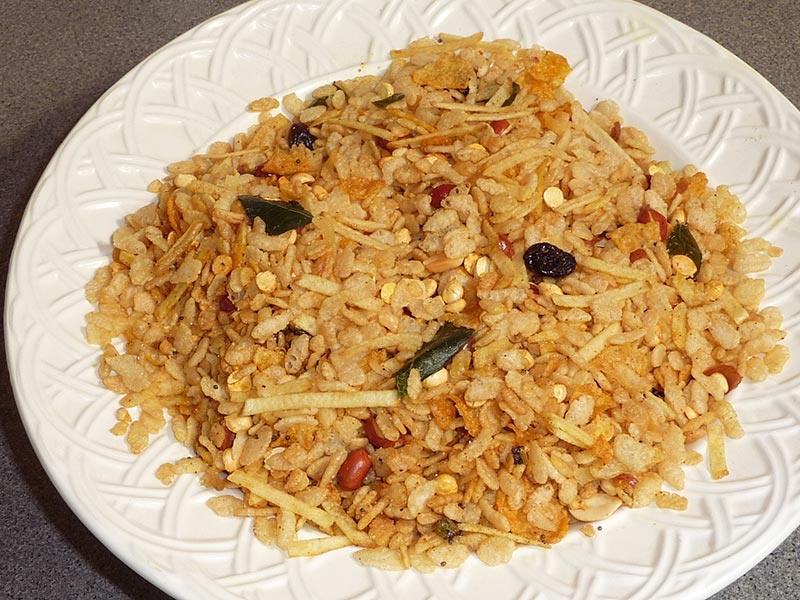
Cereal Chivda (Snack)
Ingredients
- 4 cups rice crispy cereal
- 1/2 cup corn flakes
- 1/2 cup fine potato sticks
- 1 tbsp tablespoon raisins
- 1/2 cup roasted peanuts
- 1/2 cup roasted chana dal
- 3 tbsp oil
- 1/2 tbsp mustard seeds (rai)
- Pinch of asafetida (hing)
- 1 green chili chopped adjust to taste
- About 10 curry leaves
- 1/2 tbsp fennel seeds (saunf)
- 1/4 tbsp turmeric (haldi)
- 1/4 spoon red chili powder adjust to taste
- 1/2 tbsp salt adjust to taste
- 1/4 tbsp mango powder (amchoor)
Instructions
- Heat the oil in a wide saucepan over medium high heat. After oil is moderately hot add mustard seeds.
- As mustard seeds crack add asafetida, green chili, and curry leaves. As precaution cover the pan immediately for few seconds because as you add curry leaves to oil it will splatter.
- Lower the heat to medium low, stir-fry for about 30 seconds; add raisins, peanuts and chana dal, stir-fry for one minute.
- Add fennel seeds, chili powder, turmeric, and salt mix it well.
- Add rice crispy cereal and corn flakes (crush the corn flakes before adding to the mix) stir the mixture gently, add potato sticks mix it well quick and turn off the heat. Chivda is ready.
- Let the cereal chivda cool of to room temperature before serving.
- Cereal chivda can be kept for several days in airtight container.
A Delightful Crunch: Exploring the Versatility of Cereal Chivda
Cereal Chivda is a delightful, crispy snack that combines the crunch of cereals with the flavors of traditional Indian spices. This cereal chivda recipe is perfect for those looking for a diet-friendly snack that doesn’t compromise on taste. Whether you’re enjoying it with your afternoon tea or packing it for a quick snack on the go, this homemade chivda cereal snack is sure to satisfy your cravings.
The Essence of Cereal Chivda
Cereal Chivda is a modern twist on the traditional Indian chivda, a savory snack mix. By incorporating cereals, this snack becomes lighter and perfect for those watching their calorie intake. The blend of spices, nuts, and dried fruits adds layers of flavor and texture, making it a versatile snack that can be enjoyed any time of the day.
Origin and Popularity
Chivda has been a popular snack in Indian households for generations. Traditionally made with flattened rice (poha), it has evolved to include a variety of ingredients, such as cereals, to cater to modern dietary preferences. This diet chivda with cereal is a testament to its adaptability, offering a healthier option without losing its deliciousness.
Why You’ll Love This Recipe
- Healthy Snack: Made with wholesome cereals, nuts, and spices, this chivda is both nutritious and delicious.
- Easy to Make: Simple steps and readily available ingredients make this recipe easy to follow.
- Flavorful: A perfect balance of spices and textures ensures every bite is packed with flavor.
- Versatile: Can be enjoyed on its own or paired with other dishes.
How to Make Cereal Chivda
Here’s a step-by-step guide on making cereal chivda:
- Prepare the Ingredients: Gather your choice of cereals (cornflakes, puffed rice, or any diet-friendly cereal), nuts (peanuts, cashews), curry leaves, and spices (turmeric, mustard seeds, green chilies, and salt).
- Roast the Nuts: In a large pan, dry roast the peanuts and cashews until they are golden brown. Remove and set aside.
- Toast the Cereals: In the same pan, add the cereals and toast them lightly until they become crispy. Remove and set aside.
- Prepare the Spice Mix: Heat a small amount of oil in the pan. Add mustard seeds and allow them to splutter. Then add curry leaves, finely chopped green chilies, and turmeric powder. Sauté until the curry leaves are crispy.
- Combine and Mix: Add the roasted nuts and toasted cereals back into the pan. Sprinkle salt and mix everything well, ensuring the cereals and nuts are evenly coated with the spice mix.
- Cool and Store: Let the mixture cool completely before transferring it to an airtight container. This ensures the chivda remains crispy.
Variations of the Recipe
Exploring Manjula’s Kitchen reveals a treasure trove of other delicious snack recipes that you might enjoy. Here are some related variations that you might find interesting:
- Spicy Chivda: Spicy chivda crunchy savory snack is quick and easy to make. Chivda, also known as poha, is flattened rice that is flavored with spices.
- Masala Peanuts: Spicy and crunchy peanuts that make for a perfect snack.
- Spicy Sev: Thin, crispy strands made from chickpea flour and spices, perfect for munching.
- Roasted Chickpeas: A healthy and crunchy snack made with chickpeas tossed in spices and roasted until crispy.
- Methi Mathri: Crispy, savory crackers made with fenugreek leaves and spices.
Serving Suggestions
Cereal chivda can be enjoyed in various ways:
- As a Snack: Enjoy it as a standalone snack during tea time or as a healthy mid-day treat.
- With Yogurt: Pair it with a bowl of yogurt for a delicious and satisfying snack.
- As a Topping: Use it as a crunchy topping for salads or soups.
- For Travel: Pack it as a travel-friendly snack for road trips or flights.
Tips and Tricks
To perfect your chivda cereal recipe, consider these helpful tips:
- Use Fresh Ingredients: Fresh nuts and cereals will enhance the flavor and crunchiness of your chivda.
- Adjust Spices: Tailor the amount of green chilies and turmeric to your spice preference.
- Store Properly: Ensure the chivda is completely cool before storing to maintain its crispiness.
FAQs
Is Cereal Chivda Vegan?
Yes, this recipe is vegan as it uses plant-based ingredients.
Can I Make It Ahead of Time?
Yes, this chivda can be made ahead of time and stored in an airtight container for up to two weeks.
What Can I Serve with This Chivda?
This chivda pairs well with yogurt, can be used as a topping for salads, or enjoyed on its own as a snack.
How Long Does It Take to Make?
The preparation and cooking time for this chivda is about 30 minutes.