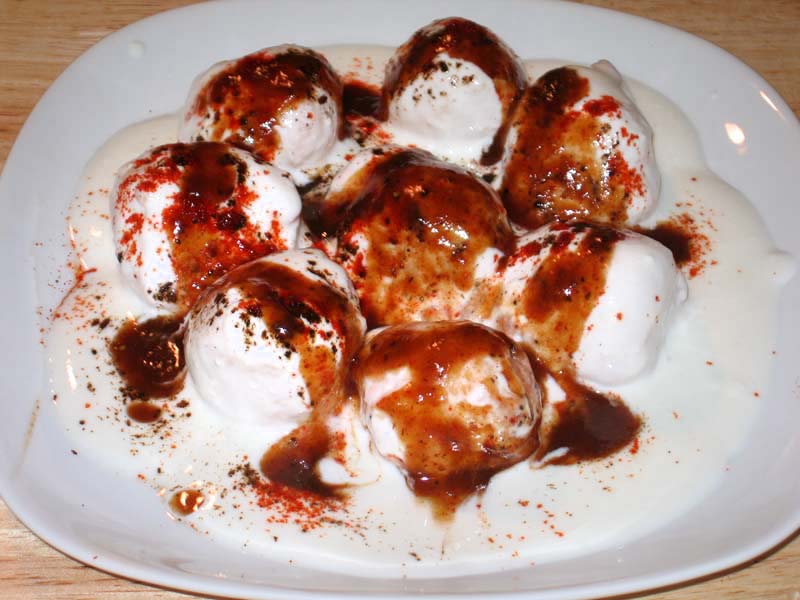
Party Appetizers: The Perfect Starters for Any Celebration
Introduction
Planning a party involves many details, but one of the most crucial elements is the food. Party appetizers are essential as they keep guests satisfied and engaged while they wait for the main course. Whether you are hosting a small get-together or a large celebration, these appetizers for party settings will impress your guests. From easy appetizers for party prep to the best party appetizers that everyone will love, here’s a comprehensive guide to delicious starters.
Benefits of Appetizers at Parties
Stimulate Appetite: Appetizers help to stimulate the appetite and prepare guests for the main meal.
Encourage Mingling: Small, bite-sized appetizers for a party encourage guests to mingle and socialize.
Variety: Offering a variety of appetizers ensures that there is something for everyone, catering to different tastes and dietary needs.
Manage Hunger: They keep guests’ hunger at bay, especially if the main course is delayed.
Popular Party Appetizers
1. Vegetable Samosas
Vegetable samosas are classic party Indian veg appetizers. These deep-fried pastries filled with spiced potatoes and peas are a hit at any event.
2. Mini Quiches
Mini quiches are versatile and can be made with various fillings like spinach, cheese, and mushrooms. They are perfect appetizers for a party and can be served warm or at room temperature.
3. Stuffed Mushrooms
Stuffed mushrooms are elegant and flavorful. Fill them with a mixture of bread crumbs, cheese, and herbs for the best appetizers for party settings. Its one of those easy indian recipes that are close to everyone’s heart.
4. Paneer Tikka
Paneer tikka involves marinating cubes of paneer in spices and grilling them. It is a popular dish coming from Indian paneer recipes. This is one of the best party appetizers that’s both delicious and visually appealing.
5. Spinach Artichoke Dip
Spinach artichoke dip served with crackers or bread slices is a crowd-pleaser. It’s creamy, cheesy, and a must-have easy appetizer for party menus.
Easy Appetizers for Party
1. Bruschetta
Bruschetta is a simple appetizer made from toasted bread topped with diced tomatoes, basil, and olive oil. It’s quick to prepare and always a favorite.
2. Cheese Platter
A cheese platter with a variety of cheeses, fruits, nuts, and crackers is easy to assemble and offers something for everyone.
3. Caprese Skewers
Caprese skewers are made with cherry tomatoes, mozzarella balls, and basil leaves drizzled with balsamic glaze. They are fresh, colorful, and easy to eat.
4. Guacamole and Chips
Guacamole and chips are always a hit. This dip made from avocados, lime, cilantro is fresh and perfect for dipping.
Best Party Appetizers
1. Jalapeno Poppers
Jalapeno poppers stuffed with cream cheese and cheddar, then breaded and fried, are spicy and addictive. They are among the best party appetizers.
2. Vegetable Spring Rolls
Vegetable spring rolls are filled with fresh veggies and served with a sweet and spicy dipping sauce. They are light and crisp, ideal for any party.
3. Fruit Skewers
Fruit skewers made with a variety of fresh fruits are refreshing and healthy. They add a colorful touch to the appetizer table.
4. Baked Brie
Baked brie with honey and nuts served with slices of baguette is a rich and elegant appetizer that’s easy to prepare.
5. Falafel Balls
Falafel balls served with tahini sauce are delicious and vegetarian-friendly. They are crunchy on the outside and soft on the inside.
Tips for Serving Party Appetizers
Variety: Ensure there is a mix of hot and cold appetizers, and include vegetarian options to cater to all guests.
Presentation: Arrange appetizers attractively on platters or trays. Use garnishes like herbs or edible flowers to enhance the presentation.
Accessibility: Place appetizers at different locations around the party space to encourage guests to mingle and explore.
Timing: Serve appetizers as soon as guests arrive to keep them engaged and satisfied until the main meal is ready.
Portion Control: Keep the portions small and manageable, allowing guests to try multiple appetizers without feeling full too quickly.
FAQs
Q: What are party appetizers called?
A: Party appetizers are also known as hors d’oeuvres, starters, or finger foods. They are small dishes served before the main course to stimulate the appetite.
Q: What are the 8 kinds of appetizer?
A: The eight kinds of appetizers include canapés, crudités, dips, finger foods, starters, snacks, hors d’oeuvres, and tapas. Each type offers a different style and presentation, making it easy to cater to various tastes and preferences.
Conclusion
When planning your next event, ensure you have a variety of party appetizers to delight your guests. From easy appetizers for party settings to best party appetizers that will leave a lasting impression, these starters are sure to make your celebration a success. Enjoy experimenting with different flavors and presentations, and watch your guests savor every bite.
This Colorful Antipasti Bread is a delicious, beautiful, and most importantly fun, low fat and healthybread to make! (I received the original recipe from Oren Giron)
1 Kg of sifted white flour (for the best results use Bread Flour, if you can't find any, regular white flour will do the trick)
30 gr dry yeast
450-600 milliliters of lukewarm water (depending on how moist the flour is)
a bundle of fresh Basil chopped
50 gr of sugar
20 gr of salt
100 gr grated Parmesan cheese
For the filling:
3 courgettis, sliced and lightly roasted in the oven
2 red peppers, roasted and pealed
2 small sweet potatoes roasted in the oven
(you can also use an eggplant sliced and roasted, or other veggies you like roasted in the oven)
Instructions
Method
Roast and prepare the vegetable filling you intend on using in the bread.
Place all of the dough's ingredients in a mixer bowl with 450ml of water and start mixing. If dough seems a little dry add a bit more water until it forms into a smooth soft ball (but no more than 600ml), this should take about 10 minutes. you can also do this by hand.
Place the dough in a bowl, cover it and let it rise until volume has doubled. This takes about one hour, depending on the weather 🙂
Preheat the oven to 200C.
Divide the dough into 3 equal pieces and roll out each one into a rectangle (do not over knead the dough, or it will turn elastic and hard to work with).
Place a third of the vegetables on each rectangle leaving the edges empty (see photo).
Fold each vegetable topped rectangle into an oval shaped loaf (see photo).
Place loaf on baking dish lined with a baking sheet, cover and let rise until the loaf doubles in volume.
Dust the tops of the loafs with flour and make small incisions on top with a knife.
Bake for 230C for 15 minutes and then reduce to 200C for about 20 minutes.
Take a peek in the oven near the end, when the bread is nice and brown (the bottom too) its ready.
This is one simple and yummy halwa that is quick & easy to make and tastes great. The richness of the halwa comes from the almonds added to it. Also this halwa is almost healthy as it includes a large amount of veggie in it. It has less fat than the traditional badam halwa but tastes almost similar to it.
Mushroom Sesame Fingers are a great choice for a light, crispy and low-fatappetizer. Prepare it in advance whenever there’s a party, and store it in the oven. Reheat for 10 minutes before serving.
Crispy Veggie Balls with Cilantro Dipping Sauce is a delicious appetizer to entertain guests throughout the years. It has been highly appreciated by all my guests who have tried it. Whenever I invite people for dinner, they ask if I will be serving crispy veggie balls! Hope this recipe pleases your crowd as well!
1 cup French green beans, cut into 1/4 inch long sections 1 large potato, cooked in microwave (approx 6 or 7 minutes), peeled, and mashed
1/2 of a large onion, finely chopped
1/2 cup roasted cashew nuts, chopped
1/2 cup golden raisins
1/3 cup water
3 cloves garlic, peeled and finely chopped
1 large jalapeno pepper, finely chopped (substitute: 1 tsp red chili pepper – can adjust to taste)
2 tbsp powdered corn starch
1 tsp curry powder
1/2 tsp salt
1/4 tsp garam masala
4 cups canola oil (or oil of your choice, for frying)
Dipping Sauce (optional):
1/3 cup tomato ketchup
1/4 cup honey mustard
1/4 cup cilantro, un-stemmed and finely chopped
1/2 tsp red chili flakes (or more, according to taste)
Instructions
Method
In a 10” stir fry pan, heat 2 tbs cooking oil over medium high heat. Add coconut and cook until slightly brown. Next add garlic, onion, jalapeno (or chili pepper), curry powder. Cook for 2 minutes and then reduce to medium heat.
Add Nutrela (which you prepared as above), carrots, beans, and salt. Combine thoroughly and let cook with lid on top. Let cook for approx 3 minutes or until vegetables are cooked through.
Uncover the pan and increase the heat a bit. Cook until the water that was released by vegetables dries out. Then turn off heat.
Add garam masala, cashews, raisins, and cilantro. Combine thoroughly for approx 2 minutes. Then set aside for a few minutes to allow mixture to cool down.
Add mashed potato (as prepared above) to cooked vegetables and combine thoroughly. Potato will serve as a binder. Use a candy or melon scooper to make approx 30 (1” diameter) balls. Set these aside on a large dinner platter.
In a 1 or 2 qt sauce pan, bring 1/3 cup of water to boil over high heat. Add corn starch and boil over medium heat for 4-5 minutes (stirring frequently) to make liquid starch. Set aside for a few minutes to allow it to cool before working with it.
Place 2 cups of Panko on a medium platter. Place liquid starch in a bowl. Dip one ball at a time in the starch and roll over the Panko. Place on a clean dinner platter. (Starch will act like glue to help Panko stick to balls). After you have breaded all the balls, repeat the process by re-dipping balls in starch and rolling in Panko again. Let the balls rest for approx 5 minutes at room temperature – this will allow Panko to settle on the veggie balls.
Over medium high heat in 10” stir fry pan, place rest of cooking oil and wait until it has heated up. Fry 4-5 balls at a time until golden brown all over. Adjust the heat as necessary during frying.
Serve immediately with cilantro dipping sauce (you can substitute with any store-bought cilantro chutney or tomato ketchup)
Who doesn't like chaat? I think the Indian chaat is loved universally these days. It's a great appetizer and one that's bound to get those taste buds jumpin' for more. Chaat is a great all-weather appetizer too. The spices make it perfect for that rainy/cold day and the freshness makes it perfect for a hot summer's day as well. However, chaat – be it bhel puri, aloo chaat, dahi batata puri etc., served up in the traditional way can get messy and it's not easy to serve as an appetizer, especially to large party crowds. When made ahead of time, it can get soggy too.Appetizers are typically finger foods that are easy to pick up and eat while waiting for the main course. So I decided to come up with an appetizer that has all the flavors of a traditional chaat and at the same time has the convenience of being able to be made ahead of time and is also a finger food. After some thinking, I came up with these yummy Chaat Bites – a crowd pleaser for sure!
1/2 Chickpeas – can drained or 1/2 cup after soaking overnight
1 small Tomato (chopped)
3 tsp Chaat masala
1-2 tsp Red chili powder
2 tsp Chole masala
1 tbsp Greek yogurt (if you don't have greek yogurt, take regular plain yogurt in a thin muslin cloth, tie the ends and hang it overnight in the refrigerator to drain out the liquid)
Salt to taste
1 Cup Fine Sev
For Date/Tamarind (Red) chutney:
5 dates
1 tbsp tamarind paste
1 tbsp of jaggery
1 tsp black salt
1 tsp red chili powder
2 tsp cumin powder
1 1/4 cup of water
For Mint/Cilantro (Green) chutney:
2 cups Mint leaves (washed)
1 cup Cilantro leaves (washed)
2-3 green chilies
salt to taste
pinch of jaggery
2-3 tbsp of water
Instructions
Method
Take the chickpeas in a microwave safe bowl. Add 2 tsp chaat masala, chopped tomato, chole masala, salt to taste (chaat masala already has salt), 2tbsp water. Microwave covered on high for 5 minutes. Remove and mash with fork or pulse couple times in the blender to get a course and chunky paste.
Take the above paste in a big bowl. Add all the remaining ingredients except the chutneys and the sev.
Now add about 2 tsp of red chutney and 2tsp of green chutney.
Mix all ingredients well using a spatula or clean hands to form a big ball like dough. Should be able to make small balls.
Now take about lemon sized chunks of the mixture and shape into balls.
Place the balls on a cookie sheet and bake at 350F for about 7-8mins. This step is entirely optional. The baking only adds some crispiness to the texture and enhances some flavors but the since all ingredients are already cooked, this step can be skipped.
Now in another deep bowl combine 1/2 cup of red chutney and 1/2 cup of green chutney and mix well.
Take the 1cup of fine sev in a shallow dish.
Now take one ball and dip it in the chutney mixture to coat it evenly and then roll it in the sev until the sev sticks to it all around. You just made your first chaat bite!
Carefully place it on the serving dish. Repeat with all other balls and serve the chaat bites along with the remaining chutney.
For Date/Tamarind (Red) chutney:
Combines all ingredients into a pan.
Heat on medium until water starts to boil and the dates soften.
Then put it in a blender and blend to smooth chutney.
Back home in India, we used to relish the pickled chilies or mirchi ka achar, where good quality of mirchi or chilies are chosen with great care, and then stuffed with pickle spices , drenched in hot mustard oil and infused with the flavor of fennel, cumin, mustard etc. The other way to enjoy it as an appetizer, where the jalapeno or korean chilies are coated with seasoned chickpeas flour and then deep-fried in hot oil, and on an overcast monsoon day you can relish these hot mirchi bhajjis with a cup of coffee…some of the simple pleasures in life. No discussion of chilies can be ever completed without mentioning the celebrated mirchi ka salan from the cuisines of Hyderabad. The lip smacking dish successfully wins every heart whether you love or hate the chilies.
leave the stalk intact and cut (lengthwise) the chili in half with a knife, take extra care while handling the chilies. Discard the seed and membrane with the help of a knife or spoon. Do not touch the seeds and membrane with your hand.
Drop the chilies in boiling water for couple of minutes, drain and let it dry. Blanching the chilies, this way will reduce the heat or spiciness of chilies.
Preparing the filling : Heat a tablespoon of olive oil in a pan, and then brown the sliced onion for few moments.
Once the onions are browned evenly, add the grated coconut, candied ginger, raisins, seasoned it well with salt and pepper. If you wish, you can add little cumin powder also.
Stir for few moments on low heat. Take off the heat and add bread crumbs in it. Mix them well.
Let the filling cool slightly before stuffing the chili peppers.
With the help of a tea-spoon, fill the halved chili peppers with coconut mixture and topped each of them with cheese.
Bake in a preheated oven at 350 F for 15-20 minute or until the cheese melts.
Mawa Kachori is an exotic dessert. This is a delicacy from the state of Rajasthan. Rajasthan is known for its rich food and culture its a sweet savory snack. Pastry filled with an aromatic mixture of Mawa and nuts makes a very festive dessert.
1/4 cup mixed nuts (almonds, pistachios coarsely ground)
1/4 teaspoon crushed cardamom
3 tablespoons sugar
Note: If you are using Mawa use ¾ cup of Mawa instead cream and powder
Oil to fry
Syrup
1cup sugar
1/2 cup water
1/8 teaspoon crushed cardamom
Few strands of saffron
Instructions
Crust
Mix flour, and clarified butter in a bowl, making it firm and soft adding water slowly as needed. Knead the dough until the dough becomes soft and pliable.
Set the dough aside and cover it with a damp cloth. Let the dough sit for at least ten minutes.
Syrup
Boil the sugar and water on medium heat, as sugar comes to a boil add saffron, and cardamom on medium heat until syrup is about one thread or 220 degrees (Fahrenheit) on a candy thermometer. Set it aside.
Filling
Mix the cream and milk powder in a frying pan. Cook on medium heat until it becomes the consistency of soft dough, this should take about 3-4 minutes. Stir continuously so the mixture does not burn on the bottom of the pan. This mixture is known as Mava.
Next add nuts mixture, sugar, and cardamom powder to Mawa. Mix well and cook for about 2 more minutes until the mixture is consistent with soft dough. Keep it aside.
After cooling, the mixture will become drier but still should be lightly moist.
Making Kachoris
Knead the dough for a minute.
Divide the dough into about 18 equal parts.
Roll each ball into about 2-inch diameters.
Take one of the rolled doughs in your palm and place about 1 tablespoon of filling in the center. Pull the edges of the dough to wrap the filling. Proceed to make all 30 balls.
Let the filled balls sit for 3 to 4 minutes before pressing.
In the frying pan heat the oil on medium-high, the frying pan should have about 1-1/2 inches of oil.
Set the filled balls on a clean and dry surface with the seam facing up. Using the base of your palm, slowly flatten them into a circle of about 3 inches.
To check if the oil is ready put a little piece of dough in the oil. It should sizzle, and come up slowly.
Slowly drop the Kachoris in the oil, do not overcrowd the kachoris in a frying pan, fry them on medium heat.
After they are puffed, slowly turn them over.
It will take about 5-6 minutes to fry. Fry until golden brown on all sides.
If the kachoris are fried on high heat, they will get soft and will not be crispy.
Notes
Serving
Just before serving drizzle the kachori with about 2 tablespoons of hot syrup. Garnish them with leftover filling or sliced pistachios.
Wonton Cups with Spicy Carrot and Cheesy Apple Filling
These pretty little wonton cups are perfect for a delicious springtime appetizer. A spicy carrot and potato filling is delicately balanced with the taste of cheesy and crunchy apples. The wonton cup adds just the right amount of crunchiness to this zestful mix of flavors. Serve these for your next party and watch the plate getting emptied out as quick as a wink!
Preheat oven to 350 degrees. Brush oil on both sides of each wonton wrapper. Gently press one wrapper into each cup of a 12-muffin pan. Bake for 7 minutes. Remove from oven and allow it to cool.
To make the filling
Boil potatoes until they are tender
After the potatoes are cool, peel the skin off and mash the potatoes.
Heat the remaining ¼ cup oil in a frying pan. Test the temperature of the oil by adding a fennel seed to the oil; if it cracks right away the oil is ready.
Add fennel seeds and stir fry for half a minute.
Add the onions and carrots in the oil. Stir fry in medium high heat till the onions turn golden brown.
Add the potatoes to the mixture and stir fry on medium high heat till they are light golden brown.
Add salt, cumin powder, ground red pepper and cook for another 4-5 minutes. Adjust salt and red pepper to your taste.
Replace 12 of the baked cups in the muffin pan.
Fill with 2 tablespoons of filling mixture.
Sprinkle with grated parmesan cheese.
Return to the oven and bake at 350 degrees for 17-20 minutes. The wonton wrap will become crisp. (Sometimes oven timings vary; so if the wonton cup doesn’t become crisp in the given time, return to oven for 2-3 minutes. Make sure to wear oven gloves)
Remove from muffin-pan to cool.
Garnish with crunchy sweet apples.
Notes
Notes
Wonton wraps are available in Chinese grocery stores or in Asian vegetables section in regular grocery stores.
You will also need a muffin pan for this recipe. Available in the Baking Section in grocery stores.
Tips
This appetizer is a perfect solution to busy schedules.
Pre-bake the wrappers and store in airtight containers once cool.
Make the filling and store it in the fridge. It is very convenient and quick to bake when guests drop by unexpectedly.
Suggestions
Try adding soybean nuggets to the filling. Boil 10-15 soybean nuggets in water with a little salt. When the soybean nuggets are softened, shred them into little pieces. Heat oil in a frying pan with medium to high heat. Fry the shredded nuggets. Add while potatoes are being fried.
This Bean Sprouts Salad Spring Roll recipe is Vietnamese cuisine inspired salad. I give credit to my very dear friend Anaya for this recipe and she in turn gives credit to her friend and food network. No matter what changes we make, this spring roll is tasty, healthy, very filling, very colorful, and quick & easy to make. It has always been a very big hit whenever I have taken to potluck. Hope you all enjoy it. This versatile spring roll can be eaten with mint sauce or cilantro. I have used mint dressing in this recipe. I especially like this since it is not fried, tasty and a healthy salad which I like to skip a meal and eat this instead.
In a mixing bowl take 3 cups of bean sprouts and set aside.
Cut carrots and beets into thin strips and add to bean sprouts. Chop cilantro and green chilies finely and add to the bowl.
Dry roast 1/3 cup of peanuts without oil and mix it in.
Add I tsp of black sesame oil, salt, pepper powder, lime juice and set aside for 15 minutes.
Now take the rice paper wrapper (Available in all Chinese/Vietnamese grocery store) and follow the instructions on the wrapper to fold it.
Divide the salad into 10 equal parts or stuff in a handful at a time.
Most of the rice paper needs to be soaked in water for 2-3 minutes and put the stuffing in and roll it. Once put in water it becomes very soft and pliable.
Notes
Tips
Tastes best when served immediately after the salad is wrapped.
If planning to make for a party, make the stuffing ready and wrap it 30 minutes before or if wrapped at an earlier time, roll each wrap in saran wrap so that it does not stick to each other.
Be innovative and add vegetables and nuts as per your taste.
While searching for different recipes, I came across a quiche recipe with crescent rolls. This sparked my desire to create a quiche with an Indian twist. Since potato was the main ingredient for this contest, I was even more inspired to experiment with my own version of an Indian-style quiche. I'm excited to present this unique recipe to you all. It's a delightful snack or appetizer that you must try!
Hot and spicy peanuts fried with delicious mix of spices. This makes a great snacks for sitting around watching TV or playing games with family and friends. Recipe serves 6.
In a frying pan roast the dry peanuts on medium heat for 3-4 minutes and let it cool for few minutes.
Mix all the ingredients together in a large bowl.
Add water as needed making sure the spices and flour stick to the peanuts uniformly.
Heat the oil in a frying pan on medium heat.
The frying pan should have at least 1 inch of oil. To check if the oil is ready, put one drop of batter in the oil. The batter should raise to the top but not change color right away.
put few drops of oil in your hand it helps droping the penuts before putting peanuts on the oil.
While putting the peanuts into oil, loosen them with your fingers to make sure the peanuts are separated and do not form lumps. Peanuts should be separated while frying.
Fry the peanuts until they turn light brown, turning them occasionally.
When they are done cooking, take them out of the oil with a slotted spoon. Place them on a paper towel to absorb the extra oil.
After cooling to room temperature, the peanuts should be crispy.
Notes
Masala Peanuts can be stored for a month in an airtight container.
Also see my recipe for Spicy Cashew, Almond brittle.
These make a delicious homemade gift – pack it in a jar or candy bag.
Masala Peanuts are delightful appetizers perfect for holidays and festivals, offering a crunchy, gluten-free snack option that satisfies both vegan and non-vegan palates alike. Peanut masala recipe is a beloved snack across India, offering a delightful combination of crunchy peanuts and aromatic spices. This masala peanuts recipe is a favorite among snack enthusiasts for its bold flavors and addictive crunch. Whether you’re hosting a gathering or simply craving a savory treat, learning how to make masala peanuts recipe at home is both rewarding and satisfying.
How to Make Masala Peanuts Recipe: Step-by-Step Guide
Step 1: Prepare the Peanuts
Start by selecting fresh, raw peanuts for the best results. Rinse them thoroughly under cold water to remove any dirt or debris. Then, pat them dry using a clean kitchen towel or paper towels.
Step 2: Dry Roast the Peanuts
Heat a non-stick pan over medium heat. Once the pan is hot, add the peanuts in a single layer. Dry roast them, stirring occasionally, until they turn golden brown and emit a nutty aroma. This process typically takes about 8 to 10 minutes. Keep a close eye on them to prevent burning.
Step 3: Prepare the Spice Mixture
While the peanuts are roasting, prepare the spice mixture. In a small bowl, combine masala peanuts recipe spices such as red chili powder, turmeric powder, cumin powder, chaat masala, and salt according to your taste preferences. Adjust the spice levels to suit your palate.
Step 4: Coat the Peanuts with Spices
Once the peanuts are roasted to perfection, transfer them to a large mixing bowl. While they are still warm, sprinkle the prepared spice mixture over the peanuts. Toss them gently to ensure that each peanut is evenly coated with the spices. Allow the peanuts to cool completely before serving.
Step 5: Serve and Enjoy
Your homemade masala peanuts are now ready to be enjoyed! Serve them as a standalone snack or pair them with your favorite beverages. Store any leftovers in an airtight container to maintain their freshness and crunchiness.
Tips for Making Perfect Masala Peanuts
Experiment with different spice blends to customize the flavor according to your preferences.
You can add ingredients like amchur powder for tanginess or garam masala for extra warmth.
For an extra layer of flavor, consider adding roasted garlic or curry leaves to the spice mixture.
Make sure to roast the peanuts evenly to achieve a uniform golden brown color and prevent any burnt spots.
Allow the peanuts to cool completely before storing them to maintain their crispiness.
Variations of Masala Peanuts
Sweet and Spicy: Add a touch of sweetness to your masala peanuts by incorporating a bit of powdered sugar or jaggery along with the spices.
Herb Infused: Experiment with fresh herbs like cilantro, mint, or curry leaves to add a refreshing twist to your masala peanuts.
Nutty Crunch: Enhance the texture of your masala peanuts by tossing them with a handful of toasted cashews, almonds, or pistachios.
Benefits of Masala Peanuts
Rich in Protein: Peanuts are an excellent source of plant-based protein, making masala peanuts a nutritious snack option.
Good Source of Healthy Fats: Peanuts are high in monounsaturated fats, which are beneficial for heart health when consumed in moderation.
Packed with Essential Nutrients: Peanuts are rich in essential nutrients like vitamins, minerals, and antioxidants, contributing to overall well-being.
FAQs about Masala Peanuts
Can I use pre-roasted peanuts for this recipe?
While you can use pre-roasted peanuts, roasting them yourself allows you to control the level of crunchiness and ensures that they are freshly toasted.
How long do homemade masala peanuts stay fresh?
When stored in an airtight container at room temperature, homemade masala peanuts can stay fresh for up to two weeks. However, they are best enjoyed within the first few days to maintain their crispiness.
Can I make masala peanuts without oil?
Yes, you can skip the oil and dry roast the peanuts directly in a pan for a healthier alternative. However, using a small amount of oil helps the spices adhere to the peanuts more effectively.
For more delightful Indian recipes, explore Manjula’s Kitchen, where you’ll find a treasure trove of culinary inspiration ranging from traditional dishes to modern twists on classic favorites. Be sure to check out recipes like Aloo Gobi, Palak Paneer, and Chana Masala for a taste of authentic Indian cuisine.
Papdi (papri) Chaat is my kind of food and there are so many kinds of chaat. Chaat is a popular street food all over India. Chaat is basically different varieties of snacks served with tamarind or hari (cilantro) chutney or with hot spice mix. The definition of chaat literally is "to taste".Recipe serves 4 to 6
Mix the flour, sooji, salt, and oil in a bowl. Add water to the mixture a little at a time, kneading to form firm dough.
Cover the dough and set aside for 15 minutes or more.
Divide the dough into about 3 equal parts.
Roll one section of the dough to eight inches in diameter, fairly thin – about thickness of dime. Do the same with the remaining two parts.
Prick the rolled dough firmly every quarter-inch or so with a fork to keep the papdi from puffing while frying. Using a sharp knife, cut the rolls into 1½-inch squares.
Heat the oil in about one inch of oil in a frying pan over medium heat. To test, drop a small piece of dough in the oil. The dough should sizzle but come up to the surface slowly. If the dough rises
immediately, let the oil cool slightly and try again.
Place just enough papdi to cover the oil in the frying pan in a single layer. Don’t crowd them.
Fry the papdi until both sides are a light golden brown.
Remove cooked papdi with a slotted or mesh spoon and transfer to a plate. Continue cooking the remaining papdi in batches.
After the papdi cool to room temperature they should be crisp.
Papdi can be stored in airtight container for 1 month.
Making the Garnish
Mash the chickpeas lightly and mix with hari (cilantro) chutney to your taste. Keep aside.
Put the yogurt into a bowl and whisk until smooth. Add a little milk as needed to consistency of pancake batter. Add salt to taste. Set aside
Arrange the papdi on a large plate.
Place a slice of potato on top of each papdi (does not need to be the exact size). Place ½ teaspoon of the chickpea mixture over each potatoa slice.
Drizzle yogurt over each papdi.
Sprinkle roasted cumin powder, and red chili to your taste.
Finish the papdi chat by drizzling with tamarind chutney.
Notes
To make round papdi, divide the dough in about 30 equal parts and roll them individually into 2½-inch rounds. Prick with a fork in four to five places.
Papdi Chaat, a popular street food delicacy, combines crispy papdi with a tantalizing mix of appetizers and chaat elements, creating a flavorful explosion that delights the taste buds. Papdi chat is a delightful Indian street foodsnack that tantalizes the taste buds with its crispy papdis, tangy chutneys, yogurt, and assorted toppings. This papdi chat recipe promises to deliver an explosion of flavors in every bite, making it a perfect choice for parties, gatherings, or simply as a savory indulgence.
How to Make Papdi Chat
To create this mouthwatering delicacy, start by preparing the papdis, the essential base of the dish. Combine all-purpose flour, semolina, carom seeds, and salt in a mixing bowl. Knead the ingredients into a firm dough, adding water gradually. Roll out the dough thinly and cut it into small rounds. Prick the rounds with a fork and deep fry until golden brown and crispy. Drain excess oil and set aside.
Next, prepare the tangy tamarind chutney by simmering tamarind pulp, dates, jaggery, and spices until thickened. Strain the mixture to remove any solids, resulting in a smooth, flavorful chutney. Similarly, whip up a refreshing mint chutney by blending mint leaves, coriander, green chilies, and yogurt into a smooth paste.
Now, assemble the papdi chat by arranging the crispy papdis on a serving plate. Drizzle generous amounts of both chutneys over the papdis, followed by spoonfuls of beaten yogurt. Sprinkle chaat masala, roasted cumin powder, and red chili powder for an extra kick of flavor. Top it off with tomatoes, and fresh coriander leaves.
Serve the papdi chat immediately, allowing everyone to enjoy the perfect blend of textures and tastes.
Tips for Making Papdi Chat
Crispy Papdis: Ensure the papdis are rolled out thinly and fried until crisp to achieve the perfect texture.
Chutney Consistency: Adjust the consistency of the chutneys by adding water gradually while cooking to achieve the desired thickness.
Topping Variation: Experiment with different toppings such as boiled potatoes, chickpeas, or sev to add more depth to the flavor profile.
Spice Level: Adjust the amount of green chilies and red chili powder according to your preference for spice.
Variations of Papdi Chat
Dahi Papdi Chat: For a creamier variation, substitute beaten yogurt with thick, creamy yogurt or hung curd.
Healthy Twist: Replace fried papdis with baked or air-fried versions for a healthier alternative.
Fusion Flavors: Experiment with fusion flavors by incorporating ingredients like avocado, salsa, or shredded cheese for a unique twist on the traditional recipe.
Benefits of Papdi Chat
Rich in Flavors: Papdi chat combines a variety of flavors, textures, and spices, making it a truly indulgent treat for the taste buds.
Nutrient-Rich Ingredients: Ingredients like yogurt, chickpeas, and fresh vegetables provide essential nutrients like protein, fiber, vitamins, and minerals.
Cultural Experience: Enjoying papdi chat offers a cultural experience, allowing you to savor the vibrant street food culture of India.
FAQs (Frequently Asked Questions)
Q: Can I prepare the papdis ahead of time?
A: Yes, you can prepare the papdis in advance and store them in an airtight container once cooled to maintain their crispiness.
Q: Can I make the chutneys ahead of time?
A: Absolutely, both tamarind and mint chutneys can be prepared in advance and stored in the refrigerator for several days.
Q: Can I make papdi chat without yogurt?
A: Yes, you can omit yogurt or use a dairy-free alternative like coconut yogurt for a vegan version of the dish.
Papdi chat is a versatile and beloved snack that never fails to impress with its burst of flavors and textures. Whether enjoyed as an appetizer, a snack, or a light meal, this recipe promises to be a crowd-pleaser at any gathering or occasion. So, gather your ingredients and embark on a culinary journey to recreate this iconic Indian street food delight in your own kitchen!
Dahi Vadas are lentil dumplings dipped in yogurt and topped with spicy savory tamarind chutney. These are great as a side dish for a formal dinner, appetizer or served as a chaat.
Mix both dals and wash several times until the water appears clear. Soak dal in 4 cups of water for at least six hours. Drain the water. In a blender, blend the dal to very creamy texture. Use only as little water as needed to blend. Using too much water for blending will not give the desired creamy texture.
Whip the dal batter, stirring with a spoon in a circular motion two to three minutes, until batter is light and fluffy. Add a few spoonfuls of water as needed.
Cover the bottom of a flat frying pan with ½-inch of oil and heat over medium high heat. Test the oil by dropping a little batter into it. When the oil sizzles, it is ready.
Place one tablespoon of batter into the oil. The oil should not be deep enough to cover the batter; the vadas will be softer if they are shallow-fried. The vadas will begin to expand slowly, without changing color.
Fry the vadas in small batches, until golden all around.
After you have made all of the vadas, place them in lukewarm water and soak for about 20 minutes. Squeeze the vadas gently to remove the water, being careful not to break the vadas. Set aside.
Whip the yogurt until smooth. Add a little milk as needed to make the consistency similar to pancake batter or lassi. Add about one teaspoon salt, to taste.
Soak vadas in the yogurt batter for at least half an hour, giving the vadas time to absorb the yogurt.
Slowly pick up each vada and transfer to a serving dish. Pour a few more spoons yogurt over the Vadas.
Just before serving, sprinkle some salt as needed, ground roasted cumin seeds, red chile powder, and finish off with a drizzle of tamarind chutney.
Notes
Variations:Change the proportion of dals, or use only urad dal.As an alternative, you can add chopped green chilies and crushed coriander seeds to the dal batter just before frying.Instead of serving with tamarind chutney, you can sprinkle chopped cilantro over the dahi vadas.You can also make the vadas very small and serve as a Raita dish.If you are vegan, you can soak the vadas in tamarind chutney instead of yogurt and sprinkle some chopped cilantro or chopped mint leaves.Suggestions:You can make the dahi vadas in advance and freeze them before soaking in water. When ready to use, soak as many as needed in hot water for about half an hour, then change the water to room temperature and soak for another ten minutes. Now proceed according to the recipe.
Keyword Dahi Pakora, Dahi Vada Chaat, Dal Dumpling
Remove the crust from all sides of the bread. Slice the bread lengthwise into 3 equal parts.
Mix all the dry ingredients together: Gram flour (besan), rice flour, asafetida, cumin seeds, and salt. Rice flour adds to the crispness. Add the water slowly to make a smooth batter. (Batter should be the consistency of pancake batter or dosa batter)
Next, add the green chilies and cilantro. Mix well.
Heat the oil in a frying pan on medium high heat. Frying pan should have at least 1 inch of oil. To check if the oil is ready, put one drop of batter in the oil. The batter should come up but not change color right away.
Dip the bread slices in the batter one at a time and slowly drop into the frying pan. Fry the Pakoras in small batches. The pakoras will take about 4 to 5 minutes to cook.
Turn them occasionally. Fry the Pakoras until both sides are golden-brown. Repeat this process. The crispy, delicious Bread Pakoras are ready to serve.
Notes
Tips:If oil is too hot Pakoras will cook too fast and will not be crispy; if oil is not hot enough Pakoras will be greasy. You may have to adjust the heat as needed while cooking.Variations:Use 1/4 cup of chopped spinach or 2 tablespoons of chopped fenugreek leaves as a substitute for the chopped cilantro.Serving suggestions:The bread pakoras are best when dipped with a fresh cilantro chutney or Pakoras taste best when they are served hot.Pakoras can be made one day in advance do not refrigerate. When ready to eat, place on a cookie sheet and heat in the preheated oven on 300 degrees.