Wholesome Family Meals: Indian Vegetarian Recipes for Every Occasion
Sharing a meal with family is a cherished tradition in many cultures, and in India, it’s no different. Family meals are more than just an opportunity to nourish the body—they’re a time to connect, share stories, and create lasting memories. Indian cuisine, with its rich variety of flavors and dishes, offers countless options for creating wholesome and satisfying family meals that everyone will enjoy.
Whether it’s a simple weeknight dinner or a special weekend gathering, Indian vegetarian recipes provide the perfect balance of taste, nutrition, and comfort. From hearty dals to flavorful curries and aromatic rice dishes, there’s something for everyone to enjoy.
Must-Try Indian Vegetarian Recipes for Family Meals
Rajma (Kidney Bean Curry)
Rajma is a North Indian recipe that is staple, comforting and nutritious. Made with kidney beans cooked in a spicy tomato gravy, it’s often served with steamed basmati rice, making it a complete meal. The combination of protein-rich beans and aromatic spices makes it a family favorite.
Palak Paneer
Palak Paneer is a classic paneer recipe that combines soft paneer (Indian cottage cheese) with a creamy spinach sauce. It’s a great way to include greens in your family’s diet while offering a dish that is both flavorful and satisfying. Serve it with naan or rotis for a balanced meal.
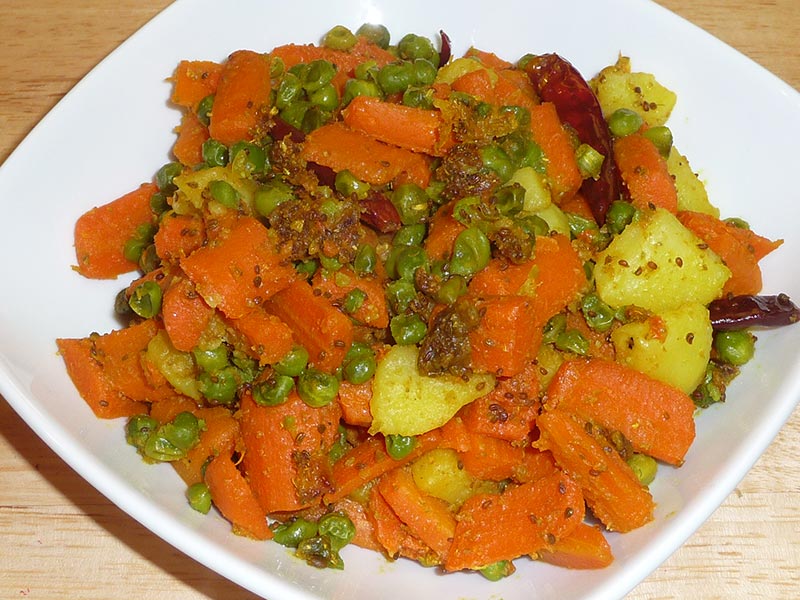
Aloo Gobi
Aloo Gobi is a simple yet delicious dish made with potatoes and cauliflower, flavored with turmeric, cumin, and coriander. This dry curry is easy to prepare and pairs well with both rice and Indian breads, making it an ideal choice for a family meal.
Vegetable Biryani
Vegetable Biryani is a one-pot dish that’s perfect for feeding a crowd. Vegetable Biryani is a fragrant indian rice recipes cooked with mixed vegetables, aromatic spices, and herbs. It’s a wholesome and flavorful meal that can be enjoyed on its own or with a side of raita (yogurt sauce).
Chana Masala
Chana Masala, or chickpea curry, is a hearty and protein-packed dish that’s popular in Indian households. The chickpeas are simmered in a spicy tomato gravy, creating a rich and satisfying meal. It’s often served with rice or bhature (deep-fried bread) for a complete family meal.
Paneer Butter Masala
Paneer Butter Masala is a rich and creamy curry made with paneer in a tomato-based sauce, enriched with butter and cream. This dish is a hit with both kids and adults, making it a perfect choice for a family dinner. Serve it with naan or rice for a comforting meal.
Baingan Bharta
Baingan Bharta is a smoky and flavorful dish made with roasted eggplant, mashed and cooked with tomatoes, and spices. It’s a great way to enjoy eggplant and is often served with rotis or parathas as part of a family meal.
Toor Dal (Split Pigeon Pea Lentils)
Toor Dal is a staple in many Indian homes, offering a simple yet nourishing dish that’s full of flavor. The lentils are cooked with tomatoes and spices, and are often served with rice or chapatis. This dish is a great source of protein and is perfect for a wholesome family meal.
Stuffed Parathas
Stuffed Parathas are a versatile and filling option for a family meal. These whole wheat flatbreads are stuffed with a variety of fillings, such as spiced potatoes, paneer, or even mixed vegetables. They can be enjoyed with yogurt, pickles, or a side of curry.
Vegetable Pulao
Vegetable Pulao is a quick and easy one-pot meal that’s perfect for busy weeknights. This rice dish is cooked with mixed vegetables, spices, and herbs, offering a wholesome and satisfying meal that the whole family will love.
Tips for Planning Family Meals
Balance the Menu: When planning family meals, try to include a variety of dishes that offer different flavors and nutrients. A typical Indian meal might include a dal, a vegetable curry, a rice dish, and a bread option like chapati or naan.
Make it Nutritious: Indian vegetarian meals are naturally rich in vegetables, legumes, and whole grains, making them nutritious and well-balanced. Include a variety of vegetables, leafy greens, and protein-rich legumes to ensure a wholesome meal.
Get the Family Involved: Cooking together can be a fun and rewarding experience. Get the family involved in meal preparation, whether it’s rolling out chapatis, chopping vegetables, or setting the table.
Make It a Tradition: Establish regular family meal times where everyone can gather around the table. This not only strengthens family bonds but also creates a routine that everyone can look forward to.
Conclusion
Family meals are a time to come together, share stories, and enjoy delicious food. Indian vegetarian cuisine offers a wealth of options that are not only flavorful but also nourishing and satisfying. Whether you’re preparing a quick weeknight dinner or a special weekend feast, these recipes are sure to bring comfort and joy to your family table.
For more family meal ideas, visitManjula’s Kitchen – Family Meals. Explore a variety of wholesome and delicious recipes that are perfect for bringing the family together.
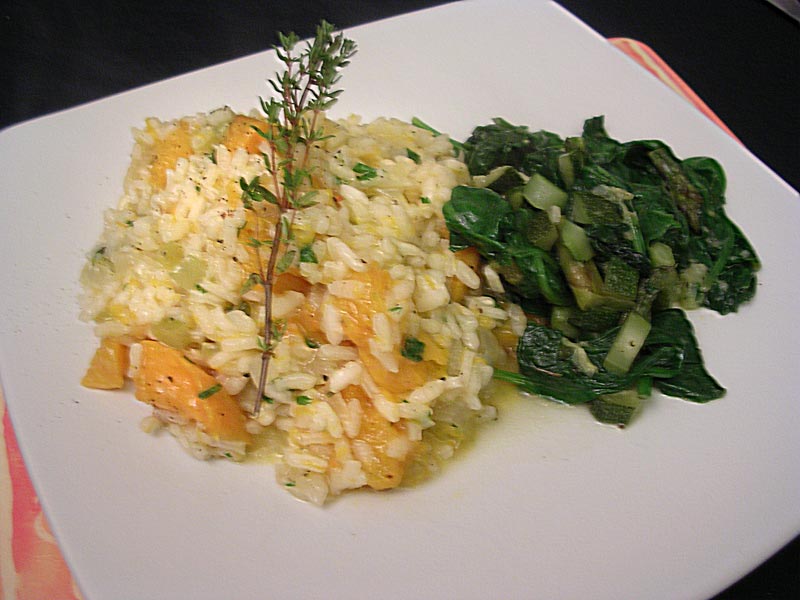
Butternut Squash Risotto is a simple, rice-based delicious quick & easy recipe that can be served anytime. It can be served with any side of green vegetables.
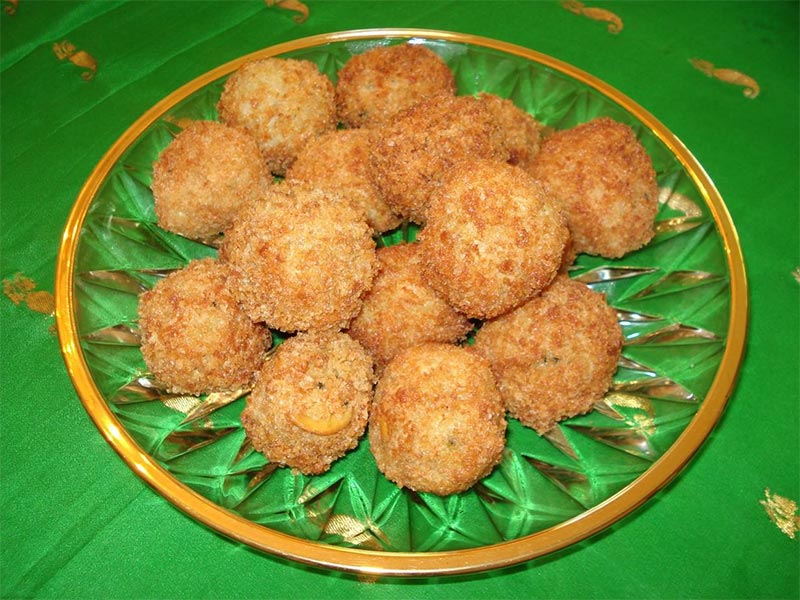
Crispy Veggie Balls with Cilantro Dipping Sauce is a delicious appetizer to entertain guests throughout the years. It has been highly appreciated by all my guests who have tried it. Whenever I invite people for dinner, they ask if I will be serving crispy veggie balls! Hope this recipe pleases your crowd as well!
1 cup French green beans, cut into 1/4 inch long sections 1 large potato, cooked in microwave (approx 6 or 7 minutes), peeled, and mashed
1/2 of a large onion, finely chopped
1/2 cup roasted cashew nuts, chopped
1/2 cup golden raisins
1/3 cup water
3 cloves garlic, peeled and finely chopped
1 large jalapeno pepper, finely chopped (substitute: 1 tsp red chili pepper – can adjust to taste)
2 tbsp powdered corn starch
1 tsp curry powder
1/2 tsp salt
1/4 tsp garam masala
4 cups canola oil (or oil of your choice, for frying)
Dipping Sauce (optional):
1/3 cup tomato ketchup
1/4 cup honey mustard
1/4 cup cilantro, un-stemmed and finely chopped
1/2 tsp red chili flakes (or more, according to taste)
Instructions
Method
In a 10” stir fry pan, heat 2 tbs cooking oil over medium high heat. Add coconut and cook until slightly brown. Next add garlic, onion, jalapeno (or chili pepper), curry powder. Cook for 2 minutes and then reduce to medium heat.
Add Nutrela (which you prepared as above), carrots, beans, and salt. Combine thoroughly and let cook with lid on top. Let cook for approx 3 minutes or until vegetables are cooked through.
Uncover the pan and increase the heat a bit. Cook until the water that was released by vegetables dries out. Then turn off heat.
Add garam masala, cashews, raisins, and cilantro. Combine thoroughly for approx 2 minutes. Then set aside for a few minutes to allow mixture to cool down.
Add mashed potato (as prepared above) to cooked vegetables and combine thoroughly. Potato will serve as a binder. Use a candy or melon scooper to make approx 30 (1” diameter) balls. Set these aside on a large dinner platter.
In a 1 or 2 qt sauce pan, bring 1/3 cup of water to boil over high heat. Add corn starch and boil over medium heat for 4-5 minutes (stirring frequently) to make liquid starch. Set aside for a few minutes to allow it to cool before working with it.
Place 2 cups of Panko on a medium platter. Place liquid starch in a bowl. Dip one ball at a time in the starch and roll over the Panko. Place on a clean dinner platter. (Starch will act like glue to help Panko stick to balls). After you have breaded all the balls, repeat the process by re-dipping balls in starch and rolling in Panko again. Let the balls rest for approx 5 minutes at room temperature – this will allow Panko to settle on the veggie balls.
Over medium high heat in 10” stir fry pan, place rest of cooking oil and wait until it has heated up. Fry 4-5 balls at a time until golden brown all over. Adjust the heat as necessary during frying.
Serve immediately with cilantro dipping sauce (you can substitute with any store-bought cilantro chutney or tomato ketchup)
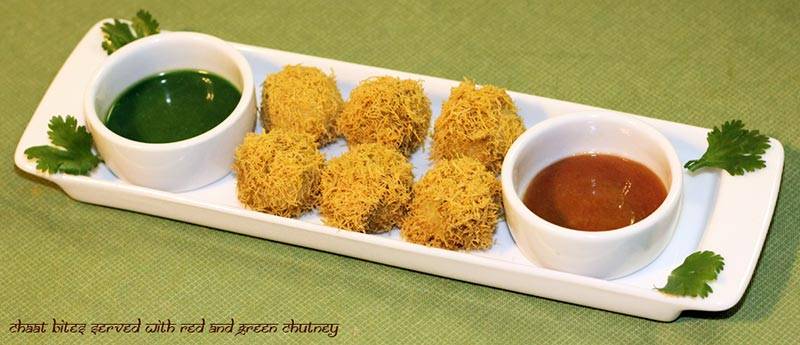
Who doesn't like chaat? I think the Indian chaat is loved universally these days. It's a great appetizer and one that's bound to get those taste buds jumpin' for more. Chaat is a great all-weather appetizer too. The spices make it perfect for that rainy/cold day and the freshness makes it perfect for a hot summer's day as well. However, chaat – be it bhel puri, aloo chaat, dahi batata puri etc., served up in the traditional way can get messy and it's not easy to serve as an appetizer, especially to large party crowds. When made ahead of time, it can get soggy too.Appetizers are typically finger foods that are easy to pick up and eat while waiting for the main course. So I decided to come up with an appetizer that has all the flavors of a traditional chaat and at the same time has the convenience of being able to be made ahead of time and is also a finger food. After some thinking, I came up with these yummy Chaat Bites – a crowd pleaser for sure!
1/2 Chickpeas – can drained or 1/2 cup after soaking overnight
1 small Tomato (chopped)
3 tsp Chaat masala
1-2 tsp Red chili powder
2 tsp Chole masala
1 tbsp Greek yogurt (if you don't have greek yogurt, take regular plain yogurt in a thin muslin cloth, tie the ends and hang it overnight in the refrigerator to drain out the liquid)
Salt to taste
1 Cup Fine Sev
For Date/Tamarind (Red) chutney:
5 dates
1 tbsp tamarind paste
1 tbsp of jaggery
1 tsp black salt
1 tsp red chili powder
2 tsp cumin powder
1 1/4 cup of water
For Mint/Cilantro (Green) chutney:
2 cups Mint leaves (washed)
1 cup Cilantro leaves (washed)
2-3 green chilies
salt to taste
pinch of jaggery
2-3 tbsp of water
Instructions
Method
Take the chickpeas in a microwave safe bowl. Add 2 tsp chaat masala, chopped tomato, chole masala, salt to taste (chaat masala already has salt), 2tbsp water. Microwave covered on high for 5 minutes. Remove and mash with fork or pulse couple times in the blender to get a course and chunky paste.
Take the above paste in a big bowl. Add all the remaining ingredients except the chutneys and the sev.
Now add about 2 tsp of red chutney and 2tsp of green chutney.
Mix all ingredients well using a spatula or clean hands to form a big ball like dough. Should be able to make small balls.
Now take about lemon sized chunks of the mixture and shape into balls.
Place the balls on a cookie sheet and bake at 350F for about 7-8mins. This step is entirely optional. The baking only adds some crispiness to the texture and enhances some flavors but the since all ingredients are already cooked, this step can be skipped.
Now in another deep bowl combine 1/2 cup of red chutney and 1/2 cup of green chutney and mix well.
Take the 1cup of fine sev in a shallow dish.
Now take one ball and dip it in the chutney mixture to coat it evenly and then roll it in the sev until the sev sticks to it all around. You just made your first chaat bite!
Carefully place it on the serving dish. Repeat with all other balls and serve the chaat bites along with the remaining chutney.
For Date/Tamarind (Red) chutney:
Combines all ingredients into a pan.
Heat on medium until water starts to boil and the dates soften.
Then put it in a blender and blend to smooth chutney.
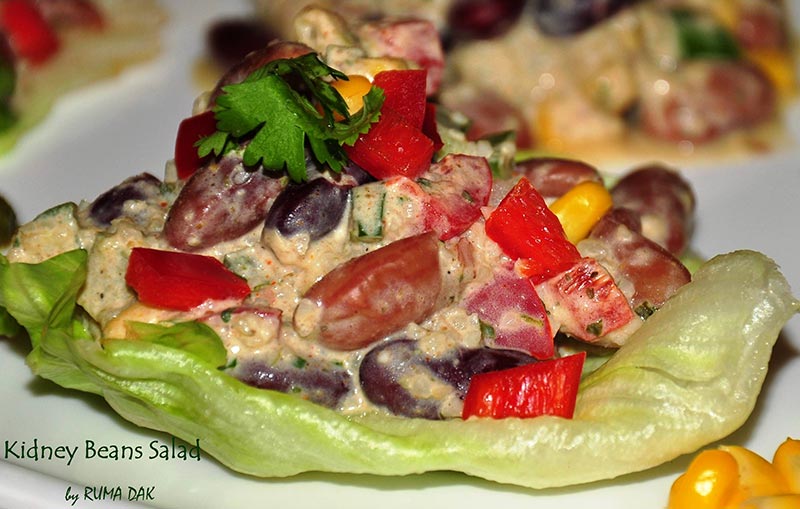
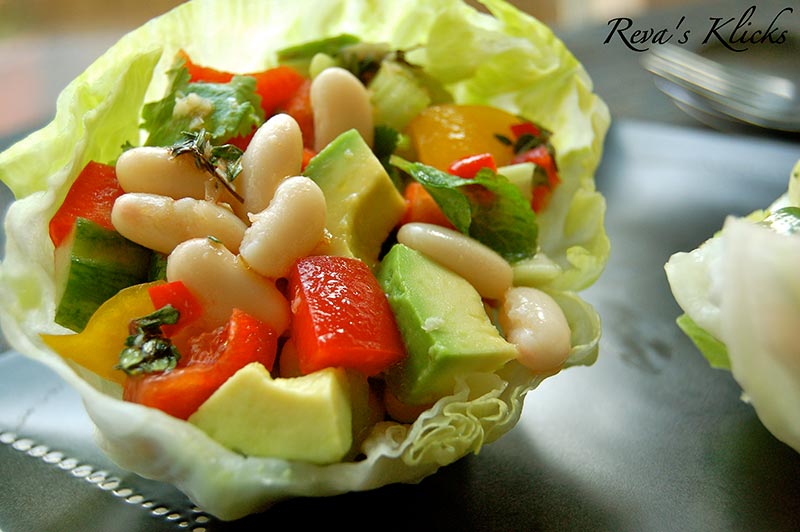
A healthy bean salad with an Indian twist is something that can bring you accolades at a party. This high-protein-packed salad brings with it the goodness of fresh and colorful veggies. Couscous adds to the fiber content of the salad while the minty yogurt gives it an Indian touch and that extra zing!, keeping the calories under count too. At times this can also serve a full meal on its own! The veggies for this salad are chosen such that you can make this salad ahead of time ( to lessen that last-minute hush) and it will not turn soggy/watery or have that oniony smell. What more can you ask from a simple salad recipe!
1 cup Kidney Beans (I used a mix of the dark and light variety)
1 cup finely cut veggies: red, green and yellow capsicum, boiled corn kernels, celery.
1/4 – 1/2 Cup couscous (as per your choice)
Lemon juice – to taste
For the Dressing:
1 Cup yogurt (I used Greek style Yoghurt)
1 Cup fresh mint leaves
Handful of fresh coriander leaves
Chopped tomato – half
Garlic cloves and ginger – to taste (optional)
Chaat masala, salt, black salt, red chili powder, black pepper powder, green mango powder, anardana powder – To taste.
For Garnishing and serving:
Fresh Coriander and mint leaves
Lettuce leaves
Some chopped capsicum, boiled corn etc.
Instructions
Method
Wash and soak kidney beans overnight in sufficient water. Pressure cook or boil them till cooked. The beans should retain the shape and should be well cooked. Set aside for cooling.
Wash and drain cous cous properly. Add enough warm water to soak it and leave aside for 10-15 minutes.
Grind together mint leaves, coriander, and garlic, ginger, chopped tomato, all spices for the dressing. You can add green chilies if you like your salad hot.
Mix the above with hung yoghurt. Make sure the yoghurt is thick as we do not want the salad to turn watery.
In a big bowl, add the boiled beans (just press them little so that they open up a bit; this will help the dressing seep into the beans and impart them some flavor but make sure they still retain their shape). Now add cut vegetables and the minty yoghurt dressing and well.
Fork through the cous cous so that the grains separate. Add this to the salad bowl and give it a good mix. Finally add some lemon juice and mix. Do a taste test and adjust salt if needed.
For an eye catching presentation, serve a portion each on Lettuce leaves such that the leaf serves as a plate as well for individual serving! Sprinkle some cut veggies and mint and cilantro leaves!
Notes
Variations and tips:
If you have mint chutney on your menu with some starter, this salad is a must! Just mix green chutney and yogurt, throw in some more spices and Voila! You have the dressing ready in a jiffy.
Although capsicum and celery are enough to give a crunch, but still if you really do want to have onions, add them just before serving. It will look fresh as well as avoid that smell. Tomatoes are also grinded and not added directly as they tend to release water and the salad can’t be made ahead of time.
This can be made with only coriander if mint is not at hand. But adding mint makes it unique and so very flavorful! Try using dried mint instead but you will lose on the flavor.
Yogurt should not have extra water; else the salad will go runny.
Instead of yogurt, you can make a simple cream/sour cream dressing as well but that adds to the calorie count too!
You can use sprouted moong, moth instead of kidney beans but it tastes great with kidney beans; you will have to take my word for that.
You can use dried herbs as well like oregano, parsley or herb mixture of your choice. Options are endless!
Serving Options:
Serve it as a starter with corn chips.
It goes very well with Rice/Biryani or even bread or chapattis for that matter.
Use it as a noteworthy addition to your next scrumptious party menu.
Hot and Cold Bean Salad in Lettuce Cups with Tomato Lime Dressing
This Hot and Cold Bean Salad in Lettuce Cups with Tomato Lime Dressing recipe is full of color and bursting with flavors and textures. The best way to serve this salad is both hot and cold at the same time. Confused!? Well, don't be.One ingredient is warm and the rest of them are cold. The best thing is that the cup in which it is served can also be eaten (so minimal washing after). That is a well deserved bonus for all the busy bees out there along with the recipe being a healthyvegan and a great meal for those who are diet conscious.
3-4Whole iceberg lettuce leaves or gem lettuce leaves :
Wash and trim the edges of the leaves.
1/2 hour before serving time, take a large bowl of cold water and add ice cubes.
Plunge the lettuce leaves in this ice cold water.
Instructions
Method
Wash and chop the veggies. Keep the chopped avacado in a seperate bowl. Refrigerate rest of the veggies.
Wash the mint and coriander leaves and chop coarsely
Grate the garlic finely.
De-seed and chop the red chili.
Finely chop the lemon thyme sprigs.
Mix all the ingredients given for the salad dressing and refrigerate.
Assemble and serve:
In a large bowl add the chopped veggies except avocado, mint and coriander leaves.
Add half the dressing and mix two to three times.
Drain and rinse the beans to get rid of the excessive salt. Add fresh water (just enough to barely cover the beans).
Cook in microwave high for 4-5 mins until pipping hot.
Add this to the veggie mix along with the avacado and toss once.
Serve immediately in the chilled lettuce cups along with the reserved salad dressing.
Notes
Notes:
Avocado can turn mushy if mixed at the beginning and will not look and taste nice.
It is important to serve the dressing chilled even if the salad is at room temperature. The reason being, flax seed oil contains more than 50% of good fats (omega 3 and omega 6) which gets destroyed when heated. Even though this is a healthy oil,1-2 tbsp is enough as it does comes with more or less the same amount of calories as the others. If this oil is unavailable, please kindly use olive oil or peanut oil for a smoky tasty.
Points to remember:
Buy fresh vegetables and cut them before 20 minutes or so before serving time.
Refrigerate all the vegetables added in this salad before and after cutting them until serving time.
Shahi Paneer is a very festive main dish that is creamy and rich in flavor. It is usually a special occasion dish. Shahi paneer can be served with any Indian bread, such as naan or with rice.
Grind cashews into powder-like consistency. Keep aside.
Puree tomatoes, green chili and ginger. Keep aside.
Add oil in a pan, over medium heat. Shallow fry paneer cubes till they turn slightly brown. Remove from pan and place over paper towels to absorb excess oil.
Increase heat to medium-high and test the oil by adding one cumin seed. If it cracks immediately, the oil is ready. Add cumin seeds to the oil and as they crack, add asafetida and bay leaves. Stir for a few seconds.
Add tomato puree, coriander powder, turmeric, red chili powder, and paprika. Cook the mixture, stirring occasionally for 2-3 minutes. It will reduce to half its volume and start separating from the oil.
Add sugar, cashew powder and yogurt. Cook for another minute then add 1 cup of water and salt and bring to boil.
Add paneer and cover the pan. Simmer for a few minutes over medium-low heat, till gravy is slightly thick in consistency.
Remove from heat, add garam masala and chopped cilantro. Mix gently, cover the pan and let it sit for a couple of minutes. Shahi paneer tastes best if it is served hot.
Notes
Serve Shahi Paneer with Naan, or over the Jeera Rice
Keyword Creamy Cashew Gravy, Kid Friendly, Party Dish
Shahi Paneer is a delightful and gluten-free culinary creation, offering a rich and creamy gravy that is not only a treat for the taste buds but also is kids friendly as its a hit among kids too. This regal dish is characterized by its luxurious texture and flavorful combination of paneer, creating a harmonious blend that appeals to both young and adult palates. Its festive dish made on special occasions and would be a great addition to parties and gatherers as a party recipe.
Dicing the Paneer:
Grab your paneer and a sharp knife. Cut the paneer into cubes that are about the size of a large grape or ¾ of an inch each. It’s okay if they’re not perfectly uniform, but similar-sized pieces will cook more evenly. Set the cut paneer aside in a bowl for now.
Grinding the Cashews:
Take your cashews and grind them up into a fine powder using a mortar and pestle, a spice grinder, or even a food processor if you have one. You want them to be like a smooth, nutty dust. Once they’re ground, store them in a separate bowl for later.
Making the Tomato-Ginger-Chili Paste:
Grab your tomatoes, green chili, and ginger. If you prefer a milder dish, you can remove the seeds from the chili before chopping. Finely chop all three ingredients. You can use a blender or food processor to make things easier. Blend them together until you have a smooth, thick paste. Set this paste aside in a bowl with the other ingredients.
Pan-Frying the Paneer:
Pour some oil into a pan and heat it up over medium heat. You want the oil to be hot but not so hot that it starts to smoke. When the oil is ready, gently add the paneer cubes to the pan. Carefully fry the paneer cubes, turning them occasionally, until they turn a light golden brown on all sides. This will take a few minutes. Once they’re browned, take the paneer out of the pan with a spoon and place them on a paper towel-lined plate. The paper towels will soak up any excess oil.
Tempering the Oil and Adding Spices:
Now, increase the heat to medium-high. To test if the oil is hot enough, take a single cumin seed and toss it in the oil. If it sizzles right away, the oil is ready. If it doesn’t sizzle, wait a little longer before testing again. Once the oil is hot, add the cumin seeds. As the cumin seeds crackle, add a pinch of asafetida (if using) and a few bay leaves. Sauté these spices for a few seconds, stirring them constantly, until they release their aroma.
Cooking the Tomato Masala:
Add the tomato-ginger-chili paste you made earlier to the pan with the spices. Next, sprinkle in the coriander powder, turmeric, red chili powder, and paprika. Stir everything together and cook the mixture over medium heat for 2-3 minutes, stirring occasionally. You’ll notice the mixture will start to reduce in volume and thicken up as it cooks. It may even separate a little from the oil around the edges of the pan. That’s okay!
Adding Sweetness and Creaminess:
Now, it’s time to add a touch of sweetness and creaminess to the sauce. Sprinkle in some sugar and add the ground cashew powder you made earlier. Stir this in and cook for another minute. Then, pour in one cup of water and add salt to taste. Bring the mixture to a boil.
Simmering the Paneer in the Masala:
Carefully add the pan-fried paneer cubes back into the pan with the simmering tomato masala. Gently stir everything together to coat the paneer in the sauce. Cover the pan with a lid and reduce the heat to medium-low. Let the paneer simmer for a few minutes, until the gravy thickens slightly and becomes a nice consistency.
Finishing Touches:
Once the paneer is cooked through and the gravy has reached your desired consistency, turn off the heat. Now, sprinkle in some garam masala and chopped fresh cilantro. Gently fold these ingredients into the dish without over stirring. Cover the pan again and let it sit for a couple of minutes. This allows the flavors to meld together.
Serving Up the Shahi Paneer:
Your Shahi Paneer is now ready to be enjoyed! For the best flavor, serve it hot with rice, naan, or your favorite flatbread.
Shahi Paneer FAQs:
Is Shahi Paneer vegetarian?
Yes, Shahi Paneer is a vegetarian dish made with paneer, vegetables, and spices.
Is Shahi Paneer healthy?
While delicious, Shahi Paneer is on the richer side due to the use of cashews and cream. Moderation is key. It offers some protein from paneer and healthy fats from cashews, but may be higher in calories.
Can I substitute paneer in Shahi Paneer?
Tofu can be used as a substitute, although the texture will be slightly different.
What does Shahi Paneer taste like?
Shahi Paneer offers a burst of flavors: creamy, slightly sweet from tomatoes, savory from cashews and yogurt, with a hint of spice.
How to store leftover Shahi Paneer?
Store leftover Shahi Paneer in an airtight container in the refrigerator for up to 2-3 days. Reheat gently on the stovetop over low heat.
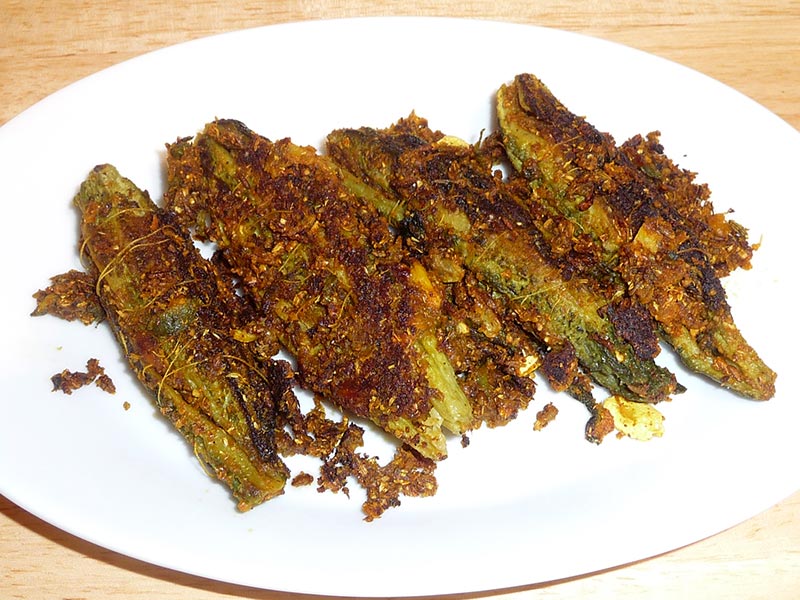
Wash karelas thoroughly and using a knife, scrape the skin. Set the scrapes aside.
Make a slit in the karelas length wise and remove the seeds. Add karelas and the skin scrapings to a bowl. Mix and sprinkle with salt and lemon juice. Let it marinate for at least an hour.
Squeeze the karelas to remove all the marinade. Wash karelas twice with hot water and then squeeze out all the water. Separate the scrapings from the whole karelas.
Preparing the Filling:
Heat the oil in a saucepan. Test the heat by adding one cumin seed to the oil; if the seed cracks right away, the oil is ready. Add the cumin seeds and asafetida to the oil. After the cumin seeds crack, add the karela scrapings and stir fry for about 2 minutes.
Add gram flour (besan) and stir-fry for another minute.
Add all the remaining dry spices: coriander powder, fennel powder, turmeric, chili powder, and mango powder. Sauté for a minute and then turn off the heat.
Stuff the split karelas with this spice mixture (there should be some spice mix remaining, which will be used later). Tie the karelas with a thread so that the stuffing does not come out while cooking.
Cooking the Stuffed karelas:
Add 2 tablespoons of oil in a sauce pan over medium heat. Spread the stuffed karelas in the pan and sprinkle with salt. Cover the pan and let it cook for about 2 minutes.
Turn the karelas over to the uncooked side and cook for about 1 minute. Repeat until all four sides of the karelas are cooked.
Sprinkle 2 tablespoons of water and the remaining spice mixture over the karelas. Cover the pan and let it cook for 2 more minutes.
Remove the lid to see if the karelas are tender. Gently turn them over a few more times, making sure they are covered with the spice mixture.
Notes
NotesStuffed karela can be served hot or cold and can be refrigerated up to a week.VariationsFor a slightly sweeter taste add 2 tablespoons of sugar to the cooked spice filling, prior to stuffing the karela.I like to Serve Karela with Urad Dal Tadka, Mixed Dal, Dal Makhini and Rice
Keyword Bitter Melon, Diabetic Friendly, Healthy Side Dish
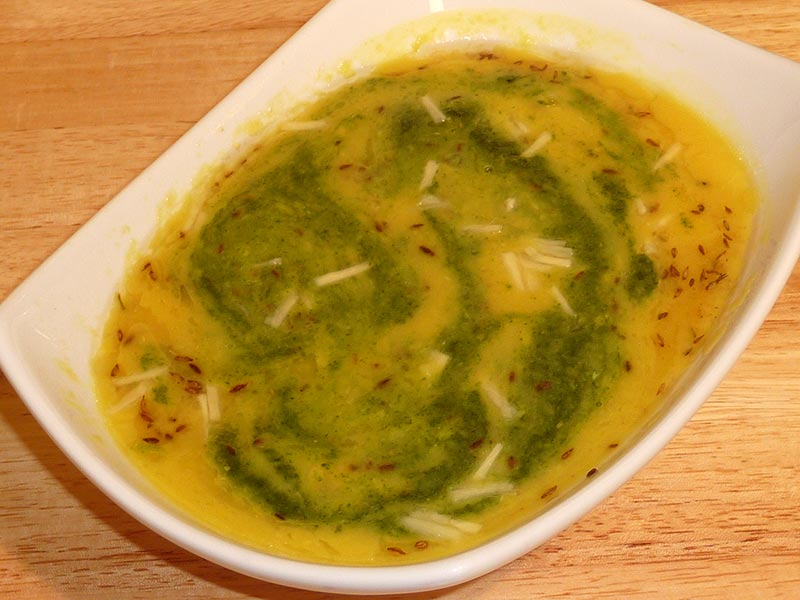
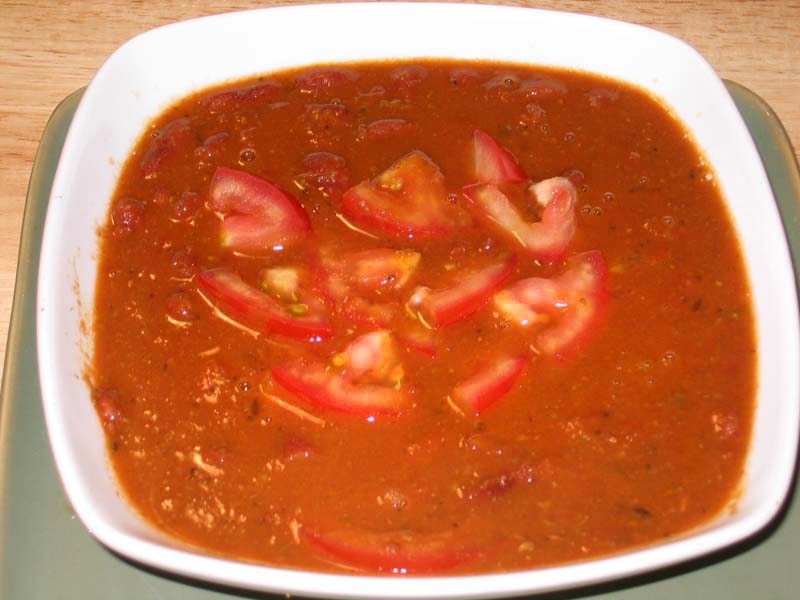
This healthful vegan soup is high in protein. Made with split Moong dal and flavored with hari cilantro chutney, moong dal soup is flavorful yet simple and easy to make.
1 cup split yellow Moong dal, washed (available in Indian grocery stores)
1 teaspoon salt
1/4 teaspoon turmeric (haldi)
3 cups water
Approximately 1/4 cup of Hari Cilantro Chutney
For the Seasoning
1 tablespoon oil
1/2teaspoon cumin seeds (jeera)
Pinch of asafetida (hing)
For the Garnish (optional)
1 tablespoon ginger, finely sliced
1/8 teaspoonsalt, adjust to taste
1 teaspoon lemon juice
Instructions
Method
Wash the dal several times, until the water becomes almost clear.
In a medium pot combine the moong dal, turmeric, salt, and water. Cook over medium-high heat until it starts to boil. Remove the frothy foam that accumulates on the surface as the dal cooks.
Lower the heat to medium and cook for 15 to 20 minutes, until completely cooked and a little mushy. Stir occasionally and add more water if needed. Turn off the heat.
Puree the dal using a hand blender or regular blender. If needed, adjust the thickness of the dal by adding more boiled water. Mix well. The dal will thicken as it cools.
Add hari cilantro chutney to suit your taste. The chutney gives the soup a fresh green appearance and a tangy flavor.
Seasoning
Heat the oil in a small saucepan. Add cumin seeds and wait until the seeds crack. Add asafetida and turn off the heat.
Pour the mixture over the cooked soup.
Garnish (optional)
Combine the ginger, salt and lemon juice. Marinate for at least a half hour.
Garnish with a few slices of marinated ginger.
Marinated ginger can be refrigerated for up to a week.
Notes
Time-saving Tip:To save time you may use a pressure cooker, as follows.
In a pressure cooker add Moong dal, turmeric, salt, and water. Close the cooker.
Cook over medium-high heat until it starts to steam. Lower the heat to medium and cook for 5 more minutes.
Turn off the heat and let the steam escape before you open the pressure cooker.
Puree the dal using a hand blender or regular blender. If needed, adjust the dal to your desired consistency by adding more boiled water. Mix well.
Add “Hari Cilantro Chutney” according to your taste. The chutney will give a fresh green look to the soup and have a tangy flavor.
Moong dal soup is a nutritious dish made from split mung beans, also known as moong dal. It is suitable for individuals with diabetes as it has a low glycemic index, meaning it doesn’t cause a rapid spike in blood sugar levels. Additionally, it is gluten-free, making it safe for those with gluten sensitivities or celiac disease.
The soup is high in protein due to the lentils, making it a filling and satisfying meal option. It is also low in fat, which can be beneficial for those looking to manage their weight or reduce their fat intake.
Moong dal soup is often prepared as a vegan dish, as it typically does not contain any animal products. It can be served as a standalone soup or paired with salads for a wholesome and nutritious meal. Overall, it’s a healthy option that aligns with various dietary preferences and requirements.
Moong dal soup is a comforting and nutritious dish that is popular in Indian cuisine. Made from split mung beans, this soup is not only delicious but also packed with protein, fibre, and essential nutrients. In this easy moong dal soup recipe, we’ll guide you through the process of making a flavorful and hearty soup that is perfect for any occasion.
Easy Moong Dal Soup: A Cozy and Flavorful Treat
This recipe guides you through making a delicious and comforting moong dal soup, perfect for a quick and nourishing meal. Moong dal, also known as split mung beans, cooks quickly and offers a satisfying protein punch. Let’s get started!
Prep Work (15 minutes): Clean the Dal: Rinse the moong dal thoroughly under cold running water to remove any dust or debris. Soaking the dal for 30 minutes to 1 hour is optional, but it helps them cook faster and become more tender.
Flavor Builders: While the dal soaks (or if you choose to skip soaking), chop up some fresh ginger for that warming aroma. You can also add diced tomatoes and green chilies for a touch of sweetness and heat, depending on your preference.
Cooking the Soup (30-40 minutes): Sautéing the Aromatics: Heat oil or ghee in a pot over medium heat. Once hot, add the chopped ginger and cook for a few minutes until fragrant. This fragrant base will form the foundation of your soup’s flavor.
Spice Up Your Life: Now comes the magic! Add ground cumin, coriander, turmeric, and a pinch of asafoetida (if using) to the pot with the ginger. Stir everything well to coat the aromatics in the spices. Let them sizzle for a bit, releasing their wonderful aromas. Feel free to adjust the spice quantities based on your taste preference.
Simmering the Dal: Add the soaked (or unsoaked) moong dal to the pot and stir to combine it with the flavorful spice mixture. Next, pour in enough water or vegetable broth to cover the dal completely. Bring the mixture to a boil, then reduce heat and simmer gently. Let it simmer until the dal is tender and cooked through.
Creamy Option (optional, 5-10 minutes): Smooth Operator (Optional): If you prefer a creamy soup, let it cool slightly. Then, use an immersion blender or a regular blender (in batches) to achieve a smooth and velvety texture. Blend until you reach your desired consistency.
Final Touches (5 minutes): Season to Perfection: Now’s the time to adjust the taste! Add salt and a squeeze of lemon juice (optional) to balance the flavors. You can also add more spices if needed.
Fresh Finish: Garnish your soup with freshly chopped cilantro leaves for a pop of color and a refreshing touch.
Serving Up Warmth (enjoy!):
Ladle and Enjoy: Ladle the hot soup into serving bowls and garnish with additional cilantro, if desired. Pair your comforting bowl of moong dal soup with crusty bread, naan, or rice for a complete and satisfying meal. Enjoy this nourishing and delicious soup anytime you need a warm hug in a bowl!
Tips for Making the Perfect Moong Dal Soup:
Soaking the moong dal helps reduce cooking time and improves texture.
Experiment with different spices and seasonings to customize the flavor of the soup to your liking.
For added richness, you can stir in a spoonful of coconut milk or cream towards the end of cooking.
If you prefer a chunkier soup, you can skip blending and leave some of the dal intact.
Variations of Moong Dal Soup:
Vegetable Moong Dal Soup: Add diced carrots, peas, and spinach for a hearty and nutritious twist.
Spicy Moong Dal Soup: Increase the amount of green chilies or add red chili powder for extra heat.
Coconut Moong Dal Soup: Stir in coconut milk for a creamy and indulgent flavor.
Benefits of Including Moong Dal Soup in Your Diet:
High in Protein: Moong dal is an excellent source of plant-based protein, making it ideal for vegetarians and vegans.
Rich in Fiber: The fiber content in moong dal aids digestion and helps maintain a healthy gut.
Low in Fat: Moong dal soup is low in fat and cholesterol, making it a heart-healthy option for all.
Frequently Asked Questions (FAQs) about Moong Dal Soup:
Q: Can I use other lentils instead of moong dal?
A: Yes, you can substitute other lentils such as masoor dal or red lentils for moong dal in this recipe.
Q: Can I make moong dal soup in advance?
A: Yes, you can make the soup ahead of time and store it in the refrigerator for up to 3 days. Reheat gently on the stovetop or in the microwave before serving.
Q: Is moong dal soup gluten-free?
A: Yes, moong dal soup is naturally gluten-free, making it suitable for those with gluten intolerance or celiac disease.
For more delicious Indian soup recipes, visit Manjula’s Kitchen. Explore a variety of vegetarian soups, appetizers, main courses, and desserts to delight your taste buds and impress your family and friends.
Steamed gram-flour dumplings cooked in spicy gravy is a popular North Indian dish from the Indian state of Rajasthan. This mouth-watering dish will surely tantalize your taste buds with its rich, spicy flavors and delightful texture. Ideal for those who crave a hearty and flavorful meal, this Rajasthani delicacy is both satisfying and memorable. Enjoy the authentic taste of Rajasthan with every bite!
1 1/4 cups besan (gram flour) (available in Indian grocery stores)
1/2 teaspoon chili powder adjust to taste
1/2 teaspoon salt
1/8 teaspoon turmeric (haldi)
3 tablespoons yogurt (dahi)
3 tablespoons oil
For the kadhi
1 cup yogurt (dahi)
1 tablespoon besan (gram flour)
1/4 teaspoon turmeric powder (haldi)
1/4 teaspoon chili powder adjust to taste
1 tablespoon coriander powder (dhania)
1 teaspoon salt adjust to taste
2 tablespoons oil
1 teaspoon cumin seeds (jeera)
1/2 teaspoon mustard seeds (rai)
1/8 teaspoon asafetida (hing)
4 whole red chilies
1 bay leaf (tejpat)
1 black cardamom optional
1/2 teaspoon paprika (dagi mirch)
For Garnish
2 tablespoons chopped cilantro
Instructions
For Gattes
Mix all the ingredients in a mixing bowl and gather into a soft dough, adding a little water if needed. At this point the dough will be a bit sticky; wetting your fingers with oil or water will help.
Divide the dough into four or five parts. Roll each one between your palms into a long, smooth log, approx. five” in length and ¾” in diameter. You will need to oil your palms to prevent the dough from sticking.
Bring three cups of water to a boil in a pot. Gently drop the gatte logs into the boiling water and cook for four to five minutes, or until they begin to float up to the surface.
Remove the cooked Gatte logs from the water and let them cool.
Slice the logs into approx. ¾ inch pieces. Set the Gatte aside.
For The Kadhi
Mix yogurt and gram flour into a smooth paste. Add turmeric, chili powder, and coriander powder to the yogurt paste.
Pour the oil into a saucepan over medium heat. Test the heat by adding one cumin seed to the oil. If the cumin seed cracks immediately, the oil is ready. Add the cumin seeds, mustard seeds, and asafetida.
When seeds crack add the whole red chilies, bay leaf, cardamom, and paprika. Stir for a few seconds.
Pour in the yogurt paste and stir for two minutes. Add three cups of water and stir until the gravy comes to a boil. Add salt to taste.
Add the gatte to the gravy. Cover and cook over low-to-medium heat for 20 minutes or longer. Turn off the heat.
Add cilantro and cover the pot for a few more minutes.
Now you are ready to serve!
Notes
Other Suggestions
A slice of gatte can be cooked in advance and added to the gravy later. Gatte can be frozen for up to a month or refrigerated for a few days.
Slices of gatte are used to make a wide variety of dishes, including subji (cooked dry vegetables), rice pulao, etc.
A slice of gatte can be fried and served as a snack.
A slice of gatte can be used to make raita (mixed with yogurt).
Gatte Ke Kadhi is a traditional North Indian dish made primarily with chickpea flour (besan) dumplings cooked in a tangy yogurt-based curry/gravy. The dish is gluten-free and suitable for individuals observing a gluten-free diet. It is often prepared during festive occasions like Karwa Chauth, a Hindu festival where married women fast for the well-being and longevity of their husbands. The addition of lentils (Dal) and vegetables enhances the nutritional value of the dish, making it a wholesome and flavorful option for a vegetarian meal.
Gatte ki kadhi, also known as gatta kadhi or gatte ki sabji, is a traditional Rajasthani dish that combines chickpea flour dumplings (gatte) with a tangy yogurt-based curry (kadhi). This hearty and flavorful dish is a staple in Rajasthani cuisine and is often enjoyed with rice or roti. In this recipe, we’ll show you how to make Rajasthani gatte ki kadhi from scratch, so you can enjoy the authentic flavors of Rajasthan in the comfort of your own home.
Step 1: Preparing the Gatte:
To start, we’ll prepare the gatte, which are the chickpea flour dumplings that give this dish its unique texture. In a mixing bowl, combine chickpea flour (besan), yogurt, salt, red chili powder, turmeric, and a pinch of asafoetida (hing). Knead the mixture into a smooth dough, adding water as needed to achieve the right consistency. Divide the dough into small portions and shape them into cylindrical dumplings.
Step 2: Boiling the Gatte:
Next, we’ll boil the gatte to cook them through before adding them to the kadhi. Bring a pot of water to a boil and gently add the gatte to the boiling water. Let them cook for about 10-12 minutes, or until they float to the surface and are cooked through. Once cooked, remove the gatte from the water and set them aside to cool slightly.
Step 3: Preparing the Kadhi Base:
While the gatte are boiling, we’ll prepare the kadhi base. In a separate bowl, whisk together yogurt, chickpea flour, turmeric, red chili powder, and salt until smooth. This mixture will form the base of the kadhi and give it its creamy texture. Be sure to whisk out any lumps to ensure a smooth consistency.
Step 4: Tempering the Kadhi:
In a large pan, heat oil and add mustard seeds, cumin seeds, fenugreek seeds, and dried red chilies. Let the seeds splutter and release their aroma, infusing the oil with flavor. This tempering adds depth and complexity to the kadhi, enhancing its overall flavor.
Step 5: Cooking the Kadhi:
Once the tempering is ready, pour in the yogurt-chickpea flour mixture and stir well to combine. Add water to adjust the consistency of the kadhi and bring it to a gentle simmer. Let the kadhi cook for about 10-15 minutes, stirring occasionally, until it thickens slightly and the raw taste of the chickpea flour is cooked out.
Step 6: Adding the Gatte:
Once the kadhi is cooked to perfection, it’s time to add the boiled gatte to the curry. Carefully slice the gatte into bite-sized pieces and add them to the kadhi. Let them simmer in the kadhi for a few minutes to absorb the flavors of the curry and heat through.
Step 7: Finishing Touches:
Before serving, garnish the gatte ki kadhi with freshly chopped cilantro leaves for a pop of color and freshness. You can also sprinkle some roasted cumin powder on top for extra flavor. Serve the kadhi hot with steamed rice or roti for a comforting and satisfying meal.
Tips for Making Perfect Gatte Ki Kadhi:
Ensure the Gatte are Firm: Make sure the gatte dough is kneaded well to avoid any cracks or breakage while boiling.
Adjust the Consistency: If the kadhi is too thick, add more water to thin it out. If it’s too thin, let it simmer for longer to thicken.
Taste and Adjust Seasoning: Taste the kadhi before adding the gatte and adjust the seasoning as needed with salt, red chili powder, or other spices.
Variations of Gatte Ki Kadhi:
Vegetable Gatte Ki Kadhi: Add diced vegetables such as carrots, peas, and potatoes to the kadhi for added texture and nutrition.
Paneer Gatte Ki Kadhi: Substitute paneer cubes for the gatte to create a rich and creamy variation of the dish.
Spinach Gatte Ki Kadhi: Stir in chopped spinach leaves to the kadhi for a vibrant green color and earthy flavor.
Benefits of Including Gatte Ki Kadhi in Your Diet:
Rich in Protein: The combination of chickpea flour and yogurt in gatte ki kadhi provides a good amount of protein, essential for muscle repair and growth.
Probiotic Benefits: Yogurt used in the kadhi is rich in probiotics, which promote a healthy gut microbiome and aid digestion.
Nutrient-Dense: Gatte ki kadhi is packed with vitamins, minerals, and antioxidants from the spices and ingredients used, contributing to overall health and well-being.
Frequently Asked Questions (FAQs) about Gatte Ki Kadhi:
Q: Can I make gatte ki kadhi in advance?
A: Yes, you can make the kadhi base in advance and store it in the refrigerator for up to 2 days. Add the gatte and simmer just before serving.
Q: Can I freeze gatte ki kadhi?
A: While you can freeze gatte ki kadhi, the texture of the gatte may change slightly upon thawing. It’s best enjoyed fresh or stored in the refrigerator for a few days.
Q: Can I adjust the spice level of gatte ki kadhi?
A: Yes, you can adjust the amount of red chili powder and green chilies according to your taste preferences. If you prefer a milder kadhi, reduce the amount of spice used.
For more delicious Rajasthani recipes, visit Manjula’s Kitchen. Explore a variety of traditional dishes from Rajasthan, including dal bati churma, laal maas, and more, to experience the rich flavors and culinary heritage of the region.
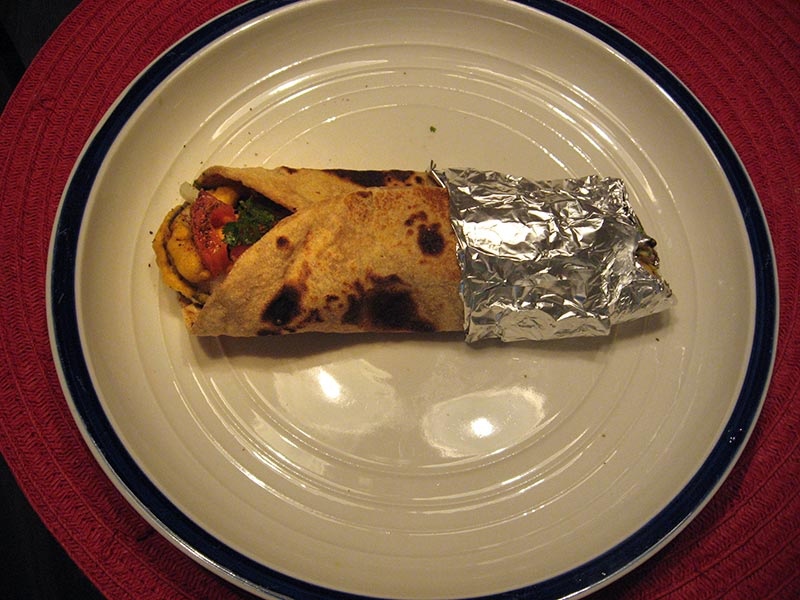
I am fond of Mediterranean food, so I made my own version of wrap inspired by Mediterranean flavors. I used big sized roti/chapati for the wrap, eggplant pakoras/fritters along with home-made hummus and mint chutney.
I bought a new small Indoor Electric grill (George Foreman grill) this summer and have tried several grilling recipes – the most hit was the Pineapple grilled with Honey sauce – which was actually my own accidental invention. So I have used it for the eggplant-tomato-green peppers filling. The dressing is the sauce filtered out from the grill machine spread over the tortilla before putting the filling! The wrap is filled with fresh romaine lettuce and pepper jack cheese! Hope you will like this appetizer or snack recipe.
1 1/2 tablespoon fresh pineapple juice (you can substitute with lemon juice – I consume a lot of fresh pineapple juice almost everyday so I have it handy!!!)
2 teaspoon garlic paste
2 teaspoon ginger paste
1/4 teaspoon red cayenne pepper (you can add adjust for hotness)
1/4 teaspoon sea salt (adjust per taste)
1/4 teaspoon ajwain seeds
1/2 teaspoon dried parsley leaves
For the tortilla wrap filling:
1/2 inch thick Round Eggplant slices – 3
2 medium tomatoes – cubed
1/4 cup finely chopped green peppers
1/2 cup fresh romaine lettuce
1/4 cup shredded cheese (I used Weight watchers Pepper Jack cheese)
Instructions
For Tortilla:
Turn on the tortilla maker on medium-high setting – Optionally you can also cook these on the tawa/griddle like roti/parathas.
Take the flour in a bowl big enough to knead the dough. Add salt and olive oil- mix well. Add sprouted moong and mix well. Add 1 tablespoon water at a time and bind into firm and smooth dough – firm enough to not use extra dry flour while rolling – this will avoid brushing more oil while making the tortilla.
Divide the dough into two pieces.
Roll the dough into 7 inch diameter circles and place on the tortilla maker – do not close the top. Once you see few areas bubbled up on the roti – after 1-2 minutes. Flip over the tortilla-roti and cook the other side similarly. Then turn back-over and press the top side of the tortilla maker to press it well – just 1-2 seconds. Flip back over and do the same for 1-2 seconds. Take out the tortilla and place covered in paper napkin in a roti casserole bowl to avoid from being dry and firm.
For the dressing and grill marinate:
Add well the ingredients as listed above in a wide bowl and keep aside.
For the filling:
Turn on the grill (or just do the entire process on the tawa/griddle on stove)
Roll the eggplant pieces in the prepared dressing and leave it in the bowl until the grill is ready
Put the eggplant pieces on the grill and let stand for 30 seconds. Then cover and grill for 2-3 minutes.
Meanwhile add the chopped tomatoes and peppers into the remaining dressing/marinate mix and keep it aside
Flip over the eggplant pieces and continue grilling for another 2 minutes. Then remove and keep aside
Now add the tomato-pepper mixture on the grill and add all the remaining sauce over it.
Grill similarly for 2-3 minutes on each side. While flipping over take some of the collected sauce out of the grill and pour it back on the grill.
Save the collected-drained sauce while grilling to apply on the tortilla as dressing!
Notes
Serving Instructions:
Take the tortilla roti and apply the drained dressing sauce all over. Then spread with shredded cheese and lettuce. Chop the eggplant pieces and place over the lettuce with the tomato-pepper mixture. Wrap the tortilla and “pin-up” using the tooth-pick.
Use the remaining tomato-pepper mixture and the drained sauce mixture combined as “salsa on the side”. ENJOY!!!!
Variations to prepare the sauce without the grill:
Heat the ingredients of the dressing sauce in microwave or on medium heat on stove in double-sized bowl for 4 minutes – checking not to spill it over and stirring every minute.
Grill the eggplant and tomato-pepper on the hot griddle/tawa once rolled in the dressing sauce or on gas grill pan.
Peel and cut the squash into cubes. Save about ¼ of the squash peel and chop them.
In a small bowl, mix the shredded ginger, coriander powder, funnel, red chili powder, paprika, turmeric, and ¼ cup of water to make a paste.
Heat the oil in a pan. Test the heat by adding one cumin seed to the oil; if seed cracks right away oil is ready. Add cumin seeds and asafetida after seeds crack add fenugreek seeds and red chilies and stir for a few seconds.
Add the spice paste and stir-fry for a minute until spices start leaving the oil.
Add the squash, squash peels, salt, and ¼ cup of water. Mix well. Cover the pan and let it cook on medium heat until the vegetables are tender. Squash will be semi mushy.
Make sure to stir gently every 3 to 4 minutes. Check if more water is needed.
Lastly, add the mango powder, sugar and chopped cilantro. Mix everything and cover for a minute. Adjust the salt to your taste.
Notes
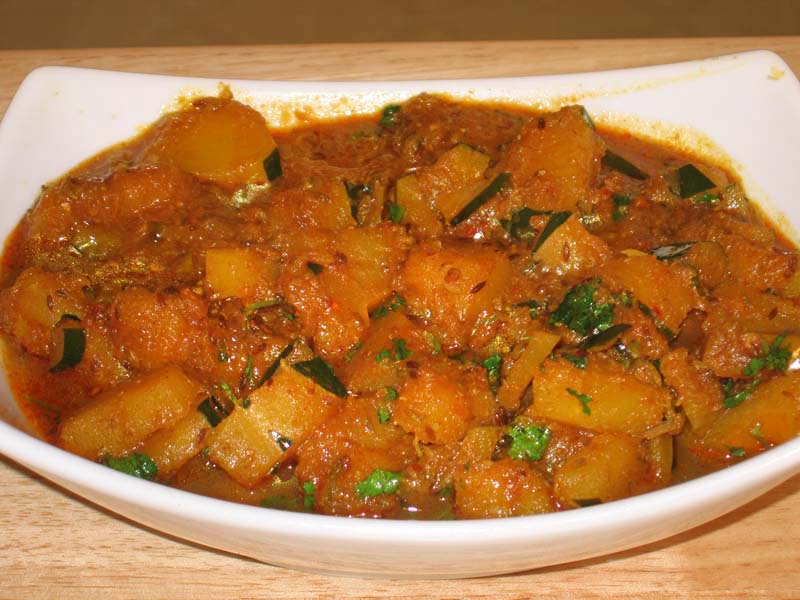
Tips: I have used acorn squash but any squash can be used whatever is available for example banana squash, butternut squash, buttercup squash etc. The only one I know does not work is spaghetti squash and pumpkin.Suggestion: The recipe is with many blends of spices and great aroma makes a great dish to serve with plain rice. Just make the dish with extra gravy by adding more water on step 9. Serve with Puri, in North India Spicy Squash served with Urad Dal Puri.
Indian Squash Recipe | Butternut Squash Indian Recipes | Manjula’s Kitchen
Indian cuisine is renowned for its rich and diverse flavors, one such delightful gluten-free vegetable curry-based Indian Squash Recipe is spicy squash Indian curry a dish that embraces the vibrant colors and aromatic spices synonymous with Indian cooking. To start select a fresh squash, preferably Butternut or Acorn Squash, though other options like banana squash or buttercup squash can also be employed. It’s worth noting that spaghetti squash and pumpkin are not recommended for this particular squash recipe Indian.
The first step involves the preparation of the squash, a crucial task to ensure the perfect texture in the final dish. Peel and cut the squash into cubes, reserving about ¼ of the squash peel for later use. This unique touch adds both texture and visual appeal to the Butternut Squash Sabzi.
The heart of the dish lies in the aromatic spice blend that brings the Indian flavors to life. In a small bowl, combine shredded ginger, coriander powder, funnel, red chili powder, paprika, turmeric, and water to create a flavorful paste. This amalgamation of spices forms the base, infusing the squash with a medley of tastes that are quintessentially Indian.
As the pan sizzles with anticipation, heat the oil to the right temperature. A simple test with cumin seeds determines the readiness of the oil; a crackling cumin seed indicates the perfect moment. Add cumin seeds, asafetida, fenugreek seeds, and red chilies to the hot oil. The ensuing aroma is a testament to the robust flavors that will unfold.
The spice paste takes center stage as it sizzles in the pan. Stir-fry for a minute until the spices release their essence into the oil, creating a tantalizing blend. Now, it’s time for the star of the show – the cubed squash, along with the reserved squash peels. Sprinkle salt, add water, and cover the pan, allowing the vegetables to simmer and tenderize. The squash transforms into a semi-mushy consistency, absorbing the myriad spices infused in the dish.
A gentle stir every few minutes ensures even cooking, and periodic checks determine if more water is needed to maintain the desired texture. The Butternut Squash Sabzi takes shape, with the kitchen filled with the heady aroma of Indian spices.x
In the final act, add mango powder, sugar, and chopped cilantro, elevating the dish with a burst of tanginess and freshness. The amalgamation of flavors is perfected as everything melds together under the lid for a minute. A final adjustment of salt ensures the dish is tailored to individual taste preferences.
As the Butternut Squash Sabzi graces the dining table, it presents a feast for the senses. The blend of spices, the semi-mushy texture of the squash, and the infusion of mango powder create a symphony of flavors that captivate the palate. This Indian squash recipe is not just a dish; it’s a celebration of culinary prowess and cultural richness amongst all other butternut squash Indian recipes.
For those seeking variety in acorn squash recipes, this recipe seamlessly transitions to accommodate Acorn Squash. The versatility of this Indian squash recipe allows for a delightful twist using acorn squash, offering a slightly different flavor profile while still capturing the essence of Indian cuisine. Acorn squash recipes in Indian households often mirror the steps of this Butternut Squash Sabzi, proving that the charm of this dish transcends the specific type of squash used.
In the realm of squash recipes Indian cuisine has a lot to offer, this Butternut Squash Sabzi stands out as a testament to the creativity and depth of flavor inherent in Indian cooking. Its adaptability with various types of squash ensures that households can explore the rich tapestry of Indian cuisine, savoring the distinctive tastes and aromas that make every bite a culinary adventure. Whether served with plain rice or accompanied by Urad DalPuriin North India, this spicy squash dish is a gastronomic delight that bridges the gap between tradition and innovation in the realm of Indian cooking.
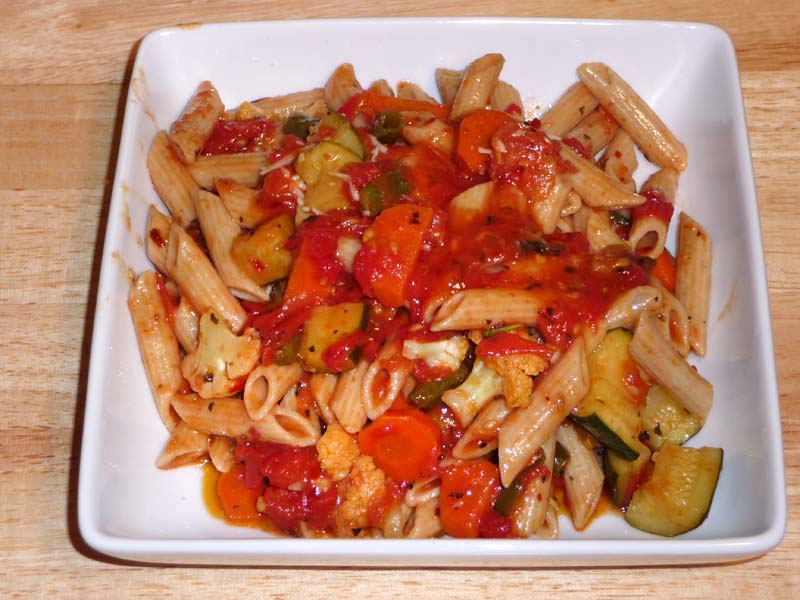
Fresh vegetables and whole grain pasta with savory tomato sauce makes a very colorful and delicious pasta dish. This is a simple pasta dinner. Serve with a side of salad and bread.
In a large pot boil the water with salt and oil. After water comes to the boil add the pasta.
Cook the pasta until it is just tender, not too soft. Drain the water and set pasta aside.
making Vegetables:
Heat the oil in a frying pan over medium high heat.
Add vegetables (carrot, green beans, bell pepper, mushrooms, and zucchini) to skillet and sauté until they are nearly tender.
Marinara Sauce
Mix the cornstarch in ¼ cup of water and keep aside.
Heat the olive oil in a saucepan and add the basil, Italian herbs, and chili flakes stir and add tomatoes.
Let the tomatoes cook until they become pasty.
Next add cornstarch, salt and sugar to the tomato sauce, cornstarch will give thickness to the sauce.
Next add the sauté vegetables to the sauce and cook for few minutes on medium heat until sauce come to the desirable thickness.
Prepare The Pasta
Heat the oil in a saucepan and add basil and chili flakes stir for few seconds.
Next add the drained pasta and sauté for a minute until pasta is well coated with oil.
Pour the vegetable sauce over the pasta, serve hot with slice of French bread and salad.
Notes
Variations:For this recipe you need about 5 cups of vegetable, replace the vegetables to your choice.Serving suggestion:Serve pasta with slice of toasted bread and green salad.Additional Notes:I like to serve pasta with slice toasted and spiced French bread. Before toasting the bread spread the olive oil and sprinkle basil, chili flakes and salt.
Keyword Pasta With Marinara Sauce, Pasta Without Onion Garlic
Wash and soak the kidney beans in about six cups of water for at least 6 hours (the beans will double in volume ).
Cut the tomatoes in small pieces, green chili slice lengthwise and take out the seeds (if you prefer mild). Blend tomatoes, green chili, and ginger and make a paste.
Heat the oil in pressure cooker. Test the heat by adding one cumin seed. If the seed cracks right away, the oil is ready. Add asafetida and cumin seeds, as the cumin seeds crack add tomato paste, coriander, turmeric, chili powder, black pepper, and paprika.
Stir-fry for two to three minutes, until the oil begins to separate from the mixture. Add kidney beans, salt, and three cups of water. Close the cooker. Cook over medium high heat.
When pressure cooker starts to steam, turn the heat down to medium and cook twelve minutes.
Turn off the heat. Wait until the steam has stopped before opening the pressure cooker.
Kidney beans should be soft and tender. Stir and mash them gently. Adjust salt and pepper to taste.
How To Make Rajma Chawal Recipe: A Jain Rajma Recipe with Tips and FAQs
Rajma Chawal, a quintessential North Indian dish, is beloved for its rich flavors and comforting texture. While traditionally made with kidney beans simmered in a tomato-based gravy, there are various regional and dietary variations to this dish. In this rendition, we present a Jain version of Rajma Chawal, devoid of onion and garlic, yet bursting with aromatic spices and wholesome goodness.
Preparation:
Wash the kidney beans thoroughly under running water to remove any dirt or impurities.
Soak the kidney beans in about six cups of water for at least 6 hours or overnight. This helps in softening the beans and reducing cooking time.
Making the Paste:
Cut the tomatoes into small pieces and slice the green chilies lengthwise, removing the seeds if you prefer a milder taste.
Peel and chop the ginger.
In a blender, combine the tomatoes, green chilies, and ginger to make a smooth paste. Set aside.
Cooking:
Heat the cooking oil in a pressure cooker over medium heat.
To test the oil temperature, add one cumin seed. If it crackles right away, the oil is ready.
Add a pinch of asafetida followed by the cumin seeds. Allow the cumin seeds to crackle.
Once the cumin seeds start crackling, add the prepared tomato paste to the cooker.
Stir in the coriander powder, turmeric powder, red chili powder, black pepper powder, and paprika. Mix well.
Stir-frying:
Stir-fry the mixture for two to three minutes or until the oil begins to separate from the sides. This step enhances the flavor of the spices and ensures a rich gravy.
Adding Kidney Beans:
Drain the soaked kidney beans and add them to the pressure cooker.
Season with salt according to taste.
Pour in three cups of water and mix well to combine all the ingredients.
Pressure Cooking:
Close the pressure cooker with its lid securely.
Cook over medium-high heat until the pressure cooker starts steaming.
Reduce the heat to medium and continue cooking for twelve minutes.
Finishing Touches:
Once the cooking time is complete, turn off the heat and allow the pressure to release naturally.
Once the steam has stopped, carefully open the pressure cooker lid.
Mashing and Adjusting Seasoning:
The kidney beans should be soft and tender. Gently stir and mash them to thicken the gravy.
Taste the Rajma and adjust the salt and pepper as per your preference.
Garnishing:
Serve the Jain Rajma hot, garnished with chopped tomatoes for a refreshing burst of flavor.
Tips and Suggestions:
Soaking the kidney beans overnight or for at least 6 hours is crucial as it helps in reducing the cooking time and ensures even cooking.
Use mustard oil for an authentic flavor, but if unavailable, any cooking oil can be substituted.
Adjust the quantity of green chilies and red chili powder according to your spice preference.
For a creamier texture, you can mash some of the kidney beans before serving.
Garnish the Rajma with freshly chopped cilantro for added freshness and aroma.
Serve Rajma Chawal with steamed rice or Indian bread like roti or naan for a wholesome meal.
Benefits of Rajma Chawal:
High in Protein: Kidney beans are an excellent source of plant-based protein, making Rajma Chawal a nutritious meal choice, especially for vegetarians and vegans.
Rich in Fiber: Rajma is loaded with dietary fiber, which aids digestion, promotes satiety, and helps maintain a healthy weight.
Essential Nutrients: This dish provides essential nutrients such as iron, potassium, and folate, which are vital for overall health and well-being.
Heart-Healthy: Consuming kidney beans regularly may help lower cholesterol levels and reduce the risk of heart disease.
Satisfying and Comforting: Rajma Chawal is not only nutritious but also deeply comforting, making it a favorite comfort food for many.
FAQs (Frequently Asked Questions):
Q: Can I use canned kidney beans instead of dried ones?
A: Yes, you can use canned kidney beans for convenience. However, dried beans are preferred for their texture and flavor.
Q: Can I skip soaking the kidney beans?
A: Soaking the kidney beans is essential as it helps in reducing cooking time and aids in digestion. Skipping this step may result in unevenly cooked beans.
Q: How do I make Jain Rajma without onion and garlic?
A: In this Rajma recipe, we have omitted onion and garlic to make it suitable for a Jain diet. The rich flavor comes from a blend of aromatic spices and tomatoes.
Q: Can I make this Rajma recipe without a pressure cooker?
A: While a pressure cooker significantly reduces the cooking time, you can cook Rajma on a stovetop in a heavy-bottomed pot. It will require longer cooking time and frequent stirring to prevent sticking.
Q: How long can I store leftover Rajma?
A: Leftover Rajma can be stored in an airtight container in the refrigerator for up to 3-4 days. Reheat thoroughly before serving.
Jain Rajma Chawal is a delicious and wholesome dish that can be enjoyed by everyone, regardless of dietary preferences. With aromatic spices, creamy kidney beans, and a rich tomato gravy, it’s a comforting meal that’s perfect for any occasion. Follow this simple rajma chawal recipe and savor the authentic flavors of North Indian cuisine right in your own kitchen. Explore more delightful Rajasthani recipes on Manjula’s Kitchen, Explore more appetiser recipes on Manjula’s Kitchen: Vegetable Samosas, Paneer Tikka, Crispy Spinach Pakoras, Mango Lassi, Masala Chai, Gulab Jamun, Kheer (Rice Pudding)