Gluten-Free Indian Recipes: Delicious and Healthy Options
Eating gluten-free doesn’t mean sacrificing flavor, especially with the wide array of gluten free Indian recipes available. Whether you are gluten intolerant or simply looking to reduce gluten in your diet, these gluten free recipes Indian style will delight your taste buds. Let’s explore some delectable gluten free Indian food recipes that you can enjoy for every meal.
Breakfast Recipes
Besan Chilla
Besan Chilla, or chickpea flour pancake, is a high protein vegetarian meals option that fits perfectly within gluten free Indian recipes. This dish is quick to prepare and can be enjoyed with a side of yogurt or chutney. Besan Chilla is also a great example of Indian gluten free recipes that are both nutritious and delicious.
Poha
Poha is a light and flavorful dish made from flattened rice, seasoned with turmeric, mustard seeds, and curry leaves. This dish is a staple in many Indian households and is a fantastic gluten free Indian food recipe for Indian breakfast ideas. It’s easy to make and highly customizable.
Lunch Recipes
Rajma Chawal (without the wheat)
Rajma Chawal is one such beloved north indian recipes made with red kidney beans in a spiced tomato gravy, typically served with rice. By using gluten-free rice, this dish becomes a delightful addition to your collection of gluten free Indian recipes.
Bajra Roti
Bajra Roti is a traditional Indian flatbread made from pearl millet flour. This roti is a staple in the gluten free recipes Indian category and pairs well with various curries and sabzis. It’s nutritious and adds a rustic flavor to your meal.
Dinner Recipes
Paneer Tikka
Paneer Tikka is popular in paneer recipes made by marinating paneer cubes in yogurt and spices, then grilling them to perfection. This dish is not only delicious but also fits well within gluten free Indian food recipes. It’s a great starter for any dinner.
Vegetable Pulao
Vegetable Pulao is a one-pot rice dish cooked with mixed vegetables and aromatic spices. This dish is a versatile and satisfying gluten free Indian food recipe that can be enjoyed by everyone. It’s perfect for a quick and nutritious Indian dinner recipes.
Snack Recipes
Bhel Puri (without sev)
Bhel Puri is a popular Indian street food made with puffed rice, vegetables, and tamarind chutney. By omitting sev (which usually contains gluten), this snack becomes a fantastic addition to your gluten free Indian recipes. It’s tangy, spicy, and utterly delicious.
Roasted Makhana
Roasted Makhana are fox nuts that are lightly roasted and seasoned with spices. This snack is not only crunchy and addictive but also fits perfectly into the gluten free recipes Indian category. It’s a healthy option for those mid-day cravings.
Dessert Recipes
Kheer
Kheer is a creamy rice pudding flavored with cardamom and garnished with nuts. This classic Indian dessert is naturally gluten-free and is a beloved part of gluten free Indian food recipes. It’s easy to make and perfect for any festive occasion.
Coconut Ladoo
Coconut Ladoo are sweet balls made from grated coconut and condensed milk, often flavored with cardamom. These ladoos are a delightful example of Indian gluten free recipes that can be enjoyed as a dessert or a snack.
Enhancing Your Gluten-Free Menu
To make your gluten-free menu even more delightful, consider adding dishes from related categories that complement these gluten free Indian recipes. Adding Indian snacks like roasted makhana and bhel puri can provide a variety of flavors and textures. For a sweet ending, explore Indian desserts such as kheer and coconut ladoo, made with gluten-free ingredients. Incorporating healthy recipes like besan chilla and vegetable pulao can offer lighter options for your meals. Hosting a large gathering? The popular party recipe category is filled with dishes that are sure to impress your guests and make your celebration memorable. Including North Indian recipes like rajma chawal or bajra roti can add a touch of authenticity to your meal.
Frequently Asked Questions (FAQs)
Q: What are some popular gluten free Indian recipes?
A: Some popular gluten free Indian recipes include Besan Chilla, Poha, Rajma Chawal (without wheat), Bajra Roti, Paneer Tikka, Vegetable Pulao, Bhel Puri (without sev), Roasted Makhana, Kheer, and Coconut Ladoo.
Q: How can I make traditional Indian food gluten-free?
A: To make traditional Indian food for diabetics gluten-free, try recipes like Besan Chilla, Bajra Roti, and Kheer. These recipes are modified to exclude gluten while retaining their authentic flavors.
Q: What are some gluten-free recipes Indian style for a party?
A: Some gluten free recipes Indian style for a party include Paneer Tikka, Vegetable Pulao, Bhel Puri (without sev), and Coconut Ladoo. These dishes are flavorful and perfect for gatherings while being gluten-free.
Q: Can I prepare gluten-free Indian food in advance?
A: Yes, many gluten free Indian food recipes can be prepared in advance and stored. Snacks like Roasted Makhana and Bhel Puri can be made ahead of time, while dishes like Vegetable Pulao and Rajma Chawal can be prepped and refrigerated.
Q: What are some healthy options for gluten-free Indian food?
A: Some healthy options for gluten free Indian recipes include Quinoa Salad, Vegetable Stir Fry, Oats Idli, and Besan Chilla. These dishes are high in fiber and protein, helping to manage blood sugar levels effectively.
Conclusion
Gluten free Indian recipes are a celebration of healthy and flavorful foods. Whether you’re looking for gluten free recipes Indian style or traditional gluten free Indian food recipes, these dishes will bring variety and nutrition to your meals.
So, gather your ingredients, try out these recipes, and create delicious meals that are mindful of your health needs. Don’t forget to explore related categories for more delightful recipes from Manjula’s Kitchen!
By incorporating these dishes into your diet, you’ll be able to enjoy a wide variety of delicious and nutritious foods. Whether you’re looking for breakfast, snacks, main courses, or desserts, there’s a gluten free Indian recipe to suit every taste. Happy cooking and healthy eating!
Spicy plantain, Kachhe Kele ki Sabzi , makes a delicious side dish. Plantain is green raw banana that is used for cooking. They do not have the sweetness or flavor as regular bananas, but taste amazing when cooked with spices. I like to serve them with dal and rice.
Boil the plantain in pressure cooker with four cups of water over medium high heat. After pressure cooker start steaming lower the heat medium low and cook for 10 minutes. Turn off the heat and open the pressure cooker after all the steam has escaped. Plantain do not get very soft and mushy.
Peel the plantain and slice them about 1/8-inch-thick in half moon.
In a small bowl, mix the shredded ginger, coriander powder, chili powder, turmeric, and about 1/4 cup of water to make a paste.
Heat the oil in a frying pan over medium high heat. Test the heat by adding one cumin seed to the oil; if seed crack right away oil is ready.
Add cumin seeds, and fenugreek seeds to the oil after seeds crack add spice mix and green chilies and stir for a minute until spices start leaving the oil. Lower the heat to medium.
Add bananas, and salt, and mix well with Masala. Stir fry for 4-5 minutes. While stir frying keep mashing the bananas in small pieces. All the bananas should be coated with the spices.
Add about 1/4 cup of water and cook again for 2-3 minutes, bananas should be little moist. Turn off the heat’
Lastly, add the mango powder and fresh cilantro, mix it well. Adjust the salt to your taste.
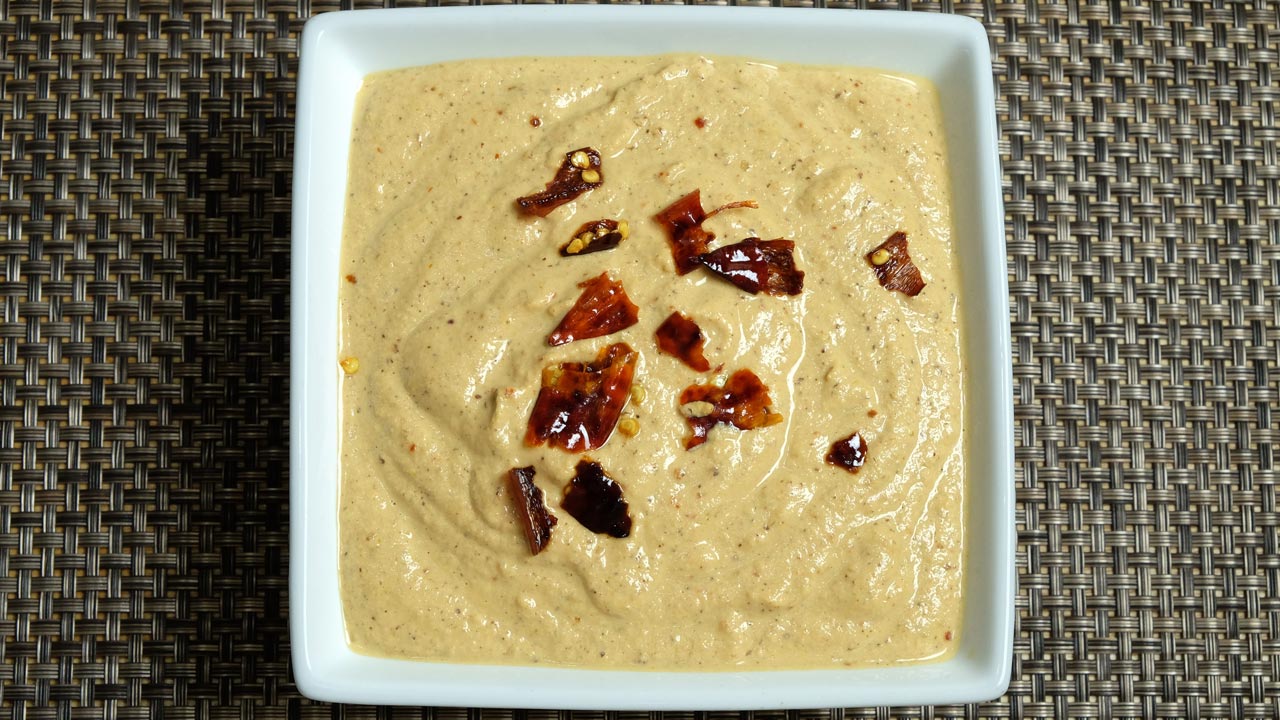
Peanut chutney is a delicious condiment that compliments many South Indian dishes such as dosa, idli, and Medu Vada. This chutney also makes a great spicy spread for sandwiches. I often use this as a dip with pita chips. This is a quick and easy recipe to make!
Heat the oil in a small frying pan over medium heat. Add mustard seeds, as mustard seeds crack add whole red chilies, and peanuts stir-fry them for about 2 minutes.
Lower the heat to low. Add fenugreek seeds. Sesame seeds, asafetida, and curry leaves stir for about 30 seconds. Take out 4 red chilies, set aside.
Add tamarind paste, and salt mix it well. Add one cup of water. Turn the heat to medium, cook for about 2 minutes. Turn off the heat and let it cool off to room temperature.
Grind the peanut mixture to a smooth but not make it paste.
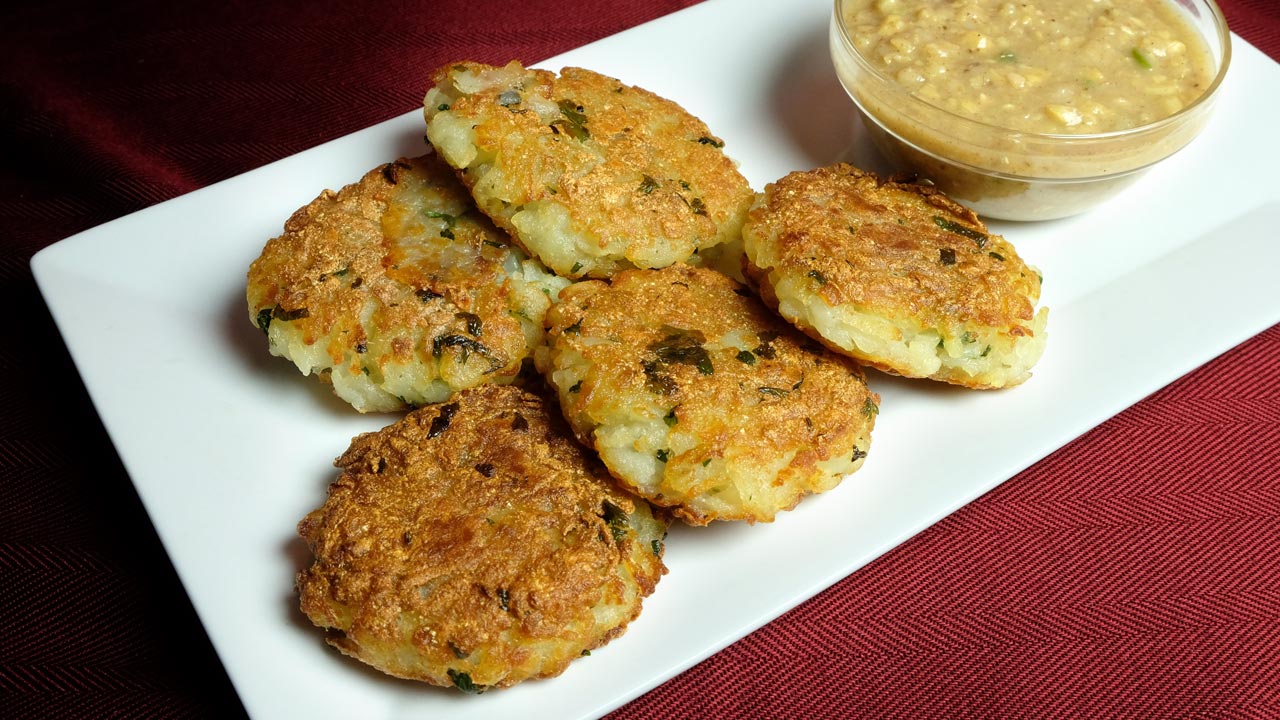
Crispy Aloo Tikki is a popular street foodchaat that can be made in a variety of ways. Any way you prepare these tikkis, they are sure to turn out great! They taste especially delicious with cilantro chutney or tamarind chutney. One of my favorite toppings is spiced chola (this recipe for crispy aloo tikki is with spicy chola topping).
1 15oz can of chick pea, garbanzo beans, kabuli chana,
2tablespoons oil
2tablespoons besan (gram flour)
2tablespoons green chili finely chopped, adjust to taste
2 tablespoons ginger finely chopped, adjust to taste
1teaspoon salt
1/2teaspoon black salt
1 teaspoon roasted cumin seeds powder
1teaspoon garam masala
1/2teaspoon mango powder (amchoor)
Instructions
Preparation for potatoes
Boil the potatoes you will need 3 to 4 potatoes, do not overcook the potatoes they should be still firm, otherwise potatoes will be mushy, and tikki will not be crispy as desired. Peel and shred the potatoes.
Add salt, corn starch, and cilantro to shredded potatoes and mix it well with light hand. Don’t knead the potatoes. Divide the potatoes in eight equal parts and roll them, into patties. Cover the patties and refrigerate for at least 4-5 hours. This is an important step to make crispy tikkies.
Chola Topping
Wash the chick peas changing the water 2-3 times. In a blender mash the chick peas with one cup of water just churning few times. Chick peas should be mashed not pasty.
Heat the oil in a pan over medium heat add the besan and roast the besan stirring continuously until besan is golden brown this should take about a minute.
Add ginger and green chili stir for 30 seconds, add chick peas, salt, cumin seed powder, garam masala, and mango powder.
Cook over low heat for about 10 minutes if needed add water, chick peas should be consistency of dosa or pancake batter.
Turn off the heat, spiced chola topping should be served hot with crispy aloo tikki.
Making the Crispy Aloo Tikki
Heat the flat frying pan with less than 1/8 inch of oil over medium high heat. When oil is moderately hot put the potatoes patties leaving some space in between. Let it brown for about 2 minutes then turn it over. Shallow fry the tikkies until they are light brown from both sides.
Notes
Tips
Do not cook on low heat, tikkies will become greasy and will not be as crispy.
Aloo tikkies are ready serve hot with spicy chola.
You can also serve crispy tikkies with cilantro chutney or tamarind chutney.
Chola topping also goes well with samosas and Samosa Pinwheels.
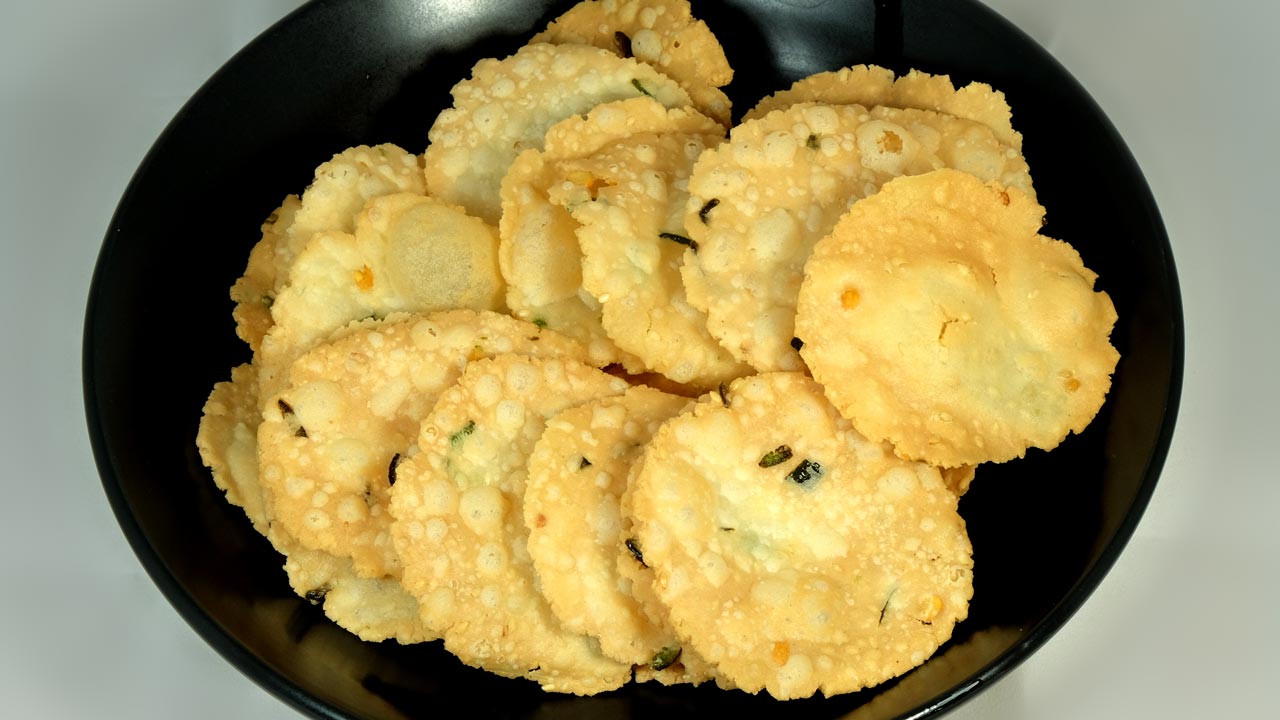
Thattai is a popular south Indiansnack. You may call them crispy rice crackers. This is made with rice flour and a few spices. It is both vegan and gluten free. Thattai is a great snack to have on hand in your pantry.
Combine all the ingredients in a bowl, except water, rice flour, salt, asafetida, sesame seeds, chana dal, ginger, green chili, and oil mix it well. Add water as needed to make the firm dough.
Divide the dough in about 30 equal parts.
Take 2 plastic sheet, I am using zip lock bags this makes it easy to roll. Place one part of the dough between two bags and flatten it thin. Heat oil in a heavy frying pan on medium heat. Check the oil temperature by dropping a small piece of dough into the oil, if it sizzle and rises to the surface slowly, without changing the color, oil is ready for frying.
Gently transfer the flattened dough into the oil. Do not over crowed the frying pan. Fry them until they are light golden brown both sides. This should take about four minutes.
Take them out over paper towed to drain the excess oil.
Repeat the same process for the rest of the dough.
Thattai should be crisp. After it cools, store it in an air tight container.
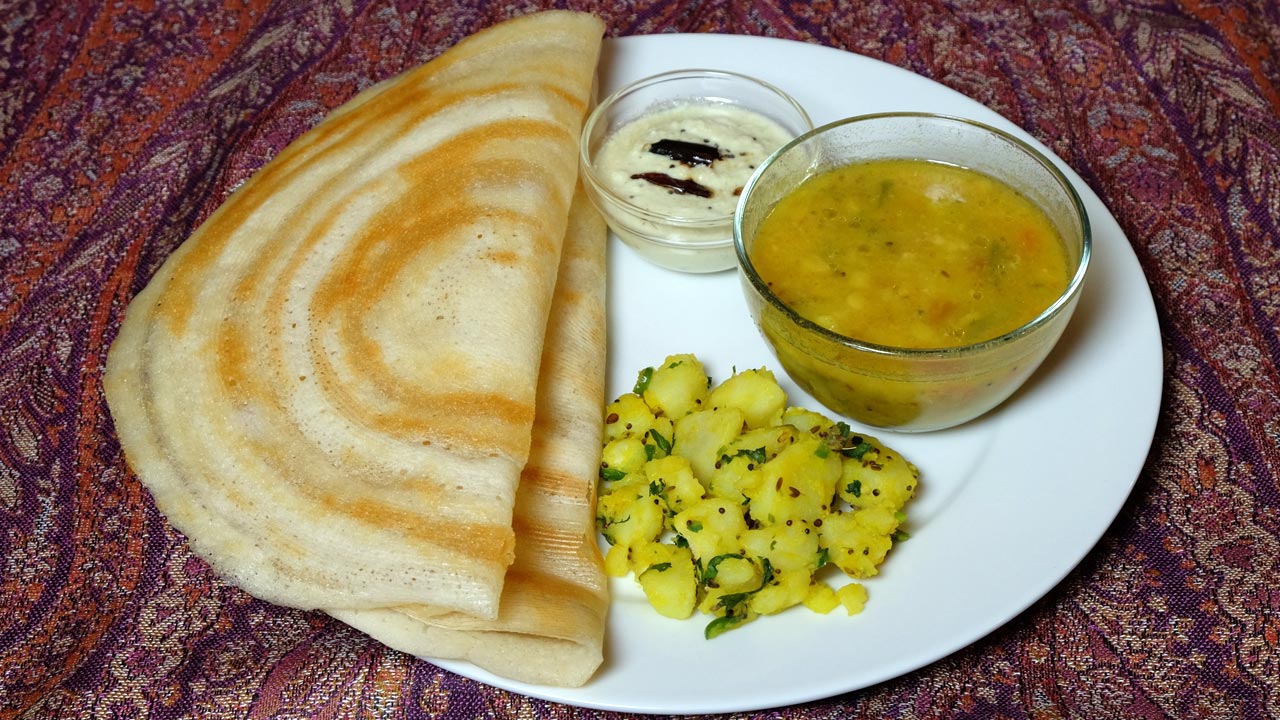
Dosa is a popular South Indian delicacy which looks like a crepe. Dosa is a crisp and thin pancakes made of a rice and urad dal batter. Traditionally Dosa is served with samber, aloo masala and coconut chutney.
Wash rice and dal changing water three to four times. Soak rice mix and fenugreek seeds in about 4 cups of water for at least six hours.
In a blender, blend the rice and dal mix to very creamy texture. Use only as little water as needed to blend. Using too much water for blending will not give the desired creamy texture. Use the same water dal was soaked to grind the batter as that helps in fermentation.
Add the salt to batter, cover and ferment the batter in a warm place for about a day. Batter will be about one and half time in volume.
When ready to make dosa whip the batter for few seconds. Add water as needed, batter should be pourable, or like pancake consistency.
Place a non-stick- heavy skillet over medium heat. Test by sprinkling a few drops of water on it. The water should sizzle right away.
Pour 1/2 cup of the batter mixture into the skillet and spread evenly with the back of a spoon. Starting from the center, spiral outward until evenly spread, about eight inches in diameter thin circle.
Smear about 2 teaspoons oil over it and along the edges and cook till the dosa turns brown in color and crisp. This point flip the dosa using a flat spatula, for about 15 seconds.
Dosa is ready, repeat with remaining batter. Every time wipe the skillet with wet towel that helps spreading the dosa.
Serve with coconut chutney, aloo masala and sambhar.
Jeera rice is a simple rice dish flavored with cumin seeds. Jeera Rice or Cumin Rice makes a delicious side dish that can be served with any kind of gravy meal and makes it festive.
2 tablespoons ghee clarified butter for garnishing
Instructions
Wash the rice gently and soak it in lukewarm water for about 15 minutes. Drain the water and set aside.
Heat the oil in a saucepan moderately. Oil is the right temperature when one cumin seed drops into the oil cracks immediately.
Add the cumin seeds. When they crack, add all the spices red chili, cinnamon, bay leaves, and cardamom, and stir for a few seconds.
Add the rice. Stir-fry one minute.
Bring the water and salt to a boil, and turn the heat to low. Cover the pan.
Cook for 15 minutes, or until the rice is tender and the water has evaporated. Turn off the heat add cilantro and fluff the rice. Jeera rice is ready, serve hot.
Garnish the rice with ghee but this is optional. Jeera rice is very aromatic and delicious. This can enhance any meal.
Master Art of Jeera Rice: A Guide to Indian Cumin Rice Recipe
Jeera rice is commonly served as a side dish in Indian cuisine and pairs well with a variety of main courses. It is often served alongside dishes such as Toor Dal, Kala Chana, Palak Kadhi, Urad Dal Tadka, Dal Tadka, Aam ki DalVegetable curries, or paneer dishes. The mild and aromatic flavor of jeera rice complements the rich and spicy flavors of these dishes, making it a popular choice to balance out the meal.
Additionally, jeera rice can also be enjoyed on its own with a dollop of yogurt or raita for a simple and satisfying meal. Overall, jeera rice is a versatile and delicious dish that adds a fragrant and flavorful touch to any Indian meal.
Preparing the Rice: Washing and Soaking
To start this flavorful jeera rice recipe, gently wash the rice and then soak it in lukewarm water for approximately 15 minutes. This step helps to ensure that the rice grains absorb enough water, resulting in a perfectly cooked and fluffy texture. After soaking, drain the water from the rice and set it aside, ready for the next stage of preparation.
Heating the Oil: Ensuring the Right Temperature
In a saucepan, heat the oil to the right temperature. You’ll know the oil is ready when a cumin seed dropped into it crackles immediately, indicating that it’s at the perfect temperature for cooking. This ensures that the jeera rice will be infused with the rich flavors of the spices and cumin seeds.
Tempering the Spices: Infusing Flavor
Once you’ve completed the crucial step of tempering the spices in your jeera rice preparation, it’s time to introduce the rice to the flavorful mixture. Adding the rice to the saucepan after the spices have been tempered ensures that it absorbs the rich aromas and flavors, resulting in a truly delicious jeera rice recipe.
Adding the Rice: Stir-Frying for Flavor
As you add the rice to the saucepan, begin stir-frying it for about a minute. This process allows the rice grains to come into contact with the aromatic spices and oil, enabling them to absorb the flavors deeply. Stir-frying the rice ensures that each grain is coated with a flavorful mixture, thereby enhancing its taste and aroma.
Cooking the Rice: Simmering to Perfection
Once the rice is stir-fried, bring the water and salt to a boil in the saucepan. Then, reduce the heat to low and cover the pan. Allow the rice to cook undisturbed for about 15 minutes, or until it is tender and the water has evaporated. This gentle simmering process ensures that the jeera rice cooks evenly and achieves the desired fluffy texture.
Finishing Touches: Adding Freshness
After the rice is cooked, turn off the heat and add freshly chopped cilantro. Gently fluff the rice with a fork to incorporate the cilantro and distribute the flavors evenly. This final step adds a burst of freshness to the jeera rice, enhancing its aroma and visual appeal. Your delicious Indian cumin rice is now ready to be served and enjoyed as a flavorful side dish or accompaniment to your favorite curry.
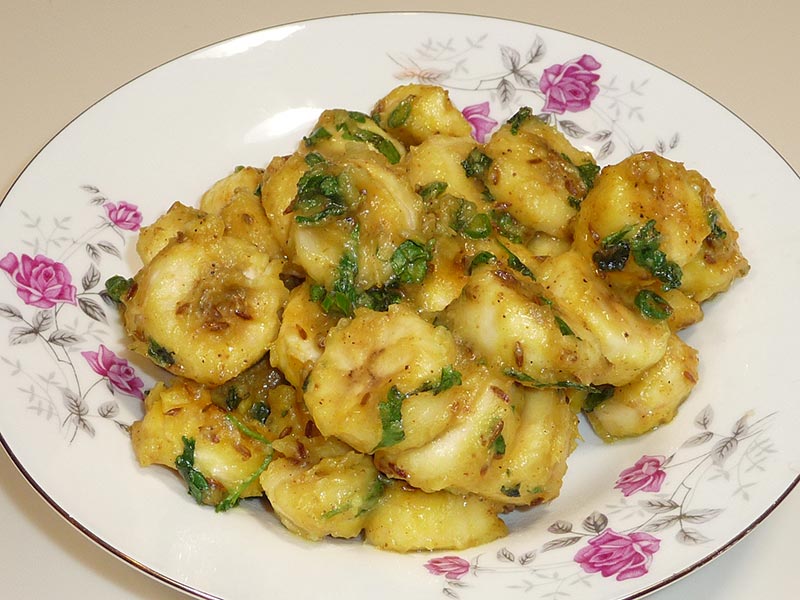
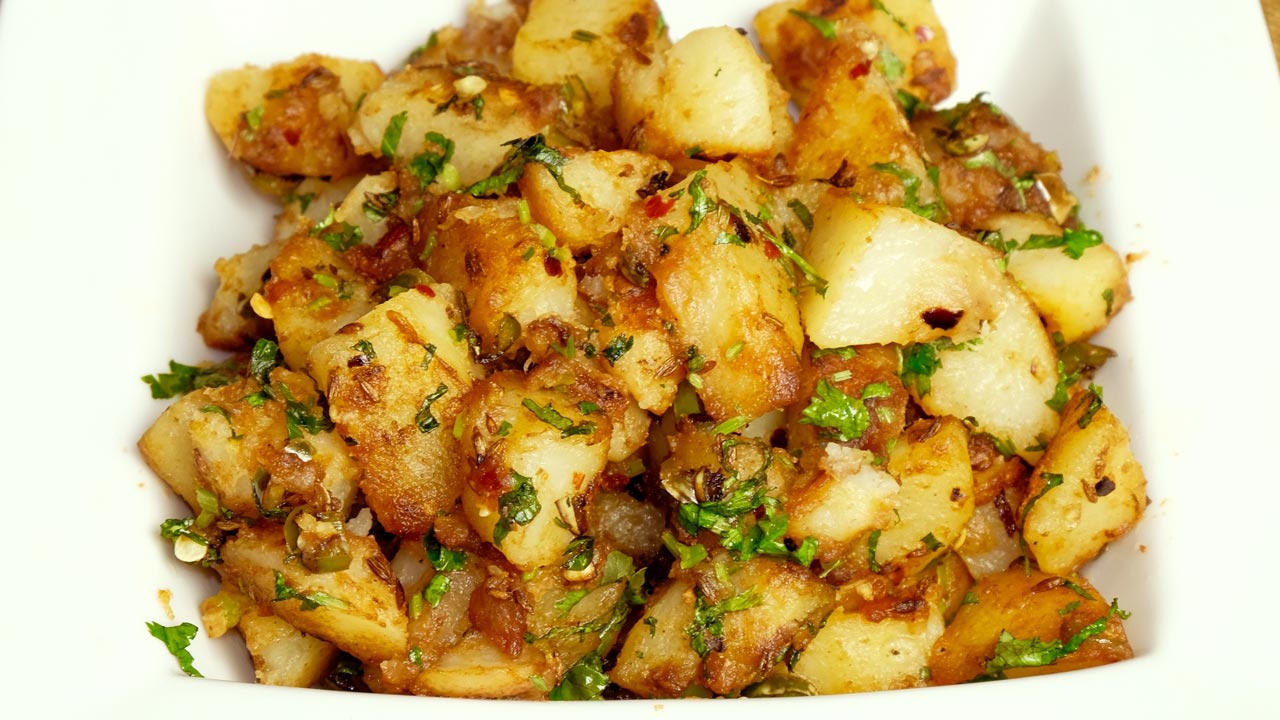
Chatpate Aloo or spicy stir-fry potatoes is a tangy and delicious spicy dish. These Stir-fried potatoes with green chili and tamarind give a very unique flavor. Chatpate Aloo is perfect as a delicious appetizer or you can serve them as a side dish with any meal.
3cups potatoes boiled peeled and cubed in byte size
4tablespoons oil, I like canola oil
1 teaspoon cumin seeds, jeera
1teaspoon salt
2tablespoons green chili finely chopped, adjust to your taste
1/4teaspoon chili flake
1 teaspoon finely shredded ginger
2 tablespoons tamarind paste (do not use concentrated Tamarind)
1/4teaspoon sugar
1/4cup cilantro chopped
2-3 tablespoons water
Instructions
Heat the oil in a frying pan on medium-high heat. Oil is the right temperature when cumin seeds crack immediately after being put in the pan.
Add cumin seeds after seeds crack add potatoes and sprinkle the salt over potatoes.
Stir-fry until potatoes are light golden brown this should take about 6-7 minutes. Add ginger, green chilies and chili flakes. Stir for about a minute.
Add tamarind paste, and sugar mix it well. Add water as needed about 2-3 tablespoons. Potatoes should be moist.
Turn off the heat and add cilantro. Mix it well and serve chatpata aloo hot.
Chatpate Aloo is a delightful dish featuring sautéed potatoes seasoned with a tantalizing blend of spices. This recipe is perfect for various occasions including appetizers, gluten-free diets, lunch box suggestions, quick & easy meals, snacks, and especially suits vegan and vegetarian preferences. The potatoes are cooked to perfection, creating a crispy exterior while remaining tender inside. Bursting with flavor, Chatpate Aloo offers a satisfying experience with its spicy and aromatic profile, making it a popular choice among those seeking a delicious and wholesome dish.
Preparing the Potatoes
To begin making the chatpate aloo fry, start by washing and peeling the potatoes. Cut them into small cubes or slices, depending on your preference. This step is crucial as it ensures even cooking and allows the flavors to penetrate the potatoes evenly. Chatpate aloo fry is all about the spicy and tangy flavors, so make sure to cut the potatoes into bite-sized pieces for maximum flavor impact.
Frying the Potatoes
Heat oil in a pan and add cumin seeds to it. Once the cumin seeds start to splutter, add the diced potatoes to the pan. Fry the potatoes on medium heat until they turn golden brown and crispy on the edges. This step is essential as it gives the chatpate aloo fry its characteristic texture and crunchiness. Make sure to stir the potatoes occasionally to ensure even frying.
Adding Spices
Once the potatoes are fried to perfection, it’s time to add the spices. Sprinkle turmeric powder, red chili powder, and chatpate masala over the fried potatoes. Adjust the quantity of spices according to your taste preferences. The chatpate masala is the star ingredient of this dish, adding a unique blend of tangy and spicy flavors to the chatpate aloo fry. Stir well to coat the potatoes evenly with the spices.
Seasoning and Garnishing
Next, add salt to taste and squeeze fresh lemon juice over the chatpate aloo fry. The lemon juice adds a refreshing tanginess to the dish, balancing out the heat from the spices. Garnish the dish with freshly chopped cilantro leaves for a burst of freshness and color. Cilantro not only enhances the visual appeal of the dish but also adds a subtle herbaceous flavor that complements the spicy potatoes perfectly.
Serving
Once the chatpate aloo fry is ready, transfer it to a serving platter and serve hot. This spicy potato dish is perfect as a side dish or snack and pairs well with roti, naan, or rice. You can also enjoy it on its own as a delicious and flavorful appetizer. Serve it with your favorite chutney or dip for an extra kick of flavor. Whether you’re entertaining guests or craving a spicy snack, chatpate aloo fry is sure to satisfy your taste buds with its bold and irresistible flavors.
Tips:
To make the chatpate aloo fry even spicier, you can add finely chopped green chilies along with the spices.
For added crunchiness, you can coat the potatoes in a thin layer of cornstarch before frying them.
If you don’t have chatpate masala on hand, you can make your own by combining equal parts of chaat masala, amchur (dried mango powder), and black salt.
Variations:
Chatpate Aloo Chaat: Turn this chatpate aloo fry into a delicious chaat by topping it with yogurt, tamarind chutney, tomatoes, and sev (crispy chickpea noodles).
Chatpate Aloo Sandwich: Use the chatpate aloo fry as a filling for sandwiches along with some mint chutney and sliced vegetables for a spicy and satisfying meal.
Benefits:
Potatoes are a good source of vitamins and minerals, including vitamin C, potassium, and B vitamins.
The spices used in chatpate aloo fry, such as turmeric and red chili powder, have anti-inflammatory and antioxidant properties.
Lemon juice adds vitamin C to the dish, which boosts immunity and aids in digestion.
Cilantro is rich in antioxidants and may help lower blood sugar levels and improve heart health.
FAQs:
Q: Can I make chatpate aloo fry ahead of time?
A: While chatpate aloo fry is best enjoyed fresh and hot, you can prepare the fried potatoes in advance and store them in an airtight container in the refrigerator. When ready to serve, reheat the potatoes in a pan and add the spices and seasonings.
Q: Can I use sweet potatoes instead of regular potatoes?
A: Yes, you can definitely use sweet potatoes to make chatpate aloo fry. Sweet potatoes add a slightly sweet and earthy flavor to the dish, which pairs well with the spicy and tangy seasonings.
Q: Is chatpate aloo fry spicy?
A: Yes, chatpate aloo fry is meant to be spicy, thanks to the addition of red chili powder and chatpate masala. However, you can adjust the level of spiciness according to your taste preferences by reducing the amount of chili powder or omitting it altogether.
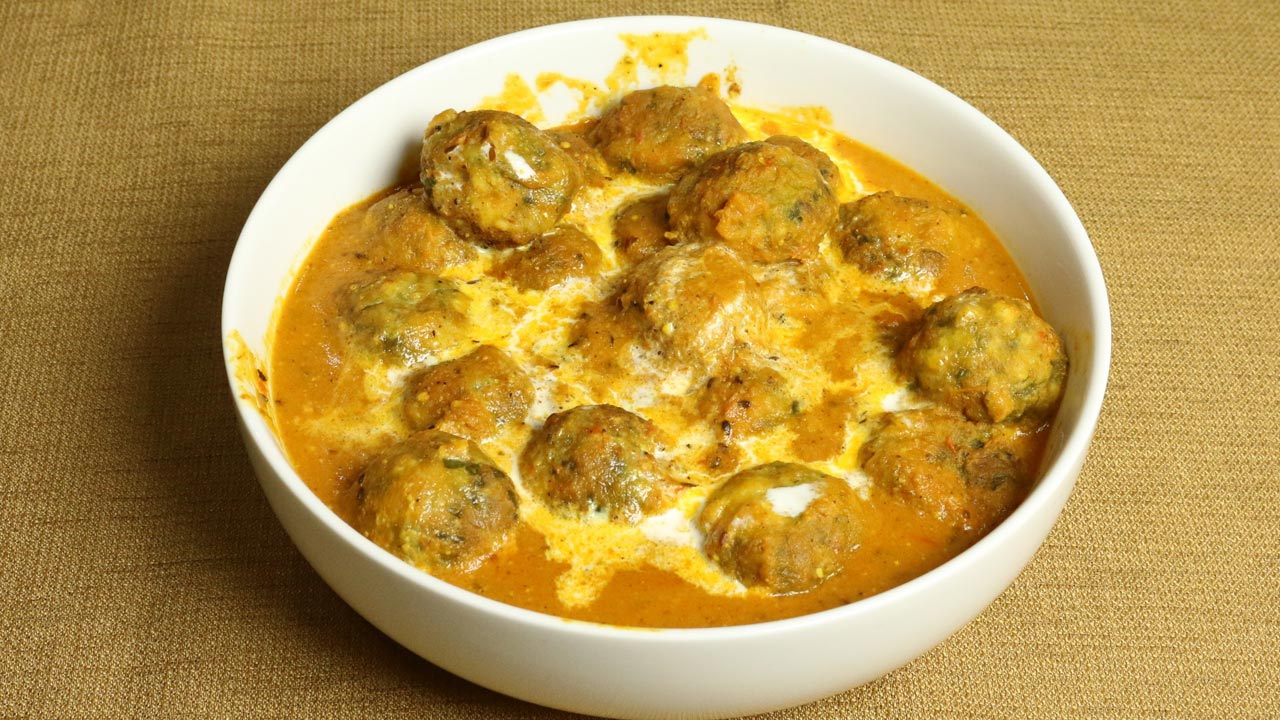
Spinach kofta curry is an exotic gravy-based dish. These spinach and potato koftas (also known as pakoras or dumplings) are simmered in rich creamy tomato gravy making this a very delicious dish. Spinach kofta can be served with any Indian flat bread like Roti, Naan, Paratha, or with plain white rice. This will be enjoyed by everyone.
Mix all the ingredients for kofta spinach, potatoes, cumin seeds, and salt, this mix should consistency of dough. Notes: spinach should be pat dry and potatoes should be firm not overcook. Otherwise mix will be very soft and will not hold the shape after adding to the gravy.
With oiled hands, divide the mixture into 24 to 30 equal parts. Make them in round balls.
Make the batter add the water slowly as needed in the besan, batter should be very smooth no lumps. It should be pouring consistency.
Heat the oil in a frying pan on medium high heat. Frying pan should have about 1 inch of oil. Oil should be moderately hot. To check if the oil is ready, put small piece of mix in the oil, oil should sizzle.
Dip the spinach balls in the batter one at a time and slowly drop into the frying pan. Fry koftas until golden-brown all around. Turn them occasionally. This should take about 3-4 minutes.
Making Gravy:
Blend the tomatoes, green chilies and ginger to make a puree. If you prefer a milder version, take the seeds out of the green chili before blending.
Heat the oil in a saucepan on medium-high. Test the heat by adding one cumin seed to the oil; if it cracks right away oil is ready.
Add the asafetida, cumin seeds stir for a minute. Lower the heat to low, add the other spices except garam masala, coriander powder, turmeric, salt sugar, turmeric, and cashew powder. Stir-fry for a minutes.
Add the tomato puree, increase the heat to medium cook until the tomato mixture starts leaving the oil and reduces to about half in quantity. Add cream save about 1 tablespoon for garnishing and cook for another minute.
Add about 1-1/2 cups of water, as it comes to boil reduce the heat to low and let the gravy cook for few minutes.
Note: adjust the thickness of the gravy to your taste by adjusting the water.
Add the prepared koftas and let it simmer for 1-2 minutes.
Turn of the heat and add the garam masala and cover the pot.
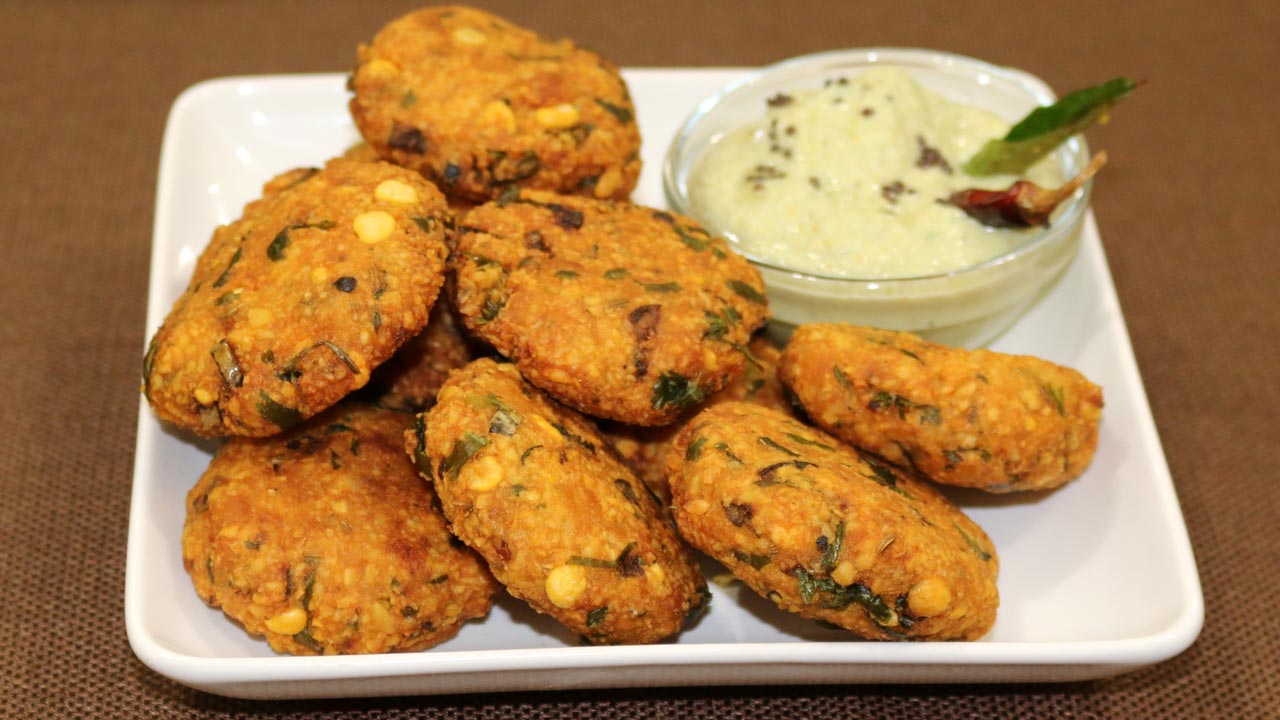
Masala Vada is a South Indian favorite snack that is made with spiced chana dal. They are delicious crunchy on the outside and soft inside. Masala Vada is a popular street food in South India. Try serving along with your afternoon tea.
Wash and Soak chana dal in three cups of water for about 4 hours after soaking this will become about twice in volume.
Drain the water, keep 2 tablespoons soaked dal aside. Grind dal coarsely without adding any water. I like to use food processor.
Take out the dal in a mixing bowl, add all the ingredients, potatoes, rice flour, salt , fennel seeds, mango powder, black pepper, asafetida, ginger, green chili, cilantro and soaked chana dal. Mix it well.
Lightly wet your palms, this will make easy to roll the vadas. Take a lemon size ball of the mix, flatten it with your hands, making them to about half inch thick patties. This should make about 16 patties. I like to make few of patties before I start frying.
Heat the oil in a frying pan, (frying pan should have about 1” of oil) over medium heat. Oil should be moderately hot when you drop the vada, oil should sizzle and come to surface slowly. Gently drop the vadas in oil making sure they don’t overlap.
Fry the vadas both sides till golden brown and crisp, turning over two to three times. This should take 6-7 minutes. Repeat the same procedure for the rest of the mix.
Take them out over paper towel, this absorb the access oil.
Serve vadas as they are or with chutneys, I like them with coconut chutney.
Masala Vada is a delightful Indian appetizer and street food snack that fits perfectly into the categories of gluten-free, vegan, and snacks. Made primarily from chickpea flour and an assortment of spices, Masala Vada is a savory fritter popular in South Indian cuisine. It’s typically crafted by blending soaked and coarsely ground chana dal (split chickpeas) with green chilies, ginger, curry leaves, and coriander leaves.
Masala vada is a popular South Indian snack made from chana dal. It is crispy on the outside and soft on the inside, making it a delightful treat for snack lovers. This masala vada recipe is easy to follow and yields delicious vadas that are perfect for serving with tea or as an appetizer.
Soaking the Chana Dal
To begin making the recipe of masala vada, start by soaking the chana dal in water for at least 3-4 hours. This helps to soften the dal and make it easier to grind later on.
Draining and Grinding
Once the dal is soaked, drain the water completely and transfer the dal to a blender or food processor. Grind it coarsely without adding any water. The texture should be coarse, with small pieces of dal still visible.
Mixing the Ingredients
Transfer the ground dal to a mixing bowl and add chopped green chilies, grated ginger, chopped cilantro, cumin seeds, and salt to taste. Mix everything together until well combined. This mixture forms the base of your masala vada.
Shaping the Vadas
Heat oil in a deep frying pan or kadhai over medium heat. While the oil is heating, take small portions of the dal mixture and shape them into small patties or vadas. You can flatten them slightly with your palms to ensure even cooking.
Frying the Vadas
Carefully slide the shaped vadas into the hot oil, making sure not to overcrowd the pan. Fry them in batches until they turn golden brown and crispy on both sides. Use a slotted spoon to remove the fried vadas from the oil and drain them on paper towels to remove excess oil.
Serving
Serve the dal vada hot with your favorite chutney or sauce. They can also be enjoyed on their own as a crunchy and flavorful snack.
Tips
To make the vadas even more flavorful, you can add curry leaves, or grated coconut to the dal mixture.
Make sure the oil is hot enough before frying the vadas to ensure they cook evenly and become crispy.
If you prefer a spicier version, you can increase the quantity of green chilies or add a pinch of red chili powder to the dal mixture.
Variations
Instead of chana dal, you can use a combination of different dals like moong dal, urad dal, or toor dal to make variations of masala vada.
For a healthier alternative, you can air-fry the vadas instead of deep-frying them. Simply preheat the air fryer, brush the vadas with a little oil, and air-fry them until crispy.
Benefits
Masala vada is a good source of protein and fiber due to the presence of chana dal, making it a nutritious snack option.
The spices used in the vadas like ginger and cumin seeds have digestive properties and aid in digestion.
As these vadas are fried, they should be consumed in moderation as part of a balanced diet.
FAQs
Can I make masala vada ahead of time?
Yes, you can prepare the dal mixture in advance and store it in the refrigerator. When ready to serve, shape the vadas and fry them fresh for the best taste and texture.
Can I freeze masala vada?
While it’s best to consume masala vada fresh, you can freeze any leftover vadas for later consumption. Simply place them in an airtight container or ziplock bag and freeze for up to a month. Reheat them in an oven or air fryer before serving.
Can I use pre-cooked dal to make masala vada?
It’s recommended to use uncooked, soaked dal for this recipe as it gives the vadas the right texture and consistency. Using pre-cooked dal may result in vadas that are too soft and mushy.
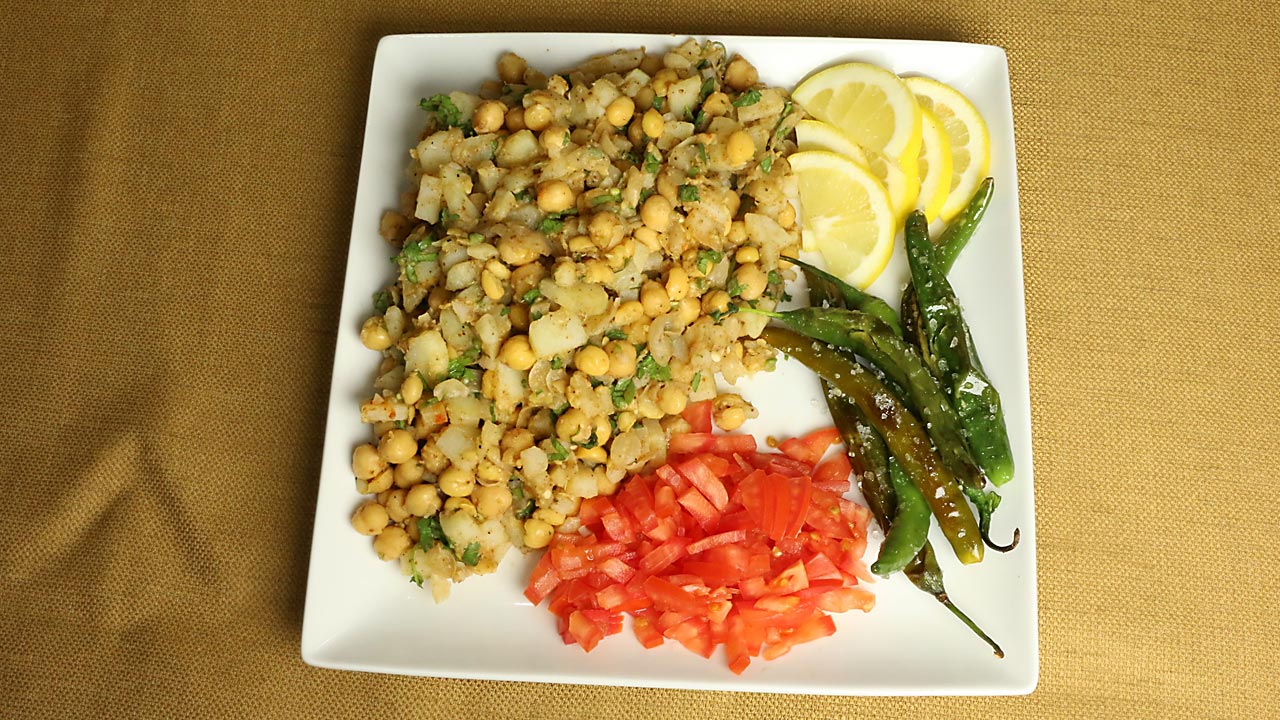
Aloo chana chaat is a spicy potato and chickpea snack. It's very easy to make and is a favorite tasty treat of mine. This recipe involves marinating boiled potatoes and chickpeas in spices to make a great savory snack.
Wash and dry the whole green chilies. Heat a small frying pan on low medium heat, add the oil and green chilies, and cover the pan. Shake the pan slowly to move the chilies around. Notes: it is important to keep the pan cover chilies will splatter. Cook the chilies for about 2 minutes turn off the heat, wait till it stop splattering and remove the lid chilies should be light brown if it is not cook for another minute. Remove and keep aside.
Place chickpeas in a bowl and lightly mash. Add the potatoes and all the ingredients ginger, green chili, red pepper, salt, black salt, black pepper, mango powder, sugar, roasted cumin powder, lemon juice, and cilantro mix it well.
Let it sit for at least fifteen minutes or more, chickpeas and potatoes will absorbed the flavor of spices.
Serve the aloo chana chat with side of tomatoes, fried green peppers and lemon wedges.
How to boil the chickpea
Soak one cup of chickpeas for about eight hours or more, after soaking chick peas will be about 2-1/2 times. Drain the water, cooked the chickpeas in pressure cooker on high heat with 2 cups of water and no salt. After pressure cooker start steaming reduce the heat to low medium and cook for 10 minutes.
Notes
Serving suggestions
Aloo chana chaat also makes a good lunch box meal.
Serve this with tamarind chutney or cilantro chutney and you will have a new recipe.
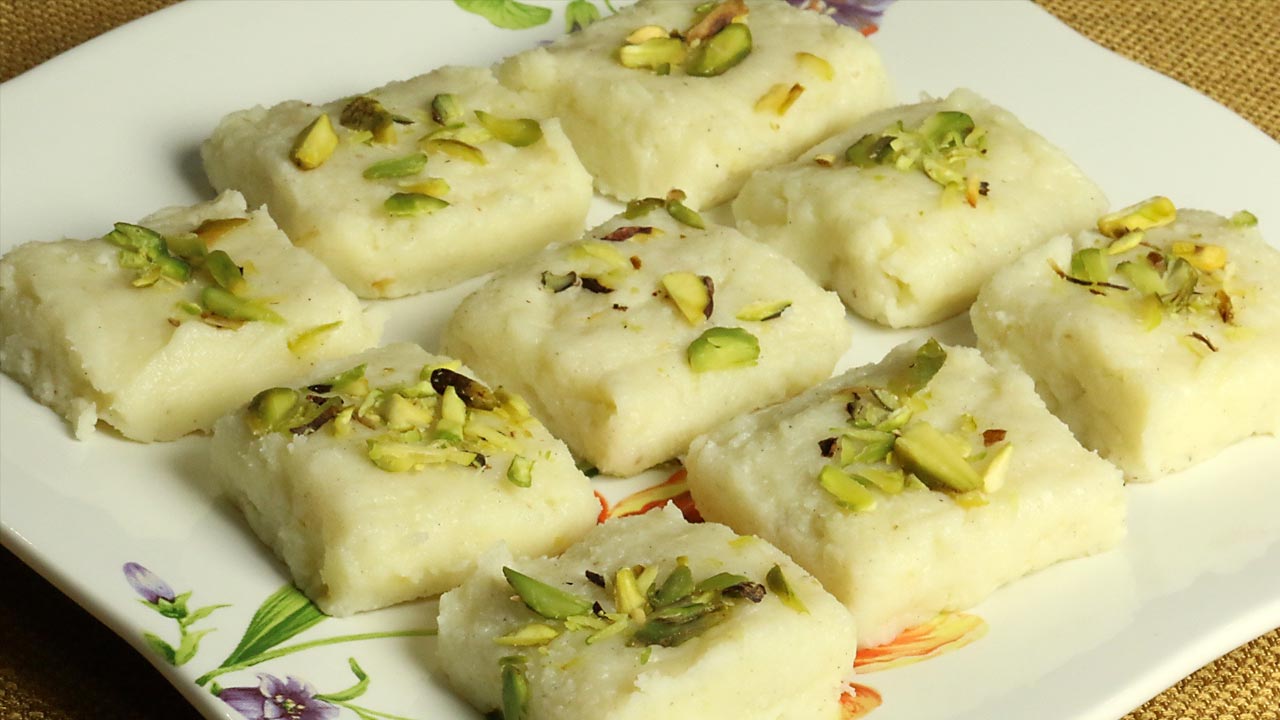
Milk burfi, also known as khoya burfi is a classic Indian sweet that can be served both as a dessert or snack. Milk Burfi is made with milk, sugar, and flavored with cardamom. Finish it with a garnish of sliced pistachios and you have a simply divine treat! This is a staple in most North Indian households and served on many occasions.
Heat the milk, heavy cream and lemon juice on a heavy bottom pan over medium heat, stirring occasionally. As milk will start heating the curd will start separating from the whey, slowly it will separate into thick curds and whey will separate.
Once the milk fat has separated from the whey, drain the whey using a strainer line with cheesecloth, or muslin cloth.
Wrap the curds in a muslin cloth, rinse under cold water, and squeeze well. This process takes out the sourness from the lemon.
Heat the frying pan on medium. Add butter and let it melt.
Next add milk curd, and milk powder. Mix it well.
Cook mixture on medium heat stirring continuously until mixture starts leaving the sides of the frying pan and becomes like soft dough. This should take about 12 minutes. Now this is known as khoya.
Transfer the khoya into a bowl and let it cool off until khoya becomes just lukewarm.
Mix the sugar and cardamom powder into the khoya and knead it for about a minute until everything blends together and become soft dough. Note: if you mix the sugar while khoya is hot that will make burfi soft.
Transfer mixture to the greased plate and press firmly into a square or rectangular shape, approximately 1/2 inch high.
Let the burfi sit for about one hour before slicing I prefer cutting in about 1-1/2 inch squares.
For garnishing put few pieces of sliced pistachios on every piece burfi.
Notes
Notes: Do not heat the milk on high heat, milk should separate slowly. Also some time milk will separate in small curds or sometimes you will not see the curds either way it will be fine.
This Eggless Omelet is similar to a variation of besan chila. I combine lots of vegetables including bell pepper, spinach, and tomatoes and then add in some light spices. Now you have a healthy and delicious choice for breakfast or light lunch. It is also vegan and gluten free!
3/4cup besan (gram flour) available in Indian grocery stores
1/2 teaspoon salt
1/2teaspoon cumin seeds (jeera)
1/8teaspoon black pepper
1 green chili finely chopped, optional
1/2 cup tomato seeded and finely chopped
1/2cup finely chopped spinach
1/2cup finely chopped bell pepper
1/2cup water to make batter
2tablespoons oil
Use vegetables quantity as a guide line, it can be little more or less, also change the vegetables to your choice.
Instructions
Mix all the dry ingredients together: besan, cumin seeds, black pepper and salt. Add the water slowly to make a smooth batter, the consistency of pancake batter or Dosa batter. Add the green chilies, tomato, spinach, and bell pepper. Mix well.
Heat the skillet on medium heat (Use a non-stick skillet) skillet should be moderately hot. Test by sprinkling a few drops of water on it. Water should sizzle right away.
Pour approx. 1/2cup of the batter mixture into the skillet and spread evenly with the back of a spoon. Starting from the center, spiral the batter outward evenly to form a circle about 7” in diameter.
When the batter starts to dry, gently spread about two teaspoons of oil over it. Wait about 30 seconds; flip the omelet using a flat spatula.
Press the omelet lightly all around with the spatula to make the omelet cook evenly. Turn the omelet three or four times, until cook well and golden brown on both sides.
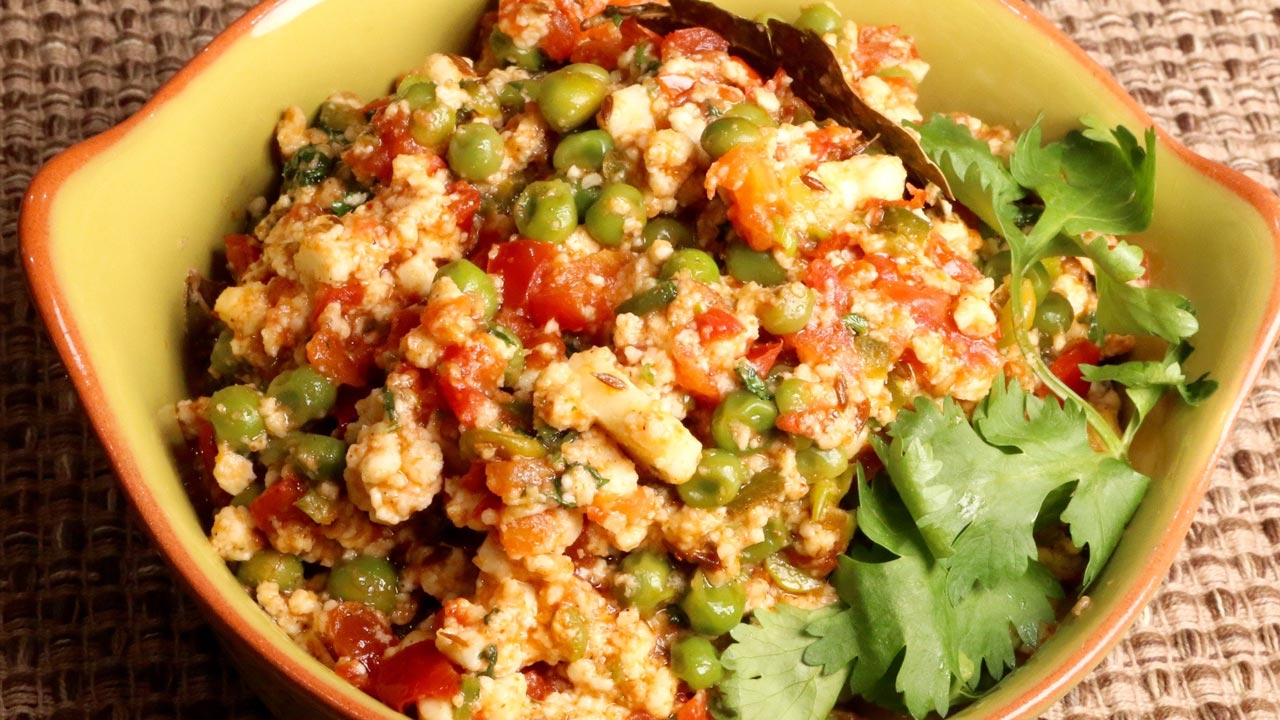
Paneer bhurji is a delightful and spicy paneer dish. Paneer bhurji is a quick and easy recipe to make, made from crumbled paneer simmered in spicy tomato gravy. Paneer bhurji tastes great with roti, paratha, or even with regular bread! This is also makes a good stuffing for dosas or vegetable Frankie rolls.
Soak the paneer in hot water with 1/4 teaspoon of salt for five minutes. Drain the water and crumbled the paneer. This process will make the paneer soft, if you are using the fresh paneer skip this step. Set aside.
Heat the oil in sauce pan over medium heat; after oil is moderately hot add cumin seeds.
After the seeds crack add green peas, and green chili stir for about one minute. Add tomatoes, coriander, salt, sugar and red chili powder, stir and mix well. Cover the pan and cook for 3-4 minutes till the tomatoes and peas becomes soft.
Add paneer stir and cook for 1-2 minutes. Don’t cook the paneer for a long time as paneer will lose the softness. If it is too dry add few spoons of water. Lastly add chopped coriander leaves to paneer bhurji and mix.
Serve paneer bhurji with rotis, plain parathas or with a toast.
Notes
Notes, if you are using the paneer bhurji for stuffing then don’t the water, bhurji should be dry in texture.
Paneer Bhurji Recipe: Crafting the Perfect Indian-Style Dish
Indulge in the savory goodness of vegetables sauteed paneer Bhurji, a quick & easyparty recipe. This delightful, spicy dish features crumbled paneer simmered in a flavorful, gluten-free tomato gravy. Elevate your dining experience with this quick and easy paneer delight!
Step 1: Soaking and Crumbling Paneer for Paneer Bhurji
In the first phase of understanding how to make Paneer Bhurji, immerse the paneer in hot water with a quarter teaspoon of salt for five minutes. This crucial soaking process contributes to the softness of the paneer, a key aspect of the authentic paneer bhurji Indian style. Following this, carefully drain the water and proceed to crumble the paneer, enhancing the overall texture of the dish.
Step 2: Sautéing Cumin Seeds and Building Flavor in Paneer Bhurji Recipe
As you embark on the journey of preparing this delectable paneer bhurji Indian style, heat oil in a saucepan over medium heat. Once the oil reaches the desired temperature, introduce cumin seeds, infusing the dish with a distinct aroma. Let the seeds crackle, then add green peas and green chili, stirring for about a minute. This process forms the flavorful foundation of the paneer bhurji recipe.
Step 3: Cooking Tomatoes, Spices, and Peas for Paneer Bhurji
Continuing the exploration of how to make paneer bhurji, incorporate tomatoes, coriander, salt, sugar, and red chili powder into the pan. Thoroughly mix these ingredients to coat the vegetables, creating a harmonious blend of spices in your paneer bhurji Indian style. Cover the pan and allow the mixture to cook for 3-4 minutes, ensuring the tomatoes and peas reach a soft, succulent state.
Step 4: Incorporating Paneer and Finalizing Paneer Bhurji Recipe
Now, in the heart of the paneer bhurji recipe, gently introduce the crumbled paneer into the aromatic mixture. Stir it delicately, ensuring an even distribution throughout the dish. Cook for a brief 1-2 minutes, being mindful not to overcook the paneer as it might compromise its softness. If needed, add a few spoons of water to maintain the desired consistency. For the finishing touch, generously sprinkle chopped coriander leaves into the paneer bhurji Indian style, elevating the flavors to perfection.
Step 5: Serving the Versatile Paneer Bhurji
As you present your culinary creation, serve the paneer bhurji with rotis, plain parathas, or toast. The adaptability of this dish makes it a delightful addition to any meal. Whether enjoyed on its own or used as a stuffing, it is recommended to maintain a dry texture if you plan to utilize the paneer bhurji Indian style for stuffing purposes.
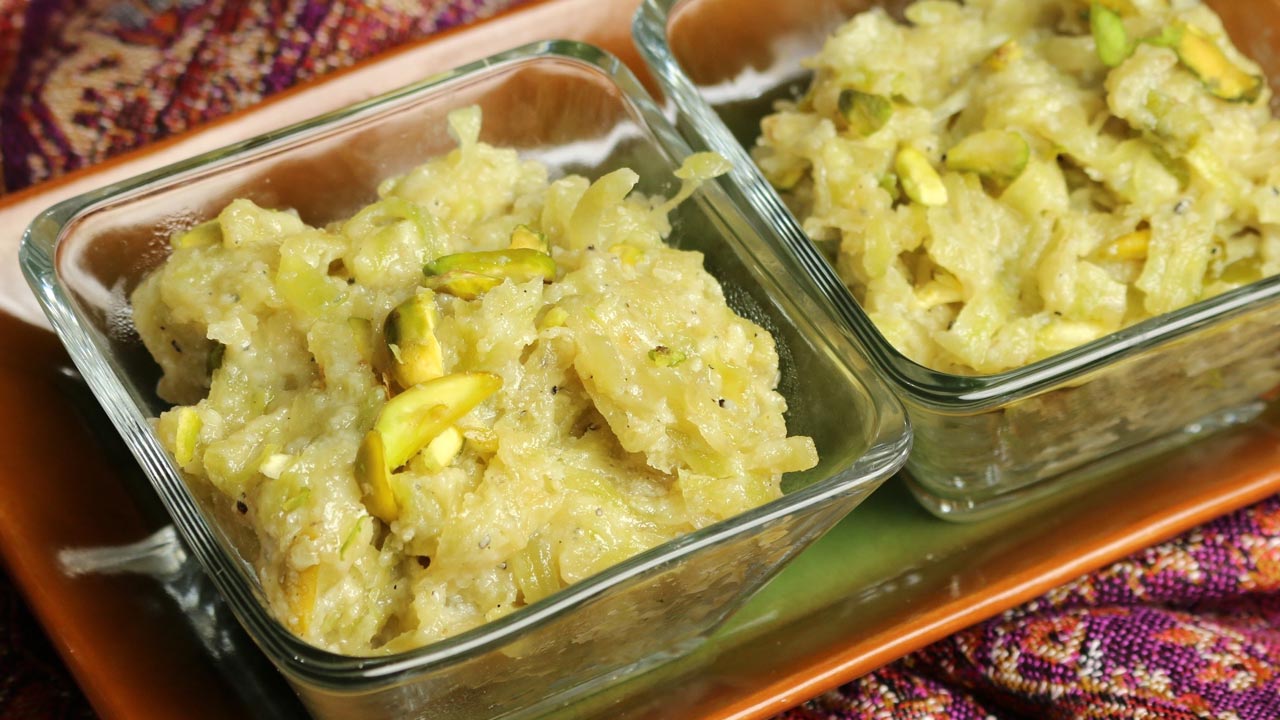
Lauki halwa is a classic dessert that is simple and delicious! Lauki is also known as dodhi, ghia, bottle gourd, or opo squash. Lauki halwa is packed with all the nutrition of lauki and tastes absolutely divine. Just a few ingredients are needed for this dessert: lauki, milk and sugar for its a quick and easy recipe to make.
2cups lauki peeled and shredded, before shredding remove the seeds (bottle gourd, doodhi, ghia, opo squash)
2-1/2cups milk
2 tablespoons ghee, or clarified butter
1/2 cup sugar
1/2teaspoon coarsely ground cardamom seeds
2tablespoons pistachio chopped
Instructions
Squeeze the water from shredded lauki after taking out the water lauki should be 2 cups packed. Set aside.
Boil the milk on medium high heat in heavy bottom pan making sure milk does not burn. After milk comes to boil lower the heat to medium low and boil for ten minutes, until it becomes about 1-1/2 cups. Set aside.
Melt the ghee in frying pan on medium heat add lauki and sauté for 3 minutes, or until it is tender but not mushy. Add milk mix well and bring it to boil, reduce heat to low and cook until mixture becomes thick. It will take approx. 10 minutes. Stir occasionally in between to prevent sticking.
Add sugar, cardamom, and half the pistachios. Stir continuously and cook until mixture becomes of consistency of soft sticky dough, this will take approx. 3-4 minutes. Turn of the heat.
Delicious lauki halwa is ready. Transfer it to serving bowl and garnish with remaining pistachios, and serve hot or at room temperature.
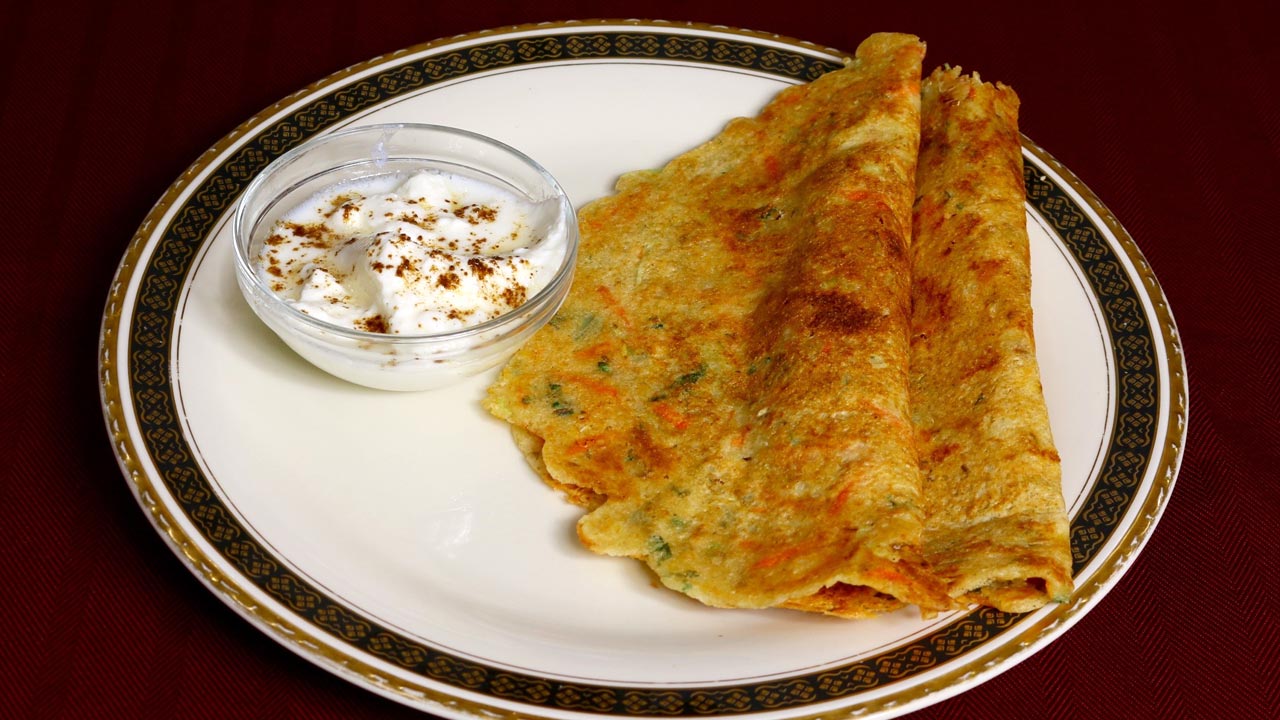
Instant Oat dosa is an easy recipe that is perfect for busy families. Sometimes you want to make something that is easy and hassle-free and of course healthy. Oat dosas are instant dosas and make a great breakfast or anytime snack. This gluten-free dish is made with oats, rice flour, yogurt, and a few spices. I am also adding cabbage and carrots for texture. This will be a staple in my house.
Grind oats to make fine powder. Add all the dry ingredients except ENO rice flour, asafetida, salt, and cumin seeds and mix it well. Notes: ENO is added just before making dosa.
Add yogurt mix, add water as needed to make batter consistency of dosa or pancake mix. Set aside for about fifteen minutes.
Add green chilies, cilantro, cabbage, and carrots mix it well.
Place a non-stick skillet over medium-high heat. Grease the skillet lightly. Test by sprinkling a few drops of water on it. The water should sizzle right away.
In a small bowl take about ½ cup of batter and add ¼ teaspoon of ENO mix it well batter will become a little frothy.
Pour the batter mixture into the skillet and spread evenly with the back of a spoon, about seven inches in diameter.
When the batter begins to dry, gently spread one teaspoon of oil over it. Wait about 30 seconds, then flip the dosa using a flat spatula.
Press the dosa lightly with the spatula all around to ensure even cooking, turning two to three times. The dosa should be golden brown on both sides.
Repeat for the remaining dosas.
Serve oat dosa with your choice of chutney, I like it with tomato chutney.
Oats Dosa Recipe: Crispy and Healthy Dosas with a Nutritious Oats Twist
Dosa is a popular south Indian delicacy that looks like a crepe. It’s like a crisp and thin pancake made of rice and urad dal batter. Traditionally Dosa is served with sambar, aloo masala, and coconut chutney. It is an Indian crepe made usually through rice batter, but here we have experimented and made many alternative dosa such as Oat Dosa, Besan Dosa, Rava Dosa, Sorghand um Dosa. This preparation uses oats dosa and is a bread-basedbreakfast recipe that is vegan. The preparation entails skillfully combining pan techniques and manual dexterity to achieve the perfect bread cooked on non-stick skillets.
1. Grind Oats to Make Fine Powder: Elevating Texture with Oats Dosa
Start the oats dosa preparation by grinding oats into a fine powder. This step not only enhances the nutritional profile but also contributes to the unique texture of the dosa. The combination of finely ground oats with other dry ingredients, excluding ENO, rice flour, asafetida, salt, and cumin seeds, ensure a harmonious blend of flavors. It’s essential to note that ENO is introduced just before making the dosa, adding a special touch to the preparation.
Create the Dosa Batter: Blending Nutrients and Flavors with Oats
Building on the groundwork laid in the first step, proceed to create the dosa batter. Integrate yogurt into the dry mixture, adjusting the consistency with water to achieve a batter reminiscent of dosa or pancake mix. Allowing the batter to rest for fifteen minutes is a crucial step in enhancing the overall flavor profile. This brief resting period ensures that the oats absorb the flavors, resulting in a more palatable and delicious end product.
Enhance with Vegetables: Burst of Colors and Nutrients in Oats Dosa
Take your oats dosa to the next level by introducing a medley of vegetables. Finely chopped green chilies, cilantro, cabbage, and carrots bring not only vibrant colors but also a variety of nutrients to the dosa. This step adds a delightful crunch and freshness, transforming the oats dosa into a visually appealing and nutrition-packed dish that is as wholesome as it is flavorful.
Heat the Skillet: Perfecting the Cooking Surface for Oats Dosas
Achieving the ideal dosa requires a properly heated skillet. Place a non-stick skillet over medium-high heat and lightly grease it. To test readiness, sprinkle a few drops of water on the skillet – the water should sizzle right away. This ensures that the dosa cooks evenly and attains the desired crispiness while preventing sticking to the surface.
Prepare the Frothy Batter: Enhancing Texture for Irresistible Oats Dosas
Before pouring the batter onto the skillet, take a small portion (about ½ cup) and introduce ¼ teaspoon of ENO. Mixing this well creates a frothy consistency in the batter, adding a light and airy texture to the dosa. This step is crucial for achieving the perfect balance between softness and crispiness in each bite.
Spread the Batter: Crafting Perfectly Shaped Oats Dosas
Once the skillet is ready, pour the batter onto it, spreading it evenly with the back of a spoon to form a dosa of about seven inches in diameter. This step requires a bit of finesse to ensure an even thickness throughout the dosa, contributing to the overall enjoyable texture.
Flip and Oil: Locking in Flavor with Precision
As the batter begins to dry, delicately spread one teaspoon of oil over the dosa. Waiting for about 30 seconds before flipping with a flat spatula ensures that the dosa achieves a golden brown hue on both sides. This careful process locks in the flavors and adds a subtle yet essential touch of crispiness.
Ensure Even Cooking: Perfecting the Golden Brown Finish
To guarantee even cooking, lightly press the dosa with the spatula all around, turning it two to three times. This step is vital in achieving the desired golden brown color, indicating that the dosa is cooked to perfection. The interplay of textures, from the soft interior to the crispy edges, creates a delightful culinary experience.
Repeat for More Dosas: Scaling Up the Oats Dosa Feast
The joy of oats dosa doesn’t end with just one. Repeat the cooking process for the remaining batter, creating a batch of these tasty dosas. This step allows you to share the wholesome goodness and unique flavors with family and friends, turning the dosa-making experience into a communal celebration of culinary delight.
Serve with Chutney: Pairing Oats Dosa with Flavorful Companions
Finally, elevate your oats dosa experience by serving it with your choice of chutney. The versatility of oats dosa makes it a perfect companion for various chutney options. Whether you prefer the tanginess of tomato chutney or the spiciness of coconut chutney, the pairing enhances the overall dining experience, making each bite a harmonious blend of flavors. Enjoy this nutritious twist on a classic dish, savoring the delicious combination of oats dosa and flavorful chutneys.