Category: Quick & Easy

Easy Indian Recipes: Quick and Delicious Vegetarian Dishes

In today’s fast-paced world, we often find ourselves seeking meals that are quick to prepare but still bursting with flavor. Indian cuisine, known for its rich and aromatic spices, offers a plethora of options that are both easy to make and incredibly satisfying. Let’s explore some easy Indian recipes vegetarian, perfect for any occasion, ensuring that you can enjoy delicious easy Indian recipes without spending hours in the kitchen.

Paneer Bhurji

Paneer Bhurji is a delightful scramble made with crumbled paneer (Indian cottage cheese) and a mix of vegetables and spices. This dish is a staple in many Indian households and is a fantastic example of easy Indian recipes. It comes together quickly, making it ideal for a weeknight dinner or a hearty breakfast. Serve it with a side of warm roti or toast for a complete meal.

Vegetable Pulao

For a one-pot wonder, Vegetable Pulao is a go-to choice. This dish features rice cooked with a medley of vegetables and fragrant spices. It’s a shining star among easy Indian food recipes due to its simplicity and the minimal effort required. Pair it with a cooling cucumber raita from the Raita Recipes category for a refreshing touch.

Aloo Jeera

Aloo Jeera, or cumin-spiced potatoes, is a quick and flavorful dish that exemplifies Indian food recipes easy. The potatoes are sautéed with cumin seeds and a handful of spices, resulting in a dish that’s both comforting and satisfying. This recipe is perfect for those times when you need something delicious without a lot of fuss.

Enhancing Your Quick and Easy Menu

To elevate your menu, why not include some delectable options from other categories? Indian Breads like chapati or naan can be quickly prepared and make a perfect accompaniment to any meal. For those with a sweet tooth, Indian Desserts Recipes such as a speedy coconut burfi or a delightful mango lassi can provide a sweet finish to your meal. Incorporating dishes from the Healthy Recipes section, such as a simple and nutritious palak dal or a crisp salad from the Soups and Salads Recipe category, can add a healthy balance to your table.

More Easy Indian Recipes

Chana Masala

Chana Masala is a popular dish featuring chickpeas cooked in a spiced tomato gravy. This dish is not only delicious but also quick to prepare, making it a favorite in the realm of easy Indian recipes vegetarian. Serve it with basmati rice or naan for a complete meal.

Moong Dal Khichdi

For a comforting and nourishing option, Moong Dal Khichdi is a must-try. This simple dish made from rice and yellow moong dal (split yellow lentils) is seasoned with basic spices and is incredibly easy to make. It’s perfect for those days when you want something light yet satisfying.

Sweet and Simple Endings

Sheera

Sheera is a traditional Indian dessert made with semolina, ghee, and sugar. It’s a quick and easy dessert that fits perfectly into the category of easy Indian food recipes. The best part? It takes just a few minutes to prepare, making it a great option for last-minute sweet cravings.

Coconut Ladoo

Another sweet treat that’s both simple and delightful is Coconut Ladoo. Made with grated coconut and condensed milk, these sweet balls are a favorite among easy Indian recipes vegetarian. They’re perfect for festivals or just as a quick dessert to satisfy your sweet tooth.

Frequently Asked Questions (FAQs)

Q: What are some popular easy Indian recipes vegetarian? 

A: Some popular easy Indian recipes vegetarian include Paneer Bhurji, Vegetable Pulao, Aloo Jeera, Chana Masala, Moong Dal Khichdi, Sheera, and Coconut Ladoo. These dishes are quick to prepare and full of flavor.

Q: How can I make traditional Indian food recipes easy? 

A: To make traditional Indian food recipes easy, look for recipes that require minimal ingredients and cooking time. Dishes like Paneer Bhurji, Aloo Jeera, and Moong Dal Khichdi are great examples of easy and quick Indian recipes.

Q: What are some easy Indian food recipes for beginners? 

A: Some easy Indian food recipes for beginners include Vegetable Pulao, Chana Masala, and Coconut Ladoo. These recipes are straightforward and don’t require advanced cooking skills, making them perfect for those new to Indian cooking.

Q: Can I prepare easy Indian recipes in advance? 

A: Yes, many easy Indian recipes can be prepared in advance. Dishes like Vegetable Pulao and Chana Masala can be made ahead of time and stored in the refrigerator. Simply reheat before serving.

Q: What are some quick Indian desserts? 

A: Some quick Indian desserts recipes include Sheera and Coconut Ladoo. These desserts are easy to make and require minimal preparation time, making them perfect for when you need a sweet treat in a hurry.

Conclusion

Easy Indian recipes vegetarian offer a world of flavors and aromas without the lengthy preparation time. 

Whether you’re looking for easy Indian recipes, easy Indian food recipes, or specific Indian food recipes easy, these dishes bring convenience and deliciousness to your table. 

So, gather your ingredients, try out these recipes, and enjoy the rich and diverse world of Indian cuisine. Happy cooking and happy eating!

By incorporating these dishes into your menu, you’ll be able to enjoy a wide variety of delicious and nutritious foods. Whether you’re looking for quick snacks, main courses, or desserts, there’s an easy Indian recipe to suit every taste. 

Don’t forget to check out Manjula’s Kitchen for more inspiration and culinary delights. Happy cooking and happy eating!

  • Oat Dosa (Spicy Pancake)

    Oat Dosa (Spicy Pancake)

    Instant Oat Dosa

    (Spicy Pancake)

    Instant Oat dosa is an easy recipe that is perfect for busy families. Sometimes you want to make something that is easy and hassle-free and of course healthy.  Oat dosas are instant dosas and make a great breakfast or anytime snack. This gluten-free dish is made with oats, rice flour, yogurt, and a few spices. I am also adding cabbage and carrots for texture.  This will be a staple in my house.
    No ratings yet
    Course Bread
    Cuisine Indian
    Servings 2 people

    Ingredients
      

    • 1 cup quick oats
    • 1/2 cup rice flour
    • 1/2 cup yogurt whipped
    • 1/8 teaspoon asafetida
    • 1/2 teaspoon cumin seeds
    • 1 green chili finely chopped
    • 2 tablespoons cilantro finely chopped
    • 1 teaspoon ginger finely shredded
    • 1/3 cup cabbage shredded
    • 1/3 cup carrot shredded
    • 1/2 teaspoon salt
    • 1 cup water
    • 1-1/2 teaspoon ENO
    • 1-1/2 tablespoons oil

    Instructions
     

    • Grind oats to make fine powder. Add all the dry ingredients except ENO rice flour, asafetida, salt, and cumin seeds and mix it well. Notes: ENO is added just before making dosa.
    • Add yogurt mix, add water as needed to make batter consistency of dosa or pancake mix. Set aside for about fifteen minutes.
    • Add green chilies, cilantro, cabbage, and carrots mix it well.
    • Place a non-stick skillet over medium-high heat. Grease the skillet lightly. Test by sprinkling a few drops of water on it. The water should sizzle right away.
    • In a small bowl take about ½ cup of batter and add ¼ teaspoon of ENO mix it well batter will become a little frothy.
    • Pour the batter mixture into the skillet and spread evenly with the back of a spoon, about seven inches in diameter.
    • When the batter begins to dry, gently spread one teaspoon of oil over it. Wait about 30 seconds, then flip the dosa using a flat spatula.
    • Press the dosa lightly with the spatula all around to ensure even cooking, turning two to three times. The dosa should be golden brown on both sides.
    • Repeat for the remaining dosas.
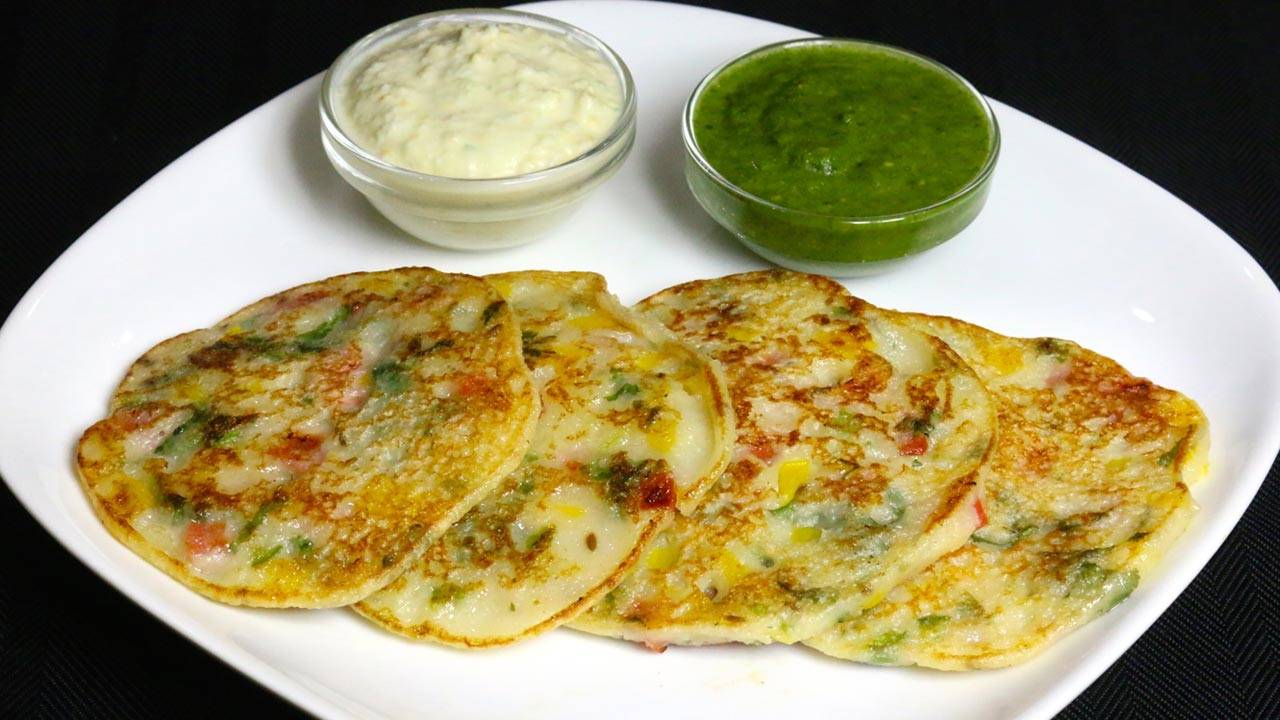
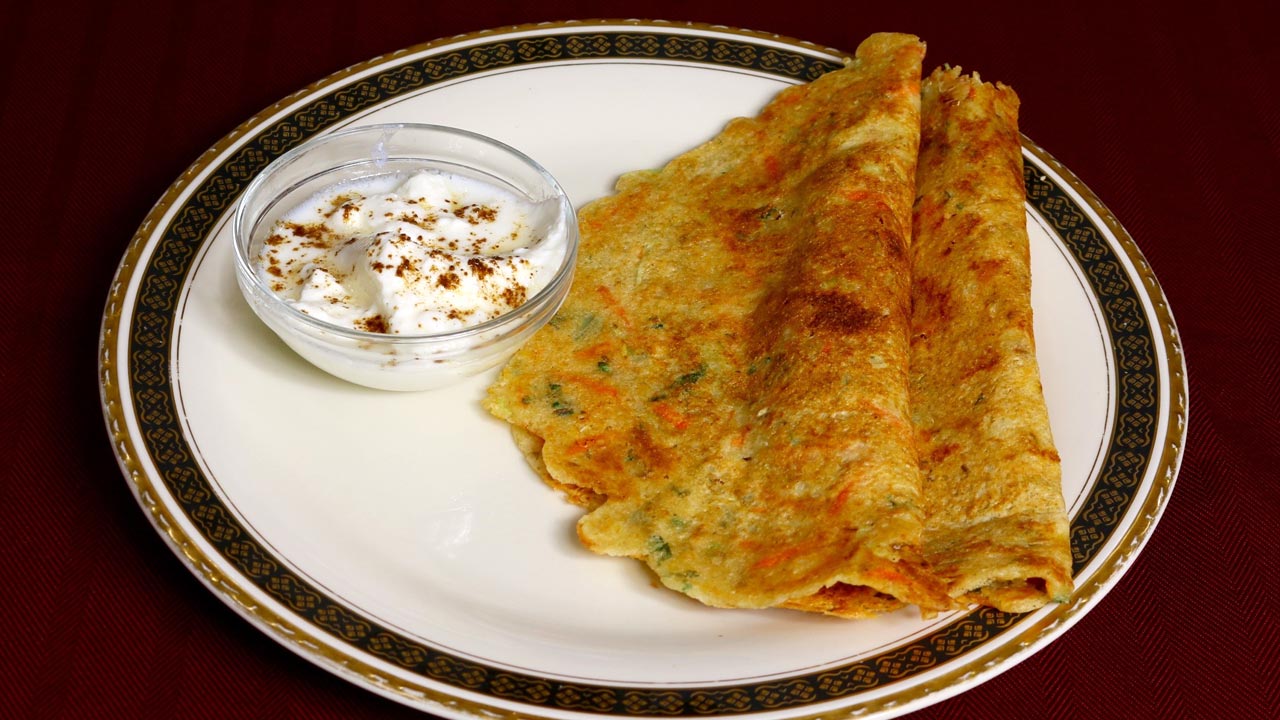
    • Serve oat dosa with your choice of chutney, I like it with tomato chutney.
    Tried this recipe?Let us know how it was!

    Oats Dosa Recipe: Crispy and Healthy Dosas with a Nutritious Oats Twist 

    Dosa is a popular south Indian delicacy that looks like a crepe. It’s like a crisp and thin pancake made of rice and urad dal batter. Traditionally Dosa is served with sambar, aloo masala, and coconut chutney. It is an Indian crepe made usually through rice batter, but here we have experimented and made many alternative dosa such as Oat Dosa, Besan Dosa, Rava Dosa, Sorghand um Dosa. This preparation uses oats dosa and is a bread-based breakfast recipe that is vegan. The preparation entails skillfully combining pan techniques and manual dexterity to achieve the perfect bread cooked on non-stick skillets.

    1. Grind Oats to Make Fine Powder: Elevating Texture with Oats Dosa 

    Start the oats dosa preparation by grinding oats into a fine powder. This step not only enhances the nutritional profile but also contributes to the unique texture of the dosa. The combination of finely ground oats with other dry ingredients, excluding ENO, rice flour, asafetida, salt, and cumin seeds, ensure a harmonious blend of flavors. It’s essential to note that ENO is introduced just before making the dosa, adding a special touch to the preparation.

    1. Create the Dosa Batter: Blending Nutrients and Flavors with Oats 

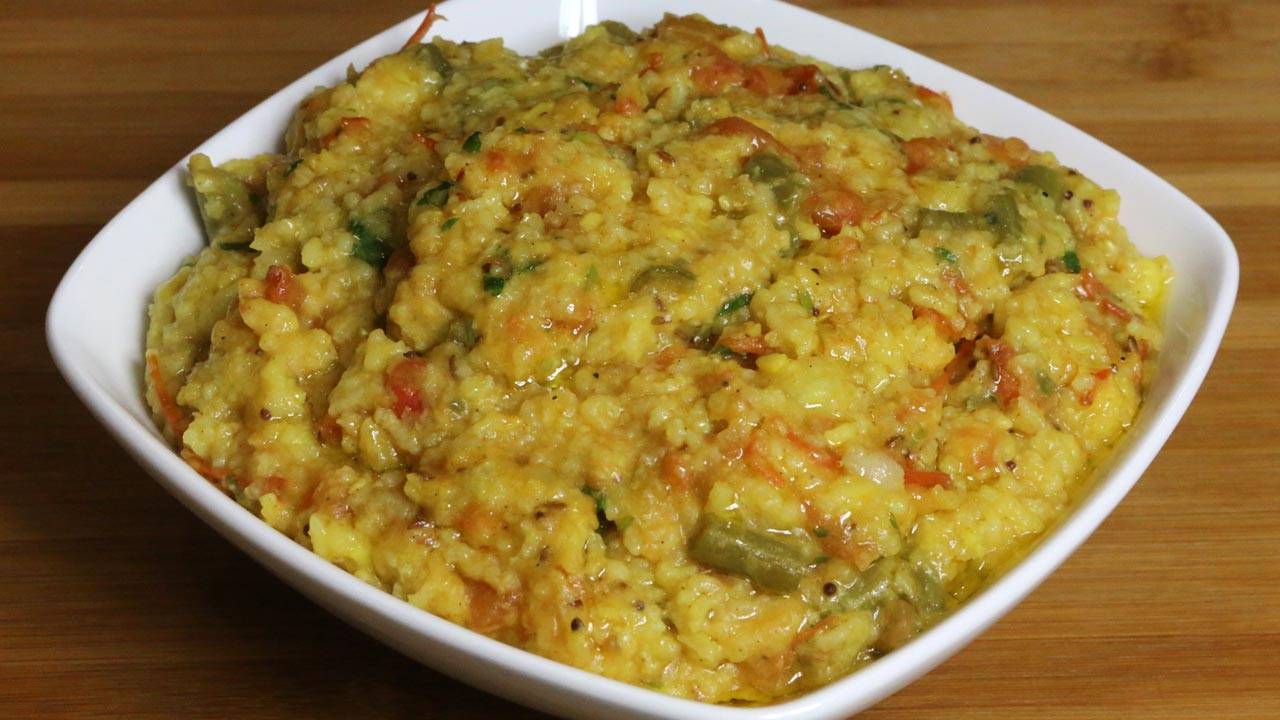
    Building on the groundwork laid in the first step, proceed to create the dosa batter. Integrate yogurt into the dry mixture, adjusting the consistency with water to achieve a batter reminiscent of dosa or pancake mix. Allowing the batter to rest for fifteen minutes is a crucial step in enhancing the overall flavor profile. This brief resting period ensures that the oats absorb the flavors, resulting in a more palatable and delicious end product.

    1. Enhance with Vegetables: Burst of Colors and Nutrients in Oats Dosa 

    Take your oats dosa to the next level by introducing a medley of vegetables. Finely chopped green chilies, cilantro, cabbage, and carrots bring not only vibrant colors but also a variety of nutrients to the dosa. This step adds a delightful crunch and freshness, transforming the oats dosa into a visually appealing and nutrition-packed dish that is as wholesome as it is flavorful.

    1. Heat the Skillet: Perfecting the Cooking Surface for Oats Dosas 

    Achieving the ideal dosa requires a properly heated skillet. Place a non-stick skillet over medium-high heat and lightly grease it. To test readiness, sprinkle a few drops of water on the skillet – the water should sizzle right away. This ensures that the dosa cooks evenly and attains the desired crispiness while preventing sticking to the surface.

    1. Prepare the Frothy Batter: Enhancing Texture for Irresistible Oats Dosas 

    Before pouring the batter onto the skillet, take a small portion (about ½ cup) and introduce ¼ teaspoon of ENO. Mixing this well creates a frothy consistency in the batter, adding a light and airy texture to the dosa. This step is crucial for achieving the perfect balance between softness and crispiness in each bite.

    1. Spread the Batter: Crafting Perfectly Shaped Oats Dosas 

    Once the skillet is ready, pour the batter onto it, spreading it evenly with the back of a spoon to form a dosa of about seven inches in diameter. This step requires a bit of finesse to ensure an even thickness throughout the dosa, contributing to the overall enjoyable texture.

    1. Flip and Oil: Locking in Flavor with Precision 

    As the batter begins to dry, delicately spread one teaspoon of oil over the dosa. Waiting for about 30 seconds before flipping with a flat spatula ensures that the dosa achieves a golden brown hue on both sides. This careful process locks in the flavors and adds a subtle yet essential touch of crispiness.

    1. Ensure Even Cooking: Perfecting the Golden Brown Finish 

    To guarantee even cooking, lightly press the dosa with the spatula all around, turning it two to three times. This step is vital in achieving the desired golden brown color, indicating that the dosa is cooked to perfection. The interplay of textures, from the soft interior to the crispy edges, creates a delightful culinary experience.

    1. Repeat for More Dosas: Scaling Up the Oats Dosa Feast 

    The joy of oats dosa doesn’t end with just one. Repeat the cooking process for the remaining batter, creating a batch of these tasty dosas. This step allows you to share the wholesome goodness and unique flavors with family and friends, turning the dosa-making experience into a communal celebration of culinary delight.

    1. Serve with Chutney: Pairing Oats Dosa with Flavorful Companions 

    Finally, elevate your oats dosa experience by serving it with your choice of chutney. The versatility of oats dosa makes it a perfect companion for various chutney options. Whether you prefer the tanginess of tomato chutney or the spiciness of coconut chutney, the pairing enhances the overall dining experience, making each bite a harmonious blend of flavors. Enjoy this nutritious twist on a classic dish, savoring the delicious combination of oats dosa and flavorful chutneys.

  • Urad Dal Kachori

    Urad Dal Kachori

    Urad Dal Kachori

    Urad Dal Kachori

    Dal kachori is a delicacy from north India. Dal kachori is a spicy puffed pastry. Traditionally kachories are sold at HALWAI (a sweet and snack shop). Today, I will use urad dal lentils (skinned black gram) for the inside filling. These mouthwatering Dal kachories can be served as a snack, chaat or part of main meal, making the meal exotic.
    No ratings yet
    Course Appetizer, Bread
    Cuisine Indian
    Servings 4 people

    Ingredients
      

    Dough

    • 1 cup All Purpose flour (plain flour or maida)
    • 1 tablespoon fine sooji (semolina)
    • 1/4 teaspoon salt
    • 2 tablespoons ghee / clarified butter
    • 1/4 cup lukewarm water

    Filling

    • 1/4 cup washed urad dal lentils (skinned black gram)
    • 1 tablespoon fennel seeds coarsely grinded (saunf)
    • 1 tablespoon coriander seeds coarsely grinded (dhania)
    • 1 teaspoon red chili flakes
    • 1/2 teaspoon mango powder (amchoor)
    • 1/4 teaspoon asafetida (hing)
    • 1/2 teaspoon salt (adjust to your taste)
    • 1 tablespoon ghee / clarified butter

    Also need oil to fry

    Instructions
     

    To Make Dough

    • Mix the flour, semolina, salt and ghee. Add water slowly to make dough. Dough should be firm but pliable. Cover the dough and let it sit for at least fifteen minutes.

    To make filling

    • Boil dal in about 2 cups of water, until dal is soft not mushy. Drain the access water.
    • Heat the ghee (clarified butter) over low medium heat add all the spices for filling fennel, coriander, red chili, mango powder, asafetida and salt, stir and add boiled dal.
    • Stir continuously, and keep pressing dal, until water from dal has evaporated, notes, dal should not be powdery.
    • Turn off the heat. Let the mixture cool off.

    To make the Kachoris

    • Take the dough and knead it for a minutes. Divide the dough in twelve equal parts.
    • Take one part of the dough and with your fingers flatten the edges and make into 3-inch circle. Leaving center little thicker than edges.
    • Mold the dough into a cup and place about 2 teaspoons of filling in the center. Pull the edges of the dough to wrap the dal filling. Proceed to make all 12 balls.
    • Let the filled ball sit for three to four minutes before rolling.
    • Set the kachoris on a surface with the seams facing up. Roll it slowly about three inches in diameter.
    • Heat the oil in frying pan over medium heat frying pan should have about one inch of oil. To check if oil is ready put a little piece of dough in the oil. Dough should sizzle, and come up very slow.
    • Fry them on medium-low heat. After they start to puff, slowly turn them over. Fry until golden-brown on both sides. This should take about five minutes. If the kachoris are fried on high heat, they will get soft and will not be crispy.
    • Kachories can be stored for at least a week in an airtight container.

    Notes

    If kachories get soft warm up the kachoris in an oven on 200 degree F for about 7 to 10 minutes, this will bring back the freshness and crispyness.
    Serving suggestion: serve them plain, or with tamarind chutney and yogurt as chaat, or serve the kachories as main meal and serve them with aloo dum
    Tried this recipe?Let us know how it was!

    Urad Dal Kachori Recipe: A Delectable Indian Snack 

    Urad Dal Kachori is a delectable Indian snack that perfectly fits into categories like appetizers, party recipes, and snacks. With its crispy exterior and flavorful filling, it’s an ideal addition to festive occasions like Diwali and Holi, where indulging in savory treats is a tradition. This traditional dish combines the richness of urad dal (black gram lentils) with a blend of spices encased in a golden, fried dough shell, making it a beloved choice among food enthusiasts. 

    Enjoyed hot and fresh, Urad Dal Kachori offers a delightful burst of flavors and textures, making it a popular choice for gatherings and celebrations alike. Urad Dal Kachori is a traditional Indian snack enjoyed by many across the country. This flavorful delicacy is a popular choice for breakfast, snacks, or even as a side dish. In this comprehensive guide, I will walk you through how to make urad dal kachori step by step, ensuring that you achieve the perfect blend of flavors and textures in every bite.

    How to Make Urad Dal Kachori: Step-by-Step Instructions 

    Prepare the Dough:

    Combine flour, semolina, salt, and ghee in a bowl. Gradually incorporate water while mixing until a firm but pliable dough forms. Cover the dough and allow it to rest for at least 15 minutes.

    Cook the Lentils:

    Boil the lentils in approximately 2 cups of water until softened but not mushy. Drain any excess water.

    Make the Filling:

    Heat ghee over low-medium heat. Add all the filling spices (fennel seeds, coriander seeds, red chili powder, mango powder, and asafetida) and stir briefly. Add the cooked lentils and continue stirring while mashing the lentils to remove excess moisture. The filling should not be dry or powdery. Turn off the heat and let the mixture cool.

    Assemble the Kachoris:

    Knead the rested dough for a minute and divide it into 12 equal portions. Roll each portion into a 3-inch circle, keeping the center slightly thicker than the edges. Gently cup the dough to form a small pocket. Add approximately 2 teaspoons of the cooled lentil filling to the center. Pull the edges of the dough together to enclose the filling securely. Repeat this process to create 12 filled balls.

    Shape and Fry:

    Allow the filled balls to rest for 3-4 minutes. Gently roll each ball out to a 3-inch diameter circle, ensuring the seam faces upwards. Heat oil (about 1 inch deep) in a frying pan over medium heat. To test the oil temperature, drop a small piece of dough; it should sizzle and rise slowly to the surface. Carefully place the kachoris in the hot oil and fry over medium-low heat. Once they begin to puff up, gently flip them over. Fry until golden brown on both sides, which should take approximately 5 minutes. Avoid high heat, as this will result in soft rather than crispy kachoris.

    Storage:

    Once cool, kachoris can be stored in an airtight container for up to a week.

    Variations of Urad Dal Kachori 

    While the traditional urad dal kachori recipe is delightful on its own, you can experiment with various fillings and flavors to create unique variations. Instead of urad dal, you can use mashed potatoes, green peas, or lentils for the filling. Additionally, you can add a touch of sweetness by incorporating raisins or dates into the filling mixture. Get creative with spices and herbs to customize the flavor according to your preference.

    Benefits of Urad Dal Kachori

    Urad dal, the main ingredient in urad dal kachori, is a rich source of protein, fiber, and various nutrients. Including kachoris in your diet provides you with essential nutrients and energy, making it a wholesome snack option. Moreover, homemade kachoris allow you to control the quality of ingredients and avoid unhealthy additives commonly found in store-bought snacks.

    FAQs (Frequently Asked Questions) 

    Q: Can I make urad dal kachoris in advance?

    A: Yes, you can prepare the filling and dough in advance and store them separately in the refrigerator. When ready to serve, assemble the kachoris and fry them fresh for the best taste and texture.

    Q: Can I bake kachoris instead of frying them?

    A: While traditional kachoris are deep-fried for a crispy texture, you can certainly try baking them for a healthier alternative. Brush the assembled kachoris with oil and bake in a preheated oven until they turn golden brown and crisp.

    Q: Can I freeze leftover kachoris?

    A: Yes, you can freeze leftover kachoris in an airtight container for up to 2-3 weeks. When ready to eat, reheat them in a preheated oven or toaster oven until heated through.

    For more delicious recipes, visit Manjula’s Kitchen and explore other Recipes. If you’re looking to explore more Indian recipes, appetizers, beverages, and desserts, be sure to check out the following links on Manjula’s Kitchen. Here are some links to recipes on Manjula’s Kitchen official website: Paneer Tikka Masala Recipe, Chana Chaat (Spicy Chickpea Salad) Recipe, Pav Bhaji (Spicy Vegetable Hash with Buns) Recipe, Raj Kachori (Crunchy Chaat) Recipe, Vegetable Biryani Recip. These recipes should offer you a flavorful experience straight from Manjula’s Kitchen.

  • Spicy Chivda (Roasted Spicy Flattened Rice)

    Spicy Chivda (Roasted Spicy Flattened Rice)

    Spicy Chivda (Poha)

    Spicy Chivda (Roasted Spicy Flattened Rice)

    Spicy chivda crunchy savory snack is quick and easy to make.  Chivda, also known as poha, is flattened rice that is flavored with spices. When I was growing up this was one of the snacks my mom will make, and we all will enjoy. I still enjoy this spicy chivda even today while watching TV. Store this in an airtight container and this chivda stays fresh and crunchy for 2 to 3 weeks.
    No ratings yet
    Prep Time 5 minutes
    Cook Time 9 minutes
    Course vegan
    Cuisine Indian
    Servings 4 people

    Ingredients
      

    • 2 cups thick chivda, poha
    • 2 tablespoons oil
    • 1 teaspoon mustard seeds (rai)
    • 1/2 teaspoon cumin seeds (jeera)
    • 1 tablespoon chopped green chili
    • 10 to 12 curry leaves
    • 2 red pepper dried broken in few pieces
    • 2 tablespoons peanuts
    • 2 tablespoons roasted chana
    • 2 tablespoons coconut dried sliced
    • 1/8 teaspoon asafetida (hing)
    • 1/4 teaspoon turmeric (haldi)
    • 1/2 teaspoon salt adjust to taste
    • 1/8 teaspoon citric acid (nimbu sat)
    • 1 teaspoon sugar

    Instructions
     

    • Roast the chivda in a microwave oven for one and half minutes, first do it for one minute take it out mix it well and put it back for another half minute. Set aside. Note: This gives a nice crunch to the chivda and save time. If it is roasted directly in frying pan it will takes more oil and will have to stir fry for about ten to fifteen minutes.
    • Heat the flat frying on medium heat, add the oil, oil should be moderately hot, add mustard seeds and cumin seeds as they start cracking lower the heat to low.
    • Add curry leaves and green chilies stir fry them for about a minute till the green chili and curry leaves stop splattering.
    • Next add peanuts and red chilies roast them for two minute until it start catching the color… do keep stirring
    • Time to add roasted chana, and coconut stir fry for another 30 seconds
    • Add asafetida, salt and turmeric stir for few seconds add chivda mix it well. Add sugar and citric acid keep stiring continuously for about 2 to 3 minutes. Why I am adding salt to the oil, this way all the chivda will be coated with salt evenly.
    • Chivda is ready turn off the heat while chivda is hot it will taste little chewy after it will cool of will become crunchy.
    Tried this recipe?Let us know how it was!
  • Eggless Pancake

    Eggless Pancake

    Eggless Pancake

    Eggless Pancake

    Eggless pancake are super easy to make and delicious. What better way to start off your day than with "Eggless Pancakes". These pancakes are light and fluffy. I like to add homemade fresh strawberry sauce as a topping.  This was a family favorite breakfast recipe when my sons were younger. Now this is my grandkids favorite when we have sleep over.
    No ratings yet
    Prep Time 10 minutes
    Cook Time 15 minutes
    Course Snack
    Cuisine Indian
    Servings 4 people

    Ingredients
      

    • 1 Cup All Purpose Flour
    • 2 Teaspoon Sugar
    • 1 Teaspoons Baking soda
    • 1/8 teaspoon salt
    • 1 Cup Milk
    • 1/4 cup yogurt
    • 1 Tablespoon melted butter
    • 2 Tablespoons Butter for cooking

    For Strawberry Sauce

    • 2 cups strawberry sliced, use fresh or frozen
    • 1 teaspoon lemon juice
    • 3/4 cup sugar
    • 1 tablespoon corn starch

    Instructions
     

    To make Strawberry Sauce

    • In a small pan over medium heat, combine the strawberries, sugar, and lemon juice. Bring to boil. Mix the corn starch with about 2 tablespoons of water making smooth paste and add to strawberries. This will make sauce creamy and will give thickness to the sauce. Bring to a simmer. Stir occasionally until sauce thickens slightly. This should take about 5 minutes.

    To make Pancake

    • Mix milk and yogurt together, set aside,
    • Mix all the dry ingredients together in bowl, all purpose flour, sugar, salt, and baking soda. Slowly add the milk and yogurt to the dry ingredients, pancake batter should be pourable consistency. Add butter to batter and mix do not over-mix the batter. Set aside for about 10 minutes.
    • Heat the skillet at medium heat. Grease the skillet, when the skillet is moderately hot pour about ¼ cup of batter. Cook until bubbles appear on the face of the pancake.
    • Carefully flip the pancake and cook until its golden brown.
    • Top the pancake with hot sauce. Enjoy!

    Notes

    Notes
    Strawberry sauce is a great sauce for topping waffles, ice cream, cakes and more.
    Tried this recipe?Let us know how it was!
  • Date and Nut Ladoo

    Date and Nut Ladoo

    Date and Nut Ladoo (Healthy Indian Candy) Recipe by Manjula

    Date and Nut Ladoo

    This recipe is for Date and Nut Ladoo, or Candy as we call them at home. For my grand kids they are like candy and they love it. Adapted from my friend Renu’s recipe, when I tried this ladoo for the first time, I said WOW. I could not believe the main ingredient was only dates. That surprised me because I am not very fond of dates. This was the first time I have tasted date ladoos flavored with coco powder. This is a quick and easy recipe. Like me if you are using roasted nuts then there is a little or no cooking involved? This is a guilt free healthy snack (no sugar or butter added). Date ladoos are also vegan and gluten free. It's hard to eat just one!
    5 from 2 votes
    Prep Time 5 minutes
    Cook Time 10 minutes
    Course Dessert
    Cuisine Indian
    Servings 18 ladoos

    Ingredients
      

    • 1 cup dates pitted and chopped (khajoor)
    • 1-1/2 cups mixed nuts roasted and roughly chopped, I am using almonds, pistachios, cashews, and pecans
    • 2 tablespoons coco powder
    • 1/2 teaspoon instant coffee
    • Pinch of salt
    • 1/4 teaspoon oil to oil your palms

    Instructions
     

    • Soften the chopped dates in microwave for 30 seconds.
    • Blend the dates in the food processor until they become to the paste, this should take about 10 seconds, add coffee, coco, and salt blend it again until all the ingredients nicely incorporated about 10 seconds. Add the nuts to the food processor and blend it for about 15 seconds. Nuts should be still chunky.
    • Remove from food processor, oil your palm and knead the mix into dough, and divide them into 18 equal parts and roll them into ladoos.
    • Dates and nuts ladoos can be stored in air tight container for a month or more.

    Notes

    Notes: if you do not have roasted nuts dry roast them individually for about 3 minutes on medium heat and use your choice of nuts.
    Tried this recipe?Let us know how it was!
  • Besan Sev (Crispy Indian Snack)

    Besan Sev (Crispy Indian Snack)

    Besan Sev

    Besan Sev (Crispy Indian Snack)

    Besan sev is a popular savory crispy snack, which is made in almost every household in India. These noodle-like Sev are so tasty that when you start munching, it's often difficult to stop.  This is a quick and easy recipe. Besan Sev is a great snack to make in bulk as it stays fresh for months.  They are made on all festive occasions. How you serve these sev often depends on how thick sev are. Fine sev are used for garnishing chaat. Thicker sev are served alone as a snack.   My favorite way to serve sev drizzeled with cilantro chutney. To make sev you do need to use sev maker, which is a small gadget like for making noodles.
    No ratings yet
    Prep Time 10 minutes
    Cook Time 14 minutes
    Course snacks
    Cuisine Indian
    Servings 4 people

    Ingredients
      

    • 2 cups besan (gram flour)
    • 1 teaspoon carom seeds crushed (ajwain)
    • 1-1/2 salt
    • 1/2 teaspoon red chili powder, adjust to taste
    • 1/4 teaspoon black pepper
    • 1/4 teaspoon asafetida (hing)
    • 3 tablespoons oil
    • 1/2 cup lukewarm water
    • Oil to fry

    Also need sev maker

    Instructions
     

    • Mix all the dry ingredients together, besan carom seeds, red chili, black pepper, and asafetida. Add the oil and mix it well.
    • Add the water slowly to make soft and smooth dough. Dough is very sticky, I used a spoon to mix the dough in the beginning. Then oil the palm and knead the dough. Cover the dough and allow to rest for about 15 minutes.
    • Greased sev maker with attachment. Place enough dough to fill the cylinder of sev maker and close. On other side, heat the oil in a frying pan on medium heat, frying pan should have about one inch of oil.
    • Oil should be moderately hot, Note: when you place little piece of dough oil should sizzle and dough should come up slowly without changing color.
    • Now hold the sev maker over frying pan, press the handle, sev will start coming out in to the oil. As sev is coming, slowly move the sev maker in circular motion.
    • As you complete one circle stop. Fry both sides till they become light golden brown, and oil will stop sizzling. Sev is ready. Remove it using slotted spoon.
    • Take them out over paper towel lined plate. And continue the same process for remaining dough.
    • Let the sev cool completely, as it cools they will become crispy. Break sev lightly with your hand and sev is ready to serve.
    Tried this recipe?Let us know how it was!
  • Aloo Chaat (Spicy Potato Snack)

    Aloo Chaat (Spicy Potato Snack)

    Aloo Chaat

    Aloo Chaat (Spicy Potato Snack)

    Aloo Chaat, which is a spicy potato snack. Aloo chaat is a popular snack found at north Indian road side vendors. This is one of the very few chaats served without any chutney. However you can always add cilantro and tamarind chutney. This recipe is inspired by the chaat I used to enjoy near my childhood home in India. I incorporated a special spice mix also known as chaat masala and would suggest trying this recipe without chutney. This mouthwatering chaat is just perfect for anyone who loves spicy food.
    No ratings yet
    Prep Time 10 minutes
    Cook Time 19 minutes
    Course Chaat
    Cuisine Indian
    Servings 4 people

    Ingredients
      

    • About 4 cups cubed potatoes, firmly boiled peeled and cut into bite size
    • 3 tablespoons oil
    • 1 teaspoon salt adjust to taste
    • 1/4 cup cilantro finely chopped
    • 1 tablespoon ginger thinly sliced
    • 1 tablespoon green chili finely chopped, adjust to taste
    • 2 teaspoons lemon juice

    Spice Mix for Chaat Masala

    • 1 tablespoon roasted cumin seed powder (bhuna jeera)
    • 1 teaspoon red chili powder
    • 1 teaspoon mango powder (amchoor)
    • 1/4 teaspoon black pepper
    • 1 teaspoons black salt
    • 1/8 teaspoon asafetida
    • 1/8 teaspoon citric acid
    • 1/2 teaspoon ginger powder (saunth)
    • 2 teaspoons sugar

    Instructions
     

    • To make spice mix all the spice mix together really well and set aside.
    • Heat heavy flat frying pan on medium high heat, add the oil in to warm frying pan. Place the cubed potatoes on the frying pan and sprinkle the salt over the potatoes.
    • Stir fry the potatoes; turn them occasionally until all sides are golden brown. This process should take 8-10 minutes.
    • Turn off the heat and sprinkle ginger, cilantro, green chilies, lemon juice and about 1-1/2 tablespoons of spice mix. Mix it well, making sure all the pieces of potatoes are coated.
    • Taste one of the potato and add more spice mix if needed according to your taste.

    Notes

    Note: This spice mix known as chaat masala can also be used to spice up any food. It especially tastes good when it is sprinkled over sliced cucumber and tomato or over pakoras. You can make the chaat masala in a larger quantity and keep it ready to go whenever you need it.
    Tried this recipe?Let us know how it was!

    Aloo Chat Recipe: A Tangy Delight 

    Aloo Chaat is a popular Indian street food snack that can be prepared quickly and easily. It’s typically gluten-free and vegan, making it suitable for those with dietary restrictions. This appetizer is perfect for Navaratri or any occasion when you’re craving delicious chaat. With its blend of spices and tangy flavors, Aloo Chaat offers a delightful taste experience that’s loved by many.

    Introduction to Aloo Chat Recipe 

    Indulge in the tantalizing flavors of aloo chat with this delightful recipe that promises to tantalize your taste buds. A quintessential street food favorite, aloo chat is loved for its spicy, tangy, and savory taste. This recipe provides a step-by-step guide on how to make aloo chat at home, allowing you to enjoy this beloved snack anytime you crave it.

    Step 1: Prepare the Aloo Tikki 

    Begin by preparing the star ingredient of this dish – the aloo tikki. Boil potatoes until they are tender, then mash them and mix in spices such as cumin powder, coriander powder, and amchur (dry mango) powder for that authentic flavor. Shape the mixture into small patties and shallow fry them until golden brown and crispy. These flavorful aloo tikkis will serve as the base of your aloo chat, providing a satisfying crunch with every bite.

    Step 2: Assemble the Ingredients 

    Gather all the ingredients you’ll need to assemble your aloo chat. Apart from the prepared aloo tikkis,  tomatoes, green chilies, and fresh cilantro for added freshness and crunch. Additionally, prepare tamarind chutney and mint chutney to drizzle over the aloo chat, adding layers of tanginess and flavor to the dish.

    Step 3: Arrange the Aloo Tikki on a Plate 

    Place the crispy aloo tikkis on a serving plate, ensuring they are evenly spaced apart to allow for easy topping and garnishing. The golden-brown hue of the aloo tikkis will entice your senses, promising a delightful culinary experience ahead.

    Step 4: Add Toppings and Chutneys 

    Now comes the fun part – adding the toppings and chutneys to elevate the flavors of your aloo chat. Sprinkle  tomatoes, and green chilies generously over the aloo tikkis, ensuring each bite is bursting with freshness. Drizzle tamarind chutney and mint chutney over the toppings, allowing the tangy and spicy flavors to meld together harmoniously.

    Step 5: Garnish with Fresh Cilantro 

    To add a final flourish of freshness and color to your aloo chat, garnish it with a generous handful of freshly chopped cilantro. Not only does cilantro lend a vibrant green hue to the dish, but it also imparts a refreshing burst of flavor that perfectly complements the spiciness of the aloo tikkis and the tanginess of the chutneys.

    Step 6: Serve and Enjoy 

    Your delicious aloo chat is now ready to be served and savored. Whether enjoyed as a snack, appetizer, or even a light meal, this flavorful dish is sure to delight your taste buds with its irresistible combination of textures and flavors. Serve it hot and fresh, garnished with a sprinkle of chaat masala for an extra burst of zestiness.

    Tips for Making the Perfect Aloo Chat 

    • Ensure the aloo tikkis are crispy on the outside and soft on the inside by frying them over medium heat until golden brown.
    • Customize the level of spiciness in your aloo chat by adjusting the amount of green chilies used in the recipe.
    • Experiment with different chutney flavors, such as sweet date chutney or  to create unique variations of aloo chat.

    Variations of Aloo Chat 

    • Aloo Tikki Chat: Transform this recipe into a heartier dish by topping the aloo tikkis with a generous serving of chickpea curry, yogurt, and chutneys, creating a wholesome and satisfying meal.
    • Aloo Chat with Ragda: Incorporate ragda, a flavorful white pea curry, into your aloo chat for an extra dose of protein and richness.

    Benefits of Aloo Chat 

    • Nutrient-Rich: Potatoes, the main ingredient in aloo chat, are rich in vitamins, minerals, and antioxidants, making this dish not only delicious but also nutritious.
    • Quick and Easy: With simple ingredients and minimal preparation, aloo chat is a convenient snack or meal option for busy days.

    FAQs (Frequently Asked Questions) 

    Q: Can I make the aloo tikkis ahead of time?

    A: Yes, you can prepare the aloo tikkis in advance and store them in the refrigerator. Simply reheat them in a preheated oven or on a skillet before assembling the aloo chat.

    Q: Can I make this recipe vegan-friendly?

    A: Absolutely! This recipe is inherently vegan, as it does not contain any animal products. Just ensure that the chutneys you use are also vegan-friendly.

    Q: Can I add other toppings to my aloo chat?

    A: Certainly! Get creative with your toppings by adding ingredients such as sev (crispy chickpea flour noodles), pomegranate seeds, or grated cheese for additional flavor and texture.

    For more delicious recipes, explore more Indian recipes, appetizers, beverages, and desserts, be sure to check out the following links on Manjula’s Kitchen. Here are some links to recipes on Manjula’s Kitchen official website: Paneer Tikka Masala Recipe, Chana Chaat (Spicy Chickpea Salad) Recipe, Pav Bhaji (Spicy Vegetable Hash with Buns) Recipe, Raj Kachori (Crunchy Chaat) Recipe, Vegetable Biryani Recip. These recipes should offer you a flavorful experience straight from Manjula’s Kitchen.

  • Rabri (Malai – Kerchan)

    Rabri (Malai – Kerchan)

    Rabri

    Rabri (Malai – Kerchan)

    Rabri or rabadi is a North Indian delicacy. It is served as a dessert. Rabri is a reduced milk, cooked little differently instead of creamy rubri is lumpy.  I like this dish because you can serve alone or over malpua, jalebi, gulab jamun, or waffles. There are countless combinations you can come up with.
    No ratings yet
    Prep Time 5 minutes
    Cook Time 39 minutes
    Course Dessert
    Cuisine Indian
    Servings 4 people

    Ingredients
      

    • 4 cups of milk
    • 2 tablespoons sugar
    • 1/4 teaspoon crushed cardamom
    • 2 teaspoon sliced almonds
    • 2 teaspoon sliced pistachios

    Instructions
     

    • To make rabri use wide heavy frying pan. Boil the milk over medium high heat as milk comes to boil reduce the heat to low medium.
    • Move the layer of foaming from boiling milk towards the rim, do the same as milk foams again. Keep doing this until milk is about 3/4 in volume. This should take about 30 minutes after milk first comes to boil. Note: it is important to keep the heat low otherwise milk on the rim will start burning.
    • After about 20 minutes of boiling milk add the sugar and cardamom, continue to boil, until it is 3/4 in volume. Add almonds and keep pistachios for garnishing. Turn of the heat, remove the cream from the rim and fold it into milk.
    • Rabri is ready, taste best when it is served chilled. But if you are serving rubric with part of other dessert use warm.
    Tried this recipe?Let us know how it was!
    1. To make rabri use wide heavy frying pan. Boil the milk over medium high heat as milk comes to boil reduce the heat to low medium.
  • Peanut Chikki (Peanut Brittle)

    Peanut Chikki (Peanut Brittle)

    Peanut Chikki

    Peanut Chikki (Peanut Brittle)

    Peanut chikki or peanut brittle is a delicious homemade sweet snack. This recipe is super simple and easy with very few ingredients, peanuts, sugar and touch of ginger and salt. Ginger adds a very nice tanginess to the chikki.
    No ratings yet
    Prep Time 5 minutes
    Cook Time 19 minutes
    Course Dessert
    Cuisine Indian
    Servings 12 peanut chikkies

    Ingredients
      

    • 1 cup peanuts shelled unsalted raw
    • 1 cup sugar
    • 2 teaspoons of clarified butter or ghee
    • 1/4 teaspoon salt
    • 2 teaspoons ginger juice

    Instructions
     

    • Grease about 5×7 plate and set aside.
    • Dry roast the peanuts on medium heat stirring continuously for about 6 to 7 minutes until golden brown. Remove from pan, wait till they cool off rub between your palms and remove most of the skin. Lightly crush the peanuts.
    • In a heavy bottom sauce pan, over medium high heat melt the butter, then add sugar, ginger, and salt.
    • Keep stirring the sugar continuously till sugar start melting and changing the color to light brown. Turn off the heat as soon it comes to golden brown in color. Note: when sugar starts melting it changes the color very quickly and it can easily burn.
    • Add peanuts stir quickly. Pour over the greased plate and spread evenly.
    • Cool for a few minutes chikki should be warm, cut them in about 1-1/2 inch square.
    • Store them in air tight container

    Notes

     Note: To make the ginger juice grate the ginger using fine shredder and then press it between your fingers to yield the juice.
    Tried this recipe?Let us know how it was!
  • Vegetable Rice Cutlets

    Vegetable Rice Cutlets

    Vegetable Rice Cutlets

    Vegetable Rice Cutlets

    Vegetable rice cutlets are great as an appetizer or snack for any get together. These cutlets are made with rice blended with mixed vegetables. This is an easy and quick recipe to make. Vegetable rice cutlets are crisp outside and soft inside. Try it!
    No ratings yet
    Prep Time 20 minutes
    Cook Time 15 minutes
    Course Appetizer
    Cuisine Indian
    Servings 16 cutlets

    Ingredients
      

    • 2 cups cooked rice
    • 1 small potato peeled and cut in small pieces
    • 1 cup mixed vegetables cut into very small pieces (green beans, bell pepper and carrot)
    • 2 teaspoon ginger chopped
    • 1/2 teaspoon red chili powder, adjust to taste
    • 1-1/2 teaspoons salt
    • 1 teaspoon cumin seeds
    • 1 tablespoon corn starch
    • Oil to fry

    Instructions
     

    • Pat dry all the vegetables.
    • Put all the ingredients in food processer and mix for about half a minutes. Mix should not become like paste and you should be able to see all the vegetables.
    • Remove from the food processer, rice mix will be textured of chunky soft dough. Divide the mix into 16 pieces and roll them into flat patties about 1/2 inch thick.
    • Heat the oil in a frying pan on medium high heat. Drop the cutlets slowly into it, taking care not to overlap them.
    • Fry the cutlets until they are golden brown, turning occasionally. This should take about 5 to 6 minutes. Take them out over a paper towel.
    • For best taste serve them hot. Cutlets taste great with cilantro chutney.
    Tried this recipe?Let us know how it was!

    Vegetable Rice Cutlet Recipe

    Vegetable Rice Cutlet is a delectable appetizer that is not only gluten-free but also suitable for both Krishna Janmashtami and Navaratri celebrations. This snack is prepared by combining cooked rice with various finely chopped vegetables, forming a mixture that is then shaped into patties and fried until golden brown.

    Being vegan-friendly, these cutlets cater to a wide range of dietary preferences. 

    They serve as delightful snacks or appetizers, perfect for any occasion or gathering. In this guide, we will explore the delightful world of Vegetable Rice Cutlets. These savory treats are perfect for any occasion, whether you’re hosting a party or simply craving a flavorful snack.

    Packed with wholesome ingredients and bursting with flavor, these cutlets are sure to be a hit with your family and friends.

    How to Make Vegetable Rice Cutlet: A Step-by-Step Guide

    Prep the Vegetables: For perfect texture, ensure all vegetables are meticulously dried. Pat them dry to remove excess moisture that can affect the final consistency.

    Combine Ingredients: Assemble all ingredients in a food processor. Pulse carefully to achieve a cohesive mixture with some texture. Avoid over-processing into a paste.

    Shape the Cutlets: Transfer the mixture – it should be a chunky, pliable dough. Divide it into 16 equal portions. Shape each portion into a flat patty, about half an inch thick, for even cooking.

    Fry to Golden Perfection: Heat oil in a frying pan over medium-high heat. Add enough oil to submerge half the patty. Gently place patties in the hot oil, ensuring they don’t touch. Fry for 5-6 minutes, turning occasionally, until golden brown.

    Drain and Serve: Transfer the golden cutlets to absorbent paper towels to remove excess oil while maintaining crispness.

    Variations:

    You can customize Vegetable Rice Cutlets according to your preferences and dietary restrictions. Here are some variations to try:

    Spicy Variation: Add chopped green chilies or a dash of chili powder to the mixture for an extra kick of heat.

    Cheesy Variation: Mix in grated cheese to the filling mixture for a gooey and indulgent twist.

    Vegan Variation: Replace potatoes with mashed chickpeas or sweet potatoes for a vegan-friendly option.

    Gluten-Free Variation: Use gluten-free bread crumbs or crushed cornflakes for coating to make the cutlets suitable for those with gluten intolerance.

    FAQs:

    Can I bake the cutlets instead of frying them?

    Yes, you can bake the cutlets in a preheated oven at 375°F (190°C) for 20-25 minutes or until they are golden brown and crispy.

    Can I use leftover rice?

    Absolutely! Vegetable rice cutlets are a great way to use leftover rice. Just make sure it’s cooked and cooled completely.

    Can I freeze the cutlets for later use?

    Yes, you can freeze the uncooked cutlets in a single layer on a baking sheet until firm, then transfer them to a freezer-safe bag or container for up to 3 months. Thaw them in the refrigerator before frying or baking.

    How long will they stay fresh?

    Store leftover cutlets in an airtight container in the refrigerator for up to 3 days. Reheat in a pan or oven until warmed through.

    For more delicious recipes, visit Manjula’s Kitchen and explore other Recipes. If you’re looking to explore more Indian recipes, appetizers, beverages, and desserts, be sure to check out the following links on Manjula’s Kitchen. Here are some links to recipes on Manjula’s Kitchen official website: Paneer Tikka Masala Recipe, Chana Chaat (Spicy Chickpea Salad) Recipe, Pav Bhaji (Spicy Vegetable Hash with Buns) Recipe, Raj Kachori (Crunchy Chaat) Recipe, Vegetable Biryani Recip. These recipes should offer you a flavorful experience straight from Manjula’s Kitchen.

  • Eggless Vanilla Cake with Strawberry Sauce

    Eggless Vanilla Cake with Strawberry Sauce

    Eggless Vanilla Cake with Strawberry Sauce

    Eggless Vanilla Cake with Strawberry Sauce

    Eggless Vanilla Mini Cakes, they are simply delicious sweet snack. These cakes are moist and soft with the perfect amount of sweetness. The vanilla cake is nicely paired with hot strawberry sauce as a dessert.https://manjulaskitchen.com/category/recipes/desserts/
    No ratings yet
    Prep Time 20 minutes
    Cook Time 24 minutes
    Course Dessert
    Cuisine Indian
    Servings 6 mini Cakes.

    Ingredients
      

    • 1-3/4 cup all-purpose flour (maida or plain flour)
    • 4 tablespoons corn starch
    • 1 1/2 teaspoon baking powder
    • 1 teaspoon baking soda
    • 1/4 teaspoon salt
    • 1 cup unsalted butter room temperature
    • 1 cup sugar
    • 2 teaspoons vanilla extract
    • 1/2 cup yogurt room temperature
    • 1 cup milk room temperature

    Strawberry Sauce

    • 1 cup raspberry, use fresh or frozen
    • 1-1/2 cup strawberry, use fresh or frozen
    • 1/4 cup fresh orange juice
    • 1 tablespoon corn starch
    • 3/4 cup sugar

    Also Need

    • Cake molds

    Instructions
     

    • Preheat oven to 350 degree F.
    • Sieve flour, corn starch, baking soda, baking powder and salt, set aside.
    • In a bowl, cream the butter and sugar until creamy using the electric mixer on low speed. Do not over beat.
    • Add yogurt and vanilla essence to the butter mix keep mixing on low speed and add the milk slowly. Mix will not be very smooth.
    • Add the flour few spoons at a time into the batter. Keep folding using the whisk, until all the flour is incorporated in to the butter mix, Do not over beat.
    • Scoop the batter into baking molds filling them about 2/3 full.
    • Bake for 20 minutes check the cakes inserting a knife in the center and it should come out clean. It took me 22 minutes.
    • After cakes come to the room temperature take them out from the molds.

    Strawberry Sauce

    • First wash strawberries, and raspberries hulled and slice the strawberries.
    • Combine all the ingredients except corn starch, in a small pot over medium high heat, bring to boil. Mix the corn starch with about 2 tablespoons of water making smooth paste and add to strawberries. This will make sauce creamy and will give thickness to the sauce.
    • Lower the heat to medium cook for 2-3 minutes, stir continually. Turn off the heat and sauce ready.
    • Top the cake with hot sauce. Enjoy!

    Notes

    Notes
    Strawberry sauce is a great sauce for topping pancakes, waffles, ice cream, cakes and more.
    Tried this recipe?Let us know how it was!

  • Hara Bhara Kabab – Vegetable Cutlet

    Hara Bhara Kabab – Vegetable Cutlet

    Hara Bhara Kabab (Vegetable Cutlet)

    Hara Bhara Kabab – Vegetable Cutlet

    Hara bhara kabab is a popular tasty snacks in Indian restaurants. This spicy delicious snack is deep fried made with spinach and potatoes flavored with spice mix. Hara bhara kabab is crispy outside and soft inside. Hara Bhara Kebabs are absolutely delicious appetizer and looks like cutlets.
    No ratings yet
    Prep Time 20 minutes
    Cook Time 30 minutes
    Course Appetizer
    Cuisine Indian
    Servings 20 kababs

    Ingredients
      

    • 6 cup spinach finely chopped, (do remove all the stems)
    • 1-1/2 cup potatoes boiled, peeled and shredded
    • 2 teaspoons oil
    • ½ teaspoon cumin seeds (jeera)
    • 1 teaspoon ginger finely chopped
    • 3/4 teaspoon salt
    • 3 tablespoons corn starch
    • ¼ cup finely chopped cilantro (hara dhania)
    • 2 tablespoons green chili finely chopped
    • Also need oil to fry

    Instructions
     

    • Heat the oil in a saucepan on medium-high heat. Oil should be moderately hot add cumin seeds. After the cumin seeds crack, add the spinach.
    • Stir-fry, making sure to press the spinach down so the water can evaporate. Cook the spinach until most of the water has evaporated. Spinach still should be moist not dry.
    • After spinach is at room temperature, add to the potatoes with all other ingredients, ginger, cilantro, green chilies, salt, and corn starch. Mix will be the consistency of soft dough.
    • Divided the mix to 20 equal parts and roll them into oval shapes.
    • Heat the oil in a frying pan on medium heat. The frying pan should have about 1 inch of oil. To check if the oil is ready, put small piece of the mix in oil. It should sizzle and come up slowly. If oil is very hot kababs will not cook through and will not be crispy.
    • Fry the kababs in small batches. Fry kababs until golden-brown all around, this should take about 6-7 minutes.
    • Serve them hot with sweet and sour tamarind chutney.
    Tried this recipe?Let us know how it was!

    Hara Bhara Kabab Recipe – A Delicious Veggie Treat 

    Hara Bhara Kabab is a delightful appetizer commonly enjoyed during Diwali celebrations. These gluten-free and vegan kababs are perfect for parties and gatherings, offering a flavorful snack option. Made with a mix of spinach, potatoes, peas, and spices, Hara Bhara Kabab is not only delicious but also caters to dietary preferences, making it an inclusive choice for various guests.

    Are you craving a delightful snack that’s not only tasty but also healthy? Look no further than hara bhara kabab! These delightful vegetable cutlets are packed with the goodness of spinach, peas, and potatoes, making them a wholesome treat for any occasion. In this hara bhara kabab recipe, I’ll walk you through the steps to create these crispy delights at home, ensuring you achieve the perfect texture and flavor every time.

    How to Make Hara Bhara Kabab – Step by Step Guide 

    • Preparing the Vegetables: Begin by blanching spinach leaves and peas until they are tender. Drain them well and set aside. Boil and mash the potatoes until they are smooth and lump-free.
    • Making the Kabab Mixture: In a mixing bowl, combine the blanched spinach, peas, and mashed potatoes. Add finely chopped green chilies, ginger, and coriander leaves for a burst of flavor. Season the mixture with salt, garam masala, and chaat masala to enhance the taste.
    • Binding the Ingredients: To bind the mixture together, add breadcrumbs or roasted chickpea flour (besan). This will help absorb excess moisture and give the kababs a nice texture. Mix everything thoroughly until well combined.
    • Shaping the Kababs: Take small portions of the mixture and shape them into round or oval patties. Press them gently between your palms to ensure they hold their shape. You can also coat the kababs with additional breadcrumbs for extra crispiness.
    • Frying the Kababs: Heat oil in a pan for shallow frying or deep frying, depending on your preference. Once the oil is hot, carefully place the kababs in the pan and fry them until they turn golden brown and crispy on both sides.

    Tips for Perfect Hara Bhara Kababs 

    • Use Fresh Ingredients: For the best flavor and texture, use fresh spinach, peas, and potatoes. Avoid using frozen vegetables as they may contain excess moisture, affecting the consistency of the kababs.
    • Adjust Spices to Taste: Feel free to adjust the amount of green chilies, ginger, and spices according to your taste preferences. You can make the kababs milder or spicier to suit your palate.
    • Add Nutritional Boost: Sneak in additional veggies like grated carrots or finely chopped bell peppers for added nutrition and flavor. These kababs are a great way to get picky eaters to consume their vegetables.
    • Make Ahead and Freeze: You can prepare the kabab mixture in advance and freeze it for later use. Simply shape the mixture into patties, arrange them on a baking sheet, and freeze until firm. Once frozen, transfer the patties to a freezer bag or container and store them for up to a month. When ready to enjoy, thaw the kababs in the refrigerator and fry as directed.

    Variations of Hara Bhara Kabab 

    • Paneer Hara Bhara Kabab: Add crumbled paneer (Indian cottage cheese) to the kabab mixture for a creamy and rich texture. Paneer adds protein and enhances the taste of the kababs.
    • Corn and Spinach Kabab: Replace peas with sweet corn kernels for a slightly sweet flavor and crunchy texture. Corn and spinach complement each other beautifully, making these kababs a crowd-pleaser.
    • Quinoa and Vegetable Kabab: For a healthier twist, substitute a portion of the potatoes with cooked quinoa. Quinoa adds protein, fiber, and a nutty flavor to the kababs, making them a nutritious snack option.

    Benefits of Hara Bhara Kabab 

    • Rich in Nutrients: Hara bhara kababs are loaded with vitamins, minerals, and antioxidants from the spinach, peas, and other vegetables. They make for a nutritious snack or appetizer option.
    • Vegetarian Protein Source: These kababs are an excellent source of plant-based protein, especially when made with ingredients like peas, chickpea flour, and paneer. They are perfect for vegetarians and vegans looking to increase their protein intake.
    • Low in Calories: When shallow fried or baked, hara bhara kababs are relatively low in calories compared to traditional fried snacks. They offer a guilt-free indulgence without compromising on taste.

    FAQs About Hara Bhara Kabab 

    Can I Bake Hara Bhara Kababs Instead of Frying Them?

    • Yes, you can bake hara bhara kababs in a preheated oven at 375°F (190°C) for 20-25 minutes or until they are golden brown and crispy. Remember to brush or spray the kababs with oil before baking to help them brown evenly.

    Can I Make Hara Bhara Kababs Gluten-Free?

    • Absolutely! Simply replace breadcrumbs with crushed cornflakes or gluten-free oats to make the kababs gluten-free. You can also use chickpea flour (besan) instead of breadcrumbs for binding.

    Are Hara Bhara Kababs Suitable for Kids?

    • Yes, hara bhara kababs are kid-friendly and a great way to sneak in some vegetables into their diet. You can adjust the spiciness level to suit their taste preferences and serve them with their favorite dipping sauce or chutney.

    Can I Freeze Hara Bhara Kabab Mixture?

    • Yes, you can prepare the kabab mixture in advance and freeze it for later use. Simply shape the mixture into patties, arrange them on a baking sheet, and freeze until firm. Once frozen, transfer the patties to a freezer bag or container and store them for up to a month. Thaw them in the refrigerator before frying.
    • Other Recipes on Manjula’s Kitchen

    If you’re looking to explore more Indian recipes, appetizers, beverages, and desserts, be sure to check out the following links on Manjula’s Kitchen. Here are some links to recipes on Manjula’s Kitchen official website: Paneer Tikka Masala Recipe, Chana Chaat (Spicy Chickpea Salad) Recipe, Pav Bhaji (Spicy Vegetable Hash with Buns) Recipe, Raj Kachori (Crunchy Chaat) Recipe, Vegetable Biryani Recipe. These recipes should offer you a flavorful experience straight from Manjula’s Kitchen.

  • Bread Uttapam, South Indian Snack

    Bread Uttapam, South Indian Snack

    Bread Uttapam

    Bread Uttapam

    Uttapam is a popular South Indian dish. Traditionally uttapam is made with rice and lentil batter, which can be a long process. Bread Uttapam, on the other hand, is instant and easy to make. Not to mention it tastes delicious. Uttapam is a thick dosa, or pancake, with vegetables cooked over skillet. It tastes divine served hot and with a side of coconut chutney.
    No ratings yet
    Prep Time 15 minutes
    Cook Time 6 minutes
    Total Time 21 minutes
    Course Breakfast
    Cuisine Indian
    Servings 3 people

    Ingredients
      

    • 3 slice white bread
    • 3 tbsp sooji coarse samolina
    • 3 tbsp all-purpose flour maida, plain flour
    • 1/4 cup yogurt curd, dahai
    • 1 tsp salt
    • 1/4 tsp cumin seeds jeera
    • 1/4 cup bell pepper, finely chopped capsicum
    • 1/4 cup tomatoes finely chopped remove the seeds
    • 1 green chili finely chopped
    • 2 tsp ginger shredded adrak
    • 2 tbsp cilantro finely chopped hara dhania
    • 2 tbsp oil to cook

    Instructions
     

    • Remove the crest from bread and cut them in small pieces.
    • In a blender add bread, sooji, all-purpose flour, salt, yogurt, and water, and blend to a thick and smooth paste.
    • Take out the batter in a bowl and add the remaining ingredients, cumin seeds, bell pepper, tomatoes, ginger, green chili, and cilantro, mix it well. Batter should be thick in consistency add more water if needed, batter should not be too thick but should not be runny.
    • Heat the skillet over medium heat and lightly grease the skillet. Pour about 2 tablespoons of batter and spread consistency should be of thick pancake.
    • Pour little oil around uttapam. Let it cook for about 2 minutes and turn them over, bread uttapam should be golden brown from both sides and this should take about four minutes. Notes: do not cook on high heat, uttapam will not cook through.

    Notes

    Serve bread uttapam with your choice of chutney, I like to serve with coconut chutney or green cilantro chutney.
    Keyword Healthy Breakfast, South Indian Cuisine
    Tried this recipe?Let us know how it was!

  • Masala Khichdi (Rice and Moong Dal)

    Masala Khichdi (Rice and Moong Dal)


    Masala Khichdi

    Masala Khichdi

    Masala Khichdi is a spicy variation of simple khichdi. This is healthy but ultimate comfort food. Khichdi is basically prepared with rice and lentils. Every hosehold has their own recipe for khichdi. At my home khichdi was made just with rice and moong dal. Adding a few vegetables with spicy tomato seasoning makes khichdi a complete meal. Usually khichdi is served with yogurt, pickle and papdam.
    5 from 4 votes
    10 20 minutes
    Course Main Course
    Cuisine Indian
    Servings 3 people

    Ingredients
      

    • 1/2 cup moong dal washed and split
    • 1/2 cup rice
    • 1/2 cup green beans cut into about 1/2 inch pieces
    • 1 medium potato washed peeled and small cubed this will make about 1/2 cup of cubed potatoes
    • 1 tsp salt
    • 1/4 tsp turmeric haldi
    • 1 tbsp clarified butter (ghe)
    • 3 cups water for cooking

    Spices

    • 2 tbsp clarified butter or ghee
    • 1/2 tsp cumin seeds jeera
    • 1/2 tsp mustard seeds rai
    • 1/8 tsp asafetida hing
    • 1-1/2 cups tomatoes finely chopped
    • 1 green chilies finely chopped
    • 1/4 tsp red chili powder
    • 1/2 tsp salt
    • 2 tsp ginger finely shredded
    • 2 tbsp cilantro finely choped
    • 1/4 tsp garam masala

    Instructions
     

    • Wash rice and moong dal changing water 3 to 4 times, drain the water. Use the pressure cooker to save time. In preassure cooker add rice, beans, potatoes, salt, turmeric, clarified butter, and 3 cups of water.
    • Close the pressure cooker and seal the exhaust, or put the weight. Cook over high heat.
    • After the pressure cooker start steaming lower the heat to medium and cook for about 4 minutes.
    • Turn off the heat and wait until steam has stopped before opening the cooker.
    • Mix the khichdi well, dal and rice should be very soft, little mushy.
    • Heat the clarified butter in other saucepan over medium heat, Test the oil by adding one cumin seed to the oil; if it cracks right away oil is ready. Add the cumin seeds, black mustard seeds, and asafetida as seeds crack add tomatoes, green chili, ginger, salt and red pepper stir.
    • Let tomatoes cook over medium heat until they are tender and mushy. This should take about 6 to 7 minutes. Lower the heat to low. Add cilantro and garam masala, stir for a minutes.
    • Add cooked rice, mix gently, and add hot water slowly as needed. Consistency of the khichdi should be like runny dough. Note: as khichdi cools will become little thick.
    • Serve khichdi hot, and serve the khichdi with pickle, yogurt and papdam.
    Tried this recipe?Let us know how it was!

    Masala Khichdi Recipe: A Flavorful Blend of Spices & Goodness 

    Masala Khichdi is a spicy rice-based variation of simple khichdi. It is a healthy gluten-free low fat but amazing comfort food and a great lunch box option. Khichdi is prepared with rice and lentils. Every household has its khichdi masala recipe. Adding a few vegetables with spicy tomato seasoning makes khichdi a complete meal. Usually, khichdi is served with yogurt, pickles, and papadam.

    1. Preparing the Ingredients: Washing and Pressure Cooking 

    Begin the process of making this flavorful masala khichdi recipe by thoroughly washing the rice and moong dal, and changing the water 3 to 4 times. Drain the water and transfer the washed rice and dal to a pressure cooker to save time. In the pressure cooker, combine the rice, beans, potatoes, salt, turmeric, clarified butter, and 3 cups of water.

    1. Pressure Cooking the Masala Khichdi: Infusing Flavors

    Close the pressure cooker securely and seal the exhaust or place the weight on top. Cook the mixture over high heat until the pressure cooker starts steaming. Once steaming begins, reduce the heat to medium and continue cooking for about 4 minutes.

    1. Allowing Pressure to Release: Ensuring Safety 

    Turn off the heat and patiently wait until the steam has completely stopped before opening the pressure cooker. This step ensures safety and allows the pressure to release naturally.

    1. Mixing the Masala  Khichdi: Achieving Desired Texture 

    Once the pressure has dissipated, carefully open the pressure cooker and mix the dal khichdi masala well. The dal and rice should be very soft and slightly mushy, creating a comforting and hearty texture.

    1. Tempering the Spices: Enhancing Flavor 

    In another saucepan, heat clarified butter over medium heat. Test the oil’s readiness by adding a cumin seed; if it crackles right away, the oil is ready. Add cumin seeds, black mustard seeds, and asafetida, and stir until the seeds crackle. Then, add tomatoes, green chili, ginger, salt, and red pepper, allowing the tomatoes to cook until tender and mushy for about 6 to 7 minutes over medium heat. Lower the heat, add cilantro and garam masala, and stir for an additional minute.

    1. Incorporating the Dal Khichdi Masala: Achieving Consistency 

    Add the cooked rice to the saucepan, mixing gently. Gradually add hot water as needed to achieve the desired consistency of the dal khichdi masala, resembling a runny dough. Note that the dal khichdi masala will thicken slightly as it cools.

    1. Serving the Masala Khichdi: Enjoying Comfort and Flavor 

    Serve the masala khichdi hot, accompanied by pickle, yogurt, and papadam. This comforting and flavorful dish is sure to satisfy your taste buds and provide a wholesome meal experience.

    If you loved our masala khichdi recipe then you must also check out other variants of Rice: Vegetable Biryani, Masala Khichdi, chole biryani, Quinoa Vegetable Pilaf, and Lemon Rice