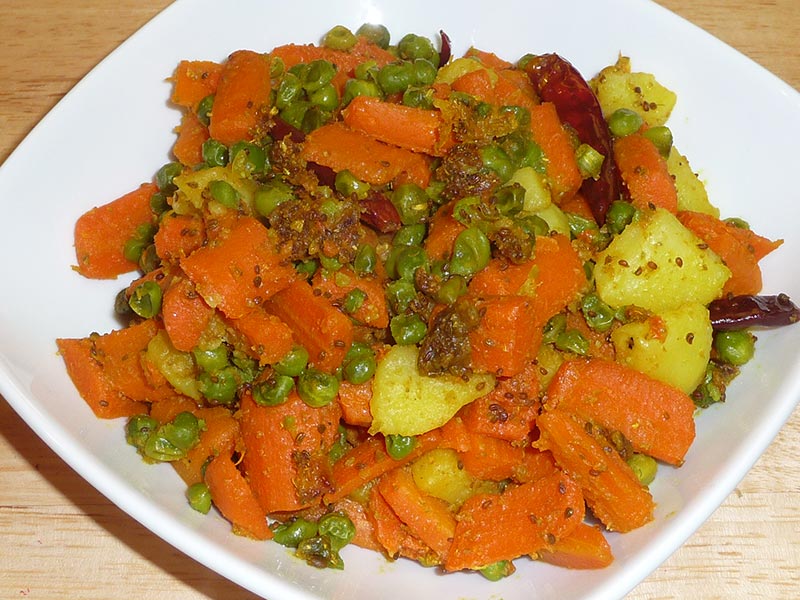
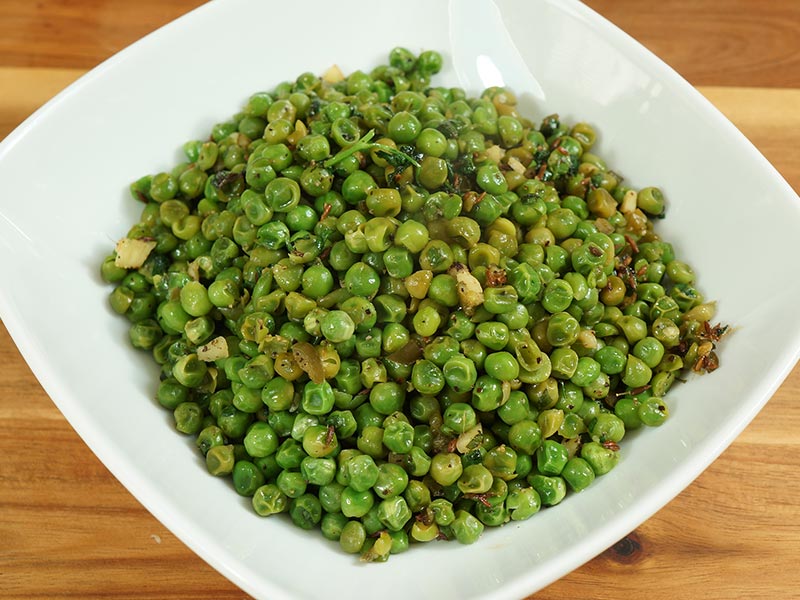
Category: Low Fat Recipes

Low Fat Vegetarian Recipes: Delicious and Healthy Indian Options

Maintaining a low-fat diet is essential for overall health and well-being, and Indian cuisine offers a variety of low fat indian vegetarian recipes that are both delicious and nutritious. Whether you’re looking for low calorie Indian food, fat free dinner ideas, or simply low calorie recipes, this guide provides a selection of dishes perfect for a healthy lifestyle. Let’s explore some fantastic low fat vegetarian recipes that you can incorporate into your diet.

Breakfast Recipes

Oats Upma

Oats Upma is a nutritious and light breakfast option. Made with oats and vegetables, this dish is perfect for those looking for low calorie Indian food. Oats are known for their health benefits, making this a great start to your day with low calorie recipes.

Moong Dal Cheela

Moong Dal Cheela, or lentil pancakes, is a protein-rich breakfast that fits well within low fat vegetarian recipes. It’s quick to prepare and can be enjoyed with a side of yogurt or chutney. This dish is also suitable for those seeking low calorie recipes.

Lunch Recipes

Quinoa Salad

Quinoa Salad is a versatile dish that can be customized with various vegetables and herbs. This salad is perfect for those looking for low calorie Indian food as it is high in protein and fiber, helping to manage hunger and maintain energy levels. It’s also an ideal option for a light lunch or dinner.

Palak Tofu

Palak Tofu is a nutritious dish made with spinach and tofu. Rich in iron and protein, this dish fits perfectly within low fat vegetarian recipes. It can be paired with a side salad for a balanced meal, making it one of the best low calorie recipes for lunch.

Dinner Recipes

Moong Dal Tadka

Moong Dal Tadka is a simple yet flavorful lentil dish that fits perfectly within low calorie Indian food. Made with split yellow lentils and a blend of spices, this dish is a staple in Indian households. It’s a nutritious and satisfying way to enjoy fat free dinner ideas.

Vegetable Stir Fry

Vegetable Stir Fry is a quick and easy dinner option that fits well within low fat vegetarian recipes. Using a variety of colorful vegetables and minimal oil, this dish is not only healthy but also packed with nutrients. It’s a great way to enjoy low calorie recipes in a simple and flavorful manner.

Snack Recipes

Sprout Salad

Sprout Salad is a refreshing and nutritious snack that fits well within low fat vegetarian recipes. Made with sprouted legumes, fresh vegetables, and a tangy dressing, this salad is a perfect example of low calorie Indian food that is healthy and delicious.

Roasted Makhana

Roasted Makhana are fox nuts that are lightly roasted and seasoned with spices. This snack is not only crunchy and addictive but also fits perfectly into the fat free dinner ideas category. It’s a healthy option for those mid-day cravings.

Dessert Recipes

Fruit Salad

Fruit Salad is a nutritious and refreshing dessert made with a mix of fresh fruits, spices, and lime juice. This dessert is a delightful example of low calorie recipes that can be enjoyed as a dessert or a snack. It’s perfect for those looking for a sweet treat that is also healthy.

Chia Seed Pudding

Chia Seed Pudding is a versatile dessert that can be flavored with vanilla, cocoa, or fruits. This dish is perfect for those seeking low fat vegetarian recipes as it uses plant-based milk and is sweetened with a sugar substitute. It’s a nutritious and satisfying way to end a meal.

Elevancing Your Low-Fat Menu

To make your low-fat menu even more delightful, consider adding dishes from related categories that complement these low-fat vegetarian recipes. Indian snacks like roasted makhana and sprout salad can offer a variety of flavors and textures.

For a sweet ending, explore Indian desserts such as fruit salad and chia seed pudding, made with low-fat ingredients. Incorporating healthy recipes like quinoa salad and vegetable stir-fry can provide lighter options for your meals.

Hosting a large gathering? The popular party recipe category is filled with dishes that are sure to impress your guests and make your celebration memorable. Including North Indian recipes like palak tofu or moong dal tadka can add a touch of authenticity to your meal.

Frequently Asked Questions (FAQs)

Q: What are some popular low calorie Indian food options? 

A: Some popular low calorie Indian food options include Oats Upma, Moong Dal Cheela, Quinoa Salad, Palak Tofu, Moong Dal Tadka, Vegetable Stir Fry, Sprout Salad, Roasted Makhana, Fruit Salad, and Chia Seed Pudding.

Q: How can I make traditional Indian food low in fat? 

A: To make traditional Indian food low in fat, try recipes like Moong Dal Tadka, Vegetable Stir Fry, and Palak Tofu. These recipes are modified to include heart-healthy ingredients while retaining their authentic flavors.

Q: What are some fat free dinner ideas for a party? 

A: Some fat free dinner ideas for a party include Quinoa Salad, Sprout Salad, Roasted Makhana, and Fruit Salad. These dishes are flavorful and perfect for gatherings while being mindful of fat content.

Q: Can I prepare low calorie Indian food in advance? 

A: Yes, many low calorie Indian food recipes can be prepared in advance and stored. Snacks like Roasted Makhana and Sprout Salad can be made ahead of time, while dishes like Moong Dal Tadka and Vegetable Stir Fry can be prepared and refrigerated.

Q: What are some healthy options for low calorie Indian food? 

A: Some healthy options for low calorie Indian recipes include Quinoa Salad, Vegetable Stir Fry, Oats Upma, and Moong Dal Cheela. These dishes are high in fiber and protein, helping to maintain energy levels effectively.

Conclusion

Low fat vegetarian recipes are a celebration of healthy and flavorful meals. Whether you’re looking for low calorie Indian food or low calorie recipes, these dishes will bring variety and nutrition to your meals. 

So, gather your ingredients, try out these recipes, and create delicious meals that are mindful of your heart health. Don’t forget to explore related categories for more delightful recipes from Manjula’s Kitchen!

By incorporating these dishes into your diet, you’ll be able to enjoy a wide variety of delicious and nutritious foods. Whether you’re looking for breakfast, snacks, main courses, or desserts, there’s a low fat vegetarian recipe to suit every taste. Happy cooking and healthy eating!

  • Spicy Green Peas

    Spicy Green Peas

    Spicy Green Peas

    Spicy Green Peas

    Spicy Peas, touch of spices added to sweetness from peas and sourness from lemon makes this a great snack or a side dish. This is an easy recipe to make. Bright green color gives a nice touch to any meal.
    5 from 1 vote
    Prep Time 5 minutes
    Cook Time 5 minutes
    Total Time 10 minutes
    Course Side Dish
    Cuisine Indian
    Servings 4 people

    Ingredients
      

    • 3 cups green peas, frozen preferred baby peas
    • 1-1/2 tbsp oil
    • 3/4 tsp cumin seeds jeera
    • 2 tsp ginger chopped
    • 1-1/2 tsp green chili chopped
    • 1 tsp salt
    • 1/4 tsp black pepper
    • 2 tbsp cilantro chopped hara dhania
    • 2 tsp lemon juice

    Instructions
     

    • Thaw the peas and pat dry.
    • Heat the oil in a saucepan over medium-high heat. Test the heat by adding one cumin seed to the oil. If the cumin seed cracks right away, the oil is ready. Add cumin seeds as they crack add green chili and ginger, stir for few second add green peas and salt.
    • Cook for about 4-5 minutes string occasionally, till peas are tender. Add black pepper and cilantro mix it well.
    • Turn off the heat and squeeze the lemon juice over and stir.Spicy green peas are ready to serve!

    Notes

    Serving suggestions: Serve Spicy green peas hot or at room temperature. 
    Serve this as a snack or as a side dish with any dal or gravy base dish.
    Spicy Green Peas also good for sandwiches or making wrap 
    Tried this recipe?Let us know how it was!

    Spicy Green Peas Masala Recipe

    Spicy Green Peas Masala is a delectable dish that combines the freshness of green peas with a fiery kick of spices. It’s perfect for those seeking appetizers or snacks that are gluten-free, low in fat, and vegan-friendly. This quick and easy recipe involves sautéing green peas along with a blend of aromatic spices. The result is a flavorful dish bursting with the natural goodness of vegetables, making it a healthy and satisfying choice for any occasion. If you’re looking for an enticing and flavorful dish to tantalize your taste buds, this spicy green peas masala recipe is just what you need. Bursting with aromatic spices and the freshness of green peas, this dish is a delightful treat for both spice enthusiasts and lovers of comfort food. Let’s dive into the steps of how to make this irresistible spicy green pea masala.

    Step 1: Preparing the Ingredients

    Before diving into the cooking process, gather all the necessary ingredients. You’ll need fresh or frozen green peas, tomatoes, ginger, green chilies, and a blend of spices including cumin, coriander, turmeric, and garam masala. Make sure to have some oil on hand for sautéing.

    Step 2: Sautéing the Aromatics

    Heat some oil in a pan over medium heat. Add ginger, and green chilies to the pan. Sauté them until they turn golden brown and release their aromatic flavors. This forms the flavorful base of our spicy green pea masala.

    Step 3: Adding the Spice Mix

    Once the aromatics are nicely sautéed, it’s time to add the spice mix. Sprinkle in the ground cumin, coriander, turmeric, and garam masala. Stir the spices well evenly, allowing them to toast slightly and develop a rich, deep flavor profile.

    Step 4: Introducing the Green Peas

    Now, it’s time to add the star ingredient: the green peas. Whether you’re using fresh peas or frozen ones, toss them into the pan and mix them thoroughly with the spice-infused mixture. Let the peas cook for a few minutes, allowing them to absorb all the wonderful flavors.

    Step 5: Simmering with Tomatoes

    Next, add diced tomatoes to the pan. Tomatoes not only add a tangy sweetness to the dish but also contribute to its vibrant color. Stir everything together and let the mixture simmer gently, allowing the tomatoes to soften and meld with the other ingredients.

    Step 6: Adjusting Seasonings

    Taste the spicy green peas masala and adjust the seasonings according to your preferences. If you prefer it spicier, you can add more green chilies or a pinch of red chili powder. For extra richness, you can sprinkle in some cream or coconut milk.

    Step 7: Garnishing and Serving

    Once the flavors have melded beautifully and the green peas are tender, garnish the dish with freshly chopped cilantro leaves. This adds a burst of freshness and color to the dish. Serve the spicy green peas masala hot with rice, roti, or naan for a satisfying meal that’s sure to impress.

    Variations:

    • For a creamier texture, you can blend a portion of the cooked green peas masala to create a thick gravy.
    • Add diced potatoes or paneer cubes along with the green peas for an extra layer of flavor and texture.
    • Experiment with different spices and herbs to customize the dish according to your taste preferences.

    Benefits:

    • Green peas are a good source of vitamins, minerals, and fiber, making this dish not only delicious but also nutritious.
    • The spices used in this recipe, such as turmeric and cumin, are known for their anti-inflammatory and digestive properties.

    FAQs:

    Can I use canned peas instead of fresh or frozen ones?

    • While fresh or frozen peas are recommended for the best flavor and texture, you can use canned peas if that’s what you have on hand. Just make sure to drain and rinse them before adding them to the dish.

    Is this dish suitable for vegetarians and vegans?

    • Yes, this spicy green peas masala recipe is entirely plant-based and suitable for both vegetarians and vegans. Just make sure to use oil instead of ghee for a vegan-friendly version.

    Can I make this dish ahead of time?

    • Yes, you can prepare the spicy green peas masala ahead of time and store it in the refrigerator for a few days. Simply reheat it gently on the stovetop or in the microwave before serving.

    For more delightful recipes like this one, explore other offerings in Manjula’s Kitchen, such as Paneer Tikka Masala, Chole (Chickpea Curry), and Aloo Gobi (Potato Cauliflower).

  • Peanut Chaat

    Peanut Chaat

    Peanut Chaat

    Peanut Chaat

    Peanut Chaat is a combination of peanuts, tomatoes, cucumbers and spices. It is a delicious and satisfying snack-not to mention healthy and low-fat! It is easy to make. It can be served as an appetizer or anytime spicy snack.
    No ratings yet
    Course Appetizer, Chaat
    Cuisine Indian
    Servings 4 people

    Ingredients
      

    Ingredients:

    • 1/2 cup raw peanuts
    • 1/2+1/2 teaspoon salt adjust to taste
    • 1/8 teaspoon turmeric (haldi)
    • 3/4 cup tomatoes seeded cut in small cubes
    • 3/4 cup cucumber cut in small cubes
    • 1 tablespoon ginger finally chopped
    • 1 green chili finally chopped adjust to taste
    • 1/2 teaspoon roasted cumin seed powder (bhuna jeera)
    • 1/8 teaspoon red chili powder
    • 1/8 teaspoon black pepper
    • 1/4 teaspoon sugar
    • 1/2 teaspoon  mango powder (amchoor)
    • tablespoon lemon juice

    Instructions
     

    Method

    • In a sauce pan add peanuts with 2 cups of water turmeric and 1/2 teaspoon of salt. Cook over medium high heat for about 25 minutes until peanuts are soft.
    • Drain the water and let it cool to room temperature.
    • Mix ginger, chili, 1/2 teaspoon salt, cumin seed powder, red chili powder, black pepper, sugar, mango powder and lemon juice together.
    • Mix the peanuts with tomatoes and cucumbers, add the spice mix and toss.
    • Peanut Chaat is ready to serve.
    Tried this recipe?Let us know how it was!

    Peanut Chaat Recipe 

    Peanut chaat is a delightful appetizer that caters to various dietary preferences, offering a gluten-free and vegan option packed with high protein, yet low in fat, making it an ideal snack choice. Peanut chaat is a delightful and flavorful snack that is popular across India. This peanut chaat recipe combines the nuttiness of peanuts with the tanginess of various spices and chutneys, creating a mouthwatering dish that is perfect for any occasion. Here’s how to make peanut chaat at home.

    • Boiling the Peanuts: Begin by placing the peanuts in a saucepan. Add 2 cups of water, turmeric, and ½ teaspoon of salt. Bring the pot to a medium-high heat. Once boiling, reduce the heat slightly and simmer the peanuts for about 25 minutes. The key here is to cook the peanuts until they are tender and soft throughout. You can test for doneness by taking a peanut out and splitting it in half. If the center is firm, continue cooking for a few more minutes.

    • Cooling and Draining: Once the peanuts are cooked, drain the water from the pot using a colander. It’s important to drain the peanuts thoroughly to prevent a watery chaat. Spread the cooked peanuts on a plate or baking sheet to cool completely. This will take about 30 minutes to an hour, depending on the amount of peanuts. Cooling the peanuts is necessary before adding the other ingredients to ensure they don’t become soggy.

    • Making the Spice Mix: While the peanuts cool, prepare the flavor base for your chaat. In a separate bowl, combine grated ginger, chopped chili pepper (adjust the amount depending on your spice preference), ½ teaspoon of salt, cumin seed powder, red chili powder, black pepper, sugar, mango powder, and lemon juice. Mix all these ingredients into a fragrant and flavorful spice mix. This will be what brings the chaat to life!

    • Assembling the Chaat: Once the peanuts are cool, transfer them to a large mixing bowl. Add chopped tomatoes and cucumbers to the peanuts. Then, pour the prepared spice mix over the peanuts and vegetables. Using a spoon or spatula, gently toss everything together until well combined. This ensures each peanut gets a good coating of the flavorful spice mix.

    • Serving: Your Peanut Chaat is now ready to be enjoyed! Serve immediately for the freshest flavor and best textural contrast between the soft peanuts and the crisp vegetables. You can garnish with chopped fresh cilantro for an extra pop of color and freshness.

    Tips:  

    • You can customize the peanut chaat by adding other ingredients such as boiled potatoes, diced cucumber, or grated carrots for added texture and flavor.
    • For a healthier version, you can use roasted peanuts without any added salt or oil.
    • Adjust the spice levels according to your preference by increasing or decreasing the amount of red chili powder and green chilies.

    Variations: 

    • For a tangier flavor, drizzle some tamarind chutney or mint chutney over the peanut chaat before serving.
    • Experiment with different toppings such as pomegranate seeds, grated cheese, or yogurt for a unique twist on this classic snack.

    Benefits: 

    • Peanuts are a good source of protein, fiber, and essential nutrients such as vitamins and minerals, making peanut chaat a nutritious snack option.
    • This dish is vegetarian and gluten-free, making it suitable for individuals with dietary restrictions.

    FAQs: 

    Can I use pre-roasted peanuts for this recipe? 

    • Yes, you can use pre-roasted peanuts if you prefer. However, roasting the peanuts yourself adds an extra layer of flavor to the chaat.

    How long can I store peanut chaat? 

    • Peanut chaat is best enjoyed fresh but can be stored in an airtight container in the refrigerator for up to 2 days. However, keep in mind that the peanuts may lose their crunchiness over time.

    Can I make peanut chaat ahead of time?

    • While it’s best to assemble the chaat just before serving to maintain its freshness, you can prepare the ingredients in advance and assemble them when ready to serve.

    For more delicious Indian recipes, you can explore other recipes on Manjula’s Kitchen, such as Vegetable Pakoras, Aloo Tikki Chaat, and Pani Puri. These recipes are perfect for any occasion and are sure to impress your family and friends. Enjoy cooking!

  • Jaljeera Drink (Indian Flavored Lemonade)

    Jaljeera Drink (Indian Flavored Lemonade)

    Jaljeera Drink

    Jaljeera Drink (Indian Flavored Lemonade)

    Jaljeera is very refreshing drink. Best way to describe Jaljeera, Indian flavored lemonade. Jaljeera is a popular summer drink in India.
    5 from 2 votes
    Prep Time 5 minutes
    Cook Time 5 minutes
    Total Time 10 minutes
    Course Drinks
    Cuisine Indian
    Servings 4 people

    Ingredients
      

    • 1/4 cup packed chopped mint leaves podhina
    • 1/4 cup packed chopped cilantro hara dhania
    • 1 tbsp chopped ginger adrak
    • 1 tbsp cumin seeds dry roasted and powder bhuna jeera
    • pinch asafetida hing
    • 1 tsp salt
    • 1 tsp black salt
    • 3 tbsp lemon juice
    • 1 tbsp tamarind seedless imli
    • 2 tbsp sugar
    • 4 cups water
    • 1 cup crushed ice

    Instructions
     

    •  Blend all the spices into the paste using enough water needed to blend. Strain the spice mix and squeeze all the spicy water out. Discard the roughage. Add the water, mix it and serve over the ice.
    Tried this recipe?Let us know how it was!
  • Salted Mint Lassi (Salted Yogurt Drink)

    Salted Mint Lassi (Salted Yogurt Drink)

    Salted Mint Lassi

    Salted Mint Lassi (Salted Yogurt Drink)

    Lassi is a healthful yogurt-based drink, popular throughout India. Mint and ginger give it a tangy and refreshing taste. Mint Lassi is a great compliment to any meal, especially during summer.
    No ratings yet
    Course Beverages
    Cuisine Indian
    Servings 2 people

    Ingredients
      

    Ingredients:

    • 2 cups of yogurt (dahi, curd)
    • ¼ cup mint leaves (podina)
    • 1 teaspoon ginger juice*
    • ½ teaspoon salt
    • 1/4 teaspoon black salt (optional)
    • 1/8 teaspoon roasted cumin seed powder* (bhuna jeera)
    • Few mint leaves for garnishing
    • ½ cup of ice cubes

    Instructions
     

    Method

    • Blend mint  leaves with two tablespoons of yogurt to make a paste. Add yogurt, ginger  juice, salt, black salt, and one cup of water. Blend just enough to make the drink smooth; don’t over-blend as it will froth.
    • Pour it over ice cubes and garnish with roasted cumin seed powder and mint leave.
    • Lassi can be made one day in advance and refrigerated.

    Notes

    *Note:
    1. Making Ginger juice: shred the ginger using a fine grater or zester and squeeze the pulp using fingers.
    2. Roasting Cumin seeds: Toast cumin in a heavy skillet over medium heat, stirring frequently, until aromatic and brown in color. You can make a small jar of this in advance and keep it for couple of months. This is used in many recipes.
    Tried this recipe?Let us know how it was!
  • Masala Papad (Papad Salad)

    Masala Papad (Papad Salad)

    Masala Papad

    Masala Papad (Papad Salad)

    Crispy papad topped with spicy salad makes a very refreshing appetizer. Masala Papad is full of flavors and very tempting. This is a very simple and easy recipe to make.
    Papad is a round, flat, dry cracker made with a variety of lentils. They are sold uncooked in Indian grocery stores. You can deep-fry them or dry-roast them.
    No ratings yet
    Course Salad
    Cuisine Indian
    Servings 2 people

    Ingredients
      

    Ingredients:

    • 2 plain papad, (available in Indian grocery stores)
    • 2 medium tomatoes, seeded and diced very small to make a approx. 1cup
    • 1/2  English or deseeded cucumber, cut in very small pieces to make it about ½  cup
    • 2 tablespoons cilantro finely chopped
    • 1 teaspoon ginger finely shredded, optional
    • 1 green chili finely chopped, optional
    • ½ lemon
    • 2 teaspoon 2 teaspoon oil

    Spice Mix for Garnishing

    • 1/2 teaspoon salt
    • 1/4 teaspoon black salt
    • 1/2 teaspoon dry roasted cumin seeds powder
    • 1/8 teaspoon black pepper
    • Pinch red chili 

    Instructions
     

    Method

    • Mix all the dry ingredients to make a spice mix, set aside.
    • Mix tomatoes, cucumbers, cilantro, ginger, and green chili, set aside
    • Lightly oil the papads from both sides, set aside.
    • Preheat the skillet over medium high heat. Roast the papads on both sides in the skillet one at a time, pressing with spatula. The papads will change to a light yellow with a few brown spots. Be careful not to over-roast. Fold the Papads in quarters while they are hot, making triangles right on the skillet.
    • Remove the papads from the skillet and break on the folds, creating four triangles from each one.
    • Take one piece of papad and top it with cucumber, tomato, ginger, green chili, and cilantro. Drizzle with lemon juice and sprinkle the spice mix on top.

    Notes

    Notes
    1. Removing the seeds from the tomatoes keeps the papads crunchy.
    2. English cucumber is crisper on the outside and tender on the inside.
    3. You can prepare  the masala papad in advance, and add the toppings just before serving.
    Tried this recipe?Let us know how it was!

    Crunchy Delight: How to Make Delicious Masala Papad at Home 

    Masala Papad is a flavorful appetizer perfect for parties, offering a low-fat, vegan option that delights snack enthusiasts with its crunchy texture and spicy seasoning. Masala Papad is a delightful Indian appetizer that combines the crunchiness of papad with a burst of spicy, tangy flavors. If you’re wondering how to make masala papad, you’re in for a treat! This masala papad recipe brings together a harmonious blend of ingredients to create a dish that’s not only delicious but also incredibly easy to prepare at home. Let’s dive into the steps to prepare this mouthwatering delicacy.

    1. Making the Spice Mix:

    First, we’ll create a flavorful spice blend to add a kick to your masala papad. Gather all the dry ingredients like cumin, coriander powder, chili powder, and maybe even some chaat masala (a tangy and savory spice blend commonly used in Indian street food). In a bowl, carefully measure and combine these dry spices. Once everything is incorporated, set the bowl aside for later.

    2. Preparing the Veggie Topping:

    Next, we’ll create a refreshing and vibrant topping for the papad. Start by chopping the tomatoes, cucumbers, cilantro, ginger, and green chili. Aim for a fine chop to ensure even distribution on the papad. You can remove the seeds from the tomatoes if you prefer a drier topping, as the seeds can release moisture and make the papad soggy. After chopping, combine all the veggies in a separate bowl and set it aside with the spice mix.

    3. Oiling and Roasting the Papads:

    Now it’s time to prepare the base of our dish – the papad itself! Take each papad and lightly brush or drizzle a thin layer of oil on both sides. This will help them crisp up nicely during roasting. Once oiled, set the papads aside on a plate.

    4. Roasting and Folding the Papads:

    Heat up your skillet over medium-high heat. It’s important to have the pan hot enough to ensure the papads roast quickly and evenly. Carefully place one papad at a time in the hot skillet. Use a spatula to gently press down on the papad as it cooks. You’ll see the color change from its original white to a light yellow with a few brown spots. This is your cue to flip the papad and cook the other side. Be mindful not to overcook them, as they can become burnt and brittle. While the papad is still hot and pliable, fold it in half to create a semi-circle shape. Then, fold it in half again to form a small triangle. This folding technique not only creates a nice presentation but also helps cradle the toppings when assembled.

    5. Assembling and Serving the Masala Papad:

    Finally, it’s time to put everything together! Take one of the folded papad triangles and carefully break it along the folds to create four smaller triangles. Now you have a crispy base ready for the toppings. Place a dollop of the prepared vegetable mixture on each papad triangle. Don’t forget a squeeze of fresh lemon juice for a touch of tanginess! Lastly, sprinkle the reserved spice mix over the top for a burst of flavor.

    Tips for Perfect Masala Papad 

    Using English cucumbers is recommended for their crisp texture, but regular cucumbers will work too.
    You can prepare the masala papad in advance for a quick and easy snack. Just store the roasted papad triangles in an airtight container and assemble them with fresh toppings right before serving.

    Experiment with different toppings such as grated cheese, finely chopped bell peppers, or even crumbled paneer to create your own unique variations of masala papad.

    For a healthier alternative, opt for baked papads instead of the traditional fried ones.

    If you’re short on time, you can prepare the masala mixture in advance and store it in the refrigerator until ready to use.

    Variations of Masala Papad 

    Paneer Masala Papad: Top your papads with a spicy paneer mixture for a creamy twist on this classic recipe. Check out the recipe here.

    Corn Masala Papad: Add a sweet and savory element to your masala papad by incorporating corn kernels into the masala mixture. Find the recipe here.

    Schezwan Masala Papad: Give your masala papad an Indo-Chinese twist by drizzling it with spicy Schezwan sauce. Learn how to make Schezwan sauce here.

    Benefits of Masala Papad

    Masala papad is a low-calorie snack that’s perfect for those watching their weight.

    The combination of spices in masala papad aids digestion and stimulates the appetite.

    Papads are rich in dietary fiber, making them a healthy option for snacking.

    FAQs about Masala Papad 

    Can I make masala papad in advance? 

    Yes, you can prepare the masala mixture ahead of time and store it in an airtight container in the refrigerator. Simply assemble the papads right before serving.

    Can I use store-bought papads for this recipe? 

    Absolutely! Store-bought papads work just as well as homemade ones for making masala papad.

    Can I customize the spice level of masala papad? 

    Of course! Adjust the amount of green chilies and chaat masala according to your preference for spiciness.

    With these simple steps and tips, you’ll be able to whip up a batch of delicious masala papad that’s sure to be a hit at your next gathering or as a quick snack for yourself. Enjoy experimenting with different toppings and flavors to create your own signature version of this beloved Indian appetizer!

    Other Recipes on Manjula’s Kitchen

    If you’re looking to explore more Indian recipes, appetizers, beverages, and desserts, be sure to check out the following links on Manjula’s Kitchen. Here are some links to recipes on Manjula’s Kitchen official website: Paneer Tikka Masala Recipe, Chana Chaat (Spicy Chickpea Salad), Pav Bhaji (Spicy Vegetable Hash with Buns), Raj Kachori (Crunchy Chaat), Vegetable Biryani 

  • Matar (Matra) Chaat

    Matar (Matra) Chaat

    Matar Chaat

    Matar (Matra) Chaat

    This is a delicious spicy snack. Matar Ki Chaat can be served as a snack or as a main dish with Kulcha or Naan.
    No ratings yet
    Course Chaat
    Cuisine Indian
    Servings 4 people

    Ingredients
      

    Ingredients:

    • 1 cup matar, (light brown in color, they look almost like chick peas; available in Indian grocery stores)
    • 1 teaspoon salt (adjust to taste)
    • 1 teaspoon black salt (adjust to taste)
    • 1/4  teaspoon black pepper
    • 1/4  teaspoon sugar
    • 1 tablespoon cumin seed
    • 1 tablespoon coriander
    • 2 tablespoons ginger finely chopped
    • 2 small green chilies finely chopped, (adjust to taste)
    • 2 tablespoons tamarind pulp 
    • 1 tablespoon lemon juice

    For Garnishing

    • Few slices of lemon
    • 2 tablespoons ginger finely chopped
    • 2 green chilies finely chopped

    Instructions
     

    Method

    • Wash and soak matra in three cups of water overnight. After soaking matra will be about 2 1/2 times the volume of the original.
    • Dry roast the cumin seeds and coriander seeds separately, until they are brown and you can smell their aroma. Let them cool and grind to powder consistency.
    • Put the matra in a pressure cooker with 2½ cups of water. Add the salt, ginger, and green chili. Cook on medium high heat.
    • When the pressure cooker starts to steam, turn the heat down to medium and cook eight to nine minutes more.
    • Turn off the heat and wait until steam has stopped before opening the pressure cooker. Matra should be soft and tender.
    • Add all the spices; this is the time to adjust the salt and pepper to your taste. Mix the spices well. Add a little water if they look too dry, the gravy should be thick.
    • Serve warm garnish with ginger and green chili and lemon.
    Tried this recipe?Let us know how it was!

    Matar Chaat Recipe: Step-by-Step Guide to Homemade Delight 

    Stuffed Bell Peppers make for fantastic party recipes, offering quick & easy appetizers that are vegan, gluten-free, and low-fat, perfect for satisfying cravings with a delightful chaat-inspired twist, ideal for snacking. In this matar chaat recipe, we’ll explore the delightful flavors of this popular Indian street food. Matar chaat is a savory snack made with dried yellow peas, bursting with tangy, spicy, and sweet flavors. It’s a perfect dish to satisfy your cravings for something savory and delicious. This recipe offers a perfect blend of textures and tastes, making it a favorite among both kids and adults alike.

    Step 1: Soaking the Peas 

    To begin with this matar chaat recipe, the first step is to soak the dried yellow peas overnight or for at least 8 hours. Soaking helps to soften the peas, making them easier to cook and digest. It also reduces the cooking time significantly, ensuring that your chaat is ready in no time.

    Step 2: Cooking the Peas 

    Once the peas are soaked, drain the water and rinse them thoroughly. Then, transfer them to a pressure cooker or a large pot. Add enough water to cover the peas and some salt. Cook until the peas are tender but not mushy. Cooking time may vary depending on the type and freshness of the peas, but it usually takes around 15-20 minutes in a pressure cooker.

    Step 3: Preparing the Chaat 

    Once the peas are cooked, it’s time to prepare the chaat. Heat some oil in a pan and add cumin seeds. Let them splutter and then add finely chopped green chilies. Now, add some minced ginger and cook for a minute until the raw smell disappears.

    Step 4: Adding Spices 

    Next, add the cooked peas to the pan along with some chaat masala, red chili powder, amchur (dry mango powder), and a pinch of garam masala. Mix well until all the spices are evenly coated with the peas. Adjust the seasoning according to your taste preferences.

    Step 5: Serving the Matar Chaat 

    Once the matar chaat is ready, transfer it to a serving dish and garnish with freshly chopped cilantro leaves, chopped tomatoes, and a drizzle of tamarind chutney. You can also sprinkle some sev (crispy chickpea flour noodles) on top for an extra crunch. Serve hot and enjoy this flavorful matar ki chaat with your favorite beverages.

    Tips: 

    • You can customize this matar chaat recipe according to your taste preferences by adding ingredients like chopped cucumber, boiled potatoes, or pomegranate seeds.
    • To make it healthier, you can use olive oil instead of regular cooking oil.
    • Adjust the spice levels according to your preference. If you like it spicy, add more green chilies or red chili powder.

    Variations: 

    • For a creamy twist, you can add a dollop of yogurt or sour cream on top of the chaat.
    • If you’re vegan, you can skip the yogurt and use vegan yogurt or coconut cream instead.
    • Experiment with different toppings like grated cheese for added flavor and texture.

    Benefits: 

    • Matar chaat is a nutritious snack as it’s packed with protein and fiber from the yellow peas.
    • It’s also rich in vitamins and minerals, making it a healthy option for snacking.
    • The spices used in this chaat, such as cumin, ginger have various health benefits including aiding digestion and boosting immunity.

    FAQs: 

    Q: Can I use canned peas instead of dried peas?

    A: While canned peas can be used in a pinch, dried peas are preferred for this recipe as they have a better texture and flavor. If using canned peas, make sure to drain and rinse them well before cooking.

    Q: Can I make this chaat ahead of time?

    A: Yes, you can prepare the cooked peas and spice mixture ahead of time and store them in the refrigerator. When ready to serve, simply reheat the mixture and assemble the chaat with your desired toppings.

    Other Recipes on Manjula’s Kitchen

    If you’re looking to explore more Indian recipes, appetizers, beverages, and desserts, be sure to check out the following links on Manjula’s Kitchen. Here are some links to recipes on Manjula’s Kitchen official website:

    Paneer Tikka Masala Recipe

    Chana Chaat (Spicy Chickpea Salad) Recipe

    Pav Bhaji (Spicy Vegetable Hash with Buns) Recipe

    Raj Kachori (Crunchy Chaat) Recipe

    Vegetable Biryani Recipe

    These recipes should offer you a flavorful experience straight from Manjula’s Kitchen.

  • Stir Fry Collard Greens

    Stir Fry Collard Greens

    Stir Fry Collard Greens

    Stir Fry Collard Greens

    Stir-Fry Collard Green is a delicious healthy nutrient-packed dish. This appetizer dish compliment any meal.
    No ratings yet
    Course vegan
    Cuisine Indian
    Servings 5 people

    Ingredients
      

    Ingredients

    • About 8 collard green leaves or 4 cups sliced
    • 1 tablespoon oil
    • 1 teaspoon cumin seeds (jeera)
    • 4 whole red chilies
    • 1 teaspoon salt
    • 1/8 teaspoon black pepper
    • 1 teaspoon shredded ginger
    • 1 teaspoon lemon juice

    Instructions
     

    Method

    • Wash each leaves of collard greens thoroughly.
    • Collard greens have thick vein running in the center of the leaf. Make sure to cut the leaf from both sides of the vein.
    • Bunch the leaves together, roll them tightly and cut them crosswise in thin strip.
    • In a wide heavy pan heat the oil over medium heat. Add cumin seed. As seeds crack add red chilies and stir for a few seconds.
    • Next add collard green, salt and ginger and increase the heat to medium high. Stir–fry for 3-4 minutes. When the leaves are tender, turn off the heat.
    • Add black pepper and lemon juice over greens and stir. The collard greens are ready to serve.

    Notes

    Serving Suggestions
    1. Serve them as a side dish.
    2. Garnish the plain rice with Stir Fry Collard Greens; this gives a nice color and texture to rice.
    3. Take a toasted bagel or slice of bread spread the cream cheese and garnish with stir-fry collard green to make an open face sandwich.
    4. I also like to use them in grilled cheese sandwich.
    Tried this recipe?Let us know how it was!
  • Garden Fresh Tapas

    Garden Fresh Tapas

    Garden Fresh Tapas

    Garden Fresh Tapas

    This is a mildly spiced, refreshing and healthy appetizer. Tomatoes and cucumbers are filled with sprouted moong or flavored cream cheese. It makes an amazingly colorful finger food that is quick & easy to prepare and tastes incredible.
    5 from 1 vote
    Course Appetizer
    Cuisine Indian
    Servings 4 Garden Fresh Tapas

    Ingredients
      

    Ingredients:

    • 2 small firm tomatoes
    • 8-1/2 inch long English Cucumber pieces

    Sprout Topping

    • 1/4 cup moong sprouts
    • 1/2 teaspoon oil
    • ¼ teaspoon cumin seeds
    • 1 teaspoon minced ginger
    • 1/8 teaspoon black pepper
    • 1/4 teaspoon salt
    • Few drops of lemon juice
    • 1 tablespoon of water

    Cream Cheese Topping

    • 2 tablespoons cream cheese
    • ½ teaspoon minced ginger
    • 1/4 teaspoon salt
    • Pinch of black pepper
    • 1 teaspoon finely chopped cilantro or dill

    Instructions
     

    Method

    • Prepare Sprouts: In a small frying pan, heat the oil on medium heat. Add cumin seeds and as they crack add sprouts, ginger, black pepper and water. Cook for 2-3 minutes until sprouts are tender. Remove pan from heat. Add lemon juice, stir and set aside.
    • Prepare cream cheese topping by mixing all the ingredients. Set aside.
    • Cut tomatoes in half and scoop out the seeds creating hollow bowls.
    • Take cucumber slices and scoop out the seeds, creating small bowls.
    • Fill all tomatoes and 4 cucumber slices with moong sprouts.
    • Fill the remaining 4 cucumber slices with cream cheese filling.
    • Serve and enjoy!

    Notes

    How to make sprouts
    1. Soak the whole moong for 10 to 12 hours. Water should be about four times more than the Moong.
    2. After soaking moong, it will double in volume.
    3. Drain the water and loosely wrap the beans with the muslin or cheesecloth. Store the soaked beans in a warm dark place
    Tried this recipe?Let us know how it was!
  • Grilled Tofu Sandwich

    Grilled Tofu Sandwich

    Grilled Tofu Sandwich

    Grilled Tofu Sandwich

    These are absolutely delicious and flavorful sandwiches that are quick and easy to make. Tofu sandwiches are healthy and appropriate for Vegans, too. The Tofu provides a great source of protein, while the Hari Cilantro chutney brings in a unique ethnic flavor to the sandwich. These sandwiches make a great “to-go” lunch.
    No ratings yet
    Course sandwich
    Cuisine Indian
    Servings 2 sandwiches

    Ingredients
      

    Ingredients:

    • French rolls or sandwich rolls
    • 4-¼ inch thick firm tofu slices (tofu usually comes in 16oz blocks soaked in water and each of these will make approx. 12 slices)
    • 1 zucchini
    • slices of tomatoes
    • Few pieces of romaine lettuce
    • 2 tablespoons olive oil
    • ¼ cup Hari Cilantro Chutney
    • 2 teaspoons  sugar
    • About 1/8 teaspoon salt

    Instructions
     

    Method

    • Prepare sandwich ingredients: Slice tofu into ¼” thickness and pat dry. Wash and remove ends of zucchini, then cut lengthwise into approx. ⅛” thick slices. Wash and slice tomatoes. Set aside.
    • Mix Hari Cilantro Chutney and sugar, set aside.
    • Generously grease a flat skillet and bring to medium heat. Add tofu and zucchini slices and lightly sprinkle with salt. Grill on both sides until they are light-brown in color. Remove from skillet and wipe skillet clean.
    • Slice rolls lengthwise through the center and lightly spread with olive oil on the inside portion. Place on medium-heat skillet to toast. Turn off the heat.
    • Assemble the sandwich over the skillet: Turn over the roll and lightly spread Hari Cilantro Chutney on the bottom half of the roll. Layer with lettuce followed by tofu slices. Spread tofu with more chutney. Layer with zucchini followed by tomatoes. Cover with the top half of the roll.

    Notes

    Variation
    Yellow Squash, eggplant, or mushrooms also taste great in this sandwich.
    Tried this recipe?Let us know how it was!
  • Potato Skins / Potato Bowl Chaat

    Potato Skins / Potato Bowl Chaat

    Potato Skins

    Potato Skins / Potato Bowl Chaat

    Potato skins are boiled potatoes filled with spicy chickpeas. This is a mouthwatering snack, that looks great and tastes yummy. It is a delicious and healthy appetizer for the people who don’t like to have oily food.
    No ratings yet
    Course Chaat
    Cuisine Indian
    Servings 5 Potato Bowl Chaat

    Ingredients
      

    Ingredients:

    • 4 medium size red potatoes
    • 3 cups water
    • 1 tablespoon salt
    • 2 tablespoons oil

    Filling

    • 1/2 cup chickpeas
    • 1/2 teaspoon salt
    • 1/4 teaspoon black salt
    • 1/2 teaspoon roasted cumin
    • 1/2  teaspoon mango powder
    • 1/2 teaspoon garam masala
    • 1/4 teaspoon black pepper
    • 1 tablespoon finely shredded ginger
    • 1 tablespoon finely chopped green chili adjust to taste
    • 1 teaspoon lemon juice

    For Garnish

    Instructions
     

    Method

    • Wash the potatoes and slice them into halves.
    • Boil approximately 3 cups of water in a pan over medium high heat; add salt, oil and potatoes.
    • Cover and cook potatoes till they are tender, which will take approximately 20 minutes. Remove them from the water.
    • Once the potatoes are cool to touch, scoop out the insides from the center leaving ¼ inch thickness to outside of the potato. Red potato works best for this recipe because they hold their shape nicely.
    • Set potatoes aside.

    Filling

    • Soak chickpeas for at least 8 hours in 3 cups of water or more.
    • Boil the chickpeas in 1 ½ cup of water in a pressure cooker over medium high heat. As the pressure cooker begins to steam, lower    the heat to medium and cook for 6 minutes.
    • Add all the spices, mix well and cook for 3-4 minutes over low heat.
    • Spicy chickpeas should be a thick gravy-like consistency, not dry. As chickpeas cool they will absorb the water. Set aside.

    Assembling Potato Skin

    • Take each potato bowl and coat the inside with one teaspoon of Hari Cilantro Chutney.
    • Place 2 tablespoons of spiced chickpeas into the chutney coated bowl. Drizzle the top with tamarind chutney.
    • Serve warmed up or at room temperature.
    Tried this recipe?Let us know how it was!

    Potato Skins Recipe: A Delicious Appetizer for Any Occasion

    Potato skins, a beloved appetizer, can be transformed into a delectable snack that satisfies both vegan and gluten-free diets, offering a low-fat option perfect for those seeking a healthier indulgence, while still enjoying the savory crunch of chaat-inspired flavors. Potato skins are a classic appetizer loved by many for their crispy texture and delicious toppings. This potato skins recipe offers a simple yet flavorful way to enjoy this dish at home. Whether you’re hosting a party or simply craving a savory snack, learning how to make potato skins will surely impress your guests and satisfy your taste buds.

    Step 1: Preparing the Potatoes

    Start by scrubbing the potatoes thoroughly under running water to remove any dirt or debris. Since the skin plays a crucial role in this dish, ensure you choose potatoes that are uniform in size and free from blemishes. The ideal potatoes for potato skins are russets or Idaho potatoes, known for their starchy texture, which crisps up beautifully when baked.

    Step 2: Baking the Potatoes

    Once cleaned, prick the potatoes all over with a fork to allow steam to escape during baking. This prevents them from bursting open in the oven. Place the potatoes directly on the middle rack of a preheated oven and bake at 400°F for about 45-60 minutes or until tender when pierced with a fork. Baking the potatoes ensures they are cooked through while developing that desirable crispy texture in the potato skin.

    Step 3: Cooling and Halving the Potatoes

    After baking, allow the potatoes to cool for a few minutes until they are safe to handle. Then, carefully cut each potato in half lengthwise using a sharp knife. Use a spoon to scoop out the flesh, leaving about a quarter-inch layer attached to the potato skin. Reserve the scooped-out potato flesh for another use, such as mashed potatoes or potato soup, minimizing food waste.

    Step 4: Crisping the Potato Skins

    Return the hollowed-out potato skins to the oven, placing them cut side up on a baking sheet. Increase the oven temperature to 450°F and bake the potato skins for an additional 10-15 minutes or until they are golden and crispy. This step ensures that the potato skins develop a satisfying crunch, providing the perfect base for your toppings.

    Step 5: Adding Toppings

    Once the potato skins are crispy and golden brown, it’s time to add your favorite toppings. Popular options include shredded cheese and dollops of sour cream. Feel free to get creative with your toppings, experimenting with different combinations to suit your taste preferences. Return the topped potato skins to the oven for a few minutes to melt the cheese and heat up the toppings.

    Step 6: Serving and Enjoying

    Once the toppings are heated through and the cheese is melted and bubbly, remove the potato skins from the oven and transfer them to a serving platter. Garnish with additional chopped herbs, such as parsley or chives, for a pop of color and freshness. Serve the potato skins hot, alongside your favorite dipping sauces, and watch them disappear within minutes!

    Tips for Perfect Potato Skins

    For extra crispy potato skins, brush the hollowed-out shells with melted butter or olive oil before baking.

    To save time, you can prepare the potato skins in advance up to the point of baking them with the toppings. Simply cover and refrigerate the assembled potato skins until you’re ready to bake and serve.

    Get creative with your toppings! Try adding cooked ground beef or turkey, diced bell peppers, or jalapeños for a spicy kick.

    Variations of Potato Skins

    Vegetarian Option: Opt for vegetarian toppings such as sautéed mushrooms, diced tomatoes, and black olives.

    Loaded Potato Skins: Go all out with your toppings by adding a variety of ingredients such as chili con carne, guacamole, and salsa for a hearty and flavorful twist.

    Tex-Mex Potato Skins: Use Mexican-inspired toppings like shredded Mexican cheese blend, diced avocado, and a drizzle of chipotle mayo for a south-of-the-border flair.

    Benefits of Potato Skins

    Nutrient-Rich: Potato skins are a good source of fiber, vitamins, and minerals, including potassium and vitamin C. Leaving the skin on maximizes the nutritional benefits of this appetizer.

    Versatile: You can customize potato skins with your favorite toppings, making them suitable for various dietary preferences and occasions.

    Crowd-Pleaser: Whether served as an appetizer at a party or enjoyed as a snack while watching the game, potato skins are sure to be a hit with guests of all ages.

    Frequently Asked Questions (FAQs)

    Q: Can I make potato skins ahead of time?

    A: Yes, you can prepare the potato skins up to the point of adding the toppings, then cover and refrigerate them until you’re ready to bake and serve.

    Q: Can I freeze leftover potato skins?

    A: While it’s best to enjoy potato skins fresh, you can freeze any leftovers in an airtight container for up to 1-2 months. Reheat them in the oven until heated through before serving.

    Q: Can I use different types of potatoes for this recipe?

    A: While russet or Idaho potatoes are traditionally used for potato skins, you can experiment with other varieties such as Yukon Gold or sweet potatoes for a unique twist.

    Other Recipes on Manjula’s Kitchen

    If you’re looking to explore more Indian recipes, appetizers, beverages, and desserts, be sure to check out the following links on Manjula’s Kitchen. Here are some links to recipes on Manjula’s Kitchen official website:

    Paneer Tikka Masala Recipe

    Chana Chaat (Spicy Chickpea Salad) Recipe

    Pav Bhaji (Spicy Vegetable Hash with Buns) Recipe

    Raj Kachori (Crunchy Chaat) Recipe

    Vegetable Biryani Recipe

    These recipes should offer you a flavorful experience straight from Manjula’s Kitchen.


  • Kala Chana (Black Chana)

    Kala Chana (Black Chana)

    Kala Chana (Black Chickpea) Curry

    Kala Chana (Black Chana)

    Kala Chana is very high protein and provides a nutritional meal. It has a low glycemic index and is a good protein option for people with Diabetes. Kala Chana is a variation of the commonly found chickpea but it is dark brown in color and smaller in size. It is also known as Bengal gram. This recipe goes along nicely with rotis and rice.
    5 from 1 vote
    Course dal
    Cuisine Indian
    Servings 6 people

    Ingredients
      

    Ingredients:

    • 1 cup kala chana
    • 3 tablespoons oil
    • 1/8 teaspoon asafetida (hing)
    • 1 teaspoon cumin seeds (jeera)
    • 2 tablespoons gram flour (besan)
    • 1 tablespoon grated ginger
    • 1 green chili finely chopped
    • 2 tablespoons coriander powder (dhania)
    • ½ tablespoon turmeric (haldi)
    • ½ teaspoon red chili powder adjust to taste
    • 2 teaspoons salt adjust to taste
    • Approximately 1 teaspoon lemon juice
    • 1 tablespoon finely chopped cilantro (hara dhania) to garnish

    Instructions
     

    Method

    • Wash and soak kala chana in approx. 4 cups of water, for at least 6 hours. The kala chana will double in volume after soaking.
    • In a small bowl mix ginger, green chili, coriander powder, turmeric, and chili powder with ¼ cup of water. Set aside.
    • Heat oil in a pressure cooker over medium high heat. Test the heat by adding one cumin seed and if it cracks immediately, the oil is ready for cooking.
    • Add cumin seeds and as they crack, add asafetida and gram flour. Stir for few seconds. Add the mixed spices (step 2) and stir for another minute.
    • Add soaked kala chana, and 4 cups of water to the pressure cooker. Close the cooker. As it starts steaming, turn down the heat to medium and cook for approx. 12 minutes. If your pressure cooker whistles then wait for 4-5 whistles.
    • Turn off the heat and wait until all the steam has released before opening the pressure cooker.
    • Add salt and slightly press down on the Kala Chana to thicken the gravy, let it cook for 2-3 minutes on low heat. You can always adjust the consistency of the gravy by adding more water. Simmer for a few minutes after adding the water.
    • Stir in lemon juice and cilantro, just before serving. This goes very well with plain rice and makes for a complete meal.

    Notes

    Tip
    Kala Chana can also be prepared without a pressure cooker. Just remember to cook on medium heat for 50 minutes to an hour with the lid closed. Unlike other beans, Kala Chana holds its shape well even after cooking, so be sure to test if it has cooked all the way.
    Tried this recipe?Let us know how it was!

    Introduction to easy kala chana recipe

    Kala chana, also known as black chickpea, is a versatile legume widely used in Indian cuisine. This easy kala chana recipe is a flavorful and nutritious dish that can be enjoyed as a side or main course. Packed with protein, fiber, and essential nutrients, kala chana curry is not only delicious but also beneficial for your health as it is low fat, gluten free winter special. In this recipe, we’ll guide you through the process of making a delicious kala chana curry that will surely become a favorite in your kitchen.

    Step 1: Preparing the Kala Chana:

    Before you begin cooking, it’s essential to properly prepare the kala chana. Start by rinsing the black chickpeas under cold water to remove any dirt or debris. Then, soak them in water overnight or for at least 8 hours. This soaking process helps soften the chickpeas, reducing the cooking time and improving their texture. Once the kala chana are soaked, drain the water and they’re ready to be cooked.

    Step 2: Sauteing Aromatics:

    To infuse the kala chana curry with flavor, we’ll start by sautéing aromatics such as ginger. Next, add minced ginger, and cook for another couple of minutes until fragrant. The aroma of these ingredients will enhance the taste of the curry.

    Step 3: Adding Spices:

    Spices play a crucial role in Indian cooking, adding depth and complexity to dishes. In this kala chana recipe, we’ll use a blend of spices to create a rich and aromatic curry. Add ground cumin, coriander, turmeric, and garam masala to the ginger. Stir well to coat the aromatics with the spices, allowing them to toast slightly and release their flavors.

    Step 4: Cooking the Kala Chana:

    Now it’s time to add the soaked kala chana to the pan. Stir well to combine the chickpeas with the aromatic spice mixture. Then, pour in enough water to cover the chickpeas and bring the mixture to a boil. Once boiling, reduce the heat to low and let the curry simmer gently until the kala chana are tender. This may take about 45 minutes to an hour, depending on the freshness of the chickpeas.

    Step 5: Finishing Touches:

    Once the kala chana are cooked to perfection, it’s time to add the finishing touches to the curry. Taste and adjust the seasoning as needed, adding salt and any additional spices to suit your preference. You can also add a splash of lemon juice for a hint of acidity and freshness. Garnish the kala chana curry with freshly chopped cilantro leaves for a burst of color and flavor.

    Step 6: Serving the Kala Chana Curry:

    Your kala chana curry is now ready to be served! Spoon the hot curry into serving bowls and garnish with more cilantro leaves if desired. Serve the kala chana curry alongside steamed rice, naan bread, or roti for a satisfying meal. This hearty and nutritious dish is perfect for lunch or dinner, and leftovers can be stored in the refrigerator for a few days.

    Tips for Making the Perfect Kala Chana Curry:

    • Soaking the kala chana overnight helps reduce cooking time and improves texture.
    • Experiment with different spices and seasonings to customize the flavor of the curry to your liking.
    • For extra creaminess, you can add a splash of coconut milk or yogurt to the curry.
    • To make the dish spicier, add chopped green chilies or a pinch of cayenne pepper.

    Variations of Kala Chana Curry:

    • Spinach Kala Chana Curry: Add chopped spinach to the curry for a nutritious twist.
    • Coconut Kala Chana Curry: Stir in coconut milk for a creamy and indulgent curry.
    • Tomato Kala Chana Curry: Add diced tomatoes for a tangy flavor and vibrant color.

    Benefits of Including Kala Chana in Your Diet:

    • High in Protein: Kala chana is an excellent source of plant-based protein, making it a great option for vegetarians and vegans.
    • Rich in Fiber: The high fiber content of kala chana promotes digestive health and helps keep you feeling full and satisfied.
    • Packed with Nutrients: Kala chana is loaded with vitamins, minerals, and antioxidants that contribute to overall health and well-being.

    Frequently Asked Questions (FAQs) about Kala Chana Curry:

    Q: Can I use canned kala chana instead of dried chickpeas?

    A: Yes, you can use canned kala chana for convenience, but keep in mind that the texture and flavor may differ slightly from dried chickpeas.

    Q: Can I freeze leftover kala chana curry?

    A: Yes, you can freeze the curry in an airtight container for up to 3 months. Thaw in the refrigerator before reheating.

    Q: Is kala chana curry spicy?

    A: The level of spiciness can be adjusted according to your preference by controlling the amount of chili powder or green chilies added to the curry.

    For more delicious Indian recipes, visit Manjula’s Kitchen. Explore a variety of vegetarian dishes, snacks, desserts, and more to elevate your culinary skills and delight your taste buds.

  • Moong Dal Soup

    Moong Dal Soup

    Moong Dal Soup

    Moong Dal Soup

    This healthful vegan soup is high in protein. Made with split Moong dal and flavored with hari cilantro chutney, moong dal soup is flavorful yet simple and easy to make.
    No ratings yet
    Course dal, Soup
    Cuisine Indian
    Servings 4 people

    Ingredients
      

    For the Soup

    • 1 cup split yellow Moong dal, washed (available in Indian grocery stores)
    • 1 teaspoon salt
    • 1/4  teaspoon turmeric (haldi)
    • 3 cups water
    • Approximately 1/4 cup of Hari Cilantro Chutney

    For the Seasoning

    • 1 tablespoon oil
    • 1/2 teaspoon cumin seeds (jeera)
    • Pinch of asafetida (hing)

    For the Garnish (optional)

    • 1 tablespoon ginger, finely sliced
    • 1/8 teaspoon salt, adjust to taste
    • 1 teaspoon lemon juice

    Instructions
     

    Method

    • Wash the dal several times, until the water becomes almost clear.
    • In a medium pot combine the moong dal, turmeric, salt, and water. Cook over medium-high heat until it starts to boil. Remove the frothy foam that accumulates on the surface as the dal cooks.
    • Lower the heat to medium and cook for 15 to 20 minutes, until completely cooked and a little mushy. Stir occasionally and add more water if needed. Turn off the heat.
    • Puree the dal using a hand blender or regular blender. If needed, adjust the thickness of the dal by adding more boiled water. Mix well. The dal will thicken as it cools.
    • Add hari cilantro chutney to suit your taste.  The chutney gives the soup a fresh green appearance and a tangy flavor.

    Seasoning

    • Heat the oil in a small saucepan. Add cumin seeds and wait until the seeds crack. Add asafetida and turn off the heat.
    • Pour the mixture over the cooked soup.

    Garnish (optional)

    • Combine the ginger, salt and lemon juice. Marinate for at least a half hour.
    • Garnish with a few slices of marinated ginger.
    • Marinated ginger can be refrigerated for up to a week.

    Notes

    Time-saving Tip:
    To save time you may use a pressure cooker, as follows.
    1. In a pressure cooker add Moong dal, turmeric, salt, and water.  Close the cooker.
    2. Cook over medium-high heat until it starts to steam.  Lower the heat to medium and cook for 5 more minutes.
    3. Turn off the heat and let the steam escape before you open the pressure cooker.
    4. Puree the dal using a hand blender or regular blender. If needed, adjust the dal to your desired consistency by adding more boiled water.  Mix well.
    5. Add “Hari Cilantro Chutney” according to your taste.  The chutney will give a fresh green look to the soup and have a tangy flavor.
    Tried this recipe?Let us know how it was!

    How to make Yellow Moong al Soup with Vegetables

    Moong dal soup is a nutritious dish made from split mung beans, also known as moong dal. It is suitable for individuals with diabetes as it has a low glycemic index, meaning it doesn’t cause a rapid spike in blood sugar levels. Additionally, it is gluten-free, making it safe for those with gluten sensitivities or celiac disease.

    The soup is high in protein due to the lentils, making it a filling and satisfying meal option. It is also low in fat, which can be beneficial for those looking to manage their weight or reduce their fat intake.

    Moong dal soup is often prepared as a vegan dish, as it typically does not contain any animal products. It can be served as a standalone soup or paired with salads for a wholesome and nutritious meal. Overall, it’s a healthy option that aligns with various dietary preferences and requirements.

    Moong dal soup is a comforting and nutritious dish that is popular in Indian cuisine. Made from split mung beans, this soup is not only delicious but also packed with protein, fibre, and essential nutrients. In this easy moong dal soup recipe, we’ll guide you through the process of making a flavorful and hearty soup that is perfect for any occasion.

    Easy Moong Dal Soup: A Cozy and Flavorful Treat
    This recipe guides you through making a delicious and comforting moong dal soup, perfect for a quick and nourishing meal. Moong dal, also known as split mung beans, cooks quickly and offers a satisfying protein punch. Let’s get started!

    Prep Work (15 minutes): Clean the Dal: Rinse the moong dal thoroughly under cold running water to remove any dust or debris. Soaking the dal for 30 minutes to 1 hour is optional, but it helps them cook faster and become more tender.

    Flavor Builders: While the dal soaks (or if you choose to skip soaking), chop up some fresh ginger for that warming aroma. You can also add diced tomatoes and green chilies for a touch of sweetness and heat, depending on your preference.

    Cooking the Soup (30-40 minutes): Sautéing the Aromatics: Heat oil or ghee in a pot over medium heat. Once hot, add the chopped ginger and cook for a few minutes until fragrant. This fragrant base will form the foundation of your soup’s flavor.

    Spice Up Your Life: Now comes the magic! Add ground cumin, coriander, turmeric, and a pinch of asafoetida (if using) to the pot with the ginger. Stir everything well to coat the aromatics in the spices. Let them sizzle for a bit, releasing their wonderful aromas. Feel free to adjust the spice quantities based on your taste preference.

    Simmering the Dal: Add the soaked (or unsoaked) moong dal to the pot and stir to combine it with the flavorful spice mixture. Next, pour in enough water or vegetable broth to cover the dal completely. Bring the mixture to a boil, then reduce heat and simmer gently. Let it simmer until the dal is tender and cooked through.

    Creamy Option (optional, 5-10 minutes): Smooth Operator (Optional): If you prefer a creamy soup, let it cool slightly. Then, use an immersion blender or a regular blender (in batches) to achieve a smooth and velvety texture. Blend until you reach your desired consistency.

    Final Touches (5 minutes): Season to Perfection: Now’s the time to adjust the taste! Add salt and a squeeze of lemon juice (optional) to balance the flavors. You can also add more spices if needed.

    Fresh Finish: Garnish your soup with freshly chopped cilantro leaves for a pop of color and a refreshing touch.

    Serving Up Warmth (enjoy!):

    Ladle and Enjoy: Ladle the hot soup into serving bowls and garnish with additional cilantro, if desired. Pair your comforting bowl of moong dal soup with crusty bread, naan, or rice for a complete and satisfying meal. Enjoy this nourishing and delicious soup anytime you need a warm hug in a bowl!

    Tips for Making the Perfect Moong Dal Soup:

    • Soaking the moong dal helps reduce cooking time and improves texture.
    • Experiment with different spices and seasonings to customize the flavor of the soup to your liking.
    • For added richness, you can stir in a spoonful of coconut milk or cream towards the end of cooking.
    • If you prefer a chunkier soup, you can skip blending and leave some of the dal intact.

    Variations of Moong Dal Soup:

    • Vegetable Moong Dal Soup: Add diced carrots, peas, and spinach for a hearty and nutritious twist.
    • Spicy Moong Dal Soup: Increase the amount of green chilies or add red chili powder for extra heat.
    • Coconut Moong Dal Soup: Stir in coconut milk for a creamy and indulgent flavor.

    Benefits of Including Moong Dal Soup in Your Diet:

    • High in Protein: Moong dal is an excellent source of plant-based protein, making it ideal for vegetarians and vegans.
    • Rich in Fiber: The fiber content in moong dal aids digestion and helps maintain a healthy gut.
    • Low in Fat: Moong dal soup is low in fat and cholesterol, making it a heart-healthy option for all.

    Frequently Asked Questions (FAQs) about Moong Dal Soup:

    Q: Can I use other lentils instead of moong dal?

    A: Yes, you can substitute other lentils such as masoor dal or red lentils for moong dal in this recipe.

    Q: Can I make moong dal soup in advance?

    A: Yes, you can make the soup ahead of time and store it in the refrigerator for up to 3 days. Reheat gently on the stovetop or in the microwave before serving.

    Q: Is moong dal soup gluten-free?

    A: Yes, moong dal soup is naturally gluten-free, making it suitable for those with gluten intolerance or celiac disease.

    For more delicious Indian soup recipes, visit Manjula’s Kitchen. Explore a variety of vegetarian soups, appetizers, main courses, and desserts to delight your taste buds and impress your family and friends.

  • Gajar Matar (Carrots With Green Peas)

    Gajar Matar (Carrots With Green Peas)

    Gajar Matar

    Gajar Matar (Carrots With Green Peas)

    Gajar Matar is a healthy and quick & easy recipe to make. This mildly spiced, colorful dish can compliment just about any meal.
    5 from 1 vote
    Course Dessert
    Cuisine Indian
    Servings 4 people

    Ingredients
      

    Ingredients

    • 2 cups carrots diced in about 1/2 inch pieces
    • 1 cup potato cubed in about ½ inch pieces
    • 1 cup green peas
    • 2 tablespoons oil
    • 1 teaspoon carom seeds (ajwain)
    • 4 whole red chilies
    • 1 tablespoon coriander powder (dhania)
    • 1/2  teaspoon turmeric (haldi)
    • 1 teaspoon salt
    • 1 teaspoon lemon juice

    Instructions
     

    Method

    • Heat the oil in a saucepan, on medium heat.Add carom seeds.   The oil should NOT be very hot as the carom seeds will burn and lose their flavor.
    • Add whole red chilies and turmeric and stir for a few seconds.
    • Add carrots, potatoes, green peas,  coriander powder, and salt.  Mix well.
    • Cover the pan and let it cook on medium heat for 10 minutes until the vegetables are tender. Stir occasionally. Turn off the heat when done.
    • Add the lemon juice and stir.
    • Serve hot.
    Tried this recipe?Let us know how it was!

  • Lauki Chana Dal (Bottle Gourd, Ghiya, Doodhi)

    Lauki Chana Dal (Bottle Gourd, Ghiya, Doodhi)

    Lauki Chana Dal

    Lauki Chana Dal (Bottle Gourd, Ghiya, Doodhi)

    Lauki Chana Dal is is a healthful, wholesome lentil and vegetable main course dish. Having a low glycemic index, it is especially good for diabetics.
    5 from 1 vote
    Prep Time 5 minutes
    Cook Time 20 minutes
    soaking dal 30 minutes
    Total Time 25 minutes
    Course Main Course
    Cuisine Indian
    Servings 3 people

    Ingredients
      

    • 1 medium bottle gourd (laucki, ghiya, doodhi)
    • 1/2 cup yellow split gram (chana dal)
    • 2 tbsp oil
    • 1/2 tsp cumin seeds jeera
    • 1/8 tsp asafetida hing
    • 2 whole red chilies
    • 1 tsp ginger shredded adrak
    • 1/4 tsp turmeric haldi
    • 1/2 tsp chili powder, adjust to taste
    • 1 tsp salt
    • 1/2 tsp garam masala
    • 1 tsp mango powder amchoor
    • 2 tbsp cilantro finely chopped hara dhania
    • 1 cup water used as needed

    Instructions
     

    • Wash and soak chana dal for one hour or more.
    • Peel and wash laucki (bottle gourd). Cut into half-inch cubes.
    • Heat the oil in a saucepan. Test the heat by adding one cumin seed to the oil; if the seed cracks right away, the oil is ready. Add the cumin seeds. When seeds start to crack, add the asafetida and whole red chilies. Stir for a few seconds. Add ginger, turmeric, and chili powder and stir for a few seconds.
    • Add the chana dal, bottle gourd, salt, and one cup of water (adjust as needed to desired gravy thickness; bottle guard varies in moisture content).
    • Cook the chana dal until soft. About fifteen minutes. Turn off the heat and add the mango powder, garam masala, and cilantro. Stir and cover the pan for a few minutes before serving.

    Notes

    Serving suggestion
    Serve with roti (whole wheat flat bread), paratha (flat bread), or plain rice.
    Variations
    Mango powder can be replaced with lemon juice.
    Add two tablespoons dry fenugreek leaves or two tablespoons of fresh chopped fenugreek leaves when adding the bottle gourd.
    Tried this recipe?Let us know how it was!

    Introduction to Lauki Chana Dal

    Lauki Chana Dal, also known as bottle gourd with split chickpeas, is a nutritious gluten free and flavorful dish that is popular in Indian cuisine. This wholesome recipe combines tender bottle gourd (lauki) with protein-rich split chickpeas (chana dal) to create a comforting and satisfying dish. In this Lauki Chana Dal recipe, we’ll show you how to make this delicious sabzi (vegetable dish) step by step, so you can enjoy its goodness at home.

    Step 1: Preparing the Ingredients:

    To start, gather all the necessary ingredients for making Lauki Chana Dal. Rinse the chana dal under cold water and soak it for a few hours or overnight to soften. Meanwhile, peel the bottle gourd and chop it into small cubes. Finely chopped tomatoes, green chilies, garlic, and ginger. Having all the ingredients prepped and ready will make the cooking process smoother.

    Step 2: Cooking the Chana Dal:

    In a pressure cooker or a pot, add the soaked chana dal along with water, turmeric, and salt. Pressure cook or simmer until the dal is soft and cooked through. Cooking the dal separately ensures that it’s tender and retains its shape when combined with the other ingredients later. Once the dal is cooked, set it aside while we prepare the rest of the dish.

    Step 3: Tempering the Spices:

    In a separate pan, heat ghee or oil over medium heat. Add cumin seeds and let them splutter. Next, add ginger, followed by chopped green chilies. Sauté until the raw aroma of the spices disappears and the mixture becomes fragrant.

    Step 4: Adding the Bottle Gourd:

    Once the spices are tempered, add the chopped bottle gourd to the pan. Stir well to coat the gourd pieces with the aromatic spices. Cook the bottle gourd for a few minutes until it starts to soften slightly. The gentle cooking process allows the flavors to meld together, resulting in a delicious and well-balanced dish.

    Step 5: Combining with Chana Dal:

    Now, add the cooked chana dal to the pan with the bottle gourd and spices. Stir gently to combine all the ingredients. Allow the mixture to simmer for a few more minutes, allowing the flavors to mingle and the bottle gourd to cook through completely. Adjust the seasoning with salt and add a pinch of garam masala for extra flavor if desired.

    Step 6: Finishing Touches:

    Once the Lauki Chana Dal is cooked to perfection, garnish it with freshly chopped cilantro leaves for a burst of freshness and color. You can also squeeze a bit of lemon juice over the dish to enhance its flavor. Serve the Lauki Chana Dal hot with steamed rice or roti for a wholesome and satisfying meal.

    Tips for Making Perfect Lauki Chana Dal:

    • Soak Chana Dal: Soaking the chana dal beforehand helps reduce cooking time and ensures that it cooks evenly.
    • Don’t Overcook Bottle Gourd: Be careful not to overcook the bottle gourd, as it can become mushy. Cook until it’s tender but still retains its shape.
    • Adjust Spice Level: Customize the spice level according to your preference by adjusting the amount of green chilies or adding red chili powder.

    Variations of Lauki Chana Dal:

    • Lauki Chana Dal Curry: Add coconut milk or tomato puree to create a creamy curry version of the dish.
    • Spicy Lauki Chana Dal: Increase the amount of green chilies or add dried red chili flakes for extra heat.
    • Lauki Chana Dal Soup: Blend the cooked ingredients with some vegetable broth to create a hearty and nutritious soup.

    Benefits of Including Lauki Chana Dal in Your Diet

    • Rich in Protein: Chana dal is an excellent source of plant-based protein, making Lauki Chana Dal a nutritious option for vegetarians and vegans.
    • High in Fiber: Both chana dal and bottle gourd are rich in fiber, which aids digestion and helps keep you feeling full and satisfied.
    • Loaded with Vitamins and Minerals: Lauki Chana Dal is packed with essential nutrients such as vitamin C, vitamin B6, iron, and potassium, contributing to overall health and well-being.

    Frequently Asked Questions (FAQs) about Lauki Chana Dal:

    Q: Can I use other lentils instead of chana dal?

    A: Yes, you can use other lentils such as masoor dal or moong dal if you prefer. Keep in mind that cooking times may vary.

    Q: Can I make Lauki Chana Dal ahead of time?

    A: Yes, Lauki Chana Dal can be made ahead of time and stored in the refrigerator for up to 3 days. Reheat gently on the stovetop before serving.

    Q: Is Lauki Chana Dal gluten-free?

    A: Yes, Lauki Chana Dal is naturally gluten-free, making it suitable for those with gluten intolerance or celiac disease.

    For more delicious Indian vegetable recipes, visit Manjula’s Kitchen. Explore a variety of vegetarian dishes featuring seasonal vegetables, lentils, and spices to add variety and flavor to your meals.