Kid-Friendly Vegetarian Recipes: Delicious Indian Food for Kids
Finding recipes that are both nutritious and appealing to kids can be challenging. Indian cuisine offers a variety of vegetarian recipes for kids that are both delicious and easy to prepare. Whether you’re looking for vegetarian kid-friendly recipes, Indian food for kids, or specific Indian recipes for kids, Manjula’s Kitchen provides an extensive collection of dishes to suit every palate. Let’s explore some fantastic recipes that will make mealtimes enjoyable for your little ones.
Classic Vegetarian Recipes for Kids
Aloo Paratha
Aloo Paratha is a popular Indian flatbread stuffed with spiced mashed potatoes. This dish is a classic example of vegetarian recipes for kids that are both hearty and satisfying. Serve it with yogurt and a bit of butter for a complete meal. The soft texture and mild spices make it appealing to children.
Paneer Butter Masala
Paneer Butter Masala is a rich and creamy curry made with paneer (Indian cottage cheese) cooked in a tomato and cream sauce. This dish is a favorite among vegetarian kid-friendly recipes. Serve it with naan or jeera rice to make it a meal your kids will love.
Easy Indian Food for Kids
Vegetable Pulao
Vegetable Pulao is a fragrant and flavorful rice dish cooked with a variety of vegetables and mild spices. This dish is perfect for kids who enjoy rice. It’s a nutritious and delicious option in the category of vegan Indian food for kids. The colorful vegetables make it visually appealing as well.
Chole (Chickpea Curry)
Chole is a mild chickpea curry that is both tasty and nutritious. This dish is ideal for those looking for easy indian vegetarian recipes for kids. Serve it with rice or roti for a wholesome meal. The soft texture of chickpeas makes it easy for kids to eat and enjoy.
Healthy Vegetarian Kid-Friendly Recipes
Moong Dal Khichdi
Moong Dal Khichdi is a simple and healthy dish made with rice and split yellow lentils. It’s one of the best vegetarian kid-friendly recipes as it is easy to digest and packed with nutrients. This dish can be served with a dollop of ghee and a side of yogurt.
Palak Paneer
Palak Paneer is a nutritious dish made with spinach and paneer. It’s a great way to introduce leafy greens to your child’s diet. This dish is a fantastic example of vegetarian Indian recipes for kids that are both healthy and delicious. Serve it with chapati or rice.
Quick and Simple Indian Recipes for Kids
Besan Chilla
Besan Chilla, or chickpea flour pancake, is a quick and easy option that fits well within vegetarian recipes for kids. Made with chickpea flour and a variety of vegetables, this dish is a nutritious choice. It can be enjoyed with a side of green chutney and is perfect for breakfast or a snack.
Masala Dosa
Masala Dosa is a thin, crispy crepe made from fermented rice and urad dal batter, filled with a spiced potato mixture. This dish is a favorite in Indian food for kids. The crispy exterior and soft filling make it a hit with children. Serve it with coconut chutney and sambar.
Snacks and Appetizers for Kids
Samosas
Samosas are crispy pastries filled with spiced potatoes and peas. This snack is a favorite among vegetarian Indian recipes for kids and is perfect for lunchboxes or as an after-school snack. Serve them with tamarind or mint chutney for added flavor.
Pakoras
Pakoras are deep-fried fritters made with vegetables like spinach, potatoes, and cauliflower. This snack is a popular item in the vegetarian kid-friendly recipes category and is perfect for tea-time or as an appetizer. Serve pakoras with a side of green chutney.
Sweet Indian Recipes for Kids
Gulab Jamun
Gulab Jamun are soft, deep-fried balls made from khoya (dried milk) soaked in a sweet syrup flavored with cardamom and rose water. This dessert is a staple in traditionalIndian food for kids and is often enjoyed during festivals and special occasions. The melt-in-your-mouth texture and sweet flavor make it a favorite among many.
Kheer
Kheer is a creamy rice pudding flavored with cardamom and garnished with nuts and raisins. This dessert is a classic in north indian vegetarian recipes for kids and is easy to prepare. Kheer is a perfect ending to any meal and is often enjoyed during celebrations.
Elevating Your Kid-Friendly Menu
To elevate your kid-friendly menu, consider adding dishes from various categories that enhance these vegetarian recipes for kids. Including Indian snacks like samosas and pakoras can introduce a variety of flavors and textures.
For a sweet finish, explore Indian desserts such as gulab jamun and kheer. Offering nutritious recipes like moong dal khichdi and palak paneer can provide lighter meal options.
Planning a kids’ party? The popular party recipe category offers numerous dishes that are sure to delight your young guests and make your celebration unforgettable. Incorporating North Indian recipes like aloo paratha or paneer butter masala can bring an authentic touch to your meal.
Frequently Asked Questions (FAQs)
Q: What are some popular vegetarian recipes for kids?
A: Some popular vegetarian recipes for kids include Aloo Paratha, Paneer Butter Masala, Vegetable Pulao, Chole, Moong Dal Khichdi, Palak Paneer, Besan Chilla, Masala Dosa, Samosas, Pakoras, Gulab Jamun, and Kheer. These dishes are flavorful, nutritious, and perfect for children.
Q: How can I make traditional Indian food suitable for kids?
A: To make traditional Indian food suitable for kids, try recipes like Aloo Paratha, Paneer Butter Masala, and Moong Dal Khichdi. These recipes are mild in spices and easy to eat, making them perfect for children.
Q: What are some easy Indian recipes for kids?
A: Some easy Indian recipes for kids include Besan Chilla, Masala Dosa, Vegetable Pulao, and Samosas. These dishes are quick to prepare and provide the necessary nutrients for growing children.
Q: Can I prepare Indian recipes for kids in advance?
A: Yes, many Indian recipes for kids can be prepared in advance and stored. Dishes like Vegetable Pulao and Chole can be made ahead of time and refrigerated, while snacks like Samosas and Pakoras can be prepped and frozen.
Q: What are some healthy vegetarian kid-friendly recipes?
A: Some healthy vegetarian kid-friendly recipes include Moong Dal Khichdi, Palak Paneer, Besan Chilla, and Vegetable Pulao. These dishes are nutritious, mild in flavor, and perfect for maintaining a healthy diet for kids.
Conclusion
Vegetarian recipes for kids are a celebration of diverse flavors and nutritious ingredients. Whether you’re looking for vegetarian kid-friendly recipes, Indian food for kids, or specific Indian recipes for kids, these dishes will bring variety and flavor to your meals. So, gather your ingredients, try out these recipes, and enjoy the rich and diverse world of Indian food for children. Happy cooking and happy eating!
By incorporating these dishes into your menu, you’ll be able to enjoy a wide variety of delicious and nutritious foods that your kids will love. Whether you’re looking for snacks, main courses, or desserts, there’s a vegetarian recipe for kids to suit every taste. Don’t forget to check out Manjula’s Kitchen for more inspiration and culinary delights. Happy cooking and happy eating!
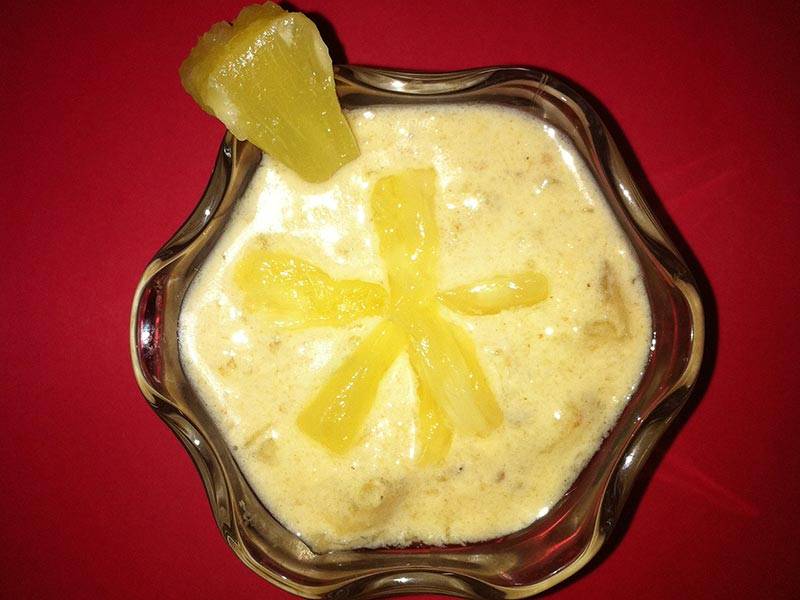
Pineapple Kheer is a very refreshing dessert made with ripened Pineapple (annanas). It is a nice healthy recipe with use of fruit and sugar can be added as per your taste and diet.
14oz Pineapple chunks in pineapple juice (1 1/2 cans)
4 Tbsp Coconut powder (finely shredded coconut)
1 Tbsp Corn flour
3/4 Cup Sugar
Instructions
Method
Boil the milk in a heavy bottom wide pan on medium high heat. Stir often to make sure the milk does not burn in the bottom of the pan. Cook until the milk is reduced to about half of its original volume.
Mix well 1 tablespoon Corn flour in 4 table spoons of water and add this in the milk, also add Coconut powder 4 table spoons in the milk and cook the milk for another 10 minutes on low heat. Then turn off the heat and let the milk cool down.
Drain 1 can pineapple using strainer let the juice dripped through without squeezing. Note: we will use juice and pineapple both.
Cut each chunk of pineapple in about 3 to 4 small pieces.
In a pan put all the pineapple juice drained from 1 can, add ¾ cup sugar and the pineapple pieces and cook on medium heat for about 30 minutes: until the pineapple pieces become soft and translucent.
Then from another pineapple can, take out half of pineapples and half of its juice- blend it blender. Add this in the cooked pineapple mixture and cook for additional 10 minutes. Then turn off the heat.
Let pineapple mixture come down to room temperature.
Once both the milk and pineapple mixture are cooled down, add the pineapple mixture in the milk and stir gently.
Serving Suggestion
Keep in the refrigerator for at least one hour before serving the desert. You can use the remaining half of pineapple chunks to decorate the kheer making floral patterns and any other way you might like.
Notes
TipsMix pineapples in the milk when both the milk and pineapples are on room temperature or cold.
Banana Puries are delicious fried Indian puffed bread. Puries have richness of banana flavor enhanced with cardamom. Banana Puries are good for festive occasions and holidays. These can be served for breakfast or as a snack. Puries are especially good for picnic or to take for travel.
Peel and mash the banana, add the sugar, almond, butter, salt and cardamom mix it well. Add whole-wheat flour and all-purpose flour to the banana mix and make a firm and smooth dough. Keep it aside for about 2 hours.
Grease the fingers and knead the dough for a minute and divide in four equal parts
Roll them into 8” diameter and cut them in about 2” diameter, using a cookie cutter.
Heat the oil in a frying pan on medium heat. To check the heat if oil is ready put one piece of dough in oil, dough should sizzle and come up slowly.
Fry the puries few at a time don’t over crowd the frying pan. Puries will puff and fry them till they are dark brown from all around. It will take about 2 minutes to fry every batch.
Take them out over paper towel so it can absorb the extra oil.
Notes
Notes:This is good recipe for vegan by replacing the butter with oil. Puries can be served hot or eaten at room temperature. Banana Puries can be stored for a week; you don’t need to refrigerate them.
Summer is the best time for frozen treats and there is nothing better than ice cold Popsicle. These Popsicles are made with fresh fruits. This is a kid’s friendly recipe. This recipe is for two different fruit flavored Popsicles, orange and strawberry.
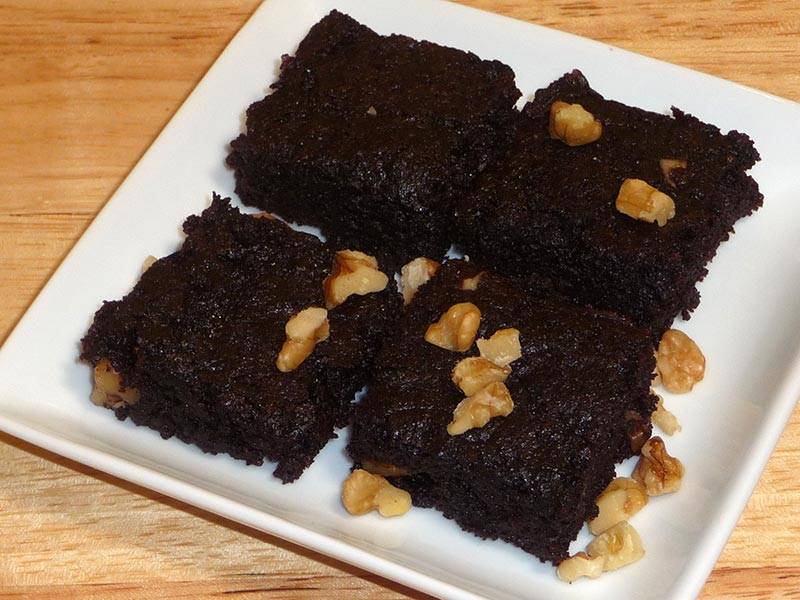
This is a great recipe to satisfy your and your kid’s sweet tooth. Your family and guests will appreciate a dessert tray filled with chocolate brownies. These brownies are very moist and have a deep chocolate flavor its a sweet snack loved by all.
Preheat the oven to 350 degree F/180c. Grease the 8×8-baking pan.
Mix the tofu until it is smooth.
Mix flour, salt and baking soda, set aside.
In a mixing bowl stir together the oil, cocoa powder and sugar until its well blended. Then stir in the mixed tofu and vanilla.
Add the flour mix and once its well-mixed, then fold-in walnuts.
Pour the mixture into a greased baking pan evenly and bake it for 25 to 30 minutes. Place the pan on the middle oven tray.
Once the brownies are baked, let them cool to room temperature before cutting the brownies into squares. Cutting too early will make the brownies to crumble.
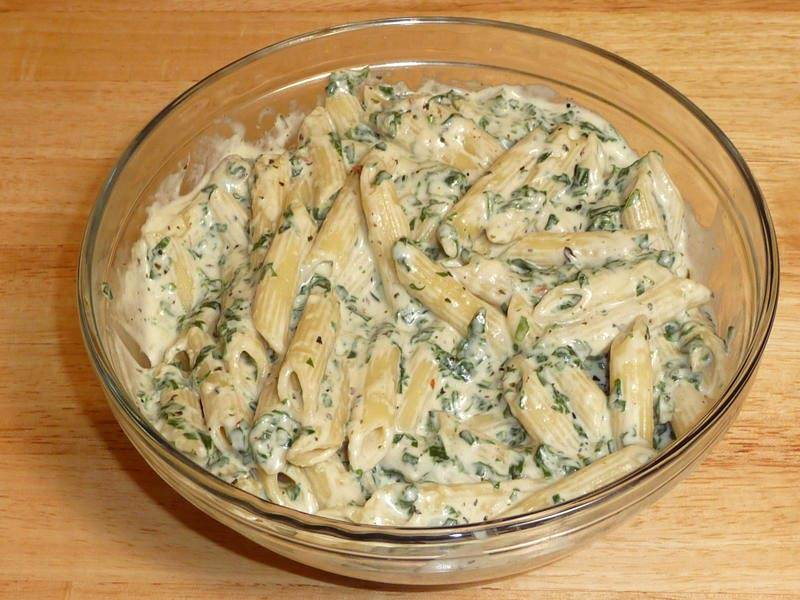
This is a delicious pasta dish with fresh spinach and rich white sauce. It is my version of fettuccini alfredo. Creamy spinach pasta looks and tastes great. Its a nice vegetarianappetizer.
6 ozchopped spinach, just the leaves, about 2 cups
Instructions
Bring a large pot of water to boil, add salt and oil. After water boils add the pasta.Cook the pasta until it is tender this will take about 10 minutes. Drain the water and set pasta aside.
Heat the oil over medium heat and add all-purpose flour, then stir for a minute. Add basil, Italian herb mix, black pepper, and chili flakes, and stir for another minute.
While stirring slowly add cream making sure there are no lumps. After it comes to a boil, add milk then bring it to a boil again.
Add spinach, mix it well and let it cook for 2-3 minutes stirring continuously, then turn off the heat. Add Mozzarella cheese and stir.
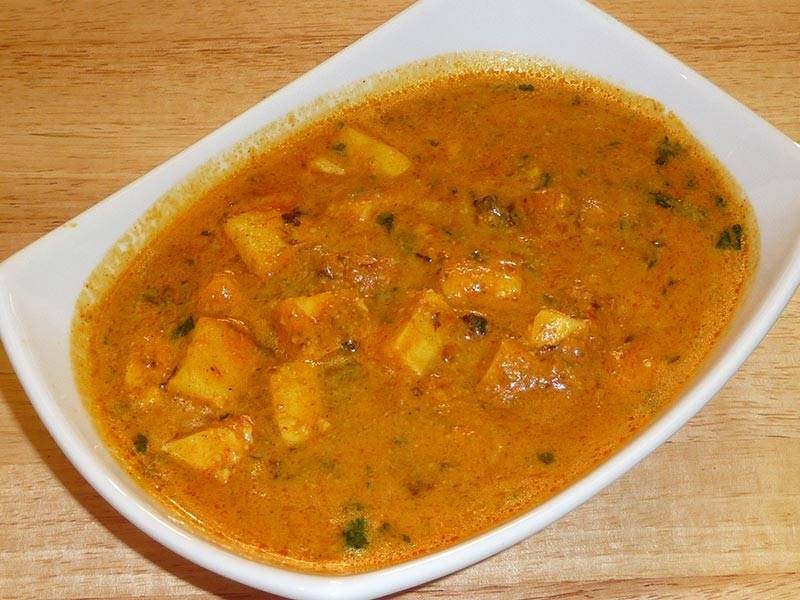
Shahi Paneer is a very festive main dish that is creamy and rich in flavor. It is usually a special occasion dish. Shahi paneer can be served with any Indian bread, such as naan or with rice.
Grind cashews into powder-like consistency. Keep aside.
Puree tomatoes, green chili and ginger. Keep aside.
Add oil in a pan, over medium heat. Shallow fry paneer cubes till they turn slightly brown. Remove from pan and place over paper towels to absorb excess oil.
Increase heat to medium-high and test the oil by adding one cumin seed. If it cracks immediately, the oil is ready. Add cumin seeds to the oil and as they crack, add asafetida and bay leaves. Stir for a few seconds.
Add tomato puree, coriander powder, turmeric, red chili powder, and paprika. Cook the mixture, stirring occasionally for 2-3 minutes. It will reduce to half its volume and start separating from the oil.
Add sugar, cashew powder and yogurt. Cook for another minute then add 1 cup of water and salt and bring to boil.
Add paneer and cover the pan. Simmer for a few minutes over medium-low heat, till gravy is slightly thick in consistency.
Remove from heat, add garam masala and chopped cilantro. Mix gently, cover the pan and let it sit for a couple of minutes. Shahi paneer tastes best if it is served hot.
Notes
Serve Shahi Paneer with Naan, or over the Jeera Rice
Keyword Creamy Cashew Gravy, Kid Friendly, Party Dish
Shahi Paneer is a delightful and gluten-free culinary creation, offering a rich and creamy gravy that is not only a treat for the taste buds but also is kids friendly as its a hit among kids too. This regal dish is characterized by its luxurious texture and flavorful combination of paneer, creating a harmonious blend that appeals to both young and adult palates. Its festive dish made on special occasions and would be a great addition to parties and gatherers as a party recipe.
Dicing the Paneer:
Grab your paneer and a sharp knife. Cut the paneer into cubes that are about the size of a large grape or ¾ of an inch each. It’s okay if they’re not perfectly uniform, but similar-sized pieces will cook more evenly. Set the cut paneer aside in a bowl for now.
Grinding the Cashews:
Take your cashews and grind them up into a fine powder using a mortar and pestle, a spice grinder, or even a food processor if you have one. You want them to be like a smooth, nutty dust. Once they’re ground, store them in a separate bowl for later.
Making the Tomato-Ginger-Chili Paste:
Grab your tomatoes, green chili, and ginger. If you prefer a milder dish, you can remove the seeds from the chili before chopping. Finely chop all three ingredients. You can use a blender or food processor to make things easier. Blend them together until you have a smooth, thick paste. Set this paste aside in a bowl with the other ingredients.
Pan-Frying the Paneer:
Pour some oil into a pan and heat it up over medium heat. You want the oil to be hot but not so hot that it starts to smoke. When the oil is ready, gently add the paneer cubes to the pan. Carefully fry the paneer cubes, turning them occasionally, until they turn a light golden brown on all sides. This will take a few minutes. Once they’re browned, take the paneer out of the pan with a spoon and place them on a paper towel-lined plate. The paper towels will soak up any excess oil.
Tempering the Oil and Adding Spices:
Now, increase the heat to medium-high. To test if the oil is hot enough, take a single cumin seed and toss it in the oil. If it sizzles right away, the oil is ready. If it doesn’t sizzle, wait a little longer before testing again. Once the oil is hot, add the cumin seeds. As the cumin seeds crackle, add a pinch of asafetida (if using) and a few bay leaves. Sauté these spices for a few seconds, stirring them constantly, until they release their aroma.
Cooking the Tomato Masala:
Add the tomato-ginger-chili paste you made earlier to the pan with the spices. Next, sprinkle in the coriander powder, turmeric, red chili powder, and paprika. Stir everything together and cook the mixture over medium heat for 2-3 minutes, stirring occasionally. You’ll notice the mixture will start to reduce in volume and thicken up as it cooks. It may even separate a little from the oil around the edges of the pan. That’s okay!
Adding Sweetness and Creaminess:
Now, it’s time to add a touch of sweetness and creaminess to the sauce. Sprinkle in some sugar and add the ground cashew powder you made earlier. Stir this in and cook for another minute. Then, pour in one cup of water and add salt to taste. Bring the mixture to a boil.
Simmering the Paneer in the Masala:
Carefully add the pan-fried paneer cubes back into the pan with the simmering tomato masala. Gently stir everything together to coat the paneer in the sauce. Cover the pan with a lid and reduce the heat to medium-low. Let the paneer simmer for a few minutes, until the gravy thickens slightly and becomes a nice consistency.
Finishing Touches:
Once the paneer is cooked through and the gravy has reached your desired consistency, turn off the heat. Now, sprinkle in some garam masala and chopped fresh cilantro. Gently fold these ingredients into the dish without over stirring. Cover the pan again and let it sit for a couple of minutes. This allows the flavors to meld together.
Serving Up the Shahi Paneer:
Your Shahi Paneer is now ready to be enjoyed! For the best flavor, serve it hot with rice, naan, or your favorite flatbread.
Shahi Paneer FAQs:
Is Shahi Paneer vegetarian?
Yes, Shahi Paneer is a vegetarian dish made with paneer, vegetables, and spices.
Is Shahi Paneer healthy?
While delicious, Shahi Paneer is on the richer side due to the use of cashews and cream. Moderation is key. It offers some protein from paneer and healthy fats from cashews, but may be higher in calories.
Can I substitute paneer in Shahi Paneer?
Tofu can be used as a substitute, although the texture will be slightly different.
What does Shahi Paneer taste like?
Shahi Paneer offers a burst of flavors: creamy, slightly sweet from tomatoes, savory from cashews and yogurt, with a hint of spice.
How to store leftover Shahi Paneer?
Store leftover Shahi Paneer in an airtight container in the refrigerator for up to 2-3 days. Reheat gently on the stovetop over low heat.
These Whole Wheat Almond Eggless Cookies are perfect gluten free, desserts, kid-friendlysnacks, or a delicious treat anytime. Made with wholesome ingredients, they offer a healthier twist on traditional cookies without compromising on taste.
1/2 teaspoon green cardamom seed coarsely powder (ilaichi)
1/2 cup unsalted butter (8 tablespoons or 4oz)
About 2 tablespoons of milk or as needed
Instructions
Method
Pre heat the oven to 360 degree F.
In a bowl, mix the flour, sugar, salt, sliced almonds and cardamom powder well.
Next add soft butter and milk to the flour mixture to make dough. Dough should be very soft.
Divide the dough into about 24 equal parts and make them into balls.
Press each ball between your palms lightly; every piece should be about 1/2” in thickness.
Place the dough balls on an ungreased cookie sheet about inch a part.
Bake the cookies for about 18 minutes or until cookies are lightly gold brown.
After they become lightly golden brown remove the cookie sheet from the oven. Let the cookies cool down for two to three minutes before taking them off the cookie sheet.
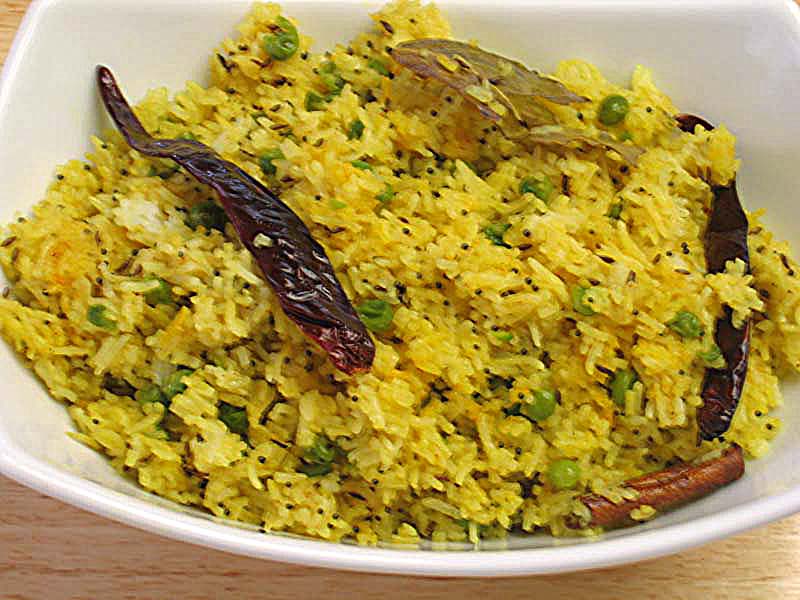
yellow rice is very flavorful and aromatic with great blend of spices. Turmeric adds the vivid golden color to the rice. Yellow rice is quick and easy to make. This goes great with soup, and salad or as a side dish with any meal.
Wash rice gently and soak it for at least 15 minutes prior to cooking.
After cooking rice expands to about three times in volume, so be sure to use the proper size pan. Drain the rice and put into the saucepan. Add the water, green peas, 1 teaspoon of oil, and salt, bring to a boil and turn the heat to low, and cover the pan.
Cook about 15 minutes, or until the rice is tender and the water has evaporated. Turn off the heat and fluff the rice with a fork.
Heat the oil in a frying pan on medium high. Test the heat by adding one cumin seed to the oil; if seed cracks right away oil is ready. Add asafetida, cumin seeds, and mustard seeds. After the seeds crack, add red chilies, bay leaves, and cinnamon stick and stir-fry for few seconds.
Add rice, turmeric, and cayenne pepper to the spices in frying pan. Mix it gently. Stir-fry for about 5 to 6 minutes.
Learn What makes Fried Rice Yellow with this easy-to-follow recipe.
Yellow fried rice is a variation of fried rice that gets its distinct yellow color from the addition of turmeric. Turmeric not only imparts a vibrant hue but also adds a subtle earthy flavor to the dish. It is a gluten free, kids friendly, vegan option
1. Washing and Soaking the Rice: Preparing for Yellow Fried Rice
Commence the culinary adventure of crafting delectable yellow fried rice by carefully washing the rice and allowing it to soak in water for a minimum of 15 minutes prior to cooking. This essential step ensures that the grains absorb ample moisture, facilitating even cooking and achieving a fluffy texture in the final dish.
2. Cooking the Rice: Ensuring Proper Size and Volume for Yellow Fried Rice
A crucial consideration in preparing fried rice yellow is accounting for the expansion of the rice during cooking, which approximately triples in volume. Thus, it is imperative to select a saucepan of adequate size to accommodate this expansion. Following the soaking process, transfer the drained rice to the saucepan and add water, green peas, a teaspoon of oil, and salt. Allow the mixture to come to a gentle boil, then reduce the heat to low, cover the pan, and allow the rice to simmer for approximately 15 minutes until it achieves a tender consistency and the water has evaporated. Once cooked, delicately fluff the rice with a fork to enhance its texture.
3. Tempering the Spices: Infusing Flavor into Yellow Curry Fried Rice
Elevate the flavor profile of your yellow curry fried rice by embarking on a journey of tempering aromatic spices. In a separate frying pan set over medium-high heat, heat oil until it reaches the optimum temperature for tempering. To test the readiness of the oil, introduce a cumin seed; if it crackles immediately, the oil is primed for the next step. Proceed by adding asafetida, cumin seeds, and mustard seeds to the fragrant oil, allowing them to sizzle and release their captivating aroma. Follow this with the addition of red chilies, bay leaves, and a cinnamon stick, stirring briefly to coax out the essence of each spice.
4. Stir-Frying the Rice: Creating Vibrant Color and Flavor in Yellow Fried Rice
Delight in the visual and gustatory allure of yellow fried rice by incorporating the pre-cooked rice, turmeric, and cayenne pepper into the spice-infused frying pan. Gently combine the ingredients, ensuring that each grain of rice is enveloped in the golden hue of turmeric and infused with the subtle heat of cayenne pepper. Stir-fry the mixture for approximately 5 to 6 minutes, allowing the flavors to meld harmoniously and the rice to absorb the aromatic essence of the spices, resulting in a dish that is as visually stunning as it is delicious.
Notes: Serving Suggestions for Yellow Fried Rice
Savor the irresistible simplicity of yellow fried rice by serving it piping hot alongside an array of comforting accompaniments, such as soup, dal, or yogurt. This versatile dish offers a perfect balance of flavors and textures, making it an ideal choice for a satisfying meal that tantalizes the taste buds and leaves a lasting impression on discerning palates.
Papdi (papri) Chaat is my kind of food and there are so many kinds of chaat. Chaat is a popular street food all over India. Chaat is basically different varieties of snacks served with tamarind or hari (cilantro) chutney or with hot spice mix. The definition of chaat literally is "to taste".Recipe serves 4 to 6
Mix the flour, sooji, salt, and oil in a bowl. Add water to the mixture a little at a time, kneading to form firm dough.
Cover the dough and set aside for 15 minutes or more.
Divide the dough into about 3 equal parts.
Roll one section of the dough to eight inches in diameter, fairly thin – about thickness of dime. Do the same with the remaining two parts.
Prick the rolled dough firmly every quarter-inch or so with a fork to keep the papdi from puffing while frying. Using a sharp knife, cut the rolls into 1½-inch squares.
Heat the oil in about one inch of oil in a frying pan over medium heat. To test, drop a small piece of dough in the oil. The dough should sizzle but come up to the surface slowly. If the dough rises
immediately, let the oil cool slightly and try again.
Place just enough papdi to cover the oil in the frying pan in a single layer. Don’t crowd them.
Fry the papdi until both sides are a light golden brown.
Remove cooked papdi with a slotted or mesh spoon and transfer to a plate. Continue cooking the remaining papdi in batches.
After the papdi cool to room temperature they should be crisp.
Papdi can be stored in airtight container for 1 month.
Making the Garnish
Mash the chickpeas lightly and mix with hari (cilantro) chutney to your taste. Keep aside.
Put the yogurt into a bowl and whisk until smooth. Add a little milk as needed to consistency of pancake batter. Add salt to taste. Set aside
Arrange the papdi on a large plate.
Place a slice of potato on top of each papdi (does not need to be the exact size). Place ½ teaspoon of the chickpea mixture over each potatoa slice.
Drizzle yogurt over each papdi.
Sprinkle roasted cumin powder, and red chili to your taste.
Finish the papdi chat by drizzling with tamarind chutney.
Notes
To make round papdi, divide the dough in about 30 equal parts and roll them individually into 2½-inch rounds. Prick with a fork in four to five places.
Papdi Chaat, a popular street food delicacy, combines crispy papdi with a tantalizing mix of appetizers and chaat elements, creating a flavorful explosion that delights the taste buds. Papdi chat is a delightful Indian street foodsnack that tantalizes the taste buds with its crispy papdis, tangy chutneys, yogurt, and assorted toppings. This papdi chat recipe promises to deliver an explosion of flavors in every bite, making it a perfect choice for parties, gatherings, or simply as a savory indulgence.
How to Make Papdi Chat
To create this mouthwatering delicacy, start by preparing the papdis, the essential base of the dish. Combine all-purpose flour, semolina, carom seeds, and salt in a mixing bowl. Knead the ingredients into a firm dough, adding water gradually. Roll out the dough thinly and cut it into small rounds. Prick the rounds with a fork and deep fry until golden brown and crispy. Drain excess oil and set aside.
Next, prepare the tangy tamarind chutney by simmering tamarind pulp, dates, jaggery, and spices until thickened. Strain the mixture to remove any solids, resulting in a smooth, flavorful chutney. Similarly, whip up a refreshing mint chutney by blending mint leaves, coriander, green chilies, and yogurt into a smooth paste.
Now, assemble the papdi chat by arranging the crispy papdis on a serving plate. Drizzle generous amounts of both chutneys over the papdis, followed by spoonfuls of beaten yogurt. Sprinkle chaat masala, roasted cumin powder, and red chili powder for an extra kick of flavor. Top it off with tomatoes, and fresh coriander leaves.
Serve the papdi chat immediately, allowing everyone to enjoy the perfect blend of textures and tastes.
Tips for Making Papdi Chat
Crispy Papdis: Ensure the papdis are rolled out thinly and fried until crisp to achieve the perfect texture.
Chutney Consistency: Adjust the consistency of the chutneys by adding water gradually while cooking to achieve the desired thickness.
Topping Variation: Experiment with different toppings such as boiled potatoes, chickpeas, or sev to add more depth to the flavor profile.
Spice Level: Adjust the amount of green chilies and red chili powder according to your preference for spice.
Variations of Papdi Chat
Dahi Papdi Chat: For a creamier variation, substitute beaten yogurt with thick, creamy yogurt or hung curd.
Healthy Twist: Replace fried papdis with baked or air-fried versions for a healthier alternative.
Fusion Flavors: Experiment with fusion flavors by incorporating ingredients like avocado, salsa, or shredded cheese for a unique twist on the traditional recipe.
Benefits of Papdi Chat
Rich in Flavors: Papdi chat combines a variety of flavors, textures, and spices, making it a truly indulgent treat for the taste buds.
Nutrient-Rich Ingredients: Ingredients like yogurt, chickpeas, and fresh vegetables provide essential nutrients like protein, fiber, vitamins, and minerals.
Cultural Experience: Enjoying papdi chat offers a cultural experience, allowing you to savor the vibrant street food culture of India.
FAQs (Frequently Asked Questions)
Q: Can I prepare the papdis ahead of time?
A: Yes, you can prepare the papdis in advance and store them in an airtight container once cooled to maintain their crispiness.
Q: Can I make the chutneys ahead of time?
A: Absolutely, both tamarind and mint chutneys can be prepared in advance and stored in the refrigerator for several days.
Q: Can I make papdi chat without yogurt?
A: Yes, you can omit yogurt or use a dairy-free alternative like coconut yogurt for a vegan version of the dish.
Papdi chat is a versatile and beloved snack that never fails to impress with its burst of flavors and textures. Whether enjoyed as an appetizer, a snack, or a light meal, this recipe promises to be a crowd-pleaser at any gathering or occasion. So, gather your ingredients and embark on a culinary journey to recreate this iconic Indian street food delight in your own kitchen!
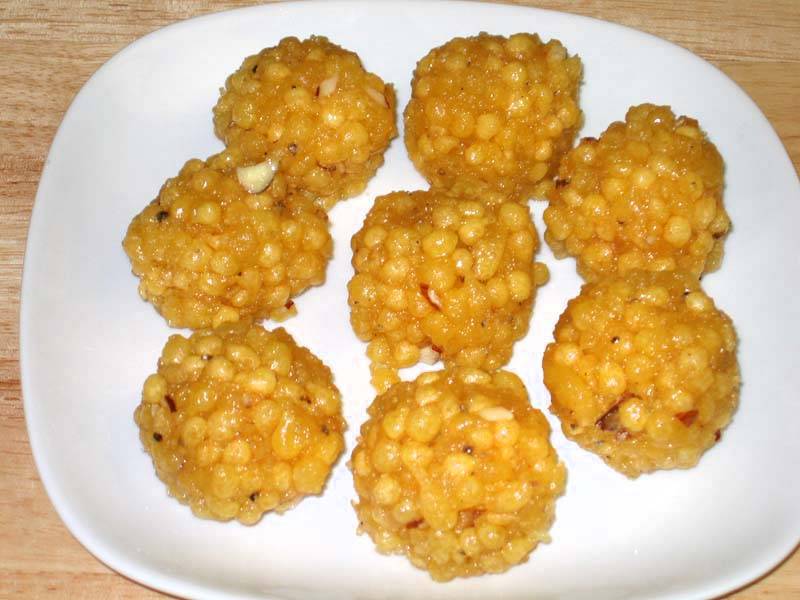
Boondi Ladoo is a popular mouthwatering dessert and must to have at all special occasions all over India. Boondis are very small, round deep-fried balls that have been soaked in fragrant sugar syrup. After soaking, the syrup is drained, and the syrup infused boondi are formed into balls (ladoos). It is a popular sweet delicacy made during festivals like Diwali or Holi.
Perforated Spoon, Skimmer, or Ladle: to make Boondi
The critical part of boondi making is to use the right kind of utensil for the batter to drop through the holes into the hot oil to form the little pearl shaped fried balls. To accomplish this you need to use a flat skimmer, strainer or perforated ladle that has several round holes on the surface, each about the size of a whole black peppercorn.
Instructions
Crack open the cardamom pods and remove the seeds. Crush the seeds and keep aside.
Put the water and sugar in a saucepan and bring to a boil on medium-high heat. When the syrup comes to a boil, turn the heat down to medium and stir to dissolve the sugar. Let it simmer until the syrup is about half thread consistency or 220 degrees on the candy thermometer.
Mix the gram flour with water to make a smooth pancake-like batter or slightly thicker than dosa batter.
Heat the oil in a frying pan on medium high heat. The frying pan should have at least 1 1/2 inches of oil. Tip: To test if the oil is the right temperature, drop a pinch of batter into the oil; if it rises immediately without changing color then the oil is ready to start frying the
Hold the skimmer about 1 to 1 1/2 inches above the oil over the center of the frying pan with one hand. With your other hand pour some of the batter onto the skimmer to cover all of the holes without spilling over the edge of the skimmer. Tip: if you hold the skimmer higher than 11/2 inches above the oil boondi will not be round.
The batter will start dropping through the holes into the oil. If the batter doesn’t drop right away through the holes, pour the batter on the skimmer back into the batter bowl, mix a little more water to the batter and start again. Drop enough boondi into the oil so they just cover the surface of the oil in frying pan in a single layer
Fry them until the sound of sizzling stops and boondis are light gold in color but not crispy! Lift the boondi out of the oil with a slotted spoon (this allows excess oil to drip back into the frying pan) and put them directly into the warm syrup and mix.*
Before making the next batch of boondi, wipe clean the skimmer. This helps to keep the boondi round.
Repeat the process of making boondi and adding to the syrup with rest of the batter. You may have to adjust the heat in between making boondis.
When finished frying the boondi, let them soak in the syrup for few minutes. Add the crushed cardamom seeds and sliced almonds to the syrup. Now drain off the excess syrup.
If the boondis are still hot, let them sit only until they are warm enough to handle – don’t let them to cool off. If the boondis become cold you will not be able to form them into ladoos.
To make the ladoos, scoop up some of the boondi mixture into your palm with a spoon. Gently squeeze the mixture between both palms to shape into a round ball about the size of a golf ball. As you are squeezing some of the syrup will come out. You can make the ladoo larger or smaller if you have a preference.
As you finish making each ladoo, put it on a plate and continue on to make the next ladoo.
As the Ladoos cool to room temperature they will become firm but they should still be moist.
Notes
Shelf LifeLadoos will keep at room temperature in a covered container for up to 10 days and for one month in the refrigerator.TipsIf the syrup is not of the right temperature, you will not be able to form the ladoos.If the boondis cool down to room temperature before being shaped into balls, the sugar will crystallize.If you are not able to make ladoos, don’t worry. You can still enjoy them as “meethi boondi” or sweet boondi.*If you like the boondi for raita or making some other salty snack don’t add to the syrup.
Keyword Festival Special, Kid Friendly, Popular Dessert
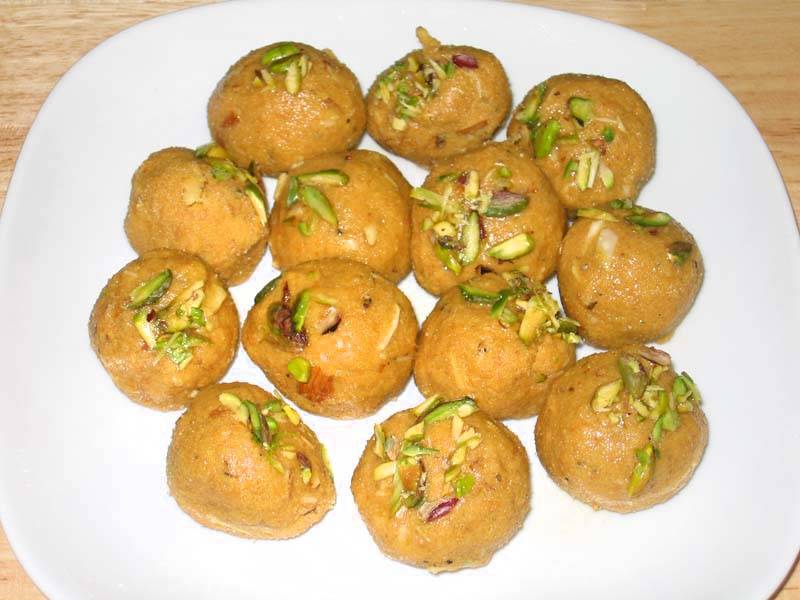
Besan ladoos are rich, sweet dessert–snack made from gently roasted gram flour (besan). Ladoos can be served any time of the day. Traditionally in Indian households ladoos and burfis are served as cookies and chocolate during festive seasons like Navratri, Diwali, Holi.
Put the besan (gram flour), sooji, and melted butter in a large frying pan and mix.
Turn the stove on to medium heat and begin to roast the basen mixture until basen becomes light golden brown in color. Stir the mixture continuously with a spatula to prevent burning. Cooking on high heat will not allow the mixture to fully cook.
When the color has changed you will also start to smell the sweetness of roasted besan. This should take about 7 to 10 minutes. Remove the pan from the heat and let the basen cool to a warm temperature. don’t let it become to room temperature.
While the mixture is warm add and mix cardamom seeds, almonds, and sugar.
To make the ladoos, take about 2 tablespoons of warm basen mixture into your palm. Gently press the mixture between your palms to form a smooth, round ball. The ladoos are usually about the size of a ping-pong ball, but you can adjust the as you prefer.
When you have finished making all of the ladoos, take one ladoo at a time and dip the ladoo a quarter inch into melted butter or ghee. Then lightly touch the part of the ladoo with the butter into the sliced pistachios just enough so some pistachios stick to the ladoo.
Put ladoos back on the plate with the pistachio side facing the top.
Leave the ladoos on a plate to cool to room temperature before putting into a covered container. The ladoos can be stored in an airtight container for 2 to 3 weeks.
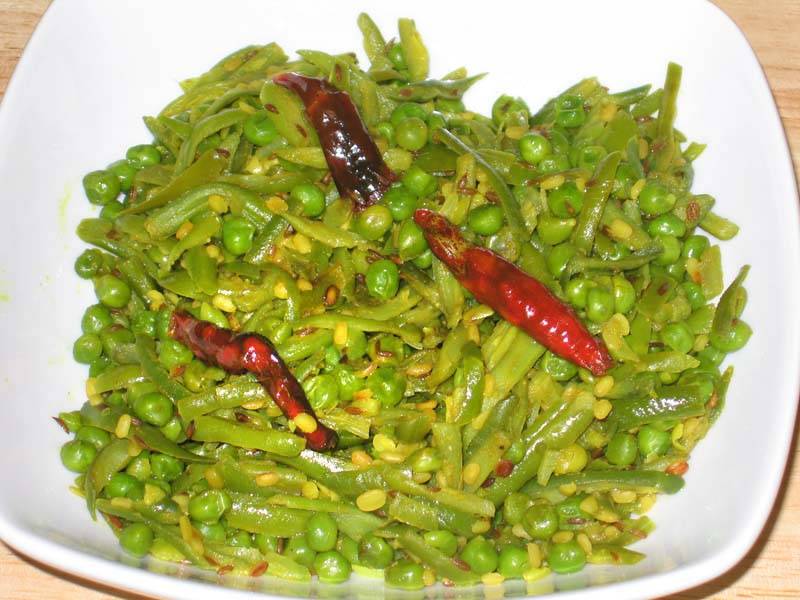
Heat the oil in a saucepan on medium-high heat. Test the heat by adding one cumin seed to the oil. If the cumin seed cracks right away, the oil is ready.
When the cumin seeds crack, add hing, red chilies and urad dal.
Stir-fry for half a minute, stop if the urad dal changes color.
Add green beans and peas, mix it well, and cover the pan. Turn down the heat to medium.
Let it cook for five to six minutes until the peas and beans are lightly tender. Do stir once in between.
Remove the cover and add the coriander powder, salt, and turmeric.
Let beans and peas cook without cover to allow the water to evaporate, this way the beans don’t become mushy. Stir the beans occasionally. Beans and peas should be lightly moist.
After turning of the heat add lemon juice.
Notes
Suggestions
Urad dal can be replaced with washed moong or chana dal.
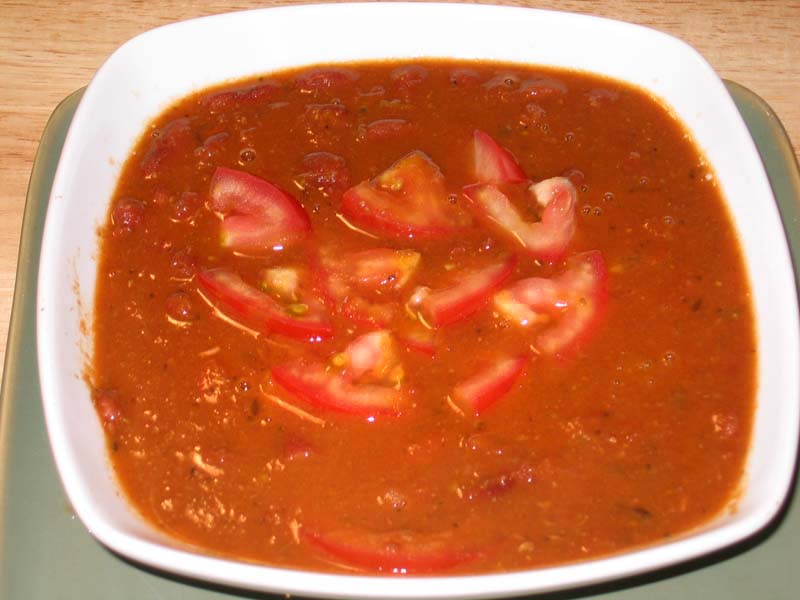
Wash and soak the kidney beans in about six cups of water for at least 6 hours (the beans will double in volume ).
Cut the tomatoes in small pieces, green chili slice lengthwise and take out the seeds (if you prefer mild). Blend tomatoes, green chili, and ginger and make a paste.
Heat the oil in pressure cooker. Test the heat by adding one cumin seed. If the seed cracks right away, the oil is ready. Add asafetida and cumin seeds, as the cumin seeds crack add tomato paste, coriander, turmeric, chili powder, black pepper, and paprika.
Stir-fry for two to three minutes, until the oil begins to separate from the mixture. Add kidney beans, salt, and three cups of water. Close the cooker. Cook over medium high heat.
When pressure cooker starts to steam, turn the heat down to medium and cook twelve minutes.
Turn off the heat. Wait until the steam has stopped before opening the pressure cooker.
Kidney beans should be soft and tender. Stir and mash them gently. Adjust salt and pepper to taste.
How To Make Rajma Chawal Recipe: A Jain Rajma Recipe with Tips and FAQs
Rajma Chawal, a quintessential North Indian dish, is beloved for its rich flavors and comforting texture. While traditionally made with kidney beans simmered in a tomato-based gravy, there are various regional and dietary variations to this dish. In this rendition, we present a Jain version of Rajma Chawal, devoid of onion and garlic, yet bursting with aromatic spices and wholesome goodness.
Preparation:
Wash the kidney beans thoroughly under running water to remove any dirt or impurities.
Soak the kidney beans in about six cups of water for at least 6 hours or overnight. This helps in softening the beans and reducing cooking time.
Making the Paste:
Cut the tomatoes into small pieces and slice the green chilies lengthwise, removing the seeds if you prefer a milder taste.
Peel and chop the ginger.
In a blender, combine the tomatoes, green chilies, and ginger to make a smooth paste. Set aside.
Cooking:
Heat the cooking oil in a pressure cooker over medium heat.
To test the oil temperature, add one cumin seed. If it crackles right away, the oil is ready.
Add a pinch of asafetida followed by the cumin seeds. Allow the cumin seeds to crackle.
Once the cumin seeds start crackling, add the prepared tomato paste to the cooker.
Stir in the coriander powder, turmeric powder, red chili powder, black pepper powder, and paprika. Mix well.
Stir-frying:
Stir-fry the mixture for two to three minutes or until the oil begins to separate from the sides. This step enhances the flavor of the spices and ensures a rich gravy.
Adding Kidney Beans:
Drain the soaked kidney beans and add them to the pressure cooker.
Season with salt according to taste.
Pour in three cups of water and mix well to combine all the ingredients.
Pressure Cooking:
Close the pressure cooker with its lid securely.
Cook over medium-high heat until the pressure cooker starts steaming.
Reduce the heat to medium and continue cooking for twelve minutes.
Finishing Touches:
Once the cooking time is complete, turn off the heat and allow the pressure to release naturally.
Once the steam has stopped, carefully open the pressure cooker lid.
Mashing and Adjusting Seasoning:
The kidney beans should be soft and tender. Gently stir and mash them to thicken the gravy.
Taste the Rajma and adjust the salt and pepper as per your preference.
Garnishing:
Serve the Jain Rajma hot, garnished with chopped tomatoes for a refreshing burst of flavor.
Tips and Suggestions:
Soaking the kidney beans overnight or for at least 6 hours is crucial as it helps in reducing the cooking time and ensures even cooking.
Use mustard oil for an authentic flavor, but if unavailable, any cooking oil can be substituted.
Adjust the quantity of green chilies and red chili powder according to your spice preference.
For a creamier texture, you can mash some of the kidney beans before serving.
Garnish the Rajma with freshly chopped cilantro for added freshness and aroma.
Serve Rajma Chawal with steamed rice or Indian bread like roti or naan for a wholesome meal.
Benefits of Rajma Chawal:
High in Protein: Kidney beans are an excellent source of plant-based protein, making Rajma Chawal a nutritious meal choice, especially for vegetarians and vegans.
Rich in Fiber: Rajma is loaded with dietary fiber, which aids digestion, promotes satiety, and helps maintain a healthy weight.
Essential Nutrients: This dish provides essential nutrients such as iron, potassium, and folate, which are vital for overall health and well-being.
Heart-Healthy: Consuming kidney beans regularly may help lower cholesterol levels and reduce the risk of heart disease.
Satisfying and Comforting: Rajma Chawal is not only nutritious but also deeply comforting, making it a favorite comfort food for many.
FAQs (Frequently Asked Questions):
Q: Can I use canned kidney beans instead of dried ones?
A: Yes, you can use canned kidney beans for convenience. However, dried beans are preferred for their texture and flavor.
Q: Can I skip soaking the kidney beans?
A: Soaking the kidney beans is essential as it helps in reducing cooking time and aids in digestion. Skipping this step may result in unevenly cooked beans.
Q: How do I make Jain Rajma without onion and garlic?
A: In this Rajma recipe, we have omitted onion and garlic to make it suitable for a Jain diet. The rich flavor comes from a blend of aromatic spices and tomatoes.
Q: Can I make this Rajma recipe without a pressure cooker?
A: While a pressure cooker significantly reduces the cooking time, you can cook Rajma on a stovetop in a heavy-bottomed pot. It will require longer cooking time and frequent stirring to prevent sticking.
Q: How long can I store leftover Rajma?
A: Leftover Rajma can be stored in an airtight container in the refrigerator for up to 3-4 days. Reheat thoroughly before serving.
Jain Rajma Chawal is a delicious and wholesome dish that can be enjoyed by everyone, regardless of dietary preferences. With aromatic spices, creamy kidney beans, and a rich tomato gravy, it’s a comforting meal that’s perfect for any occasion. Follow this simple rajma chawal recipe and savor the authentic flavors of North Indian cuisine right in your own kitchen. Explore more delightful Rajasthani recipes on Manjula’s Kitchen, Explore more appetiser recipes on Manjula’s Kitchen: Vegetable Samosas, Paneer Tikka, Crispy Spinach Pakoras, Mango Lassi, Masala Chai, Gulab Jamun, Kheer (Rice Pudding)
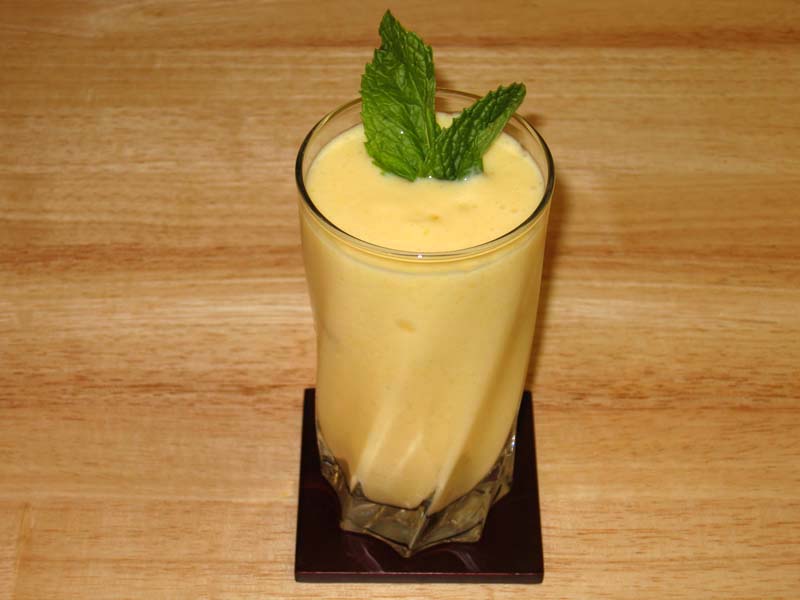
Mango Lassi is a soothing cold drink for hot summer days or to brighten up any meal. This pale drink is a blend of mango and yogurt. A popular beverage in Indian restaurants.
Blend yogurt, mango, and 2 tablespoons sugar and taste before adding more sugar. How much sugar is used depends on the sweetness of the mango and the yogurt.
Add and cardamom powder and blend. If it is too thick, add some water to desired consistency. Pour into a tall glass and garnish with mint leaves. ice and cardamom powder and blend again.
Notes
TipsAdjust ingredient quantities depending on the sweetness of the mango and the thickness of the yogurt. Mango Lassi it is better if the mangoes are not fibrous.You may also enjoy Falooda, Lemonade
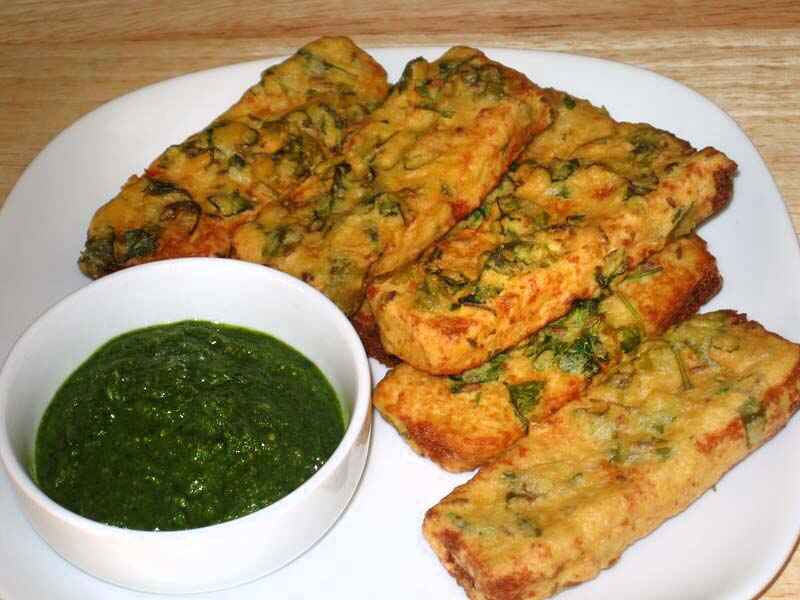
Remove the crust from all sides of the bread. Slice the bread lengthwise into 3 equal parts.
Mix all the dry ingredients together: Gram flour (besan), rice flour, asafetida, cumin seeds, and salt. Rice flour adds to the crispness. Add the water slowly to make a smooth batter. (Batter should be the consistency of pancake batter or dosa batter)
Next, add the green chilies and cilantro. Mix well.
Heat the oil in a frying pan on medium high heat. Frying pan should have at least 1 inch of oil. To check if the oil is ready, put one drop of batter in the oil. The batter should come up but not change color right away.
Dip the bread slices in the batter one at a time and slowly drop into the frying pan. Fry the Pakoras in small batches. The pakoras will take about 4 to 5 minutes to cook.
Turn them occasionally. Fry the Pakoras until both sides are golden-brown. Repeat this process. The crispy, delicious Bread Pakoras are ready to serve.
Notes
Tips:If oil is too hot Pakoras will cook too fast and will not be crispy; if oil is not hot enough Pakoras will be greasy. You may have to adjust the heat as needed while cooking.Variations:Use 1/4 cup of chopped spinach or 2 tablespoons of chopped fenugreek leaves as a substitute for the chopped cilantro.Serving suggestions:The bread pakoras are best when dipped with a fresh cilantro chutney or Pakoras taste best when they are served hot.Pakoras can be made one day in advance do not refrigerate. When ready to eat, place on a cookie sheet and heat in the preheated oven on 300 degrees.