Diverse Vegetarian Lunch Ideas to Keep Your Meals Exciting Introduction
Finding diverse and exciting vegetarian lunch ideas can be a challenge, but Indian cuisine offers a plethora of options that are both delicious and nutritious. From hearty veg gravy to refreshing salads, Indian lunch ideas vegetarian are full of flavors and easy to prepare. This article will explore a variety of easy vegetarian lunch ideas that are perfect for your everyday meals. Quick and Easy Vegetarian Lunch Ideas
Vegetable Biryani: A fragrant rice dish cooked with mixed vegetables and aromatic spices, making it one of the easy vegetarian lunch ideas that can be prepared in advance and enjoyed throughout the week. Paneer Bhurji: Crumbled paneer cooked with tomatoes, and spices. This dish is quick to prepare and pairs well with whole wheat chapatis or as a filling for sandwiches. Chickpea Salad: A refreshing Indian salad recipes made with boiled chickpeas, chopped vegetables, and a tangy lemon dressing. This is one of the simple vegetarian lunch ideas that is both filling and nutritious. Aloo Paratha: Stuffed whole wheat flatbreads filled with spiced mashed potatoes. These parathas are perfect for a satisfying lunch and can be paired with yogurt or pickles. Vegetable Stir-Fry: A quick stir-fry using seasonal vegetables and flavored with soy sauce, ginger. Serve it with brown rice or noodles for a complete meal.
Traditional Indian Vegetarian Lunch Ideas
Rajma Chawal: Kidney beans cooked in a rich tomato gravy, served with steamed rice. This classic main course combination is not only comforting but also a great source of protein and fiber. Baingan Bharta: Smoked eggplant mashed and cooked with tomatoes, and spices. Serve it with roti or paratha for a delicious and unique lunch. Chole Puri: Spicy chickpea curry served with deep-fried bread. This dish is a favorite in many Indian households and is perfect for a weekend lunch. Kadhi Pakora: Gram flour dumplings cooked in a tangy yogurt-based gravy. Pair it with steamed rice for a complete and satisfying meal. Palak Paneer: Spinach and paneer cooked together in a creamy sauce. This dish is not only nutritious but also one of the best vegetarian meals for lunch.
Healthy and Simple Vegetarian Lunch Ideas
Lentil Soup: A simple and nourishing soup made with indian dal or red lentils, vegetables, and spices. It’s easy to make and perfect for a light lunch. Quinoa Salad: Cooked quinoa mixed with vegetables, beans, and a lemon dressing. This salad is high in protein and can be prepared in advance. Vegetable Wrap: Whole wheat wraps filled with hummus, fresh vegetables, and greens. These wraps are quick to assemble and make for a portable lunch option. Methi Thepla: Fenugreek leaf flatbreads that are not only healthy but also flavorful. Pair them with yogurt or a pickle for a complete meal. Sprout Salad: A nutritious salad made with sprouted mung beans, chopped vegetables, and a tangy dressing. This salad is a great way to add protein to your diet.
Vegetarian Lunch Ideas for Special Occasions
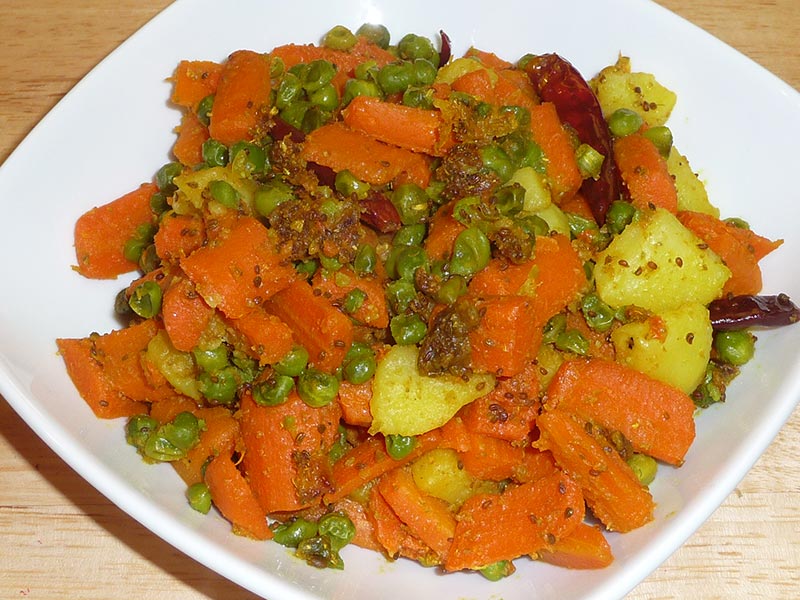
Dum Aloo: Baby potatoes cooked in a rich and creamy tomato gravy. This dish is a bit indulgent and perfect for special lunches. Paneer Tikka: Marinated paneer cubes grilled to perfection. Serve it with a side of mint chutney and salad for a delightful meal. Stuffed Bell Peppers: Bell peppers stuffed with a mixture of vegetables, paneer, and spices, then baked until tender. This dish is visually appealing and delicious. Veg Pulao: A mixed vegetable rice dish that is both aromatic and flavorful. It can be paired with a raita or a simple cucumber salad. Kofta Curry: Vegetable or paneer balls cooked in a creamy tomato-based gravy. This dish is rich and perfect for festive lunches.
Tips for Preparing Vegetarian Lunches
Meal Prep: Preparing ingredients like chopped vegetables, cooked beans, and grains in advance can save a lot of time during the week. Batch Cooking: Making larger quantities of dishes like curries and soups can ensure you have leftovers for the next day. Variety: Keep your lunches exciting by rotating different cuisines and trying new recipes regularly. Balance: Aim to include a balance of protein, carbohydrates, and healthy fats in your lunches to keep you energized throughout the day. Storage: Use airtight containers to store your meals to maintain freshness and flavor.
75 vegetarian lunch ideas, categorized for easier selection: Indian Lunch Ideas
Paneer Butter Masala with Naan
Chole Bhature
Vegetable Biryani
Palak Paneer with Rice
Aloo Gobi with Paratha
Rajma Chawal
Baingan Bharta with Roti
Dal Tadka with Jeera Rice
Bhindi Masala with Chapati
Kadhi Pakora with Rice
Matar Paneer with Pulao
Aloo Paratha with Yogurt
Methi Thepla with Pickle
Paneer Tikka Wrap
Vegetable Pulao
Masoor Dal with Roti
Paneer Bhurji with Bread
Sambar with Rice
Rava Idli with Coconut Chutney
Mixed Vegetable Curry with Rice
Aloo Methi with Roti
Dum Aloo with Rice
Vegetable Kofta with Naan
Chana Masala with Rice
Mushroom Masala with Roti
Fusion & International Lunch Ideas
Veggie Sushi Rolls
Falafel Wrap with Hummus
Vegetarian Tacos
Quinoa Salad with Veggies
Veggie Burger with Sweet Potato Fries
Margherita Pizza
Vegetable Stir-Fry with Rice
Mushroom Risotto
Caprese Sandwich
Veggie Pasta Salad
Stuffed Bell Peppers
Greek Salad with Pita Bread
Vegetarian Pho
Veggie Lasagna
Chickpea Salad Sandwich
Tofu Pad Thai
Veggie Quesadilla
Eggplant Parmesan
Black Bean Burrito Bowl
Thai Green Curry with Rice
Vegetarian Sushi Bowl
Spinach and Feta Stuffed Mushrooms
Roasted Vegetable Sandwich
Avocado Toast with Cherry Tomatoes
Vegetarian Moussaka
Light & Healthy Lunch Ideas
Lentil Soup with Whole Grain Bread
Stuffed Zucchini Boats
Grilled Veggie Skewers with Quinoa
Spinach and Mushroom Quiche
Beetroot and Chickpea Salad
Kale and Sweet Potato Salad
Cauliflower Rice Bowl
Zucchini Noodles with Pesto
Cucumber and Hummus Sandwich
Avocado and Black Bean Salad
Roasted Chickpea and Veggie Wrap
Tomato and Mozzarella Salad
Chickpea and Spinach Curry
Stuffed Portobello Mushrooms
Mediterranean Buddha Bowl
Broccoli and Almond Salad
Quinoa and Black Bean Tacos
Green Pea and Mint Soup
Roasted Veggie Grain Bowl
Spaghetti Squash with Marinara
Cabbage and Carrot Slaw
Vegetable Lentil Stew
Sweet Potato and Black Bean Enchiladas
Butternut Squash Soup with Toasted Seeds
Tempeh and Vegetable Stir-Fry
These ideas cover a wide range of cuisines and dietary preferences, ensuring a variety of tasty and nutritious vegetarian lunch options. FAQs Q: What are some quick vegetarian lunch ideas?
A: Some quick vegetarian lunch ideas include vegetable stir-fry, chickpea salad, paneer bhurji, and quinoa salad. These dishes are easy to prepare and nutritious. Q: Can I make vegetarian lunches in advance?
A: Yes, many vegetarian dishes like biryani, lentil soup, and wraps can be prepared in advance and stored in the refrigerator for a few days. Q: What are some healthy vegetarian lunch options?
A: Healthy vegetarian lunch ideas include lentil soup, sprout salad, vegetable wrap, and methi thepla. These meals are nutritious and easy to make. Q: Are Indian vegetarian meals suitable for a balanced diet?
A: Absolutely. Indian vegetarian meals are rich in vegetables, legumes, and whole grains, providing a balanced mix of essential nutrients. Q: How can I add variety to my vegetarian lunches?
A: You can add variety by trying different recipes, using seasonal vegetables, and incorporating various grains and legumes into your meals. Conclusion
Exploring vegetarian lunch ideas can open up a world of flavors and nutritional benefits. From easy vegetarian lunch ideas to simple vegetarian lunch ideas, Indian cuisine offers a wide range of options to keep your meals exciting and healthy. Whether you are looking for a quick lunch on a busy day or a special meal for an occasion, these vegetarian meals will not disappoint.
Enjoy the rich and diverse flavors of Indian vegetarian cuisine and make your lunchtime a delightful experience.
Explore more recipes on Manjula’s Kitchen and discover the joy of cooking nutritious and delicious food.
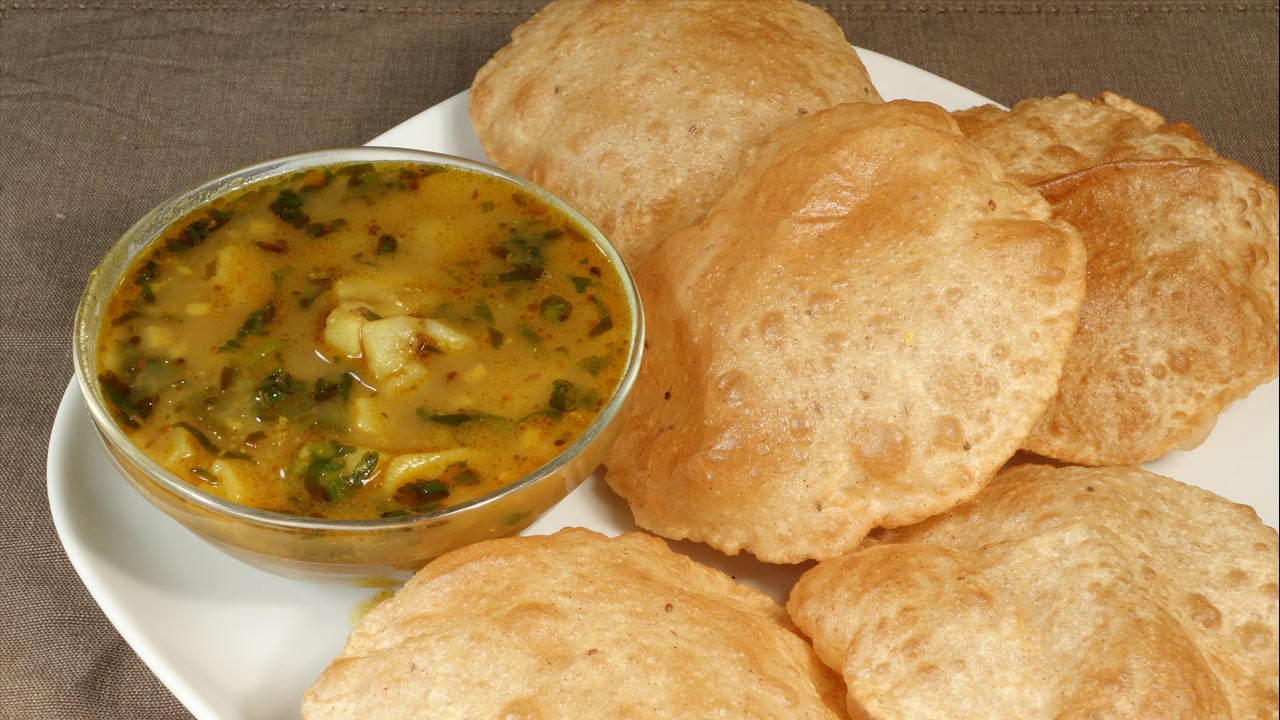
Aloo Puri, spicy potatoes with gravy and puffed whole wheat bread (puri). It is simple and makes a complete meal. This is a popular combination in North India. This can be served for a casual breakfast, lunch, or dinner.
3 medium-sized potatoes peeled and cubed in bite size, about 2 cups of cubed potato
1-1/2 tablespoons oil
1teaspoon cumin seeds (jeera)
1/8 teaspoon asafetida (hing)
1/4 teaspoon turmeric (haldi)
1teaspoon ginger chopped
1 green chili chopped
2 teaspoon coriander powder (dhania)
1teaspoon of fennel seed crushed
1/4teaspoon red chili powder
1teaspoon salt
1/2teaspoon mango powder (amchur)
1/4teaspoon garam masala
About 2tablespoons cilantro (hara dhania) finely chopped
for Puri
1 cup whole wheat flour
1tablespoon sooji/semolina
1/8 teaspoon carom seeds (ajwain)
1/2teaspoon salt
Approx. ½ cup water
Also need oil to fry
Instructions
For Aloo
In a small bowl, mix the coriander, fennel, turmeric, chili powder, salt, ginger, and green chili with about 2 tablespoons of water. Set it aside.
Heat the oil in a saucepan over medium-high heat. Test the heat by adding one cumin seed to the oil. If the cumin seed cracks right away, the oil is ready. Add cumin seeds, and asafetida, as cumin seeds crack add spice mix and stir fry for about 15 seconds
Add potatoes mixed with spices, lower the heat to low medium, cover the pan, and let it cook for about three to four minutes stirring once in between.
Add about 1-1/2 cups of water and change the heat to medium-high heat. As potatoes come to a boil cover the pan lower the heat to medium and let it cook for about eight minutes.
Mix the potatoes and mash some potatoes as mixing the potatoes, this will thickness to the gravy. Adjust the water in the gravy to your liking; gravy will thicken as it cools.
Add mango powder, garam masala and cilantro. Mix it well, turn off the heat, and cover the pan.
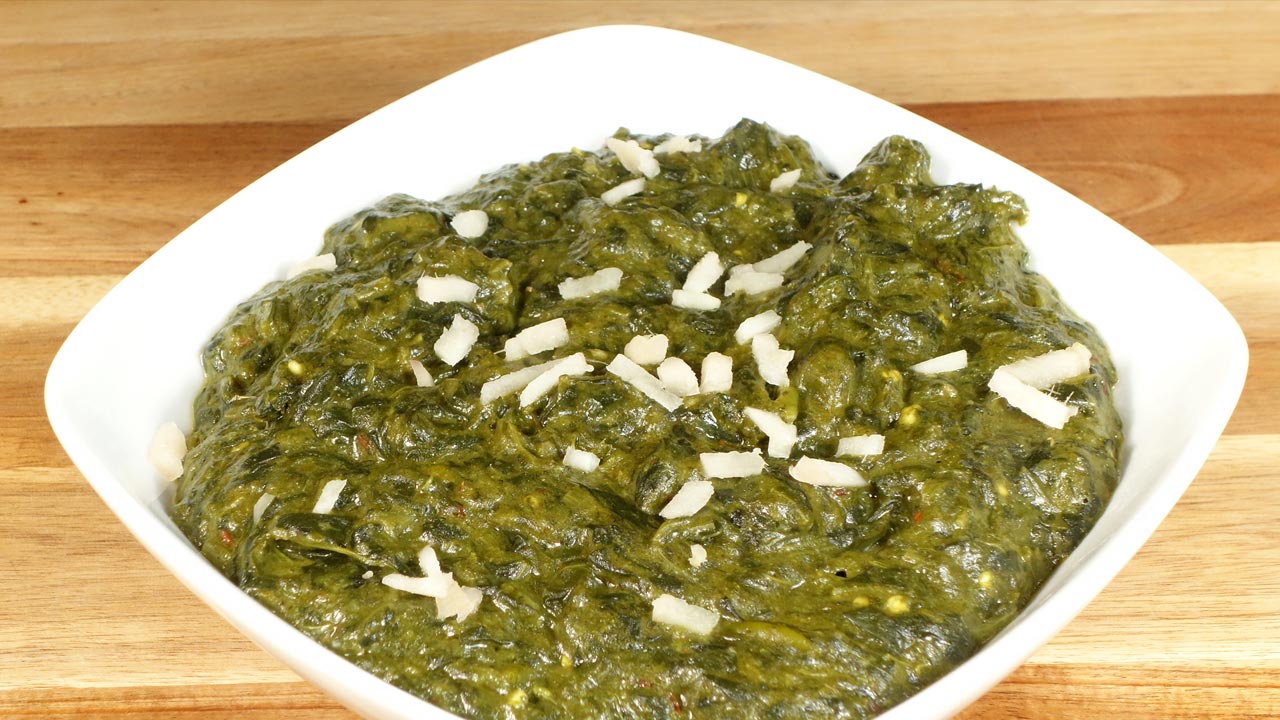
Sarson Ka Saag, mustard greens with spinach is a healthy and easy to prepare dish. Sarson ka saag is a all time favorite punjabi dish. Traditionally this is served with makki ki roti (maize flat bread) and gur (unrefined cane sugar).
Mix corn flour with ½ cup of water and keep aside.
In a heavy bottom pan boil the mustard, and spinach leaves, 4 tablespoons ghee/ clarified butter, salt, turmeric, ginger and green chili with one cup of water over medium high heat.
After greens come to boil cover the pan and turn heat down to medium. Cook for approximately 30 minutes; stir 3-4 times in between. Greens should be well cook and mushy; they will become about 1/3 in volume.
Add corn flour mixture and mix it well and let it simmer for about 20 minutes. Stir 3-4 times in between. Saag should be cook well all the ingredients nicely integrated together.
For seasoning heat the ghee/ clairfied butter in small pan, ghee should be moderately hot. Add cumin seeds they should crack right a way. Add asafetida and red chilies stir for few second and add to the saag. Mix it well.
Sarson ka saag is ready. Serve hot with maki ki roti, naan or Thandoori Roti.
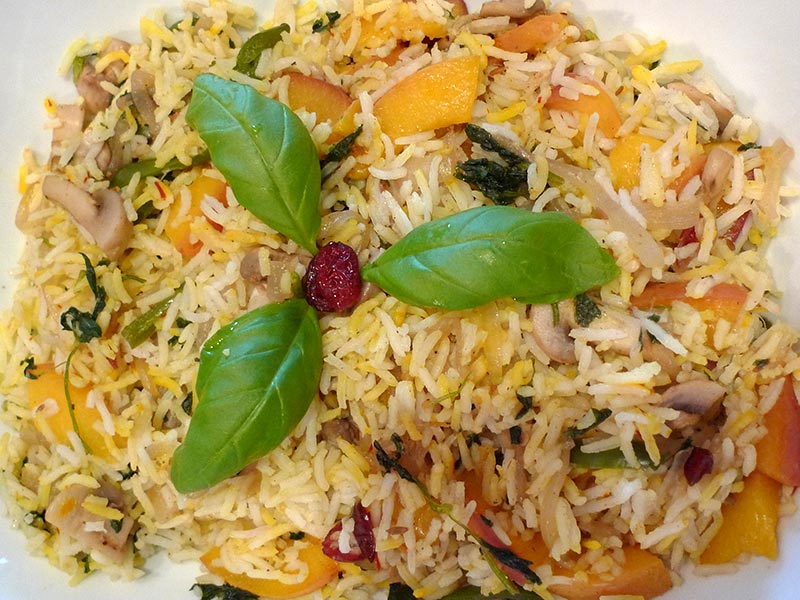
Mushroom peach biryani is a flavorful variation of the traditional vegetable biryani. Its a rice based dish that goes well as a stand alone dish and also can be served along with other forms of curries and gravy recipes.
Wash the rice several times with water till the water appears clear.
Soaking the rice in water for about 30 min before cooking is recommended.
After this drain the water and add rice and 2 cups of water in a pan, also add ½ teaspoon of salt. Set the flame to high till the water comes to a boil, once the water boils reduce the flame to low and cover the pan and cook until the water evaporates.
Mix the saffron with milk
Let the rice cool for about 10-15 min before adding the saffron mixture and mix very gently to avoid breaking the rice grains.
For Gravy:
Chop the onions and peaches into thin long slices, cut each mushroom into 4-6 pieces. Cut the chilies into thin slices lengthwise and coarsely cut the cilantro.
Heat the oil in a large skillet on medium flame, add cumin seeds, crushed green cardamom pods and cinnamon stick
After this is done, add the sliced onions and green chilies cook for few minutes till the onions look transparent. After this add the shredded ginger and mix.
Add the mushrooms, salt, chilli powder, coriander powder and cook till the water from the mushroom dries.
Add the sliced peaches and cilantro and cover the skillet and let it cook for another 5 minutes, the peaches will start turning slighty transparent but they must not be mushy. Mix the gravy once or twice in between so that it doesn’t burn or stick to the base of the skillet.
After this add the dried cranberries and garam masala and mix.
Carefully add the rice to the gravy and mix gently so that the rice grains go not break let it cook covered for another 2 minutes.
For garnishing:
I used fresh basil leaves and cranberries.
Notes
Additional Tips:Other fruits like apricots and nectarines can also be used instead of the peaches and you can remove the peel of the fruits if you prefer it that way.
This bread is called Ari Pathal (Rice bread). This is my moms recipe (from Kerala) . It is normally served for breakfast or for snack, it can be eaten as it is or with potato masala curry or with chutney.
1/2 cupCoconut Grated -( if using dried shredded ones sprinkle some warm water ,mix and keep aside for it to soften)
½ cupChopped Shallots or red onions
1 tspJeera
1/2 tspSalt – or to taste
2 cupsWater – (hot)
Instructions
Method
Roast the rice flour for about 5 minutes on medium heat . (don’t brown it)
Boil 2 cups of water on the other stove while You are roasting the rice flour
Transfer the roasted flour in to a wider bowl and make a well in the center .
Add salt and the half the water(straight from the stove) and mix with a spoon , slowly add the remaining water and give it a good mix. Keep aside for some time for it to cool
Meanwhile chop onions finely , keep the other ingredients ready
Now knead the flour with hand just like we do for chapattis
Heat oil on Medium high
Make lemon size balls( greasing hands with oil will prevent it from sticking)
Press gently each balls with palms just like we do for Kachoris. Shape the edges if needed( this is
Traditionally done on banana leaves but I shaped it on wax paper today. Zip-Loc bags can also be used)
Flip the pressed ones on hand and deep fry ( 5 min or until it turns light golden brown)
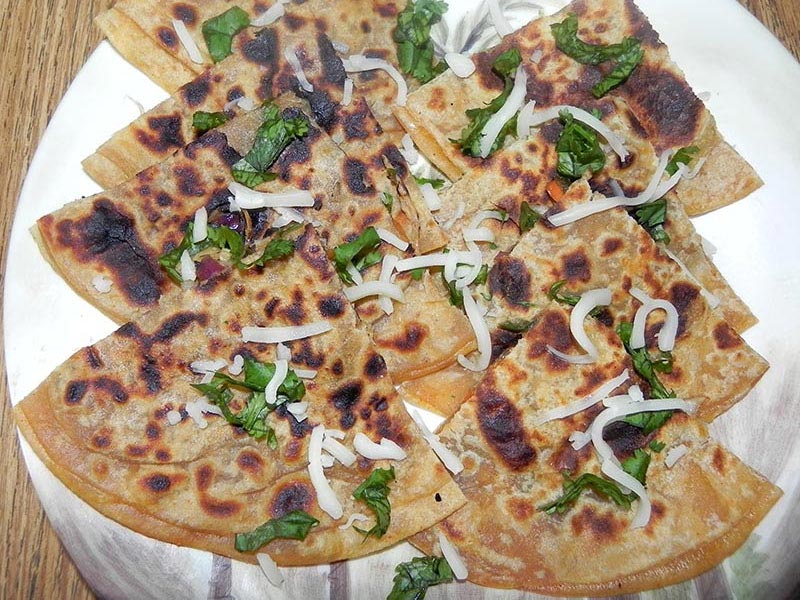
We all love Chinese food. I love it too. Actually chinese is one of my favorite cuisine. Chinese food is really healthy food and aroma of sauces used in it is also very nice. It always contains so many healthy vegetables. This time I found a new version of that. How about a chinese paratha? Give it a try. Trust me, you will fall in love with it.
1/2 Cup of very finely chopped cabbage/Patta Gobhi
1/4 Cup of very finely chopped capsicum/Shimla mirch
1/2 Cup of very finely chopped carrot
1/2 Cup of very finely chopped Green onions
2-3 very finely chopped green chillies
1 Tbsp of dark soya sauce
1 Tbsp of chilly sauce
1 & 1/2 Garlic very clove finely chopped
salt to taste
a pinch or 2 of black pepper
1 Cup of Wheat Flour
1/4th Tsp salt
1/4th Tsp 1/4th Tsp Red pepper/Lal mirch
Water as required to make the dough/around 1/2 cup
Oil or butter or Ghee[Purified butter] for paratha's
Instructions
Method
In wheat flour add salt and red pepper and mix well.
Slowly adding water to it, make the dough as same as chapati dough. Cover it and keep it aside for around 15 minutes.
All vegetables should be very finely chopped. Mix together all vegetables, green chillies, black pepper, sauces and salt as per taste. Be careful while adding salt with stuffing, because all types of sauces contains already salt.
Divide the dough in 10 equal parts. Roll 2 balls in circle shape as same as chapati with the help of rolling pin.
On one chapati, spread 2 tbsp. of vegetable mix. Cover it with another rolled chapati. Press it from all sides and pack it well, so that the stuffing will not come out.
Cook it from both sides on hot tawa, adding little oil/butter/ghee, till very small brown patches appeared on both sides.
Serve hot.
Notes
Additional:If you want to garnish it, spread some green coriander leaves and grated paneer/Indian cheese on it.
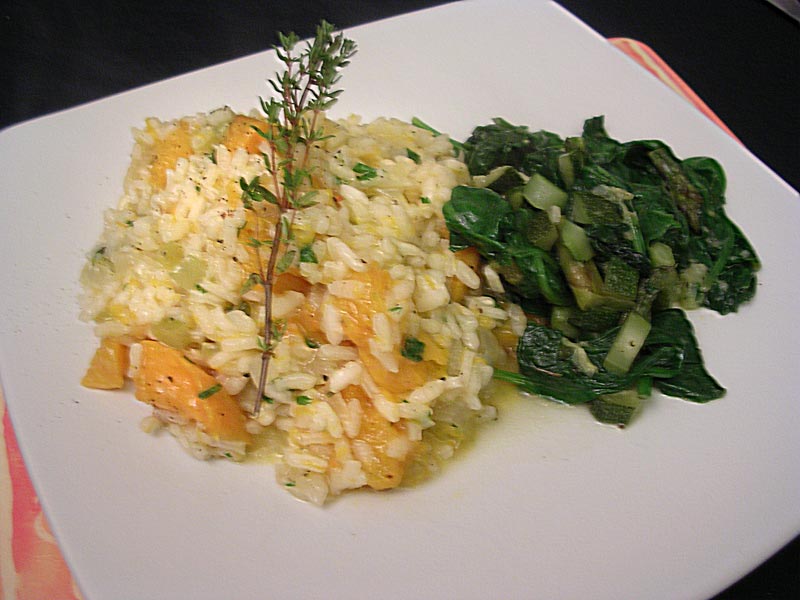
Butternut Squash Risotto is a simple, rice-based delicious quick & easy recipe that can be served anytime. It can be served with any side of green vegetables.
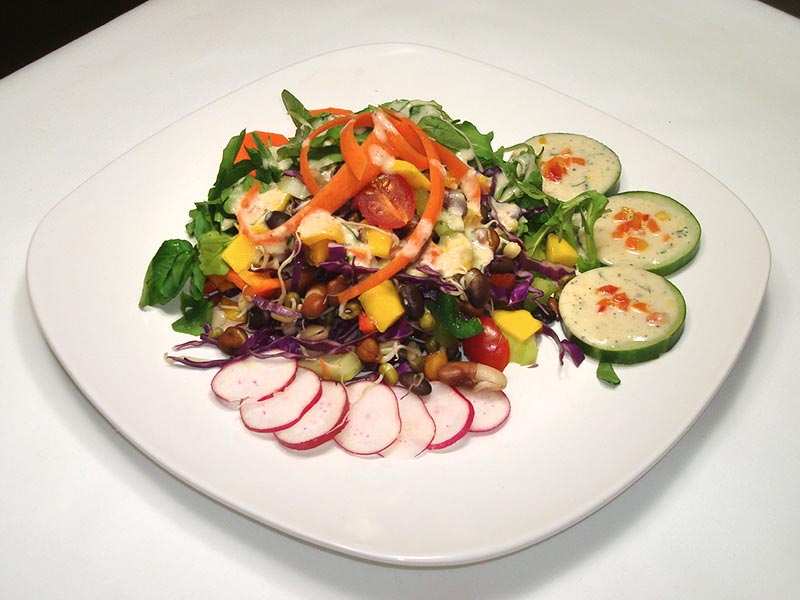
Mixed Sprouts and Arugula Green Salad with White Bean Dressing
My recipe for this month's contest is Mixed Sprouts and Arugula Green Salad with White Bean Dressing. I have been following your website for some time and I learned many recipes from you (as well as recipes from every month contest winners). This time I got chance to participate in the contest and I am very excited. This is a healthyvegansalad with all the right nutrients to give a boost to ones health.
4-5 tablespoonQuarter cup sprouted Kala channa (Bengal gram)
Quarter cup sprouted Red Kidney beans
Quarter cup sprouted Black beans
Quarter cup sprouted Moong beans
10 cherry tomatoes cut into two pieces
1/2 cup Red Cabbage chopped
1/4 cup of Poblano Pepper chopped bite size
1 carrot cut into bite size
2 Sweet Red Mini peppers chopped into bite size
2 Sweet Yellow Mini peppers chopped into bite size
2 Sweet Orange Mini peppers chopped into bite size
1 seeded and chopped green chili
1 stick of celery chopped
1 small Mexican mango cut into bite size
2 cup of arugula green (I also mixed a small amount of watercress green)
1 teaspoon of olive oil
1 teaspoon of cumin seed
For Salad Dressing:
4-5 tablespoonQuarter cup white beans washed and soaked in about 1 cups of water overnight.
1/2 tablespoon black pepper
1 and 1/2 teaspoon Salt, adjust to taste
1 teaspoon Red chilly powder
1/2 tablespoon vinegar
10 dashes of Balsamic vinegar
1 tablespoon lemon juice, adjust to taste
1 tablespoon ginger juice or adjust to taste
2 tablespoon olive oil
1 Orange
1 Zest of orange
1/2Zest of Lemon
Sweet Mini peppers – 1/2 of Red, 1/2 of Yellow and 1/2 of Orange, chopped very finely.
1 and 1/2 tablespoon fresh Dill
1/2 cup of water
For Garnish
Slices Cucumbers, Radish, and Carrot
Instructions
For Dressing
Drain the white bean and wash it.
In a pressure cooker add white beans with 1 and 1/2 cup of water.
As pressure cooker starts steaming turn the heat down to medium low, cook for about 10- 12 minutes.
Turn off the heat and wait for 10 min. Now open cooker and check white bean, they should be soft. Drain the white beans and allow it to cool for 10 -15 min.
Next, in a food processor add white bean, 2 tablespoon of olive oil and 3 tablespoons of water. Make a paste.
In bowl add white bean paste and add rest of water to make it dressing like consistency (this depends upon one's own choice).
Next add orange zest and the juice of a orange. Stir.
Shahi Paneer is a very festive main dish that is creamy and rich in flavor. It is usually a special occasion dish. Shahi paneer can be served with any Indian bread, such as naan or with rice.
Grind cashews into powder-like consistency. Keep aside.
Puree tomatoes, green chili and ginger. Keep aside.
Add oil in a pan, over medium heat. Shallow fry paneer cubes till they turn slightly brown. Remove from pan and place over paper towels to absorb excess oil.
Increase heat to medium-high and test the oil by adding one cumin seed. If it cracks immediately, the oil is ready. Add cumin seeds to the oil and as they crack, add asafetida and bay leaves. Stir for a few seconds.
Add tomato puree, coriander powder, turmeric, red chili powder, and paprika. Cook the mixture, stirring occasionally for 2-3 minutes. It will reduce to half its volume and start separating from the oil.
Add sugar, cashew powder and yogurt. Cook for another minute then add 1 cup of water and salt and bring to boil.
Add paneer and cover the pan. Simmer for a few minutes over medium-low heat, till gravy is slightly thick in consistency.
Remove from heat, add garam masala and chopped cilantro. Mix gently, cover the pan and let it sit for a couple of minutes. Shahi paneer tastes best if it is served hot.
Notes
Serve Shahi Paneer with Naan, or over the Jeera Rice
Keyword Creamy Cashew Gravy, Kid Friendly, Party Dish
Shahi Paneer is a delightful and gluten-free culinary creation, offering a rich and creamy gravy that is not only a treat for the taste buds but also is kids friendly as its a hit among kids too. This regal dish is characterized by its luxurious texture and flavorful combination of paneer, creating a harmonious blend that appeals to both young and adult palates. Its festive dish made on special occasions and would be a great addition to parties and gatherers as a party recipe.
Dicing the Paneer:
Grab your paneer and a sharp knife. Cut the paneer into cubes that are about the size of a large grape or ¾ of an inch each. It’s okay if they’re not perfectly uniform, but similar-sized pieces will cook more evenly. Set the cut paneer aside in a bowl for now.
Grinding the Cashews:
Take your cashews and grind them up into a fine powder using a mortar and pestle, a spice grinder, or even a food processor if you have one. You want them to be like a smooth, nutty dust. Once they’re ground, store them in a separate bowl for later.
Making the Tomato-Ginger-Chili Paste:
Grab your tomatoes, green chili, and ginger. If you prefer a milder dish, you can remove the seeds from the chili before chopping. Finely chop all three ingredients. You can use a blender or food processor to make things easier. Blend them together until you have a smooth, thick paste. Set this paste aside in a bowl with the other ingredients.
Pan-Frying the Paneer:
Pour some oil into a pan and heat it up over medium heat. You want the oil to be hot but not so hot that it starts to smoke. When the oil is ready, gently add the paneer cubes to the pan. Carefully fry the paneer cubes, turning them occasionally, until they turn a light golden brown on all sides. This will take a few minutes. Once they’re browned, take the paneer out of the pan with a spoon and place them on a paper towel-lined plate. The paper towels will soak up any excess oil.
Tempering the Oil and Adding Spices:
Now, increase the heat to medium-high. To test if the oil is hot enough, take a single cumin seed and toss it in the oil. If it sizzles right away, the oil is ready. If it doesn’t sizzle, wait a little longer before testing again. Once the oil is hot, add the cumin seeds. As the cumin seeds crackle, add a pinch of asafetida (if using) and a few bay leaves. Sauté these spices for a few seconds, stirring them constantly, until they release their aroma.
Cooking the Tomato Masala:
Add the tomato-ginger-chili paste you made earlier to the pan with the spices. Next, sprinkle in the coriander powder, turmeric, red chili powder, and paprika. Stir everything together and cook the mixture over medium heat for 2-3 minutes, stirring occasionally. You’ll notice the mixture will start to reduce in volume and thicken up as it cooks. It may even separate a little from the oil around the edges of the pan. That’s okay!
Adding Sweetness and Creaminess:
Now, it’s time to add a touch of sweetness and creaminess to the sauce. Sprinkle in some sugar and add the ground cashew powder you made earlier. Stir this in and cook for another minute. Then, pour in one cup of water and add salt to taste. Bring the mixture to a boil.
Simmering the Paneer in the Masala:
Carefully add the pan-fried paneer cubes back into the pan with the simmering tomato masala. Gently stir everything together to coat the paneer in the sauce. Cover the pan with a lid and reduce the heat to medium-low. Let the paneer simmer for a few minutes, until the gravy thickens slightly and becomes a nice consistency.
Finishing Touches:
Once the paneer is cooked through and the gravy has reached your desired consistency, turn off the heat. Now, sprinkle in some garam masala and chopped fresh cilantro. Gently fold these ingredients into the dish without over stirring. Cover the pan again and let it sit for a couple of minutes. This allows the flavors to meld together.
Serving Up the Shahi Paneer:
Your Shahi Paneer is now ready to be enjoyed! For the best flavor, serve it hot with rice, naan, or your favorite flatbread.
Shahi Paneer FAQs:
Is Shahi Paneer vegetarian?
Yes, Shahi Paneer is a vegetarian dish made with paneer, vegetables, and spices.
Is Shahi Paneer healthy?
While delicious, Shahi Paneer is on the richer side due to the use of cashews and cream. Moderation is key. It offers some protein from paneer and healthy fats from cashews, but may be higher in calories.
Can I substitute paneer in Shahi Paneer?
Tofu can be used as a substitute, although the texture will be slightly different.
What does Shahi Paneer taste like?
Shahi Paneer offers a burst of flavors: creamy, slightly sweet from tomatoes, savory from cashews and yogurt, with a hint of spice.
How to store leftover Shahi Paneer?
Store leftover Shahi Paneer in an airtight container in the refrigerator for up to 2-3 days. Reheat gently on the stovetop over low heat.
Wash karelas thoroughly and using a knife, scrape the skin. Set the scrapes aside.
Make a slit in the karelas length wise and remove the seeds. Add karelas and the skin scrapings to a bowl. Mix and sprinkle with salt and lemon juice. Let it marinate for at least an hour.
Squeeze the karelas to remove all the marinade. Wash karelas twice with hot water and then squeeze out all the water. Separate the scrapings from the whole karelas.
Preparing the Filling:
Heat the oil in a saucepan. Test the heat by adding one cumin seed to the oil; if the seed cracks right away, the oil is ready. Add the cumin seeds and asafetida to the oil. After the cumin seeds crack, add the karela scrapings and stir fry for about 2 minutes.
Add gram flour (besan) and stir-fry for another minute.
Add all the remaining dry spices: coriander powder, fennel powder, turmeric, chili powder, and mango powder. Sauté for a minute and then turn off the heat.
Stuff the split karelas with this spice mixture (there should be some spice mix remaining, which will be used later). Tie the karelas with a thread so that the stuffing does not come out while cooking.
Cooking the Stuffed karelas:
Add 2 tablespoons of oil in a sauce pan over medium heat. Spread the stuffed karelas in the pan and sprinkle with salt. Cover the pan and let it cook for about 2 minutes.
Turn the karelas over to the uncooked side and cook for about 1 minute. Repeat until all four sides of the karelas are cooked.
Sprinkle 2 tablespoons of water and the remaining spice mixture over the karelas. Cover the pan and let it cook for 2 more minutes.
Remove the lid to see if the karelas are tender. Gently turn them over a few more times, making sure they are covered with the spice mixture.
Notes
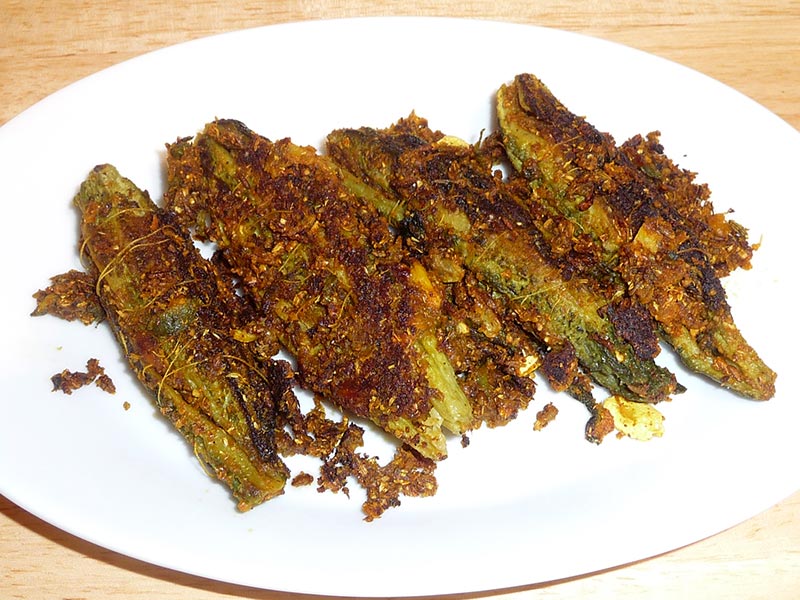
NotesStuffed karela can be served hot or cold and can be refrigerated up to a week.VariationsFor a slightly sweeter taste add 2 tablespoons of sugar to the cooked spice filling, prior to stuffing the karela.I like to Serve Karela with Urad Dal Tadka, Mixed Dal, Dal Makhini and Rice
Keyword Bitter Melon, Diabetic Friendly, Healthy Side Dish
Mix all dry ingredients together in a bowl: flour, gram flour, asafetida, cumin seeds, turmeric, chili flakes, salt, and fenugreek leaves.
Add oil and yogurt to the flour mix and mix well. Add water as needed to make firm dough. Knead the dough for a minute on a lightly greased surface to make it smooth and pliable. Set the dough aside and cover it with a damp cloth. Let the dough rest at least ten minutes.
Divide the dough into six to eight equal parts. Using your oiled palm, roll each one into a smooth ball and press flat.
Take one dough ball and press it lightly on both sides on a surface covered with dry flour. Using a rolling pin, roll the dough into a circle of five to six inches. If dough starts sticking, dust it with more flour. However, do not use any dry flour toward the end of the rolling, as it will make the thepla dry.
Heat a skillet over medium high heat. To test, sprinkle a couple of drops of water on the skillet. It should sizzle immediately.
Place the thepla in the skillet. As it cooks, the dough will change color and have a dryer look. Turn the thepla over using a spatula. You should see golden-brown spots on the semi-cooked side.
After few seconds, spread ½ teaspoon oil onto the thepla using a spatula. Turn the thepla over. Using your spatula, lightly press the entire surface of the thepla to help it cook all the way through. It may puff up in some areas.
Turn over the Thepla over again and press with the spatula, making sure it is golden-brown on both sides. Remove from heat.
Repeat with the remaining dough, untill they are all done.
Notes
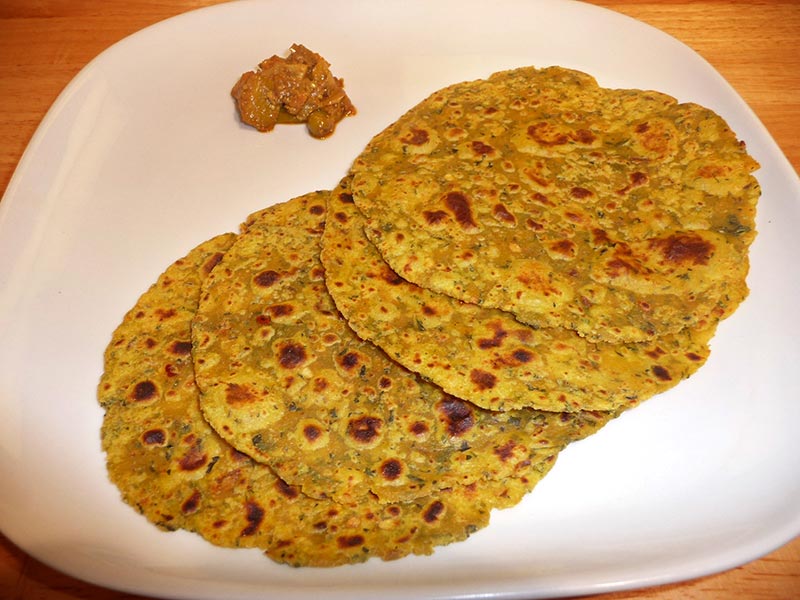
Serving SuggestionsMethi Thapla can be served plain or serve with Plain Yogurt or try with Date and Raisin Chutney, this sweet and chutney can really enhance the flavor.VariationThis recipe uses dry fenugreek leaves, as they are available year-round. But fresh fenugreek leaves are ideal if you can find them. Substitute ½ cup fresh chopped fenugreek leaves for the dry leaves.
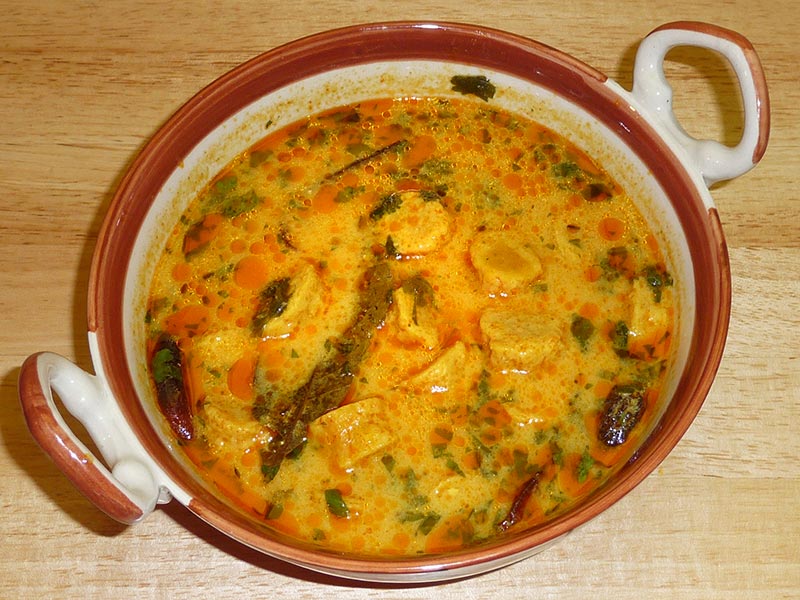
Steamed gram-flour dumplings cooked in spicy gravy is a popular North Indian dish from the Indian state of Rajasthan. This mouth-watering dish will surely tantalize your taste buds with its rich, spicy flavors and delightful texture. Ideal for those who crave a hearty and flavorful meal, this Rajasthani delicacy is both satisfying and memorable. Enjoy the authentic taste of Rajasthan with every bite!
1 1/4 cups besan (gram flour) (available in Indian grocery stores)
1/2 teaspoon chili powder adjust to taste
1/2 teaspoon salt
1/8 teaspoon turmeric (haldi)
3 tablespoons yogurt (dahi)
3 tablespoons oil
For the kadhi
1 cup yogurt (dahi)
1 tablespoon besan (gram flour)
1/4 teaspoon turmeric powder (haldi)
1/4 teaspoon chili powder adjust to taste
1 tablespoon coriander powder (dhania)
1 teaspoon salt adjust to taste
2 tablespoons oil
1 teaspoon cumin seeds (jeera)
1/2 teaspoon mustard seeds (rai)
1/8 teaspoon asafetida (hing)
4 whole red chilies
1 bay leaf (tejpat)
1 black cardamom optional
1/2 teaspoon paprika (dagi mirch)
For Garnish
2 tablespoons chopped cilantro
Instructions
For Gattes
Mix all the ingredients in a mixing bowl and gather into a soft dough, adding a little water if needed. At this point the dough will be a bit sticky; wetting your fingers with oil or water will help.
Divide the dough into four or five parts. Roll each one between your palms into a long, smooth log, approx. five” in length and ¾” in diameter. You will need to oil your palms to prevent the dough from sticking.
Bring three cups of water to a boil in a pot. Gently drop the gatte logs into the boiling water and cook for four to five minutes, or until they begin to float up to the surface.
Remove the cooked Gatte logs from the water and let them cool.
Slice the logs into approx. ¾ inch pieces. Set the Gatte aside.
For The Kadhi
Mix yogurt and gram flour into a smooth paste. Add turmeric, chili powder, and coriander powder to the yogurt paste.
Pour the oil into a saucepan over medium heat. Test the heat by adding one cumin seed to the oil. If the cumin seed cracks immediately, the oil is ready. Add the cumin seeds, mustard seeds, and asafetida.
When seeds crack add the whole red chilies, bay leaf, cardamom, and paprika. Stir for a few seconds.
Pour in the yogurt paste and stir for two minutes. Add three cups of water and stir until the gravy comes to a boil. Add salt to taste.
Add the gatte to the gravy. Cover and cook over low-to-medium heat for 20 minutes or longer. Turn off the heat.
Add cilantro and cover the pot for a few more minutes.
Now you are ready to serve!
Notes
Other Suggestions
A slice of gatte can be cooked in advance and added to the gravy later. Gatte can be frozen for up to a month or refrigerated for a few days.
Slices of gatte are used to make a wide variety of dishes, including subji (cooked dry vegetables), rice pulao, etc.
A slice of gatte can be fried and served as a snack.
A slice of gatte can be used to make raita (mixed with yogurt).
Gatte Ke Kadhi is a traditional North Indian dish made primarily with chickpea flour (besan) dumplings cooked in a tangy yogurt-based curry/gravy. The dish is gluten-free and suitable for individuals observing a gluten-free diet. It is often prepared during festive occasions like Karwa Chauth, a Hindu festival where married women fast for the well-being and longevity of their husbands. The addition of lentils (Dal) and vegetables enhances the nutritional value of the dish, making it a wholesome and flavorful option for a vegetarian meal.
Gatte ki kadhi, also known as gatta kadhi or gatte ki sabji, is a traditional Rajasthani dish that combines chickpea flour dumplings (gatte) with a tangy yogurt-based curry (kadhi). This hearty and flavorful dish is a staple in Rajasthani cuisine and is often enjoyed with rice or roti. In this recipe, we’ll show you how to make Rajasthani gatte ki kadhi from scratch, so you can enjoy the authentic flavors of Rajasthan in the comfort of your own home.
Step 1: Preparing the Gatte:
To start, we’ll prepare the gatte, which are the chickpea flour dumplings that give this dish its unique texture. In a mixing bowl, combine chickpea flour (besan), yogurt, salt, red chili powder, turmeric, and a pinch of asafoetida (hing). Knead the mixture into a smooth dough, adding water as needed to achieve the right consistency. Divide the dough into small portions and shape them into cylindrical dumplings.
Step 2: Boiling the Gatte:
Next, we’ll boil the gatte to cook them through before adding them to the kadhi. Bring a pot of water to a boil and gently add the gatte to the boiling water. Let them cook for about 10-12 minutes, or until they float to the surface and are cooked through. Once cooked, remove the gatte from the water and set them aside to cool slightly.
Step 3: Preparing the Kadhi Base:
While the gatte are boiling, we’ll prepare the kadhi base. In a separate bowl, whisk together yogurt, chickpea flour, turmeric, red chili powder, and salt until smooth. This mixture will form the base of the kadhi and give it its creamy texture. Be sure to whisk out any lumps to ensure a smooth consistency.
Step 4: Tempering the Kadhi:
In a large pan, heat oil and add mustard seeds, cumin seeds, fenugreek seeds, and dried red chilies. Let the seeds splutter and release their aroma, infusing the oil with flavor. This tempering adds depth and complexity to the kadhi, enhancing its overall flavor.
Step 5: Cooking the Kadhi:
Once the tempering is ready, pour in the yogurt-chickpea flour mixture and stir well to combine. Add water to adjust the consistency of the kadhi and bring it to a gentle simmer. Let the kadhi cook for about 10-15 minutes, stirring occasionally, until it thickens slightly and the raw taste of the chickpea flour is cooked out.
Step 6: Adding the Gatte:
Once the kadhi is cooked to perfection, it’s time to add the boiled gatte to the curry. Carefully slice the gatte into bite-sized pieces and add them to the kadhi. Let them simmer in the kadhi for a few minutes to absorb the flavors of the curry and heat through.
Step 7: Finishing Touches:
Before serving, garnish the gatte ki kadhi with freshly chopped cilantro leaves for a pop of color and freshness. You can also sprinkle some roasted cumin powder on top for extra flavor. Serve the kadhi hot with steamed rice or roti for a comforting and satisfying meal.
Tips for Making Perfect Gatte Ki Kadhi:
Ensure the Gatte are Firm: Make sure the gatte dough is kneaded well to avoid any cracks or breakage while boiling.
Adjust the Consistency: If the kadhi is too thick, add more water to thin it out. If it’s too thin, let it simmer for longer to thicken.
Taste and Adjust Seasoning: Taste the kadhi before adding the gatte and adjust the seasoning as needed with salt, red chili powder, or other spices.
Variations of Gatte Ki Kadhi:
Vegetable Gatte Ki Kadhi: Add diced vegetables such as carrots, peas, and potatoes to the kadhi for added texture and nutrition.
Paneer Gatte Ki Kadhi: Substitute paneer cubes for the gatte to create a rich and creamy variation of the dish.
Spinach Gatte Ki Kadhi: Stir in chopped spinach leaves to the kadhi for a vibrant green color and earthy flavor.
Benefits of Including Gatte Ki Kadhi in Your Diet:
Rich in Protein: The combination of chickpea flour and yogurt in gatte ki kadhi provides a good amount of protein, essential for muscle repair and growth.
Probiotic Benefits: Yogurt used in the kadhi is rich in probiotics, which promote a healthy gut microbiome and aid digestion.
Nutrient-Dense: Gatte ki kadhi is packed with vitamins, minerals, and antioxidants from the spices and ingredients used, contributing to overall health and well-being.
Frequently Asked Questions (FAQs) about Gatte Ki Kadhi:
Q: Can I make gatte ki kadhi in advance?
A: Yes, you can make the kadhi base in advance and store it in the refrigerator for up to 2 days. Add the gatte and simmer just before serving.
Q: Can I freeze gatte ki kadhi?
A: While you can freeze gatte ki kadhi, the texture of the gatte may change slightly upon thawing. It’s best enjoyed fresh or stored in the refrigerator for a few days.
Q: Can I adjust the spice level of gatte ki kadhi?
A: Yes, you can adjust the amount of red chili powder and green chilies according to your taste preferences. If you prefer a milder kadhi, reduce the amount of spice used.
For more delicious Rajasthani recipes, visit Manjula’s Kitchen. Explore a variety of traditional dishes from Rajasthan, including dal bati churma, laal maas, and more, to experience the rich flavors and culinary heritage of the region.
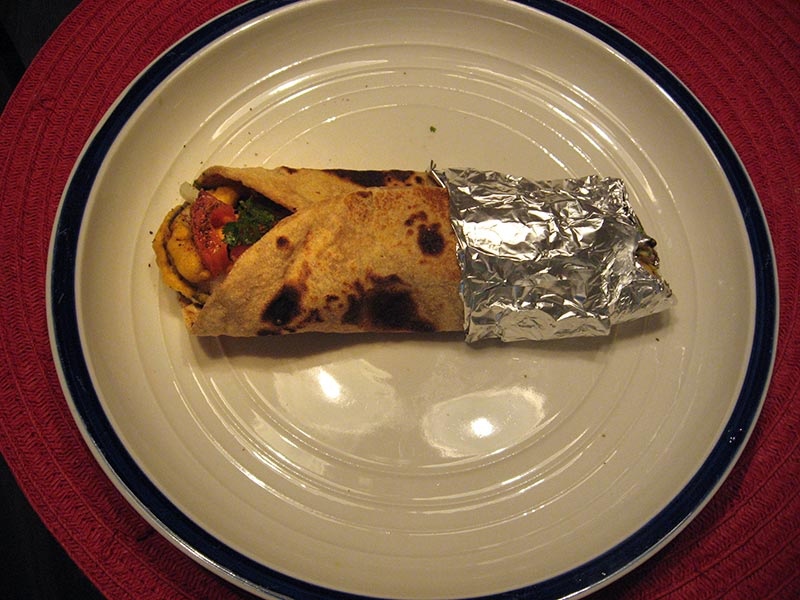
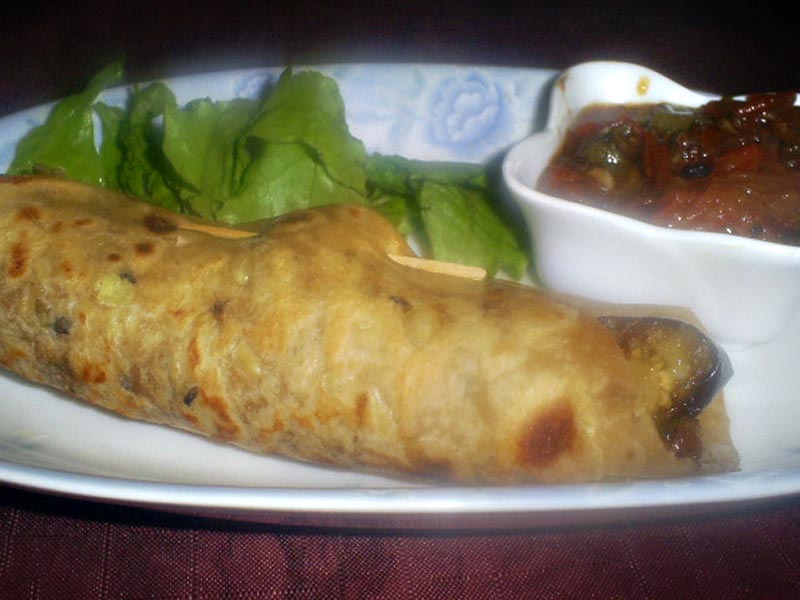
I am fond of Mediterranean food, so I made my own version of wrap inspired by Mediterranean flavors. I used big sized roti/chapati for the wrap, eggplant pakoras/fritters along with home-made hummus and mint chutney.
I bought a new small Indoor Electric grill (George Foreman grill) this summer and have tried several grilling recipes – the most hit was the Pineapple grilled with Honey sauce – which was actually my own accidental invention. So I have used it for the eggplant-tomato-green peppers filling. The dressing is the sauce filtered out from the grill machine spread over the tortilla before putting the filling! The wrap is filled with fresh romaine lettuce and pepper jack cheese! Hope you will like this appetizer or snack recipe.
1 1/2 tablespoon fresh pineapple juice (you can substitute with lemon juice – I consume a lot of fresh pineapple juice almost everyday so I have it handy!!!)
2 teaspoon garlic paste
2 teaspoon ginger paste
1/4 teaspoon red cayenne pepper (you can add adjust for hotness)
1/4 teaspoon sea salt (adjust per taste)
1/4 teaspoon ajwain seeds
1/2 teaspoon dried parsley leaves
For the tortilla wrap filling:
1/2 inch thick Round Eggplant slices – 3
2 medium tomatoes – cubed
1/4 cup finely chopped green peppers
1/2 cup fresh romaine lettuce
1/4 cup shredded cheese (I used Weight watchers Pepper Jack cheese)
Instructions
For Tortilla:
Turn on the tortilla maker on medium-high setting – Optionally you can also cook these on the tawa/griddle like roti/parathas.
Take the flour in a bowl big enough to knead the dough. Add salt and olive oil- mix well. Add sprouted moong and mix well. Add 1 tablespoon water at a time and bind into firm and smooth dough – firm enough to not use extra dry flour while rolling – this will avoid brushing more oil while making the tortilla.
Divide the dough into two pieces.
Roll the dough into 7 inch diameter circles and place on the tortilla maker – do not close the top. Once you see few areas bubbled up on the roti – after 1-2 minutes. Flip over the tortilla-roti and cook the other side similarly. Then turn back-over and press the top side of the tortilla maker to press it well – just 1-2 seconds. Flip back over and do the same for 1-2 seconds. Take out the tortilla and place covered in paper napkin in a roti casserole bowl to avoid from being dry and firm.
For the dressing and grill marinate:
Add well the ingredients as listed above in a wide bowl and keep aside.
For the filling:
Turn on the grill (or just do the entire process on the tawa/griddle on stove)
Roll the eggplant pieces in the prepared dressing and leave it in the bowl until the grill is ready
Put the eggplant pieces on the grill and let stand for 30 seconds. Then cover and grill for 2-3 minutes.
Meanwhile add the chopped tomatoes and peppers into the remaining dressing/marinate mix and keep it aside
Flip over the eggplant pieces and continue grilling for another 2 minutes. Then remove and keep aside
Now add the tomato-pepper mixture on the grill and add all the remaining sauce over it.
Grill similarly for 2-3 minutes on each side. While flipping over take some of the collected sauce out of the grill and pour it back on the grill.
Save the collected-drained sauce while grilling to apply on the tortilla as dressing!
Notes
Serving Instructions:
Take the tortilla roti and apply the drained dressing sauce all over. Then spread with shredded cheese and lettuce. Chop the eggplant pieces and place over the lettuce with the tomato-pepper mixture. Wrap the tortilla and “pin-up” using the tooth-pick.
Use the remaining tomato-pepper mixture and the drained sauce mixture combined as “salsa on the side”. ENJOY!!!!
Variations to prepare the sauce without the grill:
Heat the ingredients of the dressing sauce in microwave or on medium heat on stove in double-sized bowl for 4 minutes – checking not to spill it over and stirring every minute.
Grill the eggplant and tomato-pepper on the hot griddle/tawa once rolled in the dressing sauce or on gas grill pan.
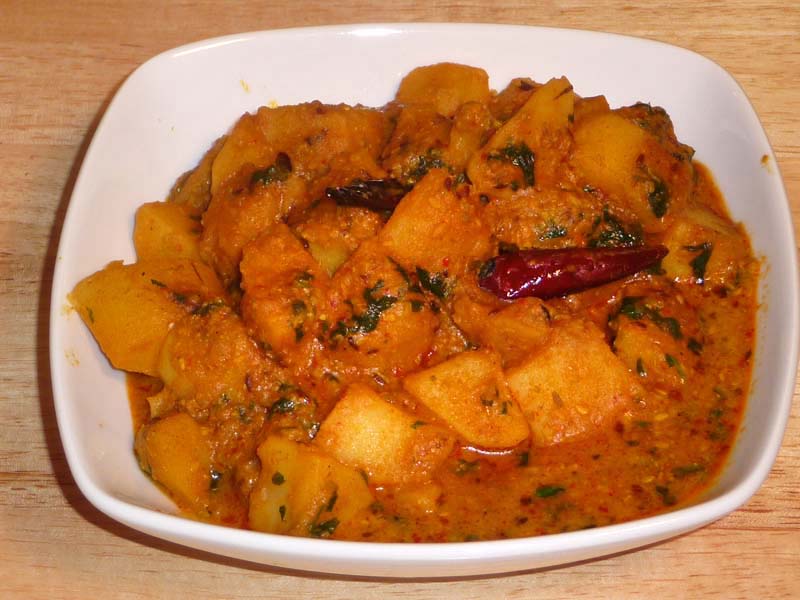
Aloo Dum is an exotic delicious main course dish. Just the smell of aloo dum can make you hungry! To make this dish, potatoes are fried and then soaked in the spicy aromatic gravy. This is a perfect dish for any dinnerparty.
Heat the oil in a frying pan over medium high heat.
Frying pan should have at least 1 inch of oil. To check if the oil is ready, put one piece of potato in the oil. The potato should sizzle right away. If potatoes are fried on low heat, they will be very oily.
Fry the potatoes till they are cooked through; turn the potatoes a few times while frying. Take out potatoes with a slotted spoon (this allows excess oil to drip back into the frying pan) and place on a paper towel. Keep it aside.
Heat the pan on medium heat and stir-fry the sesame seeds for about a minute until seeds lightly change color. Take them out and keep aside.
Blend sesame seeds, coconut, ginger, green chili, and make it into a paste. Use water as needed to blend into paste.
In a small bowl mix, sesame paste, yogurt, ginger, green chili, coriander powder, funnels seed powder, paprika, red chili powder, and turmeric into a paste. Keep it aside.
Heat the oil in a saucepan. Test the heat by adding one cumin seed to the oil; if seed cracks right away oil is ready. Add the cumin asafetida and cumin seeds. After the cumin seeds crack, add whole red chili and besan (gram flour). Stir-fry for about half a minute until the besan (gram flour) is golden-brown.
Add the spice paste and stir-fry for about 2 minutes on medium heat until the spices start to separate from the oil.
Add the potatoes, mix it well and add about 1cup of water. After the gravy boils, let it cook on low-medium heat for 8 to 10 minutes. Adjust the gravy to your liking.
Add the cilantro and garam masala, cover the pan, and turn off the heat. Let it sit for a few minutes before taking off the cover. This helps bring the color to the top of the dish.
Keyword Exotic, Party Food, Side Dish, Spicy Potatoes