Category: Special Occasion Recipes

Special Occasion Recipes: Celebrate with Delicious Indian Vegetarian Dishes

In Indian culture, food is an integral part of every celebration, festival, and special occasion. Whether it’s a grand wedding, a religious festival, or a simple family get-together, the menu is always elaborate, reflecting the richness of the Indian culinary heritage. Special occasions call for special dishes, and when it comes to Indian cuisine, the options are endless. From mouth-watering appetizers to sumptuous main courses and decadent desserts, Indian vegetarian recipes can make any celebration truly unforgettable.

The Importance of Food in Indian Celebrations

Food plays a central role in Indian celebrations, symbolizing prosperity, happiness, and togetherness. Each dish is thoughtfully prepared, using ingredients that are in harmony with the occasion’s significance. Traditional recipes passed down through generations often take center stage, with a focus on flavors, textures, and presentation.

Indian vegetarian cuisine, in particular, offers a wide range of options that cater to various dietary preferences and religious practices. These recipes are not only delicious but are also steeped in cultural and regional significance, making them ideal for special occasions.

Must-Try Indian Vegetarian Recipes for Special Occasions

Paneer Lababdar

Paneer Lababdar is a rich and creamy dish made with paneer (Indian cottage cheese) cooked in a tomato-based gravy. The addition of cream and butter gives it a luxurious texture, making it perfect for a festive meal. Serve it with naan or pulao for a complete experience.

Dum Aloo

Dum Aloo is a popular dish from North India, where baby potatoes are cooked slowly in a spicy yogurt-based gravy. The slow cooking process, known as “dum,” ensures that the flavors are deeply infused into the potatoes, making it a favorite for special occasions.

Malai Kofta

Malai Kofta is a classic dish that features soft, melt-in-the-mouth koftas (dumplings) made from paneer, potatoes, and nuts, simmered in a creamy tomato gravy. It’s a dish that’s sure to impress your guests and is often served at weddings and celebrations.

Pulao with Nuts and Raisins

A fragrant and flavorful rice dish, pulao is often prepared with a variety of spices, nuts, and raisins. This dish is a staple at Indian weddings and festivals, offering a delightful combination of sweet and savory flavors.

Gajar Ka Halwa

No Indian celebration is complete without dessert, and Gajar Ka Halwa (carrot pudding) is a must-have. Made with grated carrots, milk, sugar, and ghee, this dessert is garnished with nuts and is often served during Diwali and other festive occasions.

Puran Poli

Puran Poli is a traditional Maharashtrian sweet flatbread stuffed with a filling made from chana dal (split chickpeas) and jaggery. This delicacy is commonly prepared during festivals like Holi and Ganesh Chaturthi and is enjoyed by people of all ages.

Kofta Biryani

Biryani is synonymous with celebration, and Kofta Biryani adds a vegetarian twist to this classic dish. Made with spiced koftas, basmati rice, and aromatic spices, this dish is layered and slow-cooked to perfection, making it ideal for festive gatherings.

Dahi Bhalla

Dahi Bhalla is a popular North Indian snack made from deep-fried lentil balls soaked in yogurt and topped with chutneys and spices. This dish is a favorite during festivals like Holi and Diwali and is loved for its tangy and sweet flavors.

Shahi Paneer

Shahi Paneer is a royal dish that lives up to its name. “Shahi” means royal, and this dish is made with paneer cooked in a rich and creamy gravy of cashews, almonds, and cream. It’s a dish that is often reserved for the most special occasions.

Kheer

Kheer, a rice pudding, is one of the most beloved Indian desserts, often prepared for festivals and celebrations. Made with rice, milk, sugar, and flavored with cardamom and saffron, kheer is garnished with nuts and dried fruits, making it a fitting end to a celebratory meal.

Tips for Planning a Special Occasion Menu

Balance the Menu: Ensure that your menu has a good mix of appetizers, main courses, and desserts. Include a variety of flavors and textures to keep your guests engaged.

Consider Dietary Preferences: Indian cuisine offers a range of vegetarian options, but it’s also important to consider other dietary needs, such as vegan or gluten-free preferences.

Plan Ahead: Special occasion meals often require elaborate preparation. Plan your menu in advance and do as much prep work as possible the day before the event.

Presentation Matters: The way you present your food can enhance the dining experience. Use garnishes, elegant serving dishes, and thoughtful plating to make your dishes visually appealing.

Conclusion

Indian vegetarian cuisine offers a rich tapestry of flavors and dishes that are perfect for any special occasion. Whether you’re celebrating a wedding, a festival, or just gathering with loved ones, these recipes will add a touch of festivity and joy to your table. From creamy paneer dishes to decadent desserts, each dish is crafted to make your celebration memorable.

For more special occasion recipes, visit Manjula’s Kitchen – Special Occasion Recipes. Explore a world of flavors and find the perfect dishes to make your celebration truly special.

  • Chatpate Aloo (Spicy Stir-Fry Potatoes)

    Chatpate Aloo (Spicy Stir-Fry Potatoes)

    Chatpate Aloo (Spicy Stir-Fry Potatoes)

    Chatpate Aloo (Spicy Stir-Fry Potatoes)

    Chatpate Aloo or spicy stir-fry potatoes is a tangy and delicious spicy dish. These Stir-fried potatoes with green chili and tamarind give a very unique flavor. Chatpate Aloo is perfect as a delicious appetizer or you can serve them as a side dish with any meal.
    No ratings yet
    Course Appetizer
    Cuisine Indian
    Servings 4 people

    Ingredients
      

    • 3 cups potatoes boiled peeled and cubed in byte size
    • 4 tablespoons oil, I like canola oil
    • 1 teaspoon cumin seeds, jeera
    • 1 teaspoon salt
    • 2 tablespoons green chili finely chopped, adjust to your taste
    • 1/4 teaspoon chili flake
    • 1 teaspoon finely shredded ginger
    • 2 tablespoons tamarind paste (do not use concentrated Tamarind)
    • 1/4 teaspoon sugar
    • 1/4 cup cilantro chopped
    • 2-3 tablespoons water

    Instructions
     

    • Heat the oil in a frying pan on medium-high heat. Oil is the right temperature when cumin seeds crack immediately after being put in the pan.
    • Add cumin seeds after seeds crack add potatoes and sprinkle the salt over potatoes.
    • Stir-fry until potatoes are light golden brown this should take about 6-7 minutes. Add ginger, green chilies and chili flakes. Stir for about a minute.
    • Add tamarind paste, and sugar mix it well. Add water as needed about 2-3 tablespoons. Potatoes should be moist.
    • Turn off the heat and add cilantro. Mix it well and serve chatpata aloo hot.
    Tried this recipe?Let us know how it was!

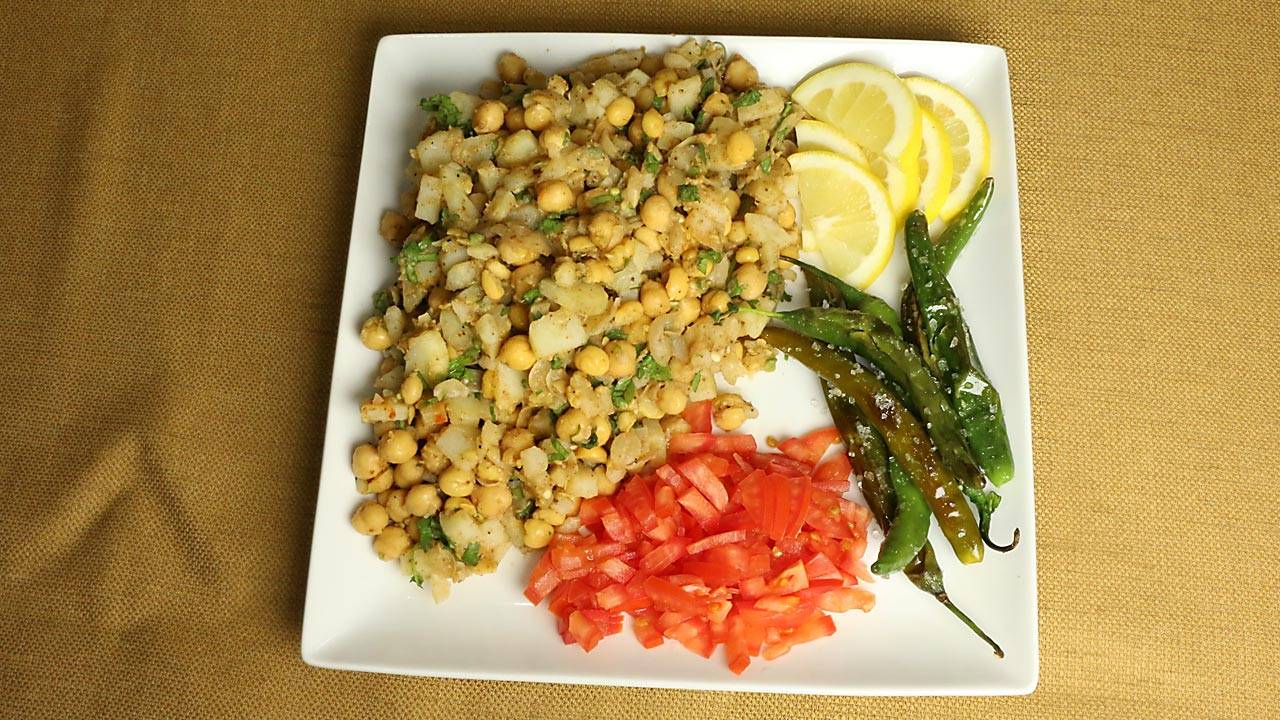
    Chatpate Aloo Fry Recipe: Spicy Potatoes 

    Chatpate Aloo is a delightful dish featuring sautéed potatoes seasoned with a tantalizing blend of spices. This recipe is perfect for various occasions including appetizers, gluten-free diets, lunch box suggestions, quick & easy meals, snacks, and especially suits vegan and vegetarian preferences. The potatoes are cooked to perfection, creating a crispy exterior while remaining tender inside. Bursting with flavor, Chatpate Aloo offers a satisfying experience with its spicy and aromatic profile, making it a popular choice among those seeking a delicious and wholesome dish.

    1. Preparing the Potatoes 

    To begin making the chatpate aloo fry, start by washing and peeling the potatoes. Cut them into small cubes or slices, depending on your preference. This step is crucial as it ensures even cooking and allows the flavors to penetrate the potatoes evenly. Chatpate aloo fry is all about the spicy and tangy flavors, so make sure to cut the potatoes into bite-sized pieces for maximum flavor impact.

    1. Frying the Potatoes 

    Heat oil in a pan and add cumin seeds to it. Once the cumin seeds start to splutter, add the diced potatoes to the pan. Fry the potatoes on medium heat until they turn golden brown and crispy on the edges. This step is essential as it gives the chatpate aloo fry its characteristic texture and crunchiness. Make sure to stir the potatoes occasionally to ensure even frying.

    1. Adding Spices 

    Once the potatoes are fried to perfection, it’s time to add the spices. Sprinkle turmeric powder, red chili powder, and chatpate masala over the fried potatoes. Adjust the quantity of spices according to your taste preferences. The chatpate masala is the star ingredient of this dish, adding a unique blend of tangy and spicy flavors to the chatpate aloo fry. Stir well to coat the potatoes evenly with the spices.

    1. Seasoning and Garnishing 

    Next, add salt to taste and squeeze fresh lemon juice over the chatpate aloo fry. The lemon juice adds a refreshing tanginess to the dish, balancing out the heat from the spices. Garnish the dish with freshly chopped cilantro leaves for a burst of freshness and color. Cilantro not only enhances the visual appeal of the dish but also adds a subtle herbaceous flavor that complements the spicy potatoes perfectly.

    1. Serving 

    Once the chatpate aloo fry is ready, transfer it to a serving platter and serve hot. This spicy potato dish is perfect as a side dish or snack and pairs well with roti, naan, or rice. You can also enjoy it on its own as a delicious and flavorful appetizer. Serve it with your favorite chutney or dip for an extra kick of flavor. Whether you’re entertaining guests or craving a spicy snack, chatpate aloo fry is sure to satisfy your taste buds with its bold and irresistible flavors.

    Tips: 

    To make the chatpate aloo fry even spicier, you can add finely chopped green chilies along with the spices.

    For added crunchiness, you can coat the potatoes in a thin layer of cornstarch before frying them.

    If you don’t have chatpate masala on hand, you can make your own by combining equal parts of chaat masala, amchur (dried mango powder), and black salt.

    Variations: 

    Chatpate Aloo Chaat: Turn this chatpate aloo fry into a delicious chaat by topping it with yogurt, tamarind chutney, tomatoes, and sev (crispy chickpea noodles).

    Chatpate Aloo Sandwich: Use the chatpate aloo fry as a filling for sandwiches along with some mint chutney and sliced vegetables for a spicy and satisfying meal.

    Benefits: 

    Potatoes are a good source of vitamins and minerals, including vitamin C, potassium, and B vitamins.

    The spices used in chatpate aloo fry, such as turmeric and red chili powder, have anti-inflammatory and antioxidant properties.

    Lemon juice adds vitamin C to the dish, which boosts immunity and aids in digestion.

    Cilantro is rich in antioxidants and may help lower blood sugar levels and improve heart health.

    FAQs: 

    Q: Can I make chatpate aloo fry ahead of time? 

    A: While chatpate aloo fry is best enjoyed fresh and hot, you can prepare the fried potatoes in advance and store them in an airtight container in the refrigerator. When ready to serve, reheat the potatoes in a pan and add the spices and seasonings.

    Q: Can I use sweet potatoes instead of regular potatoes? 

    A: Yes, you can definitely use sweet potatoes to make chatpate aloo fry. Sweet potatoes add a slightly sweet and earthy flavor to the dish, which pairs well with the spicy and tangy seasonings.

    Q: Is chatpate aloo fry spicy? 

    A: Yes, chatpate aloo fry is meant to be spicy, thanks to the addition of red chili powder and chatpate masala. However, you can adjust the level of spiciness according to your taste preferences by reducing the amount of chili powder or omitting it altogether.

    Explore more recipes on Manjula’s Kitchen: Vegetable Samosas, Paneer Tikka, Crispy Spinach Pakoras, Mango Lassi, Masala Chai, Gulab Jamun, Kheer (Rice Pudding)


  • Mixed Vegetable Pakoras

    Mixed Vegetable Pakoras

    Mixed Vegetable Pakoras

    Mixed Vegetable Pakoras

    These Mixed Vegetable Pakoras are an all-time favorite snack in India. There are endless variations of pakoras, which are also known as bhajias. Mixed vegetable pakoras as the name suggests are made with a variety of vegetables. Pakoras are great as an appetizer or snack for any type of the gathering. They are perfect for a rainy day, and even more delicious paired with a cup of hot spicy chai.
    No ratings yet
    Course Appetizer
    Cuisine Indian
    Servings 6 people

    Ingredients
      

    • 1 cup potato peeled and cut into very small pieces
    • 1 cup cauliflower cut into very small pieces
    • 1 cup packed spinach roughly chopped
    • 1 cup cabbage thinly sliced
    • 2 green chilies finely chopped adjust to taste
    • 1-1/2 cups besan (gram flour)
    • 3 teaspoons oil
    • 1 tablespoon coriander coarsely ground (Dhania)
    • 1 tablespoon fennel seeds coarsely ground (saunf)
    • 1/8 teaspoon asafetida
    • 1/2 teaspoon red chili powder
    • 1/2 teaspoon mango powder (amchoor)
    • 1/4 teaspoon garam masala
    • 1-1/2 teaspoons salt
    • Oil to fry

    Instructions
     

    • Combine all the dry ingredients, besan, coriander, fennel, red pepper, salt, and asafetida in a bowl. Mix it well.
    • Add potatoes, cauliflower, spinach, cabbage, and green chilies and oil into dry mix, mix it well keep aside for about ten minutes. When you are ready to fry pakoras if mix is too dry add as needed 1 or 2 spoons of water to make texture of soft dough.
    • Heat at least one inch of oil in a frying pan over medium high heat. To test, put one drop of batter in the oil. The batter should come up and not change color instantly.
    • Place about two tablespoons of mix holding with your fingers into the oil. Do not overlap the pakoras.
    • Fry the pakoras in small batches; after you turn the pakoras one time press the pakoras lightly.
    • This will take five to six minutes per batch. Fry the pakoras, turning occasionally, until both sides are golden brown.
    • Repeat this process for the remaining batches.
    • The crispy, delicious pakoras are now ready to serve.

    Notes

    Tips
    If the oil is too hot the pakoras will not be crisp; if the oil is not hot enough, the pakoras will be greasy.
     
    Serving suggestions
    1. The vegetable pakoras are best dipped in a mint chutney, tamarind chutney, or sprinkled with chat masala.
    2. Pakoras taste best when they are served hot.
    3. You can make the pakoras one day in advance, do not refrigerate. When ready to serve refry them in moderately hot oil.
    4. Leftover pakoras make good sandwiches.
    Tried this recipe?Let us know how it was!

    Mixed Vegetable Pakora Recipe: How to make Mixed Vegetable Pakora

    Introduction to Mixed Vegetable Pakora

    Mixed vegetable pakoras are a popular Indian vegan street food and snacks made with a variety of vegetables coated in a spiced chickpea flour batter and deep-fried until crispy. This mixed vegetable pakora recipe is a delicious way to enjoy the flavors of different vegetables in a crunchy and flavorful snack. It’s perfect for serving at parties, as a tea-time snack, or as an appetizer before a meal.

    Ingredients for Mixed Vegetable Pakora

    The ingredients required for making mixed vegetable pakoras include a variety of vegetables such as potatoes, cauliflower, spinach. These vegetables are thinly sliced or chopped into bite-sized pieces, depending on preference. Other ingredients include chickpea flour (besan), rice flour for added crispiness, spices like cumin seeds, turmeric powder, chili powder, and salt to taste. Fresh cilantro leaves and green chilies can be added for extra flavor and heat.

    Step-by-Step Instructions on How to Make Mixed Vegetable Pakora

    Preparation of Vegetables

    • Start by washing and preparing the vegetables. Peel and thinly slice the potatoes, chop the cauliflower into small florets, and finely chop the spinach leaves. Thinly slice green chilies. Ensure that all the vegetables are dry before using them in the batter.

    Making the Batter

    • In a large mixing bowl, combine chickpea flour, rice flour, cumin seeds, turmeric powder, chili powder, and salt to taste. Gradually add water to form a thick batter, ensuring there are no lumps. The batter should be thick enough to coat the back of a spoon but still easily coat the vegetables.

    Mixing Vegetables with Batter

    • Add the prepared vegetables to the batter and mix until they are evenly coated. Ensure that each piece of vegetable is well-coated with the batter for even frying.

    Frying the Pakoras

    • Heat oil in a deep frying pan or kadhai over medium heat. Once the oil is hot, carefully drop spoonfuls of the vegetable batter into the hot oil. Fry the pakoras in batches, ensuring not to overcrowd the pan. Fry until they are golden brown and crispy, flipping them occasionally for even frying.

    Draining and Serving

    • Once the pakoras are golden brown and crispy, remove them from the oil using a slotted spoon and drain them on paper towels to remove excess oil. Serve hot with mint chutney, tamarind chutney, or ketchup.

    Tips for Making Perfect Mixed Vegetable Pakoras

    • Ensure that the vegetables are thinly sliced or chopped uniformly to ensure even frying.
    • Use chilled water to make the batter, as it helps in making the pakoras crispier.
    • Adjust the spice levels according to your preference by adding more or less chili powder and green chilies.
    • Fry the pakoras on medium heat to ensure that they cook through evenly without burning.

    Variations of Mixed Vegetable Pakoras

    • Paneer Pakoras: Add cubes of paneer (Indian cottage cheese) along with the vegetables for an extra protein boost.
    • Corn Pakoras: Add sweet corn kernels to the vegetable batter for a sweet and crunchy variation.
    • Mushroom Pakoras: Slice mushrooms and coat them with the batter for a flavorful mushroom pakora.

    Benefits of Eating Mixed Vegetable Pakoras

    • Provides a good source of vitamins and minerals from the variety of vegetables used.
    • Chickpea flour used in the batter is gluten-free and rich in protein and fiber.
    • Frying the pakoras in moderate amounts of oil makes them crispy and delicious without being overly greasy.

    FAQs about Mixed Vegetable Pakoras

    Can I make mixed vegetable pakoras ahead of time?

    Yes, you can prepare the vegetable batter ahead of time and refrigerate it. However, it’s best to fry the pakoras just before serving to retain their crispiness.

    Can I bake mixed vegetable pakoras instead of frying them?

    While frying gives the pakoras a crispy texture, you can try baking them in a preheated oven at 375°F (190°C) for about 20-25 minutes or until they are golden brown and crispy.

    How long can I store leftover mixed vegetable pakoras?

    Leftover pakoras can be stored in an airtight container in the refrigerator for up to 2-3 days. Reheat them in a toaster oven or oven until they are heated through before serving.

    Other Recipes from Manjula’s Kitchen

    • Appetizers: Try out the delicious Samosa Recipe for another popular Indian appetizer.
    • Beverages: Refresh yourself with a cool glass of Mango Lassi, a traditional Indian yogurt-based drink.
    • Desserts: Indulge your sweet tooth with the delectable Gulab Jamun Recipe, a classic Indian dessert made from milk solids soaked in sugar syrup.

    With these recipes, you can explore a variety of flavors and tastes from the rich culinary tradition of Indian cuisine. Enjoy cooking and savoring these delightful dishes with family and friends!

  • Crispy Jalebi

    Crispy Jalebi

    Crispy Jalebi

    Crispy Jalebi

    Jalebi is a warm crispy, delicious treat. It can best be described as funnel cake. In my home town jalebi was a breakfast treat like pancakes, especially when they were served with kachori (puffed fried bread filled with spicy dal).  I know jalebi is mostly served as a dessert, but for me jalebi still makes the best breakfast treat.
    No ratings yet
    Course Dessert
    Cuisine Indian
    Servings 8 people

    Ingredients
      

    for Batter

    • 1 cup all-purpose flour, minus 2 Tablespoons
    • 2 tablespoons corn starch
    • Pinch of citric acid
    • 1 teaspoon oil
    • 1 teaspoon Yeast
    • 1-1/2 cup lukewarm water

    for Syrup

    • 1-1/2 cups sugar
    • 3/4 cup water
    • 4 cardamom crushed
    • A few strands of saffron
    • Few drops lemon juice
    • Oil to fry

    Instructions
     

    for Batter

    • Sift the all-purpose flour and corn starch together, add the citric acid, and yeast mix it well.
    • Add the water slowly to make a smooth batter, add oil and mix it well. Batter should be pourable consistency of dosa.
    • Set the batter aside in a warm place for about half an hour. Make sure the batter is not over-ferment. After fermenting the batter will be a little lacy.

    for Syrup

    • Boil the sugar and water together. Add the lemon juice, cardamom and saffron. (The lemon juice keeps the mixture from crystallizing). Boil for 2-3 minutes until syrup is about sticky to fingers but has not formed a thread. Turn off the heat.

    for Jalebi

    • Heat the oil in a flat frying pan about one inch deep. To test, put one drop of batter in the oil. The batter should sizzle and rise into a ball without changing color right away.
    • Fill the Jalebi batter into a piping bag with a #3 nozzle. You can also use an empty ketchup or mustard bottle. That’s what I am using.
    • Squeeze the Jalebi batter out into the hot oil in pretzel shapes about three inches in diameter.
    • Fry the jalebis until light golden brown on both sides. Take them out, wait for a minute then transfer them into the warm syrup. Let the jalebis soak in the syrup for about half a minute, take them out. Repeat the process.
    • Jalebies are ready to serve.

    Notes

    Variations
    1. Sprinkle sliced pistachios and almonds, cinnamon powder, coco powder, or sugar powder over the jalebis for a creative touch.
    2. Serve jalebis with malai (a milk reduced by boiling to about one-third of its original quantity.
    Keyword jalebi
    Tried this recipe?Let us know how it was!
  • Khaman (Besan) Dhokla

    Khaman (Besan) Dhokla

    Khaman (Besan) Dhokla

    Khaman (Besan) Dhokla

    Khaman (Besan) dhokla, is a tasty Gujarati snack. This salty vegan, gluten free snack has a texture similar to cake. This is a popular street food in Gujarat.  The best snacks are usually easy and quick to make. This is a delicious guilt-free snack, or side dish that can go with any meal.
    5 from 1 vote
    Course Appetizer
    Cuisine Indian
    Servings 6 people

    Ingredients
      

    • 1-1/2 cups besan (Gram flour)
    • 2 tablespoons Sooji (rava, Semolina)
    • 1/2 teaspoon Citric acid
    • 1/8 teaspoon asafetida (hing)
    • 1/4 teaspoon turmeric (haldi)
    • 3 teaspoons sugar
    • 1 teaspoon ginger paste
    • 1 green chili finely chopped
    • 1 teaspoon salt
    • 1-1/4 cups water use as needed to make pouring consistency
    • 2-1/2 teaspoons Eno (fruit Salt)

    For Seasoning:

    • 2 tablespoons oil
    • 1/2 teaspoon mustard seeds (rai)
    • 1/2 teaspoon sesame seeds (til)
    • 4-5 curry leaves optional
    • 2 green chili seeded and cut into 4 length wise

    Also need 2-3 tablespoons hot water

    Utensils to steam Dhokla

    • Dhokla maker – or, if you don’t have that, use all three of the following: that’s what I am also using
    • Covered pan large enough to hold round cake rack
    • Round cake-cooling rack
    • Round 9” cake pan

    Instructions
     

    • Sift the besan, and make batter should be smooth and pouring consistency. Add all the ingredients except the ENO to the batter sooji, salt, sugar, asafetida, ginger, citric acid and green chili, mix it well, if needed add little more water. Set aside. We will add the ENO just before steaming.
    • Grease the cake pan and set aside.
    • Set the cake rack in the pan. Add water, just enough to touch the cake rack, and bring to a boil. This will be used to steam the dhokla.
    • When the water boils, turn down the heat to medium.
    • Add the ENO to the batter and beat the batter for a minute, batter will become airy and frothy. Quickly pour batter into a greased cake pan. Place the cake pan into the saucepan over the cake rack. Cover the pan. Steam for about 8 minutes on medium heat. Do not open the pen in between.
    • Check Dhokla with a knife. If the knife comes out clean, dhokla is ready. Turn off the heat and let it sit over the stem for 4-5 minutes covered.

    Prepare the seasoning

    • Heat oil in a small pan over medium heat moderately. Add mustard seeds, and sesame seeds stir for 3-4 seconds, add green chili stir and curry leaves, stir for few seconds. Cover the pan and turn off the heat. Careful curry leaves will splatter.
    • First drizzle the hot water over dhokla this will keep the dhokla moist. Then drizzle the seasoning over.
    • Cut them in squares.
    • Serve with Hari cilantro chutney. Taste best when it is served warm.

    Notes

    Suggestion
    1. Khaman Dhokla can be refrigerated for a few days. Before serving, heat Dhokla in a microwave or heat over steam.
    Tried this recipe?Let us know how it was!

    Instructions for How to make Khaman Dhokla

    Khaman Dhokla is a steamed savory cake made from fermented chickpea flour batter, typically served as an appetizer or snack in Indian cuisine. It’s a versatile dish that fits well within various dietary preferences such as being suitable for diabetics, low cholesterol, low fat, lunch box suggestions, street food recipes, and vegan diets.

    This light and fluffy snack is perfect for those looking for healthier options due to its low-fat content and absence of cholesterol. It can also be an ideal addition to lunch boxes, providing a nutritious and flavorful alternative to traditional snacks. Moreover, Khaman Dhokla’s vegan ingredients make it inclusive for those adhering to plant-based diets.

    With its savory taste and soft texture, Khaman Dhokla is a popular choice for street food enthusiasts seeking satisfying yet wholesome options. Its ability to cater to various dietary needs while offering delicious flavors makes it a versatile and beloved dish in Indian cuisine.

    Understanding the Method: 

    To begin our journey towards mastering Khaman Dhokla, it’s essential to understand the method behind its preparation. The process involves creating a smooth batter from besan (gram flour) along with a blend of spices and other ingredients. The batter is then steamed until it rises and cooks to perfection. Let’s delve into the detailed steps involved in making this savory delight:

    • Preparing the Batter: 

      • Sift the besan to ensure a smooth texture.
      • Gradually add water to achieve a pouring consistency, ensuring there are no lumps.
      • Incorporate additional ingredients such as sooji (semolina), salt, sugar, asafetida, ginger, citric acid, and green chili, mixing thoroughly.
      • Adjust the batter consistency if necessary by adding a little more water.
      • Set aside the batter and refrain from adding ENO (fruit salt) at this stage.
    • Setting up for Steaming:

      • Grease a cake pan and set it aside.
      • Place a cake rack inside a saucepan and add water, ensuring it touches the cake rack.
      • Bring the water to a boil over medium heat.
    • Adding ENO and Steaming: 

      • Just before steaming, add ENO to the batter and beat vigorously for a minute until the batter becomes airy and frothy.
      • Quickly pour the batter into the greased cake pan and place it inside the saucepan over the cake rack.
      • Cover the saucepan and steam the dhokla for approximately 8 minutes on medium heat without opening the lid.
      • To check for doneness, insert a knife into the dhokla; if it comes out clean, the dhokla is ready.
      • Turn off the heat and let the dhokla sit over the steam for 4-5 minutes, covered.
    • Preparing the Seasoning:

      • Heat oil in a small pan over medium heat.
      • Add mustard seeds and sesame seeds, stirring for a few seconds until they begin to crackle.
      • Incorporate green chilies and curry leaves, stirring briefly.
      • Cover the pan and turn off the heat, being cautious as curry leaves may splatter.
    • Finishing Touches and Serving: 

      • Drizzle hot water over the steamed dhokla to keep it moist.
      • Pour the prepared seasoning over the dhokla.
      • Cut the dhokla into squares for serving.
      • Serve warm with Hari cilantro chutney for a delightful culinary experience.

    Tips for Perfecting Khaman Dhokla:

    Now that we’ve outlined the method, let’s delve into some essential tips to ensure your Khaman Dhokla turns out perfect every time:

    • Consistency is Key: Achieving the right consistency of the batter is crucial for fluffy dhoklas. Aim for a smooth, lump-free batter with a pouring consistency.
    • Timeliness: Once ENO is added to the batter, it should be steamed immediately to ensure the dhokla rises properly.
    • Steaming Technique: Maintain a medium heat while steaming and resist the urge to open the lid during the steaming process, as this may affect the dhokla’s texture.
    • Seasoning Sensation: The tempering or seasoning adds an extra layer of flavor to the dhokla. Ensure the mustard seeds crackle and the curry leaves release their aroma for the perfect seasoning.
    • Serving Suggestions: Khaman Dhokla tastes best when served warm with fresh Hari cilantro chutney. The combination of flavors elevates the culinary experience.

    Frequently Asked Questions (FAQs):

    Here are some common queries regarding Khaman Dhokla along with their answers:

    Can I make Khaman Dhokla in advance? 

    Yes, you can prepare Khaman Dhokla in advance and refrigerate it for a few days. Before serving, reheat the dhokla either in a microwave or by steaming.

    Can I customize the spice level of Khaman Dhokla? 

    Absolutely! Feel free to adjust the quantity of green chilies according to your spice preference. You can also omit them altogether for a milder flavor.

    What can I serve with Khaman Dhokla besides chutney? 

    Khaman Dhokla pairs well with a variety of accompaniments such as tamarind chutney, mint chutney, or even a tangy tomato-based sauce.

    Can I freeze Khaman Dhokla for later use? 

    While it’s best enjoyed fresh, you can freeze Khaman Dhokla for a short period. Ensure it is tightly wrapped to prevent freezer burn, and thaw it thoroughly before reheating.

    Health Benefits of Khaman Dhokla: 

    Apart from its delicious taste, Khaman Dhokla offers several health benefits

    • Rich in Protein: Gram flour, the main ingredient in Khaman Dhokla, is an excellent source of plant-based protein, making it a nutritious snack or meal option.
    • Low in Calories: Steamed rather than fried, Khaman Dhokla is relatively low in calories compared to other fried snacks, making it a healthier choice for weight-conscious individuals.
    • Gluten-Free: Since Khaman Dhokla is made from gram flour, it is naturally gluten-free, catering to individuals with gluten intolerance or celiac disease.
    • Easy to Digest: The steaming process makes Khaman Dhokla light and easy to digest, making it suitable for individuals with digestive sensitivities.

    Mastering the art of making Khaman Dhokla is a rewarding culinary journey. By following the detailed method, incorporating essential tips, and exploring serving suggestions and health benefits, you can elevate your dhokla-making skills to new heights. Whether enjoyed as a snack, breakfast item, or party appetizer, Khaman Dhokla is sure to tantalize your taste buds and leave you craving for more. So, gather your ingredients, embark on this flavorful adventure, and savor the joy of creating and indulging in homemade Khaman Dhokla!

    If you’re looking to explore more Indian recipes, appetizers, beverages, and desserts, be sure to check out the following links on Manjula’s Kitchen. Here are some links to recipes on Manjula’s Kitchen official website: Vegetable Pakoras, Kaju Katli (Cashew Burfi), Baingan Bharta (Roasted Eggplant), Matar (Green Peas) Paneer, Besan Ladoo.


  • Grilled Veggie Pasta Salad

    Grilled Veggie Pasta Salad

    Grilled Veggie Pasta Salad

    Grilled Veggie Pasta Salad

    Grilled Veggie Pasta Salad is nutritious, tasty and full of flavor. This salad is made with a combination of vegetables and pasta. These are then tossed with a homemade dressing. Grilled Veggie Pasta Salad will make a very enjoyable lunch box meal.
    No ratings yet
    Course Salad, Soup
    Cuisine Indian
    Servings 4 people

    Ingredients
      

    • 3/4 cup elbow pasta,
    • 2 cups bell pepper cut to the bite size – use different color bell pepper of your choice
    • 2 cups zucchini with skin on cut to the bite size
    • 2 cups tomatoes cut to the bite size
    • 1 tablespoon oil
    • 1/2 teaspoon salt

    Dressing

    • 2 tablespoons olive oil
    • 2 tablespoon vinegar
    • 1 teaspoon lemon juice
    • 1 teaspoon ginger zest
    • 1 teaspoon salt
    • 1 teaspoon sugar
    • 1/8 teaspoon black pepper

    Instructions
     

    • Cook pasta as directed on package. Set aside.
    • For dressing mix all the dressing ingredients oil, vinegar and seasonings in small bowl and whisk until well blended. Set aside.
    • Add the oil in a frying pan with a spatula spread the oil to coat the frying pan. Notes: wide bottom frying pan works the best. Add the zucchini and bell peppers, sprinkle the salt.
    • Turn the heat to high and grilled the vegetable moving the around slowly until they are nice brown color looking like grilled. This should take 4-5 minutes.
    • Add the tomatoes and cook just for a minutes stirring continuously. Tomatoes should not be soft. Toss the pasta with vegetables.
    • Transfer salad into the bowl. Add the dressing and toss the salad making sure all the vegetables and pasta are coated.
    • Let salad sit for about fifteen minutes before serving.

    Notes

    Suggestions
    1. You can also refrigerate this salad for a day.
    2. Grilled vegetable pasta salad makes a nice lunch box meal.
    Tried this recipe?Let us know how it was!

  • Dal Puri (Indian Fried Bread)

    Dal Puri (Indian Fried Bread)

    Dal Puri

    Dal Puri (Indian Fried Bread)

    Dal Puri (fried puffed bread), which consist of puris filled with mildly spiced moong dal. This delicacy is delicious and very festive. Dal Puri is an excellent option with any meal as it is sure to be a crowd-pleaser. Serve these incredible dal puris with spicy squash, or potato curry with yogurt gravy.
    No ratings yet
    Course Bread
    Cuisine Indian
    Servings 4 people

    Ingredients
      

    For Dough

    • 1-1/2 cups all-purpose flour – plain flour – maida
    • 1-1/2 tablespoons oil
    • 1/4 teaspoon salt
    • About 1/2 cup water

    For Filling

    • 1/2 cup moong dal
    • 1 tablespoon ginger chopped
    • 1 green chili chopped
    • 1/2 teaspoon salt
    • 1 teaspoon fennel seeds powder- saunf
    • 1/2 teaspoon cumin seeds – jeera
    • 1/2 teaspoon mango powder – amchoor
    • 1/8 teaspoon asafetida – hing
    • 2 teaspoons oil
    • Also need oil to fry

    Instructions
     

    For Dough

    • In a bowl mix the flour, salt and oil together. Add the water slowly, mixing with your fingers as you pour. Dough should be firm and smooth. I used about half cup of water. Knead the dough lightly. Cover the dough and let it sit for at least fifteen minutes.

    For Filling

    • Wash and soak dal for at least four hours. Drain the water and blend dal, with ginger, and green chili to smooth paste. While blending dal just use enough water needed to blend. I used about 3 tablespoons of water.
    • After dal is blended to smooth paste add all the ingredients fennel seeds, cumin seeds, asafetida, and mango powder except oil, blend for few seconds making all the ingredients mix well.
    • Heat the oil in a nonstick frying pan over low medium heat, add dal paste and keep stirring until it becomes consistency of soft dough. This should take about 2 minutes.
    • Remove from heat and let it cool just enough that you can knead it to make a soft dough.

    Making the Dal Puri

    • Take the dough and knead it for a minutes. Divide the dough in 18 equal parts.
    • Take the filling and divide into 18 parts, filling should be little smaller then dough ball. You may have some filling left over.
    • Take one part of the dough and with your fingers flatten the edges and make into 3-inch circle. Leaving center little thicker then edges.
    • Mold the dough into a cup and place 1 part of filling in the center. Pull the edges of the dough to wrap the dal filling. Proceed to make all the balls.
    • Let the filled ball sit for three to four minutes before rolling.
    • Lightly Oil the rolling pin and rolling surface. Roll the balls gently into 6” circles.
    • You can roll two or three puris before start frying, but do not roll all the puris at once or they will begin to dry out and fail to puff.
    • Heat the oil in frying pan over medium heat frying pan should have about one inch of oil. To check if oil is ready put a little piece of dough in the oil. Dough should sizzle, and come up slowly.
    • Fry one puri at a time. Place the puri in the frying pan and press with a skimmer. The puri should puff up. Turn puri over and cook until light golden brown on both sides. Take the puri out and place them on paper towels to absorb the excess oil. Repeat the process for remaining piries.
    Tried this recipe?Let us know how it was!

  • Spinach Kofta Curry

    Spinach Kofta Curry

    Spinach Kofta Curry

    Spinach Kofta Curry

    Spinach kofta curry is an exotic gravy-based dish. These spinach and potato koftas (also known as pakoras or dumplings) are simmered in rich creamy tomato gravy making this a very delicious dish. Spinach kofta can be served with any Indian flat bread like RotiNaan, Paratha, or with plain white rice. This will be enjoyed by everyone.
    3.50 from 2 votes
    Course curry
    Cuisine Indian
    Servings 4 people

    Ingredients
      

    For Kofta

    • 2 cups spinach finely chopped
    • 1-1/2 cups potatoes boiled, peeled and mash
    • 1/2 teaspoon cumin seed (jeera)
    • 1/2 teaspoon salt

    For Batter

    • 1/4 cup besan (gram flour)
    • About 1/4 cup water
    • Also needed Oil to fry

    Gravy

    • 2 tablespoons oil
    • 1 teaspoon cumin seeds (jeera)
    • 1/8 teaspoon asafetida (hing)
    • 2 teaspoon coriander powder (dhania)
    • 1/2 teaspoon turmeric (haldi)
    • 3 tablespoons cashew powder
    • About 2 cups tomatoes cut into small pieces
    • 1 tablespoon chopped ginger
    • 1 green chili chopped
    • 1 teaspoons salt
    • 1 teaspoon sugar
    • 1/4 cup cream
    • 1/4 teaspoon garam masala
    • About 1-1/2 cups of water

    Instructions
     

    Koftas (dumpling):

    • Mix all the ingredients for kofta spinach, potatoes, cumin seeds, and salt, this mix should consistency of dough. Notes: spinach should be pat dry and potatoes should be firm not overcook. Otherwise mix will be very soft and will not hold the shape after adding to the gravy.
    • With oiled hands, divide the mixture into 24 to 30 equal parts. Make them in round balls.
    • Make the batter add the water slowly as needed in the besan, batter should be very smooth no lumps. It should be pouring consistency.
    • Heat the oil in a frying pan on medium high heat. Frying pan should have about 1 inch of oil. Oil should be moderately hot. To check if the oil is ready, put small piece of mix in the oil, oil should sizzle.
    • Dip the spinach balls in the batter one at a time and slowly drop into the frying pan. Fry koftas until golden-brown all around. Turn them occasionally. This should take about 3-4 minutes.

    Making Gravy:

    • Blend the tomatoes, green chilies and ginger to make a puree. If you prefer a milder version, take the seeds out of the green chili before blending.
    • Heat the oil in a saucepan on medium-high. Test the heat by adding one cumin seed to the oil; if it cracks right away oil is ready.
    • Add the asafetida, cumin seeds stir for a minute. Lower the heat to low, add the other spices except garam masala, coriander powder, turmeric, salt sugar, turmeric, and cashew powder. Stir-fry for a minutes.
    • Add the tomato puree, increase the heat to medium cook until the tomato mixture starts leaving the oil and reduces to about half in quantity. Add cream save about 1 tablespoon for garnishing and cook for another minute.
    • Add about 1-1/2 cups of water, as it comes to boil reduce the heat to low and let the gravy cook for few minutes.
    • Note: adjust the thickness of the gravy to your taste by adjusting the water.
    • Add the prepared koftas and let it simmer for 1-2 minutes.
    • Turn of the heat and add the garam masala and cover the pot.
    Tried this recipe?Let us know how it was!

  • Masala Vada (Vadai)

    Masala Vada (Vadai)

    Masala Vada

    (Vadai)

    Masala Vada is a South Indian favorite snack that is made with spiced chana dal. They are delicious crunchy on the outside and soft inside. Masala Vada is a popular street food in South India.  Try serving along with your afternoon tea.
    No ratings yet
    Course Appetizer
    Cuisine Indian
    Servings 6 people

    Ingredients
      

    • 1 cup chana dal or also known Bengal gram
    • 1 tablespoons rice flour
    • 1 cup potatoes boiled peeled and mashed
    • 1 teaspoon salt
    • 1-1/2 teaspoons fennel seeds crushed
    • 1 teaspoon mango powder
    • 1/2 teaspoon black pepper crushed
    • 1/8 teaspoon asafetida
    • 1 tablespoon ginger paste
    • 2 tablespoons finely chopped green chilies
    • 1/4 cup cilantro finely chopped
    • Also need oil to fry

    Instructions
     

    • Wash and Soak chana dal in three cups of water for about 4 hours after soaking this will become about twice in volume.
    • Drain the water, keep 2 tablespoons soaked dal aside. Grind dal coarsely without adding any water. I like to use food processor.
    • Take out the dal in a mixing bowl, add all the ingredients, potatoes, rice flour, salt , fennel seeds, mango powder, black pepper, asafetida, ginger, green chili, cilantro and soaked chana dal. Mix it well.
    • Lightly wet your palms, this will make easy to roll the vadas. Take a lemon size ball of the mix, flatten it with your hands, making them to about half inch thick patties. This should make about 16 patties. I like to make few of patties before I start frying.
    • Heat the oil in a frying pan, (frying pan should have about 1” of oil) over medium heat. Oil should be moderately hot when you drop the vada, oil should sizzle and come to surface slowly. Gently drop the vadas in oil making sure they don’t overlap.
    • Fry the vadas both sides till golden brown and crisp, turning over two to three times. This should take 6-7 minutes. Repeat the same procedure for the rest of the mix.
    • Take them out over paper towel, this absorb the access oil.
    • Serve vadas as they are or with chutneys, I like them with coconut chutney.
    Tried this recipe?Let us know how it was!

    Masala Vada Recipe: Delightful Snack


    Masala Vada is a delightful Indian appetizer and street food snack that fits perfectly into the categories of gluten-free, vegan, and snacks. Made primarily from chickpea flour and an assortment of spices, Masala Vada is a savory fritter popular in South Indian cuisine. It’s typically crafted by blending soaked and coarsely ground chana dal (split chickpeas) with green chilies, ginger, curry leaves, and coriander leaves. 

    Masala vada is a popular South Indian snack made from chana dal. It is crispy on the outside and soft on the inside, making it a delightful treat for snack lovers. This masala vada recipe is easy to follow and yields delicious vadas that are perfect for serving with tea or as an appetizer.

    Soaking the Chana Dal

    To begin making the recipe of masala vada, start by soaking the chana dal in water for at least 3-4 hours. This helps to soften the dal and make it easier to grind later on.

    Draining and Grinding

    Once the dal is soaked, drain the water completely and transfer the dal to a blender or food processor. Grind it coarsely without adding any water. The texture should be coarse, with small pieces of dal still visible.

    Mixing the Ingredients

    Transfer the ground dal to a mixing bowl and add chopped green chilies, grated ginger, chopped cilantro, cumin seeds, and salt to taste. Mix everything together until well combined. This mixture forms the base of your masala vada.

    Shaping the Vadas

    Heat oil in a deep frying pan or kadhai over medium heat. While the oil is heating, take small portions of the dal mixture and shape them into small patties or vadas. You can flatten them slightly with your palms to ensure even cooking.

    Frying the Vadas

    Carefully slide the shaped vadas into the hot oil, making sure not to overcrowd the pan. Fry them in batches until they turn golden brown and crispy on both sides. Use a slotted spoon to remove the fried vadas from the oil and drain them on paper towels to remove excess oil.

    Serving

    Serve the dal vada hot with your favorite chutney or sauce. They can also be enjoyed on their own as a crunchy and flavorful snack.

    Tips

    • To make the vadas even more flavorful, you can add curry leaves, or grated coconut to the dal mixture.
    • Make sure the oil is hot enough before frying the vadas to ensure they cook evenly and become crispy.
    • If you prefer a spicier version, you can increase the quantity of green chilies or add a pinch of red chili powder to the dal mixture.

    Variations

    • Instead of chana dal, you can use a combination of different dals like moong dal, urad dal, or toor dal to make variations of masala vada.
    • For a healthier alternative, you can air-fry the vadas instead of deep-frying them. Simply preheat the air fryer, brush the vadas with a little oil, and air-fry them until crispy.

    Benefits

    • Masala vada is a good source of protein and fiber due to the presence of chana dal, making it a nutritious snack option.
    • The spices used in the vadas like ginger and cumin seeds have digestive properties and aid in digestion.
    • As these vadas are fried, they should be consumed in moderation as part of a balanced diet.

    FAQs

    Can I make masala vada ahead of time?

    Yes, you can prepare the dal mixture in advance and store it in the refrigerator. When ready to serve, shape the vadas and fry them fresh for the best taste and texture.

    Can I freeze masala vada?

    While it’s best to consume masala vada fresh, you can freeze any leftover vadas for later consumption. Simply place them in an airtight container or ziplock bag and freeze for up to a month. Reheat them in an oven or air fryer before serving.

    Can I use pre-cooked dal to make masala vada?

    It’s recommended to use uncooked, soaked dal for this recipe as it gives the vadas the right texture and consistency. Using pre-cooked dal may result in vadas that are too soft and mushy.

    For more delicious recipes, explore more Indian recipes, appetizers, beverages, and desserts, be sure to check out the following links on Manjula’s Kitchen. Here are some links to recipes on Manjula’s Kitchen official website: Paneer Tikka Masala Recipe, Chana Chaat (Spicy Chickpea Salad) Recipe, Pav Bhaji (Spicy Vegetable Hash with Buns) Recipe, Raj Kachori (Crunchy Chaat) Recipe, Vegetable Biryani Recip. These recipes should offer you a flavorful experience straight from Manjula’s Kitchen.

  • Coconut Almond Burfi

    Coconut Almond Burfi

    Coconut Almond Burfi

    Coconut Almond Burfi

    Coconut almond burfi is a classic dessert and simply delicious. Coconut almond burfi is super easy to make with few ingredients.  This is also vegan and gluten-free.
    No ratings yet
    Course Dessert
    Cuisine Indian
    Servings 6 people

    Ingredients
      

    • 2 cups coconut freshly grated, I am using frozen shredded coconut
    • 1-3/4 cups sugar
    • 1/2 cup blanched almond powder
    • 1/4 teaspoon cardamom powder

    Instructions
     

    • In a non-stick frying pan add coconut and sugar, cook over low medium heat, stir continuously till sugar is melted and mixture starts to bubble.
    • Add the almond powder and cardamom, keep stirring continuously, scraping the sides and bottom of the pan, until mixture start coming together and becomes consistency of soft dough. This should take about 6-7 minutes. Turn of the heat.
    • Pour the mixture into greased plate while burfi mixture is still hot spread it evenly about 3/4 inch thick in a square shape. Press the mixture with spatula to make it firm.
    • While burfi is still warm cut them in about one inch square.
    • Allow the burfi to cool for about an hour to dry and hold its shape. Now you can remove the burfi from the plate.
    • Burfi can be stored for 2 weeks in air tight container.

    Notes

    Notes: To blanch almonds, drop almonds in boiling water and keep aside. Drain and rinse under cold water after 5 minutes. Press the almonds one by one and squeeze the skin lightly to pop
    Tried this recipe?Let us know how it was!

  • Aloo Chana Chaat

    Aloo Chana Chaat

    Aloo chana chaat recipe by Manjula

    Aloo Chana Chaat

    Aloo chana chaat is a spicy potato and chickpea snack. It's very easy to make and is a favorite tasty treat of mine. This recipe involves marinating boiled potatoes and chickpeas in spices to make a great savory snack.
    No ratings yet
    Prep Time 30 minutes
    Cook Time 10 minutes
    Course Chaat
    Cuisine Indian
    Servings 4 people

    Ingredients
      

    • 1-1/2 cups boiled chickpeas, garbanzo (chols, kabuli chana)
    • 1-1/2 cups potatoes (aloo) boiled peeled and cubed in small pieces
    • 1 tablespoon ginger finely grated (adrak)
    • 2 teaspoons green chili finely chopped
    • 1/4 teaspoon red chili powder
    • 1 teaspoon roasted cumin seed powder
    • 1/2 teaspoon salt
    • 1/2 teaspoon black salt (kala namak)
    • 1/2 teaspoon mango powder (amchoor)
    • 2 teaspoons lemon juice
    • 1/2 teaspoon sugar
    • 2 tablespoons finely chopped cilantro (hara dhania)

    For Garnishing

    • 1 tomato finely chopped
    • 6 slices of lemon
    • 6 green chilies mild
    • 2 tablespoons oil
    • 1 teaspoon sea salt or coarse salt

    Instructions
     

    • Wash and dry the whole green chilies. Heat a small frying pan on low medium heat, add the oil and green chilies, and cover the pan. Shake the pan slowly to move the chilies around. Notes: it is important to keep the pan cover chilies will splatter. Cook the chilies for about 2 minutes turn off the heat, wait till it stop splattering and remove the lid chilies should be light brown if it is not cook for another minute. Remove and keep aside.
    • Place chickpeas in a bowl and lightly mash. Add the potatoes and all the ingredients ginger, green chili, red pepper, salt, black salt, black pepper, mango powder, sugar, roasted cumin powder, lemon juice, and cilantro mix it well.
    • Let it sit for at least fifteen minutes or more, chickpeas and potatoes will absorbed the flavor of spices.
    • Serve the aloo chana chat with side of tomatoes, fried green peppers and lemon wedges.

    How to boil the chickpea

    • Soak one cup of chickpeas for about eight hours or more, after soaking chick peas will be about 2-1/2 times. Drain the water, cooked the chickpeas in pressure cooker on high heat with 2 cups of water and no salt. After pressure cooker start steaming reduce the heat to low medium and cook for 10 minutes.

    Notes

    Serving suggestions
    1. Aloo chana chaat also makes a good lunch box meal.
    2. Serve this with tamarind chutney or cilantro chutney and you will have a new recipe.
    Tried this recipe?Let us know how it was!

  • Milk (Khoya) Burfi

    Milk (Khoya) Burfi

    Milk (Khoya) Burfi

    Milk (Khoya) Burfi

    Milk burfi, also known as khoya burfi is a classic Indian sweet that can be served both as a dessert or snack. Milk Burfi is made with milk, sugar, and flavored with cardamom. Finish it with a garnish of sliced pistachios and you have a simply divine treat! This is a staple in most North Indian households and served on many occasions.
    No ratings yet
    Course Dessert
    Cuisine Indian
    Servings 6 people

    Ingredients
      

    • 3-1/2 cups whole milk
    • 1/2 cup heavy cream
    • 3 tablespoons lemon juice strained
    • 1 tablespoon clarified butter or ghee
    • 3/4 cup milk powder
    • 1/3 cup sugar
    • 1/4 teaspoon cardamom powder
    • 1 tablespoon sliced pistachios for garnishing

    Instructions
     

    • Heat the milk, heavy cream and lemon juice on a heavy bottom pan over medium heat, stirring occasionally. As milk will start heating the curd will start separating from the whey, slowly it will separate into thick curds and whey will separate.
    • Once the milk fat has separated from the whey, drain the whey using a strainer line with cheesecloth, or muslin cloth.
    • Wrap the curds in a muslin cloth, rinse under cold water, and squeeze well. This process takes out the sourness from the lemon.
    • Heat the frying pan on medium. Add butter and let it melt.
    • Next add milk curd, and milk powder. Mix it well.
    • Cook mixture on medium heat stirring continuously until mixture starts leaving the sides of the frying pan and becomes like soft dough. This should take about 12 minutes. Now this is known as khoya.
    • Transfer the khoya into a bowl and let it cool off until khoya becomes just lukewarm.
    • Mix the sugar and cardamom powder into the khoya and knead it for about a minute until everything blends together and become soft dough. Note: if you mix the sugar while khoya is hot that will make burfi soft.
    • Transfer mixture to the greased plate and press firmly into a square or rectangular shape, approximately 1/2 inch high.
    • Let the burfi sit for about one hour before slicing I prefer cutting in about 1-1/2 inch squares.
    • For garnishing put few pieces of sliced pistachios on every piece burfi.

    Notes

    Notes: Do not heat the milk on high heat, milk should separate slowly. Also some time milk will separate in small curds or sometimes you will not see the curds either way it will be fine.
    Tried this recipe?Let us know how it was!

  • Eggless Omelet (Vegan)

    Eggless Omelet (Vegan)

    Eggless Omelet

    Eggless Omelet (Vegan)

    This Eggless Omelet is similar to a variation of besan chila. I combine lots of vegetables including bell pepper, spinach, and tomatoes and then add in some light spices. Now you have a healthy and delicious choice for breakfast or light lunch. It is also vegan and gluten free!
    5 from 1 vote
    Prep Time 15 minutes
    Cook Time 15 minutes
    Course Bread
    Cuisine Indian
    Servings 2 people

    Ingredients
      

    • 3/4 cup besan (gram flour) available in Indian grocery stores
    • 1/2 teaspoon salt
    • 1/2 teaspoon cumin seeds (jeera)
    • 1/8 teaspoon black pepper
    • 1 green chili finely chopped, optional
    • 1/2 cup tomato seeded and finely chopped
    • 1/2 cup finely chopped spinach
    • 1/2 cup finely chopped bell pepper
    • 1/2 cup water to make batter
    • 2 tablespoons oil

    Use vegetables quantity as a guide line, it can be little more or less, also change the vegetables to your choice.

    Instructions
     

    • Mix all the dry ingredients together: besan, cumin seeds, black pepper and salt. Add the water slowly to make a smooth batter, the consistency of pancake batter or Dosa batter. Add the green chilies, tomato, spinach, and bell pepper. Mix well.
    • Heat the skillet on medium heat (Use a non-stick skillet) skillet should be moderately hot. Test by sprinkling a few drops of water on it. Water should sizzle right away.
    • Pour approx. 1/2cup of the batter mixture into the skillet and spread evenly with the back of a spoon. Starting from the center, spiral the batter outward evenly to form a circle about 7” in diameter.
    • When the batter starts to dry, gently spread about two teaspoons of oil over it. Wait about 30 seconds; flip the omelet using a flat spatula.
    • Press the omelet lightly all around with the spatula to make the omelet cook evenly. Turn the omelet three or four times, until cook well and golden brown on both sides.
    • Repeat for the remaining omelet.

    Notes

    Serve this with mint chutney
    Tried this recipe?Let us know how it was!

  • Paneer Bhurji

    Paneer Bhurji

    Paneer Bhurji

    Paneer Bhurji

    Paneer bhurji is a delightful and spicy paneer dish. Paneer bhurji is a quick and easy recipe to make, made from crumbled paneer simmered in spicy tomato gravy. Paneer bhurji tastes great with roti, paratha, or even with regular bread! This is also makes a good stuffing for dosas or vegetable Frankie rolls.
    5 from 1 vote
    Course paneer
    Cuisine Indian
    Servings 2 people

    Ingredients
      

    • 1 cup paneer cut in small pieces
    • 1 cup tomatoes chopped
    • 1/2 cup green peas, I am using frozen green peas
    • 2 tablespoons oil
    • 1/2 tsp cumin seeds (jeera)
    • 2 bay leaves
    • 1 tablespoon finely chopped green chilies
    • 2 teaspoon coriander powder (dhania)
    • 1/2 tsp chili powder
    • 1 teaspoon salt
    • 1/2 teaspoon sugar
    • 1/4 teaspoon garam masala
    • 2 tablespoons finely chopped coriander (dhania)

    Instructions
     

    • Soak the paneer in hot water with 1/4 teaspoon of salt for five minutes. Drain the water and crumbled the paneer. This process will make the paneer soft, if you are using the fresh paneer skip this step. Set aside.
    • Heat the oil in sauce pan over medium heat; after oil is moderately hot add cumin seeds.
    • After the seeds crack add green peas, and green chili stir for about one minute. Add tomatoes, coriander, salt, sugar and red chili powder, stir and mix well. Cover the pan and cook for 3-4 minutes till the tomatoes and peas becomes soft.
    • Add paneer stir and cook for 1-2 minutes. Don’t cook the paneer for a long time as paneer will lose the softness. If it is too dry add few spoons of water. Lastly add chopped coriander leaves to paneer bhurji and mix.
    • Serve paneer bhurji with rotis, plain parathas or with a toast.

    Notes

    Notes, if you are using the paneer bhurji for stuffing then don’t the water, bhurji should be dry in texture.
    Tried this recipe?Let us know how it was!

    Paneer Bhurji Recipe: Crafting the Perfect Indian-Style Dish

    Indulge in the savory goodness of vegetables sauteed paneer Bhurji, a quick & easy party recipe. This delightful, spicy dish features crumbled paneer simmered in a flavorful, gluten-free tomato gravy. Elevate your dining experience with this quick and easy paneer delight!

    Step 1: Soaking and Crumbling Paneer for Paneer Bhurji

    In the first phase of understanding how to make Paneer Bhurji, immerse the paneer in hot water with a quarter teaspoon of salt for five minutes. This crucial soaking process contributes to the softness of the paneer, a key aspect of the authentic paneer bhurji Indian style. Following this, carefully drain the water and proceed to crumble the paneer, enhancing the overall texture of the dish.

    Step 2: Sautéing Cumin Seeds and Building Flavor in Paneer Bhurji Recipe

    As you embark on the journey of preparing this delectable paneer bhurji Indian style, heat oil in a saucepan over medium heat. Once the oil reaches the desired temperature, introduce cumin seeds, infusing the dish with a distinct aroma. Let the seeds crackle, then add green peas and green chili, stirring for about a minute. This process forms the flavorful foundation of the paneer bhurji recipe.

    Step 3: Cooking Tomatoes, Spices, and Peas for Paneer Bhurji

    Continuing the exploration of how to make paneer bhurji, incorporate tomatoes, coriander, salt, sugar, and red chili powder into the pan. Thoroughly mix these ingredients to coat the vegetables, creating a harmonious blend of spices in your paneer bhurji Indian style. Cover the pan and allow the mixture to cook for 3-4 minutes, ensuring the tomatoes and peas reach a soft, succulent state.

    Step 4: Incorporating Paneer and Finalizing Paneer Bhurji Recipe

    Now, in the heart of the paneer bhurji recipe, gently introduce the crumbled paneer into the aromatic mixture. Stir it delicately, ensuring an even distribution throughout the dish. Cook for a brief 1-2 minutes, being mindful not to overcook the paneer as it might compromise its softness. If needed, add a few spoons of water to maintain the desired consistency. For the finishing touch, generously sprinkle chopped coriander leaves into the paneer bhurji Indian style, elevating the flavors to perfection.

    Step 5: Serving the Versatile Paneer Bhurji

    As you present your culinary creation, serve the paneer bhurji with rotis, plain parathas, or toast. The adaptability of this dish makes it a delightful addition to any meal. Whether enjoyed on its own or used as a stuffing, it is recommended to maintain a dry texture if you plan to utilize the paneer bhurji Indian style for stuffing purposes.

    If you liked the recipe of Paneer Bhurji you may also try: Spinach Kofta Curry, Urad Dal Kachori, Hara Bhara Kabab, Cocktail Green Peas Samosa & Paneer Makhani

  • Paratha Samosa

    Paratha Samosa


    Paratha Samosa

    Paratha Samosa

    Is this a Paratha or Samosa! These Paratha Samosas are a delicious fusion on traditional samosas and aloo parathas. Who doesn't enjoy samosas or aloo parathas? Although the ingredients are the same as samosas, they are made like a paratha. And they taste absolutely delicious!  You can now enjoy both your favorites (samosa and paratha) at the same time.
    5 from 1 vote
    Course Appetizer
    Cuisine Indian
    Servings 4 people

    Ingredients
      

    Dough

    • 1 cup all-purpose flour (plain flour, maida)
    • 1/2 teaspoon salt
    • 2 tablespoons clarified butter or ghee (if you follow vegan diet use oil)
    • 1/3 cup water

    Filling

    • 3 medium potatoes, boiled peeled and cubed into very small pieces, this will make about 2 cups of cubed potatoes
    • 1/4 cup green peas, I am using frozen peas thawed
    • 1-1/2 tablespoons oil
    • 1/2 teaspoon cumin seeds (jeera)
    • 1 teaspoon coriander powder (dhania)
    • 1 teaspoon salt
    • 1/4 teaspoon red chili powder
    • 1 tablespoon green chili finely chopped
    • 1/2 teaspoon mango powder (amchoor)
    • 1/4 teaspoon garam masala
    • 2 tablespoons chopped cilantro (hara dhania)

    Also need about 1/4 cup oil for cooking

    Instructions
     

    Dough

    • Mix flour, salt, and oil, add the water as needed to make firm and smooth dough. Knead the dough on a lightly oil surface for about one minute. Cover the dough and set aside for at least 10 minutes.

    Filling

    • Heat the oil in a frying on medium heat. Oil should be moderately hot. Add cumin seeds, as cumin seeds crack add green chili and green peas stir-fry about a minute add the potatoes and stir-fry for 3-4 minutes. Stir in garam masala, mango powder, and cilantro. Add more pepper, salt or mango powder according to taste. Turn off the heat.
    • Let the filling cool to the room temperature. Lightly mash the filling.

    Making Paratha Samosa

    • Divide the dough in four equal parts and form into balls. Roll dough ball into about 7” circle. Place about 1/2 cup of the filling in the center and spread it over leaving 1” dough circle all around. Pull the edges of the dough in the center cover the filling. This will make about 4” thick pattie. Repeat and fill all the balls.
    • Gently roll them in about 6” circle. If needed sprinkle little all-purpose flour to help it roll.
    • Heat heavy sauce flat pan over low medium heat. Add about 2 to 3 tablespoons of oil to the pan depends on the size of the pan.
    • Place the rolled paratha on the pan. When the paratha start to change color from sides, flip it over. Parathe will be light brown.
    • Lightly press the paratha all around and flip. Shallow fry the paratha both sides until golden brown. You will have to flip the paratha 3 to 4 times.
    • Paratha Samosa is the best served hot and crispy.
    • If they are made in advance re-heat using a skillet or oven.
    Tried this recipe?Let us know how it was!

    Paratha Samosa Recipe: Introduction to Paratha Samosa Recipe

    Paratha Samosa is a delightful fusion snack that combines the crispy, triangular goodness of samosas with the flaky, layered texture of parathas. It’s a savory treat perfect for appetizers, breakfast, or snacks. These samosas are made by wrapping a spicy and flavorful filling usually consisting of mashed potatoes, peas, spices, in a thinly rolled paratha dough. The stuffed parcels are then deep-fried until golden brown, resulting in a crispy exterior that encases a deliciously moist and aromatic filling. 

    Whether served with chutney or enjoyed on its own, Paratha Samosa is sure to tantalize your taste buds and make for a satisfying snack or meal option at any time of the day. In this Paratha Samosa recipe, we’ll be combining the deliciousness of samosas with the flakiness of parathas to create a mouthwatering fusion dish. This samosa paratha is a delightful twist on the traditional samosa, where the crispy, savory filling is enveloped in a soft, flaky paratha crust. It’s perfect for breakfast, brunch, or as a satisfying snack any time of the day. Let’s dive into the step-by-step process of making this irresistible samosa paratha recipe.

    Step 1: Prepare the Filling

    To begin this paratha samosa recipe, let’s first prepare the flavorful filling. Heat oil in a pan over medium heat and add cumin seeds, green peas, boiled and mashed potatoes, and a blend of spices including garam masala, turmeric powder, and coriander powder. Sauté the spices are fragrant. This aromatic filling will be the heart of our delicious samosa paratha.

    Step 2: Make the Paratha Dough

    While the filling is cooking, let’s prepare the dough for our samosa paratha. In a mixing bowl, combine whole wheat flour, salt, and a splash of oil. Gradually add water and knead the mixture into a smooth, pliable dough. Cover the dough and let it rest for about 15-20 minutes to allow the gluten to relax, making it easier to roll out later.

    Step 3: Stuff and Shape the Parathas

    Now comes the fun part – assembling the samosa paratha. Divide the dough into equal-sized balls and roll each ball into a small circle. Place a portion of the prepared filling in the center of each circle. Fold the edges of the dough over the filling to encase it completely, shaping it into a round or triangular parcel resembling a traditional samosa. Gently flatten the stuffed dough balls with your palm.

    Step 4: Cook the Parathas

    Heat a skillet or tawa over medium heat and carefully place the stuffed paratha samosas onto it. Cook each side until golden brown, brushing with ghee or oil for a crispy, flavorful crust. Make sure to cook the samosa parathas evenly on both sides until they are cooked through and crispy on the outside. Once done, transfer them to a plate lined with paper towels to drain any excess oil.

    Step 5: Serve and Enjoy

    Your delicious samosa parathas are now ready to be served hot! Garnish them with freshly chopped cilantro and serve with your favorite chutney or dipping sauce. These paratha samosas are perfect for breakfast, brunch, or as a delightful snack for any occasion. Enjoy the crispy exterior, the flavorful filling, and the comforting warmth of this fusion delicacy.

    Tips for Perfect Samosa Paratha

    • Ensure the filling is well-seasoned with spices to enhance the flavor of your paratha samosa.
    • Use hot water while kneading the dough for softer, more pliable samosa parathas.
    • Don’t overcrowd the skillet while cooking the paratha samosas to ensure even cooking and crispiness.

    Variations of Samosa Paratha

    • Experiment with different fillings such as minced meat, paneer, or mixed vegetables to create unique variations of samosa parathas.
    • Add a dash of chaat masala or amchur (dry mango powder) to the filling for a tangy twist.
    • For a cheesy indulgence, sprinkle grated cheese onto the filling before sealing the paratha samosas.

    Benefits of Paratha Samosa

    • Combines the flavors of two popular Indian snacks – samosas and parathas.
    • Provides a hearty and satisfying meal or snack option.
    • Can be customized with various fillings and spices to suit individual preferences.

    Frequently Asked Questions (FAQs)

    Q: Can I make the dough for samosa paratha in advance?

    A: Yes, you can prepare the dough ahead of time and store it in the refrigerator for up to a day. Just make sure to bring it to room temperature before rolling out the paratha samosas.

    Q: Can I freeze leftover samosa parathas?

    A: Yes, you can freeze the cooked paratha samosas for later use. Simply allow them to cool completely, then store them in an airtight container or freezer bag. When ready to eat, reheat them in a skillet or oven until heated through.

    Other Recipes on Manjula’s Kitchen

    If you’re looking to explore more Indian recipes, appetizers, beverages, and desserts, be sure to check out the following links on Manjula’s Kitchen. Here are some links to recipes on Manjula’s Kitchen official website: khaman (besan) dhokla, rasgulla, gobi (cauliflower) manchurian, aloo tikki (potato patties), malai koftai. These recipes should offer you a flavorful experience straight from Manjula’s Kitchen.

  • Making Pizza on The Stove Top

    Making Pizza on The Stove Top

    Pizza on the Stove

    Making Pizza on The Stove Top

    This is a quick and easy recipe for Stove Top Pizza. This is just perfect for times when you want to enjoy homemade snack such as pizza and don't feel like ordering take-out pizza or going anywhere! The best part is that you also don’t need to have access to a good oven.
    No ratings yet
    Course Snack
    Cuisine Indian
    Servings 2 pizzas

    Ingredients
      

    • 1 cup all-purpose flour (plain flour or maida)
    • 1/2 teaspoon baking powder
    • 1/2 teaspoon baking soda
    • 1/2 teaspoon salt
    • ½ teaspoon sugar
    • 1 teaspoon oil
    • 2 tablespoons thick yogurt (curd or dahi) room temperature
    • 1/3 cup lukewarm water use as needed
    • About 2 tablespoon all-purpose flour needed to roll the dough

    Sauce

    • 1-1/2 cups tomatoes seeded and chopped in small pieces
    • 1/4 teaspoon salt
    • sugar
    • 1/2 teaspoon Italian seasoning optional
    • 1/2 teaspoon crushed red pepper
    • 1 tablespoon olive oil

    Topping

    • 1/2 cup bell pepper cut into small pieces,
    • 1/4 cup mushrooms sliced
    • About 3/4 cup mozzarella cheese shredded

    Instructions
     

    • In a bowl mix all the dry ingredients, flour, baking powder, baking soda, salt, and sugar.
    • Add oil and yogurt to the flour and mix it well, add water as needed to make soft dough will be little sticky. Sprinkle little dry flour over the dough and knead to make smooth dough.
    • Cover the dough and let it sit for about 3 hours or more.
    • In a saucepan heat the oil on medium high heat. Add all the sauce ingredients, tomatoes, salt, sugar, pepper, and Italian herbs. Cook for about 3 minutes till most of the water from tomato has evaporated and looks like a chunky sauce.
    • Use the same pan and sauté the bell peppers, and mushrooms for 2 minutes until most of the moisture has evaporated but still they are crisp. Set aside.
    • Knead the dough for few seconds and divide into two equal parts and roll them in about 10” circle, if dough start sticking to the rolling pin or rolling surface dust little more dry flour.
    • Heat the heavy pan skillet over low medium heat, lightly oil the skillet and put the rolled pizza over. Let it cook for about 2 minutes until crust has nicely browned from bottom. Lower the heat to low.
    • Flip the crust, brush it lightly with oil do it quick spread about half the sauce, cheese and topping. Cover the pan for about 3 minutes and check, cheese should be melted. Lift the pizza little from the side crust should be the nicely brown.

    Notes

    Tips: make sure heat is low otherwise pizza will burn and not cook through.
    Tried this recipe?Let us know how it was!