10 Easy Vegan Recipes | Vegan Indian Foods by Manjula’s Kitchen
Embracing a vegan lifestyle doesn’t mean you have to give up on the rich and flavorful experience of Indian cuisine. Here at Manjula’s Kitchen, we bring you a collection of vegan Indian food that is both delicious and easy to prepare. Let’s dive into 10 easy vegan recipes that will make your meals exciting and nutritious. These vegan Indian recipes are perfect for anyone looking to incorporate more plant-based meals into their diet.
1. Vegan Aloo Gobi
Aloo Gobi is a classic Indian dish made with potatoes and cauliflower. This flavorful and hearty dish is a staple in many Indian households and is a great example of vegan Indian food that is both satisfying and healthy. The combination of tender potatoes and cauliflower florets cooked with aromatic spices like cumin, turmeric, and garam masala makes this dish irresistible. Aloo Gobi is not only delicious but also easy indian recipesto prepare, making it a perfect choice for busy weeknights. Serve it with roti or rice for a complete meal.
2. Chana Masala
Chana Masala is a spicy and tangy chickpea curry that is a favorite among many. It’s one of the 10 easy vegan recipes that you can prepare quickly, and it’s packed with protein and flavor, making it a perfect vegan food recipe. Chickpeas are simmered in a rich tomato sauce flavored with an array of spices like coriander, cumin, and chili powder. This dish is hearty and comforting, ideal for lunch or dinner. Pair it with steamed basmati rice or warm naan for a satisfying meal.
3. Vegan Palak Tofu
Palak Tofu is a delicious twist on the traditional Palak Paneer. Instead of paneer, tofu is used to keep this dish vegan. The creamy spinach sauce pairs perfectly with the tofu, creating a nutritious and tasty vegan Indian recipe. Spinach is blended into a smooth puree and cooked with spices, then combined with tofu cubes to create a delightful dish. This vegan version retains all the flavors of the original and is a fantastic way to enjoy spinach and tofu in a new and exciting way. Serve it with jeera rice or chapati.
4. Baingan Bharta
Baingan Bharta is a smoky and flavorful eggplant dish that is popular in north indian recipes. This dish is made by roasting eggplants and cooking them with tomatoes, and spices, making it a delightful addition to your collection of vegan food recipes. The roasting process gives the eggplant a unique smoky flavor, which is then enhanced by the addition of spices like cumin, coriander, and garam masala. Baingan Bharta is perfect as a side dish or a main course when served with roti or rice.
5. Vegan Vegetable Biryani
Vegetable Biryani is a fragrant and flavorful rice dish cooked with a variety of vegetables and spices. This vegan version is just as delicious as the traditional one, making it a must-try among vegan Indian recipes. The rice is layered with a mixture of vegetables like carrots, peas, and bell peppers, along with aromatic spices such as cardamom, cinnamon, and cloves. Biryani is a complete meal in itself and can be enjoyed with a side of raita or salad.
6. Tofu Tikka Masala
Tofu Tikka Masala is a vegan take on the classic Chicken Tikka Masala. Tofu is marinated in spices and yogurt, then cooked in a rich and creamy tomato sauce. This dish is perfect for those looking for vegan food recipes that are both hearty and flavorful. The tofu absorbs the flavors of the marinade and the sauce, resulting in a dish that is rich and satisfying. Serve it with basmati rice or naan to soak up the delicious sauce.
7. Vegan Rajma
Rajma is a kidney bean curry that is a staple in North Indian cuisine. This vegan version is just as delicious and comforting, making it a great choice for anyone seeking vegan Indian food that is both nutritious and satisfying. Kidney beans are cooked in a spiced tomato gravy, flavored with a blend of spices like cumin, coriander, and garam masala. Rajma is traditionally served with rice, making it a wholesome and filling meal.
8. Masoor Dal
Masoor Dal is a simple yet flavorful red lentil curry. It’s one of the easiest vegan Indian recipes to prepare and is packed with protein and fiber, making it a healthy addition to your meal rotation. Red lentils are cooked with tomatoes, and spices, creating a comforting and nourishing dish. Masoor Dal is perfect for a quick lunch or indian dinner recipes and can be enjoyed with rice or chapati.
9. Vegan Korma
Vegan Korma is a creamy and mildly spiced curry made with a variety of vegetables and a rich coconut-based sauce. This dish is perfect for those looking for 10 easy vegan recipes that are both luxurious and easy to make. The vegetables are simmered in a sauce made from coconut milk, cashews, and spices, resulting in a dish that is rich and flavorful. Vegan Korma can be served with rice or naan for a complete meal.
10. Vegan Pulao
Vegan Pulao is a simple and flavorful rice dish cooked with vegetables and aromatic spices. It’s a versatile dish that can be enjoyed on its own or as a side, making it a great addition to your list of vegan Indian food recipes. The rice is cooked with vegetables like peas, carrots, and bell peppers, along with spices such as cumin, cinnamon, and bay leaves. Vegan Pulao is perfect for a quick and easy meal and can be paired with raita or a salad.
Conclusion
These 10 easy vegan recipes showcase the versatility and richness of vegan Indian food. From hearty curries to flavorful rice dishes, these recipes are sure to bring joy and nutrition to your table. Explore more vegan Indian recipes and discover the delicious possibilities of plant-based cooking with Manjula’s Kitchen. Happy cooking and enjoy your journey with vegan food recipes!
By incorporating these dishes into your diet, you’ll be able to enjoy a wide variety of delicious and nutritious foods. Whether you’re looking for breakfast, snacks, main courses, or desserts, there’s a vegan Indian recipe to suit every taste. Don’t forget to check out Manjula’s Kitchen for more inspiration and culinary delights. Happy cooking and happy eating!
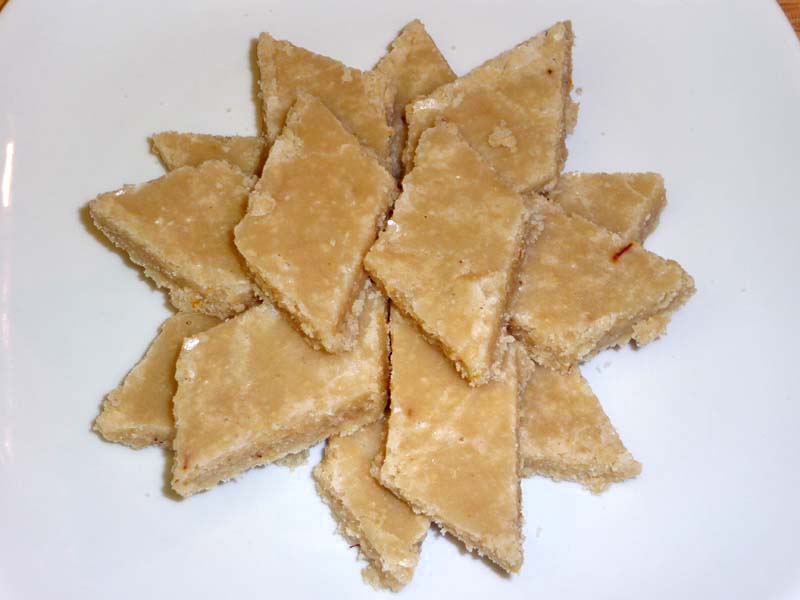
Kaju burfi is probably the most favorite Indian dessert. Kaju burfi is a delicious treat for any occasion. This can also be served as a fudge or candy. This is also a great vegan treat.
Grind the cashew nuts to powder. Dry grinder or a coffee grinder works the best.
On very low heat in a heavy bottom pan roast the cashew nut powder for about 4 minutes or until powder just get warm. Do not heat for any longer otherwise powder will start getting oily.
In a saucepan, boil the sugar and water together on medium heat until syrup is 1 thread or 225 degrees F on a candy thermometer.
Next add the saffron to the syrup mix it well. Saffron is optional. Turn off the heat.
Add the cashew powder to the syrup and mix it well, making sure there are no lumps.
To check the right consistency take a little mix in a spoon, you should be able to roll this into softball.
Next spread the mix quick to the greased plate. Spread before the mix cools off.
Allow burfi to cool and then cut them in the shapes you will like.
Enjoy!
Notes
Notes:
Grind small portion at a time if you grind for too long nuts start getting oily.
Store at room temperature for a week or in the fridge for longer.
Tips:
If the burfi remains soft, you can cook the mixture on low heat for few minutes.
If the mixture is too dry add the boiling water 1 spoon at a time making sue it comes to right consistency.
As you see you can never go wrong with this recipe.
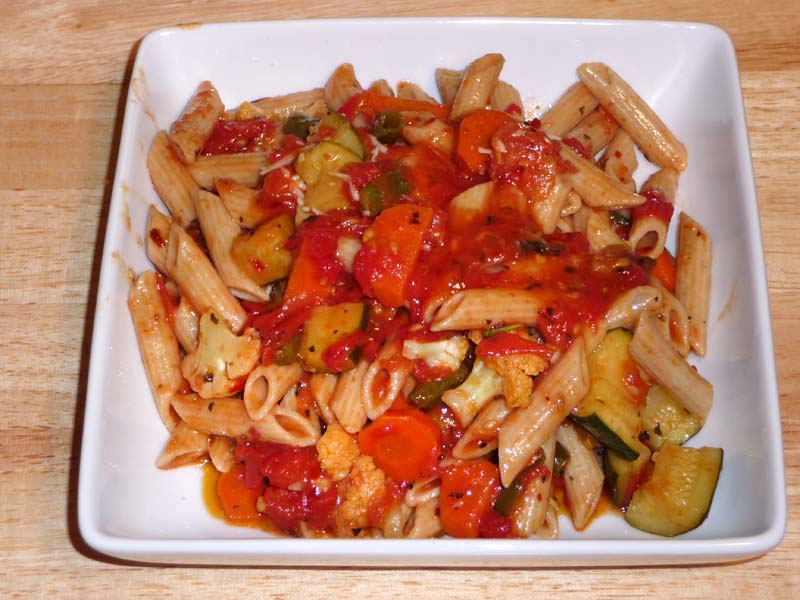
Fresh vegetables and whole grain pasta with savory tomato sauce makes a very colorful and delicious pasta dish. This is a simple pasta dinner. Serve with a side of salad and bread.
In a large pot boil the water with salt and oil. After water comes to the boil add the pasta.
Cook the pasta until it is just tender, not too soft. Drain the water and set pasta aside.
making Vegetables:
Heat the oil in a frying pan over medium high heat.
Add vegetables (carrot, green beans, bell pepper, mushrooms, and zucchini) to skillet and sauté until they are nearly tender.
Marinara Sauce
Mix the cornstarch in ¼ cup of water and keep aside.
Heat the olive oil in a saucepan and add the basil, Italian herbs, and chili flakes stir and add tomatoes.
Let the tomatoes cook until they become pasty.
Next add cornstarch, salt and sugar to the tomato sauce, cornstarch will give thickness to the sauce.
Next add the sauté vegetables to the sauce and cook for few minutes on medium heat until sauce come to the desirable thickness.
Prepare The Pasta
Heat the oil in a saucepan and add basil and chili flakes stir for few seconds.
Next add the drained pasta and sauté for a minute until pasta is well coated with oil.
Pour the vegetable sauce over the pasta, serve hot with slice of French bread and salad.
Notes
Variations:For this recipe you need about 5 cups of vegetable, replace the vegetables to your choice.Serving suggestion:Serve pasta with slice of toasted bread and green salad.Additional Notes:I like to serve pasta with slice toasted and spiced French bread. Before toasting the bread spread the olive oil and sprinkle basil, chili flakes and salt.
Keyword Pasta With Marinara Sauce, Pasta Without Onion Garlic
2 tablespoons chana dal, pre-soaked in water for at least half an hour
1/4 cup unsalted roasted peanuts
1 teaspoon salt adjust to taste
1/4 cup lemon juice
Instructions
Method
Wash rice gently changing water several times until the water appears clear.
For fluffier rice, the rice should be soaked for at least 15 minutes prior to cooking.
Drain the rice and put it into the saucepan. Add water, oil, and salt, and bring to a boil. Once the water is boiling reduce the heat to low and cover the pan.
Cook about 15 minutes, or until the rice is tender and the water has evaporated. Turn off the heat and fluff the rice with a fork.
Preparing The Seasoning:
Heat the oil in a frying pan on medium heat; stir-fry the peanuts for about 2 minutes until peanuts changes the color to light brown.
Take out the peanuts from oil and use the same oil for rest of the seasoning.
Add cumin seeds and mustard seeds after seeds crack add red chili, curry leaves, and green chilies, and stir for a few seconds.
Add the chana dal, stir-fry for about a minute.
Add turmeric and mix it well.
Add the pre-cooked rice, peanuts and sprinkle salt and lemon juice over the rice.
Mix gently, making sure do not break the rice and stir-fry for about 2 minutes. Rice is ready, Enjoy!
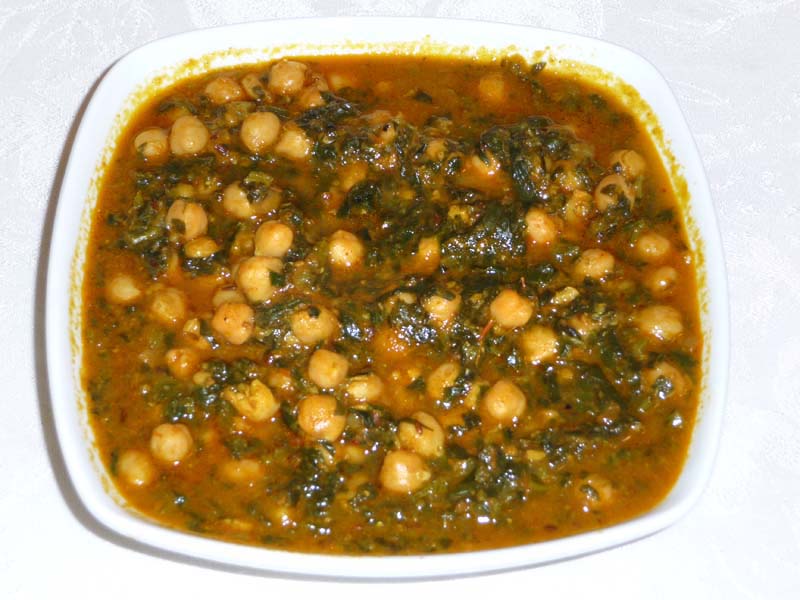
Chickpeas and spinach is a marvelous combination, and Chole Palak is a healthy, high protein dish. Chickpeas, also known as garbanzo beans and kabuli chana, are immersed in spicy spinach gravy.
Blend the tomatoes, green chilies, and ginger to make a puree.
Heat the oil in a saucepan. Test the heat by adding one cumin seed to the oil; if the seed cracks right away, the oil is ready. Add the asafetida and cumin seeds. When the cumin seeds crack, add the tomato puree, coriander powder, turmeric, and red chili powder. Cook for three to four minutes on medium heat. The tomato mixture will separate from the oil and reduce to about half in quantity.
Add spinach, salt, and one-half cup of water. Cook, covered, four to five minutes on medium heat.
Add the chickpeas and mash them lightly with a spatula. Add more water as needed to keep the gravy consistency to your liking. Cook on low heat for seven to eight minutes. Add the garam masala.
Notes
Serving suggestions
Chole Palak can be served with roti, naan, or any other bread. It also goes well with plain rice.
Chole Palak is a delicious, healthy choice for people who eat a vegan or gluten-free diet
Introduction to Chole Palak – Chickpeas with Spinach:
Palak Chana Masala is a flavorful and nutritious Indian dish that combines spinach (palak) and chickpeas (chana) in a spiced gravy or curry. It is typically made with dal (lentils), making it a good source of protein, and is naturally gluten-free and low in fat. This dish is quick and easy to prepare, making it perfect for a winter meal. It is also suitable for vegans as it does not contain any animal products.
Chole Palak, also known as chickpeas with spinach or palak chana masala, is a delightful and nutritious dish that combines the goodness of chickpeas and spinach in a flavorful curry. This Chana Saag recipe is a perfect balance of protein-rich chickpeas and iron-packed spinach, making it not only delicious but also incredibly healthy. In this recipe, we’ll guide you through the process of making this hearty and satisfying dish step by step.
Chole Palak Recipe:
Drain and Rinse the Chickpeas: Open the can of chickpeas and pour its contents into a colander. Use running water to thoroughly rinse the chickpeas, removing any canning liquid or residue. Shake the colander gently to remove excess water. Set the rinsed chickpeas aside for now.
Blend the Aromatics: Wash and roughly chop the tomatoes, green chilies, and ginger. Add them to a blender and blend until you have a smooth puree. This puree will form the flavorful base of your chickpea curry.
Heat the Oil and Add Spices: Pour oil into a saucepan and heat it up on medium heat. To test if the oil is hot enough, carefully add a single cumin seed to the pan. If the seed sizzles and cracks right away, the oil is at the perfect temperature. Once the oil is hot, add the asafetida (a pinch is enough) and cumin seeds. Asafetida adds a unique, slightly garlicky aroma to curries. Listen for the cumin seeds to crackle, indicating they’ve released their flavors.
Cook the Tomato Masala: Now it’s time to add the blended tomato puree, coriander powder, turmeric, and red chili powder to the pan with the cumin seeds. Stir the mixture well to combine all the spices with the tomato puree. Let this mixture cook on medium heat for three to four minutes. As it cooks, the oil will separate from the tomato mixture, and the mixture itself will reduce in volume by about half. This concentration of flavors is what will give your curry its depth.
Add Spinach and Simmer: After the tomato masala has cooked down, add the spinach and salt to the pan. Pour in half a cup of water as well. Give everything a good stir and bring to a simmer. Cover the pan and let the contents simmer for four to five minutes on medium heat. The spinach should wilt and become tender during this time.
Add Chickpeas and Adjust Consistency: Once the spinach is cooked, add the rinsed and drained chickpeas to the pan. Use a spatula to gently mash some of the chickpeas against the side of the pan. This will help slightly thicken the gravy and add some textural variation to the curry. If the gravy seems too thick at this point, simply add more water, a little bit at a time, until you reach your desired consistency. Let the chickpeas simmer in the gravy for another seven to eight minutes on low heat, allowing them to absorb all the flavors.
Finish with Garam Masala: As a final touch, take the pan off the heat and stir in the garam masala. Garam masala is a warming spice blend commonly used in Indian cuisine. It will add another layer of complexity to your curry. Give everything a final stir and your chickpea curry is complete!
Tips for Making Perfect Chole Palak:
Use Fresh Spinach: Fresh spinach works best in this recipe as it adds a vibrant green color and a tender texture to the curry.
Adjust Spice Level: Customize the spice level according to your preference by adjusting the amount of red chili powder or green chilies used.
Add Lemon Juice: A squeeze of lemon juice added to the curry just before serving will brighten the flavors and add a hint of acidity.
Variations of Chole Palak:
Creamy Chole Palak: Stir in some coconut milk or cashew cream for a creamy and indulgent version of the dish.
Spicy Chole Palak: Add extra green chilies or a pinch of cayenne pepper for a spicier kick.
Chole Palak with Paneer: Add cubed paneer to the curry for added richness and protein.
Benefits of Including Chole Palak in Your Diet:
High in Protein: Chickpeas are an excellent source of plant-based protein, making Chole Palak a nutritious option for vegetarians and vegans.
Rich in Iron: Spinach is packed with iron, which is essential for maintaining healthy blood cells and preventing anemia.
Loaded with Vitamins and Minerals: Chole Palak is rich in vitamins A, C, and K, as well as folate, potassium, and magnesium, contributing to overall health and well-being.
Frequently Asked Questions (FAQs) about Chole Palak:
Q: Can I use frozen spinach instead of fresh spinach?
A: Yes, you can use frozen spinach if fresh spinach is not available. Thaw the frozen spinach and squeeze out any excess water before adding it to the curry.
Q: Can I make Chole Palak in advance?
A: Yes, Chole Palak can be made ahead of time and stored in the refrigerator for up to 3 days. Reheat gently on the stovetop before serving.
Q: Is Chole Palak gluten-free?
A: Yes, Chole Palak is naturally gluten-free, making it suitable for those with gluten intolerance or celiac disease.
Parathas are whole-wheat Indian flat-bread, a staple bread in north India. Parathas can be made plain or stuffed with different fillings.Makes 5 parathas.
In a bowl, mix the flour, salt and water. Mix well until it forms to soft dough (adjust the water as needed).
Knead the dough on a lightly greased surface. The dough should be very smooth and soft.
Set the dough aside and cover. Let the dough rest for at least ten minutes before.
Heat the skillet on medium high. Note: An iron skillet works best. To check if the skillet is ready, put a couple of drops of water on it. If the water sizzles right away, the skillet is ready.
Divide the dough into 5 equal parts. Roll the dough into about 3 inch diameter circles. Spread about 2 drops of oil and fold into two again put another drop of oil and food now you have a triangle.
Roll the patty in dry whole-wheat flour. Press it a little and start rolling on a clean surface to about 6 inches in diameter.
Place the Paratha over the skillet. When you see the color change and the paratha will puff in different places. Turn the paratha over.
The paratha should have golden-brown spots. Wait a few seconds and put about 1/2 teaspoon of oil and spread with a spatula.
Flip the paratha and lightly press the puffed areas of the paratha with a spatula that will help paratha to puff up.
Flip again and press with the spatula making sure the paratha is golden-brown on both sides.
Notes
Serving Suggestions:
Paratha can be served with any gravy vegetable or dry spiced vegetable.
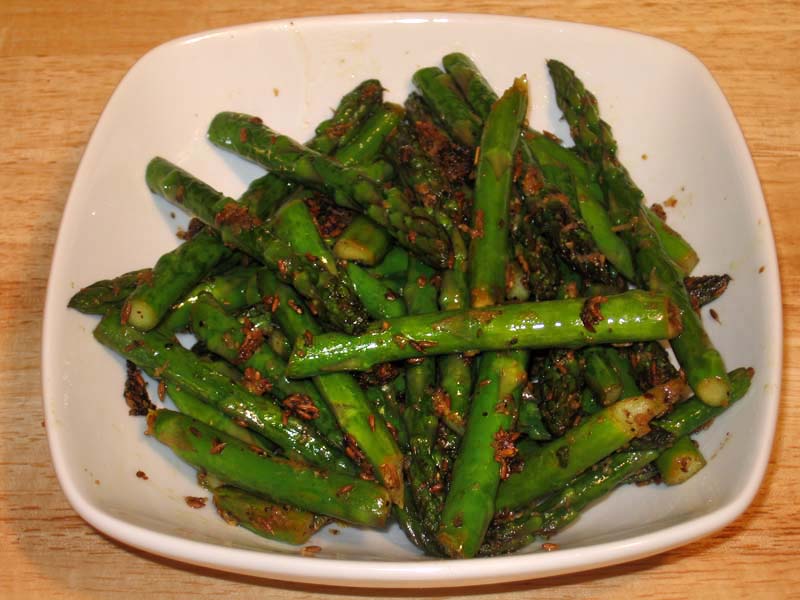
Stir-fry asparagus is healthy and simple to prepare, yet very delicious. Asparagus With Ginger is a beautiful dish to serve and makes a great appetizer or a side dish.Recipe serves 4.
Asparagus Ginger is a flavorful appetizer that caters to various dietary needs, including being suitable for those who are diabetic, gluten-free, and seeking low-cholesterol and low-fat options. Additionally, it’s a vegan dish featuring fresh asparagus delicately sautéed with aromatic ginger, highlighting the natural flavors of the vegetables without added fats.
In this recipe, we combine the vibrant flavors of asparagus and ginger to create a delightful stir-fry dish that is both nutritious and delicious. Asparagus, with its tender spears, brings a unique earthy flavor, while ginger adds a refreshing zing, making this dish a perfect addition to any meal.
Step 1: Preparing the Ingredients
To begin, gather all the necessary ingredients for this asparagus ginger recipe. You will need fresh asparagus, ginger, oil, salt, and pepper. Wash the asparagus thoroughly and trim off the tough ends. Peel and finely chop the ginger, ensuring you have enough to infuse the dish with its aromatic flavor.
Step 2: Sautéing the Asparagus and Ginger
In a skillet or wok, heat some oil over medium-high heat. Add the chopped ginger to the hot oil and sauté for a minute or two until it becomes fragrant. The aroma of the ginger asparagus combination will start to fill your kitchen, enticing your senses and preparing you for the delightful dish to come.
Step 3: Adding the Asparagus
Once the ginger is aromatic, add the trimmed asparagus spears to the skillet. Stir-fry the asparagus and ginger together, ensuring that the spears are coated evenly with the ginger-infused oil. Season with salt and pepper to taste, enhancing the natural flavors of the dish.
Step 4: Cooking to Perfection
Continue to stir-fry the asparagus ginger stir-fry over medium-high heat until the asparagus is tender yet still crisp, typically for about 5-7 minutes. Be mindful not to overcook the asparagus, as you want to preserve its vibrant green color and crisp texture, providing a satisfying crunch with every bite.
Step 5: Serving and Enjoying
Once the asparagus and ginger are cooked to perfection, transfer the stir-fry to a serving dish and garnish with some freshly chopped cilantro or sesame seeds for an added touch of flavor and visual appeal. Serve hot alongside your favorite main course or enjoy it as a standalone dish.
Tips for Success
For an extra burst of flavor, you can add minced garlic along with the ginger.
Feel free to incorporate other vegetables such as bell peppers or snap peas for added color and variety.
Adjust the seasoning according to your taste preferences, adding more ginger for a stronger flavor or a dash of soy sauce for added depth.
Variations to Explore
For a spicy kick, sprinkle some red pepper flakes or drizzle with chili oil before serving.
Experiment with different cooking methods such as grilling or roasting the asparagus for a change in texture and flavor.
Benefits of Asparagus and Ginger
Asparagus is a nutrient-dense vegetable rich in vitamins A, C, and K, as well as folate and fiber. It supports digestive health, aids in weight loss, and is packed with antioxidants that promote overall well-being. Ginger, on the other hand, is renowned for its anti-inflammatory and immune-boosting properties. It aids in digestion, relieves nausea, and may even help alleviate muscle pain and soreness.
FAQs (Frequently Asked Questions)
Q: Can I use frozen asparagus for this recipe?
A: While fresh asparagus is preferable for its flavor and texture, you can certainly use frozen asparagus if that’s what you have on hand. Just be sure to thaw it thoroughly before cooking and adjust the cooking time accordingly.
Q: How do I store leftover asparagus ginger stir-fry?
A: Store any leftovers in an airtight container in the refrigerator for up to 2-3 days. Reheat gently in the microwave or on the stovetop until heated through before serving.
Q: Can I make this dish ahead of time?
A: While this dish is best enjoyed fresh, you can prepare the ingredients ahead of time and stir-fry them just before serving to retain the optimal texture and flavor.
More Recipes to Explore (H2)
If you enjoyed making these masala peanuts, why not try your hand at some other mouthwatering recipes from Manjula’s Kitchen?
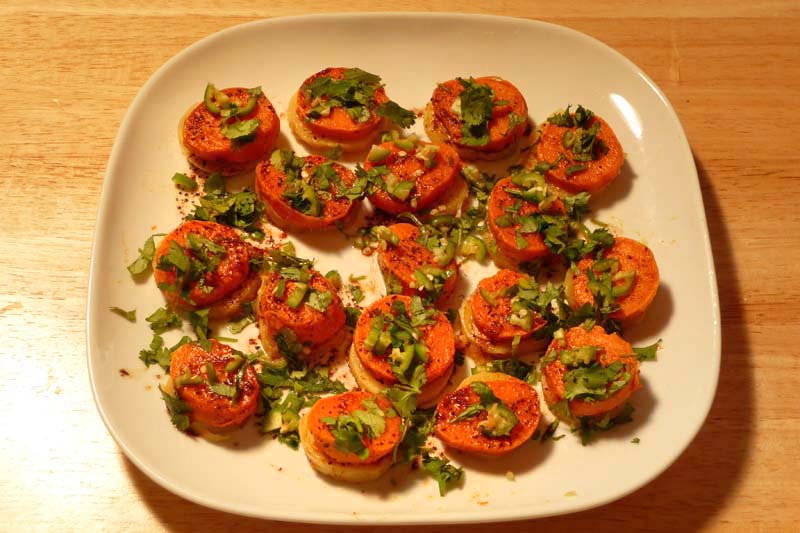
Spicy Sweet Potatoes and Yams is a delicious dish that makes a great appetizer. This can also be served as a snack with tea. Sweet potatoes spiced up with lemon and ginger juice makes a mouth-watering dish.Recipe serves 4.
Sweet and Spicy Potatoes Recipe: A Flavorful Delight
For Ganesh Chaturthi celebrations, serve up Spicy Sweet Potatoes as appetizers that cater to everyone’s dietary needs, being both gluten-free, low-fat, and vegan-friendly. Indulge in the tantalizing blend of flavors with this exquisite spicy sweet potato recipe. These sweet and spicy potatoes are a delightful treat for your taste buds, offering a perfect balance of heat and sweetness. Let’s delve into how to make these delectable spicy sweet potatoes that will surely become a favorite in your culinary repertoire.
How to Make Spicy Sweet Potato: A Step-by-Step Guide
Step 1: Preparing the Sweet Potatoes
Begin by preheating your oven to 400°F (200°C). Wash and scrub sweet potatoes thoroughly under running water to remove any dirt or debris. Pat them dry with a clean kitchen towel.
Step 2: Cutting and Seasoning
Cut the sweet potatoes into uniform cubes or wedges, ensuring even cooking. In a large mixing bowl, toss the sweet potato pieces with olive oil, salt, black pepper, and your preferred spices. You can experiment with spices like cayenne pepper, paprika, chilli powder, or a blend of your favorite seasonings to achieve the desired level of heat and flavor.
Step 3: Roasting the Sweet Potatoes
Spread the seasoned sweet potato pieces in a single layer on a baking sheet lined with parchment paper. Place the baking sheet in the preheated oven and roast for 25-30 minutes, or until the sweet potatoes are tender and lightly browned, flipping halfway through the cooking time for even caramelization.
Step 4: Adding the Sweet and Spicy Glaze
While the sweet potatoes are roasting, prepare the sweet and spicy glaze. In a small saucepan, combine honey, sriracha sauce, and a dash of soy sauce or lime juice for a tangy twist. Heat the mixture over low heat, stirring continuously until well combined and slightly thickened.
Step 5: Glazing the Roasted Sweet Potatoes
Once the sweet potatoes are cooked to perfection, remove them from the oven and transfer them to a serving dish. Drizzle the prepared sweet and spicy glaze generously over the roasted sweet potatoes, ensuring each piece is coated evenly.
Step 6: Serving Suggestions
Garnish the spicy sweet potatoes with freshly chopped cilantro for a burst of freshness and color. Serve hot as a delightful side dish alongside your favorite main course or as a standalone snack for a flavorful indulgence.
Variations to Enhance Your Sweet and Spicy Potatoes
Cheesy Twist: Sprinkle grated Parmesan or cheddar cheese over the roasted sweet potatoes before adding the sweet and spicy glaze for an irresistible cheesy flavor.
Herb Infusion: Experiment with fresh herbs like rosemary, thyme, or cilantro to add a fragrant herbal aroma to your spicy sweet potatoes.
Nutty Crunch: Toss in some toasted nuts such as pecans or almonds for a delightful crunch and added nutrition.
Benefits of Spicy Sweet Potatoes
Nutrient-Rich: Sweet potatoes are packed with essential vitamins and minerals, including vitamin A, vitamin C, potassium, and fibre, making them a nutritious choice for a balanced diet.
Antioxidant Properties: The vibrant orange hue of sweet potatoes signifies their high antioxidant content, which helps combat oxidative stress and inflammation in the body.
Digestive Health: The fibre present in sweet potatoes promotes healthy digestion and may aid in regulating blood sugar levels, making them suitable for individuals with diabetes or those looking to manage their weight.
FAQs (Frequently Asked Questions)
Q: Can I adjust the spiciness level of the dish?
A: Absolutely! Feel free to adjust the amount of sriracha sauce or chilli powder according to your preference for heat. You can also omit the spicy elements altogether if you prefer a milder flavor profile.
Q: Can I make this recipe ahead of time?
A: While these sweet and spicy potatoes are best enjoyed fresh out of the oven, you can prepare the roasted sweet potatoes in advance and reheat them in the oven before serving. However, it’s recommended to prepare the sweet and spicy glaze just before serving for optimal flavor.
Q: Are there any alternative sweeteners I can use instead of honey?
A: Yes, you can substitute honey with maple syrup, agave nectar, or brown sugar for a vegan-friendly option. Adjust the quantity according to your desired level of sweetness.
Explore More Delectable Recipes
For more mouthwatering recipes and culinary inspiration, explore the following links from Manjula’s Kitchen:
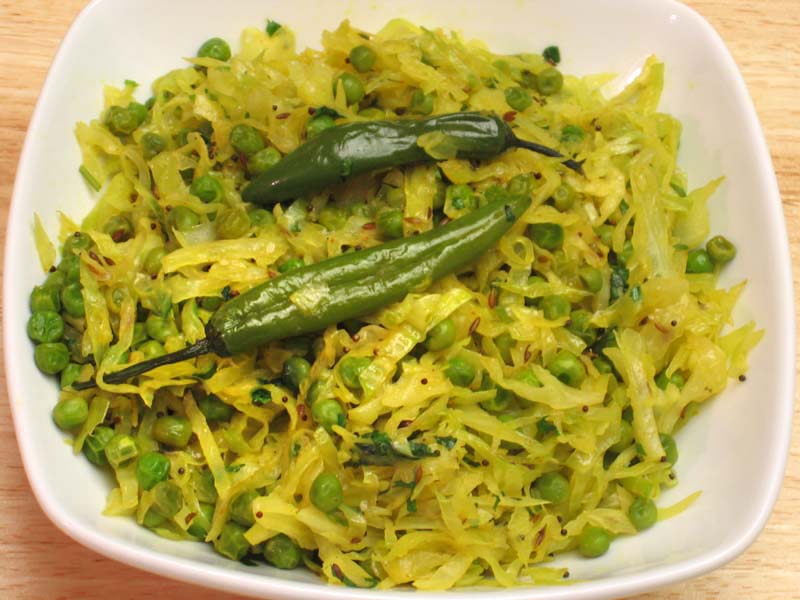
Bund Gobi with Matar or Cabbage With Peas is a delicious main course dish with mild spices, which is a nice compliment to any meal, simple quick and easy recipe to make. Serves 3 to 4
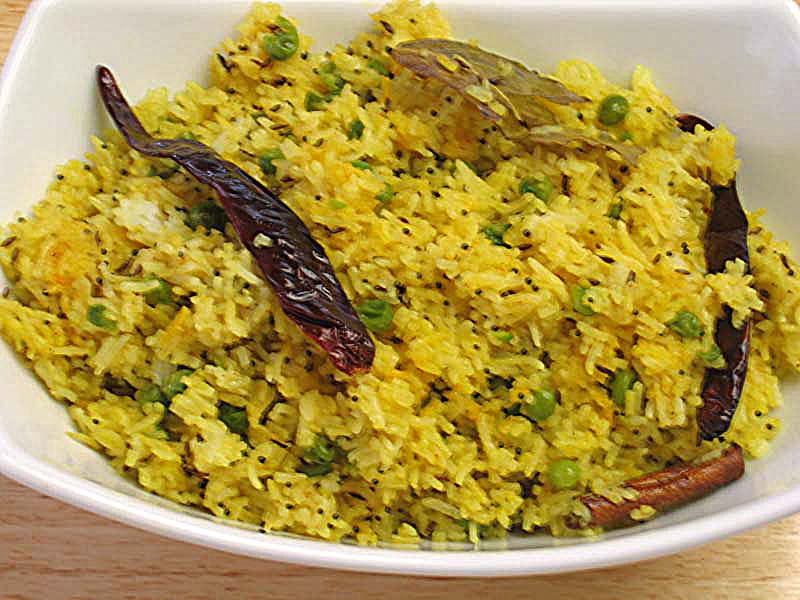
yellow rice is very flavorful and aromatic with great blend of spices. Turmeric adds the vivid golden color to the rice. Yellow rice is quick and easy to make. This goes great with soup, and salad or as a side dish with any meal.
Wash rice gently and soak it for at least 15 minutes prior to cooking.
After cooking rice expands to about three times in volume, so be sure to use the proper size pan. Drain the rice and put into the saucepan. Add the water, green peas, 1 teaspoon of oil, and salt, bring to a boil and turn the heat to low, and cover the pan.
Cook about 15 minutes, or until the rice is tender and the water has evaporated. Turn off the heat and fluff the rice with a fork.
Heat the oil in a frying pan on medium high. Test the heat by adding one cumin seed to the oil; if seed cracks right away oil is ready. Add asafetida, cumin seeds, and mustard seeds. After the seeds crack, add red chilies, bay leaves, and cinnamon stick and stir-fry for few seconds.
Add rice, turmeric, and cayenne pepper to the spices in frying pan. Mix it gently. Stir-fry for about 5 to 6 minutes.
Learn What makes Fried Rice Yellow with this easy-to-follow recipe.
Yellow fried rice is a variation of fried rice that gets its distinct yellow color from the addition of turmeric. Turmeric not only imparts a vibrant hue but also adds a subtle earthy flavor to the dish. It is a gluten free, kids friendly, vegan option
1. Washing and Soaking the Rice: Preparing for Yellow Fried Rice
Commence the culinary adventure of crafting delectable yellow fried rice by carefully washing the rice and allowing it to soak in water for a minimum of 15 minutes prior to cooking. This essential step ensures that the grains absorb ample moisture, facilitating even cooking and achieving a fluffy texture in the final dish.
2. Cooking the Rice: Ensuring Proper Size and Volume for Yellow Fried Rice
A crucial consideration in preparing fried rice yellow is accounting for the expansion of the rice during cooking, which approximately triples in volume. Thus, it is imperative to select a saucepan of adequate size to accommodate this expansion. Following the soaking process, transfer the drained rice to the saucepan and add water, green peas, a teaspoon of oil, and salt. Allow the mixture to come to a gentle boil, then reduce the heat to low, cover the pan, and allow the rice to simmer for approximately 15 minutes until it achieves a tender consistency and the water has evaporated. Once cooked, delicately fluff the rice with a fork to enhance its texture.
3. Tempering the Spices: Infusing Flavor into Yellow Curry Fried Rice
Elevate the flavor profile of your yellow curry fried rice by embarking on a journey of tempering aromatic spices. In a separate frying pan set over medium-high heat, heat oil until it reaches the optimum temperature for tempering. To test the readiness of the oil, introduce a cumin seed; if it crackles immediately, the oil is primed for the next step. Proceed by adding asafetida, cumin seeds, and mustard seeds to the fragrant oil, allowing them to sizzle and release their captivating aroma. Follow this with the addition of red chilies, bay leaves, and a cinnamon stick, stirring briefly to coax out the essence of each spice.
4. Stir-Frying the Rice: Creating Vibrant Color and Flavor in Yellow Fried Rice
Delight in the visual and gustatory allure of yellow fried rice by incorporating the pre-cooked rice, turmeric, and cayenne pepper into the spice-infused frying pan. Gently combine the ingredients, ensuring that each grain of rice is enveloped in the golden hue of turmeric and infused with the subtle heat of cayenne pepper. Stir-fry the mixture for approximately 5 to 6 minutes, allowing the flavors to meld harmoniously and the rice to absorb the aromatic essence of the spices, resulting in a dish that is as visually stunning as it is delicious.
Notes: Serving Suggestions for Yellow Fried Rice
Savor the irresistible simplicity of yellow fried rice by serving it piping hot alongside an array of comforting accompaniments, such as soup, dal, or yogurt. This versatile dish offers a perfect balance of flavors and textures, making it an ideal choice for a satisfying meal that tantalizes the taste buds and leaves a lasting impression on discerning palates.
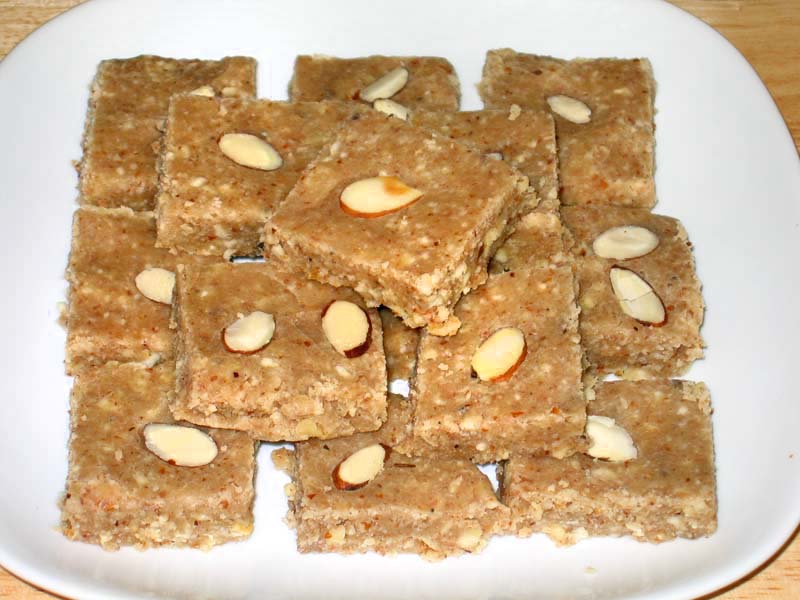
Almond Walnut Cashew Burfi is a healthy, quality substitute for candy that your entire family will enjoy. Its a nice sweet snack that is popular in north India. Recipe will make 24 pieces.
Dry grind the walnuts, cashews and almonds in a food processor.
Dry roast the groundnuts in a frying pan on low medium heat.
Roast them just enough so that the nuts start to give off an aroma. It will take about 4 to 5 minutes. Remove from heat and set aside.
Put the sugar and water together in a saucepan on medium heat. Bring to a boil to make the 1 thread syrup or on the candy thermometer it should reach 230 degrees F.
Turn off the heat and stir in the cardamom powder.
Add the nuts to the syrup and mix, and then spread over a greased 8-inch plate. Note: don’t let the syrup cool off. It must be spread while still hot.
Wait a few minutes until burfi is set but still soft.
Then cut the burfi into any shape you like (such as square, diamond, triangle).
Garnish each piece of burfi with sliced almonds while the burfi is still soft.
Allow the burfi to cool for about an hour to dry and hold its shape. Now you can remove the burfi from the plate.
Hot and spicy peanuts fried with delicious mix of spices. This makes a great snacks for sitting around watching TV or playing games with family and friends. Recipe serves 6.
In a frying pan roast the dry peanuts on medium heat for 3-4 minutes and let it cool for few minutes.
Mix all the ingredients together in a large bowl.
Add water as needed making sure the spices and flour stick to the peanuts uniformly.
Heat the oil in a frying pan on medium heat.
The frying pan should have at least 1 inch of oil. To check if the oil is ready, put one drop of batter in the oil. The batter should raise to the top but not change color right away.
put few drops of oil in your hand it helps droping the penuts before putting peanuts on the oil.
While putting the peanuts into oil, loosen them with your fingers to make sure the peanuts are separated and do not form lumps. Peanuts should be separated while frying.
Fry the peanuts until they turn light brown, turning them occasionally.
When they are done cooking, take them out of the oil with a slotted spoon. Place them on a paper towel to absorb the extra oil.
After cooling to room temperature, the peanuts should be crispy.
Notes
Masala Peanuts can be stored for a month in an airtight container.
Also see my recipe for Spicy Cashew, Almond brittle.
These make a delicious homemade gift – pack it in a jar or candy bag.
Masala Peanuts are delightful appetizers perfect for holidays and festivals, offering a crunchy, gluten-free snack option that satisfies both vegan and non-vegan palates alike. Peanut masala recipe is a beloved snack across India, offering a delightful combination of crunchy peanuts and aromatic spices. This masala peanuts recipe is a favorite among snack enthusiasts for its bold flavors and addictive crunch. Whether you’re hosting a gathering or simply craving a savory treat, learning how to make masala peanuts recipe at home is both rewarding and satisfying.
How to Make Masala Peanuts Recipe: Step-by-Step Guide
Step 1: Prepare the Peanuts
Start by selecting fresh, raw peanuts for the best results. Rinse them thoroughly under cold water to remove any dirt or debris. Then, pat them dry using a clean kitchen towel or paper towels.
Step 2: Dry Roast the Peanuts
Heat a non-stick pan over medium heat. Once the pan is hot, add the peanuts in a single layer. Dry roast them, stirring occasionally, until they turn golden brown and emit a nutty aroma. This process typically takes about 8 to 10 minutes. Keep a close eye on them to prevent burning.
Step 3: Prepare the Spice Mixture
While the peanuts are roasting, prepare the spice mixture. In a small bowl, combine masala peanuts recipe spices such as red chili powder, turmeric powder, cumin powder, chaat masala, and salt according to your taste preferences. Adjust the spice levels to suit your palate.
Step 4: Coat the Peanuts with Spices
Once the peanuts are roasted to perfection, transfer them to a large mixing bowl. While they are still warm, sprinkle the prepared spice mixture over the peanuts. Toss them gently to ensure that each peanut is evenly coated with the spices. Allow the peanuts to cool completely before serving.
Step 5: Serve and Enjoy
Your homemade masala peanuts are now ready to be enjoyed! Serve them as a standalone snack or pair them with your favorite beverages. Store any leftovers in an airtight container to maintain their freshness and crunchiness.
Tips for Making Perfect Masala Peanuts
Experiment with different spice blends to customize the flavor according to your preferences.
You can add ingredients like amchur powder for tanginess or garam masala for extra warmth.
For an extra layer of flavor, consider adding roasted garlic or curry leaves to the spice mixture.
Make sure to roast the peanuts evenly to achieve a uniform golden brown color and prevent any burnt spots.
Allow the peanuts to cool completely before storing them to maintain their crispiness.
Variations of Masala Peanuts
Sweet and Spicy: Add a touch of sweetness to your masala peanuts by incorporating a bit of powdered sugar or jaggery along with the spices.
Herb Infused: Experiment with fresh herbs like cilantro, mint, or curry leaves to add a refreshing twist to your masala peanuts.
Nutty Crunch: Enhance the texture of your masala peanuts by tossing them with a handful of toasted cashews, almonds, or pistachios.
Benefits of Masala Peanuts
Rich in Protein: Peanuts are an excellent source of plant-based protein, making masala peanuts a nutritious snack option.
Good Source of Healthy Fats: Peanuts are high in monounsaturated fats, which are beneficial for heart health when consumed in moderation.
Packed with Essential Nutrients: Peanuts are rich in essential nutrients like vitamins, minerals, and antioxidants, contributing to overall well-being.
FAQs about Masala Peanuts
Can I use pre-roasted peanuts for this recipe?
While you can use pre-roasted peanuts, roasting them yourself allows you to control the level of crunchiness and ensures that they are freshly toasted.
How long do homemade masala peanuts stay fresh?
When stored in an airtight container at room temperature, homemade masala peanuts can stay fresh for up to two weeks. However, they are best enjoyed within the first few days to maintain their crispiness.
Can I make masala peanuts without oil?
Yes, you can skip the oil and dry roast the peanuts directly in a pan for a healthier alternative. However, using a small amount of oil helps the spices adhere to the peanuts more effectively.
For more delightful Indian recipes, explore Manjula’s Kitchen, where you’ll find a treasure trove of culinary inspiration ranging from traditional dishes to modern twists on classic favorites. Be sure to check out recipes like Aloo Gobi, Palak Paneer, and Chana Masala for a taste of authentic Indian cuisine.
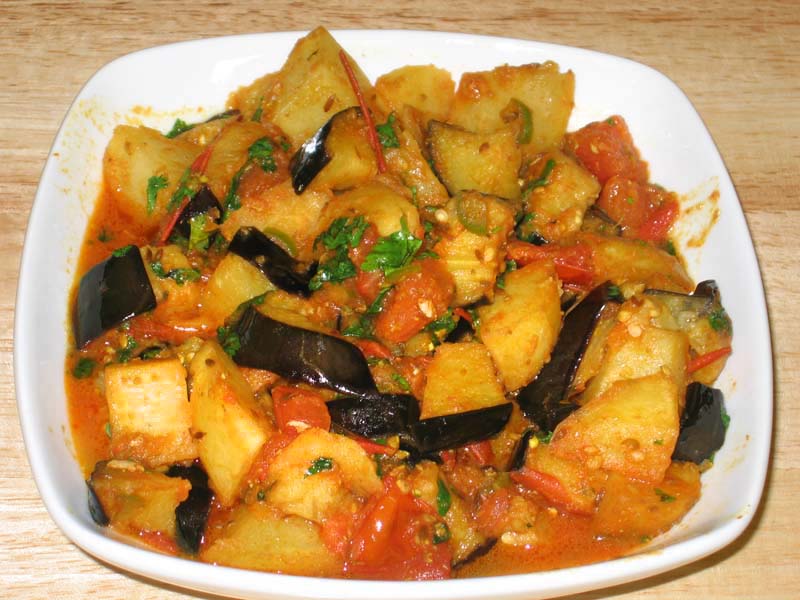
1medium purple eggplantbaingan, un-peeled, cut into 1/2″ cubes
2medium russet potatoesaloo, peeled and cut into 1/2″ cubes
4medium tomatoestamatar cut into 1/2″ cubes
2Tbspcilantrochopped, hara dhania
1Tbspoil
Pinchof asafetidahing
1tspcumin seed
1green chilichopped, adjust to taste
1tspginger pasteadrek
1Tbspcoriander powderdhania powder
½tspturmerichaldi
½tsppaprikadagi mirch
1tspsaltadjust to taste
2Tbspwater
Also needed
Oil to fry
Instructions
Heat the oil in a frying pan over medium high heat.
Frying pan should have at least 1 ½ inch of oil. To check if the oil is ready, put one piece of potato in the oil. The potato should sizzle right away. If vegetables are fried in low heat they will be very oily.
Fry the potatoes till they are cooked through, turn the potatoes few times while frying. Take out potatoes with a slotted spoon (this allows excess oil to drip back into the frying pan) and place on a paper towel.
Test the oil again with a piece of eggplant. Fry the eggplant pieces same way.
In a small bowl, mix the shredded ginger, green pepper, coriander powder, paprika, turmeric, and 2 tablespoons of water to make a paste.
Heat the 1 tablespoon of oil in a pan. Test the heat by adding one cumin seed to the oil; if seed cracks right away oil is ready.
Add cumin seeds and asafetida after seeds crack add the spice mixture and stir-fry for a minute until you see the oil start to separate from the spice mixture.
Add chopped tomatoes stir-fry for a minute.
Add fried potatoes and eggplant mix it gently, let it simmer for three to four minute on medium low heat.
Subji should be not very dry if needed add three to four spoons of water.
Turn off the heat and add chopped cilantro mix it well.
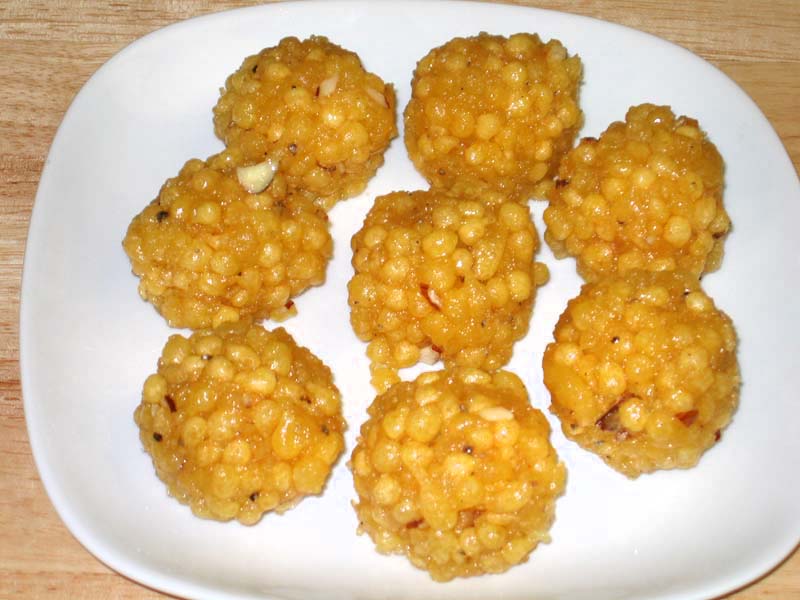
Boondi Ladoo is a popular mouthwatering dessert and must to have at all special occasions all over India. Boondis are very small, round deep-fried balls that have been soaked in fragrant sugar syrup. After soaking, the syrup is drained, and the syrup infused boondi are formed into balls (ladoos). It is a popular sweet delicacy made during festivals like Diwali or Holi.
Perforated Spoon, Skimmer, or Ladle: to make Boondi
The critical part of boondi making is to use the right kind of utensil for the batter to drop through the holes into the hot oil to form the little pearl shaped fried balls. To accomplish this you need to use a flat skimmer, strainer or perforated ladle that has several round holes on the surface, each about the size of a whole black peppercorn.
Instructions
Crack open the cardamom pods and remove the seeds. Crush the seeds and keep aside.
Put the water and sugar in a saucepan and bring to a boil on medium-high heat. When the syrup comes to a boil, turn the heat down to medium and stir to dissolve the sugar. Let it simmer until the syrup is about half thread consistency or 220 degrees on the candy thermometer.
Mix the gram flour with water to make a smooth pancake-like batter or slightly thicker than dosa batter.
Heat the oil in a frying pan on medium high heat. The frying pan should have at least 1 1/2 inches of oil. Tip: To test if the oil is the right temperature, drop a pinch of batter into the oil; if it rises immediately without changing color then the oil is ready to start frying the
Hold the skimmer about 1 to 1 1/2 inches above the oil over the center of the frying pan with one hand. With your other hand pour some of the batter onto the skimmer to cover all of the holes without spilling over the edge of the skimmer. Tip: if you hold the skimmer higher than 11/2 inches above the oil boondi will not be round.
The batter will start dropping through the holes into the oil. If the batter doesn’t drop right away through the holes, pour the batter on the skimmer back into the batter bowl, mix a little more water to the batter and start again. Drop enough boondi into the oil so they just cover the surface of the oil in frying pan in a single layer
Fry them until the sound of sizzling stops and boondis are light gold in color but not crispy! Lift the boondi out of the oil with a slotted spoon (this allows excess oil to drip back into the frying pan) and put them directly into the warm syrup and mix.*
Before making the next batch of boondi, wipe clean the skimmer. This helps to keep the boondi round.
Repeat the process of making boondi and adding to the syrup with rest of the batter. You may have to adjust the heat in between making boondis.
When finished frying the boondi, let them soak in the syrup for few minutes. Add the crushed cardamom seeds and sliced almonds to the syrup. Now drain off the excess syrup.
If the boondis are still hot, let them sit only until they are warm enough to handle – don’t let them to cool off. If the boondis become cold you will not be able to form them into ladoos.
To make the ladoos, scoop up some of the boondi mixture into your palm with a spoon. Gently squeeze the mixture between both palms to shape into a round ball about the size of a golf ball. As you are squeezing some of the syrup will come out. You can make the ladoo larger or smaller if you have a preference.
As you finish making each ladoo, put it on a plate and continue on to make the next ladoo.
As the Ladoos cool to room temperature they will become firm but they should still be moist.
Notes
Shelf LifeLadoos will keep at room temperature in a covered container for up to 10 days and for one month in the refrigerator.TipsIf the syrup is not of the right temperature, you will not be able to form the ladoos.If the boondis cool down to room temperature before being shaped into balls, the sugar will crystallize.If you are not able to make ladoos, don’t worry. You can still enjoy them as “meethi boondi” or sweet boondi.*If you like the boondi for raita or making some other salty snack don’t add to the syrup.
Keyword Festival Special, Kid Friendly, Popular Dessert
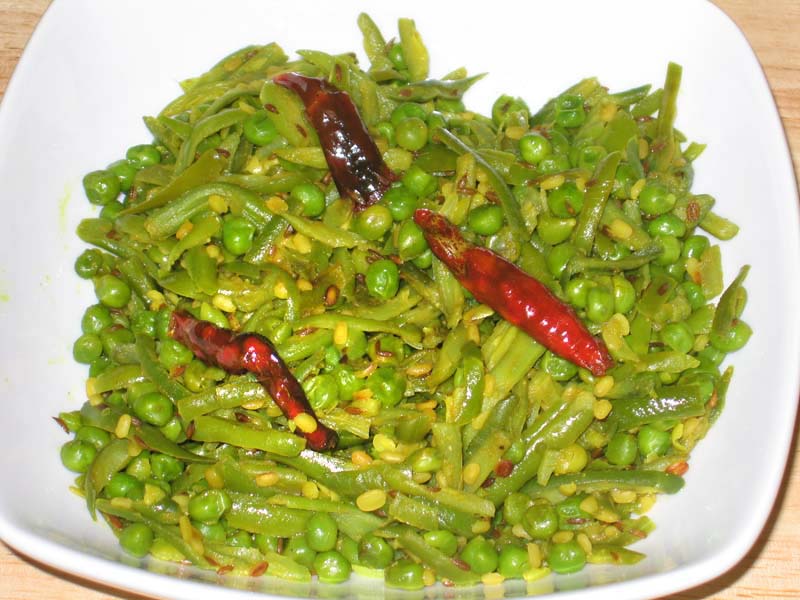
Heat the oil in a saucepan on medium-high heat. Test the heat by adding one cumin seed to the oil. If the cumin seed cracks right away, the oil is ready.
When the cumin seeds crack, add hing, red chilies and urad dal.
Stir-fry for half a minute, stop if the urad dal changes color.
Add green beans and peas, mix it well, and cover the pan. Turn down the heat to medium.
Let it cook for five to six minutes until the peas and beans are lightly tender. Do stir once in between.
Remove the cover and add the coriander powder, salt, and turmeric.
Let beans and peas cook without cover to allow the water to evaporate, this way the beans don’t become mushy. Stir the beans occasionally. Beans and peas should be lightly moist.
After turning of the heat add lemon juice.
Notes
Suggestions
Urad dal can be replaced with washed moong or chana dal.
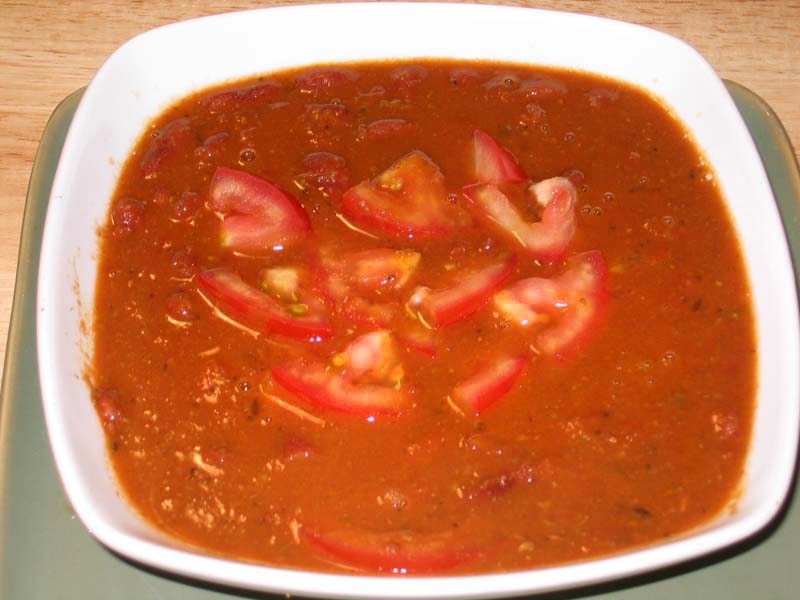
Wash and soak the kidney beans in about six cups of water for at least 6 hours (the beans will double in volume ).
Cut the tomatoes in small pieces, green chili slice lengthwise and take out the seeds (if you prefer mild). Blend tomatoes, green chili, and ginger and make a paste.
Heat the oil in pressure cooker. Test the heat by adding one cumin seed. If the seed cracks right away, the oil is ready. Add asafetida and cumin seeds, as the cumin seeds crack add tomato paste, coriander, turmeric, chili powder, black pepper, and paprika.
Stir-fry for two to three minutes, until the oil begins to separate from the mixture. Add kidney beans, salt, and three cups of water. Close the cooker. Cook over medium high heat.
When pressure cooker starts to steam, turn the heat down to medium and cook twelve minutes.
Turn off the heat. Wait until the steam has stopped before opening the pressure cooker.
Kidney beans should be soft and tender. Stir and mash them gently. Adjust salt and pepper to taste.
How To Make Rajma Chawal Recipe: A Jain Rajma Recipe with Tips and FAQs
Rajma Chawal, a quintessential North Indian dish, is beloved for its rich flavors and comforting texture. While traditionally made with kidney beans simmered in a tomato-based gravy, there are various regional and dietary variations to this dish. In this rendition, we present a Jain version of Rajma Chawal, devoid of onion and garlic, yet bursting with aromatic spices and wholesome goodness.
Preparation:
Wash the kidney beans thoroughly under running water to remove any dirt or impurities.
Soak the kidney beans in about six cups of water for at least 6 hours or overnight. This helps in softening the beans and reducing cooking time.
Making the Paste:
Cut the tomatoes into small pieces and slice the green chilies lengthwise, removing the seeds if you prefer a milder taste.
Peel and chop the ginger.
In a blender, combine the tomatoes, green chilies, and ginger to make a smooth paste. Set aside.
Cooking:
Heat the cooking oil in a pressure cooker over medium heat.
To test the oil temperature, add one cumin seed. If it crackles right away, the oil is ready.
Add a pinch of asafetida followed by the cumin seeds. Allow the cumin seeds to crackle.
Once the cumin seeds start crackling, add the prepared tomato paste to the cooker.
Stir in the coriander powder, turmeric powder, red chili powder, black pepper powder, and paprika. Mix well.
Stir-frying:
Stir-fry the mixture for two to three minutes or until the oil begins to separate from the sides. This step enhances the flavor of the spices and ensures a rich gravy.
Adding Kidney Beans:
Drain the soaked kidney beans and add them to the pressure cooker.
Season with salt according to taste.
Pour in three cups of water and mix well to combine all the ingredients.
Pressure Cooking:
Close the pressure cooker with its lid securely.
Cook over medium-high heat until the pressure cooker starts steaming.
Reduce the heat to medium and continue cooking for twelve minutes.
Finishing Touches:
Once the cooking time is complete, turn off the heat and allow the pressure to release naturally.
Once the steam has stopped, carefully open the pressure cooker lid.
Mashing and Adjusting Seasoning:
The kidney beans should be soft and tender. Gently stir and mash them to thicken the gravy.
Taste the Rajma and adjust the salt and pepper as per your preference.
Garnishing:
Serve the Jain Rajma hot, garnished with chopped tomatoes for a refreshing burst of flavor.
Tips and Suggestions:
Soaking the kidney beans overnight or for at least 6 hours is crucial as it helps in reducing the cooking time and ensures even cooking.
Use mustard oil for an authentic flavor, but if unavailable, any cooking oil can be substituted.
Adjust the quantity of green chilies and red chili powder according to your spice preference.
For a creamier texture, you can mash some of the kidney beans before serving.
Garnish the Rajma with freshly chopped cilantro for added freshness and aroma.
Serve Rajma Chawal with steamed rice or Indian bread like roti or naan for a wholesome meal.
Benefits of Rajma Chawal:
High in Protein: Kidney beans are an excellent source of plant-based protein, making Rajma Chawal a nutritious meal choice, especially for vegetarians and vegans.
Rich in Fiber: Rajma is loaded with dietary fiber, which aids digestion, promotes satiety, and helps maintain a healthy weight.
Essential Nutrients: This dish provides essential nutrients such as iron, potassium, and folate, which are vital for overall health and well-being.
Heart-Healthy: Consuming kidney beans regularly may help lower cholesterol levels and reduce the risk of heart disease.
Satisfying and Comforting: Rajma Chawal is not only nutritious but also deeply comforting, making it a favorite comfort food for many.
FAQs (Frequently Asked Questions):
Q: Can I use canned kidney beans instead of dried ones?
A: Yes, you can use canned kidney beans for convenience. However, dried beans are preferred for their texture and flavor.
Q: Can I skip soaking the kidney beans?
A: Soaking the kidney beans is essential as it helps in reducing cooking time and aids in digestion. Skipping this step may result in unevenly cooked beans.
Q: How do I make Jain Rajma without onion and garlic?
A: In this Rajma recipe, we have omitted onion and garlic to make it suitable for a Jain diet. The rich flavor comes from a blend of aromatic spices and tomatoes.
Q: Can I make this Rajma recipe without a pressure cooker?
A: While a pressure cooker significantly reduces the cooking time, you can cook Rajma on a stovetop in a heavy-bottomed pot. It will require longer cooking time and frequent stirring to prevent sticking.
Q: How long can I store leftover Rajma?
A: Leftover Rajma can be stored in an airtight container in the refrigerator for up to 3-4 days. Reheat thoroughly before serving.
Jain Rajma Chawal is a delicious and wholesome dish that can be enjoyed by everyone, regardless of dietary preferences. With aromatic spices, creamy kidney beans, and a rich tomato gravy, it’s a comforting meal that’s perfect for any occasion. Follow this simple rajma chawal recipe and savor the authentic flavors of North Indian cuisine right in your own kitchen. Explore more delightful Rajasthani recipes on Manjula’s Kitchen, Explore more appetiser recipes on Manjula’s Kitchen: Vegetable Samosas, Paneer Tikka, Crispy Spinach Pakoras, Mango Lassi, Masala Chai, Gulab Jamun, Kheer (Rice Pudding)