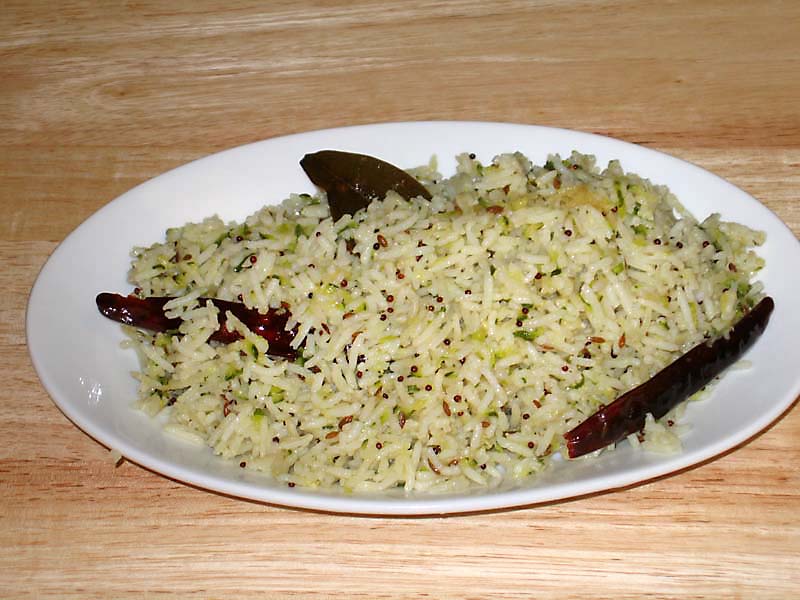
Easy Indian Recipes: Quick and Delicious Vegetarian Dishes
In today’s fast-paced world, we often find ourselves seeking meals that are quick to prepare but still bursting with flavor. Indian cuisine, known for its rich and aromatic spices, offers a plethora of options that are both easy to make and incredibly satisfying. Let’s explore some easy Indian recipes vegetarian, perfect for any occasion, ensuring that you can enjoy delicious easy Indian recipes without spending hours in the kitchen.
Paneer Bhurji
Paneer Bhurji is a delightful scramble made with crumbled paneer (Indian cottage cheese) and a mix of vegetables and spices. This dish is a staple in many Indian households and is a fantastic example of easy Indian recipes. It comes together quickly, making it ideal for a weeknight dinner or a hearty breakfast. Serve it with a side of warm roti or toast for a complete meal.
Vegetable Pulao
For a one-pot wonder, Vegetable Pulao is a go-to choice. This dish features rice cooked with a medley of vegetables and fragrant spices. It’s a shining star among easy Indian food recipes due to its simplicity and the minimal effort required. Pair it with a cooling cucumber raita from the Raita Recipes category for a refreshing touch.
Aloo Jeera
Aloo Jeera, or cumin-spiced potatoes, is a quick and flavorful dish that exemplifies Indian food recipes easy. The potatoes are sautéed with cumin seeds and a handful of spices, resulting in a dish that’s both comforting and satisfying. This recipe is perfect for those times when you need something delicious without a lot of fuss.
Enhancing Your Quick and Easy Menu
To elevate your menu, why not include some delectable options from other categories? Indian Breads like chapati or naan can be quickly prepared and make a perfect accompaniment to any meal. For those with a sweet tooth, Indian Desserts Recipes such as a speedy coconut burfi or a delightful mango lassi can provide a sweet finish to your meal. Incorporating dishes from the Healthy Recipes section, such as a simple and nutritious palak dal or a crisp salad from the Soups and Salads Recipe category, can add a healthy balance to your table.
More Easy Indian Recipes
Chana Masala
Chana Masala is a popular dish featuring chickpeas cooked in a spiced tomato gravy. This dish is not only delicious but also quick to prepare, making it a favorite in the realm of easy Indian recipes vegetarian. Serve it with basmati rice or naan for a complete meal.
Moong Dal Khichdi
For a comforting and nourishing option, Moong Dal Khichdi is a must-try. This simple dish made from rice and yellow moong dal (split yellow lentils) is seasoned with basic spices and is incredibly easy to make. It’s perfect for those days when you want something light yet satisfying.
Sweet and Simple Endings
Sheera
Sheera is a traditional Indian dessert made with semolina, ghee, and sugar. It’s a quick and easy dessert that fits perfectly into the category of easy Indian food recipes. The best part? It takes just a few minutes to prepare, making it a great option for last-minute sweet cravings.
Coconut Ladoo
Another sweet treat that’s both simple and delightful is Coconut Ladoo. Made with grated coconut and condensed milk, these sweet balls are a favorite among easy Indian recipes vegetarian. They’re perfect for festivals or just as a quick dessert to satisfy your sweet tooth.
Frequently Asked Questions (FAQs)
Q: What are some popular easy Indian recipes vegetarian?
A: Some popular easy Indian recipes vegetarian include Paneer Bhurji, Vegetable Pulao, Aloo Jeera, Chana Masala, Moong Dal Khichdi, Sheera, and Coconut Ladoo. These dishes are quick to prepare and full of flavor.
Q: How can I make traditional Indian food recipes easy?
A: To make traditional Indian food recipes easy, look for recipes that require minimal ingredients and cooking time. Dishes like Paneer Bhurji, Aloo Jeera, and Moong Dal Khichdi are great examples of easy and quick Indian recipes.
Q: What are some easy Indian food recipes for beginners?
A: Some easy Indian food recipes for beginners include Vegetable Pulao, Chana Masala, and Coconut Ladoo. These recipes are straightforward and don’t require advanced cooking skills, making them perfect for those new to Indian cooking.
Q: Can I prepare easy Indian recipes in advance?
A: Yes, many easy Indian recipes can be prepared in advance. Dishes like Vegetable Pulao and Chana Masala can be made ahead of time and stored in the refrigerator. Simply reheat before serving.
Q: What are some quick Indian desserts?
A: Some quick Indian desserts recipes include Sheera and Coconut Ladoo. These desserts are easy to make and require minimal preparation time, making them perfect for when you need a sweet treat in a hurry.
Conclusion
Easy Indian recipes vegetarian offer a world of flavors and aromas without the lengthy preparation time.
Whether you’re looking for easy Indian recipes, easy Indian food recipes, or specific Indian food recipes easy, these dishes bring convenience and deliciousness to your table.
So, gather your ingredients, try out these recipes, and enjoy the rich and diverse world of Indian cuisine. Happy cooking and happy eating!
By incorporating these dishes into your menu, you’ll be able to enjoy a wide variety of delicious and nutritious foods. Whether you’re looking for quick snacks, main courses, or desserts, there’s an easy Indian recipe to suit every taste.
Don’t forget to check out Manjula’s Kitchen for more inspiration and culinary delights. Happy cooking and happy eating!
Eggplant and Mushroom Wrap with Roasted Red Pepper and Sun Dried Tomato Chutney
I was inspired by the ingredient: Bell Pepper and Eggplant. Red Bell Peppers are so delicious and sweet and roasting them brings out even more flavor and sweetness. Adding Sun Dried Tomatoes adds even more intense flavor. I’m trying to get my husband to stop eating meat, so I have to cook things with a lot of flavor and meaty textures. This chutney has very bold and robust flavor, the eggplant and mushrooms provide the meaty consistency, while the crumbled paneer adds protein.
2 red bell (capsicum) peppers, roasted, peeled, chopped
1/4 teaspoon mustard seeds (rai)
1/4 teaspoon cumin seeds (jeera)
1 pinch asafetida (hing)
1 teaspoon ginger paste
1 green chili, chopped
1/4 teaspoon turmeric (haldi)
1/2 teaspoon paprika (dagi mirch), for color
2 tablespoons peanuts
1/4 cup sun dried tomatoes in oil, chopped
1 walnut sized tamarind pulp (imli) , soaked in 1/4 cup hot water to soften
1 tablespoon brown sugar, or to taste
salt, to taste
For the CHUTNEY
2 Tablespoons Ghee or oil
10 baby eggplants, washed and sliced into 1/4” thick coins
1/2 pound button or crimini mushrooms, washed and cut into 1/4” thick slices
1-3 green chilies, chopped fine
1 inch piece ginger, chopped fine/divided
Salt to taste
1/2 teaspoon cumin seeds (jeera), ground
1/2 teaspoon coriander seed (dhania), ground
1/4 teaspoon turmeric (haldi)
2 tablespoons yogurt
1/2 teaspoon garam masala
1 carrot, washed, peeled and shredded (adds crunch)
1/2 cup crumbled paneer
1/4 cup chopped fresh cilantro
Roasted Red Pepper Chutney
4 warm rotis
Instructions
Method
Wash and dry bell peppers. Coat lightly with oil. Set oven rack to highest position and broil peppers, turning as needed to blacken skin on all sides. Remove from oven, place in a bowl and cover with plastic wrap to let steam for 15 minutes. Remove blackened skin with fingers (don’t rinse peppers as it rinses away flavor). Set aside.
In sauté pan, heat 1 tablespoon of oil (use oil sun dried tomatoes are packed in for more flavor) over medium-high heat. Add mustard seeds and cook until they start to splutter. Add cumin seeds and hing, cook for a few seconds. Add ginger paste, chopped green chili, peanuts, turmeric, paprika, tamarind pulp, and sun dried tomatoes, cook for 1-2 minutes. Remove from heat and allow to cool a bit, then put in food processor with roasted red peppers, and blend until smooth. Add Brown Sugar and Salt to taste. Can be made a couple of days ahead.
For the CHUTNEY
Melt ghee in large sauté pan, over medium heat. Add sliced eggplant, mushrooms, chopped green chilies, chopped ginger and salt. Cook until eggplant and mushrooms are soft. Add ground cumin, ground coriander, and turmeric, mix well and cook for 2 minutes. Turn off heat and add garam masala and yogurt. Stir to combine.
Assemble wraps:
On each warm roti, spread 2-3 tablespoons of the Roasted Red Pepper Chutney. Add 1/4 of the Eggplant, Mushroom mixture and top with 1/4 of the shredded carrots, a small bit of chopped fresh ginger (optional), chopped cilantro, and crumbled paneer. Roll into a wrap and serve with fresh tomato slices and more chutney if desired. These would also be good served with some raita on the side.
Mix flour, semolina (sooji), gram flour (besan), salt, carom seeds, asafetida, chili flakes, and oil, together.
Add water as needed to make firm but smooth dough. Cover with damp cloth and set aside at least for ten minutes.
Knead the dough for another minute and divide into four equal parts.Take each part of the dough and make a flat ball shape.
Roll them thin into about 9-inch circles. Prick them with a fork all over the rolled dough, the Paree do not puff when frying.
Cut each of the rolled dough into about half inch wide and 3 inch long pieces. Note: you can cut them in your desire shape.
Heat the oil in a frying pan on medium heat. The frying pan should have at least 1 inch of oil. To check if the oil is ready, put a small piece of dough in the oil. The dough should make the oil sizzle and come up slowly.
Make sure to place just enough Paara so you can turn them over easily when frying. Fry the Paara until both sides are light golden-brown.
After Besan Paara come to room temperature they should become crisp.
Notes
Suggestions:Try replacing carom (ajwain) seed with dry fenugreek leaves.you will also like Besan Sev, Atta Ka Ladoo
Aloo Dum is an exotic delicious main course dish. Just the smell of aloo dum can make you hungry! To make this dish, potatoes are fried and then soaked in the spicy aromatic gravy. This is a perfect dish for any dinnerparty.
Heat the oil in a frying pan over medium high heat.
Frying pan should have at least 1 inch of oil. To check if the oil is ready, put one piece of potato in the oil. The potato should sizzle right away. If potatoes are fried on low heat, they will be very oily.
Fry the potatoes till they are cooked through; turn the potatoes a few times while frying. Take out potatoes with a slotted spoon (this allows excess oil to drip back into the frying pan) and place on a paper towel. Keep it aside.
Heat the pan on medium heat and stir-fry the sesame seeds for about a minute until seeds lightly change color. Take them out and keep aside.
Blend sesame seeds, coconut, ginger, green chili, and make it into a paste. Use water as needed to blend into paste.
In a small bowl mix, sesame paste, yogurt, ginger, green chili, coriander powder, funnels seed powder, paprika, red chili powder, and turmeric into a paste. Keep it aside.
Heat the oil in a saucepan. Test the heat by adding one cumin seed to the oil; if seed cracks right away oil is ready. Add the cumin asafetida and cumin seeds. After the cumin seeds crack, add whole red chili and besan (gram flour). Stir-fry for about half a minute until the besan (gram flour) is golden-brown.
Add the spice paste and stir-fry for about 2 minutes on medium heat until the spices start to separate from the oil.
Add the potatoes, mix it well and add about 1cup of water. After the gravy boils, let it cook on low-medium heat for 8 to 10 minutes. Adjust the gravy to your liking.
Add the cilantro and garam masala, cover the pan, and turn off the heat. Let it sit for a few minutes before taking off the cover. This helps bring the color to the top of the dish.
Keyword Exotic, Party Food, Side Dish, Spicy Potatoes
Kaju burfi is probably the most favorite Indian dessert. Kaju burfi is a delicious treat for any occasion. This can also be served as a fudge or candy. This is also a great vegan treat.
Grind the cashew nuts to powder. Dry grinder or a coffee grinder works the best.
On very low heat in a heavy bottom pan roast the cashew nut powder for about 4 minutes or until powder just get warm. Do not heat for any longer otherwise powder will start getting oily.
In a saucepan, boil the sugar and water together on medium heat until syrup is 1 thread or 225 degrees F on a candy thermometer.
Next add the saffron to the syrup mix it well. Saffron is optional. Turn off the heat.
Add the cashew powder to the syrup and mix it well, making sure there are no lumps.
To check the right consistency take a little mix in a spoon, you should be able to roll this into softball.
Next spread the mix quick to the greased plate. Spread before the mix cools off.
Allow burfi to cool and then cut them in the shapes you will like.
Enjoy!
Notes
Notes:
Grind small portion at a time if you grind for too long nuts start getting oily.
Store at room temperature for a week or in the fridge for longer.
Tips:
If the burfi remains soft, you can cook the mixture on low heat for few minutes.
If the mixture is too dry add the boiling water 1 spoon at a time making sue it comes to right consistency.
As you see you can never go wrong with this recipe.
Fresh vegetables and whole grain pasta with savory tomato sauce makes a very colorful and delicious pasta dish. This is a simple pasta dinner. Serve with a side of salad and bread.
In a large pot boil the water with salt and oil. After water comes to the boil add the pasta.
Cook the pasta until it is just tender, not too soft. Drain the water and set pasta aside.
making Vegetables:
Heat the oil in a frying pan over medium high heat.
Add vegetables (carrot, green beans, bell pepper, mushrooms, and zucchini) to skillet and sauté until they are nearly tender.
Marinara Sauce
Mix the cornstarch in ¼ cup of water and keep aside.
Heat the olive oil in a saucepan and add the basil, Italian herbs, and chili flakes stir and add tomatoes.
Let the tomatoes cook until they become pasty.
Next add cornstarch, salt and sugar to the tomato sauce, cornstarch will give thickness to the sauce.
Next add the sauté vegetables to the sauce and cook for few minutes on medium heat until sauce come to the desirable thickness.
Prepare The Pasta
Heat the oil in a saucepan and add basil and chili flakes stir for few seconds.
Next add the drained pasta and sauté for a minute until pasta is well coated with oil.
Pour the vegetable sauce over the pasta, serve hot with slice of French bread and salad.
Notes
Variations:For this recipe you need about 5 cups of vegetable, replace the vegetables to your choice.Serving suggestion:Serve pasta with slice of toasted bread and green salad.Additional Notes:I like to serve pasta with slice toasted and spiced French bread. Before toasting the bread spread the olive oil and sprinkle basil, chili flakes and salt.
Keyword Pasta With Marinara Sauce, Pasta Without Onion Garlic
Spinach raita is a refreshing yogurt-based dish made with spiced spinach and yogurt. By adjusting its thickness, you can also serve spinach raita as a sandwich spread or as a dip for fresh veggies. Spinach raita tastes delicious any way you serve it.
Heat the oil in a saucepan on medium high heat. Test the heat by adding one cumin seed to the oil; if seed cracks right away, oil is ready.
Add the asafetida and cumin seeds. After the cumin seeds crack, add red chilies stir-fry for few seconds.
Add spinach, salt, and black pepper and stir-fry, pressing the spinach down to allow most of the water to evaporate but still leaving the spinach moist.
After the spinach cools off, mix it well into the yogurt.
Add milk to the raita about half a cup adjust to the desire consistency.
For best result serve chill.
Notes
Tips:Frozen chopped spinach can be used instead of fresh spinach.Variations:
Spinach raita also can be served as a spread with bread or crackers keep the consistency thick do not need to add any milk.
To serve as a dip add about ¼ cup of milk but keep thicker then raita.
Serving suggestion: Serve over plain rice or as a side dish with any meal.
1. Heating Oil and Infusing Flavours: Initiating Palak Raita Preparation
Begin the palatable journey of creating Palak Raita by heating oil in a saucepan over medium-high heat. A simple test, featuring the crackling of a cumin seed, confirms the readiness of the oil for the culinary symphony about to unfold. With the aromatic base established, infuse the oil with the distinctive essence of asafetida and cumin seeds. As the cumin seeds crackle, introduce red chilies, stirring the mix for a tantalizing burst of flavour that sets the stage for the vibrant palak raita.
Sautéing Spinach with Seasonings: Crafting the Palak Raita Base
Add the star ingredient, spinach, to the fragrant mix, along with a dash of salt and black pepper. Engage in a thorough stir-fry, applying gentle pressure to the spinach, coaxing it to release its moisture. The objective is to strike a balance, allowing most of the water to evaporate while retaining the spinach’s inherent moisture. This meticulous step forms the foundation of the palak raita, infusing it with the earthy essence of spinach.
Blending Spinach with Yogurt and Milk: Achieving Palak Raita Consistency
Once the sautéed spinach cools off, seamlessly integrate it into the waiting yogurt. This integration creates a symphony of textures and flavours, transforming the yogurt into the creamy canvas for the palak raita. To achieve the desired consistency, introduce milk gradually, adjusting until reaching the perfect balance. This harmonious blend of yogurt and milk ensures a palak raita that is not only flavorful but also luxuriously creamy.
Chilling for Optimal Enjoyment: Perfecting the Palak Raita Experience
For optimal results, serve the palak raita chilled. This step enhances the overall sensory experience, allowing the flavours to meld and intensify. The coolness complements the earthy spinach and the tanginess of the yogurt, resulting in a refreshing and delightful palak raita that is sure to tantalize the taste buds.
Tips and Variations: Enhancing the Palak Raita Recipe
Consider using frozen chopped spinach as a convenient alternative to fresh spinach. Additionally, palak raita transforms into a versatile spread when served with bread or crackers, maintaining a thick consistency without the need for additional milk. For a dip, add approximately ¼ cup of milk, ensuring a thicker texture than traditional raita. These variations allow palak raita to shine in diverse culinary roles, catering to a spectrum of taste preferences.
Serving Suggestions: Palak Raita as a Versatile Accompaniment
Experience the versatility of Palak Raita by serving it over plain rice or as a side dish accompanying any meal. Its dynamic flavours and creamy texture make it a perfect accompaniment to a variety of dishes, contributing a touch of freshness and vibrancy to the overall dining experience.
2 tablespoons chana dal, pre-soaked in water for at least half an hour
1/4 cup unsalted roasted peanuts
1 teaspoon salt adjust to taste
1/4 cup lemon juice
Instructions
Method
Wash rice gently changing water several times until the water appears clear.
For fluffier rice, the rice should be soaked for at least 15 minutes prior to cooking.
Drain the rice and put it into the saucepan. Add water, oil, and salt, and bring to a boil. Once the water is boiling reduce the heat to low and cover the pan.
Cook about 15 minutes, or until the rice is tender and the water has evaporated. Turn off the heat and fluff the rice with a fork.
Preparing The Seasoning:
Heat the oil in a frying pan on medium heat; stir-fry the peanuts for about 2 minutes until peanuts changes the color to light brown.
Take out the peanuts from oil and use the same oil for rest of the seasoning.
Add cumin seeds and mustard seeds after seeds crack add red chili, curry leaves, and green chilies, and stir for a few seconds.
Add the chana dal, stir-fry for about a minute.
Add turmeric and mix it well.
Add the pre-cooked rice, peanuts and sprinkle salt and lemon juice over the rice.
Mix gently, making sure do not break the rice and stir-fry for about 2 minutes. Rice is ready, Enjoy!
Chickpeas and spinach is a marvelous combination, and Chole Palak is a healthy, high protein dish. Chickpeas, also known as garbanzo beans and kabuli chana, are immersed in spicy spinach gravy.
Blend the tomatoes, green chilies, and ginger to make a puree.
Heat the oil in a saucepan. Test the heat by adding one cumin seed to the oil; if the seed cracks right away, the oil is ready. Add the asafetida and cumin seeds. When the cumin seeds crack, add the tomato puree, coriander powder, turmeric, and red chili powder. Cook for three to four minutes on medium heat. The tomato mixture will separate from the oil and reduce to about half in quantity.
Add spinach, salt, and one-half cup of water. Cook, covered, four to five minutes on medium heat.
Add the chickpeas and mash them lightly with a spatula. Add more water as needed to keep the gravy consistency to your liking. Cook on low heat for seven to eight minutes. Add the garam masala.
Notes
Serving suggestions
Chole Palak can be served with roti, naan, or any other bread. It also goes well with plain rice.
Chole Palak is a delicious, healthy choice for people who eat a vegan or gluten-free diet
Introduction to Chole Palak – Chickpeas with Spinach:
Palak Chana Masala is a flavorful and nutritious Indian dish that combines spinach (palak) and chickpeas (chana) in a spiced gravy or curry. It is typically made with dal (lentils), making it a good source of protein, and is naturally gluten-free and low in fat. This dish is quick and easy to prepare, making it perfect for a winter meal. It is also suitable for vegans as it does not contain any animal products.
Chole Palak, also known as chickpeas with spinach or palak chana masala, is a delightful and nutritious dish that combines the goodness of chickpeas and spinach in a flavorful curry. This Chana Saag recipe is a perfect balance of protein-rich chickpeas and iron-packed spinach, making it not only delicious but also incredibly healthy. In this recipe, we’ll guide you through the process of making this hearty and satisfying dish step by step.
Chole Palak Recipe:
Drain and Rinse the Chickpeas: Open the can of chickpeas and pour its contents into a colander. Use running water to thoroughly rinse the chickpeas, removing any canning liquid or residue. Shake the colander gently to remove excess water. Set the rinsed chickpeas aside for now.
Blend the Aromatics: Wash and roughly chop the tomatoes, green chilies, and ginger. Add them to a blender and blend until you have a smooth puree. This puree will form the flavorful base of your chickpea curry.
Heat the Oil and Add Spices: Pour oil into a saucepan and heat it up on medium heat. To test if the oil is hot enough, carefully add a single cumin seed to the pan. If the seed sizzles and cracks right away, the oil is at the perfect temperature. Once the oil is hot, add the asafetida (a pinch is enough) and cumin seeds. Asafetida adds a unique, slightly garlicky aroma to curries. Listen for the cumin seeds to crackle, indicating they’ve released their flavors.
Cook the Tomato Masala: Now it’s time to add the blended tomato puree, coriander powder, turmeric, and red chili powder to the pan with the cumin seeds. Stir the mixture well to combine all the spices with the tomato puree. Let this mixture cook on medium heat for three to four minutes. As it cooks, the oil will separate from the tomato mixture, and the mixture itself will reduce in volume by about half. This concentration of flavors is what will give your curry its depth.
Add Spinach and Simmer: After the tomato masala has cooked down, add the spinach and salt to the pan. Pour in half a cup of water as well. Give everything a good stir and bring to a simmer. Cover the pan and let the contents simmer for four to five minutes on medium heat. The spinach should wilt and become tender during this time.
Add Chickpeas and Adjust Consistency: Once the spinach is cooked, add the rinsed and drained chickpeas to the pan. Use a spatula to gently mash some of the chickpeas against the side of the pan. This will help slightly thicken the gravy and add some textural variation to the curry. If the gravy seems too thick at this point, simply add more water, a little bit at a time, until you reach your desired consistency. Let the chickpeas simmer in the gravy for another seven to eight minutes on low heat, allowing them to absorb all the flavors.
Finish with Garam Masala: As a final touch, take the pan off the heat and stir in the garam masala. Garam masala is a warming spice blend commonly used in Indian cuisine. It will add another layer of complexity to your curry. Give everything a final stir and your chickpea curry is complete!
Tips for Making Perfect Chole Palak:
Use Fresh Spinach: Fresh spinach works best in this recipe as it adds a vibrant green color and a tender texture to the curry.
Adjust Spice Level: Customize the spice level according to your preference by adjusting the amount of red chili powder or green chilies used.
Add Lemon Juice: A squeeze of lemon juice added to the curry just before serving will brighten the flavors and add a hint of acidity.
Variations of Chole Palak:
Creamy Chole Palak: Stir in some coconut milk or cashew cream for a creamy and indulgent version of the dish.
Spicy Chole Palak: Add extra green chilies or a pinch of cayenne pepper for a spicier kick.
Chole Palak with Paneer: Add cubed paneer to the curry for added richness and protein.
Benefits of Including Chole Palak in Your Diet:
High in Protein: Chickpeas are an excellent source of plant-based protein, making Chole Palak a nutritious option for vegetarians and vegans.
Rich in Iron: Spinach is packed with iron, which is essential for maintaining healthy blood cells and preventing anemia.
Loaded with Vitamins and Minerals: Chole Palak is rich in vitamins A, C, and K, as well as folate, potassium, and magnesium, contributing to overall health and well-being.
Frequently Asked Questions (FAQs) about Chole Palak:
Q: Can I use frozen spinach instead of fresh spinach?
A: Yes, you can use frozen spinach if fresh spinach is not available. Thaw the frozen spinach and squeeze out any excess water before adding it to the curry.
Q: Can I make Chole Palak in advance?
A: Yes, Chole Palak can be made ahead of time and stored in the refrigerator for up to 3 days. Reheat gently on the stovetop before serving.
Q: Is Chole Palak gluten-free?
A: Yes, Chole Palak is naturally gluten-free, making it suitable for those with gluten intolerance or celiac disease.
Black-eyed pea salad is colorful and delicious, with ginger dressing for a nice tangy flavor. It works well for a quick & easy light lunch. Black-eyed pea salads are easy to make.
Drain the whey using a strainer line with cheesecloth, or muslin cloth. Wrap the curds in a muslin cloth, rinse under cold water, and squeeze well.
Once the paneer is drained, place on a dry, clean surface and knead the paneer until the paneer is almost rolls into smooth soft dough.
Add the sugar and cardamom into the paneer and knead the paneer again until sugar is mixed well.
Next on low heat cook the paneer mixture stirring continuously until paneer starts coming together as soft dough. This should take about 6 to 7 minutes.
Turn off the heat and keep mixing the paneer like you are making dough. This is most important step to this dish; you are just cooking paneer enough to take out the rawness. If you over cook the paneer it will become crumbly.
Mix the saffron thread in 1 teaspoon of warm milk and mix it well. Keep aside.
Divide the paneer in 24 equal parts and roll them giving a ball shape.
Garnish with crushed pineapple, or garnish them with a drop of saffron paste putting sliced pistachio over.
Refrigerate them for few hours before serving. Serve them chilled!
Notes
NotesImportant step to this dish; you are just cooking paneer enough to take out the rawness. If you over cook the paneer it will become crumbly.Sandesh can be refrigerated for a week.You will also enjoy to Rasgulla and Chumchum
Hot and spicy peanuts fried with delicious mix of spices. This makes a great snacks for sitting around watching TV or playing games with family and friends. Recipe serves 6.
In a frying pan roast the dry peanuts on medium heat for 3-4 minutes and let it cool for few minutes.
Mix all the ingredients together in a large bowl.
Add water as needed making sure the spices and flour stick to the peanuts uniformly.
Heat the oil in a frying pan on medium heat.
The frying pan should have at least 1 inch of oil. To check if the oil is ready, put one drop of batter in the oil. The batter should raise to the top but not change color right away.
put few drops of oil in your hand it helps droping the penuts before putting peanuts on the oil.
While putting the peanuts into oil, loosen them with your fingers to make sure the peanuts are separated and do not form lumps. Peanuts should be separated while frying.
Fry the peanuts until they turn light brown, turning them occasionally.
When they are done cooking, take them out of the oil with a slotted spoon. Place them on a paper towel to absorb the extra oil.
After cooling to room temperature, the peanuts should be crispy.
Notes
Masala Peanuts can be stored for a month in an airtight container.
Also see my recipe for Spicy Cashew, Almond brittle.
These make a delicious homemade gift – pack it in a jar or candy bag.
Masala Peanuts are delightful appetizers perfect for holidays and festivals, offering a crunchy, gluten-free snack option that satisfies both vegan and non-vegan palates alike. Peanut masala recipe is a beloved snack across India, offering a delightful combination of crunchy peanuts and aromatic spices. This masala peanuts recipe is a favorite among snack enthusiasts for its bold flavors and addictive crunch. Whether you’re hosting a gathering or simply craving a savory treat, learning how to make masala peanuts recipe at home is both rewarding and satisfying.
How to Make Masala Peanuts Recipe: Step-by-Step Guide
Step 1: Prepare the Peanuts
Start by selecting fresh, raw peanuts for the best results. Rinse them thoroughly under cold water to remove any dirt or debris. Then, pat them dry using a clean kitchen towel or paper towels.
Step 2: Dry Roast the Peanuts
Heat a non-stick pan over medium heat. Once the pan is hot, add the peanuts in a single layer. Dry roast them, stirring occasionally, until they turn golden brown and emit a nutty aroma. This process typically takes about 8 to 10 minutes. Keep a close eye on them to prevent burning.
Step 3: Prepare the Spice Mixture
While the peanuts are roasting, prepare the spice mixture. In a small bowl, combine masala peanuts recipe spices such as red chili powder, turmeric powder, cumin powder, chaat masala, and salt according to your taste preferences. Adjust the spice levels to suit your palate.
Step 4: Coat the Peanuts with Spices
Once the peanuts are roasted to perfection, transfer them to a large mixing bowl. While they are still warm, sprinkle the prepared spice mixture over the peanuts. Toss them gently to ensure that each peanut is evenly coated with the spices. Allow the peanuts to cool completely before serving.
Step 5: Serve and Enjoy
Your homemade masala peanuts are now ready to be enjoyed! Serve them as a standalone snack or pair them with your favorite beverages. Store any leftovers in an airtight container to maintain their freshness and crunchiness.
Tips for Making Perfect Masala Peanuts
Experiment with different spice blends to customize the flavor according to your preferences.
You can add ingredients like amchur powder for tanginess or garam masala for extra warmth.
For an extra layer of flavor, consider adding roasted garlic or curry leaves to the spice mixture.
Make sure to roast the peanuts evenly to achieve a uniform golden brown color and prevent any burnt spots.
Allow the peanuts to cool completely before storing them to maintain their crispiness.
Variations of Masala Peanuts
Sweet and Spicy: Add a touch of sweetness to your masala peanuts by incorporating a bit of powdered sugar or jaggery along with the spices.
Herb Infused: Experiment with fresh herbs like cilantro, mint, or curry leaves to add a refreshing twist to your masala peanuts.
Nutty Crunch: Enhance the texture of your masala peanuts by tossing them with a handful of toasted cashews, almonds, or pistachios.
Benefits of Masala Peanuts
Rich in Protein: Peanuts are an excellent source of plant-based protein, making masala peanuts a nutritious snack option.
Good Source of Healthy Fats: Peanuts are high in monounsaturated fats, which are beneficial for heart health when consumed in moderation.
Packed with Essential Nutrients: Peanuts are rich in essential nutrients like vitamins, minerals, and antioxidants, contributing to overall well-being.
FAQs about Masala Peanuts
Can I use pre-roasted peanuts for this recipe?
While you can use pre-roasted peanuts, roasting them yourself allows you to control the level of crunchiness and ensures that they are freshly toasted.
How long do homemade masala peanuts stay fresh?
When stored in an airtight container at room temperature, homemade masala peanuts can stay fresh for up to two weeks. However, they are best enjoyed within the first few days to maintain their crispiness.
Can I make masala peanuts without oil?
Yes, you can skip the oil and dry roast the peanuts directly in a pan for a healthier alternative. However, using a small amount of oil helps the spices adhere to the peanuts more effectively.
For more delightful Indian recipes, explore Manjula’s Kitchen, where you’ll find a treasure trove of culinary inspiration ranging from traditional dishes to modern twists on classic favorites. Be sure to check out recipes like Aloo Gobi, Palak Paneer, and Chana Masala for a taste of authentic Indian cuisine.
Papdi (papri) Chaat is my kind of food and there are so many kinds of chaat. Chaat is a popular street food all over India. Chaat is basically different varieties of snacks served with tamarind or hari (cilantro) chutney or with hot spice mix. The definition of chaat literally is "to taste".Recipe serves 4 to 6
Mix the flour, sooji, salt, and oil in a bowl. Add water to the mixture a little at a time, kneading to form firm dough.
Cover the dough and set aside for 15 minutes or more.
Divide the dough into about 3 equal parts.
Roll one section of the dough to eight inches in diameter, fairly thin – about thickness of dime. Do the same with the remaining two parts.
Prick the rolled dough firmly every quarter-inch or so with a fork to keep the papdi from puffing while frying. Using a sharp knife, cut the rolls into 1½-inch squares.
Heat the oil in about one inch of oil in a frying pan over medium heat. To test, drop a small piece of dough in the oil. The dough should sizzle but come up to the surface slowly. If the dough rises
immediately, let the oil cool slightly and try again.
Place just enough papdi to cover the oil in the frying pan in a single layer. Don’t crowd them.
Fry the papdi until both sides are a light golden brown.
Remove cooked papdi with a slotted or mesh spoon and transfer to a plate. Continue cooking the remaining papdi in batches.
After the papdi cool to room temperature they should be crisp.
Papdi can be stored in airtight container for 1 month.
Making the Garnish
Mash the chickpeas lightly and mix with hari (cilantro) chutney to your taste. Keep aside.
Put the yogurt into a bowl and whisk until smooth. Add a little milk as needed to consistency of pancake batter. Add salt to taste. Set aside
Arrange the papdi on a large plate.
Place a slice of potato on top of each papdi (does not need to be the exact size). Place ½ teaspoon of the chickpea mixture over each potatoa slice.
Drizzle yogurt over each papdi.
Sprinkle roasted cumin powder, and red chili to your taste.
Finish the papdi chat by drizzling with tamarind chutney.
Notes
To make round papdi, divide the dough in about 30 equal parts and roll them individually into 2½-inch rounds. Prick with a fork in four to five places.
Papdi Chaat, a popular street food delicacy, combines crispy papdi with a tantalizing mix of appetizers and chaat elements, creating a flavorful explosion that delights the taste buds. Papdi chat is a delightful Indian street foodsnack that tantalizes the taste buds with its crispy papdis, tangy chutneys, yogurt, and assorted toppings. This papdi chat recipe promises to deliver an explosion of flavors in every bite, making it a perfect choice for parties, gatherings, or simply as a savory indulgence.
How to Make Papdi Chat
To create this mouthwatering delicacy, start by preparing the papdis, the essential base of the dish. Combine all-purpose flour, semolina, carom seeds, and salt in a mixing bowl. Knead the ingredients into a firm dough, adding water gradually. Roll out the dough thinly and cut it into small rounds. Prick the rounds with a fork and deep fry until golden brown and crispy. Drain excess oil and set aside.
Next, prepare the tangy tamarind chutney by simmering tamarind pulp, dates, jaggery, and spices until thickened. Strain the mixture to remove any solids, resulting in a smooth, flavorful chutney. Similarly, whip up a refreshing mint chutney by blending mint leaves, coriander, green chilies, and yogurt into a smooth paste.
Now, assemble the papdi chat by arranging the crispy papdis on a serving plate. Drizzle generous amounts of both chutneys over the papdis, followed by spoonfuls of beaten yogurt. Sprinkle chaat masala, roasted cumin powder, and red chili powder for an extra kick of flavor. Top it off with tomatoes, and fresh coriander leaves.
Serve the papdi chat immediately, allowing everyone to enjoy the perfect blend of textures and tastes.
Tips for Making Papdi Chat
Crispy Papdis: Ensure the papdis are rolled out thinly and fried until crisp to achieve the perfect texture.
Chutney Consistency: Adjust the consistency of the chutneys by adding water gradually while cooking to achieve the desired thickness.
Topping Variation: Experiment with different toppings such as boiled potatoes, chickpeas, or sev to add more depth to the flavor profile.
Spice Level: Adjust the amount of green chilies and red chili powder according to your preference for spice.
Variations of Papdi Chat
Dahi Papdi Chat: For a creamier variation, substitute beaten yogurt with thick, creamy yogurt or hung curd.
Healthy Twist: Replace fried papdis with baked or air-fried versions for a healthier alternative.
Fusion Flavors: Experiment with fusion flavors by incorporating ingredients like avocado, salsa, or shredded cheese for a unique twist on the traditional recipe.
Benefits of Papdi Chat
Rich in Flavors: Papdi chat combines a variety of flavors, textures, and spices, making it a truly indulgent treat for the taste buds.
Nutrient-Rich Ingredients: Ingredients like yogurt, chickpeas, and fresh vegetables provide essential nutrients like protein, fiber, vitamins, and minerals.
Cultural Experience: Enjoying papdi chat offers a cultural experience, allowing you to savor the vibrant street food culture of India.
FAQs (Frequently Asked Questions)
Q: Can I prepare the papdis ahead of time?
A: Yes, you can prepare the papdis in advance and store them in an airtight container once cooled to maintain their crispiness.
Q: Can I make the chutneys ahead of time?
A: Absolutely, both tamarind and mint chutneys can be prepared in advance and stored in the refrigerator for several days.
Q: Can I make papdi chat without yogurt?
A: Yes, you can omit yogurt or use a dairy-free alternative like coconut yogurt for a vegan version of the dish.
Papdi chat is a versatile and beloved snack that never fails to impress with its burst of flavors and textures. Whether enjoyed as an appetizer, a snack, or a light meal, this recipe promises to be a crowd-pleaser at any gathering or occasion. So, gather your ingredients and embark on a culinary journey to recreate this iconic Indian street food delight in your own kitchen!
Pani puris are a great snack, served as chaat and a popular street food all over India. They are served filled with spicy water, chickpeas and potatoes. Makes about 60 puris.
Blend everything except the water together to make a fine paste. While blending, add water as needed to blend.
Taste to adjust the green chilies as they can be mild or hot. Add more lemon juice, sugar, and salt as needed to your desired taste. Remember you will be adding more water to dilute so paste should be spicier. Strain the paste using water as needed.
After straining mix the paste with remaining water or adjusting to the taste.
The pani (water) will taste best if refrigerated for a day.
To make Puris:
Mix the flour and sooji. Add water as needed to make firm dough. Knead the dough until it is pliable. Cover the dough with a damp cloth for about ten minutes.
Damp two kitchen towels, spread one damp towel over a cookie sheet or plain surface, close to where you are going to fry the puris.
Divide the dough into about 60 small balls. Keep them under a damp cloth.
Start rolling each ball to about a 2-inch diameter circle. Place over a damp towel and cover with another damp towel. Do this for all 60 puris. TIP: Placing the puris between damp cloths helps the puris to puff evenly on all sides.
Heat the oil on medium high heat. Oil should be about 1 1/2 inch high in frying pan. To test the oil, put a little piece of dough in the oil. The oil is ready if the dough comes up right away and does not change color.
Start frying the puris, starting first with the puri you first rolled.
Put one puri in the oil and press lightly. When it puffs turn over and put another puri in the oil. Keep adding six to eight puris at a time. Fry the puris until they are golden-brown all around by turning a few times. You may adjust the heat as needed while frying.
Take the puris out and place over paper towel, so the excess oil is absorbed. TIP: When taking the puris out of the frying pan, make sure to tilt the skimmer so that the excess oil is drained before placing on the paper towel.
Fry all the puris. They should be crisp and puff like a ball.
Notes
Serving Suggestions
Pani puris are served by making a small hole in each puri. Fill the puris with boiled and chopped potatoes, or boiled chickpeas.
Finish by filling each puri with the spicy pani (water). Enjoy!
Pani Puri Recipe: The Ultimate Guide to Making Delicious Pani Puris
Introduction to Pani Puri
Pani Puri, also known as golgappa or phuchka, is a beloved Indian street food famous for its burst of flavors and crunchy texture. This pani puri recipe encapsulates the essence of Indian culinary tradition, offering a delightful mix of tangy, spicy, and sweet flavors. Perfect for gatherings, parties, or simply as a snack, making pani puri at home is a rewarding experience that brings friends and family together.
How to Make Pani Puri: Step-by-Step Guide
Preparing the Puris
To start this recipe for pani puri, you’ll need puris, which are hollow, crispy semolina or wheat spheres. You can either make them at home or purchase them from a store. If making at home, mix semolina or wheat flour with water and knead into a firm dough. Roll out small circles and deep fry until golden brown. Set aside to cool.
Preparing the Pani
The pani puri is incomplete without its signature spicy and tangy water. In a blender, combine mint leaves, coriander leaves, green chilies, ginger, tamarind pulp, black salt, roasted cumin powder, chaat masala, and salt. Blend until smooth. Strain the mixture and dilute it with water according to taste. Chill the pani in the refrigerator for at least an hour before serving.
Preparing the Filling
For the filling, boil potatoes until tender, then peel and mash them. Add boiled chickpeas, and a dash of chaat masala for extra flavor. Mix well and set aside.
Assembling the Pani Puris
Now comes the fun part! Take each puri and gently make a hole in the center, creating a cavity for the filling. Stuff the puris with the potato mixture and arrange them on a serving plate. Pour the chilled pani into each puri using a small spoon or a pani puri maker, ensuring they’re filled to the brim.
Garnishing and Serving
Garnish the pani puris with a drizzle of sweet tamarind chutney and a sprinkle of sev (crunchy chickpea flour noodles) for added texture. Serve immediately to enjoy the burst of flavors and textures in every bite.
Tips for Perfect Pani Puris
Fresh Ingredients: Use fresh mint, coriander, and tamarind for the pani to enhance the flavor.
Chilling Time: Allow the pani to chill for at least an hour to let the flavors meld together.
Crunchy Puris: Ensure the puris are crispy and hollow to hold the filling and pani without getting soggy.
Variations of Pani Puri
Ragda Pani Puri: Replace the potato filling with ragda (spicy chickpea curry) for a heartier version.
Fruit Pani Puri: Experiment with filling options like diced mango, pomegranate seeds, or grated pineapple for a fruity twist.
Sukha Puri: Skip the pani and serve the stuffed puris with sweet tamarind chutney and spicy mint chutney for a dry version.
Benefits of Pani Puri
Rich in Flavor: Pani puri offers a medley of flavors, from spicy and tangy to sweet and savory.
Customizable: You can adjust the spice level and filling according to your preference, making it suitable for all taste buds.
Social Experience: Making and enjoying pani puri with friends and family fosters bonding and creates lasting memories.
FAQs (Frequently Asked Questions)
Q: Can I make the puris ahead of time?
A: Yes, you can prepare the puris in advance and store them in an airtight container for up to a week.
Q: How spicy should the pani be?
A: The spice level of the pani can be adjusted according to your preference. Start with fewer green chilies and add more if desired.
Q: Can I make a healthier version of pani puri?
A: Yes, you can opt for baked puris and use less oil in the filling to make a healthier version of pani puri.
For more delightful Indian recipes, visit Manjula’s Kitchen and explore a world of culinary delights!
By following this comprehensive pani puri recipe, you’ll be able to recreate the magic of this iconic Indian street food in the comfort of your own kitchen. Whether it’s a special occasion or just a craving for something delicious, pani puri never fails to satisfy. So gather your ingredients, invite your loved ones, and embark on a flavorful journey with homemade pani puris!
Kadhi, a blend of yogurt and besan (gram flour) with besan pakoras, this is served with rice. This dish is popular throughout India specially in North India.
pinchcitric acid if needed to give more sourness to kadhi
For Pakoras
3/4 cupbesan,gram flour
2/3cupwater use as needed
For Garnish
1tspgheclarified butter
1tspred chili powder
Instructions
Making Kadhi
Mix gram flour and turmeric with yogurt until smooth. Add three cups of water slowly and mix well.
Heat the oil in a saucepan. Test the heat by adding one cumin seed to the oil. If the cumin seeds crack right away, the oil is ready. Add the asafetida, fenugreek seeds, cumin seeds, stir and add bay leaves, whole red chilies, and red chili powder. Stir for a few seconds. Add the yogurt mixture and keep stirring until the kadhi comes to a boil.
Add three cups of water and let it come to boil. Add salt. Turn the heat to medium low. Let the kadhi cook an hour and a half, stir occasionally. To adjust thickness, add boiled water.
Making Pakoras
Add water slowly to the besan to make a smooth and thick batter. Whip the besan batter two to three minutes in a circular motion using a spoon, until light and fluffy.
Fry the pakoras in ½ inch of oil in a flat frying pan over medium heat. (Don’t use enough oil to cover the pakoras; they will be softer and fluffier if fried in shallow oil.
To test, drop one drop of batter into the oil. The batter should form a ball on the surface of the pan, but not change color right away.
Place about one tablespoon of batter into the oil. Fry the pakoras in small batches until golden-brown.
After frying, soak the pakoras in room-temperature water for ten minutes. Squeeze the pakoras gently to remove the water, taking care not to break them.
Add the pakoras to the kadhi and boil on low to medium heat for ten minutes.
Making the Seasoning
Heat the ghee (clarified butter) lightly in a small saucepan. Add chili powder and/or paprika (adjust to taste). Pour over the kadhi when ready to serve.
Notes
Variations Add one cup chopped spinach to the kadhi just before adding the pakoras for extra flavor and color. Add one tablespoon dry fenugreek leaves (dry mathi leaves) to the pakora batter.My favrait way to Serve Kadhi Pakoras is with Rice, Roti, Jeera Aloo, Spicy Green Peas
Kadhi Pakora is a gluten-freesummer recipe featuring a savory vegetable curry with dal (lentils) and crispy fried pakoras, creating a delightful and flavorful dish. Kadhi Pakora, a popular North Indian dish, is a comforting and flavorful yogurt-based curry with gram flour dumplings. This traditional dish is known for its tangy and savory taste, making it a favorite among many households. In this kadhi recipe, we’ll show you how to make authentic Punjabi Kadhi Pakora step by step, so you can enjoy its deliciousness at home. Whether you’re craving a comforting meal or planning a special dinner, Kadhi Pakora is sure to satisfy your taste buds.
Step 1: Preparation of Ingredients for kadhi pakora punjabi style
Start by gathering all the necessary ingredients for making Kadhi Pakora. For the pakoras, prepare a batter using gram flour, spices, and water. Slice and chop green chilies, cilantro, and ginger for the pakora batter. For the kadhi, whisk yogurt and gram flour together until smooth, and set aside. Finely tomatoes and ginger for the kadhi gravy. Having all the ingredients ready will streamline the cooking process.
Step 2: Making Pakoras:
To make the pakoras, heat oil in a deep-frying pan. Drop Spoonfuls of the pakora batter into the hot oil and fry until golden brown and crispy. Remove the pakoras from the oil and place them on a paper towel to drain excess oil. Repeat the process until all the batter is used. The crispy pakoras will add texture and flavor to the kadhi.
Step 3: Preparing the Kadhi Base:
In a large pot or saucepan, heat oil or ghee over medium heat. Add cumin seeds, mustard seeds, and fenugreek seeds, and let them splutter. Next, add ginger, and cook until fragrant. The aromatic base will form the foundation of the kadhi gravy, imparting depth of flavor to the dish.
Step 4: Cooking the Kadhi:
Once the aromatics are sautéed, it’s time to add the chopped tomatoes to the pot. Cook the tomatoes until they soften and break down, forming a thick gravy. Then, add the whisked yogurt and gram flour mixture to the pot, stirring continuously to prevent lumps from forming. Bring the mixture to a gentle boil, then reduce the heat and let it simmer.
Step 5: Adding Pakoras:
Once the kadhi base is cooked and thickened, add the fried pakoras to the pot. Gently stir to coat the pakoras with the flavorful kadhi gravy. Allow the pakoras to simmer in the kadhi for a few minutes to absorb the flavors. The combination of soft pakoras and tangy kadhi creates a harmonious and satisfying dish.
Step 6: Finishing Touches:
Before serving, garnish the Kadhi Pakora with freshly chopped cilantro leaves for a burst of freshness and color. You can also sprinkle some roasted cumin powder on top for extra flavor. Serve the Kadhi Pakora hot with steamed rice or roti for a comforting and wholesome meal.
Tips for Making Perfect Kadhi Pakora:
Consistency: Adjust the consistency of the kadhi by adding more water if it’s too thick or simmering longer if it’s too thin.
Fresh Ingredients: Use fresh yogurt and spices for the best flavor in the kadhi gravy.
Frying Pakoras: Fry the pakoras in batches to ensure even cooking and crispiness.
Variations of Kadhi Pakora:
Vegetarian Variation: Skip the addition of pakoras and add vegetables like potatoes, carrots, or bell peppers to the kadhi for a vegetarian version.
Gluten-Free Option: Use chickpea flour (besan) instead of wheat flour for the pakora batter to make it gluten-free.
Spicy Version: Add extra green chilies or red chili powder for a spicier kadhi.
Benefits of Including Kadhi Pakora in Your Diet:
Probiotic-rich: Yogurt used in kadhi is rich in probiotics, which promote gut health and digestion.
Good Source of Protein: Gram flour used in pakoras adds protein to the dish, making it a satisfying meal option.
Balanced Meal: Kadhi Pakora is a balanced meal that provides carbohydrates, protein, and fats, along with essential vitamins and minerals.
Frequently Asked Questions (FAQs) about Kadhi Pakora:
Q: Can I make kadhi without pakoras?
A: Yes, you can skip adding pakoras and enjoy the kadhi as a creamy yogurt-based curry with a tempering of spices.
Q: How long does kadhi pakora last in the refrigerator?
A: Kadhi Pakora can be stored in the refrigerator for up to 3-4 days. Reheat gently on the stovetop before serving.
Q: Can I freeze kadhi pakora?
A: While you can freeze kadhi pakora, the texture of the pakoras may change slightly upon thawing. It’s best enjoyed fresh or stored in the refrigerator for a few days.
For more delicious Indian curry recipes, visit Manjula’s Kitchen. Explore a variety of vegetarian curry dishes featuring a range of spices, vegetables, and legumes to add flavor and variety to your meals.
Mango Lassi is a soothing cold drink for hot summer days or to brighten up any meal. This pale drink is a blend of mango and yogurt. A popular beverage in Indian restaurants.
Blend yogurt, mango, and 2 tablespoons sugar and taste before adding more sugar. How much sugar is used depends on the sweetness of the mango and the yogurt.
Add and cardamom powder and blend. If it is too thick, add some water to desired consistency. Pour into a tall glass and garnish with mint leaves. ice and cardamom powder and blend again.
Notes
TipsAdjust ingredient quantities depending on the sweetness of the mango and the thickness of the yogurt. Mango Lassi it is better if the mangoes are not fibrous.You may also enjoy Falooda, Lemonade