10 Easy Vegan Recipes | Vegan Indian Foods by Manjula’s Kitchen
Embracing a vegan lifestyle doesn’t mean you have to give up on the rich and flavorful experience of Indian cuisine. Here at Manjula’s Kitchen, we bring you a collection of vegan Indian food that is both delicious and easy to prepare. Let’s dive into 10 easy vegan recipes that will make your meals exciting and nutritious. These vegan Indian recipes are perfect for anyone looking to incorporate more plant-based meals into their diet.
1. Vegan Aloo Gobi
Aloo Gobi is a classic Indian dish made with potatoes and cauliflower. This flavorful and hearty dish is a staple in many Indian households and is a great example of vegan Indian food that is both satisfying and healthy. The combination of tender potatoes and cauliflower florets cooked with aromatic spices like cumin, turmeric, and garam masala makes this dish irresistible. Aloo Gobi is not only delicious but also easy indian recipesto prepare, making it a perfect choice for busy weeknights. Serve it with roti or rice for a complete meal.
2. Chana Masala
Chana Masala is a spicy and tangy chickpea curry that is a favorite among many. It’s one of the 10 easy vegan recipes that you can prepare quickly, and it’s packed with protein and flavor, making it a perfect vegan food recipe. Chickpeas are simmered in a rich tomato sauce flavored with an array of spices like coriander, cumin, and chili powder. This dish is hearty and comforting, ideal for lunch or dinner. Pair it with steamed basmati rice or warm naan for a satisfying meal.
3. Vegan Palak Tofu
Palak Tofu is a delicious twist on the traditional Palak Paneer. Instead of paneer, tofu is used to keep this dish vegan. The creamy spinach sauce pairs perfectly with the tofu, creating a nutritious and tasty vegan Indian recipe. Spinach is blended into a smooth puree and cooked with spices, then combined with tofu cubes to create a delightful dish. This vegan version retains all the flavors of the original and is a fantastic way to enjoy spinach and tofu in a new and exciting way. Serve it with jeera rice or chapati.
4. Baingan Bharta
Baingan Bharta is a smoky and flavorful eggplant dish that is popular in north indian recipes. This dish is made by roasting eggplants and cooking them with tomatoes, and spices, making it a delightful addition to your collection of vegan food recipes. The roasting process gives the eggplant a unique smoky flavor, which is then enhanced by the addition of spices like cumin, coriander, and garam masala. Baingan Bharta is perfect as a side dish or a main course when served with roti or rice.
5. Vegan Vegetable Biryani
Vegetable Biryani is a fragrant and flavorful rice dish cooked with a variety of vegetables and spices. This vegan version is just as delicious as the traditional one, making it a must-try among vegan Indian recipes. The rice is layered with a mixture of vegetables like carrots, peas, and bell peppers, along with aromatic spices such as cardamom, cinnamon, and cloves. Biryani is a complete meal in itself and can be enjoyed with a side of raita or salad.
6. Tofu Tikka Masala
Tofu Tikka Masala is a vegan take on the classic Chicken Tikka Masala. Tofu is marinated in spices and yogurt, then cooked in a rich and creamy tomato sauce. This dish is perfect for those looking for vegan food recipes that are both hearty and flavorful. The tofu absorbs the flavors of the marinade and the sauce, resulting in a dish that is rich and satisfying. Serve it with basmati rice or naan to soak up the delicious sauce.
7. Vegan Rajma
Rajma is a kidney bean curry that is a staple in North Indian cuisine. This vegan version is just as delicious and comforting, making it a great choice for anyone seeking vegan Indian food that is both nutritious and satisfying. Kidney beans are cooked in a spiced tomato gravy, flavored with a blend of spices like cumin, coriander, and garam masala. Rajma is traditionally served with rice, making it a wholesome and filling meal.
8. Masoor Dal
Masoor Dal is a simple yet flavorful red lentil curry. It’s one of the easiest vegan Indian recipes to prepare and is packed with protein and fiber, making it a healthy addition to your meal rotation. Red lentils are cooked with tomatoes, and spices, creating a comforting and nourishing dish. Masoor Dal is perfect for a quick lunch or indian dinner recipes and can be enjoyed with rice or chapati.
9. Vegan Korma
Vegan Korma is a creamy and mildly spiced curry made with a variety of vegetables and a rich coconut-based sauce. This dish is perfect for those looking for 10 easy vegan recipes that are both luxurious and easy to make. The vegetables are simmered in a sauce made from coconut milk, cashews, and spices, resulting in a dish that is rich and flavorful. Vegan Korma can be served with rice or naan for a complete meal.
10. Vegan Pulao
Vegan Pulao is a simple and flavorful rice dish cooked with vegetables and aromatic spices. It’s a versatile dish that can be enjoyed on its own or as a side, making it a great addition to your list of vegan Indian food recipes. The rice is cooked with vegetables like peas, carrots, and bell peppers, along with spices such as cumin, cinnamon, and bay leaves. Vegan Pulao is perfect for a quick and easy meal and can be paired with raita or a salad.
Conclusion
These 10 easy vegan recipes showcase the versatility and richness of vegan Indian food. From hearty curries to flavorful rice dishes, these recipes are sure to bring joy and nutrition to your table. Explore more vegan Indian recipes and discover the delicious possibilities of plant-based cooking with Manjula’s Kitchen. Happy cooking and enjoy your journey with vegan food recipes!
By incorporating these dishes into your diet, you’ll be able to enjoy a wide variety of delicious and nutritious foods. Whether you’re looking for breakfast, snacks, main courses, or desserts, there’s a vegan Indian recipe to suit every taste. Don’t forget to check out Manjula’s Kitchen for more inspiration and culinary delights. Happy cooking and happy eating!
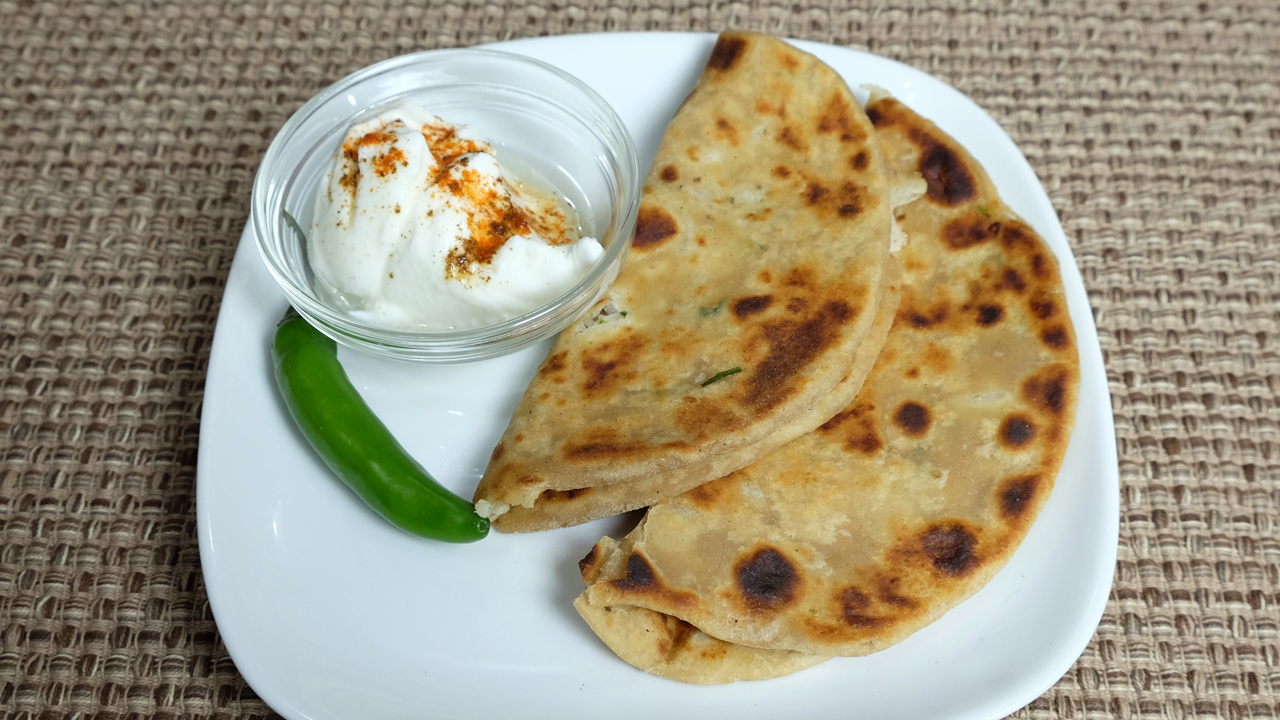
Mooli is a white radish or daikon. This is an exotic flat bread filled with mooli. Mooli ka paratha is a popular north Indianbreakfast treat with cup of hot chai.
Also need about ¼ cup whole wheat flour for rolling and 5 teaspoon oil for cooking paratha
Instructions
Making the Dough
Mix flour, salt, and oil in a bowl add the water as needed to make soft dough. Knead the dough for about one minutes on a lightly greased surface to make soft, and pliable dough.
Set the dough aside for at least ten minutes.
Making the Filling
Shred the mooli / white radish, add the salt to shredded mooli mix it well let it sit for about 2-3 minutes. Squeeze the water as much possible from mooli. Add all filling ingredients together, carom seeds, chili and cilantro mix it well. Do this processes just before you are ready to make parathas.
Making of paratha
Divide the dough into four equal parts.
Take one part of the dough and with your fingers flatten the edges to form a three-inch circle, leaving the center a little thicker than the edges.
Mold the dough into a cup and place the filling in the center, filling should be little less then dough. Pull the edges of the dough to wrap the filling.
Heat an iron skillet or heavy skillet on medium high heat. Test by sprinkling it with a couple of drops of water. If the water sizzles right away, the skillet is ready.
Press the filled ball lightly on dry whole wheat flour from both sides.
Using a rolling pin, roll the balls lightly to make six-inch circles, keeping the sealed side of the balls on top. If the dough sticks to the rolling pin or rolling surface, lightly dust the parathas with dry flour.
Place the paratha on the skillet. When the paratha start to change color flip it over. You will notice some golden-brown spots.
After a few seconds, drizzle one teaspoon of oil over the paratha. Flip the paratha again and lightly press the paratha on the sides with a spatula, to help paratha cook through evenly.
Flip again and press with a spatula making sure the paratha is golden-brown on both sides. Repeat for the remaining parathas.
Paratha are best served hot and crispy. They will be soft if not served hot. If you are not going to serve them right away, cool them on a wire rack to keep them from getting soggy.
Parathas can be kept unrefrigerated for up to two days wrapped in aluminum foil or in a covered container. For later use, parathas can be refrigerated four to five days or frozen for up to a month. Re-heat using a skillet or oven.
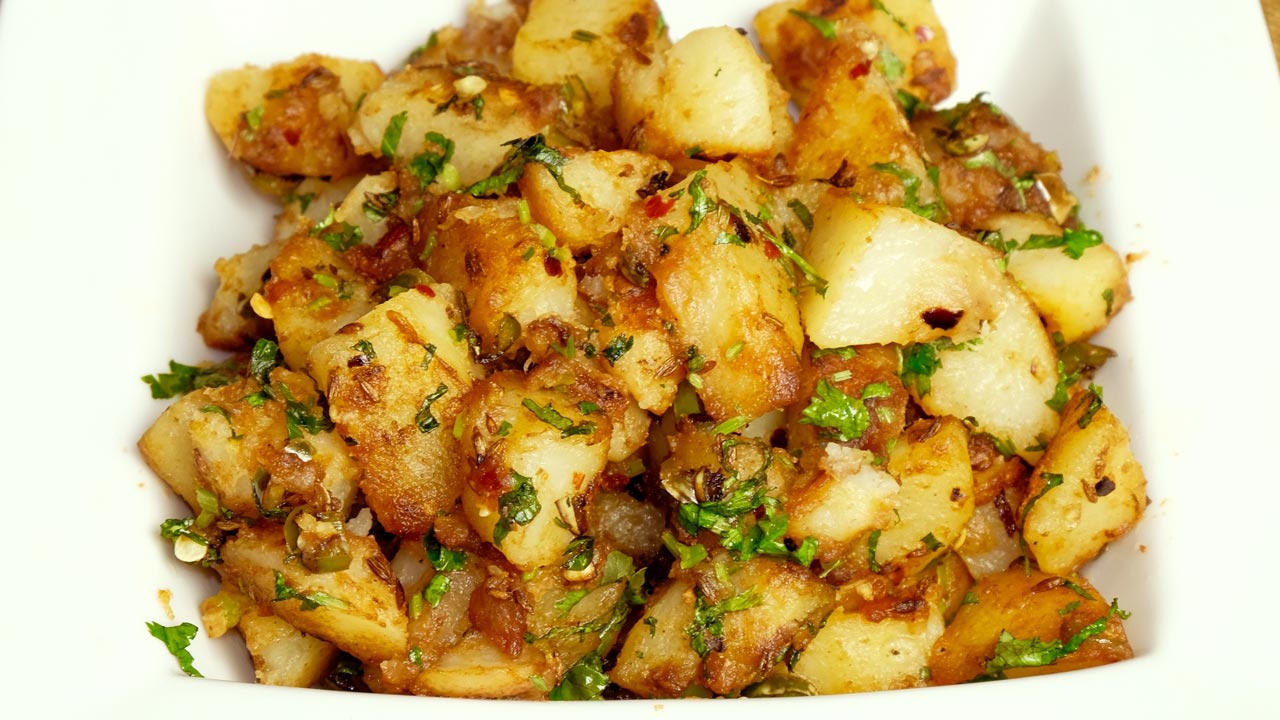
Chatpate Aloo or spicy stir-fry potatoes is a tangy and delicious spicy dish. These Stir-fried potatoes with green chili and tamarind give a very unique flavor. Chatpate Aloo is perfect as a delicious appetizer or you can serve them as a side dish with any meal.
3cups potatoes boiled peeled and cubed in byte size
4tablespoons oil, I like canola oil
1 teaspoon cumin seeds, jeera
1teaspoon salt
2tablespoons green chili finely chopped, adjust to your taste
1/4teaspoon chili flake
1 teaspoon finely shredded ginger
2 tablespoons tamarind paste (do not use concentrated Tamarind)
1/4teaspoon sugar
1/4cup cilantro chopped
2-3 tablespoons water
Instructions
Heat the oil in a frying pan on medium-high heat. Oil is the right temperature when cumin seeds crack immediately after being put in the pan.
Add cumin seeds after seeds crack add potatoes and sprinkle the salt over potatoes.
Stir-fry until potatoes are light golden brown this should take about 6-7 minutes. Add ginger, green chilies and chili flakes. Stir for about a minute.
Add tamarind paste, and sugar mix it well. Add water as needed about 2-3 tablespoons. Potatoes should be moist.
Turn off the heat and add cilantro. Mix it well and serve chatpata aloo hot.
Chatpate Aloo is a delightful dish featuring sautéed potatoes seasoned with a tantalizing blend of spices. This recipe is perfect for various occasions including appetizers, gluten-free diets, lunch box suggestions, quick & easy meals, snacks, and especially suits vegan and vegetarian preferences. The potatoes are cooked to perfection, creating a crispy exterior while remaining tender inside. Bursting with flavor, Chatpate Aloo offers a satisfying experience with its spicy and aromatic profile, making it a popular choice among those seeking a delicious and wholesome dish.
Preparing the Potatoes
To begin making the chatpate aloo fry, start by washing and peeling the potatoes. Cut them into small cubes or slices, depending on your preference. This step is crucial as it ensures even cooking and allows the flavors to penetrate the potatoes evenly. Chatpate aloo fry is all about the spicy and tangy flavors, so make sure to cut the potatoes into bite-sized pieces for maximum flavor impact.
Frying the Potatoes
Heat oil in a pan and add cumin seeds to it. Once the cumin seeds start to splutter, add the diced potatoes to the pan. Fry the potatoes on medium heat until they turn golden brown and crispy on the edges. This step is essential as it gives the chatpate aloo fry its characteristic texture and crunchiness. Make sure to stir the potatoes occasionally to ensure even frying.
Adding Spices
Once the potatoes are fried to perfection, it’s time to add the spices. Sprinkle turmeric powder, red chili powder, and chatpate masala over the fried potatoes. Adjust the quantity of spices according to your taste preferences. The chatpate masala is the star ingredient of this dish, adding a unique blend of tangy and spicy flavors to the chatpate aloo fry. Stir well to coat the potatoes evenly with the spices.
Seasoning and Garnishing
Next, add salt to taste and squeeze fresh lemon juice over the chatpate aloo fry. The lemon juice adds a refreshing tanginess to the dish, balancing out the heat from the spices. Garnish the dish with freshly chopped cilantro leaves for a burst of freshness and color. Cilantro not only enhances the visual appeal of the dish but also adds a subtle herbaceous flavor that complements the spicy potatoes perfectly.
Serving
Once the chatpate aloo fry is ready, transfer it to a serving platter and serve hot. This spicy potato dish is perfect as a side dish or snack and pairs well with roti, naan, or rice. You can also enjoy it on its own as a delicious and flavorful appetizer. Serve it with your favorite chutney or dip for an extra kick of flavor. Whether you’re entertaining guests or craving a spicy snack, chatpate aloo fry is sure to satisfy your taste buds with its bold and irresistible flavors.
Tips:
To make the chatpate aloo fry even spicier, you can add finely chopped green chilies along with the spices.
For added crunchiness, you can coat the potatoes in a thin layer of cornstarch before frying them.
If you don’t have chatpate masala on hand, you can make your own by combining equal parts of chaat masala, amchur (dried mango powder), and black salt.
Variations:
Chatpate Aloo Chaat: Turn this chatpate aloo fry into a delicious chaat by topping it with yogurt, tamarind chutney, tomatoes, and sev (crispy chickpea noodles).
Chatpate Aloo Sandwich: Use the chatpate aloo fry as a filling for sandwiches along with some mint chutney and sliced vegetables for a spicy and satisfying meal.
Benefits:
Potatoes are a good source of vitamins and minerals, including vitamin C, potassium, and B vitamins.
The spices used in chatpate aloo fry, such as turmeric and red chili powder, have anti-inflammatory and antioxidant properties.
Lemon juice adds vitamin C to the dish, which boosts immunity and aids in digestion.
Cilantro is rich in antioxidants and may help lower blood sugar levels and improve heart health.
FAQs:
Q: Can I make chatpate aloo fry ahead of time?
A: While chatpate aloo fry is best enjoyed fresh and hot, you can prepare the fried potatoes in advance and store them in an airtight container in the refrigerator. When ready to serve, reheat the potatoes in a pan and add the spices and seasonings.
Q: Can I use sweet potatoes instead of regular potatoes?
A: Yes, you can definitely use sweet potatoes to make chatpate aloo fry. Sweet potatoes add a slightly sweet and earthy flavor to the dish, which pairs well with the spicy and tangy seasonings.
Q: Is chatpate aloo fry spicy?
A: Yes, chatpate aloo fry is meant to be spicy, thanks to the addition of red chili powder and chatpate masala. However, you can adjust the level of spiciness according to your taste preferences by reducing the amount of chili powder or omitting it altogether.
These Mixed Vegetable Pakoras are an all-time favorite snack in India. There are endless variations of pakoras, which are also known as bhajias. Mixed vegetable pakoras as the name suggests are made with a variety of vegetables. Pakoras are great as an appetizer or snack for any type of the gathering. They are perfect for a rainy day, and even more delicious paired with a cup of hot spicy chai.
Combine all the dry ingredients, besan, coriander, fennel, red pepper, salt, and asafetida in a bowl. Mix it well.
Add potatoes, cauliflower, spinach, cabbage, and green chilies and oil into dry mix, mix it well keep aside for about ten minutes. When you are ready to fry pakoras if mix is too dry add as needed 1 or 2 spoons of water to make texture of soft dough.
Heat at least one inch of oil in a frying pan over medium high heat. To test, put one drop of batter in the oil. The batter should come up and not change color instantly.
Place about two tablespoons of mix holding with your fingers into the oil. Do not overlap the pakoras.
Fry the pakoras in small batches; after you turn the pakoras one time press the pakoras lightly.
This will take five to six minutes per batch. Fry the pakoras, turning occasionally, until both sides are golden brown.
Repeat this process for the remaining batches.
The crispy, delicious pakoras are now ready to serve.
Notes
TipsIf the oil is too hot the pakoras will not be crisp; if the oil is not hot enough, the pakoras will be greasy.Serving suggestions
The vegetable pakoras are best dipped in a mint chutney, tamarind chutney, or sprinkled with chat masala.
Pakoras taste best when they are served hot.
You can make the pakoras one day in advance, do not refrigerate. When ready to serve refry them in moderately hot oil.
Mixed Vegetable Pakora Recipe: How to make Mixed Vegetable Pakora
Introduction to Mixed Vegetable Pakora
Mixed vegetable pakoras are a popular Indian veganstreet food and snacks made with a variety of vegetables coated in a spiced chickpea flour batter and deep-fried until crispy. This mixed vegetable pakora recipe is a delicious way to enjoy the flavors of different vegetables in a crunchy and flavorful snack. It’s perfect for serving at parties, as a tea-time snack, or as an appetizer before a meal.
Ingredients for Mixed Vegetable Pakora
The ingredients required for making mixed vegetable pakoras include a variety of vegetables such as potatoes, cauliflower, spinach. These vegetables are thinly sliced or chopped into bite-sized pieces, depending on preference. Other ingredients include chickpea flour (besan), rice flour for added crispiness, spices like cumin seeds, turmeric powder, chili powder, and salt to taste. Fresh cilantro leaves and green chilies can be added for extra flavor and heat.
Step-by-Step Instructions on How to Make Mixed Vegetable Pakora
Preparation of Vegetables
Start by washing and preparing the vegetables. Peel and thinly slice the potatoes, chop the cauliflower into small florets, and finely chop the spinach leaves. Thinly slice green chilies. Ensure that all the vegetables are dry before using them in the batter.
Making the Batter
In a large mixing bowl, combine chickpea flour, rice flour, cumin seeds, turmeric powder, chili powder, and salt to taste. Gradually add water to form a thick batter, ensuring there are no lumps. The batter should be thick enough to coat the back of a spoon but still easily coat the vegetables.
Mixing Vegetables with Batter
Add the prepared vegetables to the batter and mix until they are evenly coated. Ensure that each piece of vegetable is well-coated with the batter for even frying.
Frying the Pakoras
Heat oil in a deep frying pan or kadhai over medium heat. Once the oil is hot, carefully drop spoonfuls of the vegetable batter into the hot oil. Fry the pakoras in batches, ensuring not to overcrowd the pan. Fry until they are golden brown and crispy, flipping them occasionally for even frying.
Draining and Serving
Once the pakoras are golden brown and crispy, remove them from the oil using a slotted spoon and drain them on paper towels to remove excess oil. Serve hot with mint chutney, tamarind chutney, or ketchup.
Tips for Making Perfect Mixed Vegetable Pakoras
Ensure that the vegetables are thinly sliced or chopped uniformly to ensure even frying.
Use chilled water to make the batter, as it helps in making the pakoras crispier.
Adjust the spice levels according to your preference by adding more or less chili powder and green chilies.
Fry the pakoras on medium heat to ensure that they cook through evenly without burning.
Variations of Mixed Vegetable Pakoras
Paneer Pakoras: Add cubes of paneer (Indian cottage cheese) along with the vegetables for an extra protein boost.
Corn Pakoras: Add sweet corn kernels to the vegetable batter for a sweet and crunchy variation.
Mushroom Pakoras: Slice mushrooms and coat them with the batter for a flavorful mushroom pakora.
Benefits of Eating Mixed Vegetable Pakoras
Provides a good source of vitamins and minerals from the variety of vegetables used.
Chickpea flour used in the batter is gluten-free and rich in protein and fiber.
Frying the pakoras in moderate amounts of oil makes them crispy and delicious without being overly greasy.
FAQs about Mixed Vegetable Pakoras
Can I make mixed vegetable pakoras ahead of time?
Yes, you can prepare the vegetable batter ahead of time and refrigerate it. However, it’s best to fry the pakoras just before serving to retain their crispiness.
Can I bake mixed vegetable pakoras instead of frying them?
While frying gives the pakoras a crispy texture, you can try baking them in a preheated oven at 375°F (190°C) for about 20-25 minutes or until they are golden brown and crispy.
How long can I store leftover mixed vegetable pakoras?
Leftover pakoras can be stored in an airtight container in the refrigerator for up to 2-3 days. Reheat them in a toaster oven or oven until they are heated through before serving.
Appetizers: Try out the delicious Samosa Recipe for another popular Indian appetizer.
Beverages: Refresh yourself with a cool glass of Mango Lassi, a traditional Indian yogurt-based drink.
Desserts: Indulge your sweet tooth with the delectable Gulab Jamun Recipe, a classic Indian dessert made from milk solids soaked in sugar syrup.
With these recipes, you can explore a variety of flavors and tastes from the rich culinary tradition of Indian cuisine. Enjoy cooking and savoring these delightful dishes with family and friends!
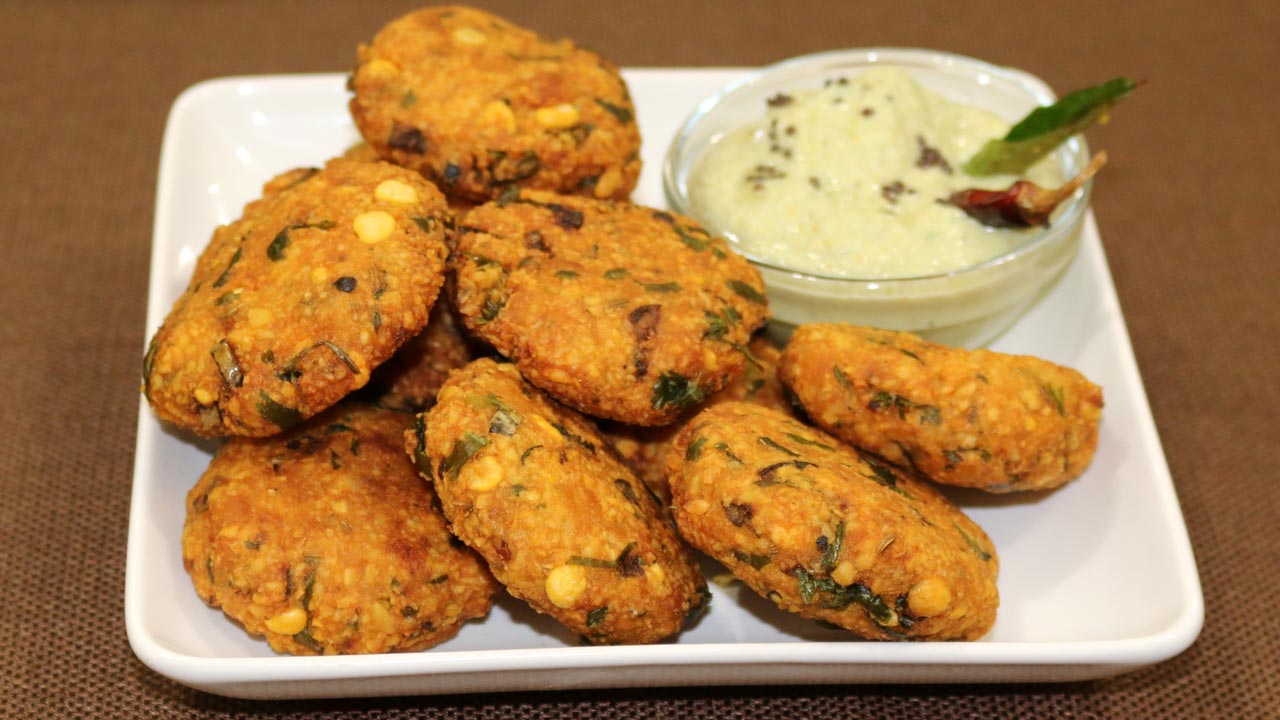
Masala Vada is a South Indian favorite snack that is made with spiced chana dal. They are delicious crunchy on the outside and soft inside. Masala Vada is a popular street food in South India. Try serving along with your afternoon tea.
Wash and Soak chana dal in three cups of water for about 4 hours after soaking this will become about twice in volume.
Drain the water, keep 2 tablespoons soaked dal aside. Grind dal coarsely without adding any water. I like to use food processor.
Take out the dal in a mixing bowl, add all the ingredients, potatoes, rice flour, salt , fennel seeds, mango powder, black pepper, asafetida, ginger, green chili, cilantro and soaked chana dal. Mix it well.
Lightly wet your palms, this will make easy to roll the vadas. Take a lemon size ball of the mix, flatten it with your hands, making them to about half inch thick patties. This should make about 16 patties. I like to make few of patties before I start frying.
Heat the oil in a frying pan, (frying pan should have about 1” of oil) over medium heat. Oil should be moderately hot when you drop the vada, oil should sizzle and come to surface slowly. Gently drop the vadas in oil making sure they don’t overlap.
Fry the vadas both sides till golden brown and crisp, turning over two to three times. This should take 6-7 minutes. Repeat the same procedure for the rest of the mix.
Take them out over paper towel, this absorb the access oil.
Serve vadas as they are or with chutneys, I like them with coconut chutney.
Masala Vada is a delightful Indian appetizer and street food snack that fits perfectly into the categories of gluten-free, vegan, and snacks. Made primarily from chickpea flour and an assortment of spices, Masala Vada is a savory fritter popular in South Indian cuisine. It’s typically crafted by blending soaked and coarsely ground chana dal (split chickpeas) with green chilies, ginger, curry leaves, and coriander leaves.
Masala vada is a popular South Indian snack made from chana dal. It is crispy on the outside and soft on the inside, making it a delightful treat for snack lovers. This masala vada recipe is easy to follow and yields delicious vadas that are perfect for serving with tea or as an appetizer.
Soaking the Chana Dal
To begin making the recipe of masala vada, start by soaking the chana dal in water for at least 3-4 hours. This helps to soften the dal and make it easier to grind later on.
Draining and Grinding
Once the dal is soaked, drain the water completely and transfer the dal to a blender or food processor. Grind it coarsely without adding any water. The texture should be coarse, with small pieces of dal still visible.
Mixing the Ingredients
Transfer the ground dal to a mixing bowl and add chopped green chilies, grated ginger, chopped cilantro, cumin seeds, and salt to taste. Mix everything together until well combined. This mixture forms the base of your masala vada.
Shaping the Vadas
Heat oil in a deep frying pan or kadhai over medium heat. While the oil is heating, take small portions of the dal mixture and shape them into small patties or vadas. You can flatten them slightly with your palms to ensure even cooking.
Frying the Vadas
Carefully slide the shaped vadas into the hot oil, making sure not to overcrowd the pan. Fry them in batches until they turn golden brown and crispy on both sides. Use a slotted spoon to remove the fried vadas from the oil and drain them on paper towels to remove excess oil.
Serving
Serve the dal vada hot with your favorite chutney or sauce. They can also be enjoyed on their own as a crunchy and flavorful snack.
Tips
To make the vadas even more flavorful, you can add curry leaves, or grated coconut to the dal mixture.
Make sure the oil is hot enough before frying the vadas to ensure they cook evenly and become crispy.
If you prefer a spicier version, you can increase the quantity of green chilies or add a pinch of red chili powder to the dal mixture.
Variations
Instead of chana dal, you can use a combination of different dals like moong dal, urad dal, or toor dal to make variations of masala vada.
For a healthier alternative, you can air-fry the vadas instead of deep-frying them. Simply preheat the air fryer, brush the vadas with a little oil, and air-fry them until crispy.
Benefits
Masala vada is a good source of protein and fiber due to the presence of chana dal, making it a nutritious snack option.
The spices used in the vadas like ginger and cumin seeds have digestive properties and aid in digestion.
As these vadas are fried, they should be consumed in moderation as part of a balanced diet.
FAQs
Can I make masala vada ahead of time?
Yes, you can prepare the dal mixture in advance and store it in the refrigerator. When ready to serve, shape the vadas and fry them fresh for the best taste and texture.
Can I freeze masala vada?
While it’s best to consume masala vada fresh, you can freeze any leftover vadas for later consumption. Simply place them in an airtight container or ziplock bag and freeze for up to a month. Reheat them in an oven or air fryer before serving.
Can I use pre-cooked dal to make masala vada?
It’s recommended to use uncooked, soaked dal for this recipe as it gives the vadas the right texture and consistency. Using pre-cooked dal may result in vadas that are too soft and mushy.
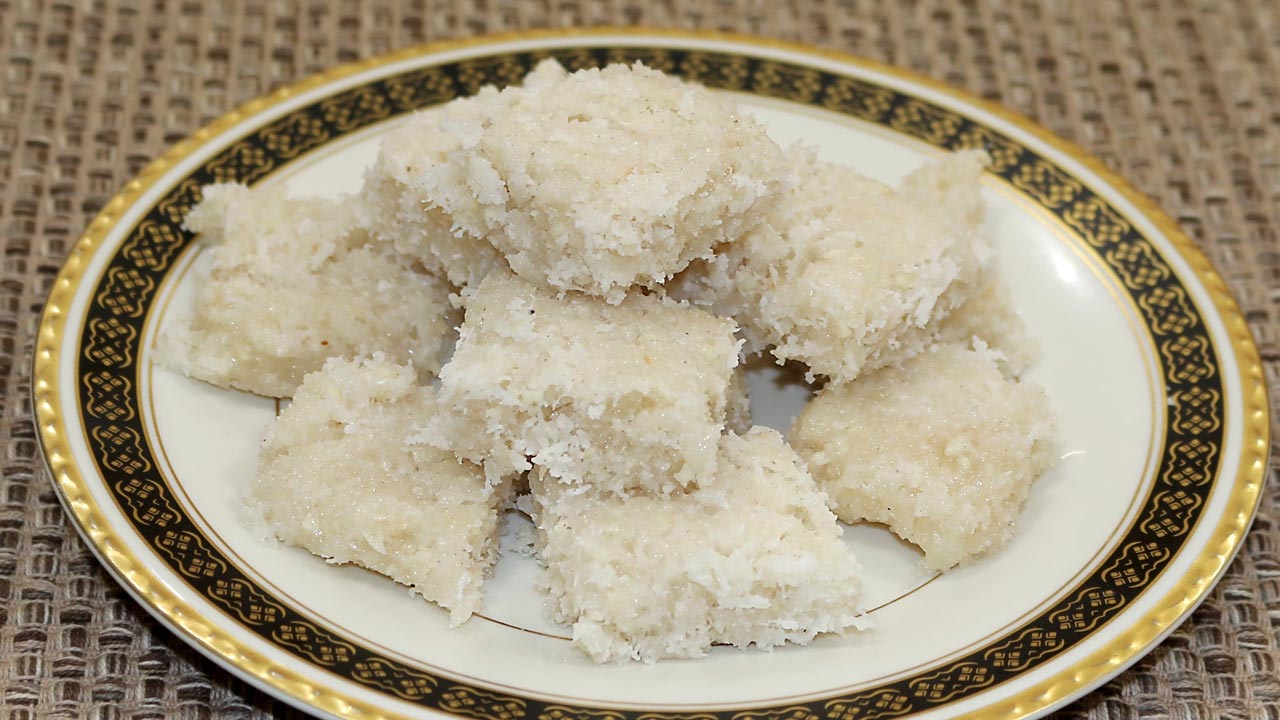
Coconut almond burfi is a classic dessert and simply delicious. Coconut almond burfi is super easy to make with few ingredients. This is also vegan and gluten-free.
2cups coconut freshly grated, I am using frozen shredded coconut
1-3/4cups sugar
1/2cup blanched almond powder
1/4teaspoon cardamom powder
Instructions
In a non-stick frying pan add coconut and sugar, cook over low medium heat, stir continuously till sugar is melted and mixture starts to bubble.
Add the almond powder and cardamom, keep stirring continuously, scraping the sides and bottom of the pan, until mixture start coming together and becomes consistency of soft dough. This should take about 6-7 minutes. Turn of the heat.
Pour the mixture into greased plate while burfi mixture is still hot spread it evenly about 3/4 inch thick in a square shape. Press the mixture with spatula to make it firm.
While burfi is still warm cut them in about one inch square.
Allow the burfi to cool for about an hour to dry and hold its shape. Now you can remove the burfi from the plate.
Burfi can be stored for 2 weeks in air tight container.
Notes
Notes: To blanch almonds, drop almonds in boiling water and keep aside. Drain and rinse under cold water after 5 minutes. Press the almonds one by one and squeeze the skin lightly to pop
This Eggless Omelet is similar to a variation of besan chila. I combine lots of vegetables including bell pepper, spinach, and tomatoes and then add in some light spices. Now you have a healthy and delicious choice for breakfast or light lunch. It is also vegan and gluten free!
3/4cup besan (gram flour) available in Indian grocery stores
1/2 teaspoon salt
1/2teaspoon cumin seeds (jeera)
1/8teaspoon black pepper
1 green chili finely chopped, optional
1/2 cup tomato seeded and finely chopped
1/2cup finely chopped spinach
1/2cup finely chopped bell pepper
1/2cup water to make batter
2tablespoons oil
Use vegetables quantity as a guide line, it can be little more or less, also change the vegetables to your choice.
Instructions
Mix all the dry ingredients together: besan, cumin seeds, black pepper and salt. Add the water slowly to make a smooth batter, the consistency of pancake batter or Dosa batter. Add the green chilies, tomato, spinach, and bell pepper. Mix well.
Heat the skillet on medium heat (Use a non-stick skillet) skillet should be moderately hot. Test by sprinkling a few drops of water on it. Water should sizzle right away.
Pour approx. 1/2cup of the batter mixture into the skillet and spread evenly with the back of a spoon. Starting from the center, spiral the batter outward evenly to form a circle about 7” in diameter.
When the batter starts to dry, gently spread about two teaspoons of oil over it. Wait about 30 seconds; flip the omelet using a flat spatula.
Press the omelet lightly all around with the spatula to make the omelet cook evenly. Turn the omelet three or four times, until cook well and golden brown on both sides.
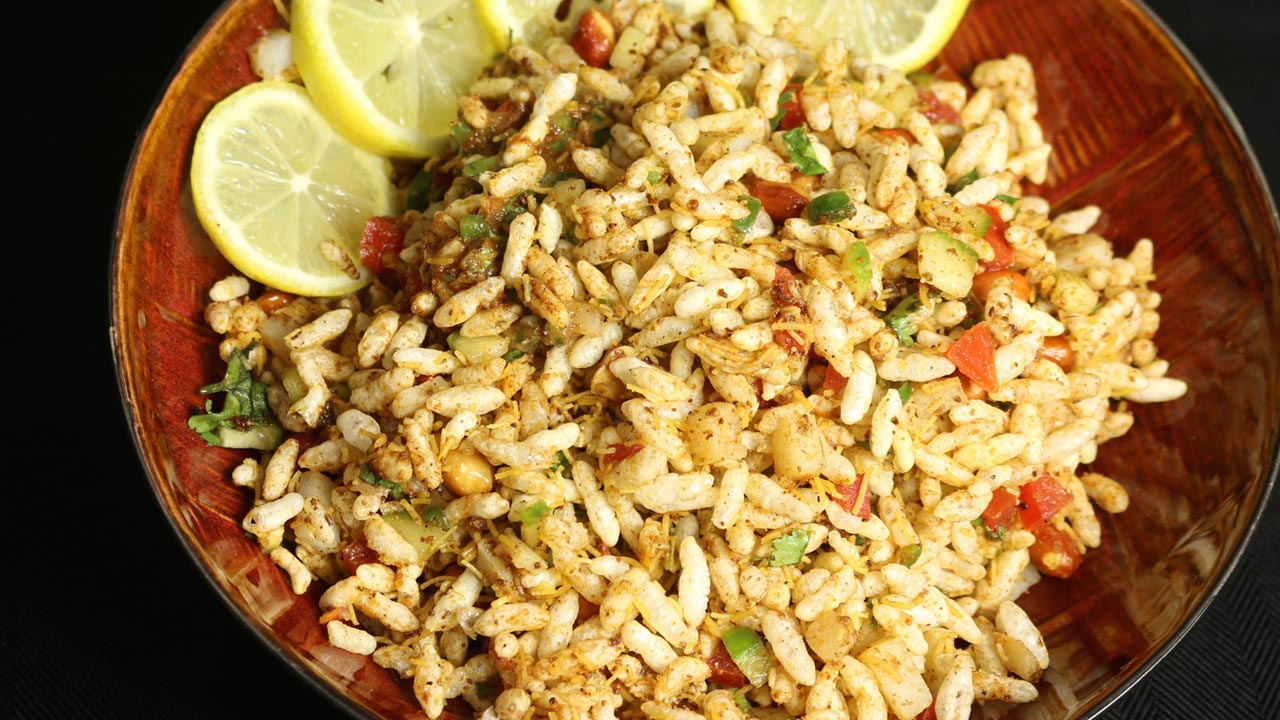
Jhaal muri is a popular street foodsnack of Kolkata. Jhaal means spices and muri is puffed rice. A long time ago, I visited my uncle in Kolkata and I still remember this mouthwatering snack. This puffed rice is tossed with potato, cucumber, tomatoes. A special blend of spices including tamarind pulp, and mustard oil are also added to jhaal muri. This is a simple yet delicious snack.
Heat a 1 teaspoon of oil in a small pan on medium heat, add peanuts and roast stirring continuously till lightly brown. This should take about 2 minutes. Set aside.
Dry roast the muri/puffed rice on medium heat for about 3 minutes. Notes: muri should not change color, they should be white but roasting gives freshness and make them crispy. Set aside.
Just before ready to serve jhaal muri add the peanuts, sev, tomato, potato, cucumber, green chili, cilantro, tamarind paste, mustard oil and spices. Toss them and serve.
You may adjust all the ingredients to your taste. Enjoy!
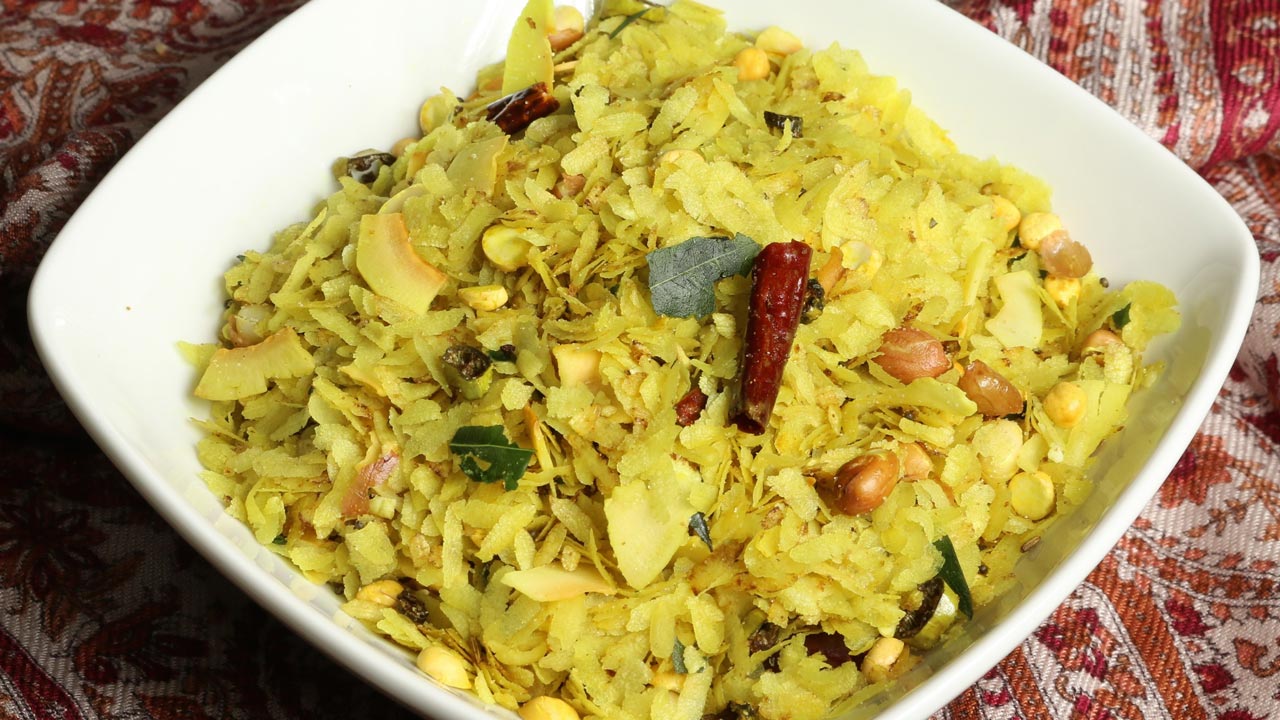
Spicy chivda crunchy savory snack is quick and easy to make. Chivda, also known as poha, is flattened rice that is flavored with spices. When I was growing up this was one of the snacks my mom will make, and we all will enjoy. I still enjoy this spicy chivda even today while watching TV. Store this in an airtight container and this chivda stays fresh and crunchy for 2 to 3 weeks.
Roast the chivda in a microwave oven for one and half minutes, first do it for one minute take it out mix it well and put it back for another half minute. Set aside. Note: This gives a nice crunch to the chivda and save time. If it is roasted directly in frying pan it will takes more oil and will have to stir fry for about ten to fifteen minutes.
Heat the flat frying on medium heat, add the oil, oil should be moderately hot, add mustard seeds and cumin seeds as they start cracking lower the heat to low.
Add curry leaves and green chilies stir fry them for about a minute till the green chili and curry leaves stop splattering.
Next add peanuts and red chilies roast them for two minute until it start catching the color… do keep stirring
Time to add roasted chana, and coconut stir fry for another 30 seconds
Add asafetida, salt and turmeric stir for few seconds add chivda mix it well. Add sugar and citric acid keep stiring continuously for about 2 to 3 minutes. Why I am adding salt to the oil, this way all the chivda will be coated with salt evenly.
Chivda is ready turn off the heat while chivda is hot it will taste little chewy after it will cool of will become crunchy.
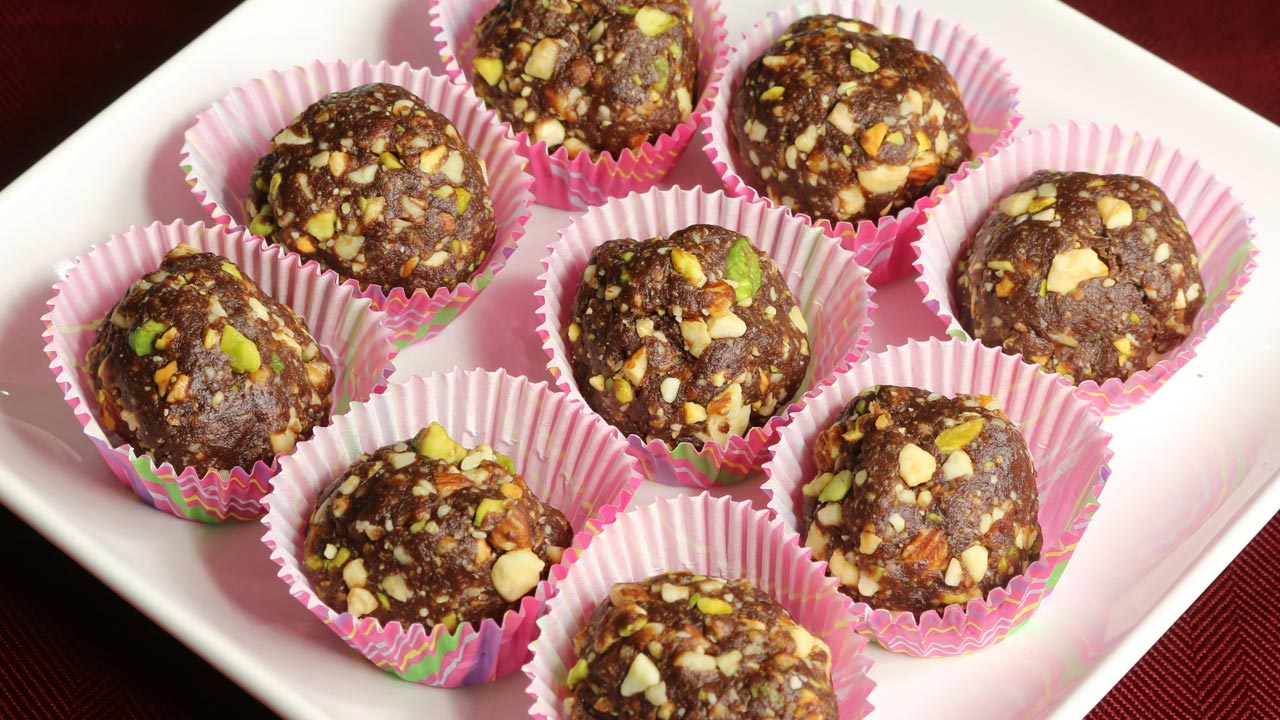
This recipe is for Date and Nut Ladoo, or Candy as we call them at home. For my grand kids they are like candy and they love it. Adapted from my friend Renu’s recipe, when I tried this ladoo for the first time, I said WOW. I could not believe the main ingredient was only dates. That surprised me because I am not very fond of dates. This was the first time I have tasted date ladoos flavored with coco powder. This is a quick and easy recipe. Like me if you are using roasted nuts then there is a little or no cooking involved? This is a guilt free healthysnack (no sugar or butter added). Date ladoos are also vegan and gluten free. It's hard to eat just one!
1-1/2cups mixed nuts roasted and roughly chopped, I am using almonds, pistachios, cashews, and pecans
2tablespoons coco powder
1/2 teaspoon instant coffee
Pinch of salt
1/4 teaspoon oil to oil your palms
Instructions
Soften the chopped dates in microwave for 30 seconds.
Blend the dates in the food processor until they become to the paste, this should take about 10 seconds, add coffee, coco, and salt blend it again until all the ingredients nicely incorporated about 10 seconds. Add the nuts to the food processor and blend it for about 15 seconds. Nuts should be still chunky.
Remove from food processor, oil your palm and knead the mix into dough, and divide them into 18 equal parts and roll them into ladoos.
Dates and nuts ladoos can be stored in air tight container for a month or more.
Notes
Notes: if you do not have roasted nuts dry roast them individually for about 3 minutes on medium heat and use your choice of nuts.
Besan sev is a popular savory crispy snack, which is made in almost every household in India. These noodle-like Sev are so tasty that when you start munching, it's often difficult to stop. This is a quick and easy recipe. Besan Sev is a great snack to make in bulk as it stays fresh for months. They are made on all festive occasions. How you serve these sev often depends on how thick sev are. Fine sev are used for garnishing chaat. Thicker sev are served alone as a snack. My favorite way to serve sev drizzeled with cilantro chutney. To make sev you do need to use sev maker, which is a small gadget like for making noodles.
Mix all the dry ingredients together, besan carom seeds, red chili, black pepper, and asafetida. Add the oil and mix it well.
Add the water slowly to make soft and smooth dough. Dough is very sticky, I used a spoon to mix the dough in the beginning. Then oil the palm and knead the dough. Cover the dough and allow to rest for about 15 minutes.
Greased sev maker with attachment. Place enough dough to fill the cylinder of sev maker and close. On other side, heat the oil in a frying pan on medium heat, frying pan should have about one inch of oil.
Oil should be moderately hot, Note: when you place little piece of dough oil should sizzle and dough should come up slowly without changing color.
Now hold the sev maker over frying pan, press the handle, sev will start coming out in to the oil. As sev is coming, slowly move the sev maker in circular motion.
As you complete one circle stop. Fry both sides till they become light golden brown, and oil will stop sizzling. Sev is ready. Remove it using slotted spoon.
Take them out over paper towel lined plate. And continue the same process for remaining dough.
Let the sev cool completely, as it cools they will become crispy. Break sev lightly with your hand and sev is ready to serve.
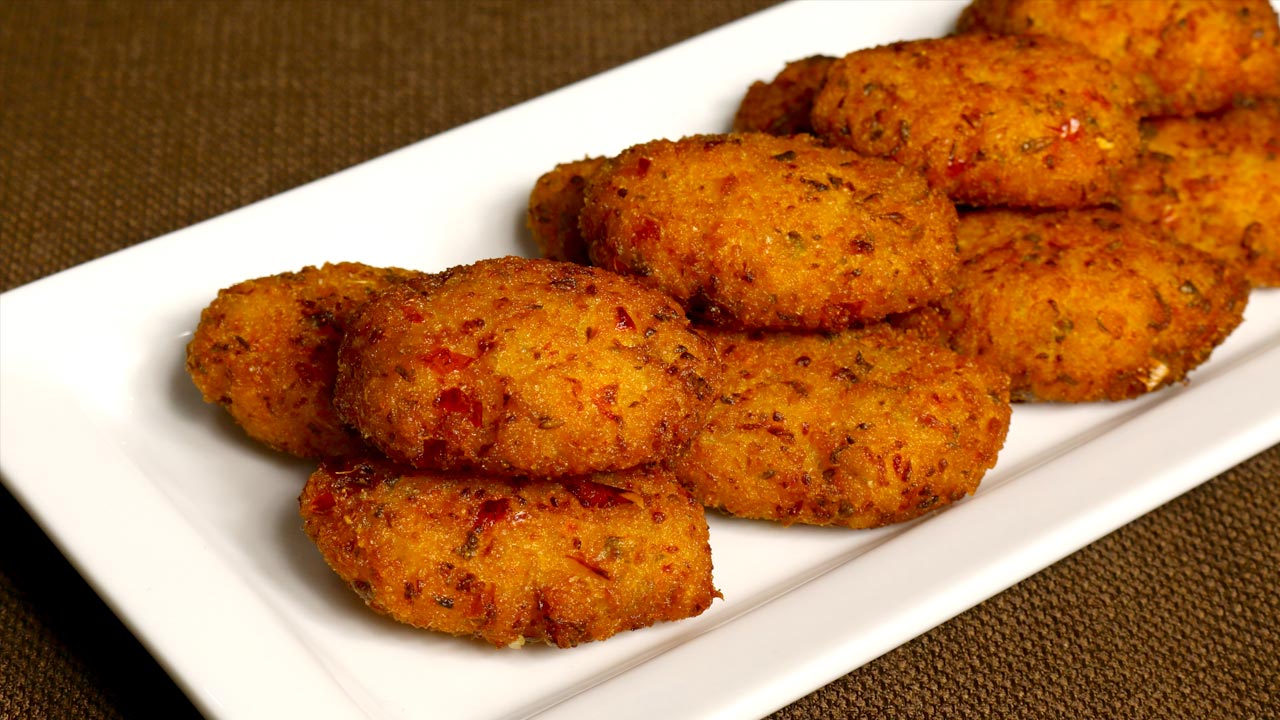
Vegetable rice cutlets are great as an appetizer or snack for any get together. These cutlets are made with rice blended with mixed vegetables. This is an easy and quick recipe to make. Vegetable rice cutlets are crisp outside and soft inside. Try it!
1cup mixed vegetables cut into very small pieces (green beans, bell pepper and carrot)
2teaspoon ginger chopped
1/2 teaspoon red chili powder, adjust to taste
1-1/2teaspoons salt
1teaspoon cumin seeds
1 tablespoon corn starch
Oil to fry
Instructions
Pat dry all the vegetables.
Put all the ingredients in food processer and mix for about half a minutes. Mix should not become like paste and you should be able to see all the vegetables.
Remove from the food processer, rice mix will be textured of chunky soft dough. Divide the mix into 16 pieces and roll them into flat patties about 1/2 inch thick.
Heat the oil in a frying pan on medium high heat. Drop the cutlets slowly into it, taking care not to overlap them.
Fry the cutlets until they are golden brown, turning occasionally. This should take about 5 to 6 minutes. Take them out over a paper towel.
For best taste serve them hot. Cutlets taste great with cilantro chutney.
Vegetable Rice Cutlet is a delectable appetizer that is not only gluten-free but also suitable for both Krishna Janmashtami and Navaratri celebrations. This snack is prepared by combining cooked rice with various finely chopped vegetables, forming a mixture that is then shaped into patties and fried until golden brown.
Being vegan-friendly, these cutlets cater to a wide range of dietary preferences.
They serve as delightful snacks or appetizers, perfect for any occasion or gathering. In this guide, we will explore the delightful world of Vegetable Rice Cutlets. These savory treats are perfect for any occasion, whether you’re hosting a party or simply craving a flavorful snack.
Packed with wholesome ingredients and bursting with flavor, these cutlets are sure to be a hit with your family and friends.
How to Make Vegetable Rice Cutlet: A Step-by-Step Guide
Prep the Vegetables: For perfect texture, ensure all vegetables are meticulously dried. Pat them dry to remove excess moisture that can affect the final consistency.
Combine Ingredients: Assemble all ingredients in a food processor. Pulse carefully to achieve a cohesive mixture with some texture. Avoid over-processing into a paste.
Shape the Cutlets: Transfer the mixture – it should be a chunky, pliable dough. Divide it into 16 equal portions. Shape each portion into a flat patty, about half an inch thick, for even cooking.
Fry to Golden Perfection: Heat oil in a frying pan over medium-high heat. Add enough oil to submerge half the patty. Gently place patties in the hot oil, ensuring they don’t touch. Fry for 5-6 minutes, turning occasionally, until golden brown.
Drain and Serve: Transfer the golden cutlets to absorbent paper towels to remove excess oil while maintaining crispness.
Variations:
You can customize Vegetable Rice Cutlets according to your preferences and dietary restrictions. Here are some variations to try:
Spicy Variation: Add chopped green chilies or a dash of chili powder to the mixture for an extra kick of heat.
Cheesy Variation: Mix in grated cheese to the filling mixture for a gooey and indulgent twist.
Vegan Variation: Replace potatoes with mashed chickpeas or sweet potatoes for a vegan-friendly option.
Gluten-Free Variation: Use gluten-free bread crumbs or crushed cornflakes for coating to make the cutlets suitable for those with gluten intolerance.
FAQs:
Can I bake the cutlets instead of frying them?
Yes, you can bake the cutlets in a preheated oven at 375°F (190°C) for 20-25 minutes or until they are golden brown and crispy.
Can I use leftover rice?
Absolutely! Vegetable rice cutlets are a great way to use leftover rice. Just make sure it’s cooked and cooled completely.
Can I freeze the cutlets for later use?
Yes, you can freeze the uncooked cutlets in a single layer on a baking sheet until firm, then transfer them to a freezer-safe bag or container for up to 3 months. Thaw them in the refrigerator before frying or baking.
How long will they stay fresh?
Store leftover cutlets in an airtight container in the refrigerator for up to 3 days. Reheat in a pan or oven until warmed through.
Hara bhara kabab is a popular tasty snacks in Indian restaurants. This spicy delicious snack is deep fried made with spinach and potatoes flavored with spice mix. Hara bhara kabab is crispy outside and soft inside. Hara Bhara Kebabs are absolutely delicious appetizer and looks like cutlets.
6cup spinach finely chopped, (do remove all the stems)
1-1/2cup potatoes boiled, peeled and shredded
2 teaspoons oil
½teaspoon cumin seeds (jeera)
1 teaspoon ginger finely chopped
3/4 teaspoon salt
3tablespoons corn starch
¼cup finely chopped cilantro (hara dhania)
2 tablespoons green chili finely chopped
Also need oil to fry
Instructions
Heat the oil in a saucepan on medium-high heat. Oil should be moderately hot add cumin seeds. After the cumin seeds crack, add the spinach.
Stir-fry, making sure to press the spinach down so the water can evaporate. Cook the spinach until most of the water has evaporated. Spinach still should be moist not dry.
After spinach is at room temperature, add to the potatoes with all other ingredients, ginger, cilantro, green chilies, salt, and corn starch. Mix will be the consistency of soft dough.
Divided the mix to 20 equal parts and roll them into oval shapes.
Heat the oil in a frying pan on medium heat. The frying pan should have about 1 inch of oil. To check if the oil is ready, put small piece of the mix in oil. It should sizzle and come up slowly. If oil is very hot kababs will not cook through and will not be crispy.
Fry the kababs in small batches. Fry kababs until golden-brown all around, this should take about 6-7 minutes.
Serve them hot with sweet and sour tamarind chutney.
Hara Bhara Kabab Recipe – A Delicious Veggie Treat
Hara Bhara Kabab is a delightful appetizer commonly enjoyed during Diwali celebrations. These gluten-free and vegan kababs are perfect for parties and gatherings, offering a flavorful snack option. Made with a mix of spinach, potatoes, peas, and spices, Hara Bhara Kabab is not only delicious but also caters to dietary preferences, making it an inclusive choice for various guests.
Are you craving a delightful snack that’s not only tasty but also healthy? Look no further than hara bhara kabab! These delightful vegetable cutlets are packed with the goodness of spinach, peas, and potatoes, making them a wholesome treat for any occasion. In this hara bhara kabab recipe, I’ll walk you through the steps to create these crispy delights at home, ensuring you achieve the perfect texture and flavor every time.
How to Make Hara Bhara Kabab – Step by Step Guide
Preparing the Vegetables: Begin by blanching spinach leaves and peas until they are tender. Drain them well and set aside. Boil and mash the potatoes until they are smooth and lump-free.
Making the Kabab Mixture: In a mixing bowl, combine the blanched spinach, peas, and mashed potatoes. Add finely chopped green chilies, ginger, and coriander leaves for a burst of flavor. Season the mixture with salt, garam masala, and chaat masala to enhance the taste.
Binding the Ingredients: To bind the mixture together, add breadcrumbs or roasted chickpea flour (besan). This will help absorb excess moisture and give the kababs a nice texture. Mix everything thoroughly until well combined.
Shaping the Kababs: Take small portions of the mixture and shape them into round or oval patties. Press them gently between your palms to ensure they hold their shape. You can also coat the kababs with additional breadcrumbs for extra crispiness.
Frying the Kababs: Heat oil in a pan for shallow frying or deep frying, depending on your preference. Once the oil is hot, carefully place the kababs in the pan and fry them until they turn golden brown and crispy on both sides.
Tips for Perfect Hara Bhara Kababs
Use Fresh Ingredients: For the best flavor and texture, use fresh spinach, peas, and potatoes. Avoid using frozen vegetables as they may contain excess moisture, affecting the consistency of the kababs.
Adjust Spices to Taste: Feel free to adjust the amount of green chilies, ginger, and spices according to your taste preferences. You can make the kababs milder or spicier to suit your palate.
Add Nutritional Boost: Sneak in additional veggies like grated carrots or finely chopped bell peppers for added nutrition and flavor. These kababs are a great way to get picky eaters to consume their vegetables.
Make Ahead and Freeze: You can prepare the kabab mixture in advance and freeze it for later use. Simply shape the mixture into patties, arrange them on a baking sheet, and freeze until firm. Once frozen, transfer the patties to a freezer bag or container and store them for up to a month. When ready to enjoy, thaw the kababs in the refrigerator and fry as directed.
Variations of Hara Bhara Kabab
Paneer Hara Bhara Kabab: Add crumbled paneer (Indian cottage cheese) to the kabab mixture for a creamy and rich texture. Paneer adds protein and enhances the taste of the kababs.
Corn and Spinach Kabab: Replace peas with sweet corn kernels for a slightly sweet flavor and crunchy texture. Corn and spinach complement each other beautifully, making these kababs a crowd-pleaser.
Quinoa and Vegetable Kabab: For a healthier twist, substitute a portion of the potatoes with cooked quinoa. Quinoa adds protein, fiber, and a nutty flavor to the kababs, making them a nutritious snack option.
Benefits of Hara Bhara Kabab
Rich in Nutrients: Hara bhara kababs are loaded with vitamins, minerals, and antioxidants from the spinach, peas, and other vegetables. They make for a nutritious snack or appetizer option.
Vegetarian Protein Source: These kababs are an excellent source of plant-based protein, especially when made with ingredients like peas, chickpea flour, and paneer. They are perfect for vegetarians and vegans looking to increase their protein intake.
Low in Calories: When shallow fried or baked, hara bhara kababs are relatively low in calories compared to traditional fried snacks. They offer a guilt-free indulgence without compromising on taste.
FAQs About Hara Bhara Kabab
Can I Bake Hara Bhara Kababs Instead of Frying Them?
Yes, you can bake hara bhara kababs in a preheated oven at 375°F (190°C) for 20-25 minutes or until they are golden brown and crispy. Remember to brush or spray the kababs with oil before baking to help them brown evenly.
Can I Make Hara Bhara Kababs Gluten-Free?
Absolutely! Simply replace breadcrumbs with crushed cornflakes or gluten-free oats to make the kababs gluten-free. You can also use chickpea flour (besan) instead of breadcrumbs for binding.
Are Hara Bhara Kababs Suitable for Kids?
Yes, hara bhara kababs are kid-friendly and a great way to sneak in some vegetables into their diet. You can adjust the spiciness level to suit their taste preferences and serve them with their favorite dipping sauce or chutney.
Can I Freeze Hara Bhara Kabab Mixture?
Yes, you can prepare the kabab mixture in advance and freeze it for later use. Simply shape the mixture into patties, arrange them on a baking sheet, and freeze until firm. Once frozen, transfer the patties to a freezer bag or container and store them for up to a month. Thaw them in the refrigerator before frying.
Chakli a popular snack all throughout India. Chakli is a crispy and delicious snack that is prepared for holidays. It is perfect with a hot cup of Chai. In my opinion, chakli is a must-have munchie! Chakli is prepared many different ways using different pulses with rice. I plan on making Chakli with rice flour and moong dal.
Also need chakli maker, available in Indian grocery stores
Instructions
Mix all the dry ingredients in a bowl rice flour, all-purpose, sesame seeds, chili powder, black pepper, cumin seeds, asafetida, turmeric, and salt. Set aside.
Cook the moong dal with 2 cups of water over medium high heat till it is very soft, and mushy, if needed add more water.
Add hot dal to rice flour mix and mix with spoon, add lemon juice, and hot oil, and mix it well. First use the spoon to mix because mix will be quite hot.
Add hot water as needed to make soft and firm dough. Cover the dough and set aside for five minutes.
Knead the dough well. Divide the dough into 3 parts and roll them into long rolls. Put one of the roll into chakli maker, and close. Press the chakli maker, making the chackli into spiral’s (roll them 3 to 4 times) over flat plate.
Heat the oil in a frying pan over medium heat, frying pan should have about one inch of oil. Oil should be moderately hot. Put few chaklies at a time just enough to cover the surface of the oil.
Fry them both sides until they are light brown, this should take 4 to 5 minutes.
Serve them after they cool off so chaklies are nice and crispy. Or store them in air tight container for later use.
Notes
Notes
If dough is too soft add little more rice flour.
If they are braking it is ok don’t worry still it will taste great, need some practice.
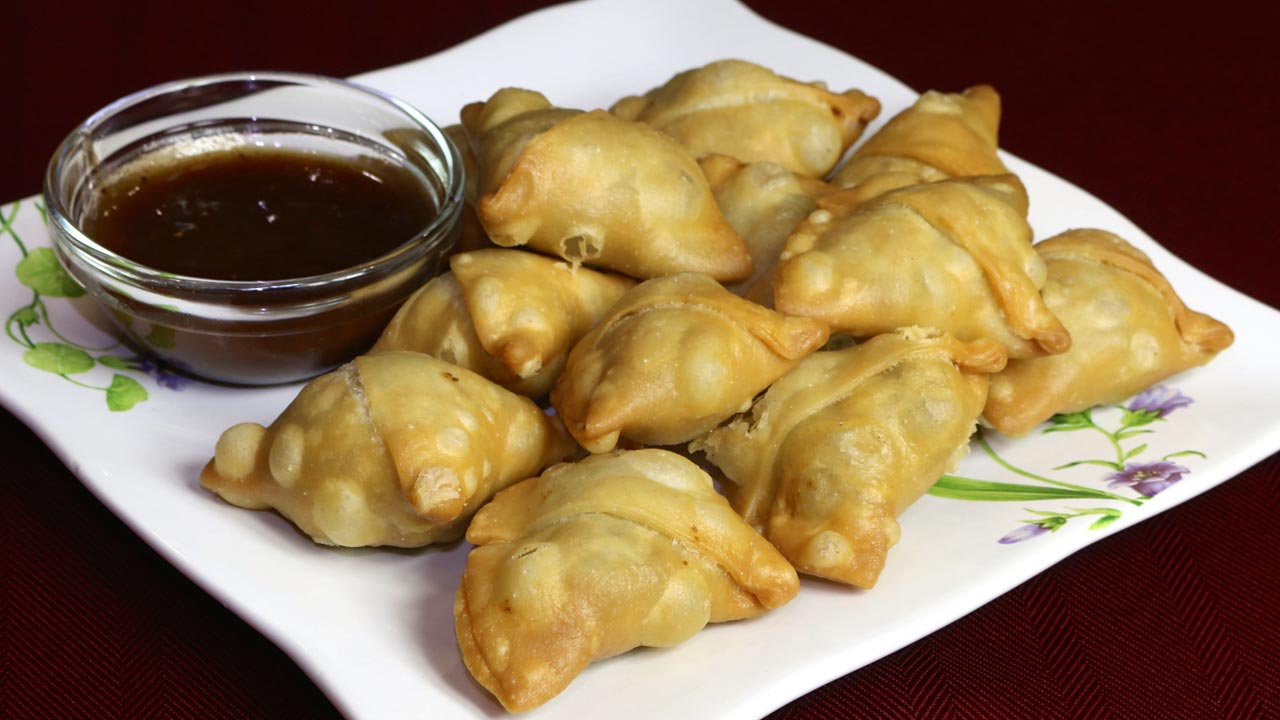
Cocktail green peas samosas are tasty snack. These bite-sized crispy samosas are filled with spicy green peas. This was my mother's go-to appetizer for special occasions, and she received many compliments. My cooking style is greatly influenced by my mother, a true inspiration! Of course they taste out of this world when served hot. Serve with tamarind chutney.
2cups boiled green peas I am using frozen green peas
2tablespoons oil
3teaspoons coriander powder (dhania)
1 teaspoon red chili powder
1teaspoon mango powder (amchoor)
1/4teaspoon garam masala
3/4teaspoon salt (adjust to your taste)
Instructions
for Dough
Mix flour, sooji, salt, oil and water together to make soft dough (add water as needed).
Knead the dough to make it smooth and pliable.
Cover the dough and let it sit least ten minutes.
To Make Filling
Boil the green peas over medium heat with 1 cup of water, until peas are tender. Drain the water, squeeze the excess water, and pat dry. Mix all the dry ingredients to the peas, coriander, chili powder, garam masala, mango powder and salt.
Heat the oil in a frying pan over medium heat, and put the green peas mix, stir fry and keep mashing, stir fry until no moisture left, but it should not be powdery.. This should take about 10-12 minutes.
Turn off the heat and let the let the filling cool to room temperature.
Making samosas
Knead the dough for a minute.
Divide the dough into 12 equal parts and roll into balls.
Roll each ball about 4-1/2-inch diameter and cut each circle in half.
Take one semicircle and wet the sides lightly all around and fold it into a cone shape. Pinch the side of this cone so that it is completely sealed.
Fill the cone with about 1 teaspoon of filling. Press this filling down.
Close the top of the cone to form a triangular shape, pinching the top edge to seal it completely.
Continue filling the rest of the samosas.
Heat about 1 inches of oil in a frying pan on medium heat. To check if oil is hot enough place a small piece of dough in oil and dough should sizzle and come to the surface slowly.
Place the samosas in the frying pan a few at a time, they should not overlap.
After samosas are floating on top of the oil turn them slowly. Fry the samosas until the samosas are golden-brown color on all sides. This should take about 8 minutes. If you use a high heat, the samosa crust will be too soft and not cook properly.
Take the Samosas out over paper towel; it will absorb extra oil.
Cocktail Samosa Recipe: A Delicious Twist on a Classic Snack
Introduction:
In this article, we’ll explore how to make cocktail samosa, specifically focusing on the delightful cocktail green peas samosa. This appetizingvegansnack is perfect for any occasion, whether you’re hosting a party or simply craving a savory treat. With its crispy exterior and flavorful filling, cocktail samosas are sure to be a hit with family and friends. Let’s dive into the recipe and discover the steps to create these irresistible snacks.
Step 1: Preparing the Dough
To begin making cocktail samosas, start by preparing the dough. You’ll need all-purpose flour, salt, carom seeds, and oil. Combine the flour, salt, and carom seeds in a mixing bowl, then gradually add the oil while mixing the ingredients together. Knead the dough until it’s smooth and firm, then cover it and let it rest for about 30 minutes. This step ensures that the dough is pliable and easy to work with when shaping the samosas. For a detailed recipe on making the dough, you can refer to Manjula’s Kitchen’s samosa dough recipe.
Step 2: Making the Green Peas Filling
Next, let’s prepare the flavorful green peas filling for our cocktail samosas. Heat oil in a pan over medium heat, then add cumin seeds and let them sizzle. Add finely chopped green chilies, ginger paste, and crushed coriander seeds, sautéing until fragrant. Stir in boiled and mashed green peas, along with salt, mango powder, and garam masala for seasoning. Cook the mixture for a few minutes until the flavors meld together, then let it cool. This delectable filling adds a burst of flavor to the cocktail samosas, making them truly irresistible.
Step 3: Shaping and Filling the Samosas
Now comes the fun part – shaping and filling the samosas! Divide the rested dough into small balls and roll each one into a thin circle. Cut each circle in half to form semi-circles, then fold each semi-circle into a cone shape, sealing the edges with a water-flour paste. Fill each cone with a spoonful of the green peas filling, then seal the top to enclose the filling completely. Repeat this process until all the dough and filling are used up, creating a batch of perfectly shaped cocktail samosas ready for frying.
Step 4: Frying to Golden Perfection
Once all the samosas are shaped and filled, it’s time to fry them to golden perfection. Heat oil in a deep frying pan or kadhai over medium-high heat until hot but not smoking. Carefully add the filled samosas to the hot oil, ensuring not to overcrowd the pan. Fry them in batches until they turn crispy and golden brown, flipping them occasionally for even cooking. Once fried, remove the samosas from the oil and drain them on paper towels to remove any excess oil. Serve the hot and crispy cocktail samosas with your favorite chutney or dipping sauce.
Step 5: Serving and Enjoying
Now that your cocktail samosas are ready, it’s time to serve and enjoy this delicious snack with your loved ones. Arrange them on a platter alongside some mint chutney, tamarind chutney, or yogurt dip for dipping. These bite-sized treats are perfect for parties, gatherings, or even as a mid-day snack. Enjoy the crispy exterior and flavorful filling of these homemade cocktail samosas, and watch them disappear within minutes!
Tips for Perfect Cocktail Samosas:
Ensure the dough is rolled thinly for crispy samosas.
Seal the edges of the samosas tightly to prevent the filling from leaking out during frying.
Fry the samosas in hot oil for a crispy texture.
Serve the samosas hot for the best taste and texture.
Variations to Try:
Substitute the green peas filling with mashed potatoes or minced meat for different flavor options.
Add chopped vegetables like carrots, bell peppers, or beans to the filling for added texture and nutrition.
Experiment with different spices and seasonings to customize the flavor of the samosas according to your preference.
Benefits of Cocktail Samosas:
Cocktail samosas are a great appetizer or snack option for parties and gatherings.
They can be easily customized with different fillings to suit various tastes and dietary preferences.
Homemade cocktail samosas are healthier than store-bought ones, as you can control the quality and quantity of ingredients used.
FAQs (Frequently Asked Questions):
Can I make cocktail samosas ahead of time?
Yes, you can prepare the samosas ahead of time and store them in an airtight container in the refrigerator. When ready to serve, reheat them in the oven until crispy and hot.
Can I bake cocktail samosas instead of frying them?
While frying gives the samosas a crispy texture, you can bake them in the oven for a healthier alternative. Simply brush the samosas with oil and bake them at 375°F (190°C) until golden brown and crispy.
How long do cocktail samosas stay fresh?
Cocktail samosas are best enjoyed fresh on the day they are made. However, you can store any leftovers in the refrigerator for up to 2-3 days and reheat them before serving.
Other Recipes on Manjula’s Kitchen
If you’re looking to explore more Indian recipes, appetizers, beverages, and desserts, be sure to check out the following links on Manjula’s Kitchen. Here are some links to recipes on Manjula’s Kitchen official website:
Modak is a delicious sweet steamed rice dumpling filled with coconut and nuts. It is also vegan and gluten free. This is a very popular sweet for Ganesh Chaturthi festival which is a celebration in western and south India.
1/3cup freshly shredded coconut; I am using frozen shredded coconut this works well, available in Indian grocery stores
3tablespoons almonds coarsely ground
3 tablespoons jaggery finely chopped, gur (unrefined cane sugar) available in Indian grocery stores
1/8 teaspoon cardamom powder
1 tablespoon oil
Instructions
Use a small frying pan, over low heat, and dry roast almonds for about one minute. Add oil, coconut and jaggery cook stirring continually until jaggery has melted and mixture becomes like soft dough, this should take about three to four minutes. Set aside.
Boil the water in a pan with salt and oil, after water comes to boil lower the heat to low and add the rice flour, mix it well. Remove from the heat and cover the pan. Let it sit for about fifteen minutes or until it is warm.
Take the rice flour mixture in a bowl, lightly oil your palm and knead the dough to make soft pliable dough. Dived the dough into 10 equal parts, and make them into smooth balls.
Take one part of the dough and with your fingers flatten the edges to about three-inch in diameter, leaving the center a little thicker than the edges.
Place one teaspoon of the filling in the center. Sealed the filling shaping it into dome shape. Proceed to make all modaks same way.
Steam the modaks in covered pan over medium heat about 10 minutes; finished modak will have a little shiney glazed.