Easy Indian Recipes: Quick and Delicious Vegetarian Dishes
In today’s fast-paced world, we often find ourselves seeking meals that are quick to prepare but still bursting with flavor. Indian cuisine, known for its rich and aromatic spices, offers a plethora of options that are both easy to make and incredibly satisfying. Let’s explore some easy Indian recipes vegetarian, perfect for any occasion, ensuring that you can enjoy delicious easy Indian recipes without spending hours in the kitchen.
Paneer Bhurji
Paneer Bhurji is a delightful scramble made with crumbled paneer (Indian cottage cheese) and a mix of vegetables and spices. This dish is a staple in many Indian households and is a fantastic example of easy Indian recipes. It comes together quickly, making it ideal for a weeknight dinner or a hearty breakfast. Serve it with a side of warm roti or toast for a complete meal.
Vegetable Pulao
For a one-pot wonder, Vegetable Pulao is a go-to choice. This dish features rice cooked with a medley of vegetables and fragrant spices. It’s a shining star among easy Indian food recipes due to its simplicity and the minimal effort required. Pair it with a cooling cucumber raita from the Raita Recipes category for a refreshing touch.
Aloo Jeera
Aloo Jeera, or cumin-spiced potatoes, is a quick and flavorful dish that exemplifies Indian food recipes easy. The potatoes are sautéed with cumin seeds and a handful of spices, resulting in a dish that’s both comforting and satisfying. This recipe is perfect for those times when you need something delicious without a lot of fuss.
Enhancing Your Quick and Easy Menu
To elevate your menu, why not include some delectable options from other categories? Indian Breads like chapati or naan can be quickly prepared and make a perfect accompaniment to any meal. For those with a sweet tooth, Indian Desserts Recipes such as a speedy coconut burfi or a delightful mango lassi can provide a sweet finish to your meal. Incorporating dishes from the Healthy Recipes section, such as a simple and nutritious palak dal or a crisp salad from the Soups and Salads Recipe category, can add a healthy balance to your table.
More Easy Indian Recipes
Chana Masala
Chana Masala is a popular dish featuring chickpeas cooked in a spiced tomato gravy. This dish is not only delicious but also quick to prepare, making it a favorite in the realm of easy Indian recipes vegetarian. Serve it with basmati rice or naan for a complete meal.
Moong Dal Khichdi
For a comforting and nourishing option, Moong Dal Khichdi is a must-try. This simple dish made from rice and yellow moong dal (split yellow lentils) is seasoned with basic spices and is incredibly easy to make. It’s perfect for those days when you want something light yet satisfying.
Sweet and Simple Endings
Sheera
Sheera is a traditional Indian dessert made with semolina, ghee, and sugar. It’s a quick and easy dessert that fits perfectly into the category of easy Indian food recipes. The best part? It takes just a few minutes to prepare, making it a great option for last-minute sweet cravings.
Coconut Ladoo
Another sweet treat that’s both simple and delightful is Coconut Ladoo. Made with grated coconut and condensed milk, these sweet balls are a favorite among easy Indian recipes vegetarian. They’re perfect for festivals or just as a quick dessert to satisfy your sweet tooth.
Frequently Asked Questions (FAQs)
Q: What are some popular easy Indian recipes vegetarian?
A: Some popular easy Indian recipes vegetarian include Paneer Bhurji, Vegetable Pulao, Aloo Jeera, Chana Masala, Moong Dal Khichdi, Sheera, and Coconut Ladoo. These dishes are quick to prepare and full of flavor.
Q: How can I make traditional Indian food recipes easy?
A: To make traditional Indian food recipes easy, look for recipes that require minimal ingredients and cooking time. Dishes like Paneer Bhurji, Aloo Jeera, and Moong Dal Khichdi are great examples of easy and quick Indian recipes.
Q: What are some easy Indian food recipes for beginners?
A: Some easy Indian food recipes for beginners include Vegetable Pulao, Chana Masala, and Coconut Ladoo. These recipes are straightforward and don’t require advanced cooking skills, making them perfect for those new to Indian cooking.
Q: Can I prepare easy Indian recipes in advance?
A: Yes, many easy Indian recipes can be prepared in advance. Dishes like Vegetable Pulao and Chana Masala can be made ahead of time and stored in the refrigerator. Simply reheat before serving.
Q: What are some quick Indian desserts?
A: Some quick Indian desserts recipes include Sheera and Coconut Ladoo. These desserts are easy to make and require minimal preparation time, making them perfect for when you need a sweet treat in a hurry.
Conclusion
Easy Indian recipes vegetarian offer a world of flavors and aromas without the lengthy preparation time.
Whether you’re looking for easy Indian recipes, easy Indian food recipes, or specific Indian food recipes easy, these dishes bring convenience and deliciousness to your table.
So, gather your ingredients, try out these recipes, and enjoy the rich and diverse world of Indian cuisine. Happy cooking and happy eating!
By incorporating these dishes into your menu, you’ll be able to enjoy a wide variety of delicious and nutritious foods. Whether you’re looking for quick snacks, main courses, or desserts, there’s an easy Indian recipe to suit every taste.
Don’t forget to check out Manjula’s Kitchen for more inspiration and culinary delights. Happy cooking and happy eating!
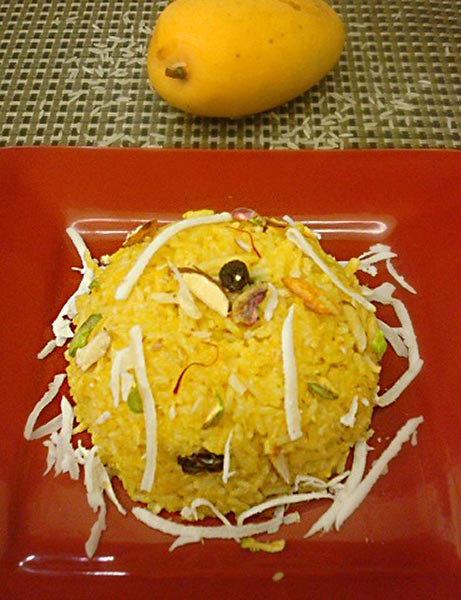
Sweet Mango Pulao is a sweet and delicious dessert, made with ripe mango pulp, shredded coconut and basmati rice! Its a nice appetizer to have which is sweet flavorful. Its a vegetariangluten free recipe most suited for people wanting to try a quirky twist or fusion
Mango Puff Puffs is a fun recipe made with fresh pureed mangos and flour. These are a sweet snack that kids will love. It is a nice dessert that can be popped in one by one as it get more and more addictive for its flavorful delight.
In a large bowl, combine the above ingredients (except powdered sugar and frying oil). Let mixture rest for 20 minutes.
In a 10” deep frying pan, heat 4 cups of oil over high heat for several minutes and then reduce to medium heat.
Drop teaspoonful of batter into the heated oil. Fry 4 to 5 balls at a time until golden brown. Cook both sides of the puff puffs by turning with a spatula.
After frying each batch, transfer to a large paper sack. Add powdered sugar, close sack, and shake gently to coat. Transfer to a platter.
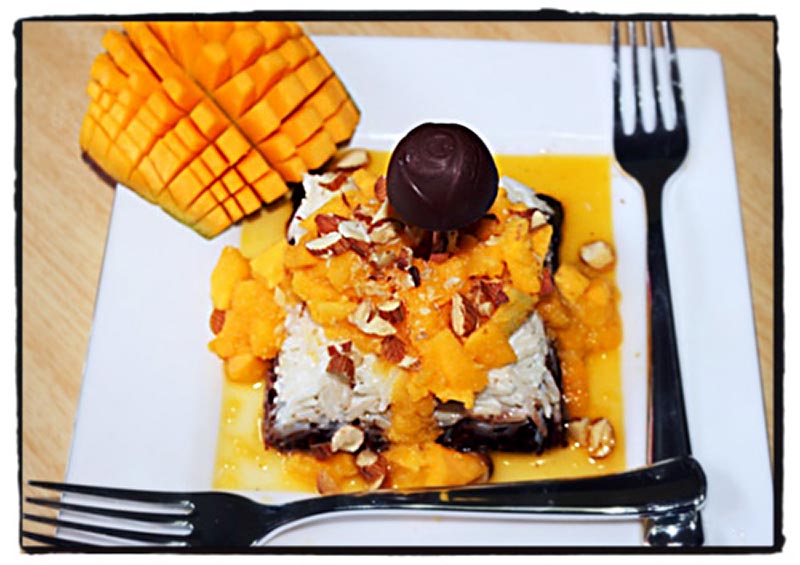
Tangy mangoes are very much in season these days and this rice preparation made with this seasonal fruit is worth trying. Chocolate Mango Fudge is exotic, flavorful, very colorful, easy to make and quick to serve. You can amaze your party guests with this recipe. I prepared this recipe today and it turns out pretty good so here I am sharing this recipe with all of you.
Cut the chocolates in pieces and melt it over a hot water steam, It will take 5 minutes. After melting mix some chopped almonds in the melted chocolate and keep it aside for cooling.
Now bring a frying pan and add rice and coconut milk to it and let it cook over medium heat for 20 minutes. Add 2 tablespoon sugar to it and let it cool.
Meanwhile bring a mango peel it and cut it into small cubes.
Bring half of the cubes in a grinder and grind it with 2 tablespoon water and 2 teaspoon of sugar. Mix it with rest of the cubes. Pour the mix in a bowl.
Bring a bowl, I have used square shaped bowl here to give it square shape which looks pretty cool. Fill it with cooked rice and then a layer of melted chocolate.
Let it cool in a refrigerator for 30 minutes or as required.
After cooling put it upside down in a plate keeping it's shape intact. Pour the mango mix over it as in the picture.
Garnish it with chopped almonds, pistachios, raisins etc. I have used a chocolate to put as a decorating cap which is making it much more beautiful for presentation.
Notes
Your Chocolate Mango Fudge is ready to eat, and it smells so good. Chocolate gives it a nice flavor and chopped almonds give the crunchiness. You can adjust the sweetness according to your taste. I hope you try it and love the praise from your guests.
Coconut Kulfi is a great take on the traditional kulfi. If you love coconuts, then this recipe is a must try. Its a nice summer recipe and a cold dessert
This coconut halwa turns out very soft and yummy and you will love it as much as my family and friends. Its a nice sweet snack or as a dessert served best during festive occasions.
I made this beautiful kids friendly delicious snowman coconut ladoos for last year Christmasparty and it was a top hit. As soon as I placed them on the table, all I heard was “WOW!” and that’s it. They got vanished in a glimpse of a second and of course, they were generous enough to leave me with a plate at least. This was the talk for a while among my family and friends. I had so much fun decorating them and that’s the time I got the idea of recreating this with my baby nephew. He was as thrilled as I was and we had an awesome aunt-nephew time together which is ineffable. Let your precious moment begins with your little ones as well! Its a fun sweet snack that would be enjoyable to eat and treat to people of all ages.
Heat 1tsp ghee in a low-medium flame on a non-stick pan and lightly roast 1 cup of desiccated coconut in it for 5 secs. DO NOT Burn them! (Remaining ½ cup of desiccated coconut will be used to roll in the ladoos.)
Remove the ghee-coconut aromatic mixture from the fire and let it cool completely.
Notes
Snowman Edible Accessories (Refer to the picture for ideas)
Hat ———- Mini Reese’s chocolates or mini Rolo or any chocolates that look like mini hat.
Eyes ———Chocolate vermicelli candies or Oreo cookie crumbs
Nose ——– Mini bead candies
Mouth —— Mini vermicelli candies
Scarf ——– Sour belts candy (Cut them into thin strips)
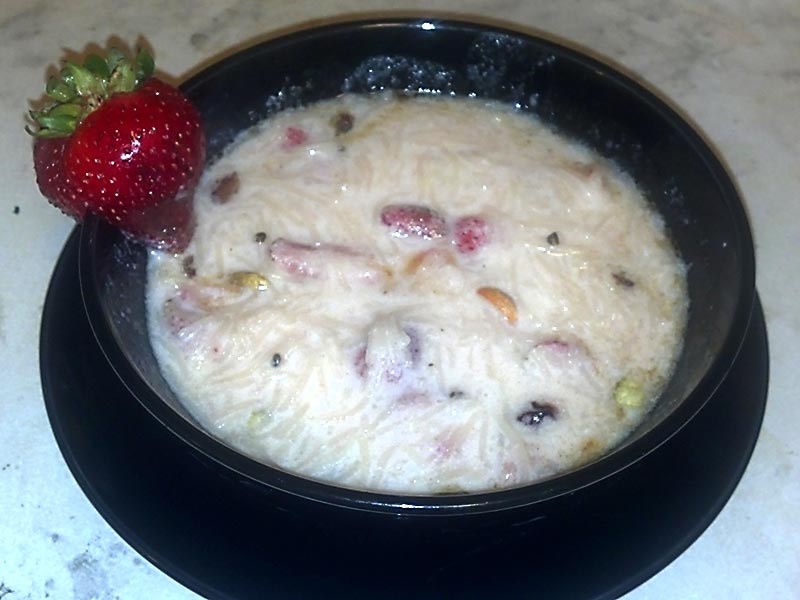
Strawberry Payasam is a delicious dessert that is made with semolina grains. It's very easy to make and the strawberries add some extra flavor. Its a nice healthy sweet snack that is fun to eat.
Then add the strawberries and cook for about 5 mins
Add cardamom powder
Fry the cashew and raisins in ghee and add on top.
Serve chilled!
Additional:
Even rice can be used instead of semolina!
Notes
Father’s Day Note:My father’s name is Ravindran. I am proud to be his daughter. The most precious moment with my dad is the day when I got married he gave me so many advises and counselled me on so many stuffs that I was responsible to manage after my marriage. Without his advises I would not have been able to cope up with the post marriage tasks meant to be for a perfect house wife!! Thanks appa for making me feel so proud of you.
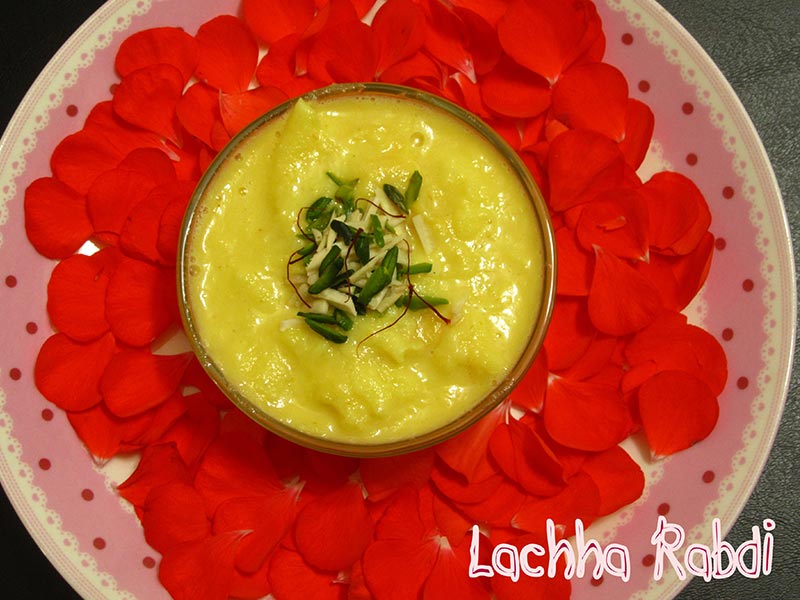
When milk start boiling ,a layer of malai will start forming over the milk.
Now take the malai with help of spatula and keep collecting it on the sides of the pan.
Collect malai on all the sides and keep stirring the milk in between so that it will not stick in the bottom.
Keep repeating the process till the milk reduced to almost 1/3 .
Now add sugar and boil for 5 minutes.
Add saffron,cardamom and chopped nuts and switch off the flame.
Now scrape the malai from the sides of the pan and add in the milk.
Let it come to room temperature.
Garnish with some nuts and saffron.
Refrigerate it for 1-2 hours and serve chilled.
Notes
Father’s Day note:When I was a kid, I used to sit on small swing in my home and my father used to feed me with his hands everyday. He will never eat before feeding me and used to feed with so love that I can still vividly remember those sweet days.
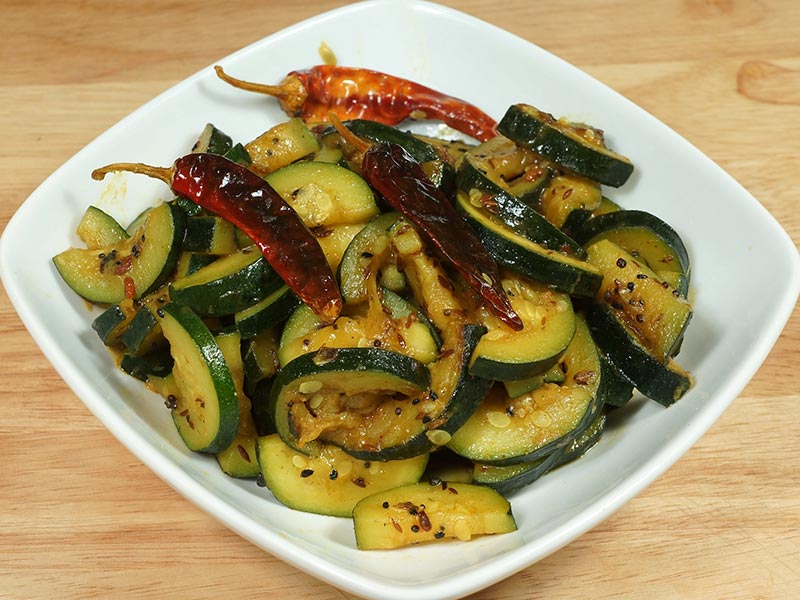
Masala Zucchini has a nutty and spicy flavor. It's great as a side dish. For this recipe, I used a popular Bengali spice mixture known as punch poran. Punch poran is a blend of five spices which gives a very unique flavor to Zucchini.
2 zucchini large size with skin, sliced in 1/2 inch thick. This will make about 4 cups of sliced zucchini
1 tablespoon oil
1/2teaspoon cumin seeds (jeera)
1/4teaspoon fenugreek seeds (Methi dana)
1/4teaspoon mustard seeds (rai)
1/4teaspoon fennel seeds (saunf)
1/4teaspoon nigella seeds (kalonji)
2 whole red chilies
1/4teaspoon red chili powder
1/4teaspoon turmeric (haldi)
1/2teaspoon heaping salt
1 teaspoon sugar
1/2teaspoon mango powder (amchoor)
1 teaspoon lemon juice
Instructions
Mix the first 5 spices to make Punch Poran cumin, fenugreek, mustard, fennel, and nigella seeds. Set aside.
Heat the oil in a flat sauce pan over medium high heat. When oil is moderately hot add the spice mix as cumin seeds and mustard seeds crack add whole red chili stir for few seconds. Add turmeric, red chili powder and salt stir and add zucchini.
Stir fry for about 1 minute lower the heat to low medium, and cover the pen. Let it cook for about 2-3 minutes, doing this zucchini will leave the moisture that will help to stir fry them.
Remove the cover bring the heat to medium high and stir fry for about 3-4 minutes. Zucchini should be tender not mushy.
Add sugar, mango powder and lemon juice, stir and mix it well. Turn off the heat Masala Zucchini is ready to serve.
Serve Masala Zucchini with roti, paratha or any bread. This also good with rice.
Notes
Notes
First 5 spice mix cumin, fenugreek, mustard, fennel, and nigella seeds known as Punch Poran. You can make your own mix or buy the mix in Indian grocery store.
This recipe works best with large and firm zucchini.
VariationsYou can also use bottle gourd (in Hindi it is known as lauki, or ghia) but do peel the skin before slicing and slice them about the same size.
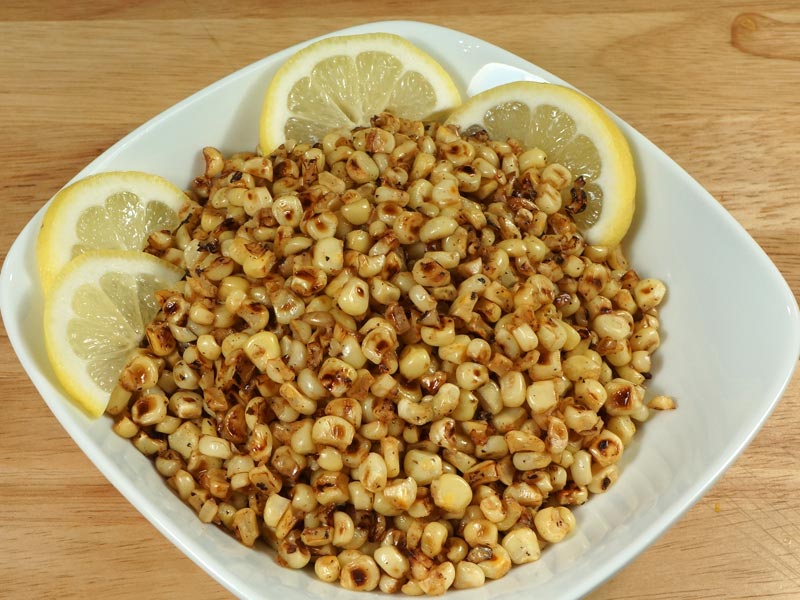
My favorite way to have corn is grilled. However, sometimes grilling corn takes a lot of time, with the set up and preparation. This is a quick & easy and no mess and a yet a healthy recipe. This is a delicious simple twist on the traditional grilled corn on the cob.
Remove the kernels from corn, it is easy to do, tear the husk off, and then run the knife downwards to remove the kernels.
Coat the flat bottom heavy frying pan with oil and heat over medium high heat, put the corn kernels and stir fry for 4-5 minutes stirring continuously.
While stir frying kernels will be getting some light and some dark brown color, some of the kernels will pop like you are grilling.
When the kernels are similar in color turn off the heat, and add salt, black pepper, lemon juice, and ginger mix it well.
You will be amazed by the taste. They match the taste of corn grilled over charcoal, without even preparing the grill.
Grilled corn off the cob makes for a delightful appetizer, perfect for summer gatherings, that’s gluten-free, vegan, and kid-friendly, offering a wholesome snack option for everyone to enjoy. Grilling corn off the cob is a fantastic way to elevate this classic vegetable, imparting a delightful smoky flavor while maintaining its natural sweetness.
Grilling corn off the cob not only adds depth to the taste but also brings a visually appealing charred texture to the dish. If you’re wondering how to grill corn off the cob, fear not! It’s simpler than you think. Let’s dive into the process and explore the nuances of this delectable preparation.
To prepare this delectable dish, begin by removing the kernels from the corn. This can be easily accomplished by first tearing away the husk to reveal the golden kernels nestled within. With a steady hand, guide a sharp knife downwards along the cob, separating the kernels from their base. This process ensures that each kernel is freed from its attachment, ready to impart its sweet, crisp flavor to the dish.
Next, prepare a flat-bottomed heavy frying pan by coating it with oil. This step is essential for achieving a golden, caramelized exterior on the corn kernels. The oil acts as a medium for heat transfer, ensuring even cooking and preventing the kernels from sticking to the pan. Once the pan is adequately coated, heat it over medium-high heat, allowing the oil to reach its optimal temperature.
Once the pan is heated, carefully add the freshly removed corn kernels. The sizzle of the kernels hitting the hot surface is a testament to the imminent transformation they are about to undergo. With a spatula or wooden spoon in hand, stir-fry the kernels for 4-5 minutes, ensuring continuous movement to prevent uneven cooking and to coax out their natural sweetness.
As the kernels dance in the heat, they will gradually take on a medley of colors, ranging from light golden to deep brown. Some kernels may even burst open, reminiscent of the crackling sound of grilling over an open flame. This visual and auditory symphony is a sign that the kernels are nearing perfection, their flavors intensifying with each passing moment.
When the kernels have achieved a uniform color and are tinged with a hint of caramelization, it is time to remove them from the heat. With the pan still sizzling, add a dash of salt, a sprinkle of black pepper, a squeeze of fresh lemon juice, and a hint of ginger. These carefully selected seasonings complement the natural sweetness of the corn, elevating its flavor profile to new heights.
Give the ingredients a gentle stir, allowing the flavors to meld together and coat each kernel with their tantalizing essence. The aroma that wafts from the pan is a testament to the culinary magic that has taken place, promising a taste experience that transcends expectation.
As you take your first bite, you will be greeted with a burst of flavor that rivals the charred perfection of corn grilled over charcoal. The sweetness of the kernels is enhanced by the savory notes of salt and pepper, while the brightness of lemon juice adds a refreshing tang. The subtle warmth of ginger lingers on the palate, leaving a tantalizing finish that beckons for another bite.
Tips for Success
Maintain medium-high heat: Consistency in heat is key to achieving perfectly grilled corn off the cob. Avoid fluctuations in temperature for optimal results.
Rotate the corn: Turning the corn regularly ensures even cooking and prevents any single side from burning.
Experiment with seasonings: Don’t be afraid to get creative with seasonings and toppings to elevate the flavor profile of your grilled corn off the cob.
Variations to Explore
Spicy Chipotle Corn: Brush grilled corn with chipotle-infused butter for a smoky and spicy kick.
Herb-Infused Corn: Toss grilled corn with chopped fresh herbs such as cilantro, parsley, and chives for a burst of freshness.
Sweet and Savory Corn: Drizzle grilled corn with honey and sprinkle with crispy bits of fried bell peppers for a delightful combination of sweet and savory flavors.
Benefits of Grilling Corn off the Cob
Grilling corn off the cob offers numerous benefits beyond its enticing flavor. By removing the kernels from the cob, you create a versatile ingredient that can be incorporated into various dishes with ease. Additionally, grilling imparts a smoky essence to the corn, enhancing its natural sweetness and elevating its overall taste profile. Furthermore, corn off the cob on the grill is a visually appealing dish that adds a pop of color to any table spread, making it a favorite among both chefs and diners alike.
FAQs (Frequently Asked Questions)
Q: Can I grill corn off the cob ahead of time?
A: Absolutely! Grilled corn off the cob can be prepared in advance and reheated just before serving. Simply store the grilled kernels in an airtight container in the refrigerator for up to two days. When ready to serve, reheat the corn in a skillet over medium heat until warmed through.
Q: Can I freeze grilled corn off the cob?
A: Yes, you can freeze grilled corn off the cob for future use. Allow the grilled kernels to cool completely, then transfer them to a freezer-safe bag or container. Label the container with the date and store it in the freezer for up to three months. To use, simply thaw the corn in the refrigerator overnight before reheating.
Q: Can I grill corn off the cob indoors?
A: While grilling corn off the cob is traditionally done outdoors on a grill, you can also achieve similar results indoors using a grill pan or a cast-iron skillet. Simply heat the grill pan or skillet over medium-high heat and follow the same grilling process as you would on an outdoor grill.
Q: Can I use frozen corn instead of fresh for grilling?
A: While fresh corn is preferred for grilling, you can certainly use frozen corn kernels as a convenient alternative. Thaw the frozen corn before grilling and pat it dry to remove excess moisture. Keep in mind that frozen corn may require slightly longer cooking time than fresh corn to achieve that perfect char.
Explore More Recipes
Looking to expand your culinary repertoire? Explore more mouthwatering recipes on Manjula’s Kitchen:
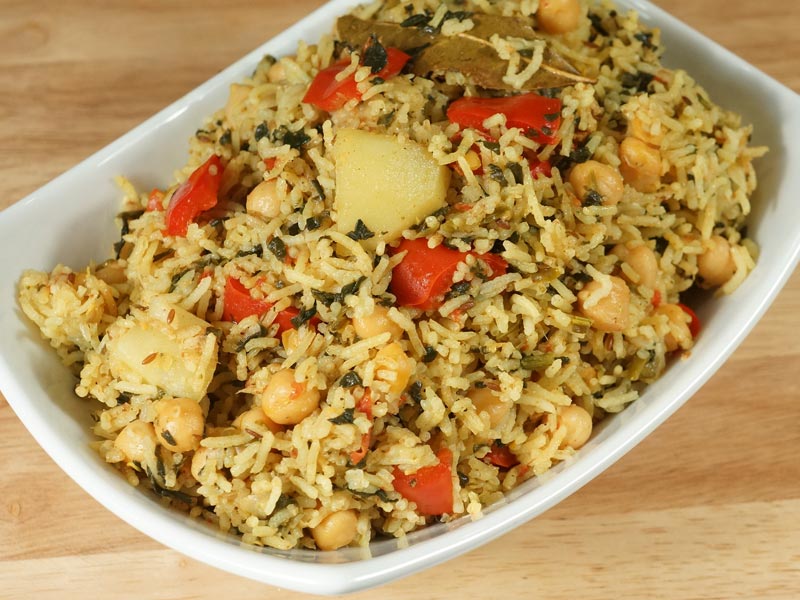
This dish is a delicious combination of rice, chickpeas, with vegetables and of course spices. This is a great, hearty, and healthy meal. This is a one dish and one pot meal.
15oz chickpeas/chola/garbanzo/kabule chana canned or cooked
2 tomatoes medium size chopped will make about 1-1/2 cup chopped tomatoes
1 potato medium size peeled and cubes bite size pieces will make about 3/4 cup
6 oz spinach chopped frozen or 3 cups of chopped fresh spinach
1 cup bell pepper cubed in bite size pieces
3tablespoons oil
1teaspoon cumin seeds/jeera
1/8 teaspoon asafetida/hing
1 bay leafs/tajpat
1tablespoon ginger finely shredded
1 green chili finely chopped
1-1/2teaspoon salt
1/4teaspoon turmeric/haldi
1/2 teaspoon mango powder/amchoor
1/4teaspoon garam masala
1-1/2cups water
Instructions
Wash and soak the rice in about 2 cups of water at least for 10 minutes.
Drain the liquid out of the can of chickpeas and wash the chickpeas well.
Heat the oil in a saucepan. Test the heat by adding one cumin seed to the oil; if seed cracks right away oil is ready.
Add cumin seeds as seeds crack add the ginger, green chili, and turmeric stir for few seconds.
Add tomatoes and salt cook until tomatoes are tender, about 2 minutes.
Add chickpeas and potatoes after it comes to boil cover the pen and let it cook for about 8 minutes over medium low heat, stir occasionally.
Add rice, spinach, bell pepper and water. Mix and bring it to boil. Cover the pan and let it cook for about 12-15 minutes over low heat. Don’t stir the rice in between they will get mushy check the rice in about 12 minutes. Cook Pulav until the rice is tender and the water has evaporated.
When Pulav is ready add mango powder and garam masala mix gently.
Serve alone or with side of yogurt or pickle if you want to spice it up more.
Chole pulao is a delectable gluten free, quick & easy, vegan, lunch box dish that combines the rich flavors of chickpeas (chole) with fragrant basmati rice. This dish is a popular variation of traditional pulao, infused with the vibrant spices and hearty texture of chickpeas to make it a sumptuous chickpea pulao.
Preparing the Rice: Washing and Soaking for Perfect Chole Rice
Embark on your journey to create delectable chole rice by meticulously washing and soaking the rice in approximately 2 cups of water for a minimum of 10 minutes. This crucial step is paramount to ensuring that the rice grains attain optimal moisture content, thereby resulting in a flawlessly cooked dish of chole biryani.
Preparing the Chickpeas: Draining and Washing for Flavorful Chole Biryani
Simultaneously, prepare the chickpeas for your culinary masterpiece by meticulously draining the liquid from the can and washing the chickpeas thoroughly. This meticulous process guarantees that the chickpeas are clean and primed to impart their rich flavors to the chole pulao.
Tempering the Spices: Heating the Oil to Infuse Flavor into Chole Rice
In a sturdy saucepan, initiate the culinary alchemy by heating oil over medium heat. Test the readiness of the oil by introducing a solitary cumin seed; upon immediate crackling, the oil is primed to infuse its essence into the chickpea biryani.
Adding Flavorful Spices: Tempering with Cumin Seeds to Enhance Chole Pulao
Introduce the aromatic dance of spices by incorporating cumin seeds into the heated oil. Await their harmonious crackling before introducing the enchanting trio of ginger, green chili, and turmeric, infusing the environment with an irresistible aroma synonymous with chickpea pulao.
Cooking the Base: Sautéing Tomatoes and Seasoning for Chole Biryani
Elevate the essence of your culinary creation by gently sautéing the succulent tomatoes alongside a sprinkle of salt until they reach a state of tender perfection, a foundational cornerstone of your tantalizing chickpea biryani.
Cooking the Chickpeas and Potatoes: Simmering to Perfection in Chole Rice
Transition seamlessly into the heart of your gastronomic endeavor by incorporating the chickpeas and potatoes into the saucepan, allowing them to luxuriate in a simmering concoction that amplifies their innate flavors. Cover the pan and allow the symphony of flavors to intermingle over medium-low heat for approximately 8 minutes, intermittently stirring to ensure uniformity in your divine chole pulao.
Adding Rice and Vegetables: Fusion of Flavors in Chole Pulao
Continue your culinary odyssey by introducing the soaked rice, verdant spinach, vibrant bell pepper, and invigorating water into the saucepan, orchestrating a harmonious amalgamation of flavors that epitomises the essence of chole rice. Allow the amalgamation to gracefully ascend to a crescendo as it boils fervently before serenely simmering over low heat for 12-15 minutes. Resist the urge to stir the concoction, as doing so may compromise the integrity of your enchanting chole biryani.
Finishing Touches: Infusing Flavorful Seasonings into Chole Pulao
Elevate the sensory experience of your culinary creation by delicately infusing it with the vibrant nuances of mango powder and garam masala, carefully intertwining the essence of these exquisite seasonings into the very fabric of your delectable chickpea pulao.
Serving Suggestions: Savoring the Culinary Excellence of Chole Rice
Delight in the gastronomic opulence of your culinary masterpiece by savoring it either in its glorious solitude or accompanied by a tantalizing side of yogurt or pickle. Let the symphony of flavors and textures evoke a sense of culinary euphoria, as you revel in the exquisite delight that is your chole rice.
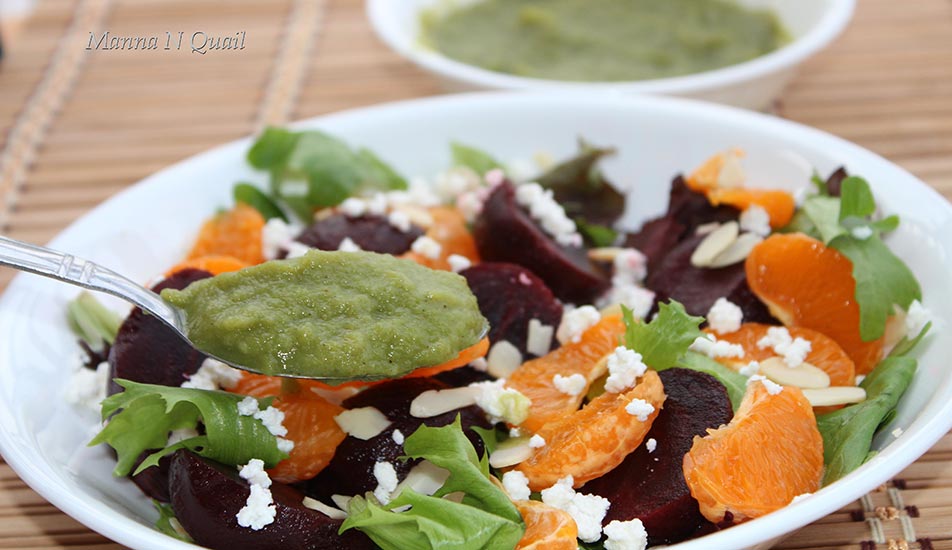
This delicious healthy salad is an alluring combination of roasted beets, mandarin oranges, leafy greens with creamy mango dressing. The mixture of sweet and tart flavors with a tangy mango dressing turns this salad recipe into something special. Total time: 1 Hour This recipe will serve 4.
1 medium sized raw mango, peeled and cut into cubes.
2 sprigs of cilantro/coriander leaves, stem removed
Approx 2tbsp fresh lime juice, or to taste
Approx 1 tsp honey
1/4 tsp roasted ground cumin seeds
1/4tsp of salt
Instructions
Preheat oven to 375 degrees Fahrenheit. Combine beets and 2 tsp olive oil and ¼ tsp pepper in a bowl and toss to coat. Place beets in a baking pan.
Cover tightly with aluminum foil and roast for 45 minutes or until tender when pierced with the tip of a small knife.
When the beets have cooled slightly but are still warm, rub off the skins with a towel. Trim off roots.
Cut beets into ½ inch wedges; cool completely.
Blend all the dressing ingredients together until creamy. Adjust seasonings to taste, adding more honey, lime juice, or salt if desired.
Place greens and beets in a large bowl; Scatter the orange segments in the bowl. Pour the dressing over salad and toss gently. Top each serving with 1 tablespoon crumbled paneer and 1 1/2 teaspoons toasted almonds
Notes
Variations
Baby salad greens can be replaced with spinach or any greens of choice.
Instead of roasting the beets we can boil them. Cover the beets with water, bring to a boil, and simmer for 45 minutes or until beets can easily be pierced with the tip of a small knife.
Replace the almond with roasted crushed peanuts.
Additional Note: To make crumbled paneer:
1 cup milk
1/2 Tbsp lime juice with 1 tsp water
Method
Let the milk boil on medium high stirring continuously.
When the milk is boiling add lime juice, then strain the paneer onto muslin/thin cotton cloth and run it under cold water, squeeze excess water.
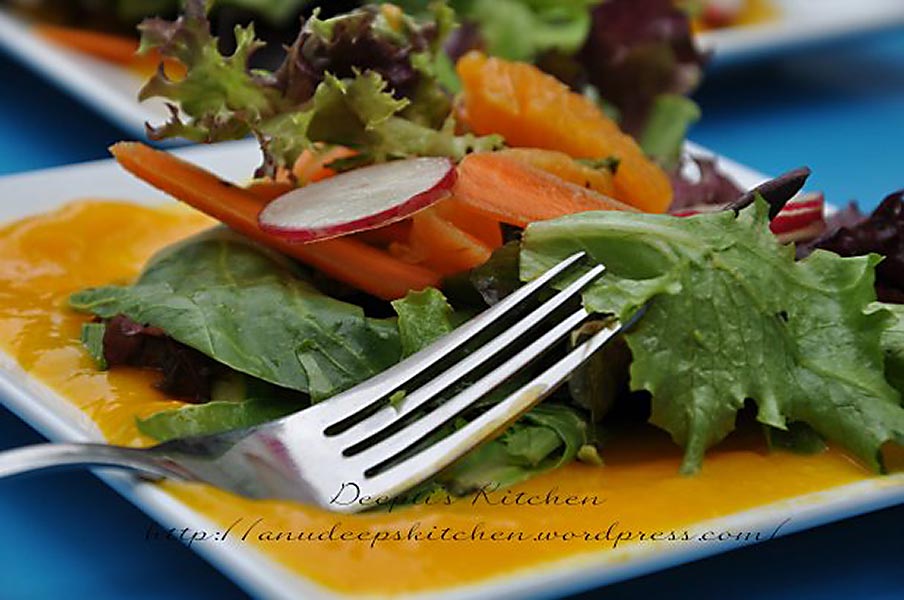
Tropical Spring Salad with Mango Orange Dressing is a yummy healthy spring salad with a homemade dressing that tastes awesome and is totally loved by kids for its Mango flavor.
Preheat the oven to 350F. Grease a baking pan with cooking spray. Add the chopped Asparagus with a dash of salt and pepper. Keep it in the oven for 20 mins.
Add the chopped Radish to a big bowl.
Add Sliced Avocado to it.
Now add the thinly sliced Carrots.
Next add the peeled & sectioned Oranges.
Then add the Spring Mix.
Add the oven cooked tender Asparagus.
Mix it well with a pinch of Salt, Lemon juice & Walnut.
Blend the chopped Mango along with the Orange juice, Orange Zest & Sugar in a blender until a smooth creamy texture is obtained.
Spread 1/4 cup dressing in a plate. Add the salad on top and serve.
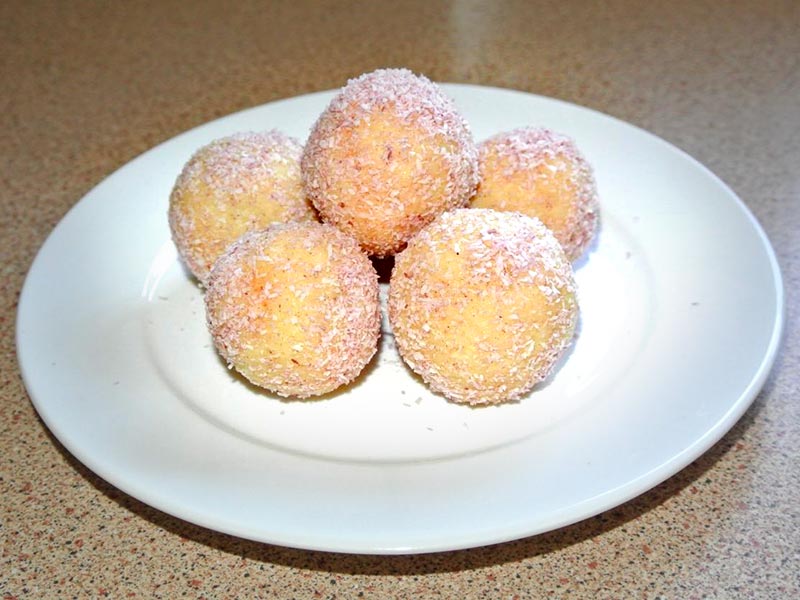
For stuffing, in a non-stick pan mix condensed milk, milk powder and Thandai masala cook on low flame until the mixture leaves the sides of the pan and turn into dough consistency. Remove from fire and set it aside for cooling.
For Coating, in a same pan Mix condensed milk, crushed paneer, Milk Powder and mawa. same way cook until the mixture leaves the sides of the pan and turn into dough consistency. Remove from fire and set it aside for cooling
Now grease your hand with ghee and make small balls out of stuffing Mixture.
Take hand full dough of coating press with your hand than stuff with one ball of stuffing and cover it, make a round ball.
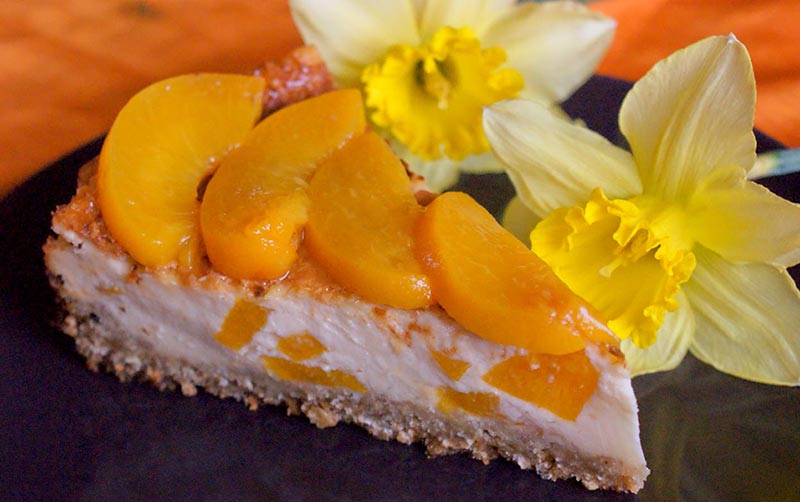
I have figured out this cheesecake recipe after experimenting and trying out different combinations for many years. Finally I am really happy with the result! It has a crispy base and firm and creamy filling with a refreshing accent of mild fruit. Its a nice appetizing dessert that compliments after having a nice dinner.
Optional: another 800g cane of peach halves in syrup for decoration
Instructions
Melt butter
In a bowl mix flour, rolled oats, sugar and vanilla sugar, add melted butter and mix well, rub it with your fingers. It will be quite try mixture, but that’s ok.
Cover your cake tin with baking paper or smear it with butter and spoon the mixture in the tin and press it with your palms to form a strong layer on the bottom of the tin.
Preheat the oven to 180C and bake the base for 10 min or until it starts to get slightly golden, then remove from the oven.
In a bowl mix together all the ingredients for the filling except for peaches and mix very well. I like to use electric mixer for this. The mixture will be quite liquid, but do not worry it will firm up after baking
Take the peach halves out of the syrup and cut into cubes.
Mix the peaches into the filling
Carefully pour or spoon the filling in the cake tin on top of the base.
Bake with 180C for 1 h.
When the cake is ready let it cool down and the best is to keep it in the fridge overnight or at least 2h before serving.
Open another cane of peach halves in syrup cut the peaches into slices and decorate the cake right before serving.