10 Easy Vegan Recipes | Vegan Indian Foods by Manjula’s Kitchen
Embracing a vegan lifestyle doesn’t mean you have to give up on the rich and flavorful experience of Indian cuisine. Here at Manjula’s Kitchen, we bring you a collection of vegan Indian food that is both delicious and easy to prepare. Let’s dive into 10 easy vegan recipes that will make your meals exciting and nutritious. These vegan Indian recipes are perfect for anyone looking to incorporate more plant-based meals into their diet.
1. Vegan Aloo Gobi
Aloo Gobi is a classic Indian dish made with potatoes and cauliflower. This flavorful and hearty dish is a staple in many Indian households and is a great example of vegan Indian food that is both satisfying and healthy. The combination of tender potatoes and cauliflower florets cooked with aromatic spices like cumin, turmeric, and garam masala makes this dish irresistible. Aloo Gobi is not only delicious but also easy indian recipesto prepare, making it a perfect choice for busy weeknights. Serve it with roti or rice for a complete meal.
2. Chana Masala
Chana Masala is a spicy and tangy chickpea curry that is a favorite among many. It’s one of the 10 easy vegan recipes that you can prepare quickly, and it’s packed with protein and flavor, making it a perfect vegan food recipe. Chickpeas are simmered in a rich tomato sauce flavored with an array of spices like coriander, cumin, and chili powder. This dish is hearty and comforting, ideal for lunch or dinner. Pair it with steamed basmati rice or warm naan for a satisfying meal.
3. Vegan Palak Tofu
Palak Tofu is a delicious twist on the traditional Palak Paneer. Instead of paneer, tofu is used to keep this dish vegan. The creamy spinach sauce pairs perfectly with the tofu, creating a nutritious and tasty vegan Indian recipe. Spinach is blended into a smooth puree and cooked with spices, then combined with tofu cubes to create a delightful dish. This vegan version retains all the flavors of the original and is a fantastic way to enjoy spinach and tofu in a new and exciting way. Serve it with jeera rice or chapati.
4. Baingan Bharta
Baingan Bharta is a smoky and flavorful eggplant dish that is popular in north indian recipes. This dish is made by roasting eggplants and cooking them with tomatoes, and spices, making it a delightful addition to your collection of vegan food recipes. The roasting process gives the eggplant a unique smoky flavor, which is then enhanced by the addition of spices like cumin, coriander, and garam masala. Baingan Bharta is perfect as a side dish or a main course when served with roti or rice.
5. Vegan Vegetable Biryani
Vegetable Biryani is a fragrant and flavorful rice dish cooked with a variety of vegetables and spices. This vegan version is just as delicious as the traditional one, making it a must-try among vegan Indian recipes. The rice is layered with a mixture of vegetables like carrots, peas, and bell peppers, along with aromatic spices such as cardamom, cinnamon, and cloves. Biryani is a complete meal in itself and can be enjoyed with a side of raita or salad.
6. Tofu Tikka Masala
Tofu Tikka Masala is a vegan take on the classic Chicken Tikka Masala. Tofu is marinated in spices and yogurt, then cooked in a rich and creamy tomato sauce. This dish is perfect for those looking for vegan food recipes that are both hearty and flavorful. The tofu absorbs the flavors of the marinade and the sauce, resulting in a dish that is rich and satisfying. Serve it with basmati rice or naan to soak up the delicious sauce.
7. Vegan Rajma
Rajma is a kidney bean curry that is a staple in North Indian cuisine. This vegan version is just as delicious and comforting, making it a great choice for anyone seeking vegan Indian food that is both nutritious and satisfying. Kidney beans are cooked in a spiced tomato gravy, flavored with a blend of spices like cumin, coriander, and garam masala. Rajma is traditionally served with rice, making it a wholesome and filling meal.
8. Masoor Dal
Masoor Dal is a simple yet flavorful red lentil curry. It’s one of the easiest vegan Indian recipes to prepare and is packed with protein and fiber, making it a healthy addition to your meal rotation. Red lentils are cooked with tomatoes, and spices, creating a comforting and nourishing dish. Masoor Dal is perfect for a quick lunch or indian dinner recipes and can be enjoyed with rice or chapati.
9. Vegan Korma
Vegan Korma is a creamy and mildly spiced curry made with a variety of vegetables and a rich coconut-based sauce. This dish is perfect for those looking for 10 easy vegan recipes that are both luxurious and easy to make. The vegetables are simmered in a sauce made from coconut milk, cashews, and spices, resulting in a dish that is rich and flavorful. Vegan Korma can be served with rice or naan for a complete meal.
10. Vegan Pulao
Vegan Pulao is a simple and flavorful rice dish cooked with vegetables and aromatic spices. It’s a versatile dish that can be enjoyed on its own or as a side, making it a great addition to your list of vegan Indian food recipes. The rice is cooked with vegetables like peas, carrots, and bell peppers, along with spices such as cumin, cinnamon, and bay leaves. Vegan Pulao is perfect for a quick and easy meal and can be paired with raita or a salad.
Conclusion
These 10 easy vegan recipes showcase the versatility and richness of vegan Indian food. From hearty curries to flavorful rice dishes, these recipes are sure to bring joy and nutrition to your table. Explore more vegan Indian recipes and discover the delicious possibilities of plant-based cooking with Manjula’s Kitchen. Happy cooking and enjoy your journey with vegan food recipes!
By incorporating these dishes into your diet, you’ll be able to enjoy a wide variety of delicious and nutritious foods. Whether you’re looking for breakfast, snacks, main courses, or desserts, there’s a vegan Indian recipe to suit every taste. Don’t forget to check out Manjula’s Kitchen for more inspiration and culinary delights. Happy cooking and happy eating!
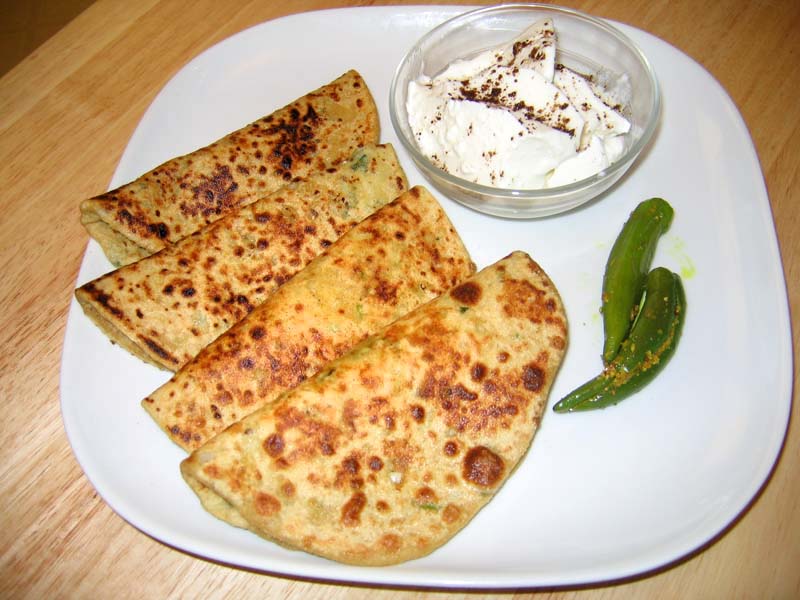
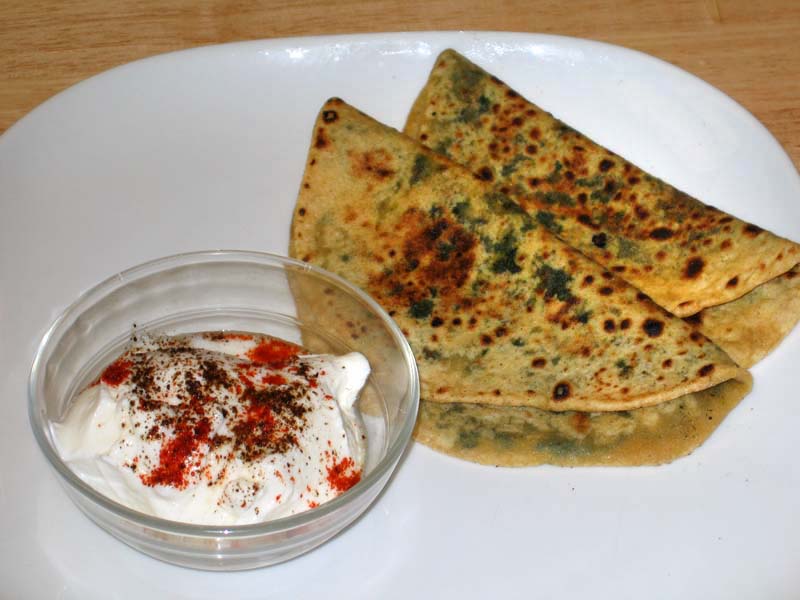
Mix flour, salt and water together to make a soft dough (add water as needed). Knead the dough for about 2 minutes on a lightly greased surface to make soft, smooth and pliable dough.
Set the dough aside and cover it with a damp cloth. Let the dough rest for at least ten minutes.
Making the Filling
Shred the cauliflower using a shredder (electric or manual). Do not use a food processor to blend the cauliflower, as it will become too moist and hard to work with.
Squeeze the cauliflower take out as much water as possible. Add all filling ingredients together, mix it well.
Making the Paratha
Divide the dough and cauliflower mixture into 6 equal parts. Roll one part of the dough into a three inch circle. Place one part of the filing in the center. To wrap, pull the edges of the rolled dough together to cover the filling. Repeat to make all six balls.
Allow each ball to settle for two minutes before rolling. (Timing is critical here. If you roll paratha just after filling, or if you leave them longer than two minutes before rolling, the cauliflower mixture will seep through the edges when rolling).
Heat an iron skillet or heavy skillet on medium high heat. Test by sprinkling it with a couple of drops of water. If the water sizzles right away, the skillet is ready.
Press the filled ball lightly on both sides on a surface covered with dry whole wheat flour. Keep the sealed side of the filled ball on top. Roll the ball with a light hand into 6” circles. When the dough sticks to the rolling pin or rolling surface, lightly dust with dry flour.
Place rolled paratha on the skillet. After a few seconds, the paratha will start to change color and puff up. Flip the paratha over. You will notice some golden-brown spots on it.
After a few seconds, spread one teaspoon of oil over the paratha. Flip the paratha again and lightly press the puffed areas with a spatula. Flip again and press with the spatula making sure the parathas are golden-brown on both sides.
Repeat for the remaining parathas. Cool the parathas on a wire rack so they don’t get soggy.
Notes
NotesAllow each ball to settle for two minutes before rolling. (Timing is critical here. If you roll paratha just after filling, or if you leave them longer than two minutes before rolling, the cauliflower mixture will seep through the edges when rolling).Parathas can be kept unrefrigerated up to two days,wrapped in aluminum foil or stored in a covered container. For later use, parathas can be refrigerated five to six days or frozen (wrapped in aluminum foil) for a month. Re-heat in a skillet or toaster oven.Serving SuggestionsGobhi Paratha goes well with Salted Mint Lassi, Carrot Pickle, Aloo Mattar.
Keyword Breakfast, Cauliflower Paratha, Homemade, Video Recipe
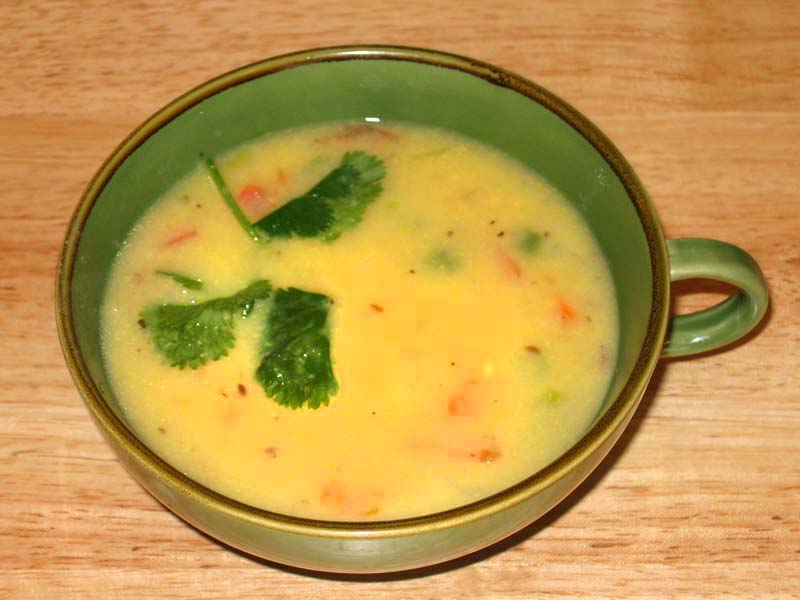
Corn Vegetable Soup is a creamy corn soup with vegetables is a great starter for a summerlunch. This delicious soup can be served hot or cold. Serves 4.
Chop cabbage, carrot, and string beans into very small pieces.
Chop tomato in small pieces and remove the seeds. Set aside.
Boil the corn in about 1 ½ cups of water until the corn is soft. Remove ¼ cup of corn and set aside.
Blend the rest of the corn into a paste and strain.
Mix the cornstarch with ¼ cup of water and set aside.
Heat the oil in a saucepan. Test the heat by adding one cumin seed to the oil; if seed cracks right away oil is ready.
Now add the cumin seeds. After the cumin seeds crack, add the carrot, cabbage, beans and ¼ cup of water. Cook the vegetables on medium heat until they are tender.
Next, add the corn paste, corn, cornstarch mixture, and two cups of water to the vegetables. Bring the soup to a boil add tomatoes and lower the heat to medium low. Let the soup cook for another five minutes. Add the lemon juice and serve.
Notes
Suggestions
Corn soup can be refrigerated for about a week and can be frozen for months.
If you have decided to freeze or refrigerate the soup hold the water you were adding.
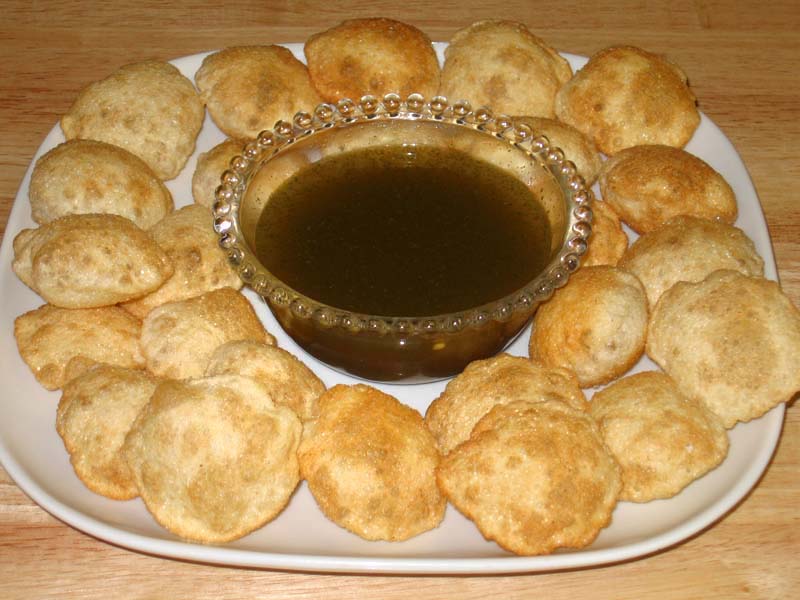
Pani puris are a great snack, served as chaat and a popular street food all over India. They are served filled with spicy water, chickpeas and potatoes. Makes about 60 puris.
Blend everything except the water together to make a fine paste. While blending, add water as needed to blend.
Taste to adjust the green chilies as they can be mild or hot. Add more lemon juice, sugar, and salt as needed to your desired taste. Remember you will be adding more water to dilute so paste should be spicier. Strain the paste using water as needed.
After straining mix the paste with remaining water or adjusting to the taste.
The pani (water) will taste best if refrigerated for a day.
To make Puris:
Mix the flour and sooji. Add water as needed to make firm dough. Knead the dough until it is pliable. Cover the dough with a damp cloth for about ten minutes.
Damp two kitchen towels, spread one damp towel over a cookie sheet or plain surface, close to where you are going to fry the puris.
Divide the dough into about 60 small balls. Keep them under a damp cloth.
Start rolling each ball to about a 2-inch diameter circle. Place over a damp towel and cover with another damp towel. Do this for all 60 puris. TIP: Placing the puris between damp cloths helps the puris to puff evenly on all sides.
Heat the oil on medium high heat. Oil should be about 1 1/2 inch high in frying pan. To test the oil, put a little piece of dough in the oil. The oil is ready if the dough comes up right away and does not change color.
Start frying the puris, starting first with the puri you first rolled.
Put one puri in the oil and press lightly. When it puffs turn over and put another puri in the oil. Keep adding six to eight puris at a time. Fry the puris until they are golden-brown all around by turning a few times. You may adjust the heat as needed while frying.
Take the puris out and place over paper towel, so the excess oil is absorbed. TIP: When taking the puris out of the frying pan, make sure to tilt the skimmer so that the excess oil is drained before placing on the paper towel.
Fry all the puris. They should be crisp and puff like a ball.
Notes
Serving Suggestions
Pani puris are served by making a small hole in each puri. Fill the puris with boiled and chopped potatoes, or boiled chickpeas.
Finish by filling each puri with the spicy pani (water). Enjoy!
Pani Puri Recipe: The Ultimate Guide to Making Delicious Pani Puris
Introduction to Pani Puri
Pani Puri, also known as golgappa or phuchka, is a beloved Indian street food famous for its burst of flavors and crunchy texture. This pani puri recipe encapsulates the essence of Indian culinary tradition, offering a delightful mix of tangy, spicy, and sweet flavors. Perfect for gatherings, parties, or simply as a snack, making pani puri at home is a rewarding experience that brings friends and family together.
How to Make Pani Puri: Step-by-Step Guide
Preparing the Puris
To start this recipe for pani puri, you’ll need puris, which are hollow, crispy semolina or wheat spheres. You can either make them at home or purchase them from a store. If making at home, mix semolina or wheat flour with water and knead into a firm dough. Roll out small circles and deep fry until golden brown. Set aside to cool.
Preparing the Pani
The pani puri is incomplete without its signature spicy and tangy water. In a blender, combine mint leaves, coriander leaves, green chilies, ginger, tamarind pulp, black salt, roasted cumin powder, chaat masala, and salt. Blend until smooth. Strain the mixture and dilute it with water according to taste. Chill the pani in the refrigerator for at least an hour before serving.
Preparing the Filling
For the filling, boil potatoes until tender, then peel and mash them. Add boiled chickpeas, and a dash of chaat masala for extra flavor. Mix well and set aside.
Assembling the Pani Puris
Now comes the fun part! Take each puri and gently make a hole in the center, creating a cavity for the filling. Stuff the puris with the potato mixture and arrange them on a serving plate. Pour the chilled pani into each puri using a small spoon or a pani puri maker, ensuring they’re filled to the brim.
Garnishing and Serving
Garnish the pani puris with a drizzle of sweet tamarind chutney and a sprinkle of sev (crunchy chickpea flour noodles) for added texture. Serve immediately to enjoy the burst of flavors and textures in every bite.
Tips for Perfect Pani Puris
Fresh Ingredients: Use fresh mint, coriander, and tamarind for the pani to enhance the flavor.
Chilling Time: Allow the pani to chill for at least an hour to let the flavors meld together.
Crunchy Puris: Ensure the puris are crispy and hollow to hold the filling and pani without getting soggy.
Variations of Pani Puri
Ragda Pani Puri: Replace the potato filling with ragda (spicy chickpea curry) for a heartier version.
Fruit Pani Puri: Experiment with filling options like diced mango, pomegranate seeds, or grated pineapple for a fruity twist.
Sukha Puri: Skip the pani and serve the stuffed puris with sweet tamarind chutney and spicy mint chutney for a dry version.
Benefits of Pani Puri
Rich in Flavor: Pani puri offers a medley of flavors, from spicy and tangy to sweet and savory.
Customizable: You can adjust the spice level and filling according to your preference, making it suitable for all taste buds.
Social Experience: Making and enjoying pani puri with friends and family fosters bonding and creates lasting memories.
FAQs (Frequently Asked Questions)
Q: Can I make the puris ahead of time?
A: Yes, you can prepare the puris in advance and store them in an airtight container for up to a week.
Q: How spicy should the pani be?
A: The spice level of the pani can be adjusted according to your preference. Start with fewer green chilies and add more if desired.
Q: Can I make a healthier version of pani puri?
A: Yes, you can opt for baked puris and use less oil in the filling to make a healthier version of pani puri.
For more delightful Indian recipes, visit Manjula’s Kitchen and explore a world of culinary delights!
By following this comprehensive pani puri recipe, you’ll be able to recreate the magic of this iconic Indian street food in the comfort of your own kitchen. Whether it’s a special occasion or just a craving for something delicious, pani puri never fails to satisfy. So gather your ingredients, invite your loved ones, and embark on a flavorful journey with homemade pani puris!
Kadhi, a blend of yogurt and besan (gram flour) with besan pakoras, this is served with rice. This dish is popular throughout India specially in North India.
pinchcitric acid if needed to give more sourness to kadhi
For Pakoras
3/4 cupbesan,gram flour
2/3cupwater use as needed
For Garnish
1tspgheclarified butter
1tspred chili powder
Instructions
Making Kadhi
Mix gram flour and turmeric with yogurt until smooth. Add three cups of water slowly and mix well.
Heat the oil in a saucepan. Test the heat by adding one cumin seed to the oil. If the cumin seeds crack right away, the oil is ready. Add the asafetida, fenugreek seeds, cumin seeds, stir and add bay leaves, whole red chilies, and red chili powder. Stir for a few seconds. Add the yogurt mixture and keep stirring until the kadhi comes to a boil.
Add three cups of water and let it come to boil. Add salt. Turn the heat to medium low. Let the kadhi cook an hour and a half, stir occasionally. To adjust thickness, add boiled water.
Making Pakoras
Add water slowly to the besan to make a smooth and thick batter. Whip the besan batter two to three minutes in a circular motion using a spoon, until light and fluffy.
Fry the pakoras in ½ inch of oil in a flat frying pan over medium heat. (Don’t use enough oil to cover the pakoras; they will be softer and fluffier if fried in shallow oil.
To test, drop one drop of batter into the oil. The batter should form a ball on the surface of the pan, but not change color right away.
Place about one tablespoon of batter into the oil. Fry the pakoras in small batches until golden-brown.
After frying, soak the pakoras in room-temperature water for ten minutes. Squeeze the pakoras gently to remove the water, taking care not to break them.
Add the pakoras to the kadhi and boil on low to medium heat for ten minutes.
Making the Seasoning
Heat the ghee (clarified butter) lightly in a small saucepan. Add chili powder and/or paprika (adjust to taste). Pour over the kadhi when ready to serve.
Notes
Variations Add one cup chopped spinach to the kadhi just before adding the pakoras for extra flavor and color. Add one tablespoon dry fenugreek leaves (dry mathi leaves) to the pakora batter.My favrait way to Serve Kadhi Pakoras is with Rice, Roti, Jeera Aloo, Spicy Green Peas
Kadhi Pakora is a gluten-freesummer recipe featuring a savory vegetable curry with dal (lentils) and crispy fried pakoras, creating a delightful and flavorful dish. Kadhi Pakora, a popular North Indian dish, is a comforting and flavorful yogurt-based curry with gram flour dumplings. This traditional dish is known for its tangy and savory taste, making it a favorite among many households. In this kadhi recipe, we’ll show you how to make authentic Punjabi Kadhi Pakora step by step, so you can enjoy its deliciousness at home. Whether you’re craving a comforting meal or planning a special dinner, Kadhi Pakora is sure to satisfy your taste buds.
Step 1: Preparation of Ingredients for kadhi pakora punjabi style
Start by gathering all the necessary ingredients for making Kadhi Pakora. For the pakoras, prepare a batter using gram flour, spices, and water. Slice and chop green chilies, cilantro, and ginger for the pakora batter. For the kadhi, whisk yogurt and gram flour together until smooth, and set aside. Finely tomatoes and ginger for the kadhi gravy. Having all the ingredients ready will streamline the cooking process.
Step 2: Making Pakoras:
To make the pakoras, heat oil in a deep-frying pan. Drop Spoonfuls of the pakora batter into the hot oil and fry until golden brown and crispy. Remove the pakoras from the oil and place them on a paper towel to drain excess oil. Repeat the process until all the batter is used. The crispy pakoras will add texture and flavor to the kadhi.
Step 3: Preparing the Kadhi Base:
In a large pot or saucepan, heat oil or ghee over medium heat. Add cumin seeds, mustard seeds, and fenugreek seeds, and let them splutter. Next, add ginger, and cook until fragrant. The aromatic base will form the foundation of the kadhi gravy, imparting depth of flavor to the dish.
Step 4: Cooking the Kadhi:
Once the aromatics are sautéed, it’s time to add the chopped tomatoes to the pot. Cook the tomatoes until they soften and break down, forming a thick gravy. Then, add the whisked yogurt and gram flour mixture to the pot, stirring continuously to prevent lumps from forming. Bring the mixture to a gentle boil, then reduce the heat and let it simmer.
Step 5: Adding Pakoras:
Once the kadhi base is cooked and thickened, add the fried pakoras to the pot. Gently stir to coat the pakoras with the flavorful kadhi gravy. Allow the pakoras to simmer in the kadhi for a few minutes to absorb the flavors. The combination of soft pakoras and tangy kadhi creates a harmonious and satisfying dish.
Step 6: Finishing Touches:
Before serving, garnish the Kadhi Pakora with freshly chopped cilantro leaves for a burst of freshness and color. You can also sprinkle some roasted cumin powder on top for extra flavor. Serve the Kadhi Pakora hot with steamed rice or roti for a comforting and wholesome meal.
Tips for Making Perfect Kadhi Pakora:
Consistency: Adjust the consistency of the kadhi by adding more water if it’s too thick or simmering longer if it’s too thin.
Fresh Ingredients: Use fresh yogurt and spices for the best flavor in the kadhi gravy.
Frying Pakoras: Fry the pakoras in batches to ensure even cooking and crispiness.
Variations of Kadhi Pakora:
Vegetarian Variation: Skip the addition of pakoras and add vegetables like potatoes, carrots, or bell peppers to the kadhi for a vegetarian version.
Gluten-Free Option: Use chickpea flour (besan) instead of wheat flour for the pakora batter to make it gluten-free.
Spicy Version: Add extra green chilies or red chili powder for a spicier kadhi.
Benefits of Including Kadhi Pakora in Your Diet:
Probiotic-rich: Yogurt used in kadhi is rich in probiotics, which promote gut health and digestion.
Good Source of Protein: Gram flour used in pakoras adds protein to the dish, making it a satisfying meal option.
Balanced Meal: Kadhi Pakora is a balanced meal that provides carbohydrates, protein, and fats, along with essential vitamins and minerals.
Frequently Asked Questions (FAQs) about Kadhi Pakora:
Q: Can I make kadhi without pakoras?
A: Yes, you can skip adding pakoras and enjoy the kadhi as a creamy yogurt-based curry with a tempering of spices.
Q: How long does kadhi pakora last in the refrigerator?
A: Kadhi Pakora can be stored in the refrigerator for up to 3-4 days. Reheat gently on the stovetop before serving.
Q: Can I freeze kadhi pakora?
A: While you can freeze kadhi pakora, the texture of the pakoras may change slightly upon thawing. It’s best enjoyed fresh or stored in the refrigerator for a few days.
For more delicious Indian curry recipes, visit Manjula’s Kitchen. Explore a variety of vegetarian curry dishes featuring a range of spices, vegetables, and legumes to add flavor and variety to your meals.
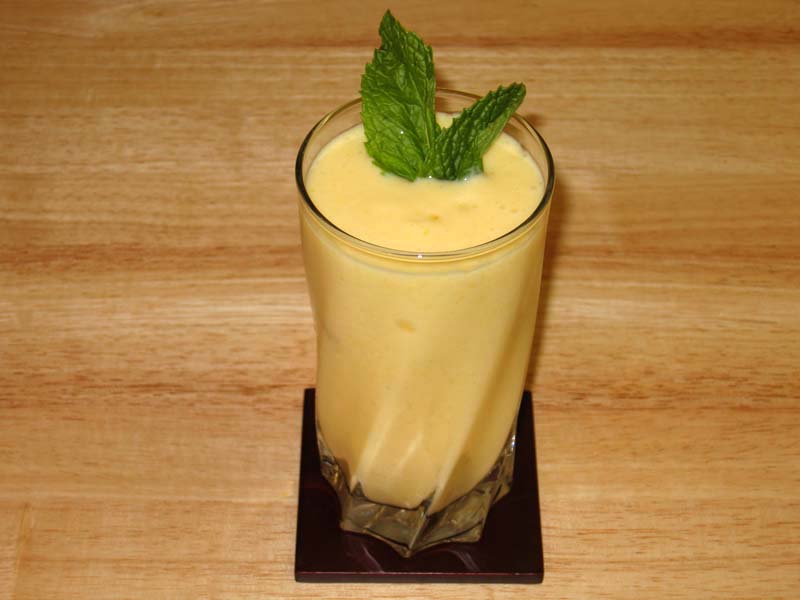
Mango Lassi is a soothing cold drink for hot summer days or to brighten up any meal. This pale drink is a blend of mango and yogurt. A popular beverage in Indian restaurants.
Blend yogurt, mango, and 2 tablespoons sugar and taste before adding more sugar. How much sugar is used depends on the sweetness of the mango and the yogurt.
Add and cardamom powder and blend. If it is too thick, add some water to desired consistency. Pour into a tall glass and garnish with mint leaves. ice and cardamom powder and blend again.
Notes
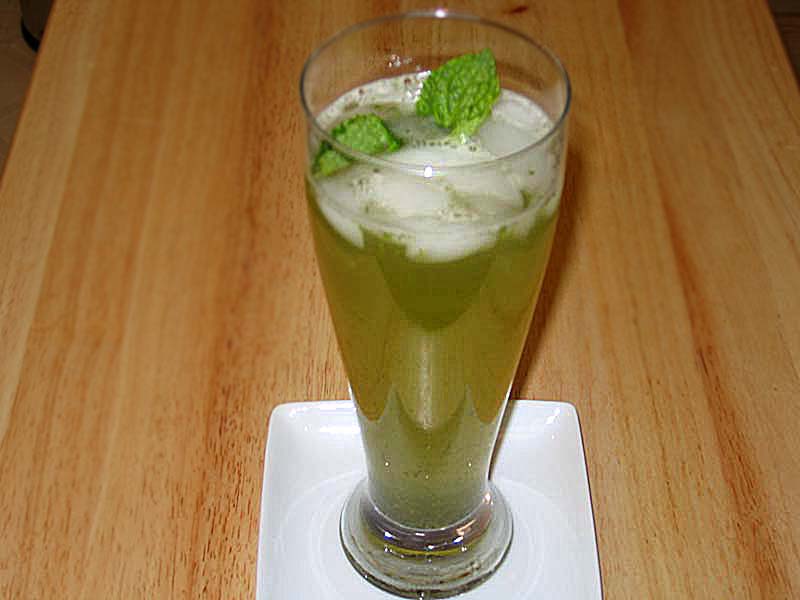
TipsAdjust ingredient quantities depending on the sweetness of the mango and the thickness of the yogurt. Mango Lassi it is better if the mangoes are not fibrous.You may also enjoy Falooda, Lemonade
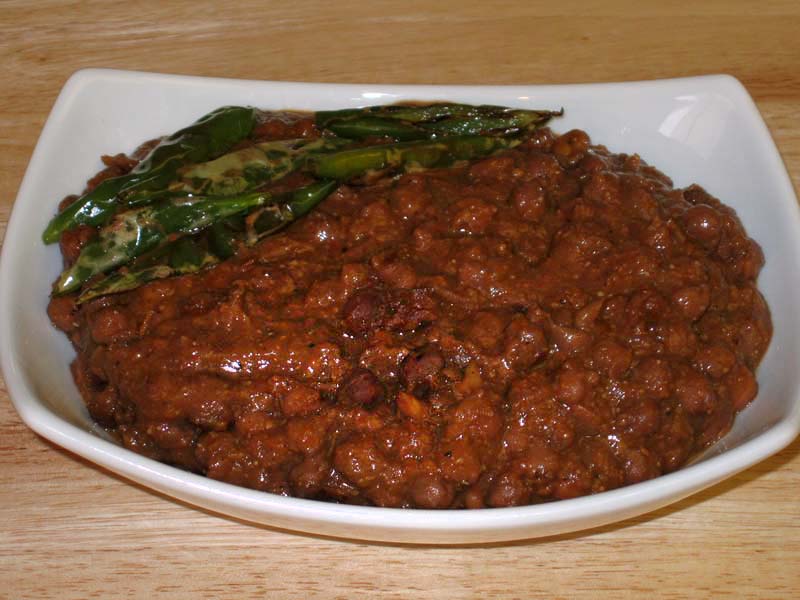
Punjabi chole are the best compliment with Baturas, and Naan. The combination is known as Chola Battura. This is a mouth-watering dish, popular with all ages. Popular street food.
Boil 5 cups of water with tea bags; after tea comes to boil turn down the heat to medium low. Let it boil for another 2 to 3 minutes. Take out the tea bags and keep aside.
Wash chickpeas well and soak in tea water for about 8 hours. Chickpeas after soaking will become about 2 1/2 times the volume of the original.
In pressure cooker add chickpeas with the water they were soaked in, plus 2 more cups of water. Close the cooker and put the pressure on. Cook on medium high heat.
As pressure cooker starts steaming turn the heat down to medium and cook for about 15 minutes.
Close the heat and wait until steam has stopped before opening the pressure cooker. Chickpeas should be soft and tender.
Blend the tomatoes, ginger and green chili to make paste.
Heat the oil in a saucepan. Test the heat by adding one cumin seed to the oil; if it cracks right away oil is ready. Add cumin seeds, and as the cumin seeds crack add basen stir-fry until basen is light gold brown.
Next add tomato paste, coriander powder, and black pepper. Stir-fry for 2 to 3 minutes until the oil is separating from the mixture and tomato mixture should be about half in volume.
Add spice mix, salt, garam masala, and mango powder to chickpeas. While mixing, lightly mash the chickpeas. Adjust salt, pepper, and sourness to your taste.
Cook on medium high heat. After choles come to boil lower the heat to medium low and put the lid on.
Choles are ready to eat in as little as ten minutes, but for best taste let simmer for 30 minutes, stirring every 5 or 6 minutes.
Garnish choles with shredded ginger and sliced green chili.
Homestyle Punjabi Chola Curry: A Flavorful Delight
Chola, also known as chole or chana, refers to a popular North Indian dish made from dal (lentils), specifically chickpeas, which are simmered in a flavorful blend of spices and herbs. This dish is typically enjoyed with rice, naan, or bhature.
Chola is naturally gluten-free, making it suitable for individuals with gluten sensitivities or celiac disease. It’s often included in party recipes due to its rich, hearty flavor and versatility in serving large gatherings. Additionally, chola is a favorite among vegans, as it contains no animal products and provides a substantial source of plant-based protein.
Step 1: Preparation – Punjabi Chola Recipe
Before diving into cooking the Punjabi chola, it’s essential to prepare all the ingredients. Gather punjabi chola, chickpeas, tomatoes, ginger, green chilies, and spices like cumin, coriander powder, garam masala, and amchur. Rinse the chickpeas thoroughly and soak them overnight or for at least 8 hours. Soaking helps in softening the chickpeas and reduces the cooking time. Also, finely chop tomatoes, ginger and green chilies.
Step 2: Cooking the Chickpeas – Punjabi Chole Recipe
In a pressure cooker, add the soaked chickpeas along with water, salt, and tea bags. The tea bags impart a dark color to the chickpeas, giving them an authentic Punjabi chole look. Pressure cook the chickpeas until they are soft and cooked through. Once cooked, discard the tea bags and set the chickpeas aside.
Step 3: Preparing the Base – Chola Curry Recipe
Heat oil in a pan and add cumin seeds. Let them crackle, then add Add finely chopped ginger and green chilies, and sauté for a few more minutes until the raw smell disappears. Now, add tomatoes and cook until they are soft and mushy.
Step 4: Adding Spices – Punjabi Chole Recipe
Once the tomatoes are cooked, it’s time to add the spices. Add coriander powder, cumin powder, garam masala, red chili powder, and amchur (dry mango powder). These spices lend the authentic flavors to the Punjabi chola. Stir well to combine and cook the spices for a couple of minutes until they release their aroma.
Step 5: Incorporating Chickpeas – Chola Curry Recipe
Now, add the cooked chickpeas to the pan along with a little water. Stir well to coat the chickpeas with the masala mixture. Allow the chola curry to simmer on low heat for about 10-15 minutes, allowing the flavors to meld together.
Step 6: Garnishing and Serving – Punjabi Chole Recipe
Once the chola curry has thickened to your desired consistency, garnish it with freshly chopped coriander leaves. Serve the piping hot Punjabi chole with bhature, naan, or rice for a hearty and satisfying meal.
Tips for Perfect Punjabi Chole:
Soaking Chickpeas: Ensure you soak the chickpeas for an adequate amount of time to soften them, reducing the cooking time.
Using Tea Bags: Adding tea bags while cooking the chickpeas gives them a rich, dark color characteristic of authentic Punjabi chole.
Spice Levels: Adjust the amount of red chili powder and green chilies according to your preference for spice levels.
Garnish: Freshly chopped coriander leaves add a burst of freshness to the chola curry. Don’t skip this step for the best flavor.
Variations of Punjabi Chola:
Creamy Chola Curry: Add a splash of cream or coconut milk towards the end of cooking for a creamy texture and milder flavor.
Benefits of Punjabi Chola:
Rich in Protein: Chickpeas are an excellent source of plant-based protein, making Punjabi chola a nutritious option for vegetarians and vegans.
Fiber-Rich: Chickpeas are high in dietary fiber, promoting digestive health and aiding in weight management.
Vitamins and Minerals: Chola curry is packed with essential vitamins and minerals like iron, folate, and vitamin C from tomatoes and spices.
FAQs – Punjabi Chole Recipe:
Can I use canned chickpeas instead of dried ones?
Yes, you can use canned chickpeas for convenience, but the texture may vary slightly from using dried chickpeas.
How long can I store leftover Punjabi chole?
Leftover chola curry can be stored in an airtight container in the refrigerator for up to 3-4 days. Reheat before serving.
Mix flour, salt and water togather to make soft dough (if needed add more water).
Knead the dough for a few minutes on a lightly greased surface to make soft, smooth and pliable dough.
Set the dough aside and cover it with a damp cloth. Let the dough rest for at least ten minutes.
Filling
Heat the oil in a saucepan on medium-high heat. Oil is the right temperature when cumin cracks immedialety after being put the oil.
Add the asafetida and cumin seeds. After the cumin seeds crack, add the spinach.
Stir-fry, making sure to press the spinach down so the water can evaporate.
Cook the spinach until most of the water has evaporated. Spinach still should be moist and should be able to form a ball. Add the salt and pepper and mix well. Set aside until the spinach cools off.
Making of Paratha
Divide the dough and spinach filling into 6 equal parts.
Roll the dough into 3 inch circles. Put the filling in the center. Seal by pulling the edges together and make into a ball. Procced to make all six balls.
Each ball needs to settle for two minutes before you start rolling. Note: If you don’t wait long enough spinach mixture will seep through the edges when rolling the paratha.
Heat the skillet on medium high. Note: An iron skillet works best. To see if the skillet is ready, put a couple of drops of water on it. If the water sizzles right away, the skillet is ready.
Press th filled ball lightly on dry whole-wheat flour from both sides.
Roll the ball light handed to make 6-inch circle. Note: Keep the sealed side of the ball on the top.
If the paratha sticks to the rolling pin or rolling surface, lightly dust the paratha with dry flour.
Place the paratha over the skillet.
After paratha start changing color and start puffing in different places flip the paratha over. You will notice some golden-brown spots.
After few seconds, spread 1 teaspoon of oil on the paratha. Flip the paratha and lightly press the puffed areas of the paratha with a spatula.
Flip again and press with the spatula making sure the paratha is golden-brown on both sides.
Cool the parathas on a wire rack so they don’t get soggy.
Parathas can be kept outside for up to 2 days wrapped in aluminum foil or in a closed container. For later use paratha can be refrigerated for 3-4 days.
Notes
Serving suggestions
Parathas can be served with plain yogurt, potatoes with gravy, and with any Indian pickle.
Put cheese in the middle, fold over, heat, and eat like a quesadilla.
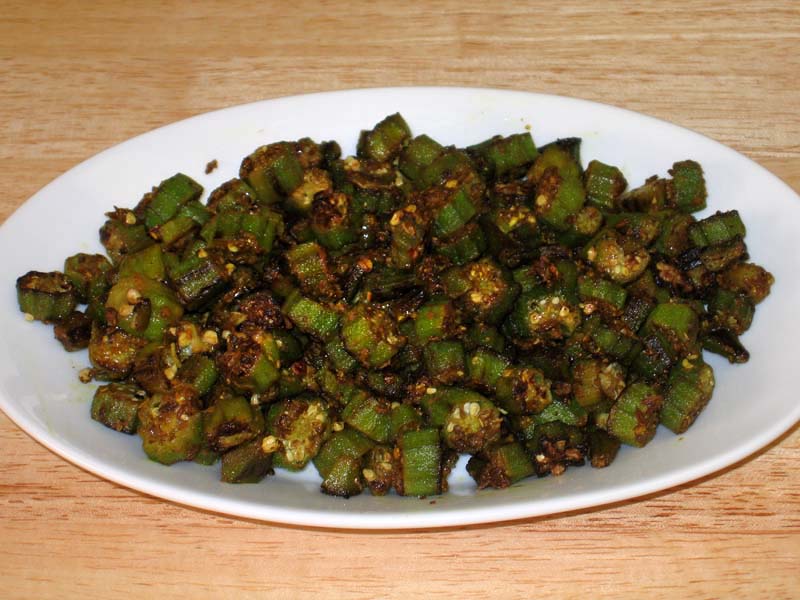
Wash the okra and pat dry. Make sure to completely dry the okra as wet okra will be sticky when cutting.
Cut off the both ends of the okra, and slice lengthwise in halves. Set aside.
Heat the oil in a frying pan on medium-high heat. Test the heat by adding one cumin seed to the oil; if seed crack right away oil is ready. Add the cumin seeds and asafetida (hing). When the cumin seeds crack, add the okra.
Stir for a minute and reduce the heat to medium. Cover the okra for two to three minutes.
Remove the cover and add the coriander powder, red cayenne pepper and turmeric, stir.
Next add gram flour (besan) and continue to stir-fry until the okra is tender. Add the salt, mango powder and bell peppers, cook for another minute. Salt is added last to avoid the okra becoming lacy. Masala Bhindi is ready. Enjoy!
Notes
VariationsAdding colorful bell pepper is a great garnish for the okra and adds flavor to the dish.You can substitute the bell pepper with sliced tomatoes as a garnish.You can also slice the okra in 1/4 inch pieces and follow the same method above.
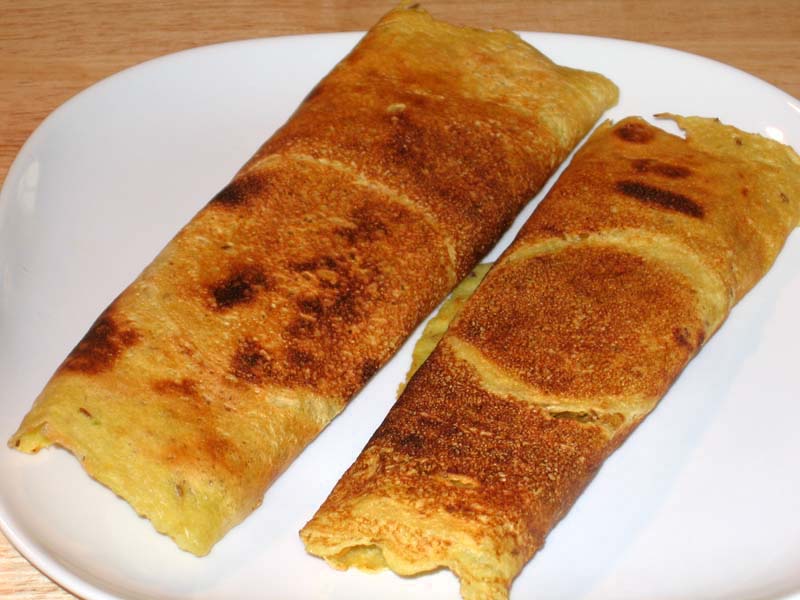
Moong Dal Dosa, also known as “cheela” or “puda, is a thin, crisp pancake made from any one of a variety of batters. Moong dal dosa is a convenient substitute, quick & easy to prepare than the traditional dosa. Traditional dosas are made with fermented urad dal and rice.
Wash the dal, changing the water several times until it appears clear. Soak dal in four cups of water for at least four hours.
Drain the water. Blend the dal with green chile and ginger, adding water slowly as needed to make a smooth batter. Note: The less water, the smoother the batter.
Mix the salt and cumin seeds into the batter. Add water as needed. The total water added will be about ½ cup, just enough to achieve the consistency of pancake batter.
Place a non-stick- skillet over medium-high heat. Test by sprinkling a few drops of water on it. The water should sizzle right away.
Pour ½ cup of the batter mixture into the skillet and spread evenly with the back of a spoon. Starting from the center, spiral outward until evenly spread, about seven inches in diameter.
When the batter begins to dry, gently spread one teaspoon of oil over it. Wait about 30 seconds, then flip the puda using a flat spatula.
Press the dosa lightly with the spatula all around to assure even cooking, turning them two to three times. Dosa should be crisp and golden brown on both sides.Repeat for the remaining dosas.
Notes
Serving suggestion: Serve dosa folded with Aloo Masala For Dosa or Jeera Aloo you can fold with your favorite cheese. You can also serve with Samber or with yogurt.
Learn How To Make Moong Dal Dosa With Moong Dal – Manjula’s Kitchen
Dosa is a popular south indian delicacy which looks like a crepe. It’s like a crisp and thin pancake made of rice and urad dal batter. Traditionally Dosa is served with sambar, aloo masala and coconut chutney. It is an Indian crepe made usually through rice batter, but here we have experimented and made many alternative dosa such as Oat Dosa, Besan Dosa, Rava Dosa, Sorghum Dosa, whole wheat dosa. This preparation is using moong dal and is a bread based gluten freebreakfast recipe that is vegan. The preparation entails skillfully combining pan techniques and manual dexterity to achieve the perfect bread cooked on non-stick skillets.
Preparing Moong Dal:
Embarking on the enticing journey of crafting moong dal dosa, initiate by meticulously washing the moong dal, repeating the water-changing ritual to ensure absolute clarity. Immerse the dal in four cups of water, allowing it to soak for a minimum of four hours, cultivating a soft and pliable texture essential for the success of this revered moong dal dosa recipe. The thorough soaking not only aids in the dosa’s consistency but also serves as a testament to the meticulousness ingrained in the recipes of moong dal dosa.
Blending Moong Dal Batter:
Upon draining the soaked moong dal, transition to the blending phase, where precision is key. Combine the dal with green chile and ginger, gradually introducing water to achieve a seamlessly smooth batter. Be mindful that the proportion of water directly impacts the final texture, a crucial detail in the nuanced art of dosa recipe with moong dal. This harmonious blending process transforms the moong dal into a versatile canvas, ready to absorb the flavours and nuances that define this iconic dish.
Seasoning the Batter:
Elevate the moong dal batter to a symphony of flavours by introducing salt and cumin seeds. Adjust the water content with care, ensuring the batter attains the consistency reminiscent of pancake batter, a vital characteristic in the sought-after recipes of moong dal dosa. This seasoning process not only imparts depth to the batter but also plays a pivotal role in shaping the distinct taste profile that defines moong dal dosa recipe.
Heating the Skillet:
Transitioning to the cooking phase, heat a non-stick skillet over medium-high heat, a critical step in the dosa-making process. The sizzle of water droplets confirms the skillet’s readiness, setting the stage for the dosa’s journey from batter to a crisp delicacy. This well-calibrated heat not only ensures the dosa’s optimum texture but also encapsulates the essence of precision embedded in the moong dal dosa recipe.
Pouring and Spreading the Batter:
With the skillet primed, gracefully pour ½ cup of the moong dal batter onto the heated surface. Employing the back of a spoon, skillfully spread the batter in a spiral motion, originating from the centre and expanding to a symmetrical seven-inch diameter. This meticulous spreading ritual is not merely a technicality but an artful dance that defines the visual appeal and thickness of the moong dal dosa, showcasing the intricacies of dosa recipe with moong dal.
Cooking and Flipping the Dosa:
As the batter begins to dry, introduce a teaspoon of oil, spreading it delicately over the dosa’s surface. After a brief interlude, execute a precise flip using a flat spatula, revealing the golden-brown underside. Gently press the dosa to ensure uniform cooking, turning it two to three times. This vigilant cooking process guarantees a crisp finish and a tantalising aroma, embodying the essence of moong dal dosa recipe.
Repeating the Dosa-Making Ritual:
The final act involves replicating the dosa-making ritual for the remaining batter, ensuring a consistent outcome. Reiterate the process of pouring, spreading, cooking, and flipping until each moong dal dosa mirrors the perfection achieved in the initial creation. This dedicated repetition encapsulates the spirit of tradition and craftsmanship ingrained in the recipes of moong dal dosa, culminating in a batch of savoury, golden delights awaiting appreciation in all their flavorful glory.
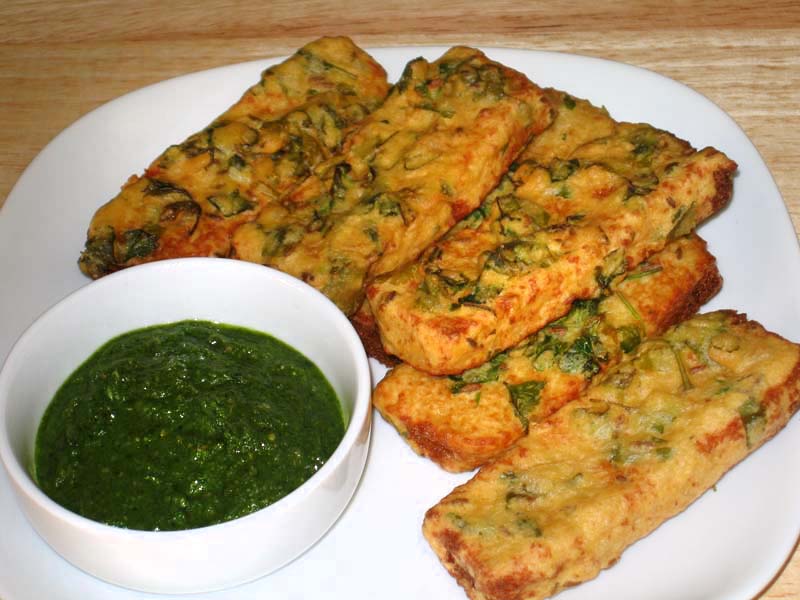
Remove the crust from all sides of the bread. Slice the bread lengthwise into 3 equal parts.
Mix all the dry ingredients together: Gram flour (besan), rice flour, asafetida, cumin seeds, and salt. Rice flour adds to the crispness. Add the water slowly to make a smooth batter. (Batter should be the consistency of pancake batter or dosa batter)
Next, add the green chilies and cilantro. Mix well.
Heat the oil in a frying pan on medium high heat. Frying pan should have at least 1 inch of oil. To check if the oil is ready, put one drop of batter in the oil. The batter should come up but not change color right away.
Dip the bread slices in the batter one at a time and slowly drop into the frying pan. Fry the Pakoras in small batches. The pakoras will take about 4 to 5 minutes to cook.
Turn them occasionally. Fry the Pakoras until both sides are golden-brown. Repeat this process. The crispy, delicious Bread Pakoras are ready to serve.
Notes
Tips:If oil is too hot Pakoras will cook too fast and will not be crispy; if oil is not hot enough Pakoras will be greasy. You may have to adjust the heat as needed while cooking.Variations:Use 1/4 cup of chopped spinach or 2 tablespoons of chopped fenugreek leaves as a substitute for the chopped cilantro.Serving suggestions:The bread pakoras are best when dipped with a fresh cilantro chutney or Pakoras taste best when they are served hot.Pakoras can be made one day in advance do not refrigerate. When ready to eat, place on a cookie sheet and heat in the preheated oven on 300 degrees.
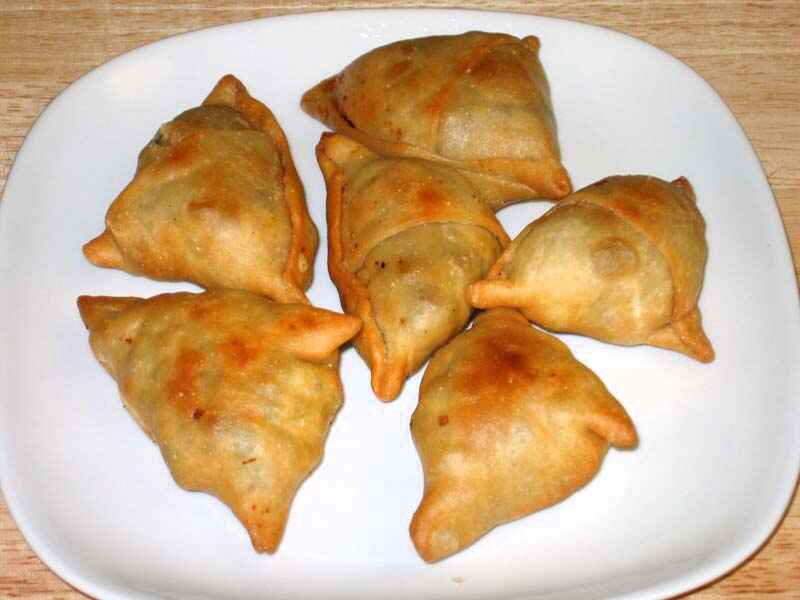
Samosa is probably the most popular Indian snack. Fried puffed pastry filled with spicy potatoes and green peas. No one can resist samosas, a mouthwatering snack. Samosas can be served any time and for any occasion. This recipe is for traditional north Indian Samosa.
3boiled potatoes, peeled and chopped into very small cubes
1/2tspcumin seedsjeera
1tbspchopped green chilies
1tspcoriander powderdhania
1/4tspgaram masala
1tspmangopowderamchoor
1tspsalt
2tbspoilcanola or vegetable
1/2cupgreen peasI am using frozen peas
Need oil to fry
Instructions
Making the Dough:
Mix the flour, sooji, salt, oil and salt together to make a soft dough (add more water as needed). knead the dough for about 1 to 2 minutes to make the dough smooth and pliable. Set the dough aside and cover it with damp cloth. Let the dough sit for at least 15 minutes.
Making the Filling:
Heat the oil in a frying pan on medium high heat. Test the heat by adding one cumin seed to the oil; if it cracks right away oil is ready. Add cumin seeds as cumin seeds crack, add green chilies, coriander powder and stir for few seconds. Next add green peas and turn heat to medium and stir until tender. Add the potatoes and stir-fry for about 4 minutes. Stir in garam masala and amchur. Add more salt or amchur according to taste.
Let the filling cool to room temperature.
Making Samosa:
Take 2 tablespoons of water and 1 tablespoon of all-purpose flour to make a paste and keep aside.
Knead the dough for a minute. Divide the dough into 4 equal parts and make into balls. Roll each ball into 6-inch diameter circles and cut each circle in half.
Spread the paste lightly all along the edge of one semicircle. Pick this semicircle up with both hands and fold it into a cone shape. Pinch the side of this cone so that it is completely sealed.
Fill the cone with 3 tablespoons of filling. Press this filling down with your fingers. Now close the top of this cone into a triangle shape, pinching the top edge so that it is completely sealed. Continue filling the rest of the samosas.
Heat about 1 inch of the oil in a frying pan on medium heat. To check if oil is hot enough place a small piece of dough in oil and dough should sizzle and come to the surface slowly.
Place the samosas in the frying pan a few at a time. After samosas are floating on top of the oil turn them slowly. Fry the samosas until the samosas turn a light golden-brown color on all sides. If you use a high heat, the samosa crust will be too soft and not crispy.
Notes
Tips:Boil the potatoes just until tender. Be careful not to poke the potatoes multiple times while they are cooking, as they will absorb the water. Drain immediately and keep aside until cool enough to touch.The dough has to be kneaded well; otherwise, the samosas will not come out as crisp.If the filled samosas sit for too long, they will dry. To avoid this, cover with a damp cloth.Suggestions:Samosa can be prepared ahead of time and can be freeze for a month.Before freezing fry them enough until samosa changes the color to very light gold brown.After samosas are on room temperature bag them in zip lock bags and freeze them.To use frozen samosas take out as many you need and fry them on medium heat.
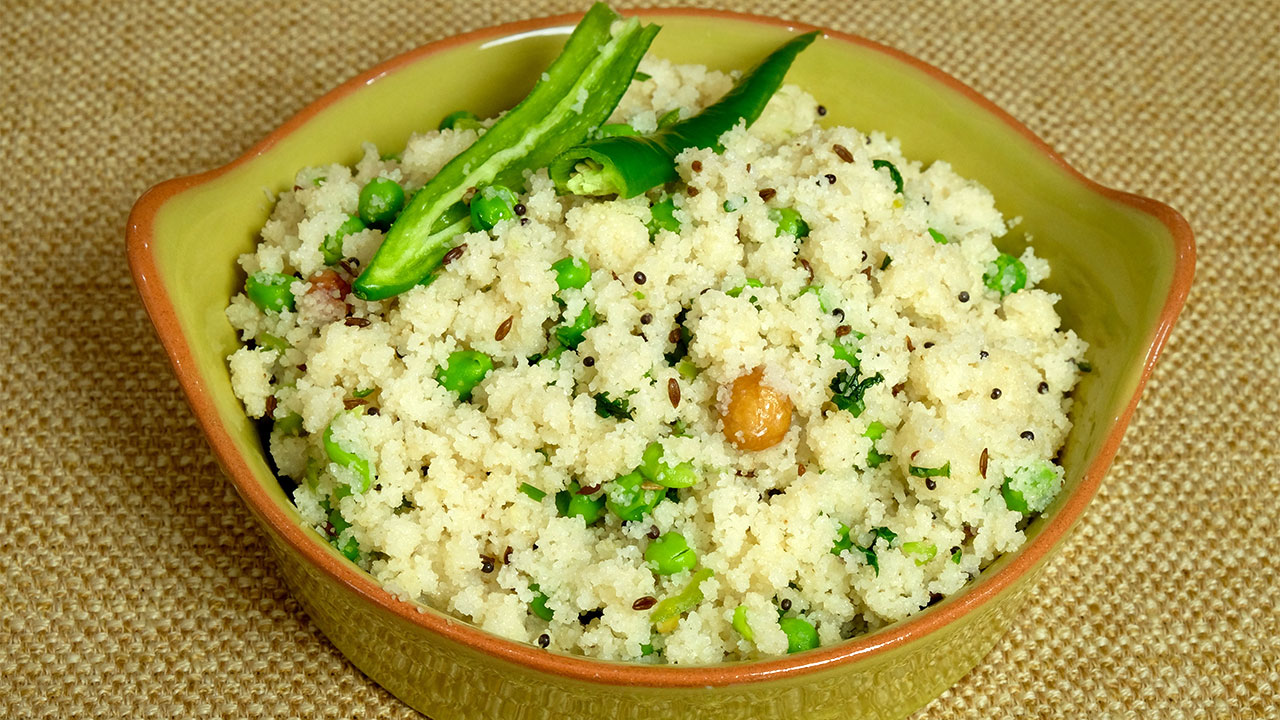
As water comes to boil turn heat to low and continue cooking until peas are tender.
Turn off the heat and set aside.
Heat the oil in a saucepan. Test the heat by adding one cumin seed to the oil; if it cracks right away oil is ready. Add black mustard seed and cumin seed.
Add mustard seed and cumin seeds as seeds crack, add peanuts and stir for one minute.
Add sooji and stir-fry about 3 minutes on medium heat till sooji turns gold brown.
Add green peas with water a little at a time, otherwise water will splatter.
Add lemon juice and cover for 2 minutes.
Sooji will absorb some of the water leaving the upma moist.
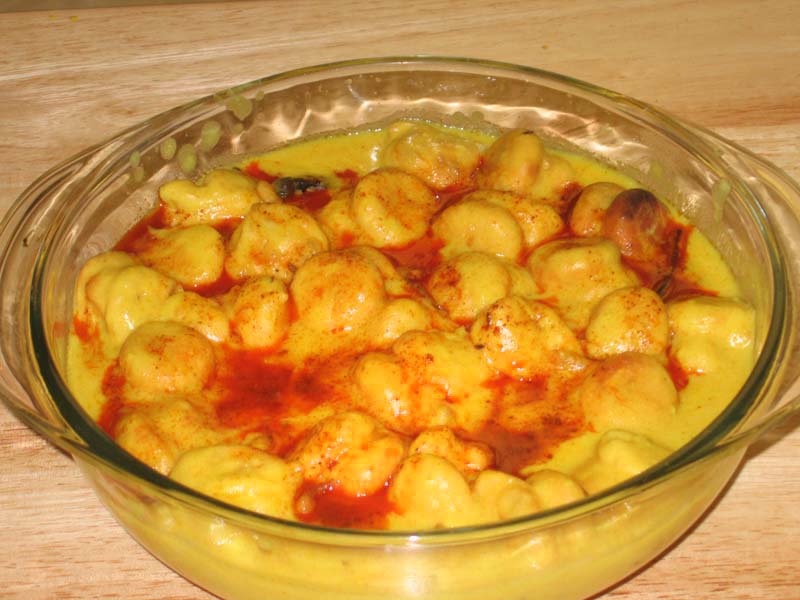
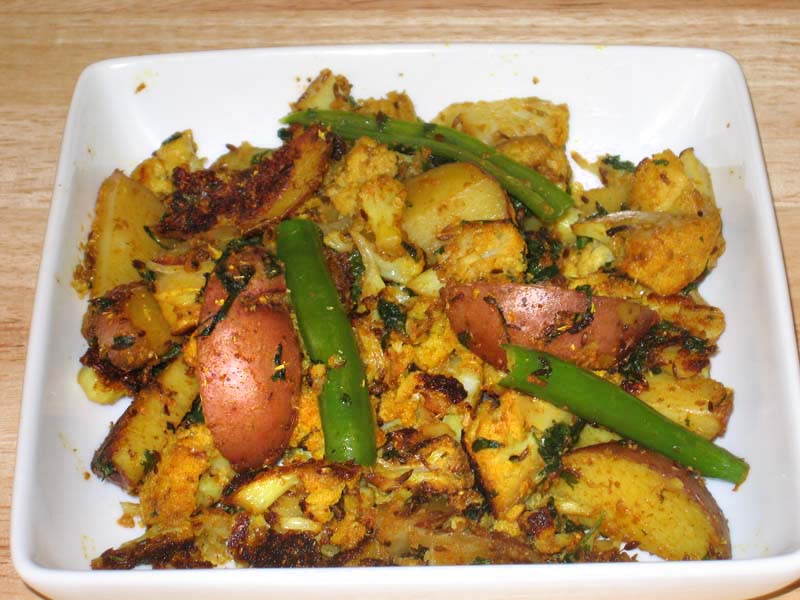
Aloo Gobi is a delicious main dish made with potatoes, cauliflower, and a great blend of spices. Aloo Gobi can be served with various breads, such as rotis, parathas, and puris.
In a small bowl, mix the shredded ginger, coriander powder, cayenne pepper, turmeric, and 3 tablespoons of water to make a paste.
Heat the oil in a pan. Test the heat by adding one cumin seed to the oil; if seed crack right away oil is ready. Add hing and cumin seeds to the oil after seeds crack add the bay leaves and green chilies and stir for a few seconds.
Next, add the spice paste and stir for a minute until spices start leaving the oil.
Add cauliflower, potatoes, 2 tablespoons of water and salt. Mix well. Cover the pan and let it cook on medium heat for about 15 to 20 minutes until the vegetables are tender. Make sure to stir gently every 3 to 4 minutes.
Lastly, add the mango powder and fresh cilantro (green coriander). Mix everything and cover for a minute. Adjust the salt to your taste.
Notes
Variations:Add some green peas and/or sliced red bell peppers. The red bell peppers should be added at the end of the recipe as they cook quickly.Tips:Making a paste with the spices will prevent the spices from burning.Serve with Paratha, Puri