Category: Appetizers

Indian Vegetarian Appetizers: A Delightful Start to Any Meal

When it comes to starting a meal on a high note, Indian vegetarian appetizers offer a delightful and diverse range of options. These veg appetizers Indian style are not only delicious but also reflect the rich culinary heritage of India. From spicy and tangy to savory and crispy, there’s something for everyone to enjoy. Let’s dive into some of the most popular Indian veg appetizers that you can easily prepare at home.

Popular Vegetarian Appetizers

Samosa

The samosa is perhaps the most iconic Indian vegetarian appetizer. These deep-fried pastries are filled with a spiced mixture of potatoes and peas, offering a perfect blend of flavors and textures. Whether served with chutneys or as part of a larger meal, samosas are a favorite among all age groups. This veg appetizer Indian is also a great popular party recipe for any occasion. Additionally, samosas can be included in lunch box suggestions for a delightful midday meal. For those who love the tangy and spicy flavors, explore easy chat recipes that can add a delightful zing to your meal.

Pakora

Pakoras are another beloved veg appetizer Indian. These are fritters made by dipping vegetables like potatoes, or spinach in a seasoned gram flour batter and deep-frying them until golden brown. The crispiness and savory taste make pakoras a perfect snack for rainy days or festive occasions. Pakora is a vegetarian recipe that can also be enjoyed as part of a healthy Indian recipe collection if baked instead of fried. Furthermore, pakoras can be a highlight in indian street food recipes, capturing the essence of Indian street food culture. For those looking for quick and easy bites, these pakoras can also be included in the Indian snacks category.

Aloo Tikki

Aloo Tikki is a popular street food that also doubles as a great appetizer. These are patties made from boiled potatoes, spices, and herbs, shallow-fried to perfection. Often served with chutneys and yogurt, aloo tikki can be a hit at any gathering. It’s also a versatile dish that fits well in lunch box suggestions. For a twist, you can explore fusion recipes, combining aloo tikki with other cuisines to create unique flavors. For instance, making aloo tikki burgers or spring rolls can surprise your guests with innovative dishes. Aloo tikki can also be part of your healthy Indian snacks collection by altering the cooking method.

Paneer Tikka

For those who love paneer, Paneer Tikka is the ultimate Indian vegetarian appetizer. Cubes of paneer are marinated in a mixture of yogurt and spices, then grilled or baked until they acquire a smoky flavor. This appetizer is not only delicious but also packed with protein, making it an excellent choice for a high protein diet. Paneer Tikka also fits well in indian food recipes, as it’s perfect for grilling during outdoor gatherings. If you enjoy experimenting with flavors, trying fusion paneer tikka tacos can be an exciting culinary adventure. Including paneer tikka in your popular party recipe list is sure to impress guests.

Dhokla

Hailing from the western state of Gujarat, Dhokla is a steamed cake made from fermented rice and chickpea batter. Light and fluffy, this best Indian appetizer is typically garnished with mustard seeds, curry leaves, and grated coconut, offering a unique taste experience. It’s also a fantastic option for those looking for gluten-free recipes. Additionally, dhokla can be considered one of the healthy recipes due to its steamed preparation method and nutritious ingredients. It also works well as a snack, providing a quick and satisfying bite. Dhokla is a versatile dish that can be enjoyed in various forms, such as adding it to a lunch box or serving it at a party.

Enhance Your Appetizer Experience

To enhance your appetizer experience, it’s beneficial to explore related categories that complement these delightful flavors of Indian appetizers vegetarian. For example, chaat recipes can bring tangy and spicy elements to your meal, while Indian snacks provide quick and easy options that are perfect for any time of the day. If you enjoy experimenting with flavors, the fusion category offers innovative recipes that blend Indian flavors with other cuisines. Embrace the vibrant taste of India’s street food culture with street food recipes, and opt for lighter versions of your favorite appetizers with healthy recipes

For those with dietary restrictions, gluten-free options like dhokla are both delicious and nutritious. Including high protein appetizers like paneer tikka in your meal plan can help you meet your nutritional needs while enjoying tasty food. Many Indian appetizers, such as samosas and aloo tikki, are great additions to lunch boxes, ensuring a satisfying meal on the go. Hosting a party? The popular party recipe category is filled with crowd-pleasing appetizers that are sure to impress your guests. During the warmer months, grilled appetizers from the summer recipes category are a hit, while during the colder months, warming appetizers from the winter recipes category provide comfort and satisfaction.

Conclusion

Indian vegetarian appetizers are more than just starters; they are a celebration of flavors and culinary traditions. Whether you’re hosting a party or simply want to enjoy a tasty snack, these veg appetizers Indian style will never disappoint. So, gather your ingredients and try out these Indian appetizers today. And don’t forget to find vegetarian recipes related categories for more delightful recipes from Manjula’s Kitchen!

By incorporating these appetizers into your culinary repertoire, you’ll be able to enjoy a wide variety of delicious and nutritious dishes. Whether you’re looking for a quick snack, a healthy option, or a popular party recipe, there’s an Indian appetizer vegetarian to suit every occasion. Happy cooking!

Frequently Asked Questions (FAQs)

Q: What are some popular Indian vegetarian appetizers?

A: Some popular Indian vegetarian appetizers include Samosas, Pakoras, Aloo Tikki, Paneer Tikka, and Dhokla.

Q: What are the benefits of including Indian appetizers in my meal plan?

A: Including Indian appetizers vegetarian in your meal plan adds variety, flavor, and nutritional benefits. These appetizers are often rich in spices and ingredients that offer numerous health benefits.

Q: Can these appetizers be made healthier?

A: Yes, many Indian veg appetizers can be made healthier by baking instead of frying, using less oil, and incorporating more vegetables. For example, you can bake pakoras or use low-fat paneer for paneer tikka.

Q: Are there any gluten-free Indian appetizers?

A: Yes, there are several gluten-free Indian appetizers, such as Dhokla and some versions of pakoras made with gram flour. These options are great for those with gluten sensitivities.

Q: How can I incorporate these appetizers into a party menu?

A: These veg appetizers Indian style are perfect for any party menu. Serve them with a variety of chutneys and dips, include some Indian snacks, and finish with a selection of Indian desserts for a complete festive spread.

  • Mirchi Vada (Chili Fritter)

    Mirchi Vada (Chili Fritter)

    Mirchi Vada (Chili Fritters)

    Mirchi Vada (Chili Fritter)

    Mirchi Vada, or Mirchi Bhaji, is a popular Rajasthani snack. This dish of green chilies filled with spicy potatoes, dipped in batter and fried, makes a mouthwatering appetizer for people who love hot, spicy food.
    5 from 1 vote
    Course Appetizer
    Cuisine Indian
    Servings 9 Mirchi Vada

    Ingredients
      

    Ingredients:

    • 8 green chilies (I use yellow chili peppers)

    For Filling

    • 1 cup potatoes boiled peeled and mashed
    • 1/2 teaspoon  salt
    • 1/4 teaspoon  cumin seeds (jeera)
    • 1 teaspoon coriander powder (dhania)
    • 1/4 teaspoon mango powder (amchur)
    • 1 tablespoon chopped cilantro (hara dhania)
    • 1/4  teaspoon chilli powder (lal mirch), (optional)

    For Batter

    • 1/2  cup Besan (gram flour), (available in Indian grocery stores)
    • 1/4  teaspoon salt
    • 1/4  teaspoon cumin seeds (jeera)
    • 1/8 tablespoon baking powder
    • 1 tablespoon cilantro chopped (hara dhania)
    • Approx. ¼ cup water

    Also, need oil to deep-fry

    Instructions
     

    • Vertically slit the chili and remove the seeds,.but not the stems. Set aside.
    • Mix all the filling ingredients and set aside.
    • To make the vada batter, mix all the dry ingredients: Besan, cumin seeds, baking powder and salt. Add the water slowly to make a thick smooth batter, the consistency of pancake batter.
    •  Add cilantro and mix it well.
    • Stuff the chilies with potato mix.
    • Heat one inch of oil in a frying pan over medium heat. To test, put one drop of batter in the oil. The batter should form a small ball on the surface of the pan, but not change color right away.
    • Dip the filled chilies in the batter one at a time, making sure each is covered with batter all around. Drop slowly into the frying pan.
    • Fry the mirchi vada until all sides are golden brown, four to five minutes, turning occasionally. Take them out and place them on a paper towel.

    Notes

     Suggestion
    1. You can prepare the Mirchi Vadas in advance, and heat them in a 300°F oven before serving.
    2. The leftover makes great sandwiches.
    Tried this recipe?Let us know how it was!

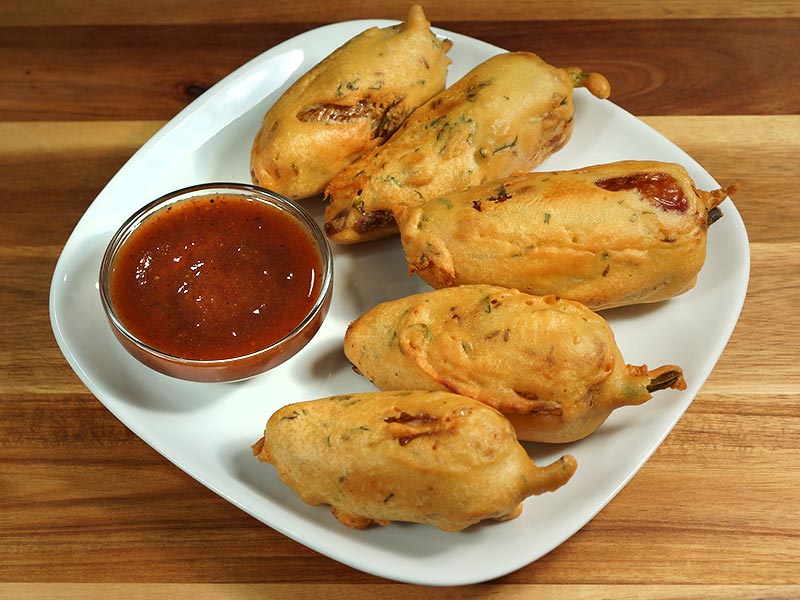
    Mirchi Vada Recipe: A Spicy Delight 

    Mirchi Vada is a spicy and flavorful Indian street food snack made by stuffing green chilies with a tangy potato filling, coating them in a gluten-free batter, and deep frying until crispy, making it a delectable vegan appetizer or snack option.

    Introduction to Mirchi Vada 

    Mirchi vada, also known as chili fritters, is a popular Indian snack that features green chilies stuffed with a spicy potato filling, dipped in a gram flour batter, and deep-fried to golden perfection. This crispy and flavorful snack is a favorite across India and is often enjoyed with a variety of chutneys or sauces. Mirchi vada is a delightful treat for spice lovers and is perfect for snacking or serving as an appetizer at parties.

    How to Make Mirchi Vada: Step-by-Step Guide 


    Preparing the Ingredients 


    Before starting the preparation, gather all the necessary ingredients. You will need fresh green chilies, potatoes, gram flour (besan), spices such as cumin seeds, turmeric powder, and salt, as well as oil for deep frying. Ensure that the potatoes are boiled and peeled beforehand.

    Preparing the Filling 


    Begin by preparing the spicy potato filling. Mash the boiled potatoes in a bowl and add the desired spices such as cumin seeds, turmeric powder, and salt to taste. Mix well until all the spices are evenly incorporated into the mashed potatoes.

    Stuffing the Chilies 


    Next, carefully slit each green chili lengthwise and remove the seeds if you prefer a milder flavor. Stuff the prepared potato filling into the chilies, ensuring they are evenly filled. Be cautious while handling the chilies to avoid any skin irritation.

    Preparing the Batter 


    In a separate bowl, prepare the gram flour batter by combining gram flour, a pinch of turmeric powder, salt, and water. Mix until you achieve a smooth and thick consistency batter that coats the back of a spoon.

    Dipping and Frying 


    Now, heat oil in a deep frying pan or kadhai over medium heat. Once the oil is hot, dip each stuffed chili into the gram flour batter, ensuring it is well coated. Gently place the coated chilies into the hot oil and fry until they turn golden brown and crispy. Use a slotted spoon to remove the fried mirchi vadas from the oil and drain them on a paper towel to remove excess oil.

    Chilli Fritters Recipe: Tips and Tricks 

    • Ensure that the green chilies are fresh and firm for the best results.
    • Adjust the spiciness of the filling according to your preference by adding more or fewer spices.
    • To reduce the spiciness of the chilies, you can soak them in salted water for a few minutes before stuffing.
    • Make sure the oil is hot enough before frying to prevent the mirchi vadas from absorbing excess oil.

    Variations of Green Chilli Fritters

    • For a cheesy twist, add grated cheese to the potato filling before stuffing the chilies.
    • You can also add finely chopped cilantro, or mint leaves to the potato filling for added flavor and freshness.
    • Experiment with different spices and herbs to customize the filling according to your taste preferences.

    Benefits of Mirchi Vada 


    Mirchi vada is not only delicious but also offers several health benefits. Green chilies are rich in vitamins A and C, as well as antioxidants, which help boost immunity and promote overall health. Additionally, potatoes provide a good source of carbohydrates and energy, making mirchi vada a satisfying snack option.

    FAQs about Mirchi Vada 


    Q: Can I make mirchi vada ahead of time and reheat them later?
    A: While mirchi vadas are best enjoyed fresh and hot, you can prepare them ahead of time and reheat them in a preheated oven or an air fryer to maintain their crispiness.

    Q: Can I freeze leftover mirchi vadas? 


    A: Yes, you can freeze leftover mirchi vadas in an airtight container for up to a month. To reheat, simply thaw them in the refrigerator overnight and then heat them in an oven until they are warm and crispy.

    Q: Is mirchi vada a gluten-free snack?  


    A: Yes, mirchi vada can be made gluten-free by using chickpea flour (besan) instead of wheat flour for the batter.

    Explore More Recipes from Manjula’s Kitchen


    If you enjoyed making mirchi vada, you might also like to explore other recipes from Manjula’s Kitchen. Here are some popular options to try: Palak (Spinach) Paneer, Aloo Gobi (Potato and Cauliflower), Vegetable Pakoras, Kaju Katli (Cashew Burfi), Baingan Bharta (Roasted Eggplant)

    In conclusion, mirchi vada or green chili fritters are a delightful snack that combines the heat of green chilies with the comforting flavors of spiced potatoes. 

    By following this step-by-step recipe and incorporating some helpful tips and variations, you can easily recreate this popular Indian snack at home. So, gather your ingredients and get ready to indulge in the crispy goodness of mirchi vada!

  • Spicy Green Peas

    Spicy Green Peas

    Spicy Green Peas

    Spicy Green Peas

    Spicy Peas, touch of spices added to sweetness from peas and sourness from lemon makes this a great snack or a side dish. This is an easy recipe to make. Bright green color gives a nice touch to any meal.
    5 from 1 vote
    Prep Time 5 minutes
    Cook Time 5 minutes
    Total Time 10 minutes
    Course Side Dish
    Cuisine Indian
    Servings 4 people

    Ingredients
      

    • 3 cups green peas, frozen preferred baby peas
    • 1-1/2 tbsp oil
    • 3/4 tsp cumin seeds jeera
    • 2 tsp ginger chopped
    • 1-1/2 tsp green chili chopped
    • 1 tsp salt
    • 1/4 tsp black pepper
    • 2 tbsp cilantro chopped hara dhania
    • 2 tsp lemon juice

    Instructions
     

    • Thaw the peas and pat dry.
    • Heat the oil in a saucepan over medium-high heat. Test the heat by adding one cumin seed to the oil. If the cumin seed cracks right away, the oil is ready. Add cumin seeds as they crack add green chili and ginger, stir for few second add green peas and salt.
    • Cook for about 4-5 minutes string occasionally, till peas are tender. Add black pepper and cilantro mix it well.
    • Turn off the heat and squeeze the lemon juice over and stir.Spicy green peas are ready to serve!

    Notes

    Serving suggestions: Serve Spicy green peas hot or at room temperature. 
    Serve this as a snack or as a side dish with any dal or gravy base dish.
    Spicy Green Peas also good for sandwiches or making wrap 
    Tried this recipe?Let us know how it was!

    Spicy Green Peas Masala Recipe

    Spicy Green Peas Masala is a delectable dish that combines the freshness of green peas with a fiery kick of spices. It’s perfect for those seeking appetizers or snacks that are gluten-free, low in fat, and vegan-friendly. This quick and easy recipe involves sautéing green peas along with a blend of aromatic spices. The result is a flavorful dish bursting with the natural goodness of vegetables, making it a healthy and satisfying choice for any occasion. If you’re looking for an enticing and flavorful dish to tantalize your taste buds, this spicy green peas masala recipe is just what you need. Bursting with aromatic spices and the freshness of green peas, this dish is a delightful treat for both spice enthusiasts and lovers of comfort food. Let’s dive into the steps of how to make this irresistible spicy green pea masala.

    Step 1: Preparing the Ingredients

    Before diving into the cooking process, gather all the necessary ingredients. You’ll need fresh or frozen green peas, tomatoes, ginger, green chilies, and a blend of spices including cumin, coriander, turmeric, and garam masala. Make sure to have some oil on hand for sautéing.

    Step 2: Sautéing the Aromatics

    Heat some oil in a pan over medium heat. Add ginger, and green chilies to the pan. Sauté them until they turn golden brown and release their aromatic flavors. This forms the flavorful base of our spicy green pea masala.

    Step 3: Adding the Spice Mix

    Once the aromatics are nicely sautéed, it’s time to add the spice mix. Sprinkle in the ground cumin, coriander, turmeric, and garam masala. Stir the spices well evenly, allowing them to toast slightly and develop a rich, deep flavor profile.

    Step 4: Introducing the Green Peas

    Now, it’s time to add the star ingredient: the green peas. Whether you’re using fresh peas or frozen ones, toss them into the pan and mix them thoroughly with the spice-infused mixture. Let the peas cook for a few minutes, allowing them to absorb all the wonderful flavors.

    Step 5: Simmering with Tomatoes

    Next, add diced tomatoes to the pan. Tomatoes not only add a tangy sweetness to the dish but also contribute to its vibrant color. Stir everything together and let the mixture simmer gently, allowing the tomatoes to soften and meld with the other ingredients.

    Step 6: Adjusting Seasonings

    Taste the spicy green peas masala and adjust the seasonings according to your preferences. If you prefer it spicier, you can add more green chilies or a pinch of red chili powder. For extra richness, you can sprinkle in some cream or coconut milk.

    Step 7: Garnishing and Serving

    Once the flavors have melded beautifully and the green peas are tender, garnish the dish with freshly chopped cilantro leaves. This adds a burst of freshness and color to the dish. Serve the spicy green peas masala hot with rice, roti, or naan for a satisfying meal that’s sure to impress.

    Variations:

    • For a creamier texture, you can blend a portion of the cooked green peas masala to create a thick gravy.
    • Add diced potatoes or paneer cubes along with the green peas for an extra layer of flavor and texture.
    • Experiment with different spices and herbs to customize the dish according to your taste preferences.

    Benefits:

    • Green peas are a good source of vitamins, minerals, and fiber, making this dish not only delicious but also nutritious.
    • The spices used in this recipe, such as turmeric and cumin, are known for their anti-inflammatory and digestive properties.

    FAQs:

    Can I use canned peas instead of fresh or frozen ones?

    • While fresh or frozen peas are recommended for the best flavor and texture, you can use canned peas if that’s what you have on hand. Just make sure to drain and rinse them before adding them to the dish.

    Is this dish suitable for vegetarians and vegans?

    • Yes, this spicy green peas masala recipe is entirely plant-based and suitable for both vegetarians and vegans. Just make sure to use oil instead of ghee for a vegan-friendly version.

    Can I make this dish ahead of time?

    • Yes, you can prepare the spicy green peas masala ahead of time and store it in the refrigerator for a few days. Simply reheat it gently on the stovetop or in the microwave before serving.

    For more delightful recipes like this one, explore other offerings in Manjula’s Kitchen, such as Paneer Tikka Masala, Chole (Chickpea Curry), and Aloo Gobi (Potato Cauliflower).

  • Peanut Chaat

    Peanut Chaat

    Peanut Chaat

    Peanut Chaat

    Peanut Chaat is a combination of peanuts, tomatoes, cucumbers and spices. It is a delicious and satisfying snack-not to mention healthy and low-fat! It is easy to make. It can be served as an appetizer or anytime spicy snack.
    No ratings yet
    Course Appetizer, Chaat
    Cuisine Indian
    Servings 4 people

    Ingredients
      

    Ingredients:

    • 1/2 cup raw peanuts
    • 1/2+1/2 teaspoon salt adjust to taste
    • 1/8 teaspoon turmeric (haldi)
    • 3/4 cup tomatoes seeded cut in small cubes
    • 3/4 cup cucumber cut in small cubes
    • 1 tablespoon ginger finally chopped
    • 1 green chili finally chopped adjust to taste
    • 1/2 teaspoon roasted cumin seed powder (bhuna jeera)
    • 1/8 teaspoon red chili powder
    • 1/8 teaspoon black pepper
    • 1/4 teaspoon sugar
    • 1/2 teaspoon  mango powder (amchoor)
    • tablespoon lemon juice

    Instructions
     

    Method

    • In a sauce pan add peanuts with 2 cups of water turmeric and 1/2 teaspoon of salt. Cook over medium high heat for about 25 minutes until peanuts are soft.
    • Drain the water and let it cool to room temperature.
    • Mix ginger, chili, 1/2 teaspoon salt, cumin seed powder, red chili powder, black pepper, sugar, mango powder and lemon juice together.
    • Mix the peanuts with tomatoes and cucumbers, add the spice mix and toss.
    • Peanut Chaat is ready to serve.
    Tried this recipe?Let us know how it was!

    Peanut Chaat Recipe 

    Peanut chaat is a delightful appetizer that caters to various dietary preferences, offering a gluten-free and vegan option packed with high protein, yet low in fat, making it an ideal snack choice. Peanut chaat is a delightful and flavorful snack that is popular across India. This peanut chaat recipe combines the nuttiness of peanuts with the tanginess of various spices and chutneys, creating a mouthwatering dish that is perfect for any occasion. Here’s how to make peanut chaat at home.

    • Boiling the Peanuts: Begin by placing the peanuts in a saucepan. Add 2 cups of water, turmeric, and ½ teaspoon of salt. Bring the pot to a medium-high heat. Once boiling, reduce the heat slightly and simmer the peanuts for about 25 minutes. The key here is to cook the peanuts until they are tender and soft throughout. You can test for doneness by taking a peanut out and splitting it in half. If the center is firm, continue cooking for a few more minutes.

    • Cooling and Draining: Once the peanuts are cooked, drain the water from the pot using a colander. It’s important to drain the peanuts thoroughly to prevent a watery chaat. Spread the cooked peanuts on a plate or baking sheet to cool completely. This will take about 30 minutes to an hour, depending on the amount of peanuts. Cooling the peanuts is necessary before adding the other ingredients to ensure they don’t become soggy.

    • Making the Spice Mix: While the peanuts cool, prepare the flavor base for your chaat. In a separate bowl, combine grated ginger, chopped chili pepper (adjust the amount depending on your spice preference), ½ teaspoon of salt, cumin seed powder, red chili powder, black pepper, sugar, mango powder, and lemon juice. Mix all these ingredients into a fragrant and flavorful spice mix. This will be what brings the chaat to life!

    • Assembling the Chaat: Once the peanuts are cool, transfer them to a large mixing bowl. Add chopped tomatoes and cucumbers to the peanuts. Then, pour the prepared spice mix over the peanuts and vegetables. Using a spoon or spatula, gently toss everything together until well combined. This ensures each peanut gets a good coating of the flavorful spice mix.

    • Serving: Your Peanut Chaat is now ready to be enjoyed! Serve immediately for the freshest flavor and best textural contrast between the soft peanuts and the crisp vegetables. You can garnish with chopped fresh cilantro for an extra pop of color and freshness.

    Tips:  

    • You can customize the peanut chaat by adding other ingredients such as boiled potatoes, diced cucumber, or grated carrots for added texture and flavor.
    • For a healthier version, you can use roasted peanuts without any added salt or oil.
    • Adjust the spice levels according to your preference by increasing or decreasing the amount of red chili powder and green chilies.

    Variations: 

    • For a tangier flavor, drizzle some tamarind chutney or mint chutney over the peanut chaat before serving.
    • Experiment with different toppings such as pomegranate seeds, grated cheese, or yogurt for a unique twist on this classic snack.

    Benefits: 

    • Peanuts are a good source of protein, fiber, and essential nutrients such as vitamins and minerals, making peanut chaat a nutritious snack option.
    • This dish is vegetarian and gluten-free, making it suitable for individuals with dietary restrictions.

    FAQs: 

    Can I use pre-roasted peanuts for this recipe? 

    • Yes, you can use pre-roasted peanuts if you prefer. However, roasting the peanuts yourself adds an extra layer of flavor to the chaat.

    How long can I store peanut chaat? 

    • Peanut chaat is best enjoyed fresh but can be stored in an airtight container in the refrigerator for up to 2 days. However, keep in mind that the peanuts may lose their crunchiness over time.

    Can I make peanut chaat ahead of time?

    • While it’s best to assemble the chaat just before serving to maintain its freshness, you can prepare the ingredients in advance and assemble them when ready to serve.

    For more delicious Indian recipes, you can explore other recipes on Manjula’s Kitchen, such as Vegetable Pakoras, Aloo Tikki Chaat, and Pani Puri. These recipes are perfect for any occasion and are sure to impress your family and friends. Enjoy cooking!

  • Urad Dal Puri (Bedmi Puri Kachori)

    Urad Dal Puri (Bedmi Puri Kachori)

    Urad Dal Puri Bedmi Kachori

    Urad Dal Puri (Bedmi Puri Kachori)

    Urad Dal Puri, also known as Bedmi Kachori, is a hearty dish of fried puffed bread with a mix of lentils and spices. Urad Dal Puri is a North Indian delicacy. Delicious and festive, it is an excellent option with any meal and sure to be a crowd-pleaser!
    3 from 2 votes
    Course Bread
    Cuisine Indian
    Servings 8 puries.

    Ingredients
      

    Ingredients:

    • 1/4 cup urad dal (available in Indian grocery stores)
    • 1 cup whole wheat flour (roti atta)
    • 1 tablespoon fennel seed powder (Saunf)
    • 1 tablespoon coriander powder (dhania)
    • 1/8 teaspoon asafetida (hing)
    • 1/4 teaspoon dry ginger powder (sonth)
    • 1/2 teaspoon red chili flakes adjust to taste
    • 1/2 teaspoon salt
    • 2 tablespoon oil 
    • Oil to fry

    Instructions
     

    Method

    • Wash and soak urad dal four hours or more. Drain the water. Blend dal coarsely into a thick paste, preferably in a food processor, using as little water as possible.
    • In a bowl mix all the spices. Add to the flour and mix well.
    • Add the dal paste (pithi) to the flour and form into a soft dough using lukewarm water as needed. Dough will be a little sticky. Grease your palm. Spread one teaspoon of oil over the dough and knead for one minute. Cover the dough with a damp cloth and let it sit half an hour or more.
    • Oil your palm and knead the dough again and divide into eight equal parts. Oil palm again and roll the eight parts into smooth balls. Set aside five minutes.
    • Oil the rolling pin and rolling surface. Roll the balls gently into 6” circles.
    • You can roll two or three puris before start frying, but do not roll all the puris at once or they will begin to dry out and fail to puff.
    • Heat at least one of oil in a frying pan over medium high heat. To test, place a small piece of dough in the oil. If the oil is hot enough, the dough will rise quickly to the top.
    • Fry one puri at a time. Place the puri in the frying pan and press with a skimmer. The puri should puff up. Turn puri over and cook until light golden brown on both sides. Take the puri out and place them on paper towels to absorb the excess oil. Repeat the process for remaining piries.
    • Urad dal puris are best served hot and crisp. Store in a covered container after they cool to room temperature.
    Tried this recipe?Let us know how it was!
  • Masala Papad (Papad Salad)

    Masala Papad (Papad Salad)

    Masala Papad

    Masala Papad (Papad Salad)

    Crispy papad topped with spicy salad makes a very refreshing appetizer. Masala Papad is full of flavors and very tempting. This is a very simple and easy recipe to make.
    Papad is a round, flat, dry cracker made with a variety of lentils. They are sold uncooked in Indian grocery stores. You can deep-fry them or dry-roast them.
    No ratings yet
    Course Salad
    Cuisine Indian
    Servings 2 people

    Ingredients
      

    Ingredients:

    • 2 plain papad, (available in Indian grocery stores)
    • 2 medium tomatoes, seeded and diced very small to make a approx. 1cup
    • 1/2  English or deseeded cucumber, cut in very small pieces to make it about ½  cup
    • 2 tablespoons cilantro finely chopped
    • 1 teaspoon ginger finely shredded, optional
    • 1 green chili finely chopped, optional
    • ½ lemon
    • 2 teaspoon 2 teaspoon oil

    Spice Mix for Garnishing

    • 1/2 teaspoon salt
    • 1/4 teaspoon black salt
    • 1/2 teaspoon dry roasted cumin seeds powder
    • 1/8 teaspoon black pepper
    • Pinch red chili 

    Instructions
     

    Method

    • Mix all the dry ingredients to make a spice mix, set aside.
    • Mix tomatoes, cucumbers, cilantro, ginger, and green chili, set aside
    • Lightly oil the papads from both sides, set aside.
    • Preheat the skillet over medium high heat. Roast the papads on both sides in the skillet one at a time, pressing with spatula. The papads will change to a light yellow with a few brown spots. Be careful not to over-roast. Fold the Papads in quarters while they are hot, making triangles right on the skillet.
    • Remove the papads from the skillet and break on the folds, creating four triangles from each one.
    • Take one piece of papad and top it with cucumber, tomato, ginger, green chili, and cilantro. Drizzle with lemon juice and sprinkle the spice mix on top.

    Notes

    Notes
    1. Removing the seeds from the tomatoes keeps the papads crunchy.
    2. English cucumber is crisper on the outside and tender on the inside.
    3. You can prepare  the masala papad in advance, and add the toppings just before serving.
    Tried this recipe?Let us know how it was!

    Crunchy Delight: How to Make Delicious Masala Papad at Home 

    Masala Papad is a flavorful appetizer perfect for parties, offering a low-fat, vegan option that delights snack enthusiasts with its crunchy texture and spicy seasoning. Masala Papad is a delightful Indian appetizer that combines the crunchiness of papad with a burst of spicy, tangy flavors. If you’re wondering how to make masala papad, you’re in for a treat! This masala papad recipe brings together a harmonious blend of ingredients to create a dish that’s not only delicious but also incredibly easy to prepare at home. Let’s dive into the steps to prepare this mouthwatering delicacy.

    1. Making the Spice Mix:

    First, we’ll create a flavorful spice blend to add a kick to your masala papad. Gather all the dry ingredients like cumin, coriander powder, chili powder, and maybe even some chaat masala (a tangy and savory spice blend commonly used in Indian street food). In a bowl, carefully measure and combine these dry spices. Once everything is incorporated, set the bowl aside for later.

    2. Preparing the Veggie Topping:

    Next, we’ll create a refreshing and vibrant topping for the papad. Start by chopping the tomatoes, cucumbers, cilantro, ginger, and green chili. Aim for a fine chop to ensure even distribution on the papad. You can remove the seeds from the tomatoes if you prefer a drier topping, as the seeds can release moisture and make the papad soggy. After chopping, combine all the veggies in a separate bowl and set it aside with the spice mix.

    3. Oiling and Roasting the Papads:

    Now it’s time to prepare the base of our dish – the papad itself! Take each papad and lightly brush or drizzle a thin layer of oil on both sides. This will help them crisp up nicely during roasting. Once oiled, set the papads aside on a plate.

    4. Roasting and Folding the Papads:

    Heat up your skillet over medium-high heat. It’s important to have the pan hot enough to ensure the papads roast quickly and evenly. Carefully place one papad at a time in the hot skillet. Use a spatula to gently press down on the papad as it cooks. You’ll see the color change from its original white to a light yellow with a few brown spots. This is your cue to flip the papad and cook the other side. Be mindful not to overcook them, as they can become burnt and brittle. While the papad is still hot and pliable, fold it in half to create a semi-circle shape. Then, fold it in half again to form a small triangle. This folding technique not only creates a nice presentation but also helps cradle the toppings when assembled.

    5. Assembling and Serving the Masala Papad:

    Finally, it’s time to put everything together! Take one of the folded papad triangles and carefully break it along the folds to create four smaller triangles. Now you have a crispy base ready for the toppings. Place a dollop of the prepared vegetable mixture on each papad triangle. Don’t forget a squeeze of fresh lemon juice for a touch of tanginess! Lastly, sprinkle the reserved spice mix over the top for a burst of flavor.

    Tips for Perfect Masala Papad 

    Using English cucumbers is recommended for their crisp texture, but regular cucumbers will work too.
    You can prepare the masala papad in advance for a quick and easy snack. Just store the roasted papad triangles in an airtight container and assemble them with fresh toppings right before serving.

    Experiment with different toppings such as grated cheese, finely chopped bell peppers, or even crumbled paneer to create your own unique variations of masala papad.

    For a healthier alternative, opt for baked papads instead of the traditional fried ones.

    If you’re short on time, you can prepare the masala mixture in advance and store it in the refrigerator until ready to use.

    Variations of Masala Papad 

    Paneer Masala Papad: Top your papads with a spicy paneer mixture for a creamy twist on this classic recipe. Check out the recipe here.

    Corn Masala Papad: Add a sweet and savory element to your masala papad by incorporating corn kernels into the masala mixture. Find the recipe here.

    Schezwan Masala Papad: Give your masala papad an Indo-Chinese twist by drizzling it with spicy Schezwan sauce. Learn how to make Schezwan sauce here.

    Benefits of Masala Papad

    Masala papad is a low-calorie snack that’s perfect for those watching their weight.

    The combination of spices in masala papad aids digestion and stimulates the appetite.

    Papads are rich in dietary fiber, making them a healthy option for snacking.

    FAQs about Masala Papad 

    Can I make masala papad in advance? 

    Yes, you can prepare the masala mixture ahead of time and store it in an airtight container in the refrigerator. Simply assemble the papads right before serving.

    Can I use store-bought papads for this recipe? 

    Absolutely! Store-bought papads work just as well as homemade ones for making masala papad.

    Can I customize the spice level of masala papad? 

    Of course! Adjust the amount of green chilies and chaat masala according to your preference for spiciness.

    With these simple steps and tips, you’ll be able to whip up a batch of delicious masala papad that’s sure to be a hit at your next gathering or as a quick snack for yourself. Enjoy experimenting with different toppings and flavors to create your own signature version of this beloved Indian appetizer!

    Other Recipes on Manjula’s Kitchen

    If you’re looking to explore more Indian recipes, appetizers, beverages, and desserts, be sure to check out the following links on Manjula’s Kitchen. Here are some links to recipes on Manjula’s Kitchen official website: Paneer Tikka Masala Recipe, Chana Chaat (Spicy Chickpea Salad), Pav Bhaji (Spicy Vegetable Hash with Buns), Raj Kachori (Crunchy Chaat), Vegetable Biryani 

  • Matar (Matra) Chaat

    Matar (Matra) Chaat

    Matar Chaat

    Matar (Matra) Chaat

    This is a delicious spicy snack. Matar Ki Chaat can be served as a snack or as a main dish with Kulcha or Naan.
    No ratings yet
    Course Chaat
    Cuisine Indian
    Servings 4 people

    Ingredients
      

    Ingredients:

    • 1 cup matar, (light brown in color, they look almost like chick peas; available in Indian grocery stores)
    • 1 teaspoon salt (adjust to taste)
    • 1 teaspoon black salt (adjust to taste)
    • 1/4  teaspoon black pepper
    • 1/4  teaspoon sugar
    • 1 tablespoon cumin seed
    • 1 tablespoon coriander
    • 2 tablespoons ginger finely chopped
    • 2 small green chilies finely chopped, (adjust to taste)
    • 2 tablespoons tamarind pulp 
    • 1 tablespoon lemon juice

    For Garnishing

    • Few slices of lemon
    • 2 tablespoons ginger finely chopped
    • 2 green chilies finely chopped

    Instructions
     

    Method

    • Wash and soak matra in three cups of water overnight. After soaking matra will be about 2 1/2 times the volume of the original.
    • Dry roast the cumin seeds and coriander seeds separately, until they are brown and you can smell their aroma. Let them cool and grind to powder consistency.
    • Put the matra in a pressure cooker with 2½ cups of water. Add the salt, ginger, and green chili. Cook on medium high heat.
    • When the pressure cooker starts to steam, turn the heat down to medium and cook eight to nine minutes more.
    • Turn off the heat and wait until steam has stopped before opening the pressure cooker. Matra should be soft and tender.
    • Add all the spices; this is the time to adjust the salt and pepper to your taste. Mix the spices well. Add a little water if they look too dry, the gravy should be thick.
    • Serve warm garnish with ginger and green chili and lemon.
    Tried this recipe?Let us know how it was!

    Matar Chaat Recipe: Step-by-Step Guide to Homemade Delight 

    Stuffed Bell Peppers make for fantastic party recipes, offering quick & easy appetizers that are vegan, gluten-free, and low-fat, perfect for satisfying cravings with a delightful chaat-inspired twist, ideal for snacking. In this matar chaat recipe, we’ll explore the delightful flavors of this popular Indian street food. Matar chaat is a savory snack made with dried yellow peas, bursting with tangy, spicy, and sweet flavors. It’s a perfect dish to satisfy your cravings for something savory and delicious. This recipe offers a perfect blend of textures and tastes, making it a favorite among both kids and adults alike.

    Step 1: Soaking the Peas 

    To begin with this matar chaat recipe, the first step is to soak the dried yellow peas overnight or for at least 8 hours. Soaking helps to soften the peas, making them easier to cook and digest. It also reduces the cooking time significantly, ensuring that your chaat is ready in no time.

    Step 2: Cooking the Peas 

    Once the peas are soaked, drain the water and rinse them thoroughly. Then, transfer them to a pressure cooker or a large pot. Add enough water to cover the peas and some salt. Cook until the peas are tender but not mushy. Cooking time may vary depending on the type and freshness of the peas, but it usually takes around 15-20 minutes in a pressure cooker.

    Step 3: Preparing the Chaat 

    Once the peas are cooked, it’s time to prepare the chaat. Heat some oil in a pan and add cumin seeds. Let them splutter and then add finely chopped green chilies. Now, add some minced ginger and cook for a minute until the raw smell disappears.

    Step 4: Adding Spices 

    Next, add the cooked peas to the pan along with some chaat masala, red chili powder, amchur (dry mango powder), and a pinch of garam masala. Mix well until all the spices are evenly coated with the peas. Adjust the seasoning according to your taste preferences.

    Step 5: Serving the Matar Chaat 

    Once the matar chaat is ready, transfer it to a serving dish and garnish with freshly chopped cilantro leaves, chopped tomatoes, and a drizzle of tamarind chutney. You can also sprinkle some sev (crispy chickpea flour noodles) on top for an extra crunch. Serve hot and enjoy this flavorful matar ki chaat with your favorite beverages.

    Tips: 

    • You can customize this matar chaat recipe according to your taste preferences by adding ingredients like chopped cucumber, boiled potatoes, or pomegranate seeds.
    • To make it healthier, you can use olive oil instead of regular cooking oil.
    • Adjust the spice levels according to your preference. If you like it spicy, add more green chilies or red chili powder.

    Variations: 

    • For a creamy twist, you can add a dollop of yogurt or sour cream on top of the chaat.
    • If you’re vegan, you can skip the yogurt and use vegan yogurt or coconut cream instead.
    • Experiment with different toppings like grated cheese for added flavor and texture.

    Benefits: 

    • Matar chaat is a nutritious snack as it’s packed with protein and fiber from the yellow peas.
    • It’s also rich in vitamins and minerals, making it a healthy option for snacking.
    • The spices used in this chaat, such as cumin, ginger have various health benefits including aiding digestion and boosting immunity.

    FAQs: 

    Q: Can I use canned peas instead of dried peas?

    A: While canned peas can be used in a pinch, dried peas are preferred for this recipe as they have a better texture and flavor. If using canned peas, make sure to drain and rinse them well before cooking.

    Q: Can I make this chaat ahead of time?

    A: Yes, you can prepare the cooked peas and spice mixture ahead of time and store them in the refrigerator. When ready to serve, simply reheat the mixture and assemble the chaat with your desired toppings.

    Other Recipes on Manjula’s Kitchen

    If you’re looking to explore more Indian recipes, appetizers, beverages, and desserts, be sure to check out the following links on Manjula’s Kitchen. Here are some links to recipes on Manjula’s Kitchen official website:

    Paneer Tikka Masala Recipe

    Chana Chaat (Spicy Chickpea Salad) Recipe

    Pav Bhaji (Spicy Vegetable Hash with Buns) Recipe

    Raj Kachori (Crunchy Chaat) Recipe

    Vegetable Biryani Recipe

    These recipes should offer you a flavorful experience straight from Manjula’s Kitchen.

  • Garden Fresh Tapas

    Garden Fresh Tapas

    Garden Fresh Tapas

    Garden Fresh Tapas

    This is a mildly spiced, refreshing and healthy appetizer. Tomatoes and cucumbers are filled with sprouted moong or flavored cream cheese. It makes an amazingly colorful finger food that is quick & easy to prepare and tastes incredible.
    5 from 1 vote
    Course Appetizer
    Cuisine Indian
    Servings 4 Garden Fresh Tapas

    Ingredients
      

    Ingredients:

    • 2 small firm tomatoes
    • 8-1/2 inch long English Cucumber pieces

    Sprout Topping

    • 1/4 cup moong sprouts
    • 1/2 teaspoon oil
    • ¼ teaspoon cumin seeds
    • 1 teaspoon minced ginger
    • 1/8 teaspoon black pepper
    • 1/4 teaspoon salt
    • Few drops of lemon juice
    • 1 tablespoon of water

    Cream Cheese Topping

    • 2 tablespoons cream cheese
    • ½ teaspoon minced ginger
    • 1/4 teaspoon salt
    • Pinch of black pepper
    • 1 teaspoon finely chopped cilantro or dill

    Instructions
     

    Method

    • Prepare Sprouts: In a small frying pan, heat the oil on medium heat. Add cumin seeds and as they crack add sprouts, ginger, black pepper and water. Cook for 2-3 minutes until sprouts are tender. Remove pan from heat. Add lemon juice, stir and set aside.
    • Prepare cream cheese topping by mixing all the ingredients. Set aside.
    • Cut tomatoes in half and scoop out the seeds creating hollow bowls.
    • Take cucumber slices and scoop out the seeds, creating small bowls.
    • Fill all tomatoes and 4 cucumber slices with moong sprouts.
    • Fill the remaining 4 cucumber slices with cream cheese filling.
    • Serve and enjoy!

    Notes

    How to make sprouts
    1. Soak the whole moong for 10 to 12 hours. Water should be about four times more than the Moong.
    2. After soaking moong, it will double in volume.
    3. Drain the water and loosely wrap the beans with the muslin or cheesecloth. Store the soaked beans in a warm dark place
    Tried this recipe?Let us know how it was!
  • Potato Skins / Potato Bowl Chaat

    Potato Skins / Potato Bowl Chaat

    Potato Skins

    Potato Skins / Potato Bowl Chaat

    Potato skins are boiled potatoes filled with spicy chickpeas. This is a mouthwatering snack, that looks great and tastes yummy. It is a delicious and healthy appetizer for the people who don’t like to have oily food.
    No ratings yet
    Course Chaat
    Cuisine Indian
    Servings 5 Potato Bowl Chaat

    Ingredients
      

    Ingredients:

    • 4 medium size red potatoes
    • 3 cups water
    • 1 tablespoon salt
    • 2 tablespoons oil

    Filling

    • 1/2 cup chickpeas
    • 1/2 teaspoon salt
    • 1/4 teaspoon black salt
    • 1/2 teaspoon roasted cumin
    • 1/2  teaspoon mango powder
    • 1/2 teaspoon garam masala
    • 1/4 teaspoon black pepper
    • 1 tablespoon finely shredded ginger
    • 1 tablespoon finely chopped green chili adjust to taste
    • 1 teaspoon lemon juice

    For Garnish

    Instructions
     

    Method

    • Wash the potatoes and slice them into halves.
    • Boil approximately 3 cups of water in a pan over medium high heat; add salt, oil and potatoes.
    • Cover and cook potatoes till they are tender, which will take approximately 20 minutes. Remove them from the water.
    • Once the potatoes are cool to touch, scoop out the insides from the center leaving ¼ inch thickness to outside of the potato. Red potato works best for this recipe because they hold their shape nicely.
    • Set potatoes aside.

    Filling

    • Soak chickpeas for at least 8 hours in 3 cups of water or more.
    • Boil the chickpeas in 1 ½ cup of water in a pressure cooker over medium high heat. As the pressure cooker begins to steam, lower    the heat to medium and cook for 6 minutes.
    • Add all the spices, mix well and cook for 3-4 minutes over low heat.
    • Spicy chickpeas should be a thick gravy-like consistency, not dry. As chickpeas cool they will absorb the water. Set aside.

    Assembling Potato Skin

    • Take each potato bowl and coat the inside with one teaspoon of Hari Cilantro Chutney.
    • Place 2 tablespoons of spiced chickpeas into the chutney coated bowl. Drizzle the top with tamarind chutney.
    • Serve warmed up or at room temperature.
    Tried this recipe?Let us know how it was!

    Potato Skins Recipe: A Delicious Appetizer for Any Occasion

    Potato skins, a beloved appetizer, can be transformed into a delectable snack that satisfies both vegan and gluten-free diets, offering a low-fat option perfect for those seeking a healthier indulgence, while still enjoying the savory crunch of chaat-inspired flavors. Potato skins are a classic appetizer loved by many for their crispy texture and delicious toppings. This potato skins recipe offers a simple yet flavorful way to enjoy this dish at home. Whether you’re hosting a party or simply craving a savory snack, learning how to make potato skins will surely impress your guests and satisfy your taste buds.

    Step 1: Preparing the Potatoes

    Start by scrubbing the potatoes thoroughly under running water to remove any dirt or debris. Since the skin plays a crucial role in this dish, ensure you choose potatoes that are uniform in size and free from blemishes. The ideal potatoes for potato skins are russets or Idaho potatoes, known for their starchy texture, which crisps up beautifully when baked.

    Step 2: Baking the Potatoes

    Once cleaned, prick the potatoes all over with a fork to allow steam to escape during baking. This prevents them from bursting open in the oven. Place the potatoes directly on the middle rack of a preheated oven and bake at 400°F for about 45-60 minutes or until tender when pierced with a fork. Baking the potatoes ensures they are cooked through while developing that desirable crispy texture in the potato skin.

    Step 3: Cooling and Halving the Potatoes

    After baking, allow the potatoes to cool for a few minutes until they are safe to handle. Then, carefully cut each potato in half lengthwise using a sharp knife. Use a spoon to scoop out the flesh, leaving about a quarter-inch layer attached to the potato skin. Reserve the scooped-out potato flesh for another use, such as mashed potatoes or potato soup, minimizing food waste.

    Step 4: Crisping the Potato Skins

    Return the hollowed-out potato skins to the oven, placing them cut side up on a baking sheet. Increase the oven temperature to 450°F and bake the potato skins for an additional 10-15 minutes or until they are golden and crispy. This step ensures that the potato skins develop a satisfying crunch, providing the perfect base for your toppings.

    Step 5: Adding Toppings

    Once the potato skins are crispy and golden brown, it’s time to add your favorite toppings. Popular options include shredded cheese and dollops of sour cream. Feel free to get creative with your toppings, experimenting with different combinations to suit your taste preferences. Return the topped potato skins to the oven for a few minutes to melt the cheese and heat up the toppings.

    Step 6: Serving and Enjoying

    Once the toppings are heated through and the cheese is melted and bubbly, remove the potato skins from the oven and transfer them to a serving platter. Garnish with additional chopped herbs, such as parsley or chives, for a pop of color and freshness. Serve the potato skins hot, alongside your favorite dipping sauces, and watch them disappear within minutes!

    Tips for Perfect Potato Skins

    For extra crispy potato skins, brush the hollowed-out shells with melted butter or olive oil before baking.

    To save time, you can prepare the potato skins in advance up to the point of baking them with the toppings. Simply cover and refrigerate the assembled potato skins until you’re ready to bake and serve.

    Get creative with your toppings! Try adding cooked ground beef or turkey, diced bell peppers, or jalapeños for a spicy kick.

    Variations of Potato Skins

    Vegetarian Option: Opt for vegetarian toppings such as sautéed mushrooms, diced tomatoes, and black olives.

    Loaded Potato Skins: Go all out with your toppings by adding a variety of ingredients such as chili con carne, guacamole, and salsa for a hearty and flavorful twist.

    Tex-Mex Potato Skins: Use Mexican-inspired toppings like shredded Mexican cheese blend, diced avocado, and a drizzle of chipotle mayo for a south-of-the-border flair.

    Benefits of Potato Skins

    Nutrient-Rich: Potato skins are a good source of fiber, vitamins, and minerals, including potassium and vitamin C. Leaving the skin on maximizes the nutritional benefits of this appetizer.

    Versatile: You can customize potato skins with your favorite toppings, making them suitable for various dietary preferences and occasions.

    Crowd-Pleaser: Whether served as an appetizer at a party or enjoyed as a snack while watching the game, potato skins are sure to be a hit with guests of all ages.

    Frequently Asked Questions (FAQs)

    Q: Can I make potato skins ahead of time?

    A: Yes, you can prepare the potato skins up to the point of adding the toppings, then cover and refrigerate them until you’re ready to bake and serve.

    Q: Can I freeze leftover potato skins?

    A: While it’s best to enjoy potato skins fresh, you can freeze any leftovers in an airtight container for up to 1-2 months. Reheat them in the oven until heated through before serving.

    Q: Can I use different types of potatoes for this recipe?

    A: While russet or Idaho potatoes are traditionally used for potato skins, you can experiment with other varieties such as Yukon Gold or sweet potatoes for a unique twist.

    Other Recipes on Manjula’s Kitchen

    If you’re looking to explore more Indian recipes, appetizers, beverages, and desserts, be sure to check out the following links on Manjula’s Kitchen. Here are some links to recipes on Manjula’s Kitchen official website:

    Paneer Tikka Masala Recipe

    Chana Chaat (Spicy Chickpea Salad) Recipe

    Pav Bhaji (Spicy Vegetable Hash with Buns) Recipe

    Raj Kachori (Crunchy Chaat) Recipe

    Vegetable Biryani Recipe

    These recipes should offer you a flavorful experience straight from Manjula’s Kitchen.


  • Rava Idli (Semolina Dumpling)

    Rava Idli (Semolina Dumpling)

    Rava Idli (Semolina Dumpling)

    Rava Idli, Steam Dumplings

    Rava Idli is a popular South Indian dish. The traditional way of making idlis would take two days. This recipe is much quicker and easier, and tastes just as delicious! Rava Idlis can be enjoyed as a snack or as a light meal.
    5 from 1 vote
    Prep Time 5 minutes
    Cook Time 20 minutes
    Resting time 30 minutes
    Total Time 25 minutes
    Course Appetizer
    Cuisine Indian
    Servings 4 people

    Ingredients
      

    For the batter

    • 1 cup coarse sooji semolina
    • 1 tsp salt
    • 1 green chili finely choppes
    • 1 tsp ginger finely grated
    • 1 tbsp cilantro finely chopped hara dhania
    • 1/4 cup cabbage finely chopped
    • 1/2 cup yogurt dahi, curd
    • 1 cup water, use as needed
    • 1 tsp ENO fruit salt

    Seasoning

    • 1 tbsp oil
    • 1/4 tsp mustard seeds rai
    • 1/4 tsp cumin seeds jeera
    • 2 2 green chilies sliced lengthwise and cut in half.

    Utensils for Steaming Idlis

    Idli stand – this has three to four plates stacked over each other.

    Covered pot, large enough to hold the idli stand.

    Alternatively, an egg poacher can work just as well,

    Instructions
     

    • Mix sooji, salt, green chili, ginger, cilantro, cabbage, yogurt, and water (as needed) to make a pancake-like batter. Set aside for at least 30 minutes.
    • The batter thickens as the semolina absorbs the water. At this point, add a little more water if it is too thick.
    • Add approximately ¾ cup of water to the pot. Check to make sure that the water does not touch the bottom plate of the idli stand. Bring to boil
    • Lightly grease Idli plates with oil.
    • Add Eno Fruit Salt to the batter and mix well. The mixture will begin foaming. Immediately begin pouring into the Idli trays. Place the stand into the steaming pot.
    • Cover the pot and steam the idlis ten to twelve minutes on medium heat. Insert a toothpick in the center of one idli. If the toothpick comes out clean, remove the stand from the pot. Do not overcook the idlis, as they will lose their softness and dry out as they cool.
    • Cool for just a few minutes before removing each individual idli. They should come out easily and not stick to the mould. The idlis should be spongy and soft.

    For The Seasoning

    • Heat oil in a saucepan. Add mustard and cumin seeds. When the seeds begin to crack, add the chilies. Stir for a few seconds and remove from the heat.
      Pour the seasoning over the Idlis on the serving plate.

    Notes

    Tips
    You can replace the cabbage with shredded carrots.
    This recipe will make slightly more than 16 idlis. If you choose, you can make it in two batches.  The batter can be prepared all at once; however, you must add the Eno just prior to pouring into the idli stand.
    Serving Suggestions
    Serve seasoned Idlis with coconut or cilantro chutney.
    Serve Idlis with samber (south Indian vegetable soup). Idlis do not have to be seasoned for that.
    Stir-fry Idlis in the seasoning oil mixture over medium heat for a few minutes. They will turn slightly brown.
    Tried this recipe?Let us know how it was!

    Introduction to Rava Idli Recipe

    Rava Idli is a popular South Indian dish known for its simplicity and delicious taste. Rava Idli is a fantastic option for a quick & easy appetizer or snack, and it also makes for a convenient lunch box suggestion. Rava idli recipe is a versatile dish that can be enjoyed for breakfast, lunch, or dinner. Made from idli rava, a type of semolina, this dish is easy to prepare and requires minimal ingredients. 

    Idli rava is coarser in texture compared to regular semolina, giving the idlis a unique taste and texture. In this rava idli recipe, we will explore the process of making rava idli and various tips, variations, and benefits associated with it.

    Making Rava Idli: Step-by-Step Guide

    Preparation of Batter

    • To begin rava idli preparation, start by heating a tablespoon of oil in a pan. Add mustard seeds and allow them to splutter. Then, add finely chopped green chilies, grated ginger, and curry leaves for added flavor. Sauté for a few minutes until the raw aroma disappears. Incorporating these spices enhances the taste of rava idli.

    Roasting Idli Rava

    • Next, add idli rava to the pan and roast it for a few minutes until it turns aromatic and light golden brown. Roasting the idli rava adds a nutty flavor to the dish and ensures that the idlis are soft and fluffy.

    Preparing the Batter

    • Transfer the roasted idli rava to a mixing bowl and let it cool slightly. Then, add yogurt and water to the roasted rava and mix well to form a thick batter. Allow the batter to rest for 10-15 minutes to allow the idli rava to absorb the moisture. This step is crucial for achieving the perfect texture in rava idli.

    Seasoning the Batter

    • Meanwhile, prepare the seasoning by heating oil in a small pan. Add mustard seeds, urad dal, and cashew nuts, and fry until the dal turns golden brown and the nuts are lightly roasted. Pour this seasoning over the rava idli batter and mix well. Seasoning adds a depth of flavor to the rava idli and makes it more aromatic.

    Adding Baking Soda

    • Just before steaming the idlis, add baking soda to the batter and mix gently. Baking soda acts as a leavening agent and helps in making the idlis soft and fluffy. However, it’s important not to overmix the batter at this stage to ensure that the idlis remain airy and light.

    Steaming the Idlis

    • Grease the idli molds with oil and pour the batter into each mold. Place the molds in a steamer and steam the idlis for 10-12 minutes or until they are cooked through. Insert a toothpick into the center of an idli to check for doneness. If it comes out clean, the idlis are ready to be served.

    Tips for Perfect Rava Idlis

    • Use fresh idli rava for the best results. Stale or old rava may result in dense and hard idlis.
    • Adjust the consistency of the batter by adding more water if it’s too thick or yogurt if it’s too thin.
    • For enhanced flavor, you can add grated vegetables like carrots, peas, or capsicum to the batter.
    • Serve rava idli hot with coconut chutney or sambar for a wholesome and satisfying meal.

    Variations of Rava Idli

    • Vegetable Rava Idli: Add finely chopped vegetables like carrots, peas, and bell peppers to the batter for a nutritious twist.
    • Spicy Rava Idli: Increase the quantity of green chilies and add finely chopped coriander leaves for a spicier version of rava idli.
    • Paneer Rava Idli: Grate paneer and mix it into the batter along with some chopped mint leaves for a rich and flavorful variation.
    • Masala Rava Idli: Add a teaspoon of garam masala powder to the batter along with some tomatoes for a masaledar twist.

    Benefits of Rava Idli

    • Nutritious: Rava idli is a good source of carbohydrates, proteins, and essential nutrients, making it a wholesome meal option.
    • Easy to Digest: Since idli rava is made from semolina, it’s easy to digest and is suitable for people of all ages.
    • Quick and Easy: Unlike traditional idlis, which require fermentation, rava idli can be prepared instantly, making it a convenient option for busy days.
    • Versatile: You can customize rava idli with different toppings and seasonings to suit your taste preferences.

    FAQs about Rava Idli

    Can I use regular semolina instead of idli rava?

    • While you can use regular semolina to make idlis, the texture and taste may vary slightly from traditional rava idli. Idli rava is coarser and gives a unique texture to the idlis.

    How long should I steam the idlis?

    • Steam the idlis for 10-12 minutes or until a toothpick inserted into the center comes out clean. Over-steaming may result in dry and rubbery idlis.

    Can I make rava idli without baking soda?

    • Baking soda helps in making the idlis soft and fluffy. However, if you prefer not to use it, you can substitute it with a pinch of fruit salt or eno.

    For more delicious recipes, you can explore other recipes on Manjula’s Kitchen.

    Explore more mouthwatering recipes on Manjula’s Kitchen: Paneer Tikka Masala, Vegetable Biryani, Aloo Paratha, Mango Lassi, Palak Paneer

  • Sabudana Vada (Fried Dumplings of Potatoes and Tapioca)

    Sabudana Vada (Fried Dumplings of Potatoes and Tapioca)

    Sabudana Vada

    Sabudana Vada (Fried Dumplings of Potatoes and Tapioca)

    Sabudana Vada is a delicious snack with a great texture. It is crunchy on the outside and soft inside. This can satisfy just about anybody, even those on a gluten-free diet. This recipe is completely gluten free.
    No ratings yet
    Course Appetizer
    Cuisine Indian
    Servings 4 people

    Ingredients
      

    Ingredients

    • 3 medium potatoes
    • 1/3 cup tapioca (sabudana)
    • teaspoon salt adjust to taste(namak)
    • 1 teaspoon cumin seeds (jeera)
    • 1 finely chopped green chili adjust to taste
    • Approximately 2 tablespoons finely chopped cilantro (hara dhania)
    • 1 teaspoon lemon juice
    • Oil to fry

    Instructions
     

    Method

    • Wash the tapioca and soak it in 3 cups of water for 3 to 4 hours.
    • Drain the water. After soaking, the tapioca will have increased in volume, by about 2 times. Set aside.
    • Par-boil the potatoes, so they are only half-cooked. Insert a knife into the potato to ensure that it is still somewhat firm.
    • Cool the potatoes, then peel and grate them using a vegetable grater.
    • Mix all the ingredients together. The dough will be a little sticky and soft in consistency.
    • Divide the potato dough into 16 parts.
    • Roll each one into a smooth patty. You will need to lightly oil your palms to prevent the dough from sticking.
    • Heat the oil in a frying pan on medium high heat. There should be at least 1½ inches of oil in the frying pan. To check if the oil is ready, drop a small piece of dough into the oil. The dough should rise to the surface, and not change its color immediately.
    • Slowly drop the patties into the frying pan.
    • Fry the vada until both sides are golden brown. Turn them occasionally. It will take approx. 4 to 5 minutes to cook.
    • Remove the vada and place over a paper towel so the excess oil is absorbed.
    • Sabudana vada should be crunchy on the outside and soft inside.
    • Serve them as is or with cilantro or tamarind chutney.

    Notes

    Tip
    The frying oil needs to be sufficiently hot, or else the Vadas will turn out greasy and may break into pieces while cooking.
     
    Serving suggestions
    1. Sabudana Vadas are best served with cilantro chutney or tamarind chutney as a dip.
    2. Vadas taste best when they are served hot.
    3. Sabudana Vadas can be made one day in advance and stored at room temperature. Do not refrigerate. When ready to serve, place on a cookie sheet and heat in the oven at 300 degrees till warm.
    Tried this recipe?Let us know how it was!

    Making Sabudana Vada: A Traditional Indian Snack

    Sabudana Vada, a popular snack especially during Navaratri and Ganesh Chaturthi celebrations, is a gluten-free and vegan appetizer commonly enjoyed as a delightful treat during festivals like Krishna Janmashtami, offering a crunchy texture and savory flavor to those seeking gluten-free and vegan snack options. Sabudana Vada is a beloved snack in Indian cuisine, especially popular during festivals and fasting periods. 

    Sabudana vada is essentially fried dumplings made from potatoes and tapioca pearls. It’s a delightful blend of flavors and textures, crispy on the outside and soft on the inside. This sabudana vada recipe is not only delicious but also relatively simple to make, requiring just a few basic ingredients commonly found in Indian households. 

    Let’s delve into the process of how to make sabudana vada and explore some tips, variations, benefits, and frequently asked questions regarding this classic snack.

    Tips for Perfect Sabudana Vada

    • Soak Sabudana Properly: The key to making good sabudana vada lies in soaking the tapioca pearls properly. Rinse the sabudana under running water until the water runs clear, then soak them in water for at least 4-5 hours or overnight. They should be soaked enough to be easily mashed between your fingers.
    •  
    • Use Boiled Potatoes: Ensure that the potatoes are boiled properly and mashed well. This helps bind the vada mixture together and prevents them from breaking apart during frying.
    • Adjust Seasonings: Feel free to adjust the seasonings according to your taste preferences. You can add more green chilies for extra heat or increase the amount of lemon juice for a tangier flavor.
    • Fry on Medium Heat: Fry the vadas on medium heat to ensure they cook evenly from inside out and develop a golden-brown crust on the outside.
    • Serve Hot: Sabudana vadas are best enjoyed hot and fresh. Serve them with mint chutney, tamarind chutney, or yogurt for a delightful snack experience.
    •  

    Variations of Sabudana Vada

    • Sabudana Aloo Tikki: Instead of shaping the vada into traditional round patties, you can make them into tikki shapes for a twist. Flatten the mixture into small discs and fry until golden brown on both sides.
    • Sabudana Vada with Peanuts: Add roasted and crushed peanuts to the vada mixture for an extra crunch and nutty flavor.
    • Sweet Sabudana Vada: For a unique variation, add some sugar and grated coconut to the vada mixture to make sweet sabudana vadas. Serve them as a dessert or a sweet snack.
    • Baked Sabudana Vada: If you’re looking for a healthier alternative, you can bake the vadas instead of frying them. Simply brush them with oil and bake in a preheated oven until golden brown and crispy.

    Benefits of Sabudana Vada

    • Rich in Carbohydrates: Sabudana, being made from tapioca pearls, is rich in carbohydrates, providing a quick source of energy.
    • Gluten-Free: Since sabudana is derived from tapioca, it is naturally gluten-free, making it suitable for those with gluten intolerance or celiac disease.
    • Good Source of Protein: Potatoes used in the vada mixture add a decent amount of protein to the snack, making it more satiating.
    • Easy to Digest: Sabudana is easy to digest, which makes it a popular choice during fasting periods when heavier foods are avoided.
    •  

    FAQs about Sabudana Vada

    • Can I make sabudana vada ahead of time?

    • While sabudana vada is best enjoyed fresh, you can prepare the mixture ahead of time and refrigerate it. Fry the vadas just before serving for the best taste and texture.
    • Can I freeze sabudana vada?

    • Yes, you can freeze uncooked sabudana vada. Place them on a tray lined with parchment paper and freeze until firm, then transfer them to a freezer-safe bag or container. Fry them directly from frozen, adding a few extra minutes to the frying time.
    • What can I serve with sabudana vada?

    • Sabudana vada pairs well with various chutneys such as mint chutney, tamarind chutney, or yogurt. You can also enjoy them with a hot cup of masala chai for a perfect snack time treat.

    For more mouthwatering recipes and culinary inspiration, explore the following links from Manjula’s Kitchen:

    Crispy Spinach Pakoras, Vegetable Biryani, Paneer Tikka Masala, Vegetable Pakoras Recipe, Baingan Bharta (Roasted Eggplant) Recipe & Matar (Green Peas) Paneer Recipe

    Dive into the world of authentic Indian cuisine and elevate your cooking skills with these delightful recipes.

  • Mattar Ke Kachori (Spicy Puff Pastry)

    Mattar Ke Kachori (Spicy Puff Pastry)

    Matar Kachori

    Matar Kachori

    Mattar Kachori is a delicious, fried puff pastry filled with spicy green peas. This mouthwatering snack also can be served as part of any main course meal.
    5 from 1 vote
    Prep Time 10 minutes
    Cook Time 25 minutes
    Total Time 35 minutes
    Course Main Course
    Cuisine Indian
    Servings 4 people

    Ingredients
      

    For Dough

    • 1 cup All Purpose flour plain flour or Maida
    • 1/4 tsp salt
    • 2 tbsp oil
    • 1/2 cup approx. 1/2 cup chilled water

    Filling

    • 1 cup green peas, I am using frozen peas
    • 1 tsp oil
    • 1 tbsp coriander powder dhania
    • 1 tsp fennel seed powder saunf
    • 1 tsp red chili powder
    • 1 tsp ginger shredded
    • 1/2 tsp mango powder amchur
    • 1/2 tsp salt

    Instructions
     

    To Make Dough

    • Add the flour, salt, and oil to a bowl and mix it well.
    • Add the chilled water slowly, mixing with your fingers as you pour the water. Do not knead the dough. The dough should be very soft but not sticking to fingers. Cover the dough and let it sit for at least fifteen minutes.

    To Make Filling

    • Heat the oil in a frying pan, add green peas, stir-fry until peas are tender.
    • Add ginger, coriander powder, fennel seed powder, chili powder, mango powder and salt, stir fry for another few minutes.
    • While stir frying the peas mash them with spatula.
    • Let the filling cool to room temperature.

    To Make Kachoris

    • Take the dough and lightly knead it. Divide the dough in twelve equal parts.
    • Take one part of the dough and with your fingers flatten the edges and make it into about a 2-inch circle. Leaving the center, a little thicker than the edges around. Mold the dough into a cup and place about 1 teaspoon of filling in the center. Pull the edges of the dough to wrap the filling. Proceed to make all 12 balls.
    • Let the filled balls sit for 3 to 4 minutes before pressing.
    • Set the filled balls on a clean and dry surface with the seam facing up. Using the base of your palm, slowly flatten them into about 3 inches circle.
    • Heat about 1-1/2 inches of oil in a frying pan on medium heat. To check if the oil is ready put a little piece of dough in the oil. It should sizzle, and come up very slowly.
    • Do not overcrowd the kachoris in a frying pan, fry them on medium heat. After they are puffed, slowly turn them over.
    • It will take about 3 minutes to fry from each side. Fry until golden-brown on both sides.
    • If the kachoris are fried on high heat, they will get soft and will not be crispy.

    Notes

    Serving suggestions
    Kachoris can be served plain, with Boondi Ka Raita, or with Aloo Dum.
    Keyword Appetizer, Breakfast, Lunch Box, Main Dish, Mattar Kachori, Party Food, Stuffed Puri
    Tried this recipe?Let us know how it was!

  • Crispy Spinach Pakoras

    Crispy Spinach Pakoras

    Crispy Spinach Pakoras

    Crispy Spinach Pakoras

    Spinach pakoras are delicious as a snack. Spinach pakoras can be served many different ways and they always taste great as an appetizer. One of my favorite ways to serve these pakoras is papdi chaat.
    No ratings yet
    Course Appetizer
    Cuisine Indian
    Servings 30 pieces

    Ingredients
      

    For Batter

    • ½ cup gram flour (basen)
    • 1 tablespoon corn starch (arrow root powder)
    • ½ teaspoon salt adjust to taste
    • 1/2 teaspoon cumin seeds (jeera)
    • 1/4 teaspoon black pepper
    • 1/8 teaspoon asafetida (hing)
    • About 3/4 cup water

    Also need

    • About 30 fresh spinach leaves
    • Oil to fry

    Instructions
     

    Method

    • Mix all the dry ingredients together: besan, corn starch, black pepper, cumin seeds, asafetida, and salt. Corn starch adds to the crispness.
    • Add the water slowly to make a smooth batter (batter should be thin consistency).
    • Heat the oil in a frying pan on medium high heat.
    • The frying pan should have at least 1 ½ inch of oil. To check if the oil is ready, put one drop of batter in oil. The batter should come up but not change color right away.
    • Dip the spinach leaf into the batter one at a time, making sure it is covered by the batter completely; wipe it from side of the batter bowl making sure batter is evenly spread over spinach. Then, slowly drop in the slices into the frying pan.
    • Fry the pakoras in small batches. The pakoras will take about 2 to 3 minutes to cook.
    • Turn them occasionally. Fry the pakoras until both sides are golden-brown.
    • The crispy, delicious pakoras are now ready to serve.
    • They can be stored for several days in air tight container.

    Notes

    Tips
    If oil is too hot pakoras will not be crispy; if oil is not hot enough, pakoras will be greasy.
     
    Serving Suggestions
    1. Spinach pakoras can be served as chips with your choice of dipping sauce.
    2. Spinach crisp can also be served as papdi chaat.
    Tried this recipe?Let us know how it was!

    Crispy Spinach Pakoras: A Delectable Indian Snack

    Crispy spinach pakoras are a quintessential Indian snack that tantalize taste buds with their crunchy texture and flavorful profile. Spinach Pakora, a delightful blend of appetizers and snacks, is a gluten-free and vegan treat perfect for winter recipes, offering a crunchy and flavorful indulgence. These bite-sized delights, also known as crispy spinach pakoras, are a favorite among food enthusiasts for their simplicity and robust taste. In this comprehensive guide, we delve into the art of crafting these irresistible treats, exploring the crispy spinach pakoras recipe, step by step.

    Step 1: Gathering Ingredients

    To embark on this culinary adventure, gather the necessary ingredients. Fresh spinach leaves, besan (gram flour), rice flour, ajwain (carom seeds), turmeric powder, chili powder, cumin seeds, asafetida (hing), and salt are the key players in this recipe. These ingredients blend harmoniously to create the signature flavor and texture of crispy spinach pakoras.

    Step 2: Preparing the Batter

    Begin by washing the spinach leaves thoroughly and patting them dry. Chop the spinach finely, ensuring uniformity in size. In a mixing bowl, combine besan, rice flour, ajwain, turmeric powder, chili powder, cumin seeds, asafoetida, and salt. Gradually add water to the dry mixture, whisking continuously until a smooth batter forms. The consistency should be thick enough to coat the spinach leaves evenly.

    Step 3: Coating the Spinach

    Dip each spinach leaf into the prepared batter, ensuring it is well-coated on both sides. Gently shake off any excess batter to achieve a light coating. Repeat this process for the remaining spinach leaves, arranging them on a plate for frying.

    Step 4: Frying to Perfection

    Heat oil in a deep-frying pan over medium-high heat. Once the oil reaches the desired temperature, carefully slide the coated spinach leaves into the hot oil, ensuring they are not overcrowded. Fry the spinach pakoras until they turn golden brown and crisp, flipping them occasionally for even cooking. Once done, transfer them to a plate lined with paper towels to absorb any excess oil.

    Step 5: Serving and Enjoying

    Serve the hot and crispy spinach pakoras with a side of mint chutney or tamarind sauce for an added burst of flavor. These delectable treats are perfect for snacking on rainy days or as appetizers for gatherings. Enjoy the crunchy exterior giving way to the tender spinach inside with every bite.

    Variations:

    Paneer Spinach Pakoras: Add crumbled paneer (Indian cottage cheese) to the batter for a creamy twist.

    Cheese Spinach Pakoras: Stuff the spinach leaves with cheese before coating them with batter for a gooey surprise.

    Benefits:

    Spinach is a nutritional powerhouse, packed with vitamins, minerals, and antioxidants that promote overall health. Incorporating spinach into pakoras not only enhances the flavor but also adds a dose of goodness to this indulgent snack. Additionally, the use of besan (gram flour) provides a gluten-free alternative, making it suitable for individuals with dietary restrictions.

    FAQs:

    Q: Can I make crispy spinach pakoras ahead of time?

    A: While pakoras are best enjoyed fresh and hot, you can prepare the batter in advance and fry them just before serving to retain their crispiness.

    Q: Can I bake spinach pakoras instead of frying them?

    A: Although frying yields the crispiest results, you can try baking spinach pakoras in a preheated oven at 375°F (190°C) for approximately 15-20 minutes or until golden brown.

    Q: Can I freeze leftover pakoras?

    A: While pakoras are best consumed fresh, you can freeze any leftovers in an airtight container. Reheat them in the oven or air fryer for a few minutes until warmed through.

    Explore More Delectable Recipes

    For more mouthwatering recipes and culinary inspiration, explore the following links from Manjula’s Kitchen:

    Crispy Spinach Pakoras, Vegetable Biryani, Paneer Tikka Masala, Vegetable Pakoras Recipe, Baingan Bharta (Roasted Eggplant) Recipe & Matar (Green Peas) Paneer Recipe

    Dive into the world of authentic Indian cuisine and elevate your cooking skills with these delightful recipes.

  • Chole Chaat (Spicy Chickpeas)

    Chole Chaat (Spicy Chickpeas)

    Chole Chaat

    Chole Chaat (Spicy Chickpeas)

    Chole Chaat is a zesty snack for people who enjoy spicy food. This is a very quick & easy recipe to prepare, and quite an aromatic dish.
    No ratings yet
    Course snacks
    Cuisine Indian
    Servings 4 Spicy Chickpeas

    Ingredients
      

    Ingredients:

    • 1 cup chickpeas (Garbanzo beans, Kabuli chana)
    • 1 medium size boiled potato
    • 2 tablespoons oil
    • 1/4  cup gram flour (besan)
    • 1 tablespoon finely grater ginger
    • 1 seeded minced green chili adjust to taste
    • 1 1/2  teaspoon salt adjust to taste
    • 1 teaspoon black salt (kala namak)
    • 1/2  teaspoon black pepper
    • 1 teaspoon roasted cumin powder*
    • 1 teaspoon mango powder
    • 1 tablespoon garam masala
    • 1 tablespoon lemon juice

    Garnish

    • 2 tablespoon  Ginger relish
    • Few slices of lemon
    • 8 Romaine lettuce leaves

    Instructions
     

    Method

    • Peel and cut the boiled potato into ¼-inch cubes.  Set aside
    • Wash the chickpeas and soak in four cups water for at least eight hours. Chickpeas will increase to two and a half times their original volume.
    • Drain the water and wash the chickpeas.
    • Place the chickpeas in a pressure cooker with four cups water. Cook on medium high heat. When it starts to steam, turn down the heat to medium, and cook for another eight minutes.
    • Turn off the heat and wait until steam has stopped before opening the pressure cooker. Chickpeas should be soft and tender.
    • Heat the oil in a saucepan over medium heat, add the gram flour (besan) and stir fry one to two minutes, until the color changes to golden brown.
    • Add grated ginger and minced green chili, stir for a few seconds. Add the chickpeas to the gram flour.
    • Add salt, black salt, black pepper, roasted cumin seed powder, and mango powder. Lightly mash chickpeas while mixing in the spices. Cook on low heat 10 to 15 minutes.  Turn off the heat.
    • Cook on low heat for 10 to 15 minutes.  Turn off the heat.
    • Add the potatoes, garam masala, and lemon juice. Mix gently.
    • Before serving, let the chickpeas sit at least half an hour to absorb all the flavors.  The gravy will thicken as it cools.

    Notes

    Serving Suggestions
    1. Chole chaat tastes best when served warm.
    2. Garnished the chole chaat with ginger relish and/or a slice of lemon.
    3. Serve chole chaat as a lettuce wrap using Romaine lettuce leaves.  It provides a nice crunch to the chaat and makes for a beautiful presentation.
     
    Tips
    1. For an easier and quicker recipe, substitute canned chickpeas.
    2. *The roasted cumin seed powder is prepared by dry roasting whole cumin seeds and then grinding them to a powder.
    Tried this recipe?Let us know how it was!

    Chole Chaat Recipe: A Tangy Twist to Spicy Chickpeas 

    Introduction to Chole Chaat Recipe 

    Chole Chaat is a delightful fusion of street food flavors, blending the essence of appetizers with the tanginess of chaat, all while being gluten-free and vegan, making it a perfect choice for those seeking delicious and wholesome street food recipes. 

    This chole chaat recipe offers a unique twist to traditional chickpeas by infusing them with a medley of spices and chutneys. Perfect for snacking or as a side dish, this chole chaat is sure to be a crowd-pleaser at any gathering. Let’s dive into the flavorful journey of creating this irresistible recipe of chole chaat.

    How to Make Chole Chaat: Step-by-Step Guide 

    To begin preparing the Chole Chaat, start by peeling and cutting the boiled potato into uniform ¼-inch cubes. This step ensures that the potatoes will cook evenly and integrate well with the other ingredients. Set aside the cubed potatoes for later use.

    Next, thoroughly wash the chickpeas and proceed to soak them in four cups of water for a minimum of eight hours. This soaking process allows the chickpeas to rehydrate and soften, expanding to approximately two and a half times their original volume. After the soaking period, drain the water from the chickpeas and give them a final rinse to remove any residual impurities.

    Now, it’s time to cook the chickpeas. Place the soaked chickpeas in a pressure cooker along with four cups of fresh water. Set the pressure cooker on medium-high heat and allow it to come to a steam. Once steam begins to emit, reduce the heat to medium and continue cooking for an additional eight minutes. It’s crucial to ensure that the pressure cooker is properly sealed and maintained during the cooking process.

    After cooking, turn off the heat and allow the pressure cooker to naturally release its steam until it’s safe to open. The chickpeas should now be soft and tender, ready to be incorporated into the chaat.

    Meanwhile, in a separate saucepan, heat oil over medium heat. Once the oil is heated, add the gram flour (besan) and stir-fry for one to two minutes until it takes on a golden brown hue. This toasting of the gram flour enhances its flavor and aroma.

    To the golden-brown gram flour, add grated ginger and minced green chili, stirring briefly to infuse their flavors into the mixture. Then, introduce the cooked chickpeas to the pan, along with the specified amounts of salt, black salt, black pepper, roasted cumin seed powder, and mango powder. Lightly mash the chickpeas while incorporating the spices, allowing them to meld together over low heat for 10 to 15 minutes.

    Following this, gently incorporate the previously prepared cubed potatoes into the chickpea mixture, along with the garam masala and freshly squeezed lemon juice. Stir gently to ensure all ingredients are evenly distributed.

    Before serving, allow the Chole Chaat to rest for at least half an hour to allow the flavors to fully develop and meld together. During this time, the gravy will naturally thicken, enhancing the overall texture and taste of the dish.

    For serving, Chole Chaat is best enjoyed warm, garnished with optional ginger relish and/or a slice of lemon for added freshness. For a creative presentation, consider serving the chaat as lettuce wraps using Romaine lettuce leaves, which provide a satisfying crunch and elevate the dish’s visual appeal.

    Lastly, for a quicker alternative, canned chickpeas can be substituted in place of soaked and cooked chickpeas. Additionally, the roasted cumin seed powder mentioned in the recipe can be easily prepared by dry roasting whole cumin seeds and subsequently grinding them into a fine powder, imparting a robust, smoky flavor to the dish.

    Tips for Perfecting Your Chole Chaat Recipe 

    • To enhance the flavor profile of the chole chaat, you can add a pinch of amchur (dry mango powder) or  chaat masala for an extra tangy twist.
    • For a healthier version, you can use boiled chickpeas instead of cooking them in oil. Simply boil the chickpeas until tender and proceed with the recipe as directed.
    • Customize the spice level of the chole chaat according to your preference by adjusting the amount of green chilies or red chili powder used in the masala.

    Variations to Explore 

    • Paneer Chole Chaat: Add cubes of paneer (Indian cottage cheese) to the chole chaat for a protein-rich variation.
    • Sprouts Chole Chaat: Incorporate sprouted chickpeas or mixed bean sprouts to amp up the nutritional content of the chaat.
    • Avocado Chole Chaat: For a creamy twist, top the chole chaat with diced avocado and a dollop of yogurt.

    Benefits of Chole Chaat 

    • Chickpeas, the star ingredient of chole chaat, are a rich source of protein, fiber, and essential nutrients such as iron, magnesium, and folate.
    • The spices used in chole chaat, such as cumin, ginger, and garlic, are known for their digestive properties and can aid in digestion.
    • Chole chaat is a wholesome and satisfying snack option that can help curb hunger cravings while providing a burst of energy.

    FAQs (Frequently Asked Questions)

    Can I use canned chickpeas instead of dried chickpeas for this recipe?

    • Yes, you can substitute canned chickpeas for dried chickpeas. Simply rinse and drain the canned chickpeas before using them in the recipe.


    Can I prepare the chole chaat in advance?

    • Yes, you can prepare the chole chaat ahead of time and store it in the refrigerator for up to 2-3 days. Simply reheat it before serving.


    Is chole chaat suitable for vegetarians and vegans?

    • Yes, chole chaat is a vegetarian and vegan-friendly dish as it does not contain any animal products.


    Can I adjust the spiciness of the chole chaat according to my preference?

    • Absolutely! Feel free to adjust the amount of green chilies or red chili powder to suit your taste buds.


    What can I serve with chole chaat?

    • Chole chaat pairs well with crispy papdis (fried dough wafers), sev (crispy chickpea noodles), or even plain yogurt for a refreshing contrast.


    Explore more mouthwatering recipes on Manjula’s Kitchen: Paneer Tikka Masala, Vegetable Biryani, Aloo Paratha, Mango Lassi, Palak Paneer

  • Sabudana Khichdi (Spicy Tapioca)

    Sabudana Khichdi (Spicy Tapioca)


    Sabudana Khichdi (Spicy Tapioca)

    Sabudana khichdi (Spiced Tapioca)

    Sabudana also known as Tapioca makes a great Khichdi. This recipe is mildly spiced and peanuts give it a light crunch. Tapioca khichdi is great for breakfast or as a snack and it tastes delicious.
    5 from 2 votes
    Prep Time 5 minutes
    Cook Time 15 minutes
    Total Time 20 minutes
    Course Breakfast
    Cuisine Indian
    Servings 4 people

    Ingredients
      

    • 1-1/2 cups tapioca sabudana
    • 1/2 cup broken raw peanuts mungfali
    • 1/2 cup green peas hari matar
    • 2 green chilies sliced long ways
    • 3 tbsp oil
    • 1/2 tsp cumin seeds jeera
    • 1/2 tsp black mustard rai
    • 1/4 tsp turmeric haldi
    • 1 tsp salt
    • 1 tbsp lemon juice
    • 2 tbsp cilantro finely chopped hara dhania

    Instructions
     

    • Gently wash then soak tapioca (sabudana) in about 1/2 cup of water for 6 to 8 hours.
    • Roast the peanuts on medium heat, until they are lightly brown. Keep aside.
    • Heat the oil in a frying pan on medium heat. Test the heat by adding one cumin seed to the oil; if seed cracks right away then oil is ready. Add cumin seeds and mustard seeds after seeds crack add green chilies and stir for a few seconds.
    • Next add the green peas and stir fry until peas are tender.
    • Add the soaked tapioca (sabudana) and stir fry for 3 to 4 minutes ,
    • Add turmeric, and salt and stir fry on medium heat continuously until tapioca (sabudana) becomes translucence, looks like pearls. Stir gently and making sure tapioca doesn’t get sticky and stuck to each other. This should take about 6 to 7 minutes.
    • Add peanuts, lemon juice and cilantro (hara dhania), stir gently. Serve hot.

    Notes

    To save time soak the tapioca in warm water for about 2 to 3 hours water should not be hot.
    If you don’t stir continuously tapioca will stick to each other.
    Keyword Appetizer, Tea Time Snack
    Tried this recipe?Let us know how it was!