Easy Indian Recipes: Quick and Delicious Vegetarian Dishes
In today’s fast-paced world, we often find ourselves seeking meals that are quick to prepare but still bursting with flavor. Indian cuisine, known for its rich and aromatic spices, offers a plethora of options that are both easy to make and incredibly satisfying. Let’s explore some easy Indian recipes vegetarian, perfect for any occasion, ensuring that you can enjoy delicious easy Indian recipes without spending hours in the kitchen.
Paneer Bhurji
Paneer Bhurji is a delightful scramble made with crumbled paneer (Indian cottage cheese) and a mix of vegetables and spices. This dish is a staple in many Indian households and is a fantastic example of easy Indian recipes. It comes together quickly, making it ideal for a weeknight dinner or a hearty breakfast. Serve it with a side of warm roti or toast for a complete meal.
Vegetable Pulao
For a one-pot wonder, Vegetable Pulao is a go-to choice. This dish features rice cooked with a medley of vegetables and fragrant spices. It’s a shining star among easy Indian food recipes due to its simplicity and the minimal effort required. Pair it with a cooling cucumber raita from the Raita Recipes category for a refreshing touch.
Aloo Jeera
Aloo Jeera, or cumin-spiced potatoes, is a quick and flavorful dish that exemplifies Indian food recipes easy. The potatoes are sautéed with cumin seeds and a handful of spices, resulting in a dish that’s both comforting and satisfying. This recipe is perfect for those times when you need something delicious without a lot of fuss.
Enhancing Your Quick and Easy Menu
To elevate your menu, why not include some delectable options from other categories? Indian Breads like chapati or naan can be quickly prepared and make a perfect accompaniment to any meal. For those with a sweet tooth, Indian Desserts Recipes such as a speedy coconut burfi or a delightful mango lassi can provide a sweet finish to your meal. Incorporating dishes from the Healthy Recipes section, such as a simple and nutritious palak dal or a crisp salad from the Soups and Salads Recipe category, can add a healthy balance to your table.
More Easy Indian Recipes
Chana Masala
Chana Masala is a popular dish featuring chickpeas cooked in a spiced tomato gravy. This dish is not only delicious but also quick to prepare, making it a favorite in the realm of easy Indian recipes vegetarian. Serve it with basmati rice or naan for a complete meal.
Moong Dal Khichdi
For a comforting and nourishing option, Moong Dal Khichdi is a must-try. This simple dish made from rice and yellow moong dal (split yellow lentils) is seasoned with basic spices and is incredibly easy to make. It’s perfect for those days when you want something light yet satisfying.
Sweet and Simple Endings
Sheera
Sheera is a traditional Indian dessert made with semolina, ghee, and sugar. It’s a quick and easy dessert that fits perfectly into the category of easy Indian food recipes. The best part? It takes just a few minutes to prepare, making it a great option for last-minute sweet cravings.
Coconut Ladoo
Another sweet treat that’s both simple and delightful is Coconut Ladoo. Made with grated coconut and condensed milk, these sweet balls are a favorite among easy Indian recipes vegetarian. They’re perfect for festivals or just as a quick dessert to satisfy your sweet tooth.
Frequently Asked Questions (FAQs)
Q: What are some popular easy Indian recipes vegetarian?
A: Some popular easy Indian recipes vegetarian include Paneer Bhurji, Vegetable Pulao, Aloo Jeera, Chana Masala, Moong Dal Khichdi, Sheera, and Coconut Ladoo. These dishes are quick to prepare and full of flavor.
Q: How can I make traditional Indian food recipes easy?
A: To make traditional Indian food recipes easy, look for recipes that require minimal ingredients and cooking time. Dishes like Paneer Bhurji, Aloo Jeera, and Moong Dal Khichdi are great examples of easy and quick Indian recipes.
Q: What are some easy Indian food recipes for beginners?
A: Some easy Indian food recipes for beginners include Vegetable Pulao, Chana Masala, and Coconut Ladoo. These recipes are straightforward and don’t require advanced cooking skills, making them perfect for those new to Indian cooking.
Q: Can I prepare easy Indian recipes in advance?
A: Yes, many easy Indian recipes can be prepared in advance. Dishes like Vegetable Pulao and Chana Masala can be made ahead of time and stored in the refrigerator. Simply reheat before serving.
Q: What are some quick Indian desserts?
A: Some quick Indian desserts recipes include Sheera and Coconut Ladoo. These desserts are easy to make and require minimal preparation time, making them perfect for when you need a sweet treat in a hurry.
Conclusion
Easy Indian recipes vegetarian offer a world of flavors and aromas without the lengthy preparation time.
Whether you’re looking for easy Indian recipes, easy Indian food recipes, or specific Indian food recipes easy, these dishes bring convenience and deliciousness to your table.
So, gather your ingredients, try out these recipes, and enjoy the rich and diverse world of Indian cuisine. Happy cooking and happy eating!
By incorporating these dishes into your menu, you’ll be able to enjoy a wide variety of delicious and nutritious foods. Whether you’re looking for quick snacks, main courses, or desserts, there’s an easy Indian recipe to suit every taste.
Don’t forget to check out Manjula’s Kitchen for more inspiration and culinary delights. Happy cooking and happy eating!
Put the yogurt in a strainer lined with muslin or cheese cloth. Gently squeeze excess water from the yogurt. Make sure not to squeeze out the yogurt, and leave it at least 4 hours or more. Before removing the yogurt from muslin cloth squeeze one more time.
The yogurt will become thick in consistency, this is known hung yogurt, and this should make about half cup.
Add all the ingredients for filling with yogurt and mix it well.
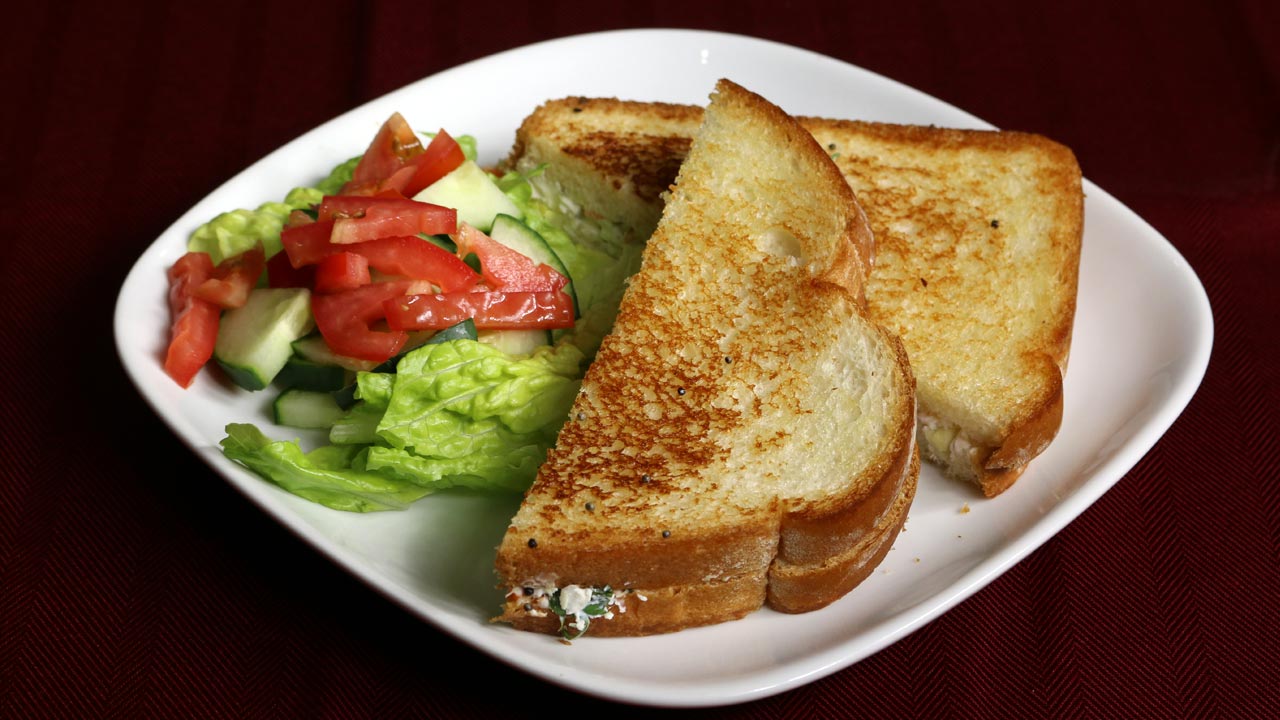
Spread the mix over two slices of bread and cover them with other slice.
Heat the skillet over medium heat; grease the skillet with about half teaspoon of butter.
Sprinkle the skillet with mustard seeds as seeds crack place the sandwich over, brush the butter on top of the slice. Grill the sandwich from both sides until they are golden brown. This should take about one minute each side.
Sandwiches are ready; serve them with side of salad
Yogurt sandwiches taste great even at room temperature, and great for lunch box.
In a blender place watermelon, lemon juice, ginger juice, sugar, pepper and salt together and blend until it is smooth. Add ice and blend it again until ice is crushed.
Pore the drink in a glass filling the glass up to 3/4 and add ginger ale, serve immediately.
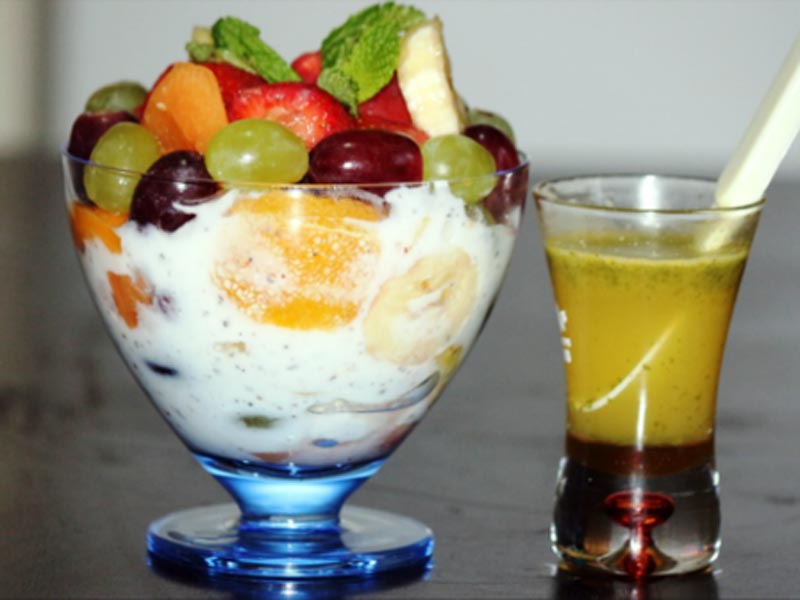
Seasonal fruit such as cantaloupe, mango and grapes tastes even more refreshing splashed with a flavorful honey-lime-mint dressing for a sweet fruit salad. A simply elegant fruit salad paired with sweet yogurt and tangy honey- lemon-mint dressing makes it a refreshing treat on its own.
To make dressing whisk lemon juice, orange juice, crushed mint leaves and honey together in a small bowl and drizzle over the fruit mixture and toss to coat
Take yoghurt in a bowl and add cardamom powder and powder sugar (optional) mix it well
Now take a bowl and add a layer of fruits then a layer of yoghurt whip and then another layer of fruits and yoghurt whip
Add final layer of fruits and garnish it with mint leaves
This is a great recipe of delicious dessert, moist and eggless cake to satisfy your chocolate cravings and sweet tooth. Adults and kids alike will be delighted with this yummy cake. A cake that is like a sweet snack in every bite and is kids favorite for having chocolate in it.
Place chocolate in a bowl and add the vanilla essence. Bring the heavy cream to boil and turn off the heat. Pour the cream over chocolate and stir until chocolate completely dissolve and become glossy. As ganache cool it will become thick.
For Cake
Preheat the oven at 350 degree F
Grease 8×8 inches cake pan. Set aside.
All the dry ingredients except sugar, sift together flour, corn starch, coco powder, baking soda, baking powder, and salt, three times to make sure all the ingredients are well mixed. Set aside.
With the electric mixer on low speed mix the butter, sugar, vinegar and vanilla until it is smooth this should take about two minutes. Add the tofu to butter mixture and mix on low speed for about two minutes. This will have a curdle kind of texture.
Slowly add the dry mix, mix with spatula all the ingredients should be mixed well. Add milk as needed, batter should be of thick consistency but pourable.
Pour the mixture into a greased baking pan evenly. Place the pan on middle oven rack and bake it for 35 minutes or until knife inserted in centre comes out clean.
Allow cake to cool for about 15 minutes in pan and then run a butter knife around the edges of cake. Place a wire cooling rack over top of pan. Use both hands to hold the rack in place while flipping the cake over onto the rack. Set the rack down and gently tap on the bottom of pan until the cake is released. Cool completely before slicing the cake.
Pour the ganache over the cake or individual cake pieces.
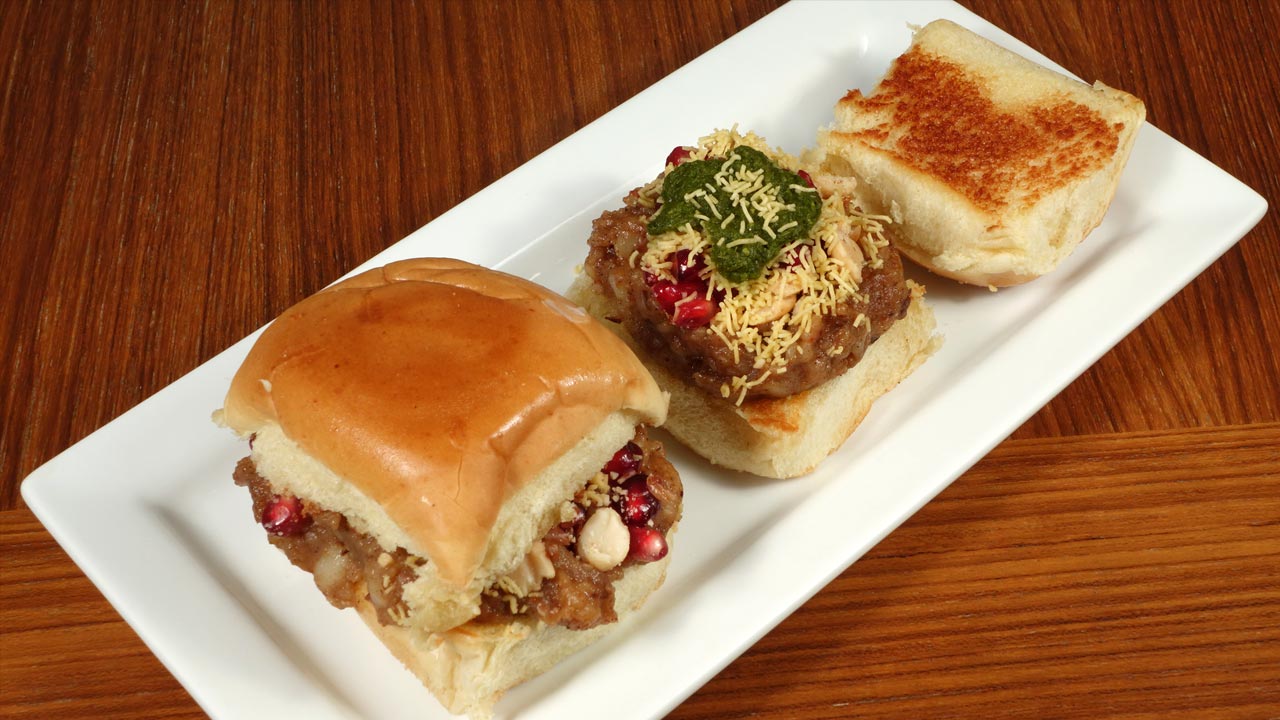
Dabeli is a popular snack on the go, with street vendor in Mumbai. Pav (small burger buns) filled with spicy potatoes and topped with peanuts, chutney, fine sev and pomegranate. Enjoy this delicious sandwich;
Spice mix which we prepared that should be about 1 tablespoon
1tablespoon tamarind paste (imli)
3teaspoons sugar
1/2cup water
Also Need
4 buns
2tablespoons butter for cooking
To Serve
1/4 cup roasted and crushed peanuts
1/4cup fine sev available in Indian grocery stores
1/4cup pomegranate (anar) seeds, if not available red or green grapes cut into small pieces
3tablespoons cilantro chutney (dhania chutney)
Instructions
For Dabeli Masala: roast all the ingredients red chili, coriander, cloves, cumin seeds, cinnamon and black pepper, in a small pan on the medium heat for two minutes, spices will become very aromatic. Grind the spices to fine powder. This should make about one tablespoon.
For Filling: heat the oil in pan on medium heat moderately. Add cumin seeds when seeds crack add potatoes spice mix, salt and tamarind paste, mix it well.
Add about half cup of water mix it and bring to boil, cook on low heat for about two minutes. Mix should be consistency of thick paste. Set aside.
How to Proceed
Slice the buns into halves and toast the buns over skillet on medium heat using little butter both sides.
Over one half of the bun put about ¼ cup of the filling, top it with chutney, pomegranate, peanuts and fine sev (you can find in Indian grocery stores), sandwich with the other half of the bun.
Dabeli is a beloved Indian street food that tantalizes taste buds with its spicy, sweet, and tangy flavors. Originating from the state of Gujarat, dabeli has gained popularity across the country for its unique taste and satisfying texture. This dabeli recipe offers a delightful culinary journey, combining aromatic spices, creamy potatoes, crunchy peanuts, and a medley of chutneyssandwiched between soft buns. Let’s delve into the art of making this irresistible dabeli.
Step 1: Making the Dabeli Masala
To begin, let’s prepare the dabeli masala. In a dry skillet over medium heat, roast the coriander seeds, cumin seeds, cloves, cinnamon stick, dried red chilies, fennel seeds, and peppercorns until fragrant. Allow the spices to cool, then grind them into a fine powder using a spice grinder or mortar and pestle. This aromatic dabeli masala forms the heart of the dabeli’s flavorful filling.
Step 2: Preparing the Potato Filling
Next, let’s create the savory potato filling. Heat oil in a pan over medium heat and add mustard seeds. Once the mustard seeds splutter. Now, incorporate the mashed potatoes into the pan along with the prepared dabeli masala. Mix well to ensure the potatoes are evenly coated with the spices. Drizzle in the tamarind chutney for a hint of tanginess and season with salt to taste. Allow the filling to cook for a few minutes until the flavors meld together beautifully.
Step 3: Assembling the Dabeli
Now comes the exciting part – assembling the dabeli sandwiches! Slice the burger buns in half and lightly toast them with a smear of butter on a hot griddle until golden brown. Spread a generous layer of the prepared potato filling onto the bottom half of each bun. Sprinkle roasted peanuts, pomegranate seeds, and chopped coriander leaves on top for added crunch and freshness. Drizzle a little more tamarind chutney over the filling for an extra burst of flavor. Finally, cover the sandwiches with the remaining bun halves and press gently to secure the layers.
Step 4: Serving and Enjoying
Once assembled, dabeli sandwiches are ready to be served and savored! For the authentic street food experience, garnish each sandwich with a generous sprinkle of sev – crispy chickpea flour noodles that add a delightful crunch. Serve dabeli sandwiches hot with extra chutneys on the side for dipping, if desired. These irresistible treats are perfect for picnics, parties, or simply as a satisfying snack any time of day.
Variations and Tips:
For a twist on the classic recipe, try substituting the potato filling with paneer (Indian cottage cheese) or mixed vegetables for a vegetarian option.
Experiment with different types of chutneys, such as mint chutney or to customize the flavor profile according to your preference.
To make dabeli spicier, add chopped green chilies or a dash of chili powder to the potato filling.
For a richer taste, spread a layer of butter on the toasted buns before assembling the sandwiches.
Benefits of Dabeli:
Dabeli is a wholesome snack that provides energy and satisfies hunger cravings, making it ideal for a quick meal or on-the-go snack.
Potatoes, the main ingredient in dabeli, are a good source of carbohydrates, fiber, and essential nutrients like vitamin C and potassium.
The combination of spices in dabeli masala not only enhances the flavor of the dish but also offers various health benefits, including aiding digestion and boosting metabolism.
FAQs (Frequently Asked Questions):
Q: Can I make dabeli masala in advance?
A: Yes, you can prepare dabeli masala in large batches and store it in an airtight container for future use. This allows for quick and convenient assembly whenever the craving strikes.
Q: Can I adjust the spice level of dabeli according to my taste preferences?
A: Absolutely! Feel free to adjust the amount of dabeli masala or add more/less chili powder to suit your preferred spice level. You can also control the heat by choosing mild or spicy chutneys.
Other Recipes on Manjula’s Kitchen (H2)
If you’re looking to explore more Indian recipes, appetizers, beverages, and desserts, be sure to check out the following links on Manjula’s Kitchen. Here are some links to recipes on Manjula’s Kitchen official website:
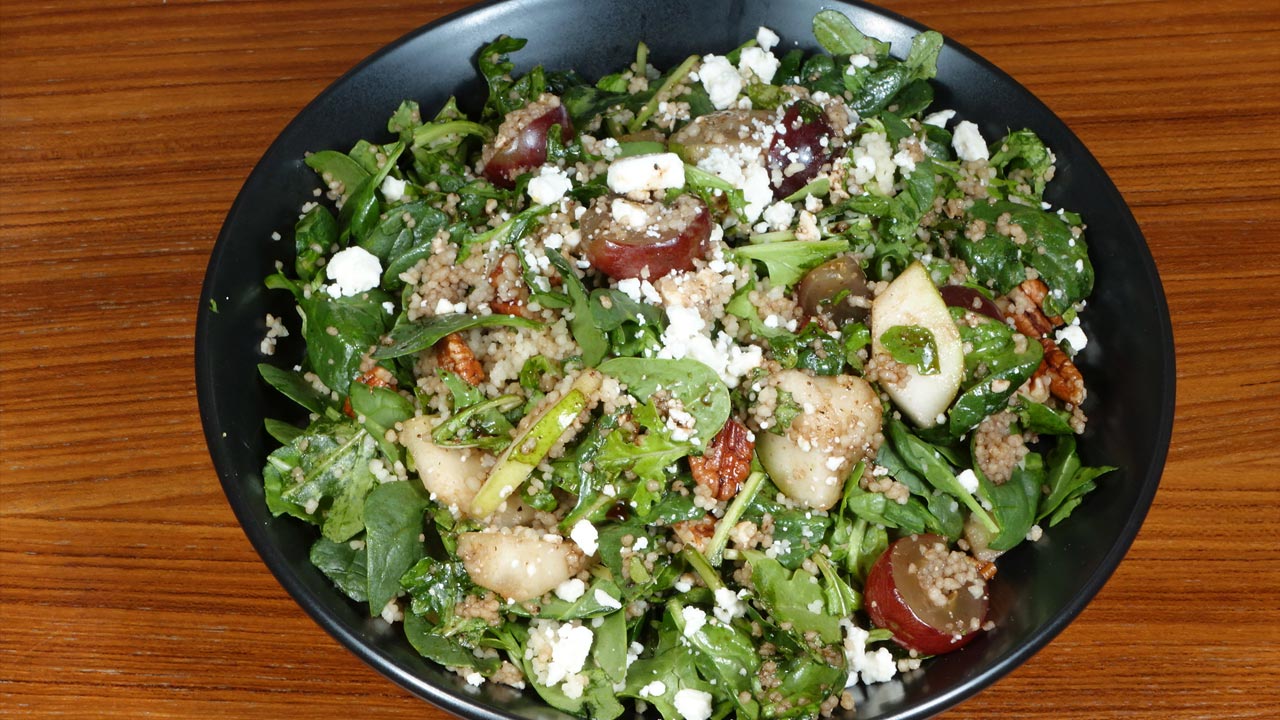
There's nothing like a fresh salad. They are healthy and contrary to popular belief they can be quite filling and extremely satisfying! Spinach Couscous Salad is made with fresh spinach, arugula, couscous, sliced red grapes, cheese crumbles, pecans and my special house-dressing!
2cups spinach, steamed removed and roughly chopped
2cups arugula roughly chopped
1/4 cup pecans roasted and roughly chopped
1/2cup seedless red grapes cut in half
1/2cup pear cut into bite size pieces
3 tablespoons feta cheese crumbled
2/3cup water
Dressing
2tablespoons balsamic vinegar
2tablespoons olive oil
2teaspoons sugar
½ teaspoon salt
¼teaspoon black pepper
½teaspoon mustard (rai) powder
1 teaspoon ginger juice*
Instructions
For dressing: add all the dressing ingredients together mix it well making sure sugar is dissolved. Set aside. * To make ginger juice shred the ginger using fine shredder or zester, and squeeze the juice with fingers.
Boil the water in a saucepan over medium high heat with oil and salt. Add couscous mix it, cover the pan and turn off the heat. Couscous should be ready in about 5-6 minutes, fluff couscous with a fork. Set aside.
Toss spinach, arugula, couscous, pecans, and grapes together pour the dressing over and toss, sprinkle the feta cheese.
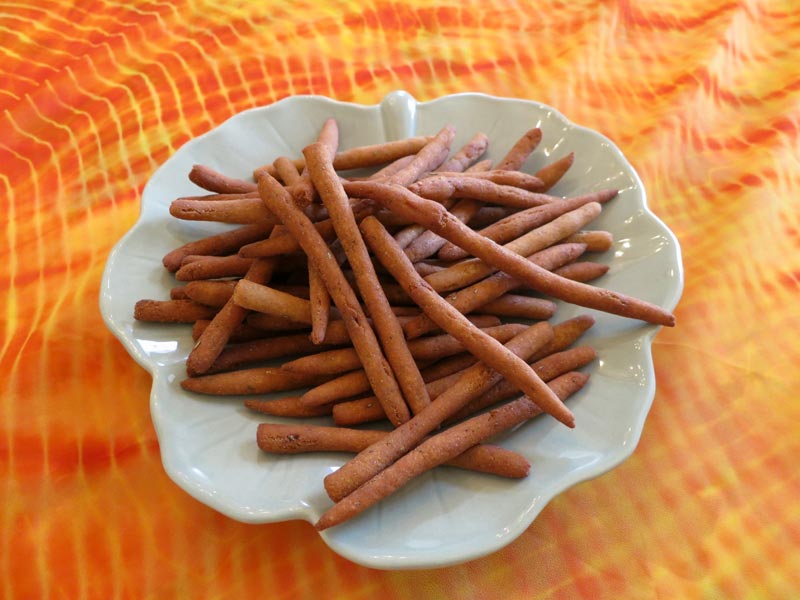
1cup coconut flour (available at Sprouts or any specialty store)
1 cup all-purpose flour
2 tbs cooking oil for making dough
2tbs brown sugar
1tbs finely crushed dry rosemary
1tbs freshly squeezed ginger juice (grate a piece of ginger and then squeeze to extract juice)
1tbs rice flour
1/2 tsp salt
1/8tsp baking soda
Approx. 1 1/2cups water for making dough
6cups cooking oil for frying
Instructions
In a large bowl, thoroughly combine coconut flour, all-purpose flour, salt, rice flour, brown sugar, baking soda, crushed rosemary, and 2 tbs oil.
Add ginger juice and water a little bit at a time to form a soft dough. Cover and allow dough to rest for 15 minutes.
Divided the dough into approximately 60 smaller portions. Roll the little portion of the dough with both hands on a flat surface to give it a shape of thin log like a pretzel stick.
Place a 10” stir-fry pan over high heat and wait until oil is heated. Reduce heat to medium and start frying a small batch of 5 or 6 pretzel sticks at a time until golden brown.
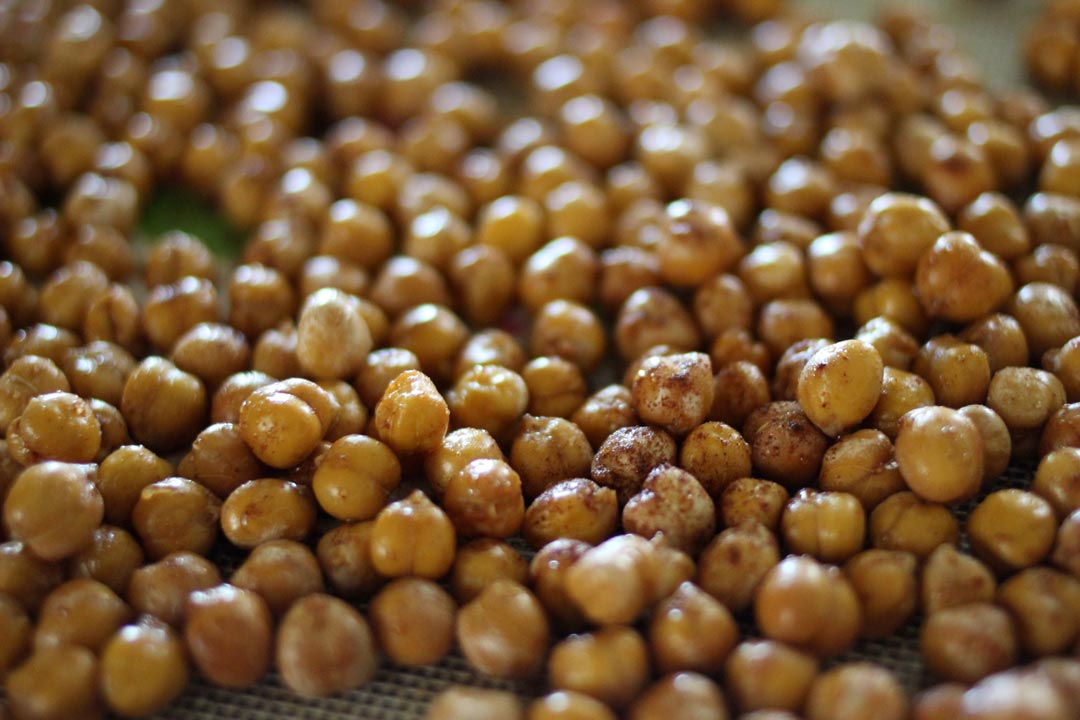
Roasted Chickpeas is one of my favorite (and easy to make) snacks. This makes little snacks for 2-6 people. They are very good and the spicy crunchy contrast is delicious. I am sure you will love it too!
Preheat the oven to 425 Fahrenheit and grease a cookie sheet or line with foil.
Drain and rinse the chickpeas, removing as many of the skins as possible, or use chickpeas that have been soaked overnight.
Melt the coconut oil and toss the chickpeas with the oil and spices.
Spread onto the cookie sheet and bake for 15 minutes. Stir the chickpeas and bake for another 12-16 minutes or until they are fully roasted and crunchy.
Remove and let cool before eating. Once cooled, they can be store in an airtight container to maintain freshness.
Notes
Olive oil can also be used if coconut oil is unavailable. Enjoy!
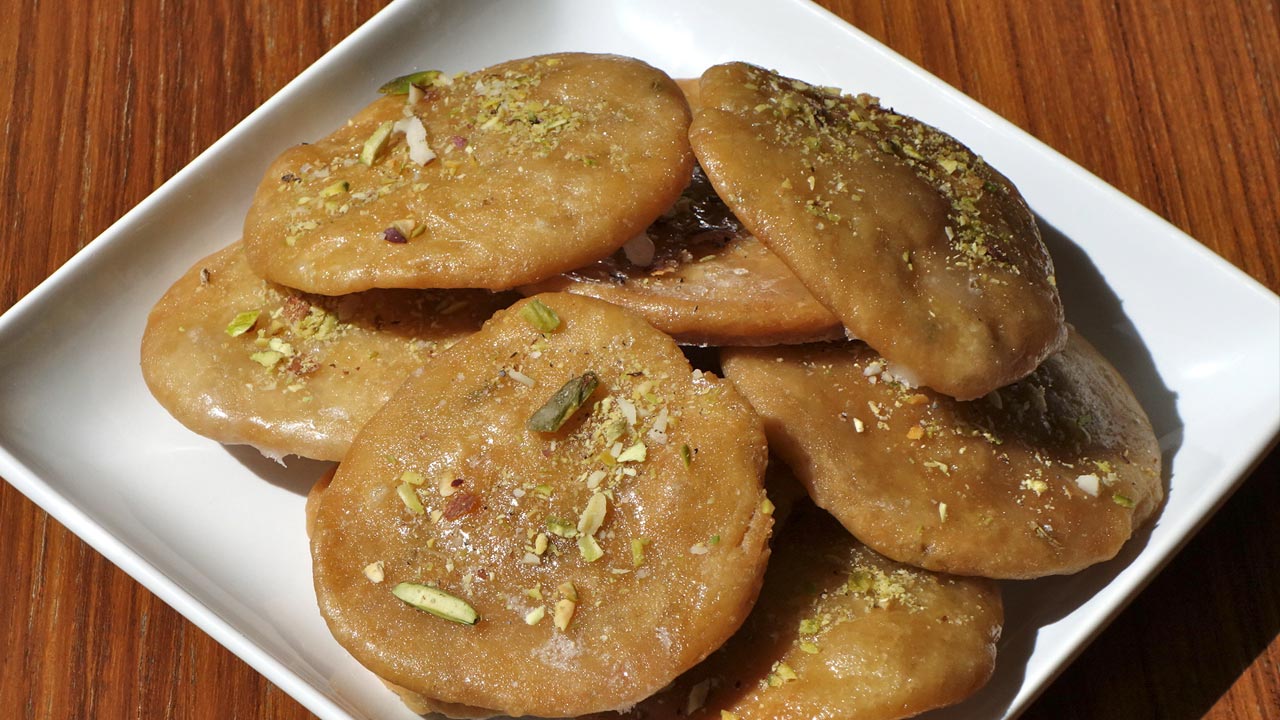
Meethi matries are delightful crispy and sweet snack made during festivals like Holi and Diwali. You can also serve them as biscuit or cookie. Fennel and cardamom gives very nice and sweet flavor to them.
Mix flour, sooji, salt, fennel seeds and oil in a bowl. Add water as needed to make soft dough. Don’t knead the dough. Cover the dough with a damp cloth. Let it rest at least 15 minutes.
Divide the dough into 14 equal parts. Rolling the dough between your palms form into balls.
Roll the dough balls into three inch circles. Prick each matri with a fork 8-10 places on both sides. This will prevent matri not to puff when frying.
Heat at least one inch of oil in a frying pan over medium heat. To check if oil is ready put a little piece of dough in the oil. It should make oil lightly sizzle, if dough float instantly oil is too hot.
Fry a few matri at a time. Fry the matries until both sides are a light golden-brown. It should take six to eight minutes. If the matries are fried on high heat, they will not be cooked inside.
Take them out over paper towel so it can absorb the extra oil.
For syrup, in a sauce pan add water, and sugar over medium heat, bring it to a boil. Let it boil for about 2 minutes until syrup is sticky, on candy thermometer it should be 230 degree.
Dip the matri one at a time into the syrup making sure it is coated with syrup all around.
Place the matries on a wire rack to allow the extra syrup drain or over greased plate.
Garnish the matries with cardamom and sliced pistachios while the matries are still moist with syrup.
Matries will be dry in an hour.
Matries can be stored in airtight container up to a month.
Baked Samosa Pies (actually more of mini pies) are wolves in a sheep’s clothing. Street food gone fancy! Or may be street food with a make-over.I made the dough at home but if you are short on time, check the “My Take” section for a shortcut that will save you 45 minutes. You can probably make them as appetizers for a party or as an evening snack with a cup of hot tea.I was quite skeptical about how this would turn out because I have never had a baked samosa before but to my pleasant surprise, they were great (and the calories you are not consuming because they are not deep-fried?!). I even had a few left overs which we later warmed up using a microwave, they tasted as fresh as ever.Like I was saying, these wolves are true samosas to their core with a stuffing of warm spiced boiled potatoes. I have adapted this recipe from Manjula’s Kitchen for the contest of Jan’14.
1 cup all-purpose flour/Maida (Makes around 8 pies)
1 1/2 tablespoon sooji (semolina flour/cream of wheat)
1/4 tsp baking soda
1/2 tsp baking powder
1/8 tsp celery seeds (ajwain)
1/4 teaspoon salt
3 tablespoons oil
1/3 cup lukewarm water
For the stuffing
1 cup of boiled & mashed potatoes (Crudely mashed to leave chunks or dice them)
1/4 cup green peas (fresh/frozen)
1/2 teaspoon cumin seeds
2 green chilies finely chopped
1 teaspoon coriander powder
1/4 teaspoon garam masala
Salt to taste
2 tablespoons oil
2 tbsp chopped cilantro
1 tbsp fresh lemon juice
Instructions
Mix all the ingredients meant for the samosa wrappers using the lukewarm water(Add water in small quantities while mixing making sure it does not get soggy)
Knead the dough well. Finish off the kneading process using a drop of oil to get smooth-surfaced dough.
Cover the dough with a damp cloth and let it rest for at least 15 minutes.
Heat the oil meant for the stuffing in a pan.
Add cumin seeds and allow them to crackle. Add the chopped green chilies and green peas.
Sauté for a min, add the coriander powder, garam masala and salt and mix well.
Add the boiled & mashed/diced potatoes. Mix with a light hand.
Turn off the heat; add the chopped cilantro and lemon juice and mix.
Add the potatoes and stir-fry for about 4 minutes. Stir in garam masala and amchur. Add more salt or amchur according to taste. Set aside.
Knead the dough for a minute.
Divide the dough into 2 parts (1 part 3/4 of the dough)
Divide the bigger portion of the dough into 8 equal portions. And roll them into rounds. Line the cups of a muffin pan with the freshly rolled rounds. Keep the pan covered with a damp cloth.
Take the smaller portion of the dough and again divide into 8 portions. Roll out smaller circles for covering the samosa wrapper cups.
Place stuffing into the samosa wrappers lined in the pan.
Brush the circumference of the small circles with water and paste them on top of the filled samosa wrapper cups.
Brush the tops with some oil and bake in a pre-heated oven at 350°F (180°C) for 15 min or until the samosa tops turn golden.
Allow them to cool on a wired rack for 2-3 min.
Enjoy hot with some hot sauce / Mint Chutney.
Notes
Additional Notes:
Super simple short-cut – use some cookie cutters and make samosa wrappers and covers out of store bought pie crusts!
Experiment with stuffing. Try some cauliflower and cheese or spinach & feta. Go wild!
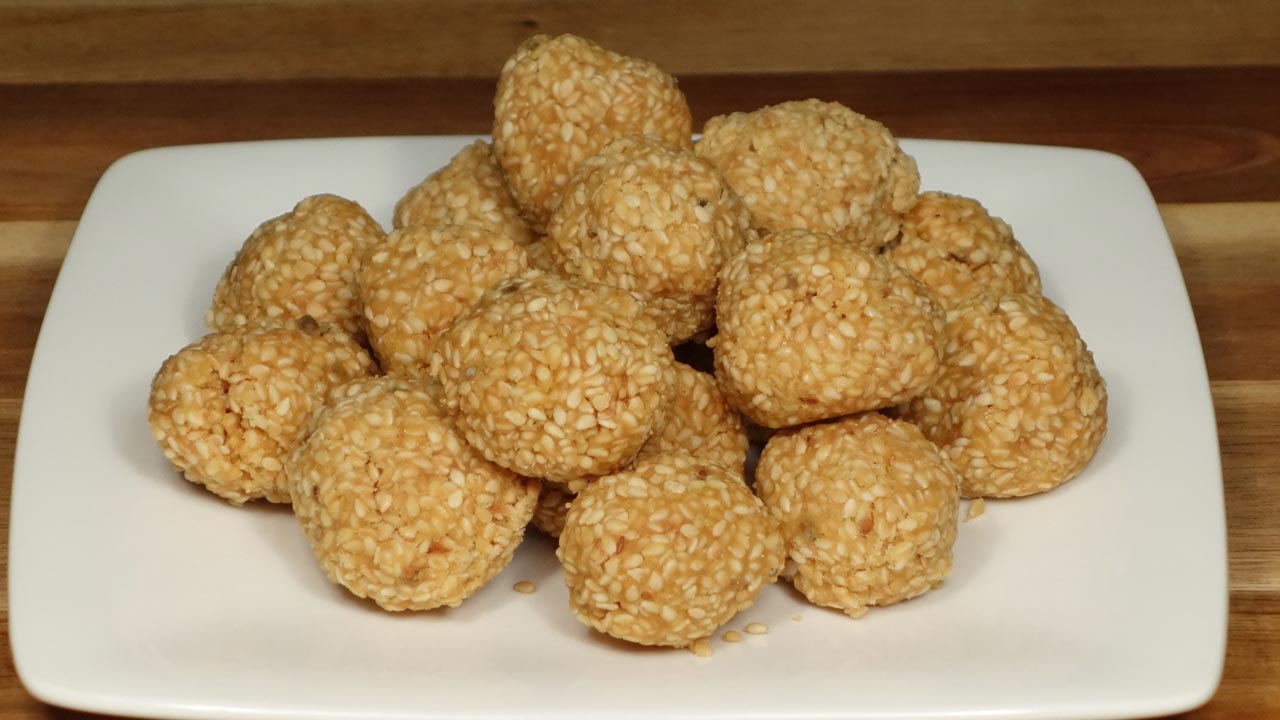
Til ka ladoo is a traditional winter sweet. This is a simple recipe made with til and jaggery. Til is sesame seed and jaggery is unrefined cane sugar. You can also enjoy them as sesame candy. Til ka ladoos are also made on various festivals especially for Makar Sankranti and also like a regular sweet snack munchies.
1cup jaggery or gur broken in small pieces, available at Indian grocery store
3tablespoons clarified butter, ghee
1/2teaspoon crushed cardamom
1/2cup water
Instructions
Grease a plate and set aside.
In a frying pan roast the sesame seeds on medium heat stirring continuously. Sesame seeds will become light golden brown. This should take 4-5 minutes. Take the seeds out in a bowl. Set aside.
In the same frying pan heat the water and add the jaggery.
Simmer over medium heat till it starts caramelizing and forms a ball when you add a drop of syrup in cold water. This should take 4-5 minutes. Reduce the heat to low.
Add ghee, cardamom, and roasted sesame seeds mix it thoroughly with melted jaggery.
Transfer it in greased plate; take one tablespoon of mixture in your palm and make them into round ball, this should be half the size of golf balls.
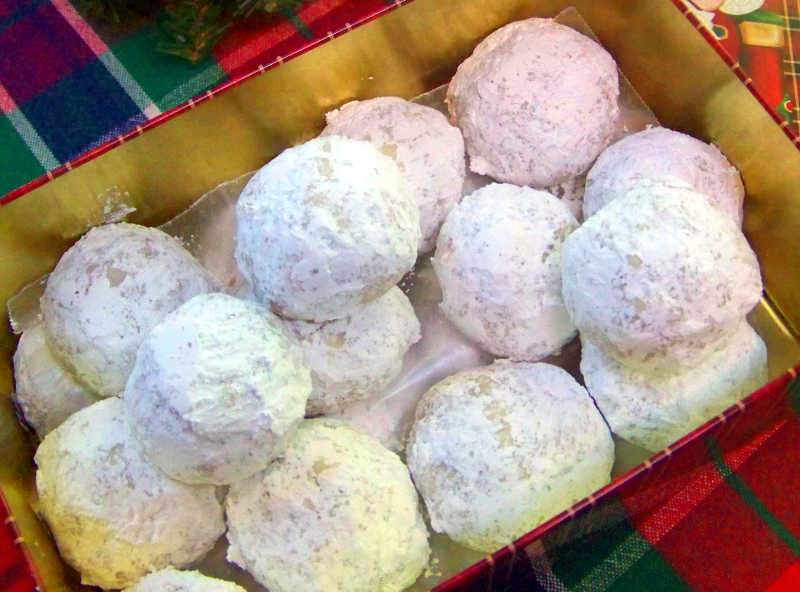
These Victory Vegan Tea cakes are easy to make. I guarantee you will love these little, melt in your mouth gems. They can be served as a dessert or as some sweet bunch of snacks.
Samosa pinwheels are great partysnack. This is an interesting fusion on the popular Indian snack samosas. They make a mouthwatering appetizer or can be served as a chaat.
4mediumpotatoes, boiled, peeled and roughly mashedwill be about 2-1/2 cup mashed potatoes
1/2cupgreen peas boiled and drainusing frozen green peas
1tspcumis seedsjeera
1 tbspgreen chili finely chopped
2tspscoriander powderdhania
1/2tspred chili powderlal mirch
1/2tspgaram masala
1tspmango powderamchoor
1-1/4tspasalt
2tbspscilantro finely choppedhara dhania
Dough
1cupall-purpose flourmaida, plain flour
2tbspsfine soojisamolina
1/2tspsalt
3tbspsoilcanola, vegetable
1/3cupcold water, approx.
Also Need
3tbspaall-purpose flourmaida, plain flour
1/4cupwater
oil to fry
Instructions
Dough
Mix flour, sooji, salt, and oil. Add water as needed to make soft dough. Don’t knead the dough. Cover the dough with a damp cloth. Let it rest at least 15 minutes.
Filling
Squeeze the water from the green peas. Mix all the ingredients for filling: potatoes, cumin seeds, coriander, green chili, mango powder, salt, and cilantro.Divide the filling in 2 parts and set aside
Making Pinwheels
Mix the 3 tablespoons all purpose flour and ¼ cup water to make a thin batter. Set aside.
Knead the dough for a minute before rolling. Divide dough into two equal parts and make them into patties and roll each one into about 11 inch diameter.
Spread one part of the filling evenly over one of the rolled dough, slightly pressing.
Roll the sheet gently, but firmly until you have a nice firm log. Use a little water to seal the end of the sheet firmly, roll the log gently 6-7 times this helps keeping together.
With a sharp knife slice the both ends about 1 inch long then slice the log into ½ inch thick, this should make about 14 -16 pinwheels. Press each pinwheel lightly. Do the same with second sheet, you will have about 30 pinwheels.
Heat at least one inch of oil in a frying pan over medium high heat. To test, put a small piece of dough into the oil; dough should sizzle and come up slowly, but not change color.
Fry the pinwheels in small batches. Dip them in the batter one at a time and drop them slowly into the hot oil. Fry the pinwheels until both sides are golden-brown, turning occasionally. Each batch will take three to four minutes to cook. Repeat this process until all the pinwheels are cooked.
The crisp, delicious pinwheels are now ready to serve.
Notes
Samosa pinwheels can be frozen five to six weeks. To freeze, fry them halfway. Once they reach room temperature, layer them in a container between sheets of waxed paper. When ready to use, re-fry them or heat them in the oven at 350° F until golden brown.You can also refrigerate them three to four days.Serving SuggestionsServe Samosa Pinwheels With Hari Cilantro Chutney and or Tamarind Chutney.Serve them as a chaat with drizzling whipped yogurt and tamarind chutney.Also can be served with chola .
Pinwheel Samosa Recipe: How to Make Potato Samosa Pinwheel
Samosa pinwheels are savory veganappetizers reminiscent of traditional chaat, perfect for parties with their delightful fusion of flavors and convenient bite-sized format. Samosa pinwheels are a delightful twist on the traditional samosa, offering all the flavor and crunch in a fun, bite-sized package. In this pinwheel samosa recipe, we’ll guide you through the process of creating these savory treats step by step. Whether you’re hosting a party, looking for a unique appetizer, or simply craving a delicious snack, these samosa pinwheels are sure to impress.
Step 1: Prepare the Filling for Samosa Pinwheels
Begin by preparing the filling for your samosa pinwheels. Heat oil in a pan over medium heat and add cumin seeds, letting them sizzle for a few seconds. Add boiled and mashed potatoes to the pan, along with green peas, finely chopped green chilies, ginger paste, salt, red chili powder, mango powder, and garam masala. Mix the ingredients well and cook for a few minutes until the flavors meld together. Once done, set the filling aside to cool.
Step 2: Prepare the Dough for Samosa Pinwheels
While the filling cools, it’s time to prepare the dough for your samosa pinwheels. In a large mixing bowl, combine all-purpose flour, salt, and carom seeds (ajwain). Gradually add water and knead the ingredients into a smooth, pliable dough. Cover the dough with a damp cloth and let it rest for about 15-20 minutes.
Step 3: Assemble the Samosa Pinwheels
Now comes the fun part – assembling the samosa pinwheels! Divide the rested dough into small equal-sized balls and roll each ball into a thin circle, similar to a chapati or tortilla. Spread a thin layer of mint chutney evenly over each circle of dough, followed by a generous portion of the prepared potato filling. Carefully roll each circle into a tight log, similar to a Swiss roll, ensuring the filling is enclosed within the dough.
Step 4: Shape and Bake the Samosa Pinwheels
Once you’ve rolled all the circles into logs, it’s time to shape and bake your samosa pinwheels. Using a sharp knife, slice each log into smaller pieces, about 1 inch in width. Place the sliced pinwheels on a baking tray lined with parchment paper, leaving some space between each piece. Preheat your oven to 375°F (190°C) and bake the samosa pinwheels for 20-25 minutes, or until they turn golden brown and crispy.
Step 5: Serve and Enjoy Your Samosa Pinwheels
Once baked to perfection, remove the samosa pinwheels from the oven and let them cool slightly. Transfer them to a serving platter and garnish with fresh coriander leaves and a drizzle of mint chutney. These delightful samosa pinwheels are best enjoyed warm with your favorite dipping sauce or chutney. Serve them as appetizers at your next gathering or enjoy them as a tasty snack any time of day.
Variations and Tips for Samosa Pinwheels
Vegetarian Variation: This recipe for samosa pinwheels is completely vegetarian, making it suitable for those following a plant-based diet. However, feel free to customize the filling according to your preferences. You can add ingredients like paneer, tofu, or even a medley of vegetables for added texture and flavor.
Spice Level: Adjust the amount of green chilies and red chili powder according to your preferred spice level. If you prefer a milder flavor, you can reduce or omit these ingredients altogether.
Make-Ahead Option: You can prepare the filling and dough for the samosa pinwheels in advance and store them separately in the refrigerator. When ready to serve, simply assemble, shape, and bake the pinwheels for a quick and convenient snack or appetizer.
Serve with Dips: These samosa pinwheels pair perfectly with a variety of dips and chutneys, such as tamarind chutney, mint chutney, or yogurt-based sauces. Get creative with your dipping options to enhance the flavors of this delicious snack.
FAQs about Samosa Pinwheels
Can I Freeze Samosa Pinwheels?
Yes, you can freeze unbaked samosa pinwheels for later use. Simply assemble the pinwheels and place them on a baking tray lined with parchment paper. Once frozen, transfer them to a freezer-safe bag or container. When ready to bake, place the frozen pinwheels directly in the oven and adjust the baking time as needed.
Can I Air Fry Samosa Pinwheels?
Absolutely! To air fry samosa pinwheels, preheat your air fryer to 375°F (190°C) and place the assembled pinwheels in the basket, making sure they are not overcrowded. Cook for 10-12 minutes, or until golden brown and crispy, shaking the basket halfway through to ensure even cooking.
Can I Make Mini Samosa Pinwheels?
Yes, you can make mini samosa pinwheels by rolling the dough into smaller circles and cutting them into thinner slices. Adjust the baking time accordingly to ensure they cook evenly and become crispy.
Kulfi is an eggless Indian ice cream. This is a simple and delicious dessert made with milk and sugar. Kulfi is very popular with street vendors, especially in summer. This is an easy recipe to make and Kulfi is an absolute treat for both young and old.
1/2 teaspoon agar-agar (sea weed works as a vegetarian gelatin)
1/4 teaspoon cardamoms crushed
Instructions
In a heavy bottom pan over medium high heat boil the milk, heavy cream, and sugar together.
After milk comes to boil lower the heat to medium and let it boil for about 35 minutes, stir the milk occasionally and clean the sides preventing milk not to make a ring on sides. Because of cream, milk does not burn in bottom of the pan.
In a small bowl mix corn starch, agar-agar, and cardamom with 2 spoons of water really well making sure there are no lumps,
Add to the boiling milk mix it well, boil for about 3 minutes. Turn off the heat and mix the milk for about a minute.
Let it cool and pour into the molds, use Kulfi molds, Popsicle molds or small cups. I am using 3 oz plastic cups.
Freeze for about 5 hours, before Kulfi is ready to serve.
Notes
SuggestionsYou can flavor Kulfi with saffron or vanilla and add the nuts of your choice.
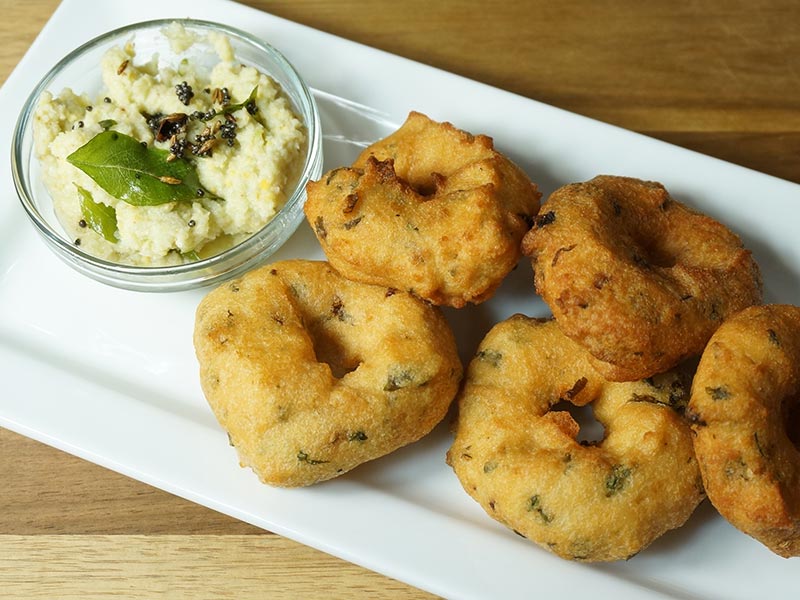
Medu Vadas are a traditional South Indian dish which can be served as a main course, side dish, or snack. This crispy deliciousness is made with spiced urad dal batter and fried in donut shape dumplings. They are crispy on the outside and soft on the inside. They are served with Sambar and Coconut Chutney.
1cup split washed urad dal (available in Indian stores)
1/8 teaspoon asafetida (hing)
2 teaspoon whole coriander seeds (sabut dhania)
1tablespoon green chili chopped
2tablespoons cilantro chopped (hara dhania)
1teaspoon salt
Oil to fry
Instructions
Wash and soak dal in about 3 cups of water for about 4-6 hours.
Drain the water and grind dal to smooth paste using very little water just enough to grind, food processor works good for this. Blend for another 2 minutes to whip dal to make fluffy. Take dal batter out in a wide bowl.
Add all the ingredients to the dal batter, cilantro, green chili, coriander, asafetida and salt, beat the batter for 2-3 minutes this will make the batter light and fluffy. To make sure batter is ready put one drop of batter in a bowl of water, batter should float.
Keeping the right consistency of batter is very important; add water as needed batter should not be soft but not runny. When you put the batter on your palm batter should hold its shape. Make the Vadas batter when you are ready to fry them, as the batter sit will get soft if you are not ready to fry keep batter refrigerated.
Heat the oil in a frying pan over medium high heat.
The frying pan should have about 1 inch of oil. To check if the oil is ready, put one drop of batter in oil. The batter should sizzle and come up but not change color right away. If oil is very hot Vadas will not cook through and will not be crispy.
Wet the palms and take golf size batter and place over your palm, flatten to round shape and make hole in the center looking like donut now with other hand wet fingers slowly slide Vada into the hot oil.
Fry the Vadas from both sides to golden brown. Take them out over a paper towel to drain access oil.
Traditionally Medu Vada is served with Coconut Chutney, and sambar (aromatic lentil soup with vegetables).
Notes
Notes
If the Medu Vada Batter is too thick: The Vada will shape nicely but they will be hard inside after frying.
If the batter is too soft: it will not be able to hold the shape and will absorb too much oil.
It’s the consistency of the batter that determines how soft and shapely the Vadas turn out.
Medu Vada is a South Indian delicacy often served as an appetizer or snack, especially during festive occasions like Yugadi. It is a gluten-free and vegan dish made primarily from urad dal (black gram lentils) batter, seasoned with spices like cumin seeds, black pepper, and curry leaves. The batter is shaped into round doughnuts and deep-fried until golden brown, resulting in a crispy exterior and a soft, fluffy interior.
Medu Vada is commonly enjoyed with coconut chutney or sambar, enhancing its flavor profile and making it a popular choice for those seeking gluten-free and vegan snack options. Medu Vada is a popular South Indian snack known for its crispy exterior and soft interior texture. Originating from the state of Tamil Nadu, it has gained widespread popularity across India and beyond. This medu vada recipe offers a step-by-step guide on how to make this delectable treat right in your kitchen.
How to Make Medu Vada: Step-by-Step Recipe
Preparing the Batter
To start making medu vada, you’ll need to prepare the batter first. Begin by soaking urad dal in water for at least 4-5 hours or preferably overnight. The soaked dal should be soft enough to easily break when pressed between your fingers. Once soaked, drain the water and transfer the dal to a blender. Grind it to a smooth paste, adding minimal water as needed. The consistency should be thick, similar to that of a pancake batter. This step is crucial in achieving the perfect texture for your medu vada.
Shaping the Vadas
Once the batter is ready, transfer it to a mixing bowl. Add finely chopped green chilies, ginger, curry leaves, cumin seeds, asafoetida, and salt to taste. Mix all the ingredients thoroughly to ensure an even distribution of flavors. Now, heat oil in a deep frying pan or kadhai on medium heat. To shape the vadas, wet your palms with water to prevent sticking. Take a small portion of the batter and flatten it slightly to form a disc shape with a hole in the center, resembling a donut. Carefully slide the shaped vada into the hot oil and fry until golden brown and crispy on both sides. Repeat the process with the remaining batter, frying a few vadas at a time to avoid overcrowding the pan.
Frying to Perfection
Achieving the perfect medu vada requires frying them to crispy perfection. Make sure the oil is adequately heated before adding the vadas to ensure they cook evenly and develop a crunchy exterior. It’s essential to maintain the oil at a consistent temperature throughout the frying process. Avoid overcrowding the pan, as this can lower the oil temperature and result in soggy vadas. Fry the vadas in small batches, flipping them occasionally to ensure uniform browning on all sides. Once done, remove the vadas from the oil using a slotted spoon and drain the excess oil on paper towels.
Serving Suggestions
Medu vada is best enjoyed hot and crispy, served with coconut chutney and sambar. You can also pair it with a tangy tomato chutney or spicy mint chutney for added flavor. Some prefer to enjoy medu vada with a cup of hot filter coffee, making it a perfect breakfast or evening snack option. Experiment with different dipping sauces and accompaniments to find your favorite combination.
Tips for Making Perfect Medu Vada
Ensure the urad dal is soaked well to achieve a smooth batter texture.
Maintain the oil temperature while frying to achieve crispy vadas.
Wet your palms with water to prevent the batter from sticking while shaping the vadas.
Add chopped green chilies and ginger for an extra kick of flavor.
Serve medu vada hot for the best taste and texture.
Variations of Medu Vada
While the traditional medu vada recipe calls for basic ingredients like urad dal, spices, and herbs, you can experiment with variations to suit your taste preferences. Some popular variations include:
Masala Medu Vada: Add coriander leaves and grated carrots to the batter for an extra burst of flavor.
Rava Medu Vada: Mix semolina (rava) with the urad dal batter to add a crunchy texture to the vadas.
Vegetable Medu Vada: Incorporate grated vegetables like carrots, cabbage, and spinach into the batter for a nutritious twist.
Cheese Medu Vada: Stuff the vadas with a cheesy filling or sprinkle grated cheese on top before frying for a gooey, indulgent treat.
Benefits of Medu Vada
Medu vada is not only delicious but also offers several health benefits when consumed in moderation. Here are some of the benefits:
Rich in Protein: Urad dal, the main ingredient in medu vada, is a good source of protein, essential for muscle repair and growth.
Nutrient-Dense: It contains essential nutrients like iron, magnesium, and potassium, which are vital for overall health and well-being.
Gluten-Free: Since medu vada is made from urad dal, it is naturally gluten-free, making it suitable for individuals with gluten sensitivities or celiac disease.
Good Source of Fiber: Including medu vada in your diet can help improve digestion and promote gut health due to its fiber content.
Energizing Snack: It provides a quick energy boost, making it an ideal snack option for busy days or post-workout refueling.
FAQs about Medu Vada
Q: Can I make the batter ahead of time?
A: Yes, you can soak the urad dal and grind the batter ahead of time. Store it in the refrigerator for up to 1-2 days and fry the vadas when ready to serve.
Q: Can I freeze the vadas?
A: While it’s best to consume medu vada fresh for optimal taste and texture, you can freeze the shaped vadas and fry them directly from frozen when needed. However, freshly fried vadas are recommended for the best flavor.
Q: Can I bake instead of frying?
A: While traditional medu vada is deep-fried for that crispy texture, you can try baking them in a preheated oven at 375°F (190°C) for 20-25 minutes or until golden brown for a healthier alternative.
Q: Can I use split urad dal instead of whole urad dal?
A: Yes, you can use split urad dal (white or black) to make medu vada. However, the texture may vary slightly compared to using whole urad dal.
Q: Can I make gluten-free medu vada?
A: Yes, medu vada is naturally gluten-free since it’s made from urad dal. Just ensure that all ingredients used are gluten-free, especially if adding any additional flavorings or seasonings.
In conclusion, medu vada is a versatile and flavorful snack that can be enjoyed on its own or paired with a variety of chutneys and dips. With this detailed recipe and helpful tips, you can recreate this South Indian delicacy at home and impress your family and friends with your culinary skills. So, roll up your sleeves, gather your ingredients, and get ready to savor the crispy goodness of homemade medu vada!