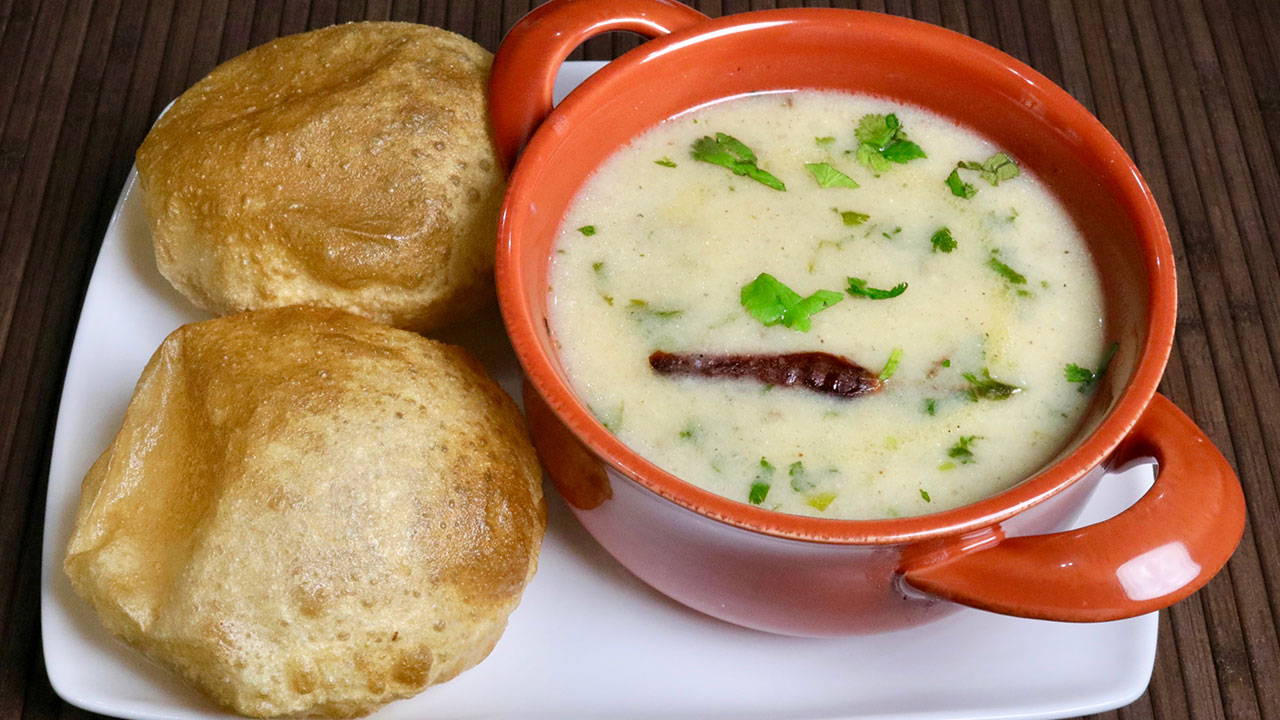
Category: Kid-Friendly

Kid-Friendly Vegetarian Recipes: Delicious Indian Food for Kids

Finding recipes that are both nutritious and appealing to kids can be challenging. Indian cuisine offers a variety of vegetarian recipes for kids that are both delicious and easy to prepare. Whether you’re looking for vegetarian kid-friendly recipes, Indian food for kids, or specific Indian recipes for kids, Manjula’s Kitchen provides an extensive collection of dishes to suit every palate. Let’s explore some fantastic recipes that will make mealtimes enjoyable for your little ones.

Classic Vegetarian Recipes for Kids

Aloo Paratha

Aloo Paratha is a popular Indian flatbread stuffed with spiced mashed potatoes. This dish is a classic example of vegetarian recipes for kids that are both hearty and satisfying. Serve it with yogurt and a bit of butter for a complete meal. The soft texture and mild spices make it appealing to children.

Paneer Butter Masala

Paneer Butter Masala is a rich and creamy curry made with paneer (Indian cottage cheese) cooked in a tomato and cream sauce. This dish is a favorite among vegetarian kid-friendly recipes. Serve it with naan or jeera rice to make it a meal your kids will love.

Easy Indian Food for Kids

Vegetable Pulao

Vegetable Pulao is a fragrant and flavorful rice dish cooked with a variety of vegetables and mild spices. This dish is perfect for kids who enjoy rice. It’s a nutritious and delicious option in the category of vegan Indian food for kids. The colorful vegetables make it visually appealing as well.

Chole (Chickpea Curry)

Chole is a mild chickpea curry that is both tasty and nutritious. This dish is ideal for those looking for easy indian vegetarian recipes for kids. Serve it with rice or roti for a wholesome meal. The soft texture of chickpeas makes it easy for kids to eat and enjoy.

Healthy Vegetarian Kid-Friendly Recipes

Moong Dal Khichdi

Moong Dal Khichdi is a simple and healthy dish made with rice and split yellow lentils. It’s one of the best vegetarian kid-friendly recipes as it is easy to digest and packed with nutrients. This dish can be served with a dollop of ghee and a side of yogurt.

Palak Paneer

Palak Paneer is a nutritious dish made with spinach and paneer. It’s a great way to introduce leafy greens to your child’s diet. This dish is a fantastic example of vegetarian Indian recipes for kids that are both healthy and delicious. Serve it with chapati or rice.

Quick and Simple Indian Recipes for Kids

Besan Chilla

Besan Chilla, or chickpea flour pancake, is a quick and easy option that fits well within vegetarian recipes for kids. Made with chickpea flour and a variety of vegetables, this dish is a nutritious choice. It can be enjoyed with a side of green chutney and is perfect for breakfast or a snack.

Masala Dosa

Masala Dosa is a thin, crispy crepe made from fermented rice and urad dal batter, filled with a spiced potato mixture. This dish is a favorite in Indian food for kids. The crispy exterior and soft filling make it a hit with children. Serve it with coconut chutney and sambar.

Snacks and Appetizers for Kids

Samosas

Samosas are crispy pastries filled with spiced potatoes and peas. This snack is a favorite among vegetarian Indian recipes for kids and is perfect for lunchboxes or as an after-school snack. Serve them with tamarind or mint chutney for added flavor.

Pakoras

Pakoras are deep-fried fritters made with vegetables like spinach, potatoes, and cauliflower. This snack is a popular item in the vegetarian kid-friendly recipes category and is perfect for tea-time or as an appetizer. Serve pakoras with a side of green chutney.

Sweet Indian Recipes for Kids

Gulab Jamun

Gulab Jamun are soft, deep-fried balls made from khoya (dried milk) soaked in a sweet syrup flavored with cardamom and rose water. This dessert is a staple in traditional Indian food for kids and is often enjoyed during festivals and special occasions. The melt-in-your-mouth texture and sweet flavor make it a favorite among many.

Kheer

Kheer is a creamy rice pudding flavored with cardamom and garnished with nuts and raisins. This dessert is a classic in north indian vegetarian recipes for kids and is easy to prepare. Kheer is a perfect ending to any meal and is often enjoyed during celebrations.

Elevating Your Kid-Friendly Menu

To elevate your kid-friendly menu, consider adding dishes from various categories that enhance these vegetarian recipes for kids. Including Indian snacks like samosas and pakoras can introduce a variety of flavors and textures.

For a sweet finish, explore Indian desserts such as gulab jamun and kheer. Offering nutritious recipes like moong dal khichdi and palak paneer can provide lighter meal options.

Planning a kids’ party? The popular party recipe category offers numerous dishes that are sure to delight your young guests and make your celebration unforgettable. Incorporating North Indian recipes like aloo paratha or paneer butter masala can bring an authentic touch to your meal.

Frequently Asked Questions (FAQs)

Q: What are some popular vegetarian recipes for kids? 

A: Some popular vegetarian recipes for kids include Aloo Paratha, Paneer Butter Masala, Vegetable Pulao, Chole, Moong Dal Khichdi, Palak Paneer, Besan Chilla, Masala Dosa, Samosas, Pakoras, Gulab Jamun, and Kheer. These dishes are flavorful, nutritious, and perfect for children.

Q: How can I make traditional Indian food suitable for kids? 

A: To make traditional Indian food suitable for kids, try recipes like Aloo Paratha, Paneer Butter Masala, and Moong Dal Khichdi. These recipes are mild in spices and easy to eat, making them perfect for children.

Q: What are some easy Indian recipes for kids? 

A: Some easy Indian recipes for kids include Besan Chilla, Masala Dosa, Vegetable Pulao, and Samosas. These dishes are quick to prepare and provide the necessary nutrients for growing children.

Q: Can I prepare Indian recipes for kids in advance? 

A: Yes, many Indian recipes for kids can be prepared in advance and stored. Dishes like Vegetable Pulao and Chole can be made ahead of time and refrigerated, while snacks like Samosas and Pakoras can be prepped and frozen.

Q: What are some healthy vegetarian kid-friendly recipes? 

A: Some healthy vegetarian kid-friendly recipes include Moong Dal Khichdi, Palak Paneer, Besan Chilla, and Vegetable Pulao. These dishes are nutritious, mild in flavor, and perfect for maintaining a healthy diet for kids.

Conclusion

Vegetarian recipes for kids are a celebration of diverse flavors and nutritious ingredients. Whether you’re looking for vegetarian kid-friendly recipes, Indian food for kids, or specific Indian recipes for kids, these dishes will bring variety and flavor to your meals. So, gather your ingredients, try out these recipes, and enjoy the rich and diverse world of Indian food for children. Happy cooking and happy eating!

By incorporating these dishes into your menu, you’ll be able to enjoy a wide variety of delicious and nutritious foods that your kids will love. Whether you’re looking for snacks, main courses, or desserts, there’s a vegetarian recipe for kids to suit every taste. Don’t forget to check out Manjula’s Kitchen for more inspiration and culinary delights. Happy cooking and happy eating!

  • Green Pea Soup

    Green Pea Soup

    Green Pea Soup

    Green Pea Soup

    Manjula Jain
    This is a healthy and delicious vibrant green color soup. Green pea soup can be served with slice of bread or with rice.
    5 from 1 vote
    Course Soup
    Cuisine Indian
    Servings 4 people

    Ingredients
      

    • 2 Cup frozen thawed green peas
    • 1 tbsp ginger paste easy to make shred ginger using zester or fine shredder
    • 1-1/2 tbsp oil
    • 1 tbsp salt
    • 3 tbsp heavy cream
    • 2 Cup water

    Instructions
     

    • Blend the green peas into coarse paste using little water or no water.
    • Heat 1 tablespoon of oil in a frying pan and add the peas, salt and ginger paste stir fry the peas over medium heat by pressing and scrapping from the sides for about 5 minutes. Set aside.
    • Heat 1 tablespoon of oil in a saucepan over medium high heat, Test the heat by adding one cumin seed to the oil; if seed cracks right away oil is ready.
    • Add the cumin seeds as they crack add fenugreek seeds and turmeric stir for a second and add water let it come to boil.
    • Add cooked green peas, and cream, mix it well. As it comes to boil lower the heat to low medium, cover the sauce pan and let it cook for about 20 minutes. Turn off the heat.
    • Add lemon juice, black pepper, garam masala mix and cover for few minutes.
    • Garnish with cream. Serve warm or at room temperature.

    Notes

    For seasoning:
    • 1/2 tablespoon oil
    • 1 teaspoon cumin seeds (jeera)
    • 1/4 teaspoon fenugreek seeds (methi dana)
    • 1/4 teaspoon turmeric (haldi)
    • 1 teaspoon lemon juice
    • 1/4 teaspoon garam masala, available in Indian grocery stores
    • 1/8 teaspoon black pepper
     For garnishing 2 tablespoons of heavy cream is optional
     
    Enjoy this tasty Pea Soup!
    Keyword Green Pea Soup
    Tried this recipe?Let us know how it was!

    Introduction to Green Pea Soup

    Green pea soup is a delightful and nutritious dish, perfect for both vegans and vegetarians. This easy-to-make soup is a staple in many households and offers a range of health benefits. In this guide, we’ll delve into the different types of green pea soup, its health benefits, and why it should be a part of your regular diet. 

    What is Green Pea Soup?

    Green pea soup is a versatile and healthy dish made primarily from green peas. It can be served hot or cold, making it suitable for any season. This soup can be made creamy or chunky, depending on your preference.

    Health Benefits of Green Pea Soup

    Green peas are packed with nutrients like vitamins A, C, K, and several B vitamins. They are also rich in fiber and protein, making green pea soup a great option for those looking to maintain a healthy diet.

    Vegan Green Pea Soup: A Plant-Based Delight

    Vegan green pea soup is made without any animal products, making it an excellent choice for those following a plant-based diet. This version of the soup is not only delicious but also easy to prepare.

    Vegetarian Green Pea Soup: A Nutritious Choice

    Vegetarian green pea soup includes dairy products like milk or cream but excludes any form of meat or meat-based broths. It offers a rich, creamy texture that is both satisfying and nutritious.

    Easy Green Pea Soup: Quick and Simple Recipes

    For those short on time, easy green pea soup recipes are the perfect solution. These recipes require minimal ingredients and effort, allowing you to enjoy a nutritious meal without spending hours in the kitchen.

    Split Pea Soup: A Variation Worth Trying

    Split pea soup is another variation of green pea soup, made using dried split peas. This version is heartier and often thicker, providing a more filling meal.

    Why Choose Green Pea Soup?

    Green pea soup is not only delicious but also highly nutritious. It’s an excellent source of protein for vegetarians and vegans and is packed with essential vitamins and minerals.

    How to Enjoy Green Pea Soup

    Green pea soup can be enjoyed in various ways. Serve it as a starter, a side dish, or a main course. Pair it with crusty bread or a fresh salad for a complete meal.

    Other Soup Recipe available on Manjula’s Kitchen

    Tomato Soup: Nothing compares to the satisfaction and comfort of a hot bowl of soup. This quick and easy Tomato Soup recipe is not only simply delicious but also versatile, perfect as a starter or a light meal when paired with a salad and crusty bread.

    Millet Soup: Millet Soup, also known as Bajra Raab, is a traditional warm soup from Rajasthan and Gujarat. This healthy and delicious recipe highlights the nutritional benefits of millet, which is gluten-free and packed with essential nutrients.

    Corn Vegetable Soup: Corn Vegetable Soup is a creamy corn soup with vegetables that is a great starter for a summer lunch. This delicious soup can be served hot or cold.

    Moong Dal Soup: This healthful vegan soup is high in protein. Made with split Moong dal and flavoured with hari cilantro chutney, moong dal soup is flavorful yet simple and easy to make.

    Green Pea Soup in Different Cuisines

    Green pea soup is enjoyed in various cuisines around the world. From the French potage Saint-Germain to Indian matar ka shorba, the possibilities are endless.

    FAQs

    What is the best way to store green pea soup?

    Store green pea soup in an airtight container in the refrigerator for up to five days. It can also be frozen for up to three months.

    Can green pea soup be made ahead of time?

    Yes, green pea soup can be made ahead of time and reheated before serving. This makes it a convenient option for meal prep.

    Is green pea soup good for weight loss?

    Yes, green pea soup is low in calories and high in fiber, making it a great option for those looking to lose weight.

    What can I serve with green pea soup?

    Green pea soup pairs well with crusty bread, a fresh salad, or a sandwich.

    Can I use frozen peas for green pea soup?

    Yes, frozen peas can be used to make green pea soup. They are convenient and retain most of their nutrients.

    Is green pea soup gluten-free?

    Yes, green pea soup can be made gluten-free by ensuring all ingredients used are gluten-free.

    Green pea soup is a versatile, nutritious, and delicious dish that is perfect for any diet. Whether you prefer a vegan, vegetarian, or easy-to-make version, there is a green pea soup recipe for everyone. Make sure to explore different recipes on Manjula’s Kitchen.

  • Rava Dosa

    Rava Dosa

    Rava Dosa

    Rava Dosa (South Indian Delicacy)

    Rava Dosa is a popular South Indian thin and crispy flat bread. It looks like thin crepes. This is a mouthwatering culinary delight. Rava Dosas are quick to make. They can be served as a snack or part of a main meal.
    4.67 from 3 votes
    Prep Time 10 minutes
    Cook Time 15 minutes
    Batter fermenting 30 minutes
    Total Time 25 minutes
    Course Main Course
    Cuisine Indian
    Servings 3 people

    Ingredients
      

    • 1/2 cup fine sooji samolina
    • 1/4 cup rice flour
    • 1/4 cup all-purpose-flour plain flour, maida
    • 1/2 tsp cumin seeds jeera
    • 1/2 tsp salt
    • 1/8 tsp asafetida hing
    • 1 tbsp cilantro chopped hara dhania
    • 1 green finely chopped
    • 2 cupa watwer approximately

    Instructions
     

    • Mix all three flours including semolina, rice flour and all-purpose flour. Make a thin batter using little water at a time and avoiding any lumps. Batter should have pouring consistency like buttermilk.
    • Add all other ingredients to the batter including cumin seeds, salt, asafetida, cilantro and green chili. Mix it well. Let the batter stand for about 30 minutes.
    • Heat the skillet on medium high. To check if skillet is ready sprinkle few drops of water over skillet water should sizzle. Wipe the skillet with few drops of oil.
    • Pour the batter with ladle on the skillet in a circular motion starting from the periphery to the center. Keep pouring the batter till it covers the whole skillet.
    • Note: pour the batter on the skillet from about 3 to 4 inches height. Don’t try to spread the batter otherwise the characteristic and appearance of Rava Dosa will not come. Rava Dosa should have holes like swiss cheese or have lacy look.
    • Sprinkle 1 teaspoon of oil around dosa.
    • Cook Dosa over medium heat for about 2 minutes or until Dosa becomes golden brown. Then turn the Dosa using spatula.
    • Let Dosa cook for about 1 minute from other side. Dosa will be golden brown on one side and light color on other side. Thin and crispy Rava Dosa is ready to serve.

    Notes

    Serving Suggestions
    Rava dosa is very flavorful. You may eat this snack with Hari Cilantro Chutney.
    Traditionally Rava Dosa is served with Sambar (lentil soup cooked with vegetables), and coconut chutney.
    I have the recipes for Sambar, Coconut Chutney, and Hari Cilantro Chutney on my web site.
    Tried this recipe?Let us know how it was!

    How to make Rava Dosa: Your Guide to the Perfect Crispy Delight 

    Dosa is a popular south indian delicacy which looks like a crepe. It’s like a crisp and thin pancake made of rice and urad dal batter. Traditionally Dosa is served with sambar, aloo masala and coconut chutney. It is an Indian crepe made usually through rice batter, but here we have experimented and made many alternative dosa such as Oat Dosa, Besan Dosa, Rava Dosa, Sorghum Dosa. What is Rava Dosa: This preparation is using rava and is a bread based breakfast recipe that is vegan. The preparation entails skillfully combining pan techniques and manual dexterity to achieve the perfect bread cooked on non-stick skillets.

    Mixing the Flours: Crafting the Perfect Rava Dosa Batter 

    Embark on your culinary journey to master the art of rava dosa by starting with the essential step of mixing the flours. In your quest to perfect the rava dosa recipe, combine three key flours – semolina, rice flour, and all-purpose flour. This trio forms the foundation of the batter, each contributing its unique texture and flavor.

    As you blend the flours, ensure a smooth consistency by gradually adding water to the mix, meticulously stirring to prevent the formation of lumps. Aim for a batter resembling buttermilk, with a fluidity that promises to spread effortlessly on the skillet. This foundational step lays the groundwork for the success of your dosa rava recipe, setting the stage for a culinary masterpiece.

    Flavorful Fusion: Adding the Finishing Touches to Your Dosa Rava Recipe 

    Elevate the rava dosa batter to new heights by infusing it with a harmonious medley of essential ingredients. Cumin seeds, salt, asafetida, cilantro, and green chilli converge to create a symphony of flavors that dance on the palate.

    With a thorough mix, allow the batter to rest for approximately 30 minutes—a crucial period that allows the ingredients to meld and intermingle, enhancing the overall taste and texture of your rava dosa.

    This resting period is a vital secret in the art of how to make rava dosa, imparting depth and complexity to the final dish. Embrace this moment of anticipation as the flavors marry and evolve, preparing to embark on a culinary adventure like no other.

    Sizzling Skillet: Setting the Stage for Rava Dosa Magic 

    Prepare your skillet on medium-high heat, the stage upon which the magic of rava dosa unfolds. A simple water test unveils the skillet’s readiness – when sprinkled on the surface, the water should sizzle and evaporate in an instant, signalling the perfect temperature for dosa-making.

    A touch of oil ensures a non-stick surface, laying the groundwork for the mesmerising dance of the rava dosa batter. With the skillet prepped and primed, you are poised to embark on a culinary journey filled with tantalizing aromas and mouthwatering flavors.

    Artful Pouring: Creating the Signature Look of Rava Dosa 

    With finesse and precision, pour the rava dosa batter onto the heated skillet, employing a circular motion from the edges towards the centre. The key lies in maintaining a height of 3 to 4 inches while pouring, resisting the urge to spread the batter thinly.

    This technique ensures the characteristic appearance of rava dosa – a delicate, lacy texture with enticing holes reminiscent of Swiss cheese. As the batter spreads and sizzles on the skillet, marvel at the artistry unfolding before your eyes, a testament to the skill and craftsmanship inherent in the rava dosa tradition.

    Crispy Transformation: Cooking Your Rava Dosa to Perfection 

    As the rava dosa graces the heated skillet, sprinkle a teaspoon of oil around its edges, allowing it to cook over medium heat for approximately 2 minutes until it achieves a golden brown hue. With practised precision, skillfully flip the dosa using a spatula, revealing its crispy underside to the world.

    Let it cook for an additional minute, ensuring that both sides are cooked to perfection. The end result is a thin and crispy rava dosa, a culinary masterpiece ready to tantalize your taste buds and transport you to culinary nirvana. With each bite, savor the symphony of flavors and textures that define the essence of this beloved Indian delicacy.

    In conclusion, the journey of crafting the perfect rava dosa is a culinary adventure filled with precision, skill, and a touch of artistry. From mixing the flours to savoring the crispy transformation on the skillet, each step in the process is imbued with tradition and flavor, culminating in a dish that delights the senses and nourishes the soul.

    So, gather your ingredients, fire up your skillet, and embark on a journey to discover the magic of rava dosa – a timeless classic that never fails to captivate and delight.

    Serving Suggestions: Enhancing the Rava Dosa Experience 

    Rava dosa’s aromatic profile pairs exceptionally well with Hari Cilantro Chutney. For a traditional touch, serve it alongside Sambar, a lentil soup enriched with vegetables, and coconut chutney. Explore these culinary companions to elevate your Rava Dosa feast to new heights.

  • Cereal Chivda (Snack)

    Cereal Chivda (Snack)

    Cereal Chivda (Snack)

    Cereal Chivda is a great substitute for original chivda. This is a quick and easy recipe to make. Mix of different cereals, mildly spiced makes an enjoyable crunchy snack.
    5 from 1 vote
    Course Snack
    Cuisine Indian

    Ingredients
      

    • 4 cups rice crispy cereal
    • 1/2 cup  corn flakes
    • 1/2 cup  fine potato sticks
    • 1 tbsp tablespoon raisins
    • 1/2  cup roasted peanuts
    • 1/2 cup  roasted chana dal
    • 3 tbsp oil
    • 1/2 tbsp mustard seeds (rai)
    • Pinch of asafetida (hing)
    • 1 green chili chopped adjust to taste
    • About 10 curry leaves
    • 1/2  tbsp fennel seeds (saunf)
    • 1/4 tbsp turmeric (haldi)
    • 1/4  spoon red chili powder adjust to taste
    • 1/2 tbsp salt adjust to taste
    • 1/4 tbsp mango powder (amchoor)

    Instructions
     

    • Heat the oil in a wide saucepan over medium high heat. After oil is moderately hot add mustard seeds.
    • As mustard seeds crack add asafetida, green chili, and curry leaves. As precaution cover the pan immediately for few seconds because as you add curry leaves to oil it will splatter.
    • Lower the heat to medium low, stir-fry for about 30 seconds; add raisins, peanuts and chana dal, stir-fry for one minute.
    • Add fennel seeds, chili powder, turmeric, and salt mix it well.
    • Add rice crispy cereal and corn flakes (crush the corn flakes before adding to the mix) stir the mixture gently, add potato sticks mix it well quick and turn off the heat. Chivda is ready.
    • Let the cereal chivda cool of to room temperature before serving.
    • Cereal chivda can be kept for several days in airtight container.
    Tried this recipe?Let us know how it was!

    A Delightful Crunch: Exploring the Versatility of Cereal Chivda

    Cereal Chivda is a delightful, crispy snack that combines the crunch of cereals with the flavors of traditional Indian spices. This cereal chivda recipe is perfect for those looking for a diet-friendly snack that doesn’t compromise on taste. Whether you’re enjoying it with your afternoon tea or packing it for a quick snack on the go, this homemade chivda cereal snack is sure to satisfy your cravings.

    The Essence of Cereal Chivda

    Cereal Chivda is a modern twist on the traditional Indian chivda, a savory snack mix. By incorporating cereals, this snack becomes lighter and perfect for those watching their calorie intake. The blend of spices, nuts, and dried fruits adds layers of flavor and texture, making it a versatile snack that can be enjoyed any time of the day.

    Origin and Popularity

    Chivda has been a popular snack in Indian households for generations. Traditionally made with flattened rice (poha), it has evolved to include a variety of ingredients, such as cereals, to cater to modern dietary preferences. This diet chivda with cereal is a testament to its adaptability, offering a healthier option without losing its deliciousness.

    Why You’ll Love This Recipe

    • Healthy Snack: Made with wholesome cereals, nuts, and spices, this chivda is both nutritious and delicious.
    • Easy to Make: Simple steps and readily available ingredients make this recipe easy to follow.
    • Flavorful: A perfect balance of spices and textures ensures every bite is packed with flavor.
    • Versatile: Can be enjoyed on its own or paired with other dishes.

    How to Make Cereal Chivda

    Here’s a step-by-step guide on making cereal chivda:

    1. Prepare the Ingredients: Gather your choice of cereals (cornflakes, puffed rice, or any diet-friendly cereal), nuts (peanuts, cashews), curry leaves, and spices (turmeric, mustard seeds, green chilies, and salt).
    2. Roast the Nuts: In a large pan, dry roast the peanuts and cashews until they are golden brown. Remove and set aside.
    3. Toast the Cereals: In the same pan, add the cereals and toast them lightly until they become crispy. Remove and set aside.
    4. Prepare the Spice Mix: Heat a small amount of oil in the pan. Add mustard seeds and allow them to splutter. Then add curry leaves, finely chopped green chilies, and turmeric powder. Sauté until the curry leaves are crispy.
    5. Combine and Mix: Add the roasted nuts and toasted cereals back into the pan. Sprinkle salt and mix everything well, ensuring the cereals and nuts are evenly coated with the spice mix.
    6. Cool and Store: Let the mixture cool completely before transferring it to an airtight container. This ensures the chivda remains crispy.

    Variations of the Recipe

    Exploring Manjula’s Kitchen reveals a treasure trove of other delicious snack recipes that you might enjoy. Here are some related variations that you might find interesting:

    1. Spicy Chivda: Spicy chivda crunchy savory snack is quick and easy to make. Chivda, also known as poha, is flattened rice that is flavored with spices.
    2. Masala Peanuts: Spicy and crunchy peanuts that make for a perfect snack.
    3. Spicy Sev: Thin, crispy strands made from chickpea flour and spices, perfect for munching.
    4. Roasted Chickpeas: A healthy and crunchy snack made with chickpeas tossed in spices and roasted until crispy.
    5. Methi Mathri: Crispy, savory crackers made with fenugreek leaves and spices.

    Serving Suggestions

    Cereal chivda can be enjoyed in various ways:

    • As a Snack: Enjoy it as a standalone snack during tea time or as a healthy mid-day treat.
    • With Yogurt: Pair it with a bowl of yogurt for a delicious and satisfying snack.
    • As a Topping: Use it as a crunchy topping for salads or soups.
    • For Travel: Pack it as a travel-friendly snack for road trips or flights.

    Tips and Tricks

    To perfect your chivda cereal recipe, consider these helpful tips:

    • Use Fresh Ingredients: Fresh nuts and cereals will enhance the flavor and crunchiness of your chivda.
    • Adjust Spices: Tailor the amount of green chilies and turmeric to your spice preference.
    • Store Properly: Ensure the chivda is completely cool before storing to maintain its crispiness.

    FAQs

    Is Cereal Chivda Vegan? 

    Yes, this recipe is vegan as it uses plant-based ingredients.

    Can I Make It Ahead of Time? 

    Yes, this chivda can be made ahead of time and stored in an airtight container for up to two weeks.

    What Can I Serve with This Chivda? 

    This chivda pairs well with yogurt, can be used as a topping for salads, or enjoyed on its own as a snack.

    How Long Does It Take to Make? 

    The preparation and cooking time for this chivda is about 30 minutes.

  • Mango Chutney

    Mango Chutney

    Mango Chutney

    Mango Chutney (Mango Relish, Aam Ka Lacha)

    Mango chutney is a lightly spiced, sweet and sour relish with a chunky texture that makes a perfect vegan condiment.
    5 from 1 vote
    Course Chutney
    Cuisine Indian

    Ingredients
      

    • 2 raw green cooking mangos peeled and shredded (about 3 cups of shredded mango)
    • 2 tbsp oil
    • 1 tbsp nigella (onion seeds or kalonji)
    • 4 whole dry red chilies
    • About 1 tbsp thinly sliced ginger
    • About 2 tbsp golden raisins
    • 1/2  tbsp chili powder
    • 2 tbsp salt
    • 1 cup sugar

    Instructions
     

    • Wash and dry the mangos. Peel the skins off and shred the fruit.
    • Heat oil in a sauce pan over medium heat. Add nigella (kalonji) and whole red chili, stir for few seconds.
    • Add raisins and stir for a few seconds.  Then add remaining ingredients shredded mango, sliced ginger, chili powder, salt and sugar. Mix well.
    • When the mango mix comes to a boil, cover the pot and turn the heat down to low medium.
    • Cook for ten minutes, until mangos are tender but not mushy.
    • The finished Chutney has a lovely color.
    • Cool  the chutney and store it in a glass jar.
    • Refrigerated, the chutney will last for months.

    Notes

    Tips
    It is important to get the right mangos for chutney. Cooking mangos are different from the mangos we eat.  For best results, the mangos should be very firm.  Slices should be white and sour.
    Tried this recipe?Let us know how it was!
  • Eggless Pineapple Cake

    Eggless Pineapple Cake

    Eggless Pineapple Cake

    Eggless Pineapple Cake

    Eggless Pineapple Cake is an easy and delicious dessert recipe and this can be served any time of the day, and for any party occasion.
    3.28 from 22 votes
    Prep Time 10 minutes
    Cook Time 25 minutes
    Total Time 35 minutes
    Course Dessert
    Cuisine Fusion
    Servings 6 people

    Ingredients
      

    • 1-1/4 cups all purpose flour plain flour, maida
    • 1/2 can (7oz) sweetened condense milk
    • 1 tsp baking powder
    • 1/2 tsp baking soda
    • 1/4 tsp cardamom powder
    • 1/4 tsp salt
    • 1/2 cup melted butter
    • 1 can 20oz crushed pineapple

    Instructions
     

    • Preheat the oven at 325 degrees (F).
    • Grease 8×8 inches cake pan
    • Drain pineapple using strainer let the juice dripped through without squeezing. Note: we will use juice and pineapple both.
    • Sift together flour, baking powder, baking soda, cardamom and salt in a bowl.
    • In center part of the flour mix, add ½ cup pineapple juice, ½ cup pineapple chunks, butter, and condense milk. Gently fold every thing together.
    • Pour the mixture in greased cake pan.
    • Bake for about 25 minutes, or until cake starts leaving the pan from sides and an insert knife in the center of the cake come out clean.
    • Remove the cake from the oven and let it cool off for few minutes only.
    • Run a knife around the edges to loosen the cake and place a flat plate over the cake pan and turn it over to transfer the cake on to the plate.
    • Prick the cake several places with a fork. Brush the top of the cake generously with the leftover pineapple juice while still hot.
    • Let cake cool before slicing the cake..
    Tried this recipe?Let us know how it was!
  • Masala French Fries

    Masala French Fries

    Masala French Fries

    Masala French Fries

    Masala French Fries are an exciting twist on french fries, and they are great to serve with cocktails or as an appetizer.
    3.34 from 3 votes
    Prep Time 10 minutes
    Cook Time 10 minutes
    Total Time 20 minutes
    Course Appetizer
    Cuisine Indian
    Servings 3 people

    Ingredients
      

    • 2 medium russet potatoes
    • 2 tbsp corn starch
    • 1 tsp salt
    • 1/2 tsp dry mint
    • 1/4 tsp black pepper
    • 1/4 tsp red chili powder
    • 1/8 tsp citric acid tatre

    Oil to fry

    Instructions
     

    • Peel the potatoes wash and cut into French fries.
    • Mix the salt with potato and let it sit for about ten minutes. Drain the salt water well and lightly pat dry.
    • Mix cornstarch, salt, mint powder, citric acid, red and black pepper together. Sprinkle the spice mix over potatoes and mix well so all the fries are covered with spices.
    • Heat the oil in frying pan on medium high heat. The frying pan should have at least 1 inch of oil. To check if the oil is ready, just put potato strip in frying pan. Potato should sizzle.
    • Fry the fries till they become gold in color all around, turn the fries a few times while frying.
    • Remove fries from oil and place on paper towel.  Serve hot and enjoy!

    Notes

    Variations
    Replace dry mint with dry fenugreek leaves.
    Feel free to experiment.
    Tips
    You can make the fries few hours before serving. Heat the fries in oven at 350 degrees for seven to ten minutes before serving.
    Keyword Kid Friendly, Tea Time Snack
    Tried this recipe?Let us know how it was!

    How to make Masala French Fries

    Masala French Fries are a delicious variation of the classic French fries, where the crispy potato sticks are tossed in a blend of aromatic spices. This fusion of flavors adds an extra kick to the beloved snack, taking it to a whole new level of deliciousness. Whether you’re a fan of spicy foods or just looking to switch up your French fry game, Masala French Fries are a must-try appetizers!

    Tips for Making Perfect Masala French Fries:

    Choose the Right Potatoes: Opt for starchy potatoes like Russets or Yukon Golds, as they fry up crispier than waxy potatoes. Cut them into uniform sticks to ensure even cooking.
    Soak the Potatoes: Soaking the potato sticks in cold water for about 30 minutes helps remove excess starch, resulting in crispier fries. After soaking, pat them dry thoroughly with paper towels before frying.
    Double Fry Method: For extra crispy fries, use the double fry method. Fry the potato sticks at a lower temperature (around 325°F) until they are cooked through but not yet browned. Remove them from the oil, increase the temperature to 375°F, and fry again until golden brown and crispy.
    Seasoning Technique: Toss the hot fries in the masala seasoning immediately after frying to ensure that the spices adhere to the surface. Adjust the amount of seasoning according to your taste preferences for the perfect flavor balance.
    Serve Immediately: Masala French Fries are best enjoyed hot and fresh out of the fryer. Serve them immediately with your favorite dipping sauce or chutney for maximum enjoyment.

    Suggestions for Serving Masala French Fries:

    Dipping Sauces: Pair Masala French Fries with a variety of dipping sauces such as ketchup, mayo, or spicy sriracha mayo for a burst of flavor.
    Accompaniments: Serve Masala French Fries alongside burgers, sandwiches, or grilled meats for a tasty and satisfying meal.
    Garnishes: Sprinkle chopped cilantro, grated cheese, or a squeeze of lime juice over the fries for an extra pop of flavor and visual appeal.

    Benefits of Enjoying Masala French Fries:

    Satisfying Snack: Masala French Fries are a delicious and satisfying snack that satisfies cravings for something crispy, savory, and spicy.
    Versatile: Masala French Fries can be customized with different spice blends to suit your taste preferences. Experiment with various seasonings to create your own unique flavor profile.
    Quick & Easy: With just a few simple ingredients and basic cooking techniques, Masala French Fries can be whipped up at home in no time, making them a convenient and budget-friendly snack option.

    Variations of Masala French Fries:

    Cheesy Masala Fries: Sprinkle grated cheese over hot fries and masala seasoning, then broil in the oven until the cheese is melted and bubbly for an indulgent twist.

    Tandoori Masala Fries: Toss hot fries in a blend of tandoori masala spices for a bold and flavorful variation inspired by Indian cuisine.

    Barbecue Masala Fries: Drizzle hot fries with barbecue sauce and sprinkle with masala seasoning for a tangy and smoky flavor combination that’s sure to please.

    Crispy French Fries: Incase you aren’t into masala and spicy versions of French fries then you can go for a crispy and simple French fries.

    FAQs (Frequently Asked Questions) about Masala French Fries:

    Q: Can I bake Masala French Fries instead of frying them?

    A: Yes, you can bake Masala French Fries in the oven for a healthier alternative. Simply toss the potato sticks in oil and masala seasoning, then spread them out in a single layer on a baking sheet. Bake at 425°F for 25-30 minutes, flipping halfway through, until crispy and golden brown.

    Q: Can I make Masala French Fries ahead of time?

    A: While Masala French Fries are best enjoyed fresh, you can prepare the seasoning mix in advance and store it in an airtight container until ready to use. Fry the potatoes just before serving for the crispiest results.

    Q: What are some creative ways to use leftover Masala French Fries?

    A: Turn leftover Masala French Fries into a tasty breakfast hash by topping them with diced veggies, and a sprinkle of cheese. Alternatively, chop them up and add them to salads, or wraps for an extra crunch.

    In conclusion, Masala French Fries are a delicious and flavorful twist on the classic French fries, perfect for snacking, entertaining, or indulging in a satisfying meal. With the right ingredients, techniques, and a dash of creativity, you can easily whip up a batch of homemade Masala French Fries that will impress your taste buds and leave you craving more. So, gather your potatoes, spices, and fryer, and get ready to enjoy the irresistible goodness of Masala French Fries!

  • Chocolate Pudding

    Chocolate Pudding

    A bowl of creamy Chocolate Pudding garnished with chocolate shavings

    Chocolate Pudding

    Chocolate Pudding is a simple and delightful dessert. My son is on a vegan diet and one day he mentioned he was craving a dessert like a chocolate pudding or mousse. I think he was giving me a not-so-subtle hint that he wanted me to experiment with this! I decided to give a try and he was very happy with the results! Soon after that this became a favorite dessert with others in my family. It's funny because my family's favorites keep changing! This is a super simple and easy recipe to make. I can prepare this dessert on demand and with limited notice for my grandchildren, who love to request dishes last minute! This rich chocolatey dessert is vegan and gluten-free. Hope you enjoy!
    This recipe will serve 4
    5 from 2 votes
    Prep Time 5 minutes
    Cook Time 10 minutes
    Total Time 15 minutes
    Course Dessert
    Cuisine American
    Servings 4 people

    Ingredients
      

    • 1 ½ cup sweet potato peeled and sliced
    • ½ cup coconut milk full fat, chilled
    • 4 Tbsp cacao powder
    • 4 Tbsp sugar
    • 2 tsp vanilla extract
    • ¼ tsp cinnamon powder

    Instructions
     

    • Steam the sweet potato until soft.
    • Drain the water and wash with cold water, and pat dry them.
    • Place sweet potato, cacao, sugar, coconut milk, vanilla and cinnamon into blender and blend until smooth.
    • Take out the Chocolate Pudding into a covered bowl.
    • Refrigerate for at least an hour before serving.

    Notes

    Serving Suggestions
    When it is fully blended, scoop the Pudding into the individual serving bowls and refrigerate for an hour. Remove the Pudding from the refrigerator after it has chilled. Serve the Pudding with your choice of topping. I like to garnish with sliced almonds. You may top with fresh fruit, or seeds. Also, chocolate pudding tastes great as a dip or spread.
    Suggested Recipes
    Tried this recipe?Let us know how it was!
  • Potato Soup

    Potato Soup

    Potato Soup (Aloo Ki Kadhi)

    Potato Soup (Aloo Ki Kadhi)

    Potato soup is very comforting and delicious. At my home this was known as Aloo Ki Kadhi. This soup was served with Puri which is an Indian whole wheat fried bread. Potato Soup is mildly flavored and easy to make.
    5 from 1 vote
    Prep Time 5 minutes
    Cook Time 20 minutes
    Total Time 25 minutes
    Course Soup
    Cuisine Indian
    Servings 4 people

    Ingredients
      

    • 1/2 potato boiled, peeled and mashed
    • 1/2 cup yogurt
    • 1 cup potatoes boiled peeled and cut into small pieces
    • 2 Tbsp oil canola or vegetable oil
    • 1 tsp cumin seeds jeera
    • 1 Tbsp all-purpose flour maida or plain flour
    • 1/4 tsp fenugreek seeds dana mathi
    • 1/4 tsp black pepper kali mirch
    • 1 bay leave tajpat
    • 1 dry red chili broken into 2 pieces
    • 2 tsp ginger paste
    • 1 tsp salt
    • 1/4 tsp garam masala
    • 2 Tbsp finely chopped cilantro hara dhania

    Instructions
     

    • Mix mashed potatoes, yogurt, ginger juice, and black pepper well add about 1 cup of water and make a smooth batter. Set aside.
    • Heat the oil in a saucepan over medium high heat. Oil should be moderately hot, when you add the cumin seeds they should crack right of way. Add cumin seeds as they crack add fenugreek seeds, and all-purpose flour, stir for 1-2 minutes until all-purpose flour become very light brown.
    • Add red chili and bay leave, brake in 2 pieces, stir and add yogurt mix and mix it well. Turn the heat to low medium.
    • Add potatoes and about 2 cups of water and let it cook for about 5 minutes. Stir occasionally. Add salt, garam masala and cilantro, lower the heat to low and let it cook for 2 more minutes.
    • Adjust the thickness of the soup to your taste.
    • Potato soup is ready. Enjoy!

    Notes

    This is best served with Puri (puffed fried bread).
    Tried this recipe?Let us know how it was!

  • Makki Ki Roti

    Makki Ki Roti

    Makki Ki Roti

    Makki Ki Roti – Paratha

    Makki Ki Roti is a popular Punjabi bread made with corn flour and served with Sarson Ka Saag. Maki ki roti is also a Gluten Free flat bread.
    No ratings yet
    Course Bread
    Cuisine Indian
    Servings 3 people

    Ingredients
      

    • 2 cup Makki ka atta, corn flour
    • 1 cup potato, boiled peeled and grated
    • 1 tbsp salt
    • 1 tbsp chili flakes
    • 2 tbsp dry fenugreek leaves, kasuri methi
    • 1/8 tbsp asafetida, hing
    • ¾ cup warm water
    • 3 tbsp of ghee or clarified butter for cooking rotis

    We also need a plastic sheet about 8” x 12” to roll the rotis I am using a zip lock bag.

    Instructions
     

    • Combine all the dry ingredients in a bowl, corn flour, salt chili flakes, fenugreek leaves, and asafetida mix it well. Add potato to the mixture and mix. This will become very crumbly. Add water as needed to make the firm dough. Knead the dough for a minute. For Makki ki roti make the dough when ready to make roti.
    • Note: Makki ki roti is little hard to roll, that is the reason I decided to use potatoes. Potatoes help to bind the dough.
    • Divide the dough into 6 equal parts. Make them in smooth balls.
    • Take one ball press it between the plastic sheet plastic sheet help rolling the roti, roll the roti into about 6-inch circle. Note: maybe the edges will not be as clean as other rotis.
    • Heat the skillet over medium heat. Skillet should not be very hot. Otherwise rotis will not cook through.
    • Place the roti in the skillet. As it cooks, the dough will change color and have a dryer look. Turn the roti over using a spatula. You should see golden-brown spots on the semi-cooked side.
    • After a few seconds, spread 1 teaspoon ghee onto the roti using a spatula. Turn the roti over. Using your spatula, lightly press the entire surface of the roti to help it cook all the way through. Put the ghee on both sides of the roti while cooking. Grill the roti from both sides making sure it is golden-brown on both sides.  Remove from heat.
    • Repeat with the remaining dough, until they are all done.

    Notes

    Serve them hot. Makki ki roti is traditionally served with sarson ka saag or dal makhani. If you are vegan use the oil for cooking the rotis.
    Keyword Roti
    Tried this recipe?Let us know how it was!
  • Fruit Smoothie

    Fruit Smoothie

    Fruit Smoothie

    Fruit Smoothie

    This Fruit smoothie is a delicious and healthy drink, and also quick and easy to make. Fruit smoothie is one of my favorite summer drinks. This great smoothie consists of cantaloupes, strawberries, and yogurt with a touch of ginger giving a nice and tangy taste. Try this recipe for the perfect almost-summer drink.
    No ratings yet
    Prep Time 5 minutes
    Cook Time 5 minutes
    Course Beverages
    Cuisine Indian
    Servings 3 people

    Ingredients
      

    • 2 cup cantaloupe cut into small pieces (kharbooja)
    • 3-4 strawberries cut into small pieces
    • 1/3 cup yogurt (curd, dahai)
    • 2 tbsp sugar, adjust
    • 2 tbsp ginger juice, freshly squeezed
    • 1/4 cup orange juice freshly squeeze
    • 1 cup crushed ice

    Instructions
     

    • Put the cantaloupes and strawberries in a blender and process on high speed until smooth, add yogurt, orange juice, ginger juice and sugar blend until everything mixed well. Add ice blend on high speed until there is no ice and smoothie is little frothy. Pour into glasses and serve.

    Notes

    Notes
    Fruits should be ripe but do not use overripe fruits. Sugar needs to be adjusted depending on the fruits.
    You will also like to try Arugula and Melon Salad and Chilled Melon Soup
    Tried this recipe?Let us know how it was!

  • Falooda Kulfi Recipe

    Falooda Kulfi Recipe

    Falooda Kulfi

    Falooda Kulfi (Indian Ice Cream)

    Falooda Kulfi is a refreshing dessert. "Falooda" looks like rice noodles and they are made with cornstarch or arrowroot.  "Kulfi" is an Indian ice cream. This is a delicacy with street vendors all over India. One has to experience this delightful dessert to appreciate it.  You can also serve Falooda with any ice cream of your choice. Try this recipe to enjoy as one of my favorite summertime treats!
    No ratings yet
    Course Beverages
    Cuisine Indian
    Servings 6 people

    Ingredients
      

    • 1/2 cup corn starch or arrowroot
    • 2 cup water
    • 1/2 cup sugar
    • 1/4 cup water
    • 12 strings of saffron
    • 1/2 cup kulfi for each serving, check my web site for kulfi recipe
    • Wide bowl of ice cold water with some ice

    Instructions
     

    • For syrup boil sugar, water and saffron together, as it comes to boil turn of the heat and stir the syrup making sure sugar has dissolved. Syrup needs to be chilled before serving, keep it in refrigerator.
    • Add water to corn starch slowly making sure there is no lumps, batter will look like consistency of milk.
    • Over low medium heat in a frying pan add the batter and cook stirring continuously till corn starch become translution and consistency of thick batter or soft lumpy dough. This will take about 10-12 minutes. Turn off the heat and remove from stove.
    • Let the mix cool off little bit and pour the hot mixture into sev maker using fine sev attachment. Press the sev maker over ice cold water, and let the sev string drop into the bowl.
    • Leave the falooda in ice cold water at least for 2 hours before using.
    • Falooda will stay good for about a week in refrigerator, but make sure falooda stays in chilled water.

    Notes

    Serving the Falooda Kulfi
    Use individual serving bowl, first layer the bowel with falooda, drizzle about 1 tablespoon of syrup. Put the kulfi then over the kulfi put some more faluda and finish off drizzling 1 tablespoon of syrup. Falooda kulfi is ready to serve! This just taste great.
    Keyword icecream
    Tried this recipe?Let us know how it was!

  • Kurkuri Bhindi Recipe ( Okra )

    Kurkuri Bhindi Recipe ( Okra )

    Kurkuri Bhindi (Spicy Crispy Okra)

    Kurkuri Bhindi (Spicy Crispy Okra)

    Kurkuri Bhindi is a delicious twist to Masala Bhindi. Kurkuri means crispy and Bhindi means okra. This spicy, crispy okra is simply delicious. The okra is marinated in spices, coated with flour, and then deep fried for a satisfying crunch. Kurkuri bhindi especially goes well with Moong Dal Soup and Rice. Kurkuri bhindi can also be served as a snack, or appetizer.
    5 from 1 vote
    Prep Time 15 minutes
    Cook Time 19 minutes
    Course vegan
    Cuisine Indian
    Servings 4 people

    Ingredients
      

    • Approx. 1/2 pound okra (bhindi)
    • 1 tbsp salt
    • 1/2 tbsp cumin seed (jeera)
    • 1 tbsp coriander powder (dhania)
    • 1 tbsp red chili flakes
    • 1/2 tbsp mango powder (amchoor)
    • 1/4 tbsp turmeric (haldi)
    • 2 tbsp besan (gram flour) available in Indian grocery stores
    • 1 tbsp rice flour
    • Oil to fry

    Instructions
     

    • Wash and pat dry the okra, cut off the tops and bottom of the okra. Cut the okras vertically into thin slices.
    • Lightly massage the okra with fingers, doing this some of the seeds will come out of the okras remove the seeds; it is not necessary to remove all the seeds.
    • Sprinkle all the spice salt, cumin seeds, coriander powder, chili flakes, mango powder, and turmeric over okra and mix it well. Okras should be well coated with spices. Let it sit for about 10 minutes. Okras will become moist because of the salt.
    • Sprinkle besan, and rice flour over bhinidies, mix slowly and keep mixing by lightly rubbing them until okras are coated well.
    • Heat the oil in frying pan moderately over medium high heat. Fry the okras in batches without over crowding. Fry them till they are golden brown this should take about seven minutes. Take the okra out and place them on paper towels to absorb the excess oil.
    • Kurkuri bhindi, crispy okra is ready to be served.
    Tried this recipe?Let us know how it was!

  • Gulab Jamun

    Gulab Jamun

    Gulab Jamun Recipe by Manjula

    Gulab Jamun

    Gulab Jamun is a delicious Indian version of donuts immersed in warm sweet syrup. As India’s most popular dessert, gulab jamun is a staple in most parts of the country. Gulab jamuns are served for almost every celeberations. Gulab jamuns can be served warm or at room temperature. Gulab jamun is one of the desserts I make the more often, because this is an easy recipe to make and in my family everyone like them especially my grandkids.
    4.37 from 11 votes
    Prep Time 15 minutes
    Cook Time 30 minutes
    Total Time 45 minutes
    Course Dessert
    Cuisine Indian
    Servings 10 Gulab Jamuns

    Ingredients
      

    • 1 cup nonfat milk powder
    • 1/4 cup All Purpose flour plain flour, maida
    • 3 Tbsp unsalted butter at room temperature
    • 1/4 cup room temperature whole milk
    • Pinch of baking soda
    • 1 3/4 cup sugar
    • 1 1/2 cup water
    • 4 cardamom pods (ilachi) coarsely ground
    • 1 Tbsp sliced almonds and pistachio
    • Oil for deep-frying

    Instructions
     

    Syrup

    • In a large pan, combine the water, sugar, and ground cardamom seeds and bring to a boil. Let the syrup boil for another minute to completely dissolve the sugar. Turn off the heat.
    • Set the syrup aside.

    Gulab Jamun

    • In a bowl, mix the milk powder, flour and baking soda.
    • Add the butter and mix well.
    • Add milk to make soft dough. The dough will be sticky. The milk powder will absorb the extra milk.
    • If the dough is dry, add more milk to make it soft. Let the dough sit for a few minutes.
    • Grease your palms with butter and knead the dough.
    • Divide the dough into about ten equal parts and roll them into round balls.
    • Heat at least one inch of oil in a frying pan over medium heat. To test, place a small piece of dough into the oil; the oil should sizzle and the dough should take a minute to rise. If the dough rises faster, the oil is too hot; if oil does not sizzle, it is not hot enough.
    • Place the gulab jamuns in the frying pan. Do not crowd them, as the gulab jamuns will expand to about double their original volume.
    • Fry the gulab jamuns on medium heat for about seven minutes, rolling them around for even browning until dark brown.
    • Let the gulab jamuns cool a few minutes before placing into the hot (not boiling) syrup.
    • Let the gulab jamuns sit in the syrup for at least 20 minutes prior to serving.

    Notes

    Gulab jamuns can be kept at room temperature for about a week and up to one month when refrigerated. They can be frozen for months.
    Tips
    If the gulab jamuns are fried on high heat, they will be hard inside and not fully cooked.
    Too much baking soda will make the gulab jamuns too soft or cause them to break when frying.
    Don’t place the gulab jamuns in the syrup immediately after frying, or they will lose their shape and be  chewy.
    Serving suggestions
    Gulab jamuns can be served warm or at room temperature. They can also be served with ice cream.
    You may also like  Balushai and Jalebi
    Tried this recipe?Let us know how it was!


  • Crispy French Fries

    Crispy French Fries

    A plate of crispy French Fries served with ketchup

    Crispy French Fries

    Crispy delicious French Fries! Who doesn't enjoy French fries? It's the perfect comfort food! Homemade Fries, it’s actually quite simple and easy to make. In fact, this is a great snack for my grandkids when they come to visit me. My grandson will say very proudly my dadi (grandmother) makes the best fries.This recipe will serve 3
    4 from 1 vote
    Prep Time 5 minutes
    Cook Time 15 minutes
    Course Appetizer
    Cuisine French
    Servings 3 people

    Ingredients
      

    • 2 potatoes use russet potatoes
    • ½ tsp salt
    • Oil to fry

    Instructions
     

    • Wash and peel the potatoes, and slice potatoes into French fries, and place into ice cold water for at about 10 minutes. Soaking in water potatoes some of the starch will come out and water will look fogy. Remove them from water to clean kitchen towel and pat dry.
    • Heat oil in a frying pan over medium-high heat. Put the fries into oil, don’t over crowed them. Notes: overcrowding fries will bring oil temperature to very low and fries can become very oily.
    • Turn the fries occasionally, fry until golden brown it should take about 6-8 minutes. Remove fries from oil with a slotted spoon to drain on paper towel. Sprinkle the salt and fries are ready to serve.

    Notes

    My family and friends enjoy the fries with tamarind chutney, this exotic sweet and sour chutney is a delicious condiment. I always have this in my refrigerator. My grandkids also like to have a lemonade or Mango lassi with French fries.
    Tried this recipe?Let us know how it was!
  • Fruit and Cracker Dessert

    Fruit and Cracker Dessert

    Fruit and Cracker Dessert topped with chocolate sauce and almond slices

    Two Minute Fruit and Cracker Dessert

    One evening while playing cards with my husband, Alex, and my son’s mother-in-law, Alex suddenly asked for something sweet. I didn’t have any dessert prepared and all we had in the house was ice cream and some chocolate. Alex has always been super innovative with his food combinations, and this recipe is just that, a product of desperation. At first, my kids and grand-kids made faces when they heard what it was made of, but with a little bit of tweaking, it has become a simple dessert that our entire family has been preparing during this quarantine.
    When I say it only takes two minutes, I truly mean it. And it is so easy to make, that even my youngest grandchild can put it together in no time.
    The graham cracker pairs well with the creaminess of the cream cheese while still giving a nice crunch. The fruit adds natural sweetness and the drizzle on top of either chocolate or caramel is the perfect cherry on top. Just bring out the ingredients and everyone can help themselves.
    Today I have a very special guest star my grandson Shaan who is helping me out with today’s recipe. Behind the scenes, I also have my granddaughter, Rhea, helping to film the video. We will be making a Fruit and cracker dessert, that is kid friendly and simply delicious.
    For this recipe is quick and easy as there is no cooking involved, and the ingredient measurement I am providing only as a guide.
    Recipe will serve 2.
    1 from 1 vote
    Prep Time 2 minutes
    Cook Time 0 minutes
    Total Time 2 minutes
    Course Dessert
    Servings 2 people

    Ingredients
      

    • 8 graham crackers
    • 8 Tbsp cream cheese approximately
    • 8 strawberries thinly sliced
    • 2 Tbsp chocolate ganache
    • 2 Tbsp almonds thinly sliced

    Instructions
     

    • Spread the cream cheese over all the graham crackers
    • Next spread the slices of strawberries. Now cover them with another graham cracker to make them into sandwich.
    • Drizzle with chocolate ganache. And garnish with almonds, that gives a nice crunch and beautiful look.
    • Fruit and Cracker Dessert has nice crunch when it is eaten while making after 5 minutes crackers start getting soft.

    Notes

    This dessert can be made with any other fruits and toppings of your choice. I also love making these with bananas and kiwi, and I also like topping it off with caramel sauce. You can buy caramel sauce and chocolate ganache they are readily available. I generally keep homemade chocolate ganache and caramel on hand. They are easy to make and have a long shelf life.
    Keyword 2 Minutes Dessert, Banana, Carmel Sauce, Chocolate Ganache, Cream Cheese, Crispy, Fun Dessert, Gram Crackers, Home Made, Hot Chocolate, indian sweet, Kid Friendly, Kiwi, Mango Cheese Cake, Mango Salsa, Quick And Easy, Strawberry, Sweet, Vegetarian
    Tried this recipe?Let us know how it was!