Soak the almonds in hot water for 30 minutes. Peel the skin off the almonds.
Blend the almonds into a fine paste using just enough milk as needed to blend. Add the sugar and whip it for a couple of minutes.
Heat the ghee in the frying pan on low-medium heat. As the ghee melts, add the almond paste and cook on medium heat, stirring continuously.
Continue stirring until the mixture thickens to the consistency of bread batter and starts leaving the sides of the pan.
Add the cardamom powder. Remove the frying pan from the heat.
Whip the batter using a spoon in a circular motion for about two to three minutes.
Pour it into the prepared greased pan. Smooth en the surface of the mixture to about a quarter inch thick.
Let cool for about 20 minutes until burfi is just look warm.
Cut into 1-inch squares or any shape you like.
Notes
Cool to the room temperature and store burfi in an airtight container. Almond burfi has a long shelf life and can be kept outside for up to one week. When refrigerated, almond burfi will last a couple of months.Suggestions: You can make burfi using almond meal or almond flour. If you are using almond meal, mix one cup almond meal with the sugar and milk and knead the mixture for two minutes. Let the mixture sit for 10 to 15 minutes. Then follow the directions above. The almond flour burfi will be a little chewy.
Kheer is an Indian version of rice pudding cooked with milk and sugar, flavored with nuts and saffron. Its a nice dessert that is very popular in North India. Recipe serves 4 to 6
Wash rice, changing water until the water appears clear.
Melt the butter in a frying pan on medium heat.
Add the rice and stir-fry for 2 minutes.
Add the milk, cook until the rice is tender and the milk is creamy and reduced to about half. Stir often to ensure the milk does not burn in the bottom of the pan.
Add the sugar, saffron, cardamom, almonds and pistachios and let simmer for a few more minutes.
Turn off the heat.
As kheer cools of will become thicker in texture.
Kheer can be served chilled or warm.
Notes
Variation
Saffron, almonds and pistachios are optional in this recipe.
Instead of rice, make the kheer using only almonds and pistachios and flavor with cardamom and saffron.
Rice can be replaced with Vermicelli.
Tips
If you will be serving chilled add 1 teaspoon of extra sugar.
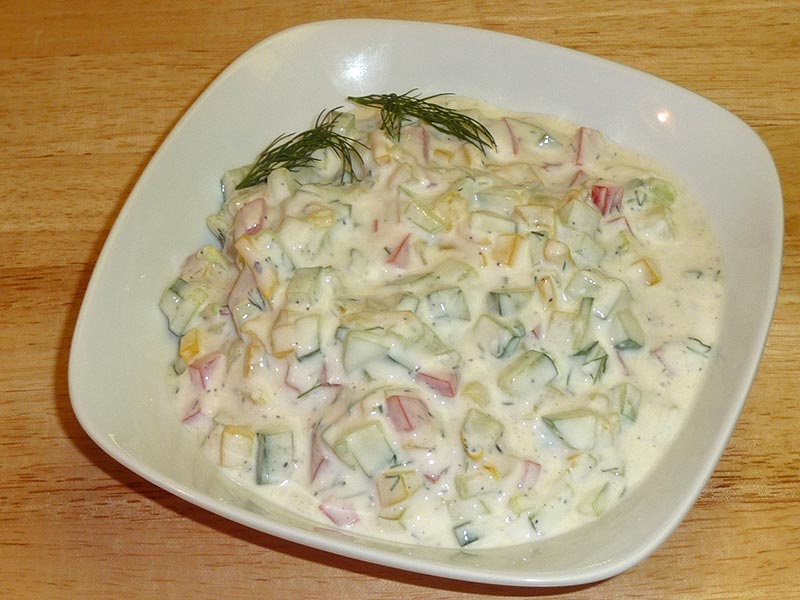
Indian meals are not complete unless the meal includes a yogurt dish such as a Vegetable Raita. This is a colorful raita and can brighten up any meal. Serving for 4.
Learn How to make Vegetable Raita by Manjula’s Kitchen
What is Vegetable Raita: Raita is an accompaniment for any Indian meal and can be created in the form of Vegetable Raita, Spinach Raita, Boondi ka Raita, Cucumber Raita & Lauki ka Raita. Here we are focussing on making vegetable raita, it is a simple quick & easy, gluten free, kid friendly and nutritious yogurt-based recipe featuring vegetables and a selection of Indian spice powders. In the realm of culinary exploration, the creation of a delectable mix vegetable raita stands as a testament to the artistry that can be achieved with a few simple ingredients. This versatile dish, known for its refreshing taste and vibrant medley of flavours, offers a delightful twist to traditional raita recipes. Let’s embark on a culinary journey, unravelling the intricacies of crafting a mix vegetable raita that captivates the palate.
Mixing the Yogurt Base:
The journey begins with the heart of the mix vegetable raita—yogurt. A foundational step involves thoroughly mixing the yogurt to create a smooth and creamy base. If the yogurt happens to be thick, akin to pudding, a strategic addition of milk is introduced to attain the desired consistency reminiscent of a yogurt drink. This meticulous process sets the stage for the infusion of various flavours that will transform the humble yogurt into a culinary delight.
Seasoning the Base:
To elevate the taste profile, a symphony of seasonings is introduced. Salt, chopped dill, black pepper, roasted cumin seeds, and paprika come together in perfect harmony, each contributing its distinct note to the mix vegetable raita. This amalgamation not only imparts a depth of flavour but also showcases the versatility of the dish, making it a fitting accompaniment to various culinary creations.
Balancing Flavours:
A key consideration in perfecting the mix vegetable raita is achieving a harmonious balance of flavours. If the yogurt tends towards sourness, a touch of sugar is introduced, striking the perfect equilibrium between sweetness and tanginess. This thoughtful addition ensures that every spoonful of the raita delivers a well-rounded and satisfying taste experience.
Infusing Freshness with Vegetables:
The introduction of chopped cucumber, tomatoes, and yellow bell pepper adds a burst of freshness and colour to the mix vegetable raita. These crisp and vibrant vegetables not only enhance the visual appeal but also contribute a delightful crunch, transforming the raita into a sensory delight. The careful selection and preparation of vegetables elevate the dish from a simple condiment to a standalone culinary creation.
Variations and Personalization:
The beauty of mix vegetable raita lies in its adaptability. Variations abound, allowing for creative culinary expressions. Dill, a traditional choice, can be replaced with chopped mint or cilantro, offering a different herbal note to the ensemble. The vegetable composition can also be tailored to individual taste preferences, making the mix vegetable raita a versatile canvas for culinary innovation.
Expert Tips for Culinary Success:
No culinary journey is complete without a few expert tips. To enhance the flavour profile, dry roasting cumin seeds is recommended. This process is performed on medium heat until the seeds turn brown, releasing the distinctive aroma of cumin. Post-roasting, grinding the cumin seeds, once cooled to room temperature, ensures that the spice is evenly distributed throughout the mix vegetable raita, intensifying the overall taste experience.
Conclusion: A Culinary Symphony Unveiled
In conclusion, the process of creating a mix vegetable raita is not just a culinary endeavour; it’s a symphony of flavours, textures, and creativity. From the careful mixing of the yogurt base to the strategic addition of seasonings and the infusion of fresh vegetables, each step contributes to the creation of a culinary masterpiece. The variations and personalised touches open the door to endless possibilities, allowing individuals to tailor the mix vegetable raita to their unique taste preferences.
As we navigate the intricacies of the mix vegetable raita recipe, it becomes apparent that this dish is not merely a side accompaniment but a culinary journey that showcases the art of harmonising diverse elements. It is an invitation to explore, experiment, and savour the richness of flavours that unfold with every bite. The mix vegetable raita, with its vibrant medley and thoughtful nuances, stands as a testament to the creative potential within the realm of culinary arts.
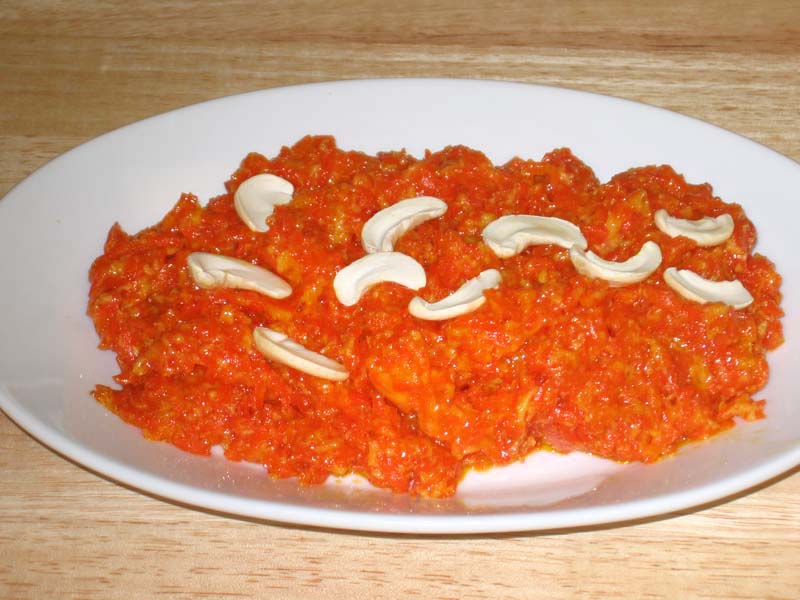
Gajar Ka Halwa is a classical Indian dessert, this is also known as gajrala. Gajar ka Halwa is a delicious and popular north indian sweet dish made with few ingredients, carrots, milk, sugar and flavored with cardamom. Gajar ka Halwa is a perfect dessert for any celebration.
Roast the cashew nuts and set aside for the garnish.
Boil the milk on medium-high heat in a non-stick pan until it is reduced to about to 1 cup. Stir often to ensure the milk does not burn in the bottom of the pan. Set aside.
Melt the butter in a frying pan on medium heat. Add the shredded carrots and stir-fry for about seven to eight minutes. Carrots should be tender and slightly changed in color.
Add the milk and cook until the milk dries. This will take about eight to ten minutes.
Next add the sugar, and cardamom powder and stir-fry for another three to four minutes until the halwa starts to leave the side of frying pan.
Garnish with cashew nuts.
Notes
Tips:Gajar Halwa can be refrigerated for up to one week and kept in the freezer for up to two months.When ready to serve just warm.Suggestion:Cook the halwa a little more and pour on a greased plate.Spread the halwa until it is flat and 3/4 inch thick.After the halwa cools, cut in squares.Garnish with cashew nuts or sliced almonds.
Samosa is probably the most popular Indian snack. Fried puffed pastry filled with spicy potatoes and green peas. No one can resist samosas, a mouthwatering snack. Samosas can be served any time and for any occasion. This recipe is for traditional north Indian Samosa.
3boiled potatoes, peeled and chopped into very small cubes
1/2tspcumin seedsjeera
1tbspchopped green chilies
1tspcoriander powderdhania
1/4tspgaram masala
1tspmangopowderamchoor
1tspsalt
2tbspoilcanola or vegetable
1/2cupgreen peasI am using frozen peas
Need oil to fry
Instructions
Making the Dough:
Mix the flour, sooji, salt, oil and salt together to make a soft dough (add more water as needed). knead the dough for about 1 to 2 minutes to make the dough smooth and pliable. Set the dough aside and cover it with damp cloth. Let the dough sit for at least 15 minutes.
Making the Filling:
Heat the oil in a frying pan on medium high heat. Test the heat by adding one cumin seed to the oil; if it cracks right away oil is ready. Add cumin seeds as cumin seeds crack, add green chilies, coriander powder and stir for few seconds. Next add green peas and turn heat to medium and stir until tender. Add the potatoes and stir-fry for about 4 minutes. Stir in garam masala and amchur. Add more salt or amchur according to taste.
Let the filling cool to room temperature.
Making Samosa:
Take 2 tablespoons of water and 1 tablespoon of all-purpose flour to make a paste and keep aside.
Knead the dough for a minute. Divide the dough into 4 equal parts and make into balls. Roll each ball into 6-inch diameter circles and cut each circle in half.
Spread the paste lightly all along the edge of one semicircle. Pick this semicircle up with both hands and fold it into a cone shape. Pinch the side of this cone so that it is completely sealed.
Fill the cone with 3 tablespoons of filling. Press this filling down with your fingers. Now close the top of this cone into a triangle shape, pinching the top edge so that it is completely sealed. Continue filling the rest of the samosas.
Heat about 1 inch of the oil in a frying pan on medium heat. To check if oil is hot enough place a small piece of dough in oil and dough should sizzle and come to the surface slowly.
Place the samosas in the frying pan a few at a time. After samosas are floating on top of the oil turn them slowly. Fry the samosas until the samosas turn a light golden-brown color on all sides. If you use a high heat, the samosa crust will be too soft and not crispy.
Notes
Tips:Boil the potatoes just until tender. Be careful not to poke the potatoes multiple times while they are cooking, as they will absorb the water. Drain immediately and keep aside until cool enough to touch.The dough has to be kneaded well; otherwise, the samosas will not come out as crisp.If the filled samosas sit for too long, they will dry. To avoid this, cover with a damp cloth.Suggestions:Samosa can be prepared ahead of time and can be freeze for a month.Before freezing fry them enough until samosa changes the color to very light gold brown.After samosas are on room temperature bag them in zip lock bags and freeze them.To use frozen samosas take out as many you need and fry them on medium heat.
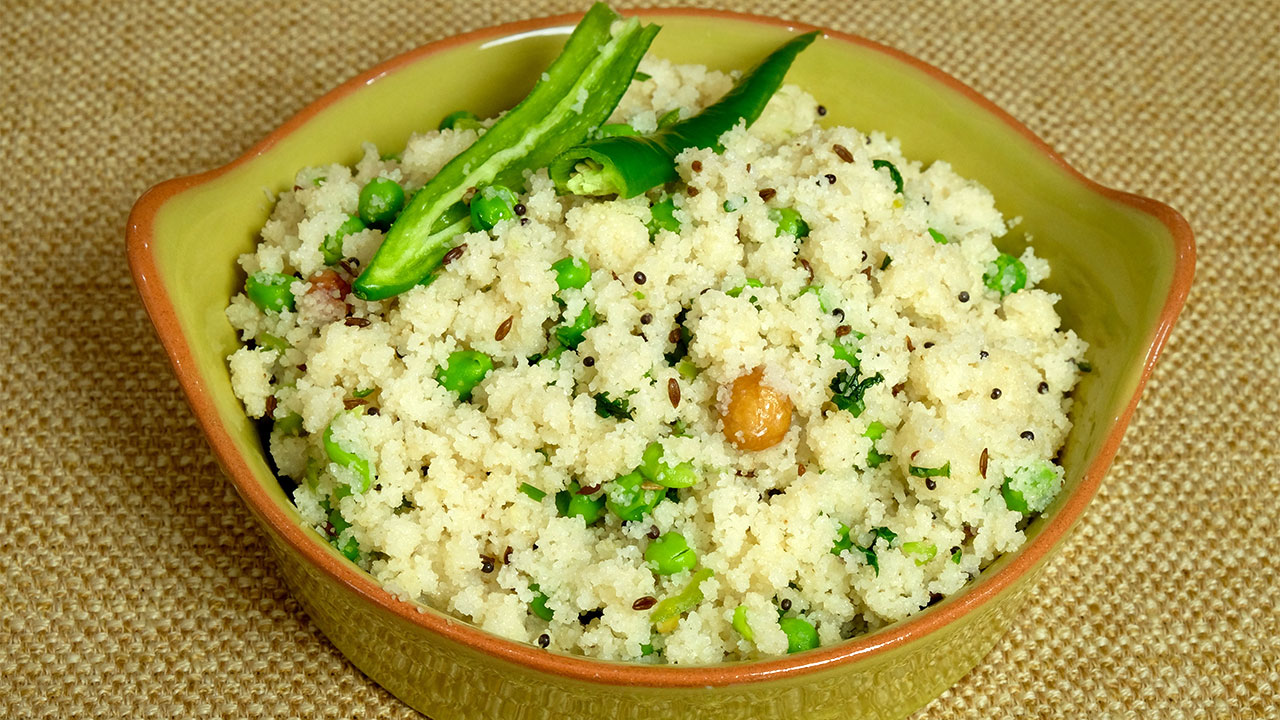
As water comes to boil turn heat to low and continue cooking until peas are tender.
Turn off the heat and set aside.
Heat the oil in a saucepan. Test the heat by adding one cumin seed to the oil; if it cracks right away oil is ready. Add black mustard seed and cumin seed.
Add mustard seed and cumin seeds as seeds crack, add peanuts and stir for one minute.
Add sooji and stir-fry about 3 minutes on medium heat till sooji turns gold brown.
Add green peas with water a little at a time, otherwise water will splatter.
Add lemon juice and cover for 2 minutes.
Sooji will absorb some of the water leaving the upma moist.
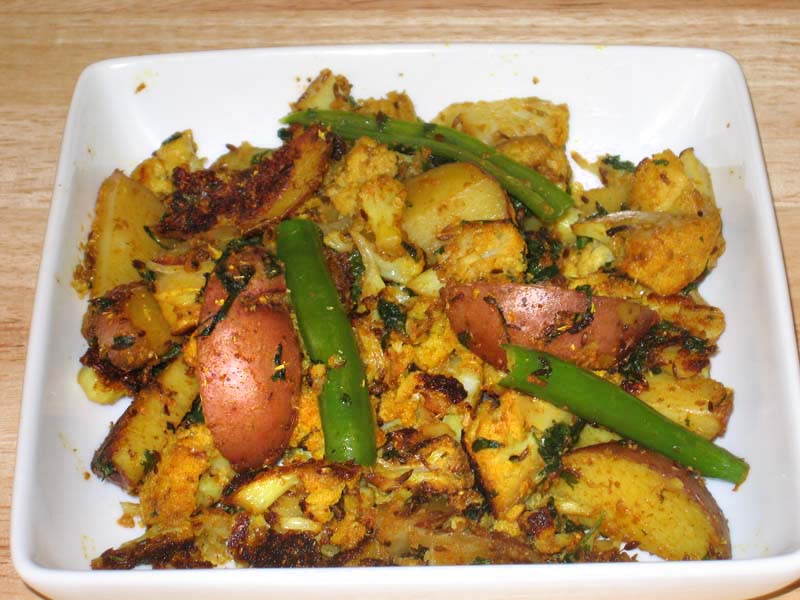
Aloo Gobi is a delicious main dish made with potatoes, cauliflower, and a great blend of spices. Aloo Gobi can be served with various breads, such as rotis, parathas, and puris.
In a small bowl, mix the shredded ginger, coriander powder, cayenne pepper, turmeric, and 3 tablespoons of water to make a paste.
Heat the oil in a pan. Test the heat by adding one cumin seed to the oil; if seed crack right away oil is ready. Add hing and cumin seeds to the oil after seeds crack add the bay leaves and green chilies and stir for a few seconds.
Next, add the spice paste and stir for a minute until spices start leaving the oil.
Add cauliflower, potatoes, 2 tablespoons of water and salt. Mix well. Cover the pan and let it cook on medium heat for about 15 to 20 minutes until the vegetables are tender. Make sure to stir gently every 3 to 4 minutes.
Lastly, add the mango powder and fresh cilantro (green coriander). Mix everything and cover for a minute. Adjust the salt to your taste.
Notes
Variations:Add some green peas and/or sliced red bell peppers. The red bell peppers should be added at the end of the recipe as they cook quickly.Tips:Making a paste with the spices will prevent the spices from burning.Serve with Paratha, Puri
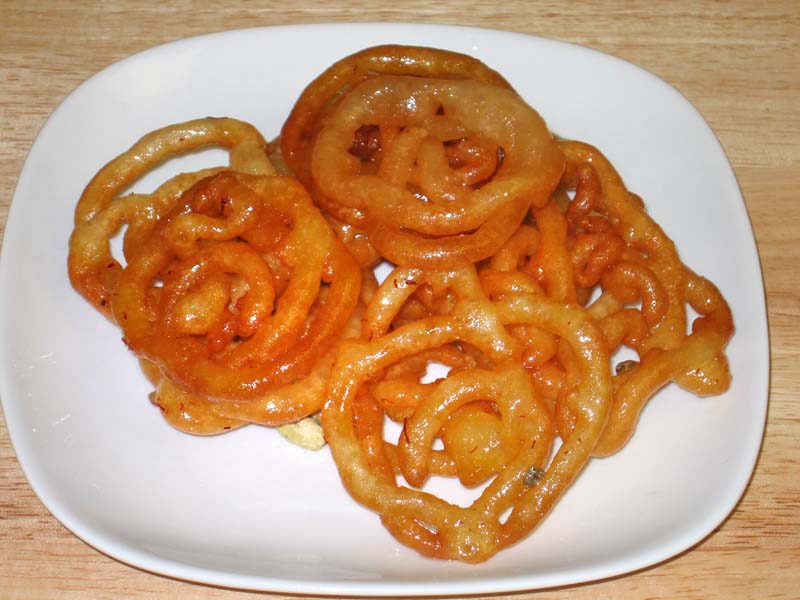
Jalebi is a warm crispy, delicious treat. It can best be described as funnel cake. In my home town jalebi was served for the breakfast treat like pancakes. It was a treat to have jalebi and kachori for a hearty breakfast. Jalebi was mostly eaten by themselves, but some time we soaked the jalebi in warm milk and that tasted delicious. I know jalebi is mostly served as dessert but for me jalebi still makes the best breakfast treat.
Dissolve the yeast in warm water and let it sit for about five minutes.
Mix the flour, besan (gram flour), oil, and sugar together. Add the yeast solution to the flour and mix to make a smooth batter. Set the batter aside in a warm place for one hour.
Make sure the batter is fermented, but do not over-ferment. After fermenting the batter will be a little lacy.
Making the Syrup
Boil the sugar and water together. Add the lemon juice and saffron and turn off the heat. (The lemon juice keeps the mixture from crystallizing).
Making Jalebis
Heat the oil in a flat frying pan about one inch deep. To test, put one drop of batter in the oil. The batter should sizzle and rise into a ball without changing color right away.
Fill the Jalebi batter into a piping bag with a #3 nozzle. You can also use an empty ketchup or mustard bottle.
Squeeze the Jalebi batter out into the hot oil in pretzel shapes about two inches in diameter. Fry the Jalebis until light golden-brown on both sides.
Transfer them into the warm syrup. Let the jalebis soak in the hot syrup a few seconds, then take them out.
Serve hot. Enjoy!
Notes
VariationsTry sprinkling cinnamon powder or drizzle melted chocolate over the Jalebis for a creative touch.Serving SuggestionIn North India Jalebi is a breakfast treat accompanied with Urad Dal Puri and Methi Chutney.
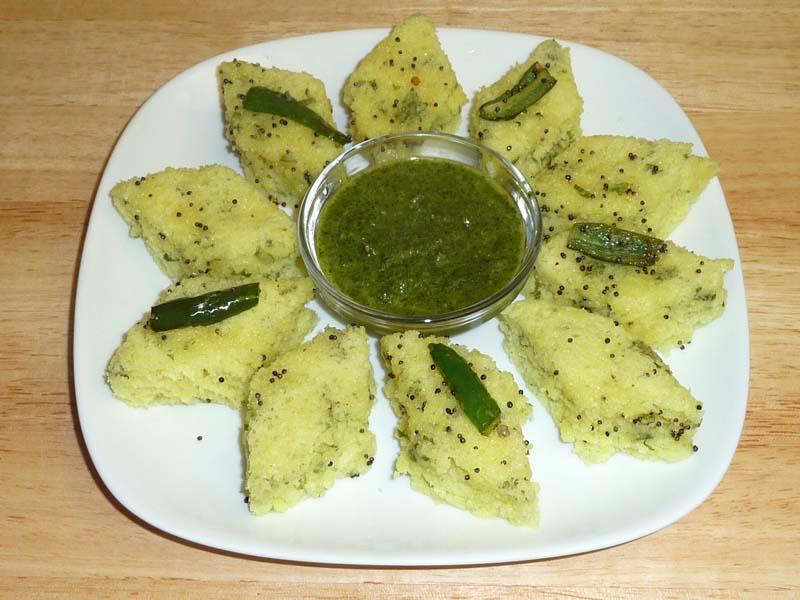
1cupsoojisemolina flour available in Indian grocery store
1cupyogurt
1/4cupwateras needed
1/4tspsalt
2tsplemon juice
Pinchof turmerichaldi
1green chilifinely chopped
2Tbspcilantrohara dhania finely chopped
1tspEno’s fruit saltSodium Bicarbonate and Citric Acid, available in Indian grocery stores)
For seasoning:
2Tbspof oil
1/2tspblack mustard seed
2green pepperschopped into about 1/4 inch pieces
Utensils to steam Dhokla:
Dhokla makeror if you don’t have that, use all three of the following:
Covered pan large enough to hold your cake rack
Round cake-cooling rack
Round 9” cake pan
Instructions
Mix the sooji, yogurt, salt, turmeric, lemon juice, green chili, and cilantro together and make a smooth batter of a pouring consistency. Add water if needed.
Allow batter to rest 15 to 20 minutes.
Grease the cake pan and set aside.
Set the cake rack in the pan. Add one cup of water, just enough to touch the cake rack, and bring to a boil. This will be used to steam the dhokla.
When the water boils, turn down the heat to medium.
Add fruit salt (Eno) to the batter just before baking. The batter will foam up.
Quickly pour batter into a greased cake pan. Place the cake pan into the saucepan over the cake rack. Cover the pan. Steam for about 10 minutes on medium heat.
Check Dhokla with a knife. If the knife comes out clean, dhokla is ready. Turn off the heat and remove the cake pan from the saucepan.
Let it cool to room temperature, then cut into triangle or square shapes.
Prepare the seasoning:
Heat oil in a small pan over medium heat. Test the heat by adding few mustard seeds to the oil; if the seeds crack right away, the oil is ready.
Add mustard seeds after seeds cracke add green chili stir for few seconds.
Drizzle the seasoning over the dhokla. Serve with Hari cilantro chutney.
Notes
Dhokla can be refrigerated for a few days. Before serving, heat Dhokla in a microwave or heat over steam.
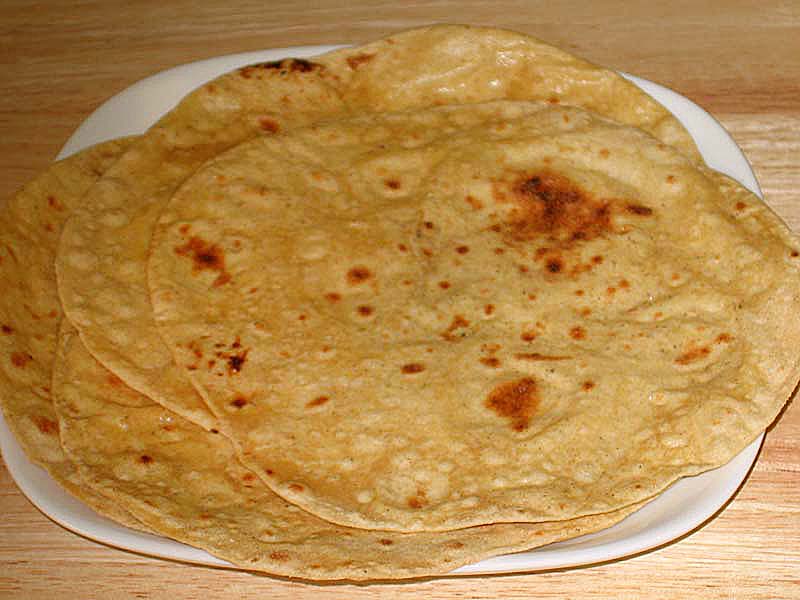
Roti also known as Chapati or Fulka, is Indian flat bread made with whole wheat flour. In North India, roti is part of the main meal. Roti is served with a variety of cooked vegetables, lentils, and yogurt.
2tbspaclarified butter or gheefor buttering the roties
Instructions
Mix flour, salt, and water to make soft dough, adding water as needed. Knead the dough for about one minute on a lightly greased surface to make it smooth and pliable. Cover the dough with a damp cloth and set aside at least ten minutes..
Divide the dough into four equal parts. Make smooth balls and press flat. Before rolling the roti press both sides of the ball on a dry floured surface to make them easy to roll.
Roll to form a six-inch-diameter circle. Use just enough dry flour to roll the roti, as too much flour will make them dry. If the dough sticks to the rolling pin or rolling surface, lightly dust the rotis with dry flour.
Heat an iron or heavy skillet on medium high heat. To test, sprinkle a few drops of water on the skillet. If the water sizzles right away, the skillet is ready. Place the one roti into the skillet. When the roti start to change color and start puffing flip it over. There will be some golden brown spots.
Flip again after a few seconds. Using a flat spatula, press lightly on the puffed parts of the roti. This will help the roti puff up. Flip the roti again, until it has light golden-brown spots on both sides.
Repeat the same process for remaining roties. Butter the roti, the side that is facing the skillet.
Place the rotis in a container lined with a paper towel. Cover the container after each roti.
Notes
Roti can be kept outside for up to 2 days wrapped in aluminum foil or in a closed container. For later use, roti can be refrigerated for 5-6 days. Re-heat in a skillet
Boil the potatoes until they are tender. Peel and cut them in bite size pieces.
Mix the yogurt, ginger, green chilies, turmeric powder, coriander powder and paprika into a paste. Set aside.
Heat the oil in a saucepan. Test the heat by adding one cumin seed to the oil. If the cumin seed cracks right away, the oil is ready. Add the cumin seeds and asafetida. After the cumin seeds crack, add the bay leaf and besan (gram flour). Stir for about half a minute until the besan (gram flour) is golden-brown.
Add the yogurt paste and stir-fry for about 2 minutes on medium heat until the paste starts leaving the oil from the sides.
Add about one cup of water. After the gravy boils, let it cook on low-medium heat for 4 to 5 minutes. Adjust the water in gravy to your liking.dd the potatoes and let it cook for 2-3 minutes.
Add the cilantro and salt and continue to cook for a few minutes. Serve with any kind of bread.
Notes
SuggestionsUse variety of vegetables, such as green peas, carrots, and cauliflowers, as a substitute for the potatoes. The recipe for the gravy remains the same. Serve with Matar Paratha, Gobi Paratha.
Keyword Aloo With Dahi, Easy, Kid Friendly, Spicy Potatoes
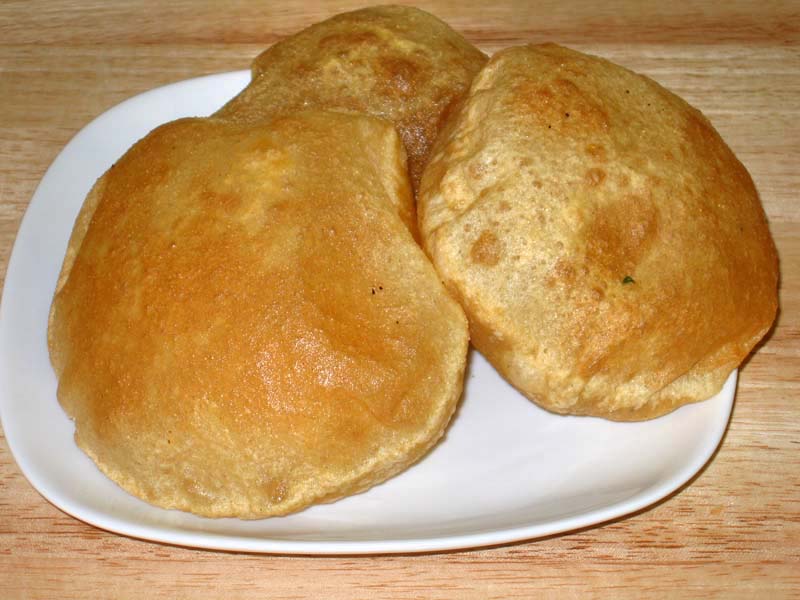
Puri is whole wheat fried bread, made on special occasions. Especially popular with children. It goes well with mutter paneer and other thick gravy recipes.
Mix whole-wheat flour and salt. Add water as needed to make firm dough. Oil your palm and knead the dough until it is pliable. Cover the dough with a damp cloth and set it aside to rest at least ten minutes.
Divide the dough in eight equal parts. Form these into smooth balls, rolling the dough between your greased plams.
Roll the dough balls into seven inch circles. If the dough sticks to the rolling pin or rolling surface, put a drop of oil on the rolling pin and on the rolling surface. Roll four or five puris before you start frying. Do not roll all the puris at once, as they will dry out and fail to puff.
Heat at least one inch of oil in a frying pan over medium high heat. When the oil is moderately hot, a small piece of dough dropped into the oil will float immediately to the top.
Place one puri at a time in the frying pan and press it with a skimmer. The puris should puff up right away. Turn the puris over. Puri should be light creamy brown on both sides. Take the puris out and place them on paper towels to absorb the excess oil.
Serve puri hot or store in covered container after they cool to room temperature.
Notes
Tips: Do not roll the puris on a floured surface. If it seems that you need to flour the surface that is an indication that the dough is too moist. In this case, put a drop of oil on the surface and on the rolling pin.If the oil is not hot enough, the puris will not puff and will be greasy.Variations:Add your choice of spices or one or more dry herbs to the flour when making dough. Red pepper flakes, asafetida, dry mint leaves, dry fenugreek leaves, or any other dry herb can be used.
Sooji Halwa is a very popular sweet dessert all over India specially in North India and is made on religious occasions, as parsad (offering to God). After prayer Halwa is served to devotees as a blessing.
Boil the water with sugar, and cardamom powder in a pan over low medium heat. Bring to a boil and Set aside.
Melt the ghee in a frying pan on medium heat. Add sooji and roast to golden brown color; stirring constantly this will take about 5 to 8 minutes. Sooji will be golden brown in color and will have a light sweet aroma.
Add the syrup slowly, as you add the syrup to sooji water will splatter. Turn down the heat to medium low and let it cook for about 2-3 minutes.
Garnish with almonds.
Notes
NotesSooji will absorb the water, as the Halwa cools so keep Halwa a little more softer then you want.Serving suggestionServe hot for best taste. If you like, garnish with shaved pistachio, almonds or shredded coconut.For breakfast serve with paratha, aloo puriVariationsInstead of water add 1 cup of milk and 1/2 cup of water and keep Halwa a little thicker. Pour the Halwa on a greased plate, keep it about 1/2 inch thick. Garnish with shaved almonds or pistachio or shredded coconut, and let it cool for about a half an hour. Cut the Halwa in square or diamond shapes like burfee.
Sooji Halwa, a classic in the realm of traditional desserts, holds enduring popularity. Renowned for its deliciousness, this treat serves as a warm and inviting indulgence for guests. The result is an exotic Halwa creation that transcends expectations, promising a delightful experience beyond your imagination.
Embark on a culinary journey through the rich flavors and aromatic spices of India with the creation of sooji halwa, a classic dessert beloved for its sweet simplicity and indulgent texture. Each step in the process—from mixing the sooji with milk to infusing the syrup with fragrant cardamom and saffron—unveils a symphony of flavors and textures, resulting in a delectable treat that delights the senses and warms the heart. Let’s explore the art of making sooji halwa in seven meticulous steps, each one essential in achieving the perfect balance of sweetness and spice.
Step 1: Mixing Sooji and Milk
In the initial step of preparing sooji halwa, take a bowl and combine the sooji (semolina) with milk, creating a cohesive mixture that forms the foundation for the dessert. Allow this blend to sit undisturbed for about five minutes, allowing the sooji to absorb the milk and soften, readying itself for the culinary journey ahead.
Step 2: Breaking Up Lumps
After the brief soaking period, the sooji and milk combination will naturally form lumps as it absorbs the liquid. Utilize a fork to gently break up these lumps, ensuring a smooth and uniform texture for the sooji halwa. This meticulous step guarantees a velvety consistency in the final preparation, an essential characteristic of a well-executed halwa sooji recipe.
Step 3: Infusing Flavors in Syrup
In parallel to preparing the sooji, initiate the syrup preparation by combining sugar, cardamom powder, and saffron in boiling water. Thoroughly mix these elements to create a fragrant and flavorful syrup that will serve as the backbone of the sooji halwa. Set this aromatic infusion aside, preserving its essence to later elevate the taste of the final dish.
Step 4: Ghee-infused Sooji
Moving to the stovetop, heat clarified butter (ghee) in a frying pan over medium heat until warm. Turn off the heat and introduce the sooji into the warm ghee, blending them together with gentle pressure from a spatula. This marks a crucial stage in the halwa sooji recipe, setting the tone for the subsequent roasting process that will impart a rich, nutty flavor to the dessert.
Step 5: Golden Brown Roasting
With the heat adjusted to medium-low, resume cooking and roast the sooji in the ghee until it reaches a golden brown color, stirring continuously to prevent burning. This meticulous roasting process takes approximately 5 to 8 minutes, resulting in a visually appealing hue and a delightful sweet aroma that fills the kitchen. Achieving the perfect golden brown color is pivotal in achieving the desired texture and flavor profile in the sooji halwa.
Step 6: Syrup Infusion and Cooking
Gradually introduce the prepared syrup to the roasted sooji, taking caution as the addition may cause splattering. Allow the mixture to cook for about 4 minutes, enabling the sooji to absorb the infused flavors and achieve a luscious consistency. It is essential to maintain a slightly softer consistency in the halwa than the desired final texture, as the sooji will continue to absorb moisture while cooling, resulting in the perfect balance of moisture and sweetness.
Step 7: Garnishing and Serving
To complete the sooji halwa recipe, garnish the preparation with pistachios, adding a visual and textural element that enhances the overall appeal of the dish. Serve the halwa warm for the best taste, presenting a delightful and aromatic dessert that captures the essence of this classic Indian sweet. With its rich flavors and indulgent texture, sooji halwa is sure to become a beloved favorite for special occasions and everyday indulgences alike. So, gather your ingredients, ignite the flames of your creativity, and embark on a flavorful journey through the enchanting world of sooji halwa.
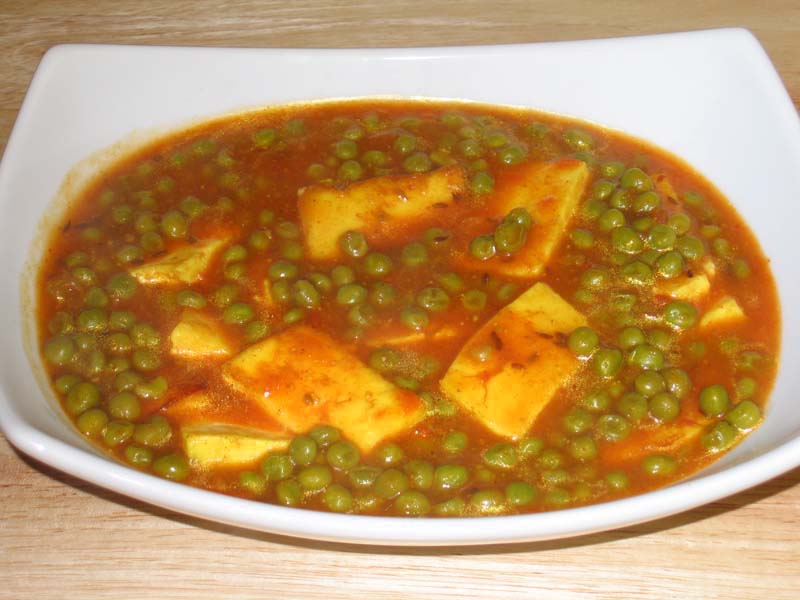
Cube the paneer into half inch pieces and deep-fry them on medium high heat. Fry until the paneer becomes a light golden color. Take the paneer out and place on a paper towel so the extra oil is absorbed.
Mix cornstarch with three tablespoons of water and keep aside.
Blend the tomatoes and ginger to make a puree.
Heat the oil in a saucepan. Test the heat by adding one cumin seed to the oil. If the cumin seed cracks right away, the oil is ready. Add the asafetida (hing), cumin seeds, bay leaves and cinnamon and stir-fry for a few seconds.
Add the tomato paste, coriander, turmeric, chili powder and paprika. Cook until the mixture reduces to half.
Add the green peas and 1/4 cup of water. cook on medium heat pan should be covered. When the peas are tender, add the salt and paneer.
To thicken the gravy add corn starch mix. Cover the pan and let it cook for 3-4 minutes.
Notes
Suggestion: Add 1 tablespoon fresh chopped fenugreek leaves or 1/2 tablespoon dried fenugreek leaves to the gravy when cooking.
Indulge in the perfect gluten-free, kid-friendly matar paneer recipe, specially crafted to elevate any occasion as this dish is a mouthwatering party recipe that’s popular among all individuals from children to adults. This delightful dish boasts a rich and flavorful gravy that will captivate both young and adult palates, ensuring a memorable dining experience.
Begin the journey of How To Make Matar Paneer by meticulously cubing the paneer into half-inch pieces. The key is to deep-fry these paneer cubes over medium-high heat until they attain a delicate golden hue. This crucial step not only imparts a delightful texture to the paneer but also sets the foundation for the indulgent experience that Matar Paneer promises. Once fried to perfection, transfer the paneer cubes onto a paper towel, allowing any excess oil to be absorbed, ensuring a balanced and flavorful outcome for this Matar Paneer sabji.
Step 2: Creating a Thickening Agent – Essential in Matar Paneer Masala
In the second step of the Matar Paneer masala preparation, take a moment to mix cornstarch with three tablespoons of water, creating a thickening agent that will contribute to the luscious consistency of the dish. This clever addition enhances the overall texture of the Matar Paneer gravy, ensuring it coats the paneer cubes and green peas harmoniously. The cornstarch mix, now prepared and set aside, is a key player in perfecting the Matar Paneer sabzi.
Step 3: Crafting a Tomato-Ginger Puree – Essence of Matar Paneer
Embark on the flavorful journey of Matar Paneer by crafting a tomato and ginger puree. This vibrant mixture lays the groundwork for the dish’s aromatic essence, infusing it with the natural sweetness of tomatoes and the subtle warmth of ginger. As the soul of the Matar Paneer recipe, this puree forms the base of the rich gravy that envelops the paneer and peas, creating a delightful symphony of flavors in this quintessential Matar Paneer masala.
Step 4: Infusing Flavorful Elements – Matar Paneer Unleashed
Heat oil in a saucepan to initiate the fourth step in the Matar Paneer saga. The aromatic journey begins by testing the oil’s readiness with a cumin seed. Once it crackles, add a melange of flavorful elements, including asafetida (hing), cumin seeds, bay leaves, and cinnamon. This infusion of spices elevates the Matar Paneer sabzi, creating a fragrant and appetizing atmosphere that sets the stage for the subsequent layers of taste in this Matar Paneer recipe.
Step 5: Crafting the Tomato Base – Foundation of Matar Paneer Recipe
As the oil embraces the aromatic symphony, introduce the tomato paste, coriander, turmeric, chili powder, and paprika to the saucepan. This marks a pivotal step where the foundation of the Matar Paneer recipe takes shape. Cook this amalgamation until it reduces to half its volume, allowing the tomatoes to release their inherent sweetness and harmonize with the array of spices. This transformative process is integral to achieving the distinctive taste that defines Matar Paneer masala.
Step 6: Introducing Green Peas – Matar Paneer Masala Symphony
For the sixth step in perfecting Matar Paneer, introduce the green peas and a quarter cup of water to the pan. Let this vibrant combination simmer on medium heat, ensuring the pan is covered. The green peas, tenderized to perfection, contribute a burst of color and freshness to the Matar Paneer masala. As the peas become tender, add salt and the previously prepared paneer cubes, creating a symphony of textures that makes Matar Paneer a delightful and wholesome sabzi.
Step 7: Thickening the Gravy – Culmination of Matar Paneer Recipe
Concluding the Matar Paneer journey, focus on thickening the gravy by incorporating the cornstarch mix. Cover the pan, allowing the Matar Paneer to simmer for an additional 3-4 minutes. This final step ensures that the Matar Paneer masala reaches its optimal thickness, creating a cohesive and flavorful gravy that clings to the paneer and peas. With this last flourish, the Matar Paneer recipe unfolds into a hearty and satisfying dish, ready to be savored in all its aromatic glory.
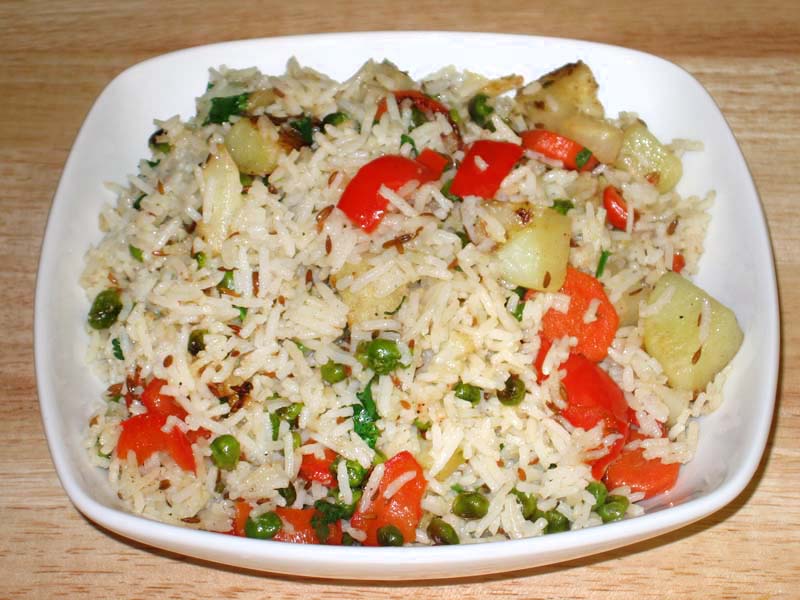
Vegetable pulav is a mix of spicy vegetables with rice. This is a great dish for lunch. If you are not in the mood to prepare a big meal, use vegetable pulav as a one-dish meal. Serve with yogurt, pickle, papadam or chutney.
Heat the oil in a saucepan. Test the oil by adding one cumin seed; if seed cracks right away oil is ready. Add cumin seeds after cumin seeds crack add bay leaves and stir for few seconds. Next add the rice. Stir-fry for 2 minutes.
Add water and salt, bring to a boil and turn the heat to low. Cover the pan. Cook about 15 minutes, or until the rice is tender and the water has evaporated. Turn off the heat and fluff the rice with a fork.
Preparing the vegetables:
Use a frying pan to cook the vegetables. Add the vegetables in steps, the vegetables that need the most time to cook are added first and the vegetables that need the least time will be added last.
Heat the oil in frying pan. Test the heat by adding one cumin seed to the oil; if it cracks right away oil is ready. Add cumin seeds after cumin seeds crack, add potatoes, stir-fry them for about 2 minutes.
Add cauliflower and carrots. Let them cook for about another 3 minutes, stirring occasionally.
Next add green peas, bell pepper, ginger and green chilies. Let the vegetables cook for a few minutes till vegetables are tender. Turn off the heat.
Add garam masala and lemon juice.
Next gently fold the rice into the vegetables. Transfer to a serving dish and garnish the rice dish with cilantro.
Vegetable pulao is a flavorful gluten-freevegan blend of spicy vegetables combined with rice, making it an excellent lunch option. This dish proves particularly convenient when you prefer a quick & easy meal. Utilize vegetable pulav as a standalone one-dish meal, or complement it with yogurt, pickle, papadam, or chutney for a satisfying and well-rounded dining experience.
Preparing Pulav Rice:
Embark on a culinary adventure as you delve into the meticulous process of crafting a delightful pulav rice recipe. Begin by heating oil in a saucepan, creating a canvas for the infusion of rich flavors. Ensure the oil is at the optimal temperature by conducting a cumin seed test; the satisfying crackle indicates readiness. Enrich the aromatic foundation by introducing additional cumin seeds and fragrant bay leaves, setting the stage for an enticing pulav rice experience.
As you add the rice to the pan, engage in a 2-minute stir-fry, allowing each grain to absorb the essence of the spices—a vital step in mastering the art of how to make pilav rice. The introduction of water and salt transforms the mixture into a bubbling concoction, simmering on low heat for 15 minutes until the rice attains a tender texture, releasing a fragrant aroma that defines the pulav rice recipe. Conclude this flavorful journey by delicately fluffing the rice with a fork, achieving a light and fluffy consistency crucial to the essence of the rice pulav recipe.
Preparing Vegetables for Pulav Rice:
In the intricate process of creating pulav rice, wield a frying pan as your culinary orchestra, orchestrating a symphony of vibrant colors and enticing textures. Elevate the aromatic canvas by heating oil to the perfect temperature, validated by the distinctive crackle of a cumin seed—the quintessential initiation into the pulav rice recipe. With each addition of cumin seeds, establish a fragrant base that paves the way for the culinary dance that follows.
Immerse potatoes into this aromatic blend, conducting a 2-minute stir-fry, a pivotal step in unraveling the secrets of how to make pulav rice. Introduce cauliflower and carrots, orchestrating an additional 3 minutes of cooking to gradually enhance their tenderness, a crucial aspect in the art of rice pulav. The crescendo of this culinary symphony includes green peas, bell pepper, ginger, and green chilies, creating a vibrant medley that transforms the pulav rice recipe into a visual and flavorful masterpiece. Conclude this vegetable overture by introducing garam masala and lemon juice, harmoniously blending the spices before gently folding the aromatic rice into the vegetable symphony, shaping the pulav rice recipe.
Final Assembly of Rice Pulav:
Culminate the gastronomic masterpiece that is the pulav rice recipe by seamlessly merging the meticulously prepared rice and vegetables. Gently fold the aromatic rice into the medley of colorful vegetables, ensuring an even distribution of flavors—a key element in the intricate art of making pulav rice. As the harmonious blend takes shape, transfer it to a serving dish, where the vibrant hues of the vegetables complement the inviting warmth of the rice pulav.
Elevate the presentation by adorning the dish with sprigs of fresh cilantro, adding a final touch of both freshness and visual appeal—a crucial finale in the rice pulav recipe. This assembly not only showcases the meticulous steps involved in creating a pulav rice dish that tantalizes taste buds but also captivates with its aesthetic allure. Serve and savor the culmination of the pulav rice recipe—a delightful union of fragrant rice and flavorful vegetables—embodied in the artistry of pulav preparation.