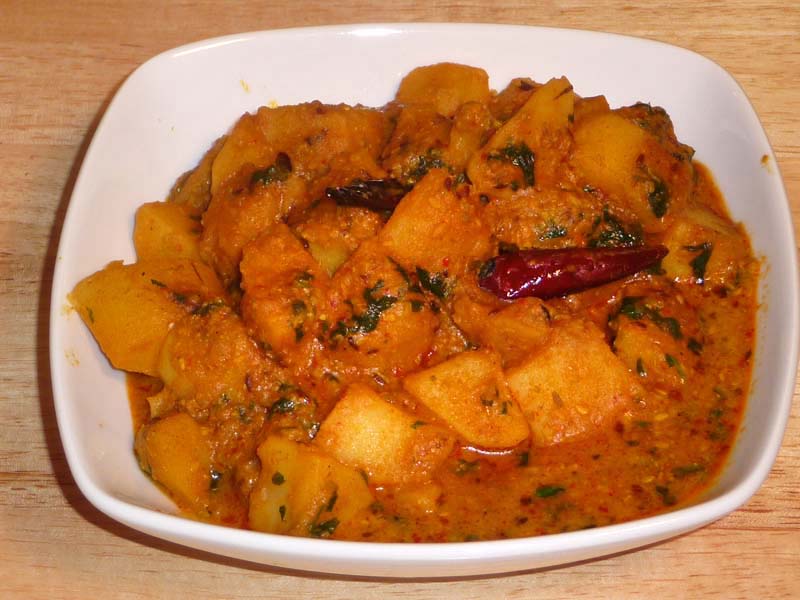
Aloo Dum is an exotic delicious main course dish. Just the smell of aloo dum can make you hungry! To make this dish, potatoes are fried and then soaked in the spicy aromatic gravy. This is a perfect dish for any dinnerparty.
Heat the oil in a frying pan over medium high heat.
Frying pan should have at least 1 inch of oil. To check if the oil is ready, put one piece of potato in the oil. The potato should sizzle right away. If potatoes are fried on low heat, they will be very oily.
Fry the potatoes till they are cooked through; turn the potatoes a few times while frying. Take out potatoes with a slotted spoon (this allows excess oil to drip back into the frying pan) and place on a paper towel. Keep it aside.
Heat the pan on medium heat and stir-fry the sesame seeds for about a minute until seeds lightly change color. Take them out and keep aside.
Blend sesame seeds, coconut, ginger, green chili, and make it into a paste. Use water as needed to blend into paste.
In a small bowl mix, sesame paste, yogurt, ginger, green chili, coriander powder, funnels seed powder, paprika, red chili powder, and turmeric into a paste. Keep it aside.
Heat the oil in a saucepan. Test the heat by adding one cumin seed to the oil; if seed cracks right away oil is ready. Add the cumin asafetida and cumin seeds. After the cumin seeds crack, add whole red chili and besan (gram flour). Stir-fry for about half a minute until the besan (gram flour) is golden-brown.
Add the spice paste and stir-fry for about 2 minutes on medium heat until the spices start to separate from the oil.
Add the potatoes, mix it well and add about 1cup of water. After the gravy boils, let it cook on low-medium heat for 8 to 10 minutes. Adjust the gravy to your liking.
Add the cilantro and garam masala, cover the pan, and turn off the heat. Let it sit for a few minutes before taking off the cover. This helps bring the color to the top of the dish.
Keyword Exotic, Party Food, Side Dish, Spicy Potatoes
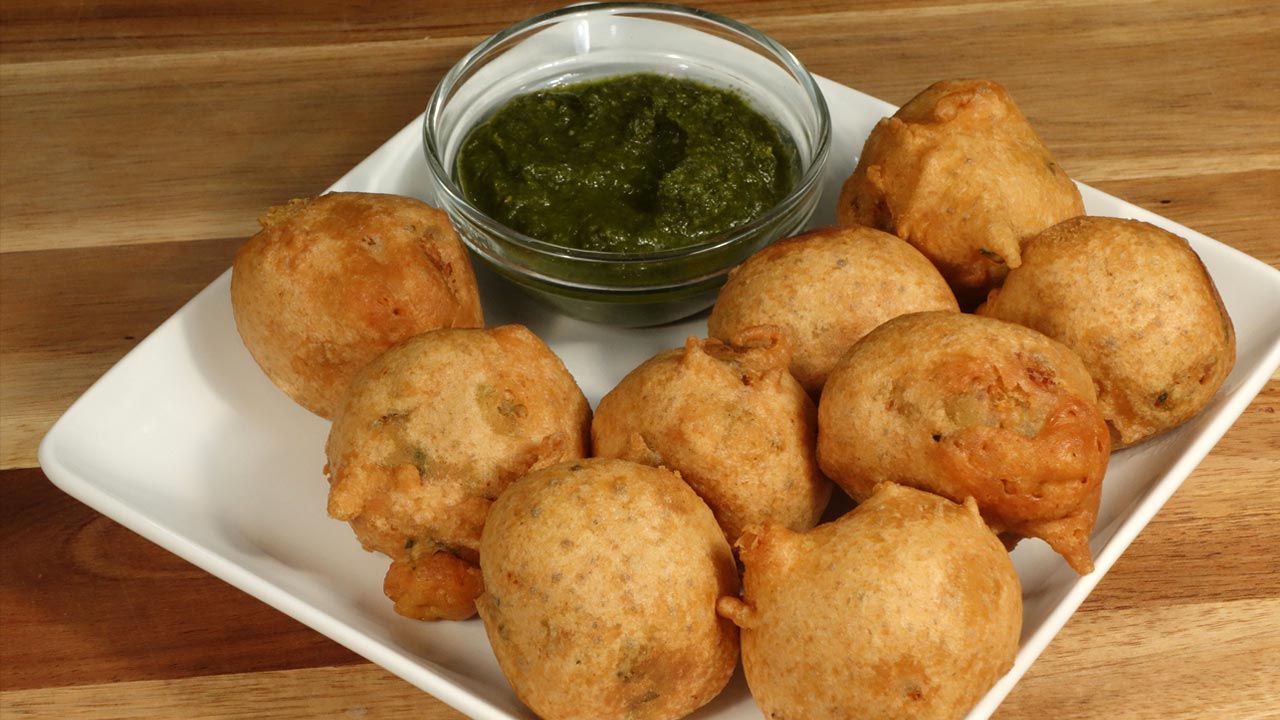
Batata Vada also known as aloo bonda, deep fried savory appetizer made with spicy potato mix. When they are serve hot they are crispy outside and soft inside. This is a very popular street food in Mumbai.
3 medium potatoes boiled peeled and roughly chopped (this will make 2 cups of chopped potatoes)
1 tablespoon oil
1/2 teaspoon black mustard seeds (rai)
7-10 curry leaves chopped, optional
1/4 teaspoon turmeric (haldi)
1 tablespoon finely chopped ginger
1 green chili finely chopped adjust to taste
2 tablespoons chopped cilantro (hara dhania)
1/2 teaspoon salt adjust to taste
For Batter
1/2 cup besan, gram flour (available in Indian grocery stores)
1 tablespoon rice flour
1/8 teaspoon asafetida (hing)
1/4 teaspoon baking soda
1/4 teaspoon red pepper
1/2 teaspoon salt adjust to taste
About 1/4 cup of water
Oil to fry
Instructions
Batter
In a bowl mix besan, rice flour, salt, asafetida, pepper, and baking powder. Add water slowly to make a thick and smooth batter. Set aside.
Vada
Heat oil in a frying pan on medium heat moderately.
Add mustard seeds as the seeds crack add curry leaves, (curry leaves splatters) potatoes, ginger, green chili, turmeric, and salt.
Stir fry for about 3 minutes over medium heat. Add cilantro mix it well. Turn of the heat.
Let the potato mix cool off, divide them into about 12 pieces and make them into smooth round ball, they will be little smaller then golf ball.
Heat about 1”of oil in a frying pan on medium high heat. To check if the oil is ready, put one drop of batter in oil. The batter should come up but not change color right away.
Dip the potato balls into the batter one at a time, making sure the potato balls are completely covered with batter. Then, slowly drop them into the frying pan.
Turn them occasionally. Fry the batata vadas until all sides are golden-brown.
Batata vadas will take about four minutes to cook.
Serve them hot with cilantro chutney.
Notes
Serve them with sandwich buns using cilantro chutney as spread. Now this is known as Vada pav, another famous street food in Mumbai.
Aloo bonda, a popular Indian street food, is a delectable appetizer consisting of spiced mashed potato balls coated in chickpea flour batter and fried to crispy perfection.
Introduction to Batata Vada and Aloo Bonda
Batata Vada, also known as Aloo Bonda, is a popular Indian street food that originated in the state of Maharashtra. This delightful snack consists of spiced mashed potatoes coated in a gram flour batter and deep-fried until golden brown. Loved for its crispy exterior and soft, flavorful interior, batata vada is a beloved snack enjoyed across the country. In this batata vada recipe, we will guide you through the process of making this delicious treat at home.
How to Make Batata Vada – Step by Step Guide
Preparation of Potato Filling: To begin making batata vada, start by boiling potatoes until they are tender. Once boiled, peel and mash them in a bowl. Heat oil in a pan and add mustard seeds, cumin seeds, asafoetida, and curry leaves. Sauté until fragrant, then add mashed potatoes, turmeric powder, red chili powder, salt, and chopped coriander leaves. Mix well and cook for a few minutes. Let the filling cool down.
Making the Gram Flour Batter: In a separate bowl, prepare the gram flour batter by mixing gram flour, rice flour, baking soda, salt, and water. Ensure a smooth consistency without any lumps. Let the batter rest for 10-15 minutes.
Assembly of Batata Vada: Take a portion of the potato filling and shape it into small balls. Dip each ball into the prepared gram flour batter, ensuring it is evenly coated.
Deep Frying the Vadas: Heat oil in a deep frying pan over medium heat. Once the oil is hot, carefully drop the coated potato balls into the oil and fry until they turn golden brown and crisp. Remove from oil and place them on paper towels to drain excess oil.
Serve Hot: Your crispy and delicious batata vada or aloo bonda is ready to be served. Enjoy them hot with green chutney or tamarind chutney.
Tips for Perfect Batata Vada
Ensure that the potato filling is well-spiced to enhance the flavor of the batata vada.
Make sure the gram flour batter is of the right consistency; it should coat the potato filling evenly.
Fry the vadas in hot oil to achieve a crispy exterior.
Serve the vadas hot for the best taste and texture.
Variations of Batata Vada
You can add crushed peanuts or cashews to the potato filling for added crunch.
For a spicy kick, add finely chopped green chilies to the potato mixture.
Experiment with different spices and herbs to customize the flavor according to your preference.
Benefits of Batata Vada
Batata vada is a filling and satisfying snack that can be enjoyed any time of the day.
Potatoes are a good source of carbohydrates, making batata vada an excellent energy booster.
This snack is vegetarian and can be enjoyed by people of all ages.
Frequently Asked Questions (FAQs)
Q: Can I make batata vada ahead of time?
A: While batata vada is best enjoyed fresh, you can prepare the potato filling and gram flour batter in advance and fry the vadas just before serving for optimal crispiness.
Q: Can I bake batata vada instead of deep-frying?
A: While traditionally batata vada is deep-fried for that crispy texture, you can try baking them in the oven for a healthier alternative. However, the texture may vary slightly.
Other Recipes on Manjula’s Kitchen
If you’re looking to explore more Indian recipes, appetizers, beverages, and desserts, be sure to check out the following links on Manjula’s Kitchen. Here are some links to recipes on Manjula’s Kitchen official website:
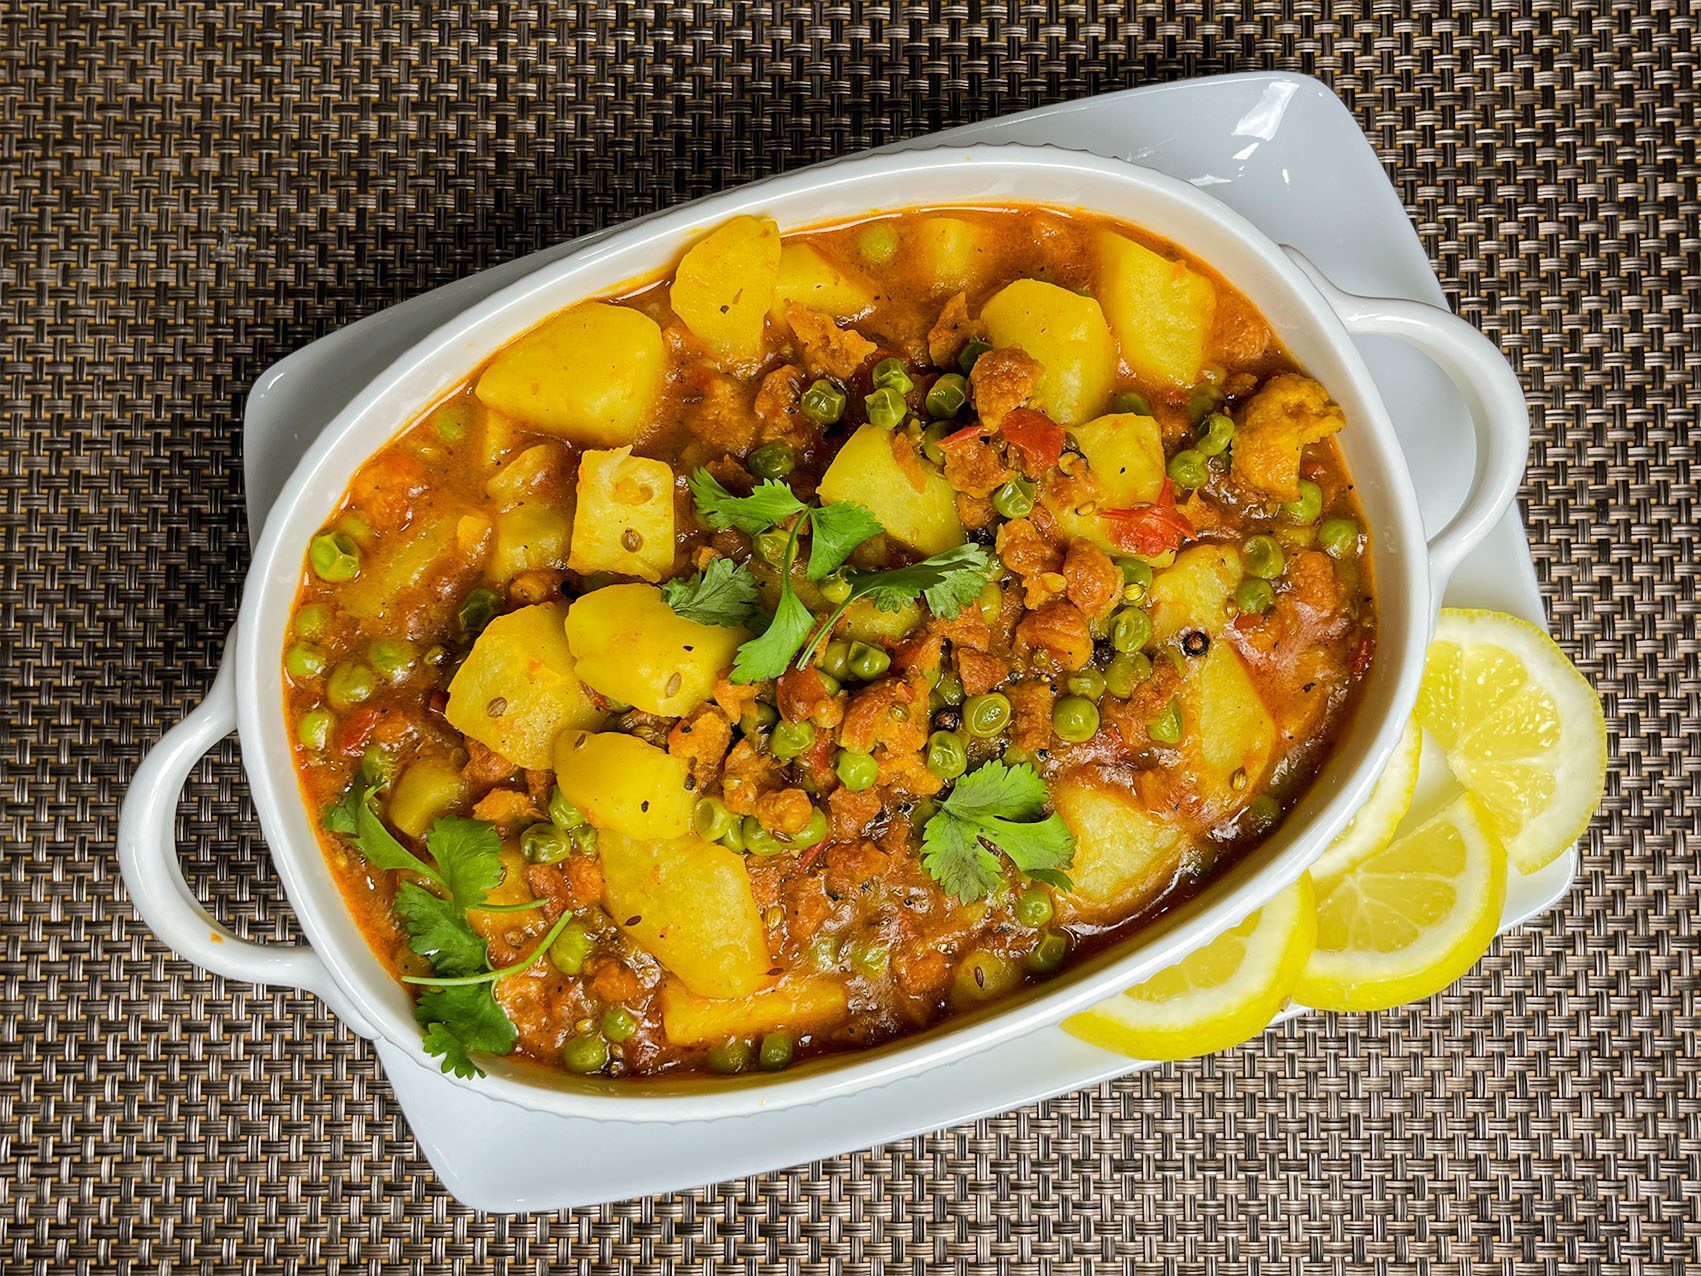
Amritsari Style Aloo Wadi Ki Sabji has a unique flavor. This is a delightful Punjabi dish using sun-dried lentil dumplings, potatoes and green peas. Aloo Wadi is a spicy, gravy-based dish, perfect for those who enjoy spicy food. Explore this tasty recipe exclusively at Manjula's Kitchen official website.This was one of my favorite dishes growing up. Amritsari Wadi wasn't available at the Indian grocery store where I shop, but they had plain Urad Dal Wadi. I like to use ingredients that are easily available. As usual, I searched on Google for the spices used in Amritsari Wadis, and there were so many different versions that none matched what I remembered. I wanted to make a recipe very close to what I remember.After trying a few times, I finally called my sister to find out the ingredients used in Amritsari Wadi. She knows some good Indian vegetarian recipes that are very traditional and excellent, and of course, she helped me out. After a few tries, I was happy with the balance of spices in the Aloo Wadi.
2cupsboiled potatoes peeled and cut into byte size cubes
1cupgreen peasfrozen green peas
3/4 cupurad dalwadi broken into small pieces
3/4cuptomato puree
3tbspoil
1tspcumin seeds (jeera)
1/8tspasafetida (hing)
1-1/2tbspcoriander crushed (dhania)
2tspblack pepper crushed (kali mirch)
2dry red chilies (sabut lal mirch)broken in small pieces
1/4tspKashmiri red chili powder, optional
1/4tspturmeric (haldi)
1-1/2tspsalt
1-1/2cup water
Instructions
Heat the pan on medium-low and add 2 tablespoons of oil. Add the urad dal vadi and stir-fry until they are light golden brown, about 2 minute. Remove them and set aside in a bowl.
In the same saucepan, add the remaining tablespoon of oil over medium heat. When the oil is moderately hot, add the cumin seeds. When the seeds start to crackle, add the asafetida, stir, and then add the tomato puree, coriander, black pepper, red chili, Kashmiri chili powder, turmeric, and salt. Cook, stirring occasionally, until the spice mix starts releasing oil, about 2 minutes.
Add the potatoes, green peas, vadis, and 1 1/2 cups of water. Cover the pan and let it cook for about 10 minutes over medium-low heat. Adjust the water if needed.
Vadis are ready, I will serve them with rice.
Notes
About Aloo WadiyanPunjabi Aloo Wadiyan is a traditional North Indian dish that features potatoes (aloo) and sun-dried Urad Dal dumplings (wadiyan). It’s a flavorful and hearty vegetarian dish that is popular in Punjabi cuisine. The sun-dried lentil dumplings add a unique texture and taste to the dish.If you don’t have urad dal vadiyan, you can use moong dal vadayan.
The Unique Flavor of Amritsari Punjabi Aloo Wadiyan
Amritsari Punjabi Aloo Wadiyan is a delightful and spicy dish from Punjab, known for its unique flavor and the use of sun-dried lentil dumplings (wadiyan). This Aloo Wadi Ki Sabji combines potatoes and green peas with flavorful spices, making it a hearty and satisfying meal. This dish is perfect for those who enjoy a spicy, gravy-based curry, explore more Indian gravy recipes.
The Essence of Aloo Wadi Ki Sabji
The essence of Aloo Wadi Ki Sabji lies in its combination of textures and flavors. The sun-dried urad dal dumplings (wadiyan) add a chewy texture and rich taste, while the potatoes and green peas provide a comforting base. The blend of spices creates a flavorful gravy that ties everything together. This dish is one of the finest Indian vegan recipes that is also gluten-free, making it suitable for various dietary preferences.
Origin and Popularity
Aloo Wadiyan is a traditional dish in Punjabi cuisine, this special occasions recipe often enjoyed during family gatherings. The use of Amritsari wadiyan adds a unique twist to this dish, with the wadiyan being a specialty of the Amritsar region. The combination of potatoes and lentil dumplings in a spicy gravy makes this dish a favorite among those who appreciate hearty and flavorful vegetarian meals.
Why You’ll Love This Recipe
Unique Flavor: The sun-dried lentil dumplings provide a distinctive taste and texture.
Spicy and Flavorful: The blend of spices creates a rich and spicy gravy.
Vegan and Gluten-Free: Suitable for various dietary preferences.
Comforting and Hearty: Perfect for a satisfying meal, especially when served with rice.
Variations of Vegetable Dry Recipes
Exploring Manjula’s Kitchen reveals a treasure trove of other delicious vegetable dry recipes that you might enjoy. Here are some related dishes that you might find interesting:
Aloo Gobi: A classic Indian dish made with potatoes and cauliflower cooked with spices.
Bhindi Masala: A flavorful dish made with okra and a blend of spices.
Baingan Bharta: A smoky and flavorful dish made with roasted eggplant and spices.
Gajar Matar: A simple and healthy dish made with carrots and green peas.
Palak Paneer: A popular dish made with spinach and paneer in a creamy sauce.
Serving Suggestions
Aloo wadi ki sabji can be enjoyed in various ways:
With Rice: Serve with steamed plain basmati rice or jeera rice for a complete meal.
With Indian Breads: Pair with roti, naan, or paratha for a satisfying meal.
As a Side Dish: Enjoy as a side with other Indian curries and dishes.
For Special Occasions: Perfect for festive meals and family gatherings.
Tips and Tricks
To perfect your aloo wadi ki sabji recipe, consider these helpful tips:
Use Fresh Wadiyan: Fresh sun-dried lentil dumplings provide the best flavor and texture.
Balance the Spices: Adjust the spice levels to suit your taste preferences.
Cook Gently: Simmer the dish on low heat to allow the flavors to meld together.
Customize: Feel free to add other vegetables like carrots or bell peppers for added nutrition and flavor.
FAQs Frequently Asked Questions
Can I Use Moong Dal Wadiyan Instead of Urad Dal Wadiyan?
Yes, you can use moong dal wadiyan as a substitute if urad dal wadiyan are not available.
How Long Does Aloo Wadi Ki Sabji Last?
Store any leftovers in an airtight container in the refrigerator for up to 2 days. Reheat gently before serving.
Is Aloo Wadi Ki Sabji Vegan?
Yes, this recipe is naturally vegan and gluten-free.
What Can I Serve With Aloo Wadi Ki Sabji?
This dish pairs well with steamed basmati rice, jeera rice, roti, naan, or paratha.
Can I Make This Dish Less Spicy?
Yes, adjust the amount of green chilies and red chili powder to make the dish milder.
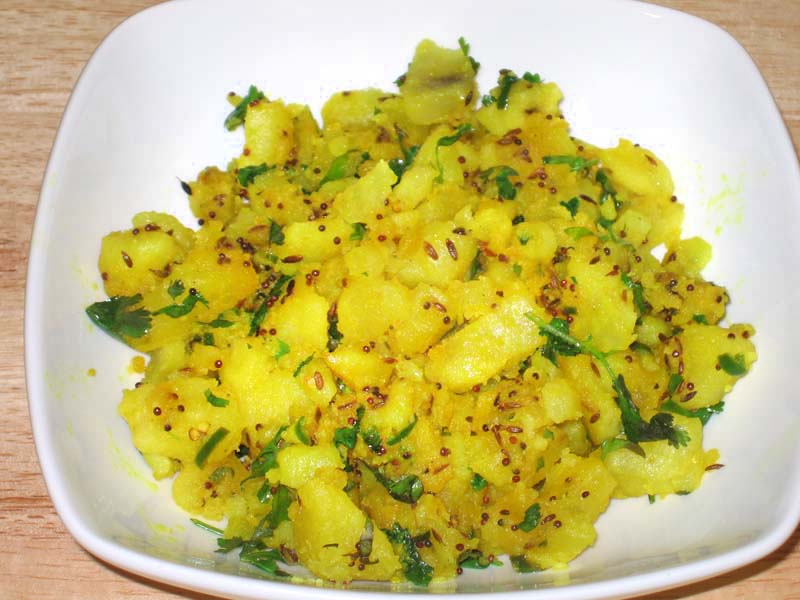
Aloo masala is a nice compliment for any kind of dosa. The Aloo Masala can be rolled in the dosa or served as a side dish. Its a great appetizer that goes well in all kinds of meal be it breakfast, lunch or dinner.
Aloo Masala Recipe: How to make Aloo Masala for Dosa
Aloo Potato Masala, a classic gluten free South Indian filling that pairs perfectly with dosa, a popular Indian crepe. This vegan versatile dish combines the earthy goodness of potatoes with aromatic spices, creating a delicious accompaniment that’s loved by all.
Spicy Potato Masala for Dosa
Hearty and Satisfying: Aloo Potato Masala is a hearty and satisfying dish that’s perfect for breakfast, brunch, or any time of the day. Its comforting flavors and creamy texture make it a popular choice among both children and adults.
Versatile Filling: Aloo Potato Masala is incredibly versatile and can be used as a filling for various Indian snacks and dishes, including dosa, samosa, and sandwich. Its bold flavors and creamy texture add depth and richness to any recipe it’s used in.
Easy to Prepare: Making Aloo Potato Masala at home is quick and easy, requiring just a few simple ingredients and basic cooking techniques. With the right combination of spices and seasoning, you can create a delicious and flavorful filling that’s sure to impress.
Variations of Aloo
Aloo Gobi: Aloo Gobi is a delicious main dish made with potatoes, cauliflower, and a great blend of spices. Aloo Gobi can be served with various breads, such as rotis, parathas, and puris.
Aloo Baingan: Aloo baingan (potato and eggplant) is a great main dish. It’s easy to make and can be served with any bread.
Aloo Dum: Is an exotic rich and luxurious variant of aloo made in a curry format and incorporates the Indian cooking style of dum.
Aloo Mattar: Aloo Mattar is a popular curry based north Indian dish. Potatoes and peas with spicy gravy makes a great main course served with puris, rotis and parathas.
Tips for Making Perfect Aloo Potato Masala:
Boil Potatoes Until Tender: Boil the potatoes until they are fork-tender before mashing them for the Aloo Potato Masala. This ensures that the potatoes are cooked through and have a smooth and creamy texture.
Temper the Spices: Temper whole spices such as mustard seeds, cumin seeds, and curry leaves in hot oil before adding other ingredients. This releases their flavors and aromas, enhancing the overall taste of the Aloo Potato Masala.
Finish with Fresh Herbs: Garnish the Aloo Potato Masala with freshly chopped cilantro or coriander leaves just before serving for a burst of freshness and color. Herbs add a vibrant touch to the dish and elevate its presentation.
FAQs about Aloo Potato Masala for Dosa:
Can I make Aloo Potato Masala ahead of time?
Yes, you can prepare the Aloo Potato Masala ahead of time and store it in the refrigerator for up to 2-3 days. Reheat it gently on the stovetop or in the microwave before serving with dosa or other dishes.
Is Aloo Potato Masala gluten-free?
Yes, Aloo Potato Masala is naturally gluten-free as it’s made with potatoes, vegetables, and spices, which are all gluten-free ingredients. It’s a safe and delicious option for individuals with gluten intolerance or celiac disease.
Can I freeze Aloo Potato Masala?
While you can freeze Aloo Potato Masala, the texture may change slightly upon thawing. It’s best to freeze the masala in an airtight container for up to 1-2 months and thaw it in the refrigerator overnight before reheating.
What can I serve with Aloo Potato Masala?
Aloo Potato Masala pairs perfectly with dosa, a South Indian crepe made from fermented rice and lentil batter. It can also be served with idli (steamed rice cakes), uttapam (Indian-style savory pancakes), or puri (deep-fried bread).
Aloo Potato Masala is a delicious and versatile dish that’s perfect for savoring with dosa or as a filling for various Indian snacks and dishes. Whether enjoyed for breakfast, brunch, or as a comforting meal option, its hearty flavors and creamy texture are sure to delight your taste buds and leave you craving for more.
So why not treat yourself to a batch of homemade Aloo Potato Masala and experience the irresistible flavors of South Indian cuisine?
Stay tuned for more such dishes on Manjula’s Kitchen exploration into the world of culinary delights!
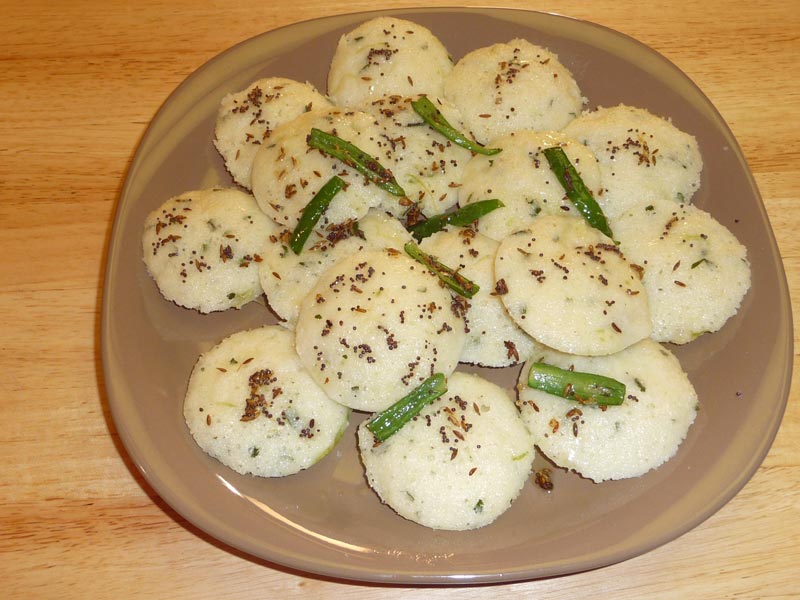
Rava Idli is a popular South Indian dish. The traditional way of making idlis would take two days. This recipe is much quicker and easier, and tastes just as delicious! Rava Idlis can be enjoyed as a snack or as a light meal.
22 green chilies sliced lengthwise and cut in half.
Utensils for Steaming Idlis
Idli stand – this has three to four plates stacked over each other.
Covered pot, large enough to hold the idli stand.
Alternatively, an egg poacher can work just as well,
Instructions
Mix sooji, salt, green chili, ginger, cilantro, cabbage, yogurt, and water (as needed) to make a pancake-like batter. Set aside for at least 30 minutes.
The batter thickens as the semolina absorbs the water. At this point, add a little more water if it is too thick.
Add approximately ¾ cup of water to the pot. Check to make sure that the water does not touch the bottom plate of the idli stand. Bring to boil
Lightly grease Idli plates with oil.
Add Eno Fruit Salt to the batter and mix well. The mixture will begin foaming. Immediately begin pouring into the Idli trays. Place the stand into the steaming pot.
Cover the pot and steam the idlis ten to twelve minutes on medium heat. Insert a toothpick in the center of one idli. If the toothpick comes out clean, remove the stand from the pot. Do not overcook the idlis, as they will lose their softness and dry out as they cool.
Cool for just a few minutes before removing each individual idli. They should come out easily and not stick to the mould. The idlis should be spongy and soft.
For The Seasoning
Heat oil in a saucepan. Add mustard and cumin seeds. When the seeds begin to crack, add the chilies. Stir for a few seconds and remove from the heat.Pour the seasoning over the Idlis on the serving plate.
Notes
TipsYou can replace the cabbage with shredded carrots.This recipe will make slightly more than 16 idlis. If you choose, you can make it in two batches. The batter can be prepared all at once; however, you must add the Eno just prior to pouring into the idli stand.Serving SuggestionsServe seasoned Idlis with coconut or cilantro chutney.Serve Idlis with samber (south Indian vegetable soup). Idlis do not have to be seasoned for that.Stir-fry Idlis in the seasoning oil mixture over medium heat for a few minutes. They will turn slightly brown.
Rava Idli is a popular South Indian dish known for its simplicity and delicious taste. Rava Idli is a fantastic option for a quick & easyappetizer or snack, and it also makes for a convenient lunch box suggestion. Rava idli recipe is a versatile dish that can be enjoyed for breakfast, lunch, or dinner. Made from idli rava, a type of semolina, this dish is easy to prepare and requires minimal ingredients.
Idli rava is coarser in texture compared to regular semolina, giving the idlis a unique taste and texture. In this rava idli recipe, we will explore the process of making rava idli and various tips, variations, and benefits associated with it.
Making Rava Idli: Step-by-Step Guide
Preparation of Batter
To begin rava idli preparation, start by heating a tablespoon of oil in a pan. Add mustard seeds and allow them to splutter. Then, add finely chopped green chilies, grated ginger, and curry leaves for added flavor. Sauté for a few minutes until the raw aroma disappears. Incorporating these spices enhances the taste of rava idli.
Roasting Idli Rava
Next, add idli rava to the pan and roast it for a few minutes until it turns aromatic and light golden brown. Roasting the idli rava adds a nutty flavor to the dish and ensures that the idlis are soft and fluffy.
Preparing the Batter
Transfer the roasted idli rava to a mixing bowl and let it cool slightly. Then, add yogurt and water to the roasted rava and mix well to form a thick batter. Allow the batter to rest for 10-15 minutes to allow the idli rava to absorb the moisture. This step is crucial for achieving the perfect texture in rava idli.
Seasoning the Batter
Meanwhile, prepare the seasoning by heating oil in a small pan. Add mustard seeds, urad dal, and cashew nuts, and fry until the dal turns golden brown and the nuts are lightly roasted. Pour this seasoning over the rava idli batter and mix well. Seasoning adds a depth of flavor to the rava idli and makes it more aromatic.
Adding Baking Soda
Just before steaming the idlis, add baking soda to the batter and mix gently. Baking soda acts as a leavening agent and helps in making the idlis soft and fluffy. However, it’s important not to overmix the batter at this stage to ensure that the idlis remain airy and light.
Steaming the Idlis
Grease the idli molds with oil and pour the batter into each mold. Place the molds in a steamer and steam the idlis for 10-12 minutes or until they are cooked through. Insert a toothpick into the center of an idli to check for doneness. If it comes out clean, the idlis are ready to be served.
Tips for Perfect Rava Idlis
Use fresh idli rava for the best results. Stale or old rava may result in dense and hard idlis.
Adjust the consistency of the batter by adding more water if it’s too thick or yogurt if it’s too thin.
For enhanced flavor, you can add grated vegetables like carrots, peas, or capsicum to the batter.
Serve rava idli hot with coconut chutney or sambar for a wholesome and satisfying meal.
Variations of Rava Idli
Vegetable Rava Idli: Add finely chopped vegetables like carrots, peas, and bell peppers to the batter for a nutritious twist.
Spicy Rava Idli: Increase the quantity of green chilies and add finely chopped coriander leaves for a spicier version of rava idli.
Paneer Rava Idli: Grate paneer and mix it into the batter along with some chopped mint leaves for a rich and flavorful variation.
Masala Rava Idli: Add a teaspoon of garam masala powder to the batter along with some tomatoes for a masaledar twist.
Benefits of Rava Idli
Nutritious: Rava idli is a good source of carbohydrates, proteins, and essential nutrients, making it a wholesome meal option.
Easy to Digest: Since idli rava is made from semolina, it’s easy to digest and is suitable for people of all ages.
Quick and Easy: Unlike traditional idlis, which require fermentation, rava idli can be prepared instantly, making it a convenient option for busy days.
Versatile: You can customize rava idli with different toppings and seasonings to suit your taste preferences.
FAQs about Rava Idli
Can I use regular semolina instead of idli rava?
While you can use regular semolina to make idlis, the texture and taste may vary slightly from traditional rava idli. Idli rava is coarser and gives a unique texture to the idlis.
How long should I steam the idlis?
Steam the idlis for 10-12 minutes or until a toothpick inserted into the center comes out clean. Over-steaming may result in dry and rubbery idlis.
Can I make rava idli without baking soda?
Baking soda helps in making the idlis soft and fluffy. However, if you prefer not to use it, you can substitute it with a pinch of fruit salt or eno.
For more delicious recipes, you can explore other recipes on Manjula’s Kitchen.
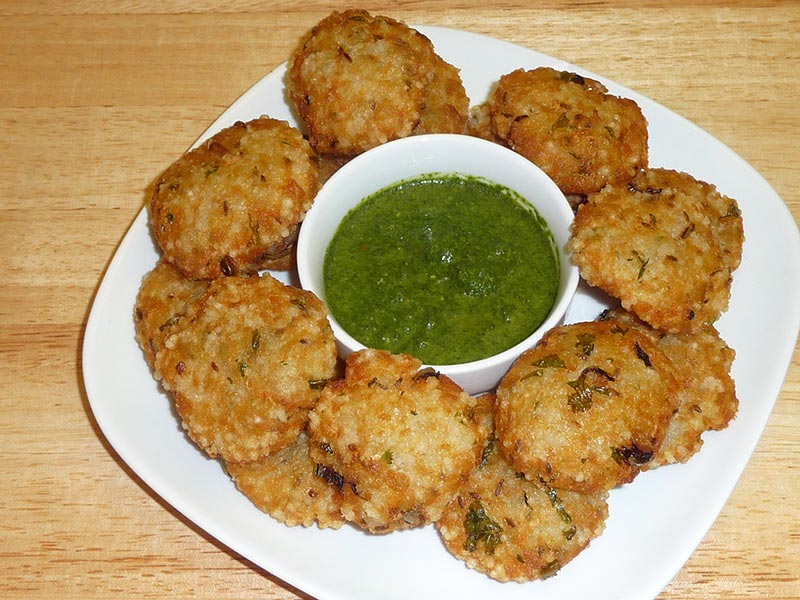
Sabudana Vada (Fried Dumplings of Potatoes and Tapioca)
Sabudana Vada is a delicious snack with a great texture. It is crunchy on the outside and soft inside. This can satisfy just about anybody, even those on a gluten-free diet. This recipe is completely gluten free.
Approximately 2 tablespoons finely chopped cilantro (hara dhania)
1 teaspoon lemon juice
Oil to fry
Instructions
Method
Wash the tapioca and soak it in 3 cups of water for 3 to 4 hours.
Drain the water. After soaking, the tapioca will have increased in volume, by about 2 times. Set aside.
Par-boil the potatoes, so they are only half-cooked. Insert a knife into the potato to ensure that it is still somewhat firm.
Cool the potatoes, then peel and grate them using a vegetable grater.
Mix all the ingredients together. The dough will be a little sticky and soft in consistency.
Divide the potato dough into 16 parts.
Roll each one into a smooth patty. You will need to lightly oil your palms to prevent the dough from sticking.
Heat the oil in a frying pan on medium high heat. There should be at least 1½ inches of oil in the frying pan. To check if the oil is ready, drop a small piece of dough into the oil. The dough should rise to the surface, and not change its color immediately.
Slowly drop the patties into the frying pan.
Fry the vada until both sides are golden brown. Turn them occasionally. It will take approx. 4 to 5 minutes to cook.
Remove the vada and place over a paper towel so the excess oil is absorbed.
Sabudana vada should be crunchy on the outside and soft inside.
Serve them as is or with cilantro or tamarind chutney.
Notes
TipThe frying oil needs to be sufficiently hot, or else the Vadas will turn out greasy and may break into pieces while cooking.Serving suggestions
Sabudana Vadas are best served with cilantro chutney or tamarind chutney as a dip.
Vadas taste best when they are served hot.
Sabudana Vadas can be made one day in advance and stored at room temperature. Do not refrigerate. When ready to serve, place on a cookie sheet and heat in the oven at 300 degrees till warm.
Sabudana Vada, a popular snack especially during Navaratri and Ganesh Chaturthi celebrations, is a gluten-free and veganappetizer commonly enjoyed as a delightful treat during festivals like Krishna Janmashtami, offering a crunchy texture and savory flavor to those seeking gluten-free and vegan snack options. Sabudana Vada is a beloved snack in Indian cuisine, especially popular during festivals and fasting periods.
Sabudana vada is essentially fried dumplings made from potatoes and tapioca pearls. It’s a delightful blend of flavors and textures, crispy on the outside and soft on the inside. This sabudana vada recipe is not only delicious but also relatively simple to make, requiring just a few basic ingredients commonly found in Indian households.
Let’s delve into the process of how to make sabudana vada and explore some tips, variations, benefits, and frequently asked questions regarding this classic snack.
Tips for Perfect Sabudana Vada
Soak Sabudana Properly: The key to making good sabudana vada lies in soaking the tapioca pearls properly. Rinse the sabudana under running water until the water runs clear, then soak them in water for at least 4-5 hours or overnight. They should be soaked enough to be easily mashed between your fingers.
Use Boiled Potatoes: Ensure that the potatoes are boiled properly and mashed well. This helps bind the vada mixture together and prevents them from breaking apart during frying.
Adjust Seasonings: Feel free to adjust the seasonings according to your taste preferences. You can add more green chilies for extra heat or increase the amount of lemon juice for a tangier flavor.
Fry on Medium Heat: Fry the vadas on medium heat to ensure they cook evenly from inside out and develop a golden-brown crust on the outside.
Serve Hot: Sabudana vadas are best enjoyed hot and fresh. Serve them with mint chutney, tamarind chutney, or yogurt for a delightful snack experience.
Variations of Sabudana Vada
Sabudana Aloo Tikki: Instead of shaping the vada into traditional round patties, you can make them into tikki shapes for a twist. Flatten the mixture into small discs and fry until golden brown on both sides.
Sabudana Vada with Peanuts: Add roasted and crushed peanuts to the vada mixture for an extra crunch and nutty flavor.
Sweet Sabudana Vada: For a unique variation, add some sugar and grated coconut to the vada mixture to make sweet sabudana vadas. Serve them as a dessert or a sweet snack.
Baked Sabudana Vada: If you’re looking for a healthier alternative, you can bake the vadas instead of frying them. Simply brush them with oil and bake in a preheated oven until golden brown and crispy.
Benefits of Sabudana Vada
Rich in Carbohydrates: Sabudana, being made from tapioca pearls, is rich in carbohydrates, providing a quick source of energy.
Gluten-Free: Since sabudana is derived from tapioca, it is naturally gluten-free, making it suitable for those with gluten intolerance or celiac disease.
Good Source of Protein: Potatoes used in the vada mixture add a decent amount of protein to the snack, making it more satiating.
Easy to Digest: Sabudana is easy to digest, which makes it a popular choice during fasting periods when heavier foods are avoided.
FAQs about Sabudana Vada
Can I make sabudana vada ahead of time?
While sabudana vada is best enjoyed fresh, you can prepare the mixture ahead of time and refrigerate it. Fry the vadas just before serving for the best taste and texture.
Can I freeze sabudana vada?
Yes, you can freeze uncooked sabudana vada. Place them on a tray lined with parchment paper and freeze until firm, then transfer them to a freezer-safe bag or container. Fry them directly from frozen, adding a few extra minutes to the frying time.
What can I serve with sabudana vada?
Sabudana vada pairs well with various chutneys such as mint chutney, tamarind chutney, or yogurt. You can also enjoy them with a hot cup of masala chai for a perfect snack time treat.
For more mouthwatering recipes and culinary inspiration, explore the following links from Manjula’s Kitchen:
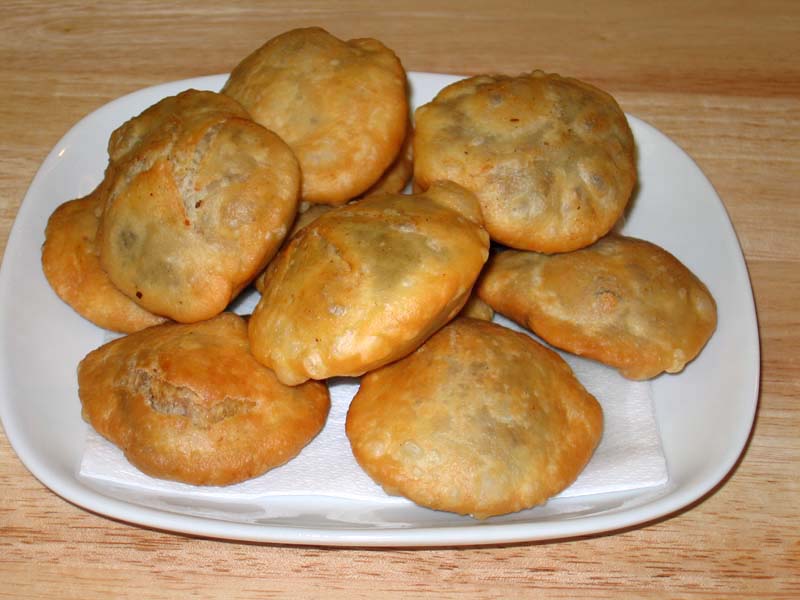
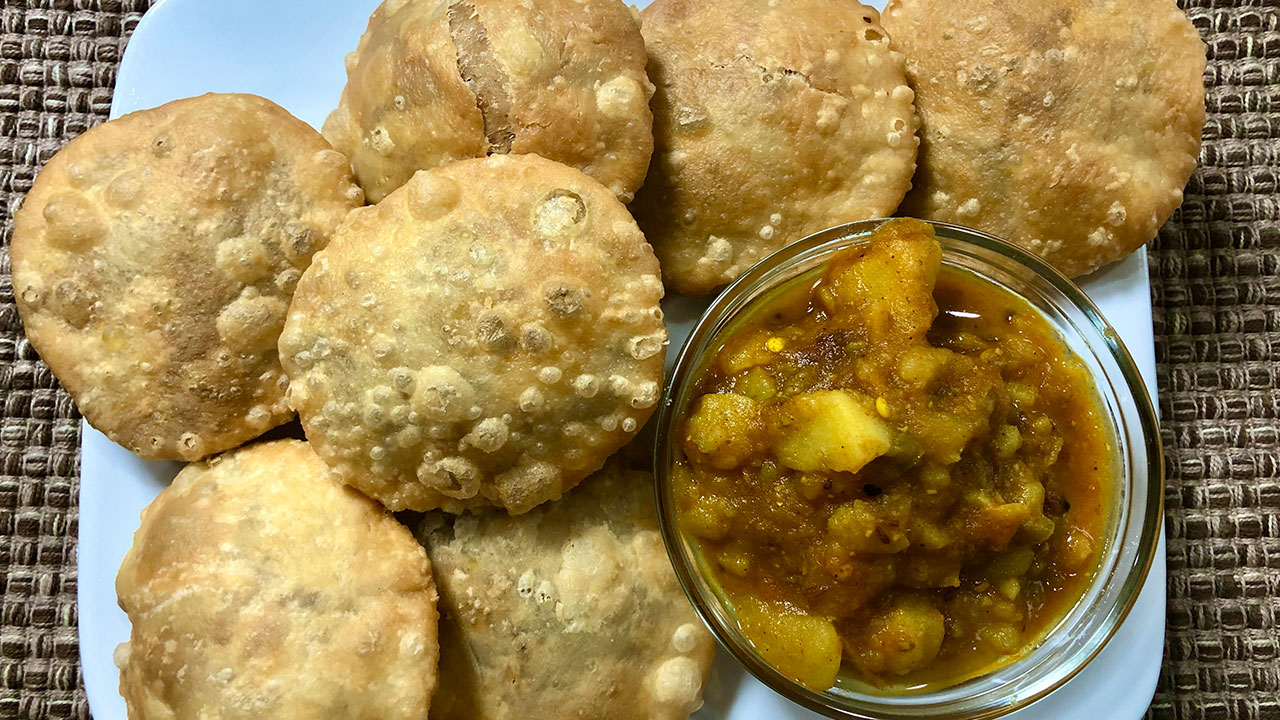
Khasta kachori is a delicious, spicy, fried puffed pastry. Khasta Kachori is filled with spicy moong dal mixture and then deep fried. Kachori is flakey from outside and hollow inside. Kachori should be fried on low heat so it can cook through to have a nice crunch. Khasta kachori is one of the dish you can eat for any meal! Serve them for breakfast with potato curry with yogurt. kachori makes a mouthwatering appetizer and can be served with, Green Chutney, and tamarind chutney. How about serving for dinner with Aloo Dum. This is one of those recipe you make when you want to impress someone. Kachories can also be stored in air tight container for a week.
Mix the flour, salt and oil. Add the chilled water slowly, mixing with your fingers as you pour. Do not knead the dough. The dough should be soft. Cover the dough and let it sit for at least fifteen minutes.
Filling
Grind the moong dal dry, almost to a powder.
Mix one tablespoon of oil to the ground dal in a frying pan and roast over medium heat for about two to three minutes or until dal changes color slightly. Stir continuously. Turn off the heat. Add all the spices mix well. Let the mixture cool off. Add two tablespoons of warm water and mix it well. Let it sit for ten minutes and cover with demp cloth.
Making Kachories
Take the dough and knead it for a minutes. Divide the dough in twelve equal parts.
Take one part of the dough and with your fingers flatten the edges and make into 3-inch circle. Leaving center little thicker then edges. Mold the dough into a cup and place 1 teaspoon of filling in the center. Pull the edges of the dough to wrap the dal filling. Proceed to make all 12 balls.
Let the filled ball sit for three to four minutes before rolling.
Set the kachoris on a surface with the seams facing up. Using the base of your palm, slowly flatten them into about three inches in diameter.
Heat the oil in frying pan over medium heat frying pan should have about one inch of oil. To check if oil is ready put a little piece of dough in the oil. Dough should sizzle, and come up very slow.
Fry them on medium-low heat. After they start to puff, slowly turn them over. Fry until golden-brown on both sides. If the kachoris are fried on high heat, they will get soft and will not be crispy.
Kachories can be stored for at least a week in an airtight container
Notes
Additional TipsDon’t roll the kachoris with a rolling pin. Rolling pins can create small holes in the dough that let the oil seep into the kachoris, and they can also cause the kachoris to come out with one side thicker than the other.VariationInstead of using moong dal, you can use washed urad dal or chana dal. The rest of the recipe stays the same.Serving suggestions:Kachoris can be served plain, with Tamarind Chutneys, chola, or with Aloo Dum. Serve them as a chat, pouring plain yogurt and chutney on top.
Khasta Kachori, a popular Indian street food delicacy, is a deep-fried pastry filled with a spicy and flavorful stuffing. This crispy and indulgent snack is loved for its rich taste and satisfying crunch, making it a favorite among food enthusiasts.
Khasta Kachori Recipe:
Rich Flavor Profile: Khasta Kachori is bursting with a medley of spices and aromatics, creating a symphony of flavors with every bite. The combination of ingredients like lentils, spices, and herbs provides a unique and indulgent taste experience.
Satiating Snack: Despite its small size, Khasta Kachori is incredibly filling and satiating, making it an ideal snack option to curb hunger pangs between meals or as a satisfying accompaniment to tea or coffee.
Versatile: While traditionally served as a snack, Khasta Kachori can also be enjoyed as a part of a larger meal. It pairs well with various chutneys, sauces, and accompaniments, allowing for endless culinary creativity.
Convenience: Khasta Kachori can be prepared in advance and stored for later consumption, making it a convenient snack option for busy days or entertaining guests.
Variations of Kachori:
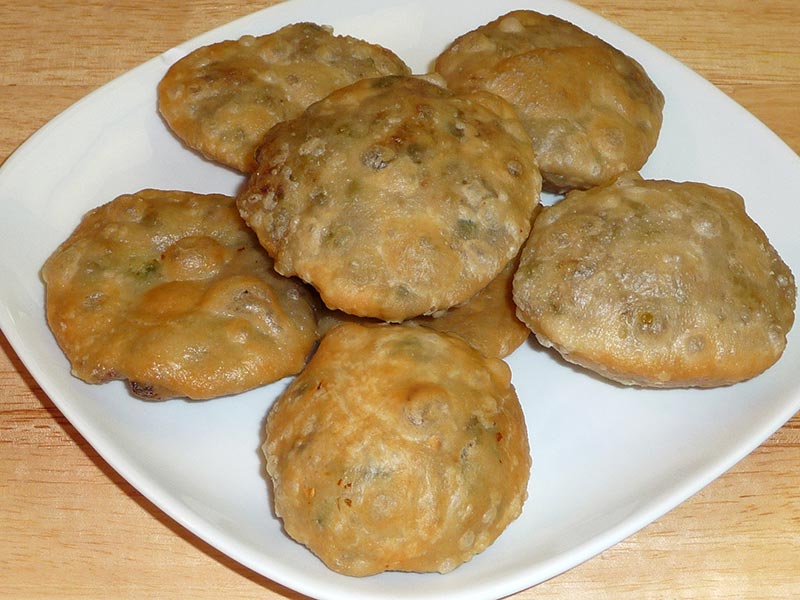
Mattar Ke Kachori: Mattar Kachori is a delicious, fried puff pastry filled with spicy green peas. This mouthwatering snack also can be served as part of any main meal.
Raj Kachori: Raj Kachori is a spicy chaat bowl filled with delicious condiments. It has refreshing flavors and makes for a unique food experience. Guests will have fun filling their own Kachoris according to their taste palette. Served as a snack or appetizer, Raj Kachories make a beautiful presentation and are thoroughly enjoyed by just about everyone.
Mawa Kachori: Mawa Kachori is an exotic dessert. This is a delicacy from the state of Rajasthan. Rajasthan is known for its rich food and culture. Pastry filled with an aromatic mixture of Mawa and nuts makes a very festive dessert.
Urad Dal Kachori: Dal kachori is a delicacy from north India. Dal kachori is a spicy puffed pastry. Traditionally kachoris are sold at a sweet and snack shop. These mouthwatering Dal kachoris can be served as a snack, chaat or part of main meal, making the meal exotic.
Tips for Making Perfect Khasta Kachori
Prepare the Dough with Care: The key to crispy and flaky Khasta Kachori lies in the dough preparation. Use a combination of all-purpose flour (maida) and semolina (sooji) to achieve the desired texture. Ensure that the dough is firm yet pliable to prevent it from becoming too soft during frying.
Fry at the Right Temperature: Fry the kachoris in hot oil over medium-high heat to ensure that they cook evenly and develop a golden-brown crust. Avoid overcrowding the frying pan to maintain the oil temperature and prevent the kachoris from absorbing too much oil.
Seal the Edges Properly: To prevent the filling from leaking out during frying, seal the edges of the kachoris tightly before frying. Press the edges together firmly and ensure that there are no gaps or openings.
Serve Fresh and Hot: Khasta Kachori is best enjoyed fresh and hot, straight out of the frying pan. Serve it with your favorite chutneys, sauces, or accompaniments for a delightful snacking experience.
FAQs about Khasta Kachori:
Can I make Khasta Kachori ahead of time?
While Khasta Kachori is best enjoyed fresh, you can prepare the dough and filling in advance and assemble the kachoris just before frying to save time.
Can I bake Khasta Kachori instead of frying?
While traditional Khasta Kachori is deep-fried for that signature crispy texture, you can try baking them for a healthier alternative. However, the texture and taste may differ slightly.
What are the best accompaniments for Khasta Kachori?
Khasta Kachori pairs well with a variety of chutneys such as tamarind chutney, mint chutney, or coriander chutney. It also tastes delicious with a dollop of yogurt and a sprinkle of chaat masala.
Is Khasta Kachori suitable for vegetarians?
Yes, Khasta Kachori is a vegetarian dish as it contains no meat or animal products. It’s a popular choice among vegetarians and vegans alike.
Khasta Kachori is not just a snack; it’s a culinary delight that excites your taste buds with its crispy exterior and flavorful filling. Whether enjoyed as a street food treat or homemade snack, its rich taste and versatility make it a beloved favorite in Indian cuisine.
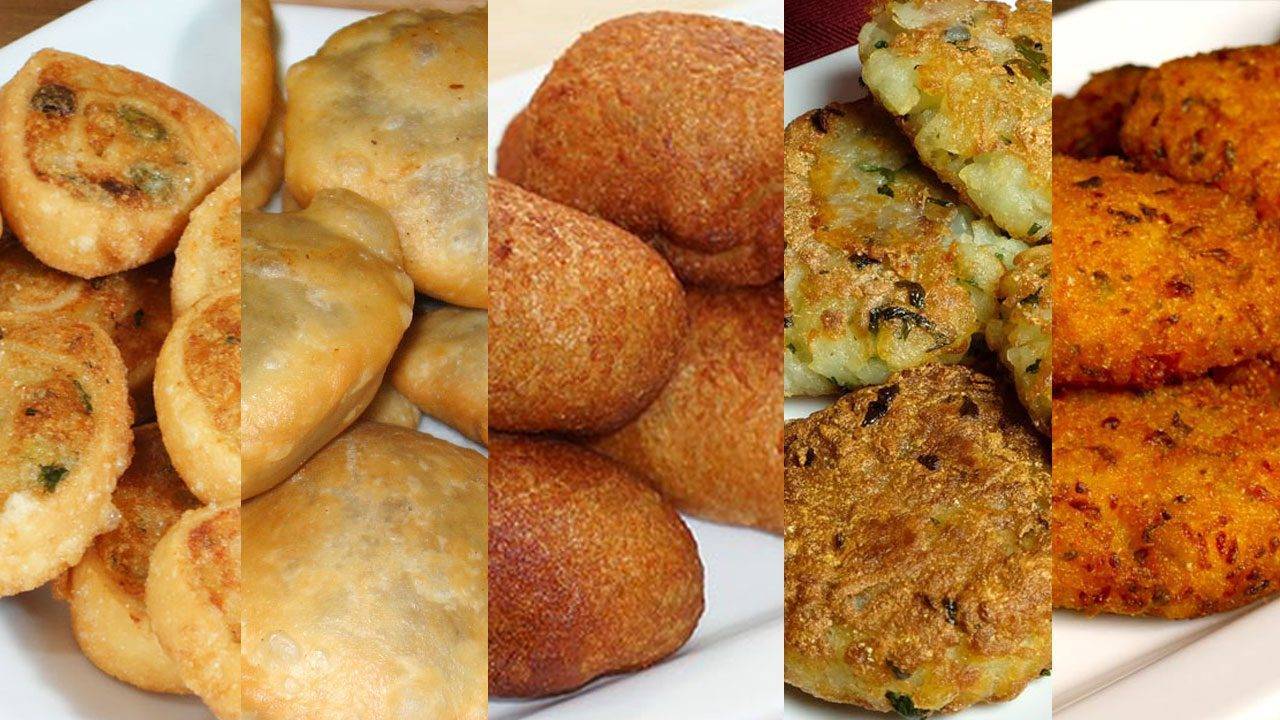
I think we all look forward to appetizers! They are samples of exciting tastes and textures that allow us to anticipate a delightful social interaction. For me they are an important part of every family get-together or in hosting a party with friends and making new acquaintances. You can do a great deal of the preparation for some of the appetizers in advance and serve them in several variations. You can play around by mixing and matching the ingredients, creating different tastes and looks.
Here are five highly favored recipes from my viewers:
Samosa Pinwheels
These appetizers freeze very well. In preparation for freezing, fry them half way and then cool them down to room temperature and then freeze the pinwheels. These can be refrigerated for 5-6 days, and can be frozen for a month.
Khasta Kachoris
These appetizers will stay good for 4-5 days at room temperature. Before sealing them into a storage container be sure they are at room temperature. I have heard from viewers that their Kachories are soft and they want to know why this has happened. If they are still warm when stored, condensation will form inside the storage container causing them to soften. If they have softened, place them in the oven at 350 degrees Fahrenheit for about 10 minutes. The crispiness will return.
Bread Potato Rolls
These can be refrigerated for 2-3 days. Make sure to cover them with moist paper towel and keep in flat container. When you are ready to serve them, take them out from refrigerator and fry.
Crispy Aloo Tikki
Uncooked patties can be refrigerated for 3-4 days before frying, shallow fry them time of serving.
Vegetable Rice Cutlets
If you need to prepare these patties in advance of your event, add some bread crumbs to the mix, and then make the patties. Now they can be refrigerated for 2-3 days.
Gather up your ingredients and prepare your magical delicacies. Enjoy!
Included are some suggestions as to how to best store and serve them, making them unique every time they are served. You can make them small or a little larger in size depending on how you want to serve them and the space needed for toppings. All of these appetizers are traditionally served with cilantro and tamarind chutney. They can also be served like a Chaat, drizzling the appetizer with whipped yogurt and chutney. Additional variations can develop by serving them with Aloo Dum or Spicy Chole. The various sauces enhance the flavor of your appetizers.
Khasta kachori is a delicacy from north India. Khasta kachori is a spicy puffed pastry. Kachories are made with a variety of different filling, and I have many recipes for Khasta Kachori. They are my favorite over samosa. Maybe one of the reasons is I can prepare them even a few days before and can be served at room temperature and served many different ways, even serving as chaat. Traditionally kachori is sold at HALWAI (a sweet and snack shop). Today, I am using spicy besan filling. These mouthwatering Kachories can be served as a snack, chaat or part of the main meal, making the meal exotic.This recipe will make 12 kachories and will serve 4.
In a bowl mix the flour, salt and oil rubbing together, this help making crust crispy. Add the warm water slowly dough should be firm, let the dough sit for at least 10 minutes. In mean time we can make the filling.
To make filling
Heat the oil over low heat add besan and all the spices for filling fennel, coriander, red chili, mango powder, ginger powder, asafetida, and salt.
Roast the besan over low heat stirring continuously, for 2-3 minutes until spice mix becomes aromatic. Turn of the heat and take out the mix in a bowl add about 3 tablespoons of warm water and mix it well, this will make sticky dough and let it sit for five minutes. Besan will absorb the water and will become crumbly.
To make the Kachoris
Take the dough and knead it for a minute. Divide the dough in twelve equal parts.
Take one part of the dough and with your fingers flatten the edges and make into 3-inch circle. Leaving center little thicker than edges.
Mold the dough into a cup and place about 1-1/2 teaspoons of filling in the center. Pull the edges of the dough to wrap the dal filling. Proceed to make all 12 balls.
Let the filled ball sit for three to four minutes before rolling.
Set the filled ball on a flat surface with the seam facing up. Roll it pressing with your palm evenly, in about three inches in diameter.
Heat the oil in frying pan over medium heat frying pan should have about one inch of oil. To check if oil is ready put a little piece of dough in the oil. Dough should sizzle and come up very slow.
Fry them on medium-low heat. After they start to puff, slowly turn them over. Fry until golden-brown on both sides. This should take about five minutes. If the kachoris are fried on high heat, they will get soft and will not be crispy.
Notes
Kachories can be stored for at least a week in an airtight container. If kachories get soft warm up the kachoris in an oven on 200-degree F for about 7 to 10 minutes, this will bring back the freshness and crispness.Serving Suggestion: Serve the Khasta Kchories plain, or with tamarind chutney and yogurt as chaat, or serve the kachories as main meal and serve them with aloo dum, Boondi Raita
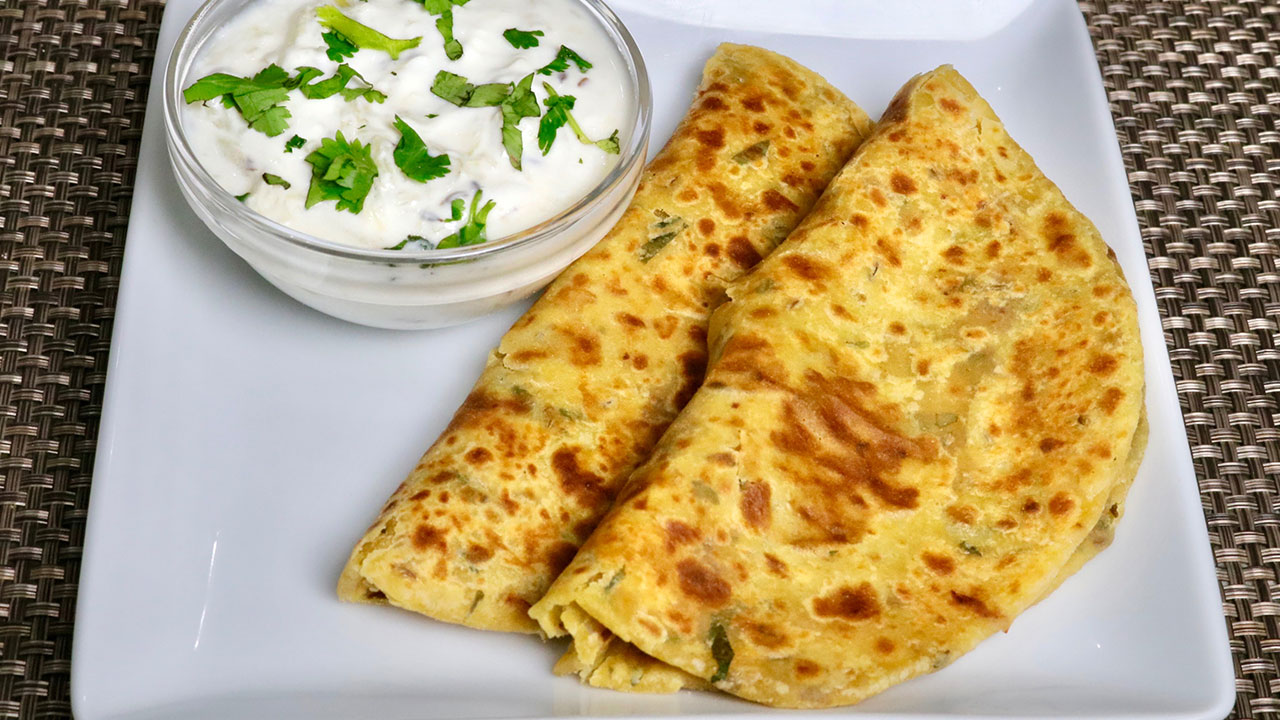
Masala Paratha is a flavorful flat bread. This paratha is a combination of whole wheat flour and besan with a mix of delicious spices. Masala Paratha is a great breakfast treat and also a great lunch box option.
Mix all the ingredients together in a bowl, except water: flour, gram flour, salt, cumin seeds, chili flakes, asafetida, ginger, mint, and oil.
Add water as needed to make firm dough. Grease your palm and knead the dough for a minute on a lightly greased surface to make it smooth and pliable. Let the dough sit aside for about 15 minutes.
Knead the dough on a lightly greased surface. The dough should be very smooth and soft. Kneading the dough is important to make good parathas.
Divide the dough into six equal parts and form into balls. Roll dough ball into a 3” circle. Spread about 2 drops of oil and pull the edges of the dough to wrap. Repeat to make all six balls.
Meanwhile heat the heavy skillet on medium heat until moderately hot. To test, sprinkle water on the skillet. If the water sizzles right away, the skillet is ready.
Take one dough ball and press it lightly on both sides on a surface covered with dry flour. Using a rolling pin, roll the dough into about 7-8 inches in circle. If dough starts sticking, dust it with more flour.
Place the Paratha over the skillet. When you see the color change and the paratha will puff in different places. Turn the paratha over.
After few seconds, spread 1/2 teaspoon oil onto the paratha. Turn the paratha over, and spread again 1/2 teaspoon of oil. Using your spatula, lightly press the entire surface of the paratha to help it cook all the way through. It will puff up.
After a few seconds, flip the paratha and press with a spatula making sure the paratha is golden-brown on both sides. Repeat for the remaining parathas.
Notes
Serve the Masala Paratha any gravy based dish like Lauki Raita, Aloo Dum.
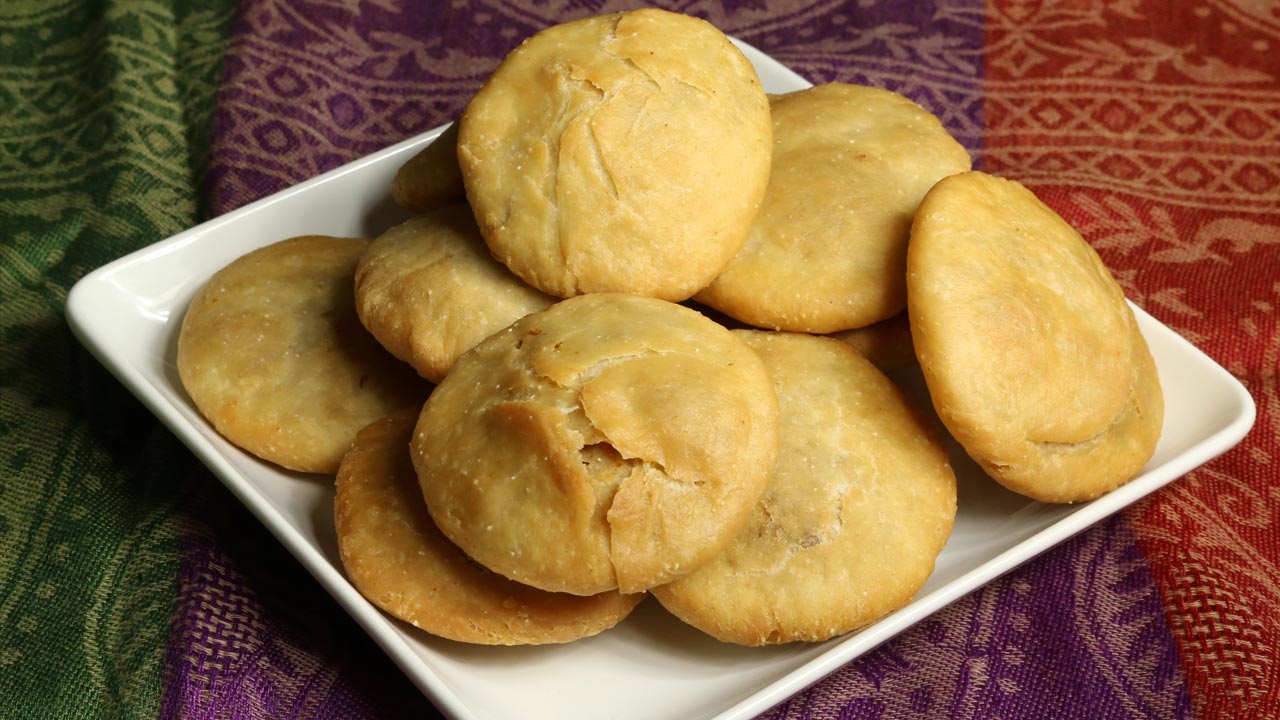
Dal kachori is a delicacy from north India. Dal kachori is a spicy puffed pastry. Traditionally kachories are sold at HALWAI (a sweet and snack shop). Today, I will use urad dal lentils (skinned black gram) for the inside filling. These mouthwatering Dal kachories can be served as a snack, chaat or part of main meal, making the meal exotic.
Mix the flour, semolina, salt and ghee. Add water slowly to make dough. Dough should be firm but pliable. Cover the dough and let it sit for at least fifteen minutes.
To make filling
Boil dal in about 2 cups of water, until dal is soft not mushy. Drain the access water.
Heat the ghee (clarified butter) over low medium heat add all the spices for filling fennel, coriander, red chili, mango powder, asafetida and salt, stir and add boiled dal.
Stir continuously, and keep pressing dal, until water from dal has evaporated, notes, dal should not be powdery.
Turn off the heat. Let the mixture cool off.
To make the Kachoris
Take the dough and knead it for a minutes. Divide the dough in twelve equal parts.
Take one part of the dough and with your fingers flatten the edges and make into 3-inch circle. Leaving center little thicker than edges.
Mold the dough into a cup and place about 2 teaspoons of filling in the center. Pull the edges of the dough to wrap the dal filling. Proceed to make all 12 balls.
Let the filled ball sit for three to four minutes before rolling.
Set the kachoris on a surface with the seams facing up. Roll it slowly about three inches in diameter.
Heat the oil in frying pan over medium heat frying pan should have about one inch of oil. To check if oil is ready put a little piece of dough in the oil. Dough should sizzle, and come up very slow.
Fry them on medium-low heat. After they start to puff, slowly turn them over. Fry until golden-brown on both sides. This should take about five minutes. If the kachoris are fried on high heat, they will get soft and will not be crispy.
Kachories can be stored for at least a week in an airtight container.
Notes
If kachories get soft warm up the kachoris in an oven on 200 degree F for about 7 to 10 minutes, this will bring back the freshness and crispyness.Serving suggestion: serve them plain, or with tamarind chutney and yogurt as chaat, or serve the kachories as main meal and serve them with aloo dum
Urad Dal Kachori Recipe: A Delectable Indian Snack
Urad Dal Kachori is a delectable Indian snack that perfectly fits into categories like appetizers, party recipes, and snacks. With its crispy exterior and flavorful filling, it’s an ideal addition to festive occasions like Diwali and Holi, where indulging in savory treats is a tradition. This traditional dish combines the richness of urad dal (black gram lentils) with a blend of spices encased in a golden, fried dough shell, making it a beloved choice among food enthusiasts.
Enjoyed hot and fresh, Urad Dal Kachori offers a delightful burst of flavors and textures, making it a popular choice for gatherings and celebrations alike. Urad Dal Kachori is a traditional Indian snack enjoyed by many across the country. This flavorful delicacy is a popular choice for breakfast, snacks, or even as a side dish. In this comprehensive guide, I will walk you through how to make urad dal kachori step by step, ensuring that you achieve the perfect blend of flavors and textures in every bite.
How to Make Urad Dal Kachori: Step-by-Step Instructions
Prepare the Dough:
Combine flour, semolina, salt, and ghee in a bowl. Gradually incorporate water while mixing until a firm but pliable dough forms. Cover the dough and allow it to rest for at least 15 minutes.
Cook the Lentils:
Boil the lentils in approximately 2 cups of water until softened but not mushy. Drain any excess water.
Make the Filling:
Heat ghee over low-medium heat. Add all the filling spices (fennel seeds, coriander seeds, red chili powder, mango powder, and asafetida) and stir briefly. Add the cooked lentils and continue stirring while mashing the lentils to remove excess moisture. The filling should not be dry or powdery. Turn off the heat and let the mixture cool.
Assemble the Kachoris:
Knead the rested dough for a minute and divide it into 12 equal portions. Roll each portion into a 3-inch circle, keeping the center slightly thicker than the edges. Gently cup the dough to form a small pocket. Add approximately 2 teaspoons of the cooled lentil filling to the center. Pull the edges of the dough together to enclose the filling securely. Repeat this process to create 12 filled balls.
Shape and Fry:
Allow the filled balls to rest for 3-4 minutes. Gently roll each ball out to a 3-inch diameter circle, ensuring the seam faces upwards. Heat oil (about 1 inch deep) in a frying pan over medium heat. To test the oil temperature, drop a small piece of dough; it should sizzle and rise slowly to the surface. Carefully place the kachoris in the hot oil and fry over medium-low heat. Once they begin to puff up, gently flip them over. Fry until golden brown on both sides, which should take approximately 5 minutes. Avoid high heat, as this will result in soft rather than crispy kachoris.
Storage:
Once cool, kachoris can be stored in an airtight container for up to a week.
Variations of Urad Dal Kachori
While the traditional urad dal kachori recipe is delightful on its own, you can experiment with various fillings and flavors to create unique variations. Instead of urad dal, you can use mashed potatoes, green peas, or lentils for the filling. Additionally, you can add a touch of sweetness by incorporating raisins or dates into the filling mixture. Get creative with spices and herbs to customize the flavor according to your preference.
Benefits of Urad Dal Kachori
Urad dal, the main ingredient in urad dal kachori, is a rich source of protein, fiber, and various nutrients. Including kachoris in your diet provides you with essential nutrients and energy, making it a wholesome snack option. Moreover, homemade kachoris allow you to control the quality of ingredients and avoid unhealthy additives commonly found in store-bought snacks.
FAQs (Frequently Asked Questions)
Q: Can I make urad dal kachoris in advance?
A: Yes, you can prepare the filling and dough in advance and store them separately in the refrigerator. When ready to serve, assemble the kachoris and fry them fresh for the best taste and texture.
Q: Can I bake kachoris instead of frying them?
A: While traditional kachoris are deep-fried for a crispy texture, you can certainly try baking them for a healthier alternative. Brush the assembled kachoris with oil and bake in a preheated oven until they turn golden brown and crisp.
Q: Can I freeze leftover kachoris?
A: Yes, you can freeze leftover kachoris in an airtight container for up to 2-3 weeks. When ready to eat, reheat them in a preheated oven or toaster oven until heated through.
Mattar Kachori is a delicious, fried puff pastry filled with spicy green peas. This mouthwatering snack also can be served as part of any main course meal.
Add the flour, salt, and oil to a bowl and mix it well.
Add the chilled water slowly, mixing with your fingers as you pour the water. Do not knead the dough. The dough should be very soft but not sticking to fingers. Cover the dough and let it sit for at least fifteen minutes.
To Make Filling
Heat the oil in a frying pan, add green peas, stir-fry until peas are tender.
Add ginger, coriander powder, fennel seed powder, chili powder, mango powder and salt, stir fry for another few minutes.
While stir frying the peas mash them with spatula.
Let the filling cool to room temperature.
To Make Kachoris
Take the dough and lightly knead it. Divide the dough in twelve equal parts.
Take one part of the dough and with your fingers flatten the edges and make it into about a 2-inch circle. Leaving the center, a little thicker than the edges around. Mold the dough into a cup and place about 1 teaspoon of filling in the center. Pull the edges of the dough to wrap the filling. Proceed to make all 12 balls.
Let the filled balls sit for 3 to 4 minutes before pressing.
Set the filled balls on a clean and dry surface with the seam facing up. Using the base of your palm, slowly flatten them into about 3 inches circle.
Heat about 1-1/2 inches of oil in a frying pan on medium heat. To check if the oil is ready put a little piece of dough in the oil. It should sizzle, and come up very slowly.
Do not overcrowd the kachoris in a frying pan, fry them on medium heat. After they are puffed, slowly turn them over.
It will take about 3 minutes to fry from each side. Fry until golden-brown on both sides.
If the kachoris are fried on high heat, they will get soft and will not be crispy.
Notes
Serving suggestionsKachoris can be served plain, with Boondi Ka Raita, or with Aloo Dum.
Keyword Appetizer, Breakfast, Lunch Box, Main Dish, Mattar Kachori, Party Food, Stuffed Puri
The holidays are here and I love celebrating them with family and loved ones! To me, the holidays represent positive energy, happiness, and warm memories of time spent with my family. The holidays give us a reason (and time) to take a break from the mundane everyday routines of work, obligations, and well, life! It’s the time to relax and do something just for you!
I am always looking for a reason to get together and cook for my family. I find peace and relaxation when I cook. However, for many planning a holiday menu can be a bit stressful. I find that when planning a holiday meal, it’s best to plan the menu ahead of time and shop in advance. You may even be able to prepare some dishes in advance. This will make the entire process less stressful!
Below are some suggested menus for the holidays, which may make your planning easier. All the below recipes can be found on this website.
Menu #1:
Appetizers: Cabbage Salad, Muthia with Hari Cilantro Chutney and Spicy Sweet Potatoes.
Main Course: Punjabi Chola, Aloo Gobhi, Gajar Pickle, Plain Yogurt, Zucchini Rice, and Battura or Naan.
Dessert: Gajar Ka Halwa.
Menu #2:
Appetizers: Spinach Salad, Vegetable Pakoras with Hari Cilantro Chutney.
Main Course: Vegetable Korma, Bhindi (okra), Aloo Dum, Dahi Vada, Plain Rice, and Puri.
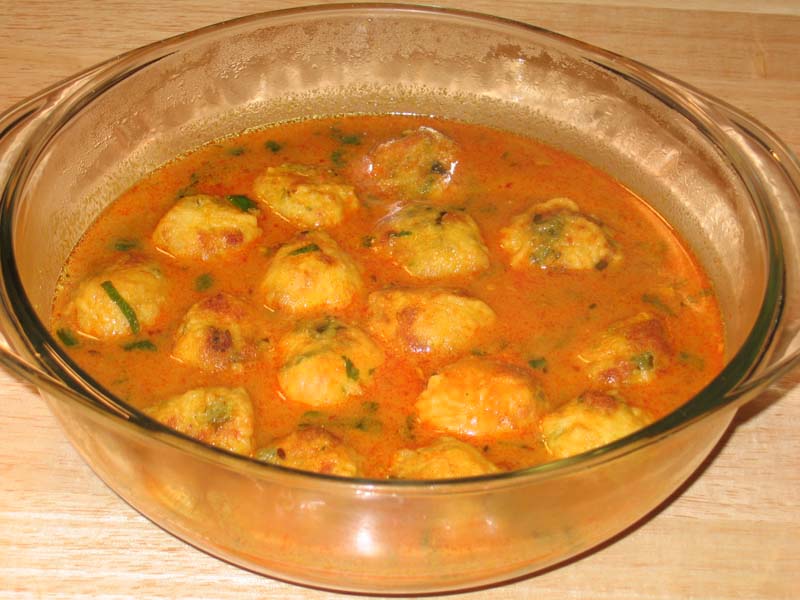
Malai kofta is a delicious and rich main course dish. Paneer dumplings with rich cream gravy. One of the popular paneer dishes for any special occasion. Serve with naan, roti or over the plain rice.
Mix all the ingredients together for kofta, With oiled hands, divide the mixture into 14 to 16 equal parts. Make them in round balls.
Mix flour with about 4 tablespoons of water and mix well until batter is smooth.
Heat the oil in a frying pan on medium high heat. The frying pan should have at least 1 inch of oil. To check if the oil is ready, just put one small piece of mix in the oil, it should come up right away but not change color.
Dip the paneer balls in the batter one at a time and slowly drop into the frying pan. Turn them occasionally. Fry koftas until golden-brown all around.
Gravy
Blend the tomatoes, green chilies and ginger to make a puree. If you prefer mild take the seeds out of green chili before blending.
Mix cream and flour and keep aside.
Heat the oil in a saucepan. Test the heat by adding one cumin seed to the oil; if it cracks right away oil is ready. Add the hing and cumin seeds.
Add the tomato puree, coriander powder, turmeric, red chili powder and cook for about 4 minutes on medium heat. Tomato mixture will start leaving the oil and will reduce to about half in quantity.
Add milk and flour mix, salt and one cup of water and let it cook covered for 7 to 8 minutes on medium heat.
Add the garam masala, salt and cilantro. Let it cook for another minute.
Add koftas as soon it comes to boil turn off the heat. Note: koftas will expand to about 11/2 times, if you like more gravy this is the time to add some more boiled water and adjust salt.
Notes
Koftas are very soft they should be added to the gravy when you are ready to serve, otherwise koftas will break.Serve Kofta, over plain rice, with Naan, Roti
Malai Kofta is a delectable party recipe featuring paneer dumplings bathed in a sumptuous, creamy gravy. This popular paneer-based dish is renowned for its rich flavors, making it an excellent choice for special occasions. The dish showcases the indulgence of paneer dumplings immersed in a luscious cream gravy, creating a culinary masterpiece that’s sure to elevate any celebration or special event.
Crafting the Kofta Mixture:
Aromatic Fusion: To embark on the creation of delectable koftas, begin by skillfully combining all the necessary ingredients. This includes aromatic spices and paneer, which will be the foundation for the flavorful kofta mixture.
Meticulous Shaping: Lightly oil your hands to prevent sticking. Divide the well-combined mixture into 14 to 16 equal portions. With meticulous care, shape each portion into a round and enticing ball. This ensures that each vegetarian malai kofta is infused with a harmonious blend of spices, promising a delightful culinary experience.
Protective Batter: To elevate the malai kofta recipe, create a smooth batter using flour and water. This batter will act as a protective and crispy layer around each kofta during frying.
Precise Frying: In a well-heated pan containing at least 1 inch of oil, carefully dip the paneer balls into the batter, ensuring complete coverage. To gauge the oil’s readiness, test it with a small piece of the batter mixture. If it swiftly ascends to the surface without browning, the oil is at the perfect temperature. Fry the coated koftas diligently, turning them intermittently. This allows the koftas to absorb the flavors of the hot oil, creating a desirable crisp exterior that complements the creamy texture within. The frying process ensures that every vegetarian malai kofta is a delightful balance of crunch and tenderness.
Malai Kofta Recipe:
Tempering the Base: Begin the malai kofta gravy by heating oil in a saucepan. Add a single cumin seed and observe its immediate crackling response. This initial step, known as tempering, infuses the curry base with layers of aromatic complexity through the introduction of hing (optional) and cumin seeds.
Introducing the Tomato Puree: Once the tempering is complete, introduce the vibrant tomato puree to the sizzling oil. Accompany the puree with an array of ground spices such as coriander powder, turmeric, and red chili powder. Allow this harmonious blend to simmer for approximately 4 minutes on medium heat. As the mixture dances in the pan, coax the tomatoes to release their natural oils, concentrating the flavors for a delectable malai kofta curry.
Enhancing the Opulence: To elevate the richness of the malai kofta gravy, seamlessly integrate the previously prepared cream and flour mixture. Infuse this indulgent blend with salt and a cup of water. Allow the mixture to simmer and thicken over a medium flame. This step ensures that the malai kofta curry achieves a luxurious consistency, enveloping each kofta in a velvety embrace.
Finalizing the Symphony: As the recipe for malai kofta curry nears its culmination, sprinkle in the aromatic garam masala. Adjust the salt to achieve perfect taste balance. Garnish with a handful of fresh cilantro for a touch of vibrancy. Allow these final touches to meld in the heat, creating the hallmark flavor profile of an exceptional malai kofta. This concluding step brings the malai kofta curry to a harmonious and flavorful completion.
Malai Kofta is a popular Indian dish featuring melt-in-your-mouth paneer dumplings bathed in a rich and creamy gravy. It’s a showstopper perfect for special occasions or a delicious weeknight meal.
Is Malai Kofta difficult to make?
While it has several steps, each step is straightforward. With careful planning and these handy tips, you can create restaurant-quality Malai Kofta at home.
How long does it take to make Malai Kofta?
The total preparation and cooking time can vary depending on your speed, but generally allow for around 50 min.
What are some good side dishes for Malai Kofta?
Malai Kofta pairs beautifully with fluffy basmati rice, soft naan bread, or flavorful jeera rice.
Can I use store-bought paneer?
Absolutely! Look for fresh paneer in the refrigerated section of your grocery store.
What if I don’t have green chilies?
You can omit them entirely for a milder dish. To retain a hint of spice, use red chili powder to adjust the spice level.
What kind of cream should I use?
Heavy cream or whipping cream will create the richest gravy. However, you can substitute full-fat yogurt or even low-fat cream for a lighter option.
Can I use a different nut instead of cashews?
Absolutely! Almonds, pistachios, or even a combination of nuts can add a delightful textural variation.
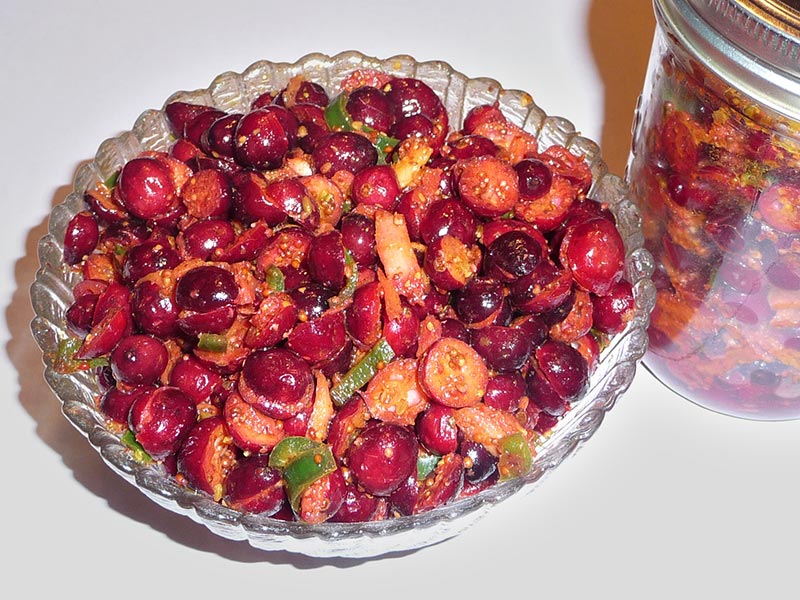
Cranberry Relish is a spicy and tangy pickle that is a perfect addition to many dishes. Cranberry Relish can spice up any meal. It tastes especially great with sandwiches and perfect for the upcoming holidays!
Cranberry Relish Pickle is a delightful gluten free condiment that combines the tartness of cranberries with a sweet and spicy blend of flavors. This cranberry relish pickle recipe is perfect for adding a burst of freshness to any dish its an indian fusion recipe. Whether you are looking to enhance your holiday meals or add a unique twist to your everyday dishes, this homemade cranberry relish is easy to make and incredibly versatile.
The Essence of Cranberry Relish Pickle
The key to this cranberry relish recipe is the perfect balance of tart cranberries, sweetness, and spices. Fresh cranberries are combined with sugar, spices, and a hint of citrus to create a relish that is both tangy and flavorful. This easy cranberry relish can be made in advance and stored, making it a convenient addition to your culinary repertoire.
Origin and Popularity
Cranberry relish has been a staple in American cuisine, especially during the holiday season. Its popularity has grown due to its unique flavor profile and versatility. The homemade cranberry relish is a modern twist on traditional recipes, offering a fresher and more vibrant taste.
Why You’ll Love This Recipe
Simple Ingredients: Uses fresh, easily available ingredients.
Burst of Flavor: Combines tart, sweet, and spicy flavors in one condiment.
Versatile: Can be used as a condiment, spread, or side dish.
Easy to Make: Requires minimal preparation and cooking time.
How to Make Cranberry Relish Pickle
Here’s a step-by-step guide on how to make cranberry relish pickle:
Prepare the Cranberries: Start with fresh or frozen cranberries. Rinse them well and remove any stems or bad berries.
Combine Ingredients: In a saucepan, combine the cranberries with sugar, water, a pinch of salt, and your choice of spices such as cinnamon, cloves, and ginger. Add a splash of orange juice or zest for a citrusy note.
Cook the Mixture: Bring the mixture to a boil over medium heat, then reduce to a simmer. Cook until the cranberries burst and the mixture thickens, about 10-15 minutes.
Cool and Store: Allow the relish to cool to room temperature before transferring it to a sterilized jar. Store in the refrigerator for up to two weeks.
Variations of Recipes from Manjula’s Kitchen reveal a treasure trove of other delicious recipes that you might enjoy. Here are some related recipes that you might find interesting:
Gatte Ki Sabzi: Gram flour dumplings cooked in a spicy yogurt-based gravy, a Rajasthani specialty.
Pindi Chole: A dry and tangy chickpea curry cooked with a blend of aromatic spices. Recipe:
Aloo Tamatar: Potatoes cooked in a tomato-based gravy with a blend of spices, perfect for pairing with puris or rotis.
Masala Paratha: Spiced whole wheat flatbreads that are flavorful and perfect for breakfast or lunch.
Toor Dal: A simple and comforting pigeon pea lentil curry, seasoned with spices. Recipe:
Serving Suggestions
Cranberry relish pickle can be enjoyed in various ways:
As a Spread: Use it as a spread on sandwiches or wraps.
With Cheese: Serve it with a cheese platter for a tangy twist.
As a Side: Enjoy it as a side dish with your favorite meals.
Tips and Tricks
To perfect your cranberry relish recipe, consider these helpful tips:
Use Fresh Ingredients: Fresh cranberries and quality spices make a big difference in flavor.
Adjust Sweetness: Tailor the amount of sugar to your taste preference.
Add Texture: For added texture, mix in some finely chopped nuts or dried fruits.
FAQs
Is Cranberry Relish Pickle Vegan?
Yes, this recipe comes under vegan indian recipes as it uses plant-based ingredients.
Can I Make It Ahead of Time?
Yes, this relish can be made ahead of time and stored in the refrigerator for up to two weeks.
What Can I Serve with This Relish?
This relish pairs well with cheese platters, and can be used as a spread for sandwiches.
How Long Does It Take to Make?
The preparation and cooking time for this relish is about 30 minutes.