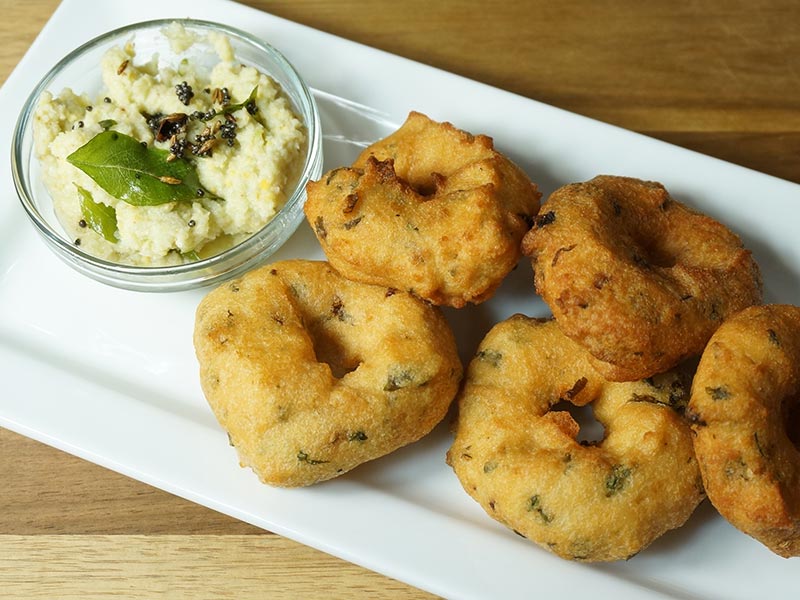
Search results for: “dal”

  • Medu Vada

    Medu Vada

    Medu Vada

    Medu Vada

    Medu Vadas are a traditional South Indian dish which can be served as a main course, side dish, or snack. This crispy deliciousness is made with spiced urad dal batter and fried in donut shape dumplings. They are crispy on the outside and soft on the inside. They are served with Sambar and Coconut Chutney.
    No ratings yet
    Course Snack
    Cuisine Indian
    Servings 10 Vadas

    Ingredients
      

    • 1 cup split washed urad dal (available in Indian stores)
    • 1/8 teaspoon asafetida (hing)
    • 2 teaspoon whole coriander seeds (sabut dhania)
    • 1 tablespoon green chili chopped
    • 2 tablespoons cilantro chopped (hara dhania)
    • 1 teaspoon salt
    • Oil to fry

    Instructions
     

    • Wash and soak dal in about 3 cups of water for about 4-6 hours.
    • Drain the water and grind dal to smooth paste using very little water just enough to grind, food processor works good for this. Blend for another 2 minutes to whip dal to make fluffy. Take dal batter out in a wide bowl.
    • Add all the ingredients to the dal batter, cilantro, green chili, coriander, asafetida and salt, beat the batter for 2-3 minutes this will make the batter light and fluffy. To make sure batter is ready put one drop of batter in a bowl of water, batter should float.
    • Keeping the right consistency of batter is very important; add water as needed batter should not be soft but not runny. When you put the batter on your palm batter should hold its shape. Make the Vadas batter when you are ready to fry them, as the batter sit will get soft if you are not ready to fry keep batter refrigerated.
    • Heat the oil in a frying pan over medium high heat.
    • The frying pan should have about 1 inch of oil. To check if the oil is ready, put one drop of batter in oil. The batter should sizzle and come up but not change color right away. If oil is very hot Vadas will not cook through and will not be crispy.
    • Wet the palms and take golf size batter and place over your palm, flatten to round shape and make hole in the center looking like donut now with other hand wet fingers slowly slide Vada into the hot oil.
    • Fry the Vadas from both sides to golden brown. Take them out over a paper towel to drain access oil.
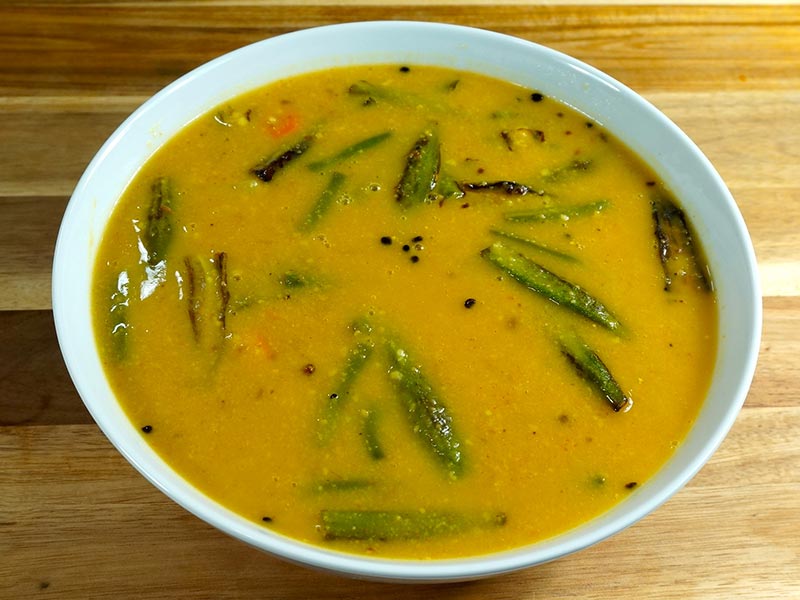
    • Traditionally Medu Vada is served with Coconut Chutney, and sambar (aromatic lentil soup with vegetables).

    Notes

    Notes
    1. If the Medu Vada Batter is too thick: The Vada will shape nicely but they will be hard inside after frying.
    2. If the batter is too soft: it will not be able to hold the shape and will absorb too much oil.
    3. It’s the consistency of the batter that determines how soft and shapely the Vadas turn out.
    Tried this recipe?Let us know how it was!

    Medu Vada: A South Indian Delicacy 

    Medu Vada is a South Indian delicacy often served as an appetizer or snack, especially during festive occasions like Yugadi. It is a gluten-free and vegan dish made primarily from urad dal (black gram lentils) batter, seasoned with spices like cumin seeds, black pepper, and curry leaves. The batter is shaped into round doughnuts and deep-fried until golden brown, resulting in a crispy exterior and a soft, fluffy interior. 

    Medu Vada is commonly enjoyed with coconut chutney or sambar, enhancing its flavor profile and making it a popular choice for those seeking gluten-free and vegan snack options. Medu Vada is a popular South Indian snack known for its crispy exterior and soft interior texture. Originating from the state of Tamil Nadu, it has gained widespread popularity across India and beyond. This medu vada recipe offers a step-by-step guide on how to make this delectable treat right in your kitchen.

    How to Make Medu Vada: Step-by-Step Recipe 

    Preparing the Batter 

    To start making medu vada, you’ll need to prepare the batter first. Begin by soaking urad dal in water for at least 4-5 hours or preferably overnight. The soaked dal should be soft enough to easily break when pressed between your fingers. Once soaked, drain the water and transfer the dal to a blender. Grind it to a smooth paste, adding minimal water as needed. The consistency should be thick, similar to that of a pancake batter. This step is crucial in achieving the perfect texture for your medu vada.

    Shaping the Vadas 

    Once the batter is ready, transfer it to a mixing bowl. Add finely chopped green chilies, ginger, curry leaves, cumin seeds, asafoetida, and salt to taste. Mix all the ingredients thoroughly to ensure an even distribution of flavors. Now, heat oil in a deep frying pan or kadhai on medium heat. To shape the vadas, wet your palms with water to prevent sticking. Take a small portion of the batter and flatten it slightly to form a disc shape with a hole in the center, resembling a donut. Carefully slide the shaped vada into the hot oil and fry until golden brown and crispy on both sides. Repeat the process with the remaining batter, frying a few vadas at a time to avoid overcrowding the pan.

    Frying to Perfection 

    Achieving the perfect medu vada requires frying them to crispy perfection. Make sure the oil is adequately heated before adding the vadas to ensure they cook evenly and develop a crunchy exterior. It’s essential to maintain the oil at a consistent temperature throughout the frying process. Avoid overcrowding the pan, as this can lower the oil temperature and result in soggy vadas. Fry the vadas in small batches, flipping them occasionally to ensure uniform browning on all sides. Once done, remove the vadas from the oil using a slotted spoon and drain the excess oil on paper towels.

    Serving Suggestions

    Medu vada is best enjoyed hot and crispy, served with coconut chutney and sambar. You can also pair it with a tangy tomato chutney or spicy mint chutney for added flavor. Some prefer to enjoy medu vada with a cup of hot filter coffee, making it a perfect breakfast or evening snack option. Experiment with different dipping sauces and accompaniments to find your favorite combination.

    Tips for Making Perfect Medu Vada 

    • Ensure the urad dal is soaked well to achieve a smooth batter texture.
    • Maintain the oil temperature while frying to achieve crispy vadas.
    • Wet your palms with water to prevent the batter from sticking while shaping the vadas.
    • Add chopped green chilies and ginger for an extra kick of flavor.
    • Serve medu vada hot for the best taste and texture.

    Variations of Medu Vada 

    While the traditional medu vada recipe calls for basic ingredients like urad dal, spices, and herbs, you can experiment with variations to suit your taste preferences. Some popular variations include:

    • Masala Medu Vada: Add coriander leaves and grated carrots to the batter for an extra burst of flavor.
    • Rava Medu Vada: Mix semolina (rava) with the urad dal batter to add a crunchy texture to the vadas.
    • Vegetable Medu Vada: Incorporate grated vegetables like carrots, cabbage, and spinach into the batter for a nutritious twist.
    • Cheese Medu Vada: Stuff the vadas with a cheesy filling or sprinkle grated cheese on top before frying for a gooey, indulgent treat.

    Benefits of Medu Vada 

    Medu vada is not only delicious but also offers several health benefits when consumed in moderation. Here are some of the benefits:

    • Rich in Protein: Urad dal, the main ingredient in medu vada, is a good source of protein, essential for muscle repair and growth.
    • Nutrient-Dense: It contains essential nutrients like iron, magnesium, and potassium, which are vital for overall health and well-being.
    • Gluten-Free: Since medu vada is made from urad dal, it is naturally gluten-free, making it suitable for individuals with gluten sensitivities or celiac disease.
    • Good Source of Fiber: Including medu vada in your diet can help improve digestion and promote gut health due to its fiber content.
    • Energizing Snack: It provides a quick energy boost, making it an ideal snack option for busy days or post-workout refueling.

    FAQs about Medu Vada 

    Q: Can I make the batter ahead of time?

    A: Yes, you can soak the urad dal and grind the batter ahead of time. Store it in the refrigerator for up to 1-2 days and fry the vadas when ready to serve.

    Q: Can I freeze the vadas?

    A: While it’s best to consume medu vada fresh for optimal taste and texture, you can freeze the shaped vadas and fry them directly from frozen when needed. However, freshly fried vadas are recommended for the best flavor.

    Q: Can I bake instead of frying?

    A: While traditional medu vada is deep-fried for that crispy texture, you can try baking them in a preheated oven at 375°F (190°C) for 20-25 minutes or until golden brown for a healthier alternative.

    Q: Can I use split urad dal instead of whole urad dal?

    A: Yes, you can use split urad dal (white or black) to make medu vada. However, the texture may vary slightly compared to using whole urad dal.

    Q: Can I make gluten-free medu vada?

    A: Yes, medu vada is naturally gluten-free since it’s made from urad dal. Just ensure that all ingredients used are gluten-free, especially if adding any additional flavorings or seasonings.

    Explore more Indian recipes on Manjula’s Kitchen:

    In conclusion, medu vada is a versatile and flavorful snack that can be enjoyed on its own or paired with a variety of chutneys and dips. With this detailed recipe and helpful tips, you can recreate this South Indian delicacy at home and impress your family and friends with your culinary skills. So, roll up your sleeves, gather your ingredients, and get ready to savor the crispy goodness of homemade medu vada!

  • Sindhi Kadhi (Vegetable in Gram Flour Gravy)

    Sindhi Kadhi (Vegetable in Gram Flour Gravy)

    Sindhi Kadhi (Vegetable in Gram Flour Gravy)

    Sindhi Kadhi (Vegetable in Gram Flour Gravy)

    Sindhi Kadhi is very delicious and nutritious gravy based main course dish. This tangy Kadhi is made with roasted besan, (gram flour) and mix of vegetables. Traditionally it is served with rice and also can be served as a soup.
    No ratings yet
    Course dal
    Cuisine Indian
    Servings 3 people

    Ingredients
      

    • 1/2 cup gram flour (besan)
    • 3 tablespoons oil
    • 1/2 teaspoon fenugreek seeds (mathi)
    • 1/2 teaspoon cumin seeds (jeera)
    • 3 whole red peppers
    • Approx. 10 curry leaves
    • 1/2 teaspoon turmeric (haldi)
    • 1/2 teaspoon red chili powder adjust to taste
    • 1 tablespoon grated ginger
    • Approx. 3 tablespoons tamarind pulp (imli)
    • 1-1/2 teaspoon salt
    • 2 cups of mixed vegetables (I am using 8 okras slit into 2 vertically, 1/4 cup carrots sliced in rounds, 1 small potato cubed, 1/4 cup cut green beans about 1 inch longs)
    • Also need 1 tablespoon oil for stir-fry okra
    • 5 cups of water

    Instructions
     

    • Wash and dry the okra. Remove the top of the okra and stir-fry in 1 tablespoon of oil over medium high heat until they are tender. Set aside.
    • Heat the oil in a sauce pan over medium high heat, add fenugreek seed, and cumin seeds, as seeds crack add asafetida, red pepper, ginger, and curry leaves stir for few seconds.
    • Reduce the heat to medium and add besan. Roast the besan stirring continually till the besan has become golden brown and aromatic (about 4-5 minutes).
    • Add about 4 cups of water slowly, stirring continuously to avoid forming lumps.
    • Add turmeric, salt, potatoes, green beans and carrots.
    • After Kadhi comes to boil, lower the heat to low medium and cover the pan and let it simmer for about 8-10 minutes, until vegetables are tender. If needed add more water, this should be running consistency but not watery.
    • Add okra and tamarind pulp to Kadhi, after kadhi comes to boil, let it simmer for another 6-7minutes over medium low heat.
    • Serve hot. Sindhi kadhi taste great with rice or serve as a soup.
    Tried this recipe?Let us know how it was!

    How To Make Sindhi Kadhi: Savor The Flavors Of Sindhi Kadhi

    Sindhi Kadhi is a flavorful and aromatic dish hailing from the Sindhi cuisine, known for its unique blend of spices and tangy flavors. This Sindhi Kadhi recipe features a medley of vegetables simmered in a creamy gram flour gravy, creating a dish that’s both comforting and nourishing. With its rich flavors and wholesome ingredients, Sindhi Kadhi is a beloved dish that’s perfect for any occasion. Sindhi Kadhi is a traditional dish originating from the Sindhi region of Pakistan and India. 

    It’s a flavorful and tangy soup made primarily with dal (lentils) and various vegetables. This dish is naturally gluten-free and low in fat, making it suitable for individuals with dietary restrictions. To prepare Sindhi Kadhi, lentils are cooked until they are soft and then combined with a variety of vegetables such as okra, potatoes, carrots, and tomatoes. The soup is seasoned with a blend of spices including turmeric, cumin, coriander, and mustard seeds, which give it its distinctive flavor profile. 

    To commence the preparation of Sindhi Kadhi, begin by thoroughly washing and drying the okra. Subsequently, delicately remove the tops of the okra and set them aside. Heat a tablespoon of oil in a skillet over medium-high heat. Once the oil reaches its optimal temperature, add the prepared okra and stir-fry until it reaches a tender consistency. This step enhances the flavor and texture of the okra, ensuring it is cooked to perfection. Once accomplished, set aside the cooked okra for future use.

    Next, in a saucepan, heat some oil over medium-high heat. Add fenugreek seeds and cumin seeds, allowing them to crackle. As they release their aroma, incorporate the asafetida, red pepper, ginger, and curry leaves, stirring for a few seconds. This process allows the spices to infuse into the oil, imparting their flavors to the dish.

    Lower the heat to medium and add besan (gram flour) to the spice-infused oil. Continuously stir the besan until it turns golden brown and emits a fragrant aroma, typically taking around 4 to 5 minutes. This roasting process is crucial as it enhances the nutty flavor of the besan, adding depth to the kadhi.

    Gradually pour in about 4 cups of water while stirring continuously to prevent the formation of lumps. This step ensures that the besan is evenly dispersed in the liquid, creating a smooth consistency for the kadhi base.

    Now, add turmeric, salt, potatoes, green beans, and carrots to the kadhi base. These vegetables not only contribute to the nutritional value of the dish but also add color and texture. Allow the kadhi to come to a gentle boil, then reduce the heat to low-medium, cover the pan, and let it simmer for 8 to 10 minutes until the vegetables are tender. If necessary, adjust the consistency by adding more water, ensuring that it retains a slightly thick, running consistency.

    Once the vegetables are cooked, add the previously prepared okra and tamarind pulp to the kadhi. Allow the kadhi to come to a boil again, then let it simmer for another 6 to 7 minutes over medium-low heat. This final step allows all the flavors to meld together, creating a harmonious balance in the dish.

    Tips for Perfect Sindhi Kadhi

    Variety of Vegetables: Experiment with different vegetables to add depth and flavor to the kadhi. Vegetables like bitter gourd (karela) and eggplant (brinjal) can also be used to enhance the taste of the dish.

    Consistency of Kadhi: Adjust the amount of water added to the kadhi to achieve the desired consistency. The kadhi should have a creamy texture that coats the back of a spoon.

    Balancing Flavors: Taste the kadhi and adjust the seasoning according to your preference. You can add more salt, sugar, or lemon juice to balance the flavors and enhance the taste.

    Variations of Sindhi Kadhi

    Paneer Kadhi: Add cubes of paneer (Indian cottage cheese) to the kadhi for a creamy and indulgent variation. Paneer adds richness and protein to the dish, making it more satisfying.

    Sprouted Lentils: Add sprouted lentils such as moong dal or matki to the kadhi for added nutrition and texture. Sprouted lentils are high in protein and fiber, making them a healthy addition to the dish.

    Benefits of Sindhi Kadhi

    Rich in Vitamins and Minerals: Sindhi Kadhi is loaded with a variety of vegetables, providing essential vitamins, minerals, and antioxidants that promote overall health and well-being.

    Digestive Aid: Gram flour (besan) is known for its digestive properties and helps aid in digestion, making Sindhi Kadhi a comforting and soothing dish for the stomach.

    Wholesome and Nourishing: With its blend of vegetables, spices, and gram flour gravy, Sindhi Kadhi is a wholesome and nourishing meal that’s perfect for the whole family.

    Frequently Asked Questions (FAQs)

    Can I make Sindhi Kadhi without vegetables?

    Yes, you can make a simple version of Sindhi Kadhi using only gram flour and spices for the gravy. However, adding vegetables enhances the taste and nutritional value of the dish.

    Can I make Sindhi Kadhi ahead of time?

    Yes, Sindhi Kadhi tastes even better when allowed to sit for a few hours or overnight, allowing the flavors to develop. Reheat it gently before serving.

    Is Sindhi Kadhi gluten-free?

    Yes, Sindhi Kadhi is naturally gluten-free as it contains no wheat or gluten-containing ingredients.

    Explore more delightful Sindhi recipes on Manjula’s Kitchen, such as Sindhi Koki for another culinary adventure.

  • Chickpea Pulav (Chole Biryani, One Pot Meal)

    Chickpea Pulav (Chole Biryani, One Pot Meal)

    Chickpea Pulav (Chole Biryani)

    Chickpea Pulav (Chole Biryani, One Pot Meal)

    This dish is a delicious combination of rice, chickpeas, with vegetables and of course spices. This is a great, hearty, and healthy meal. This is a one dish and one pot meal.
    5 from 1 vote
    Course rice
    Cuisine Indian
    Servings 3 people

    Ingredients
      

    • 1 cup rice (I use basmati rice)
    • 15 oz chickpeas/chola/garbanzo/kabule chana canned or cooked
    • 2 tomatoes medium size chopped will make about 1-1/2 cup chopped tomatoes
    • 1 potato medium size peeled and cubes bite size pieces will make about 3/4 cup
    • 6 oz spinach chopped frozen or 3 cups of chopped fresh spinach
    • 1 cup bell pepper cubed in bite size pieces
    • 3 tablespoons oil
    • 1 teaspoon cumin seeds/jeera
    • 1/8 teaspoon asafetida/hing
    • 1 bay leafs/tajpat
    • 1 tablespoon ginger finely shredded
    • 1 green chili finely chopped
    • 1-1/2 teaspoon salt
    • 1/4 teaspoon turmeric/haldi
    • 1/2 teaspoon mango powder/amchoor
    • 1/4 teaspoon garam masala
    • 1-1/2 cups water

    Instructions
     

    • Wash and soak the rice in about 2 cups of water at least for 10 minutes.
    • Drain the liquid out of the can of chickpeas and wash the chickpeas well.
    • Heat the oil in a saucepan. Test the heat by adding one cumin seed to the oil; if seed cracks right away oil is ready.
    • Add cumin seeds as seeds crack add the ginger, green chili, and turmeric stir for few seconds.
    • Add tomatoes and salt cook until tomatoes are tender, about 2 minutes.
    • Add chickpeas and potatoes after it comes to boil cover the pen and let it cook for about 8 minutes over medium low heat, stir occasionally.
    • Add rice, spinach, bell pepper and water. Mix and bring it to boil. Cover the pan and let it cook for about 12-15 minutes over low heat. Don’t stir the rice in between they will get mushy check the rice in about 12 minutes. Cook Pulav until the rice is tender and the water has evaporated.
    • When Pulav is ready add mango powder and garam masala mix gently.
    • Serve alone or with side of yogurt or pickle if you want to spice it up more.
    Tried this recipe?Let us know how it was!

    Enjoy flavorful Chole Biryani 

    Chole pulao is a delectable gluten free, quick & easy, vegan, lunch box dish that combines the rich flavors of chickpeas (chole) with fragrant basmati rice. This dish is a popular variation of traditional pulao, infused with the vibrant spices and hearty texture of chickpeas to make it a sumptuous chickpea pulao.

    1. Preparing the Rice: Washing and Soaking for Perfect Chole Rice 

    Embark on your journey to create delectable chole rice by meticulously washing and soaking the rice in approximately 2 cups of water for a minimum of 10 minutes. This crucial step is paramount to ensuring that the rice grains attain optimal moisture content, thereby resulting in a flawlessly cooked dish of chole biryani.

    1. Preparing the Chickpeas: Draining and Washing for Flavorful Chole Biryani 

    Simultaneously, prepare the chickpeas for your culinary masterpiece by meticulously draining the liquid from the can and washing the chickpeas thoroughly. This meticulous process guarantees that the chickpeas are clean and primed to impart their rich flavors to the chole pulao.

    1. Tempering the Spices: Heating the Oil to Infuse Flavor into Chole Rice 

    In a sturdy saucepan, initiate the culinary alchemy by heating oil over medium heat. Test the readiness of the oil by introducing a solitary cumin seed; upon immediate crackling, the oil is primed to infuse its essence into the chickpea biryani.

    1. Adding Flavorful Spices: Tempering with Cumin Seeds to Enhance Chole Pulao 

    Introduce the aromatic dance of spices by incorporating cumin seeds into the heated oil. Await their harmonious crackling before introducing the enchanting trio of ginger, green chili, and turmeric, infusing the environment with an irresistible aroma synonymous with chickpea pulao.

    1. Cooking the Base: Sautéing Tomatoes and Seasoning for Chole Biryani 

    Elevate the essence of your culinary creation by gently sautéing the succulent tomatoes alongside a sprinkle of salt until they reach a state of tender perfection, a foundational cornerstone of your tantalizing chickpea biryani.

    1. Cooking the Chickpeas and Potatoes: Simmering to Perfection in Chole Rice

    Transition seamlessly into the heart of your gastronomic endeavor by incorporating the chickpeas and potatoes into the saucepan, allowing them to luxuriate in a simmering concoction that amplifies their innate flavors. Cover the pan and allow the symphony of flavors to intermingle over medium-low heat for approximately 8 minutes, intermittently stirring to ensure uniformity in your divine chole pulao.

    1. Adding Rice and Vegetables: Fusion of Flavors in Chole Pulao 

    Continue your culinary odyssey by introducing the soaked rice, verdant spinach, vibrant bell pepper, and invigorating water into the saucepan, orchestrating a harmonious amalgamation of flavors that epitomises the essence of chole rice. Allow the amalgamation to gracefully ascend to a crescendo as it boils fervently before serenely simmering over low heat for 12-15 minutes. Resist the urge to stir the concoction, as doing so may compromise the integrity of your enchanting chole biryani.

    1. Finishing Touches: Infusing Flavorful Seasonings into Chole Pulao 

    Elevate the sensory experience of your culinary creation by delicately infusing it with the vibrant nuances of mango powder and garam masala, carefully intertwining the essence of these exquisite seasonings into the very fabric of your delectable chickpea pulao.

    1. Serving Suggestions: Savoring the Culinary Excellence of Chole Rice 

    Delight in the gastronomic opulence of your culinary masterpiece by savoring it either in its glorious solitude or accompanied by a tantalizing side of yogurt or pickle. Let the symphony of flavors and textures evoke a sense of culinary euphoria, as you revel in the exquisite delight that is your chole rice.

    If you loved our chole pulav rice recipe then you must also check out other variants of Rice: Vegetable Biryani, Masala Khichdi, Mango Rice, Quinoa Vegetable Pilaf and Lemon Rice

  • Yogurt Rice (Curd Rice, Mosaranna)

    Yogurt Rice (Curd Rice, Mosaranna)

    Yogurt Rice

    Yogurt Rice (Curd Rice, Mosaranna)

    Yogurt rice or curd rice is a popular South Indian dish. Yogurt Rice makes a great side dish or good for lunch box as a complete meal.
    No ratings yet
    Course rice
    Cuisine Indian
    Servings 4 people

    Ingredients
      

    Ingredients:

    • 1/2 cup rice
    • 1/4 cup split moong dal (washed) available at Indian grocery store
    • 3 cups of water
    • 1 tablespoon oil
    • 1-1/2 teaspoons salt
    • 1 cup yogurt (curd or dahi)
    • 1/4 cup shredded cucumber (kheera)
    • 1/4 cup shredded carrots (gajar)
    • 1 tablespoon finely chopped ginger (adrak)

    For Seasoning

    • 2 tablespoons oil
    • 1/2 teaspoon mustard seeds (rai)
    • 1/2 teaspoon cumin seeds (jeera)
    • 2 whole red peppers
    • 1 tablespoon finely chopped green pepper, adjust to taste
    • 8-10 curry leaves available at Indian grocery store, optional
    • 2 tablespoons chopped cilantro (hara dhania)

    Instructions
     

    • Wash rice and moong dal changing water several times until the water appears clear.
    • Drain the rice and moong dal and put it into the saucepan. Add water, oil, ginger, and salt, and bring to a boil over high heat.
    • Once the water is boiling reduce the heat to low, do not cover the pan. Cook for 10-12 minutes rice and dal will be soft cover the pan and cook for about 15 minutes, or until the rice is very soft and mushy.
    • Mix the rice and dal whipping making them mushy; if rice is dry add little more hot water as needed. Mix should be consistency of portage.
    • Let the rice cool down to room temperature, add the yogurt and mix it well. Adding the yogurt to hot rice will make yogurt sour and watery. Next add cucumber, carrot and ginger and mix.
    • Prepare the seasoning: In a small sauce pan heat the oil over medium high heat. Add the mustard seeds and cumin seeds as seeds crack add red pepper, green chili, curry leaves and cilantro stir for about a minute. As you will add curry leaves oil will splatter, so be careful.
    • Turn off the heat and mix the seasoning with rice mix. Yogurt Rice is ready to serve.
    • Yogurt Rice is served at room temperature.
    Tried this recipe?Let us know how it was!

    Learn here How to make Curd Rice or yogurt rice 

    Curd rice, also known as yogurt rice, is a popular gluten free South Indian dish made by mixing cooked rice with yogurt (curd). It is typically served as a main dish or as part of a meal, especially during hot summers, as it is cool and soothing to the palate. To prepare curd rice is quick & easy , cooked rice is mixed with fresh yogurt and seasoned with ingredients such as mustard seeds, curry leaves, green chilies, ginger, and sometimes grated vegetables like carrots or cucumber. Curd rice is known for its creamy texture, tangy flavor from the yogurt, and refreshing taste, making it a comforting and satisfying dish.

    Preparing Curd Rice: Soaking and Draining the Rice 

    To begin the recipe curd rice, start by ensuring the rice is clean and ready for cooking. Wash the rice thoroughly and then soak it in about 3 cups of water for at least 15 minutes. This soaking process helps to soften the rice grains, ensuring a creamy texture once cooked. After soaking, drain the water and set the rice aside, ready to be transformed into a delightful dish of curd rice.

    Tempering and Stir-Frying: Infusing Flavor into Curd Rice 

    In a saucepan heated over medium heat, add oil and mustard seeds. Allow the mustard seeds to crackle, releasing their aromatic essence into the oil. Once the seeds crackle, add peanuts to the pan and stir-fry for about a minute until they turn lightly golden brown. This step adds a delightful crunch and nutty flavor to the curd rice, enhancing its overall taste and texture.

    Cooking the Rice Mixture: Blending Ingredients for Curd Rice 

    To create the base for your curd rice, add chopped tomatoes, green chili, turmeric, sambar powder, salt, and cilantro to the saucepan. Cook the mixture until the tomatoes are tender, which typically takes about 2 minutes. These flavorful ingredients infuse the rice with deliciousness, setting the stage for a delectable dish of curd rice.

    Simmering and Finalizing: Perfecting the Curd Rice

    Once the tomato mixture is cooked, add the soaked and drained rice along with 2 cups of water to the saucepan. Mix everything well and bring it to a boil. Then, lower the heat to low, cover the pan, and let the rice cook for about 18-20 minutes, or until the rice is soft and the water has evaporated. After cooking, gently stir the rice and add the remaining tomatoes, stirring them in gently. Cover the pan once again and let it cook for an additional 2 minutes to ensure all the flavors meld together perfectly.

    Serving Curd Rice: Enjoying the Creamy Delight 

    Once the curd rice is cooked to perfection, it’s time to serve and savor this creamy delight. Serve the curd rice either on its own or accompanied by yogurt for a refreshing and satisfying meal. Whether enjoyed as a main dish or a side, curd rice is sure to delight your taste buds with its creamy texture and flavorful ingredients.

    If you loved this how to make curd rice recipe , then you must also check out other variants of Rice: Vegetable Biryani, Masala Khichdi, Chhole Biryani, Quinoa Vegetable Pilaf and Lemon Rice.

  • Sweet Potato Halwa (Eggless Pudding)

    Sweet Potato Halwa (Eggless Pudding)

    Sweet Potato Halwa

    Sweet Potato Halwa (Eggless Pudding)

    Sweet Potato Halwa (eggless pudding) is one of the easiest Halwa recipes to make. Cardamom and Cinnamon spices give it a delicate and unique flavor. This is a tasty, warm dessert for cold winter months.
    No ratings yet
    Course Dessert
    Cuisine Indian
    Servings 6 people

    Ingredients
      

    Ingredients:

    • 2 cups sweet potato peeled and mashed
    • 5 tablespoons unsalted butter or ghee clarified butter
    • 1 cup milk
    • 1 cup sugar
    • 1/4 teaspoon freshly ground cardamom (ilachi)
    • 1/4 teaspoon cinnamon powder (dal chini)
    • 1/8 teaspoon of nutmeg (jaifel)
    • 8 cashews broken in small pieces for garnishing (kaju)

    Instructions
     

    Method

    • Boil the sweet potato peel and mash; Sweet potatoes can be cooked in a microwave. Wrap the potatoes in wet paper towel and cook for 7-8 minutes.
    • Heat butter in heavy bottom pan over medium heat. Add sweet potatoes and stir fry by stirring continuously and pressing down for about 8-10 minutes.
    • Add milk and mix it well. After milk comes to a boil cook for 2 minutes, add sugar and cook for additional 6-8 minutes or until Halwa should start leaving the side of the pan. Halwa should be very moist.
    • Turn off the heat and add cardamom, cinnamon, and nutmeg. Mix it well.
    • Serve hot or at room temperature. Garnish with cashews. Halwa tastes best when served hot.

    Notes

     Serving suggestions
    You can serve this as pudding. Serve with vanilla ice cream or over a plain cookies/ biscuits.
    Tried this recipe?Let us know how it was!

  • Contest 2012 December Winners

    I hope everyone is having a great New Year so far. December’s contest had over 60 entries so it was lot of recipes to go through. I was happy to see many good recipes, and as always it was a challenge to narrow down the selection. Congratulations to the winners and the top five participants:

    1st Place: Ayesha Yakoob Al-Yousuf (Sweet Potato and Apricot Cheesecake)

    2nd Place: Pey-Lih (Persimmon Galette)

    Congratulations to both of you!!


    Thank you to everyone else that also participated in the contest:
    • Luca Boccia
    • Amrita Datta
    • Geeta Rao
    • Shubha Satish
    • Noopur Srivastava
    • Padmaja Thommandra
    • Sumedha
    • Anika Jindal
    • Jamie Claire
    • Lakshmi Prasanna
    • Stephen Davidson
    • Bhargav
    • Melody Crain
    • Poornima Noubad
    • Mohena Ahluwalia
    • Shweta Garg
    • Chitra Shukla
    • Poorva Sawant
    • Rajee Ramaswamy
    • Kamlesh
    • Kritika Singhal
    • Simi Ummer
    • Patricia Pangelinan
    • Vaishali
    • Prajna Prabhu
    • Nishi Manglik
    • Kumud Shukla
    • Gayathri Sathyanarayanan
    • Hem Srivastava
    • Purva Agrawal
    • Abhilasha Kothari
    • Swati Shah
    • Melanie Booth
    • Christine
    • Sujina
    • Akhila
    • Raji Muthu
    • Sudeshna Banerjee
    • Hidemi Walsh
    • Bhakti
    • Rehana Khambaty
    • Samantha S
    • Seetha
    • Alisha
    • Aru Vinu
    • Nithya Balaji
    • Marlene Steinberg
    • Lakshmi Swetha
    • Sowmya
    • Suman Agarwal
    • Divya
    • Eklas Odish
    • Samahita Kabra
    • Pranati
    • Rama Sekharan
    • Cadry Nelson
    • Sasi Kumar
  • Spicy Green Peas

    Spicy Green Peas

    Spicy Green Peas

    Spicy Green Peas

    Spicy Peas, touch of spices added to sweetness from peas and sourness from lemon makes this a great snack or a side dish. This is an easy recipe to make. Bright green color gives a nice touch to any meal.
    5 from 1 vote
    Prep Time 5 minutes
    Cook Time 5 minutes
    Total Time 10 minutes
    Course Side Dish
    Cuisine Indian
    Servings 4 people

    Ingredients
      

    • 3 cups green peas, frozen preferred baby peas
    • 1-1/2 tbsp oil
    • 3/4 tsp cumin seeds jeera
    • 2 tsp ginger chopped
    • 1-1/2 tsp green chili chopped
    • 1 tsp salt
    • 1/4 tsp black pepper
    • 2 tbsp cilantro chopped hara dhania
    • 2 tsp lemon juice

    Instructions
     

    • Thaw the peas and pat dry.
    • Heat the oil in a saucepan over medium-high heat. Test the heat by adding one cumin seed to the oil. If the cumin seed cracks right away, the oil is ready. Add cumin seeds as they crack add green chili and ginger, stir for few second add green peas and salt.
    • Cook for about 4-5 minutes string occasionally, till peas are tender. Add black pepper and cilantro mix it well.
    • Turn off the heat and squeeze the lemon juice over and stir.Spicy green peas are ready to serve!

    Notes

    Serving suggestions: Serve Spicy green peas hot or at room temperature. 
    Serve this as a snack or as a side dish with any dal or gravy base dish.
    Spicy Green Peas also good for sandwiches or making wrap 
    Tried this recipe?Let us know how it was!

    Spicy Green Peas Masala Recipe

    Spicy Green Peas Masala is a delectable dish that combines the freshness of green peas with a fiery kick of spices. It’s perfect for those seeking appetizers or snacks that are gluten-free, low in fat, and vegan-friendly. This quick and easy recipe involves sautéing green peas along with a blend of aromatic spices. The result is a flavorful dish bursting with the natural goodness of vegetables, making it a healthy and satisfying choice for any occasion. If you’re looking for an enticing and flavorful dish to tantalize your taste buds, this spicy green peas masala recipe is just what you need. Bursting with aromatic spices and the freshness of green peas, this dish is a delightful treat for both spice enthusiasts and lovers of comfort food. Let’s dive into the steps of how to make this irresistible spicy green pea masala.

    Step 1: Preparing the Ingredients

    Before diving into the cooking process, gather all the necessary ingredients. You’ll need fresh or frozen green peas, tomatoes, ginger, green chilies, and a blend of spices including cumin, coriander, turmeric, and garam masala. Make sure to have some oil on hand for sautéing.

    Step 2: Sautéing the Aromatics

    Heat some oil in a pan over medium heat. Add ginger, and green chilies to the pan. Sauté them until they turn golden brown and release their aromatic flavors. This forms the flavorful base of our spicy green pea masala.

    Step 3: Adding the Spice Mix

    Once the aromatics are nicely sautéed, it’s time to add the spice mix. Sprinkle in the ground cumin, coriander, turmeric, and garam masala. Stir the spices well evenly, allowing them to toast slightly and develop a rich, deep flavor profile.

    Step 4: Introducing the Green Peas

    Now, it’s time to add the star ingredient: the green peas. Whether you’re using fresh peas or frozen ones, toss them into the pan and mix them thoroughly with the spice-infused mixture. Let the peas cook for a few minutes, allowing them to absorb all the wonderful flavors.

    Step 5: Simmering with Tomatoes

    Next, add diced tomatoes to the pan. Tomatoes not only add a tangy sweetness to the dish but also contribute to its vibrant color. Stir everything together and let the mixture simmer gently, allowing the tomatoes to soften and meld with the other ingredients.

    Step 6: Adjusting Seasonings

    Taste the spicy green peas masala and adjust the seasonings according to your preferences. If you prefer it spicier, you can add more green chilies or a pinch of red chili powder. For extra richness, you can sprinkle in some cream or coconut milk.

    Step 7: Garnishing and Serving

    Once the flavors have melded beautifully and the green peas are tender, garnish the dish with freshly chopped cilantro leaves. This adds a burst of freshness and color to the dish. Serve the spicy green peas masala hot with rice, roti, or naan for a satisfying meal that’s sure to impress.

    Variations:

    • For a creamier texture, you can blend a portion of the cooked green peas masala to create a thick gravy.
    • Add diced potatoes or paneer cubes along with the green peas for an extra layer of flavor and texture.
    • Experiment with different spices and herbs to customize the dish according to your taste preferences.

    Benefits:

    • Green peas are a good source of vitamins, minerals, and fiber, making this dish not only delicious but also nutritious.
    • The spices used in this recipe, such as turmeric and cumin, are known for their anti-inflammatory and digestive properties.

    FAQs:

    Can I use canned peas instead of fresh or frozen ones?

    • While fresh or frozen peas are recommended for the best flavor and texture, you can use canned peas if that’s what you have on hand. Just make sure to drain and rinse them before adding them to the dish.

    Is this dish suitable for vegetarians and vegans?

    • Yes, this spicy green peas masala recipe is entirely plant-based and suitable for both vegetarians and vegans. Just make sure to use oil instead of ghee for a vegan-friendly version.

    Can I make this dish ahead of time?

    • Yes, you can prepare the spicy green peas masala ahead of time and store it in the refrigerator for a few days. Simply reheat it gently on the stovetop or in the microwave before serving.

    For more delightful recipes like this one, explore other offerings in Manjula’s Kitchen, such as Paneer Tikka Masala, Chole (Chickpea Curry), and Aloo Gobi (Potato Cauliflower).

  • Quinoa Vegetable Pilaf (Pulav)

    Quinoa Vegetable Pilaf (Pulav)

    Quinoa Vegetable Pilaf

    Quinoa Vegetable Pilaf (Pulav)

    Quinoa vegetable pilaf is a protein rich, gluten free and delicious dish. It is quick and easy to make. This can be served as a main dish or side dish.
    No ratings yet
    Course rice
    Cuisine Indian
    Servings 2 people

    Ingredients
      

    For quinoa

    • 1 cup quinoa
    • 1-1/2 cup of water
    • 1 tablespoon oil
    • 1/2 teaspoon salt
    • Pinch of turmeric

    For vegetables

    • 1/2 cup peas
    • 1/2 cup corn
    • 1/2 cup carrot cut in small pieces
    • 1 tablespoon thinly sliced ginger
    • 1 green chili minced
    • 1 tablespoon oil
    • 1/2  teaspoon cumin seeds
    • 1/4 teaspoon  black mustard seeds
    • 1 bay leave
    • 1/2 teaspoon salt adjust to taste
    • 1 1ablespoon lemon or lime juice
    • 3/4 cup  tomato chopped for garnishing

    Instructions
     

    Method

    • Wash quinoa gently changing water several times.
    • In a sauce pan combine quinoa, water, oil, salt and turmeric. Bring to a boil, cover and reduce the heat to low. Let it simmer until quinoa is tender and water is absorbed. This should take about 15 minutes.
    • While quinoa is cooking heat the oil in other saucepan over medium heat, Test the heat by adding one cumin seed to the oil; if it cracks right away oil is ready.
    • Add the cumin seeds, black mustard seeds, and bay leave, as seeds crack add all the vegetables, carrot, corn, green peas, ginger, green pepper, and salt.
    • Let the vegetable cook over medium heat until vegetables are tender but firm.
    • Turn off the heat. Add quinoa to the mix of vegetable and gently fold it.
    • Finish off by adding lemon juice and tomatoes.
    Tried this recipe?Let us know how it was!

    Quinoa Vegetable Pulao: A Gluten-Free, Protein-Rich, Vegetarian Recipe 

    Quinoa vegetable pilaf is a protein rich, gluten free and delicious rice based vegan dish. It is quick and easy to make. This can be served as a main dish or side dish.

    Preparing the Quinoa for Quinoa Pulao Recipe: 

    In this essential step of the quinoa pulao recipe, it’s crucial to ensure the quinoa is thoroughly rinsed, thereby eliminating any bitterness or unwanted residues that might affect the final dish. By washing the quinoa gently and changing the water several times, you’re not only improving its flavor but also enhancing its overall texture. 

    The combination of quinoa, water, oil, salt, and turmeric in the saucepan sets the foundation for a flavorful base, infusing the quinoa with aromatic spices and seasoning it perfectly for the upcoming cooking process. Bringing this mixture to a boil, covering it, and then simmering it over low heat allows the quinoa to absorb the flavors while achieving the ideal tender consistency, typically taking around 15 minutes.

    Sautéing the Vegetables for Quinoa Vegetable Pilaf: 

    In this next phase of crafting the quinoa vegetable pilaf, heating oil in a separate saucepan is the initial step to infusing the dish with rich flavors. Testing the oil’s readiness with a cumin seed ensures that the temperature is optimal for the subsequent sautéing process, guaranteeing that the vegetables are cooked to perfection. 

    Incorporating a blend of cumin seeds, black mustard seeds, and bay leaves into the hot oil adds depth and complexity to the dish, creating a flavorful base that complements the nutty taste of quinoa. As the seeds crackle, adding a medley of vibrant vegetables – including carrot, corn, green peas, ginger, green pepper, and salt – infuses the pilaf with a colorful array of nutrients and textures, enhancing both its visual appeal and nutritional value.

    Combining Quinoa and Vegetables for Quinoa Pilaf with Vegetables: 

    In this pivotal moment of assembling the quinoa pilaf with vegetables, the careful integration of cooked quinoa with the sautéed vegetables ensures a harmonious fusion of flavors and textures. Gently folding the quinoa into the vegetable mixture allows for even distribution, ensuring that every bite is bursting with a delightful medley of ingredients. 

    This meticulous process of combining the quinoa and vegetables not only enhances the dish’s visual presentation but also ensures that each component contributes to its overall flavor profile, resulting in a balanced and satisfying culinary experience.

    Final Touches to Complete Quinoa Indian Vegetarian Recipes:

    As the quinoa Indian vegetarian recipe nears completion, adding the final touches of lemon juice and tomatoes imparts a burst of freshness and acidity, elevating the dish to new heights of flavor complexity. The tangy notes of lemon juice complement the earthy undertones of the quinoa and vegetables, while the juicy sweetness of tomatoes adds a delightful contrast, creating a symphony of flavors that tantalize the taste buds. 

    These carefully selected ingredients not only add vibrancy and depth to the dish but also reflect the diverse culinary influences of Indian cuisine, making this quinoa recipe a true celebration of flavor and tradition.

    If you loved our quinoa vegetable pilaf recipe then you must also check out other variants of Rice: Vegetable Biryani, Masala Khichdi, Mango Rice, Quinoa Vegetable Pilaf and Lemon Rice

  • Garam Masala

    Garam Masala

    Garam Masala

    Garam Masala

    Garam Masala is a blend of several spices. Garam means hot and masala is mix of spices. This is a very aromatic spice mix which should be sparingly used. It can used in many gravies, soups and dal like dishes such as paneer tikka, chole masala or mushroom matar.
    Garam Masala is very pungent but not as hot as chili powder. This is a popular spice mix In North Indian dishes. This is my Mom’s recipe. This mix will be good for a few months.
    No ratings yet
    Course spices
    Cuisine Indian
    Servings 5 oz of Garam Masala

    Ingredients
      

    Ingredients:

    • 1/3 cup cumin seeds (jeera), 40 gram
    • 2-1/2 tablespoons black pepper (kale mirch), 20 gram
    • 1/4 cup whole black cardamom (kali ilachi), 20 gram
    • 2-1/2 tablespoons cinnamon powder (dal cheene), 20 gram
    • 1 cup packed bay leaves (tajpat), 20 gram
    • 1/4  cup cloves (long), 20 gram
    • 2 teaspoons mace powder (javantri), 8 gram
    • 2 teaspoons nutmeg powder (jaiphal), 8 gram

    Instructions
     

    Method

    • Mix all the spices and grind to a powder. Store the Garam Masala in air tight glass container. I use powdered cinnamon, mace, nutmeg, and black pepper because most home blender are not powerful to properly blend these spices.
    • All of the spices used in Garam Masala are strong in flavor and have warmth. I prefer to sprinkle Garam Masala to a dish to give it a finishing touch.
    Tried this recipe?Let us know how it was!

  • Contest 2012 July Winners

    I was nice to see many recipes for the drink contest past month. I would to thank everyone who participated. Congratulations to the winners and the top five participants:

    1st Place: Siminder Kaur (Masala Thai Iced Tea)

    2nd Place: Dhanya Keloth (Kerala Spiced Buttermilk)

    Congratulations to both of you!!

    Thank you to everyone else that also participated in the contest:
    • Jai Shree Krishna
    • Devangi
    • Usha
    • Snehal
    • Teena Mary
    • Sirisha
    • Vani
    • Esha Auluck
    • Deepti Seth
    • Jayanthi
    • Denny
    • Manjiri
    • Jayashree
    • Sowmya Chandrasekaran
    • Tundup Namgail
    • Rakhi Goyal
    • Shweta Agrawal
    • Minu Betala
    • Rehana Khambaty
    • Priya Suresh
    • Ranjani Prasanna
    • Safia Hassan
    • Suvina Ajay
    • Sreemanti Pathak
    • Neelam
    • Navita Mehra
    • Shilpa
    • Jay Modi
    • Kunzang Dolma Jammu
    • Cristina Adam
    • bhagyashree parekh
    • Jyothi Jindal
    • Deepalakshmi
    • Sujatha Subramaniam
    • Mohita Negi
    • Deepti Rao
    • Aatika shoeb
    • SJ Anderson
    • Soniya Khemlani
    • Sumaira Khan
    • Carol Graham
    • Sruti Mohan
    • Deepthi Digvijay
  • Besan Ki Roti

    Besan Ki Roti

    Besan Roti

    Besan Ki Roti

    Besan Roti is very flavorful and healthy flat bread, high in protein and gluten free. Besan roti can be served with dal and leafy green vegetables like spinach or with yogurt.
    5 from 1 vote
    Course Bread
    Cuisine Indian
    Servings 6 people

    Ingredients
      

    Ingredients:

    • 2 cups besan gram flour (available in Indian grocery stores)
    • 2 tablespoons oil
    • 2 tablespoons yogurt (dahi)
    • 1/2 teaspoon salt
    • 1/2 teaspoon chili flakes
    • 1-1/2  tablespoon dry fenugreek leaves (kasoori mathi)
    • Pinch of asafetida (hing)
    • Approx. ¼ cup of water use as needed
    • ¼ cup rice flour for rolling the roti
    • Approx. 2 tablespoons butter or ghee (clarified butter)

    Instructions
     

    Method

    • Combine all the dry ingredients in a bowl mix it well. Add oil and yogurt to the mixture and mix. This will become very crumbly. Oil the palm to make the dough as it will be very sticky. Add water as needed to make the firm dough.
    • Keep the dough aside and cover with damp cloth. Let the dough rest for at least ten minutes or more.
    • Divide the dough in 6 equal parts. Make them in smooth balls.
    • Take one ball press it in rice flour from both sides and roll into about 6-inch circle. If the dough sticks to the rolling pin or rolling surface, lightly dust the roti with rice flour.
    • Heat the skillet over medium high heat. Note: Heavy skillet works best.
    • Place the rolled roti on skillet. In few seconds roti will start changing color, turn roti over, both sides of roti will have few light brown spots.
    • Next place the roti on open burner using tong. The top part of roti should be down. Note: if you have gas stove you can put roti directly over high flames but if you have electric stove use cake cooling rack or similar over the burner so roti does not touch burner coil directly.
    • Grill the roti from both sides using tong until roti has golden brown spots both sides. Bottom part of roti should be up for serving brush the roti with ghee or butter.
    • Keep Besan Roti’s in a covered container or wrap them in aluminum foil. (Besan Roti becomes dry when they come to room temperature)
    Tried this recipe?Let us know how it was!

  • Masala Papad (Papad Salad)

    Masala Papad (Papad Salad)

    Masala Papad

    Masala Papad (Papad Salad)

    Crispy papad topped with spicy salad makes a very refreshing appetizer. Masala Papad is full of flavors and very tempting. This is a very simple and easy recipe to make.
    Papad is a round, flat, dry cracker made with a variety of lentils. They are sold uncooked in Indian grocery stores. You can deep-fry them or dry-roast them.
    No ratings yet
    Course Salad
    Cuisine Indian
    Servings 2 people

    Ingredients
      

    Ingredients:

    • 2 plain papad, (available in Indian grocery stores)
    • 2 medium tomatoes, seeded and diced very small to make a approx. 1cup
    • 1/2  English or deseeded cucumber, cut in very small pieces to make it about ½  cup
    • 2 tablespoons cilantro finely chopped
    • 1 teaspoon ginger finely shredded, optional
    • 1 green chili finely chopped, optional
    • ½ lemon
    • 2 teaspoon 2 teaspoon oil

    Spice Mix for Garnishing

    • 1/2 teaspoon salt
    • 1/4 teaspoon black salt
    • 1/2 teaspoon dry roasted cumin seeds powder
    • 1/8 teaspoon black pepper
    • Pinch red chili 

    Instructions
     

    Method

    • Mix all the dry ingredients to make a spice mix, set aside.
    • Mix tomatoes, cucumbers, cilantro, ginger, and green chili, set aside
    • Lightly oil the papads from both sides, set aside.
    • Preheat the skillet over medium high heat. Roast the papads on both sides in the skillet one at a time, pressing with spatula. The papads will change to a light yellow with a few brown spots. Be careful not to over-roast. Fold the Papads in quarters while they are hot, making triangles right on the skillet.
    • Remove the papads from the skillet and break on the folds, creating four triangles from each one.
    • Take one piece of papad and top it with cucumber, tomato, ginger, green chili, and cilantro. Drizzle with lemon juice and sprinkle the spice mix on top.

    Notes

    Notes
    1. Removing the seeds from the tomatoes keeps the papads crunchy.
    2. English cucumber is crisper on the outside and tender on the inside.
    3. You can prepare  the masala papad in advance, and add the toppings just before serving.
    Tried this recipe?Let us know how it was!

    Crunchy Delight: How to Make Delicious Masala Papad at Home 

    Masala Papad is a flavorful appetizer perfect for parties, offering a low-fat, vegan option that delights snack enthusiasts with its crunchy texture and spicy seasoning. Masala Papad is a delightful Indian appetizer that combines the crunchiness of papad with a burst of spicy, tangy flavors. If you’re wondering how to make masala papad, you’re in for a treat! This masala papad recipe brings together a harmonious blend of ingredients to create a dish that’s not only delicious but also incredibly easy to prepare at home. Let’s dive into the steps to prepare this mouthwatering delicacy.

    1. Making the Spice Mix:

    First, we’ll create a flavorful spice blend to add a kick to your masala papad. Gather all the dry ingredients like cumin, coriander powder, chili powder, and maybe even some chaat masala (a tangy and savory spice blend commonly used in Indian street food). In a bowl, carefully measure and combine these dry spices. Once everything is incorporated, set the bowl aside for later.

    2. Preparing the Veggie Topping:

    Next, we’ll create a refreshing and vibrant topping for the papad. Start by chopping the tomatoes, cucumbers, cilantro, ginger, and green chili. Aim for a fine chop to ensure even distribution on the papad. You can remove the seeds from the tomatoes if you prefer a drier topping, as the seeds can release moisture and make the papad soggy. After chopping, combine all the veggies in a separate bowl and set it aside with the spice mix.

    3. Oiling and Roasting the Papads:

    Now it’s time to prepare the base of our dish – the papad itself! Take each papad and lightly brush or drizzle a thin layer of oil on both sides. This will help them crisp up nicely during roasting. Once oiled, set the papads aside on a plate.

    4. Roasting and Folding the Papads:

    Heat up your skillet over medium-high heat. It’s important to have the pan hot enough to ensure the papads roast quickly and evenly. Carefully place one papad at a time in the hot skillet. Use a spatula to gently press down on the papad as it cooks. You’ll see the color change from its original white to a light yellow with a few brown spots. This is your cue to flip the papad and cook the other side. Be mindful not to overcook them, as they can become burnt and brittle. While the papad is still hot and pliable, fold it in half to create a semi-circle shape. Then, fold it in half again to form a small triangle. This folding technique not only creates a nice presentation but also helps cradle the toppings when assembled.

    5. Assembling and Serving the Masala Papad:

    Finally, it’s time to put everything together! Take one of the folded papad triangles and carefully break it along the folds to create four smaller triangles. Now you have a crispy base ready for the toppings. Place a dollop of the prepared vegetable mixture on each papad triangle. Don’t forget a squeeze of fresh lemon juice for a touch of tanginess! Lastly, sprinkle the reserved spice mix over the top for a burst of flavor.

    Tips for Perfect Masala Papad 

    Using English cucumbers is recommended for their crisp texture, but regular cucumbers will work too.
    You can prepare the masala papad in advance for a quick and easy snack. Just store the roasted papad triangles in an airtight container and assemble them with fresh toppings right before serving.

    Experiment with different toppings such as grated cheese, finely chopped bell peppers, or even crumbled paneer to create your own unique variations of masala papad.

    For a healthier alternative, opt for baked papads instead of the traditional fried ones.

    If you’re short on time, you can prepare the masala mixture in advance and store it in the refrigerator until ready to use.

    Variations of Masala Papad 

    Paneer Masala Papad: Top your papads with a spicy paneer mixture for a creamy twist on this classic recipe. Check out the recipe here.

    Corn Masala Papad: Add a sweet and savory element to your masala papad by incorporating corn kernels into the masala mixture. Find the recipe here.

    Schezwan Masala Papad: Give your masala papad an Indo-Chinese twist by drizzling it with spicy Schezwan sauce. Learn how to make Schezwan sauce here.

    Benefits of Masala Papad

    Masala papad is a low-calorie snack that’s perfect for those watching their weight.

    The combination of spices in masala papad aids digestion and stimulates the appetite.

    Papads are rich in dietary fiber, making them a healthy option for snacking.

    FAQs about Masala Papad 

    Can I make masala papad in advance? 

    Yes, you can prepare the masala mixture ahead of time and store it in an airtight container in the refrigerator. Simply assemble the papads right before serving.

    Can I use store-bought papads for this recipe? 

    Absolutely! Store-bought papads work just as well as homemade ones for making masala papad.

    Can I customize the spice level of masala papad? 

    Of course! Adjust the amount of green chilies and chaat masala according to your preference for spiciness.

    With these simple steps and tips, you’ll be able to whip up a batch of delicious masala papad that’s sure to be a hit at your next gathering or as a quick snack for yourself. Enjoy experimenting with different toppings and flavors to create your own signature version of this beloved Indian appetizer!

    Other Recipes on Manjula’s Kitchen

    If you’re looking to explore more Indian recipes, appetizers, beverages, and desserts, be sure to check out the following links on Manjula’s Kitchen. Here are some links to recipes on Manjula’s Kitchen official website: Paneer Tikka Masala Recipe, Chana Chaat (Spicy Chickpea Salad), Pav Bhaji (Spicy Vegetable Hash with Buns), Raj Kachori (Crunchy Chaat), Vegetable Biryani 

  • Black Eyed Beans (Lobia)

    Black Eyed Beans (Lobia)

    Black Eyed Beans (Peas, Lobia)

    Black Eyed Beans (Lobia)

    Black Eyed Bean is also known as Lobia or Chawli This is a basic recipe, quick & easy, healthy and nutritious recipe to make, very delicious and protein-rich.
    3.70 from 13 votes
    Prep Time 5 minutes
    Cook Time 15 minutes
    Total Time 20 minutes
    Course Main Course
    Cuisine Indian
    Servings 3 people

    Ingredients
      

    • 1 cup black eyed beans lobia, chawli
    • 2 tbsp oil
    • 1 tsp cumin seeds jeera
    • 1/8 tsp asafetida hing
    • 1 tbsp coriander powder dhania
    • 1 tbsp ginger shredded
    • 1/4 tsp red chili powder
    • 1/4 tsp turmeric haldi
    • 1/2 tsp mango powder aam choor
    • 1/4 tsp garam masala
    • 1 tsp salt
    • 1 tomato chopped
    • 3 cups water approx.

    Garnishing

    • 2 green chili
    • 2 lemon slices

    Instructions
     

    • Wash and soak beans for one hour or more.
    • In a small bowl, mix the ginger, green chili, coriander powder, turmeric, and 3 tablespoons of water to make a paste.
    • Heat the oil in pressure cooker on medium heat. Test the heat by adding one cumin seed to the oil; if seed cracks right away oil is ready. Add the cumin seeds as they crack add asafetida, add the spice paste and stir for a minute until spices start leaving the oil.
    • Add Black Eyed Beans, salt and water close the pressure cooker as pressure cooker starts steaming turn the heat down to medium and cook for 6-7 minutes.
    • Turn off the heat and wait until the steam has stopped before opening the pressure cooker. Black-eyed beans should be soft and tender.
    • Add mango powder, garam masala, and tomatoes, and cover the cooker for a few minutes. That will give tomatoes a chance to get semi-cooked with steam.
    • Garnish this with lemon wedge.

    Notes

    Tips
    Making a paste with the spices will prevent the spices from burning.
    Tried this recipe?Let us know how it was!

    Make The Best Black Eyed Beans Recipe

    Mastering the Art of Black-eyed beans are a type of legume that are also known as black-eyed peas. They are a variety of cowpea and are commonly used in cooking around the world. Black-eyed beans are a popular ingredient in many cuisines due to their versatility and nutritional value. They are a good source of plant-based protein, making them a great option for vegan and vegetarian diets. 

    Additionally, they are naturally gluten-free, making them suitable for those with gluten sensitivities or celiac disease. Black-eyed beans can be used to make a variety of dishes, including salads, soups, stews, and curries. They are often used in combination with other ingredients such as vegetables, spices, and grains to create flavorful and nutritious meals.

    How To Make The Best Black Eyed Beans Recipe

    • Rinse the beans: Give your black-eyed beans a good wash under running water.
    • Soak the beans (optional): Soaking the beans for at least 1 hour (or even overnight) will make them softer and easier to digest. You can skip this step if you’re short on time, but the beans may take longer to cook.
    • Make a spice mix: Combine ginger, green chili, coriander powder, turmeric, and a little water to create a flavorful paste.
    • Heat oil and spices: Add oil to your pressure cooker and heat it up. Then, add cumin seeds and wait for them to sizzle. This tells you the oil is hot enough. Once hot, toss in a pinch of asafetida (optional) followed by the spice paste. Let the spices cook for a minute or so until they smell fragrant.
    • Cook the beans: Add the rinsed (and possibly soaked) beans along with water and salt to the pressure cooker. Close the lid and let it come up to pressure. Once it starts steaming, reduce heat and cook for 6-7 minutes.
    • Release pressure and add flavor: Once done cooking, turn off the heat and let the pressure release naturally for a while. Then, carefully open the cooker. Now, add some mango powder, garam masala, and chopped tomatoes. Close the lid again for a few minutes to let the tomatoes soften with the steam.
    • Serve and enjoy! Finish the dish with a squeeze of lemon juice for a fresh touch. Your delicious black-eyed beans are ready to be devoured!

    Tips for Cooking the Best Black-Eyed Beans

    Use Fresh Beans: Whenever possible, use fresh, high-quality black-eyed beans for the best results. Fresh beans will cook more evenly and have better texture compared to older beans.

    Don’t Salt Too Early: Avoid adding salt to the cooking water until the beans are almost fully cooked. Adding salt too early can toughen the beans and prolong the cooking time.

    Customize the Flavor: Experiment with different seasonings and aromatics to customize the flavor of the beans to your taste preferences. Don’t be afraid to get creative and try new combinations of herbs and spices.

    Frequently Asked Questions (FAQs)

    What are the health benefits of black eyed beans?
    Black eyed beans are a nutritional powerhouse! They are a good source of protein, fiber, folate, iron, and magnesium. These contribute to a healthy heart, blood sugar control, and overall well-being.

    Do I need to soak black eyed beans before cooking?
    Soaking is not strictly necessary, but it helps reduce cooking time and can make the beans easier to digest. Soaking for at least 6 hours is recommended, or you can use a quick soak method.

    How long does it take to cook black eyed beans?
    Cooking time depends on whether you soaked them beforehand. Soaked beans will take about an hour to cook on the stovetop, while unsoaked beans can take up to two hours.

    How can I use black eyed beans in recipes?
    Black eyed beans are incredibly versatile! They are a delicious addition to soups, stews, salads, dips, and even burgers. You can find them used in cuisines worldwide, from Southern Hoppin’ John to Brazilian Feijoada.

    Are black eyed peas the same as black eyed beans?
    Yes, black eyed beans and black eyed peas are the same thing!

    Where can I buy black eyed beans?
    Black eyed beans are widely available in most grocery stores. You can find them dried in bulk bins or bags, or canned and pre-cooked for convenience.

    How should I store black eyed beans?
    Dried black eyed beans can be stored in an airtight container in a cool, dry place for up to a year. Cooked black eyed beans should be stored in an airtight container in the refrigerator for up to 5 days, or frozen for longer storage.