Wholesome Family Meals: Indian Vegetarian Recipes for Every Occasion
Sharing a meal with family is a cherished tradition in many cultures, and in India, it’s no different. Family meals are more than just an opportunity to nourish the body—they’re a time to connect, share stories, and create lasting memories. Indian cuisine, with its rich variety of flavors and dishes, offers countless options for creating wholesome and satisfying family meals that everyone will enjoy.
Whether it’s a simple weeknight dinner or a special weekend gathering, Indian vegetarian recipes provide the perfect balance of taste, nutrition, and comfort. From hearty dals to flavorful curries and aromatic rice dishes, there’s something for everyone to enjoy.
Must-Try Indian Vegetarian Recipes for Family Meals
Rajma (Kidney Bean Curry)
Rajma is a North Indian recipe that is staple, comforting and nutritious. Made with kidney beans cooked in a spicy tomato gravy, it’s often served with steamed basmati rice, making it a complete meal. The combination of protein-rich beans and aromatic spices makes it a family favorite.
Palak Paneer
Palak Paneer is a classic paneer recipe that combines soft paneer (Indian cottage cheese) with a creamy spinach sauce. It’s a great way to include greens in your family’s diet while offering a dish that is both flavorful and satisfying. Serve it with naan or rotis for a balanced meal.
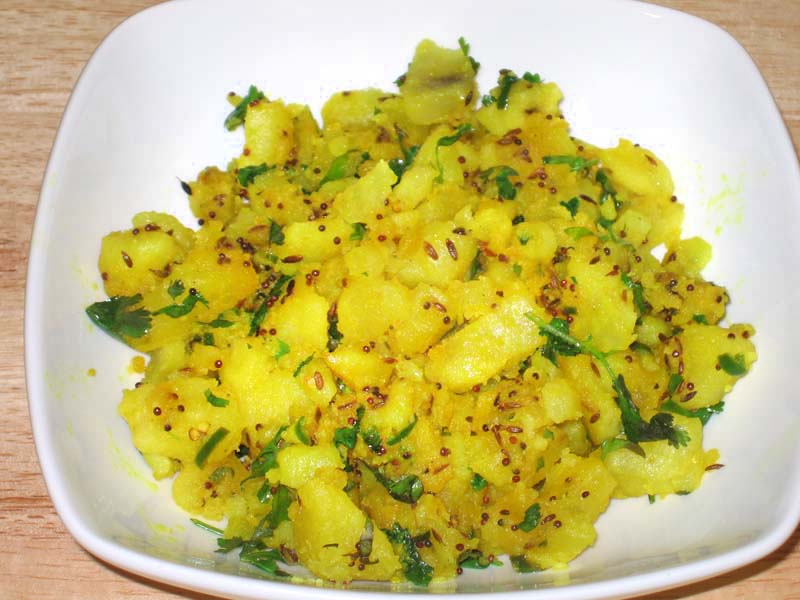
Aloo Gobi
Aloo Gobi is a simple yet delicious dish made with potatoes and cauliflower, flavored with turmeric, cumin, and coriander. This dry curry is easy to prepare and pairs well with both rice and Indian breads, making it an ideal choice for a family meal.
Vegetable Biryani
Vegetable Biryani is a one-pot dish that’s perfect for feeding a crowd. Vegetable Biryani is a fragrant indian rice recipes cooked with mixed vegetables, aromatic spices, and herbs. It’s a wholesome and flavorful meal that can be enjoyed on its own or with a side of raita (yogurt sauce).
Chana Masala
Chana Masala, or chickpea curry, is a hearty and protein-packed dish that’s popular in Indian households. The chickpeas are simmered in a spicy tomato gravy, creating a rich and satisfying meal. It’s often served with rice or bhature (deep-fried bread) for a complete family meal.
Paneer Butter Masala
Paneer Butter Masala is a rich and creamy curry made with paneer in a tomato-based sauce, enriched with butter and cream. This dish is a hit with both kids and adults, making it a perfect choice for a family dinner. Serve it with naan or rice for a comforting meal.
Baingan Bharta
Baingan Bharta is a smoky and flavorful dish made with roasted eggplant, mashed and cooked with tomatoes, and spices. It’s a great way to enjoy eggplant and is often served with rotis or parathas as part of a family meal.
Toor Dal (Split Pigeon Pea Lentils)
Toor Dal is a staple in many Indian homes, offering a simple yet nourishing dish that’s full of flavor. The lentils are cooked with tomatoes and spices, and are often served with rice or chapatis. This dish is a great source of protein and is perfect for a wholesome family meal.
Stuffed Parathas
Stuffed Parathas are a versatile and filling option for a family meal. These whole wheat flatbreads are stuffed with a variety of fillings, such as spiced potatoes, paneer, or even mixed vegetables. They can be enjoyed with yogurt, pickles, or a side of curry.
Vegetable Pulao
Vegetable Pulao is a quick and easy one-pot meal that’s perfect for busy weeknights. This rice dish is cooked with mixed vegetables, spices, and herbs, offering a wholesome and satisfying meal that the whole family will love.
Tips for Planning Family Meals
Balance the Menu: When planning family meals, try to include a variety of dishes that offer different flavors and nutrients. A typical Indian meal might include a dal, a vegetable curry, a rice dish, and a bread option like chapati or naan.
Make it Nutritious: Indian vegetarian meals are naturally rich in vegetables, legumes, and whole grains, making them nutritious and well-balanced. Include a variety of vegetables, leafy greens, and protein-rich legumes to ensure a wholesome meal.
Get the Family Involved: Cooking together can be a fun and rewarding experience. Get the family involved in meal preparation, whether it’s rolling out chapatis, chopping vegetables, or setting the table.
Make It a Tradition: Establish regular family meal times where everyone can gather around the table. This not only strengthens family bonds but also creates a routine that everyone can look forward to.
Conclusion
Family meals are a time to come together, share stories, and enjoy delicious food. Indian vegetarian cuisine offers a wealth of options that are not only flavorful but also nourishing and satisfying. Whether you’re preparing a quick weeknight dinner or a special weekend feast, these recipes are sure to bring comfort and joy to your family table.
For more family meal ideas, visitManjula’s Kitchen – Family Meals. Explore a variety of wholesome and delicious recipes that are perfect for bringing the family together.
Yogurt Chutney is great paired with dosas and pudas. It is a great and less time-consuming variation from the more commonly used chutneys, such as coconut chutney.
Aloo masala is a nice compliment for any kind of dosa. The Aloo Masala can be rolled in the dosa or served as a side dish. Its a great appetizer that goes well in all kinds of meal be it breakfast, lunch or dinner.
Aloo Masala Recipe: How to make Aloo Masala for Dosa
Aloo Potato Masala, a classic gluten free South Indian filling that pairs perfectly with dosa, a popular Indian crepe. This vegan versatile dish combines the earthy goodness of potatoes with aromatic spices, creating a delicious accompaniment that’s loved by all.
Spicy Potato Masala for Dosa
Hearty and Satisfying: Aloo Potato Masala is a hearty and satisfying dish that’s perfect for breakfast, brunch, or any time of the day. Its comforting flavors and creamy texture make it a popular choice among both children and adults.
Versatile Filling: Aloo Potato Masala is incredibly versatile and can be used as a filling for various Indian snacks and dishes, including dosa, samosa, and sandwich. Its bold flavors and creamy texture add depth and richness to any recipe it’s used in.
Easy to Prepare: Making Aloo Potato Masala at home is quick and easy, requiring just a few simple ingredients and basic cooking techniques. With the right combination of spices and seasoning, you can create a delicious and flavorful filling that’s sure to impress.
Variations of Aloo
Aloo Gobi: Aloo Gobi is a delicious main dish made with potatoes, cauliflower, and a great blend of spices. Aloo Gobi can be served with various breads, such as rotis, parathas, and puris.
Aloo Baingan: Aloo baingan (potato and eggplant) is a great main dish. It’s easy to make and can be served with any bread.
Aloo Dum: Is an exotic rich and luxurious variant of aloo made in a curry format and incorporates the Indian cooking style of dum.
Aloo Mattar: Aloo Mattar is a popular curry based north Indian dish. Potatoes and peas with spicy gravy makes a great main course served with puris, rotis and parathas.
Tips for Making Perfect Aloo Potato Masala:
Boil Potatoes Until Tender: Boil the potatoes until they are fork-tender before mashing them for the Aloo Potato Masala. This ensures that the potatoes are cooked through and have a smooth and creamy texture.
Temper the Spices: Temper whole spices such as mustard seeds, cumin seeds, and curry leaves in hot oil before adding other ingredients. This releases their flavors and aromas, enhancing the overall taste of the Aloo Potato Masala.
Finish with Fresh Herbs: Garnish the Aloo Potato Masala with freshly chopped cilantro or coriander leaves just before serving for a burst of freshness and color. Herbs add a vibrant touch to the dish and elevate its presentation.
FAQs about Aloo Potato Masala for Dosa:
Can I make Aloo Potato Masala ahead of time?
Yes, you can prepare the Aloo Potato Masala ahead of time and store it in the refrigerator for up to 2-3 days. Reheat it gently on the stovetop or in the microwave before serving with dosa or other dishes.
Is Aloo Potato Masala gluten-free?
Yes, Aloo Potato Masala is naturally gluten-free as it’s made with potatoes, vegetables, and spices, which are all gluten-free ingredients. It’s a safe and delicious option for individuals with gluten intolerance or celiac disease.
Can I freeze Aloo Potato Masala?
While you can freeze Aloo Potato Masala, the texture may change slightly upon thawing. It’s best to freeze the masala in an airtight container for up to 1-2 months and thaw it in the refrigerator overnight before reheating.
What can I serve with Aloo Potato Masala?
Aloo Potato Masala pairs perfectly with dosa, a South Indian crepe made from fermented rice and lentil batter. It can also be served with idli (steamed rice cakes), uttapam (Indian-style savory pancakes), or puri (deep-fried bread).
Aloo Potato Masala is a delicious and versatile dish that’s perfect for savoring with dosa or as a filling for various Indian snacks and dishes. Whether enjoyed for breakfast, brunch, or as a comforting meal option, its hearty flavors and creamy texture are sure to delight your taste buds and leave you craving for more.
So why not treat yourself to a batch of homemade Aloo Potato Masala and experience the irresistible flavors of South Indian cuisine?
Stay tuned for more such dishes on Manjula’s Kitchen exploration into the world of culinary delights!
Boil potatoes until they are tender. Once cooked, drain the water and let the potatoes cool down. Note: Do not cool the potatoes under running water because the potatoes will absorb the extra water, making potatoes mushy. After potatoes are cool, peel the skin off and mash the potatoes.
Drain the water out of the chickpeas and dry the chickpeas using paper towel making sure there is no access water in chickpeas. Mash the chickpeas coarsely.
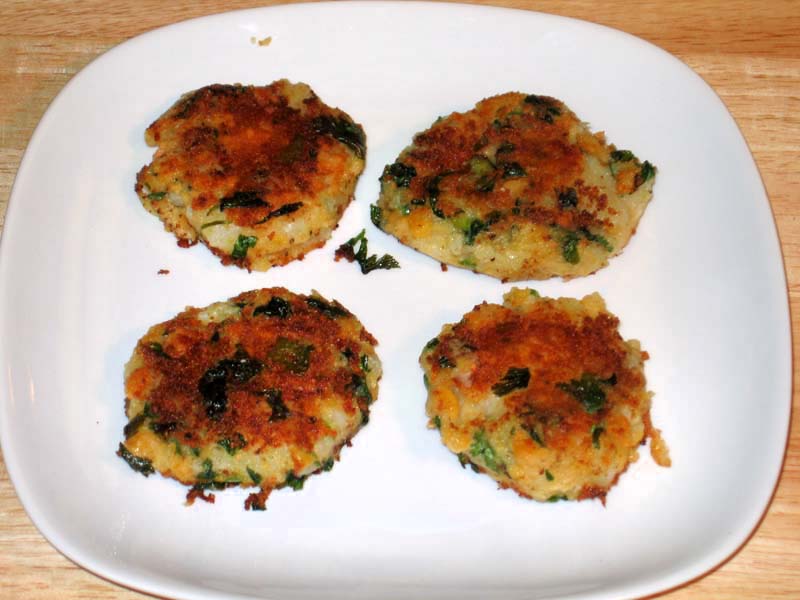
Mix all the ingredients together; adjust salt and pepper to your taste. With oiled hands, divide the mixture into 8 to 10 equal portions. Make them into the shape of patties keeping them about a half inch thick.
Heat the oil in a flat bottom saucepan on medium high heat (oil should cover the surface of the pan generously). To check the oil, place a little piece of tikki in the oil, this should make the oil sizzle.
Place the Tikkis in the pan and shallow fry the Tikkis on both sides until both sides are golden brown. If the Tikki is very dry use more oil as needed without making them too greasy.
You may have to adjust the heat while cooking as needed.
Notes
Serving suggestions:Serve Tikki hot. Drizzle some, tamarind chutney and hari chutney over the Tikki, or use any combination you prefer. See the recipes for chutney on this site.TipsSubstitute the boiled chickpeas with can chickpeas.Also if mixture is too moist Tikki will break.Tikki can be made before and refrigerated for two to three days. Before serving, heat the Tikki over the skiltet .
Chola Tikki are crispy and flavorful patties made from mashed chickpeas (chola) and spices. This chola tikki recipe is perfect snacks or indian appetizers, offering a delightful blend of textures and flavors. Whether served alone or with chutneys, these patties are sure to be a hit with your family and friends.
The Essence of Chola Tikki
The essence of chola tikki lies in its crispy exterior and soft, flavorful interior. Chickpeas are mashed and mixed with spices, herbs, and binding agents to form patties, which are then shallow-fried to golden perfection. These Indian chickpea patties are not only delicious but also nutritious, making them a great addition to your indian snack repertoire.
Origin and Popularity
Chola tikki, also known as chole tikki, is a popular Indian street food, especially in North India. These chickpea patties are enjoyed for their savory taste and satisfying crunch. They are often served with chutneys and yogurt, making them a flavorful and refreshing snack. This chickpea tikki is a versatile dish that can be enjoyed in various ways, from a standalone snack to a component of chaat (Indian street food).
Why You’ll Love This Recipe
Crispy and Flavorful: The perfect combination of a crispy exterior and a soft, flavorful interior.
Nutritious: Packed with protein and fiber from chickpeas.
Easy to Make: Simple ingredients and easy preparation.
Versatile: Can be served as a snack, appetizer, or part of a larger meal.
Other Variations of Recipes
Exploring Manjula’s Kitchen reveals a treasure trove of other delicious vegetable dry recipes that you might enjoy. Here are some related dishes that you might find interesting:
Kadhi Pakora: A tangy yogurt-based curry with gram flour dumplings, seasoned with spices. Recipe:
Methi Thepla: Spiced flatbreads made with fenugreek leaves, perfect for breakfast or as a snack. Recipe:
Stuffed Bell Peppers: Bell peppers stuffed with a spiced potato filling and baked to perfection. Recipe:
Moong Dal Khichdi: A comforting and nutritious one-pot dish made with rice and yellow lentils. Recipe:
Lobia Curry: Black-eyed peas cooked with tomatoes and spices, offering a hearty and delicious curry.
Serving Suggestions
Chola tikki can be enjoyed in various ways:
With Chutneys: Serve with mint chutney, tamarind chutney, or yogurt for a burst of flavor.
As a Snack: Perfect for tea-time or as an evening snack.
In Chaat: Use as a base for chaat with toppings like yogurt, chutneys, and sev.
With Salad: Pair with a fresh salad for a healthy meal.
Tips and Tricks
To perfect your chola tikki recipe, consider these helpful tips:
Use Cooked Chickpeas: Ensure the chickpeas are well-cooked and mashed for a smooth texture.
Bind Well: Use enough binding agents like bread crumbs or gram flour to help the patties hold together.
Fry Evenly: Fry the patties on medium heat to ensure they are cooked through and golden brown.
Season Well: Adjust the spices to your taste preference for the best flavor.
FAQs
Can I Bake the Tikkis Instead of Frying?
Yes, you can bake the tikkis in a preheated oven at 375°F (190°C) for about 20-25 minutes, flipping halfway through.
How Long Does Chola Tikki Last?
Store leftover tikkis in an airtight container in the refrigerator for up to 2 days. Reheat before serving.
Is Chola Tikki Gluten-Free?
To make it gluten-free, use gluten-free bread crumbs or omit them and use gram flour as a binder.
Can I Add Vegetables to the Mixture?
Yes, you can add finely chopped vegetables like bell peppers, or spinach to the mixture for added nutrition and flavor.
What Can I Serve with Chola Tikki?
Chola tikki pairs well with chutneys, yogurt, salads, and can also be used as a patty in a sandwich or burger.
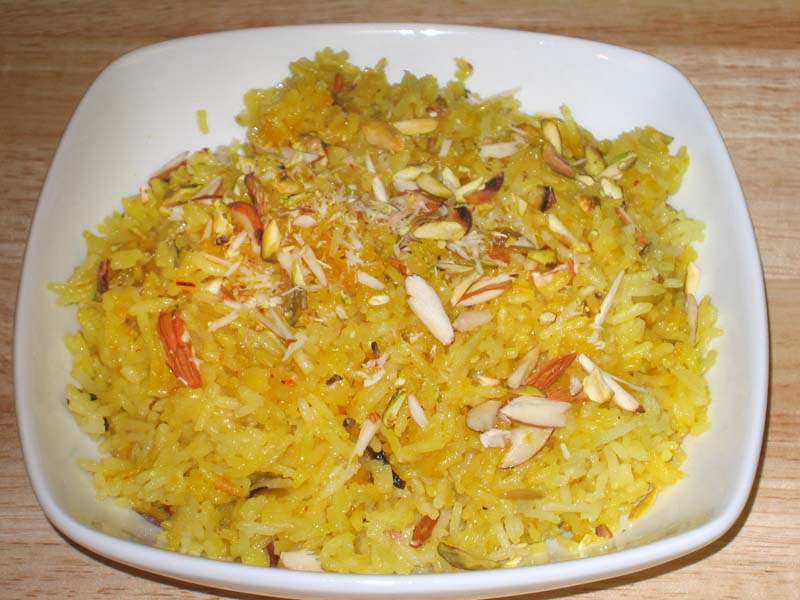
The look and smell of saffron rice is delicious and tempting. It makes a perfect dessert for lunch or any kind of get together. You can serve this dish cold or warm.Serves 4 to 6.
3Tbsppistachios and almondssliced or crushed, pista, badam
1Tbspraisinskishmish
Instructions
Dry roast the almonds, pistachios and raisins in a pan on medium heat until the raisins puff and the nuts slightly change color. Set aside.
Put the rice, water, cinnamom stick, and salt in a sauce pan over medium high heat.
When the rice comes to boil, reduce the heat to low and cover.
Let the rice cook for about 15 minutes, or until the water has evaporated.
While rice is cooking, in a separate saucepan combine milk, butter, sugar, saffron, cloves and cardamom and bring to boil on medium heat, stir until the sugar has dissolved. Remove from the heat and set aside.
Add the nuts mixture and sugar syrup over the rice. Fold gently into the rice with a spoon gently to avoid mashing the rice.
Put the cover back over the rice and turn the heat on to very low. Let the rice simmer for 3 to 4 minutes. Turn the heat off and leave it covered for another few minutes before serving.
Savor the Aromatic Bliss: Sweet Saffron Rice – A Delightful Indian Treat
Sweet saffron rice is a delectable, gluten free and aromatic dessert that originates from Indian cuisine. It features fragrant basmati rice cooked with saffron-infused syrup and a blend of spices, resulting in a rich and flavorful dessert or sweet treat. The saffron lends a vibrant golden hue and a distinct floral flavor to the dish, while the nuts and dried fruits add texture and depth. This delightful dessert is often served on special occasions, festivals, or as a comforting indulgence any time of the day.
1. Nutty Roasting: Enhancing Flavor for Sweet Saffron Rice
Begin your journey of crafting sweet saffron rice by imparting a rich nuttiness to the dish. In a pan over medium heat, dry roast the almonds, pistachios, and raisins until the raisins puff and the nuts undergo a slight color change. This step not only intensifies the flavors of the nuts but also adds a delightful crunch and texture to your saffron sweet rice, elevating its overall appeal.
2. Indian Sweet Rice Recipe: Setting the Stage for Saffron Sweetness
In a saucepan, combine rice, water, a cinnamon stick, and a pinch of salt over medium-high heat. As the ingredients come to a gentle boil, prepare the canvas for the infusion of saffron’s golden hue and aromatic essence into your Indian sweet rice recipe.
3. Simmering Brilliance: Cooking the Rice to Perfection
Once the rice mixture reaches a boil, reduce the heat to low and cover the saucepan. Allow the rice to simmer for approximately 15 minutes or until the water has evaporated, ensuring each grain is cooked to perfection. This crucial step lays the foundation for the sumptuous texture and delightful flavor profile of your saffron rice Indian delicacy.
4. Saffron Infusion: Creating the Signature Sweetness
While the rice undergoes its transformation, prepare the decadent saffron-infused syrup in a separate saucepan. Combine milk, butter, sugar, saffron strands, cloves, and cardamom over medium heat, stirring until the sugar dissolves and the aromatic spices release their essence. This fragrant mixture sets the stage for the indulgent sweetness that defines your kesar rice experience.
5. Harmonious Fusion: Merging Nutty Goodness and Sweetness
Once the rice and saffron syrup are ready, it’s time to bring together the elements of your sweet saffron rice. Gently fold the roasted nuts mixture and the fragrant saffron syrup into the cooked rice, using a spoon to ensure even distribution without mashing the grains. This harmonious fusion of flavors and textures creates a symphony of taste in every bite of your Indian sweet rice recipe.
6. Final Simmer: Infusing Depth of Flavor
Cover the saucepan once more and allow the saffron sweet rice to simmer over very low heat for an additional 3 to 4 minutes. This final step ensures that the flavors meld together seamlessly, infusing every grain of rice with the richness of saffron and the nutty crunch of almonds and pistachios.
7. Culinary Crescendo: Serving Sweet Saffron Rice in All its Glory
Turn off the heat and let the sweet saffron rice rest, covered, for a few more minutes before serving. This brief interlude allows the flavors to further develop, culminating in a dish that’s not just a treat for the taste buds but a celebration of the vibrant culinary heritage of India. Enjoy your saffron rice Indian delicacy or kesar rice as a delightful dessert or a comforting indulgence any time of the day.
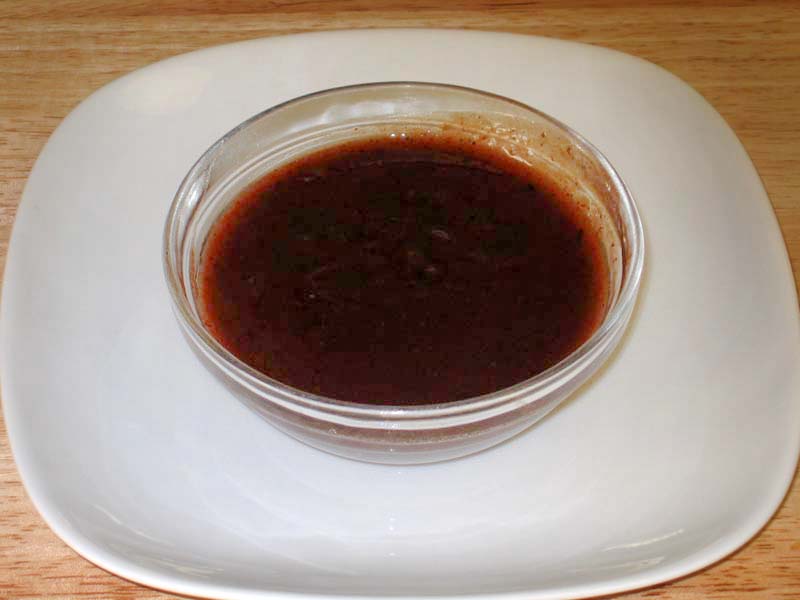
This exotic sweet and sour chutney is a zesty condiment. This chutney can be called the ketchup of the east and goes best with all kinds of indian snacks, be it pakoras to other snack munchies.
Break the tamarind into small pieces and soak in boiling water for one hour.
Mash it into a pulp and strain, pressing the tamarind into the strainer to remove all the pulp. Add sugar to the pulp. Mix well. Add the remaining ingredients. Mix and taste. Add more sugar, salt or pepper as needed.
Notes
NotesChutney can be refrigerated for two to three months.Serving SuggestionsTamarind chutney is delicious with samosas, pakoras, drizzled over dahi vadas, or any kind of chat.It is also delicious as a dipping sauce for French fries and as a spread over crackers.Try drizzling over rice to add a unique flavor to plain rice.VariationsTo use as a dip, thicker chutney is ideal. To use as a topping, add water to make the chutney thinner.Add water and ice cubes to serve as a cool spicy drink.Add equal parts yogurt and chutney to make a dipping sauce.
Keyword Hot And Spicy, Popular Condiment, Sweet And Sour Sauce
Tamarind Chutney, also known as Imli Chutney, is a sweet and tangy condiment widely used in Indian cuisine. This versatile chutney adds a burst of flavor to a variety of dishes, from savory snacksto appetizersto main courses.
Why Tamarind Chutney is so popular:
Rich Flavor Profile: Tamarind Chutney is prized for its unique combination of sweet, tangy, and slightly sour flavors. The tartness of tamarind is balanced with sweetness from jaggery or sugar, creating a harmonious blend of tastes that enhances the overall flavor of any dish.
Versatile Usage: Tamarind Chutney is incredibly versatile and can be used in various ways. It’s commonly served as a dipping sauce for snacks like samosasbe it or pakoraslike Spinach Potato Pakora, Cabbage Pakora or Palak Pakora, and Chaat. Its tangy-sweet flavor adds depth and complexity to both savory and sweet dishes.
Digestive Properties: Tamarind is known for its digestive properties and is often used in traditional medicine to aid digestion and relieve gastrointestinal issues. Tamarind Chutney, with its natural acidity, can help stimulate digestion and alleviate discomfort after a heavy meal.
Easy to Prepare: Making Tamarind Chutney at home is simple and requires only a few basic ingredients. With minimal effort, you can whip up a batch of this flavorful condiment to elevate your favorite dishes and impress your guests.
Variations of Chutney:
Hari Cilantro Chutney:Hari chutney is a blend of fresh cilantro (green coriander) and variety of spices. Hari chutney is a “must” with pakoras, samosas, chaats, and many popular Indian snacks.
Date And Raisin Chutney: Date and Raisin chutney! This exotic sweet and sour chutney is mildly spiced, this will complement any meal. This recipe is quick and easy to make.
Methi Chutney:Methi Chutney is a popular North Indian condiment. Methi Chutney is packed with flavors, sourness from mango, sweetness from raisins; some bitterness from fenugreek, mixed with spices it has a very unique taste.
Tomato Chutney: Tomato Chutney with freshly grated ginger for a warming and aromatic flavor. It adds a spicy and pungent kick to the chutney, making it ideal for pairing with rich and hearty dishes like kebabs and curries.
Tips for Making Perfect Tamarind Chutney:
Soak Tamarind Properly: Start by soaking tamarind pulp in warm water to soften it before extracting the pulp. This helps to release the natural flavors and acids from the tamarind, resulting in a more flavorful chutney.
Adjust Sweetness and Tanginess: Taste the Tamarind Chutney as you go and adjust the sweetness and tanginess according to your preference. Add more jaggery or sugar for a sweeter chutney, or increase the amount of tamarind pulp for a tangier flavor.
Strain for Smooth Texture: For a smooth and silky texture, strain the Tamarind Chutney after cooking to remove any fibrous or gritty particles. This ensures a velvety consistency and enhances the overall eating experience.
Store Properly: Store Tamarind Chutney in an airtight container in the refrigerator for up to a month. It can also be frozen for longer storage. Allow it to thaw before using and adjust the consistency with a little water if needed.
FAQs about Tamarind Chutney:
Is Tamarind Chutney gluten-free?
Yes, Tamarind Chutney is naturally gluten-free as it’s made with tamarind pulp, sugar or jaggery, and spices, which are all gluten-free ingredients. It’s safe for individuals with gluten intolerance or celiac disease to consume.
Can I make Tamarind Chutney without sugar?
Yes, you can make Tamarind Chutney without sugar by using alternatives like jaggery, honey, or maple syrup. Adjust the amount of sweetener according to your taste preferences and dietary restrictions.
How long does Tamarind Chutney last?
Tamarind Chutney can be stored in the refrigerator for up to a month in an airtight container. If properly stored, it can last even longer. However, always check for signs of spoilage before consuming.
What can I serve with Tamarind Chutney?
Tamarind Chutney pairs well with a variety of dishes, including samosas, pakoras, chaat, grilled meats, and rice dishes. It adds a tangy-sweet flavor and enhances the overall taste of the dish.
In conclusion, Tamarind Chutney is a delightful and versatile condiment that adds a burst of flavor to a wide range of dishes. Whether enjoyed as a dipping sauce for snacks or as a condiment for main courses, its tangy-sweet taste and aromatic spices are sure to tantalize your taste buds and elevate your dining experience. So why not try making a batch of homemade Tamarind Chutney and discover the joy of this beloved Indian condiment?
Stay tuned for our next exploration into the world of culinary delights!
Butter Paneer Masala is a rich entre made with Indian cheese and a creamy sauce. This dish is tasty when served over white rice or with Naan or Tandoori Roti.
Deep-fry the paneer on low-medium heat until the paneer has a little golden- brown color. Set aside.
Blend tomatoes, green chilly and ginger to make a puree.
Heat the oil in a saucepan. Test the heat by adding one cumin seed to oil; if seed cracks right away oil is ready. Add hing and cumin seeds.
After the cumin seeds crack, add the tomato puree, coriander powder, turmeric, red chili powder and bay leaves. Cook for about 4 minutes on medium heat. Tomato mixture will start to leave the oil and will reduce to about half in quantity.
Add the whipped yogurt into the gravy. Stir occasionally for about 3 minutes on medium heat.
To thicken the gravy, dissolve the cornstarch in 3 tablespoons of water and add to the gravy.
Add the green peas and paneer. Let it cook for a few minutes until the peas are tender.
Add the garam masala and cilantro. Add a little sugar if the gravy is sour.
Notes
VariationsYou can substitute the yogurt with heavy cream for a richer flavor.1 tablespoon of fresh or dried methi leaves (Fenugreek leaves) can be added at the end.Add in the yogurt powder of 4 to 5 cashews to make it creamier.This gravy can be used in any combination of vegetables you desire.This recipe is only a method – feel free to be creative and experiment!
How to Make Butter Paneer at Home – Manjula’s Kitchen
Butter Paneer Masala, also known as Paneer Butter Masala, is a timeless Gluten vegetable curry-based North Indian dish celebrated for its rich, creamy texture and aromatic flavors. In this Butter Paneer Recipe, we will delve into the intricacies of crafting the perfect Butter Paneer Masala, exploring various recipes, techniques, and customizable options. Whether you are a seasoned chef or a novice in the kitchen, this recipe for butter paneer masala will empower you to master the art of creating this culinary masterpiece.
Understanding Paneer Butter Masala:
Butter Paneer Masala is a vegetarian dish that centers around paneer, or Indian cottage cheese, immersed in a luscious tomato-based gravy enriched with butter and cream. The dish seamlessly blends spices, herbs, and dairy to create a harmonious symphony of flavors. Often enjoyed with naan or rice, Butter Paneer Masala is a favorite among Indian food enthusiasts worldwide.
Recipe: How to Make Butter Masala Paneer:
Step 1: Deep-fry the Paneer:
To initiate the culinary journey, the paneer cubes are deep-fried to perfection. This step is crucial as it imparts a golden-brown color and a slight crispiness to the paneer, enhancing its overall texture.
Step 2: Prepare Tomato Puree
The heart of the paneer masala recipe lies in the vibrant tomato puree. A blend of ripe tomatoes, green chilies, and ginger creates a smooth, flavorful base that serves as the canvas for the ensuing layers of spices and aromatics.
Step 3: Tempering the Gravy
In a hot saucepan, a tempering process begins with the crackling of cumin seeds and the aromatic release of hing (asafoetida). The tomato puree, along with coriander powder, turmeric, red chili powder, and bay leaves, is added to create a robust foundation for the Paneer Butter Masala.
Step 4: Introduce Yogurt
Whipped yogurt is then introduced into the gravy, imparting a creamy and tangy dimension to the dish. Stirring occasionally allows the yogurt to amalgamate seamlessly, contributing to the overall richness of the masala.
Step 5: Thicken the Gravy
To achieve the desired consistency, a cornstarch-water mixture is incorporated into the gravy. This step ensures a velvety and well-coated texture, elevating the dining experience.
Step 6: Add Paneer and Green Peas
The deep-fried paneer cubes, now infused with a golden hue, and vibrant green peas are added to the simmering gravy. This step allows the paneer to absorb the flavors of the aromatic sauce while the green peas contribute a sweet and crisp element.
Step 7: Seasoning and Final Touches
The final touches involve sprinkling garam masala and fresh cilantro into the mixture, providing a burst of aromatic complexity. A hint of sugar may be added to balance the flavors if the gravy tends to lean towards the tangy side.
Variations and Customizations:
Richness Enhancement: For an even more indulgent flavor, consider substituting yogurt with heavy cream. This variation introduces a luxurious creaminess that elevates the dish to a new level of decadence.
Flavorful Twist with Methi Leaves: To add a unique and slightly bitter note, incorporate 1 tablespoon of fresh or dried methi leaves (fenugreek leaves) towards the end of the cooking process. This variation introduces a depth of flavor that complements the richness of the Butter Paneer Masala.
Creamy Texture with Cashews: For those seeking an extra creamy consistency, include 1 tablespoon of yogurt powder or crushed cashews. This addition not only enhances the creaminess but also imparts a subtle nutty undertone to the dish.
Versatility in Vegetable Combinations: The Butter Paneer Masala gravy is a versatile canvas that welcomes a variety of vegetables. Experiment with different combinations to suit your preferences and create a personalized version of this classic dish.
In the end, you have learned how to make butter masala paneer which involves a meticulous balance of spices, textures, and flavors. This comprehensive how-to-make butter paneer guide has provided a detailed walkthrough of the paneer masala recipe, from deep-frying the paneer to infusing the gravy with aromatic spices.
Armed with this knowledge, you are now equipped to embark on this recipe for butter paneer masala in creating a perfect Butter Paneer Masala that is uniquely yours. So, don your apron, gather the ingredients, and let the aroma of this exquisite dish fill your kitchen.
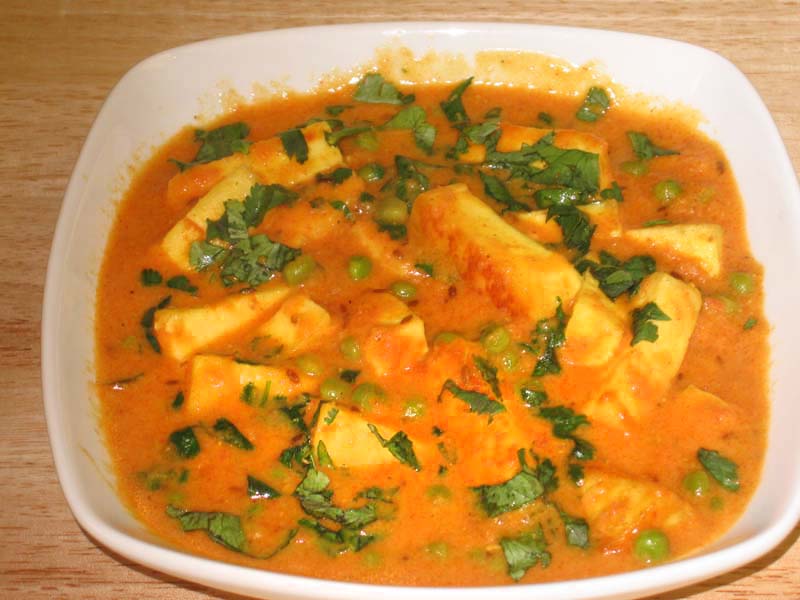
Vegetable Korma is a delicious combination of several vegetables in a creamy sauce and gravy. It is often served in Indian restaurants. Korma can be served with any Indian bread or rice.
2-1/2cupschopped vegetables (cauliflower, green peas, carrot, green beans, red bell pepper)
1/2cupchopped fried paneer
3tbspoil
1/8tspasafetidahing
1/2tspcumin seedsjeera
1green chili seeded finely chopped
1tbspshredded ginger
1tbspcoriander powderdhania
1/4tspturmerichaldi
1/2tspcayenne pepper
1bay leaves
1/2tspgaram masala
1/2tspmango powderamchoor
1cupmilk
1/2tbsp corn starch
Garnish
1/2cupseeded and chopped tomatoes
2tbspfinely chopped cilantro
Instructions
Mix the shredded ginger, green chili, coriander powder, turmeric, and cayenne pepper with 2 tablespoons of water and set aside.
Mix cornstarch with milk and set aside.
Heat the oil in a saucepan. Test the heat by adding one cumin seed to the oil; if it cracks right away oil is ready. Add the asafetida and cumin seeds. After cumin seeds crack, add the bay leaves and the spice mixture. Fry for a few seconds until the spices start separating from the oil.
Add the cauliflower, green peas, carrot and green beans. Mix well and cover the pan. Let the vegetables cook on medium heat for about 7 to 8 minutes. The vegetables should be cooked just about half way.
Add the bell pepper and paneer. Mix well. Add the milk/cornstarch mixture and cook until the vegetables are tender. Add more milk if needed for more gravy.
Turn off the heat. Mix in the garam masala, amchoor powder and cilantro.
Place the vegetable korma in a serving dish and garnish with chopped tomatoes. Enjoy!
Notes
Substitutions and VariationsSubstitute any vegetable, for example potatoes, cabbage, corn, and mushrooms or other vegetables. Four to six vegetables are a good number to use.Tofu can be used instead of paneer.For the gravy, you may replace 1-cup milk with 3/4 cups cream for a richer texture. Blending 1/4 cup cashew nuts with 1-cup milk will also give the gravy a richer texture.Serving SuggestionsVegetable serve with Roti or your choice of bread or over the rice
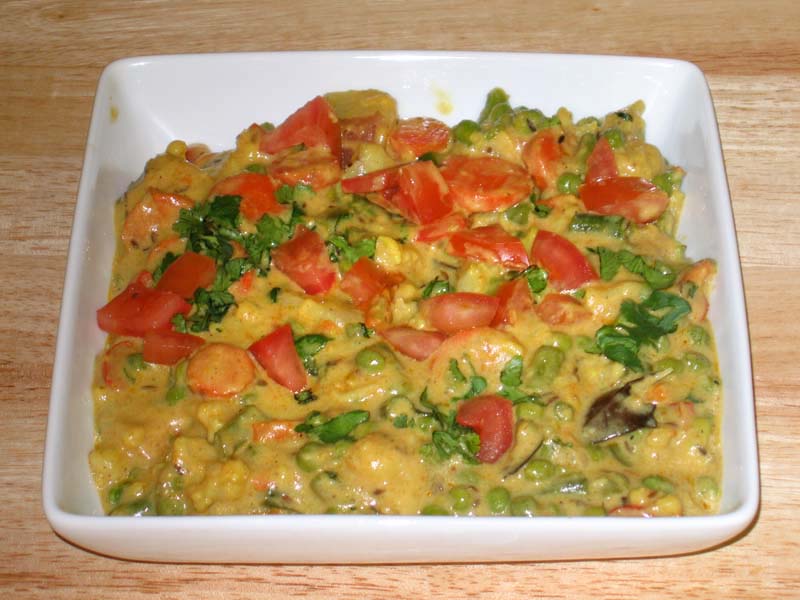
Let’s dive into the preparation of this delectable Gluten free, paneer based vegetable curry dish known as Vegetable Navratan Korma. This recipe is a flavorful blend of various vegetables and aromatic spices, making it a delightful and satisfying dish. Here’s a detailed explanation of each step:
Preparing the Spice Mixture:
Gather and mix all the ingredients that is shredded ginger, green chili, coriander powder, turmeric, and cayenne pepper to make a vibrant and aromatic spice blend. The shredded ginger contributes a zesty warmth, while the green chili brings a hint of spiciness. The addition of 2 tablespoons of water acts as a binder, forming a cohesive paste that serves as the heart and soul of the flavor profile for our Vegetable Navratan Korma. This meticulously crafted spice blend promises to infuse each bite with a symphony of tastes, making the dish a delightful and harmonious culinary experience.
Creating the Cornstarch and Milk Blend:
To enhance the sumptuousness of our Navratan Korma, an essential step involves preparing a velvety cornstarch and milk blend. In a dedicated bowl, combine the smooth consistency of cornstarch with the lusciousness of milk, ensuring a thorough mix that eliminates any lumps. As the cornstarch dissolves in the milk, it creates a luxuriously thick and rich base that coats the vegetables and absorbs the myriad of spices, elevating the overall indulgence of the Navratan Korma.
Heating the Oil:
Initiate the cooking process by heating a sufficient amount of oil in a sturdy saucepan over medium heat. The key to achieving the perfect foundation for our Navratan Korma lies in ensuring the oil reaches the ideal temperature. To determine this, employ a simple yet effective technique: introduce a single cumin seed into the heated oil. If the cumin seed crackles and sizzles immediately upon contact, it’s a clear indicator that the oil has attained the optimum temperature for our best Navratan Korma recipe.
Infusing Aromatics:
Introduce asafetida and cumin seeds into the heated oil. Once the cumin seeds crack, add bay leaves and the earlier-prepared spice mixture. Allow the spices to infuse the oil, creating a fragrant base for our veg Navratan Korma.
Vegetable Medley:
Add cauliflower, green peas, carrot, and green beans to the spice-infused oil. Ensure a thorough mix and cover the pan. Let the vegetables cook on medium heat for 7 to 8 minutes, achieving that perfect balance where they are halfway cooked.
Incorporating More Vegetables:
Introduce bell pepper and paneer into the vegetable mix. Achieve a harmonious blend of flavors by stirring in the milk/cornstarch mixture. This step is crucial for achieving the desired tenderness of the vegetables in our Navratan Korma.
Adjusting Consistency and Flavor:
If necessary, add more milk to achieve the desired level of gravy. Ensure that the vegetables are tender, providing a satisfying texture. This step is vital for the success of our vegetable Navratan Korma.
Final Seasoning and Garnish:
Turn off the heat and gently mix in garam masala, amchoor powder, and cilantro. This final touch enhances the overall flavor profile of our Veg Navratan Korma, providing a burst of aromatic goodness.
Presentation and Enjoyment:
Transfer the prepared Vegetable Navratan Korma into a serving dish and garnish it with chopped tomatoes. This not only adds a visual appeal but also complements the dish’s taste. Serve the Navratan Korma with Roti, your choice of bread, or over rice for a truly satisfying culinary experience.
This detailed walkthrough ensures that you can effortlessly recreate the best Navratan Korma recipe with an array of vegetables and aromatic spices, resulting in a delightful and flavorsome dish. Enjoy the rich and creamy goodness of this classic Indian cuisine!
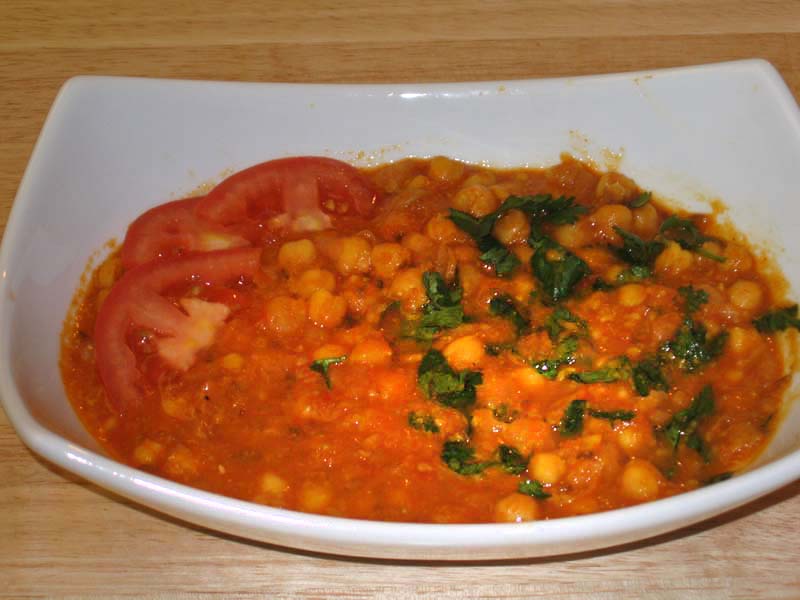
Chole also known chickpea, garbanzo, and kable chana, Chana Masala is a cooked in a spicy tomato gravy. This is a very popular, served with Naan, Tandori Roti.
Blend the tomatoes, green chilies and ginger to make a puree.
Heat the oil in a saucepan. Test the heat by adding one cumin seed to the oil; if seed cracks right away, oil is ready. Add the asafetida and cumin seeds. When cumin seeds crack, add the gram flour and stir-fry for a minute.
Add the tomato puree, coriander powder, turmeric, and red chili powder. Cook about four minutes on medium heat. The tomato mixture will separate from the oil and reduce to about half in quantity.
Add chickpeas, salt, and one cup of water. Cook, covered, for seven to eight minutes on medium heat. Press the chickpeas with a spatula to soften. Add more water as needed to keep the gravy consistency to your liking, and let it cook on low heat a few more minutes.
Add the garam masala and cilantro. Let it cook for another minute.
Garnish with thin tomato slices.
Notes
Chana Masala goes well with any Indian flat bread, like Naan, Paratha, Puri. and can also be served with Western bread or pita bread.Chana Masala is also a delectable treat over plain rice.This is a healthy, nutritious dish for vegan and gluten-free diets.
Chola Chana Masala Recipe: A Flavorful North Indian Delicacy
Chana Masala, also known as Chola Chana Masala or simply Chola Masala, is a beloved North Indian delicacy famed for its robust flavors and comforting texture. This Chola Chana Masala recipe artfully combines tender chickpeas with an array of aromatic spices, ensuring a dish that’s both hearty and satisfying. Whether paired with fluffy rice, crispy puris, or warm naan bread, this chola masala recipe promises to delight your palate and leave you yearning for more.
Chana Masala is gluten-free, vegan making it suitable for individuals with dietary restrictions. Chola Chana Masala combines tender chickpeas (chola) with a variety of aromatic spices, creating a satisfying and nutritious meal. The dish is typically prepared by simmering cooked chickpeas in a flavorful gravy made from a blend of spices, tomatoes, and other aromatic ingredients.
Tips for Perfect Chola Chana Masala
Consistency is Key: Adjust the quantity of water or cooking liquid added to the chickpeas to attain the desired consistency of the masala. For a thicker gravy, prolong the simmering duration to allow the sauce to reduce and thicken.
Enhance Flavor with Whole Spices: For an enhanced depth of flavor, contemplate incorporating whole spices such as bay leaves, cinnamon sticks, and cardamom pods into the dish. These spices impart a subtle aroma and complexity to the masala.
Customize Spice Level: Tailor the spice level of the Chana Chola Masala to align with your taste preferences by adjusting the quantities of red chili powder and green chilies utilized in chola masala recipe.
Make Ahead for Enhanced Flavor: Similar to numerous Indian dishes, Chola Chana Masala attains an even richer flavor profile when allowed to rest for a few hours or overnight, permitting the flavors to mature and intensify.
Variations of Chola Chana Masala
Punjabi Chana Masala: This variant of Chana Chola Masala showcases a tangy and spicy tomato-based gravy infused with the flavors synonymous with Punjab.
Kabuli Chana Masala: Kabuli Chana, also referred to as white chickpeas, can serve as a substitute for black chickpeas, offering a lighter-colored and milder-flavored rendition of the dish.
Chola Chana Masala with Spinach: Elevate the nutritional quotient of the dish by incorporating fresh spinach leaves into the masala, thereby amplifying its health benefits and introducing vibrant hues.
Health Benefits of Chola Chana Masala
Rich in Protein: Chickpeas, the primary ingredient in Chana Chola Masala, serve as an excellent source of plant-based protein, vital for muscle repair and growth.
High in Fiber: Chickpeas boast a high dietary fiber content, which facilitates digestive health and aids in weight management by inducing a sensation of fullness and satiety.
Packed with Vitamins and Minerals: This dish abounds in essential vitamins and minerals, including iron, magnesium, and vitamin C, which collectively contribute to overall health and well-being.
Frequently Asked Questions (FAQs)
Can I use canned chickpeas instead of dried ones?
Indeed, canned chickpeas can serve as a convenient time-saving alternative. However, it’s worth noting that dried chickpeas soaked overnight tend to yield superior texture and flavor.
Can I prepare Chola Chana Masala in advance?
Absolutely! This dish exhibits enhanced flavors upon reheating, as it allows the various spices and ingredients to meld together. Store it in an airtight container in the refrigerator for up to 3-4 days.
Is Chana Chola Masala suitable for a vegan diet?
Certainly! This dish is inherently vegan, devoid of any animal products, rendering it a perfect culinary choice for individuals adhering to a vegan or plant-based diet.
For an exploration of additional delectable Indian recipes, peruse Manjula’s Kitchen, which offers delightful culinary adventures such as Punjabi Aloo Paratha.
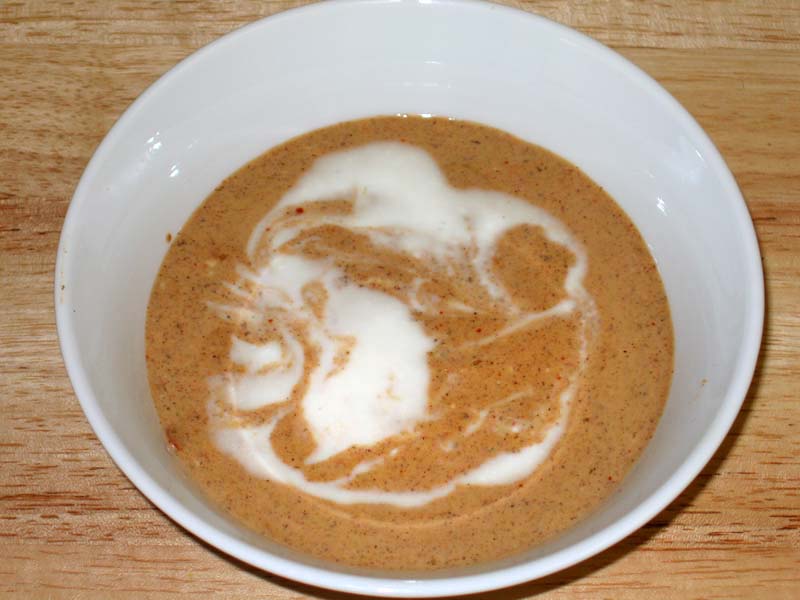
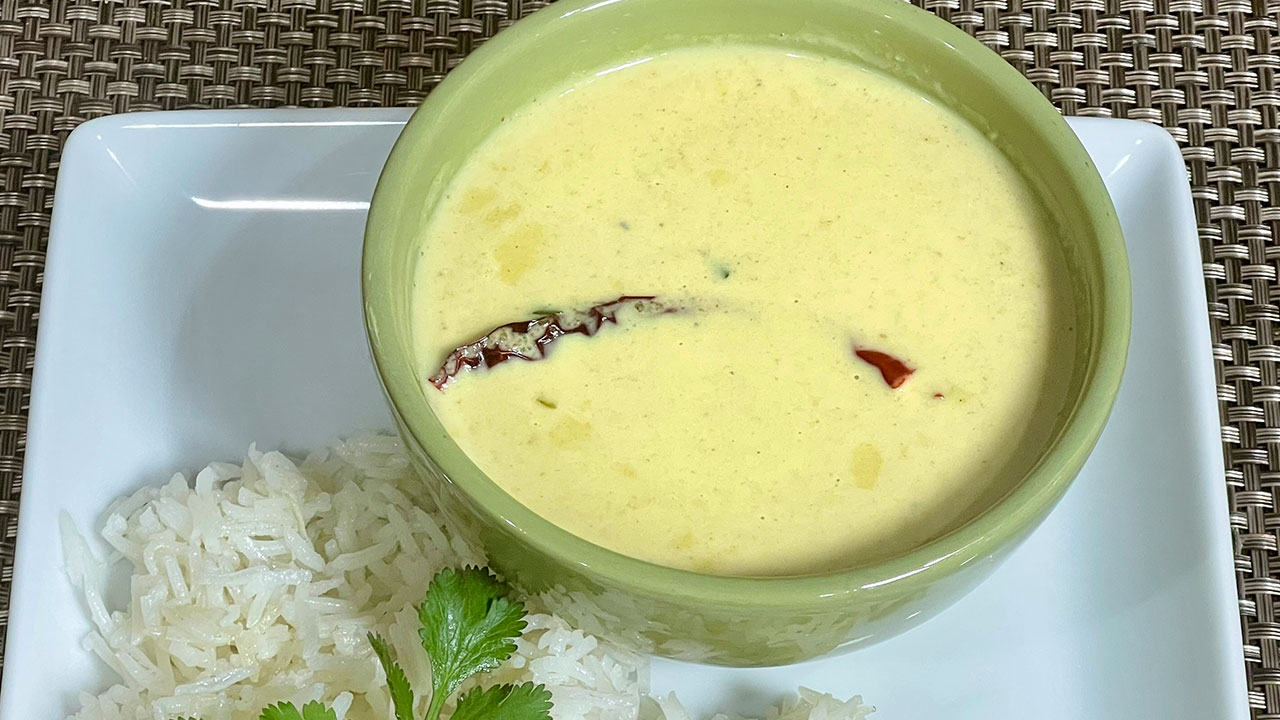
To make Kokum Coconut Kadhi, we have to know what is Kokum. Kokum is a fruit used as a souring agent in many parts of India and it is mellow in taste compared to tamarind. For me, how it can be a kadhi without besan? So, this Kokum Coconut Kadhi is my twist, by adding a little roasted besan (gram flour). This is both delicious and very refreshing. You can serve this as a soup or with rice. My son who is a very picky eater thoroughly enjoyed it! This is a quick and easy recipe which you must give it a try. This Kadhi is also vegan and gluten free.This recipe will serve 2 to 3.
Soak the kokum in ½ a cup of hot water for about 30 minutes.
Then squeeze the juice from kokum and keep aside.
Heat the oil in a saucepan. Test the heat by adding one cumin seed to the oil. If the cumin seeds crack right away, the oil is ready. Add cumin seeds and asafetida.
Next add besan and stir for about 30 seconds until besan is light golden in color.
Next add curry leaves, red chili, turmeric, and green chili, stir for few seconds.
Add squeezed kokum juice mix it well and bring kokum juice to boil.
Add coconut milk. make sure to keep flame on low-medium otherwise coconut milk might curdle. Mix well and add salt.
Cook the kadhi over low heat for 3-4 minutes, add chopped coriander leaves.
Serve kokum Coconut Kadhi as a soup or with plain rice.
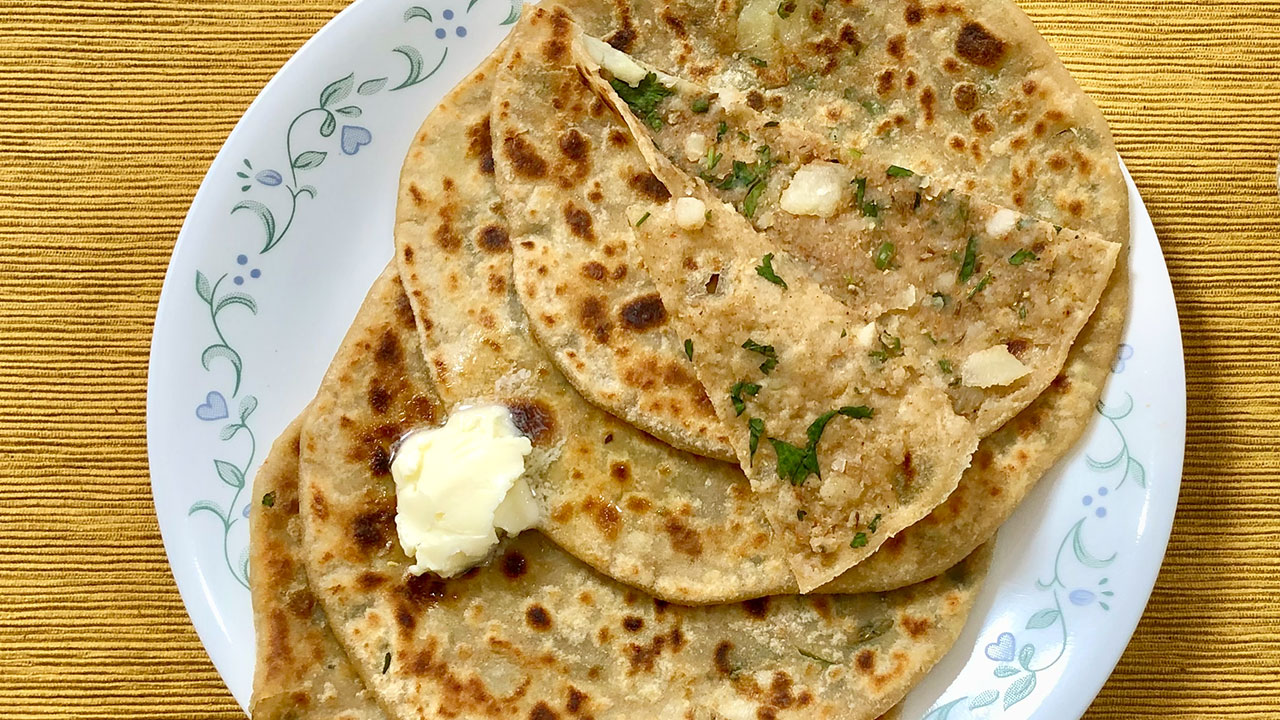
Aloo Parathas make for the perfect lazy weekend brunch. Parathas can be made plain or with a variety of different fillings. A flavorful potato filling is by far the most popular. Aloo Parathas are very popular in North India, at any time of the day. In Punjab, Aloo Parathas are a staple for breakfast. Traditionally, Aloo Parathas are served with homemade butter and buttermilk known as chaas. I'm sure you are thinking that making these parathas is very time consuming. With our busy schedules and hectic mornings, how is possible to prepare these! Of course, parathas taste best when fresh off a hot skillet! An easy solution to this problem is to simply prepare part of the recipe in advance until you are ready to roll the parathas. You can prepare the dough and filling in advance and have the potato-mix filled balls ready to just start rolling. The prepared dough can be refrigerated for up to two days. Enjoy!This Recipe will make 4 parathas.
Mix flour, salt, and oil, until oil is incorporated with flour well, add water slowly to make a soft dough (add water as needed).
Knead dough well on a lightly greased surface to make the dough soft, smooth, and pliable.
Set the dough aside and cover. Let the dough rest at least ten minutes.
Filling
In a bowl take mash potatoes add green chilies, cilantro, cumin seeds, garam masala, mango powder, and salt, mix it well.
Making paratha
Divide the dough into 4 equal parts and roll them into balls.
Then divide the potato filling into 4 parts and shape into balls. Potato balls should be about 1½ times larger than the dough balls.
Roll dough ball into a 3” circle. Place a filling ball in the center. Pull the edges of the dough to wrap it around the potato filling. Repeat to make all six balls. Let the filled balls settle three to four minutes.
Meanwhile heat heavy skillet on medium high heat until moderately hot. To test, sprinkle water on the skillet. If the water sizzles right away, the skillet is ready.
Press the filled ball lightly on dry whole wheat flour from both sides.
Using a rolling pin, roll the balls lightly to make six-inch circles, keeping the sealed side of the balls on top. If the dough sticks to the rolling pin or rolling surface, lightly dust the parathas with dry flour.
Oil the skillet and place the paratha on the skillet. When the paratha starts to change color and begins to puff up, flip it over. You will notice some olden-brown spots.
After a few seconds, drizzle one teaspoon of oil over the paratha, and spread with spatula. Flip the paratha again and lightly press the puffed areas with a spatula.
Flip again and press with a spatula making sure the paratha is golden-brown on both sides. Repeat for the remaining parathas.
Parathas are best served hot and crispy. They will be soft if not served hot. If you are not going to serve them right away, cool them on a wire rack to keep them from getting soggy.
Parathas can be kept unrefrigerated for up to two days wrapped in aluminum foil or in a covered container. For later use, parathas can be refrigerated three to four days or frozen for up to a month. Re-heat using a skillet or oven.
Notes
VariationsSubstitute chopped cilantro with ¼ cup finely chopped mint leaves, or experiment with your favorite herb. Be sure to pat the herbs dry before adding to the mixture.Serving Suggestions
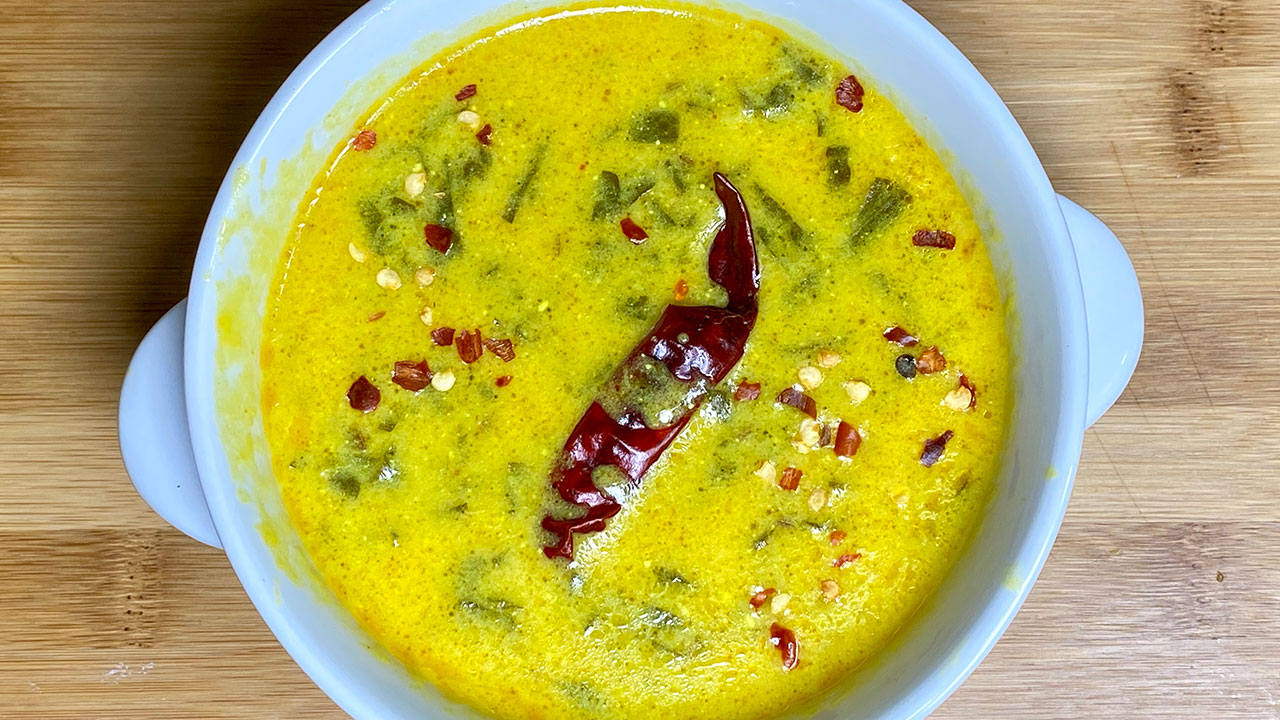
Palak Kadhi is a tasty side dish. It is spinach cooked with yogurt and besan (gram flour) and mildly spiced. I think Kadhi is one of the most enjoyed dishes all over India. Kadhi is made in so many ways in different parts of the country. One main ingredient remains the same: besan. At my house, kadhi was made thick and with dumplings. In Gujarat, Kadhi is made very watery and taste like sweet and sour soup. I enjoy the dishes which are made using besan. Palak Kadhi has become a comfort side dish for us. It is easy to make and can be served with any meal.This recipe will serve 2.
Mix besan, turmeric with yogurt until smooth, this should be lump free. Add 2 cups of water slowly and mix well.
Heat the oil in a saucepan. Test the heat by adding one cumin seed to the oil. If the cumin seeds crack right away, the oil is ready. Add cumin seeds and asafetida.
When the cumin seeds crack, turn off the heat and add fenugreek seeds, and whole red chili. Stir for a few seconds, add red chili powder. Add spinach and stir for a minute.
Add the yogurt mixture and turn the heat to medium. Keep stirring until the kadhi comes to a boil.
Add salt. Turn the heat to medium low. Let the kadhi cook for about 20-35 minutes, stir occasionally. If needed to adjust thickness, add more water. Kadhi should be a pourable consistency.
Notes
If you like Kadhi, you will enjoy other versions of Kadhi also:
Palak Kadhi, also known as Palak Ki Kadhi or Spinach Kadhi, is a comforting and nutritious Indian dish that combines the goodness of spinach with the tanginess of yogurt. Palak kadhi is a gluten-free and vegan dish made with lentils (usually split pigeon peas, or toor dal) and spinach (palak) cooked in a flavorful curry or gravy. It is a high-protein dish suitable for parties and gatherings.
The lentils provide a good source of protein, while the spinach adds vitamins and minerals. The curry/gravy is typically made with spices, yogurt (or a dairy-free alternative), and sometimes besan (chickpea flour) to thicken the sauce. Palak kadhi is a popular North Indian dish known for its creamy texture and delicious flavor.
This palak kadhi recipe offers a delightful blend of flavors and textures, making it a perfect accompaniment to steamed rice or roti. With its vibrant green color and rich taste, palak kadhi is sure to become a favorite in your household, especially for those looking to incorporate more greens into their diet.
Step 1: Blending Spinach
Begin by thoroughly washing fresh spinach leaves and removing any tough stems. Then, blanch the spinach in boiling water for a few minutes until wilted. Drain the spinach and immediately transfer it to a bowl of ice water to halt the cooking process and preserve its vibrant green color. Once cooled, blend the spinach into a smooth puree using a blender or food processor, ensuring there are no lumps.
Step 2: Preparing Yogurt Mixture
In a mixing bowl, whisk together yogurt and besan (gram flour) until smooth and creamy. This yogurt mixture forms the base of the kadhi, providing a creamy texture and tangy flavor to the dish. Ensure that the besan is well-incorporated into the yogurt to prevent any lumps from forming during the cooking process.
Step 3: Tempering Spices
In a deep saucepan or kadhai, heat oil or ghee over medium heat. Add mustard seeds, cumin seeds, fenugreek seeds, and dried red chilies to the hot oil, allowing them to splutter and release their aromatic flavors. The tempering of spices adds depth and complexity to the palak kadhi, infusing it with layers of flavor.
Step 4: Cooking Aromatics
Next, add finely chopped ginger to the tempered spices, sautéing. The combination of these aromatic ingredients forms the flavorful base of the palak kadhi, enhancing its taste and aroma. Stir the mixture occasionally to prevent it from sticking to the bottom of the pan.
Step 5: Adding Spinach Puree
Once tcooked add the blended spinach puree to the pan, stirring well to combine with the aromatics. Allow the spinach to simmer gently in the pan, infusing the kadhi with its vibrant green color and earthy flavor. Cook the spinach mixture for a few minutes until it thickens slightly and the raw flavor of the spinach is cooked out.
Step 6: Incorporating Yogurt Mixture
Gradually pour the prepared yogurt-besan mixture into the pan, stirring continuously to prevent any lumps from forming. Ensure that the yogurt mixture is well-incorporated into the spinach base, creating a smooth and creamy consistency. Allow the kadhi to simmer gently on low heat, allowing the flavors to meld together and the yogurt to thicken.
Step 7: Seasoning and Garnishing
Season the palak kadhi with salt, turmeric powder, and red chili powder to taste, adjusting the seasoning according to your preferences. Garnish the kadhi with fresh cilantro leaves and a sprinkle of garam masala for added flavor and aroma. Serve the palak kadhi hot alongside steamed rice or roti for a wholesome and satisfying meal.
Tips for Perfect Palak Kadhi
Consistency Control: Adjust the amount of water added to the kadhi to achieve the desired consistency. For a thicker kadhi, simmer it for longer to allow the yogurt mixture to reduce and thicken.
Balancing Flavors: Taste the palak kadhi as it cooks and adjust the seasoning accordingly. You can add a squeeze of lemon juice for a tangy kick or a pinch of sugar to balance the flavors.
Texture Enhancement: For added texture and flavor, consider adding fried pakoras or chickpea flour dumplings to the palak kadhi before serving. These additions not only enhance the dish but also make it more filling and satisfying.
Freshness Factor: Use fresh spinach and yogurt for the best results. Fresh ingredients impart a vibrant color and flavor to the kadhi, elevating its taste to another level.
Variations of Palak Kadhi
Punjabi Palak Kadhi: This variation of palak kadhi features a thicker consistency and a richer flavor profile, achieved by simmering the kadhi for a longer duration.
Gujarati Palak Kadhi: Gujarati-style palak kadhi is typically sweeter and tangier than its Punjabi counterpart, thanks to the addition of jaggery and kokum.
Paneer Palak Kadhi: Add cubes of paneer (Indian cottage cheese) to the palak kadhi for a protein-rich variation that’s sure to please both vegetarians and non-vegetarians alike.
Health Benefits of Palak Kadhi
Rich in Iron and Vitamins: Spinach is a nutritional powerhouse, rich in iron, vitamins, and antioxidants that support overall health and well-being.
Probiotic Benefits: Yogurt, a key ingredient in palak kadhi, is rich in probiotics that promote gut health and aid in digestion.
Low in Calories: Palak kadhi is a low-calorie dish, making it a healthy option for those looking to manage their weight without compromising on taste.
Frequently Asked Questions (FAQs)
Can I use frozen spinach instead of fresh?
Yes, you can use frozen spinach as a convenient alternative. Thaw the spinach before blending it into a puree for the kadhi.
Can I make palak kadhi ahead of time?
Yes, palak kadhi tastes even better when allowed to sit for a few hours or overnight, allowing the flavors to meld together. Reheat it gently before serving.
Is palak kadhi gluten-free?
Yes, palak kadhi is inherently gluten-free as it contains no wheat or gluten-containing ingredients.
Explore more delectable Indian recipes on Manjula’s Kitchen, such as Paneer Tikka Masala for another delightful culinary adventure.
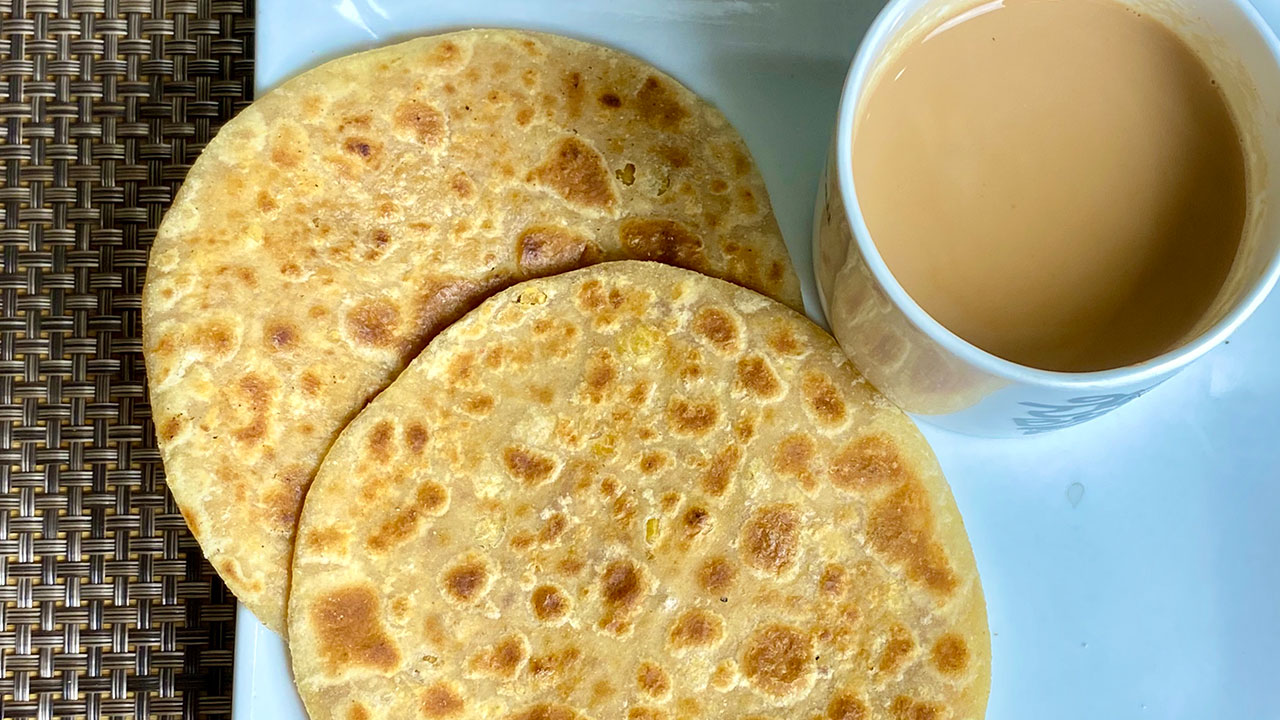
Chana Dal Sweet and Sour Parathas is a delicious and unique blend of many flavors. These Parathas are spicy, sweet, and sour. The combination of all these flavors is simply delicious.The nuttiness of the coconut and sweetness of sugar, cardamom, and fennel seeds add to the flavor. My mother was very fond of sweet and sour flavors. She first asked me to make these Parathas and requested me to make the filling, telling me exactly what she wanted in the filling. I followed her instructions exactly including what spices to put in. To my surprise, the recipe came out perfect and it was exactly the flavor combination she was looking for. I made this recipe for her several times and she really enjoyed it. It felt so good to see my mom smile. She will have these Parathas with Aloo Tamatar, or just with a hot cup of Chai.I take great pride when making these recipes for you all. I like to make sure that when you try my recipes out, they meet your expectation! I decided to make these Parathas after 30 years. I have no idea why I waited this long. This is a wonderful flavorful breakfast dish, or you can serve with the main meal. Hope you enjoy them!Recipe will serve 4.
In a bowl, mix whole-wheat flour, all-purpose flour, salt and oil, mix it well rubbing with fingers; add water slowly to make soft dough. The dough should not be stick to your fingers. Cover the dough and set it aside. Let it rest at least ten minutes.
Filling
Wash and cook dal in two cups of water, in Instant pot or pressure cooker for 25 minutes. Dal should be soft but not mushy. I am using instant pot.
Heat the oil over low medium heat in a pan add dal, and all the spices for filling fennel, red chili, mango powder, coconut powder, asafoetida, and salt, Note: if dal has extra water drains most of the water.
Stir continuously, and keep pressing dal, until water from dal has evaporated. Note: dal should be moist, not be powdery.
Turn off the heat. Let the filling cool to room temperature.
To make Parathas
Take the dough and knead it for a minute. Divide the dough and filling in 10 equal parts. Dough balls and filling should be the same size.
Take one part of the dough and with your fingers flatten the edges and make into 3-inch circle. Leaving the center a little thicker than the edges.
Place a filling in the center. Pull the edges of the dough to wrap it around the peas filling. Repeat to make all balls. Let the filled balls settle three to four minutes. Note: It helps to spread the filling evenly.
Meanwhile heat a heavy skillet on medium-high heat until moderately hot. To test, sprinkle water on the skillet. If the water sizzles right away, the skillet is ready.
Press the filled ball lightly on dry whole wheat flour from both sides.
Using a rolling pin, roll lightly to make five-inch circles, keeping the sealed side of the balls on top. If the dough sticks to the rolling pin or rolling surface, lightly dust the parathas with dry flour.
Place the paratha on the skillet. When the paratha starts to change color and begins to puff up, flip it over. You will notice some golden-brown spots.
After a few seconds, drizzle one teaspoon of oil over the paratha. Flip the paratha again and lightly press the puffed areas with a spatula.
Flip again and press with a spatula making sure the paratha is golden-brown from both sides. Repeat for the remaining parathas.
Parathas are best served hot and crispy.
Notes
You will have leftover filling; you can refrigerate for up to a week or freeze for 2-3 months.Cooking time 20 minutes, this does not include boiling Chana Dal.
Amrood Ki khati Methi Sabji (Sweet and Sour Guava Curry)
Guavas, or "amrood" in Hindi, are simply delicious and probably one of my favorite fruits! This year I have an abundance of guavas growing in my backyard. I like to sprinkle chaat masala on guavas. The spiciness really brings out its flavor. Since I have so many delicious guavas, I decided it was time for me to make Guava Sweet and Sour Curry (Amrood Ki khati Methi Sabji). In case you are not familiar, this is a popular North Indian dish which I believe tastes best with fresh hot puris or parathas. This was a staple sabji when I was a child growing up in India, provided guavas were in season. My brother especially enjoyed this dish. He simply relished this sabji and could enjoy eating it every day. However, there was catch – he would only eat this dish with puris! Rotis or parathas simply did not do this dish justice! My brother would pretend to read a book while eating so no one would disturb him so he could truly enjoy eating in peace! Whenever I make this recipe, I remember our sweet, innocent childhood memories. Guava Sweet and Sour Curry has the best flavors – spicy, sweet and sour – all in one dish!
Heat the oil in a saucepan. Oil should be moderately hot. Test the heat by adding one cumin seed to the oil. If the cumin seed cracks right away, the oil is ready.
Add the cumin seeds, asafetida, fenugreek seeds, fennel seeds powder, coriander powder, turmeric, and red chili powder stir for few seconds. Add ginger and guava mix it well add 1 cup of water and cover the pan.
Lower the heat and cover the pan cook for about 5-8 minutes until guavas are tender. Add mango powder, lemon juice and sugar stir and add cilantro. Turn off the heat and cover the pan for few minutes.
Amrood Ki khati Methi Sabji is ready to serve.
Notes
If Guava seeds are hard then remove them, adjust the sugar to taste depends how sweet are guava.
Keyword Amrood, cooking shows, Gourmet food, Guava Fruit, Home Cooking, Homemade, Indian food, Jain Food, Kadoo Ki Subji, Khatta Meetha, Main Dish, Mandir Food, No Garlic, No lahsun, No Onion, No Pyaj, North Indian Recipes, Recipe videos, Sattvik Food, Spicy, Swaminarayan, Tropical Fruit, Vegetarian, Veshno Cooking
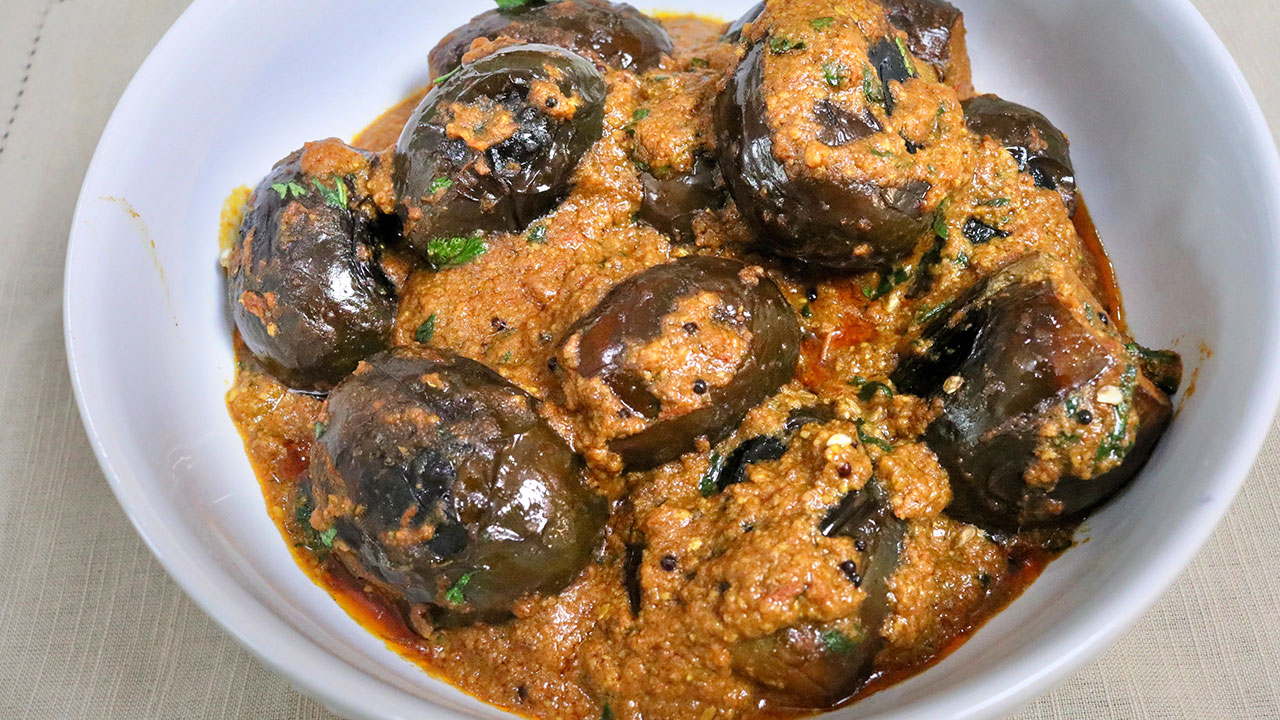
Bagara Baingan is a popular Hyderabadi dish. It is made with small eggplants that are cooked in a rich masala curry. Hyderabadi baingan is the perfect party dish to serve to guests with a sophisticated palette because of the mixture of nutty spices.
12smallIndian Eggplantif they are not available, use Japanese eggplant and slice them in long 8 long pieces
2Tbspoilto stir fry the eggplants
For Spice Mix
1tspcumin seedsjeera
1/4tsp fenugreek seedsmathi
1Tbspcoriander seedssabut dhania
10cashews crushedkaju
1Tbspsesame seeds til
2Tbspcoconut powdergola
For Gravy
2Tbspoil
1/2tspblack mustard seedsrai
1/8tsp asafetidahing
1/2tspturmerichaldi
1tspred chili powder
1 tspsugar
1-1/2tspsalt
1Tbsptamarind paste
2tomatoescut them in small pieces will make 1-1/2 cup puree
1 tspchopped ginger
2Tbspchopped cilantro for garnish
Instructions
Make a slit into eggplants, but not cutting them into half. If you are using Japanese eggplant slice them in 8 long pieces.
Heat the oil in flat frying pan over low medium heat and stir-fry eggplant rotating occasionally till they are tender not mushy. Set them aside.
For the spice mix take all the ingredients, cumin seeds, fenugreek seeds, coriander seeds, cashews, sesame seeds, and coconut powder, and grind them in fine powder. Set it aside.
Blend tomatoes and ginger together to make into fine puree. Set it aside.
Heat the flat frying pan over low medium heat, I am using the same pan I stir fry the eggplants. When the oil is moderately hot add the mustard seeds as they crack turn off the heat. Add all the spices asafetida, turmeric, red chili powder and dry spice mix stir for about 2 minutes, all the spices should be roasted.
Add tomato puree, sugar, salt, and about 1 tablespoon of tamarind paste. Stir fry the gravy until the mix becomes a little thick and start leaving the oil from the sides. Add 1/2 cup of water and bring it to a boil.
Add the eggplant spreading in the frying pan, stir gently cover the pan lower the heat to low and let it simmer for about 7-8 minutes stirring occasionally.
Eggplant should be soft and tender not mushy and coated well with the spices. Adjust the gravy thickness to your choice. Add the cilantro stir gently.
Indulge in the rich flavors of Hyderabadi Vegetables Curry cuisine with this authentic Hyderabadi Bagara Baingan recipe. A Gluten free and vegan delight with rich flavours offering spicy tantalizing savoury in every bite. Begin by making a careful slit into the eggplants, ensuring not to cut them in half. If you opt for Japanese eggplants, slice them into 8 long pieces for an elegant presentation, enhancing the visual appeal of this Hyderabadi baingan dish.
In the initial steps of crafting the Hyderabadi Bagara Baingan, take a flat frying pan and heat oil over a gentle low-medium flame. This crucial stage sets the foundation for the distinctive flavors of the bagara baingan recipe, ensuring a perfect balance of aromas.
As the oil warms embark on the preparation of the eggplants, a key element in the Hyderabadi baingan recipe. Stir-fry the eggplants with precision, delicately rotating them occasionally to evenly expose each side to the heat. The goal is to achieve the ideal tenderness without allowing them to become mushy, preserving the integrity of the eggplants in the bagara baingan.
The careful execution of this step is vital to the success of the Hyderabadi bagara baingan recipe, as it lays the groundwork for the subsequent infusion of flavors. Once the eggplants have reached the desired level of tenderness, take a moment to appreciate the beautifully cooked result. Set aside these meticulously prepared eggplants, ready to absorb the forthcoming aromatic spices that define the distinctive taste of the Hyderabadi bagara baingan.
This meticulous stir-frying process not only ensures the perfect texture of the eggplants but also sets the stage for the symphony of flavors that will unfold in the later stages of the bagara baingan Hyderabadi preparation. As you proceed with the hyderabadi baingan recipe, the memory of these beautifully cooked eggplants will linger, enhancing the overall culinary experience of savoring this Hyderabadi classic.
Now, let’s prepare the spice mix that will elevate the Bagara Baingan Hyderabadi to new heights. Gather cumin seeds, fenugreek seeds, coriander seeds, cashews, sesame seeds, and coconut powder. Grind them into a fine powder, creating a fragrant and flavorful blend. This spice mix will play a crucial role in the distinctive taste of this Hyderabadi delicacy.
Moving on, blend tomatoes and ginger into a fine puree, setting it aside for later use. In the same flat frying pan used for stir-frying eggplants, heat it over low-medium heat. Once the oil is moderately hot, add mustard seeds. As they crack, turn off the heat and introduce the spices – asafetida, turmeric, red chili powder, and the previously prepared dry spice mix. Stir this aromatic blend for about 2 minutes, ensuring the spices are well-roasted.
Add the tomato puree, along with sugar, salt, and a tablespoon of tamarind paste to the mix. Stir-fry the gravy until it thickens slightly, allowing the oil to separate from the sides. Pour in 1/2 cup of water and bring it to a gentle boil.
Now, carefully add the stir-fried eggplants into the pan, ensuring they are well-coated with the aromatic spices. Stir gently, cover the pan, lower the heat to simmer, and let it cook for about 7-8 minutes. The eggplants should be soft and tender, not mushy, absorbing the flavors of the rich Hyderabadi Bagara Baingan.
Adjust the thickness of the gravy to your preference and finish by adding fresh cilantro, stirring gently. Your Hyderabadi Bagara Baingan is now ready to be savored, offering a symphony of flavors that characterize this classic dish.
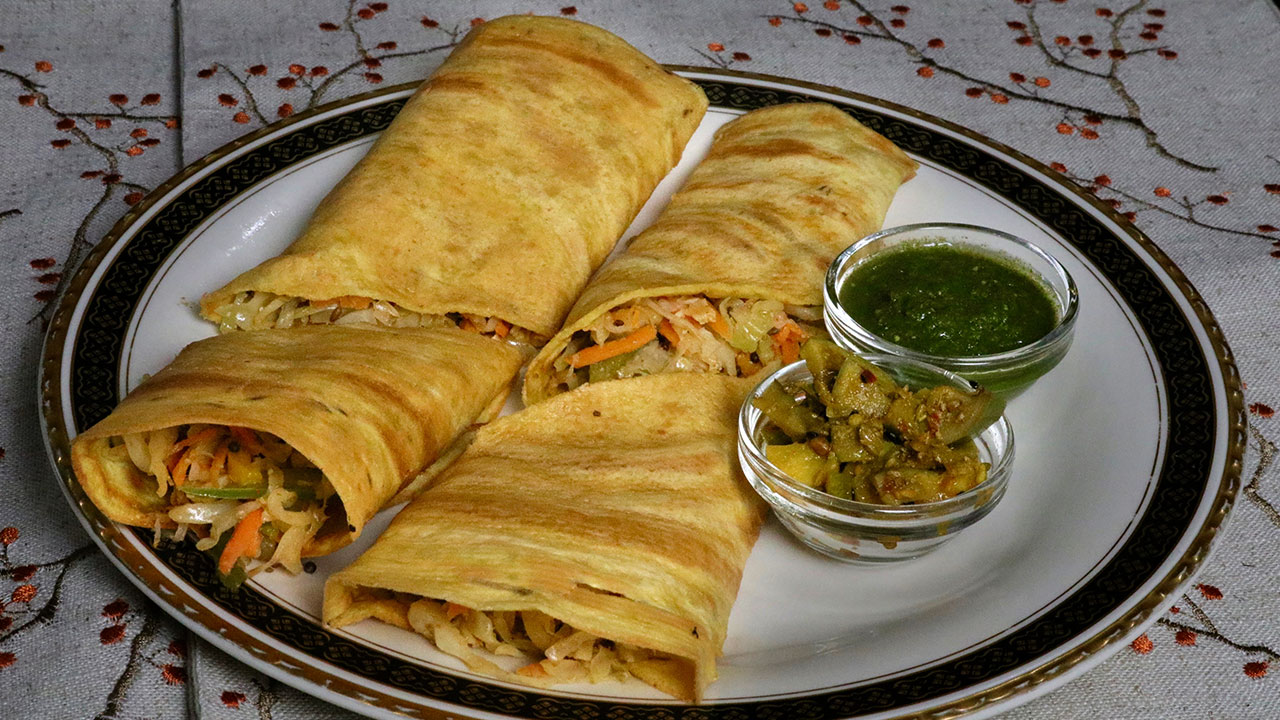
Vegetable Cheela Rolls is a healthy and delicious any-time meal. Cheela Rolls is a treat for people who are vegan and gluten free. Cheela is like a besan dosa, and can be used as a wrap and this cheela wrap with vegetables makes a wholesome meal. Cheela Rolls can be used as a snack and also for good a lunch box meal.
Mix all the dry ingredients together, besan, rice flour, cumin seeds, and salt. Add the water slowly to make a smooth batter, consistency of Dosa batter. Set aside.
To make the filling: Heat the oil in frying pan over medium high heat. Oil should be moderately hot, add cumin seeds and mustard seeds, as the seeds crack. Add cabbage, carrots, and bell pepper. Stir-fry for about one minutes add all the other ingredients, coriander powder, chili powder, salt, sugar and lemon juice. Stir- fry for about three to four minutes, vegetables should be still crisp. Turn off the heat.
To make the Cheele: Use a heavy skillet and place on medium-high heat. Test by sprinkling a few drops of water on it. Water should sizzle right away.
Pour about 1/4 cup of the batter into the skillet and spread evenly with a back of spoon. Starting from the center, spiral the batter outward evenly to form a circle.
When batter starts to dry, gently spread one teaspoon of oil over it. Wait about 30 seconds; flip the cheela using a flat spatula.
Press the cheela lightly all around with the spatula to make cheela cook evenly. Turn the cheela and in the center of the cheele put about ½ cup of stir-fry diagonally and roll it.
Vegetable Cheela Roll is ready to serve. I like to serve this with Mango Pickle or Cilantro Chutney.
Enjoy!
Notes
In the ingredients, we need about 4 cups total of sliced vegetable (this includes the cabbage, bell pepper, and carrots)Suggestions Use or preferred vegetables and also works good with any leftover vegetables.
A Comprehensive Guide to Besan Cheela Recipe with Vegetables
Welcome to Manjula’s Kitchen, your ultimate destination for authentic Indian recipes and culinary inspiration. Today, we embark on a flavorful journey to explore the delightful world of Vegetable Cheela Rolls, a versatile and nutritious dish that is perfect for any meal of the day. Made with besan (gram flour) and a colorful assortment of vegetables, these cheelas are not only delicious but also packed with vitamins, minerals, and fibre.
Join us as we unravel the secrets to creating the perfect Besan Cheela Recipe with Vegetables, along with tips, variations, benefits, and answers to frequently asked questions. Vegetable cheela is a delectable gluten-free and vegansnack, perfect for appetizers or as a bread alternative, offering a flavorful option for those seeking tasty and wholesome options.
Preparing the Batter for Vegetable Cheela
Begin by preparing the batter for the besan Vegetable Cheela, the foundation of this delectable dish. In a mixing bowl, combine besan (gram flour) with water to create a smooth and lump-free batter. Add finely chopped vegetables such as carrots, bell peppers, spinach, and green chilies to the batter, along with spices like turmeric powder, cumin powder, and salt. Mix well to ensure that the vegetables are evenly distributed throughout the batter, imparting their vibrant colors and flavors.
Cooking the Vegetable Cheela
Once the batter is ready, it’s time to cook the Vegetable Cheela to perfection. Heat a non-stick skillet or tawa over medium heat and lightly grease it with oil or ghee. Pour a ladleful of the batter onto the skillet and spread it evenly in a circular motion to form a thin layer. Cook the cheela for a few minutes until the edges start to crisp up and bubbles appear on the surface. Flip the cheela using a spatula and cook the other side until golden brown and crisp. Repeat the process with the remaining batter, adjusting the heat as needed to ensure even cooking.
Assembling the Vegetable Cheela Rolls
Once all the cheelas are cooked, it’s time to assemble the besan Vegetable Cheela Rolls, adding an extra layer of flavor and texture. Place a cooked cheela on a clean surface and spread a generous layer of mint chutney or yogurt sauce over it. Add a filling of thinly sliced cucumber, tomatoes and fresh coriander leaves on one side of the cheela. Roll the cheela tightly into a cylindrical shape, securing the filling inside. Repeat the process with the remaining cheelas to create a batch of delicious besan Vegetable Cheela Rolls.
Tips for Perfect Vegetable Cheela Rolls Every Time
Use a non-stick skillet or tawa to cook the cheelas to prevent sticking and ensure easy flipping.
Add a pinch of baking soda to the batter to make the cheelas light and fluffy.
Experiment with different vegetables and spices to customize the flavor of your cheelas according to your taste preferences.
Serve the besan Vegetable Cheela Rolls hot with a side of green chutney or ketchup for dipping.
Variations of Besan Cheela Recipe with Vegetables
Paneer Cheela: Add crumbled paneer (Indian cottage cheese) to the vegetable filling for added protein and richness.
Masala Cheela: Sprinkle chaat masala or garam masala over the cooked cheelas for an extra burst of flavor.
Cheese Cheela: Grate some cheese over the filling before rolling the cheelas for a gooey and indulgent twist.
Health Benefits of Vegetable Cheela Rolls:
Vegetable Cheela Rolls are not only delicious but also nutritious, offering a range of health benefits:
Besan (gram flour) is rich in protein, fiber, and essential nutrients, making it a healthy alternative to refined flour.
Vegetables add vitamins, minerals, and antioxidants to the dish, promoting overall health and well-being.
Cheelas are low in calories and high in satiety, making them a filling and satisfying option for weight management.
Frequently Asked Questions (FAQs) About Vegetable Cheela Rolls
Q: Can I make the batter for Vegetable Cheela in advance?
A: Yes, you can prepare the batter in advance and store it in the refrigerator for up to 24 hours. Just give it a quick stir before cooking the cheelas.
Q: Can I freeze Vegetable Cheela Rolls for later use?
A: While it’s best to enjoy besan Vegetable Cheela Rolls fresh, you can freeze them for up to 1 month. Wrap them individually in plastic wrap or foil and store them in an airtight container. Thaw and reheat in a skillet or microwave before serving.
Q: What other fillings can I use for Vegetable Cheela Rolls?
A: You can get creative with the fillings for Vegetable Cheela Rolls. Try adding cooked beans, grated cheese, or leftover cooked vegetables for added flavor and variety.
Congratulations! You have now mastered the art of making besan Vegetable Cheela Rolls, a wholesome and delicious dish that is sure to impress your family and friends. Whether enjoyed as a snack, appetizer, or light meal, these flavorful rolls are a testament to the rich culinary heritage of India. Explore more recipes and culinary inspirations on Manjula’s Kitchen and continue your culinary adventures with confidence and creativity.
If you liked the recipe here are some other recipes that you may like too
Vegetable Cheela: A savory Indian pancake made with mixed vegetables and chickpea flour.
Palak (Spinach) Paneer: A classic North Indian dish made with spinach and paneer cheese cooked in a creamy tomato-based sauce.