Delicious and Easy Indian Vegetarian Recipes for Every Occasion
Indian cuisine is known for its rich variety of spices, flavors, and vibrant vegetarian dishes that suit every occasion. Whether you’re planning a family dinner, hosting a potluck, or looking for a quick snack, Manjula’s Kitchen offers a wide array of Indian vegetarian recipes that are both healthy and delicious.
Here’s a selection of recipes from Manjula’s Kitchen to try out at home:
1. Vegetable Biryani
Vegetable Biryani is a fragrant rice dish cooked with vegetables, aromatic spices, and herbs. This one-pot meal is perfect for family dinners or gatherings and pairs well with yogurt or raita for a complete meal.
2. Paneer Tikka
Paneer Tikka is a popular grilled dish made with marinated paneer cubes cooked to perfection. The smoky flavor of this appetizer makes it a hit at parties and potlucks. Serve it with mint chutney for a burst of flavor.
3. Aloo Gobi
Aloo Gobi is a simple yet delicious combination of potatoes and cauliflower, cooked with cumin, turmeric, and coriander. It’s a quick and easy dish that pairs well with chapati or paratha.
4. Chana Masala
Chana Masala is a flavorful chickpea curry made with tomatoes, and a blend of spices. This protein-packed dish is perfect for serving with basmati rice or puris, making it a wholesome meal for any time of the day.
5. Dal Tadka
Dal Tadka is a staple in Indian households, made with yellow lentils and flavored with a tempering of cumin, garlic, and red chili. It’s a comforting and protein-rich dish served with rice or chapati.
6. Vegetable Pulao
Vegetable Pulao is a quick and easy rice dish made with mixed vegetables and fragrant spices. It’s a versatile meal that can be served on its own or alongside curries, making it perfect for busy weeknights.
7. Samosa
Samosas are crispy pastry pockets filled with a spicy potato mixture. These popular Indian snacks are perfect for potlucks, parties, or family gatherings. Serve with tamarind or mint chutney for a complete snack experience.
8. Palak Paneer
Palak Paneer is a creamy spinach-based dish with cubes of paneer (Indian cottage cheese). This healthy and flavorful recipe is rich in iron and perfect for pairing with naan or chapati.
9. Baingan Bharta
Baingan Bharta is a smoky, mashed eggplant dish cooked with tomatoes and spices. It’s a flavorful and healthy dish that goes well with Indian flatbreads like roti or paratha.
10. Kheer (Rice Pudding)
Kheer is a traditional Indian dessert made from rice, milk, and sugar, flavored with cardamom and saffron. This sweet treat is perfect for festivals or as a delightful end to any meal.
11. Pav Bhaji
Pav Bhaji is a popular street food dish made with mashed vegetables cooked in spices and served with buttered buns (pav). It’s a flavorful and hearty meal that’s perfect for potlucks or family dinners.
12. Dhokla
Dhokla is a steamed savory cake made from fermented chickpea batter. It’s light, fluffy, and tangy, making it an excellent appetizer or snack. Serve with green chutney for a refreshing side.
13. Rajma (Kidney Beans Curry)
Rajma is a hearty kidney bean curry simmered in a flavorful tomato gravy. This protein-packed dish is perfect for family meals and pairs beautifully with rice or naan.
14. Masoor Dal
Masoor Dal is a simple and nutritious red lentil curry that’s easy to make and packed with flavor. It’s a great source of protein and goes well with both rice and roti.
15. Rava Idli
Rava Idli is a steamed semolina cake, perfect for breakfast or a light dinner. It’s quick to prepare and can be served with coconut chutney and sambar for an authentic South Indian meal.
Conclusion
Whether you’re planning a special dinner, preparing for a potluck, or simply looking for a quick and healthy meal, these Indian vegetarian recipes from Manjula’s Kitchen will add flavor and variety to your meals. Each recipe is easy to follow, packed with rich Indian flavors, and perfect for vegetarians and vegans alike.
For more recipes and inspiration, visit Manjula’s Kitchen and explore the delicious world of Indian vegetarian cooking!
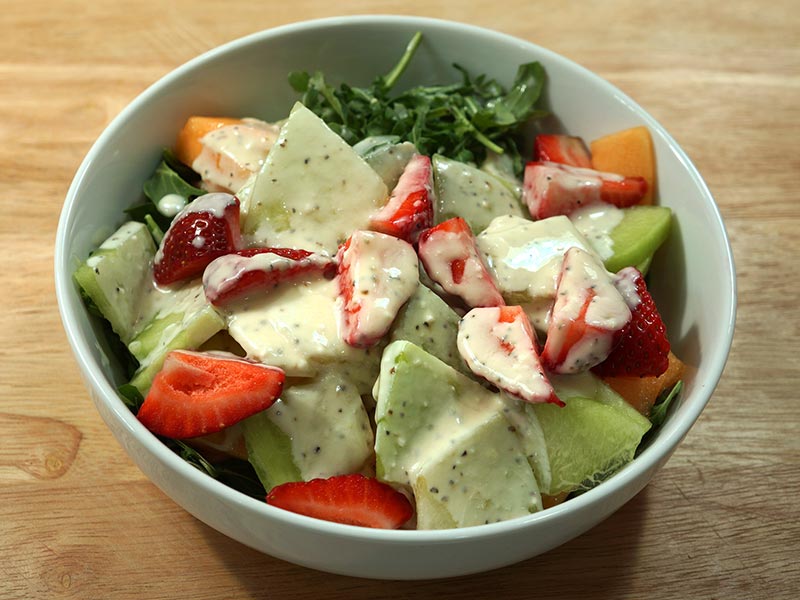
This is a beautiful looking salad which is a harmonious combination of arugula and melon. Arugula is a peppery flavor leaf while melon is juicy and sweet. Mix the two with yogurt dressing and this combination creates a very refreshing salad for summer days and can be served as healthysnack.
2 cups arugula leaves roughly chopped or substitute with spinach leaves.
2 cups melons peeled and cut into 1-1/2 inch thin slices (melon should be very firm)
3 strawberries cut into 4 pieces
Dressing
3 tablespoons plain yogurt
Approx. 4 tablespoons orange juice freshly squeezed
Approx. 1 tablespoon honey
1 tablespoon ginger juice
1/8 teaspoon salt
Pinch of black pepper
Instructions
Method
Keep the yogurt in a strainer for about fifteen minutes to drain the excess water. The yogurt should be thick in consistency.
To make dressing add honey, ginger juice, salt and pepper to the thickened yogurt and mix it well. Add orange juice to the yoghurt mix as needed to give the dressing a pourable consistency.
Arrange the arugula, melon and strawberries in salad bowl; Pour the dressing over salad. Serve this salad chilled!
Notes
NotesSalad should be served chilled, for best taste, refrigerate the sliced melon at least for one hour before serving the salad. Dressing can be prepared one day in advance.
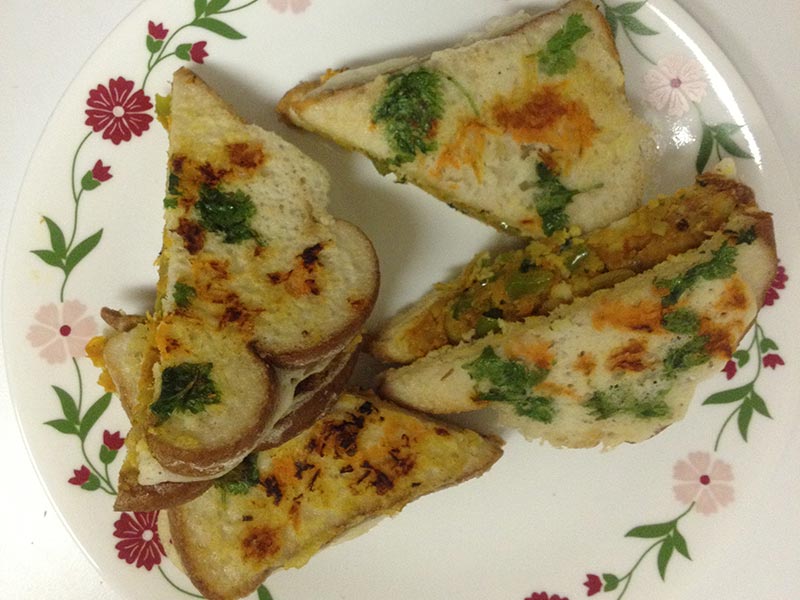
Dosa Sandwich is the classic dosa you know and love, made into a sandwich. These are easy to make and great for kids. They are great for a lunch box or a picnic.
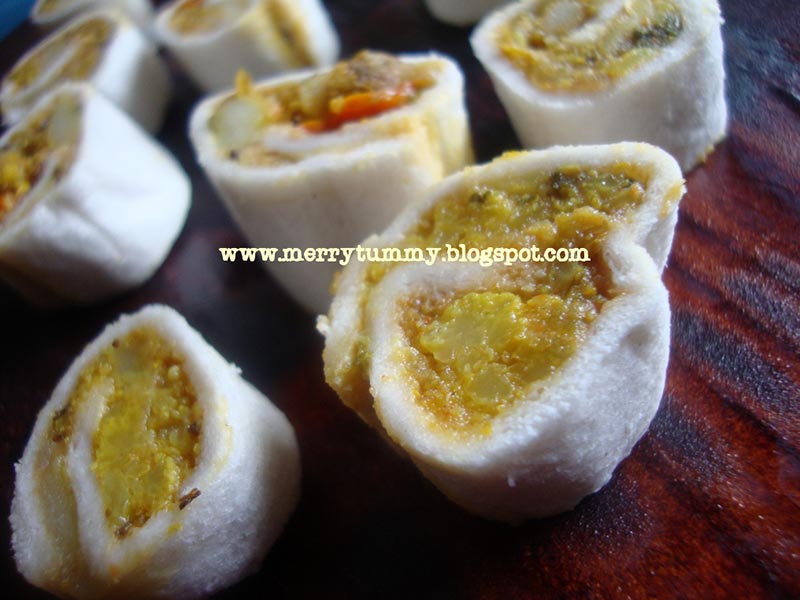
Pinwheel sandwiches are a bright idea for picnic baskets, birthday parties and even lunch boxes. They are wonderful and tasty little sandwiches which are absolute delights. If you have school friends coming over, or taking a long road trip these are perfect for that or any other occasion. But the best part is that it can be made a day or two in advance and refrigerated so it saves you the last minute rush. One can fill in peas, cottage cheese, potatoes and for sweet tooth jam or chocolate spread.
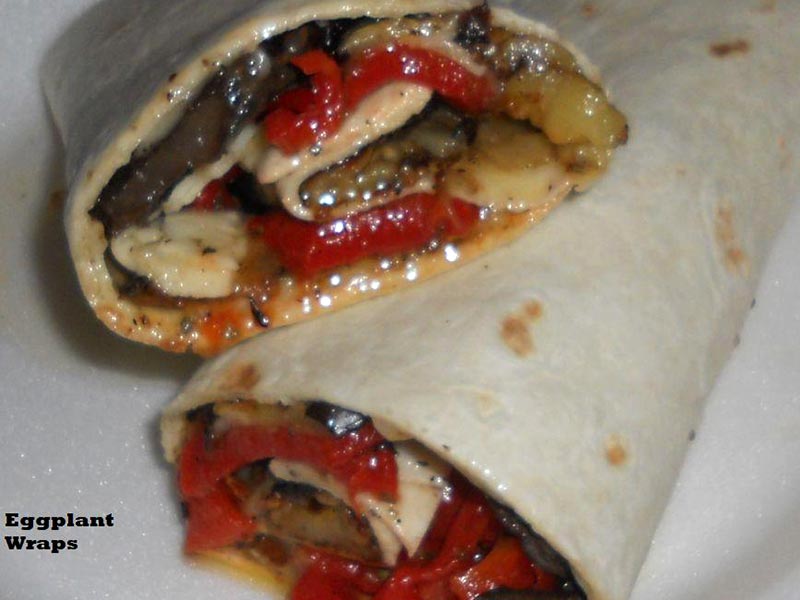
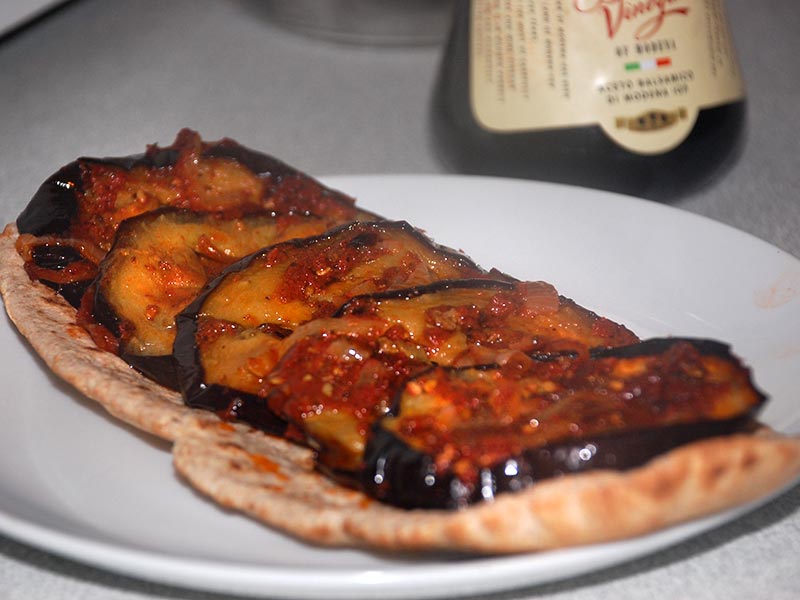
This recipe is a delicious preparation for aubergine that is inspired by my husband’s Palestinian family. Simple ingredients turn out into surprisingly delicious taste. Zaatar is traditional arab seasoning made of herbs, including wild thyme and sumac, and sesame seeds that add nuttiness and crunch. Its a nice appetizer dish that goes well most vegetarian and can be in a vegan form without adding cheese.
Wholemeal pitta bread (NOT the longlife pitta bread from supermarket – its horrible, if you can’t get fresh pitta bread substitute for any flat bread of your choice, I am sure that naan bread would work well too)
Optional: Mozzarella cheese
Instructions
Method
Slice the aubergine into 1cm slices
Mix three to four tablespoons of olive oil with one pressed clove of garlic
Brush the oil lightly over the aubergine. Sprinkle with a little salt and remember – don’t go heavy with the oil
Put the aubergine slices on a tray under medium hot grill and grill both sides until the aubergine starts turning gold and is cooked through
Meanwhile slice the onion into half circles and sautee in two tablespoons of oil until it starts turning golden color
Add tomato puree, zaatar and salt to taste and heat through
Now spread the tomato mix carefully over the grilled aubergine slices. You can leayer this and leave to marinate for some time – even overnight the taste will become only better, however it never lasts that long in my house, even my 19 month old toddler craves this
Now layer on wholemeal pitta bread (or bread of your choice and you can enjoy as it is or add some mozzarella and put under the grill to melt
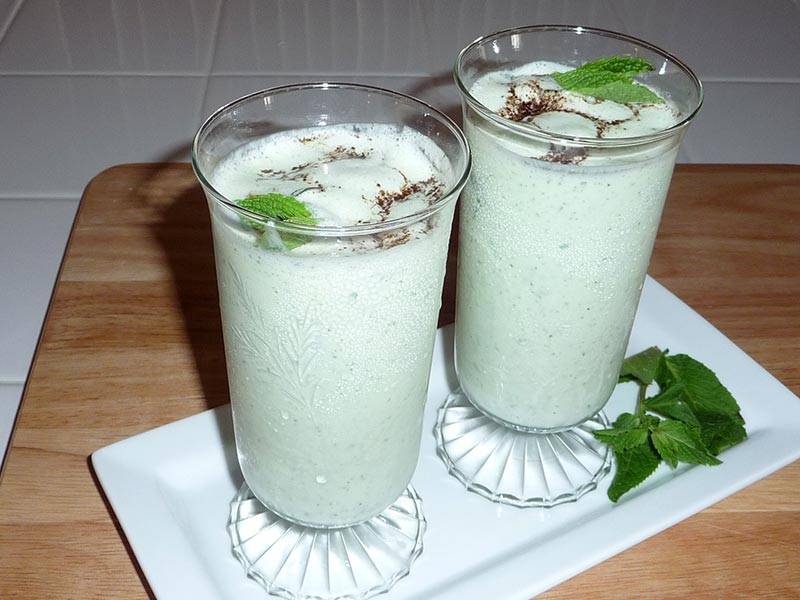
Lassi is a healthfulyogurt-based drink, popular throughout India. Mint and ginger give it a tangy and refreshing taste. Mint Lassi is a great compliment to any meal, especially during summer.
Blend mint leaves with two tablespoons of yogurt to make a paste. Add yogurt, ginger juice, salt, black salt, and one cup of water. Blend just enough to make the drink smooth; don’t over-blend as it will froth.
Pour it over ice cubes and garnish with roasted cumin seed powder and mint leave.
Lassi can be made one day in advance and refrigerated.
Notes
*Note:
Making Ginger juice: shred the ginger using a fine grater or zester and squeeze the pulp using fingers.
Roasting Cumin seeds: Toast cumin in a heavy skillet over medium heat, stirring frequently, until aromatic and brown in color. You can make a small jar of this in advance and keep it for couple of months. This is used in many recipes.
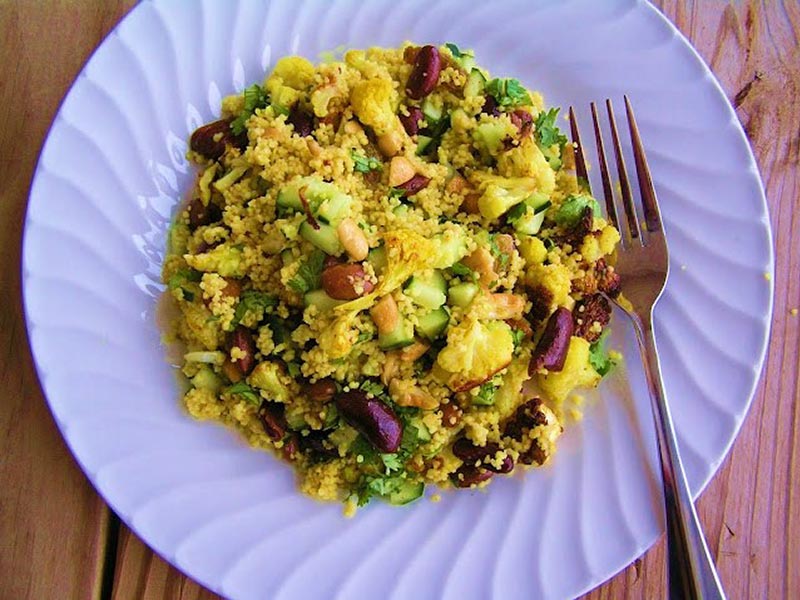
Curried Quinoa Salad with Roasted Cauliflower is very filling and nutritious. Its a healthyappetizer for those trying to cut down on their meal and find a comforting solace in salad option.
1/2 Cup Red Kidney Beans cooked (if using canned beans, drain and wash well with water)
1/2 Cup Cucumber chopped
Parsley / Cilantro – a couple of sprigs, chopped
Roasted Cashew nuts – a handful
Dried Cranberries / Raisins – a handful
For dressing :
1 Tbsp Olive Oil
1/4 Cup Plain Greek Yogurt
1 Tbsp Lemon Juice
Lemon Zest – of half a lemon
Salt
Pepper
Instructions
Method
Place the quinoa in a strainer and wash well under running water for 2 minutes. Place the quinoa along with vegetable stock in a pan and add turmeric, coriander powder, cumin powder, red chili powder and salt. Bring it to boil. Then simmer and cook till all the liquid is absorbed and the quinoa looks transparent. Keep aside.
Preheat oven to 400F. Place the cauliflower florets on a aluminium foil lined baking tray. Sprinkle salt and turmeric on top. Drizzle olive oil and bake for 30 minutes till the florets are cooked and slightly brown and caramelized.
In a serving bowl, place the quinoa, roasted cauliflower, red kidney beans, chopped cucumber, parsley, cashew nuts, cranberries and mix together.
Whisk the yogurt and olive oil together. Then make a simple dressing by mixing it with lemon juice, lemon zest, salt and pepper. Pour the dressing over the top of the salad and serve.
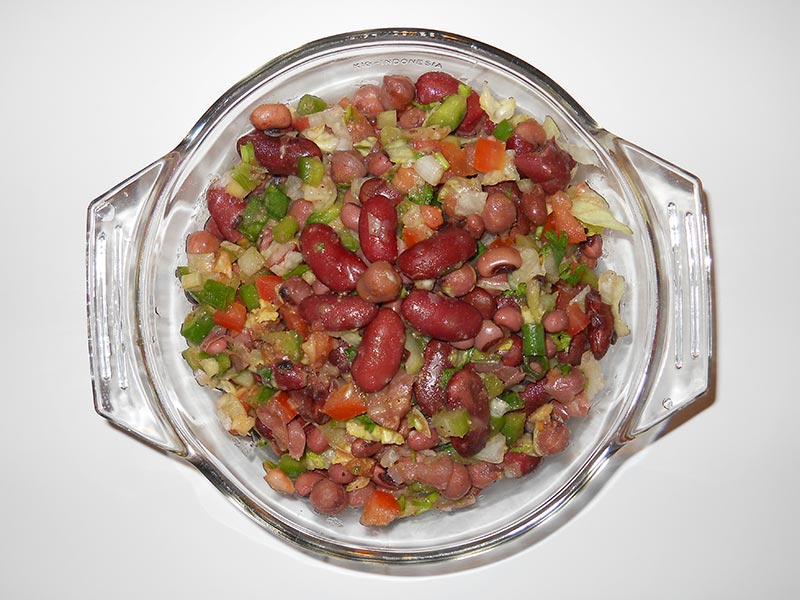
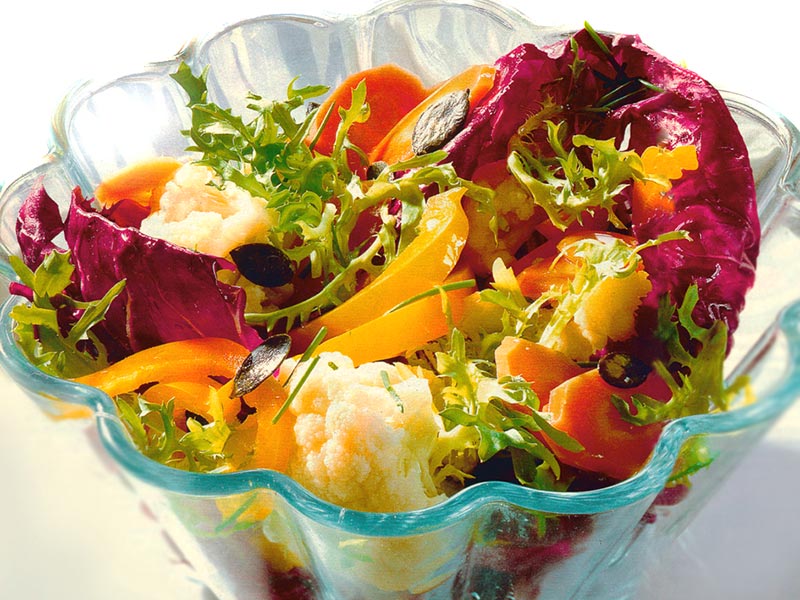
Ayurveda identifies 6 Tastes by which all foods can be categorized: sweet, sour, salty, bitter, pungent, and astringent. Ideally one should have a mix of all of them, when one is in good health. Lately my husband has seriously been exploring this field and I have taken this as a task: making food to serve as medicine.It is so easy to get into a salad boredom by mixing the same old lettuce and tomatoes…and that's where I found myself for a while. The salad I am submitting for the contest is a beautiful balance of the above listed tastes, apart from being nutritious, tasty and pleasing to the eye.I thought of thinking outside the lettuce head- and here I came up with a different salad that turned out excellent- and oh, so colorful! All of the ingredients are available at the produce section of any large grocery store. Even better, try your luck with local farmer's markets to assure freshness and quality. This recipe is a healthy, low fat, low calorie, gluten free
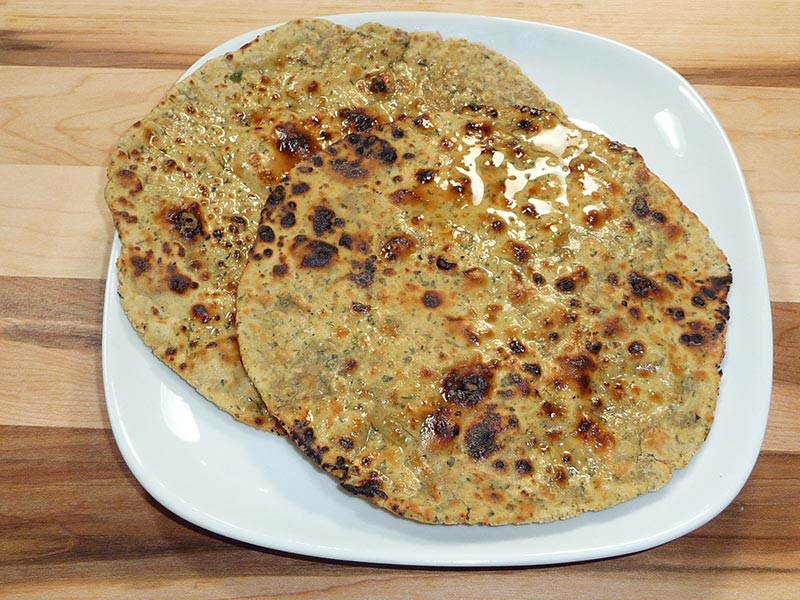
Besan Roti is very flavorful and healthy flat bread, high in protein and gluten free. Besan roti can be served with dal and leafy green vegetables like spinach or with yogurt.
Approx. 2 tablespoons butter or ghee (clarified butter)
Instructions
Method
Combine all the dry ingredients in a bowl mix it well. Add oil and yogurt to the mixture and mix. This will become very crumbly. Oil the palm to make the dough as it will be very sticky. Add water as needed to make the firm dough.
Keep the dough aside and cover with damp cloth. Let the dough rest for at least ten minutes or more.
Divide the dough in 6 equal parts. Make them in smooth balls.
Take one ball press it in rice flour from both sides and roll into about 6-inch circle. If the dough sticks to the rolling pin or rolling surface, lightly dust the roti with rice flour.
Heat the skillet over medium high heat. Note: Heavy skillet works best.
Place the rolled roti on skillet. In few seconds roti will start changing color, turn roti over, both sides of roti will have few light brown spots.
Next place the roti on open burner using tong. The top part of roti should be down. Note: if you have gas stove you can put roti directly over high flames but if you have electric stove use cake cooling rack or similar over the burner so roti does not touch burner coil directly.
Grill the roti from both sides using tong until roti has golden brown spots both sides. Bottom part of roti should be up for serving brush the roti with ghee or butter.
Keep Besan Roti’s in a covered container or wrap them in aluminum foil. (Besan Roti becomes dry when they come to room temperature)
Crispy papad topped with spicy salad makes a very refreshing appetizer. Masala Papad is full of flavors and very tempting. This is a very simple and easy recipe to make.Papad is a round, flat, dry cracker made with a variety of lentils. They are sold uncooked in Indian grocery stores. You can deep-fry them or dry-roast them.
2 plain papad, (available in Indian grocery stores)
2 medium tomatoes, seeded and diced very small to make a approx. 1cup
1/2 English or deseeded cucumber, cut in very small pieces to make it about ½ cup
2 tablespoons cilantro finely chopped
1 teaspoon ginger finely shredded, optional
1 green chili finely chopped, optional
½ lemon
2 teaspoon2 teaspoon oil
Spice Mix for Garnishing
1/2 teaspoon salt
1/4 teaspoon black salt
1/2 teaspoon dry roasted cumin seeds powder
1/8 teaspoon black pepper
Pinch red chili
Instructions
Method
Mix all the dry ingredients to make a spice mix, set aside.
Mix tomatoes, cucumbers, cilantro, ginger, and green chili, set aside
Lightly oil the papads from both sides, set aside.
Preheat the skillet over medium high heat. Roast the papads on both sides in the skillet one at a time, pressing with spatula. The papads will change to a light yellow with a few brown spots. Be careful not to over-roast. Fold the Papads in quarters while they are hot, making triangles right on the skillet.
Remove the papads from the skillet and break on the folds, creating four triangles from each one.
Take one piece of papad and top it with cucumber, tomato, ginger, green chili, and cilantro. Drizzle with lemon juice and sprinkle the spice mix on top.
Notes
Notes
Removing the seeds from the tomatoes keeps the papads crunchy.
English cucumber is crisper on the outside and tender on the inside.
You can prepare the masala papad in advance, and add the toppings just before serving.
Crunchy Delight: How to Make Delicious Masala Papad at Home
Masala Papad is a flavorful appetizer perfect for parties, offering a low-fat, vegan option that delights snack enthusiasts with its crunchy texture and spicy seasoning. Masala Papad is a delightful Indian appetizer that combines the crunchiness of papad with a burst of spicy, tangy flavors. If you’re wondering how to make masala papad, you’re in for a treat! This masala papad recipe brings together a harmonious blend of ingredients to create a dish that’s not only delicious but also incredibly easy to prepare at home. Let’s dive into the steps to prepare this mouthwatering delicacy.
1. Making the Spice Mix:
First, we’ll create a flavorful spice blend to add a kick to your masala papad. Gather all the dry ingredients like cumin, coriander powder, chili powder, and maybe even some chaat masala (a tangy and savory spice blend commonly used in Indian street food). In a bowl, carefully measure and combine these dry spices. Once everything is incorporated, set the bowl aside for later.
2. Preparing the Veggie Topping:
Next, we’ll create a refreshing and vibrant topping for the papad. Start by chopping the tomatoes, cucumbers, cilantro, ginger, and green chili. Aim for a fine chop to ensure even distribution on the papad. You can remove the seeds from the tomatoes if you prefer a drier topping, as the seeds can release moisture and make the papad soggy. After chopping, combine all the veggies in a separate bowl and set it aside with the spice mix.
3. Oiling and Roasting the Papads:
Now it’s time to prepare the base of our dish – the papad itself! Take each papad and lightly brush or drizzle a thin layer of oil on both sides. This will help them crisp up nicely during roasting. Once oiled, set the papads aside on a plate.
4. Roasting and Folding the Papads:
Heat up your skillet over medium-high heat. It’s important to have the pan hot enough to ensure the papads roast quickly and evenly. Carefully place one papad at a time in the hot skillet. Use a spatula to gently press down on the papad as it cooks. You’ll see the color change from its original white to a light yellow with a few brown spots. This is your cue to flip the papad and cook the other side. Be mindful not to overcook them, as they can become burnt and brittle. While the papad is still hot and pliable, fold it in half to create a semi-circle shape. Then, fold it in half again to form a small triangle. This folding technique not only creates a nice presentation but also helps cradle the toppings when assembled.
5. Assembling and Serving the Masala Papad:
Finally, it’s time to put everything together! Take one of the folded papad triangles and carefully break it along the folds to create four smaller triangles. Now you have a crispy base ready for the toppings. Place a dollop of the prepared vegetable mixture on each papad triangle. Don’t forget a squeeze of fresh lemon juice for a touch of tanginess! Lastly, sprinkle the reserved spice mix over the top for a burst of flavor.
Tips for Perfect Masala Papad
Using English cucumbers is recommended for their crisp texture, but regular cucumbers will work too.
You can prepare the masala papad in advance for a quick and easy snack. Just store the roasted papad triangles in an airtight container and assemble them with fresh toppings right before serving.
Experiment with different toppings such as grated cheese, finely chopped bell peppers, or even crumbled paneer to create your own unique variations of masala papad.
For a healthier alternative, opt for baked papads instead of the traditional fried ones.
If you’re short on time, you can prepare the masala mixture in advance and store it in the refrigerator until ready to use.
Variations of Masala Papad
Paneer Masala Papad: Top your papads with a spicy paneer mixture for a creamy twist on this classic recipe. Check out the recipe here.
Corn Masala Papad: Add a sweet and savory element to your masala papad by incorporating corn kernels into the masala mixture. Find the recipe here.
Schezwan Masala Papad: Give your masala papad an Indo-Chinese twist by drizzling it with spicy Schezwan sauce. Learn how to make Schezwan sauce here.
Benefits of Masala Papad
Masala papad is a low-calorie snack that’s perfect for those watching their weight.
The combination of spices in masala papad aids digestion and stimulates the appetite.
Papads are rich in dietary fiber, making them a healthy option for snacking.
FAQs about Masala Papad
Can I make masala papad in advance?
Yes, you can prepare the masala mixture ahead of time and store it in an airtight container in the refrigerator. Simply assemble the papads right before serving.
Can I use store-bought papads for this recipe?
Absolutely! Store-bought papads work just as well as homemade ones for making masala papad.
Can I customize the spice level of masala papad?
Of course! Adjust the amount of green chilies and chaat masala according to your preference for spiciness.
With these simple steps and tips, you’ll be able to whip up a batch of delicious masala papad that’s sure to be a hit at your next gathering or as a quick snack for yourself. Enjoy experimenting with different toppings and flavors to create your own signature version of this beloved Indian appetizer!
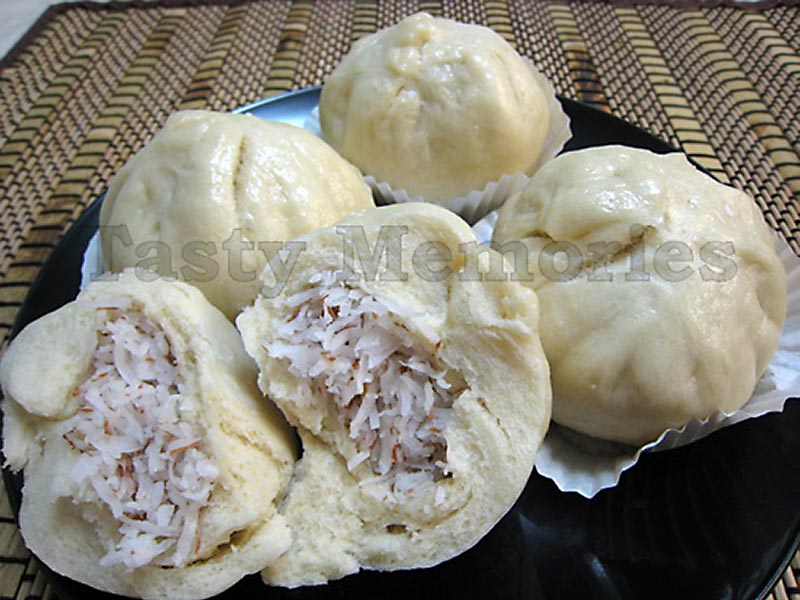
The dough recipe is quiet easy to follow and the filling used here is very simple. Dough can be filled with variety of vegetable, meat or sweet fillings. Its a good healthy, veganappetizer. This coconut filling is also very versatile and can be used to fill puff pastries or even spring roll sheets to form spring rolls or samosas. Combinations are endless and sky is the limit!
8 Standard Cupcake Liners or Parchment Paper cut into 4 inch squares
Instructions
Method
In a large bowl, combine water, yeast, oil and sugar. Mix with a spoon until well combined.
Sift in flour and salt into the liquid mixture and stir with a wooden spatula to combine. When it becomes hard to stir, start kneading dough with hands until smooth for about 2 to 3 minutes.
Lightly coat the bowl with oil spray, put dough, turn once to coat with oil, cover and leave it in warm area for about 40 minutes or until doubled in size. (For faster rising, place the bowl in a larger bowl filled with warm water)
Knead the dough for about a minute to remove air, cover and leave it again for another 30 minutes.
Meanwhile, in a medium size pan combine coconut, sugar, salt and cook over medium low heat stirring frequently until sugar is melted for about 2 to 3 minutes. Remove from heat and let it cool completely.
Place cupcake liners 1 inch apart on the rack of a steamer and keep aside.
Take dough and divide into 8 equal portions. (Keep unused dough covered to prevent from drying out.)
On lightly floured surface, roll each portion into approximately 4 inch circles leaving center thicker than edges.
Take a heap tablespoon (or 1/8) of filling and place in middle of the circle. Gather the edges of the dough and conceal the filling by pinching and sealing the edges while forming pleats. Twist ends off to seal and close; and place it in prepared steamer rack.
Continue rolling and filling rest of the dough, cover and let it rise for 20 minutes.
Steam the buns for 20 minutes, covered and undisturbed.
Turn off the heat, remove buns from steamer and serve.
Notes
Additional Notes:Steamed buns can be kept at room temperature for a day or two. Keep them in fridge for few more days after that. Before serving, wrap it with damped paper towel and microwave for 10 to 15 seconds.
This bread is called Ari Pathal (Rice bread). This is my moms recipe (from Kerala) . It is normally served for breakfast or for snack, it can be eaten as it is or with potato masala curry or with chutney.
1/2 cupCoconut Grated -( if using dried shredded ones sprinkle some warm water ,mix and keep aside for it to soften)
½ cupChopped Shallots or red onions
1 tspJeera
1/2 tspSalt – or to taste
2 cupsWater – (hot)
Instructions
Method
Roast the rice flour for about 5 minutes on medium heat . (don’t brown it)
Boil 2 cups of water on the other stove while You are roasting the rice flour
Transfer the roasted flour in to a wider bowl and make a well in the center .
Add salt and the half the water(straight from the stove) and mix with a spoon , slowly add the remaining water and give it a good mix. Keep aside for some time for it to cool
Meanwhile chop onions finely , keep the other ingredients ready
Now knead the flour with hand just like we do for chapattis
Heat oil on Medium high
Make lemon size balls( greasing hands with oil will prevent it from sticking)
Press gently each balls with palms just like we do for Kachoris. Shape the edges if needed( this is
Traditionally done on banana leaves but I shaped it on wax paper today. Zip-Loc bags can also be used)
Flip the pressed ones on hand and deep fry ( 5 min or until it turns light golden brown)
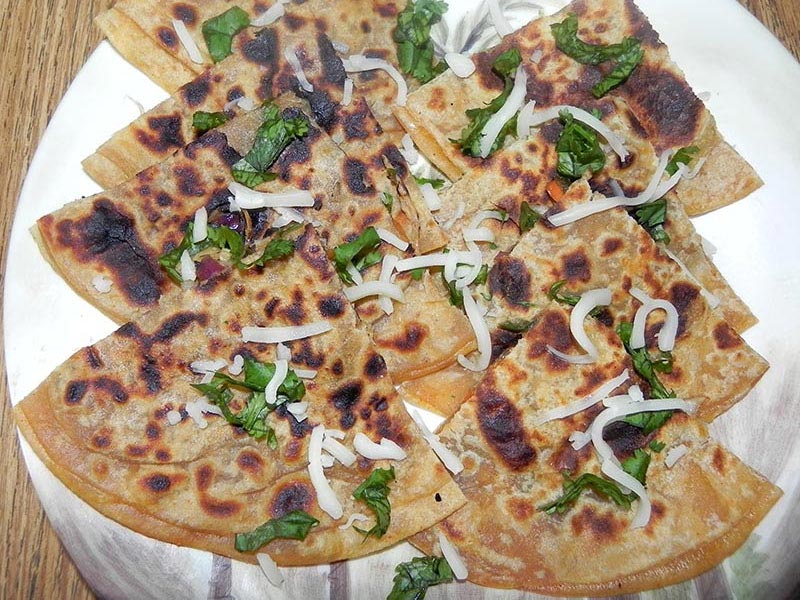
We all love Chinese food. I love it too. Actually chinese is one of my favorite cuisine. Chinese food is really healthy food and aroma of sauces used in it is also very nice. It always contains so many healthy vegetables. This time I found a new version of that. How about a chinese paratha? Give it a try. Trust me, you will fall in love with it.
1/2 Cup of very finely chopped cabbage/Patta Gobhi
1/4 Cup of very finely chopped capsicum/Shimla mirch
1/2 Cup of very finely chopped carrot
1/2 Cup of very finely chopped Green onions
2-3 very finely chopped green chillies
1 Tbsp of dark soya sauce
1 Tbsp of chilly sauce
1 & 1/2 Garlic very clove finely chopped
salt to taste
a pinch or 2 of black pepper
1 Cup of Wheat Flour
1/4th Tsp salt
1/4th Tsp 1/4th Tsp Red pepper/Lal mirch
Water as required to make the dough/around 1/2 cup
Oil or butter or Ghee[Purified butter] for paratha's
Instructions
Method
In wheat flour add salt and red pepper and mix well.
Slowly adding water to it, make the dough as same as chapati dough. Cover it and keep it aside for around 15 minutes.
All vegetables should be very finely chopped. Mix together all vegetables, green chillies, black pepper, sauces and salt as per taste. Be careful while adding salt with stuffing, because all types of sauces contains already salt.
Divide the dough in 10 equal parts. Roll 2 balls in circle shape as same as chapati with the help of rolling pin.
On one chapati, spread 2 tbsp. of vegetable mix. Cover it with another rolled chapati. Press it from all sides and pack it well, so that the stuffing will not come out.
Cook it from both sides on hot tawa, adding little oil/butter/ghee, till very small brown patches appeared on both sides.
Serve hot.
Notes
Additional:If you want to garnish it, spread some green coriander leaves and grated paneer/Indian cheese on it.
1 cup matar, (light brown in color, they look almost like chick peas; available in Indian grocery stores)
1 teaspoon salt (adjust to taste)
1 teaspoon black salt (adjust to taste)
1/4 teaspoon black pepper
1/4 teaspoon sugar
1 tablespoon cumin seed
1 tablespoon coriander
2 tablespoons ginger finely chopped
2 small green chilies finely chopped, (adjust to taste)
2 tablespoons tamarind pulp
1 tablespoon lemon juice
For Garnishing
Few slices of lemon
2 tablespoons ginger finely chopped
2 green chilies finely chopped
Instructions
Method
Wash and soak matra in three cups of water overnight. After soaking matra will be about 2 1/2 times the volume of the original.
Dry roast the cumin seeds and coriander seeds separately, until they are brown and you can smell their aroma. Let them cool and grind to powder consistency.
Put the matra in a pressure cooker with 2½ cups of water. Add the salt, ginger, and green chili. Cook on medium high heat.
When the pressure cooker starts to steam, turn the heat down to medium and cook eight to nine minutes more.
Turn off the heat and wait until steam has stopped before opening the pressure cooker. Matra should be soft and tender.
Add all the spices; this is the time to adjust the salt and pepper to your taste.Mix the spices well. Add a little water if they look too dry, the gravy should be thick.
Serve warm garnish with ginger and green chili and lemon.
Matar Chaat Recipe: Step-by-Step Guide to Homemade Delight
Stuffed Bell Peppers make for fantastic party recipes, offering quick & easyappetizers that are vegan, gluten-free, and low-fat, perfect for satisfying cravings with a delightful chaat-inspired twist, ideal for snacking. In this matar chaat recipe, we’ll explore the delightful flavors of this popular Indian street food. Matar chaat is a savory snack made with dried yellow peas, bursting with tangy, spicy, and sweet flavors. It’s a perfect dish to satisfy your cravings for something savory and delicious. This recipe offers a perfect blend of textures and tastes, making it a favorite among both kids and adults alike.
Step 1: Soaking the Peas
To begin with this matar chaat recipe, the first step is to soak the dried yellow peas overnight or for at least 8 hours. Soaking helps to soften the peas, making them easier to cook and digest. It also reduces the cooking time significantly, ensuring that your chaat is ready in no time.
Step 2: Cooking the Peas
Once the peas are soaked, drain the water and rinse them thoroughly. Then, transfer them to a pressure cooker or a large pot. Add enough water to cover the peas and some salt. Cook until the peas are tender but not mushy. Cooking time may vary depending on the type and freshness of the peas, but it usually takes around 15-20 minutes in a pressure cooker.
Step 3: Preparing the Chaat
Once the peas are cooked, it’s time to prepare the chaat. Heat some oil in a pan and add cumin seeds. Let them splutter and then add finely chopped green chilies. Now, add some minced ginger and cook for a minute until the raw smell disappears.
Step 4: Adding Spices
Next, add the cooked peas to the pan along with some chaat masala, red chili powder, amchur (dry mango powder), and a pinch of garam masala. Mix well until all the spices are evenly coated with the peas. Adjust the seasoning according to your taste preferences.
Step 5: Serving the Matar Chaat
Once the matar chaat is ready, transfer it to a serving dish and garnish with freshly chopped cilantro leaves, chopped tomatoes, and a drizzle of tamarind chutney. You can also sprinkle some sev (crispy chickpea flour noodles) on top for an extra crunch. Serve hot and enjoy this flavorful matar ki chaat with your favorite beverages.
Tips:
You can customize this matar chaat recipe according to your taste preferences by adding ingredients like chopped cucumber, boiled potatoes, or pomegranate seeds.
To make it healthier, you can use olive oil instead of regular cooking oil.
Adjust the spice levels according to your preference. If you like it spicy, add more green chilies or red chili powder.
Variations:
For a creamy twist, you can add a dollop of yogurt or sour cream on top of the chaat.
If you’re vegan, you can skip the yogurt and use vegan yogurt or coconut cream instead.
Experiment with different toppings like grated cheese for added flavor and texture.
Benefits:
Matar chaat is a nutritious snack as it’s packed with protein and fiber from the yellow peas.
It’s also rich in vitamins and minerals, making it a healthy option for snacking.
The spices used in this chaat, such as cumin, ginger have various health benefits including aiding digestion and boosting immunity.
FAQs:
Q: Can I use canned peas instead of dried peas?
A: While canned peas can be used in a pinch, dried peas are preferred for this recipe as they have a better texture and flavor. If using canned peas, make sure to drain and rinse them well before cooking.
Q: Can I make this chaat ahead of time?
A: Yes, you can prepare the cooked peas and spice mixture ahead of time and store them in the refrigerator. When ready to serve, simply reheat the mixture and assemble the chaat with your desired toppings.
Other Recipes on Manjula’s Kitchen
If you’re looking to explore more Indian recipes, appetizers, beverages, and desserts, be sure to check out the following links on Manjula’s Kitchen. Here are some links to recipes on Manjula’s Kitchen official website: