Indian Festival Foods: A Celebration of Tradition and Taste
Indian festivals are a time of joy, togetherness, and, most importantly, a feast of flavors. Indian festival foods are an integral part of the celebrations, bringing families and communities together to enjoy delicious and diverse dishes. From sweet to savory, these foods are deeply rooted in tradition and offer a taste of India’s rich culinary heritage. Let’s explore some of the best Indian festival recipes that you can prepare to make your festivities even more special. Popular Indian Festival Recipes Gulab Jamun Gulab Jamun is one of the most cherished Indian festival foods. These soft, spongy balls made from khoya (dried milk) are deep-fried and soaked in a fragrant sugar syrup. They are a must-have during festivals like Diwali and Holi. As a favorite Indian dessert, Gulab Jamun is beloved by all ages and adds a sweet touch to any celebration. Other popular Indian desserts for festivals include Shakar Paare and Namkeen Paare, which are enjoyed during various celebrations. Samosa Samosas are another staple in Indian festival recipes. These crispy, savory pastries are filled with a spiced mixture of potatoes and peas, making them a perfect indian snack for any festive gathering. Samosas are versatile and can be enjoyed as part of a meal or as a standalone treat. They are often served with tangy chutneys, adding a burst of flavor to your festive spread. Samosas are also popular Indian street food recipes and can be part of your party recipes collection. Puran Poli Puran Poli is a traditional sweet flatbread from Maharashtra, commonly prepared during festivals like Holi and Ganesh Chaturthi. This Indian festival food is made by stuffing a dough with a sweet filling made from chana dal (split chickpeas), jaggery, and cardamom. The result is a delicious, aromatic bread that is enjoyed by everyone. Puran Poli is one of the best Indian festival recipes that embodies the spirit of Indian festivals. It can also be enjoyed as part of Indian breakfast recipes on festive mornings. Kheer Kheer is a classic Indian dessert made with rice, milk, and sugar, flavored with cardamom, saffron, and nuts. This creamy and rich pudding is a staple at many Indian festivals, including Eid and Raksha Bandhan. Kheer is easy to prepare and can be served either warm or chilled, making it a versatile addition to any festive menu. It is also a delightful addition to traditional Indian recipes and gluten-free dessert recipes. Chole Bhature Chole Bhature is a popular North Indian dish often enjoyed during festivals and special occasions. This combination of spicy chickpea curry (chole) and deep-fried bread (bhature) is hearty and satisfying. Chole Bhature is one of the best Indian festival recipes for those who love bold, robust flavors. It is commonly served with pickles, and yogurt, enhancing the overall experience. This dish can also be included in dinner recipes for festive feasts. Enhance Your Festival Feast
To make your festival feast even more delightful, consider exploring related categories that complement these Indian festival foods. Adding Indian snacks like pakoras and vadas can provide a variety of flavors and textures. For a sweet ending, explore Indian desserts such as barfi and jalebi. Incorporating healthy recipes like roasted nuts and fruit chaat can offer lighter options for your guests. Hosting a large gathering? The popular party recipe category is filled with dishes that are sure to impress your guests and make your celebration memorable. Including fusion dishes like Indo-Chinese Manchurian can add a unique twist to your festival spread. Frequently Asked Questions (FAQs) Q: What are some popular Indian festival foods?
A: Some popular Indian festival foods include Gulab Jamun, Samosas, Puran Poli, Kheer, and Chole Bhature. Q: What types of festivals are celebrated in India?
A: India celebrates a wide variety of festivals including Diwali, Holi, Eid, Christmas, Raksha Bandhan, Navratri, and Ganesh Chaturthi. Each festival has its own unique traditions and foods. Q: How can I make my festival feast healthier?
A: To make your festival feast healthier, you can include healthy Indian snacks like roasted nuts, fruit chaat, and baked samosas. Opting for desserts made with natural sweeteners and using less oil in savory dishes can also help. Q: What is the significance of food in Indian festivals?
A: Food plays a central role in Indian festivals, symbolizing prosperity, togetherness, and cultural heritage. Each festival has its own traditional dishes that are prepared and enjoyed with family and friends. Q: Can I prepare these recipes in advance?
A: Yes, many Indian festival recipes can be prepared in advance. For example, Gulab Jamun and Kheer can be made a day ahead and stored in the refrigerator. Samosas can be prepped and frozen, then fried fresh on the day of the festival. Q: Are there vegetarian options for Indian festival foods?
A: Absolutely! Most Indian festival foods are vegetarian. From savory dishes like Samosas and Chole Bhature to sweet treats like Puran Poli and Kheer, there are plenty of vegetarian options to choose from. Conclusion Indian festival foods are a testament to the rich culinary traditions of India. Whether you’re celebrating Diwali, Holi, Eid, or any other festival, these best Indian festival recipes will add flavor and joy to your festivities. So, gather your ingredients, try out these Indian festival recipes, and create unforgettable memories with your loved ones. Don’t forget to find vegetarian recipes for more delightful recipes from Manjula’s Kitchen!
By incorporating these dishes into your festival celebrations, you’ll be able to enjoy a wide variety of delicious and traditional foods. Whether you’re looking for a quick snack, a hearty meal, or a sweet treat, there’s an Indian festival food to suit every occasion. Happy cooking and happy festivities!
Methi Chutney is a popular North Indian condiment. Methi Chutney is packed with flavors, sourness from mango, sweetness from raisins; some bitterness from fenugreek, mixed with spices it has a very unique taste. Traditionally this is served with Kachories (fried puffed bread with lentils) and Puri (fried puffed bread).
2 tablespoons fenugreek seeds (methi), available in Indian grocery stores
4 dry mango slice, available in Indian grocery stores
1/4cup raisins (kishmish)
4 dates sliced in fours length wise (kajoor)
1/8teaspoon asafetida (hing)
1/4teaspoon turmeric (haldi)
1/2teaspoon red chili powder (lal mirch) adjust to taste
1tablespoon coriander coarsely ground (dhania)
1tablespoon fennel seeds coarsely ground (saunf)
1-1/2tablespoon mango powder (amchoor)
1teaspoon salt, adjust to taste
1tablespoon sugar adjust to taste
Approx. 1-1/2cup water
Instructions
Method
Soak fenugreek seeds 6 hours or more. The seeds will swell to be about 3 times in volume. Drain the water.
In a pressure cooker add 1-1/2 cups of water and all the ingredients except sugar cook over medium high heat. After cooker start steaming lower the heat to medium and let it cook for about 8-10 minutes.
Open the pressure cooker after steamed has escaped, mix it well mash the mango slices.
Add the sugar, mix it well and let it simmer for 2-3 minutes. Chutney should have consistency of thick gravy, if needed add little more water.
Methi chutney can be served warm or at room temperature.
Notes
NotesMethi Chutney can be refrigerated for about one month.
I have been wanted to work on my recipe for Jaljeera for a very long time now. Jaljeera is a very easy and flavorful drink to make up. I have many great memories of drinking Jaljeera in the summer. Jaljeera is similar to flavored lemonade. So I finally decided to work on the recipe and start formulating the ingredients and measurements for it. I decided my old Jaljeera recipe needed a revamp. So I decided to get inspiration from Google! While researching, I came across a blog for Jaljeera, where Naini Setalvad explains the benefits of all the spices used to make Jaljeera. Check out this interesting article at http://www.dnaindia.com/health/column_jaljeera-magic_1263764 I thought it was interesting and wanted to share. This article reminded me of my grandmother’s thoughts on why Jaljeera is a great drink to enjoy on hot summer days.
With that said, I am working on finalizing my recipe for Jaljeera! The recipe will be coming soon!
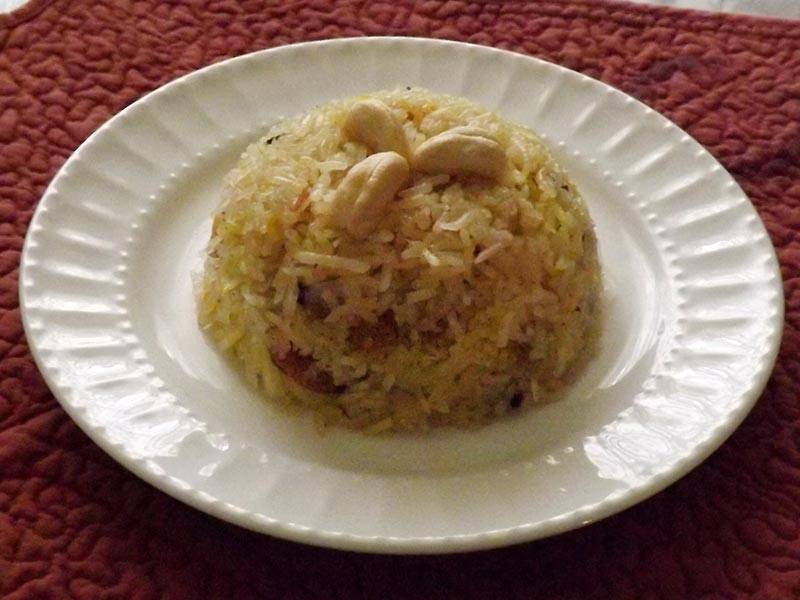
Narali Bhat is a traditional Maharastrian recipe cooked on Raksha bandhan. I was planning to cook it on Raksha Bandhan and at the same time I read about the contest. So I made it and now I am happy to share this recipe with you.
1cup Fresh garted Coconut or frozen shredded Coconut
1cup Sugar
1cup coconut milk and 1/2 cup water
6 tsp Ghee or unsalted butter
1/2tsp Saffron soaked in 1 tbsp milk
Cardamom powder to taste
3 to 4 whole Green Cardamom
5 to 6 Cloves
1 stick of cinnamon
pinch of salt
1/3cup Almonds, Cashew nuts, raisins all together
Instructions
Method
Wash and drain rice for 30 min.
Heat 3 tsp ghee, add cloves, cardamon and cinnamon. Add drained rice, saute for 2 min. Meanwhile boil coconut milk, water, pinch of salt.
Add this mixture on rice.
Let it boil on medium high. As starts boiling, reduce the heat to low put the lid and let it cook for about 10 min. Cook the rice completly. Take out the rice on the plate and cool it completely.
In another pan mix grated coconut, sugar, nuts and cook until the mixture thickens and feels dry. Add rice, saffron, 2tsp ghee and Cardamom powder.
Mix it lightly. Try not to break rice grains. Put the tight lid on and and let it cook on very low flame for 15 min. Turn off the heat and keep the lid on for another 5 min.
Sweet coconut rice is ready to serve. Enjoy.
Notes
Additional Tips:
Traditional Narali bhat is cooked with jagerry. Take yellow jagerry instead of sugar.
Cook the rice completly. after cooking rice with coconut mixture it will again dry up litbit.
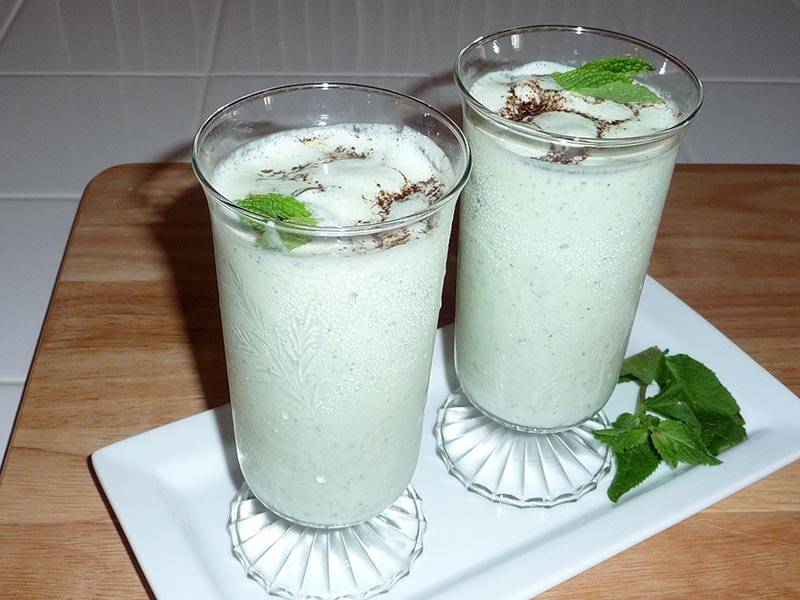
Lassi is a healthfulyogurt-based drink, popular throughout India. Mint and ginger give it a tangy and refreshing taste. Mint Lassi is a great compliment to any meal, especially during summer.
Blend mint leaves with two tablespoons of yogurt to make a paste. Add yogurt, ginger juice, salt, black salt, and one cup of water. Blend just enough to make the drink smooth; don’t over-blend as it will froth.
Pour it over ice cubes and garnish with roasted cumin seed powder and mint leave.
Lassi can be made one day in advance and refrigerated.
Notes
*Note:
Making Ginger juice: shred the ginger using a fine grater or zester and squeeze the pulp using fingers.
Roasting Cumin seeds: Toast cumin in a heavy skillet over medium heat, stirring frequently, until aromatic and brown in color. You can make a small jar of this in advance and keep it for couple of months. This is used in many recipes.
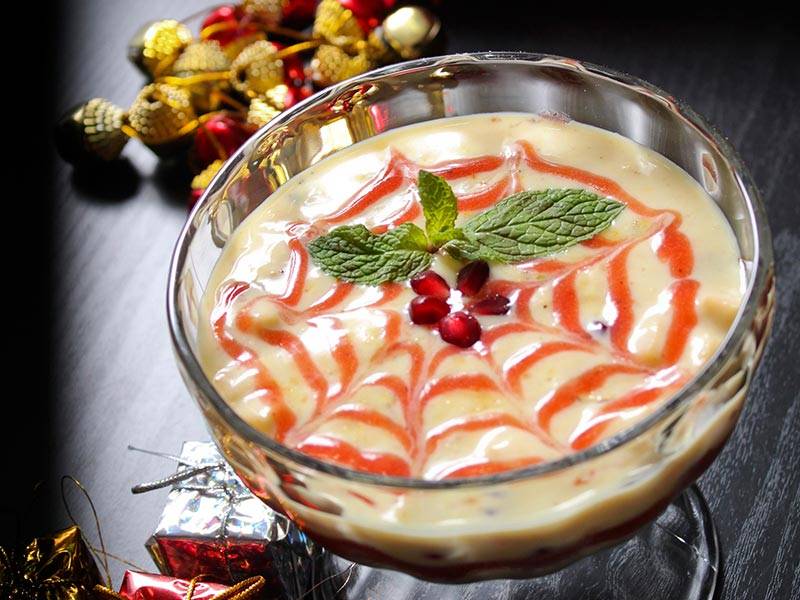
Apple custard is a nice gluten-freedessert with the red strawberry sauce to give a holiday touch. The uncooked apples and roasted almonds give it a nice texture.
2 cups (500 grams) strawberries, rinsed, green tops removed (frozen will work)
1/4 to 1/3 cup sugar (depends on sweetness of berries)
1/2 tbsp lemon juice
2 tbsp water
1 tbsp cornstarch dissolved into 2 tbsp water
for Custard
2 cups milk
3 tbsp custard powder ( I used vanilla flavor.)
3/4 cup sugar
10-15 roasted chopped almonds
1/2 tsp cardamom powder
1 1/2 cup chopped apple (you can use chikoo, banana, grapes too)
1/4 cup pomegranate seeds
Instructions
for Strawberry Sauce
Mix strawberries, sugar, lemon juice and water in a pot.
Heat the mixture in medium flame for 13-15 mins.
Keep the pot covered (occasionally stir).
When the strawberries are tender and can easily cut by spoon, this is the time to add the corn starch dissolved in water. Stir it nicely and turn off the heat. Let the mixture cool for 10 mins.
Put the mixture in blender and make a puree. Strawberries has seeds on sides. Strain the sauce to remove these seeds. Keep the sauce in refrigerator.
for Custard
Take some (3-4 tbsp) milk and mix custard powder to it.
Heat rest of the milk at medium flame, add sugar to it.
Just before boiling add the custard powder mixture (made in step 1) to the milk. Add the cardamom powder.
Keep stirring the milk till it boils. After boiling take the pot away from heat. Add roasted chopped almonds. Let it cool for an hour.
Add the fruits to custard.
Keep the mixture in refrigerator.
While serving add 1 tsp strawberry sauce at bottom of the bowl. Add the fruit custard and top it with the strawberry sauce. See Photo.
Notes
Additional:Decorate with some fresh mint leaves (optional).
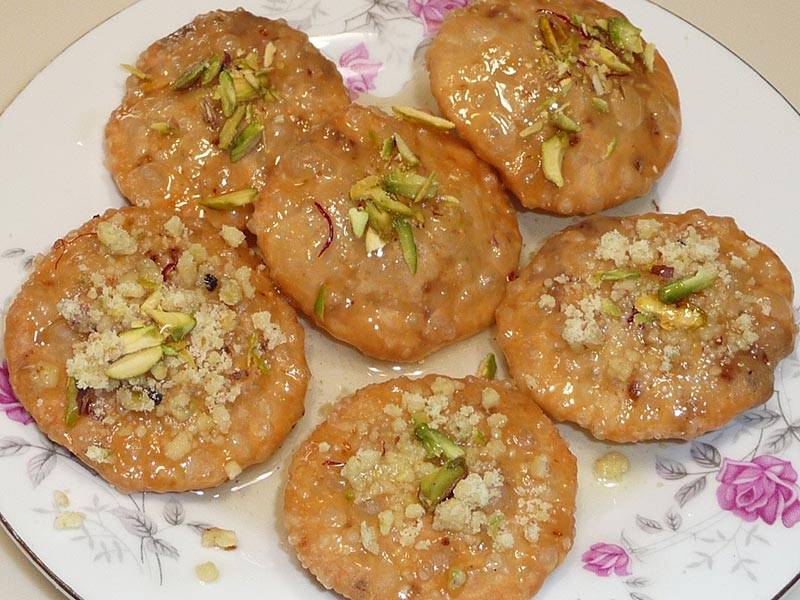
Mawa Kachori is an exotic dessert. This is a delicacy from the state of Rajasthan. Rajasthan is known for its rich food and culture its a sweet savory snack. Pastry filled with an aromatic mixture of Mawa and nuts makes a very festive dessert.
1/4 cup mixed nuts (almonds, pistachios coarsely ground)
1/4 teaspoon crushed cardamom
3 tablespoons sugar
Note: If you are using Mawa use ¾ cup of Mawa instead cream and powder
Oil to fry
Syrup
1cup sugar
1/2 cup water
1/8 teaspoon crushed cardamom
Few strands of saffron
Instructions
Crust
Mix flour, and clarified butter in a bowl, making it firm and soft adding water slowly as needed. Knead the dough until the dough becomes soft and pliable.
Set the dough aside and cover it with a damp cloth. Let the dough sit for at least ten minutes.
Syrup
Boil the sugar and water on medium heat, as sugar comes to a boil add saffron, and cardamom on medium heat until syrup is about one thread or 220 degrees (Fahrenheit) on a candy thermometer. Set it aside.
Filling
Mix the cream and milk powder in a frying pan. Cook on medium heat until it becomes the consistency of soft dough, this should take about 3-4 minutes. Stir continuously so the mixture does not burn on the bottom of the pan. This mixture is known as Mava.
Next add nuts mixture, sugar, and cardamom powder to Mawa. Mix well and cook for about 2 more minutes until the mixture is consistent with soft dough. Keep it aside.
After cooling, the mixture will become drier but still should be lightly moist.
Making Kachoris
Knead the dough for a minute.
Divide the dough into about 18 equal parts.
Roll each ball into about 2-inch diameters.
Take one of the rolled doughs in your palm and place about 1 tablespoon of filling in the center. Pull the edges of the dough to wrap the filling. Proceed to make all 30 balls.
Let the filled balls sit for 3 to 4 minutes before pressing.
In the frying pan heat the oil on medium-high, the frying pan should have about 1-1/2 inches of oil.
Set the filled balls on a clean and dry surface with the seam facing up. Using the base of your palm, slowly flatten them into a circle of about 3 inches.
To check if the oil is ready put a little piece of dough in the oil. It should sizzle, and come up slowly.
Slowly drop the Kachoris in the oil, do not overcrowd the kachoris in a frying pan, fry them on medium heat.
After they are puffed, slowly turn them over.
It will take about 5-6 minutes to fry. Fry until golden brown on all sides.
If the kachoris are fried on high heat, they will get soft and will not be crispy.
Notes
Serving
Just before serving drizzle the kachori with about 2 tablespoons of hot syrup. Garnish them with leftover filling or sliced pistachios.
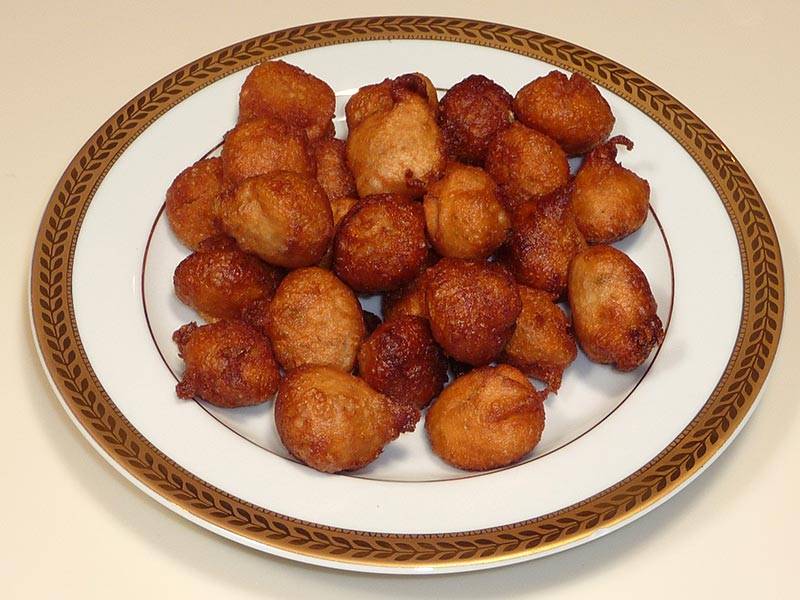
Gulgulas are like lightly sweetened mini donuts. In India these are made for special occasions. This is a quick and easy to make recipe. They make good finger food even for the kids on the go. This is an easy recipe to make when you are craving for something sweet.
Mix whole-wheat flour, yogurt, sugar, fennel seeds, and oil, add water slowly as needed to make the thick consistency batter.
Heat the oil in a frying pan on medium high heat.
The frying pan should have about 1 inch of oil. (To check if the oil is ready, put one drop of batter in oil. The batter should come up but not change color right away).
Slowly drop 1 teaspoon of batter at a time in to the oil. Don’t over crowd the frying pan.
Fry the Gulgulas golden brown all sides, turning them occasionally. It will take 2 to 3 minutes.
Remove the gulgulas and place over a paper towel so the excess oil is absorbed.
Notes
Tips, If oil is not hot enough gulgulas will stick to the bottom of the frying pan.
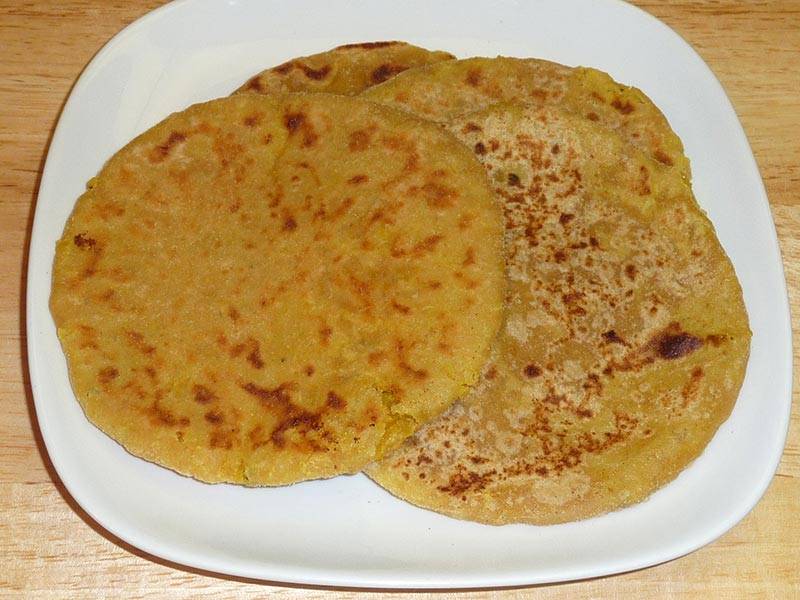
Puran Poli is a sweet flat bread with a sweet dal lentil filling. This is a popular bread in the states of Gujarat and Maharashtra. Puran poli is a wonderful breakfast dish, and can also be served as a snack.
¾ cup Toor dal (Ahrar dal) (available in Indian grocery stores)
1 cup sugar
½ teaspoon turmeric
1 teaspoon cardamom powder (elaichi)
¼ teaspoon nutmeg (jaiphal)
Also Needed
Approximately 3 tablespoons oil
Approximately ½ cup of dry whole wheat to roll the bread
Instructions
Filling
Wash and soak the toor dal in two cups of water for at least four hours. Dal will double in volume after soaking. Discard any remaining water.
Add toor dal and turmeric to two cups of water and cook in a heavy pan over medium-high heat. When dal boils, remove the yellow foam from the top. Reduce the heat to medium and cover the pan.
Let it cook for 25 minutes, adding more water if needed. Dal should be very soft and mushy.
Add sugar and cook until the dal looks like paste and starts to hold together. Add cardamom and nutmeg powder and mix well. The dal filling will be very soft and sticky.
Dough
In a bowl, mix whole-wheat flour, all-purpose flour, and oil; add water slowly to make a very soft dough. The dough should not stick to your fingers. Cover the dough and set it aside. Let it rest for at least ten minutes.
Making Puran Poli
Divide both the dough and the dal filling into ten equal parts. The parts of the dal filling should be about 2½ times that of the dough balls.
Roll the dough balls into 2½”-diameter circles. Place one part of the filling in the center of each. Seal by pulling the edges of the rolled dough together to make a ball. Proceed to make all ten balls. Let the filled balls settle for three to four minutes.
Heat the skillet on medium-high heat. To test, sprinkle a couple of drops of water on the skillet. The water should sizzle right away.
Press the filled ball lightly on both sides on a surface covered with dry whole wheat flour.
Lay the balls on the sealed side up and lightly press them into circles about 2” in diameter. Roll the balls gently into 5” circles. If the dough sticks to the rolling pin or rolling surface, lightly sprinkle dry whole wheat flour on both sides of the semi-rolled puran poli.
Place the Puran poli in the skillet. When it starts to change color, flip it over. You will notice some golden-brown spots.
After a few seconds, spread one teaspoon of oil on the puran poli. Flip them again and lightly press the puffed areas with a spatula. Flip again, and press with the spatula making sure the puran poli are golden-brown on both sides.
Repeat the same process for the remaining.
Puran poli is ready to be served and it tastes best when eaten hot.
Notes
Tips
1. When cooking the dal, use a large pot to prevent it from boiling over, as this can happen very easily.2. Cooked Puran Poli can be stored for a week in the refrigerator. Re-heat over a skillet or in the toaster oven.VariationPuran Poli can be prepared using Chana dal, however, it has to be cooked for a slightly longer time.
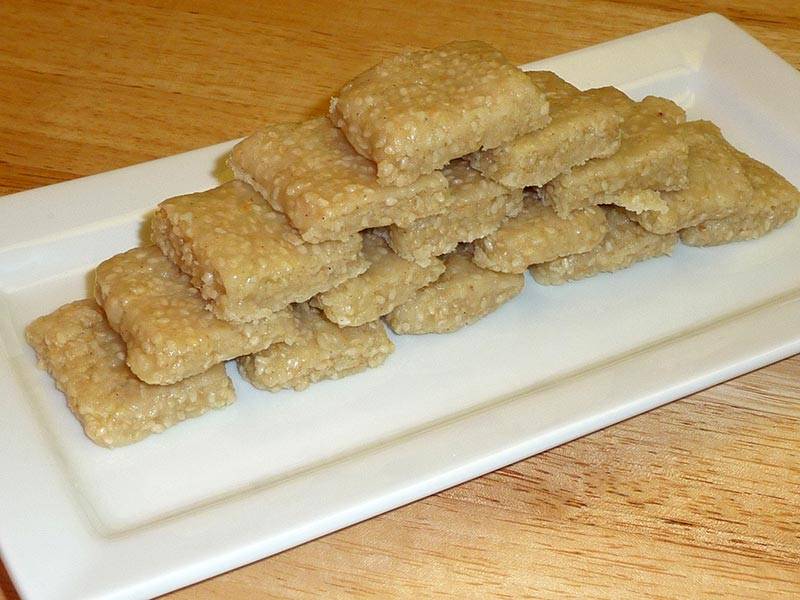
Til ki Burfi is a healthy, quick & easy way to make home-made sweet snack which can also be offered as a dessert post meal. Its a must try recipe during winters.
Roast sesame seeds over medium heat till they are golden in color. This should take about 3-4 minutes. Keep aside.
In a non-stick frying pan add heavy cream and milk powder mix it well. Cook over medium-high heat, stir continuously till the mixture starts to bubble.
Lower the heat to medium and keep stirring and scraping the sides and bottom of the pan, until mixture is reduced to thick paste and starts coming together. This should take 8-10 minutes.
Add roasted sesame seeds and mix well. Stir for another 2-3 minutes until mix start looking soft dough.
Lower the heat to low and add sugar and cardamom powder and mix it well. This will become soft in texture after adding sugar.
Keep stirring for 1-2 minutes and bring the burfi back to dough texture.
Spread burfi mixture onto the greased plate, approximately ½ inch thick. Let it sit for at leadt two hours at room temperature. Cut burfis to desired shape; square or diamond shape works well.
The burfis will store well in an airtight container, at room temperature for up to 2 weeks.
Ground Almonds( without skin)- 40 g/ just less than 2 oz
1 tspGrated zest of orange
2Eggs
3 tbspFreshly squeezed orange juice-
Butterscotch sauce:
1/2 tbspButter
2 tbspBrown sugar
75 mlCream
1 tbspHoney
1/2 tspVanilla extract
Pistachio Praline:
1 tbspPistachio without shell
2 tbspBrown sugar
1 tspLemon juice
Instructions
For the Sponge:
Melt the butter and keep it separately.
Beat the eggs and sugar in a large bowl until it looks fluffy.
Add the orange juice and zest, mix well.
Sift the flour, baking powder, bicarbonate of soda and almonds into the egg mixture.
Fold gently without any lumps.
Finally fold the butter into the mixture.
Grease 4 ramekins with butter and dust it with flour. Pour the mixture equally into the ramekins.
Preheat the oven to 180 degree Celsius.
Take a large tray, fill with boiling water and then place the ramekins inside that.
Bake it in the preheated oven for 25 minutes or until a skewer inserted comes out clean.
Note: The cooking time might vary according to the size of the dish you are using.
For Butterscotch sauce:
Heat together butter, sugar and honey in a heavy based pan in medium to low heat.
Once everything is melted completely, heat it for 2 to 3 minutes stirring continuously.
Take it off from heat, add the extract and cream little by little, stirring continuously.
For Pistachio Praline:
Heat the pistachio, sugar and lemon juice in a pan, stirring continuously.
When it reaches a consistency of 1 string consistency, take it off from heat and pour it in a baking parchment paper.
After it hardens, bash it with a rolling pin to crumble into pieces.
Note: To check the one string consistency, wet your hands with cold water. Take a small amount of syrup between your two fingers, when you press and release, you should see a small thread between your two fingers.
Notes
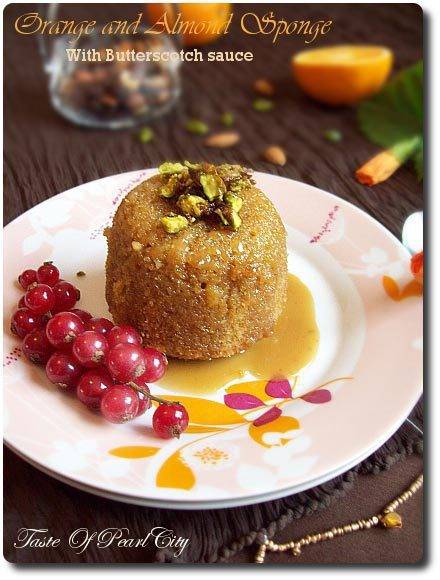
To Serve:Place the sponge in individual serving plates, pour the warm sauce on top. Finally top it up with pistachio praline.To enjoy the real taste of this dessert, serve while they are still warmAdditional Notes:
You can replace brown sugar with caster sugar for sponge.
For the butterscotch sauce, you can use caster sugar and brown sugar mixed.
For the praline also you can replace with caster sugar.
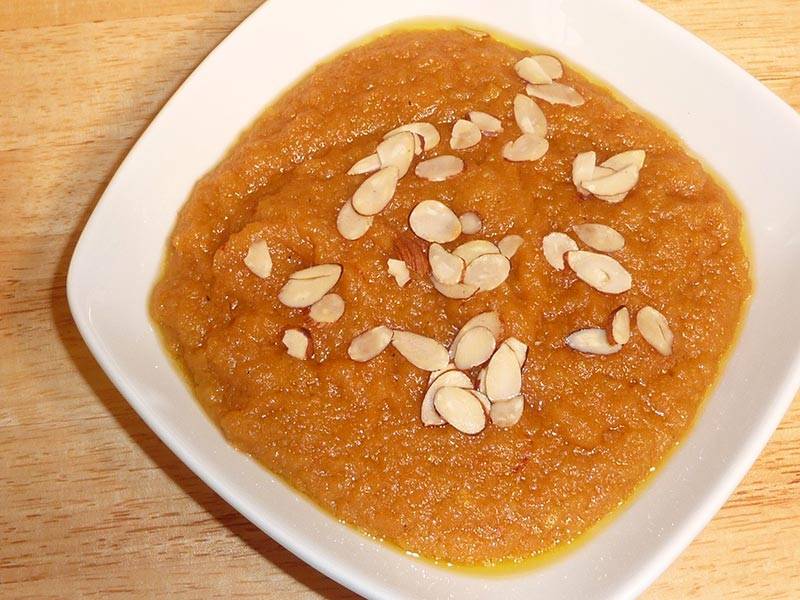
Moong Dal Halwa is a delicacy of the state of Rajasthan. It is a rich, creamy and pudding-like dessert. Made with split yellow moong dal, this is a popular and delicious dessert for the winter months.
Wash dal thoroughly and soak in 3 cups of water for at least 4 hours. Drain the water and blend dal into a thick paste, adding just enough water as needed to blend.
Boil water and sugar in a pan over medium heat, for 3-4 minutes. Remove from heat. Add cardamom powder and saffron; set aside.
In a non-stick or heavy bottom frying pan add moong dal paste and melted butter. Mix well.
Turn on the stove to medium heat and fully cook dal paste. Use spatula to gently press the paste, then fold the paste over and press again. Repeat this pressing and folding of the dal paste several times until the texture becomes grainy and light brown in color. This will take approximately 15 minutes, and will have a sweet, mild aroma when it is cooked.
Lower the heat to medium-low. Add syrup to the dal, little at a time. The syrup will splatter as you are adding. Cover and cook for an additional 2-3 minutes.
Remove cover, stir and cook for another minute. Turn off the heat. Garnish with almonds.
Notes
The halwa will thicken over time.Halwa tastes best if it is served warm.
Moong Dal Halwa: A Rich and Indulgent Vegan Dessert
Moong Dal Halwa is an Indian dessert made from moong dal (split mung beans), ghee (clarified butter), sugar, and flavoured with cardamom and saffron. This rich and aromatic dessert is a favorite during festivals and special occasions such as diwali or holi.
Tips for Making Perfect Moong Dal Halwa (Vegan):
Soak Moong Dal: To ensure a smooth texture, soak the moong dal in water for at least 4 hours overnight before cooking. Soaking helps soften the dal and reduces the cooking time, resulting in a smoother halwa.
Use a Non-Stick Pan: Use a non-stick pan or a heavy-bottomed pan to cook the Moong Dal Halwa (Vegan) to prevent it from sticking to the bottom and burning. Stir the halwa frequently to ensure even cooking and prevent lumps from forming.
Garnish with Saffron: Infuse the Moong Dal Halwa (Vegan) with the exotic aroma and vibrant color of saffron by soaking a few strands of saffron in warm water and adding it to the halwa during cooking. Garnish the halwa with additional saffron strands for a luxurious touch.
Variations of Halwa:
Gajar ka Halwa: Gajar Ka Halwa is a classical Indian dessert, this is also known as gajrala. Gajar ka Halwa is a delicious and popular sweet made with few ingredients, carrots, milk, sugar and flavored with cardamom.
Atta Ka Halwa: Atta ka Halwa, is a delicious sweet dessert. This is easy to make and with few ingredients. Atta ka halwa is made with whole wheat flour, sugar, and clarified butter, flavored with cardamom.
Sooji ka Halwa: Sooji Halwa is a very popular sweet dish all over India and is made on religious occasions, as parsad.
Sweet Potato Halwa: Sweet Potato Halwa, an eggless pudding, stands out as one of the simplest Halwa recipes to prepare. Infused with the delicate and distinctive flavors of cardamom and cinnamon, it serves as a deliciously warm dessert ideal for chilly winter evenings.
FAQs about Moong Dal Halwa (Vegan):
Can I use other lentils for Moong Dal Halwa (Vegan)?
While moong dal is traditionally used for making Moong Dal Halwa, you can experiment with other lentils such as chana dal (split chickpeas) or urad dal (black gram) for a different flavor and texture.
How long does Moong Dal Halwa (Vegan) last?
Moong Dal Halwa (Vegan) can be stored in an airtight container in the refrigerator for up to 3-4 days. Reheat the halwa gently in the microwave or on the stovetop before serving.
Can I make Moong Dal Halwa (Vegan) without sugar?
Yes, you can make Moong Dal Halwa (Vegan) without sugar by using natural sweeteners such as jaggery, maple syrup, or agave syrup. Adjust the sweetness to your taste preference and enjoy a healthier version of this classic dessert.
Is Moong Dal Halwa (Vegan) gluten-free?
Yes, Moong Dal Halwa (Vegan) is naturally gluten-free, making it suitable for those with gluten sensitivities or celiac disease. However, be sure to check the labels of any packaged ingredients to ensure they are gluten-free.
Moong Dal Halwa (Vegan) is a rich and indulgent dessert that’s perfect for special occasions or as a sweet treat to satisfy your cravings.
With its creamy texture, aromatic flavors, and wholesome ingredients, it’s sure to become a favorite among vegans and non-vegans alike.
Whether enjoyed warm or cold, on its own or with a scoop of dairy-free ice cream, Moong Dal Halwa (Vegan) is a true delight for the senses.
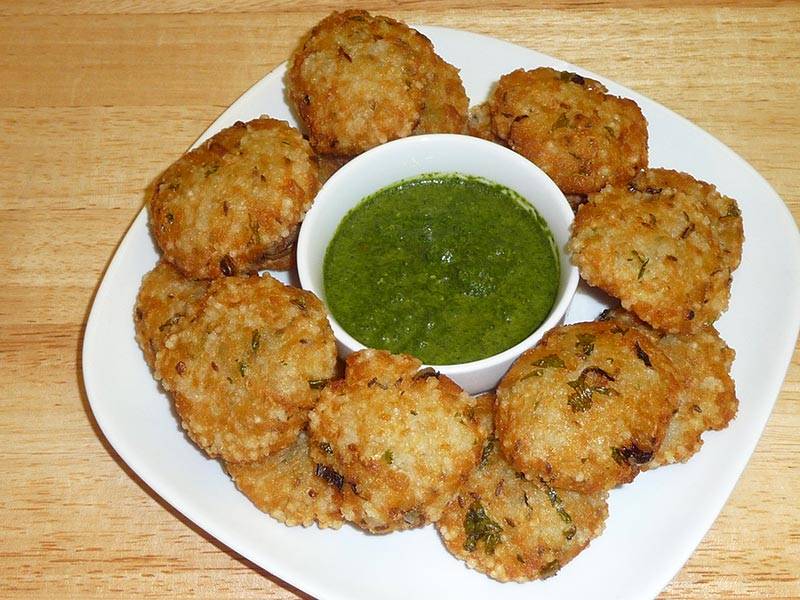
Sabudana Vada (Fried Dumplings of Potatoes and Tapioca)
Sabudana Vada is a delicious snack with a great texture. It is crunchy on the outside and soft inside. This can satisfy just about anybody, even those on a gluten-free diet. This recipe is completely gluten free.
Approximately 2 tablespoons finely chopped cilantro (hara dhania)
1 teaspoon lemon juice
Oil to fry
Instructions
Method
Wash the tapioca and soak it in 3 cups of water for 3 to 4 hours.
Drain the water. After soaking, the tapioca will have increased in volume, by about 2 times. Set aside.
Par-boil the potatoes, so they are only half-cooked. Insert a knife into the potato to ensure that it is still somewhat firm.
Cool the potatoes, then peel and grate them using a vegetable grater.
Mix all the ingredients together. The dough will be a little sticky and soft in consistency.
Divide the potato dough into 16 parts.
Roll each one into a smooth patty. You will need to lightly oil your palms to prevent the dough from sticking.
Heat the oil in a frying pan on medium high heat. There should be at least 1½ inches of oil in the frying pan. To check if the oil is ready, drop a small piece of dough into the oil. The dough should rise to the surface, and not change its color immediately.
Slowly drop the patties into the frying pan.
Fry the vada until both sides are golden brown. Turn them occasionally. It will take approx. 4 to 5 minutes to cook.
Remove the vada and place over a paper towel so the excess oil is absorbed.
Sabudana vada should be crunchy on the outside and soft inside.
Serve them as is or with cilantro or tamarind chutney.
Notes
TipThe frying oil needs to be sufficiently hot, or else the Vadas will turn out greasy and may break into pieces while cooking.Serving suggestions
Sabudana Vadas are best served with cilantro chutney or tamarind chutney as a dip.
Vadas taste best when they are served hot.
Sabudana Vadas can be made one day in advance and stored at room temperature. Do not refrigerate. When ready to serve, place on a cookie sheet and heat in the oven at 300 degrees till warm.
Sabudana Vada, a popular snack especially during Navaratri and Ganesh Chaturthi celebrations, is a gluten-free and veganappetizer commonly enjoyed as a delightful treat during festivals like Krishna Janmashtami, offering a crunchy texture and savory flavor to those seeking gluten-free and vegan snack options. Sabudana Vada is a beloved snack in Indian cuisine, especially popular during festivals and fasting periods.
Sabudana vada is essentially fried dumplings made from potatoes and tapioca pearls. It’s a delightful blend of flavors and textures, crispy on the outside and soft on the inside. This sabudana vada recipe is not only delicious but also relatively simple to make, requiring just a few basic ingredients commonly found in Indian households.
Let’s delve into the process of how to make sabudana vada and explore some tips, variations, benefits, and frequently asked questions regarding this classic snack.
Tips for Perfect Sabudana Vada
Soak Sabudana Properly: The key to making good sabudana vada lies in soaking the tapioca pearls properly. Rinse the sabudana under running water until the water runs clear, then soak them in water for at least 4-5 hours or overnight. They should be soaked enough to be easily mashed between your fingers.
Use Boiled Potatoes: Ensure that the potatoes are boiled properly and mashed well. This helps bind the vada mixture together and prevents them from breaking apart during frying.
Adjust Seasonings: Feel free to adjust the seasonings according to your taste preferences. You can add more green chilies for extra heat or increase the amount of lemon juice for a tangier flavor.
Fry on Medium Heat: Fry the vadas on medium heat to ensure they cook evenly from inside out and develop a golden-brown crust on the outside.
Serve Hot: Sabudana vadas are best enjoyed hot and fresh. Serve them with mint chutney, tamarind chutney, or yogurt for a delightful snack experience.
Variations of Sabudana Vada
Sabudana Aloo Tikki: Instead of shaping the vada into traditional round patties, you can make them into tikki shapes for a twist. Flatten the mixture into small discs and fry until golden brown on both sides.
Sabudana Vada with Peanuts: Add roasted and crushed peanuts to the vada mixture for an extra crunch and nutty flavor.
Sweet Sabudana Vada: For a unique variation, add some sugar and grated coconut to the vada mixture to make sweet sabudana vadas. Serve them as a dessert or a sweet snack.
Baked Sabudana Vada: If you’re looking for a healthier alternative, you can bake the vadas instead of frying them. Simply brush them with oil and bake in a preheated oven until golden brown and crispy.
Benefits of Sabudana Vada
Rich in Carbohydrates: Sabudana, being made from tapioca pearls, is rich in carbohydrates, providing a quick source of energy.
Gluten-Free: Since sabudana is derived from tapioca, it is naturally gluten-free, making it suitable for those with gluten intolerance or celiac disease.
Good Source of Protein: Potatoes used in the vada mixture add a decent amount of protein to the snack, making it more satiating.
Easy to Digest: Sabudana is easy to digest, which makes it a popular choice during fasting periods when heavier foods are avoided.
FAQs about Sabudana Vada
Can I make sabudana vada ahead of time?
While sabudana vada is best enjoyed fresh, you can prepare the mixture ahead of time and refrigerate it. Fry the vadas just before serving for the best taste and texture.
Can I freeze sabudana vada?
Yes, you can freeze uncooked sabudana vada. Place them on a tray lined with parchment paper and freeze until firm, then transfer them to a freezer-safe bag or container. Fry them directly from frozen, adding a few extra minutes to the frying time.
What can I serve with sabudana vada?
Sabudana vada pairs well with various chutneys such as mint chutney, tamarind chutney, or yogurt. You can also enjoy them with a hot cup of masala chai for a perfect snack time treat.
For more mouthwatering recipes and culinary inspiration, explore the following links from Manjula’s Kitchen:
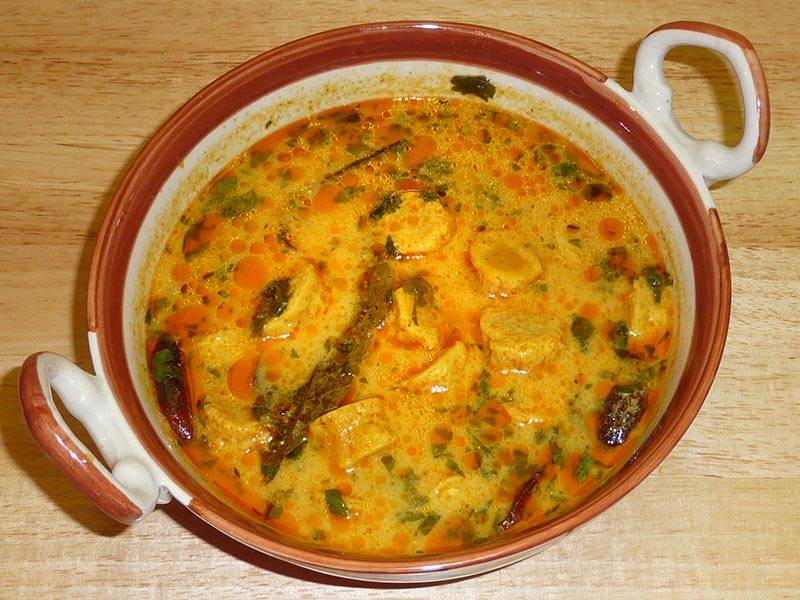
Steamed gram-flour dumplings cooked in spicy gravy is a popular North Indian dish from the Indian state of Rajasthan. This mouth-watering dish will surely tantalize your taste buds with its rich, spicy flavors and delightful texture. Ideal for those who crave a hearty and flavorful meal, this Rajasthani delicacy is both satisfying and memorable. Enjoy the authentic taste of Rajasthan with every bite!
1 1/4 cups besan (gram flour) (available in Indian grocery stores)
1/2 teaspoon chili powder adjust to taste
1/2 teaspoon salt
1/8 teaspoon turmeric (haldi)
3 tablespoons yogurt (dahi)
3 tablespoons oil
For the kadhi
1 cup yogurt (dahi)
1 tablespoon besan (gram flour)
1/4 teaspoon turmeric powder (haldi)
1/4 teaspoon chili powder adjust to taste
1 tablespoon coriander powder (dhania)
1 teaspoon salt adjust to taste
2 tablespoons oil
1 teaspoon cumin seeds (jeera)
1/2 teaspoon mustard seeds (rai)
1/8 teaspoon asafetida (hing)
4 whole red chilies
1 bay leaf (tejpat)
1 black cardamom optional
1/2 teaspoon paprika (dagi mirch)
For Garnish
2 tablespoons chopped cilantro
Instructions
For Gattes
Mix all the ingredients in a mixing bowl and gather into a soft dough, adding a little water if needed. At this point the dough will be a bit sticky; wetting your fingers with oil or water will help.
Divide the dough into four or five parts. Roll each one between your palms into a long, smooth log, approx. five” in length and ¾” in diameter. You will need to oil your palms to prevent the dough from sticking.
Bring three cups of water to a boil in a pot. Gently drop the gatte logs into the boiling water and cook for four to five minutes, or until they begin to float up to the surface.
Remove the cooked Gatte logs from the water and let them cool.
Slice the logs into approx. ¾ inch pieces. Set the Gatte aside.
For The Kadhi
Mix yogurt and gram flour into a smooth paste. Add turmeric, chili powder, and coriander powder to the yogurt paste.
Pour the oil into a saucepan over medium heat. Test the heat by adding one cumin seed to the oil. If the cumin seed cracks immediately, the oil is ready. Add the cumin seeds, mustard seeds, and asafetida.
When seeds crack add the whole red chilies, bay leaf, cardamom, and paprika. Stir for a few seconds.
Pour in the yogurt paste and stir for two minutes. Add three cups of water and stir until the gravy comes to a boil. Add salt to taste.
Add the gatte to the gravy. Cover and cook over low-to-medium heat for 20 minutes or longer. Turn off the heat.
Add cilantro and cover the pot for a few more minutes.
Now you are ready to serve!
Notes
Other Suggestions
A slice of gatte can be cooked in advance and added to the gravy later. Gatte can be frozen for up to a month or refrigerated for a few days.
Slices of gatte are used to make a wide variety of dishes, including subji (cooked dry vegetables), rice pulao, etc.
A slice of gatte can be fried and served as a snack.
A slice of gatte can be used to make raita (mixed with yogurt).
Gatte Ke Kadhi is a traditional North Indian dish made primarily with chickpea flour (besan) dumplings cooked in a tangy yogurt-based curry/gravy. The dish is gluten-free and suitable for individuals observing a gluten-free diet. It is often prepared during festive occasions like Karwa Chauth, a Hindu festival where married women fast for the well-being and longevity of their husbands. The addition of lentils (Dal) and vegetables enhances the nutritional value of the dish, making it a wholesome and flavorful option for a vegetarian meal.
Gatte ki kadhi, also known as gatta kadhi or gatte ki sabji, is a traditional Rajasthani dish that combines chickpea flour dumplings (gatte) with a tangy yogurt-based curry (kadhi). This hearty and flavorful dish is a staple in Rajasthani cuisine and is often enjoyed with rice or roti. In this recipe, we’ll show you how to make Rajasthani gatte ki kadhi from scratch, so you can enjoy the authentic flavors of Rajasthan in the comfort of your own home.
Step 1: Preparing the Gatte:
To start, we’ll prepare the gatte, which are the chickpea flour dumplings that give this dish its unique texture. In a mixing bowl, combine chickpea flour (besan), yogurt, salt, red chili powder, turmeric, and a pinch of asafoetida (hing). Knead the mixture into a smooth dough, adding water as needed to achieve the right consistency. Divide the dough into small portions and shape them into cylindrical dumplings.
Step 2: Boiling the Gatte:
Next, we’ll boil the gatte to cook them through before adding them to the kadhi. Bring a pot of water to a boil and gently add the gatte to the boiling water. Let them cook for about 10-12 minutes, or until they float to the surface and are cooked through. Once cooked, remove the gatte from the water and set them aside to cool slightly.
Step 3: Preparing the Kadhi Base:
While the gatte are boiling, we’ll prepare the kadhi base. In a separate bowl, whisk together yogurt, chickpea flour, turmeric, red chili powder, and salt until smooth. This mixture will form the base of the kadhi and give it its creamy texture. Be sure to whisk out any lumps to ensure a smooth consistency.
Step 4: Tempering the Kadhi:
In a large pan, heat oil and add mustard seeds, cumin seeds, fenugreek seeds, and dried red chilies. Let the seeds splutter and release their aroma, infusing the oil with flavor. This tempering adds depth and complexity to the kadhi, enhancing its overall flavor.
Step 5: Cooking the Kadhi:
Once the tempering is ready, pour in the yogurt-chickpea flour mixture and stir well to combine. Add water to adjust the consistency of the kadhi and bring it to a gentle simmer. Let the kadhi cook for about 10-15 minutes, stirring occasionally, until it thickens slightly and the raw taste of the chickpea flour is cooked out.
Step 6: Adding the Gatte:
Once the kadhi is cooked to perfection, it’s time to add the boiled gatte to the curry. Carefully slice the gatte into bite-sized pieces and add them to the kadhi. Let them simmer in the kadhi for a few minutes to absorb the flavors of the curry and heat through.
Step 7: Finishing Touches:
Before serving, garnish the gatte ki kadhi with freshly chopped cilantro leaves for a pop of color and freshness. You can also sprinkle some roasted cumin powder on top for extra flavor. Serve the kadhi hot with steamed rice or roti for a comforting and satisfying meal.
Tips for Making Perfect Gatte Ki Kadhi:
Ensure the Gatte are Firm: Make sure the gatte dough is kneaded well to avoid any cracks or breakage while boiling.
Adjust the Consistency: If the kadhi is too thick, add more water to thin it out. If it’s too thin, let it simmer for longer to thicken.
Taste and Adjust Seasoning: Taste the kadhi before adding the gatte and adjust the seasoning as needed with salt, red chili powder, or other spices.
Variations of Gatte Ki Kadhi:
Vegetable Gatte Ki Kadhi: Add diced vegetables such as carrots, peas, and potatoes to the kadhi for added texture and nutrition.
Paneer Gatte Ki Kadhi: Substitute paneer cubes for the gatte to create a rich and creamy variation of the dish.
Spinach Gatte Ki Kadhi: Stir in chopped spinach leaves to the kadhi for a vibrant green color and earthy flavor.
Benefits of Including Gatte Ki Kadhi in Your Diet:
Rich in Protein: The combination of chickpea flour and yogurt in gatte ki kadhi provides a good amount of protein, essential for muscle repair and growth.
Probiotic Benefits: Yogurt used in the kadhi is rich in probiotics, which promote a healthy gut microbiome and aid digestion.
Nutrient-Dense: Gatte ki kadhi is packed with vitamins, minerals, and antioxidants from the spices and ingredients used, contributing to overall health and well-being.
Frequently Asked Questions (FAQs) about Gatte Ki Kadhi:
Q: Can I make gatte ki kadhi in advance?
A: Yes, you can make the kadhi base in advance and store it in the refrigerator for up to 2 days. Add the gatte and simmer just before serving.
Q: Can I freeze gatte ki kadhi?
A: While you can freeze gatte ki kadhi, the texture of the gatte may change slightly upon thawing. It’s best enjoyed fresh or stored in the refrigerator for a few days.
Q: Can I adjust the spice level of gatte ki kadhi?
A: Yes, you can adjust the amount of red chili powder and green chilies according to your taste preferences. If you prefer a milder kadhi, reduce the amount of spice used.
For more delicious Rajasthani recipes, visit Manjula’s Kitchen. Explore a variety of traditional dishes from Rajasthan, including dal bati churma, laal maas, and more, to experience the rich flavors and culinary heritage of the region.
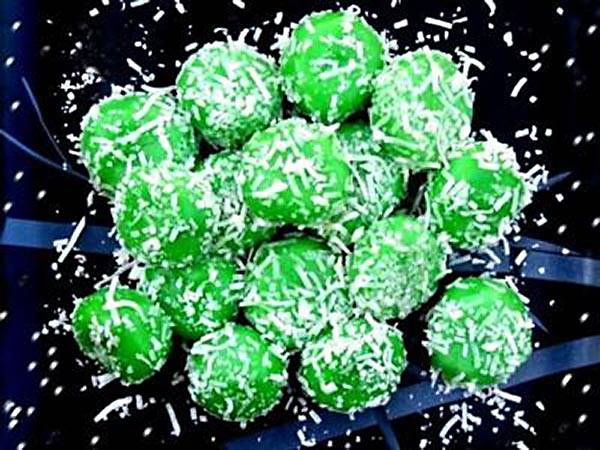
This recipe is called Sweet Rice Balls set for this coming Diwali, and I hope that you will also like it. It's a simple delicious dessert made with coconut milk and rice flour.
1/3 to 1/2 can coconut milk (make it sweet by adding some sugar in it)
1 cup (approx) brown sugar
1/2 cup dried shredded Coconut
1/2 tsp oil
Food Colour (Any colour, I used green)
Instructions
Method
Start by adding 1/3 of a can of coconut milk. Stir the coconut milk into the flour to form a dough.
You may need to add slightly more coconut milk, or more flour depending on how thin your coconut milk is. The dough should be quite stiff, It shouldn't stick to your hands (if it does, it requires a little more flour). If it doesn't stick together, it's too dry – add a little more coconut milk.
Add green colour (up to 1/2 tsp.). It will turn the dough bright green
Stir well to distribute throughout the dough.
Take a little of the dough in your hands. Now roll it between your palms until you've made a ball (like you did when you were a kid with play dough).
Now indent the sticky rice ball with your thumb or finger.
Place about 1/2 tsp. brown sugar in the rice ball. Gently pat the sugar down with your finger. (This sugar will later melt and become a liquid center.)
Pinch the sides to cover the brown sugar and close it. Now take this rather flat rice ball back into your palms. Gently roll it once again to return it to its former ball shape. Place on a plate or cutting board dusted with rice flour.
Now repeat these steps with the rest of the dough until you have lots of sticky rice balls filled with brown sugar, and all of the dough is used up.
Place some water in a large pot on the stove over high heat. When the water is boiling, drop the rice balls into the pot. They will sink to the bottom at first, then gradually rise to the surface.
Now turn the heat down to medium or medium-high, just high enough to keep the water bubbling nicely. Once the balls have risen to the surface of the water, continue cooking for 2 more minutes (3-4 minutes in total).
While the rice balls are cooking, prepare a clean surface on which to place them (a cutting board or your counter will work . Pour a few drops of oil over this surface (up to 1/2 tsp.) and "grease" it as you would a cake pan, or the balls with stick and you won't be able to remove them later
Using a slotted spoon or small strainer, remove the rice balls from the water and place on your prepared surface.
Place the dry coconut in a bowl or spread on a plate. Roll the sticky rice balls in the coconut to coat.
Place the finished rice balls on a plate – OR you can give each one a colorful wrapper by placing them in muffin papers (small or medium size). These balls can be eaten while still warm, or at room temperature.
Notes
Storing Instructions: Do not store in the refrigerator – this will only dry them out. Cover leftovers, or place in a cookie jar or other container on the counter. Try to eat your rice balls as soon as you can – within 24 hours if possible, or they will begin to harden.
Pal Kozhukattai is a popular chettinad sweet dumpling made from rice flour. It's typically prepared on special occasions on Ganesh chaturti. It is also known as milk modak. It can be prepared in many ways. Some recipes use jaggery instead of sugar & normal milk instead of coconut milk. Either way, it tastes delicious.
2 tsp – Cashews (optional, usually we don’t required cashews)
4 Cardamom (peel the skin & powder the seed)
1 tsp Ghee
1/2 tsp Salt
Instructions
For Rice dumpling:
Boil 2 cups of water with salt & ghee.
Low the flame & add rice flour little by little to this boiling water.
Keep stirring without any lumps till it forms a dough consistency.
Turn off the stove and allow it to cool.
Knead the dough gently & rest it for 5 mines.
Grease your palm with little oil & make small balls like gooseberry from the dough.
Rest it for 5-7 mins.
Steam the rice balls for above 5 mins in idly plate or in steamer.
For Milk:
Take 1/2 of the coconut cream & mix with 1/2 cup water and take it as 1st extract.
Mix remaining 1/2 of the coconut cream with 1 1/2 cup of water and take it as 2nd extract.
Notes
Preparation: ( Timing : 1to 1 1/2 hours)
In a pan add 2nd extract milk and rice balls together & allow it boil for 10mins in medium flame.
When the balls float on top add 1 extract and sugar & stir it.
After 5 mins add cardamom powder & turn off the stove.
Transfer to serving bowl & garnish with grated coconut & cashews before serving.
Can be served Hot or Chill.
Note: We can also use fresh coconut. Grind 1/2 medium size coconut with 1/2 cup of water & extract thick milk and keep it as a 1st extract. Again add 1 1/2 cup of water & extract thinner milk and keep it as a 2nd extract. Above procedure can be done using this milk. We can also use Half & Half)