Puran Poli is a sweet flat bread with a sweet dal lentil filling. This is a popular bread in the states of Gujarat and Maharashtra. Puran poli is a wonderful breakfast dish, and can also be served as a snack.
¾ cup Toor dal (Ahrar dal) (available in Indian grocery stores)
1 cup sugar
½ teaspoon turmeric
1 teaspoon cardamom powder (elaichi)
¼ teaspoon nutmeg (jaiphal)
Also Needed
Approximately 3 tablespoons oil
Approximately ½ cup of dry whole wheat to roll the bread
Instructions
Filling
Wash and soak the toor dal in two cups of water for at least four hours. Dal will double in volume after soaking. Discard any remaining water.
Add toor dal and turmeric to two cups of water and cook in a heavy pan over medium-high heat. When dal boils, remove the yellow foam from the top. Reduce the heat to medium and cover the pan.
Let it cook for 25 minutes, adding more water if needed. Dal should be very soft and mushy.
Add sugar and cook until the dal looks like paste and starts to hold together. Add cardamom and nutmeg powder and mix well. The dal filling will be very soft and sticky.
Dough
In a bowl, mix whole-wheat flour, all-purpose flour, and oil; add water slowly to make a very soft dough. The dough should not stick to your fingers. Cover the dough and set it aside. Let it rest for at least ten minutes.
Making Puran Poli
Divide both the dough and the dal filling into ten equal parts. The parts of the dal filling should be about 2½ times that of the dough balls.
Roll the dough balls into 2½”-diameter circles. Place one part of the filling in the center of each. Seal by pulling the edges of the rolled dough together to make a ball. Proceed to make all ten balls. Let the filled balls settle for three to four minutes.
Heat the skillet on medium-high heat. To test, sprinkle a couple of drops of water on the skillet. The water should sizzle right away.
Press the filled ball lightly on both sides on a surface covered with dry whole wheat flour.
Lay the balls on the sealed side up and lightly press them into circles about 2” in diameter. Roll the balls gently into 5” circles. If the dough sticks to the rolling pin or rolling surface, lightly sprinkle dry whole wheat flour on both sides of the semi-rolled puran poli.
Place the Puran poli in the skillet. When it starts to change color, flip it over. You will notice some golden-brown spots.
After a few seconds, spread one teaspoon of oil on the puran poli. Flip them again and lightly press the puffed areas with a spatula. Flip again, and press with the spatula making sure the puran poli are golden-brown on both sides.
Repeat the same process for the remaining.
Puran poli is ready to be served and it tastes best when eaten hot.
Notes
Tips
1. When cooking the dal, use a large pot to prevent it from boiling over, as this can happen very easily.2. Cooked Puran Poli can be stored for a week in the refrigerator. Re-heat over a skillet or in the toaster oven.VariationPuran Poli can be prepared using Chana dal, however, it has to be cooked for a slightly longer time.
Kala Chana is very high protein and provides a nutritional meal. It has a low glycemic index and is a good protein option for people with Diabetes. Kala Chana is a variation of the commonly found chickpea but it is dark brown in color and smaller in size. It is also known as Bengal gram. This recipe goes along nicely with rotis and rice.
1 tablespoon finely chopped cilantro (hara dhania) to garnish
Instructions
Method
Wash and soak kala chana in approx. 4 cups of water, for at least 6 hours. The kala chana will double in volume after soaking.
In a small bowl mix ginger, green chili, coriander powder, turmeric, and chili powder with ¼ cup of water. Set aside.
Heat oil in a pressure cooker over medium high heat. Test the heat by adding one cumin seed and if it cracks immediately, the oil is ready for cooking.
Add cumin seeds and as they crack, add asafetida and gram flour. Stir for few seconds. Add the mixed spices (step 2) and stir for another minute.
Add soaked kala chana, and 4 cups of water to the pressure cooker. Close the cooker. As it starts steaming, turn down the heat to medium and cook for approx. 12 minutes. If your pressure cooker whistles then wait for 4-5 whistles.
Turn off the heat and wait until all the steam has released before opening the pressure cooker.
Add salt and slightly press down on the Kala Chana to thicken the gravy, let it cook for 2-3 minutes on low heat. You can always adjust the consistency of the gravy by adding more water. Simmer for a few minutes after adding the water.
Stir in lemon juice and cilantro, just before serving. This goes very well with plain rice and makes for a complete meal.
Notes
TipKala Chana can also be prepared without a pressure cooker. Just remember to cook on medium heat for 50 minutes to an hour with the lid closed. Unlike other beans, Kala Chana holds its shape well even after cooking, so be sure to test if it has cooked all the way.
Kala chana, also known as black chickpea, is a versatile legume widely used in Indian cuisine. This easy kala chana recipe is a flavorful and nutritious dish that can be enjoyed as a side or main course. Packed with protein, fiber, and essential nutrients, kala chana curry is not only delicious but also beneficial for your health as it is low fat, gluten freewinter special. In this recipe, we’ll guide you through the process of making a delicious kala chana curry that will surely become a favorite in your kitchen.
Step 1: Preparing the Kala Chana:
Before you begin cooking, it’s essential to properly prepare the kala chana. Start by rinsing the black chickpeas under cold water to remove any dirt or debris. Then, soak them in water overnight or for at least 8 hours. This soaking process helps soften the chickpeas, reducing the cooking time and improving their texture. Once the kala chana are soaked, drain the water and they’re ready to be cooked.
Step 2: Sauteing Aromatics:
To infuse the kala chana curry with flavor, we’ll start by sautéing aromatics such as ginger. Next, add minced ginger, and cook for another couple of minutes until fragrant. The aroma of these ingredients will enhance the taste of the curry.
Step 3: Adding Spices:
Spices play a crucial role in Indian cooking, adding depth and complexity to dishes. In this kala chana recipe, we’ll use a blend of spices to create a rich and aromatic curry. Add ground cumin, coriander, turmeric, and garam masala to the ginger. Stir well to coat the aromatics with the spices, allowing them to toast slightly and release their flavors.
Step 4: Cooking the Kala Chana:
Now it’s time to add the soaked kala chana to the pan. Stir well to combine the chickpeas with the aromatic spice mixture. Then, pour in enough water to cover the chickpeas and bring the mixture to a boil. Once boiling, reduce the heat to low and let the curry simmer gently until the kala chana are tender. This may take about 45 minutes to an hour, depending on the freshness of the chickpeas.
Step 5: Finishing Touches:
Once the kala chana are cooked to perfection, it’s time to add the finishing touches to the curry. Taste and adjust the seasoning as needed, adding salt and any additional spices to suit your preference. You can also add a splash of lemon juice for a hint of acidity and freshness. Garnish the kala chana curry with freshly chopped cilantro leaves for a burst of color and flavor.
Step 6: Serving the Kala Chana Curry:
Your kala chana curry is now ready to be served! Spoon the hot curry into serving bowls and garnish with more cilantro leaves if desired. Serve the kala chana curry alongside steamed rice, naan bread, or roti for a satisfying meal. This hearty and nutritious dish is perfect for lunch or dinner, and leftovers can be stored in the refrigerator for a few days.
Tips for Making the Perfect Kala Chana Curry:
Soaking the kala chana overnight helps reduce cooking time and improves texture.
Experiment with different spices and seasonings to customize the flavor of the curry to your liking.
For extra creaminess, you can add a splash of coconut milk or yogurt to the curry.
To make the dish spicier, add chopped green chilies or a pinch of cayenne pepper.
Variations of Kala Chana Curry:
Spinach Kala Chana Curry: Add chopped spinach to the curry for a nutritious twist.
Coconut Kala Chana Curry: Stir in coconut milk for a creamy and indulgent curry.
Tomato Kala Chana Curry: Add diced tomatoes for a tangy flavor and vibrant color.
Benefits of Including Kala Chana in Your Diet:
High in Protein: Kala chana is an excellent source of plant-based protein, making it a great option for vegetarians and vegans.
Rich in Fiber: The high fiber content of kala chana promotes digestive health and helps keep you feeling full and satisfied.
Packed with Nutrients: Kala chana is loaded with vitamins, minerals, and antioxidants that contribute to overall health and well-being.
Frequently Asked Questions (FAQs) about Kala Chana Curry:
Q: Can I use canned kala chana instead of dried chickpeas?
A: Yes, you can use canned kala chana for convenience, but keep in mind that the texture and flavor may differ slightly from dried chickpeas.
Q: Can I freeze leftover kala chana curry?
A: Yes, you can freeze the curry in an airtight container for up to 3 months. Thaw in the refrigerator before reheating.
Q: Is kala chana curry spicy?
A: The level of spiciness can be adjusted according to your preference by controlling the amount of chili powder or green chilies added to the curry.
For more delicious Indian recipes, visit Manjula’s Kitchen. Explore a variety of vegetarian dishes, snacks, desserts, and more to elevate your culinary skills and delight your taste buds.
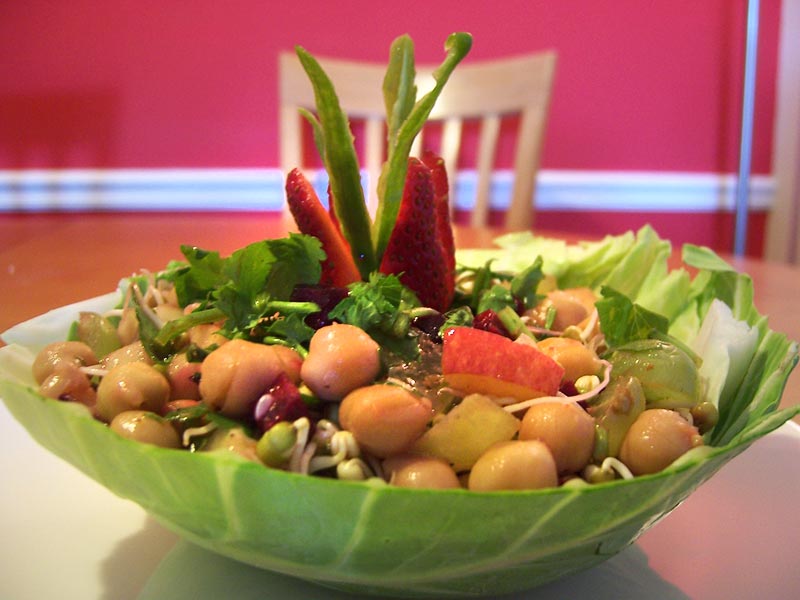
My recipe for this month's contest is Crunchy Bean salad with beetroot and fruits. It is a fresh and healthysalad, and also very quick & easy to prepare. The fruit give this salad a sweet taste.
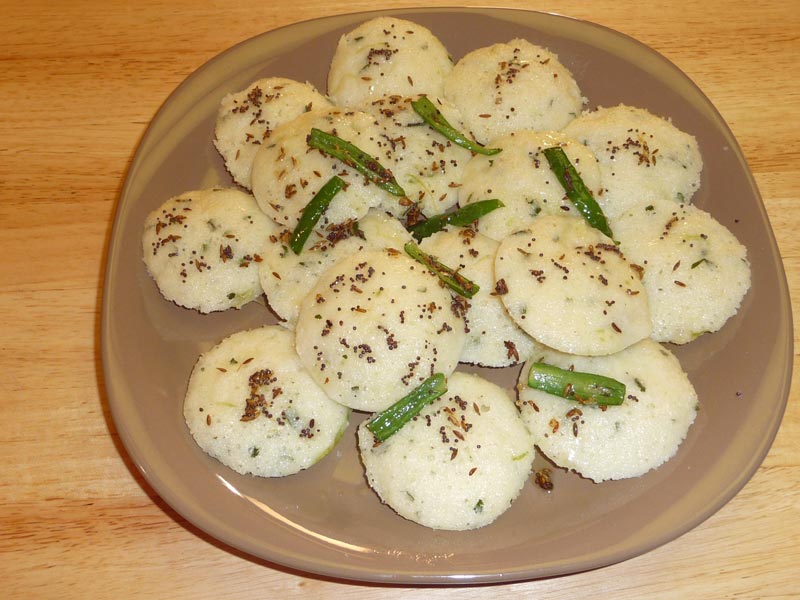
Rava Idli is a popular South Indian dish. The traditional way of making idlis would take two days. This recipe is much quicker and easier, and tastes just as delicious! Rava Idlis can be enjoyed as a snack or as a light meal.
22 green chilies sliced lengthwise and cut in half.
Utensils for Steaming Idlis
Idli stand – this has three to four plates stacked over each other.
Covered pot, large enough to hold the idli stand.
Alternatively, an egg poacher can work just as well,
Instructions
Mix sooji, salt, green chili, ginger, cilantro, cabbage, yogurt, and water (as needed) to make a pancake-like batter. Set aside for at least 30 minutes.
The batter thickens as the semolina absorbs the water. At this point, add a little more water if it is too thick.
Add approximately ¾ cup of water to the pot. Check to make sure that the water does not touch the bottom plate of the idli stand. Bring to boil
Lightly grease Idli plates with oil.
Add Eno Fruit Salt to the batter and mix well. The mixture will begin foaming. Immediately begin pouring into the Idli trays. Place the stand into the steaming pot.
Cover the pot and steam the idlis ten to twelve minutes on medium heat. Insert a toothpick in the center of one idli. If the toothpick comes out clean, remove the stand from the pot. Do not overcook the idlis, as they will lose their softness and dry out as they cool.
Cool for just a few minutes before removing each individual idli. They should come out easily and not stick to the mould. The idlis should be spongy and soft.
For The Seasoning
Heat oil in a saucepan. Add mustard and cumin seeds. When the seeds begin to crack, add the chilies. Stir for a few seconds and remove from the heat.Pour the seasoning over the Idlis on the serving plate.
Notes
TipsYou can replace the cabbage with shredded carrots.This recipe will make slightly more than 16 idlis. If you choose, you can make it in two batches. The batter can be prepared all at once; however, you must add the Eno just prior to pouring into the idli stand.Serving SuggestionsServe seasoned Idlis with coconut or cilantro chutney.Serve Idlis with samber (south Indian vegetable soup). Idlis do not have to be seasoned for that.Stir-fry Idlis in the seasoning oil mixture over medium heat for a few minutes. They will turn slightly brown.
Rava Idli is a popular South Indian dish known for its simplicity and delicious taste. Rava Idli is a fantastic option for a quick & easyappetizer or snack, and it also makes for a convenient lunch box suggestion. Rava idli recipe is a versatile dish that can be enjoyed for breakfast, lunch, or dinner. Made from idli rava, a type of semolina, this dish is easy to prepare and requires minimal ingredients.
Idli rava is coarser in texture compared to regular semolina, giving the idlis a unique taste and texture. In this rava idli recipe, we will explore the process of making rava idli and various tips, variations, and benefits associated with it.
Making Rava Idli: Step-by-Step Guide
Preparation of Batter
To begin rava idli preparation, start by heating a tablespoon of oil in a pan. Add mustard seeds and allow them to splutter. Then, add finely chopped green chilies, grated ginger, and curry leaves for added flavor. Sauté for a few minutes until the raw aroma disappears. Incorporating these spices enhances the taste of rava idli.
Roasting Idli Rava
Next, add idli rava to the pan and roast it for a few minutes until it turns aromatic and light golden brown. Roasting the idli rava adds a nutty flavor to the dish and ensures that the idlis are soft and fluffy.
Preparing the Batter
Transfer the roasted idli rava to a mixing bowl and let it cool slightly. Then, add yogurt and water to the roasted rava and mix well to form a thick batter. Allow the batter to rest for 10-15 minutes to allow the idli rava to absorb the moisture. This step is crucial for achieving the perfect texture in rava idli.
Seasoning the Batter
Meanwhile, prepare the seasoning by heating oil in a small pan. Add mustard seeds, urad dal, and cashew nuts, and fry until the dal turns golden brown and the nuts are lightly roasted. Pour this seasoning over the rava idli batter and mix well. Seasoning adds a depth of flavor to the rava idli and makes it more aromatic.
Adding Baking Soda
Just before steaming the idlis, add baking soda to the batter and mix gently. Baking soda acts as a leavening agent and helps in making the idlis soft and fluffy. However, it’s important not to overmix the batter at this stage to ensure that the idlis remain airy and light.
Steaming the Idlis
Grease the idli molds with oil and pour the batter into each mold. Place the molds in a steamer and steam the idlis for 10-12 minutes or until they are cooked through. Insert a toothpick into the center of an idli to check for doneness. If it comes out clean, the idlis are ready to be served.
Tips for Perfect Rava Idlis
Use fresh idli rava for the best results. Stale or old rava may result in dense and hard idlis.
Adjust the consistency of the batter by adding more water if it’s too thick or yogurt if it’s too thin.
For enhanced flavor, you can add grated vegetables like carrots, peas, or capsicum to the batter.
Serve rava idli hot with coconut chutney or sambar for a wholesome and satisfying meal.
Variations of Rava Idli
Vegetable Rava Idli: Add finely chopped vegetables like carrots, peas, and bell peppers to the batter for a nutritious twist.
Spicy Rava Idli: Increase the quantity of green chilies and add finely chopped coriander leaves for a spicier version of rava idli.
Paneer Rava Idli: Grate paneer and mix it into the batter along with some chopped mint leaves for a rich and flavorful variation.
Masala Rava Idli: Add a teaspoon of garam masala powder to the batter along with some tomatoes for a masaledar twist.
Benefits of Rava Idli
Nutritious: Rava idli is a good source of carbohydrates, proteins, and essential nutrients, making it a wholesome meal option.
Easy to Digest: Since idli rava is made from semolina, it’s easy to digest and is suitable for people of all ages.
Quick and Easy: Unlike traditional idlis, which require fermentation, rava idli can be prepared instantly, making it a convenient option for busy days.
Versatile: You can customize rava idli with different toppings and seasonings to suit your taste preferences.
FAQs about Rava Idli
Can I use regular semolina instead of idli rava?
While you can use regular semolina to make idlis, the texture and taste may vary slightly from traditional rava idli. Idli rava is coarser and gives a unique texture to the idlis.
How long should I steam the idlis?
Steam the idlis for 10-12 minutes or until a toothpick inserted into the center comes out clean. Over-steaming may result in dry and rubbery idlis.
Can I make rava idli without baking soda?
Baking soda helps in making the idlis soft and fluffy. However, if you prefer not to use it, you can substitute it with a pinch of fruit salt or eno.
For more delicious recipes, you can explore other recipes on Manjula’s Kitchen.
Wash karelas thoroughly and using a knife, scrape the skin. Set the scrapes aside.
Make a slit in the karelas length wise and remove the seeds. Add karelas and the skin scrapings to a bowl. Mix and sprinkle with salt and lemon juice. Let it marinate for at least an hour.
Squeeze the karelas to remove all the marinade. Wash karelas twice with hot water and then squeeze out all the water. Separate the scrapings from the whole karelas.
Preparing the Filling:
Heat the oil in a saucepan. Test the heat by adding one cumin seed to the oil; if the seed cracks right away, the oil is ready. Add the cumin seeds and asafetida to the oil. After the cumin seeds crack, add the karela scrapings and stir fry for about 2 minutes.
Add gram flour (besan) and stir-fry for another minute.
Add all the remaining dry spices: coriander powder, fennel powder, turmeric, chili powder, and mango powder. Sauté for a minute and then turn off the heat.
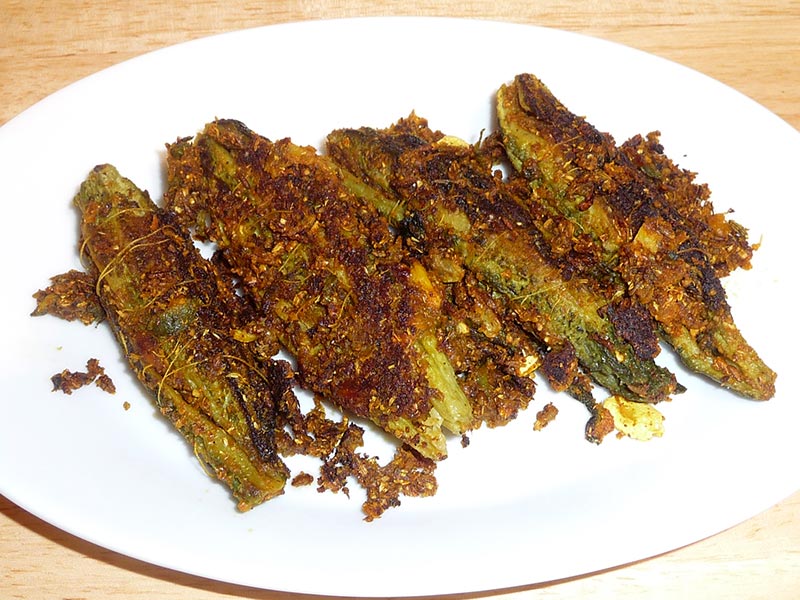
Stuff the split karelas with this spice mixture (there should be some spice mix remaining, which will be used later). Tie the karelas with a thread so that the stuffing does not come out while cooking.
Cooking the Stuffed karelas:
Add 2 tablespoons of oil in a sauce pan over medium heat. Spread the stuffed karelas in the pan and sprinkle with salt. Cover the pan and let it cook for about 2 minutes.
Turn the karelas over to the uncooked side and cook for about 1 minute. Repeat until all four sides of the karelas are cooked.
Sprinkle 2 tablespoons of water and the remaining spice mixture over the karelas. Cover the pan and let it cook for 2 more minutes.
Remove the lid to see if the karelas are tender. Gently turn them over a few more times, making sure they are covered with the spice mixture.
Notes
NotesStuffed karela can be served hot or cold and can be refrigerated up to a week.VariationsFor a slightly sweeter taste add 2 tablespoons of sugar to the cooked spice filling, prior to stuffing the karela.I like to Serve Karela with Urad Dal Tadka, Mixed Dal, Dal Makhini and Rice
Keyword Bitter Melon, Diabetic Friendly, Healthy Side Dish
Diwali is often referred to as the “Festival of Lights” and this year it will be celebrated on Friday November 5th, 2010. It is a Hindu holiday that is celebrated with great enthusiasm, throughout the world. Diwali signifies the victory of good over evil. Most people believe Diwali to be a celebration of the return of Lord Rama to his kingdom, Ayodhya after 14 years of exile and after defeating the demon king, Ravan. Jains celebrate Diwali as the time of attainment of moksha by Lord Mahavir.
My best childhood memories of Diwali are lighting the oil lamps (diyas) and putting string lights around the house. We lighted fireworks with our neighbors and the grownups played cards into the night. I remember helping my mother in the kitchen, cooking delicious food for several days. Shopping for new clothes and buying something new for the kitchen was a definite tradition.
Diwali celebration is actually a 3-day event beginning with the worship of Goddess Lakshmi called “Dhanteras”. The following day is considered pre-Diwali and the final day is the actual celebration of Diwali. My family will be getting together to have dinner and play cards each of the 3 nights, as part of the festivities.
I would like to share with you the menu I have made for this Diwali for my family and maybe this can give you some ideas too.
Menu for Wednesday November 3rd, 2010.
Appetizers: Cheese fondue with Broccoli, Cauliflower, stir fry Potatoes and some bread cubes. I prefer Tuscan or French bread.
Main Course: Matter Paneer, Aloo Gobhi, Chole (chana masala), Spinach Raita, Cumin Rice, and an Indian bread, which I have not decided yet.
Dessert: Boondi ladoo. I will serve just the Sweet Boondis in decorative cupcake liners and drizzle the top with chocolate syrup. My grandkids love it.
Menu for Thursday November 4th
Appetizers: Papdi served with Chole Chat and Salad.
Main Meal: Cabbage Kofta, Sukha Aloo, Vegetable Korma, Yogurt, Rice and Naan.
Dessert: Apple crumb Pie.
Menu for Diwali Day, Friday November 5th
We will have an early dinner and serve appetizers and dessert while playing cards, hopefully late into the night. We are fortunate that this year Diwali falls on a Friday and we can spend time freely with our family.
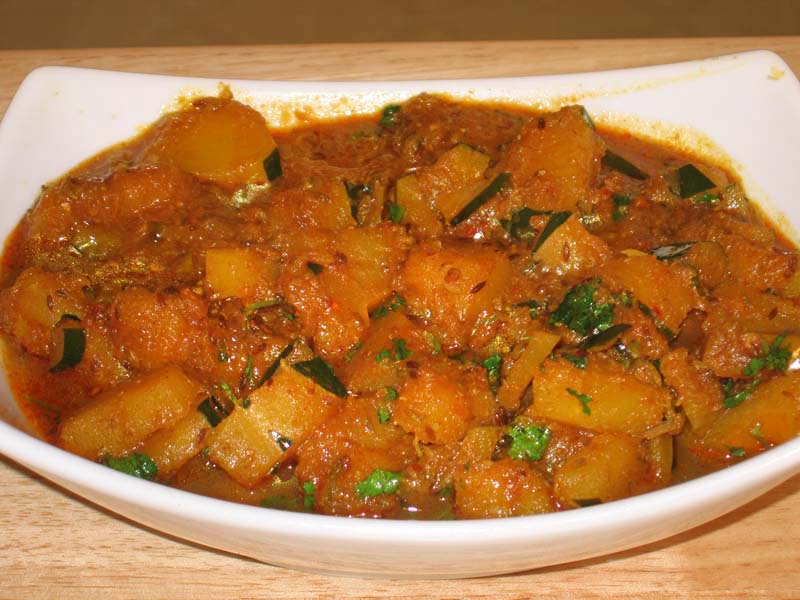
Main Course: Spicy Squash, Potato Curry with Yogurt Gravy, Butter Paneer Masala, Dahi Vada, Dal Puri (I have not posted this recipe yet, but these are whole wheat puris with urad dal filling). This is very typical, traditional holiday bread in north India.
Appetizers: Besan Paare, Crispy Spinach Pakoras, Masala Peanuts, and Muthia.
Dessert: Gajar Ka Halwa, Baklava Rolls, and Kalakand.
Steamed gram-flour dumplings cooked in spicy gravy is a popular North Indian dish from the Indian state of Rajasthan. This mouth-watering dish will surely tantalize your taste buds with its rich, spicy flavors and delightful texture. Ideal for those who crave a hearty and flavorful meal, this Rajasthani delicacy is both satisfying and memorable. Enjoy the authentic taste of Rajasthan with every bite!
1 1/4 cups besan (gram flour) (available in Indian grocery stores)
1/2 teaspoon chili powder adjust to taste
1/2 teaspoon salt
1/8 teaspoon turmeric (haldi)
3 tablespoons yogurt (dahi)
3 tablespoons oil
For the kadhi
1 cup yogurt (dahi)
1 tablespoon besan (gram flour)
1/4 teaspoon turmeric powder (haldi)
1/4 teaspoon chili powder adjust to taste
1 tablespoon coriander powder (dhania)
1 teaspoon salt adjust to taste
2 tablespoons oil
1 teaspoon cumin seeds (jeera)
1/2 teaspoon mustard seeds (rai)
1/8 teaspoon asafetida (hing)
4 whole red chilies
1 bay leaf (tejpat)
1 black cardamom optional
1/2 teaspoon paprika (dagi mirch)
For Garnish
2 tablespoons chopped cilantro
Instructions
For Gattes
Mix all the ingredients in a mixing bowl and gather into a soft dough, adding a little water if needed. At this point the dough will be a bit sticky; wetting your fingers with oil or water will help.
Divide the dough into four or five parts. Roll each one between your palms into a long, smooth log, approx. five” in length and ¾” in diameter. You will need to oil your palms to prevent the dough from sticking.
Bring three cups of water to a boil in a pot. Gently drop the gatte logs into the boiling water and cook for four to five minutes, or until they begin to float up to the surface.
Remove the cooked Gatte logs from the water and let them cool.
Slice the logs into approx. ¾ inch pieces. Set the Gatte aside.
For The Kadhi
Mix yogurt and gram flour into a smooth paste. Add turmeric, chili powder, and coriander powder to the yogurt paste.
Pour the oil into a saucepan over medium heat. Test the heat by adding one cumin seed to the oil. If the cumin seed cracks immediately, the oil is ready. Add the cumin seeds, mustard seeds, and asafetida.
When seeds crack add the whole red chilies, bay leaf, cardamom, and paprika. Stir for a few seconds.
Pour in the yogurt paste and stir for two minutes. Add three cups of water and stir until the gravy comes to a boil. Add salt to taste.
Add the gatte to the gravy. Cover and cook over low-to-medium heat for 20 minutes or longer. Turn off the heat.
Add cilantro and cover the pot for a few more minutes.
Now you are ready to serve!
Notes
Other Suggestions
A slice of gatte can be cooked in advance and added to the gravy later. Gatte can be frozen for up to a month or refrigerated for a few days.
Slices of gatte are used to make a wide variety of dishes, including subji (cooked dry vegetables), rice pulao, etc.
A slice of gatte can be fried and served as a snack.
A slice of gatte can be used to make raita (mixed with yogurt).
Gatte Ke Kadhi is a traditional North Indian dish made primarily with chickpea flour (besan) dumplings cooked in a tangy yogurt-based curry/gravy. The dish is gluten-free and suitable for individuals observing a gluten-free diet. It is often prepared during festive occasions like Karwa Chauth, a Hindu festival where married women fast for the well-being and longevity of their husbands. The addition of lentils (Dal) and vegetables enhances the nutritional value of the dish, making it a wholesome and flavorful option for a vegetarian meal.
Gatte ki kadhi, also known as gatta kadhi or gatte ki sabji, is a traditional Rajasthani dish that combines chickpea flour dumplings (gatte) with a tangy yogurt-based curry (kadhi). This hearty and flavorful dish is a staple in Rajasthani cuisine and is often enjoyed with rice or roti. In this recipe, we’ll show you how to make Rajasthani gatte ki kadhi from scratch, so you can enjoy the authentic flavors of Rajasthan in the comfort of your own home.
Step 1: Preparing the Gatte:
To start, we’ll prepare the gatte, which are the chickpea flour dumplings that give this dish its unique texture. In a mixing bowl, combine chickpea flour (besan), yogurt, salt, red chili powder, turmeric, and a pinch of asafoetida (hing). Knead the mixture into a smooth dough, adding water as needed to achieve the right consistency. Divide the dough into small portions and shape them into cylindrical dumplings.
Step 2: Boiling the Gatte:
Next, we’ll boil the gatte to cook them through before adding them to the kadhi. Bring a pot of water to a boil and gently add the gatte to the boiling water. Let them cook for about 10-12 minutes, or until they float to the surface and are cooked through. Once cooked, remove the gatte from the water and set them aside to cool slightly.
Step 3: Preparing the Kadhi Base:
While the gatte are boiling, we’ll prepare the kadhi base. In a separate bowl, whisk together yogurt, chickpea flour, turmeric, red chili powder, and salt until smooth. This mixture will form the base of the kadhi and give it its creamy texture. Be sure to whisk out any lumps to ensure a smooth consistency.
Step 4: Tempering the Kadhi:
In a large pan, heat oil and add mustard seeds, cumin seeds, fenugreek seeds, and dried red chilies. Let the seeds splutter and release their aroma, infusing the oil with flavor. This tempering adds depth and complexity to the kadhi, enhancing its overall flavor.
Step 5: Cooking the Kadhi:
Once the tempering is ready, pour in the yogurt-chickpea flour mixture and stir well to combine. Add water to adjust the consistency of the kadhi and bring it to a gentle simmer. Let the kadhi cook for about 10-15 minutes, stirring occasionally, until it thickens slightly and the raw taste of the chickpea flour is cooked out.
Step 6: Adding the Gatte:
Once the kadhi is cooked to perfection, it’s time to add the boiled gatte to the curry. Carefully slice the gatte into bite-sized pieces and add them to the kadhi. Let them simmer in the kadhi for a few minutes to absorb the flavors of the curry and heat through.
Step 7: Finishing Touches:
Before serving, garnish the gatte ki kadhi with freshly chopped cilantro leaves for a pop of color and freshness. You can also sprinkle some roasted cumin powder on top for extra flavor. Serve the kadhi hot with steamed rice or roti for a comforting and satisfying meal.
Tips for Making Perfect Gatte Ki Kadhi:
Ensure the Gatte are Firm: Make sure the gatte dough is kneaded well to avoid any cracks or breakage while boiling.
Adjust the Consistency: If the kadhi is too thick, add more water to thin it out. If it’s too thin, let it simmer for longer to thicken.
Taste and Adjust Seasoning: Taste the kadhi before adding the gatte and adjust the seasoning as needed with salt, red chili powder, or other spices.
Variations of Gatte Ki Kadhi:
Vegetable Gatte Ki Kadhi: Add diced vegetables such as carrots, peas, and potatoes to the kadhi for added texture and nutrition.
Paneer Gatte Ki Kadhi: Substitute paneer cubes for the gatte to create a rich and creamy variation of the dish.
Spinach Gatte Ki Kadhi: Stir in chopped spinach leaves to the kadhi for a vibrant green color and earthy flavor.
Benefits of Including Gatte Ki Kadhi in Your Diet:
Rich in Protein: The combination of chickpea flour and yogurt in gatte ki kadhi provides a good amount of protein, essential for muscle repair and growth.
Probiotic Benefits: Yogurt used in the kadhi is rich in probiotics, which promote a healthy gut microbiome and aid digestion.
Nutrient-Dense: Gatte ki kadhi is packed with vitamins, minerals, and antioxidants from the spices and ingredients used, contributing to overall health and well-being.
Frequently Asked Questions (FAQs) about Gatte Ki Kadhi:
Q: Can I make gatte ki kadhi in advance?
A: Yes, you can make the kadhi base in advance and store it in the refrigerator for up to 2 days. Add the gatte and simmer just before serving.
Q: Can I freeze gatte ki kadhi?
A: While you can freeze gatte ki kadhi, the texture of the gatte may change slightly upon thawing. It’s best enjoyed fresh or stored in the refrigerator for a few days.
Q: Can I adjust the spice level of gatte ki kadhi?
A: Yes, you can adjust the amount of red chili powder and green chilies according to your taste preferences. If you prefer a milder kadhi, reduce the amount of spice used.
For more delicious Rajasthani recipes, visit Manjula’s Kitchen. Explore a variety of traditional dishes from Rajasthan, including dal bati churma, laal maas, and more, to experience the rich flavors and culinary heritage of the region.
This was another tough month in choosing a winner. There were many great recipes, but ultimately, I had to choose only two out of all the great entries. Here are the winners.
FIRST PLACE:
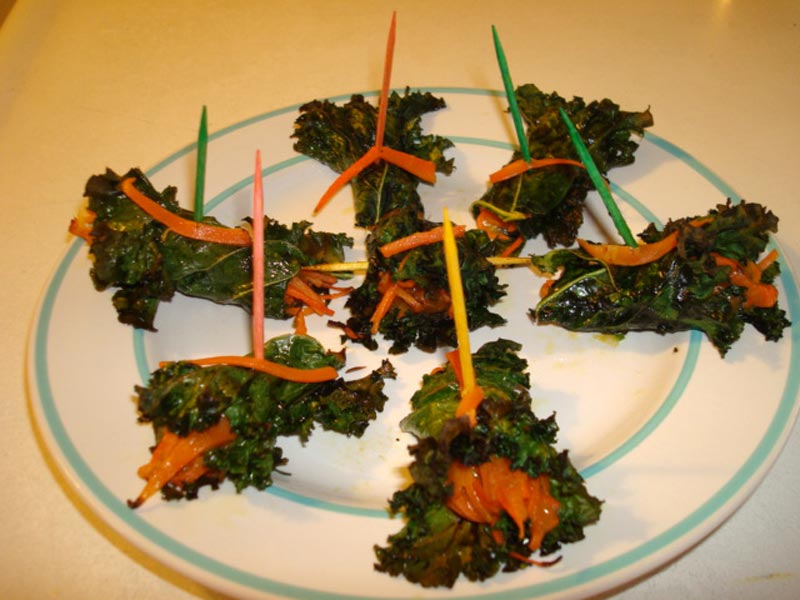
Charu Nagi wins again two months in a row! This unique recipe is called Kale Carrot wrap. The full recipe is listed below.
“Sometime ago, I was watching a TV program in which a chef named “Walter” showed a very easy recipe. He used meat as a filling and cabbage as a wrap. He blanched the whole cabbage and baked the wrap to make it crisp. I like the idea of wrapping and baking but I did wanted to use the whole cabbage. So I thought I will try with kale leaves but I didn’t know what should be the filling. I wanted to use something vegetarian, but what! I didn’t know. So I couldn’t decide what to use and eventually forgot about it. And then after reading about the May monthly contest, I thought to use carrots as the filling. But again, I thought how am I going to give it a mushy consistency. After thinking a lot, I came up with the idea to cook carrot with milk to make it soft, and then add cheese to give it a sticky consistency. And this is how I came up with this appetizer dish. It turns out very tasty, everybody loved it in my house. Crispy kale gave a kick and cheesy carrot just melted in the mouth. I believe it is a good appetizer dish, which can be made ahead of time. Anyone can make it to please their guest.”
SECOND PLACE:
Porselvi Alaqupackiam created a dish which she calls Spiky Carrot Crunchy. Her recipe is also listed below.
“I wanted to present simple but traditional recipe. So I decided to make Murukku which is special in all parts of India with different names like Murukku, chakli etc. This recipe is simple and it requires no special preparation efforts and anyone can follow this and get tasty murukku.”
I would also like to congratulate our other top contributors. Thank you so much for participating and I hope to see more for next contest:
Serves 2-3 people
Recipe should make about 12 pieces
Ingredients:
1 medium shredded carrot ( may also use thinly sliced carrot about 1inch long)
2-3 Kale leaves ( Fold the leaves and slice down the stem)
2-3 Tablespoon of milk
1 1/2 teaspoon oil ( I used olive oil)
1 small finely chopped green chili or to your taste (remove seeds)
1 pinch of salt or to your taste
1 pinch of black pepper or to your taste
1 teaspoon chopped coriander
1/2 teaspoon cumin seeds
3 tablespoon of cheese or to your taste
Method
Pre-heat the oven to 375 degree F.
In a saucepan, heat the oil on medium, add cumin seeds.
After cumin seeds crack, add green chilly. Cook for 30 sec.
Next step is to add shredded carrot and stir for a 30 sec.
Now add milk and cook until carrot soak all the milk (it took me about 5-6 min). Keep stirring.
After milk is dry turn off the gas stove. Remove the saucepan from gas stove. Carrot should be soft.
Now add pinch of salt, black pepper, cheese and coriander.
Mix everything well set it aside and let the carrot mixture cool for 5 min
Take kale leaves and wash them very well.
Now fold the kale leaves and slice down the stem and then cut the leaves 5 to 6 inches long.
Next place kale leave on the cutting board.
Next take about 1/2 table spoon of carrot mixture and place it over kale and wrap it around.
To make sure it won’t open place a tooth pick.
Brush some oil on kale wrap ( I don’t have brush so I used my finger 🙂 )
Grease baking tray and put kale wrap on it.
Now bake for about 7-10 min, until kale become crispy. Keep watching it, to make sure it doesn’t get burned.
After kale become crispy remove the tray out of oven.
Serve and Enjoy.
Serving Suggestions
Garnish with a piece of shredded carrot
Change the tooth-pics when serving to guests.
May used non-toxic colored tooth-pics for fun.
Porselvi’s Spiky Carrot Cruncy Recipe
Time – approx 60 min
Below ratio makes 15 to 20 counts.
Ingredients:
1 cup of finely shredded carrot
1 cup rice flour
1/2 cup Roasted Bengal gram (Pottukadalai)
1 tablespoon roasted urad dhal
1 tablespoon whole pepper
3 tablespoon melted butter
1/4 teaspoon Asafoetida
1 teaspoon sesame seeds
1 cup water
Oil for frying
Salt to taste
Method
Cook 1 cup shredded carrot with 1/4 cup water until fully cooked.
Cool the cooked carrot and grind into a smooth paste.
Make fine powder out of roasted bengal gram, roasted urad dhal and whole pepper and keep it aside.
Combine together cooked carrot paste, rice flour, roasted bengal gram urid dhal pepper powder, melted butter, asafoetida, sesame seeds, and salt. Make into a ball by adding little by little water.
Prepare the Chakli press (Take the 1 star attachment and fix it) by filling the above mixture.
Heat oil for frying in a kadai.
Take a small plate, turn it and apply little oil in it( 2, 3 drops).
Make nice spirals ( any number of rounds) on that plate.
Fry these spirals one at a time keeping oil in medium hot.
Once again, this month was very difficult in choosing a winner as there were so many great entries. But in the end, I had to make a choice and the winners are listed below. Be sure to try their recipes!
FIRST PLACE:
Sharmila Krishnamurty from San Diego created a dish called Cauliflower Parupu Usli which comes from the region of Tamil Nadu. The full recipe is listed below.
“I can’t tell you how thrilled I am at winning first prize! As a child I never helped my mother in the kitchen but would happily assist my father fix things around the house. After getting married I insisted that my husband and I live close enough to my parents’ place. The first few trials at cooking were an absolute disaster. My husband and I then settled on a routine where we would go to my parents’ place almost every single day for food. I started cooking here in the US as I had no other option and with the help of websites like yours plus my husband’s backing, I have reached a point where I can gladly announce that I am now a confident cook.”
SECOND PLACE:
Shina Goel also created a great recipe called Nutty Cauliflower Chickpeas Kofta. Her recipe is also listed below.
I would also like to congratulate our other top contributors. Thank you so much for participating and I hope to see more for next contest:
This is a recipe that was given to me by my dear mother in law. Parupu usli is a popular method of making dry sabzis in Tamil Nadu and the cauliflower is often replaced with beans or cabbage.
Probably enough for 2-3 people.
Ingredients:
Cauliflower – 1 small ( approx 3 cups of cut florets)
Turmeric – 1/2 tsp
Salt to taste
Initial Seasoning:
Oil – 1 tsp
Mustard seeds – 1/2 tsp
Urad dal – 1/2 tsp
Curry leaves – 2 or 3
For parupu usli:
Toor dal – 3 Tbs
Channa dal – 3 Tbs
Asafoetida – 1/4 tsp
Dry red chillies – 3 or 4
Salt to taste
Method:
Soak the toor dal and channa dal in hot water for about 5 mins. Grind into a coarse paste with asafoetida, red chillies, salt and a little bit of water
Then steam cook the above paste for about 20 – 25 mins on medium high flame in a cooker without a whistle (just like how it is done for idlis or muthias). This step drastically reduces the amount of oil required to make this dish. This will turn the paste into a crumbling mixture of cooked dals also known as parupu usli.
Take 5 cups of water and bring to a boil. Add the turmeric and salt to the boiling water. Blanch the cut florets in that water for about 5 mins or till the florets are semi cooked such that they still have some crunch left in them. Drain the florets and keep aside.
Take a pan and put in a tsp of oil. When hot enough add the mustard seeds, urad dal and curry leaves as initial seasoning. Add the parupu usli and roast till slightly brownish. Then
add the drained florets and a little bit of salt (only if required). Cover and cook on low heat for about 4-5 mins.
Serve hot with mor-kozhambu (a South Indian kadi) and piping hot rice.
Shina’s Nutty Cauliflower – Chickpeas Kofta
Ingredients:
Koftas:
1 cup cauliflower shredded
2 green chillies, finely chopped
1-2 tbsp chickpea flour or gram flour (besan)
1 tsp finely chopped ginger
1/2 tsp fenugreek seeds
1/2 tsp cumin
1/2 tsp garam masala
1/2 tsp turmeric
3/4 cup boiled chickpeas
1/2 cup shredded paneer
4 tsp finely chopped cashews nuts
pinch of salt
oil for deep frying
Gravy:
2 tbsp oil
1 tsp ginger paste or finely chopped
1 tsp coriander powder
1/2 tsp garam masala
1 tsp cumin
Pinch of asafoetida
1/4 cup of chick peas paste
1/2 tsp turmeric
1/2 tsp red chilli powder
1/2 cup mashed tomatoes
1/4 cup yogurt
Salt to taste
2 tsp Green cliantaro (hara dhania)
Method:
Wash and saok the chickpeas in water overnight or at least 7-8 hours.
Add water and ½ tsp salt. Boil it in pressure cooker until tender.
Drain the water of chickpeas and save it for the gravy.
Mesh ¾ of the chickpeas in bowl with the back of fork or potato masher, it should not be very fine for the kofta.
Shred the cauliflower and squeeze the water from cauliflower by keeping it between palms, save this water for mixture.
Now put cauliflower, cashew nuts, chickpeas, paneer and all the koftas ingredients together and mix well, if it is very dry add the cauliflower water, the mixture should be soft dough and not too watery.
Make small 1-2 inch diameter balls with greased hands and keep them in a greased plate.
Place the kadhai on medium heat for frying of these koftas, put the oil 2 inches of the height of kadhai. Koftas should be dipped fully once when dipped in oil.
To check the heat try small amount of mixture if it float in oil means oil is ready. Now put the koftas one by one in kadhai but do not fill the kadhai all once otherwise kaoftas will burst and mix together.
Fry the koftas at medium heat otherwise koftas will not cook from inside.
Turn the koftas occasionally and when it turns golden brown at all around, take out on a paper towel.
Gravy
Take 2 tbsp of oil in a pan and keep it at medium heat. To check the heat first add 1-2 seeds of cumin if cracks, add cumin, and asafoetida.
Add tomatoes, ginger and all spices, stir it until it becomes half or tomatoes start to leave the pan.
Now add yogurt and stir it for another 1-2 minutes.
Make the paste of chickpeas in grinder and add it and fry it for a minute.
Now add cauliflower water and chickpeas drained water if needed add some normal water. Approximately 1 cup water should be added in the gravy. Stir it and leave it to boil. Water can be adjusted according to taste.
After coming to boil the gravy, add koftas and boil it for another 3-4 minutes and put the heat off.
Garnish the koftas with hara dhania and serve hot with chapatti, parantha or rice.
It was very encouraging to see so many great entries this time around and I really had a difficult time choosing the winners! I was doubtful when I started these monthly contests that enough people will participate, but I feel reassured now. I want to thank everyone for taking part in this one, and congratulate the winners, Rinku and Priya. I hope to see many more participants next month. I will announce the next contest for March very soon. Stay tuned.
FIRST PLACE:
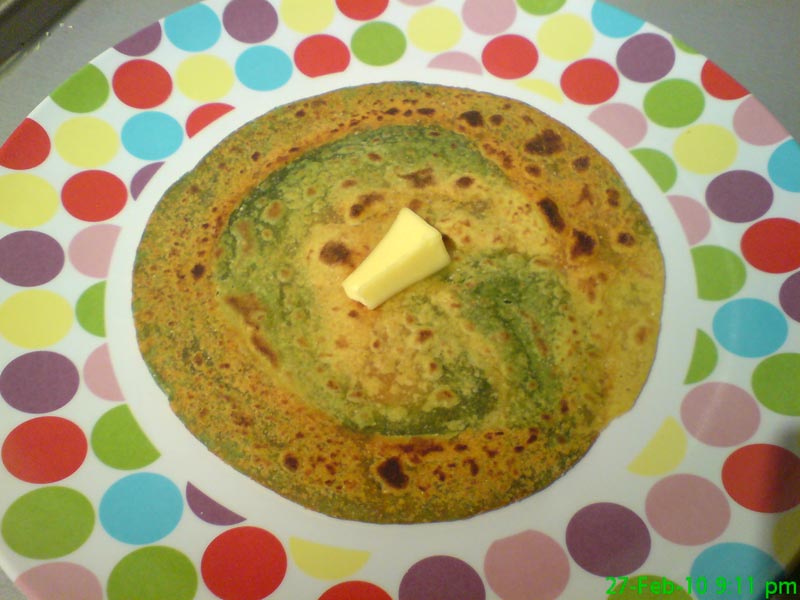
Rinku Parikh Sharma from the UK created a very colorful variation which she calls Rangeela Paratha. The full recipe is listed below.
“I have 2 kids. They are bored of eating same type of parathas so I keep making paratha with different things. Kneading the dough with Dal , tomato puree, spinach puree, left over rice and many more. So this time to make it little different and to give lots of color to it I thought why not put this three dough together and make paratha. With only one color the look of the paratha doesn’t make much difference. Then it came how to roll it that the colors should come evenly. After doing it in many ways I found out that the one which I have written here come very color full. So this is the way I came up with this recipe. Hopefully you will like it too.”
SECOND PLACE:
Priya Suresh created another amazing version using carrots. Her Carrot Paratha recipe is also listed below.
“I am a big lover of carrots and I thought of making some special with carrots so that’s the idea of carrot parathas.”
I would also like to congratulate our other top contributors. Thank you so much for participating and I hope to see more for next contest:
Take flour, mix salt , red chilli and oil and divide it in three parts (put it in three different bowl).
In the first portion put turmeric and carom seeds (ajwain). Put a little water to make a soft dough (add water as needed).
In the second portion put the tomato puree. Mix it well and then add very little water to make a soft dough.
In the third portion put the spinach puree. Mix it well and then if needed add very little water to make a soft dough.
Leave the dough for at least ten minutes or more.
Divide each coloured dough in 2 further parts and make balls. ( 2 with turmeric powder yellow colour, 2 with the tomato puree red colour and 2 with the spinach puree green colour)
Take 1 ball of red colour and press flat , on top of that put the yellow ball and press flat and at the end put the green ball and press flat. ( so top will be green then yellow and then red ball)
Put some dry flour on both the sides and roll in to a 3 inch circle.
Now put the green part on the top and apply 2 drop of ghee or butter and then fold it twice in length and then fold it inwards (it will become like a ball).
Then press it and put some dry flour and roll in to a 6-inch circle. ( use the dry flour just enough you need to roll the paratha, too much use of flour will make the paratha dry).
Heat the tava on medium high heat. (Iron tava works best)
Place the paratha over tava. After paratha start changing color and start puffing in different places flip the paratha over.
Apply some ghee/butter on the first side and then flip again and apply some ghee/oil on the other side.
Take a flat spatula and press lightly on the puffed parts of the paratha. This will help the paratha puff up .
Flip the paratha again. The paratha should have light golden-brown spots on both sides.
Now the Rangeela Paratha is ready to eat with Boondi Raita, Pickle and Chutney. And even kids can just roll it and eat like a wrap.
Priya’s Carrot Paratha
Ingredients:
Dough
whole wheat flour – 1cup
water – 1/2 cup
salt – a pinch
For Filling
carrots – 3 no.
cumin powder – 1/2 spoon
red chilli powder – 1/2 spoon
salt – 1/4 spoon
garam masala – 1/2 spoon
Also needed
1/4 cup whole-wheat flour for rolling
Oil to cook
Method:
Mix flour, salt and water to make a soft dough.
Knead the dough by hand on a greased surface to make a smooth dough.
Cover the dough with a damp cloth and rest it for 10 min.
Now take carrots, Peel the carrots and grate it.
Add salt, red chilli powder, cumin powder, garam masala powder to the grated carrots.
Mix well and Squeez this mixture and remove water from it and keep aside.
Divide the dough and carrot mixture into 6 equal parts.
Roll the dough into 3 inch diameter circles. Put the carrot filling in the center. Seal by pulling the edges of the rolled dough together to make a ball. Proceed to make all six balls.
Each ball needs to settle for two minutes before rolling.
Heat the skillet on medium high.
To make it easier to roll the balls, first roll them in dry whole-wheat flour.
Lightly press the ball with sealed side on the top when rolling. Roll the ball lightly into a circle. To reduce the stickiness on the rolling surface, sprinkle dry whole-wheat flour on both side of the paratha.
Take a pan, heat it and fry the parathas slowly. Fry them on both the sides with butter or ghee or oil.
1/2 cup of green string beans, sliced ½ inch pieces
1 cup of celery, sliced in ½ inch pieces
3 medium size tomatoes cut into 8 pieces
About ½ inch ginger thin sliced
1½ teaspoon salt
1/2 teaspoon turmeric (haldi)
1/2 teaspoon black pepper
Chaunk (seasoning):
2 tablespoon clarified butter (ghee) or 2 tablespoons oil
1/2 teaspoon cumin seed (jeera)
1/2 teaspoon garam masala
Half a lemon
Instructions
Method:
Wash lentils and soak in 2 cups of water for 1 hour or longer. Once soaked, the lentils should be about double in volume.
Heat 4 cups of water in a pressure cooker on medium high heat. Next add soaked lentils, salt, turmeric, black pepper, ginger, carrots, green beans, celery, and tomatoes.
Close the pressure cooker and put the weight on (or seal the exhaust).
As the pressure cooker starts steaming turn the heat down to medium and cook for about 6 minutes.
Turn off the heat and wait until the steam has stopped before opening the pressure cooker.
Mix dal well, if dal is thick add more boiling water and make the consistency as you desire. Soup should be chunky.
Chaunk (seasoning):
For seasoning (chaunk) heat the butter in a small saucepan, add cumin seeds and wait until cumin seed crack. Then pour it over the soup.
Add garam masala to the soup and mix it well.
Before serving squeeze, a few drops of lemon juice.
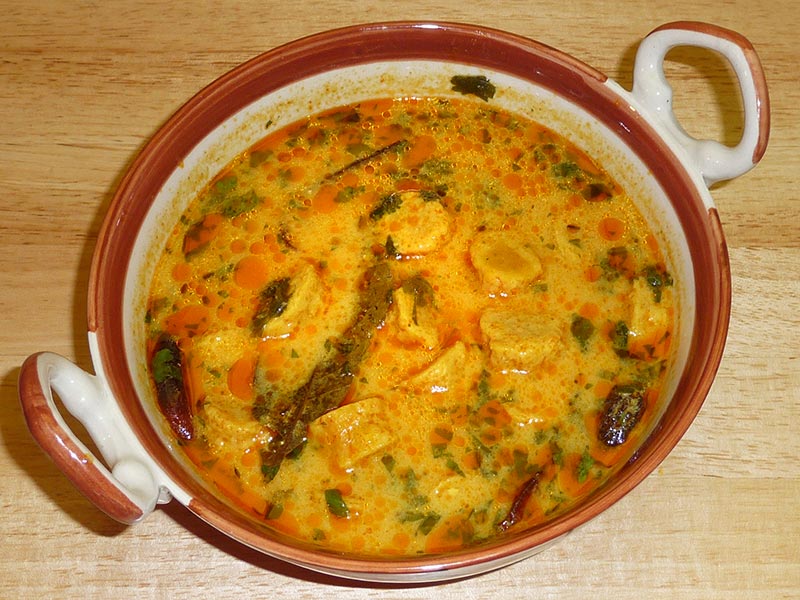
Lentil Vegetable Soup is a nutritious and hearty dish that combines lentils with various vegetables to create a flavorful and satisfying meal. It is suitable for individuals with diabetes, as it is low in cholesterol, low in fat, and gluten-free. Additionally, it is high in protein, making it a great option for those looking to increase their protein intake. This soup is perfect for winter months and can be easily packed into lunch boxes for a nutritious meal on the go. It is a wholesome option for anyone looking for a healthy and filling soup or salad option.
Lentil Vegetable Soup is a comforting and nutritious dish that is perfect for chilly days or whenever you’re craving a hearty meal. Packed with protein-rich lentils and a variety of colorful vegetables, this soup is not only delicious but also easy to make. In this recipe, we’ll show you how to make red lentil vegetable soup step by step, so you can enjoy its warmth and goodness at home.
Step 1: Gathering Ingredients:
To begin making Lentil Vegetable Soup, gather all the necessary ingredients. You’ll need red lentils, mixed vegetables such as carrots, celery, and bell peppers, along with tomatoes. Having all the ingredients prepared and ready will make the cooking process smoother and more efficient.
Step 2: Preparation of Vegetables:
Start by washing and chopping the vegetables for the soup. Dice the carrots, celery, and bell peppers into small, bite-sized pieces. Finely chop tomatoes, mince and dice the tomatoes. Preparing the vegetables in advance ensures that they cook evenly and helps to build layers of flavor in the soup.
Step 3: Sauteing Aromatics:
In a large pot or Dutch oven, heat olive oil over medium heat. Then, add the minced and cook for another minute until aromatic. The combination forms the base of the soup and adds depth of flavor.
Step 4: Adding Vegetables and Lentils:
Once the aromatics are sautéed, add the chopped vegetables to the pot. Stir well to coat the vegetables with mixture. Then, add the rinsed red lentils to the pot along with vegetable broth or water. Stir everything together and bring the soup to a gentle simmer.
Step 5: Simmering the Soup:
Let the Lentil Vegetable Soup simmer over medium-low heat for about 20-25 minutes, or until the lentils and vegetables are tender. Stir occasionally to prevent the lentils from sticking to the bottom of the pot. The soup will thicken as it cooks, creating a hearty and satisfying texture.
Step 6: Seasoning and Adjustments:
Once the soup is cooked through, season it with salt, pepper, and any other desired herbs or spices such as thyme, oregano, or bay leaves. Taste and adjust the seasoning according to your preference. You can also add a splash of lemon juice for a hint of acidity and brightness.
Step 7: Finishing Touches:
Before serving, garnish the Lentil Vegetable Soup with freshly chopped parsley or cilantro for a pop of color and freshness. Ladle the hot soup into bowls and serve with crusty bread or crackers for a complete meal. This hearty and nutritious soup is sure to warm you up from the inside out.
Tips for Making the Best Lentil Vegetable Soup:
Use Fresh Ingredients: Fresh vegetables and herbs will give the soup the best flavor and texture.
Don’t Overcook Lentils: Be careful not to overcook the lentils, as they can become mushy. Cook until they are tender but still hold their shape.
Adjust Consistency: If the soup is too thick, you can thin it out with more vegetable broth or water. If it’s too thin, let it simmer for longer to reduce and thicken.
Variations of Lentil Vegetable Soup:
Curried Lentil Vegetable Soup: Add curry powder or paste to the soup for a spicy and aromatic twist.
Coconut Lentil Vegetable Soup: Stir in coconut milk for a creamy and indulgent flavor.
Italian Lentil Vegetable Soup: Add diced tomatoes, cannellini beans, and Italian herbs such as basil and rosemary for an Italian-inspired version of the soup.
Benefits of Including Lentil Vegetable Soup in Your Diet:
Rich in Protein: Lentils are a great source of plant-based protein, making this soup a filling and satisfying meal.
Loaded with Fiber: Both lentils and vegetables are high in fiber, which promotes digestive health and helps keep you feeling full and satisfied.
Packed with Vitamins and Minerals: Lentil Vegetable Soup is packed with essential nutrients such as vitamin C, vitamin A, iron, and potassium, contributing to overall health and well-being.
Frequently Asked Questions (FAQs) about Lentil Vegetable Soup:
Q: Can I freeze Lentil Vegetable Soup?
A: Yes, Lentil Vegetable Soup freezes well. Let it cool completely before transferring to freezer-safe containers. Thaw in the refrigerator overnight before reheating.
Q: Can I use other types of lentils in this soup?
A: Yes, you can use other varieties of lentils such as green lentils or brown lentils if you prefer. Keep in mind that cooking times may vary.
Q: Is Lentil Vegetable Soup gluten-free?
A: Yes, Lentil Vegetable Soup is naturally gluten-free, making it suitable for those with gluten intolerance or celiac disease.
For more delicious soup recipes, visit Manjula’s Kitchen. Explore a variety of vegetarian soups, including lentil soups, vegetable soups, and more, to warm up your soul and tantalize your taste buds.
This year Diwali falls on October 17th – which is conveniently on a Saturday!
Diwali is often referred to as the “Festival of Lights” and is a celebration of joy and happiness. Diwali signifies the victory of good versus evil. Hindus celebrate Diwali throughout the world with great enthusiasm.
There are many traditions that are followed when celebrating Diwali. Preparations for Diwali often include cleaning your home and opening the windows to welcome the Goddess of Wealth, Lakshmi, into your home. Candles and lamps are lit as a greeting to Goddess Lakshmi, hence the name “Festival of Lights”. Gifts are exchanged and festive meals are prepared. Lively fireworks, and games of cards are enjoyed to celebrate Diwali!
This year I am especially excited for Diwali because I have a new granddaughter and this is her first Diwali.
I have been busy preparing some delicious desserts. The sweet smell of cardamom and saffron has infused the whole house! Gujias are typically prepared as a main sweet snack for Diwali. However, this year, I have decided to go a different route and prepare a variety of sweets such as coconut burfi, boondi ka ladoo, gulab jamun and shakkar para.
In celebration of Diwali, my family has helped decorating the house including the Christmas lights. I am hoping Mansi (my Granddaughter) will be able to help me to decorate the front entrance of the house with rangoli.
We will be kicking off the Diwali festivities with a family dinner at my house the day before actual Diwali. This celebration is called “Choti Diwali”. I will be preparing a traditional dinner for my family. The menu is puris filled with urad dal, spicy squash, Bhindi, matar paneer, dahi vada, and cumin rice. For dessert we will have gulab jamun and bondi ka ladoo.
After dinner, keeping in tradition with Diwali celebrations, we will be playing cards. I plan to serve spicy peanuts, burfi and of course chai. My husband is an expert at preparing chai so he will take on that task!
Diwali day we will have family get together our son’s home. I will post photographs of our celebrations soon!
Sprout lentil (dal)salad is a colorful, refreshing, nourishing dish, a good source of protein and calcium. This salad can be served as a light lunch. This is an easy recipe to prepare.
Mix all the salad dressing ingredients together. Set aside.
Cook the sprouts with salt and ¼ cup water in a saucepan. Bring it to a boil and cook two minutes. Cover the pan for three to four minutes. Drain off any liquid.
Let the sprouts cool to room temperature and add the dressing.
In a serving dish arrange tomatoes, cucumber, and oranges. Top with the spiced sprouts.
Garnish with cilantro and green chili.
Notes
How to make sproutsSoak the whole moong ten to twelve hours in four parts water. (Soaking will double the volume of the moong).Line a colander from the moong and loosely wrap the beans in the muslin cloth. Store the soaked beans in a warm dark place for a day or two (a closed, unheated oven, for example, or on the countertop covered with a heavy cloth) until sprouted.SuggestionsSprouts can be refrigerated for four to five days.Sprouts salad makes a good lunch to take to the office or school.
Peel and cut the squash into cubes. Save about ¼ of the squash peel and chop them.
In a small bowl, mix the shredded ginger, coriander powder, funnel, red chili powder, paprika, turmeric, and ¼ cup of water to make a paste.
Heat the oil in a pan. Test the heat by adding one cumin seed to the oil; if seed cracks right away oil is ready. Add cumin seeds and asafetida after seeds crack add fenugreek seeds and red chilies and stir for a few seconds.
Add the spice paste and stir-fry for a minute until spices start leaving the oil.
Add the squash, squash peels, salt, and ¼ cup of water. Mix well. Cover the pan and let it cook on medium heat until the vegetables are tender. Squash will be semi mushy.
Make sure to stir gently every 3 to 4 minutes. Check if more water is needed.
Lastly, add the mango powder, sugar and chopped cilantro. Mix everything and cover for a minute. Adjust the salt to your taste.
Notes
Tips: I have used acorn squash but any squash can be used whatever is available for example banana squash, butternut squash, buttercup squash etc. The only one I know does not work is spaghetti squash and pumpkin.Suggestion: The recipe is with many blends of spices and great aroma makes a great dish to serve with plain rice. Just make the dish with extra gravy by adding more water on step 9. Serve with Puri, in North India Spicy Squash served with Urad Dal Puri.
Indian Squash Recipe | Butternut Squash Indian Recipes | Manjula’s Kitchen
Indian cuisine is renowned for its rich and diverse flavors, one such delightful gluten-free vegetable curry-based Indian Squash Recipe is spicy squash Indian curry a dish that embraces the vibrant colors and aromatic spices synonymous with Indian cooking. To start select a fresh squash, preferably Butternut or Acorn Squash, though other options like banana squash or buttercup squash can also be employed. It’s worth noting that spaghetti squash and pumpkin are not recommended for this particular squash recipe Indian.
The first step involves the preparation of the squash, a crucial task to ensure the perfect texture in the final dish. Peel and cut the squash into cubes, reserving about ¼ of the squash peel for later use. This unique touch adds both texture and visual appeal to the Butternut Squash Sabzi.
The heart of the dish lies in the aromatic spice blend that brings the Indian flavors to life. In a small bowl, combine shredded ginger, coriander powder, funnel, red chili powder, paprika, turmeric, and water to create a flavorful paste. This amalgamation of spices forms the base, infusing the squash with a medley of tastes that are quintessentially Indian.
As the pan sizzles with anticipation, heat the oil to the right temperature. A simple test with cumin seeds determines the readiness of the oil; a crackling cumin seed indicates the perfect moment. Add cumin seeds, asafetida, fenugreek seeds, and red chilies to the hot oil. The ensuing aroma is a testament to the robust flavors that will unfold.
The spice paste takes center stage as it sizzles in the pan. Stir-fry for a minute until the spices release their essence into the oil, creating a tantalizing blend. Now, it’s time for the star of the show – the cubed squash, along with the reserved squash peels. Sprinkle salt, add water, and cover the pan, allowing the vegetables to simmer and tenderize. The squash transforms into a semi-mushy consistency, absorbing the myriad spices infused in the dish.
A gentle stir every few minutes ensures even cooking, and periodic checks determine if more water is needed to maintain the desired texture. The Butternut Squash Sabzi takes shape, with the kitchen filled with the heady aroma of Indian spices.x
In the final act, add mango powder, sugar, and chopped cilantro, elevating the dish with a burst of tanginess and freshness. The amalgamation of flavors is perfected as everything melds together under the lid for a minute. A final adjustment of salt ensures the dish is tailored to individual taste preferences.
As the Butternut Squash Sabzi graces the dining table, it presents a feast for the senses. The blend of spices, the semi-mushy texture of the squash, and the infusion of mango powder create a symphony of flavors that captivate the palate. This Indian squash recipe is not just a dish; it’s a celebration of culinary prowess and cultural richness amongst all other butternut squash Indian recipes.
For those seeking variety in acorn squash recipes, this recipe seamlessly transitions to accommodate Acorn Squash. The versatility of this Indian squash recipe allows for a delightful twist using acorn squash, offering a slightly different flavor profile while still capturing the essence of Indian cuisine. Acorn squash recipes in Indian households often mirror the steps of this Butternut Squash Sabzi, proving that the charm of this dish transcends the specific type of squash used.
In the realm of squash recipes Indian cuisine has a lot to offer, this Butternut Squash Sabzi stands out as a testament to the creativity and depth of flavor inherent in Indian cooking. Its adaptability with various types of squash ensures that households can explore the rich tapestry of Indian cuisine, savoring the distinctive tastes and aromas that make every bite a culinary adventure. Whether served with plain rice or accompanied by Urad DalPuriin North India, this spicy squash dish is a gastronomic delight that bridges the gap between tradition and innovation in the realm of Indian cooking.
I am so excited about my upcoming cooking classes presented by Mingei International Museum. The museum is an art / cultural museum in San Diego’s Balboa Park. One of my past students asked me to participate in this event. The three 1 day classes will be held at Bloomingdale’s in the Fashion Valley mall.
If you live in the area and want to attend the class, please call Mingei Museum 619-239-0003, x133 or go www.mingei.org/indiancooking website to sign up.
Class schedule:
Tuesday, September 22nd 5:30 – 7:00pm
Tuesday, September 29th 5:30 – 7:00pm
Tuesday, October 6th 5:30 – 7:00pm
Bloomingdale’s Fashion Valley, The Main Course on 3
$50 per ticket is tax deductible
15% discount when purchasing all three sections.
Open to 30 participants each session.
Non-members will receive two tickets to Mingei International Museum