Best Indian Dishes for a Party: Delicious and Easy Party Foods
Hosting a party is all about creating memorable experiences, and what better way to do that than with delicious food? Indian cuisine offers some of the best Indian dishes that are perfect for any celebration. Whether you’re looking for easy party foods, party food ideas, or the best Indian dishes for a party, Manjula’s Kitchen has a range of recipes to impress your guests. Let’s explore some fantastic dishes that will make your next gathering a hit.
Classic Indian Party Food Ideas
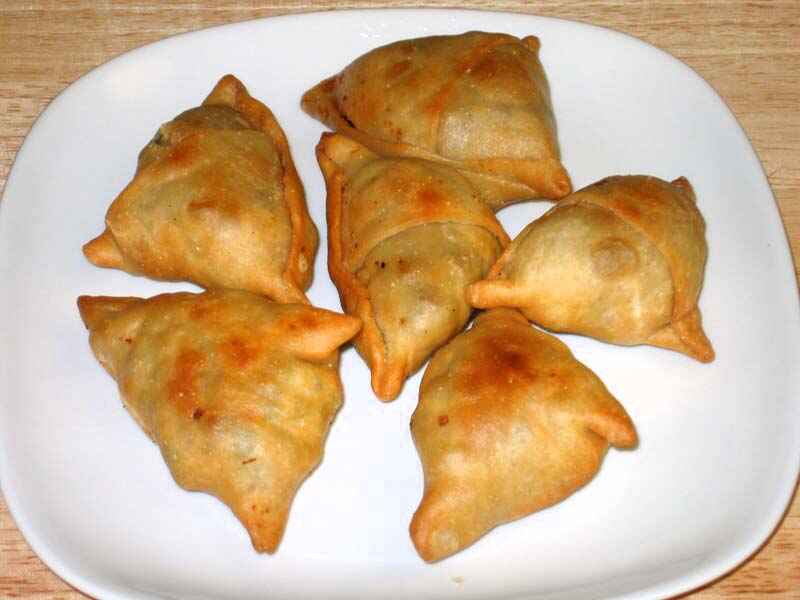
Samosas
Samosas are one of the best Indian dishes that you can serve at a party. These crispy pastries filled with spiced potatoes and peas are a favorite among many. They are easy to make and can be prepared in advance, making them one of the best Indian dishes for a party. Serve them with indian chutney such as mint and tamarind sauce for an added burst of flavor.
Pakoras
Pakoras are another popular choice for easy party foods. These deep-fried fritters made with vegetables like spinach, and potatoes are perfect for any occasion. The crunchy exterior and flavorful interior make them a hit with guests. Pair them with a spicy chutney for the perfect party snack.
Easy Party Foods: Indian Style
Paneer Tikka
Paneer Tikka is a delicious and healthy Indian veg appetizer that fits well within easy party foods. Marinated paneer cubes are grilled to perfection, creating a smoky and flavorful dish. This dish is not only easy to prepare but also a crowd-pleaser, making it one of the best Indian dishes for a party.
Vegetable Biryani
Vegetable Biryani is a fragrant and flavorful rice dish cooked with a variety of vegetables and aromatic spices. This dish is perfect for large gatherings as it can be made in large quantities. Biryani is always a hit at parties, making it one of the top party food ideas.
Best Indian Dishes for a Party
Chole Bhature
Chole Bhature is a classic North Indian dish that is perfect for parties. Spicy chickpea curry served with fluffy deep-fried bread is a combination that is hard to resist. This dish is filling and delicious, making it one of the best Indian dishes for a party. Serve it with a side of pickles and yogurt for a complete meal.
Aloo Tikki
Aloo Tikki are spiced potato patties that are crispy on the outside and soft on the inside. These are perfect as appetizers or snacks at a party. They are easy to prepare and can be served with various chutneys, making them one of the top party food ideas.
Vegetarian Party Food Ideas
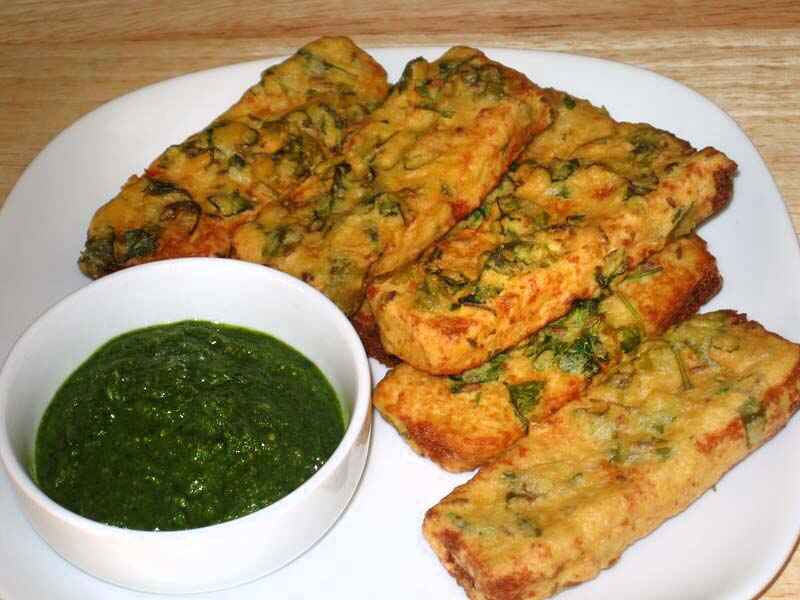
Hara Bhara Kabab
Hara Bhara Kabab is a nutritious and delicious vegetarian kabab made with spinach, peas, and potatoes. These kababs are a great addition to your list of best Indian dishes for a party. They are healthy, tasty, and easy to make, making them perfect for any gathering.
Dahi Puri
Dahi Puri is a popular Indian street food that is perfect for parties. Crisp puris are filled with spiced potatoes, chickpeas, yogurt, and chutneys, creating a burst of flavors in every bite. This dish is easy to assemble and always a hit with guests, making it one of the best Indian dishes for a party.
Indian Desserts for Parties
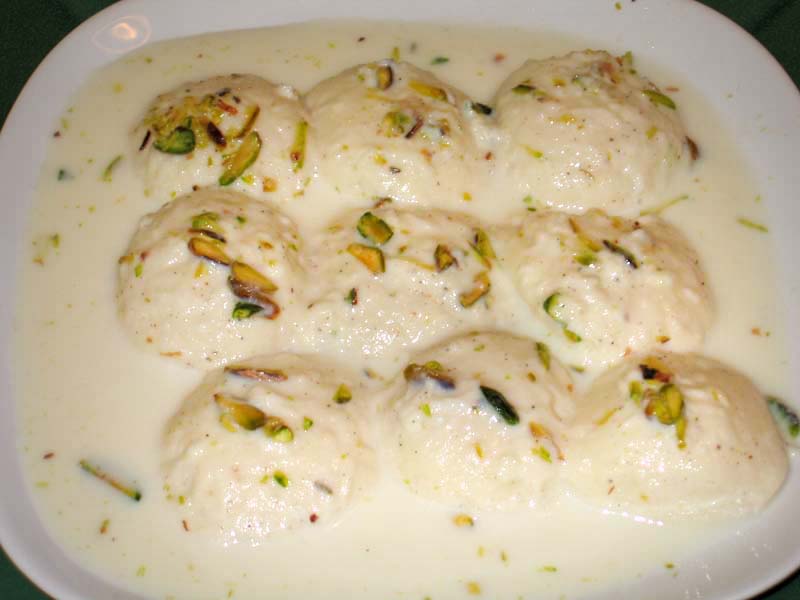
Gulab Jamun
Gulab Jamun are soft, deep-fried balls made from khoya (dried milk) soaked in a sweet syrup flavored with cardamom and rose water. This Indian dessert is a favorite among many and is perfect for any celebration. The melt-in-your-mouth texture and sweet flavor make it one of the best party food ideas for dessert.
Kheer
Kheer is a creamy rice pudding flavored with cardamom and garnished with nuts and raisins. This dessert is a classic in Indian cuisine and is easy to prepare in large quantities, making it one of the best Indian dishes for a party.
Elevating Your Party Menu
To enhance your party menu, consider incorporating dishes from related categories that complement these best Indian dishes. Adding Indian snacks like samosas and pakoras can offer a delightful variety of flavors and textures.
For a sweet ending, explore Indian desserts such as gulab jamun and kheer. Including healthy options like hara bhara kabab and paneer tikka can provide lighter choices for your meals.
Planning a large gathering? The popular party recipe category is filled with dishes that are sure to impress your guests and make your celebration memorable. Adding North Indian recipes like chole bhature or vegetable biryani can bring an authentic touch to your meal.
Frequently Asked Questions (FAQs)
Q: What are some popular easy party foods?
A: Some popular easy party foods include Samosas, Pakoras, Paneer Tikka, Aloo Tikki, and Vegetable Biryani. These dishes are flavorful, easy to prepare, and perfect for any gathering.
Q: How can I make traditional Indian dishes suitable for a party?
A: To make traditional Indian dishes suitable for a party, try recipes like Chole Bhature, Hara Bhara Kabab, and Dahi Puri. These recipes are modified to be easy to serve and can be made in large quantities.
Q: What are some vegetarian Indian dishes for a party?
A: Some vegetarian Indian dishes for a party include Hara Bhara Kabab, Dahi Puri, Paneer Tikka, and Aloo Tikki. These dishes are healthy, delicious, and sure to impress your guests.
Q: Can I prepare Indian party recipes in advance?
A: Yes, many Indian party recipes can be prepared in advance and stored. Dishes like Vegetable Biryani and Chole Bhature can be made ahead of time and refrigerated, while appetizers like Samosas and Pakoras can be prepped and frozen.
Q: What are some sweet Indian dishes for a party?
A: Some sweet Indian dishes for a party include Gulab Jamun and Kheer. These desserts are classic, easy to prepare, and perfect for any celebration.
Conclusion
Best Indian dishes for a party are a celebration of diverse flavors and nutritious ingredients. Whether you’re looking for easy party foods, party food ideas, or the best Indian dishes for a party, these recipes will bring variety and flavor to your celebrations. So, gather your ingredients, try out these recipes, and enjoy the rich and diverse world of Indian party foods. Happy cooking and happy entertaining!
By incorporating these dishes into your party menu, you’ll be able to enjoy a wide variety of delicious and nutritious foods. Whether you’re hosting a small gathering or a large celebration, there’s an Indian party recipe to suit every taste. Don’t forget to check out Manjula’s Kitchen for more inspiration and culinary delights. Happy cooking and happy eating!
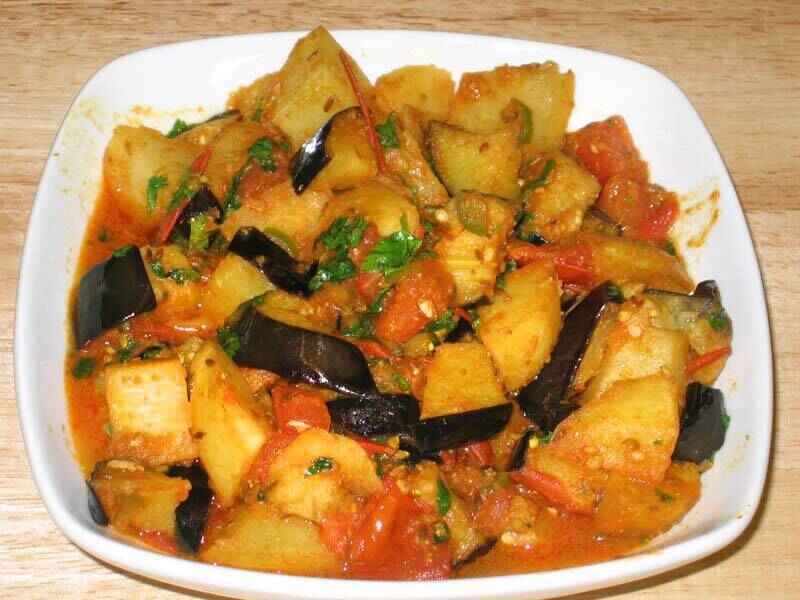
1medium purple eggplantbaingan, un-peeled, cut into 1/2″ cubes
2medium russet potatoesaloo, peeled and cut into 1/2″ cubes
4medium tomatoestamatar cut into 1/2″ cubes
2Tbspcilantrochopped, hara dhania
1Tbspoil
Pinchof asafetidahing
1tspcumin seed
1green chilichopped, adjust to taste
1tspginger pasteadrek
1Tbspcoriander powderdhania powder
½tspturmerichaldi
½tsppaprikadagi mirch
1tspsaltadjust to taste
2Tbspwater
Also needed
Oil to fry
Instructions
Heat the oil in a frying pan over medium high heat.
Frying pan should have at least 1 ½ inch of oil. To check if the oil is ready, put one piece of potato in the oil. The potato should sizzle right away. If vegetables are fried in low heat they will be very oily.
Fry the potatoes till they are cooked through, turn the potatoes few times while frying. Take out potatoes with a slotted spoon (this allows excess oil to drip back into the frying pan) and place on a paper towel.
Test the oil again with a piece of eggplant. Fry the eggplant pieces same way.
In a small bowl, mix the shredded ginger, green pepper, coriander powder, paprika, turmeric, and 2 tablespoons of water to make a paste.
Heat the 1 tablespoon of oil in a pan. Test the heat by adding one cumin seed to the oil; if seed cracks right away oil is ready.
Add cumin seeds and asafetida after seeds crack add the spice mixture and stir-fry for a minute until you see the oil start to separate from the spice mixture.
Add chopped tomatoes stir-fry for a minute.
Add fried potatoes and eggplant mix it gently, let it simmer for three to four minute on medium low heat.
Subji should be not very dry if needed add three to four spoons of water.
Turn off the heat and add chopped cilantro mix it well.
Papdi (papri) Chaat is my kind of food and there are so many kinds of chaat. Chaat is a popular street food all over India. Chaat is basically different varieties of snacks served with tamarind or hari (cilantro) chutney or with hot spice mix. The definition of chaat literally is "to taste".Recipe serves 4 to 6
Mix the flour, sooji, salt, and oil in a bowl. Add water to the mixture a little at a time, kneading to form firm dough.
Cover the dough and set aside for 15 minutes or more.
Divide the dough into about 3 equal parts.
Roll one section of the dough to eight inches in diameter, fairly thin – about thickness of dime. Do the same with the remaining two parts.
Prick the rolled dough firmly every quarter-inch or so with a fork to keep the papdi from puffing while frying. Using a sharp knife, cut the rolls into 1½-inch squares.
Heat the oil in about one inch of oil in a frying pan over medium heat. To test, drop a small piece of dough in the oil. The dough should sizzle but come up to the surface slowly. If the dough rises
immediately, let the oil cool slightly and try again.
Place just enough papdi to cover the oil in the frying pan in a single layer. Don’t crowd them.
Fry the papdi until both sides are a light golden brown.
Remove cooked papdi with a slotted or mesh spoon and transfer to a plate. Continue cooking the remaining papdi in batches.
After the papdi cool to room temperature they should be crisp.
Papdi can be stored in airtight container for 1 month.
Making the Garnish
Mash the chickpeas lightly and mix with hari (cilantro) chutney to your taste. Keep aside.
Put the yogurt into a bowl and whisk until smooth. Add a little milk as needed to consistency of pancake batter. Add salt to taste. Set aside
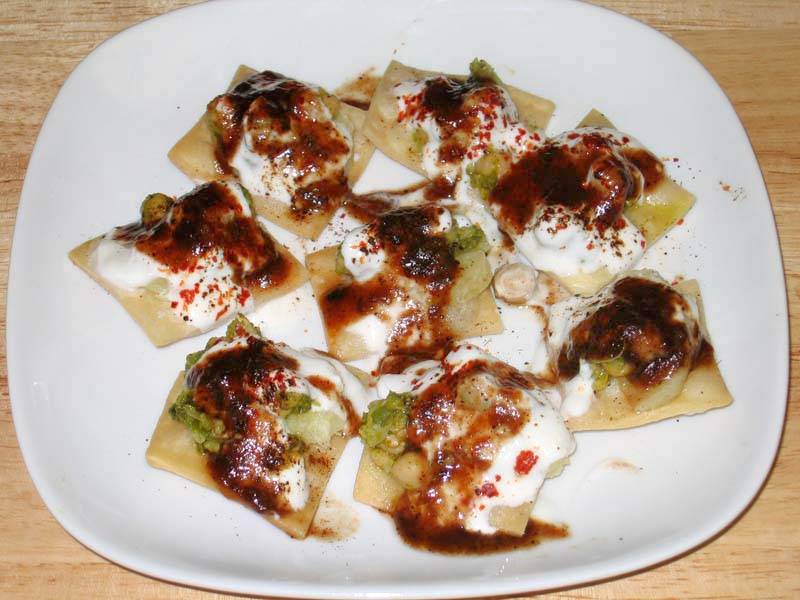
Arrange the papdi on a large plate.
Place a slice of potato on top of each papdi (does not need to be the exact size). Place ½ teaspoon of the chickpea mixture over each potatoa slice.
Drizzle yogurt over each papdi.
Sprinkle roasted cumin powder, and red chili to your taste.
Finish the papdi chat by drizzling with tamarind chutney.
Notes
To make round papdi, divide the dough in about 30 equal parts and roll them individually into 2½-inch rounds. Prick with a fork in four to five places.
Papdi Chaat, a popular street food delicacy, combines crispy papdi with a tantalizing mix of appetizers and chaat elements, creating a flavorful explosion that delights the taste buds. Papdi chat is a delightful Indian street foodsnack that tantalizes the taste buds with its crispy papdis, tangy chutneys, yogurt, and assorted toppings. This papdi chat recipe promises to deliver an explosion of flavors in every bite, making it a perfect choice for parties, gatherings, or simply as a savory indulgence.
How to Make Papdi Chat
To create this mouthwatering delicacy, start by preparing the papdis, the essential base of the dish. Combine all-purpose flour, semolina, carom seeds, and salt in a mixing bowl. Knead the ingredients into a firm dough, adding water gradually. Roll out the dough thinly and cut it into small rounds. Prick the rounds with a fork and deep fry until golden brown and crispy. Drain excess oil and set aside.
Next, prepare the tangy tamarind chutney by simmering tamarind pulp, dates, jaggery, and spices until thickened. Strain the mixture to remove any solids, resulting in a smooth, flavorful chutney. Similarly, whip up a refreshing mint chutney by blending mint leaves, coriander, green chilies, and yogurt into a smooth paste.
Now, assemble the papdi chat by arranging the crispy papdis on a serving plate. Drizzle generous amounts of both chutneys over the papdis, followed by spoonfuls of beaten yogurt. Sprinkle chaat masala, roasted cumin powder, and red chili powder for an extra kick of flavor. Top it off with tomatoes, and fresh coriander leaves.
Serve the papdi chat immediately, allowing everyone to enjoy the perfect blend of textures and tastes.
Tips for Making Papdi Chat
Crispy Papdis: Ensure the papdis are rolled out thinly and fried until crisp to achieve the perfect texture.
Chutney Consistency: Adjust the consistency of the chutneys by adding water gradually while cooking to achieve the desired thickness.
Topping Variation: Experiment with different toppings such as boiled potatoes, chickpeas, or sev to add more depth to the flavor profile.
Spice Level: Adjust the amount of green chilies and red chili powder according to your preference for spice.
Variations of Papdi Chat
Dahi Papdi Chat: For a creamier variation, substitute beaten yogurt with thick, creamy yogurt or hung curd.
Healthy Twist: Replace fried papdis with baked or air-fried versions for a healthier alternative.
Fusion Flavors: Experiment with fusion flavors by incorporating ingredients like avocado, salsa, or shredded cheese for a unique twist on the traditional recipe.
Benefits of Papdi Chat
Rich in Flavors: Papdi chat combines a variety of flavors, textures, and spices, making it a truly indulgent treat for the taste buds.
Nutrient-Rich Ingredients: Ingredients like yogurt, chickpeas, and fresh vegetables provide essential nutrients like protein, fiber, vitamins, and minerals.
Cultural Experience: Enjoying papdi chat offers a cultural experience, allowing you to savor the vibrant street food culture of India.
FAQs (Frequently Asked Questions)
Q: Can I prepare the papdis ahead of time?
A: Yes, you can prepare the papdis in advance and store them in an airtight container once cooled to maintain their crispiness.
Q: Can I make the chutneys ahead of time?
A: Absolutely, both tamarind and mint chutneys can be prepared in advance and stored in the refrigerator for several days.
Q: Can I make papdi chat without yogurt?
A: Yes, you can omit yogurt or use a dairy-free alternative like coconut yogurt for a vegan version of the dish.
Papdi chat is a versatile and beloved snack that never fails to impress with its burst of flavors and textures. Whether enjoyed as an appetizer, a snack, or a light meal, this recipe promises to be a crowd-pleaser at any gathering or occasion. So, gather your ingredients and embark on a culinary journey to recreate this iconic Indian street food delight in your own kitchen!
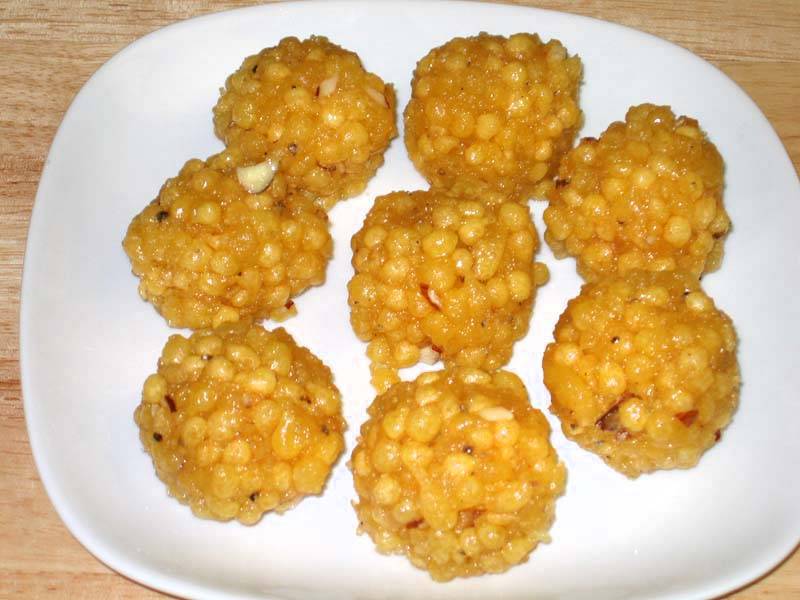
Boondi Ladoo is a popular mouthwatering dessert and must to have at all special occasions all over India. Boondis are very small, round deep-fried balls that have been soaked in fragrant sugar syrup. After soaking, the syrup is drained, and the syrup infused boondi are formed into balls (ladoos). It is a popular sweet delicacy made during festivals like Diwali or Holi.
Perforated Spoon, Skimmer, or Ladle: to make Boondi
The critical part of boondi making is to use the right kind of utensil for the batter to drop through the holes into the hot oil to form the little pearl shaped fried balls. To accomplish this you need to use a flat skimmer, strainer or perforated ladle that has several round holes on the surface, each about the size of a whole black peppercorn.
Instructions
Crack open the cardamom pods and remove the seeds. Crush the seeds and keep aside.
Put the water and sugar in a saucepan and bring to a boil on medium-high heat. When the syrup comes to a boil, turn the heat down to medium and stir to dissolve the sugar. Let it simmer until the syrup is about half thread consistency or 220 degrees on the candy thermometer.
Mix the gram flour with water to make a smooth pancake-like batter or slightly thicker than dosa batter.
Heat the oil in a frying pan on medium high heat. The frying pan should have at least 1 1/2 inches of oil. Tip: To test if the oil is the right temperature, drop a pinch of batter into the oil; if it rises immediately without changing color then the oil is ready to start frying the
Hold the skimmer about 1 to 1 1/2 inches above the oil over the center of the frying pan with one hand. With your other hand pour some of the batter onto the skimmer to cover all of the holes without spilling over the edge of the skimmer. Tip: if you hold the skimmer higher than 11/2 inches above the oil boondi will not be round.
The batter will start dropping through the holes into the oil. If the batter doesn’t drop right away through the holes, pour the batter on the skimmer back into the batter bowl, mix a little more water to the batter and start again. Drop enough boondi into the oil so they just cover the surface of the oil in frying pan in a single layer
Fry them until the sound of sizzling stops and boondis are light gold in color but not crispy! Lift the boondi out of the oil with a slotted spoon (this allows excess oil to drip back into the frying pan) and put them directly into the warm syrup and mix.*
Before making the next batch of boondi, wipe clean the skimmer. This helps to keep the boondi round.
Repeat the process of making boondi and adding to the syrup with rest of the batter. You may have to adjust the heat in between making boondis.
When finished frying the boondi, let them soak in the syrup for few minutes. Add the crushed cardamom seeds and sliced almonds to the syrup. Now drain off the excess syrup.
If the boondis are still hot, let them sit only until they are warm enough to handle – don’t let them to cool off. If the boondis become cold you will not be able to form them into ladoos.
To make the ladoos, scoop up some of the boondi mixture into your palm with a spoon. Gently squeeze the mixture between both palms to shape into a round ball about the size of a golf ball. As you are squeezing some of the syrup will come out. You can make the ladoo larger or smaller if you have a preference.
As you finish making each ladoo, put it on a plate and continue on to make the next ladoo.
As the Ladoos cool to room temperature they will become firm but they should still be moist.
Notes
Shelf LifeLadoos will keep at room temperature in a covered container for up to 10 days and for one month in the refrigerator.TipsIf the syrup is not of the right temperature, you will not be able to form the ladoos.If the boondis cool down to room temperature before being shaped into balls, the sugar will crystallize.If you are not able to make ladoos, don’t worry. You can still enjoy them as “meethi boondi” or sweet boondi.*If you like the boondi for raita or making some other salty snack don’t add to the syrup.
Keyword Festival Special, Kid Friendly, Popular Dessert
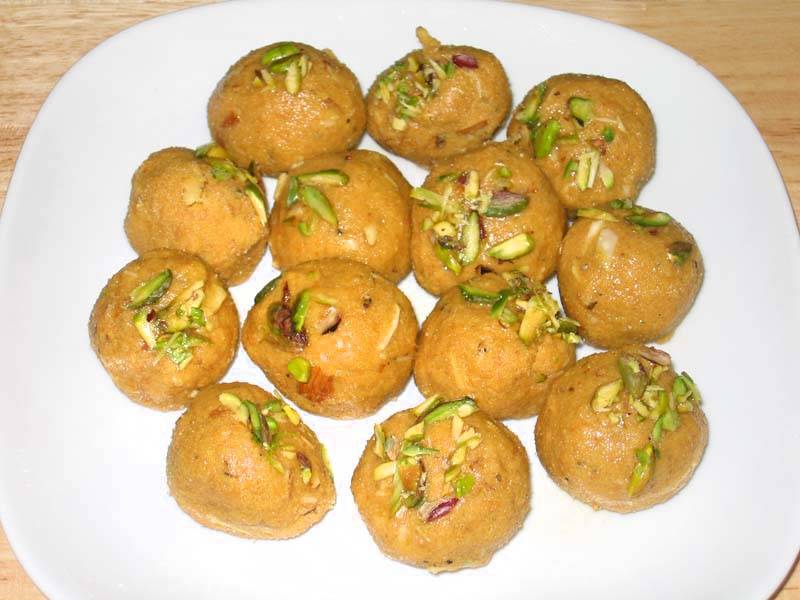
Besan ladoos are rich, sweet dessert–snack made from gently roasted gram flour (besan). Ladoos can be served any time of the day. Traditionally in Indian households ladoos and burfis are served as cookies and chocolate during festive seasons like Navratri, Diwali, Holi.
Put the besan (gram flour), sooji, and melted butter in a large frying pan and mix.
Turn the stove on to medium heat and begin to roast the basen mixture until basen becomes light golden brown in color. Stir the mixture continuously with a spatula to prevent burning. Cooking on high heat will not allow the mixture to fully cook.
When the color has changed you will also start to smell the sweetness of roasted besan. This should take about 7 to 10 minutes. Remove the pan from the heat and let the basen cool to a warm temperature. don’t let it become to room temperature.
While the mixture is warm add and mix cardamom seeds, almonds, and sugar.
To make the ladoos, take about 2 tablespoons of warm basen mixture into your palm. Gently press the mixture between your palms to form a smooth, round ball. The ladoos are usually about the size of a ping-pong ball, but you can adjust the as you prefer.
When you have finished making all of the ladoos, take one ladoo at a time and dip the ladoo a quarter inch into melted butter or ghee. Then lightly touch the part of the ladoo with the butter into the sliced pistachios just enough so some pistachios stick to the ladoo.
Put ladoos back on the plate with the pistachio side facing the top.
Leave the ladoos on a plate to cool to room temperature before putting into a covered container. The ladoos can be stored in an airtight container for 2 to 3 weeks.
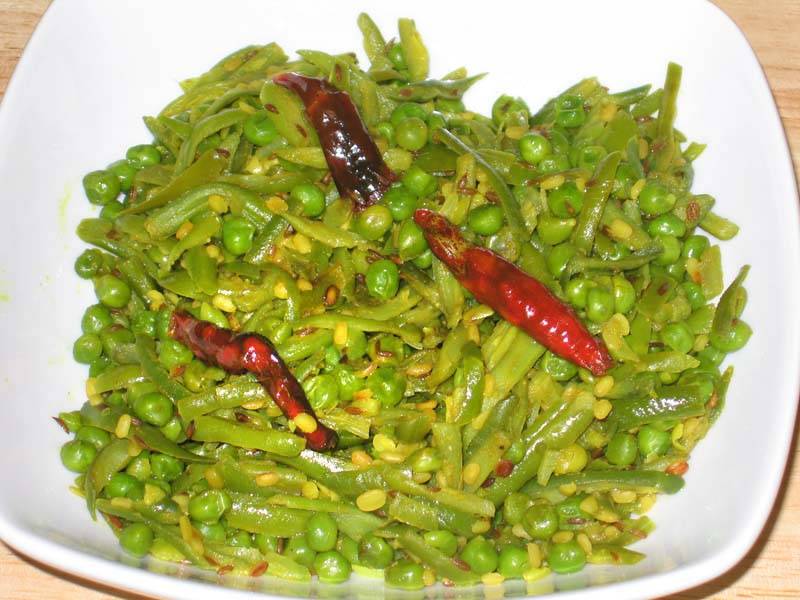
Heat the oil in a saucepan on medium-high heat. Test the heat by adding one cumin seed to the oil. If the cumin seed cracks right away, the oil is ready.
When the cumin seeds crack, add hing, red chilies and urad dal.
Stir-fry for half a minute, stop if the urad dal changes color.
Add green beans and peas, mix it well, and cover the pan. Turn down the heat to medium.
Let it cook for five to six minutes until the peas and beans are lightly tender. Do stir once in between.
Remove the cover and add the coriander powder, salt, and turmeric.
Let beans and peas cook without cover to allow the water to evaporate, this way the beans don’t become mushy. Stir the beans occasionally. Beans and peas should be lightly moist.
After turning of the heat add lemon juice.
Notes
Suggestions
Urad dal can be replaced with washed moong or chana dal.
Malai kofta is a delicious and rich main course dish. Paneer dumplings with rich cream gravy. One of the popular paneer dishes for any special occasion. Serve with naan, roti or over the plain rice.
Mix all the ingredients together for kofta, With oiled hands, divide the mixture into 14 to 16 equal parts. Make them in round balls.
Mix flour with about 4 tablespoons of water and mix well until batter is smooth.
Heat the oil in a frying pan on medium high heat. The frying pan should have at least 1 inch of oil. To check if the oil is ready, just put one small piece of mix in the oil, it should come up right away but not change color.
Dip the paneer balls in the batter one at a time and slowly drop into the frying pan. Turn them occasionally. Fry koftas until golden-brown all around.
Gravy
Blend the tomatoes, green chilies and ginger to make a puree. If you prefer mild take the seeds out of green chili before blending.
Mix cream and flour and keep aside.
Heat the oil in a saucepan. Test the heat by adding one cumin seed to the oil; if it cracks right away oil is ready. Add the hing and cumin seeds.
Add the tomato puree, coriander powder, turmeric, red chili powder and cook for about 4 minutes on medium heat. Tomato mixture will start leaving the oil and will reduce to about half in quantity.
Add milk and flour mix, salt and one cup of water and let it cook covered for 7 to 8 minutes on medium heat.
Add the garam masala, salt and cilantro. Let it cook for another minute.
Add koftas as soon it comes to boil turn off the heat. Note: koftas will expand to about 11/2 times, if you like more gravy this is the time to add some more boiled water and adjust salt.
Notes
Koftas are very soft they should be added to the gravy when you are ready to serve, otherwise koftas will break.Serve Kofta, over plain rice, with Naan, Roti
Malai Kofta is a delectable party recipe featuring paneer dumplings bathed in a sumptuous, creamy gravy. This popular paneer-based dish is renowned for its rich flavors, making it an excellent choice for special occasions. The dish showcases the indulgence of paneer dumplings immersed in a luscious cream gravy, creating a culinary masterpiece that’s sure to elevate any celebration or special event.
Crafting the Kofta Mixture:
Aromatic Fusion: To embark on the creation of delectable koftas, begin by skillfully combining all the necessary ingredients. This includes aromatic spices and paneer, which will be the foundation for the flavorful kofta mixture.
Meticulous Shaping: Lightly oil your hands to prevent sticking. Divide the well-combined mixture into 14 to 16 equal portions. With meticulous care, shape each portion into a round and enticing ball. This ensures that each vegetarian malai kofta is infused with a harmonious blend of spices, promising a delightful culinary experience.
Protective Batter: To elevate the malai kofta recipe, create a smooth batter using flour and water. This batter will act as a protective and crispy layer around each kofta during frying.
Precise Frying: In a well-heated pan containing at least 1 inch of oil, carefully dip the paneer balls into the batter, ensuring complete coverage. To gauge the oil’s readiness, test it with a small piece of the batter mixture. If it swiftly ascends to the surface without browning, the oil is at the perfect temperature. Fry the coated koftas diligently, turning them intermittently. This allows the koftas to absorb the flavors of the hot oil, creating a desirable crisp exterior that complements the creamy texture within. The frying process ensures that every vegetarian malai kofta is a delightful balance of crunch and tenderness.
Malai Kofta Recipe:
Tempering the Base: Begin the malai kofta gravy by heating oil in a saucepan. Add a single cumin seed and observe its immediate crackling response. This initial step, known as tempering, infuses the curry base with layers of aromatic complexity through the introduction of hing (optional) and cumin seeds.
Introducing the Tomato Puree: Once the tempering is complete, introduce the vibrant tomato puree to the sizzling oil. Accompany the puree with an array of ground spices such as coriander powder, turmeric, and red chili powder. Allow this harmonious blend to simmer for approximately 4 minutes on medium heat. As the mixture dances in the pan, coax the tomatoes to release their natural oils, concentrating the flavors for a delectable malai kofta curry.
Enhancing the Opulence: To elevate the richness of the malai kofta gravy, seamlessly integrate the previously prepared cream and flour mixture. Infuse this indulgent blend with salt and a cup of water. Allow the mixture to simmer and thicken over a medium flame. This step ensures that the malai kofta curry achieves a luxurious consistency, enveloping each kofta in a velvety embrace.
Finalizing the Symphony: As the recipe for malai kofta curry nears its culmination, sprinkle in the aromatic garam masala. Adjust the salt to achieve perfect taste balance. Garnish with a handful of fresh cilantro for a touch of vibrancy. Allow these final touches to meld in the heat, creating the hallmark flavor profile of an exceptional malai kofta. This concluding step brings the malai kofta curry to a harmonious and flavorful completion.
Malai Kofta is a popular Indian dish featuring melt-in-your-mouth paneer dumplings bathed in a rich and creamy gravy. It’s a showstopper perfect for special occasions or a delicious weeknight meal.
Is Malai Kofta difficult to make?
While it has several steps, each step is straightforward. With careful planning and these handy tips, you can create restaurant-quality Malai Kofta at home.
How long does it take to make Malai Kofta?
The total preparation and cooking time can vary depending on your speed, but generally allow for around 50 min.
What are some good side dishes for Malai Kofta?
Malai Kofta pairs beautifully with fluffy basmati rice, soft naan bread, or flavorful jeera rice.
Can I use store-bought paneer?
Absolutely! Look for fresh paneer in the refrigerated section of your grocery store.
What if I don’t have green chilies?
You can omit them entirely for a milder dish. To retain a hint of spice, use red chili powder to adjust the spice level.
What kind of cream should I use?
Heavy cream or whipping cream will create the richest gravy. However, you can substitute full-fat yogurt or even low-fat cream for a lighter option.
Can I use a different nut instead of cashews?
Absolutely! Almonds, pistachios, or even a combination of nuts can add a delightful textural variation.
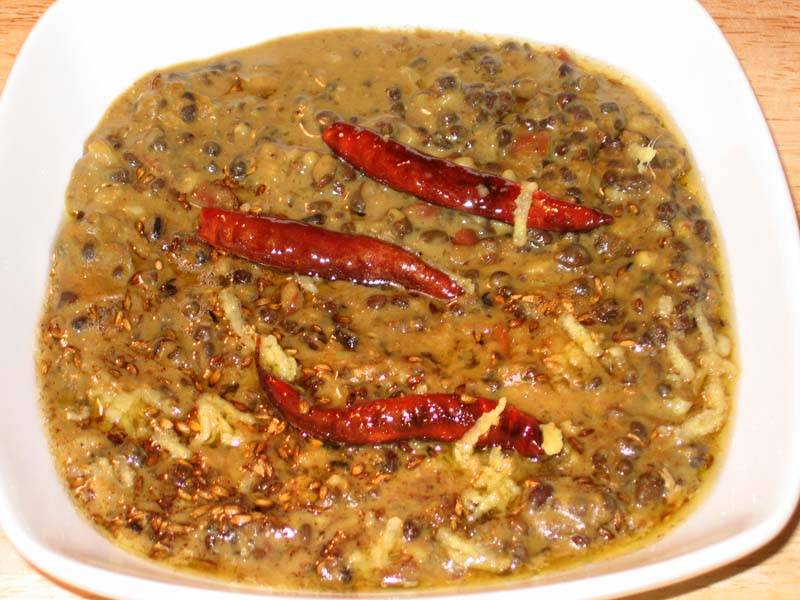
Dal Makhani is a popular dish from state of Punjab and across North India. Rich and hearty, dal makhani is a combination of whole urad (an Indian lentil)and red kidney beans. It goes well with Naan, and Tandoori Roti (oven-baked flat bread).
Wash urad dal and kidney beans well. Soak the dal in six cups of water at least for eight hours. After soaking, dal will be about two and a half times the volume of the original.
Place the dal in a pressure cooker with four cups of water. Add the salt, turmeric, ginger, and green chili, and cook over medium high heat. When it begins to steam, turn the heat down to medium. Cook 25 minutes.
Turn off the heat. Wait until steam has stopped before opening the pressure cooker. The dal and kidney beans should be soft and tender.
Lightly mash the kidney beans and dal. Cook for another five minutes on low-to-medium heat.
Add cream, garam masala, and amchoor powder. Cook for ten minutes on low heat.
For Seasoning
Heat the ghee in a small saucepan. Test the heat by adding one cumin seed to the oil; if it cracks right away, the oil is ready. Add cumin seeds. When they crack, add the asafetida, red chilies, and red chili powder. Stir for a few seconds.
Add one teaspoon of water to keep the spices from burning. Pour the spiced ghee over the dal.
Garnish with shredded ginger.
Notes
Serving suggestion, taste best with Naan, or Tandoori Roti
Punjabi Dal Makhani: A Step by Step Urad Dal Makhani Recipe
Dal Makhani is a rich and creamy lentil dish that originates from the Punjab region of India. Made with black lentils (urad dal), kidney beans, and a blend of aromatic spices, this dal makhani recipe is a staple in Punjabi cuisine. Known for its luscious texture and indulgent flavors, Dal Makhani is a popular Indian dish made primarily from lentils (dal) and typically enjoyed during the winter months.
It is a rich and creamy dish that is usually gluten-free, as lentils themselves are naturally gluten-free. The main ingredients for making Dal Makhani include black lentils (urad dal), red kidney beans (rajma), butter, cream, and various spices such as cumin, coriander, turmeric, and garam masala. It is traditionally cooked slowly over a low flame, allowing the flavors to meld together and the lentils to become tender. Dal Makhani is often served with rice or Indian bread like naan or roti.
Step 1: Preparation of Ingredients:
Begin by gathering all the necessary ingredients for making Dal Makhani. Rinse the black lentils and kidney beans under cold water and soak them for at least 8 hours or overnight to soften. Finely chop tomatoes, ginger, and green chilies to prepare the base for the dal. Having all the ingredients prepped and ready will make the cooking process smoother.
Step 2: Cooking the Lentils:
In a pressure cooker or a pot, add the soaked black lentils and kidney beans along with fresh water, salt, and a pinch of turmeric powder. Pressure cook or simmer until the lentils and beans are soft and fully cooked. Cooking them until tender is essential for achieving the creamy texture of Dal Makhani. Once cooked, set them aside while we prepare the gravy.
Step 3: Preparing the Gravy:
In a large pot or saucepan, heat oil or ghee over medium heat. Add whole spices such as cinnamon, cloves, and cardamom pods, and let them sizzle. Then, add finely chopped ginger and green chilies, and sauté until fragrant. The aromatic base will infuse the gravy with depth of flavor.
Step 4: Adding Tomatoes:
Once the aromatics are sautéed, it’s time to add the chopped tomatoes to the pot. Cook the tomatoes until they soften and break down, forming a thick gravy. You can also add tomato puree for a smoother texture. Stir in spices such as coriander powder, cumin powder, red chili powder, and garam masala, and cook until the oil separates from the mixture.
Step 5: Cooking the Lentils with Gravy:
Now, add the cooked black lentils and kidney beans to the pot with the tomato gravy. Stir well to combine all the ingredients. Allow the mixture to simmer for a while, allowing the flavors to meld together. This slow cooking process helps develop the rich and indulgent flavors of Dal Makhani.
Step 6: Adding Cream and Butter:
To finish off the dish, add a generous amount of cream and butter to the pot. Stir well to incorporate the cream and butter into the dal, creating a velvety and luxurious texture. Adjust the seasoning with salt and add a pinch of sugar to balance the acidity of the tomatoes if needed.
Step 7: Garnishing and Serving:
Before serving, garnish the Dal Makhani with freshly chopped cilantro leaves for a burst of freshness and color. You can also drizzle a little more cream on top for added richness. Serve the Dal Makhani hot with steamed rice, naan, or roti for a comforting and satisfying meal.
Tips for Making Perfect Dal Makhani:
Soak Lentils and Beans: Soaking the black lentils and kidney beans overnight helps reduce cooking time and ensures they cook evenly.
Slow Cooking: Allow the dal to simmer on low heat for a longer time to develop the flavors and achieve the desired creamy consistency.
Use Fresh Cream and Butter: Using fresh cream and butter adds richness and depth of flavor to the dish.
Variations of Dal Makhani:
Spicy Dal Makhani: Add extra green chilies or red chili powder for a spicier version of the dish.
Restaurant-style Dal Makhani: For a restaurant-style flavor, add a tadka (tempering) of cumin seeds and dried red chilies in ghee and pour it over the prepared dal before serving.
Benefits of Including Dal Makhani in Your Diet:
High in Protein: Dal Makhani is rich in protein from black lentils and kidney beans, making it a nutritious option for vegetarians and vegans.
Rich in Iron: Black lentils are a good source of iron, which is essential for maintaining healthy blood cells and preventing anemia.
Source of Healthy Fats: The addition of cream and butter provides healthy fats, which are important for overall health and satiety.
Frequently Asked Questions (FAQs) about Dal Makhani:
Q: Can I make Dal Makhani in advance?
A: Yes, Dal Makhani tastes even better when made in advance as it allows the flavors to develop. It can be stored in the refrigerator for up to 3-4 days and reheated before serving.
Q: Can I freeze Dal Makhani?
A: Yes, Dal Makhani freezes well. Allow it to cool completely, then transfer it to airtight containers or freezer bags and freeze for up to 3 months. Thaw overnight in the refrigerator before reheating.
Q: Is Dal Makhani gluten-free?
A: Yes, Dal Makhani is naturally gluten-free, making it suitable for those with gluten intolerance or celiac disease.
For more delicious Indian dal recipes, visit Manjula’s Kitchen. Explore a variety of vegetarian dal dishes featuring a range of lentils, spices, and vegetables to add flavor and variety to your meals.
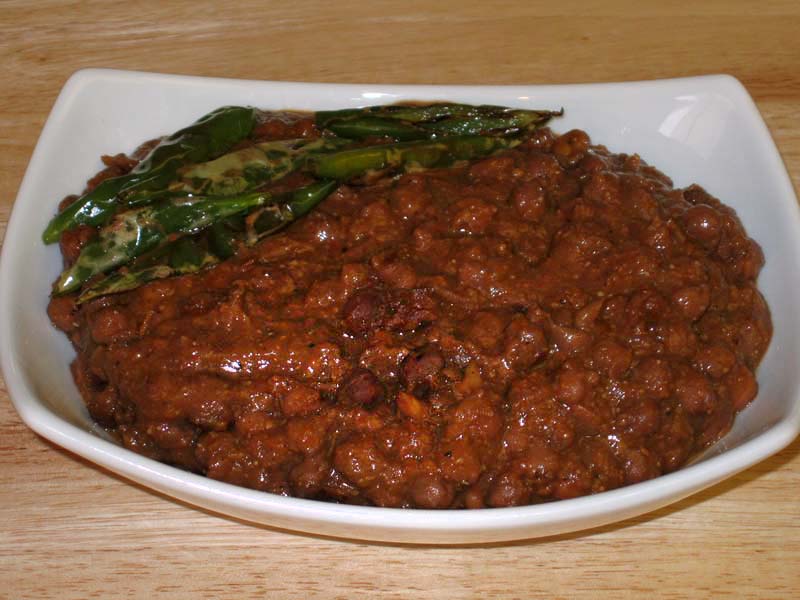
Punjabi chole are the best compliment with Baturas, and Naan. The combination is known as Chola Battura. This is a mouth-watering dish, popular with all ages. Popular street food.
Boil 5 cups of water with tea bags; after tea comes to boil turn down the heat to medium low. Let it boil for another 2 to 3 minutes. Take out the tea bags and keep aside.
Wash chickpeas well and soak in tea water for about 8 hours. Chickpeas after soaking will become about 2 1/2 times the volume of the original.
In pressure cooker add chickpeas with the water they were soaked in, plus 2 more cups of water. Close the cooker and put the pressure on. Cook on medium high heat.
As pressure cooker starts steaming turn the heat down to medium and cook for about 15 minutes.
Close the heat and wait until steam has stopped before opening the pressure cooker. Chickpeas should be soft and tender.
Blend the tomatoes, ginger and green chili to make paste.
Heat the oil in a saucepan. Test the heat by adding one cumin seed to the oil; if it cracks right away oil is ready. Add cumin seeds, and as the cumin seeds crack add basen stir-fry until basen is light gold brown.
Next add tomato paste, coriander powder, and black pepper. Stir-fry for 2 to 3 minutes until the oil is separating from the mixture and tomato mixture should be about half in volume.
Add spice mix, salt, garam masala, and mango powder to chickpeas. While mixing, lightly mash the chickpeas. Adjust salt, pepper, and sourness to your taste.
Cook on medium high heat. After choles come to boil lower the heat to medium low and put the lid on.
Choles are ready to eat in as little as ten minutes, but for best taste let simmer for 30 minutes, stirring every 5 or 6 minutes.
Garnish choles with shredded ginger and sliced green chili.
Homestyle Punjabi Chola Curry: A Flavorful Delight
Chola, also known as chole or chana, refers to a popular North Indian dish made from dal (lentils), specifically chickpeas, which are simmered in a flavorful blend of spices and herbs. This dish is typically enjoyed with rice, naan, or bhature.
Chola is naturally gluten-free, making it suitable for individuals with gluten sensitivities or celiac disease. It’s often included in party recipes due to its rich, hearty flavor and versatility in serving large gatherings. Additionally, chola is a favorite among vegans, as it contains no animal products and provides a substantial source of plant-based protein.
Step 1: Preparation – Punjabi Chola Recipe
Before diving into cooking the Punjabi chola, it’s essential to prepare all the ingredients. Gather punjabi chola, chickpeas, tomatoes, ginger, green chilies, and spices like cumin, coriander powder, garam masala, and amchur. Rinse the chickpeas thoroughly and soak them overnight or for at least 8 hours. Soaking helps in softening the chickpeas and reduces the cooking time. Also, finely chop tomatoes, ginger and green chilies.
Step 2: Cooking the Chickpeas – Punjabi Chole Recipe
In a pressure cooker, add the soaked chickpeas along with water, salt, and tea bags. The tea bags impart a dark color to the chickpeas, giving them an authentic Punjabi chole look. Pressure cook the chickpeas until they are soft and cooked through. Once cooked, discard the tea bags and set the chickpeas aside.
Step 3: Preparing the Base – Chola Curry Recipe
Heat oil in a pan and add cumin seeds. Let them crackle, then add Add finely chopped ginger and green chilies, and sauté for a few more minutes until the raw smell disappears. Now, add tomatoes and cook until they are soft and mushy.
Step 4: Adding Spices – Punjabi Chole Recipe
Once the tomatoes are cooked, it’s time to add the spices. Add coriander powder, cumin powder, garam masala, red chili powder, and amchur (dry mango powder). These spices lend the authentic flavors to the Punjabi chola. Stir well to combine and cook the spices for a couple of minutes until they release their aroma.
Step 5: Incorporating Chickpeas – Chola Curry Recipe
Now, add the cooked chickpeas to the pan along with a little water. Stir well to coat the chickpeas with the masala mixture. Allow the chola curry to simmer on low heat for about 10-15 minutes, allowing the flavors to meld together.
Step 6: Garnishing and Serving – Punjabi Chole Recipe
Once the chola curry has thickened to your desired consistency, garnish it with freshly chopped coriander leaves. Serve the piping hot Punjabi chole with bhature, naan, or rice for a hearty and satisfying meal.
Tips for Perfect Punjabi Chole:
Soaking Chickpeas: Ensure you soak the chickpeas for an adequate amount of time to soften them, reducing the cooking time.
Using Tea Bags: Adding tea bags while cooking the chickpeas gives them a rich, dark color characteristic of authentic Punjabi chole.
Spice Levels: Adjust the amount of red chili powder and green chilies according to your preference for spice levels.
Garnish: Freshly chopped coriander leaves add a burst of freshness to the chola curry. Don’t skip this step for the best flavor.
Variations of Punjabi Chola:
Creamy Chola Curry: Add a splash of cream or coconut milk towards the end of cooking for a creamy texture and milder flavor.
Benefits of Punjabi Chola:
Rich in Protein: Chickpeas are an excellent source of plant-based protein, making Punjabi chola a nutritious option for vegetarians and vegans.
Fiber-Rich: Chickpeas are high in dietary fiber, promoting digestive health and aiding in weight management.
Vitamins and Minerals: Chola curry is packed with essential vitamins and minerals like iron, folate, and vitamin C from tomatoes and spices.
FAQs – Punjabi Chole Recipe:
Can I use canned chickpeas instead of dried ones?
Yes, you can use canned chickpeas for convenience, but the texture may vary slightly from using dried chickpeas.
How long can I store leftover Punjabi chole?
Leftover chola curry can be stored in an airtight container in the refrigerator for up to 3-4 days. Reheat before serving.
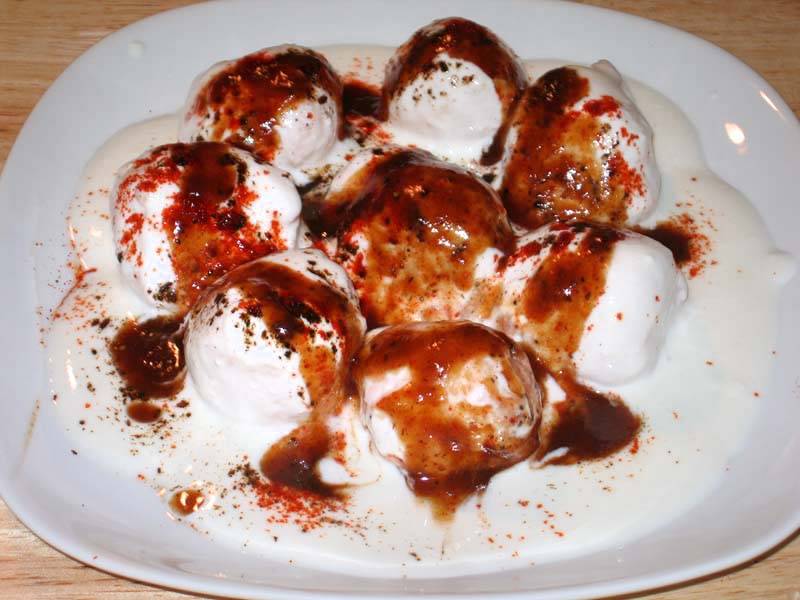
Dahi Vadas are lentil dumplings dipped in yogurt and topped with spicy savory tamarind chutney. These are great as a side dish for a formal dinner, appetizer or served as a chaat.
Mix both dals and wash several times until the water appears clear. Soak dal in 4 cups of water for at least six hours. Drain the water. In a blender, blend the dal to very creamy texture. Use only as little water as needed to blend. Using too much water for blending will not give the desired creamy texture.
Whip the dal batter, stirring with a spoon in a circular motion two to three minutes, until batter is light and fluffy. Add a few spoonfuls of water as needed.
Cover the bottom of a flat frying pan with ½-inch of oil and heat over medium high heat. Test the oil by dropping a little batter into it. When the oil sizzles, it is ready.
Place one tablespoon of batter into the oil. The oil should not be deep enough to cover the batter; the vadas will be softer if they are shallow-fried. The vadas will begin to expand slowly, without changing color.
Fry the vadas in small batches, until golden all around.
After you have made all of the vadas, place them in lukewarm water and soak for about 20 minutes. Squeeze the vadas gently to remove the water, being careful not to break the vadas. Set aside.
Whip the yogurt until smooth. Add a little milk as needed to make the consistency similar to pancake batter or lassi. Add about one teaspoon salt, to taste.
Soak vadas in the yogurt batter for at least half an hour, giving the vadas time to absorb the yogurt.
Slowly pick up each vada and transfer to a serving dish. Pour a few more spoons yogurt over the Vadas.
Just before serving, sprinkle some salt as needed, ground roasted cumin seeds, red chile powder, and finish off with a drizzle of tamarind chutney.
Notes
Variations:Change the proportion of dals, or use only urad dal.As an alternative, you can add chopped green chilies and crushed coriander seeds to the dal batter just before frying.Instead of serving with tamarind chutney, you can sprinkle chopped cilantro over the dahi vadas.You can also make the vadas very small and serve as a Raita dish.If you are vegan, you can soak the vadas in tamarind chutney instead of yogurt and sprinkle some chopped cilantro or chopped mint leaves.Suggestions:You can make the dahi vadas in advance and freeze them before soaking in water. When ready to use, soak as many as needed in hot water for about half an hour, then change the water to room temperature and soak for another ten minutes. Now proceed according to the recipe.
Keyword Dahi Pakora, Dahi Vada Chaat, Dal Dumpling
Rasmalai is a Bengali dessert consisting of soft paneer balls immersed in chilled creamy milk. Like Rasgullas, Rasmalai is also made with homemade cheese known as "paneer" or "chana". Instead of being soaked in sugar syrup like Rasgullas, Rasmalai is soaked in sweet, flavored milk.
Mix lemon juice in half a cup of hot water and keep aside.
Boil the milk in a heavy bottomed over medium-high heat, stirring frequently making sure milk do not burn on the bottom of the pan.
As the milk comes to a boil, add the lemon juice slowly and stir the milk gently. The curd will start separating from the whey, turn off the heat.
Once the milk fat has separated from the whey, drain the whey using a strainer line with cheesecloth or muslin cloth.
Wrap the curd in a muslin cloth, rince under cold water, and squeeze well. This process takes out the sourness from the lemon.
To take out the excess water squeeze the cloth, or press the wrapped paneer under a heavy pan for about one hour. Taking the right amount of water out of the paneer is the most important part of this recipe.
To check if enough water is out of the paneer, take a little piece of paneer on your palm and rub with your fingers. After rubbing the paneer for about 15-20 seconds, you should be able to make a firm but smooth ball.
Once the paneer is drained, place on a dry, clean surface and knead the paneer for 3-4 minutes until the paneer is almost rolls into smooth soft dough. Knead the paneer by dragging the palm of your hand hard on the paneer. Keep scooping it back to togather and knead more. Your palm will be little greasy.
Making the Rasmalai:
Divide the dough into 12 equal parts and roll them in smooth balls.
To make the balls apply some prassure at the first and then release when forming the balls, lightly press to make about 3/4″ patty shape.
Mix the sugar and water in a pressure cooker on medium high heat and bring to a boil.
Add the paneer balls and close the pressure cooker. After the pressure cooker starts steaming, turn the heat to medium and cook for about seven minutes.
Make sure the cooker is large enough to accommodate the finished rasgullas patties, as they will expand to about double in the volume while cooking in the syrup!
Close the heat and wait a few minutes befor opening the pressure cooker. Pour cold water over the cooker before opening. Take out the patties from the syrup and squeeze them lightly,and keep aside.
Boil the milk in a frying pan on medium heat until the milk reduce to about 2 cups. Make sure to frequently stir the milk as the milk burns easily in bottom of the pan.
Add the sugar and the Rasmalai patties in milk. Let it cook for few minutes. Add the cardamom and mix in. Garnish with sliced almonds and pistachios.
Serve the Rasmalai chilled.
Keyword Bengali Delicacy, Dessert, Made With Paneer
Remove the crust from all sides of the bread. Slice the bread lengthwise into 3 equal parts.
Mix all the dry ingredients together: Gram flour (besan), rice flour, asafetida, cumin seeds, and salt. Rice flour adds to the crispness. Add the water slowly to make a smooth batter. (Batter should be the consistency of pancake batter or dosa batter)
Next, add the green chilies and cilantro. Mix well.
Heat the oil in a frying pan on medium high heat. Frying pan should have at least 1 inch of oil. To check if the oil is ready, put one drop of batter in the oil. The batter should come up but not change color right away.
Dip the bread slices in the batter one at a time and slowly drop into the frying pan. Fry the Pakoras in small batches. The pakoras will take about 4 to 5 minutes to cook.
Turn them occasionally. Fry the Pakoras until both sides are golden-brown. Repeat this process. The crispy, delicious Bread Pakoras are ready to serve.
Notes
Tips:If oil is too hot Pakoras will cook too fast and will not be crispy; if oil is not hot enough Pakoras will be greasy. You may have to adjust the heat as needed while cooking.Variations:Use 1/4 cup of chopped spinach or 2 tablespoons of chopped fenugreek leaves as a substitute for the chopped cilantro.Serving suggestions:The bread pakoras are best when dipped with a fresh cilantro chutney or Pakoras taste best when they are served hot.Pakoras can be made one day in advance do not refrigerate. When ready to eat, place on a cookie sheet and heat in the preheated oven on 300 degrees.
Samosa is probably the most popular Indian snack. Fried puffed pastry filled with spicy potatoes and green peas. No one can resist samosas, a mouthwatering snack. Samosas can be served any time and for any occasion. This recipe is for traditional north Indian Samosa.
3boiled potatoes, peeled and chopped into very small cubes
1/2tspcumin seedsjeera
1tbspchopped green chilies
1tspcoriander powderdhania
1/4tspgaram masala
1tspmangopowderamchoor
1tspsalt
2tbspoilcanola or vegetable
1/2cupgreen peasI am using frozen peas
Need oil to fry
Instructions
Making the Dough:
Mix the flour, sooji, salt, oil and salt together to make a soft dough (add more water as needed). knead the dough for about 1 to 2 minutes to make the dough smooth and pliable. Set the dough aside and cover it with damp cloth. Let the dough sit for at least 15 minutes.
Making the Filling:
Heat the oil in a frying pan on medium high heat. Test the heat by adding one cumin seed to the oil; if it cracks right away oil is ready. Add cumin seeds as cumin seeds crack, add green chilies, coriander powder and stir for few seconds. Next add green peas and turn heat to medium and stir until tender. Add the potatoes and stir-fry for about 4 minutes. Stir in garam masala and amchur. Add more salt or amchur according to taste.
Let the filling cool to room temperature.
Making Samosa:
Take 2 tablespoons of water and 1 tablespoon of all-purpose flour to make a paste and keep aside.
Knead the dough for a minute. Divide the dough into 4 equal parts and make into balls. Roll each ball into 6-inch diameter circles and cut each circle in half.
Spread the paste lightly all along the edge of one semicircle. Pick this semicircle up with both hands and fold it into a cone shape. Pinch the side of this cone so that it is completely sealed.
Fill the cone with 3 tablespoons of filling. Press this filling down with your fingers. Now close the top of this cone into a triangle shape, pinching the top edge so that it is completely sealed. Continue filling the rest of the samosas.
Heat about 1 inch of the oil in a frying pan on medium heat. To check if oil is hot enough place a small piece of dough in oil and dough should sizzle and come to the surface slowly.
Place the samosas in the frying pan a few at a time. After samosas are floating on top of the oil turn them slowly. Fry the samosas until the samosas turn a light golden-brown color on all sides. If you use a high heat, the samosa crust will be too soft and not crispy.
Notes
Tips:Boil the potatoes just until tender. Be careful not to poke the potatoes multiple times while they are cooking, as they will absorb the water. Drain immediately and keep aside until cool enough to touch.The dough has to be kneaded well; otherwise, the samosas will not come out as crisp.If the filled samosas sit for too long, they will dry. To avoid this, cover with a damp cloth.Suggestions:Samosa can be prepared ahead of time and can be freeze for a month.Before freezing fry them enough until samosa changes the color to very light gold brown.After samosas are on room temperature bag them in zip lock bags and freeze them.To use frozen samosas take out as many you need and fry them on medium heat.
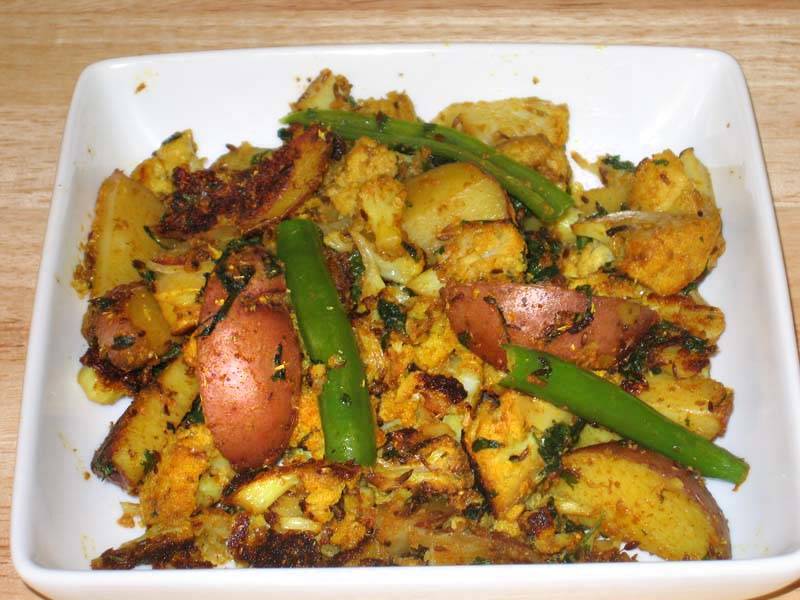
Aloo Gobi is a delicious main dish made with potatoes, cauliflower, and a great blend of spices. Aloo Gobi can be served with various breads, such as rotis, parathas, and puris.
In a small bowl, mix the shredded ginger, coriander powder, cayenne pepper, turmeric, and 3 tablespoons of water to make a paste.
Heat the oil in a pan. Test the heat by adding one cumin seed to the oil; if seed crack right away oil is ready. Add hing and cumin seeds to the oil after seeds crack add the bay leaves and green chilies and stir for a few seconds.
Next, add the spice paste and stir for a minute until spices start leaving the oil.
Add cauliflower, potatoes, 2 tablespoons of water and salt. Mix well. Cover the pan and let it cook on medium heat for about 15 to 20 minutes until the vegetables are tender. Make sure to stir gently every 3 to 4 minutes.
Lastly, add the mango powder and fresh cilantro (green coriander). Mix everything and cover for a minute. Adjust the salt to your taste.
Notes
Variations:Add some green peas and/or sliced red bell peppers. The red bell peppers should be added at the end of the recipe as they cook quickly.Tips:Making a paste with the spices will prevent the spices from burning.Serve with Paratha, Puri
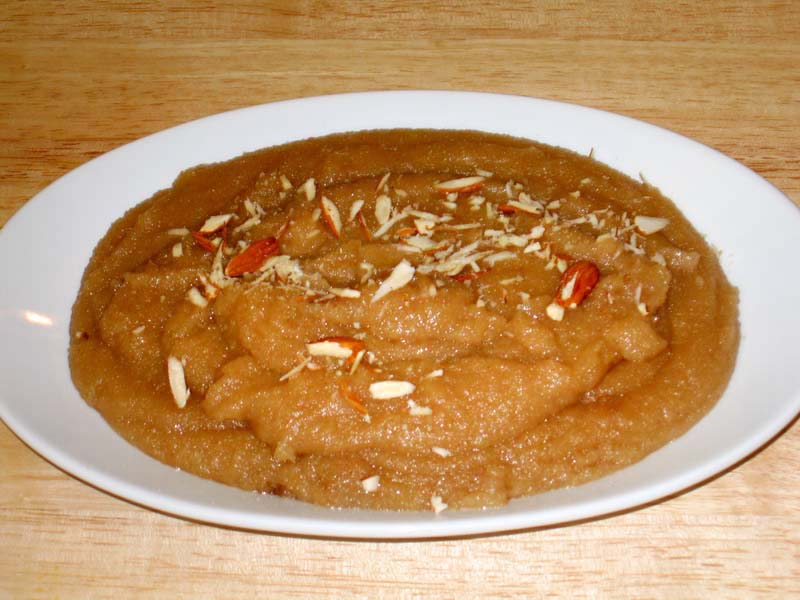
Sooji Halwa is a very popular sweet dessert all over India specially in North India and is made on religious occasions, as parsad (offering to God). After prayer Halwa is served to devotees as a blessing.
Boil the water with sugar, and cardamom powder in a pan over low medium heat. Bring to a boil and Set aside.
Melt the ghee in a frying pan on medium heat. Add sooji and roast to golden brown color; stirring constantly this will take about 5 to 8 minutes. Sooji will be golden brown in color and will have a light sweet aroma.
Add the syrup slowly, as you add the syrup to sooji water will splatter. Turn down the heat to medium low and let it cook for about 2-3 minutes.
Garnish with almonds.
Notes
NotesSooji will absorb the water, as the Halwa cools so keep Halwa a little more softer then you want.Serving suggestionServe hot for best taste. If you like, garnish with shaved pistachio, almonds or shredded coconut.For breakfast serve with paratha, aloo puriVariationsInstead of water add 1 cup of milk and 1/2 cup of water and keep Halwa a little thicker. Pour the Halwa on a greased plate, keep it about 1/2 inch thick. Garnish with shaved almonds or pistachio or shredded coconut, and let it cool for about a half an hour. Cut the Halwa in square or diamond shapes like burfee.
Sooji Halwa, a classic in the realm of traditional desserts, holds enduring popularity. Renowned for its deliciousness, this treat serves as a warm and inviting indulgence for guests. The result is an exotic Halwa creation that transcends expectations, promising a delightful experience beyond your imagination.
Embark on a culinary journey through the rich flavors and aromatic spices of India with the creation of sooji halwa, a classic dessert beloved for its sweet simplicity and indulgent texture. Each step in the process—from mixing the sooji with milk to infusing the syrup with fragrant cardamom and saffron—unveils a symphony of flavors and textures, resulting in a delectable treat that delights the senses and warms the heart. Let’s explore the art of making sooji halwa in seven meticulous steps, each one essential in achieving the perfect balance of sweetness and spice.
Step 1: Mixing Sooji and Milk
In the initial step of preparing sooji halwa, take a bowl and combine the sooji (semolina) with milk, creating a cohesive mixture that forms the foundation for the dessert. Allow this blend to sit undisturbed for about five minutes, allowing the sooji to absorb the milk and soften, readying itself for the culinary journey ahead.
Step 2: Breaking Up Lumps
After the brief soaking period, the sooji and milk combination will naturally form lumps as it absorbs the liquid. Utilize a fork to gently break up these lumps, ensuring a smooth and uniform texture for the sooji halwa. This meticulous step guarantees a velvety consistency in the final preparation, an essential characteristic of a well-executed halwa sooji recipe.
Step 3: Infusing Flavors in Syrup
In parallel to preparing the sooji, initiate the syrup preparation by combining sugar, cardamom powder, and saffron in boiling water. Thoroughly mix these elements to create a fragrant and flavorful syrup that will serve as the backbone of the sooji halwa. Set this aromatic infusion aside, preserving its essence to later elevate the taste of the final dish.
Step 4: Ghee-infused Sooji
Moving to the stovetop, heat clarified butter (ghee) in a frying pan over medium heat until warm. Turn off the heat and introduce the sooji into the warm ghee, blending them together with gentle pressure from a spatula. This marks a crucial stage in the halwa sooji recipe, setting the tone for the subsequent roasting process that will impart a rich, nutty flavor to the dessert.
Step 5: Golden Brown Roasting
With the heat adjusted to medium-low, resume cooking and roast the sooji in the ghee until it reaches a golden brown color, stirring continuously to prevent burning. This meticulous roasting process takes approximately 5 to 8 minutes, resulting in a visually appealing hue and a delightful sweet aroma that fills the kitchen. Achieving the perfect golden brown color is pivotal in achieving the desired texture and flavor profile in the sooji halwa.
Step 6: Syrup Infusion and Cooking
Gradually introduce the prepared syrup to the roasted sooji, taking caution as the addition may cause splattering. Allow the mixture to cook for about 4 minutes, enabling the sooji to absorb the infused flavors and achieve a luscious consistency. It is essential to maintain a slightly softer consistency in the halwa than the desired final texture, as the sooji will continue to absorb moisture while cooling, resulting in the perfect balance of moisture and sweetness.
Step 7: Garnishing and Serving
To complete the sooji halwa recipe, garnish the preparation with pistachios, adding a visual and textural element that enhances the overall appeal of the dish. Serve the halwa warm for the best taste, presenting a delightful and aromatic dessert that captures the essence of this classic Indian sweet. With its rich flavors and indulgent texture, sooji halwa is sure to become a beloved favorite for special occasions and everyday indulgences alike. So, gather your ingredients, ignite the flames of your creativity, and embark on a flavorful journey through the enchanting world of sooji halwa.
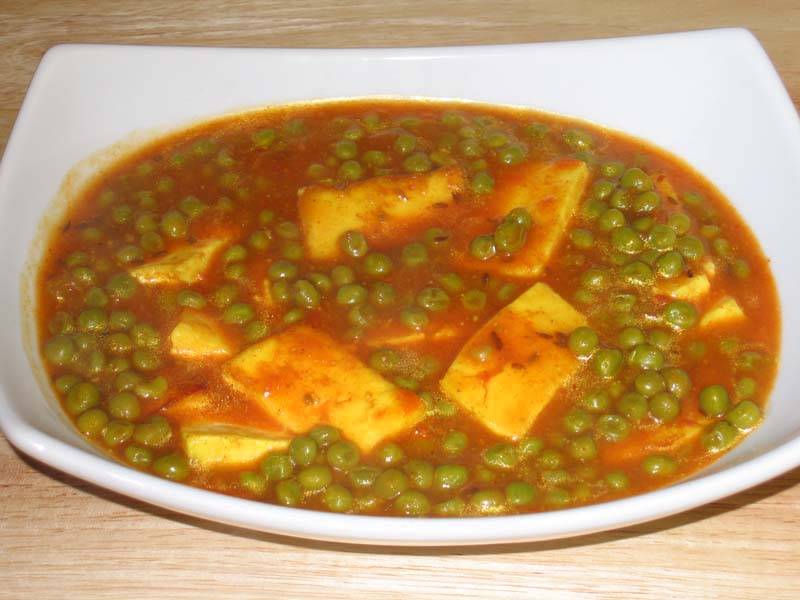
Cube the paneer into half inch pieces and deep-fry them on medium high heat. Fry until the paneer becomes a light golden color. Take the paneer out and place on a paper towel so the extra oil is absorbed.
Mix cornstarch with three tablespoons of water and keep aside.
Blend the tomatoes and ginger to make a puree.
Heat the oil in a saucepan. Test the heat by adding one cumin seed to the oil. If the cumin seed cracks right away, the oil is ready. Add the asafetida (hing), cumin seeds, bay leaves and cinnamon and stir-fry for a few seconds.
Add the tomato paste, coriander, turmeric, chili powder and paprika. Cook until the mixture reduces to half.
Add the green peas and 1/4 cup of water. cook on medium heat pan should be covered. When the peas are tender, add the salt and paneer.
To thicken the gravy add corn starch mix. Cover the pan and let it cook for 3-4 minutes.
Notes
Suggestion: Add 1 tablespoon fresh chopped fenugreek leaves or 1/2 tablespoon dried fenugreek leaves to the gravy when cooking.
Indulge in the perfect gluten-free, kid-friendly matar paneer recipe, specially crafted to elevate any occasion as this dish is a mouthwatering party recipe that’s popular among all individuals from children to adults. This delightful dish boasts a rich and flavorful gravy that will captivate both young and adult palates, ensuring a memorable dining experience.
Begin the journey of How To Make Matar Paneer by meticulously cubing the paneer into half-inch pieces. The key is to deep-fry these paneer cubes over medium-high heat until they attain a delicate golden hue. This crucial step not only imparts a delightful texture to the paneer but also sets the foundation for the indulgent experience that Matar Paneer promises. Once fried to perfection, transfer the paneer cubes onto a paper towel, allowing any excess oil to be absorbed, ensuring a balanced and flavorful outcome for this Matar Paneer sabji.
Step 2: Creating a Thickening Agent – Essential in Matar Paneer Masala
In the second step of the Matar Paneer masala preparation, take a moment to mix cornstarch with three tablespoons of water, creating a thickening agent that will contribute to the luscious consistency of the dish. This clever addition enhances the overall texture of the Matar Paneer gravy, ensuring it coats the paneer cubes and green peas harmoniously. The cornstarch mix, now prepared and set aside, is a key player in perfecting the Matar Paneer sabzi.
Step 3: Crafting a Tomato-Ginger Puree – Essence of Matar Paneer
Embark on the flavorful journey of Matar Paneer by crafting a tomato and ginger puree. This vibrant mixture lays the groundwork for the dish’s aromatic essence, infusing it with the natural sweetness of tomatoes and the subtle warmth of ginger. As the soul of the Matar Paneer recipe, this puree forms the base of the rich gravy that envelops the paneer and peas, creating a delightful symphony of flavors in this quintessential Matar Paneer masala.
Step 4: Infusing Flavorful Elements – Matar Paneer Unleashed
Heat oil in a saucepan to initiate the fourth step in the Matar Paneer saga. The aromatic journey begins by testing the oil’s readiness with a cumin seed. Once it crackles, add a melange of flavorful elements, including asafetida (hing), cumin seeds, bay leaves, and cinnamon. This infusion of spices elevates the Matar Paneer sabzi, creating a fragrant and appetizing atmosphere that sets the stage for the subsequent layers of taste in this Matar Paneer recipe.
Step 5: Crafting the Tomato Base – Foundation of Matar Paneer Recipe
As the oil embraces the aromatic symphony, introduce the tomato paste, coriander, turmeric, chili powder, and paprika to the saucepan. This marks a pivotal step where the foundation of the Matar Paneer recipe takes shape. Cook this amalgamation until it reduces to half its volume, allowing the tomatoes to release their inherent sweetness and harmonize with the array of spices. This transformative process is integral to achieving the distinctive taste that defines Matar Paneer masala.
Step 6: Introducing Green Peas – Matar Paneer Masala Symphony
For the sixth step in perfecting Matar Paneer, introduce the green peas and a quarter cup of water to the pan. Let this vibrant combination simmer on medium heat, ensuring the pan is covered. The green peas, tenderized to perfection, contribute a burst of color and freshness to the Matar Paneer masala. As the peas become tender, add salt and the previously prepared paneer cubes, creating a symphony of textures that makes Matar Paneer a delightful and wholesome sabzi.
Step 7: Thickening the Gravy – Culmination of Matar Paneer Recipe
Concluding the Matar Paneer journey, focus on thickening the gravy by incorporating the cornstarch mix. Cover the pan, allowing the Matar Paneer to simmer for an additional 3-4 minutes. This final step ensures that the Matar Paneer masala reaches its optimal thickness, creating a cohesive and flavorful gravy that clings to the paneer and peas. With this last flourish, the Matar Paneer recipe unfolds into a hearty and satisfying dish, ready to be savored in all its aromatic glory.