Traditional Indian Food: Authentic and Delicious Recipes
Indian cuisine is known for its rich flavors and diverse ingredients. Traditional Indian food offers a wide variety of dishes that are both delicious and culturally significant. Whether you’re looking for traditional Indian food, Indian traditional food, or specific traditional Indian food recipes, Manjula’s Kitchen provides an extensive collection of dishes to suit every palate.
Classic Traditional Indian Food
Aloo Methi
Aloo Methi is a classic North Indian dish made with potatoes and fenugreek leaves. This dish is a staple in many Indian households and is a perfect example of traditional Indian food. The combination of earthy potatoes and the slightly bitter taste of fenugreek leaves, cooked with mild spices, makes this dish flavorful and nutritious.
Paneer Tikka
Paneer Tikka is a popular dish made with marinated paneer cubes grilled to perfection. This dish is a favorite among those who enjoy Indian traditional food. The marinated paneer is cooked with spices and herbs, making it a delicious and satisfying option for any meal. Serve it with a side of mint chutney for an added burst of flavor. Its a popular dish from paneer recipes.
Traditional Indian Food Recipes for Main Course
Dal Tadka
Indian Dal Tadka is a simple yet flavorful lentil dish made with yellow lentils and tempered with cumin, mustard seeds, and red chilies. This dish is a staple in traditional Indian food recipes and is enjoyed with rice or roti. The rich and comforting flavor of the lentils makes it a beloved dish in many Indian households.
Baingan Bharta
Baingan Bharta is a smoky and flavorful eggplant dish that is perfect for any meal. The eggplants are roasted until soft, then mashed and cooked with tomatoes and mild spices. This dish is a delightful addition to your collection of Indian traditional food and pairs well with roti or rice. It a famous dish coming from north indian recipes
Traditional Indian Food List: Snacks and Appetizers
Samosas
Samosas are crispy pastries filled with spiced potatoes and peas. This snack is a classic part of traditional Indian food recipes and is enjoyed by people of all ages. Samosas are perfect for any occasion and can be served with tamarind or mint chutney.
Pakoras
Pakoras are deep-fried fritters made with vegetables like spinach, potatoes, and cauliflower. This snack is a popular item on the traditional Indian food list and is perfect for tea-time or as an indian veg appetizers. Serve pakoras with a side of green chutney for a delicious treat.
Traditional Indian Food Recipes for Rice Dishes
Lemon Rice
Lemon Rice is a tangy and flavorful rice dish made with cooked rice, lemon juice, peanuts, and mild spices. This dish is a staple in South Indian cuisine and is a perfect example of traditional Indian food. It’s light, refreshing, and easy to prepare, making it a great choice for any meal.
Jeera Rice
Jeera Rice is a simple and aromatic rice dish made with cumin seeds and basmati rice. This dish is a versatile item on the traditional Indian food list and pairs well with various curries and dals. The subtle flavor of cumin enhances the taste of the rice, making it a favorite in many households.
Traditional Indian Desserts
Gulab Jamun
Gulab Jamun are soft, deep-fried balls made from khoya (dried milk) soaked in a sweet syrup flavored with cardamom and rose water. This dessert is a staple in traditional Indian food recipes and is often served during festivals and special occasions. The melt-in-your-mouth texture and sweet flavor make it a favorite among many.
Kheer
Kheer is a creamy rice pudding flavored with cardamom and garnished with nuts and raisins. This dessert is a classic in traditional Indian food and is easy to prepare. Kheer is a perfect ending to any meal and is often enjoyed during celebrations.
Elevating Your Traditional Indian Food Menu
To enhance your traditional Indian food menu, consider incorporating dishes from various categories that complement these classic recipes. Indian snacks like samosas and pakoras can introduce a delightful variety of flavors and textures.
For a sweet ending, explore Indian desserts such as gulab jamun and kheer. Offering healthy options like dal tadka and baingan bharta can provide lighter meal choices.
Planning a large gathering? The popular party food ideas are filled with dishes that are sure to impress your guests and make your celebration memorable. Including North Indian recipes like aloo methi or lemon rice can bring an authentic touch to your meal.
Frequently Asked Questions (FAQs)
Q: What are some popular traditional Indian food recipes?
A: Some popular traditional Indian food recipes include Aloo Methi, Paneer Tikka, Dal Tadka, Baingan Bharta, Samosas, Pakoras, Lemon Rice, Jeera Rice, Gulab Jamun, and Kheer. These dishes are flavorful, nutritious, and perfect for any occasion..
Q: What are some traditional Indian food recipes for a vegetarian diet?
A: Some vegetarian traditional Indian food recipes include Paneer Tikka, Dal Tadka, Baingan Bharta, Samosas, Pakoras, Lemon Rice, and Jeera Rice. These dishes are nutritious, delicious, and perfect for a vegetarian diet.
Q: Can I prepare traditional Indian food recipes in advance?
A: Yes, many traditional Indian food recipes can be prepared in advance and stored. Dishes like Dal Tadka and Baingan Bharta can be made ahead of time and refrigerated, while snacks like Samosas and Pakoras can be prepped and frozen.
Q: What are some traditional Indian desserts for special occasions?
A: Some traditional Indian desserts for special occasions include Gulab Jamun and Kheer. These desserts are classic, easy to prepare, and perfect for celebrations.
Conclusion
Traditional Indian food is a celebration of diverse flavors and rich cultural heritage. Whether you’re looking for Indian traditional food, specific traditional Indian food recipes, or a comprehensive traditional Indian food list, these dishes will bring variety and flavor to your meals. So, gather your ingredients, try out these recipes, and enjoy the rich and diverse world of traditional Indian cuisine. Happy cooking and happy eating!
By incorporating these dishes into your menu, you’ll be able to enjoy a wide variety of delicious and nutritious foods. Whether you’re looking for snacks, main courses, or desserts, there’s a traditional Indian food recipe to suit every taste. Don’t forget to check out Manjula’s Kitchen for more inspiration and culinary delights. Happy cooking and happy eating!
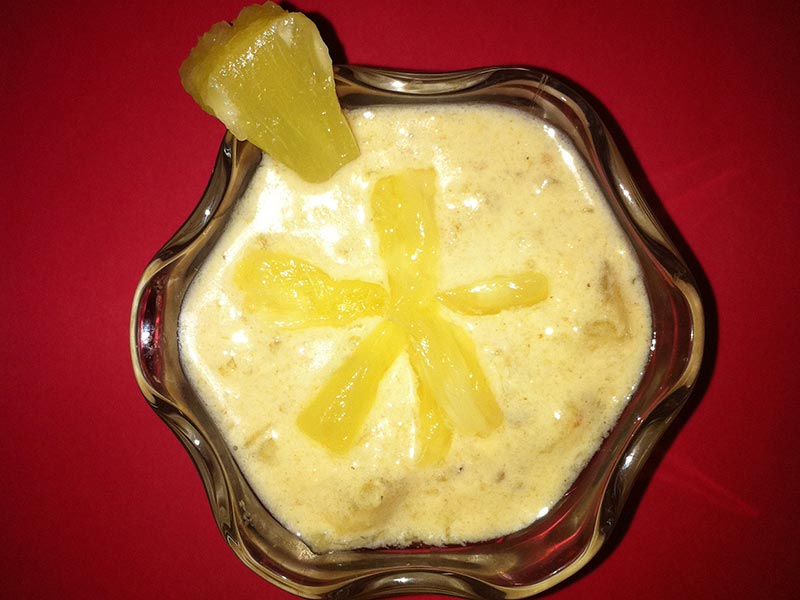
Pineapple Kheer is a very refreshing dessert made with ripened Pineapple (annanas). It is a nice healthy recipe with use of fruit and sugar can be added as per your taste and diet.
14oz Pineapple chunks in pineapple juice (1 1/2 cans)
4 Tbsp Coconut powder (finely shredded coconut)
1 Tbsp Corn flour
3/4 Cup Sugar
Instructions
Method
Boil the milk in a heavy bottom wide pan on medium high heat. Stir often to make sure the milk does not burn in the bottom of the pan. Cook until the milk is reduced to about half of its original volume.
Mix well 1 tablespoon Corn flour in 4 table spoons of water and add this in the milk, also add Coconut powder 4 table spoons in the milk and cook the milk for another 10 minutes on low heat. Then turn off the heat and let the milk cool down.
Drain 1 can pineapple using strainer let the juice dripped through without squeezing. Note: we will use juice and pineapple both.
Cut each chunk of pineapple in about 3 to 4 small pieces.
In a pan put all the pineapple juice drained from 1 can, add ¾ cup sugar and the pineapple pieces and cook on medium heat for about 30 minutes: until the pineapple pieces become soft and translucent.
Then from another pineapple can, take out half of pineapples and half of its juice- blend it blender. Add this in the cooked pineapple mixture and cook for additional 10 minutes. Then turn off the heat.
Let pineapple mixture come down to room temperature.
Once both the milk and pineapple mixture are cooled down, add the pineapple mixture in the milk and stir gently.
Serving Suggestion
Keep in the refrigerator for at least one hour before serving the desert. You can use the remaining half of pineapple chunks to decorate the kheer making floral patterns and any other way you might like.
Notes
TipsMix pineapples in the milk when both the milk and pineapples are on room temperature or cold.
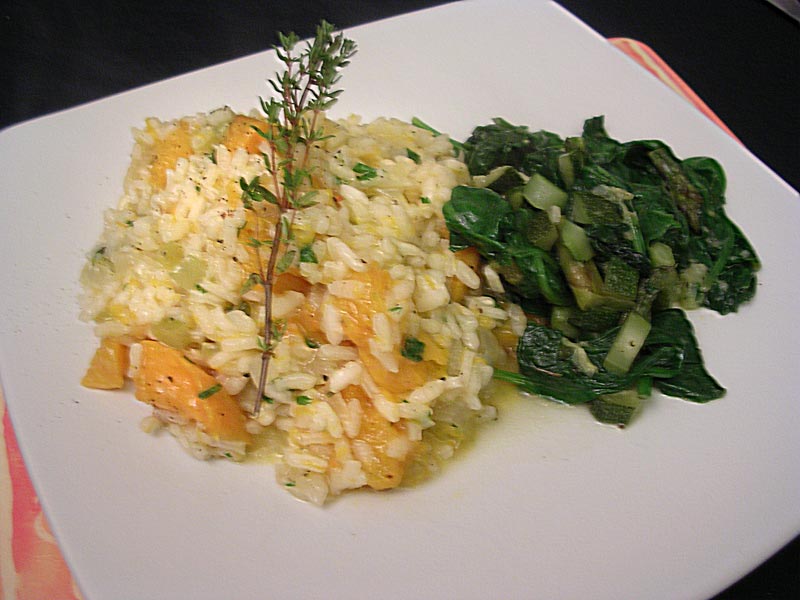
Butternut Squash Risotto is a simple, rice-based delicious quick & easy recipe that can be served anytime. It can be served with any side of green vegetables.
In India, Kheer / Payasam is mainly meant for serving to the God. Also, its very convenient to prepare Kheer when you want to prepare some sweet dish in less time. Main ingredients needed for any kind of Kheer are – milk and sugar / jaggery. Different varieties of Kheer are prepared by adding other thing with these main ingredients. When we were in Bangalore, I was getting nice bottle gourd from 'Reliance Fresh' almost throughout the year. I used to prepare Bottle-gourd Kheer frequently. After coming to Australia, I tried preparing same kind of Kheer using Zucchini. To our surprise, it resembled the same taste of Bottle-gourd Kheer! These days, I never look for bottle-gourd in the shops; we got used to the taste of zucchini itself!Zucchini Kheer (Payasam)is a delicious quick & easyhealthydessert.
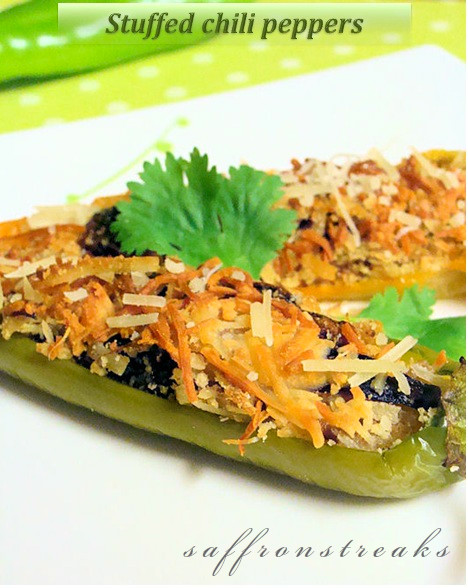
Back home in India, we used to relish the pickled chilies or mirchi ka achar, where good quality of mirchi or chilies are chosen with great care, and then stuffed with pickle spices , drenched in hot mustard oil and infused with the flavor of fennel, cumin, mustard etc. The other way to enjoy it as an appetizer, where the jalapeno or korean chilies are coated with seasoned chickpeas flour and then deep-fried in hot oil, and on an overcast monsoon day you can relish these hot mirchi bhajjis with a cup of coffee…some of the simple pleasures in life. No discussion of chilies can be ever completed without mentioning the celebrated mirchi ka salan from the cuisines of Hyderabad. The lip smacking dish successfully wins every heart whether you love or hate the chilies.
leave the stalk intact and cut (lengthwise) the chili in half with a knife, take extra care while handling the chilies. Discard the seed and membrane with the help of a knife or spoon. Do not touch the seeds and membrane with your hand.
Drop the chilies in boiling water for couple of minutes, drain and let it dry. Blanching the chilies, this way will reduce the heat or spiciness of chilies.
Preparing the filling : Heat a tablespoon of olive oil in a pan, and then brown the sliced onion for few moments.
Once the onions are browned evenly, add the grated coconut, candied ginger, raisins, seasoned it well with salt and pepper. If you wish, you can add little cumin powder also.
Stir for few moments on low heat. Take off the heat and add bread crumbs in it. Mix them well.
Let the filling cool slightly before stuffing the chili peppers.
With the help of a tea-spoon, fill the halved chili peppers with coconut mixture and topped each of them with cheese.
Bake in a preheated oven at 350 F for 15-20 minute or until the cheese melts.
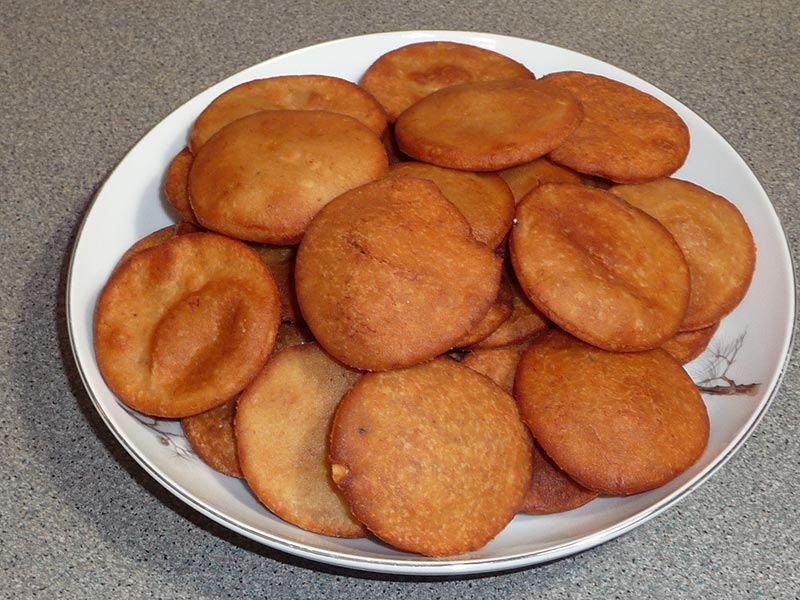
Banana Puries are delicious fried Indian puffed bread. Puries have richness of banana flavor enhanced with cardamom. Banana Puries are good for festive occasions and holidays. These can be served for breakfast or as a snack. Puries are especially good for picnic or to take for travel.
Peel and mash the banana, add the sugar, almond, butter, salt and cardamom mix it well. Add whole-wheat flour and all-purpose flour to the banana mix and make a firm and smooth dough. Keep it aside for about 2 hours.
Grease the fingers and knead the dough for a minute and divide in four equal parts
Roll them into 8” diameter and cut them in about 2” diameter, using a cookie cutter.
Heat the oil in a frying pan on medium heat. To check the heat if oil is ready put one piece of dough in oil, dough should sizzle and come up slowly.
Fry the puries few at a time don’t over crowd the frying pan. Puries will puff and fry them till they are dark brown from all around. It will take about 2 minutes to fry every batch.
Take them out over paper towel so it can absorb the extra oil.
Notes
Notes:This is good recipe for vegan by replacing the butter with oil. Puries can be served hot or eaten at room temperature. Banana Puries can be stored for a week; you don’t need to refrigerate them.
Mawa Kachori is an exotic dessert. This is a delicacy from the state of Rajasthan. Rajasthan is known for its rich food and culture its a sweet savory snack. Pastry filled with an aromatic mixture of Mawa and nuts makes a very festive dessert.
1/4 cup mixed nuts (almonds, pistachios coarsely ground)
1/4 teaspoon crushed cardamom
3 tablespoons sugar
Note: If you are using Mawa use ¾ cup of Mawa instead cream and powder
Oil to fry
Syrup
1cup sugar
1/2 cup water
1/8 teaspoon crushed cardamom
Few strands of saffron
Instructions
Crust
Mix flour, and clarified butter in a bowl, making it firm and soft adding water slowly as needed. Knead the dough until the dough becomes soft and pliable.
Set the dough aside and cover it with a damp cloth. Let the dough sit for at least ten minutes.
Syrup
Boil the sugar and water on medium heat, as sugar comes to a boil add saffron, and cardamom on medium heat until syrup is about one thread or 220 degrees (Fahrenheit) on a candy thermometer. Set it aside.
Filling
Mix the cream and milk powder in a frying pan. Cook on medium heat until it becomes the consistency of soft dough, this should take about 3-4 minutes. Stir continuously so the mixture does not burn on the bottom of the pan. This mixture is known as Mava.
Next add nuts mixture, sugar, and cardamom powder to Mawa. Mix well and cook for about 2 more minutes until the mixture is consistent with soft dough. Keep it aside.
After cooling, the mixture will become drier but still should be lightly moist.
Making Kachoris
Knead the dough for a minute.
Divide the dough into about 18 equal parts.
Roll each ball into about 2-inch diameters.
Take one of the rolled doughs in your palm and place about 1 tablespoon of filling in the center. Pull the edges of the dough to wrap the filling. Proceed to make all 30 balls.
Let the filled balls sit for 3 to 4 minutes before pressing.
In the frying pan heat the oil on medium-high, the frying pan should have about 1-1/2 inches of oil.
Set the filled balls on a clean and dry surface with the seam facing up. Using the base of your palm, slowly flatten them into a circle of about 3 inches.
To check if the oil is ready put a little piece of dough in the oil. It should sizzle, and come up slowly.
Slowly drop the Kachoris in the oil, do not overcrowd the kachoris in a frying pan, fry them on medium heat.
After they are puffed, slowly turn them over.
It will take about 5-6 minutes to fry. Fry until golden brown on all sides.
If the kachoris are fried on high heat, they will get soft and will not be crispy.
Notes
Serving
Just before serving drizzle the kachori with about 2 tablespoons of hot syrup. Garnish them with leftover filling or sliced pistachios.
Gulgulas are like lightly sweetened mini donuts. In India these are made for special occasions. This is a quick and easy to make recipe. They make good finger food even for the kids on the go. This is an easy recipe to make when you are craving for something sweet.
Mix whole-wheat flour, yogurt, sugar, fennel seeds, and oil, add water slowly as needed to make the thick consistency batter.
Heat the oil in a frying pan on medium high heat.
The frying pan should have about 1 inch of oil. (To check if the oil is ready, put one drop of batter in oil. The batter should come up but not change color right away).
Slowly drop 1 teaspoon of batter at a time in to the oil. Don’t over crowd the frying pan.
Fry the Gulgulas golden brown all sides, turning them occasionally. It will take 2 to 3 minutes.
Remove the gulgulas and place over a paper towel so the excess oil is absorbed.
Notes
Tips, If oil is not hot enough gulgulas will stick to the bottom of the frying pan.
Potato skins are boiled potatoes filled with spicy chickpeas. This is a mouthwatering snack, that looks great and tastes yummy. It is a delicious and healthyappetizer for the people who don’t like to have oily food.
Boil approximately 3 cups of water in a pan over medium high heat; add salt, oil and potatoes.
Cover and cook potatoes till they are tender, which will take approximately 20 minutes. Remove them from the water.
Once the potatoes are cool to touch, scoop out the insides from the center leaving ¼ inch thickness to outside of the potato. Red potato works best for this recipe because they hold their shape nicely.
Set potatoes aside.
Filling
Soak chickpeas for at least 8 hours in 3 cups of water or more.
Boil the chickpeas in 1 ½ cup of water in a pressure cooker over medium high heat. As the pressure cooker begins to steam, lower the heat to medium and cook for 6 minutes.
Add all the spices, mix well and cook for 3-4 minutes over low heat.
Spicy chickpeas should be a thick gravy-like consistency, not dry. As chickpeas cool they will absorb the water. Set aside.
Assembling Potato Skin
Take each potato bowl and coat the inside with one teaspoon of Hari Cilantro Chutney.
Place 2 tablespoons of spiced chickpeas into the chutney coated bowl. Drizzle the top with tamarind chutney.
Potato Skins Recipe: A Delicious Appetizer for Any Occasion
Potato skins, a beloved appetizer, can be transformed into a delectable snack that satisfies both vegan and gluten-free diets, offering a low-fat option perfect for those seeking a healthier indulgence, while still enjoying the savory crunch of chaat-inspired flavors. Potato skins are a classic appetizer loved by many for their crispy texture and delicious toppings. This potato skins recipe offers a simple yet flavorful way to enjoy this dish at home. Whether you’re hosting a party or simply craving a savory snack, learning how to make potato skins will surely impress your guests and satisfy your taste buds.
Step 1: Preparing the Potatoes
Start by scrubbing the potatoes thoroughly under running water to remove any dirt or debris. Since the skin plays a crucial role in this dish, ensure you choose potatoes that are uniform in size and free from blemishes. The ideal potatoes for potato skins are russets or Idaho potatoes, known for their starchy texture, which crisps up beautifully when baked.
Step 2: Baking the Potatoes
Once cleaned, prick the potatoes all over with a fork to allow steam to escape during baking. This prevents them from bursting open in the oven. Place the potatoes directly on the middle rack of a preheated oven and bake at 400°F for about 45-60 minutes or until tender when pierced with a fork. Baking the potatoes ensures they are cooked through while developing that desirable crispy texture in the potato skin.
Step 3: Cooling and Halving the Potatoes
After baking, allow the potatoes to cool for a few minutes until they are safe to handle. Then, carefully cut each potato in half lengthwise using a sharp knife. Use a spoon to scoop out the flesh, leaving about a quarter-inch layer attached to the potato skin. Reserve the scooped-out potato flesh for another use, such as mashed potatoes or potato soup, minimizing food waste.
Step 4: Crisping the Potato Skins
Return the hollowed-out potato skins to the oven, placing them cut side up on a baking sheet. Increase the oven temperature to 450°F and bake the potato skins for an additional 10-15 minutes or until they are golden and crispy. This step ensures that the potato skins develop a satisfying crunch, providing the perfect base for your toppings.
Step 5: Adding Toppings
Once the potato skins are crispy and golden brown, it’s time to add your favorite toppings. Popular options include shredded cheese and dollops of sour cream. Feel free to get creative with your toppings, experimenting with different combinations to suit your taste preferences. Return the topped potato skins to the oven for a few minutes to melt the cheese and heat up the toppings.
Step 6: Serving and Enjoying
Once the toppings are heated through and the cheese is melted and bubbly, remove the potato skins from the oven and transfer them to a serving platter. Garnish with additional chopped herbs, such as parsley or chives, for a pop of color and freshness. Serve the potato skins hot, alongside your favorite dipping sauces, and watch them disappear within minutes!
Tips for Perfect Potato Skins
For extra crispy potato skins, brush the hollowed-out shells with melted butter or olive oil before baking.
To save time, you can prepare the potato skins in advance up to the point of baking them with the toppings. Simply cover and refrigerate the assembled potato skins until you’re ready to bake and serve.
Get creative with your toppings! Try adding cooked ground beef or turkey, diced bell peppers, or jalapeños for a spicy kick.
Variations of Potato Skins
Vegetarian Option: Opt for vegetarian toppings such as sautéed mushrooms, diced tomatoes, and black olives.
Loaded Potato Skins: Go all out with your toppings by adding a variety of ingredients such as chili con carne, guacamole, and salsa for a hearty and flavorful twist.
Tex-Mex Potato Skins: Use Mexican-inspired toppings like shredded Mexican cheese blend, diced avocado, and a drizzle of chipotle mayo for a south-of-the-border flair.
Benefits of Potato Skins
Nutrient-Rich: Potato skins are a good source of fiber, vitamins, and minerals, including potassium and vitamin C. Leaving the skin on maximizes the nutritional benefits of this appetizer.
Versatile: You can customize potato skins with your favorite toppings, making them suitable for various dietary preferences and occasions.
Crowd-Pleaser: Whether served as an appetizer at a party or enjoyed as a snack while watching the game, potato skins are sure to be a hit with guests of all ages.
Frequently Asked Questions (FAQs)
Q: Can I make potato skins ahead of time?
A: Yes, you can prepare the potato skins up to the point of adding the toppings, then cover and refrigerate them until you’re ready to bake and serve.
Q: Can I freeze leftover potato skins?
A: While it’s best to enjoy potato skins fresh, you can freeze any leftovers in an airtight container for up to 1-2 months. Reheat them in the oven until heated through before serving.
Q: Can I use different types of potatoes for this recipe?
A: While russet or Idaho potatoes are traditionally used for potato skins, you can experiment with other varieties such as Yukon Gold or sweet potatoes for a unique twist.
Other Recipes on Manjula’s Kitchen
If you’re looking to explore more Indian recipes, appetizers, beverages, and desserts, be sure to check out the following links on Manjula’s Kitchen. Here are some links to recipes on Manjula’s Kitchen official website:
Puran Poli is a sweet flat bread with a sweet dal lentil filling. This is a popular bread in the states of Gujarat and Maharashtra. Puran poli is a wonderful breakfast dish, and can also be served as a snack.
¾ cup Toor dal (Ahrar dal) (available in Indian grocery stores)
1 cup sugar
½ teaspoon turmeric
1 teaspoon cardamom powder (elaichi)
¼ teaspoon nutmeg (jaiphal)
Also Needed
Approximately 3 tablespoons oil
Approximately ½ cup of dry whole wheat to roll the bread
Instructions
Filling
Wash and soak the toor dal in two cups of water for at least four hours. Dal will double in volume after soaking. Discard any remaining water.
Add toor dal and turmeric to two cups of water and cook in a heavy pan over medium-high heat. When dal boils, remove the yellow foam from the top. Reduce the heat to medium and cover the pan.
Let it cook for 25 minutes, adding more water if needed. Dal should be very soft and mushy.
Add sugar and cook until the dal looks like paste and starts to hold together. Add cardamom and nutmeg powder and mix well. The dal filling will be very soft and sticky.
Dough
In a bowl, mix whole-wheat flour, all-purpose flour, and oil; add water slowly to make a very soft dough. The dough should not stick to your fingers. Cover the dough and set it aside. Let it rest for at least ten minutes.
Making Puran Poli
Divide both the dough and the dal filling into ten equal parts. The parts of the dal filling should be about 2½ times that of the dough balls.
Roll the dough balls into 2½”-diameter circles. Place one part of the filling in the center of each. Seal by pulling the edges of the rolled dough together to make a ball. Proceed to make all ten balls. Let the filled balls settle for three to four minutes.
Heat the skillet on medium-high heat. To test, sprinkle a couple of drops of water on the skillet. The water should sizzle right away.
Press the filled ball lightly on both sides on a surface covered with dry whole wheat flour.
Lay the balls on the sealed side up and lightly press them into circles about 2” in diameter. Roll the balls gently into 5” circles. If the dough sticks to the rolling pin or rolling surface, lightly sprinkle dry whole wheat flour on both sides of the semi-rolled puran poli.
Place the Puran poli in the skillet. When it starts to change color, flip it over. You will notice some golden-brown spots.
After a few seconds, spread one teaspoon of oil on the puran poli. Flip them again and lightly press the puffed areas with a spatula. Flip again, and press with the spatula making sure the puran poli are golden-brown on both sides.
Repeat the same process for the remaining.
Puran poli is ready to be served and it tastes best when eaten hot.
Notes
Tips
1. When cooking the dal, use a large pot to prevent it from boiling over, as this can happen very easily.2. Cooked Puran Poli can be stored for a week in the refrigerator. Re-heat over a skillet or in the toaster oven.VariationPuran Poli can be prepared using Chana dal, however, it has to be cooked for a slightly longer time.
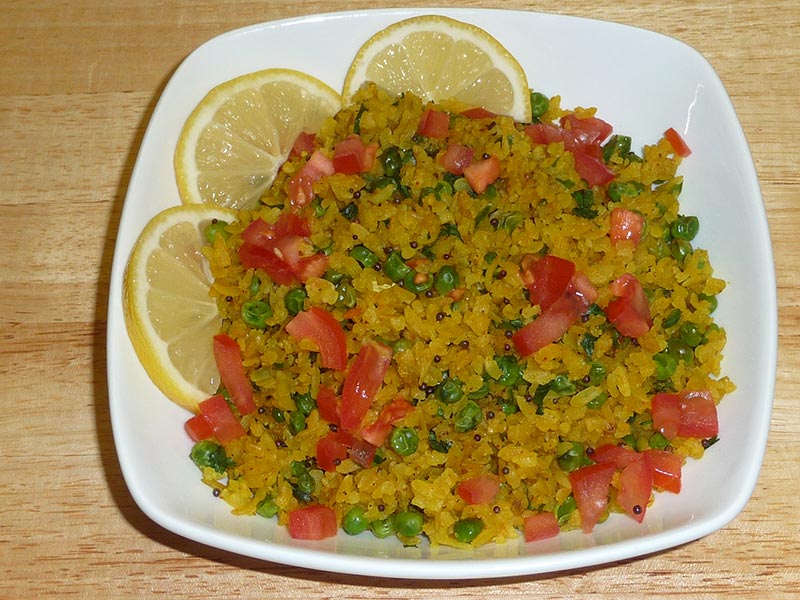
This dish is a favorite for breakfast or as a light snack in different parts of India. Being raised in Bihar, my mother was very fond of Chudwey. She would often prepare this dish as a special snack for guests to be served with tea. I have grown up loving this recipe and thought I would share it with all of you. This is a quick and easy recipe to make and very delicious.
2cupsthick poha, poha is available in different thickness
1cupgreen peas, I am using frozen
2tbspoil
1tspmustard seedsrai
3cardamomsilachai
1/2tspturmerichaldi
1/4tspred chili powder
1green Chile finely chopped
1tspginger finely chopped
1tspsalt
1tspsugar
1tsplemon juice
2tbspcilantro finely choppedhara dhania1
2lemon slice for garnishing
1/4cupchopped tomatoes for garnishing
Instructions
Gently wash poha in a colander and let it sit/drain for approx. 10 minutes.
Sprinkle turmeric, chili powder and salt and toss with a fork.
Wash and drain green peas and set aside.
Heat oil in a frying pan over medium high heat. When oil is moderately hot add mustard seeds and wait till seeds crack. Add cardamom, ginger and green chili and stir for a few seconds. Then add green peas and cook until they are tender.
Add poha and stir-fry for 3 to 4 minutes, mixing gently. (If the poha looks too dry, add a few tablespoons of water and continue cooking).
Remove from heat and add lemon juice, sugar and cilantro. Mix and cover for few minutes.
Notes
Serve hot with a side of Hari Cilantro Chutney.Tips: Poha comes in different thickness sizes, but you must use the “thick” poha for this recipe, or else it will become too mushy.Varying brands of Poha may absorb water differently. Therefore use your judgment while cooking, to add a few tablespoons of water, if it feels too dry.I am using frozen baby green peas, but you can use fresh or frozen of any style green peas. Just make sure that they are fully cooked before you add the poha.
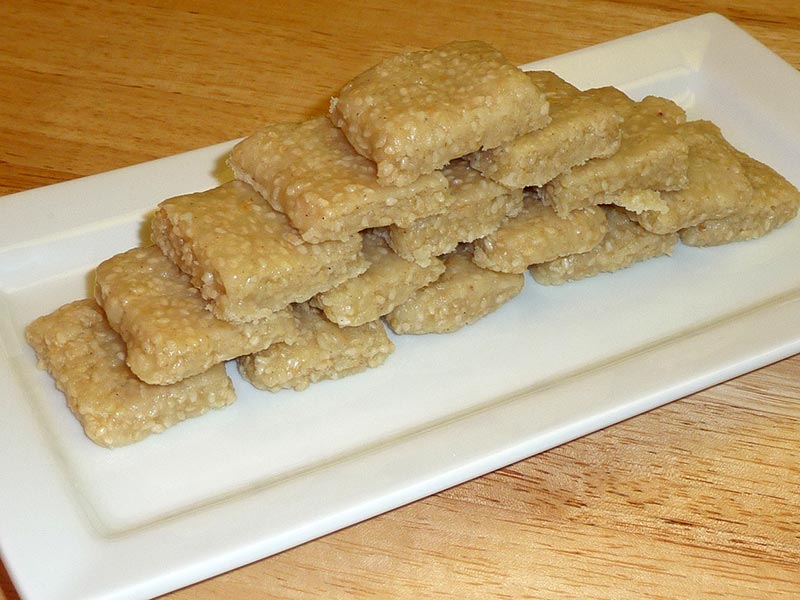
Til ki Burfi is a healthy, quick & easy way to make home-made sweet snack which can also be offered as a dessert post meal. Its a must try recipe during winters.
Roast sesame seeds over medium heat till they are golden in color. This should take about 3-4 minutes. Keep aside.
In a non-stick frying pan add heavy cream and milk powder mix it well. Cook over medium-high heat, stir continuously till the mixture starts to bubble.
Lower the heat to medium and keep stirring and scraping the sides and bottom of the pan, until mixture is reduced to thick paste and starts coming together. This should take 8-10 minutes.
Add roasted sesame seeds and mix well. Stir for another 2-3 minutes until mix start looking soft dough.
Lower the heat to low and add sugar and cardamom powder and mix it well. This will become soft in texture after adding sugar.
Keep stirring for 1-2 minutes and bring the burfi back to dough texture.
Spread burfi mixture onto the greased plate, approximately ½ inch thick. Let it sit for at leadt two hours at room temperature. Cut burfis to desired shape; square or diamond shape works well.
The burfis will store well in an airtight container, at room temperature for up to 2 weeks.
Shahi Paneer is a very festive main dish that is creamy and rich in flavor. It is usually a special occasion dish. Shahi paneer can be served with any Indian bread, such as naan or with rice.
Grind cashews into powder-like consistency. Keep aside.
Puree tomatoes, green chili and ginger. Keep aside.
Add oil in a pan, over medium heat. Shallow fry paneer cubes till they turn slightly brown. Remove from pan and place over paper towels to absorb excess oil.
Increase heat to medium-high and test the oil by adding one cumin seed. If it cracks immediately, the oil is ready. Add cumin seeds to the oil and as they crack, add asafetida and bay leaves. Stir for a few seconds.
Add tomato puree, coriander powder, turmeric, red chili powder, and paprika. Cook the mixture, stirring occasionally for 2-3 minutes. It will reduce to half its volume and start separating from the oil.
Add sugar, cashew powder and yogurt. Cook for another minute then add 1 cup of water and salt and bring to boil.
Add paneer and cover the pan. Simmer for a few minutes over medium-low heat, till gravy is slightly thick in consistency.
Remove from heat, add garam masala and chopped cilantro. Mix gently, cover the pan and let it sit for a couple of minutes. Shahi paneer tastes best if it is served hot.
Notes
Serve Shahi Paneer with Naan, or over the Jeera Rice
Keyword Creamy Cashew Gravy, Kid Friendly, Party Dish
Shahi Paneer is a delightful and gluten-free culinary creation, offering a rich and creamy gravy that is not only a treat for the taste buds but also is kids friendly as its a hit among kids too. This regal dish is characterized by its luxurious texture and flavorful combination of paneer, creating a harmonious blend that appeals to both young and adult palates. Its festive dish made on special occasions and would be a great addition to parties and gatherers as a party recipe.
Dicing the Paneer:
Grab your paneer and a sharp knife. Cut the paneer into cubes that are about the size of a large grape or ¾ of an inch each. It’s okay if they’re not perfectly uniform, but similar-sized pieces will cook more evenly. Set the cut paneer aside in a bowl for now.
Grinding the Cashews:
Take your cashews and grind them up into a fine powder using a mortar and pestle, a spice grinder, or even a food processor if you have one. You want them to be like a smooth, nutty dust. Once they’re ground, store them in a separate bowl for later.
Making the Tomato-Ginger-Chili Paste:
Grab your tomatoes, green chili, and ginger. If you prefer a milder dish, you can remove the seeds from the chili before chopping. Finely chop all three ingredients. You can use a blender or food processor to make things easier. Blend them together until you have a smooth, thick paste. Set this paste aside in a bowl with the other ingredients.
Pan-Frying the Paneer:
Pour some oil into a pan and heat it up over medium heat. You want the oil to be hot but not so hot that it starts to smoke. When the oil is ready, gently add the paneer cubes to the pan. Carefully fry the paneer cubes, turning them occasionally, until they turn a light golden brown on all sides. This will take a few minutes. Once they’re browned, take the paneer out of the pan with a spoon and place them on a paper towel-lined plate. The paper towels will soak up any excess oil.
Tempering the Oil and Adding Spices:
Now, increase the heat to medium-high. To test if the oil is hot enough, take a single cumin seed and toss it in the oil. If it sizzles right away, the oil is ready. If it doesn’t sizzle, wait a little longer before testing again. Once the oil is hot, add the cumin seeds. As the cumin seeds crackle, add a pinch of asafetida (if using) and a few bay leaves. Sauté these spices for a few seconds, stirring them constantly, until they release their aroma.
Cooking the Tomato Masala:
Add the tomato-ginger-chili paste you made earlier to the pan with the spices. Next, sprinkle in the coriander powder, turmeric, red chili powder, and paprika. Stir everything together and cook the mixture over medium heat for 2-3 minutes, stirring occasionally. You’ll notice the mixture will start to reduce in volume and thicken up as it cooks. It may even separate a little from the oil around the edges of the pan. That’s okay!
Adding Sweetness and Creaminess:
Now, it’s time to add a touch of sweetness and creaminess to the sauce. Sprinkle in some sugar and add the ground cashew powder you made earlier. Stir this in and cook for another minute. Then, pour in one cup of water and add salt to taste. Bring the mixture to a boil.
Simmering the Paneer in the Masala:
Carefully add the pan-fried paneer cubes back into the pan with the simmering tomato masala. Gently stir everything together to coat the paneer in the sauce. Cover the pan with a lid and reduce the heat to medium-low. Let the paneer simmer for a few minutes, until the gravy thickens slightly and becomes a nice consistency.
Finishing Touches:
Once the paneer is cooked through and the gravy has reached your desired consistency, turn off the heat. Now, sprinkle in some garam masala and chopped fresh cilantro. Gently fold these ingredients into the dish without over stirring. Cover the pan again and let it sit for a couple of minutes. This allows the flavors to meld together.
Serving Up the Shahi Paneer:
Your Shahi Paneer is now ready to be enjoyed! For the best flavor, serve it hot with rice, naan, or your favorite flatbread.
Shahi Paneer FAQs:
Is Shahi Paneer vegetarian?
Yes, Shahi Paneer is a vegetarian dish made with paneer, vegetables, and spices.
Is Shahi Paneer healthy?
While delicious, Shahi Paneer is on the richer side due to the use of cashews and cream. Moderation is key. It offers some protein from paneer and healthy fats from cashews, but may be higher in calories.
Can I substitute paneer in Shahi Paneer?
Tofu can be used as a substitute, although the texture will be slightly different.
What does Shahi Paneer taste like?
Shahi Paneer offers a burst of flavors: creamy, slightly sweet from tomatoes, savory from cashews and yogurt, with a hint of spice.
How to store leftover Shahi Paneer?
Store leftover Shahi Paneer in an airtight container in the refrigerator for up to 2-3 days. Reheat gently on the stovetop over low heat.
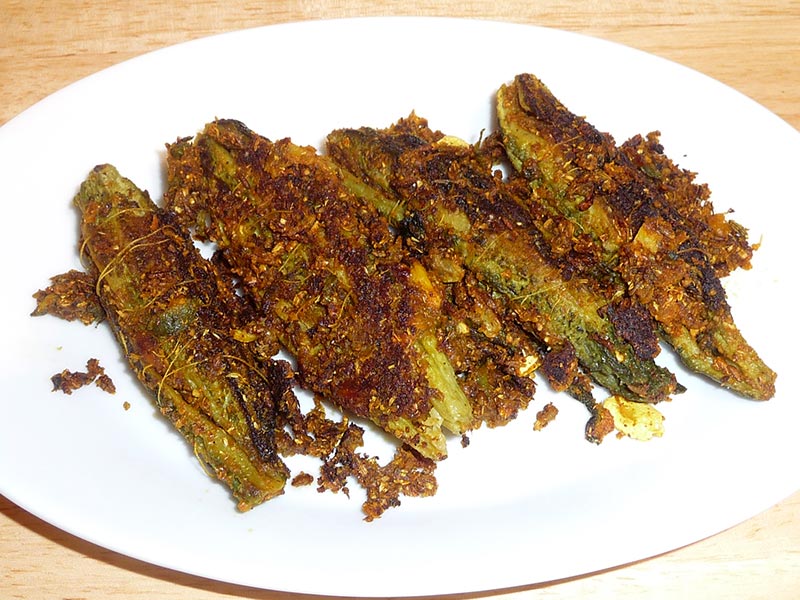
Wash karelas thoroughly and using a knife, scrape the skin. Set the scrapes aside.
Make a slit in the karelas length wise and remove the seeds. Add karelas and the skin scrapings to a bowl. Mix and sprinkle with salt and lemon juice. Let it marinate for at least an hour.
Squeeze the karelas to remove all the marinade. Wash karelas twice with hot water and then squeeze out all the water. Separate the scrapings from the whole karelas.
Preparing the Filling:
Heat the oil in a saucepan. Test the heat by adding one cumin seed to the oil; if the seed cracks right away, the oil is ready. Add the cumin seeds and asafetida to the oil. After the cumin seeds crack, add the karela scrapings and stir fry for about 2 minutes.
Add gram flour (besan) and stir-fry for another minute.
Add all the remaining dry spices: coriander powder, fennel powder, turmeric, chili powder, and mango powder. Sauté for a minute and then turn off the heat.
Stuff the split karelas with this spice mixture (there should be some spice mix remaining, which will be used later). Tie the karelas with a thread so that the stuffing does not come out while cooking.
Cooking the Stuffed karelas:
Add 2 tablespoons of oil in a sauce pan over medium heat. Spread the stuffed karelas in the pan and sprinkle with salt. Cover the pan and let it cook for about 2 minutes.
Turn the karelas over to the uncooked side and cook for about 1 minute. Repeat until all four sides of the karelas are cooked.
Sprinkle 2 tablespoons of water and the remaining spice mixture over the karelas. Cover the pan and let it cook for 2 more minutes.
Remove the lid to see if the karelas are tender. Gently turn them over a few more times, making sure they are covered with the spice mixture.
Notes
NotesStuffed karela can be served hot or cold and can be refrigerated up to a week.VariationsFor a slightly sweeter taste add 2 tablespoons of sugar to the cooked spice filling, prior to stuffing the karela.I like to Serve Karela with Urad Dal Tadka, Mixed Dal, Dal Makhini and Rice
Keyword Bitter Melon, Diabetic Friendly, Healthy Side Dish
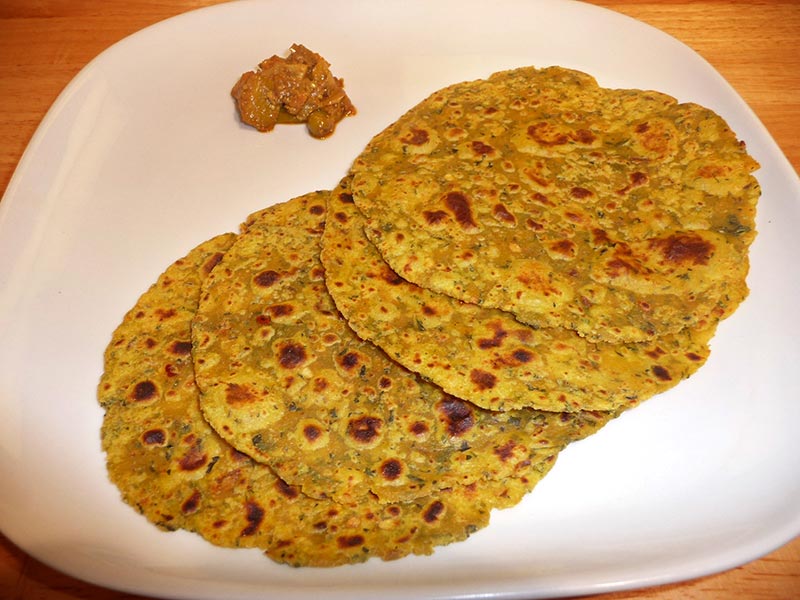
Mix all dry ingredients together in a bowl: flour, gram flour, asafetida, cumin seeds, turmeric, chili flakes, salt, and fenugreek leaves.
Add oil and yogurt to the flour mix and mix well. Add water as needed to make firm dough. Knead the dough for a minute on a lightly greased surface to make it smooth and pliable. Set the dough aside and cover it with a damp cloth. Let the dough rest at least ten minutes.
Divide the dough into six to eight equal parts. Using your oiled palm, roll each one into a smooth ball and press flat.
Take one dough ball and press it lightly on both sides on a surface covered with dry flour. Using a rolling pin, roll the dough into a circle of five to six inches. If dough starts sticking, dust it with more flour. However, do not use any dry flour toward the end of the rolling, as it will make the thepla dry.
Heat a skillet over medium high heat. To test, sprinkle a couple of drops of water on the skillet. It should sizzle immediately.
Place the thepla in the skillet. As it cooks, the dough will change color and have a dryer look. Turn the thepla over using a spatula. You should see golden-brown spots on the semi-cooked side.
After few seconds, spread ½ teaspoon oil onto the thepla using a spatula. Turn the thepla over. Using your spatula, lightly press the entire surface of the thepla to help it cook all the way through. It may puff up in some areas.
Turn over the Thepla over again and press with the spatula, making sure it is golden-brown on both sides. Remove from heat.
Repeat with the remaining dough, untill they are all done.
Notes
Serving SuggestionsMethi Thapla can be served plain or serve with Plain Yogurt or try with Date and Raisin Chutney, this sweet and chutney can really enhance the flavor.VariationThis recipe uses dry fenugreek leaves, as they are available year-round. But fresh fenugreek leaves are ideal if you can find them. Substitute ½ cup fresh chopped fenugreek leaves for the dry leaves.