Indian cuisine is renowned for its rich flavors, aromatic spices, and diverse dishes. While some may think that Indian cooking is complicated, there are numerous easy Indian recipes that you can prepare without spending hours in the kitchen.
This guide will introduce you to a variety of easy Indian recipes that are both delicious and straightforward to make. From appetizers to main courses and desserts, these Indian food recipes will become staples in your culinary repertoire.
Easy Indian Appetizers
Vegetable Samosas: These crispy and savory pastries are filled with a spiced mixture of potatoes and peas. They make for a great starter and are relatively simple to prepare with store-bought pastry sheets. Indian snacks that are sure to make every taste bud excited for more.
Chana Chaat: A tangy and spicy chickpea salad, Chana Chaat is an excellent appetizer that can be prepared in minutes. It’s made with boiled chickpeas, tomatoes, green chilies, and a variety of spices.
Paneer Tikka: Marinated in yogurt and spices, paneer cubes are grilled to perfection. This is one of the easy Indian recipes that you can quickly prepare for a party or a family dinner.
Aloo Tikki: These potato patties are flavored with spices and herbs, then shallow-fried until golden brown. Serve them with mint chutney for a delightful appetizer. One of the easy Indian street food recipes that is most tried in northern parts of India.
Simple Indian Main Courses
Palak Paneer: This spinach and cottage cheese curry is not only healthy but also easy to prepare. The creamy spinach sauce pairs perfectly with the soft paneer, making it a favorite among vegetarians.
Chole Bhature: Chole (spiced chickpea curry) and Bhature (fluffy deep-fried bread) are a classic combination. Despite its restaurant-style taste, it is one of the Indian food recipes easy to recreate at home.
Vegetable Biryani: A fragrant and flavorful rice dish, Vegetable Biryani can be made quickly using a pressure cooker or an Instant Pot. It’s a one-pot meal that’s perfect for a busy weeknight.
Dal Tadka: This daal recipe is a staple in Indian households. It involves cooking lentils with spices and then tempering them with ghee, garlic, and cumin seeds. It’s simple, nutritious, and pairs well with rice or roti.
Aloo Gobi: This dry curry made with potatoes and cauliflower is spiced with turmeric, cumin, and coriander. It’s a quick and easy Indian recipe that’s perfect for a weekday meal.
Quick Indian Side Dishes
Raita: A cooling yogurt-based side dish, Raita is made with yogurt, cucumber, mint, and spices. It’s perfect for balancing out spicy dishes.
Jeera Rice: Flavored with cumin seeds, this simple rice dish is a perfect accompaniment to curries. It’s one of the Indian recipes easy to make and adds a fragrant touch to your meal.
Baingan Bharta: Roasted and mashed eggplant cooked with tomatoes, and spices. This smoky-flavored dish is both easy and delicious.
Kachumber Salad: A refreshing salad made with chopped cucumbers, tomatoes, and a sprinkle of lemon juice and chaat masala. It’s a great side dish for any Indian meal.
Easy Indian Desserts
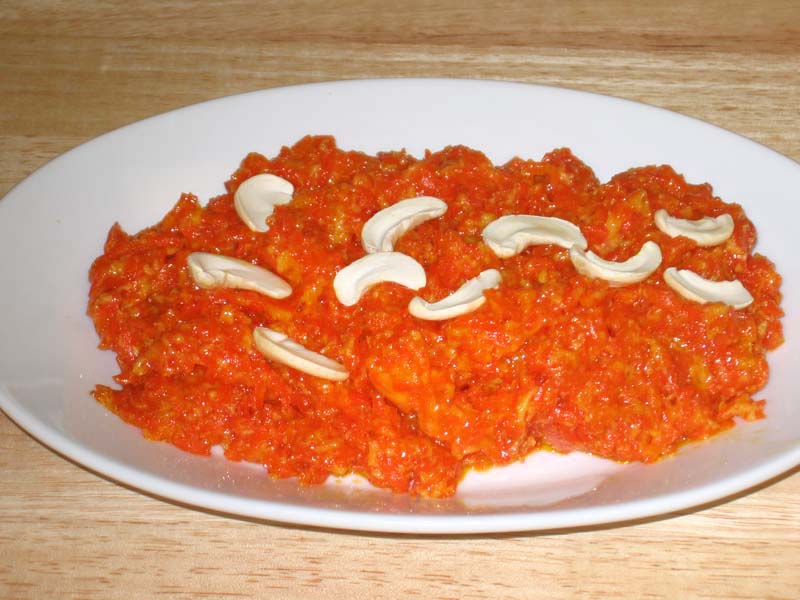
Gajar Halwa: This carrot-based dessert is made by simmering grated carrots with milk, sugar, and ghee. It’s garnished with nuts and cardamom, making it a comforting sweet treat.
Kheer: A rice pudding made with milk, rice, and sugar, flavored with cardamom and garnished with nuts. It’s one of the easy Indian food recipes that’s perfect for any festive occasion.
Rasgulla: Soft and spongy cheese balls soaked in sugar syrup. This dessert can be made quickly with store-bought paneer.
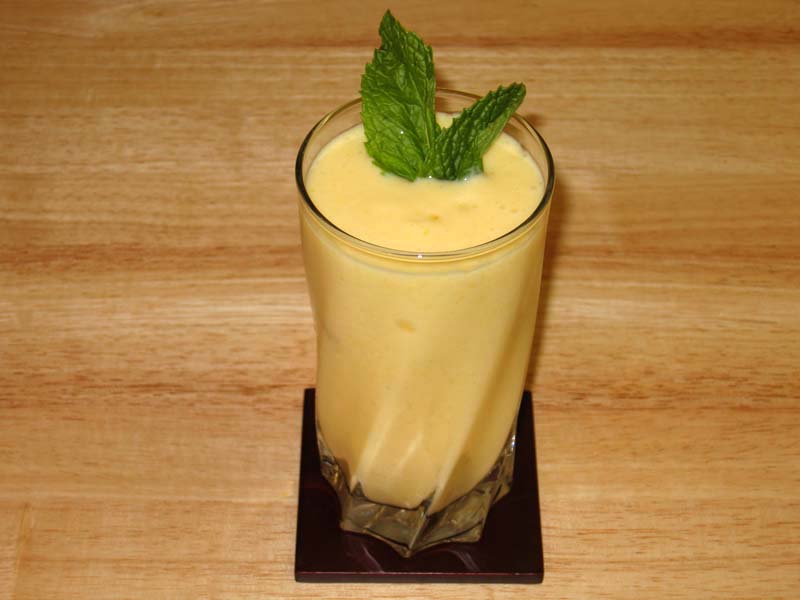
Mango Lassi: A refreshing drink made with yogurt, mango pulp, and a touch of cardamom. It’s perfect for cooling down on a hot day.
FAQs
Q: What are some easy Indian recipes for beginners?
A: Some easy Indian recipes for beginners include Chana Chaat, Aloo Tikki, Dal Tadka, and Jeera Rice. These recipes are simple to follow and don’t require advanced cooking skills.
Q: Can I make Indian food without a lot of spices?
A: Yes, many Indian food recipes can easily be made with a minimal number of spices. For example, Jeera Rice and Raita require only a few common spices like cumin and coriander.
Q: Are there quick Indian recipes for weeknight dinners?
A: Absolutely! Easy Indian recipes like Vegetable Biryani, Palak Paneer, and Aloo Gobi are perfect for weeknight dinners as they can be prepared quickly and offer a balanced meal.
Q: What are some easy Indian desserts I can try?
A: Easy Indian food recipes for desserts include Kheer, Gajar Halwa, and Mango Lassi. These desserts are straightforward to make and are sure to satisfy your sweet tooth.
Q: How can I make Indian food healthier?
A: To make Indian food healthier, use less oil, incorporate more vegetables, and opt for whole grains like brown rice or whole wheat roti. You can also use low-fat dairy products and lean proteins.
Conclusion
Exploring easy Indian recipes doesn’t have to be daunting. With these easy Indian food recipes, you can enjoy the rich and diverse flavors of Indian cuisine without spending too much time in the kitchen.
From appetizers and main courses to desserts, these Indian food recipes easy are perfect for any occasion. So, gather your ingredients and get ready to embark on a culinary journey that celebrates the best of Indian cooking.
Enjoy creating these dishes and sharing them with your loved ones! Explore more recipes on Manjula’s Kitchen and discover the joy of cooking nutritious and delicious food.
Mango Lassi is a soothing cold drink for hot summer days or to brighten up any meal. This pale drink is a blend of mango and yogurt. A popular beverage in Indian restaurants.
Blend yogurt, mango, and 2 tablespoons sugar and taste before adding more sugar. How much sugar is used depends on the sweetness of the mango and the yogurt.
Add and cardamom powder and blend. If it is too thick, add some water to desired consistency. Pour into a tall glass and garnish with mint leaves. ice and cardamom powder and blend again.
Notes
TipsAdjust ingredient quantities depending on the sweetness of the mango and the thickness of the yogurt. Mango Lassi it is better if the mangoes are not fibrous.You may also enjoy Falooda, Lemonade
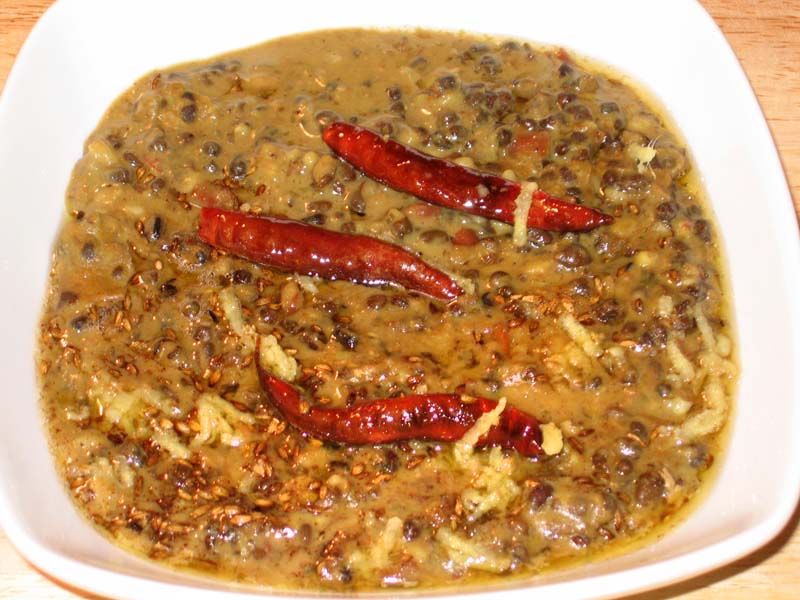
Dal Makhani is a popular dish from state of Punjab and across North India. Rich and hearty, dal makhani is a combination of whole urad (an Indian lentil)and red kidney beans. It goes well with Naan, and Tandoori Roti (oven-baked flat bread).
Wash urad dal and kidney beans well. Soak the dal in six cups of water at least for eight hours. After soaking, dal will be about two and a half times the volume of the original.
Place the dal in a pressure cooker with four cups of water. Add the salt, turmeric, ginger, and green chili, and cook over medium high heat. When it begins to steam, turn the heat down to medium. Cook 25 minutes.
Turn off the heat. Wait until steam has stopped before opening the pressure cooker. The dal and kidney beans should be soft and tender.
Lightly mash the kidney beans and dal. Cook for another five minutes on low-to-medium heat.
Add cream, garam masala, and amchoor powder. Cook for ten minutes on low heat.
For Seasoning
Heat the ghee in a small saucepan. Test the heat by adding one cumin seed to the oil; if it cracks right away, the oil is ready. Add cumin seeds. When they crack, add the asafetida, red chilies, and red chili powder. Stir for a few seconds.
Add one teaspoon of water to keep the spices from burning. Pour the spiced ghee over the dal.
Garnish with shredded ginger.
Notes
Serving suggestion, taste best with Naan, or Tandoori Roti
Punjabi Dal Makhani: A Step by Step Urad Dal Makhani Recipe
Dal Makhani is a rich and creamy lentil dish that originates from the Punjab region of India. Made with black lentils (urad dal), kidney beans, and a blend of aromatic spices, this dal makhani recipe is a staple in Punjabi cuisine. Known for its luscious texture and indulgent flavors, Dal Makhani is a popular Indian dish made primarily from lentils (dal) and typically enjoyed during the winter months.
It is a rich and creamy dish that is usually gluten-free, as lentils themselves are naturally gluten-free. The main ingredients for making Dal Makhani include black lentils (urad dal), red kidney beans (rajma), butter, cream, and various spices such as cumin, coriander, turmeric, and garam masala. It is traditionally cooked slowly over a low flame, allowing the flavors to meld together and the lentils to become tender. Dal Makhani is often served with rice or Indian bread like naan or roti.
Step 1: Preparation of Ingredients:
Begin by gathering all the necessary ingredients for making Dal Makhani. Rinse the black lentils and kidney beans under cold water and soak them for at least 8 hours or overnight to soften. Finely chop tomatoes, ginger, and green chilies to prepare the base for the dal. Having all the ingredients prepped and ready will make the cooking process smoother.
Step 2: Cooking the Lentils:
In a pressure cooker or a pot, add the soaked black lentils and kidney beans along with fresh water, salt, and a pinch of turmeric powder. Pressure cook or simmer until the lentils and beans are soft and fully cooked. Cooking them until tender is essential for achieving the creamy texture of Dal Makhani. Once cooked, set them aside while we prepare the gravy.
Step 3: Preparing the Gravy:
In a large pot or saucepan, heat oil or ghee over medium heat. Add whole spices such as cinnamon, cloves, and cardamom pods, and let them sizzle. Then, add finely chopped ginger and green chilies, and sauté until fragrant. The aromatic base will infuse the gravy with depth of flavor.
Step 4: Adding Tomatoes:
Once the aromatics are sautéed, it’s time to add the chopped tomatoes to the pot. Cook the tomatoes until they soften and break down, forming a thick gravy. You can also add tomato puree for a smoother texture. Stir in spices such as coriander powder, cumin powder, red chili powder, and garam masala, and cook until the oil separates from the mixture.
Step 5: Cooking the Lentils with Gravy:
Now, add the cooked black lentils and kidney beans to the pot with the tomato gravy. Stir well to combine all the ingredients. Allow the mixture to simmer for a while, allowing the flavors to meld together. This slow cooking process helps develop the rich and indulgent flavors of Dal Makhani.
Step 6: Adding Cream and Butter:
To finish off the dish, add a generous amount of cream and butter to the pot. Stir well to incorporate the cream and butter into the dal, creating a velvety and luxurious texture. Adjust the seasoning with salt and add a pinch of sugar to balance the acidity of the tomatoes if needed.
Step 7: Garnishing and Serving:
Before serving, garnish the Dal Makhani with freshly chopped cilantro leaves for a burst of freshness and color. You can also drizzle a little more cream on top for added richness. Serve the Dal Makhani hot with steamed rice, naan, or roti for a comforting and satisfying meal.
Tips for Making Perfect Dal Makhani:
Soak Lentils and Beans: Soaking the black lentils and kidney beans overnight helps reduce cooking time and ensures they cook evenly.
Slow Cooking: Allow the dal to simmer on low heat for a longer time to develop the flavors and achieve the desired creamy consistency.
Use Fresh Cream and Butter: Using fresh cream and butter adds richness and depth of flavor to the dish.
Variations of Dal Makhani:
Spicy Dal Makhani: Add extra green chilies or red chili powder for a spicier version of the dish.
Restaurant-style Dal Makhani: For a restaurant-style flavor, add a tadka (tempering) of cumin seeds and dried red chilies in ghee and pour it over the prepared dal before serving.
Benefits of Including Dal Makhani in Your Diet:
High in Protein: Dal Makhani is rich in protein from black lentils and kidney beans, making it a nutritious option for vegetarians and vegans.
Rich in Iron: Black lentils are a good source of iron, which is essential for maintaining healthy blood cells and preventing anemia.
Source of Healthy Fats: The addition of cream and butter provides healthy fats, which are important for overall health and satiety.
Frequently Asked Questions (FAQs) about Dal Makhani:
Q: Can I make Dal Makhani in advance?
A: Yes, Dal Makhani tastes even better when made in advance as it allows the flavors to develop. It can be stored in the refrigerator for up to 3-4 days and reheated before serving.
Q: Can I freeze Dal Makhani?
A: Yes, Dal Makhani freezes well. Allow it to cool completely, then transfer it to airtight containers or freezer bags and freeze for up to 3 months. Thaw overnight in the refrigerator before reheating.
Q: Is Dal Makhani gluten-free?
A: Yes, Dal Makhani is naturally gluten-free, making it suitable for those with gluten intolerance or celiac disease.
For more delicious Indian dal recipes, visit Manjula’s Kitchen. Explore a variety of vegetarian dal dishes featuring a range of lentils, spices, and vegetables to add flavor and variety to your meals.
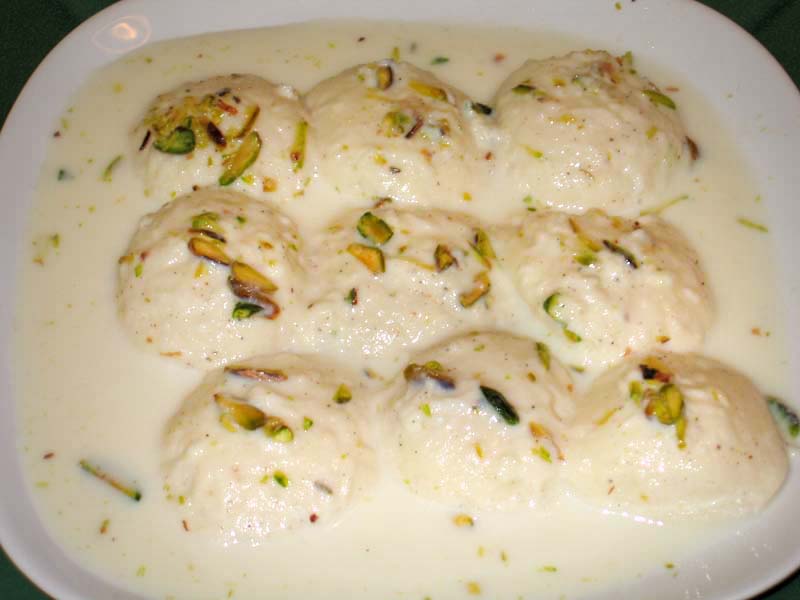
Rasmalai is a Bengali dessert consisting of soft paneer balls immersed in chilled creamy milk. Like Rasgullas, Rasmalai is also made with homemade cheese known as "paneer" or "chana". Instead of being soaked in sugar syrup like Rasgullas, Rasmalai is soaked in sweet, flavored milk.
Mix lemon juice in half a cup of hot water and keep aside.
Boil the milk in a heavy bottomed over medium-high heat, stirring frequently making sure milk do not burn on the bottom of the pan.
As the milk comes to a boil, add the lemon juice slowly and stir the milk gently. The curd will start separating from the whey, turn off the heat.
Once the milk fat has separated from the whey, drain the whey using a strainer line with cheesecloth or muslin cloth.
Wrap the curd in a muslin cloth, rince under cold water, and squeeze well. This process takes out the sourness from the lemon.
To take out the excess water squeeze the cloth, or press the wrapped paneer under a heavy pan for about one hour. Taking the right amount of water out of the paneer is the most important part of this recipe.
To check if enough water is out of the paneer, take a little piece of paneer on your palm and rub with your fingers. After rubbing the paneer for about 15-20 seconds, you should be able to make a firm but smooth ball.
Once the paneer is drained, place on a dry, clean surface and knead the paneer for 3-4 minutes until the paneer is almost rolls into smooth soft dough. Knead the paneer by dragging the palm of your hand hard on the paneer. Keep scooping it back to togather and knead more. Your palm will be little greasy.
Making the Rasmalai:
Divide the dough into 12 equal parts and roll them in smooth balls.
To make the balls apply some prassure at the first and then release when forming the balls, lightly press to make about 3/4″ patty shape.
Mix the sugar and water in a pressure cooker on medium high heat and bring to a boil.
Add the paneer balls and close the pressure cooker. After the pressure cooker starts steaming, turn the heat to medium and cook for about seven minutes.
Make sure the cooker is large enough to accommodate the finished rasgullas patties, as they will expand to about double in the volume while cooking in the syrup!
Close the heat and wait a few minutes befor opening the pressure cooker. Pour cold water over the cooker before opening. Take out the patties from the syrup and squeeze them lightly,and keep aside.
Boil the milk in a frying pan on medium heat until the milk reduce to about 2 cups. Make sure to frequently stir the milk as the milk burns easily in bottom of the pan.
Add the sugar and the Rasmalai patties in milk. Let it cook for few minutes. Add the cardamom and mix in. Garnish with sliced almonds and pistachios.
Serve the Rasmalai chilled.
Keyword Bengali Delicacy, Dessert, Made With Paneer
Gajar Ka Halwa is a classical Indian dessert, this is also known as gajrala. Gajar ka Halwa is a delicious and popular north indian sweet dish made with few ingredients, carrots, milk, sugar and flavored with cardamom. Gajar ka Halwa is a perfect dessert for any celebration.
Roast the cashew nuts and set aside for the garnish.
Boil the milk on medium-high heat in a non-stick pan until it is reduced to about to 1 cup. Stir often to ensure the milk does not burn in the bottom of the pan. Set aside.
Melt the butter in a frying pan on medium heat. Add the shredded carrots and stir-fry for about seven to eight minutes. Carrots should be tender and slightly changed in color.
Add the milk and cook until the milk dries. This will take about eight to ten minutes.
Next add the sugar, and cardamom powder and stir-fry for another three to four minutes until the halwa starts to leave the side of frying pan.
Garnish with cashew nuts.
Notes
Tips:Gajar Halwa can be refrigerated for up to one week and kept in the freezer for up to two months.When ready to serve just warm.Suggestion:Cook the halwa a little more and pour on a greased plate.Spread the halwa until it is flat and 3/4 inch thick.After the halwa cools, cut in squares.Garnish with cashew nuts or sliced almonds.
Samosa is probably the most popular Indian snack. Fried puffed pastry filled with spicy potatoes and green peas. No one can resist samosas, a mouthwatering snack. Samosas can be served any time and for any occasion. This recipe is for traditional north Indian Samosa.
3boiled potatoes, peeled and chopped into very small cubes
1/2tspcumin seedsjeera
1tbspchopped green chilies
1tspcoriander powderdhania
1/4tspgaram masala
1tspmangopowderamchoor
1tspsalt
2tbspoilcanola or vegetable
1/2cupgreen peasI am using frozen peas
Need oil to fry
Instructions
Making the Dough:
Mix the flour, sooji, salt, oil and salt together to make a soft dough (add more water as needed). knead the dough for about 1 to 2 minutes to make the dough smooth and pliable. Set the dough aside and cover it with damp cloth. Let the dough sit for at least 15 minutes.
Making the Filling:
Heat the oil in a frying pan on medium high heat. Test the heat by adding one cumin seed to the oil; if it cracks right away oil is ready. Add cumin seeds as cumin seeds crack, add green chilies, coriander powder and stir for few seconds. Next add green peas and turn heat to medium and stir until tender. Add the potatoes and stir-fry for about 4 minutes. Stir in garam masala and amchur. Add more salt or amchur according to taste.
Let the filling cool to room temperature.
Making Samosa:
Take 2 tablespoons of water and 1 tablespoon of all-purpose flour to make a paste and keep aside.
Knead the dough for a minute. Divide the dough into 4 equal parts and make into balls. Roll each ball into 6-inch diameter circles and cut each circle in half.
Spread the paste lightly all along the edge of one semicircle. Pick this semicircle up with both hands and fold it into a cone shape. Pinch the side of this cone so that it is completely sealed.
Fill the cone with 3 tablespoons of filling. Press this filling down with your fingers. Now close the top of this cone into a triangle shape, pinching the top edge so that it is completely sealed. Continue filling the rest of the samosas.
Heat about 1 inch of the oil in a frying pan on medium heat. To check if oil is hot enough place a small piece of dough in oil and dough should sizzle and come to the surface slowly.
Place the samosas in the frying pan a few at a time. After samosas are floating on top of the oil turn them slowly. Fry the samosas until the samosas turn a light golden-brown color on all sides. If you use a high heat, the samosa crust will be too soft and not crispy.
Notes
Tips:Boil the potatoes just until tender. Be careful not to poke the potatoes multiple times while they are cooking, as they will absorb the water. Drain immediately and keep aside until cool enough to touch.The dough has to be kneaded well; otherwise, the samosas will not come out as crisp.If the filled samosas sit for too long, they will dry. To avoid this, cover with a damp cloth.Suggestions:Samosa can be prepared ahead of time and can be freeze for a month.Before freezing fry them enough until samosa changes the color to very light gold brown.After samosas are on room temperature bag them in zip lock bags and freeze them.To use frozen samosas take out as many you need and fry them on medium heat.
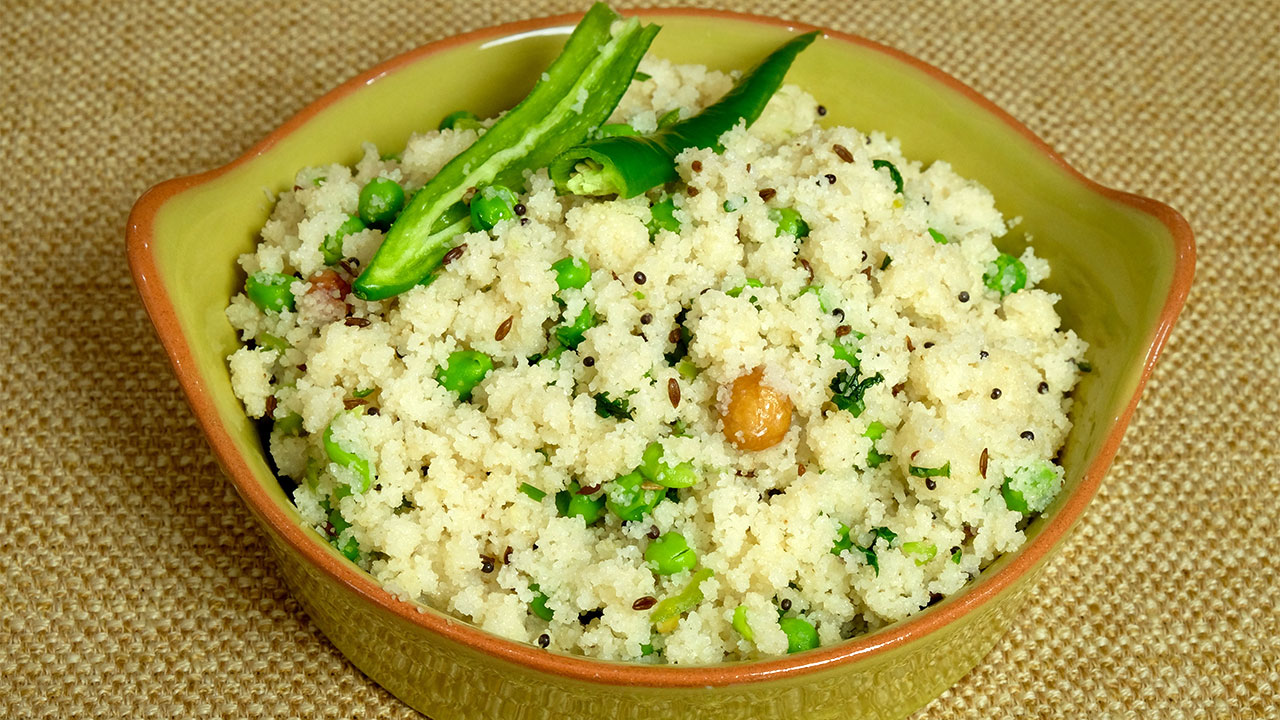
As water comes to boil turn heat to low and continue cooking until peas are tender.
Turn off the heat and set aside.
Heat the oil in a saucepan. Test the heat by adding one cumin seed to the oil; if it cracks right away oil is ready. Add black mustard seed and cumin seed.
Add mustard seed and cumin seeds as seeds crack, add peanuts and stir for one minute.
Add sooji and stir-fry about 3 minutes on medium heat till sooji turns gold brown.
Add green peas with water a little at a time, otherwise water will splatter.
Add lemon juice and cover for 2 minutes.
Sooji will absorb some of the water leaving the upma moist.
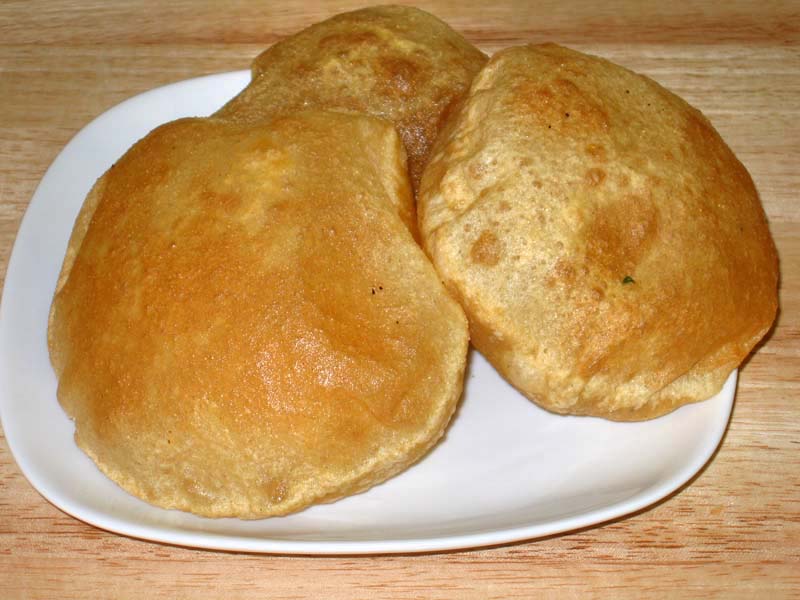
Puri is whole wheat fried bread, made on special occasions. Especially popular with children. It goes well with mutter paneer and other thick gravy recipes.
Mix whole-wheat flour and salt. Add water as needed to make firm dough. Oil your palm and knead the dough until it is pliable. Cover the dough with a damp cloth and set it aside to rest at least ten minutes.
Divide the dough in eight equal parts. Form these into smooth balls, rolling the dough between your greased plams.
Roll the dough balls into seven inch circles. If the dough sticks to the rolling pin or rolling surface, put a drop of oil on the rolling pin and on the rolling surface. Roll four or five puris before you start frying. Do not roll all the puris at once, as they will dry out and fail to puff.
Heat at least one inch of oil in a frying pan over medium high heat. When the oil is moderately hot, a small piece of dough dropped into the oil will float immediately to the top.
Place one puri at a time in the frying pan and press it with a skimmer. The puris should puff up right away. Turn the puris over. Puri should be light creamy brown on both sides. Take the puris out and place them on paper towels to absorb the excess oil.
Serve puri hot or store in covered container after they cool to room temperature.
Notes
Tips: Do not roll the puris on a floured surface. If it seems that you need to flour the surface that is an indication that the dough is too moist. In this case, put a drop of oil on the surface and on the rolling pin.If the oil is not hot enough, the puris will not puff and will be greasy.Variations:Add your choice of spices or one or more dry herbs to the flour when making dough. Red pepper flakes, asafetida, dry mint leaves, dry fenugreek leaves, or any other dry herb can be used.
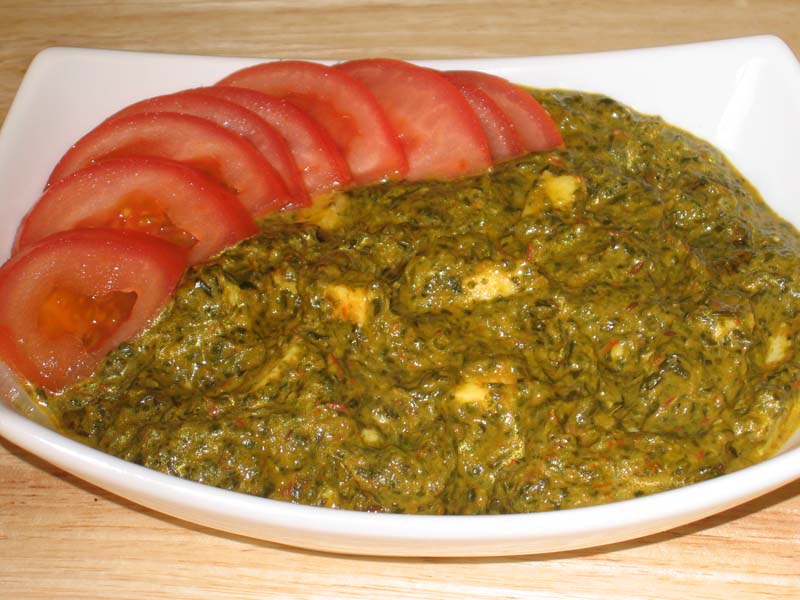
Palak Paneer is creamy spinach dish with paneer . This is a popular dish with youngsters and served in every indian resturant. The creamy texture of spinach with paneer is a good combination. I like to serve Palak Paneer with Naan or Tandoori Roti.
110 ozpacket of chopped frozen spinach or 4 cups of fresh finely chopped spinach
1/3lbpaneer
2 medtomato pureed
1tspchopped ginger
1tspcorinader powderdhania
1/2tspturmerichaldi
1/2tspred chili powderlal mirch
1tbsoilcanola or vegetable oil
1/2tspcumin seedjeera
1/8tspasafetidahing
1/2tspsalt
2tbswhole wheat flour
1/3cupheavy cream
1/2tomato thinly sliced for garnishing
Instructions
If using frozen spinach thaw and blend it just for a minute so spinach has a creamy texture but without becoming pasty.
blend the tomatoes and ginger to make puree.
Mix coriander, turmeric, and red chili with tomato puree and set aside.
Mix whole-wheat flour with heavy cream and set aside.
Cube the paneer in about half inch pieces and deep fry them on medium high heat just for few minutes so paneer become very light gold in color, take paneer out on paper towel so extra oil can be absorbed.
Heat the oil in a saucepan. Test the heat by adding one cumin seed to the oil; if it cracks right away it is ready.
Add hing and cumin seed. After cumin seeds crack, add the tomato puree mixture, and let it cook for a few minutes until the tomato puree is about half in volume.
Add the spinach, and let it cook on low medium heat for about 10 minutes covered.
Add heavy cream mixture and let this cook another four to five minutes.
Add paneer and fold it gently with spinach and let it simmer for a 2-3 minutes. Pot should remain covered until the cooking is finished, otherwise the spinach will splatter.
Transfer the spinach to a serving dish and spread the tomato slices over the top, and cover the dish so tomato slices get tender with the steam from the spinach.
Notes
You can replace the heavy cream with 1 1/2 cups of milk.serve Palak Paneer with Naan or Tandoori Roti
How to Make Palak Paneer Masala by Manjula’s Kitchen
Paneer Palak, a beloved North Indian dish, epitomizes the perfect party recipe with its creamy spinach and delectable paneer in rich gravy. This is not merely a culmination but a convergence, as the paneer becomes an integral part of the spinach symphony.
Blanch the Spinach: Bring a large pot of water (6 cups) to a boil. Add the spinach and cook for precisely one minute. Drain the water immediately and immerse the spinach in ice-cold water for two minutes. This step preserves the vibrant green color of the spinach.
Create the Palak Paneer Base: Prepare a smooth puree by blending the blanched spinach with ginger and green chili. Aim for a creamy consistency, avoiding an overly thick paste.
Soften the Paneer: Soak the cubed paneer in hot water (3 cups) for at least five minutes. This step softens the paneer, allowing it to absorb the flavors of the masala.
Temper the Spices: Heat oil in a large saucepan over medium-high heat. Add cumin seeds and asafetida. Once the cumin seeds crackle, introduce the chopped tomatoes and cook for 1-2 minutes.
Incorporate the Spices: Add coriander powder, turmeric powder, red chili powder, salt, and a hint of sugar to the simmering tomato mixture. Stir well to combine and allow the spices to release their aroma.
Cook the Spinach Puree: Reduce heat to low and add the prepared spinach puree. Simmer for 5-6 minutes without a lid to retain the vibrant green color of the spinach.
Thicken the Gravy: For a thicker consistency and richer flavor, create a slurry by mixing flour with water. Gradually whisk the slurry into the simmering palak paneer mixture. Additionally, incorporate cream for a touch of silkiness.
Incorporate the Paneer: Gently fold in the softened paneer cubes and simmer for another five minutes. This allows the paneer to absorb the flavors of the masala.
Serving: Enjoy your Palak Paneer hot with rice or naan bread.
Tips:
Spinach Selection: Use fresh, young spinach for the best color and flavor. Wash thoroughly to remove any dirt or grit.
Blanching Technique: Don’t overcook the spinach during blanching (step 1). One minute is sufficient to preserve the vibrant green color and prevent mushiness.
Creamy Texture: For a richer and creamier gravy, add a dollop of heavy cream or cashew paste at the end.
Spice Level: Adjust the amount of green chili or red chili powder to suit your preference.
Flavor Boost: Include a bay leaf or a green cardamom pod while tempering the spices for a deeper flavor profile.
Suggestions:
Serving: Pair your Palak Paneer with basmati rice, jeera rice, naan, or roti for a complete and satisfying meal.
Garnish: For a fresh touch, garnish your Palak Paneer with chopped cilantro or a dollop of plain yogurt.
Leftovers: Store leftover Palak Paneer in an airtight container in the refrigerator for up to 2-3 days. Reheat gently on the stovetop before serving.
Variations:
Vegetable Palak Paneer: Add chopped vegetables like carrots, peas, or bell peppers for extra color, texture, and nutrients.
Mushroom Palak Paneer: Substitute paneer with sliced mushrooms for a vegetarian twist.
Coconut Palak Paneer: Stir in a can of coconut milk for a creamy and tropical twist.
Dry Palak Paneer: Reduce the amount of water or simmer for a longer duration to create a thicker, dryer gravy.
FAQs:
Can I substitute spinach with another green leafy vegetable?
Yes, you can use Swiss chard or kale, but the color and flavor will be slightly different.
Can I use paneer alternatives?
Yes, firm tofu can be used as a vegetarian substitute for paneer.
Is Palak Paneer healthy?
Yes, Palak Paneer is a healthy dish packed with protein from paneer, iron from spinach, and fiber from both ingredients.
How long does it take to make Palak Paneer?
The total preparation time is typically around 30-40 minutes.
Enjoy making and savoring this delicious and versatile Palak Paneer recipe!