Category: Quick & Easy

Easy Indian Recipes: Quick and Delicious Vegetarian Dishes

In today’s fast-paced world, we often find ourselves seeking meals that are quick to prepare but still bursting with flavor. Indian cuisine, known for its rich and aromatic spices, offers a plethora of options that are both easy to make and incredibly satisfying. Let’s explore some easy Indian recipes vegetarian, perfect for any occasion, ensuring that you can enjoy delicious easy Indian recipes without spending hours in the kitchen.

Paneer Bhurji

Paneer Bhurji is a delightful scramble made with crumbled paneer (Indian cottage cheese) and a mix of vegetables and spices. This dish is a staple in many Indian households and is a fantastic example of easy Indian recipes. It comes together quickly, making it ideal for a weeknight dinner or a hearty breakfast. Serve it with a side of warm roti or toast for a complete meal.

Vegetable Pulao

For a one-pot wonder, Vegetable Pulao is a go-to choice. This dish features rice cooked with a medley of vegetables and fragrant spices. It’s a shining star among easy Indian food recipes due to its simplicity and the minimal effort required. Pair it with a cooling cucumber raita from the Raita Recipes category for a refreshing touch.

Aloo Jeera

Aloo Jeera, or cumin-spiced potatoes, is a quick and flavorful dish that exemplifies Indian food recipes easy. The potatoes are sautéed with cumin seeds and a handful of spices, resulting in a dish that’s both comforting and satisfying. This recipe is perfect for those times when you need something delicious without a lot of fuss.

Enhancing Your Quick and Easy Menu

To elevate your menu, why not include some delectable options from other categories? Indian Breads like chapati or naan can be quickly prepared and make a perfect accompaniment to any meal. For those with a sweet tooth, Indian Desserts Recipes such as a speedy coconut burfi or a delightful mango lassi can provide a sweet finish to your meal. Incorporating dishes from the Healthy Recipes section, such as a simple and nutritious palak dal or a crisp salad from the Soups and Salads Recipe category, can add a healthy balance to your table.

More Easy Indian Recipes

Chana Masala

Chana Masala is a popular dish featuring chickpeas cooked in a spiced tomato gravy. This dish is not only delicious but also quick to prepare, making it a favorite in the realm of easy Indian recipes vegetarian. Serve it with basmati rice or naan for a complete meal.

Moong Dal Khichdi

For a comforting and nourishing option, Moong Dal Khichdi is a must-try. This simple dish made from rice and yellow moong dal (split yellow lentils) is seasoned with basic spices and is incredibly easy to make. It’s perfect for those days when you want something light yet satisfying.

Sweet and Simple Endings

Sheera

Sheera is a traditional Indian dessert made with semolina, ghee, and sugar. It’s a quick and easy dessert that fits perfectly into the category of easy Indian food recipes. The best part? It takes just a few minutes to prepare, making it a great option for last-minute sweet cravings.

Coconut Ladoo

Another sweet treat that’s both simple and delightful is Coconut Ladoo. Made with grated coconut and condensed milk, these sweet balls are a favorite among easy Indian recipes vegetarian. They’re perfect for festivals or just as a quick dessert to satisfy your sweet tooth.

Frequently Asked Questions (FAQs)

Q: What are some popular easy Indian recipes vegetarian? 

A: Some popular easy Indian recipes vegetarian include Paneer Bhurji, Vegetable Pulao, Aloo Jeera, Chana Masala, Moong Dal Khichdi, Sheera, and Coconut Ladoo. These dishes are quick to prepare and full of flavor.

Q: How can I make traditional Indian food recipes easy? 

A: To make traditional Indian food recipes easy, look for recipes that require minimal ingredients and cooking time. Dishes like Paneer Bhurji, Aloo Jeera, and Moong Dal Khichdi are great examples of easy and quick Indian recipes.

Q: What are some easy Indian food recipes for beginners? 

A: Some easy Indian food recipes for beginners include Vegetable Pulao, Chana Masala, and Coconut Ladoo. These recipes are straightforward and don’t require advanced cooking skills, making them perfect for those new to Indian cooking.

Q: Can I prepare easy Indian recipes in advance? 

A: Yes, many easy Indian recipes can be prepared in advance. Dishes like Vegetable Pulao and Chana Masala can be made ahead of time and stored in the refrigerator. Simply reheat before serving.

Q: What are some quick Indian desserts? 

A: Some quick Indian desserts recipes include Sheera and Coconut Ladoo. These desserts are easy to make and require minimal preparation time, making them perfect for when you need a sweet treat in a hurry.

Conclusion

Easy Indian recipes vegetarian offer a world of flavors and aromas without the lengthy preparation time. 

Whether you’re looking for easy Indian recipes, easy Indian food recipes, or specific Indian food recipes easy, these dishes bring convenience and deliciousness to your table. 

So, gather your ingredients, try out these recipes, and enjoy the rich and diverse world of Indian cuisine. Happy cooking and happy eating!

By incorporating these dishes into your menu, you’ll be able to enjoy a wide variety of delicious and nutritious foods. Whether you’re looking for quick snacks, main courses, or desserts, there’s an easy Indian recipe to suit every taste. 

Don’t forget to check out Manjula’s Kitchen for more inspiration and culinary delights. Happy cooking and happy eating!

  • Dal Makhani

    Dal Makhani

    Dal Makhani

    Dal Makhani, Punjabi Style

    Dal Makhani is a popular dish from state of Punjab and across North India. Rich and hearty, dal makhani is a combination of whole urad (an Indian lentil)and red kidney beans. It goes well with Naan, and Tandoori Roti (oven-baked flat bread).
    5 from 1 vote
    Prep Time 20 minutes
    Cook Time 40 minutes
    Total Time 1 hour
    Course Main Course
    Cuisine Indian
    Servings 2 people

    Ingredients
      

    • 1/2 cup whole urad dal
    • 1/8 cup red kidney beans rajma
    • 1 tsp ginger grated
    • 1 green chili, finely chopped
    • 1/2 tsp turmeric haldi
    • 3/4 tsp salt
    • 1/2 tsp mango powder amchoor
    • 1/4 tsp garam masala
    • 1/4 cup cream

    For Seasoning

    • 2 tbsp ghee, clarified ghee
    • 1/2 tsp cumin seeds jeera
    • 1/8 tsp asafetida hing
    • 3 whole dried red chilies
    • 1/4 tsp red chili powder
    • 1/2 tbsp ginger thinly sliced

    Instructions
     

    • Wash urad dal and kidney beans well. Soak the dal in six cups of water at least for eight hours. After soaking, dal will be about two and a half times the volume of the original.
    • Place the dal in a pressure cooker with four cups of water. Add the salt, turmeric, ginger, and green chili, and cook over medium high heat. When it begins to steam, turn the heat down to medium. Cook 25 minutes.
    • Turn off the heat. Wait until steam has stopped before opening the pressure cooker. The dal and kidney beans should be soft and tender.
    • Lightly mash the kidney beans and dal. Cook for another five minutes on low-to-medium heat.
    • Add cream, garam masala, and amchoor powder. Cook for ten minutes on low heat.

    For Seasoning

    • Heat the ghee in a small saucepan. Test the heat by adding one cumin seed to the oil; if it cracks right away, the oil is ready. Add cumin seeds. When they crack, add the asafetida, red chilies, and red chili powder. Stir for a few seconds.
    • Add one teaspoon of water to keep the spices from burning. Pour the spiced ghee over the dal.
    • Garnish with shredded ginger.

    Notes

    Serving suggestion, taste best with Naan, or Tandoori Roti
    Tried this recipe?Let us know how it was!

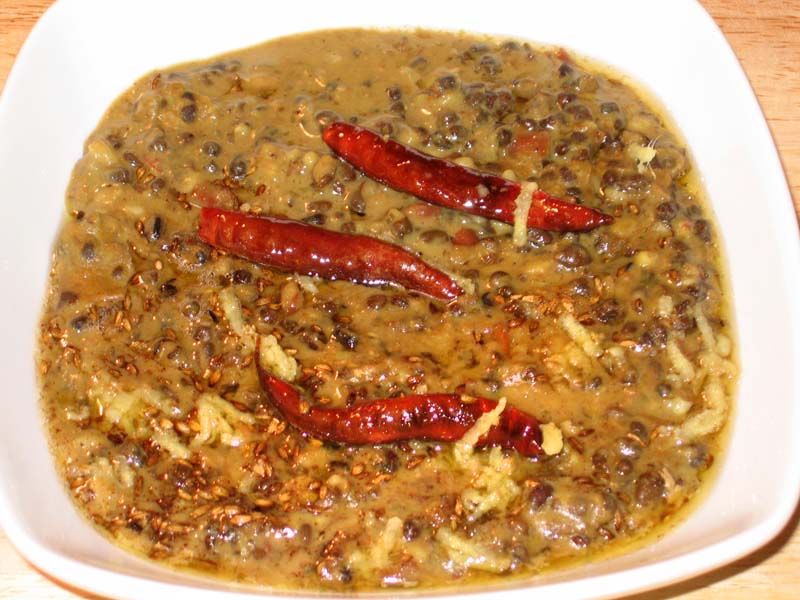
    Punjabi Dal Makhani: A Step by Step Urad Dal Makhani Recipe

    Dal Makhani is a rich and creamy lentil dish that originates from the Punjab region of India. Made with black lentils (urad dal), kidney beans, and a blend of aromatic spices, this dal makhani recipe is a staple in Punjabi cuisine. Known for its luscious texture and indulgent flavors, Dal Makhani is a popular Indian dish made primarily from lentils (dal) and typically enjoyed during the winter months. 

    It is a rich and creamy dish that is usually gluten-free, as lentils themselves are naturally gluten-free. The main ingredients for making Dal Makhani include black lentils (urad dal), red kidney beans (rajma), butter, cream, and various spices such as cumin, coriander, turmeric, and garam masala. It is traditionally cooked slowly over a low flame, allowing the flavors to meld together and the lentils to become tender. Dal Makhani is often served with rice or Indian bread like naan or roti.

    Step 1: Preparation of Ingredients:

    Begin by gathering all the necessary ingredients for making Dal Makhani. Rinse the black lentils and kidney beans under cold water and soak them for at least 8 hours or overnight to soften. Finely chop tomatoes, ginger, and green chilies to prepare the base for the dal. Having all the ingredients prepped and ready will make the cooking process smoother.

    Step 2: Cooking the Lentils:

    In a pressure cooker or a pot, add the soaked black lentils and kidney beans along with fresh water, salt, and a pinch of turmeric powder. Pressure cook or simmer until the lentils and beans are soft and fully cooked. Cooking them until tender is essential for achieving the creamy texture of Dal Makhani. Once cooked, set them aside while we prepare the gravy.

    Step 3: Preparing the Gravy:

    In a large pot or saucepan, heat oil or ghee over medium heat. Add whole spices such as cinnamon, cloves, and cardamom pods, and let them sizzle. Then, add finely chopped ginger and green chilies, and sauté until fragrant. The aromatic base will infuse the gravy with depth of flavor.

    Step 4: Adding Tomatoes: 

    Once the aromatics are sautéed, it’s time to add the chopped tomatoes to the pot. Cook the tomatoes until they soften and break down, forming a thick gravy. You can also add tomato puree for a smoother texture. Stir in spices such as coriander powder, cumin powder, red chili powder, and garam masala, and cook until the oil separates from the mixture.

    Step 5: Cooking the Lentils with Gravy:

    Now, add the cooked black lentils and kidney beans to the pot with the tomato gravy. Stir well to combine all the ingredients. Allow the mixture to simmer for a while, allowing the flavors to meld together. This slow cooking process helps develop the rich and indulgent flavors of Dal Makhani.

    Step 6: Adding Cream and Butter:

    To finish off the dish, add a generous amount of cream and butter to the pot. Stir well to incorporate the cream and butter into the dal, creating a velvety and luxurious texture. Adjust the seasoning with salt and add a pinch of sugar to balance the acidity of the tomatoes if needed.

    Step 7: Garnishing and Serving:

    Before serving, garnish the Dal Makhani with freshly chopped cilantro leaves for a burst of freshness and color. You can also drizzle a little more cream on top for added richness. Serve the Dal Makhani hot with steamed rice, naan, or roti for a comforting and satisfying meal.

    Tips for Making Perfect Dal Makhani:

    • Soak Lentils and Beans: Soaking the black lentils and kidney beans overnight helps reduce cooking time and ensures they cook evenly.
    • Slow Cooking: Allow the dal to simmer on low heat for a longer time to develop the flavors and achieve the desired creamy consistency.
    • Use Fresh Cream and Butter: Using fresh cream and butter adds richness and depth of flavor to the dish.

    Variations of Dal Makhani:

    • Spicy Dal Makhani: Add extra green chilies or red chili powder for a spicier version of the dish.
    • Restaurant-style Dal Makhani: For a restaurant-style flavor, add a tadka (tempering) of cumin seeds and dried red chilies in ghee and pour it over the prepared dal before serving.

    Benefits of Including Dal Makhani in Your Diet:

    • High in Protein: Dal Makhani is rich in protein from black lentils and kidney beans, making it a nutritious option for vegetarians and vegans.
    • Rich in Iron: Black lentils are a good source of iron, which is essential for maintaining healthy blood cells and preventing anemia.
    • Source of Healthy Fats: The addition of cream and butter provides healthy fats, which are important for overall health and satiety.

    Frequently Asked Questions (FAQs) about Dal Makhani:

    Q: Can I make Dal Makhani in advance?

    A: Yes, Dal Makhani tastes even better when made in advance as it allows the flavors to develop. It can be stored in the refrigerator for up to 3-4 days and reheated before serving.

    Q: Can I freeze Dal Makhani?

    A: Yes, Dal Makhani freezes well. Allow it to cool completely, then transfer it to airtight containers or freezer bags and freeze for up to 3 months. Thaw overnight in the refrigerator before reheating.

    Q: Is Dal Makhani gluten-free?

    A: Yes, Dal Makhani is naturally gluten-free, making it suitable for those with gluten intolerance or celiac disease.

    For more delicious Indian dal recipes, visit Manjula’s Kitchen. Explore a variety of vegetarian dal dishes featuring a range of lentils, spices, and vegetables to add flavor and variety to your meals.

    For more delicious Indian recipes, check out Manjula’s Kitchen: Chole Bhature, Naan, Paneer Tikka Masala, Aloo Paratha, Vegetable Biryani.

  • Ras Malai

    Ras Malai

    Ras Malai

    Ras Malai, Rasmalai, Bengali Dessert

    Rasmalai is a Bengali dessert consisting of soft paneer balls immersed in chilled creamy milk. Like Rasgullas, Rasmalai is also made with homemade cheese known as "paneer" or "chana". Instead of being soaked in sugar syrup like Rasgullas, Rasmalai is soaked in sweet, flavored milk.
    4.50 from 2 votes
    Prep Time 10 minutes
    Cook Time 40 minutes
    Total Time 50 minutes
    Course Dessert
    Cuisine Indian
    Servings 6 people

    Ingredients
      

    For Patties

    • 4 cups milk
    • 1/4 cup lemon juice
    • 1-1/2 cups sugar
    • 4-1/2 cups water

    Milk For Rasmalai

    • 3 cups milk
    • 2-1/2 tbsp sugar
    • 1/8 tsp crushed cardamom
    • 1 tbsp sliced almonds and pistachios to garnish

    Instructions
     

    Making Paneer

    • Mix lemon juice in half a cup of hot water and keep aside.
    • Boil the milk in a heavy bottomed over medium-high heat, stirring frequently making sure milk do not burn on the bottom of the pan.
    • As the milk comes to a boil, add the lemon juice slowly and stir the milk gently. The curd will start separating from the whey, turn off the heat.
    • Once the milk fat has separated from the whey, drain the whey using a strainer line with cheesecloth or muslin cloth.
    • Wrap the curd in a muslin cloth, rince under cold water, and squeeze well. This process takes out the sourness from the lemon.
    • To take out the excess water squeeze the cloth, or press the wrapped paneer under a heavy pan for about one hour. Taking the right amount of water out of the paneer is the most important part of this recipe.
    • To check if enough water is out of the paneer, take a little piece of paneer on your palm and rub with your fingers. After rubbing the paneer for about 15-20 seconds, you should be able to make a firm but smooth ball.
    • Once the paneer is drained, place on a dry, clean surface and knead the paneer for 3-4 minutes until the paneer is almost rolls into smooth soft dough. Knead the paneer by dragging the palm of your hand hard on the paneer. Keep scooping it back to togather and knead more. Your palm will be little greasy.

    Making the Rasmalai:

    • Divide the dough into 12 equal parts and roll them in smooth balls.
    • To make the balls apply some prassure at the first and then release when forming the balls, lightly press to make about 3/4″ patty shape.
    • Mix the sugar and water in a pressure cooker on medium high heat and bring to a boil.
    • Add the paneer balls and close the pressure cooker. After the pressure cooker starts steaming, turn the heat to medium and cook for about seven minutes.
    • Make sure the cooker is large enough to accommodate the finished rasgullas patties, as they will expand to about double in the volume while cooking in the syrup!
    • Close the heat and wait a few minutes befor opening the pressure cooker. Pour cold water over the cooker before opening. Take out the patties from the syrup and squeeze them lightly,and keep aside.
    • Boil the milk in a frying pan on medium heat until the milk reduce to about 2 cups. Make sure to frequently stir the milk as the milk burns easily in bottom of the pan.
    • Add the sugar and the Rasmalai patties in milk. Let it cook for few minutes. Add the cardamom and mix in. Garnish with sliced almonds and pistachios.
    • Serve the Rasmalai chilled.
    Keyword Bengali Delicacy, Dessert, Made With Paneer
    Tried this recipe?Let us know how it was!
  • Coconut Burfi

    Coconut Burfi

    Coconut Burfi

    Coconut Burfi

    Coconut Burfi is made with coconut powder combined with a cardamom flavored sugar syrup. This is a scrumptious dessert or snack. Makes 24 to 30 pieces.
    No ratings yet
    Course Dessert
    Cuisine Indian
    Servings 0 peices

    Ingredients
      

    • 1 cup heavy cream or whipping cream
    • 1 cup sugar
    • 1 cup dry milk powder
    • ½ cup coconut powder
    • ½ cup grounded walnut
    • ¼ teaspoon cardamom powder

    Instructions
     

    • Grease an 8-inch round or square plate and set aside.
    • Boil the heavy cream on medium-high heat.
    • After milk comes to a boil, turn the heat down to low-medium heat.
    • Add the sugar and Stir so sugar is dissolve.
    • Let it simmer six to seven minutes making sure to stir frequently. The milk syrup should heat until 230 degrees on candy thermometer or one thread.
    • Add the milk powder and mix well. Stir for about two to three minutes on medium heat or until the mixture should start leaving the pan.
    • Turn off the heat and add cardamom powder, coconut powder and ground walnut and mix well.
    • Spread on a greased plate about 1/2 inch thick and let it cool for about an hour. Cut the burfis in square or diamond shapes, or any desired shape.

    Notes

    If sugar syrup heats to above 230 degrees, the burfi will be dry. If the syrup is not thick enough, the burfi will take longer to cook with dry milk powder, making the burfi chewy like taffy.
    Keyword barfi, Burfi, Candy, Coconut, Cream, Gluten Free, Sweets, syrup, Walnuts
    Tried this recipe?Let us know how it was!
  • Badam Burfi (Almond Candy)

    Badam Burfi (Almond Candy)

    Badam Burfi

    Badam Burfi (Almond Candy)

    Badam (almond) Burfi is a healthy substitute for candy but is rich in flavor. Almond burfi can be served as dessert or snack.
    5 from 1 vote
    Prep Time 10 minutes
    Cook Time 20 minutes
    soaking time 30 minutes
    Total Time 30 minutes
    Course Dessert
    Cuisine Indian
    Servings 10 people

    Ingredients
      

    • 1 cup whole almonds
    • 1 cup sugar
    • 1/8 tsp cardamom powder
    • 2 tbsp ghe clarified butter
    • 1/3 cup milk

    Instructions
     

    • Soak the almonds in hot water for 30 minutes. Peel the skin off the almonds. 
    • Blend the almonds into a fine paste using just enough milk as needed to blend. Add the sugar and whip it for a couple of minutes.
    • Heat the ghee in the frying pan on low-medium heat. As the ghee melts, add the almond paste and cook on medium heat, stirring continuously.
    • Continue stirring until the mixture thickens to the consistency of bread batter and starts leaving the sides of the pan.
    • Add the cardamom powder. Remove the frying pan from the heat.
    • Whip the batter using a spoon in a circular motion for about two to three minutes.
    • Pour it into the prepared greased pan. Smooth en the surface of the mixture to about a quarter inch thick.
    • Let cool for about 20 minutes until burfi is just look warm.
    • Cut into 1-inch squares or any shape you like.

    Notes

    Cool to the room temperature and store burfi in an airtight container. Almond burfi has a long shelf life and can be kept outside for up to one week. When refrigerated, almond burfi will last a couple of months.
    Suggestions: 
    You can make burfi using almond meal or almond flour. If you are using almond meal, mix one cup almond meal with the sugar and milk and knead the mixture for two minutes. Let the mixture sit for 10 to 15 minutes. Then follow the directions above. The almond flour burfi will be a little chewy.
    Tried this recipe?Let us know how it was!

  • Kheer (Rice Pudding)

    Kheer (Rice Pudding)

    Kheer (Rice Pudding)

    Kheer (Rice Pudding)

    Kheer is an Indian version of rice pudding cooked with milk and sugar, flavored with nuts and saffron. Its a nice dessert that is very popular in North India. Recipe serves 4 to 6
    5 from 2 votes
    Course Dessert
    Cuisine Indian
    Servings 0 people

    Ingredients
      

    • ¼ cup rice
    • 4 cup whole milk
    • ¼ cup sugar adjust to taste
    • 6 strands of saffron
    • Pinch of crushed cardamom
    • 2 Tbsp almonds sliced
    • 1 Tbsp pistachios sliced
    • 1 tsp butter

    Instructions
     

    • Use a non-stick frying pan to make kheer.
    • Wash rice, changing water until the water appears clear.
    • Melt the butter in a frying pan on medium heat.
    • Add the rice and stir-fry for 2 minutes.
    • Add the milk, cook until the rice is tender and the milk is creamy and reduced to about half. Stir often to ensure the milk does not burn in the bottom of the pan.
    • Add the sugar, saffron, cardamom, almonds and pistachios and let simmer for a few more minutes.
    • Turn off the heat.
    • As kheer cools of will become thicker in texture.
    • Kheer can be served chilled or warm.

    Notes

    Variation
    • Saffron, almonds and pistachios are optional in this recipe.
    • Instead of rice, make the kheer using only almonds and pistachios and flavor with cardamom and saffron.
    • Rice can be replaced with Vermicelli.
    Tips
    • If you will be serving chilled add 1 teaspoon of extra sugar.
    Keyword Dessert, Ganesh Chaturthi, Gluten Free, Karwa Chauth, Kheer, Krishna Janmashtami, Makar Sankranti, milk, nuts, payasam, Pudding, Rice, Rice Pudding, saffron
    Tried this recipe?Let us know how it was!


  • Gajar ka Halwa (Carrot Halwa)

    Gajar ka Halwa (Carrot Halwa)

    Gajar Ka Halwa recipe

    Gajar Ka Halwa, Carrot Pudding

    Gajar Ka Halwa is a classical Indian dessert, this is also known as gajrala. Gajar ka Halwa is a delicious and popular north indian sweet dish made with few ingredients, carrots, milk, sugar and flavored with cardamom. Gajar ka Halwa is a perfect dessert for any celebration. 
    5 from 1 vote
    Prep Time 10 minutes
    Cook Time 40 minutes
    Total Time 50 minutes
    Course Dessert
    Cuisine Indian
    Servings 4 people

    Ingredients
      

    • 2 cups shredded carrots
    • 2 cups milk
    • 3 tbsp unsalted butter or ghee
    • 1/4 cup sugar
    • 1/2 tsp cardamom powder
    • 6 cashew roasted and broken for garnishing

    Instructions
     

    • Roast the cashew nuts and set aside for the garnish.
    • Boil the milk on medium-high heat in a non-stick pan until it is reduced to about to 1 cup. Stir often to ensure the milk does not burn in the bottom of the pan. Set aside.
    • Melt the butter in a frying pan on medium heat. Add the shredded carrots and stir-fry for about seven to eight minutes. Carrots should be tender and slightly changed in color.
    • Add the milk and cook until the milk dries. This will take about eight to ten minutes.
    • Next add the sugar, and cardamom powder and stir-fry for another three to four minutes until the halwa starts to leave the side of frying pan.
    • Garnish with cashew nuts.

    Notes

    Tips:
    Gajar Halwa can be refrigerated for up to one week and kept in the freezer for up to two months.
    When ready to serve just warm.
    Suggestion:
    Cook the halwa a little more and pour on a greased plate.
    Spread the halwa until it is flat and 3/4 inch thick.
    After the halwa cools, cut in squares.
    Garnish with cashew nuts or sliced almonds.
     
    Keyword Carrot Halwa, Delicacy, Dessert, Gajrela, Gluten Free
    Tried this recipe?Let us know how it was!

  • Samosa

    Samosa

    Part 1:

    Part 2:

    Samosa recipe

    Samosa, Aloo Samosa, Street Food

    Samosa is probably the most popular Indian snack. Fried puffed pastry filled with spicy potatoes and green peas. No one can resist samosas, a mouthwatering snack. Samosas can be served any time and for any occasion. This recipe is for traditional north Indian Samosa.
    4.50 from 4 votes
    Prep Time 10 minutes
    Cook Time 30 minutes
    boiling the potatoes 25 minutes
    Total Time 40 minutes
    Course Appetizer
    Cuisine Indian
    Servings 3 people

    Ingredients
      

    Dough

    • 1/2 cup all purpose flour plain flour, maida
    • 1/2 tbsp sooji samolina
    • 1/4 tsp salt
    • 1-1/2 tbsp oil canola or vegetable
    • 3 tbsp lukewarm water use as needed

    For the Filling:

    • 3 boiled potatoes, peeled and chopped into very small cubes
    • 1/2 tsp cumin seeds jeera
    • 1 tbsp chopped green chilies
    • 1 tsp coriander powder dhania
    • 1/4 tsp garam masala
    • 1 tsp mangopowder amchoor
    • 1 tsp salt
    • 2 tbsp oil canola or vegetable
    • 1/2 cup green peas I am using frozen peas

    Need oil to fry

    Instructions
     

    Making the Dough:

    • Mix the flour, sooji, salt, oil and salt together to make a soft dough (add more water as needed). knead the dough for about 1 to 2 minutes to make the dough smooth and pliable. Set the dough aside and cover it with damp cloth. Let the dough sit for at least 15 minutes.

    Making the Filling:

    • Heat the oil in a frying pan on medium high heat. Test the heat by adding one cumin seed to the oil; if it cracks right away oil is ready. Add cumin seeds as cumin seeds crack, add green chilies, coriander powder and stir for few seconds. Next add green peas and turn heat to medium and stir until tender. Add the potatoes and stir-fry for about 4 minutes. Stir in garam masala and amchur. Add more salt or amchur according to taste.
    • Let the filling cool to room temperature.

    Making Samosa:

    • Take 2 tablespoons of water and 1 tablespoon of all-purpose flour to make a paste and keep aside.
    • Knead the dough for a minute. Divide the dough into 4 equal parts and make into balls. Roll each ball into 6-inch diameter circles and cut each circle in half.
    • Spread the paste lightly all along the edge of one semicircle. Pick this semicircle up with both hands and fold it into a cone shape. Pinch the side of this cone so that it is completely sealed.
    • Fill the cone with 3 tablespoons of filling. Press this filling down with your fingers. Now close the top of this cone into a triangle shape, pinching the top edge so that it is completely sealed. Continue filling the rest of the samosas.
    • Heat about 1 inch of the oil in a frying pan on medium heat. To check if oil is hot enough place a small piece of dough in oil and dough should sizzle and come to the surface slowly.
    • Place the samosas in the frying pan a few at a time. After samosas are floating on top of the oil turn them slowly. Fry the samosas until the samosas turn a light golden-brown color on all sides. If you use a high heat, the samosa crust will be too soft and not crispy.

    Notes

    Tips:
    Boil the potatoes just until tender. Be careful not to poke the potatoes multiple times while they are cooking, as they will absorb the water. Drain immediately and keep aside until cool enough to touch.
    The dough has to be kneaded well; otherwise, the samosas will not come out as crisp.
    If the filled samosas sit for too long, they will dry. To avoid this, cover with a damp cloth.
    Suggestions:
    Samosa can be prepared ahead of time and can be freeze for a month.
    Before freezing fry them enough until samosa changes the color to very light gold brown.
    After samosas are on room temperature bag them in zip lock bags and freeze them.
    To use frozen samosas take out as many you need and fry them on medium heat.
    Keyword Aloo Samosa, Homemade Samosa, Punjabi Samosa
    Tried this recipe?Let us know how it was!

  • Upma Sooji (Cream of Wheat)

    Upma Sooji (Cream of Wheat)

    Upma Sooji

    Upma Sooji (Cream of Wheat)

    Upma Sooji is a great vegan dish for breakfast or brunch.
    Serving for 2.
    5 from 1 vote
    Course Breakfast
    Cuisine Indian
    Servings 2 people

    Ingredients
      

    • ½ cup sooji rawa, semolina flour
    • 2 tablespoons oil
    • ½ teaspoon black mustard seed rai
    • ½ teaspoon cumin seed jeera
    • 20 peanuts
    • 1 green pepper chopped
    • ½ teaspoon salt to your taste
    • ¼ cup green peas
    • 1 ¼ cup water
    • ½ teaspoon fresh lemon juice
    • 2 tablespoons cilantro chopped, hara dhania

    Instructions
     

    • Boil the green peas in 1 ¼ cup of water.
    • As water comes to boil turn heat to low and continue cooking until peas are tender.
    • Turn off the heat and set aside.
    • Heat the oil in a saucepan. Test the heat by adding one cumin seed to the oil; if it cracks right away oil is ready. Add black mustard seed and cumin seed.
    • Add mustard seed and cumin seeds as seeds crack, add peanuts and stir for one minute.
    • Add sooji and stir-fry about 3 minutes on medium heat till sooji turns gold brown.
    • Add green peas with water a little at a time, otherwise water will splatter.
    • Add lemon juice and cover for 2 minutes.
    • Sooji will absorb some of the water leaving the upma moist.
    • Now add the cilantro and stir. Serve while hot.
    Keyword brunch, Cream of wheat, Flour, peanuts, semolina, Sooji, Suji, Vegan
    Tried this recipe?Let us know how it was!
  • Jalebi (Sweet)

    Jalebi (Sweet)

    Jalebi Sweet

    Jalebi, Crispy Juicy Sweet

    Jalebi is a warm crispy, delicious treat. It can best be described as funnel cake. In my home town jalebi was served for the breakfast treat like pancakes. It was a treat to have jalebi and kachori for a hearty breakfast. Jalebi was mostly eaten by themselves, but some time we soaked the jalebi in warm milk and that tasted delicious. I know jalebi is mostly served as dessert but for me jalebi still makes the best breakfast treat.
    4 from 6 votes
    Prep Time 10 minutes
    Cook Time 15 minutes
    Fermenting time 1 hour
    Total Time 25 minutes
    Course Dessert
    Cuisine Indian
    Servings 3 people

    Ingredients
      

    For Jalebi Batter

    • 1/2 cup all purpose flour maida, plain flour
    • 1 tsp besan gram flour
    • 1/2 tsp yeast
    • 1/2 tsp oil
    • 1/2 tsp sugar
    • 1/3 cup lukewarm water (as needed)

    For Syrup

    • 1 cup sugar
    • 1/2 cup water
    • 1/8 tsp crushed cardamom
    • few strands saffron
    • 1 tsp lemon juice

    Also need oil to fry

    Instructions
     

    Making the Batter

    • Dissolve the yeast in warm water and let it sit for about five minutes.
    • Mix the flour, besan (gram flour), oil, and sugar together. Add the yeast solution to the flour and mix to make a smooth batter. Set the batter aside in a warm place for one hour.
    • Make sure the batter is fermented, but do not over-ferment. After fermenting the batter will be a little lacy.

    Making the Syrup

    • Boil the sugar and water together. Add the lemon juice and saffron and turn off the heat. (The lemon juice keeps the mixture from crystallizing).

    Making Jalebis

    • Heat the oil in a flat frying pan about one inch deep. To test, put one drop of batter in the oil. The batter should sizzle and rise into a ball without changing color right away.
    • Fill the Jalebi batter into a piping bag with a #3 nozzle. You can also use an empty ketchup or mustard bottle.
    • Squeeze the Jalebi batter out into the hot oil in pretzel shapes about two inches in diameter. Fry the Jalebis until light golden-brown on both sides.
    • Transfer them into the warm syrup. Let the jalebis soak in the hot syrup a few seconds, then take them out.
    • Serve hot. Enjoy! 

    Notes

    Variations
    Try sprinkling cinnamon powder or drizzle melted chocolate over the Jalebis for a creative touch.
    Serving Suggestion
    In North India Jalebi is a breakfast treat accompanied with Urad Dal Puri and Methi Chutney.
    Keyword All Time Dessert, Breakfast, jalebi
    Tried this recipe?Let us know how it was!

  • Dhokla (Suji – Semolina)

    Dhokla (Suji – Semolina)

    Dhokla (Suji – Semolina)

    Dhokla is a traditional gujrati snack, spongy and fluffy in texture. Dhokla makes a great appetizer.
    Makes about 20 pieces.
    5 from 1 vote
    Course Appetizer, Snack
    Cuisine Indian
    Servings 0

    Ingredients
      

    • 1 cup sooji semolina flour available in Indian grocery store
    • 1 cup yogurt
    • 1/4 cup water as needed
    • 1/4 tsp salt
    • 2 tsp lemon juice
    • Pinch of turmeric haldi
    • 1 green chili finely chopped
    • 2 Tbsp cilantro hara dhania finely chopped
    • 1 tsp Eno’s fruit salt Sodium Bicarbonate and Citric Acid, available in Indian grocery stores)

    For seasoning:

    • 2 Tbsp of oil
    • 1/2 tsp black mustard seed
    • 2 green peppers chopped into about 1/4 inch pieces

    Utensils to steam Dhokla:

    • Dhokla maker or if you don’t have that, use all three of the following:
    • Covered pan large enough to hold your cake rack
    • Round cake-cooling rack
    • Round 9” cake pan

    Instructions
     

    • Mix the sooji, yogurt, salt, turmeric, lemon juice, green chili, and cilantro together and make a smooth batter of a pouring consistency. Add water if needed.
    • Allow batter to rest 15 to 20 minutes.
    • Grease the cake pan and set aside.
    • Set the cake rack in the pan. Add one cup of water, just enough to touch the cake rack, and bring to a boil. This will be used to steam the dhokla.
    • When the water boils, turn down the heat to medium.
    • Add fruit salt (Eno) to the batter just before baking. The batter will foam up.
    • Quickly pour batter into a greased cake pan. Place the cake pan into the saucepan over the cake rack. Cover the pan. Steam for about 10 minutes on medium heat.
    • Check Dhokla with a knife. If the knife comes out clean, dhokla is ready. Turn off the heat and remove the cake pan from the saucepan.
    • Let it cool to room temperature, then cut into triangle or square shapes.

    Prepare the seasoning:

    • Heat oil in a small pan over medium heat. Test the heat by adding few mustard seeds to the oil; if the seeds crack right away, the oil is ready.
    • Add mustard seeds after seeds cracke add green chili stir for few seconds.
    • Drizzle the seasoning over the dhokla. Serve with Hari cilantro chutney.

    Notes

    Dhokla can be refrigerated for a few days. Before serving, heat Dhokla in a microwave or heat over steam.
    Keyword Dhokla, dokla, Flour, Gujarati, semolina, Sooji, Suji, Yogurt
    Tried this recipe?Let us know how it was!
  • Puri, Indian Puffed Flat Bread

    Puri, Indian Puffed Flat Bread

    Puri (Flat Bread) Recipe by Manjula

    Puri, Indian Puffed Flat Bread

    Puri is whole wheat fried bread, made on special occasions. Especially popular with children. It goes well with mutter paneer and other thick gravy recipes.
    4 from 4 votes
    Prep Time 5 minutes
    Cook Time 15 minutes
    Total Time 20 minutes
    Course Main Course
    Cuisine Indian
    Servings 2 people

    Ingredients
      

    • 1 cup whole wheat flour
    • 1/2 tsp salt
    • 1 tsp oil
    • 1/3 cup water, use as needed

    Instructions
     

    • Mix whole-wheat flour and salt. Add water as needed to make firm dough. Oil your palm and knead the dough until it is pliable. Cover the dough with a damp cloth and set it aside to rest at least ten minutes.
    • Divide the dough in eight equal parts. Form these into smooth balls, rolling the dough between your greased plams.
    • Roll the dough balls into seven inch circles. If the dough sticks to the rolling pin or rolling surface, put a drop of oil on the rolling pin and on the rolling surface. Roll four or five puris before you start frying. Do not roll all the puris at once, as they will dry out and fail to puff.
    • Heat at least one inch of oil in a frying pan over medium high heat. When the oil is moderately hot, a small piece of dough dropped into the oil will float immediately to the top.
    • Place one puri at a time in the frying pan and press it with a skimmer. The puris should puff up right away. Turn the puris over. Puri should be light creamy brown on both sides. Take the puris out and place them on paper towels to absorb the excess oil.
    • Serve puri hot or store in covered container after they cool to room temperature.

    Notes

    Tips: 
    Do not roll the puris on a floured surface. If it seems that you need to flour the surface that is an indication that the dough is too moist. In this case, put a drop of oil on the surface and on the rolling pin.
    If the oil is not hot enough, the puris will not puff and will be greasy.
    Variations:
    Add your choice of spices or one or more dry herbs to the flour when making dough. Red pepper flakes, asafetida, dry mint leaves, dry fenugreek leaves, or any other dry herb can be used.
    Tried this recipe?Let us know how it was!

  • Vegetable Rice (Pulav)

    Vegetable Rice (Pulav)


    Vegetable Rice

    Vegetable Rice – Vegetable Pulav

    Vegetable pulav is a mix of spicy vegetables with rice. This is a great dish for lunch. If you are not in the mood to prepare a big meal, use vegetable pulav as a one-dish meal. Serve with yogurt, pickle, papadam or chutney.
    5 from 2 votes
    Prep Time 10 minutes
    Cook Time 15 minutes
    Total Time 25 minutes
    Course Main Course
    Cuisine Indian
    Servings 2 people

    Ingredients
      

    For Rice

    • 1 cup basmati or long grain rice
    • 2 cup water
    • 2 tbsp oil canola, vegetable
    • 1 tsp cumin seeds jeera
    • 2 bay leaf taj pata
    • 1 tsp salt

    For Vegetables

    • 3 tbsp oil canola, vegetable
    • 1 tsp cumin seeds jeera
    • 1 medium sized potato, chopped into 1/2″ cubes
    • 1 carrot sliced
    • 1 cup cauliflower, cut into small pieces
    • 1 cup frozen green peas
    • 1/2 red bell pepper, chopped
    • 2 long sliced green chilies
    • 1 tsp grated ginger
    • 1 tsp salt
    • 1/2 tsp garam masala
    • 1 tbsp lemon juice

    For Garnishing

    • 2 tbsp finely chopped cilantro hara dhania

    Instructions
     

    Preparing the rice:

    • Heat the oil in a saucepan. Test the oil by adding one cumin seed; if seed cracks right away oil is ready. Add cumin seeds after cumin seeds crack add bay leaves and stir for few seconds. Next add the rice. Stir-fry for 2 minutes.
    • Add water and salt, bring to a boil and turn the heat to low. Cover the pan. Cook about 15 minutes, or until the rice is tender and the water has evaporated. Turn off the heat and fluff the rice with a fork.

    Preparing the vegetables:

    • Use a frying pan to cook the vegetables. Add the vegetables in steps, the vegetables that need the most time to cook are added first and the vegetables that need the least time will be added last.
    • Heat the oil in frying pan. Test the heat by adding one cumin seed to the oil; if it cracks right away oil is ready. Add cumin seeds after cumin seeds crack, add potatoes, stir-fry them for about 2 minutes.
    • Add cauliflower and carrots. Let them cook for about another 3 minutes, stirring occasionally.
    • Next add green peas, bell pepper, ginger and green chilies. Let the vegetables cook for a few minutes till vegetables are tender. Turn off the heat.
    • Add garam masala and lemon juice.
    • Next gently fold the rice into the vegetables. Transfer to a serving dish and garnish the rice dish with cilantro.
    Keyword Gluten Free, Vegan
    Tried this recipe?Let us know how it was!

    How to make Pulav Rice Recipe – Manjula’s Kitchen 

    Vegetable pulao is a flavorful gluten-free vegan blend of spicy vegetables combined with rice, making it an excellent lunch option. This dish proves particularly convenient when you prefer a quick & easy meal. Utilize vegetable pulav as a standalone one-dish meal, or complement it with yogurt, pickle, papadam, or chutney for a satisfying and well-rounded dining experience.

    Preparing Pulav Rice: 

    Embark on a culinary adventure as you delve into the meticulous process of crafting a delightful pulav rice recipe. Begin by heating oil in a saucepan, creating a canvas for the infusion of rich flavors. Ensure the oil is at the optimal temperature by conducting a cumin seed test; the satisfying crackle indicates readiness. Enrich the aromatic foundation by introducing additional cumin seeds and fragrant bay leaves, setting the stage for an enticing pulav rice experience. 

    As you add the rice to the pan, engage in a 2-minute stir-fry, allowing each grain to absorb the essence of the spices—a vital step in mastering the art of how to make pilav rice. The introduction of water and salt transforms the mixture into a bubbling concoction, simmering on low heat for 15 minutes until the rice attains a tender texture, releasing a fragrant aroma that defines the pulav rice recipe. Conclude this flavorful journey by delicately fluffing the rice with a fork, achieving a light and fluffy consistency crucial to the essence of the rice pulav recipe.

    Preparing Vegetables for Pulav Rice: 

    In the intricate process of creating pulav rice, wield a frying pan as your culinary orchestra, orchestrating a symphony of vibrant colors and enticing textures. Elevate the aromatic canvas by heating oil to the perfect temperature, validated by the distinctive crackle of a cumin seed—the quintessential initiation into the pulav rice recipe. With each addition of cumin seeds, establish a fragrant base that paves the way for the culinary dance that follows. 

    Immerse potatoes into this aromatic blend, conducting a 2-minute stir-fry, a pivotal step in unraveling the secrets of how to make pulav rice. Introduce cauliflower and carrots, orchestrating an additional 3 minutes of cooking to gradually enhance their tenderness, a crucial aspect in the art of rice pulav. The crescendo of this culinary symphony includes green peas, bell pepper, ginger, and green chilies, creating a vibrant medley that transforms the pulav rice recipe into a visual and flavorful masterpiece. Conclude this vegetable overture by introducing garam masala and lemon juice, harmoniously blending the spices before gently folding the aromatic rice into the vegetable symphony, shaping the pulav rice recipe.

    Final Assembly of Rice Pulav:

    Culminate the gastronomic masterpiece that is the pulav rice recipe by seamlessly merging the meticulously prepared rice and vegetables. Gently fold the aromatic rice into the medley of colorful vegetables, ensuring an even distribution of flavors—a key element in the intricate art of making pulav rice. As the harmonious blend takes shape, transfer it to a serving dish, where the vibrant hues of the vegetables complement the inviting warmth of the rice pulav. 

    Elevate the presentation by adorning the dish with sprigs of fresh cilantro, adding a final touch of both freshness and visual appeal—a crucial finale in the rice pulav recipe. This assembly not only showcases the meticulous steps involved in creating a pulav rice dish that tantalizes taste buds but also captivates with its aesthetic allure. Serve and savor the culmination of the pulav rice recipe—a delightful union of fragrant rice and flavorful vegetables—embodied in the artistry of pulav preparation.

    If you loved our recipe of vegetable pulav then you must also check out other variants of Rice: Vegetable Biryani, Masala Khichdi, Chhole Biryani, Quinoa Vegetable Pilaf, and Lemon Rice

  • Besan Puda – Cheela (Gram Flour Dosa)

    Besan Puda – Cheela (Gram Flour Dosa)

    Besan Puda Dosa

    Besan Puda – Cheela – Gram Flour Cheela

    Basen Ka Puda is a tasty low fat, quick & easy, vegan dish for breakfast or a light lunch. This recipe is quick to prepare and can be served many different ways. In my house this is a favorite dish for breakfast, folded with cheese.
    4.20 from 5 votes
    Prep Time 10 minutes
    Cook Time 15 minutes
    Total Time 25 minutes
    Course Breakfast
    Cuisine Indian
    Servings 3 people

    Ingredients
      

    • 1 cup besan gram flour
    • 1/4 cup rice flour chawal ka atta
    • 1 tsp salt
    • 3/4 cup water, use as needed
    • 1/2 tsp cumin seeds jeera
    • 1 tsp green chili finely chopped
    • 1 cup zucchini shredded
    • 1 tabs cilantro finely chopped hara dhania
    • 6 tbsp oil for cooking use as needed

    Instructions
     

    • Shred the zucchini with the skin and keep aside.
    • Mix all the dry ingredients together: besan, rice flour, cumin seeds, and salt. Add the water slowly to make a smooth batter, the consistency of pancake batter or Dosa batter. Add the green chilies, cilantro, and zucchini. Mix well.
    • Use a non-stick skillet and place on medium-high heat. Test by sprinkling a few drops of water on it. Water should sizzle right away. Pour about 1/2 cup of the batter into the skillet and spread evenly with a back of spoon. Starting from the center, spiral the batter outward evenly to form a circle about 7″ in diameter.
    • When batter starts to dry, gently spread one teaspoon of oil over it. Wait about 30 seconds; flip the puda using a flat spatula.
    • Press the puda lightly all around with the spatula to make the puda cook evenly. Turn the puda three to four time, until crisp and brown on both sides.
    • Repeat for the remaining pudas.

    Notes

    Tips:
    Spread the batter quickly, or it will begin to dry and will be difficult to spread.
    Serving Suggestions:
    You can serve the puda with yogurt, hari chutney, spicy pickles.
    Pudas can also be served as quesadillas. Fold the pudda with shredded cheddar cheese, sliced tomatoes, or roasted vegetables.
    Variations
    Zucchini can be replaced with finely chopped spinach, shredded potatoes, or  finely shredded cabbage.
    If you make the puda without vegetables, do not use rice flour. This will cause the pudas to be very dry.
    Cilantro can be replaced with ground coriander powder.
    Keyword Besan Cheela, Healthy Breakfast, Quick And Easy
    Tried this recipe?Let us know how it was!

    How to Make Besan Cheela: Crafting a Delightful Indian Pancake

    Besan Cheela is a quick & easy bread based breakfast recipe ideal for those on a gluten free and looking for low fat vegan alternative.  Besan cheela, also known as chilla or besan chilla, is a savory Indian pancake that’s not only delicious but also packed with nutrients. Made primarily from gram flour (besan), this versatile dish can be customized with various ingredients to suit individual tastes. From shredded vegetables to aromatic spices, each component contributes to the overall flavor and texture of the cheela. Let’s delve deeper into the art of crafting the perfect besan cheela, step by step.

    Step 1: Shredding Zucchini for Besan Cheela

    The journey to creating the perfect besan cheela begins with the humble zucchini. Its vibrant green hue and delicate flavor make it an ideal addition to this traditional recipe. Start by carefully shredding the zucchini, ensuring to retain its nutritious skin. This step not only adds a delightful texture to the besan cheela but also enhances its nutritional value. Once the zucchini is finely shredded, set it aside, eagerly awaiting its incorporation into the besan cheela batter.

    Step 2: Preparing Dry Ingredients for Besan Chilla

    The foundation of a perfect besan chilla lies in the precise combination of dry ingredients. In a mixing bowl, amalgamate besan, rice flour, cumin seeds, and salt, creating the essential base for the besan cheela batter. Gradually introduce water, achieving a smooth consistency akin to that of pancake or dosa batter. The inclusion of finely chopped green chilies, fresh cilantro, and the shredded zucchini further enriches the mixture, imparting a burst of flavors and a harmonious medley of textures.

    Step 3: Heating the Skillet for Making Besan Cheela

    An indispensable element in the besan cheela-making process is a well-heated skillet. Place a non-stick skillet over medium-high heat and confirm its readiness by performing the quintessential water droplet test – the sizzle upon contact indicates the skillet’s optimum temperature for crafting the perfect besan chilla.

    Step 4: Pouring and Spreading Batter for Besan Chilla

    With the skillet primed and ready, it’s time to pour approximately 1/2 cup of the besan cheela batter onto its surface. Using the back of a spoon, adeptly spread the batter evenly, starting from the center and spiraling outward. This technique ensures the formation of a well-rounded besan chilla, approximately 7 inches in diameter, ready to be adorned with flavorful toppings.

    Step 5: Cooking the Besan Cheela to Perfection

    As the besan cheela begins to set on the heated skillet, delicately spread a teaspoon of oil over its surface. After a brief interval of about 30 seconds, gracefully flip the cheela using a flat spatula. Applying gentle pressure with the spatula ensures uniform cooking, and this process is repeated three to four times until the besan chilla attains a crisp, golden-brown exterior on both sides, tantalizing the senses with its aroma and visual appeal.

    Step 6: Repeating the Process for Besan Cheela

    The besan cheela-making process is a delightful rhythm that beckons for subsequent rounds. Repeat the aforementioned steps for the remaining batter, creating a succession of besan chillas, each promising a savory and gratifying experience. Whether enjoyed as a snack or a light meal, besan chillas stand as a testament to their versatility and irresistible charm.

    In conclusion, mastering the art of making besan cheela is not only a culinary feat but also a journey of exploration and creativity. With each step carefully executed and each ingredient thoughtfully incorporated, you can create a dish that delights the palate and nourishes the body. So, gather your ingredients, heat up your skillet, and embark on the flavorful adventure of making besan chillas – a dish that’s sure to become a favorite in your kitchen repertoire.

  • Palak Paneer (Spinach)

    Palak Paneer (Spinach)

    Palak Paneer

    Palak (Spinach) Paneer

    Palak Paneer is creamy spinach dish with paneer . This is a popular dish with youngsters and served in every indian resturant. The creamy texture of spinach with paneer is a good combination. I like to serve Palak Paneer with Naan or Tandoori Roti.
    4.67 from 6 votes
    Prep Time 10 minutes
    Cook Time 30 minutes
    Total Time 40 minutes
    Course Main Course
    Cuisine Indian
    Servings 4 people

    Ingredients
      

    • 1 10 oz packet of chopped frozen spinach or 4 cups of fresh finely chopped spinach
    • 1/3 lb paneer
    • 2 med tomato pureed
    • 1 tsp chopped ginger
    • 1 tsp corinader powder dhania
    • 1/2 tsp turmeric haldi
    • 1/2 tsp red chili powder lal mirch
    • 1 tbs oil canola or vegetable oil
    • 1/2 tsp cumin seed jeera
    • 1/8 tsp asafetida hing
    • 1/2 tsp salt
    • 2 tbs whole wheat flour
    • 1/3 cup heavy cream
    • 1/2 tomato thinly sliced for garnishing

    Instructions
     

    • If using frozen spinach thaw and blend it just for a minute so spinach has a creamy texture but without becoming pasty.
    • blend the tomatoes and ginger to make puree.
    • Mix coriander, turmeric, and red chili with tomato puree and set aside.
    • Mix whole-wheat flour with heavy cream and set aside.
    • Cube the paneer in about half inch pieces and deep fry them on medium high heat just for few minutes so paneer become very light gold in color, take paneer out on paper towel so extra oil can be absorbed.
    • Heat the oil in a saucepan. Test the heat by adding one cumin seed to the oil; if it cracks right away it is ready.
    • Add hing and cumin seed. After cumin seeds crack, add the tomato puree mixture, and let it cook for a few minutes until the tomato puree is about half in volume.
    • Add the spinach, and let it cook on low medium heat for about 10 minutes covered.
    • Add heavy cream mixture and let this cook another four to five minutes.
    • Add paneer and fold it gently with spinach and let it simmer for a 2-3 minutes. Pot should remain covered until the cooking is finished, otherwise the spinach will splatter.
    • Transfer the spinach to a serving dish and spread the tomato slices over the top, and cover the dish so tomato slices get tender with the steam from the spinach.

    Notes

    You can replace the heavy cream with 1 1/2 cups of milk.
    serve Palak Paneer with Naan or Tandoori Roti
    Tried this recipe?Let us know how it was!

    How to Make Palak Paneer Masala by Manjula’s Kitchen

    Paneer Palak, a beloved North Indian dish, epitomizes the perfect party recipe with its creamy spinach and delectable paneer in rich gravy. This is not merely a culmination but a convergence, as the paneer becomes an integral part of the spinach symphony.

    1. Blanch the Spinach: Bring a large pot of water (6 cups) to a boil. Add the spinach and cook for precisely one minute. Drain the water immediately and immerse the spinach in ice-cold water for two minutes. This step preserves the vibrant green color of the spinach.
    2. Create the Palak Paneer Base: Prepare a smooth puree by blending the blanched spinach with ginger and green chili. Aim for a creamy consistency, avoiding an overly thick paste.
    3. Soften the Paneer: Soak the cubed paneer in hot water (3 cups) for at least five minutes. This step softens the paneer, allowing it to absorb the flavors of the masala.
    4. Temper the Spices: Heat oil in a large saucepan over medium-high heat. Add cumin seeds and asafetida. Once the cumin seeds crackle, introduce the chopped tomatoes and cook for 1-2 minutes.
    5. Incorporate the Spices: Add coriander powder, turmeric powder, red chili powder, salt, and a hint of sugar to the simmering tomato mixture. Stir well to combine and allow the spices to release their aroma.
    6. Cook the Spinach Puree: Reduce heat to low and add the prepared spinach puree. Simmer for 5-6 minutes without a lid to retain the vibrant green color of the spinach.
    7. Thicken the Gravy: For a thicker consistency and richer flavor, create a slurry by mixing flour with water. Gradually whisk the slurry into the simmering palak paneer mixture. Additionally, incorporate cream for a touch of silkiness.
    8. Incorporate the Paneer: Gently fold in the softened paneer cubes and simmer for another five minutes. This allows the paneer to absorb the flavors of the masala.

    Serving: Enjoy your Palak Paneer hot with rice or naan bread.

    Tips:

    Spinach Selection: Use fresh, young spinach for the best color and flavor. Wash thoroughly to remove any dirt or grit.

    Blanching Technique: Don’t overcook the spinach during blanching (step 1). One minute is sufficient to preserve the vibrant green color and prevent mushiness.

    Creamy Texture: For a richer and creamier gravy, add a dollop of heavy cream or cashew paste at the end.

    Spice Level: Adjust the amount of green chili or red chili powder to suit your preference.

    Flavor Boost: Include a bay leaf or a green cardamom pod while tempering the spices for a deeper flavor profile.

    Suggestions:

    Serving: Pair your Palak Paneer with basmati rice, jeera rice, naan, or roti for a complete and satisfying meal.

    Garnish: For a fresh touch, garnish your Palak Paneer with chopped cilantro or a dollop of plain yogurt.

    Leftovers: Store leftover Palak Paneer in an airtight container in the refrigerator for up to 2-3 days. Reheat gently on the stovetop before serving.

    Variations:

    Vegetable Palak Paneer: Add chopped vegetables like carrots, peas, or bell peppers for extra color, texture, and nutrients.

    Mushroom Palak Paneer: Substitute paneer with sliced mushrooms for a vegetarian twist.

    Coconut Palak Paneer: Stir in a can of coconut milk for a creamy and tropical twist.

    Dry Palak Paneer: Reduce the amount of water or simmer for a longer duration to create a thicker, dryer gravy.

    FAQs:

    Can I substitute spinach with another green leafy vegetable?

    Yes, you can use Swiss chard or kale, but the color and flavor will be slightly different.

    Can I use paneer alternatives?

    Yes, firm tofu can be used as a vegetarian substitute for paneer.

    Is Palak Paneer healthy?

    Yes, Palak Paneer is a healthy dish packed with protein from paneer, iron from spinach, and fiber from both ingredients.

    How long does it take to make Palak Paneer?

    The total preparation time is typically around 30-40 minutes.

    Enjoy making and savoring this delicious and versatile Palak Paneer recipe!

    If you liked this recipe. You must also try: Masala Bell Pepper Curry, Gulab Jamun, Pineapple Kulfi Ice Cream, Makhana Mutter Curry, and Ragda Puri Chaat

  • Zucchini Rice

    Zucchini Rice

    Zucchini Rice

    Zucchini Rice

    Zucchini rice is a great gluten free, vegan side dish along with main course for any time of the day. Serving for 4.
    5 from 1 vote
    Course Side Dish
    Cuisine Indian
    Servings 4 people

    Ingredients
      

    • 1 cup rice
    • 2 cups water
    • 1 cup shredded zucchini with skin
    • 1 tbsp of oil
    • 1 tsp of butter
    • 1/2 tsp cumin seed jeera
    • 1/2 tsp black mustard seed rai
    • 4 red peppers whole
    • 2 Bay Leaves tajpat
    • 1/2 tsp salt
    • 1/2 inch small piece of cinnamon stick dal chini
    • 1 tsp lemon juice

    Instructions
     

    • Heat the oil and butter in a heavy saucepan over medium high heat.Test the heat by adding one cumin seed to oil; if the cumin cracks right away oil is ready.
    • Add cumin seeds and mustard seeds to the oil. After seeds crack add red pepper and bay leaves. Add rice and stir-fry for about 2 minutes.
    • Add water, zucchini, salt and lemon juice. Stir and bring to boil.
    • After rice comes to a boil turn the heat down to low and cover the pan. Cook rice for about fifteen minutes or until the rice is tender and the water has evaporated.
    • Serve as is, with soup, yogurt, and pickle.

    Suggestions

    • Melt some cheddar cheese over rice.

    Variations

    • Replace zucchini with 1 1/2 cup finally chopped spinach.
    Tried this recipe?Let us know how it was!

    Elevate Your Cooking with Zucchini Rice: A Flavorful and Nutritious Delight

    Zucchini rice offers a delightful gluten-free option for those seeking quick and easy vegan meals. Made primarily with rice and zucchini, this dish is not only flavorful but also nutritious. Zucchini, rich in vitamins and minerals, adds a refreshing crunch and subtle sweetness to the rice. With minimal ingredients and simple cooking methods, zucchini rice is perfect for busy weeknights or as a side dish for larger gatherings.

    1. Heating the Oil and Butter: Preparing for Flavorful Zucchini Rice

    Begin crafting the delightful zucchini rice by heating a combination of oil and butter in a sturdy saucepan over medium-high heat. To ensure the oil reaches the optimal temperature for sautéing, conduct a quick test by introducing a single cumin seed into the oil. If the seed crackles upon contact, it signifies that the oil is primed and ready to infuse its essence into the dish.

    2. Tempering the Spices: Enhancing Aromatics in Zucchini Rice Recipe

    Elevate the flavor profile of the rice zucchini recipe by adding a medley of aromatic spices to the heated oil and butter. Sprinkle in cumin seeds and mustard seeds, allowing them to crackle and release their enticing aroma into the culinary canvas. Follow this with the addition of red pepper and bay leaves, infusing the dish with layers of complexity and depth.

    3. Sautéing the Rice: Fostering Texture and Flavor in Zucchini Rice Recipes

    Introduce the rice to the fragrant spice blend, stirring vigorously to coat each grain with the aromatic oils. Continue to stir-fry the rice for approximately 2 minutes, coaxing out its nutty flavors and enhancing its texture in preparation for the upcoming infusion of moisture and flavor.

    4. Adding Water and Zucchini: Building Layers of Flavor in Rice Zucchini Recipe

    Elevate the zucchini rice recipe to new heights by incorporating water, fresh zucchini, salt, and a splash of invigorating lemon juice into the saucepan. Stir the mixture well, allowing the flavors to meld harmoniously as it comes to a gentle boil, infusing the rice with the vibrant essence of the zucchini and citrus.

    5. Simmering to Perfection: Achieving Tender Texture in Zucchini Rice

    Once the rice mixture reaches a rolling boil, reduce the heat to low and cover the pan, initiating the gentle simmering process. Allow the rice to cook undisturbed for approximately fifteen minutes, or until the grains are tender and have absorbed the flavorful liquid, resulting in a tantalizing medley of textures and tastes in the completed zucchini rice recipes.

    6. Serving Suggestions: Enhancing Enjoyment of Zucchini Rice

    Indulge in the delightful simplicity of zucchini rice by serving it as is, alongside comforting accompaniments such as soup, yogurt, and pickle. For a decadent twist, consider melting a generous portion of cheddar cheese over the rice, imparting a luscious richness that elevates the dish to new heights of indulgence.

    Suggestions for Variation: Experimenting with Flavors in Zucchini Rice

    For a refreshing twist on the classic recipe, consider substituting zucchini with 1 1/2 cups of finely chopped spinach, infusing the dish with vibrant green hues and the earthy essence of leafy greens. This variation offers a delightful alternative for those seeking to explore new flavor profiles while retaining the comforting appeal of zucchini rice.

    If you loved our zuchini rice recipe then you must also check out other variants of Rice: Vegetable Biryani, Masala Khichdi, Mango Rice, Quinoa Vegetable Pilaf and Lemon Rice