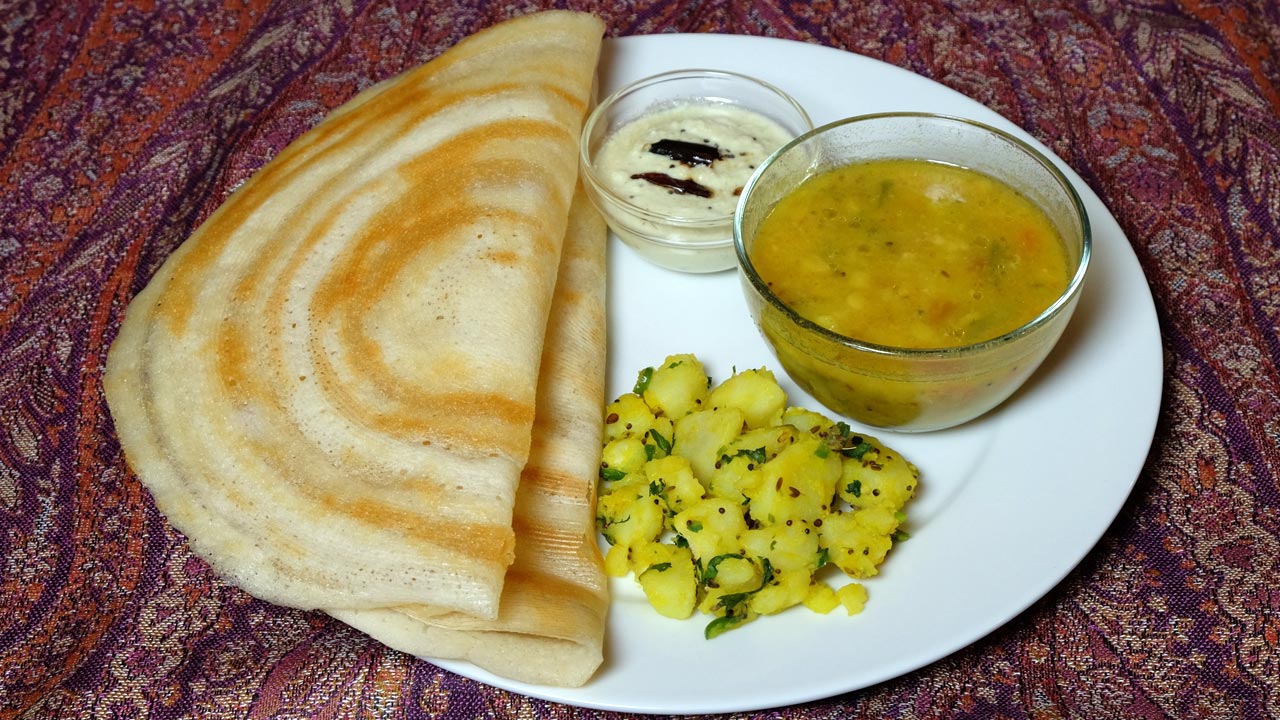
Dosa is a popular South Indian delicacy which looks like a crepe. Dosa is a crisp and thin pancakes made of a rice and urad dal batter. Traditionally Dosa is served with samber, aloo masala and coconut chutney.
Wash rice and dal changing water three to four times. Soak rice mix and fenugreek seeds in about 4 cups of water for at least six hours.
In a blender, blend the rice and dal mix to very creamy texture. Use only as little water as needed to blend. Using too much water for blending will not give the desired creamy texture. Use the same water dal was soaked to grind the batter as that helps in fermentation.
Add the salt to batter, cover and ferment the batter in a warm place for about a day. Batter will be about one and half time in volume.
When ready to make dosa whip the batter for few seconds. Add water as needed, batter should be pourable, or like pancake consistency.
Place a non-stick- heavy skillet over medium heat. Test by sprinkling a few drops of water on it. The water should sizzle right away.
Pour 1/2 cup of the batter mixture into the skillet and spread evenly with the back of a spoon. Starting from the center, spiral outward until evenly spread, about eight inches in diameter thin circle.
Smear about 2 teaspoons oil over it and along the edges and cook till the dosa turns brown in color and crisp. This point flip the dosa using a flat spatula, for about 15 seconds.
Dosa is ready, repeat with remaining batter. Every time wipe the skillet with wet towel that helps spreading the dosa.
Serve with coconut chutney, aloo masala and sambhar.
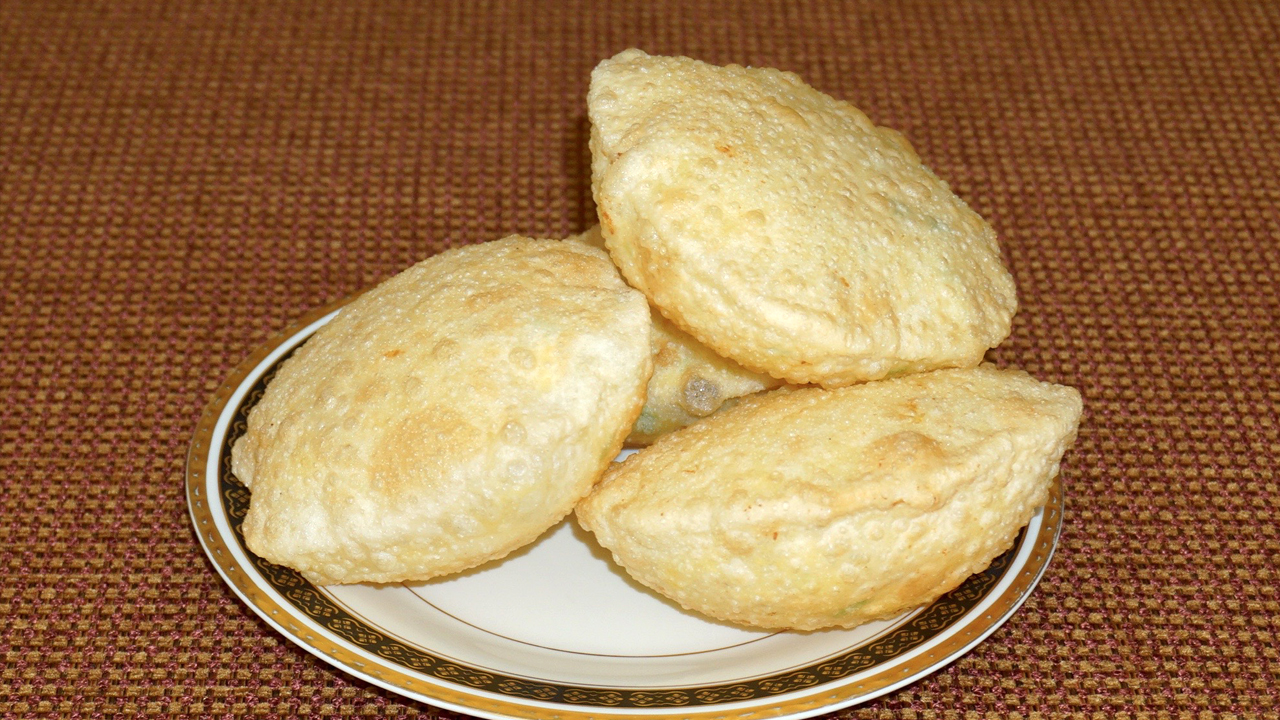
Dal Puri (fried puffed bread), which consist of puris filled with mildly spiced moong dal. This delicacy is delicious and very festive. Dal Puri is an excellent option with any meal as it is sure to be a crowd-pleaser. Serve these incredible dal puris with spicy squash, or potato curry with yogurt gravy.
In a bowl mix the flour, salt and oil together. Add the water slowly, mixing with your fingers as you pour. Dough should be firm and smooth. I used about half cup of water. Knead the dough lightly. Cover the dough and let it sit for at least fifteen minutes.
For Filling
Wash and soak dal for at least four hours. Drain the water and blend dal, with ginger, and green chili to smooth paste. While blending dal just use enough water needed to blend. I used about 3 tablespoons of water.
After dal is blended to smooth paste add all the ingredients fennel seeds, cumin seeds, asafetida, and mango powder except oil, blend for few seconds making all the ingredients mix well.
Heat the oil in a nonstick frying pan over low medium heat, add dal paste and keep stirring until it becomes consistency of soft dough. This should take about 2 minutes.
Remove from heat and let it cool just enough that you can knead it to make a soft dough.
Making the Dal Puri
Take the dough and knead it for a minutes. Divide the dough in 18 equal parts.
Take the filling and divide into 18 parts, filling should be little smaller then dough ball. You may have some filling left over.
Take one part of the dough and with your fingers flatten the edges and make into 3-inch circle. Leaving center little thicker then edges.
Mold the dough into a cup and place 1 part of filling in the center. Pull the edges of the dough to wrap the dal filling. Proceed to make all the balls.
Let the filled ball sit for three to four minutes before rolling.
Lightly Oil the rolling pin and rolling surface. Roll the balls gently into 6” circles.
You can roll two or three puris before start frying, but do not roll all the puris at once or they will begin to dry out and fail to puff.
Heat the oil in frying pan over medium heat frying pan should have about one inch of oil. To check if oil is ready put a little piece of dough in the oil. Dough should sizzle, and come up slowly.
Fry one puri at a time. Place the puri in the frying pan and press with a skimmer. The puri should puff up. Turn puri over and cook until light golden brown on both sides. Take the puri out and place them on paper towels to absorb the excess oil. Repeat the process for remaining piries.
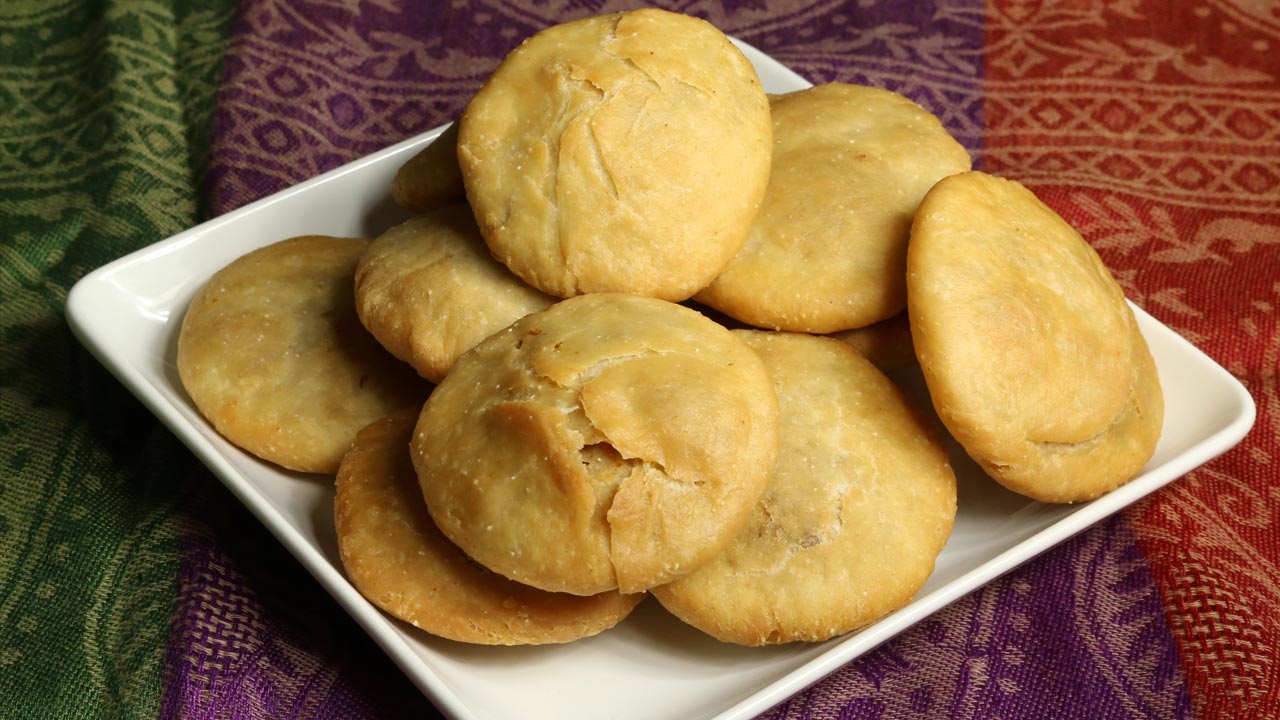
Dal kachori is a delicacy from north India. Dal kachori is a spicy puffed pastry. Traditionally kachories are sold at HALWAI (a sweet and snack shop). Today, I will use urad dal lentils (skinned black gram) for the inside filling. These mouthwatering Dal kachories can be served as a snack, chaat or part of main meal, making the meal exotic.
Mix the flour, semolina, salt and ghee. Add water slowly to make dough. Dough should be firm but pliable. Cover the dough and let it sit for at least fifteen minutes.
To make filling
Boil dal in about 2 cups of water, until dal is soft not mushy. Drain the access water.
Heat the ghee (clarified butter) over low medium heat add all the spices for filling fennel, coriander, red chili, mango powder, asafetida and salt, stir and add boiled dal.
Stir continuously, and keep pressing dal, until water from dal has evaporated, notes, dal should not be powdery.
Turn off the heat. Let the mixture cool off.
To make the Kachoris
Take the dough and knead it for a minutes. Divide the dough in twelve equal parts.
Take one part of the dough and with your fingers flatten the edges and make into 3-inch circle. Leaving center little thicker than edges.
Mold the dough into a cup and place about 2 teaspoons of filling in the center. Pull the edges of the dough to wrap the dal filling. Proceed to make all 12 balls.
Let the filled ball sit for three to four minutes before rolling.
Set the kachoris on a surface with the seams facing up. Roll it slowly about three inches in diameter.
Heat the oil in frying pan over medium heat frying pan should have about one inch of oil. To check if oil is ready put a little piece of dough in the oil. Dough should sizzle, and come up very slow.
Fry them on medium-low heat. After they start to puff, slowly turn them over. Fry until golden-brown on both sides. This should take about five minutes. If the kachoris are fried on high heat, they will get soft and will not be crispy.
Kachories can be stored for at least a week in an airtight container.
Notes
If kachories get soft warm up the kachoris in an oven on 200 degree F for about 7 to 10 minutes, this will bring back the freshness and crispyness.Serving suggestion: serve them plain, or with tamarind chutney and yogurt as chaat, or serve the kachories as main meal and serve them with aloo dum
Urad Dal Kachori Recipe: A Delectable Indian Snack
Urad Dal Kachori is a delectable Indian snack that perfectly fits into categories like appetizers, party recipes, and snacks. With its crispy exterior and flavorful filling, it’s an ideal addition to festive occasions like Diwali and Holi, where indulging in savory treats is a tradition. This traditional dish combines the richness of urad dal (black gram lentils) with a blend of spices encased in a golden, fried dough shell, making it a beloved choice among food enthusiasts.
Enjoyed hot and fresh, Urad Dal Kachori offers a delightful burst of flavors and textures, making it a popular choice for gatherings and celebrations alike. Urad Dal Kachori is a traditional Indian snack enjoyed by many across the country. This flavorful delicacy is a popular choice for breakfast, snacks, or even as a side dish. In this comprehensive guide, I will walk you through how to make urad dal kachori step by step, ensuring that you achieve the perfect blend of flavors and textures in every bite.
How to Make Urad Dal Kachori: Step-by-Step Instructions
Prepare the Dough:
Combine flour, semolina, salt, and ghee in a bowl. Gradually incorporate water while mixing until a firm but pliable dough forms. Cover the dough and allow it to rest for at least 15 minutes.
Cook the Lentils:
Boil the lentils in approximately 2 cups of water until softened but not mushy. Drain any excess water.
Make the Filling:
Heat ghee over low-medium heat. Add all the filling spices (fennel seeds, coriander seeds, red chili powder, mango powder, and asafetida) and stir briefly. Add the cooked lentils and continue stirring while mashing the lentils to remove excess moisture. The filling should not be dry or powdery. Turn off the heat and let the mixture cool.
Assemble the Kachoris:
Knead the rested dough for a minute and divide it into 12 equal portions. Roll each portion into a 3-inch circle, keeping the center slightly thicker than the edges. Gently cup the dough to form a small pocket. Add approximately 2 teaspoons of the cooled lentil filling to the center. Pull the edges of the dough together to enclose the filling securely. Repeat this process to create 12 filled balls.
Shape and Fry:
Allow the filled balls to rest for 3-4 minutes. Gently roll each ball out to a 3-inch diameter circle, ensuring the seam faces upwards. Heat oil (about 1 inch deep) in a frying pan over medium heat. To test the oil temperature, drop a small piece of dough; it should sizzle and rise slowly to the surface. Carefully place the kachoris in the hot oil and fry over medium-low heat. Once they begin to puff up, gently flip them over. Fry until golden brown on both sides, which should take approximately 5 minutes. Avoid high heat, as this will result in soft rather than crispy kachoris.
Storage:
Once cool, kachoris can be stored in an airtight container for up to a week.
Variations of Urad Dal Kachori
While the traditional urad dal kachori recipe is delightful on its own, you can experiment with various fillings and flavors to create unique variations. Instead of urad dal, you can use mashed potatoes, green peas, or lentils for the filling. Additionally, you can add a touch of sweetness by incorporating raisins or dates into the filling mixture. Get creative with spices and herbs to customize the flavor according to your preference.
Benefits of Urad Dal Kachori
Urad dal, the main ingredient in urad dal kachori, is a rich source of protein, fiber, and various nutrients. Including kachoris in your diet provides you with essential nutrients and energy, making it a wholesome snack option. Moreover, homemade kachoris allow you to control the quality of ingredients and avoid unhealthy additives commonly found in store-bought snacks.
FAQs (Frequently Asked Questions)
Q: Can I make urad dal kachoris in advance?
A: Yes, you can prepare the filling and dough in advance and store them separately in the refrigerator. When ready to serve, assemble the kachoris and fry them fresh for the best taste and texture.
Q: Can I bake kachoris instead of frying them?
A: While traditional kachoris are deep-fried for a crispy texture, you can certainly try baking them for a healthier alternative. Brush the assembled kachoris with oil and bake in a preheated oven until they turn golden brown and crisp.
Q: Can I freeze leftover kachoris?
A: Yes, you can freeze leftover kachoris in an airtight container for up to 2-3 weeks. When ready to eat, reheat them in a preheated oven or toaster oven until heated through.
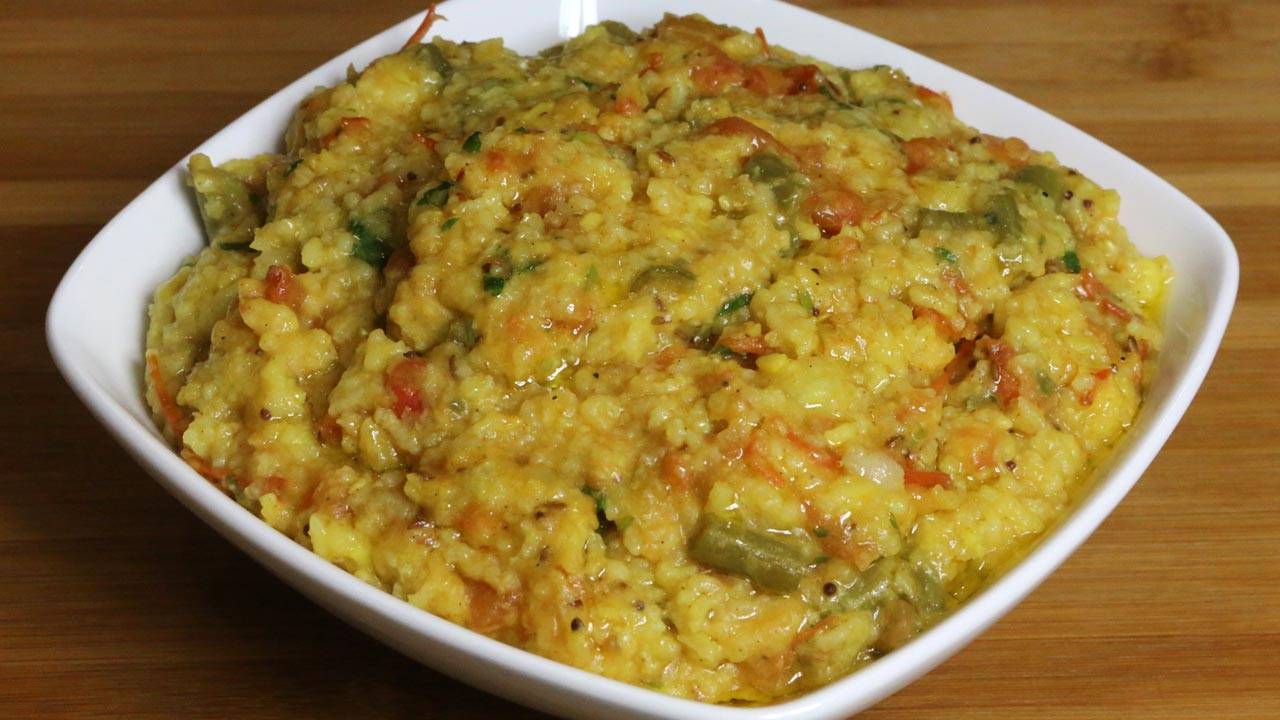
Masala Khichdi is a spicy variation of simple khichdi. This is healthy but ultimate comfort food. Khichdi is basically prepared with rice and lentils. Every hosehold has their own recipe for khichdi. At my home khichdi was made just with rice and moong dal. Adding a few vegetables with spicy tomato seasoning makes khichdi a complete meal. Usually khichdi is served with yogurt, pickle and papdam.
1mediumpotato washed peeled and small cubed this will make about 1/2 cup of cubed potatoes
1tspsalt
1/4tspturmerichaldi
1tbspclarified butter (ghe)
3cupswater for cooking
Spices
2tbspclarified butter or ghee
1/2tspcumin seedsjeera
1/2tspmustard seedsrai
1/8tspasafetidahing
1-1/2cups tomatoes finely chopped
1green chilies finely chopped
1/4tspred chili powder
1/2tspsalt
2tspginger finely shredded
2tbspcilantro finely choped
1/4tspgaram masala
Instructions
Wash rice and moong dal changing water 3 to 4 times, drain the water. Use the pressure cooker to save time. In preassure cooker add rice, beans, potatoes, salt, turmeric, clarified butter, and 3 cups of water.
Close the pressure cooker and seal the exhaust, or put the weight. Cook over high heat.
After the pressure cooker start steaming lower the heat to medium and cook for about 4 minutes.
Turn off the heat and wait until steam has stopped before opening the cooker.
Mix the khichdi well, dal and rice should be very soft, little mushy.
Heat the clarified butter in other saucepan over medium heat, Test the oil by adding one cumin seed to the oil; if it cracks right away oil is ready. Add the cumin seeds, black mustard seeds, and asafetida as seeds crack add tomatoes, green chili, ginger, salt and red pepper stir.
Let tomatoes cook over medium heat until they are tender and mushy. This should take about 6 to 7 minutes. Lower the heat to low. Add cilantro and garam masala, stir for a minutes.
Add cooked rice, mix gently, and add hot water slowly as needed. Consistency of the khichdi should be like runny dough. Note: as khichdi cools will become little thick.
Serve khichdi hot, and serve the khichdi with pickle, yogurt and papdam.
Masala Khichdi Recipe: A Flavorful Blend of Spices & Goodness
Masala Khichdi is a spicy rice-based variation of simple khichdi. It is a healthy gluten-freelow fat but amazing comfort food and a great lunch box option. Khichdi is prepared with rice and lentils. Every household has its khichdi masala recipe. Adding a few vegetables with spicy tomato seasoning makes khichdi a complete meal. Usually, khichdi is served with yogurt, pickles, and papadam.
Preparing the Ingredients: Washing and Pressure Cooking
Begin the process of making this flavorful masala khichdi recipe by thoroughly washing the rice and moong dal, and changing the water 3 to 4 times. Drain the water and transfer the washed rice and dal to a pressure cooker to save time. In the pressure cooker, combine the rice, beans, potatoes, salt, turmeric, clarified butter, and 3 cups of water.
Pressure Cooking the Masala Khichdi: Infusing Flavors
Close the pressure cooker securely and seal the exhaust or place the weight on top. Cook the mixture over high heat until the pressure cooker starts steaming. Once steaming begins, reduce the heat to medium and continue cooking for about 4 minutes.
Allowing Pressure to Release: Ensuring Safety
Turn off the heat and patiently wait until the steam has completely stopped before opening the pressure cooker. This step ensures safety and allows the pressure to release naturally.
Mixing the Masala Khichdi: Achieving Desired Texture
Once the pressure has dissipated, carefully open the pressure cooker and mix the dal khichdi masala well. The dal and rice should be very soft and slightly mushy, creating a comforting and hearty texture.
Tempering the Spices: Enhancing Flavor
In another saucepan, heat clarified butter over medium heat. Test the oil’s readiness by adding a cumin seed; if it crackles right away, the oil is ready. Add cumin seeds, black mustard seeds, and asafetida, and stir until the seeds crackle. Then, add tomatoes, green chili, ginger, salt, and red pepper, allowing the tomatoes to cook until tender and mushy for about 6 to 7 minutes over medium heat. Lower the heat, add cilantro and garam masala, and stir for an additional minute.
Incorporating the Dal Khichdi Masala: Achieving Consistency
Add the cooked rice to the saucepan, mixing gently. Gradually add hot water as needed to achieve the desired consistency of the dal khichdi masala, resembling a runny dough. Note that the dal khichdi masala will thicken slightly as it cools.
Serving the Masala Khichdi: Enjoying Comfort and Flavor
Serve the masala khichdi hot, accompanied by pickle, yogurt, and papadam. This comforting and flavorful dish is sure to satisfy your taste buds and provide a wholesome meal experience.
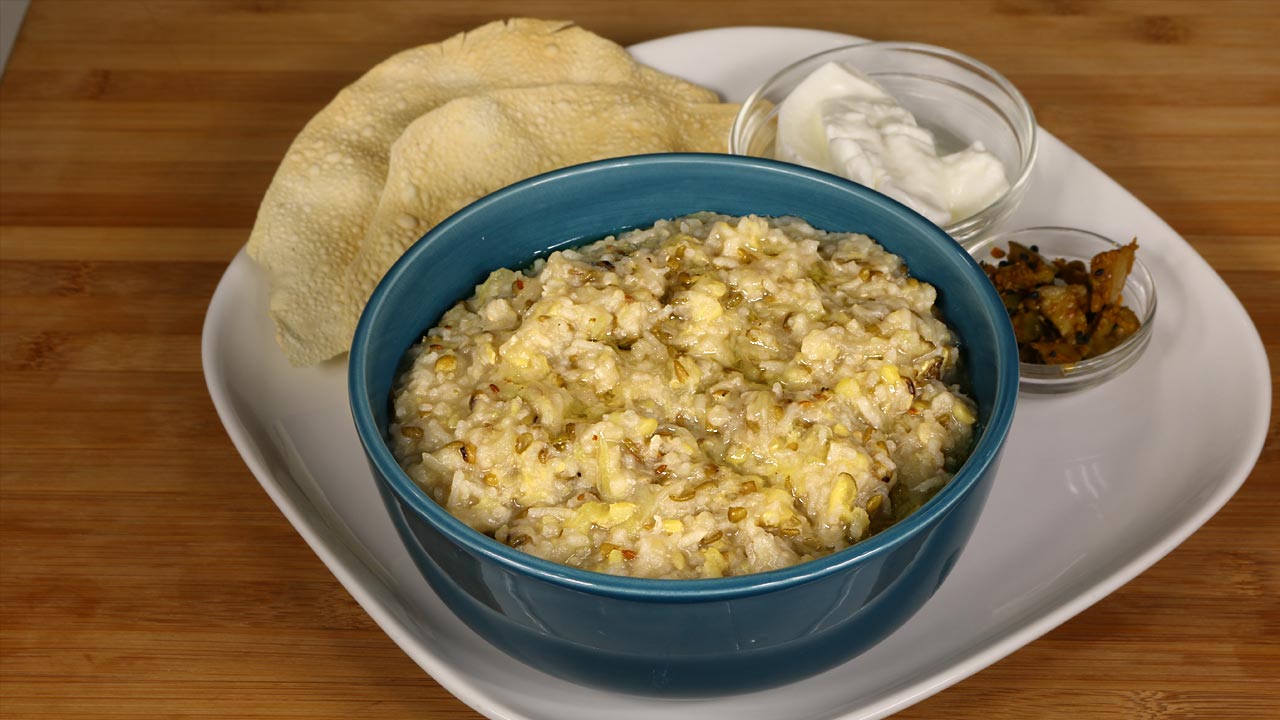
Moong dal khichdi is a very basic and healthy food. Every house hold has their own recipe for khichdi. At my home khichdi was made with split moong dal and rice. I have added the laucki (ghia, opo squash, bottle gourd), to make this a more complete one dish and one pot meal.
2 cup shredded opus also known as bottle guard, laucki or ghia, you can also use zucchini shredded with skin on
1tablespoon clarified butter (ghee) if you are vegan replace the ghee with oil
1teaspoon cumin seeds (jeera)
1/8teaspoon asafetida (hing)
1-1/4teaspoon salt
2teaspoon ginger finely grated (adrak)
3-1/2cups water
For serving
2tablespoons hot clarified butter (ghee) optional
Instructions
Wash and soak the rice and moong dal in about 3 cups of water for at least 15 minutes. Drain the water and set aside.
Heat the clarified butter in a pressure cooker over medium high heat. When butter is moderately hot, add cumin seeds and asafetida. After the seeds crack add all the other ingredients for khichdi and stir.
Close the pressure cooker and seal the exhaust, or put the weight.
After the pressure cooker start steaming lower the heat to medium and cook for about 7 minutes.
Turn off the heat and wait until steam has stopped before opening the cooker.
Mix the khichdi well, dal and rice should be very soft, little mushy. Consistency of the khichdi should be like runny dough. Note: as khichdi cools will become little thick. If needed add boiling water too adjust the consistency of your liking.
Traditionally hot butter is poured over khichdi before serving, serve hot.
Delicious Moong Dal ki Khichdi Recipe: An easy step by step preparation
Moong dal ki khichadi is a traditional gluten free, low fat, quick & easy Indian dish renowned for its simplicity, versatility, and nutritious profile. At its core, it comprises moong dal (split mung beans) and rice, which are cooked together to create a wholesome and satisfying meal.
Thoroughly Washing and Soaking for Flavorful Moong Dal Ki Khichdi
Commence the culinary journey of crafting the perfect moong dal ki khichdi by meticulously washing and soaking the rice and moong dal in approximately 3 cups of water for a minimum duration of 15 minutes. This essential step ensures that the grains imbibe adequate moisture, crucial for achieving the desired texture and taste in the moong dal khichdi. Post-soaking, meticulously drain the water and set the rice and dal aside, ready to absorb the aromatic flavors awaiting them.
Tempering the Spices: Elevating Flavor Profiles in Split Moong Dal Khichdi
In a heavy-bottomed pressure cooker, elevate the culinary experience by heating clarified butter over medium-high heat until it reaches an optimal temperature. Once sufficiently heated, introduce the fragrant duo of cumin seeds and asafetida into the glistening butter, allowing them to sizzle and release their captivating aromas. As the seeds crackle, gracefully incorporate all the other ingredients essential for crafting the quintessential moong dal khichadi, ensuring each component contributes to the symphony of flavors that define this revered dish.
Pressure Cooking: Sealing and Culinary Alchemy in split Moong Dal Khichdi
Embrace the essence of culinary alchemy as you tightly seal the pressure cooker and ignite the flames of anticipation by activating the exhaust or positioning the weight atop. As the pressure cooker builds momentum and begins to emit a gentle stream of steam, revel in the anticipation of the transformative process unfolding within, signifying the metamorphosis of simple ingredients into a tantalizing ensemble known as dal khichadi.
Cooking Under Pressure: Nurturing Texture and Flavor in split Moong Dal Khichdi
With the pressure cooker exuding a gentle hiss of anticipation, regulate the heat to a medium setting and allow the dal khichadi to undergo its metamorphosis for an approximate duration of 7 minutes. This judicious cooking period fosters the delicate interplay of flavors and textures, ensuring that the rice and dal emerge soft and supple, a testament to the culinary prowess employed in crafting this illustrious dish.
Releasing Pressure: Embracing Tradition and Consistency in Dal Khichadi
Upon completion of the cooking process, gracefully relinquish the pressure cooker from its duties and patiently await the cessation of steam before venturing to unveil the treasure concealed within. As the lid is lifted, marvel at the amalgamation of flavors and textures that greet your senses, each spoonful promising a symphony of sensations that define the essence of moong dal khichadi. With gentle, yet deliberate strokes, ensure the khichdi is thoroughly mixed, allowing the rice and dal to meld seamlessly and attain a consistency akin to that of runny dough, a hallmark of culinary perfection.
Adjusting Consistency: Fine-tuning Your Moong Dal Khichadi Masterpiece
Should the need arise, exercise culinary finesse by judiciously adjusting the consistency of the khichdi to suit your preferences. Introduce boiling water in measured increments to achieve the desired thickness, bearing in mind that as the dal khichadi cools, it may undergo a slight thickening process, necessitating preemptive measures to maintain its impeccable texture throughout.
Serving Tradition: Enhancing Flavor and Tradition with Hot Butter
Stay true to tradition and honor the heritage of moong dal ki khichdi by drizzling a generous portion of piping hot butter over the sumptuous ensemble before serving. This timeless practice not only imbues the dish with an additional layer of richness and flavor but also pays homage to the culinary customs and traditions that have stood the test of time, enriching the dining experience and elevating it to an unparalleled level of indulgence.
Serving Suggestions: Completing the Culinary Odyssey of Moong Dal Khichdi
Embark on a culinary odyssey of unparalleled flavor and indulgence as you savor each spoonful of the meticulously crafted moong dal khichdi. Accompany this gastronomic delight with an assortment of tangy pickle, creamy yogurt, and crispy papadum, each element serving to enhance and complement the nuanced flavors and textures of the dish. Let every bite be a testament to the culinary ingenuity and mastery that have culminated in the creation of this timeless masterpiece, a feast for both the senses and the soul.
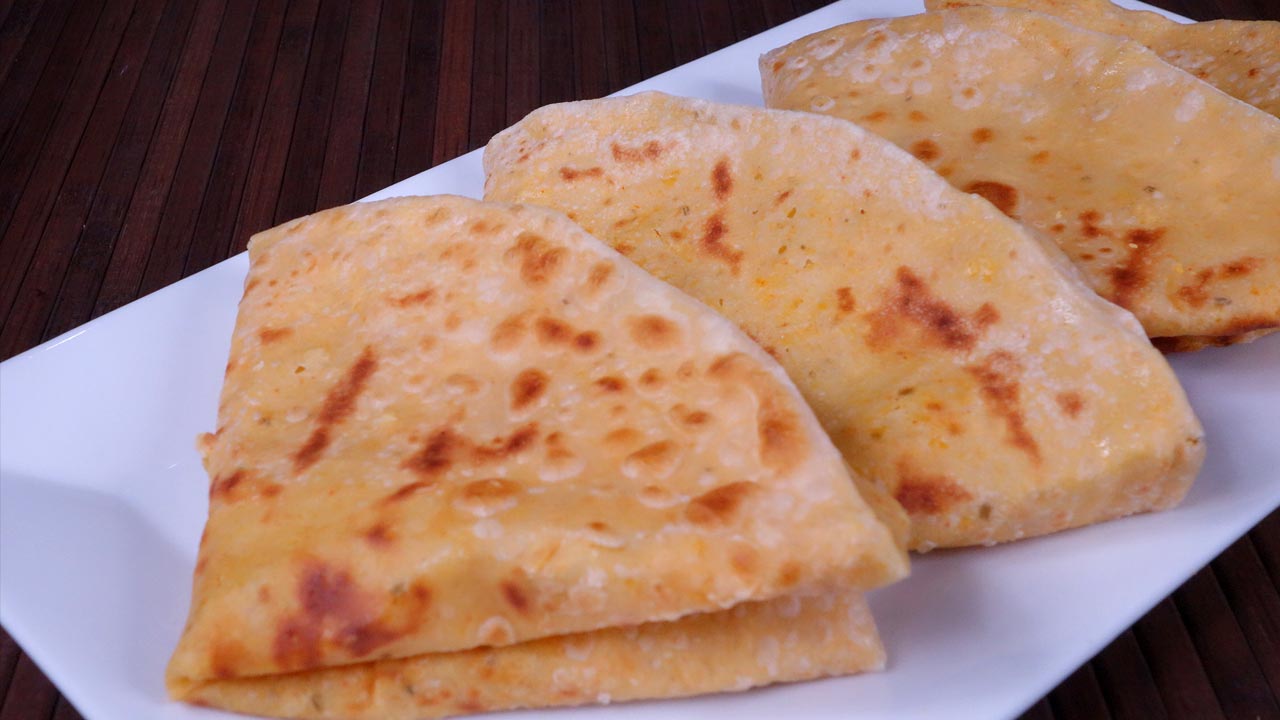
Dal Paratha, or Bikaneri Paratha, is best described as Indian stuffed flatbread. This delicious bread is filled with cooked chana dal and a variety of spices. However, unlike other stuffed parathas these are rolled super thin. These parathas are a Rajasthani delicacy. They are excellent source of protein in hot summers and are a healthyvegan option.
1/2cup chana dal, available in Indian grocery stores
1/2teaspoon salt
1 teaspoon fennel seed powder, (saunf)
1/2teaspoon red chili powder, adjust to taste
1/8teaspoon asafetida (hing)
Also, Need
1/4cup all-purpose flour, for rolling
2tablespoons oil for cooking paratha
Instructions
for Dough
Mix the flour, salt and oil.
Add the water slowly, mixing with your fingers as you pour.
Dough should be soft, do not knead the dough.
Cover the dough and let it sit for at least fifteen minutes.
for Filling
Boil the chana dal with two cups of water on medium-high heat. After the dal comes to a boil, reduce the heat to medium and let it cook until the dal is very soft. If needed add a little more water. Strain the dal removing the access water if needed.
consistency of soft dough. Consistency of dal is very important for this recipe. If dal is too soft it will be difficult to make the filling, so stir fry the dal to bring it to the right consistency. If it is too dry and crumbly add a little water.
In a bowl mix dal with salt, fennel powder, chili powder, and asafetida. Adjust the pepper and salt to taste. Set it aside.
Making Paratha
Divide the dough and filling into eight equal parts and form into balls.
Roll the dough ball lightly in dry flour and roll it into a 3” circle. Place a filling ball in the center. Pull the edges of the dough to wrap it around the filling. Repeat to make all eight balls. Let the filled balls settle for three to four minutes.
Meanwhile heat an iron or other heavy skillet on medium-high heat until moderately hot. To test, sprinkle water on the skillet. If the water sizzles right away, the skillet is ready.
Press the filled ball lightly on dry flour from both sides.
Using a rolling pin, roll the balls keeping the sealed side up. If the dough sticks to the rolling pin or rolling surface, lightly dust the parathas with dry flour; roll the paratha into a seven-inch circle.
Place the paratha on the skillet. When the paratha starts to change color and begins to puff up, flip it over. You will notice some golden-brown spots.
After a few seconds, drizzle half a teaspoon of oil over the paratha. Flip the paratha and put half a teaspoon of oil in again. Lightly press the puffed areas with a spatula. This will help Paratha to puff.
Flip again and press with a spatula making sure the paratha is golden-brown on both sides. Repeat for the remaining parathas.
Parathas are best served hot and crispy. They will be soft as they cool off.
Parathas can be kept unrefrigerated for up to two days wrapped in aluminum foil or in a covered container. For later use, parathas can be refrigerated for six to seven days or frozen for up to a month. Re-heat using a skillet or oven. But they taste great at room temperature.
Ginger-green chilli paste (small piece of ginger and 2 green chillies)
1Tsp Lemon juice
1Tsp Chaat Masala
1Tsp Garam Masala Powder
1 1/2 Cups Bread Crumbs
Coriander Leaves (few Sprigs chopped)
Salt – According to taste
Oil for deep frying
Instructions
Soak Moong Dal in warm water overnight. Drain and set aside.
In a bowl, mix together soaked split green gram , onion, coriander leaves, salt, garam masala powder, red chilli powder, chaat masala, ginger-green chilli paste and lemon juice.
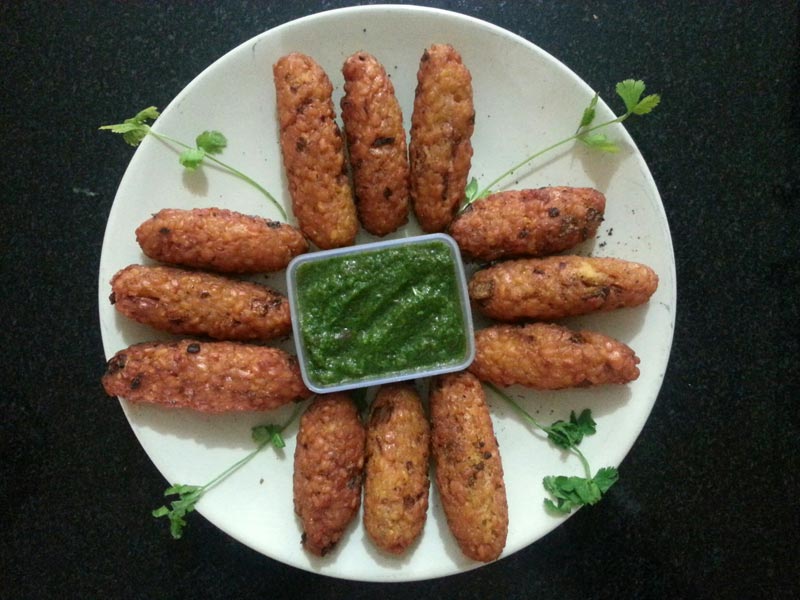
Add the bread crumbs and mix well. Divide the mixture into equal portions and shape them into fingers.
Heat sufficient oil in a kadai and deep fry the fingers in batches of three to four until crisp and golden.
Drain on absorbent paper and serve hot with tomato sauce or mint or coriander chutney.
Also need tamarind chutney for serving, check the recipe on my website
Instructions
Cooking Dal:
Wash and soak chana dal for at least 2 hours in 3 cups of water.
Drain the water and in pressure cooker add dal, 2-1/2 cups of water, salt, turmeric, green chili, and ginger, close the cooker and cook over medium high heat.
As the pressure cooker starts steaming turn the heat down to medium and cook for about 4 minutes.
Turn off the heat and wait until steam has stopped before opening the pressure cooker.
Dal should be soft well-cooked but not mushy. Add black pepper, mango powder and garam masala, mix it well. Dal should be thick in consistency.
Seasoning
Heat the oil in a saucepan. Test the heat by adding one cumin seed to the oil; if seed cracks right away oil is ready.
Add cumin seeds, after seeds crack add curry leaves stir for few seconds and pour over dal mix it well and set aside. Curry leaves splatter be careful.
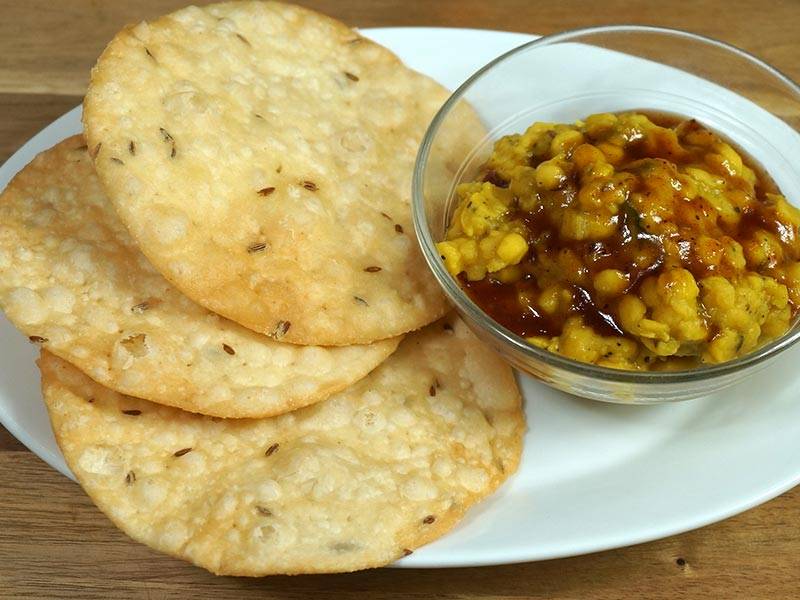
Pakwan
Crisp Puries known as Pakwan: Mix flour, sooji, salt, cumin seeds, and oil. Add enough water to make firm dough. Knead the dough well.
Set the dough aside and let it sit for at least 15 minutes or longer.
Divide the dough in 10 equal parts, Roll the dough into about 5-inch diameter. If the dough is sticking to the rolling pin or rolling surface, put couple of drops of oil on the rolling pin and a couple of drops of oil on the surface.
Prick the rolled dough all over with a fork. This will limit puries from puffing and make them crisp.
Heat the oil in a frying pan over medium heat. The frying pan should have at about 1 inch of oil. To check if the oil is ready, put a small piece of dough in the oil. The dough should sizzle and come up slowly.
Fry 2-3 puries at time until both sides are a light golden-brown.
Transfer puries over paper towel, it will absorb the extra oil.
After the puries cool to room temperature they should be crisp. Puries can be stored in airtight container for 1 month.
Notes
Serve Pakwan with hot dal with drizzle of tamarind chutney.
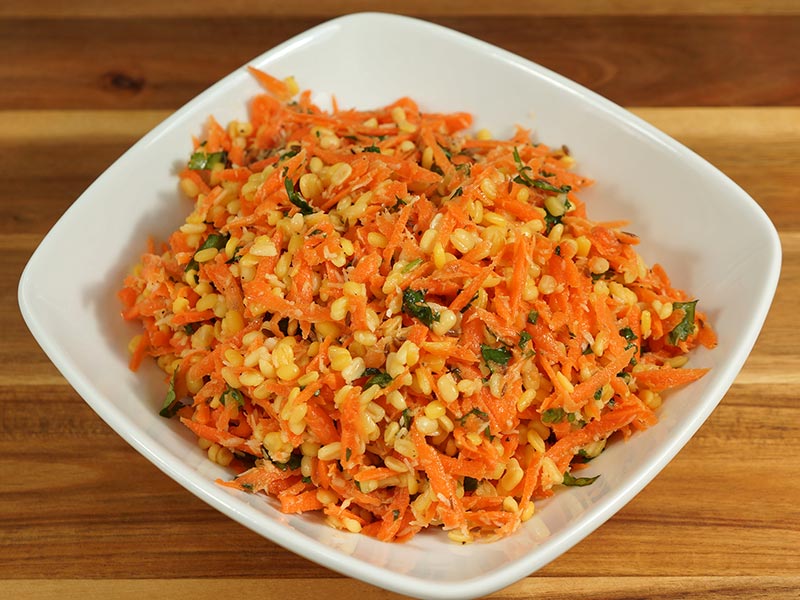
Carrot and Moong Dal Salad is a healthy and nutritious salad with beautiful colors. This is a great salad and easy to make. This can be served as an afternoon snack or an appetizer.
Urad Dal Puri, also known as Bedmi Kachori, is a hearty dish of fried puffed bread with a mix of lentils and spices. Urad Dal Puri is a North Indian delicacy. Delicious and festive, it is an excellent option with any meal and sure to be a crowd-pleaser!
1/4cup urad dal (available in Indian grocery stores)
1cup whole wheat flour (roti atta)
1 tablespoon fennel seed powder (Saunf)
1tablespoon coriander powder (dhania)
1/8teaspoon asafetida (hing)
1/4 teaspoon dry ginger powder (sonth)
1/2teaspoon red chili flakes adjust to taste
1/2 teaspoon salt
2tablespoon oil
Oil to fry
Instructions
Method
Wash and soak urad dal four hours or more. Drain the water. Blend dal coarsely into a thick paste, preferably in a food processor, using as little water as possible.
In a bowl mix all the spices. Add to the flour and mix well.
Add the dal paste (pithi) to the flour and form into a soft dough using lukewarm water as needed. Dough will be a little sticky. Grease your palm. Spread one teaspoon of oil over the dough and knead for one minute. Cover the dough with a damp cloth and let it sit half an hour or more.
Oil your palm and knead the dough again and divide into eight equal parts. Oil palm again and roll the eight parts into smooth balls. Set aside five minutes.
Oil the rolling pin and rolling surface. Roll the balls gently into 6” circles.
You can roll two or three puris before start frying, but do not roll all the puris at once or they will begin to dry out and fail to puff.
Heat at least one of oil in a frying pan over medium high heat. To test, place a small piece of dough in the oil. If the oil is hot enough, the dough will rise quickly to the top.
Fry one puri at a time. Place the puri in the frying pan and press with a skimmer. The puri should puff up. Turn puri over and cook until light golden brown on both sides. Take the puri out and place them on paper towels to absorb the excess oil. Repeat the process for remaining piries.
Urad dal puris are best served hot and crisp. Store in a covered container after they cool to room temperature.
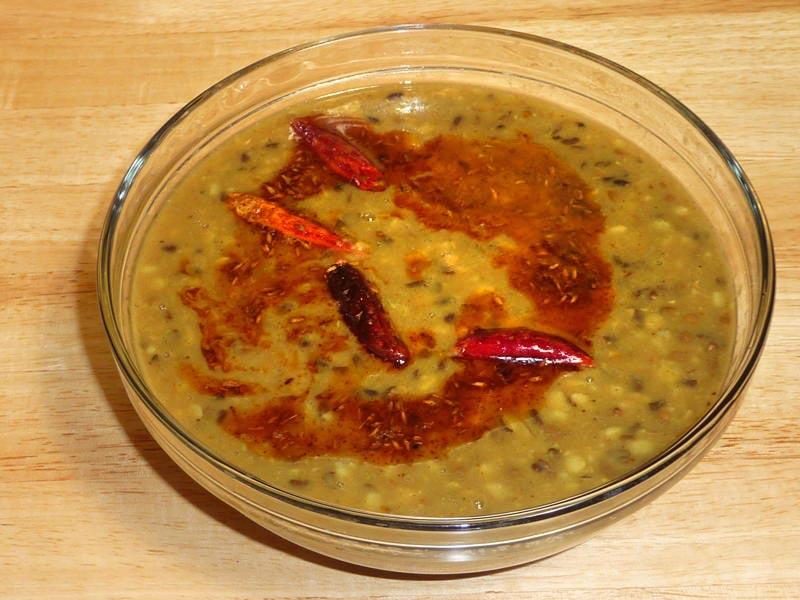
Dal is a staple dish in Indian meals and, for most Indian vegetarians, a frequent source of protein. This delicious, nourishing dish can accompany any number of different meals be it dinner or lunch as a simple main course the dish fills all appetite. Mixing a variety of lentils gives a more interesting flavor.
1/4 cup split urad dal (with skin) (available in Indian grocery stores)
1/4 cup split-wash moong dal (without skin) (available in Indian grocery stores)
1/4 cup lentil (masoor)
1/4 cup toor dal/arhar (available in Indian grocery stores)
1/2 teaspoon turmeric (haldi)
1 tablespoon minced ginger
1-1/2 teaspoon salt
3 cups water
1/2 teaspoon garam masala, optional (available in Indian grocery stores)
1/2 teaspoon mango powder (amchoor)
Chaunk (Seasoned oil)
4 tablespoons clarified butter (ghee); or oil
1 teaspoon cumin seeds (jeera)
1/8 teaspoon asafetida (hing)
4 whole red chilies
1/2 teaspoon red chili powder
Instructions
Method
Combine all dals. Wash and soak in approx. four cups of water for at least 30 minutes. Drain the water.
Put three cups water into a pressure cooker and add salt, turmeric, and ginger. Cook on medium high heat.
When the pressure cooker starts to steam, turn the heat down to medium and cook seven minutes.
Turn off the heat and wait until all the steam has escaped before opening the pressure cooker. Dal should be soft and mushy.
Mix dal, if needed, and add more water to adjust thickness to your liking. Cook another three to four minutes on low heat. Dal will thicken as it sits after cooking. So leave it more liquid than you want it to be.
Add garam masala and amchoor powder.
Prepare Chaunk
Heat ghee in a small saucepan. Test the heat by adding one cumin seed to the ghee; if it cracks immediately, the oil is ready. Add the cumin seeds. When they begin to crack, add the asafetida, red chilies and red chili powder. Stir for a few seconds. To prevent the spices from burning, you may add one teaspoon of water. Pour spiced chaunk over dal.
Mixed dal, also known as mixed lentils, is a wholesome and nutritious gluten freehigh protein dish that combines a variety of lentils to create a flavorful medley. This mixed dal recipe is a popular choice in Indian cuisine, loved for its rich taste and comforting texture.
With a harmonious blend of different lentils, mixed dal offers a balanced combination of protein, fibre, and essential nutrients. Let’s dive into the art of making delicious mixed dal that will tantalize your taste buds and nourish your body.
Step 1: Selecting Lentils
Begin by selecting a variety of lentils for your mix dal. Common choices include split green gram (moong dal), split pigeon peas (toor dal), split chickpeas (chana dal), and red lentils (masoor dal). Each lentil brings its unique flavor and texture to the dish, creating a well-rounded flavor profile. Rinse the lentils thoroughly under cold water to remove any dirt or debris before cooking.
Step 2: Preparing the Lentils
In a large bowl, combine the rinsed lentils and soak them in water for at least 30 minutes to soften them and reduce cooking time. Alternatively, you can skip the soaking step and cook the lentils directly, but soaking helps in faster and more even cooking. Once soaked, drain the lentils and rinse them again before cooking.
Step 3: Cooking the Lentils
Transfer the soaked lentils to a pressure cooker or large pot and cover them with water. For every cup of lentils, add approximately three cups of water. Cook the lentils until they are soft and tender, but not mushy. In a pressure cooker, cook the lentils for about 3-4 whistles, while in a pot, simmer them over medium heat for 20-25 minutes, stirring occasionally.
Step 4: Tempering the Dal
In a separate pan, heat ghee or oil over medium heat. Add cumin seeds, mustard seeds, and dry red chilies to the hot oil and let them sizzle and crackle. Then, add ginger, sautéing until they turn golden brown and aromatic. Next, add diced tomatoes and cook until they soften and release their juices, adding a tangy sweetness to the tempering.
Step 5: Flavoring the Dal
Once the tempering is ready, add ground spices such as turmeric powder, coriander powder, cumin powder, and red chili powder to the pan, stirring well to combine. The spices infuse the tempering with their rich flavors and aromatic fragrance, enhancing the taste of the dal. You can adjust the amount of spices according to your preference for heat and flavor intensity.
Step 6: Combining Lentils and Tempering
Once the lentils are cooked and the tempering is flavored, add the tempering to the cooked lentils, stirring gently to combine. Let the dal simmer for a few minutes to allow the flavors to meld together and the consistency to thicken slightly. If the dal is too thick, you can add more water to achieve the desired consistency.
Step 7: Garnishing and Serving
Before serving, garnish the mixed dal with freshly chopped cilantro leaves for a burst of freshness and color. You can also squeeze a dash of lemon juice over the dal for an extra tangy kick. Serve the mixed dal hot with steamed rice or roti for a comforting and satisfying meal.
Tips for Perfect Mixed Dal
Balance of Lentils: Experiment with different ratios of lentils to find the perfect balance of flavors and textures. You can adjust the proportion of each lentil according to your preference.
Tempering Variation: Get creative with the tempering by adding ingredients like curry leaves, green chilies, and grated coconut for added flavor and complexity.
Consistency Control: Pay attention to the consistency of the dal and adjust it by adding more water if it’s too thick or simmering it longer if it’s too thin.
Variations of Mixed Dal
Creamy Coconut Dal: Add coconut milk or grated coconut to the dal for a creamy and indulgent variation. Coconut adds richness and sweetness to the dish, balancing the spices.
Vegetable Medley Dal: Enhance the nutritional value of the dal by adding a variety of vegetables such as carrots, potatoes, and spinach. Vegetables add color, texture, and flavor to the dish, making it more wholesome and satisfying.
Benefits of Mixed Dal
Protein-Packed: Mixed dal is a rich source of plant-based protein, essential for muscle growth and repair.
Fiber-Rich: With a high fiber content, mixed dal promotes digestive health and helps regulate blood sugar levels.
Nutrient-Dense: Mixed dal is packed with essential vitamins, minerals, and antioxidants, making it a nourishing and balanced meal option.
Frequently Asked Questions (FAQs)
Can I use canned lentils for mixed dal?
Yes, you can use canned lentils for convenience, but keep in mind that they may have a softer texture compared to dried lentils.
Can I freeze mixed dal for later use?
Yes, you can freeze mixed dal in an airtight container for up to 3 months. Thaw it overnight in the refrigerator before reheating.
Is mixed dal gluten-free?
Yes, mixed dal is naturally gluten-free as it contains no wheat or gluten-containing ingredients.
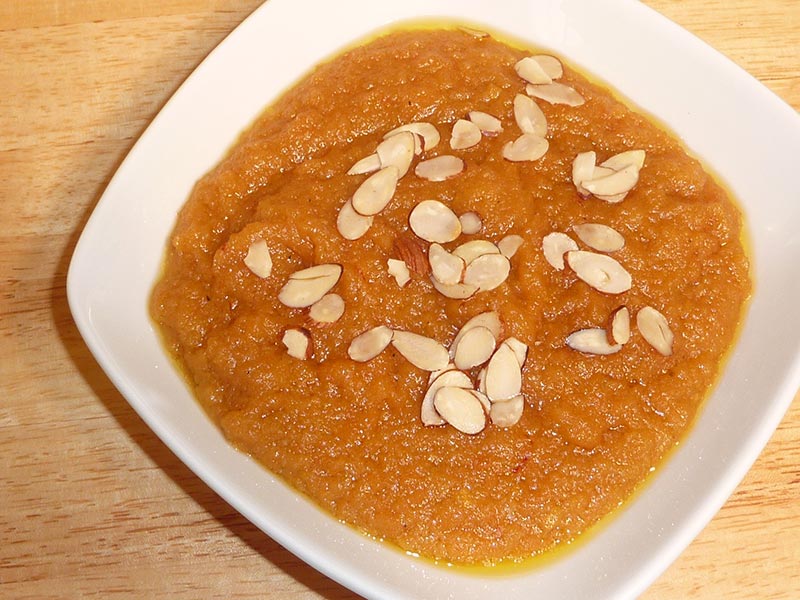
Moong Dal Halwa is a delicacy of the state of Rajasthan. It is a rich, creamy and pudding-like dessert. Made with split yellow moong dal, this is a popular and delicious dessert for the winter months.
Wash dal thoroughly and soak in 3 cups of water for at least 4 hours. Drain the water and blend dal into a thick paste, adding just enough water as needed to blend.
Boil water and sugar in a pan over medium heat, for 3-4 minutes. Remove from heat. Add cardamom powder and saffron; set aside.
In a non-stick or heavy bottom frying pan add moong dal paste and melted butter. Mix well.
Turn on the stove to medium heat and fully cook dal paste. Use spatula to gently press the paste, then fold the paste over and press again. Repeat this pressing and folding of the dal paste several times until the texture becomes grainy and light brown in color. This will take approximately 15 minutes, and will have a sweet, mild aroma when it is cooked.
Lower the heat to medium-low. Add syrup to the dal, little at a time. The syrup will splatter as you are adding. Cover and cook for an additional 2-3 minutes.
Remove cover, stir and cook for another minute. Turn off the heat. Garnish with almonds.
Notes
The halwa will thicken over time.Halwa tastes best if it is served warm.
Moong Dal Halwa: A Rich and Indulgent Vegan Dessert
Moong Dal Halwa is an Indian dessert made from moong dal (split mung beans), ghee (clarified butter), sugar, and flavoured with cardamom and saffron. This rich and aromatic dessert is a favorite during festivals and special occasions such as diwali or holi.
Tips for Making Perfect Moong Dal Halwa (Vegan):
Soak Moong Dal: To ensure a smooth texture, soak the moong dal in water for at least 4 hours overnight before cooking. Soaking helps soften the dal and reduces the cooking time, resulting in a smoother halwa.
Use a Non-Stick Pan: Use a non-stick pan or a heavy-bottomed pan to cook the Moong Dal Halwa (Vegan) to prevent it from sticking to the bottom and burning. Stir the halwa frequently to ensure even cooking and prevent lumps from forming.
Garnish with Saffron: Infuse the Moong Dal Halwa (Vegan) with the exotic aroma and vibrant color of saffron by soaking a few strands of saffron in warm water and adding it to the halwa during cooking. Garnish the halwa with additional saffron strands for a luxurious touch.
Variations of Halwa:
Gajar ka Halwa: Gajar Ka Halwa is a classical Indian dessert, this is also known as gajrala. Gajar ka Halwa is a delicious and popular sweet made with few ingredients, carrots, milk, sugar and flavored with cardamom.
Atta Ka Halwa: Atta ka Halwa, is a delicious sweet dessert. This is easy to make and with few ingredients. Atta ka halwa is made with whole wheat flour, sugar, and clarified butter, flavored with cardamom.
Sooji ka Halwa: Sooji Halwa is a very popular sweet dish all over India and is made on religious occasions, as parsad.
Sweet Potato Halwa: Sweet Potato Halwa, an eggless pudding, stands out as one of the simplest Halwa recipes to prepare. Infused with the delicate and distinctive flavors of cardamom and cinnamon, it serves as a deliciously warm dessert ideal for chilly winter evenings.
FAQs about Moong Dal Halwa (Vegan):
Can I use other lentils for Moong Dal Halwa (Vegan)?
While moong dal is traditionally used for making Moong Dal Halwa, you can experiment with other lentils such as chana dal (split chickpeas) or urad dal (black gram) for a different flavor and texture.
How long does Moong Dal Halwa (Vegan) last?
Moong Dal Halwa (Vegan) can be stored in an airtight container in the refrigerator for up to 3-4 days. Reheat the halwa gently in the microwave or on the stovetop before serving.
Can I make Moong Dal Halwa (Vegan) without sugar?
Yes, you can make Moong Dal Halwa (Vegan) without sugar by using natural sweeteners such as jaggery, maple syrup, or agave syrup. Adjust the sweetness to your taste preference and enjoy a healthier version of this classic dessert.
Is Moong Dal Halwa (Vegan) gluten-free?
Yes, Moong Dal Halwa (Vegan) is naturally gluten-free, making it suitable for those with gluten sensitivities or celiac disease. However, be sure to check the labels of any packaged ingredients to ensure they are gluten-free.
Moong Dal Halwa (Vegan) is a rich and indulgent dessert that’s perfect for special occasions or as a sweet treat to satisfy your cravings.
With its creamy texture, aromatic flavors, and wholesome ingredients, it’s sure to become a favorite among vegans and non-vegans alike.
Whether enjoyed warm or cold, on its own or with a scoop of dairy-free ice cream, Moong Dal Halwa (Vegan) is a true delight for the senses.
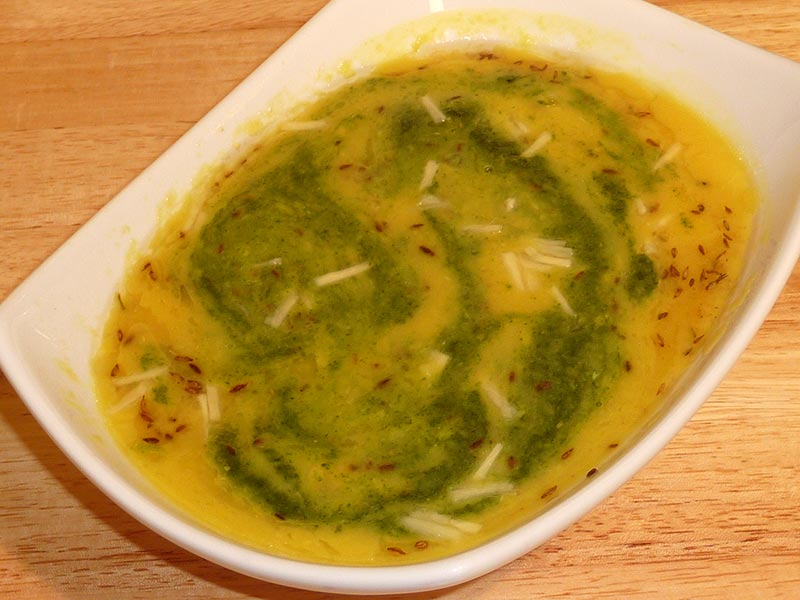
This healthful vegan soup is high in protein. Made with split Moong dal and flavored with hari cilantro chutney, moong dal soup is flavorful yet simple and easy to make.
1 cup split yellow Moong dal, washed (available in Indian grocery stores)
1 teaspoon salt
1/4 teaspoon turmeric (haldi)
3 cups water
Approximately 1/4 cup of Hari Cilantro Chutney
For the Seasoning
1 tablespoon oil
1/2teaspoon cumin seeds (jeera)
Pinch of asafetida (hing)
For the Garnish (optional)
1 tablespoon ginger, finely sliced
1/8 teaspoonsalt, adjust to taste
1 teaspoon lemon juice
Instructions
Method
Wash the dal several times, until the water becomes almost clear.
In a medium pot combine the moong dal, turmeric, salt, and water. Cook over medium-high heat until it starts to boil. Remove the frothy foam that accumulates on the surface as the dal cooks.
Lower the heat to medium and cook for 15 to 20 minutes, until completely cooked and a little mushy. Stir occasionally and add more water if needed. Turn off the heat.
Puree the dal using a hand blender or regular blender. If needed, adjust the thickness of the dal by adding more boiled water. Mix well. The dal will thicken as it cools.
Add hari cilantro chutney to suit your taste. The chutney gives the soup a fresh green appearance and a tangy flavor.
Seasoning
Heat the oil in a small saucepan. Add cumin seeds and wait until the seeds crack. Add asafetida and turn off the heat.
Pour the mixture over the cooked soup.
Garnish (optional)
Combine the ginger, salt and lemon juice. Marinate for at least a half hour.
Garnish with a few slices of marinated ginger.
Marinated ginger can be refrigerated for up to a week.
Notes
Time-saving Tip:To save time you may use a pressure cooker, as follows.
In a pressure cooker add Moong dal, turmeric, salt, and water. Close the cooker.
Cook over medium-high heat until it starts to steam. Lower the heat to medium and cook for 5 more minutes.
Turn off the heat and let the steam escape before you open the pressure cooker.
Puree the dal using a hand blender or regular blender. If needed, adjust the dal to your desired consistency by adding more boiled water. Mix well.
Add “Hari Cilantro Chutney” according to your taste. The chutney will give a fresh green look to the soup and have a tangy flavor.
Moong dal soup is a nutritious dish made from split mung beans, also known as moong dal. It is suitable for individuals with diabetes as it has a low glycemic index, meaning it doesn’t cause a rapid spike in blood sugar levels. Additionally, it is gluten-free, making it safe for those with gluten sensitivities or celiac disease.
The soup is high in protein due to the lentils, making it a filling and satisfying meal option. It is also low in fat, which can be beneficial for those looking to manage their weight or reduce their fat intake.
Moong dal soup is often prepared as a vegan dish, as it typically does not contain any animal products. It can be served as a standalone soup or paired with salads for a wholesome and nutritious meal. Overall, it’s a healthy option that aligns with various dietary preferences and requirements.
Moong dal soup is a comforting and nutritious dish that is popular in Indian cuisine. Made from split mung beans, this soup is not only delicious but also packed with protein, fibre, and essential nutrients. In this easy moong dal soup recipe, we’ll guide you through the process of making a flavorful and hearty soup that is perfect for any occasion.
Easy Moong Dal Soup: A Cozy and Flavorful Treat
This recipe guides you through making a delicious and comforting moong dal soup, perfect for a quick and nourishing meal. Moong dal, also known as split mung beans, cooks quickly and offers a satisfying protein punch. Let’s get started!
Prep Work (15 minutes): Clean the Dal: Rinse the moong dal thoroughly under cold running water to remove any dust or debris. Soaking the dal for 30 minutes to 1 hour is optional, but it helps them cook faster and become more tender.
Flavor Builders: While the dal soaks (or if you choose to skip soaking), chop up some fresh ginger for that warming aroma. You can also add diced tomatoes and green chilies for a touch of sweetness and heat, depending on your preference.
Cooking the Soup (30-40 minutes): Sautéing the Aromatics: Heat oil or ghee in a pot over medium heat. Once hot, add the chopped ginger and cook for a few minutes until fragrant. This fragrant base will form the foundation of your soup’s flavor.
Spice Up Your Life: Now comes the magic! Add ground cumin, coriander, turmeric, and a pinch of asafoetida (if using) to the pot with the ginger. Stir everything well to coat the aromatics in the spices. Let them sizzle for a bit, releasing their wonderful aromas. Feel free to adjust the spice quantities based on your taste preference.
Simmering the Dal: Add the soaked (or unsoaked) moong dal to the pot and stir to combine it with the flavorful spice mixture. Next, pour in enough water or vegetable broth to cover the dal completely. Bring the mixture to a boil, then reduce heat and simmer gently. Let it simmer until the dal is tender and cooked through.
Creamy Option (optional, 5-10 minutes): Smooth Operator (Optional): If you prefer a creamy soup, let it cool slightly. Then, use an immersion blender or a regular blender (in batches) to achieve a smooth and velvety texture. Blend until you reach your desired consistency.
Final Touches (5 minutes): Season to Perfection: Now’s the time to adjust the taste! Add salt and a squeeze of lemon juice (optional) to balance the flavors. You can also add more spices if needed.
Fresh Finish: Garnish your soup with freshly chopped cilantro leaves for a pop of color and a refreshing touch.
Serving Up Warmth (enjoy!):
Ladle and Enjoy: Ladle the hot soup into serving bowls and garnish with additional cilantro, if desired. Pair your comforting bowl of moong dal soup with crusty bread, naan, or rice for a complete and satisfying meal. Enjoy this nourishing and delicious soup anytime you need a warm hug in a bowl!
Tips for Making the Perfect Moong Dal Soup:
Soaking the moong dal helps reduce cooking time and improves texture.
Experiment with different spices and seasonings to customize the flavor of the soup to your liking.
For added richness, you can stir in a spoonful of coconut milk or cream towards the end of cooking.
If you prefer a chunkier soup, you can skip blending and leave some of the dal intact.
Variations of Moong Dal Soup:
Vegetable Moong Dal Soup: Add diced carrots, peas, and spinach for a hearty and nutritious twist.
Spicy Moong Dal Soup: Increase the amount of green chilies or add red chili powder for extra heat.
Coconut Moong Dal Soup: Stir in coconut milk for a creamy and indulgent flavor.
Benefits of Including Moong Dal Soup in Your Diet:
High in Protein: Moong dal is an excellent source of plant-based protein, making it ideal for vegetarians and vegans.
Rich in Fiber: The fiber content in moong dal aids digestion and helps maintain a healthy gut.
Low in Fat: Moong dal soup is low in fat and cholesterol, making it a heart-healthy option for all.
Frequently Asked Questions (FAQs) about Moong Dal Soup:
Q: Can I use other lentils instead of moong dal?
A: Yes, you can substitute other lentils such as masoor dal or red lentils for moong dal in this recipe.
Q: Can I make moong dal soup in advance?
A: Yes, you can make the soup ahead of time and store it in the refrigerator for up to 3 days. Reheat gently on the stovetop or in the microwave before serving.
Q: Is moong dal soup gluten-free?
A: Yes, moong dal soup is naturally gluten-free, making it suitable for those with gluten intolerance or celiac disease.
For more delicious Indian soup recipes, visit Manjula’s Kitchen. Explore a variety of vegetarian soups, appetizers, main courses, and desserts to delight your taste buds and impress your family and friends.
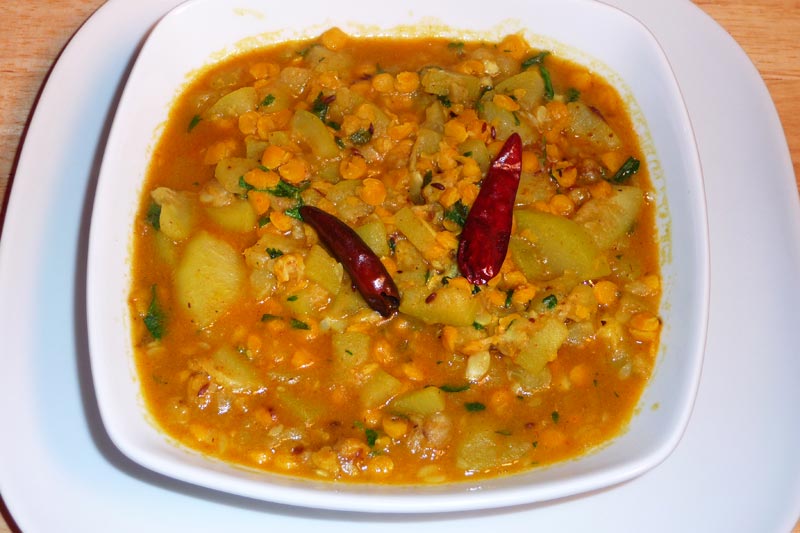
Peel and wash laucki (bottle gourd). Cut into half-inch cubes.
Heat the oil in a saucepan. Test the heat by adding one cumin seed to the oil; if the seed cracks right away, the oil is ready. Add the cumin seeds. When seeds start to crack, add the asafetida and whole red chilies. Stir for a few seconds. Add ginger, turmeric, and chili powder and stir for a few seconds.
Add the chana dal, bottle gourd, salt, and one cup of water (adjust as needed to desired gravy thickness; bottle guard varies in moisture content).
Cook the chana dal until soft. About fifteen minutes. Turn off the heat and add the mango powder, garam masala, and cilantro. Stir and cover the pan for a few minutes before serving.
Notes
Serving suggestionServe with roti (whole wheat flat bread), paratha (flat bread), or plain rice.VariationsMango powder can be replaced with lemon juice.Add two tablespoons dry fenugreek leaves or two tablespoons of fresh chopped fenugreek leaves when adding the bottle gourd.
Lauki Chana Dal, also known as bottle gourd with split chickpeas, is a nutritious gluten free and flavorful dish that is popular in Indian cuisine. This wholesome recipe combines tender bottle gourd (lauki) with protein-rich split chickpeas (chana dal) to create a comforting and satisfying dish. In this Lauki Chana Dal recipe, we’ll show you how to make this delicious sabzi (vegetable dish) step by step, so you can enjoy its goodness at home.
Step 1: Preparing the Ingredients:
To start, gather all the necessary ingredients for making Lauki Chana Dal. Rinse the chana dal under cold water and soak it for a few hours or overnight to soften. Meanwhile, peel the bottle gourd and chop it into small cubes. Finely chopped tomatoes, green chilies, garlic, and ginger. Having all the ingredients prepped and ready will make the cooking process smoother.
Step 2: Cooking the Chana Dal:
In a pressure cooker or a pot, add the soaked chana dal along with water, turmeric, and salt. Pressure cook or simmer until the dal is soft and cooked through. Cooking the dal separately ensures that it’s tender and retains its shape when combined with the other ingredients later. Once the dal is cooked, set it aside while we prepare the rest of the dish.
Step 3: Tempering the Spices:
In a separate pan, heat ghee or oil over medium heat. Add cumin seeds and let them splutter. Next, add ginger, followed by chopped green chilies. Sauté until the raw aroma of the spices disappears and the mixture becomes fragrant.
Step 4: Adding the Bottle Gourd:
Once the spices are tempered, add the chopped bottle gourd to the pan. Stir well to coat the gourd pieces with the aromatic spices. Cook the bottle gourd for a few minutes until it starts to soften slightly. The gentle cooking process allows the flavors to meld together, resulting in a delicious and well-balanced dish.
Step 5: Combining with Chana Dal:
Now, add the cooked chana dal to the pan with the bottle gourd and spices. Stir gently to combine all the ingredients. Allow the mixture to simmer for a few more minutes, allowing the flavors to mingle and the bottle gourd to cook through completely. Adjust the seasoning with salt and add a pinch of garam masala for extra flavor if desired.
Step 6: Finishing Touches:
Once the Lauki Chana Dal is cooked to perfection, garnish it with freshly chopped cilantro leaves for a burst of freshness and color. You can also squeeze a bit of lemon juice over the dish to enhance its flavor. Serve the Lauki Chana Dal hot with steamed rice or roti for a wholesome and satisfying meal.
Tips for Making Perfect Lauki Chana Dal:
Soak Chana Dal: Soaking the chana dal beforehand helps reduce cooking time and ensures that it cooks evenly.
Don’t Overcook Bottle Gourd: Be careful not to overcook the bottle gourd, as it can become mushy. Cook until it’s tender but still retains its shape.
Adjust Spice Level: Customize the spice level according to your preference by adjusting the amount of green chilies or adding red chili powder.
Variations of Lauki Chana Dal:
Lauki Chana Dal Curry: Add coconut milk or tomato puree to create a creamy curry version of the dish.
Spicy Lauki Chana Dal: Increase the amount of green chilies or add dried red chili flakes for extra heat.
Lauki Chana Dal Soup: Blend the cooked ingredients with some vegetable broth to create a hearty and nutritious soup.
Benefits of Including Lauki Chana Dal in Your Diet
Rich in Protein: Chana dal is an excellent source of plant-based protein, making Lauki Chana Dal a nutritious option for vegetarians and vegans.
High in Fiber: Both chana dal and bottle gourd are rich in fiber, which aids digestion and helps keep you feeling full and satisfied.
Loaded with Vitamins and Minerals: Lauki Chana Dal is packed with essential nutrients such as vitamin C, vitamin B6, iron, and potassium, contributing to overall health and well-being.
Frequently Asked Questions (FAQs) about Lauki Chana Dal:
Q: Can I use other lentils instead of chana dal?
A: Yes, you can use other lentils such as masoor dal or moong dal if you prefer. Keep in mind that cooking times may vary.
Q: Can I make Lauki Chana Dal ahead of time?
A: Yes, Lauki Chana Dal can be made ahead of time and stored in the refrigerator for up to 3 days. Reheat gently on the stovetop before serving.
Q: Is Lauki Chana Dal gluten-free?
A: Yes, Lauki Chana Dal is naturally gluten-free, making it suitable for those with gluten intolerance or celiac disease.
For more delicious Indian vegetable recipes, visit Manjula’s Kitchen. Explore a variety of vegetarian dishes featuring seasonal vegetables, lentils, and spices to add variety and flavor to your meals.
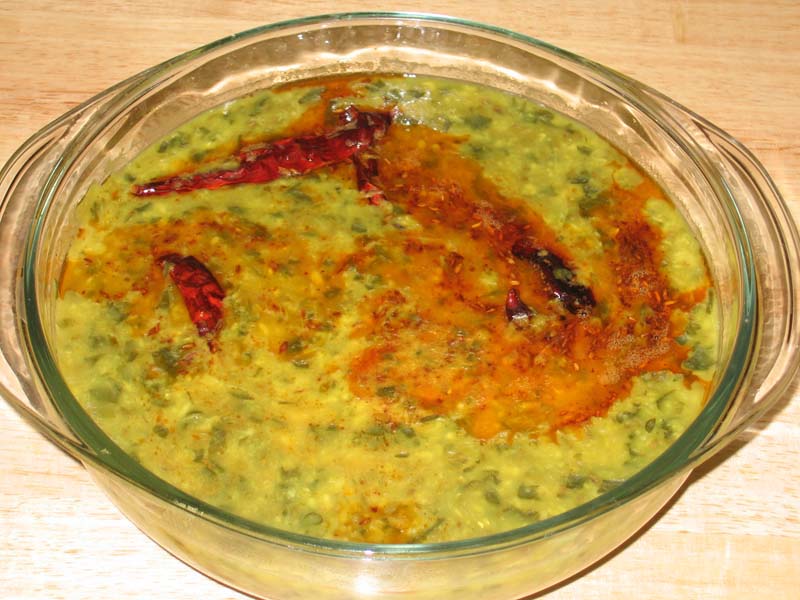
This wholesome and comforting dish is a staple in Indian cuisine, packed with protein, fiber, and essential vitamins and minerals. In this Palak Dal Recipe, we’ll show you how to make Moong Dal with Spinach step by step, so you can enjoy its deliciousness and health benefits.
Step 1: Preparation of Ingredients:
Begin by gathering all the necessary ingredients for making Moong Dal with Spinach. Rinse the moong dal under cold water and soak it for about 30 minutes to soften. Meanwhile, wash the spinach leaves thoroughly and chop them finely. tomatoes and ginger to prepare the flavor base for the dal. Having all the ingredients prepped and ready will streamline the cooking process.
Step 2: Cooking the Moong Dal:
In a pressure cooker or a pot, add the soaked moong dal along with water, turmeric, and salt. Pressure cook or simmer until the dal is soft and cooked through. Cooking the dal separately ensures that it’s tender and retains its shape when combined with the spinach later. Once the dal is cooked, set it aside while we prepare the spinach.
Step 3: Sauteing Aromatics:
In a separate pan, heat oil or ghee over medium heat. Add cumin seeds and let them splutter. Next, add minced ginger, and cook until fragrant. The aroma of these spices will form the flavorful base of the Moong Dal with Spinach.
Step 4: Adding Spinach:
Once the aromatics are sautéed, it’s time to add the chopped spinach to the pan. Stir well to coat the spinach leaves with the aromatic spices. Cook the spinach for a few minutes until it starts to wilt and shrink in volume. The gentle cooking process allows the spinach to retain its vibrant green color and nutrients.
Step 5: Combining with Moong Dal:
Now, add the cooked moong dal to the pan with the spinach and spices. Stir gently to combine all the ingredients. Allow the mixture to simmer for a few more minutes, allowing the flavors to meld together and the spinach to fully cook down. Adjust the seasoning with salt and add a pinch of garam masala for extra flavor if desired.
Step 6: Finishing Touches:
Before serving, garnish the Moong Dal with Spinach with freshly chopped cilantro leaves for a burst of freshness and color. You can also squeeze a bit of lemon juice over the dal to enhance its flavor. Serve the dal hot with rice, roti, or naan for a wholesome and satisfying meal.
Tips for Making Perfect Moong Dal with Spinach:
Soak Moong Dal: Soaking the moong dal beforehand helps reduce cooking time and ensures that it cooks evenly.
Use Fresh Spinach: Fresh spinach works best in this Palak Dal Recipe as it adds a vibrant green color and a tender texture to the dal.
Adjust Spice Level: Customize the spice level according to your preference by adjusting the amount of red chili powder or green chilies used.
Variations of Moong Dal with Spinach:
Creamy Moong Dal with Spinach: Stir in some coconut milk or cream for a creamy and indulgent version of the dish.
Spicy Moong Dal with Spinach: Add extra green chilies or a pinch of cayenne pepper for a spicier kick.
Moong Dal with Spinach and Tomatoes: Add diced tomatoes along with the spinach for a tangy twist to the dish.
Frequently Asked Questions (FAQs) about Moong Dal with Spinach:
Q: Can I use other lentils instead of moong dal?
A: Yes, you can use other lentils such as masoor dal or Toor dal if you prefer. Keep in mind that cooking times may vary.
Q: Can I make Moong Dal with Spinach ahead of time?
A: Yes, Moong Dal with Spinach can be made ahead of time and stored in the refrigerator for up to 3 days. Reheat gently on the stovetop before serving.
Q: Is Moong Dal with Spinach gluten-free?
A: Yes, Moong Dal with Spinach is naturally gluten-free, making it suitable for those with gluten intolerance or celiac disease.
What is moong dal?
Moong dal, also called mung dal, are tiny, yellow lentils that are hulled and split. They are a staple ingredient in Indian cuisine.
What does moong dal taste like?
Moong dal has a mild, nutty flavor and a delicate, slightly creamy texture when cooked.
Is moong dal easy to digest?
Yes, moong dal is generally considered one of the easiest lentils to digest. This makes it a great choice for people with sensitive stomachs.
Is moong dal healthy?
Moong dal is a nutritional powerhouse! It’s rich in protein, fiber, vitamins, and minerals. It’s also low in fat and cholesterol.
How can I cook moong dal?
Moong dal cooks quickly and easily. You can simply boil it with water or broth until tender. It’s also commonly pressure cooked for even faster preparation.
How do I use moong dal?
Moong dal is incredibly versatile. It’s used in soups, stews, dals (of course!), salads, and even sprouted for use in stir-fries or eaten raw.
Are there any benefits to sprouted moong dal?
Sprouted moong dal is believed to be even more nutritious than regular moong dal, as sprouting increases the availability of certain vitamins and minerals.