Happy Mother’s Day to all the great mothers out there!
As you know, this Sunday is the big day! I’m sure you are in the midst of planning something special for Mother’s Day. Now that Spring is officially here and the weather has been great here in San Diego, I think a fun idea is to celebrate with a picnic. It’s an easy and simple way to enjoy the abundant sunshine and fresh air. My grandkids especially enjoy picnics because they can run around and use up their energy! We enjoying playing frisbee, soccer, and most importantly munching on delicious treats. When my grandkids get together there is always the sound of laughter. It means so much to me that I get to watch them. It’s the best excuse to bring the family together.
Here are some ideas of delicious munchies to bring to a picnic:
Bread Pakoras
Puries rolled with Chatpate Aloo (spicy potato):
Puri
Chatpate Aloo
Masala Mathri
You can pair the above with a variety of chips, cookies and fruit. I also like to bring homemade lemonade to cool off.
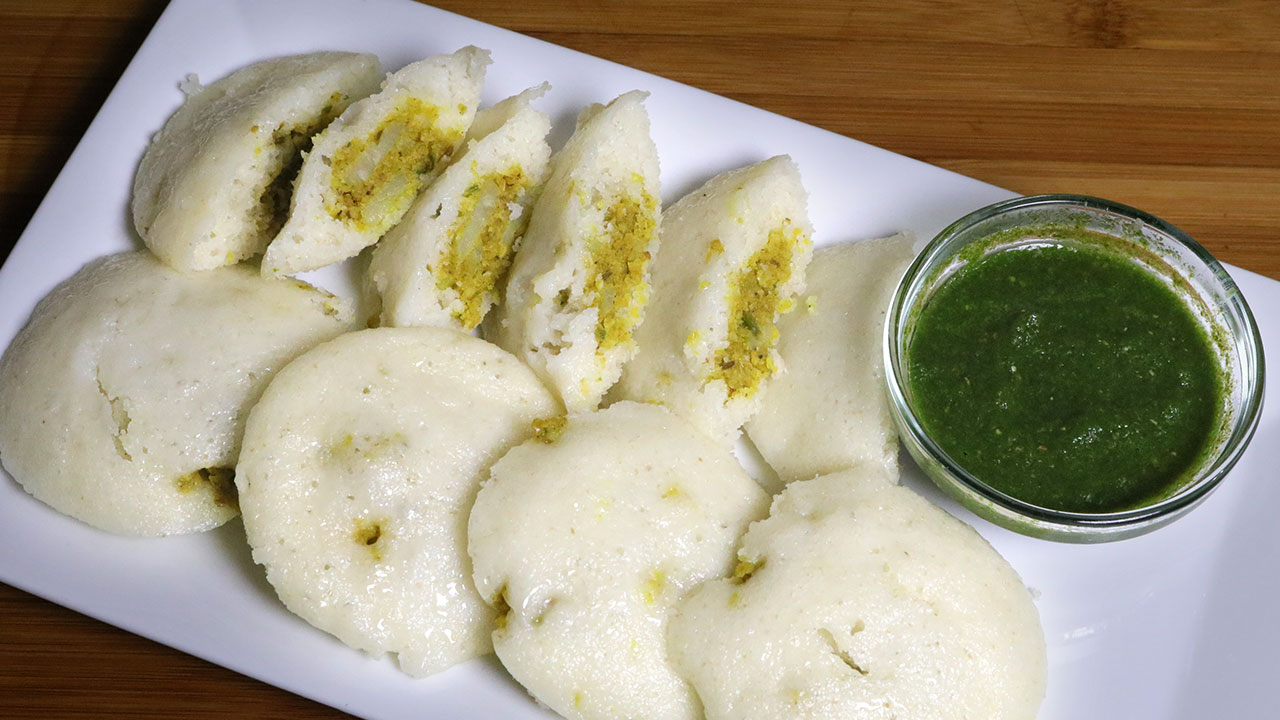
Stuffed Masala Rava Idli, Spicy Chana Dal Stuffing, Healthy Snack, Easy Idli Recipe
Stuffed Idli is a delicious and healthy snack. For the filling, I used spicy chana dal stuffing which makes it unique and also flavorful. I like to serve stuffed Idli with tea or as an appetizer with a side of cilantro chutney. This also makes a great lunch box meal as it is very healthy and satisfying.This recipe will make about 14 Idlies.
Utensils for Making Idlis, Idli stand, or Alternatively, an egg poacher can work just as well, if you do not have an Idli stand.
Instructions
For stuffing soak dal for at least 3 hours, drain the water.
Grind all the stuffing mix except potato in a grinder to make coarse paste, do not use any water I like to use food processer. Stuffing should be moist. Add potatoes and mix it well, Set aside.
Mix sooji, salt, and yogurt, add water as needed to make a pancake-like batter. Set aside for at least 30 minutes.
To make stuffed idli, grease the idly plate. Add Eno Fruit Salt to the batter and mix well. The mixture will begin foaming. Immediately begin pouring into the Idli trays.
pour about 1 tablespoon of batter and spread evenly. Now add 2 teaspoons of masala and pour over about one tablespoon idly batter covering the filling. Repeat the process. Place the stand into the steaming pot.
Cover the pot and steam idles for about 12 minutes on medium heat. Insert a fork in the center of one idli. If the fork comes out clean, remove the stand from the pot. Do not overcook idles, as they will lose their softness and dry out as they cool.
Cool for just a few minutes before removing each individual idli. They should come out easily and not stick to the mold. Idles should be spongy and soft.
Notes
SuggestionsStuffed Idli can be refrigerated for a week or freeze them for about a month. I like to brush the Idli lightly with butter before serving. Serve them your choice of chutney, Coconut Chutney, Hari Cilantro Chutney, Peanut Chutney
Masala Stuffed Idli Recipe: A Delicious Twist on Traditional Idlis
Indulge in the delightful fusion of flavors with this masala stuffed idli recipe. These stuffed masala idlis offer a tantalizing twist to the traditional South Indian favorite snacks. Bursting with aromatic spices and savory fillings, these idlis are sure to be a hit at your dining table.
Prepare the Stuffing: First, soak the dal for at least 3 hours. This allows the dal to soften and become easier to grind. After soaking, drain the water completely. Next, grind all the ingredients for the stuffing mix (except the potatoes) in a grinder or food processor. Aim for a coarse paste consistency, and avoid adding any water during grinding. The natural moisture from the ingredients should be enough. Once you have a coarse paste, add the boiled and mashed potatoes to the mix. Combine everything well by hand until the stuffing is evenly distributed and moist. Set the stuffing aside while you prepare the batter.
Make the Batter: In a separate bowl, combine the sooji (semolina), salt, and yogurt. Start by mixing these dry ingredients together. Then, gradually add water while mixing. You want the batter to reach a pancake-like consistency, thick enough to coat the back of a spoon but still pourable. Once you achieve the desired consistency, set the batter aside to rest for at least 30 minutes. This resting time allows the sooji to soften and absorb the liquids, resulting in fluffier idlis.
Assemble and Steam the Idlis: Now it’s time to assemble your stuffed idlis. Begin by greasing your idli plates to prevent sticking. Next, add Eno Fruit Salt to the batter and mix it in quickly and gently. The Eno will cause the batter to foam and rise. This is why it’s important to work quickly after adding it. Immediately spoon the batter into the greased idli molds.
Fill and Steam: Here comes the stuffing! Add about 1 tablespoon of batter to each idli mold and spread it evenly to create a base. Now, place 2 teaspoons of your prepared stuffing mixture in the center of the batter. Finally, top the stuffing with another 1 tablespoon of batter, covering the filling completely. Repeat this process for all the idli molds. Once filled, carefully place the idli stand into a steamer pot.
Steaming and Checking for Doneness: Cover the steamer pot with a lid and turn on the heat to medium. Steam the idlis for approximately 12 minutes. To check for doneness, insert a fork into the center of one idli. If the fork comes out clean without any batter residue, your idlis are cooked through. Be mindful not to overcook them, as they can become dry and lose their soft texture as they cool.
Serve and Enjoy: Once cooked, remove the idli stand from the steamer and let the idlis cool for just a few minutes before attempting to remove them from the molds. They should come out easily without sticking. Now you can enjoy your delicious homemade stuffed idlis!
Variations to Try
For a spicy kick, consider adding a teaspoon of red chili powder or finely chopped green chilies to the masala filling. You can also experiment with different vegetables such as bell peppers, cauliflower, or spinach to create your unique variations of masala stuffed idli.
Tips for Perfect Stuffed Idlis
Ensure that the idli batter is well-fermented for soft and fluffy idlis.
Use a non-stick idli mold or grease the molds lightly with oil to prevent sticking.
Be gentle while stuffing the idlis to avoid breaking them.
Steam the idlis on medium heat for the best results.
Benefits of Masala Stuffed Idlis
Provides a wholesome and nutritious meal, packed with the goodness of vegetables and spices.
Offers a creative twist to traditional idlis, appealing to both kids and adults alike.
Can be customized to suit individual taste preferences and dietary requirements.
Makes for a convenient and portable meal option for on-the-go consumption.
FAQs (Frequently Asked Questions)
Q: Can I make the masala filling in advance?
A: Yes, you can prepare the masala filling ahead of time and store it in the refrigerator for up to 2 days. Simply reheat it before stuffing the idlis.
Q: Can I freeze stuffed idlis for later use?
A: Yes, you can freeze leftover stuffed idlis in an airtight container for up to a month. Thaw them in the refrigerator overnight and steam them again before serving.
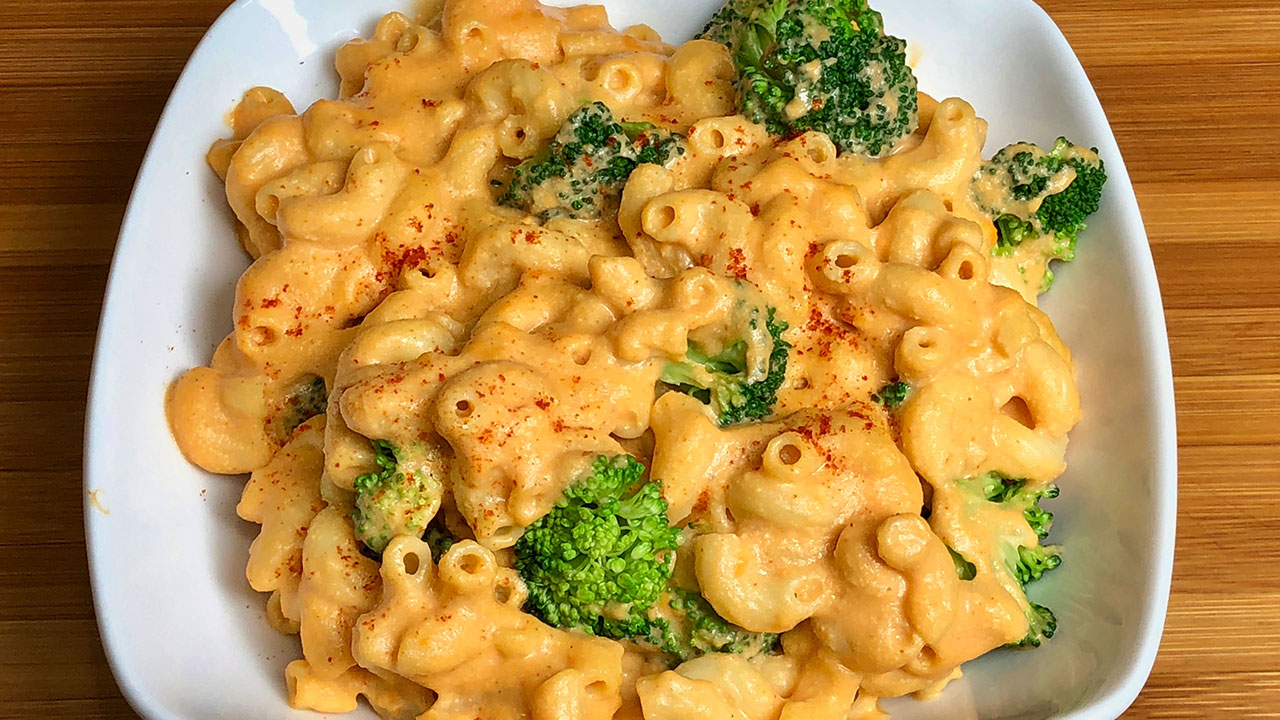
Vegan Macaroni and Cheese is made with dairy free cheese. This quick, easy recipe is creamy and delicious. Mac and cheese has always been a comfort food in my family. My son is on a dairy free diet and one day while craving for Mac and Cheese, asked about making vegan cheese. I experimented with many recipes and finally my son was happy with the result. To my surprise my grand-kids also enjoyed this vegan mac and cheese. This was a surprise success at my house.
1cupYukon gold potatoes (cubed)they have thin and smooth skin, I have already peeled and cubed
1/2cupcarrotssliced
3Tbspfresh lemon juice.
1tspsalt
1/4cupnutritional yeast
1/4tspchili powder
Instructions
Boil the macaroni according to the instruction over the box. Set aside.
In boiling water soak the broccoli for few minutes and drain the water, set aside.
Soak the cashews for about half hour and set aside.
Wash and peel both potatoes and carrots, and chop into uniform pieces and boil with 2 cups of water for about 8 minutes, till they are soft. Take them out from water.
Add all the ingredients for cheese into a blender with one cup of water and blend until smooth, use more water as needed. I used about 2 cups of water.
Pour into a pot on the stove and heat to medium-low heat, stirring occasionally. Once it starts to thicken, remove from the heat and stir again and it should thicken up a bit more. If it’s too thick, add more water. Cheese should be pourable consistency. It should only take a couple of minutes to thicken up on the stove.
For serving toss the broccoli and pasta together, pour the cheese over, serve hot.
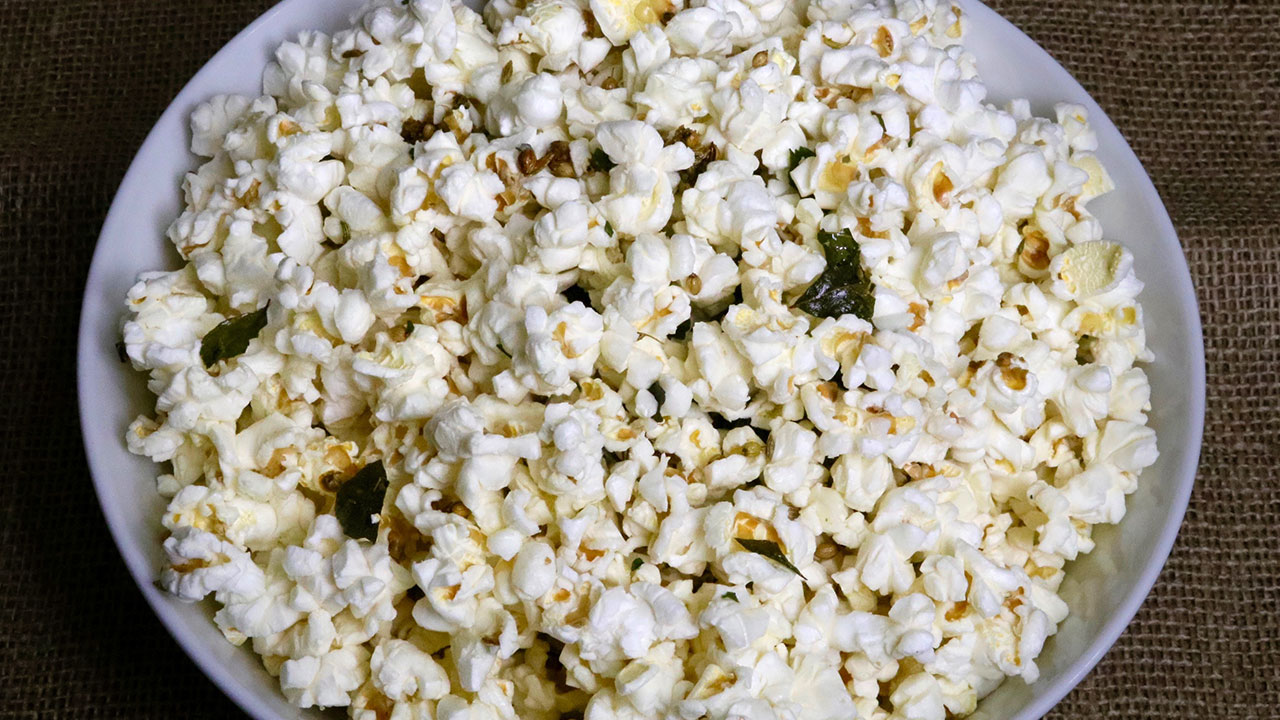
Make the popcorn using the instruction over popcorn bag. Keep aside.
Heat a large frying pan over low heat, put all the ingredients except popcorn, oil, fennel seeds, coriander seeds, asafetida, green chili, curry leaves, salt, and sugar.
Keep stirring till green chili and curry leaves are dry this should take about 2 minutes. Add the popcorn stir till popcorns are coated with spices. Turn off the heat.
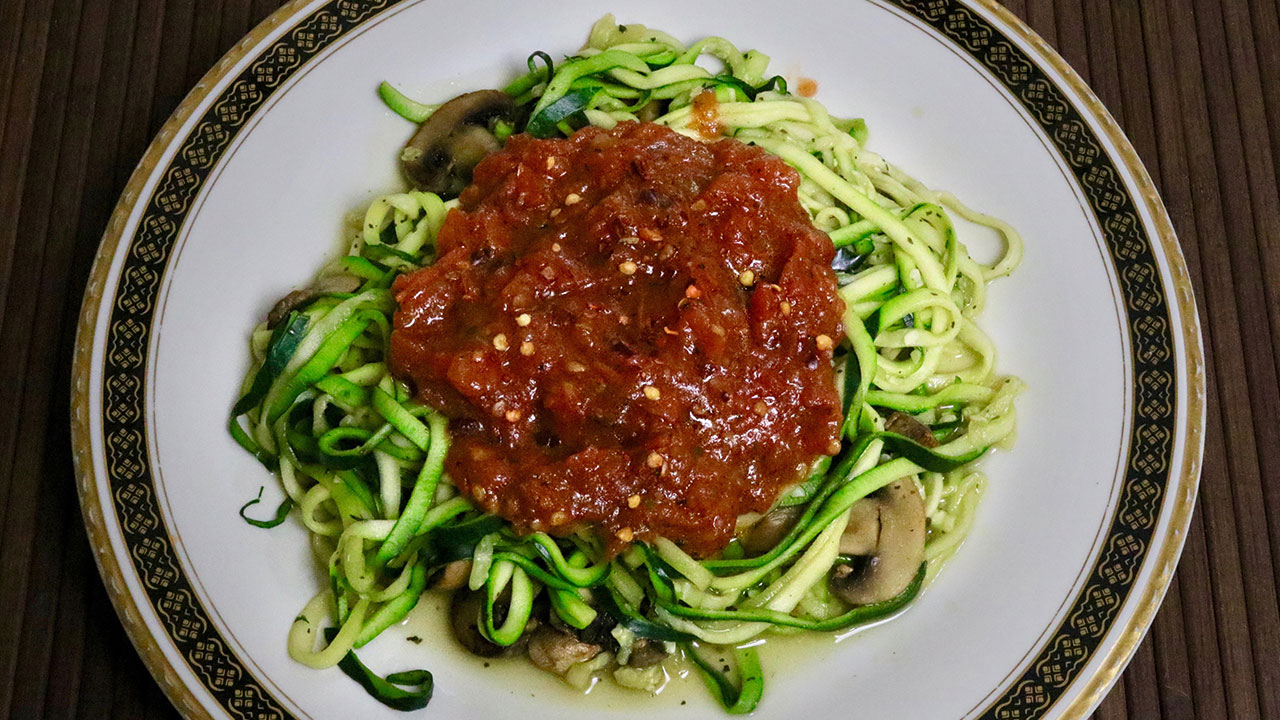
Zucchini Pasta: Delicious Vegan and Gluten-Free Zucchini Noodles
Zucchini Pasta is a healthy replacement for pasta. This is a great recipe, super easy, quick and delicious. I like to serve this with homemade tomato sauce or you can serve with your own favorite sauce. Zucchini Pasta is also vegan and gluten free.
In a sauce pan add the oil basil, oregano, red chili flakes add the tomatoes cook over medium heat. Tomatoes should be soft and little mushy. Add salt sugar and corn starch and cook for another minute until most of the water from tomato has evaporated. Keep the sauce aside.
spiralize your zucchini into noodles using a vegetable spiral slicer this is readily available.
Heat the oil in a sauce pan over medium heat add the mushrooms, stir-fry until mushrooms lightly browned. Add zucchini spirals sprinkle the salt and basil. Stir fry for about 2 minutes.
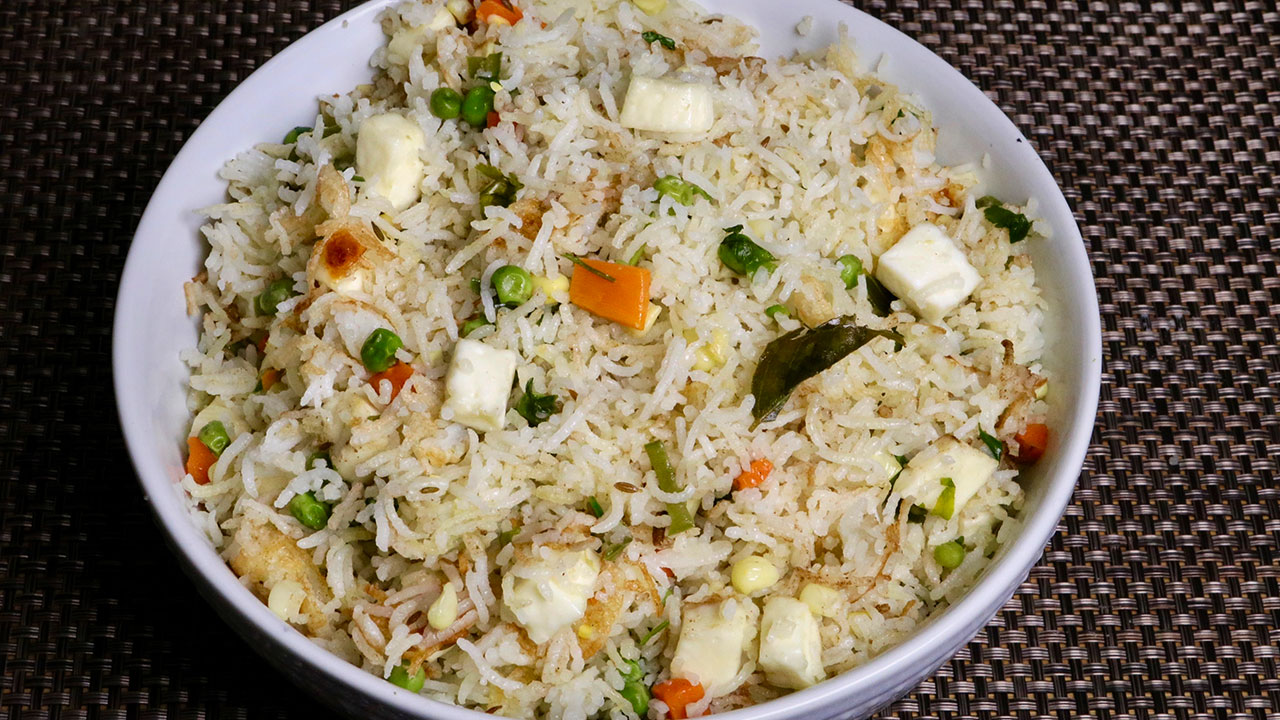
Paneer Pulao, Vegetable Pulav, Rice with Indian Cottage Cheese Pulao
Paneer Pulao is an exotic rice dish, super easy to make and tastes delicious. This is a great side dish for party and get-togethers. Paneer Pulao goes well with yogurt or soup. This is also a satisfying lunch box meal. Recipe will serve 4.
For fluffier rice, the rice should be soaked for at least 15 minutes prior to cooking.
Heat the oil in a saucepan over medium heat. Oil should be moderately hot. Add the cumin seeds. When they crack, add curry leaves, ginger, and green chili, stir for few seconds.
Add green peas, carrots, and corn, stir and add paneer, and salt stir for about one minute, add the rice and water. Increase the heat to high and bring it to boil. Turn the heat to low and cover the pan and cook for 15 minutes or until rice is tender and water has evaporated.
Turn off the heat add cilantro, and garam masala and fluff the pulao with a fork. Cover the pan for few minutes before serving.
Delicious Paneer Pulao: A Flavorful Blend of Paneer and Rice Recipes
Paneer pulao is a delightful and flavorful gluten free, quick & easy dish that originates from Indian cuisine. It is a popular variation of traditional rice dishes, blending the rich, creamy texture of paneer (Indian cottage cheese) with fragrant basmati rice and an array of aromatic spices. As a beloved recipe of paneer pulao, this dish offers a harmonious combination of flavors and textures, making it a favorite among vegetarians and paneer enthusiasts alike.
Whether enjoyed as a standalone meal or served alongside other Indian delicacies, such as dal or raita, paneer pulao stands out as a versatile and delicious addition to any dining table. Its aromatic essence and delightful blend of paneer and rice make it a quintessential choice for those seeking a comforting and flavorful dish, earning its place among cherished paneer and rice recipes in Indian cuisine.
Preparing the Rice: Washing and Soaking
To commence the preparation of this enticing paneer pulao recipe, it is essential to start with the rice. Gently washing the rice is the initial step, ensuring thorough rinsing to eliminate any impurities that may compromise the flavor and texture of the paneer pulao. It is recommended to change the water 2-3 times during this process to guarantee optimal cleanliness. Moreover, to achieve the desired fluffiness in the paneer and rice recipe, it is advisable to soak the rice in water for a minimum of 15 minutes before proceeding with the cooking process. This soaking period allows the rice grains to absorb moisture, resulting in even cooking and a delightful texture in the final paneer pulav dish.
Heating the Oil and Spices: Flavorful Aromatics
In a saucepan set over medium heat, begin the process of preparing the flavorful paneer pulao by heating the oil until it achieves a moderate temperature, ensuring it’s adequately hot before incorporating the aromatic spices essential for this enticing recipe of paneer pulao. Introduce the vibrant cumin seeds to the oil, and patiently wait for them to crackle, signifying the initiation of the flavor infusion process characteristic of authentic paneer and rice recipes. Once the cumin seeds crackle, it’s time to add the delightful trio of fragrant curry leaves, finely chopped ginger, and vibrant green chilies to the pan, enhancing the aroma and taste of the paneer pulao. Stir the aromatic blend gently for a few seconds, allowing the spices to intermingle harmoniously, releasing their distinct flavors and permeating the oil with their essence. This crucial step ensures that every bite of the paneer rice recipe is imbued with the rich and aromatic flavors characteristic of traditional paneer pulav, promising a delightful culinary experience for all who partake.
Adding Vegetables and Paneer: Creating a Colorful Medley
Incorporate an assortment of vibrant vegetables such as green peas, carrots, and corn into the saucepan, stirring them alongside the paneer cubes and a pinch of salt. Sauté the mixture for about a minute, allowing the vegetables and paneer to absorb the aromatic flavors of the spices.
Cooking the Pulao: Simmering to Perfection
After introducing the soaked rice into the pan, carefully measure and add the appropriate amount of water to ensure the perfect consistency of the paneer pulao. With the heat turned up too high, bring the flavorful mixture to a vigorous boil, allowing the aromatic spices and tender paneer to infuse every grain of rice with its delectable essence. As the mixture reaches its boiling point, reduce the heat to low and gently cover the pan, allowing the paneer pulao to simmer gently. This crucial step allows the rice to absorb the rich flavors of the spices and vegetables, while the paneer adds a creamy texture to the dish. Patiently let the paneer pulao simmer for approximately 15 minutes, ensuring that the rice cooks to perfection and absorbs all the flavors of the aromatic spices. As the cooking process unfolds, the water gradually evaporates, leaving behind a fragrant and flavorful dish that embodies the essence of this beloved paneer and rice recipe. With each forkful, savor the delicate balance of flavors and textures, knowing that you’ve created a culinary masterpiece that perfectly captures the essence of paneer pulav.
Final Touches: Garnishing and Fluffing
Upon completion of cooking, turn off the heat and add freshly chopped cilantro and a dash of garam masala to the paneer pulao, enhancing its aroma and flavor profile. Using a fork, gently fluff the pulao to ensure the ingredients are evenly distributed. Cover the pan for a few minutes to allow the flavors to meld together before serving this delicious and aromatic paneer and rice recipe.
Vote now to help Manjula’s Kitchen win YouTube’s April On the Rise channel competition! It only takes a moment—click the link, then click on the blue checkmark next to Manjula’s Kitchen!
I first tried Phirni a few years back while visiting my family in India. Phirni is considered to be a popular dessert, but it was the first time I had ever heard of it! My sister took me to a very upscale restaurant in Delhi and we decided to order Phirni for dessert. When the dessert came out, I was speechless. It looked superb and the presentation was excellent. It was served in an earthen bowl beautifully decorated and garnished with saffron and sliced pistachios. I was reluctant to try it out, but my sister, knowing my love of cooking, insisted I would love it as it is similar to a rice kheer. But instead of using rice grain as you would in rice kheer, in Phirni you use ground rice. The texture was very creamy, similar to a pudding.
I asked the restaurant for the recipe and tried making Phirni several times when I returned to the US. However, I was unable to master the same texture. It tasted fine, but it just wasn’t the experience I had at the restaurant in India. I had fallen in love with this dish and just had to master it! Finally, I figured out that since Phirni is traditionally served in an earthen bowl, the bowl absorbs some of the water, making it more firm (like JELLO). I knew it would be difficult to duplicate so I decided to give the recipe my own twist. I tried adding different fruits with it. It turned out best using peaches. It is very refreshing and great for summer.
I will be posting this recipe soon, so stay tuned! Until then, happy cooking!
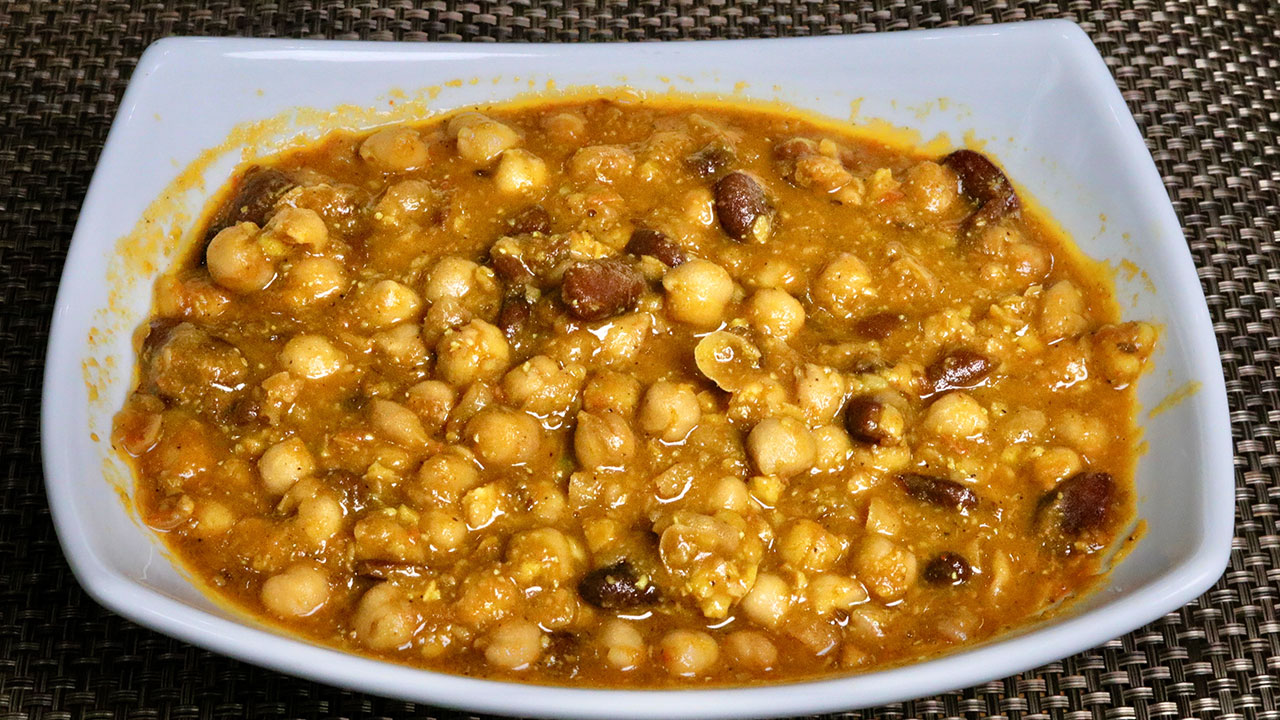
Chole Rajma Curry is a healthy and delicious main course meal. This is a popular north Indian cuisine which consists of boiled beans cooked with spicy tomato gravy. It goes well with roti, naan or rice.
Wash and soak chick peas and kidney beans in about six cups of water for at least 6 hours, preferably overnight (the beans will double in volume).
Cook the chick peas and kidney beans in pressure cooker with 3 cups of water. Close the cooker and put the pressure on.
Cook on medium high heat.
As pressure cooker starts steaming turn the heat down to medium and cook for about 30 minutes.
Close the heat and wait until steam has stopped before opening the pressure cooker. Beans should be soft and tender.
Cut the tomatoes and green chili in small pieces, and blend tomatoes, green chili, and ginger to make a pure.
Heat the oil in a sauce pan, test the heat by adding one cumin seed. If the seed cracks right away, the oil is ready. Add asafetida and cumin seeds, as the cumin seeds crack add tomato paste, coriander, turmeric, chili powder, and black pepper.
Stir-fry for two to three minutes, until the oil begins to separate from the mixture. Add beans, salt, and more water as needed. Cover the pan and cook over medium high heat, for about 10 minutes.
Turn off the heat. Chole Rajma Curry is ready to serve.
Chole Rajma is a popular Indian dish made with a combination of two types of legumes: chickpeas (Chole) and kidney beans (Rajma). It is a hearty and flavorful curry/gravy dish that is commonly enjoyed as a main course. The dish is naturally gluten-free and high in protein, making it suitable for those with dietary restrictions or preferences. Chole Rajma typically includes a rich tomato-based gravy seasoned with various spices like cumin, coriander, turmeric, and garam masala.
It is often served with rice or flat bread (such as roti or naan) and is a favorite at parties or gatherings. Additionally, it can be made vegan by omitting any dairy-based ingredients like ghee or yogurt commonly used in some variations of the recipe. Overall, Chole Rajma is a delicious and nutritious dish that showcases the versatility of lentils and beans in Indian cuisine.
Chole Rajma Curry is a flavorful and hearty Indian dish that combines two popular legumes – chickpeas (chole) and kidney beans (rajma) – in a rich and aromatic gravy. This Chole Rajma Curry recipe is a favorite among vegetarians and vegans alike for its delicious taste and nutritious ingredients. With its perfect balance of spices and textures, Chole Rajma Curry is a comforting meal that’s perfect for any occasion.
Step 1: Soaking and Cooking Legumes
Begin by soaking dried chickpeas and kidney beans in water separately for at least 8 hours or overnight. Soaking helps soften the legumes and reduce cooking time. Once soaked, drain the water and rinse the chickpeas and kidney beans thoroughly. Cook them separately in a pressure cooker or large pot until they are tender and cooked through. Ensure that the chickpeas and kidney beans are well-cooked but not mushy.
Step 2: Preparing the Gravy Base
In a deep pan or skillet, heat oil or ghee over medium heat. Add cumin seeds and let them sizzle until fragrant. Then, add finely sauté until they turn golden brown and translucent. Next, add minced ginger, and green chilies, stirring well to combine. Cook until the raw smell of ginger disappears, infusing the base with aromatic flavors.
Step 3: Adding Tomatoes and Spices
Add finely chopped tomatoes to the pan along with ground spices such as turmeric powder, coriander powder, cumin powder, garam masala, and red chili powder. Stir well to combine the spices with the tomatoes and cook until the tomatoes break down and release their juices, creating a thick and flavorful gravy base.
Step 4: Combining Chickpeas and Kidney Beans
Once the tomatoes are cooked and the gravy base is well-flavored, add the cooked chickpeas and kidney beans to the pan, stirring gently to coat them with the gravy. Allow the legumes to simmer in the gravy for a few minutes to absorb the flavors and thicken the consistency. Adjust the seasoning with salt and sugar to balance the flavors.
Step 5: Garnishing and Serving
Before serving, garnish the Chole Rajma Curry with freshly chopped cilantro leaves for a burst of freshness and color. You can also drizzle a squeeze of lemon juice over the curry for an extra tangy kick. Serve the curry hot with steamed rice, roti, or naan bread for a wholesome and satisfying meal.
Tips for Perfect Chole Rajma Curry
Consistency of Gravy: Adjust the amount of water added to the gravy to achieve the desired consistency. The gravy should be thick and coat the legumes evenly without being too watery.
Mashing Legumes: For a creamier texture, mash some of the chickpeas and kidney beans with the back of a spoon or a potato masher before adding them to the gravy. This helps thicken the curry and enhances its richness.
Balancing Flavors: Taste the curry and adjust the seasoning according to your preference. You can add more spices for extra heat or sweetness to balance the flavors.
Variations of Chole Rajma Curry
Creamy Coconut Curry: Add coconut milk or grated coconut to the gravy for a creamy and indulgent twist. Coconut adds a hint of sweetness and richness to the curry, elevating its flavor profile.
Spinach and Paneer Curry: Enhance the nutritional value of the curry by adding chopped spinach and cubed paneer (Indian cottage cheese) to the gravy. Spinach adds a pop of color and nutrients, while paneer provides protein and texture.
Benefits of Chole Rajma Curry
High in Protein: Chickpeas and kidney beans are rich sources of plant-based protein, essential for muscle repair and growth.
Rich in Fiber: Legumes are high in dietary fiber, promoting digestive health and keeping you feeling full and satisfied.
Nutrient-Dense: Chole Rajma Curry is packed with essential vitamins, minerals, and antioxidants, making it a nourishing and balanced meal option for vegetarians and non-vegetarians alike.
Frequently Asked Questions (FAQs)
Can I use canned chickpeas and kidney beans for this recipe?
Yes, you can use canned legumes for convenience. Rinse them well before adding them to the curry.
Can I make Chole Rajma Curry ahead of time?
Yes, the flavors of the curry develop even more when allowed to sit for a few hours or overnight. Reheat it gently before serving.
Is Chole Rajma Curry gluten-free?
Yes, Chole Rajma Curry is naturally gluten-free as it contains no wheat or gluten-containing ingredients.
Explore more delightful Indian recipes on Manjula’s Kitchen, such as Palak Paneer for another culinary adventure.
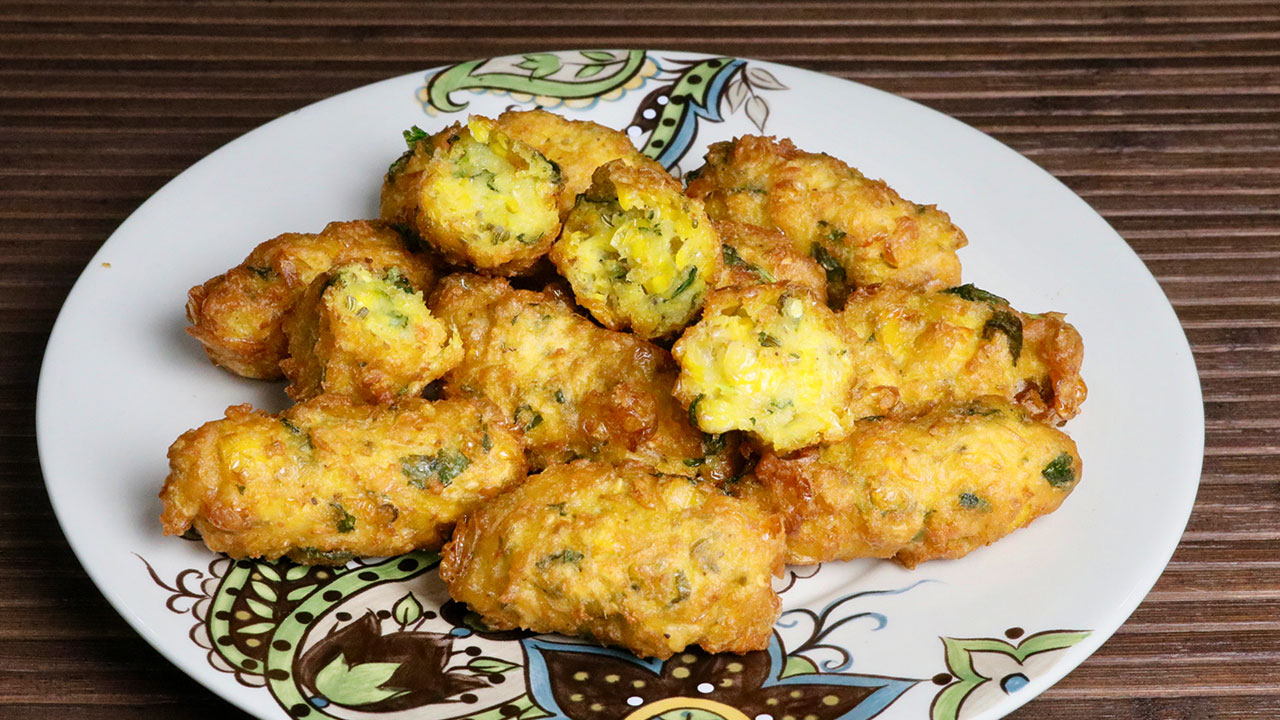
Corn Cutlets are a mouthwatering appetizer which can be served as starters for a party or even as an evening snack. Corn Cutlets are crispy outside and soft inside. This is one of those snacks you can serve without any sauce and they taste delicious. They are also gluten free, and vegan.This recipe will make 12 cutlets.
Defrost the corn, and pat dry. Then blend the corn to coarse paste without adding any water.
Transfer the paste to a large mixing bowl. Add all the spices, ginger, fennel, coriander, green chili, mango powder and salt, mix it well.
Add rice flour to the corn mixture, mix it well. Mixture should hold together, and consistency should be like a soft dough. If needed add little more rice flour.
Wash and grease your palm lightly, divide the dough into 12 equal parts and shape the into bullets.
Heat the oil in a frying pan on medium heat. Oil should be moderately hot. To check the oil, drop a little piece of mixture, mixture should sizzle and come up. Drop the rolls slowly into it, taking care not to overlap them.
Fry the cutlets until they are golden brown, turning occasionally. This should take about 6-7 minutes. Take them out over a paper towel.
Notes
SuggestionsServe them hot! If you have prepared them beforehand, heat them in a toaster oven or in oven to bring the crispness back. But they taste good even at room temperature.
Corn Cutlet is a versatile appetizer perfect for Holi, Krishna Janmashtami, or any party occasion, offering a quick and easygluten-freesnack option that’s also suitable for vegans, showcasing the delightful flavors of corn in every bite. These crispy treats are perfect for any occasion, whether it’s a party, a family gathering, or simply a cozy evening at home. In this recipe, we’ll explore how to make corn cutlet step by step, ensuring a perfect result every time.
Step 1: Preparing the Ingredients
To start making corn cutlet, gather the following ingredients: canned corn kernels, boiled potatoes, bread crumbs, chopped cilantro, minced green chilies, ginger paste, garam masala, amchur (dry mango) powder, salt, and oil for frying. These simple ingredients come together to create a delicious blend of flavors and textures in every bite.
Step 2: Mashing the Potatoes and Corn
Begin by draining the canned corn kernels and boiling the potatoes until they are soft. Once they’re cooked, mash them together in a large bowl until you have a smooth mixture. This forms the base of your corn cutlet, providing both substance and binding for the other ingredients.
Step 3: Adding Flavorful Ingredients
Now it’s time to add the flavorings to your corn and potato mixture. Mix in chopped cilantro, minced green chilies, ginger paste, garam masala, amchur powder, and salt according to your taste preferences. These spices add depth and complexity to the corn cutlet, elevating it from simple to sensational.
Step 4: Forming the Cutlets
Once all the ingredients are well combined, shape the mixture into small patties or cutlets. You can make them any size you like, but smaller cutlets are easier to handle and cook more evenly. Coat each cutlet in bread crumbs, ensuring that they’re thoroughly coated on all sides for maximum crispiness.
Step 5: Frying to Perfection
Heat oil in a deep frying pan or skillet over medium heat. Carefully place the breaded cutlets into the hot oil, making sure not to overcrowd the pan. Fry them until they’re golden brown and crispy on the outside, flipping them occasionally to ensure even cooking. Once they’re done, remove the corn cutlets from the oil and place them on a paper towel-lined plate to drain off any excess oil.
Step 6: Serving and Enjoying
Your corn cutlets are now ready to be served! Arrange them on a platter with your favorite dipping sauces or chutneys for added flavor. These cutlets are best enjoyed hot and crispy, straight from the frying pan. Serve them as an appetizer, snack, or even as a side dish alongside your favorite main course. However you choose to enjoy them, these corn cutlets are sure to be a hit with family and friends alike.
Tips for Making Perfect Corn Cutlets
Ensure that the mashed potato and corn mixture is well combined to create a uniform texture.
Adjust the amount of green chilies and spices according to your preference for heat and flavor.
For extra crunch, you can add finely chopped bell peppers to the mixture.
If you’re short on time, you can use frozen corn kernels instead of canned ones, just make sure to thaw them before using.
To make these cutlets healthier, you can bake them in the oven instead of frying them. Simply place them on a baking sheet lined with parchment paper and bake at 375°F (190°C) for 20-25 minutes, or until golden brown and crispy.
Variations on Corn Cutlets
Cheese Corn Cutlets: Add grated cheese to the corn and potato mixture for a gooey, cheesy twist.
Spicy Corn Cutlets: Increase the amount of green chilies or add red chili powder for an extra kick of heat.
Corn and Paneer Cutlets: Mix crumbled paneer (Indian cottage cheese) with the corn and potato mixture for added richness and protein.
Corn Tikki Chaat: Serve the cutlets topped with yogurt, tamarind chutney, and chaat masala for a delicious Indian street food-inspired treat.
Benefits of Corn Cutlets
Rich in fiber: Corn is a good source of dietary fiber, which aids in digestion and helps keep you feeling full for longer.
Nutrient-dense: Corn is packed with essential vitamins and minerals, including vitamin C, vitamin B6, and potassium.
Versatile: Corn cutlets can be customized with a variety of spices and ingredients to suit your taste preferences.
Crowd-pleaser: Whether you’re serving them at a party or a family dinner, corn cutlets are sure to be a hit with guests of all ages.
FAQs about Corn Cutlets
Can I make corn cutlets ahead of time and reheat them later?
Yes, you can prepare the cutlets in advance and store them in the refrigerator for up to 2-3 days. When ready to serve, simply reheat them in a preheated oven at 350°F (175°C) for 10-15 minutes, or until heated through.
Can I freeze corn cutlets?
Yes, you can freeze uncooked corn cutlets for up to 1 month. Place them on a baking sheet lined with parchment paper and freeze until firm, then transfer them to a freezer-safe bag or container. When ready to cook, fry them directly from frozen, adding a few extra minutes to the cooking time.
Can I make corn cutlets without bread crumbs?
While bread crumbs help to bind the cutlets and create a crispy exterior, you can substitute crushed cornflakes or panko breadcrumbs for a similar effect.
Are corn cutlets gluten-free?
If you use gluten-free breadcrumbs or omit them altogether, corn cutlets can be made gluten-free. Just be sure to check the labels of all ingredients to ensure they are gluten-free.
Other Recipes on Manjula’s Kitchen
If you’re looking to explore more Indian recipes, appetizers, beverages, and desserts, be sure to check out the following links on Manjula’s Kitchen. Here are some links to recipes on Manjula’s Kitchen official website:
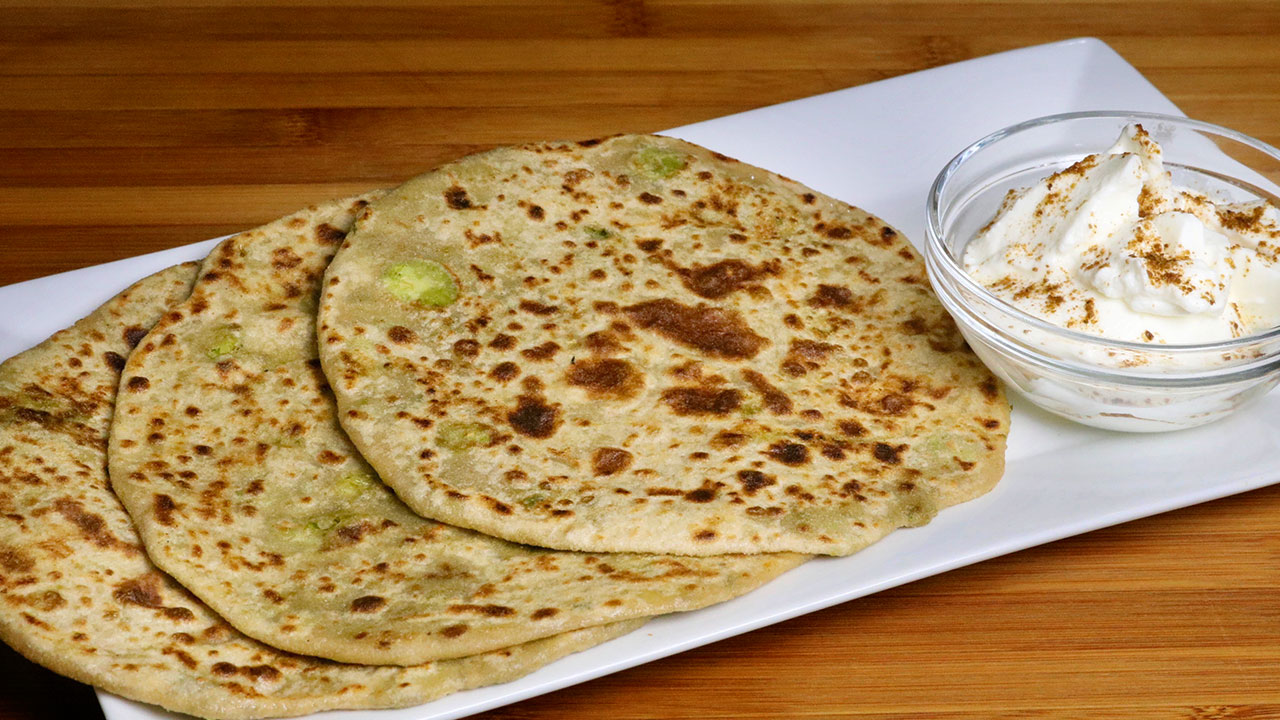
Matar Ka Paratha is stuffed paratha with spicy green peas and is a delicacy. Matar Ka Paratha can be part of any main meal, making it a special treat. This can be a one-dish meal served with a side of yogurt or pickle. Matar Ka Paratha is also a great lunch box option. This recipe will be paratha.
1/4cupwhole wheat flourapprox. for rolling paratha
2 Tbspoilapprox. for cooking paratha
Instructions
To Make Dough
Mix flour, salt, and oil, add water as needed to make a soft dough.
Knead dough for two minutes on a lightly greased surface to make the dough soft, smooth and pliable.
Cover the dough and let the dough rest for at least ten minutes.
To Make Filling
Boil the peas with 1-1/2 cups of water, over medium heat till they are very tender. Drain the water. Mash them using fork or with fingers. Add all the spices to green peas coriander, fennel seed powder, chili powder, mango powder, green chili and salt, mix it well.
Heat the oil in a frying pan, add green peas, and stir-fry until peas come together, keep mashing them with a spatula. Peas should be still a little moist, the consistency should be the soft dough. This should take about 4-5 minutes.
Let the filling cool to room temperature.
To Make Paratha
Divide the dough and filling into eight equal parts and form into balls.
Roll dough ball into a 3” circle. Place a filling ball in the center. Pull the edges of the dough to wrap it around the peas filling. Repeat to make all six balls. Let the filled balls settle three to four minutes.
Meanwhile heat a heavy skillet on medium high heat until moderately hot. To test, sprinkle water on the skillet. If the water sizzles right away, the skillet is ready.
Press the filled ball lightly on dry whole wheat flour from both sides.
Using a rolling pin, roll the balls lightly to make six-inch circles, keeping the sealed side of the balls on top. If the dough sticks to the rolling pin or rolling surface, lightly dust the parathas with dry flour.
Place the paratha on the skillet. When the paratha starts to change color and begins to puff up, flip it over. You will notice some golden-brown spots.
After a few seconds, drizzle one teaspoon of oil over the paratha. Flip the paratha again and lightly press the puffed areas with a spatula.
Flip again and press with a spatula making sure the paratha is golden-brown from both sides. Repeat for the remaining parathas.
Paratha are best served hot and crispy. They will be soft if not served hot. If you are not going to serve them right away, cool them on a wire rack to keep them from getting soggy.
Notes
NotesParathas can be kept at room temperature for up to two days wrapped in aluminum foil or in a covered container. For later use, parathas can be refrigerated three to four days or frozen for up to a month. Re-heat using a skillet or oven.Serving SuggestionsParathas can be served with Tomato Chutney, Plain Yogurt, pickle, or any gravy base dish.Serve it like a Mexican quesadilla by topping it with cheese and sliced tomatoes, then folding it in half.
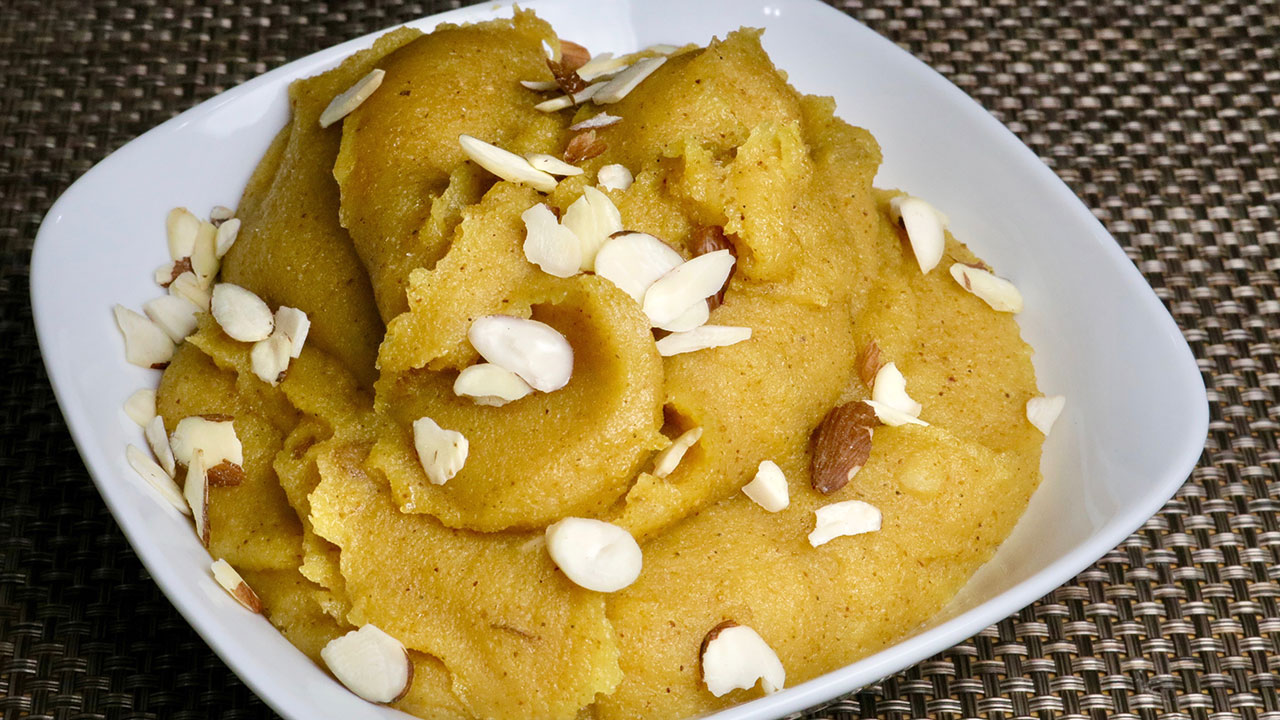
Besan Ka Halwa is a traditional Indian dessert and made using different flour, lentils, nuts and vegetables. Besan Ka Halwa is one of my favorite Halwas. This is delicious and also quick and easy to make. When you roast the besan, the house is full of sweet aroma. Besan Ka Halwa is also gluten free.
Boil the water with sugar, and cardamom powder in a sauce pan over low medium heat. Bring to a boil and Set aside.
Melt the clarified butter in a frying pan on low medium heat. Add besan and roast to golden brown color; stirring constantly this will take about 5 to 8 minutes. Besan will be golden brown in color and will have a light sweet aroma.
Add the syrup slowly, as you add the syrup to besan water will splatter.
Turn down the heat to low and let it cook for about 2-3 minutes.
Besan will absorb the water, as the Halwa cools so keep Halwa a little softer then you like.
Garnish with cashews.
Notes
Serving suggestion Serve hot for best taste. If you like, garnish with shaved pistachio, almonds or shredded coconut.Variations Instead of water add 1 cup of milk and 1/2 cup of water and keep Halwa a little thicker. Pour the Halwa on a greased plate, keep it about 1/2 inch thick. Garnish with shaved almonds or pistachio or shredded coconut, and let it cool for about a half an hour. Cut the Halwa in square or diamond shapes like burfi.
Besan ka Halwa is a classic Indian dessert made from besan (gram flour), ghee (clarified butter), sugar, and aromatic spices. This sweet treat is loved for its rich flavor, creamy texture, and irresistible aroma.
Whether served warm or at room temperature, Besan ka Halwa is a delightful dessert that’s perfect for celebrating special occasions such as a party recipe or even festive occasions such as diwali, holi, ganesh chaturthi or janmashtami or simply made to satisfy one’s sweet tooth.
Variations of Halwa:
Although Besan ka Halwa can be considered to be one of the most savoury and fulfilling desserts amongst all halwas, here we have a list of some halwas that can be savoured and enjoyed all along with friends and family.
Gajar ka Halwa: Gajar Ka Halwa is a classical Indian dessert, this is also known as gajraula. Gajar ka Halwa is a delicious and popular sweet made with few ingredients, carrots, milk, sugar and flavoured with cardamom.
Atta Ka Halwa: Atta ka Halwa, is a delicious sweet dessert. This is easy to make and with few ingredients. Atta ka halwa is made with whole wheat flour, sugar, and clarified butter, flavoured with cardamom.
Sooji ka Halwa: Sooji Halwa is a very popular sweet dish all over India and is made on religious occasions, as prasad.
Sweet Potato Halwa: Sweet Potato Halwa, an eggless pudding, stands out as one of the simplest Halwa recipes to prepare. Infused with the delicate and distinctive flavors of cardamom and cinnamon, it serves as a deliciously warm dessert ideal for chilly winter evenings.
Tips for Making Perfect Besan ka Halwa:
Use Good Quality Gram Flour: Use fresh and high-quality gram flour (besan) to make Besan ka Halwa for the best flavor and texture. Fresh besan has a nutty aroma and a smooth texture, which enhances the taste of the halwa.
Roast the Gram Flour Well: Roast the gram flour in ghee until it turns golden brown and fragrant. Properly roasting the gram flour is crucial for developing the rich and nutty flavor of the halwa.
Control the Sweetness: Adjust the amount of sugar according to your taste preferences. Some people prefer Besan ka Halwa to be sweeter, while others prefer it less sweet. Start with a smaller amount of sugar and add more if needed.
Garnish with Nuts and Saffron: Garnish Besan ka Halwa with chopped nuts such as almonds, pistachios, and cashews, as well as a few strands of saffron for a luxurious touch. The nuts add crunch and texture, while saffron adds color and aroma to the halwa.
FAQs about Besan ka Halwa:
Can I make Besan ka Halwa ahead of time?
Yes, Besan ka Halwa can be made ahead of time and stored in an airtight container in the refrigerator for up to 3-4 days. Reheat the halwa gently on the stovetop or in the microwave before serving.
Can I freeze Besan ka Halwa?
While Besan ka Halwa can be frozen, its texture may change slightly upon thawing. If freezing, allow the halwa to cool completely before transferring it to a freezer-safe container. Thaw the halwa in the refrigerator overnight before reheating.
Is Besan ka Halwa vegan-friendly?
Traditional Besan ka Halwa is made with ghee (clarified butter), which is not vegan. However, you can make a vegan version of Besan ka Halwa by using plant-based ghee or oil instead of dairy ghee.
Is Besan ka Halwa gluten-free?
Yes, Besan ka Halwa is gluten-free as it is made from gram flour, which is naturally gluten-free. However, be cautious of cross-contamination if you have a severe gluten allergy or celiac disease.
Besan ka Halwa is a luxurious and aromatic dessert that’s perfect for indulging in on special occasions or as a sweet treat for your loved ones.
With its rich flavor, creamy texture, and endless variations, Besan ka Halwa is sure to become a favorite in your dessert repertoire. Whether enjoyed warm or at room temperature, this halwa is guaranteed to satisfy your sweet cravings and leave you feeling content and happy.
Besan ka Halwa goes best even at marriage and big events hence its often served as people’s favorite choice of sweet dessert after every celebration and is a great hit among family gatherings and unions.
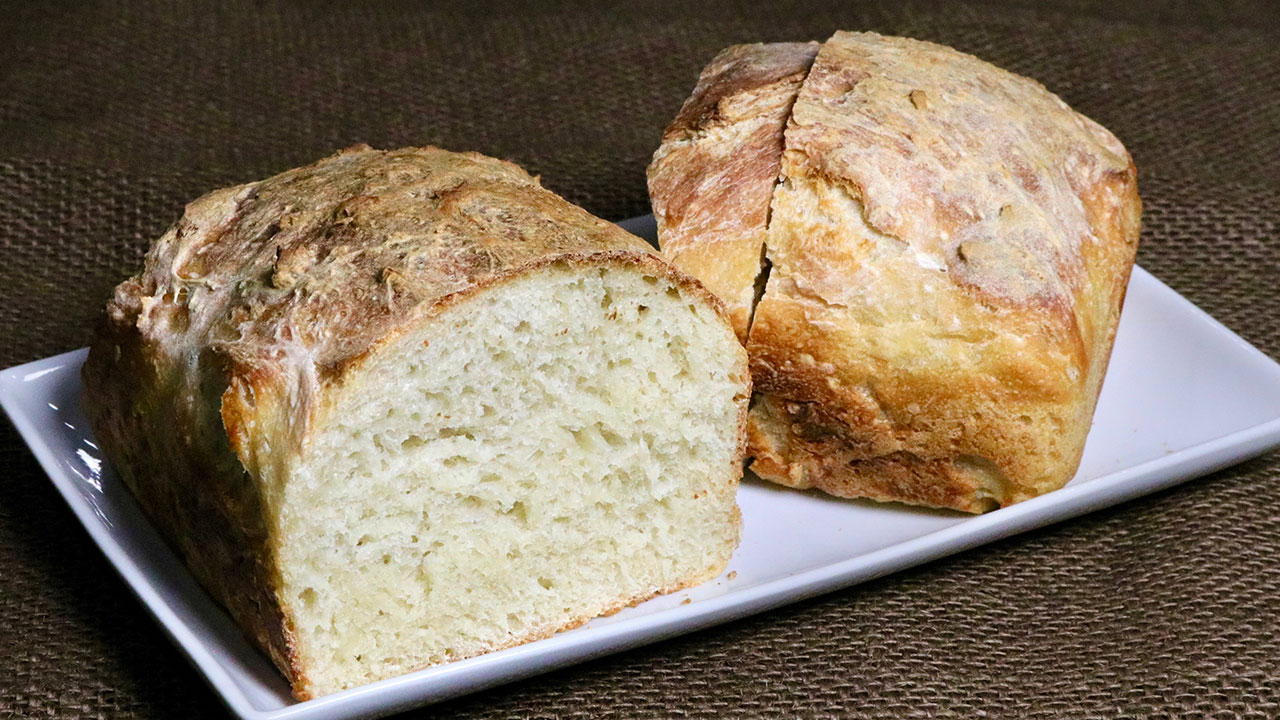
There is nothing as tempting as the smell of fresh bread in the morning. With just a few ingredients and some advance preparation, anyone can make in a quick and easy way fresh, crusty artisan bread at home just like they do in the professional bakeries.
1 ½cupWarm water. The water should be warm to touch.approximately
Also need loaf pan I am using 4.5” x 8.5” loaf pan.
Instructions
Mix your dry ingredients together. It’s easiest if you mix it with a wire whisk to make sure the yeast and salt are incorporated evenly. We will start by making a well in the middle and pouring our water. Just mix it evenly. We want to handle our dough very gently. Now you can pour water around the edges of the bowl and very gently mixing it with your hands. Do not knead the dough. Dough will be shaggy sticky.
Cover the bowl loosely with a plastic wrap and leave it to rise overnight. The dough will double in size, so make sure the bowl is big enough to accommodate the dough.
Prepare your oven. Place an empty baking pan on the very bottom of the oven. Preheat oven to 450 degrees. Fill a glass of water and keep it right by the oven.
This is a 4.5” x 8.5” loaf pan, but feel free to use any size that you have at home. Fill the pan 2/3 with dough to allow the bread room to rise. Let it rest for 10 minutes.
Now, working quickly, place the loaf pan in the oven and throw the water on the baking sheet. Quickly shut the door.
Let it bake until the loaf becomes brown. It may take about 30 to 35 minutes. When you take it out of the oven, let it cool for 20 minutes.
Using a butter knife or spatula, scrape the sides and slide your loaf out of the pan. Your fresh, crusty Artisan bread is now ready.
Hot Chocolate is a wintertime staple at my house. My grand-kids love it. It makes the whole kitchen smell wonderful. I enjoy making this with my grand-kids. This rich and creamy hot chocolate is easy to make, and it is delicious beverage.
Bring milk to a simmer in a medium saucepan over medium heat. Whisk in cocoa powder until no lumps remain, add sugar and chocolate and cook, whisking frequently, until mixture is smooth and creamy and chocolate is melted, about 5 minutes.
Divide hot chocolate among mugs. Top with whipped cream.
These Rice and Potato Cutlets are a tasty treat as a tea time snack or you can also serve them as an appetizer. They are crispy outside and soft inside. This is a quick and easy recipe and a good way to use left over rice.
In a bowl mash the rice, rice should be semi mashed add potatoes mix it well now add all the other ingredients, salt, cumin seeds, green chilies, ginger, cilantro and lemon juice. Mix should be firm and will be consistency of a sticky dough.
Grease your palm and divide them into 12 pieces I wanted to make them in small size. Roll them in patties.
Heat the oil in a frying pan on medium high heat. Frying pan should have about 1” of oil. Oil should be moderately hot. Test the oil putting a small piece of mix, this should up right of way. Drop the cutlets slowly into it, taking care not to overlap them.
Fry the cutlets until they are golden brown, turning occasionally. This should take about 5 minutes. Take them out over a paper towel.
For best taste serve them hot. Cutlets taste great with cilantro chutney.
Notes
Potatoes should be not over cooked, that will make mix soft and cutlets can break in the oil while frying.
If oil is not hot enough cutlets will be greasy. Rice and potato min should not be very soft otherwise cutlets will break in oil.
Welcome to an expanded version of the Rice Potato Cutlets recipe from Manjula’s Kitchen! These delightful cutlets are a perfect way to make the most of your leftover rice while indulging in a crispy, flavorful snack. If you’ve been wondering how to transform your surplus rice into something delicious, look no further. Let’s dive into the expanded recipe, exploring tips, variations, benefits, and frequently asked questions along the way.
Tips for Perfect Rice Cutlets
Choosing the Right Rice: For the best results, opt for cooked leftover rice that is slightly dry. This texture helps in binding the ingredients together, resulting in firmer cutlets.
Flavor Enhancement: Enhance the flavor of your cutlets by adding various spices like cumin powder, garam masala, or chaat masala to the mixture. You can also incorporate finely chopped herbs like cilantro or mint for a refreshing twist.
Crispy Coating: Achieve a crispy exterior by coating the cutlets in breadcrumbs or semolina before frying. This not only adds texture but also prevents them from becoming soggy.
Oil Temperature: Maintain the oil at a moderate temperature while frying to ensure even cooking and a golden-brown crust. Avoid overcrowding the pan, which can lower the oil temperature and lead to greasy cutlets.
Make-Ahead Option: Prepare the cutlets ahead of time and refrigerate them for up to a day. This makes them perfect for parties or quick snacks whenever cravings strike.
Variations of Rice Potato Cutlet
Vegetable Medley: Incorporate finely diced vegetables like carrots, peas, or bell peppers into the mixture for added color and nutrition. Sauté them briefly before mixing with the rice and potatoes.
Cheesy Delight: Add grated cheese to the mixture for a gooey, indulgent filling. Cheddar, mozzarella, or paneer are excellent choices that melt beautifully when fried.
Spicy Kick: Boost the heat by including chopped green chilies or a dash of chili powder in the mixture. Adjust the spiciness according to your preference for a flavorful kick.
Protein Power: Amp up the protein content by adding cooked lentils, chickpeas, or tofu to the mixture. This not only enhances the nutritional value but also adds a satisfying texture.
Benefits of Rice Cutlets
Utilizes Leftovers: This recipe provides a creative solution for using up leftover rice, minimizing food waste while creating a delicious snack or appetizer.
Budget-Friendly: With simple ingredients that are often already available in the kitchen, rice cutlets offer an economical way to enjoy a satisfying dish without breaking the bank.
Customizable: The versatility of this recipe allows for endless variations to suit individual tastes and dietary preferences. Whether you prefer a mild flavor or crave something spicy, you can customize the cutlets to your liking.
Kid-Friendly: Children tend to love the crispy texture and mild flavors of rice cutlets, making them a convenient option for family meals or lunchboxes.
FAQs about Leftover Rice Cutlet Recipe
Can I freeze the uncooked cutlets?
Yes, you can freeze the uncooked cutlets for later use. Place them in a single layer on a baking sheet and freeze until solid, then transfer to a freezer-safe container. When ready to cook, thaw them in the refrigerator overnight before frying.
Can I bake the cutlets instead of frying them?
While frying yields the crispiest results, you can bake the cutlets for a healthier alternative. Arrange them on a baking sheet lined with parchment paper and bake in a preheated oven at 375°F (190°C) for 25-30 minutes, flipping halfway through, until golden brown.
Can I use brown rice instead of white rice?
Yes, you can substitute brown rice for white rice in this recipe. Keep in mind that brown rice has a firmer texture, so you may need to adjust the amount of potato or binding agent accordingly.
What dipping sauces pair well with rice cutlets?
Rice cutlets pair well with a variety of dipping sauces, such as mint chutney, tamarind chutney, or ketchup. Get creative and experiment with different flavors to find your favorite combination.