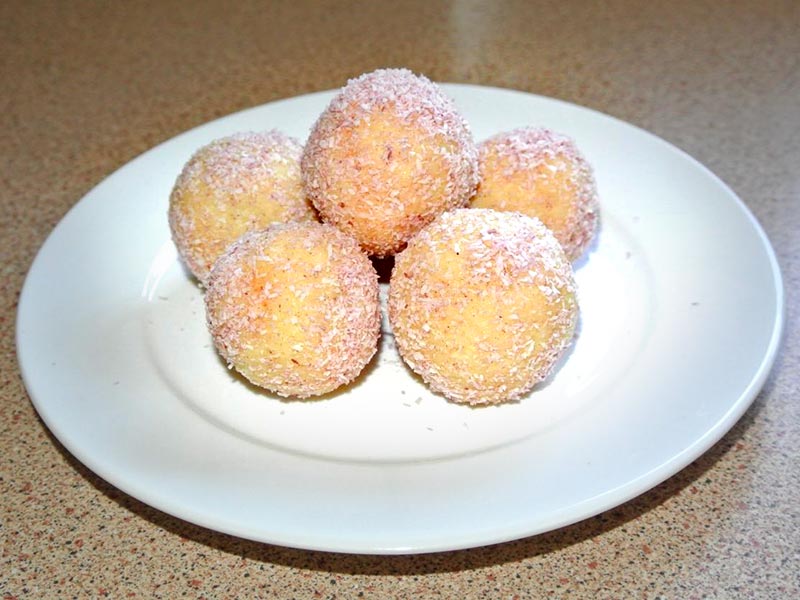
For stuffing, in a non-stick pan mix condensed milk, milk powder and Thandai masala cook on low flame until the mixture leaves the sides of the pan and turn into dough consistency. Remove from fire and set it aside for cooling.
For Coating, in a same pan Mix condensed milk, crushed paneer, Milk Powder and mawa. same way cook until the mixture leaves the sides of the pan and turn into dough consistency. Remove from fire and set it aside for cooling
Now grease your hand with ghee and make small balls out of stuffing Mixture.
Take hand full dough of coating press with your hand than stuff with one ball of stuffing and cover it, make a round ball.
1 cup Fresh Cream (use fresh cream and not heavy whipping cream)
1 cup Whole Milk
1/4 cup Raw Honey / Raw Sugar
1/2 tsp Pure Vanilla Extract
2tsp China Grass / Agar Agar ( a vegetarian alternative to gelatin)
3 tbsp Water
1/2tsp Butter
1 cup Mixed Berries (I used a mix of raspberries, blueberries, tart cherries and blackberries)
1 tbsp Honey
2tbsp Water
Instructions
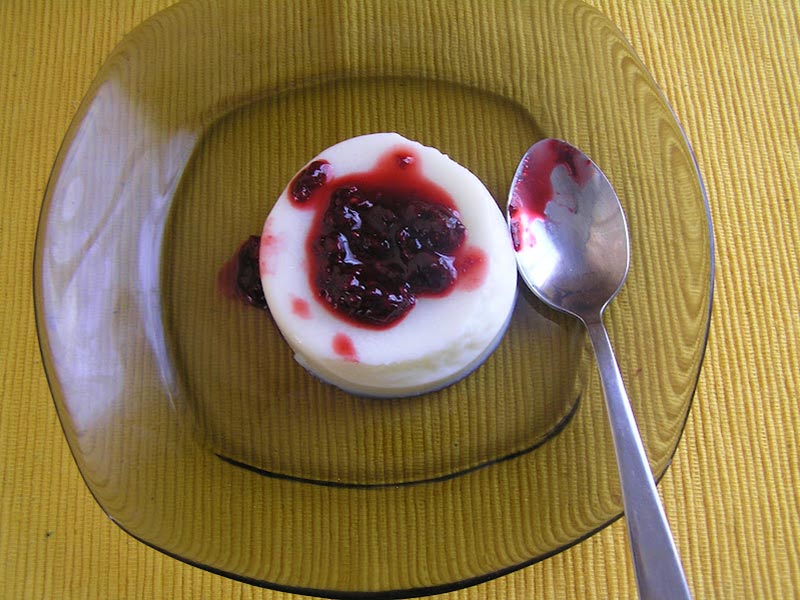
To make the berry sauce, add mixed berries and 2 tbsp water in a pan and cook on low heat for around 10 minutes or till the berries break and a thick sauce forms.
Mix the honey and keep aside to cool and then refrigerate. You can add a little bit of lemon juice too to the sauce when it cools down, but I did not add as the cherries were quite tart.
Mix the cream and milk together and bring to a boil. Once the mixture starts boiling, remove from heat.
Add vanilla and honey. Stir well so that the honey dissolves completely.
Boil 3 tbsp water and soak the china grass in the water. Stir well so that it completely dissolves in the water.
Use a strainer and add this mixture to milk and cream mixture. Stir well.
Take 4 small ramekins and grease with a little butter. Pour the cream mixture in the ramekins and leave it aside to cool.
Then refrigerate for at least 4 to 5 hours or overnight.
Remove from the refrigerator, loosen the edges a little with a knife and overturn on a serving plate.
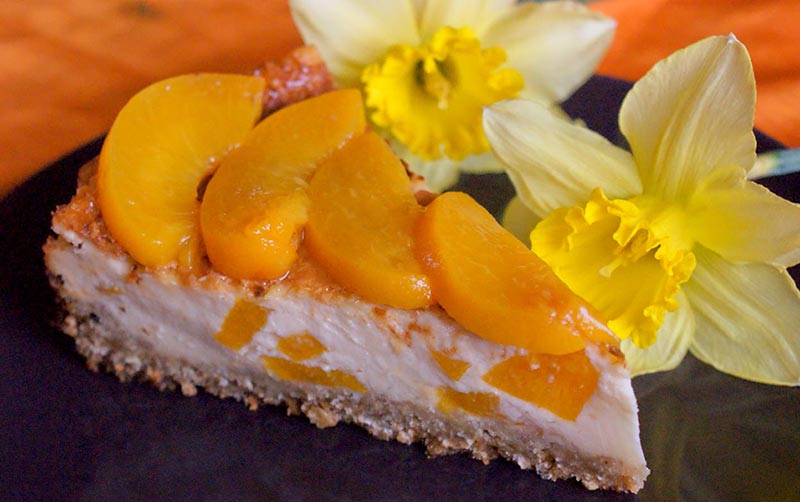
I have figured out this cheesecake recipe after experimenting and trying out different combinations for many years. Finally I am really happy with the result! It has a crispy base and firm and creamy filling with a refreshing accent of mild fruit. Its a nice appetizing dessert that compliments after having a nice dinner.
Optional: another 800g cane of peach halves in syrup for decoration
Instructions
Melt butter
In a bowl mix flour, rolled oats, sugar and vanilla sugar, add melted butter and mix well, rub it with your fingers. It will be quite try mixture, but that’s ok.
Cover your cake tin with baking paper or smear it with butter and spoon the mixture in the tin and press it with your palms to form a strong layer on the bottom of the tin.
Preheat the oven to 180C and bake the base for 10 min or until it starts to get slightly golden, then remove from the oven.
In a bowl mix together all the ingredients for the filling except for peaches and mix very well. I like to use electric mixer for this. The mixture will be quite liquid, but do not worry it will firm up after baking
Take the peach halves out of the syrup and cut into cubes.
Mix the peaches into the filling
Carefully pour or spoon the filling in the cake tin on top of the base.
Bake with 180C for 1 h.
When the cake is ready let it cool down and the best is to keep it in the fridge overnight or at least 2h before serving.
Open another cane of peach halves in syrup cut the peaches into slices and decorate the cake right before serving.
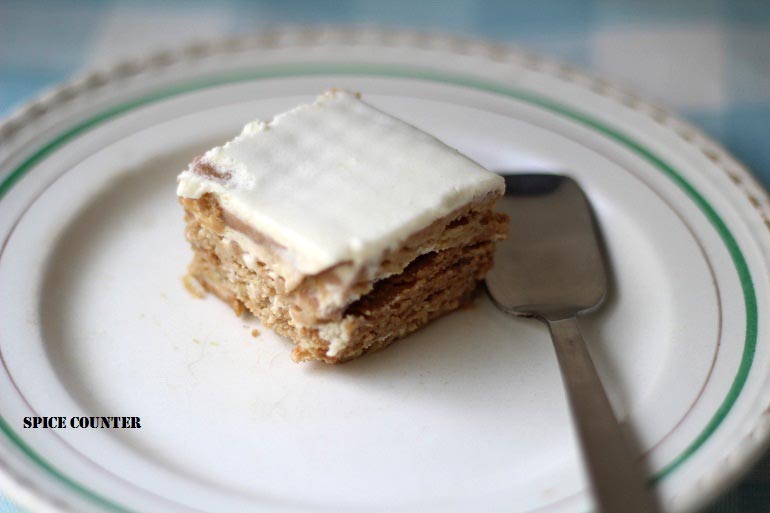
Biscuit Cream Pudding was a dessert that my mother used to make. It's sinful because its loaded with high fat cream, but is absolutely yummy. Biscuit Cream Pudding has layers of biscuit alternated with layers of sweetened whipped cream. Biscuit cream pudding is not a dessert you can make often but it is a dish you should try at least once and goes well with parties and elaborate dinner plans.
Make coffee decoction with instant coffee powder and luke warm water. Let it cool.
Freeze the mixing bowl and beater for 2-3 hours.
Pour the cream into the mixing bowl and whip the cream using the beater till the cream becomes almost stiff.
Add the sugar and whip the cream till it forms soft peaks.
Dip the biscuits in the coffee decoction and layer them on a bowl (You can try layering it on an oval plate as well since it might be easier to cut and serve).
Spread the cream on top of the layer of biscuits.
Now repeat the process with another layer of biscuits followed by cream till the biscuits are over.
Ensure that the whipped cream is the top most layer.
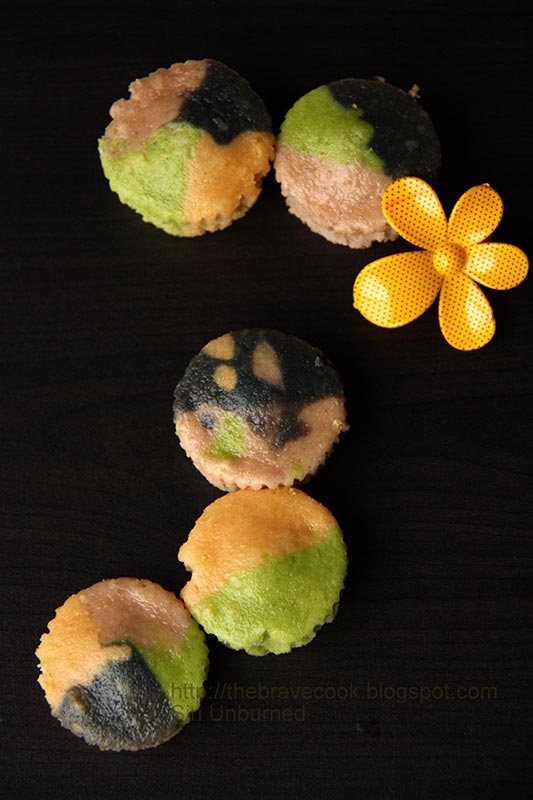
Rainbow cupcakes are colorful cakes perfect for spring time. The colors are all natural made with real fruit juice. My daughter loved them. Its a healthydessert option made with love and passion.
Stir together milk and vinegar and set aside for 5 minutes. The milk should be curdled by the end of it.
Sift together the flour, baking powder, baking soda and salt and set aside.
Once milk is curdled, whisk oil, vanilla extract and sugar into it till well combined and runny.
Make a well in the center of the dry ingredients and pour the wet ingredients into it. Mix till smooth. Do not overmix. A little lumpy is fine as long as everything is mixed well.
Making the colours (Orange Colour)
Juice the grated carrot with 1 tbsp of water. I used a regular Indian mixer to do this.
Strain the carrot juice to get the fibrous part out.
Keep 2 tbsp of orange juice aside.
Making the colours (Green Colour)
Juice the spinach leaves with 1 tbsp of water
Strain the spinach juice.
Keep 2 tbsp of green juice aside.
Making the colours (Red/Pink Colour)
Juice the strawberries with 1 tbsp of water
Keep 2 tbsp of red/pink juice aside.
Making the colours (Blue Colour)
Place frozen blueberries in a microwave safe bowl and microwave in 30 second intervals till the blueberries burst and the juice starts oozing out. It took me 3 intervals.
Allow it to cool.
Strain the blueberries juice.
Keep 2 tbsp of blue juice aside.
Putting it all together
Method
Divide the basic Vanilla cupcake batter into 5 cups. I scooped out 4 heaped tsps per cup.
To the batter in the first cup add 1 tbsp of carrot juice and mix well to get orange coloured batter.
To the batter in the second cup add 1 tbsp of spinach juice and mix well to get green coloured batter.
To the batter in the third cup add 1 tbsp of strawberry juice and mix well to get pink coloured batter.
To the batter in the fourth cup add 1 tbsp of blueberry juice and mix well to get blue coloured batter.
Keep the batter in the fifth cup uncoloured. This can be used to improve consistency in the other batters or to get a cream layer in the cupcake.
Add more juice to improve colour adjusting the consistency so that it doesnt become watery.
There are many ways of making the cupcakes clourful.
The easiest method is to layer different coloured batters one on top of the other in the cupcake liner.
Alternatively place separators in the paper liner and pour different coloured batters in each section.
I started out making the separators using card. I made a 4 section one and a 3 section like that. But I found it problematic because the batters bled into other sections easily.
Then the hubby gave an idea which turned out to be brilliant. Use crackers/biscuits as dividers. I had Parle-G gluco biscuits on hand and used them. I got 2 sections and 4 section ones using this method.
Preheat the oven to 350°F
Whatever the method fill the liners to 3/4 full and bake at 350°F for 18 minutes.
Cool the cupcakes in the pan for 5 minutes before removing them onto a wire rack and allowing them to cool completely.
Decorate with frosting or ganache as desired. The cupcakes turned out so wonderfully coloured that I did not want to cover that up at all.
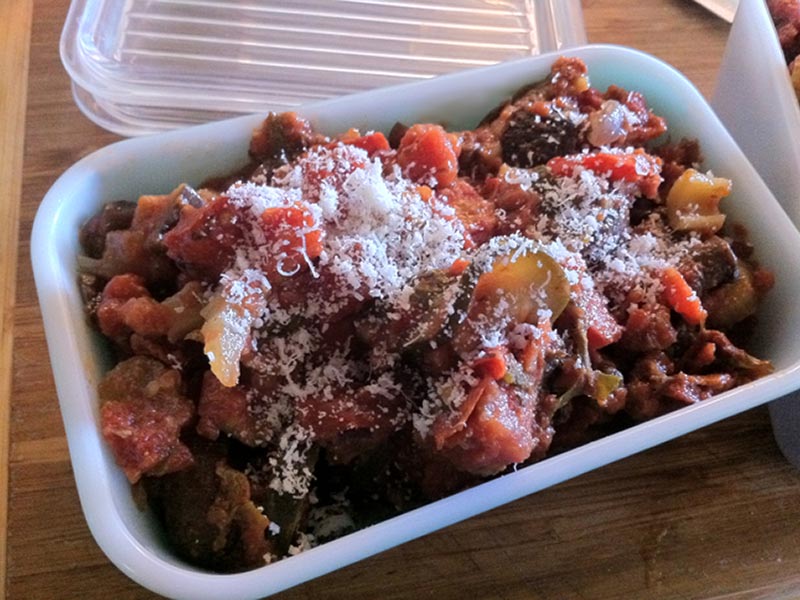
This is my recipe by Ratatouille. My quick & easy two-step process may seem like overkill to you, but the trick is to get the veggies so melty and herb-infused that an eggplant hater can’t detect the texture and falls in love with the flavor. Simmering on the stove-top just doesn't quite do it.
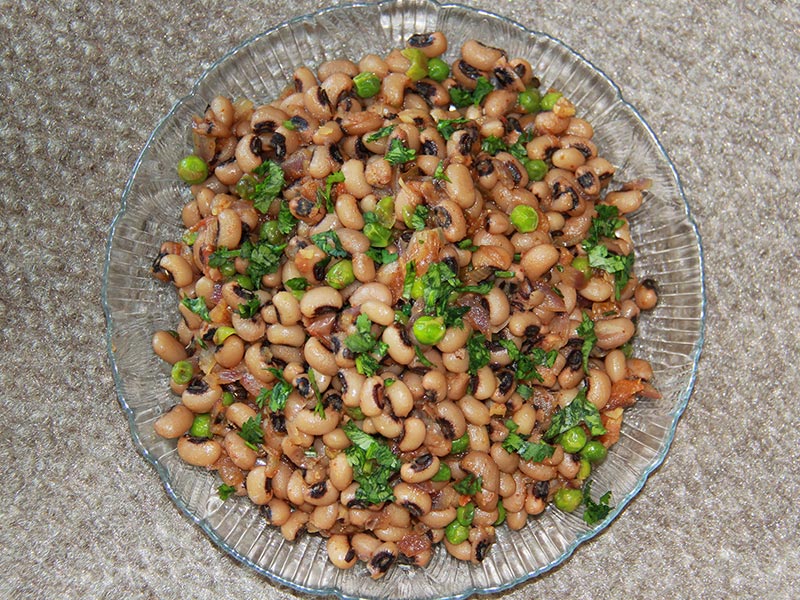
Heat oil in a pan and add onions. Stir and add ginger.
Sauté this mixture for 4-5 minutes or till the onions become translucent.
Add green peas & sauté for 2-3 mins, add tomatoes and let it cook for 2-3mins.
Now add coriander powder, chili powder, salt and black eye peas and mix. Let this mixture cook for at least 5 mins on medium flame, stirring in between.
Add lemon juice according to your taste and mix again.
Garnish with chopped coriander leaves and serve hot.(Optioanl)
Notes
Nutritional ValueThis information is gathered from the Internet and it s only for dry or cooked black eye peas. This does not apply to canned version.FiberOne of the main health benefits of black-eyed peas is their high fiber content. A 1/2 cup of dry black-eyed peas that are cooked have 5.6 g of fiber. Fiber is a nutrient that helps regulate your digestive system, and increasing your intake could help alleviate constipation and symptoms of irritable bowel syndrome. Fiber also helps keep your cholesterol levels healthy by preventing cholesterol from being absorbed into your bloodstream, which reduces your risk of developing heart disease.Low in Fat and CaloriesBlack-eyed peas are a low-fat and low-calorie food, making them a healthy addition to a weight-loss meal plan. 1/2 cup of black-eyed peas is generally less than 100 calories and contains about 1 g of fat. A diet that is low in fat and calories helps you lose weight, prevents weight gain and protects you from many health conditions, including heart disease, diabetes and depression.ProteinBlack-eyed peas are a good alternative source of protein if you don’t eat meat. Protein is important because it supports most of the parts of your body, including muscles, skin, hair and nails. In addition, protein helps cells grow and repair and provides energy to your body. A 1/2 cup of dry and cooked black-eyed peas contains 6.7 g of protein.Iron1/2 cup cooked dry black-eyed peas contains 2.2 mg. Getting adequate iron in your diet prevents anemia, which produces fatigue and weakness. Iron carries oxygen throughout your body to your organs, cells and muscles, and if the supply is low you experience sluggishness.PotassiumA 1/2 cup of cooked black-eyed peas contains 239 mg of potassium. Potassium is a nutrient that helps keep your blood pressure levels at healthy numbers, which lowers your risk of heart disease. Getting adequate potassium in your diet from black-eyed peas also supports the health of your muscles and bones.
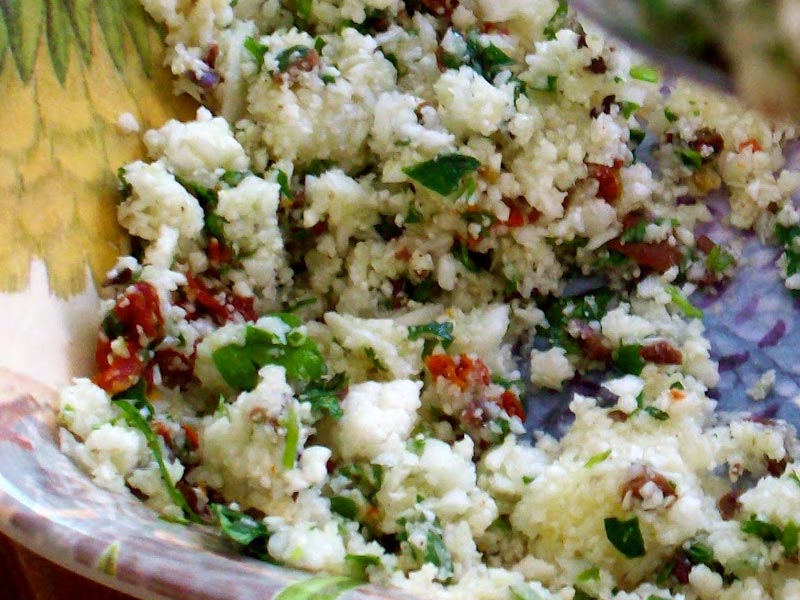
Cauliflower Couscous is a simple, gluten freeeasy to make recipe that is a delicious alternative to regular couscous. It has amazing color, texture and also tastes great.
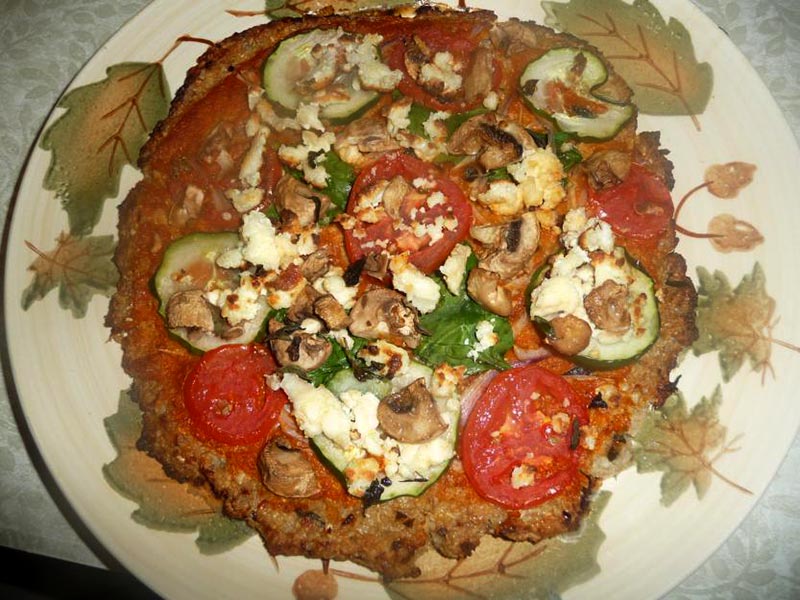
This is a yummy and healthy cauliflower crusted pizza, made with fresh ingredients and also egg-less. Pizza sauce and Indian cheese was made from scratch using fresh ingredients. Its a nice appetizer
4-5 cloves garlic, coarsely chopped (mix with some salt and allowed to sit 10 minutes)
1 sprig oregano leaves
1/2cup onion, roughly chopped ½ cup carrot, peeled and chopped
1/4 cup green pepper, chopped
5 medium sized plum tomatoes, roughly chopped
1/2tsp of lemon juice
1tbsp red chilli powder
salt, to taste, pepper, to taste all of your favorite spices, to taste* (if you want)
Cauliflower pizza crust
2cups grains cauliflower.
2 cloves garlic
5-6 leaves oregano
1/2 banana
1/4cup of cheese (paneer)
Instructions
To Make Indian Cheese (Paneer)
Make ready your strainer lined with cheese cloth. Combine the milk, salt, and sugar in a pot. Bring it to boil it while stirring occasionally. When it reaches boiling temperature simmer it and add lemon juice little by little and stir lightly. After a minute or so, remove the pot from heat. The milk will start separating into curds and whey. Pour it to a strainer lined with cheese cloth and squeeze out water. Show it to cold running water, so that the lemony flavor will go and it will get cooled. Then press it tightly to reach the desired consistency.
To make homemade tomato sauce
Heat 3tbsp olive oil in a heavy saucepan over medium heat, then add the garlic and oregano and cook for 1 minute, stirring constantly. Do not burn garlic.
Add some chopped onion, diced pepper and grated carrot and sauté for 5 minutes.
Add the tomatoes, sauté for 5 minutes. Add salt and pepper and add ½ cup water, bring to boil.
Reduce the heat and simmer, stirring occasionally, until most of the liquid cooks out. (About 10-15 minutes). Add ½ tsp of lemon juice and switch of the heat.
When there is still some liquid left in the pan, carefully purée the sauce using a blender or a food processor. Pass it through a strainer. Puree the solid again by adding 1 tbsp of water and again do the procedure.
Now again heat a saucepan with 1tsp of oil and add this strained sauce and simmer. Add 1 tbsp of red chilli powder and continue simmering until desired consistency.
And there you have it. Homemade pizza sauce so simple, yet so delicious, you'll wonder why you never thought to cook some up before.
Cauliflower pizza crust
Put cauliflower, garlic and oregano in food processor until cauliflower turns to grain size and cook it in microwave for 4 minutes uncovered.
Mash ½ banana by hand and knead together with cauliflower mixture, ¼ cup paneer, salt and red pepper flakes.
Preheat oven to 425 F .Prep a cookie sheet or pizza stone. You can grease the cookie sheet or use parchment paper. Since I don’t have any of it, I have used my baking tray, flipped it and covered with aluminum foil and spray some olive oil.
Spread dough out evenly over pizza stone – about ¼ to ½ of an inch thick. The pizza should be about medium size and spray some oil. Bake for 15-20 minutes or until the crust is golden, crispy on the edges and cooked through the middle.
Top with pizza sauce and toppings (oregano, onion, cucumber, tomato, mushroom). You can add toppings of your choice.Add the remaining ¼ cup of paneer and spread evenly on the pizza.
Bake the pizza for 10 minutes or until the toppings are hot. Allow the pizza to cool for 10 minutes then cut and serve. This wont be a crispy pizza as it is an egg-less, but it will be soft. It is easy to cut with pizza slicer, but use a spatula to transfer it to plates.
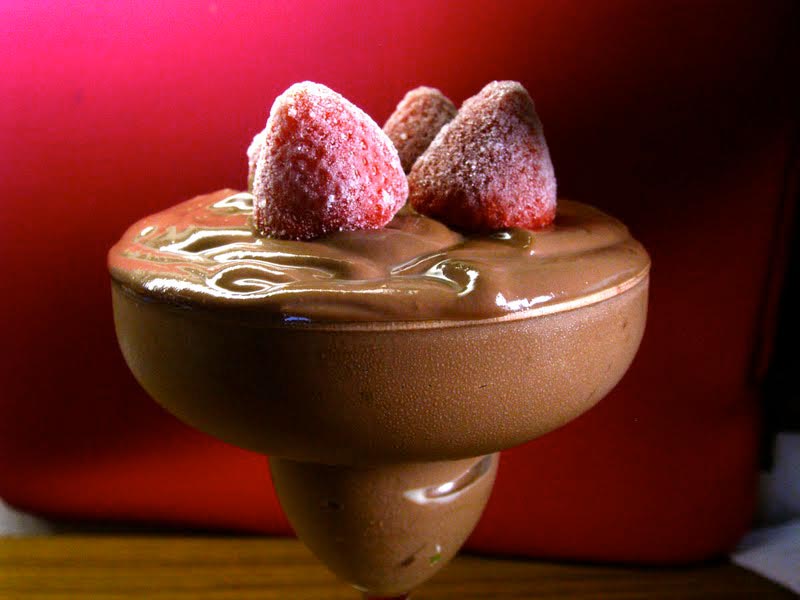
Chocolate Chili Pepper Mousse is a delectable dessert that is served cold. The chili is a perfect complement to the chocolate and provides a perfect little kick without overpowering the dish. If you like spices and chocolate, this is a must try dairy free gluten free dish.
Throw everything into a blender or food processor, except the berries and blend until smooth. You may want to mix with a spoon after blending to make sure everything is incorporated.
Pour into bowls or decorative glasses.
Refrigerate for at least two hours. The flavors develop more the longer it sits.
Top with the berries or any desired fruit. Also good with vegan whip cream or some crushed nuts. Sprinkle a bit more chili flakes if you like an extra kick.
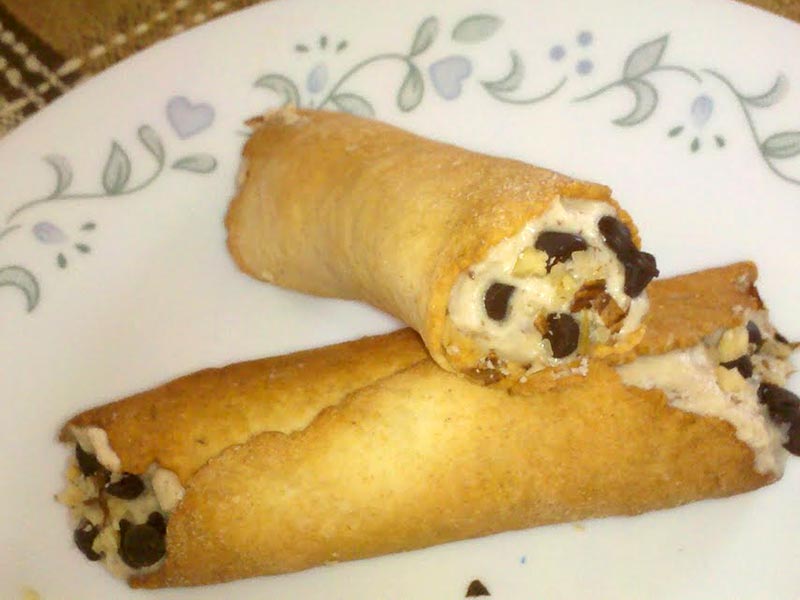
I adore this classic Italian dessert. I tasted this once and am in love with this. Mocha Cannoli is a deep fried tube shaped pastry shell stuffed with the mixture of ricotta cheese and sugar and dipped in nuts. Who won't like these!! I am not a big fan of deep frying, so I was trying to bake cannoli pastry shell for a while as a healthy alternative. Finally after several tries here is the perfected recipe!
mini semi-sweet chocolate chips and chopped hazelnuts to decorate.
Instructions
For the pastry, add the flours,salt ,sugar,baking powder in a food processor and pulse a few times.
Add cold butter and sour cream and pulse again for a minute. After a minute, keeping the food processor running, add water slowly to incorporate everything into a ball.
Once mixture starts to come together, stop pulsing. Remove from food processor, knead the mixture a few times to form a ball, wrap in a plastic wrap and chill for at least half an hour.
You get Cannoli forms in the market that you can use or else you can do what I did. Tightly roll the heavy duty foil into a cylinder shape and use that as a cannoli form.
Divide the chilled dough into 20 small balls. Roll each ball to make a thin circle.Wrap this rolled dough around the oiled/buttered 'cannoli form' and set aside. Make the rest of cannoli.
Preheat the oven to 350F. Place cannoli onto a baking sheet and bake for 10 minutes. Remove from the oven after 10 minutes and remove the half baked pastry shell carefully from the form. It comes off very easily.
Bake for another 10 minutes or until golden brown. Cool to room temperature before stuffing them. These empty shells can last up to 2 days at room temperature.
To make the stuffing, dissolve a teaspoon instant coffee powder in a tablespoon warm water and set aside to cool it down.
Whip the cream with sugar and the dissolved coffee until firm peaks. Add ricotta cheese and whip again. Add grated chocolate and mix.
Fill the piping bag with the mixture and stuff the cannoli shells from both ends.
Dip the stuffed shells into mini chocolate chips and hazelnuts and chill for half an hour so that the filling hardens a little. They are ready to serve!
Notes
Additional Notes:
Stuffed cannoli will stay crunchy for 3-4 hours. After that it turns soggy.
This recipe (stuffing only) is just a guideline.You can add any flavor combination that you like.
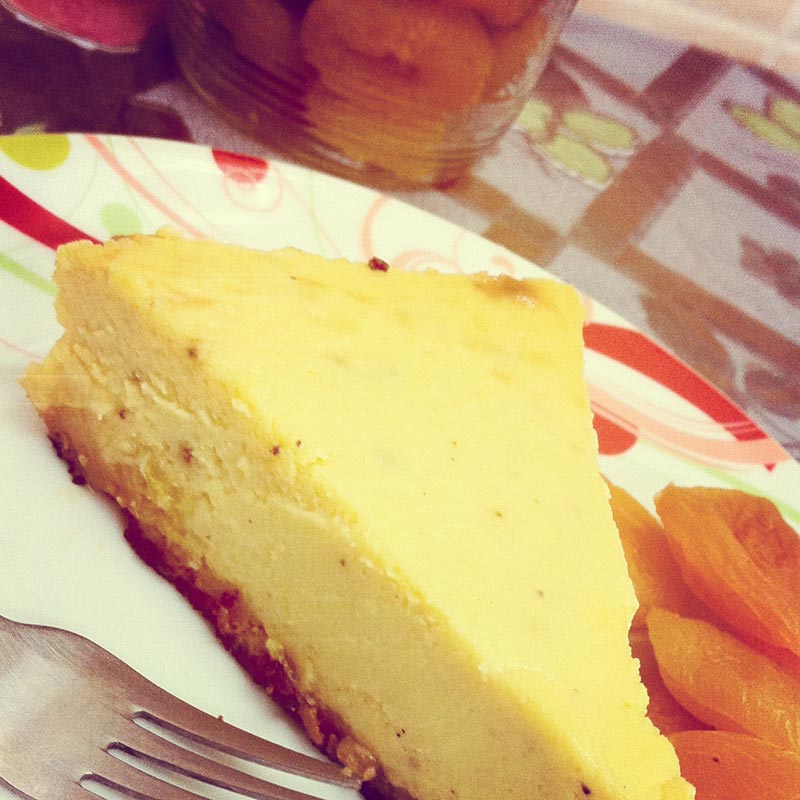
This silken cheesecake with ginger cookies crust is a perfect dessert that encapsulates the flavors of the holiday season. And what's more it's healthy too! Pureed sweet potatoes are an excellent substitute for solid fats while also offering health benefits with extra fiber, vitamins A and C. In addition, they also bake well, so this recipe can be easily made egg-less I usually add just one egg white but for this recipe I have used a little ground flax seeds (omega3s!) The spices add a wonderful flavor and dried apricots add to the fiber and natural sweetness. Enjoy!
Preheat oven to 150 degrees Celsius. Coat a round baking dish with a little butter and keep ready.
Bring 1 cup water to a boil in a small saucepan. Remove from heat, add the apricots and let stand for 10 minutes; drain. Meanwhile, peel and mash the sweet potatoes to a smooth puree
In a food processor, combine the cookies and cereal and process until finely ground. Transfer to a bowl, add the butter and mix well. Press this mixture firmly and smoothly into the bottom of the prepared dish. Keep it in the freezer for 10 minutes.
Meanwhile, in the bowl of a electric mixer, placed mashed sweet potatoes, cream cheese and yogurt and beat until smooth.
Simmer the flax seeds in 2 tbsp water for a few minutes, beat a little and add it to the sweet potatoes mixture. Add the sugar, flour, spices, vanilla and salt and beat well. Add a little water if the mixture is too thick.
Sprinkle the apricots over the prepared crust. Pour the sweet potatoes mixture over the apricots.
Cover the oven tray with water and bake the cheesecake in the water bath. This prevents burning the crust and ensures the cake is baked gently. Bake for about 30 – 40 mins until the cake is almost set. It may not set completely in the middle. It will set further on cooling. Let it stand for about an hour in the oven. Remove, cool to room temperature, cover with a plastic wrap and chill for at least 3 hours before serving.
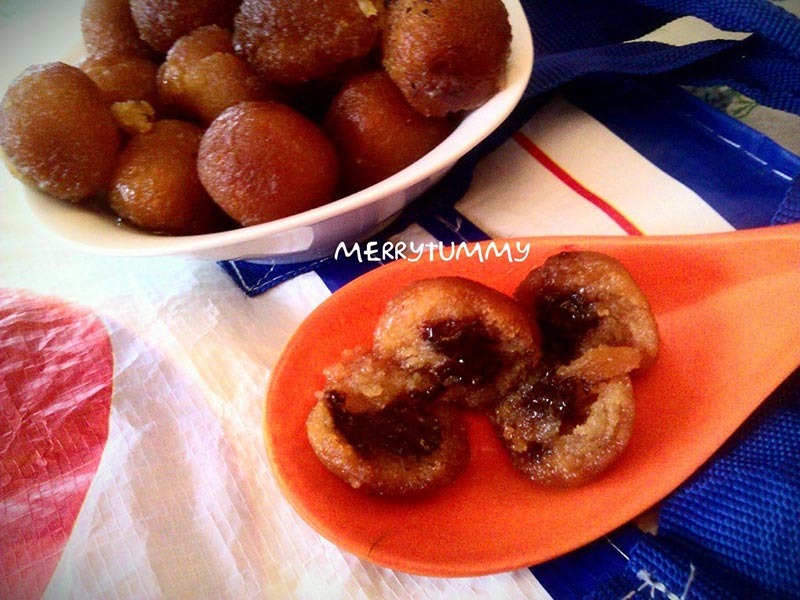
This recipe is the old sweet dish Gulab Jamun but with a new twist: Chocolate Gulab Jamuns. The bitter dark chocolate insides is a perfect balance to the sweetness of Gulab jamuns outside. Also I made these with milk powder which was new for me, and they turned out to be very soft and spongy. All were surprised and asked me for the recipe. So here it is a sweety savory juicy snack which a favorite dessert of all added with a fusion of western chocolate and Indian Gulab jamun !
Mix the milk powder with baking powder, maida, ghee and little water, make a smooth dough. Cover it with a lid and set aside for 15 minutes.
Divide the dough into small smooth balls. Fill chocolate chips in it and cover it with the mixture and make a ball.
For preparing sugar syrup add 2 cups of water and cardamom powder to sugar and make half thread sugar syrup.
For the syrup after the sugar dissolves in the water, boil the sugar syrup for a few minutes. The syrup is ready.
Heat oil in a pan for deep fry the jamuns. Fry the jamuns on a low flame stirring them constantly for even browning. When they turn to golden brown color, remove from the oil and put them into sugar syrup. Soak for 30 minutes.
Serve hot or chilled.
Notes
Tips
Remember softer the dough, softer will be the Gulab Jamuns.
You can also fill jam, gulkand, or any nuts in between.
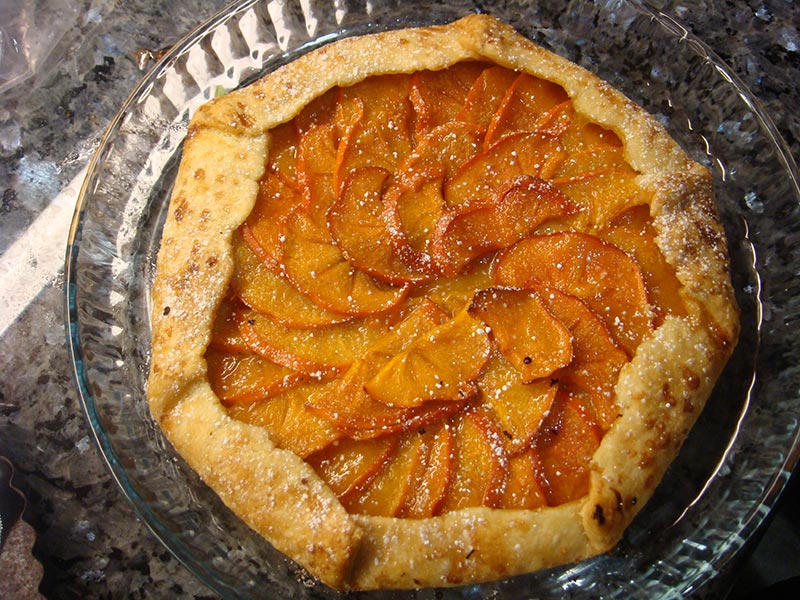
Persimmon galette is a rustic tart that has amazing color and a perfect sweetness. Its a rich royal dessert that is sure to impress your friends and family during gatherings and parties.
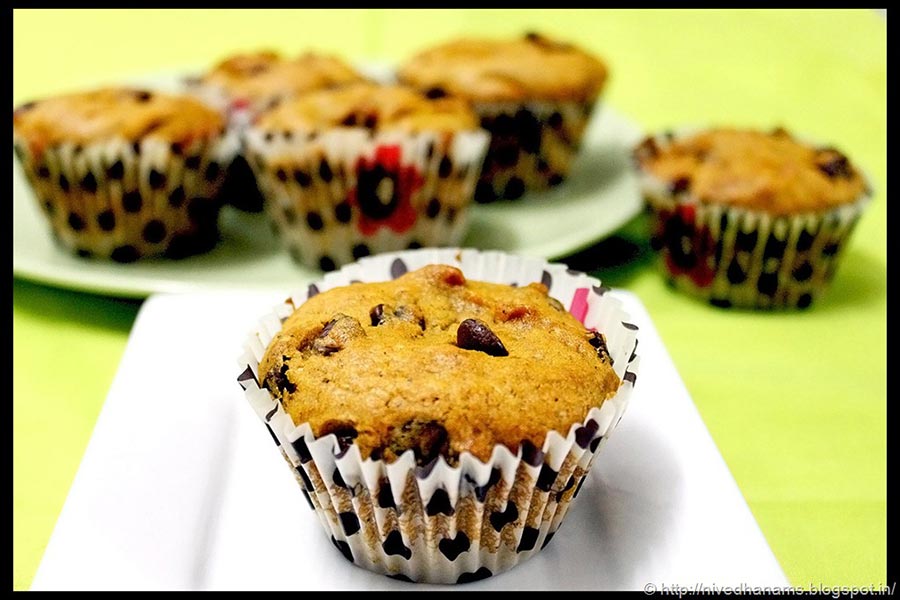
This is my recipe for Pumpkin Chocolate Chips Muffins. I made this recipe into vegan by substituting eggs and butter as a healthy and a nice dessert option. It is a very soft and super moist muffin and goes perfect with coffee. It was also moist the next day. This recipe will make 6 regular sized muffins.
Preheat the oven to 180 degrees C. Line 6 cup cake liners on the muffin trays and lightly spray cooking oil spray. Set aside
Sift together flour, baking soda, ground spices and salt.
In a small bowl, mix together egg replacer and warm water and beat well until gooey and set aside.
In another bowl, mix together oil, pumpkin puree and sugar and beat well until the sugar is well dissolved and the mixture is shiny
Add the egg replacer and vanilla and mix until combined
Now add the dry ingredients to the wet ingredients and fold it gently. Once the dry is all incorporated, add the chocolate chips and fold it well
Scoop them evenly onto the muffin cups and tap them gently to release any air bubbles
Bake in the oven for around 18 – 22 minutes until a toothpick inserted in the center comes out clean. Make sure that you do not prick a chocolate chip as that will be gooey. The toothpick should not have any batter attached to it.
Allow it to cool on the cooling rack for 30 minutes and enjoy!!!
Be careful when handling the muffins, they are too soft and delicate!!