Category: Keto Recipes

A Guide to Keto Recipes: Delicious Indian Low-Carb Vegetarian Options

The ketogenic diet, commonly known as the keto diet, is a popular low-carb, high-fat diet that has gained widespread attention for its potential benefits in weight loss, mental clarity, and overall health improvement. 

For those who enjoy Indian cuisine and are following a keto lifestyle, there is a wide array of vegetarian keto recipes that align perfectly with your dietary goals. This guide will help you navigate through some of the best Indian keto recipes, ensuring that you can enjoy your favorite flavors while staying in ketosis.

What is a Keto Diet?

The keto diet is based on a simple principle: by drastically reducing carbohydrate intake and increasing fat consumption, the body enters a state of ketosis. In ketosis, the body burns fat for fuel instead of carbohydrates, which can lead to weight loss and other health benefits. 

Typically, a keto diet involves consuming 70-80% of calories from fat, 20-25% from protein, and only 5-10% from carbohydrates.

Keto-Friendly Indian Ingredients

Indian cuisine is diverse and rich in ingredients that can easily fit into a keto diet. Some common keto-friendly Indian ingredients include:

Paneer (Indian Cottage Cheese): High in fat and protein, paneer is a versatile ingredient that can be used in various dishes.

Coconut Oil: A staple in South Indian cooking, coconut oil is an excellent source of healthy fats.

Ghee (Clarified Butter): Rich in fat, ghee adds a deep flavor to many Indian dishes and is perfect for keto cooking.

Low-Carb Vegetables: Cauliflower, zucchini, spinach, and bell peppers are all low in carbs and can be used in a variety of dishes.

Spices and Herbs: Spices like turmeric, cumin, coriander, and herbs like cilantro are keto-friendly and add a burst of flavor to your meals.

Popular Indian Keto Recipes

Keto Paneer Butter Masala

A rich and creamy dish, keto paneer butter masala replaces the traditional use of cream with heavy cream or coconut cream, making it high in fat and low in carbs. The paneer is cooked in a spiced tomato gravy, perfect for pairing with keto naan or cauliflower rice.

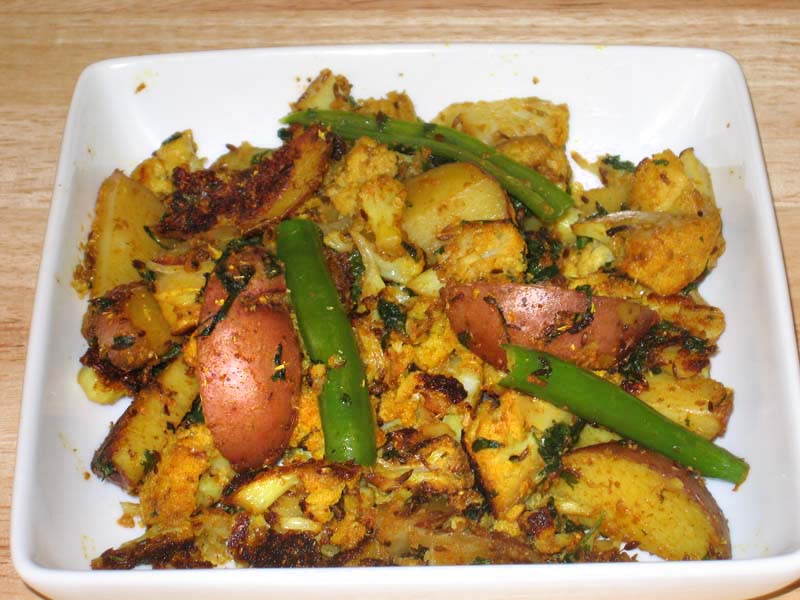
Keto Cauliflower Rice Pulao

Cauliflower rice is a fantastic low-carb substitute for regular rice. Cooked with vegetables, spices, and ghee, this keto cauliflower rice pulao is flavorful and filling, making it a great side dish or main course.
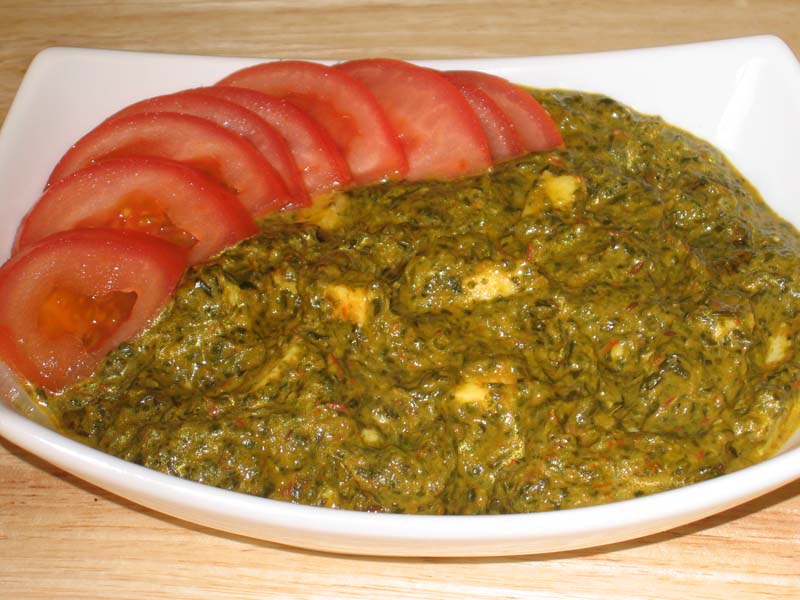
Keto Palak Paneer

Palak paneer is a beloved Indian dish made with pureed spinach and paneer. For a keto version, ensure the gravy is made with full-fat cream and butter, offering a delicious, nutrient-dense meal that’s low in carbs.

Keto Zucchini Sabzi

Zucchini, being low in carbs, is an ideal vegetable for keto dieters. This simple zucchini sabzi is stir-fried with spices and ghee, making it a quick and easy keto meal.

Keto Coconut Flour Roti

Traditional roti is made with wheat flour, which is high in carbs. However, coconut flour can be used to make a low-carb alternative that’s perfect for enjoying with your favorite keto curries.
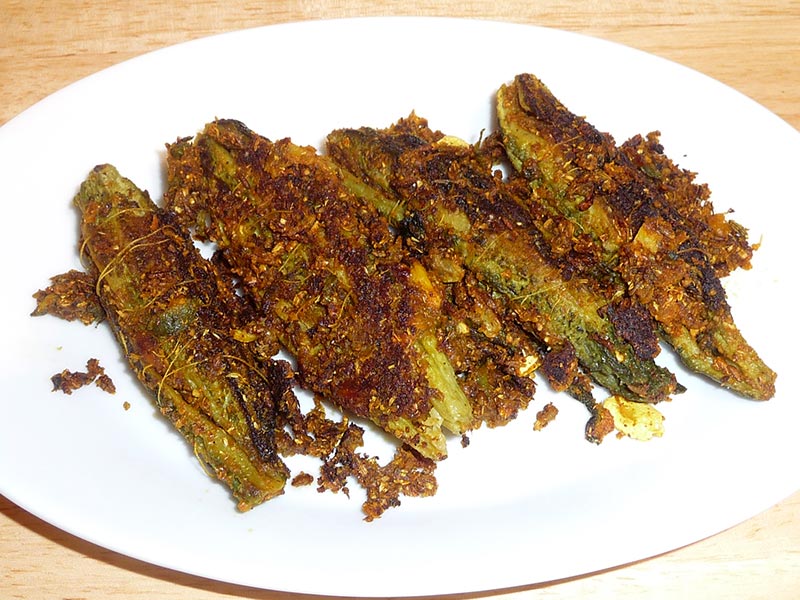
Keto Bhindi Masala

Bhindi (okra) is low in carbs and can be cooked with spices and ghee to create a keto-friendly bhindi masala. Serve this dish with cauliflower rice or keto roti for a complete meal.
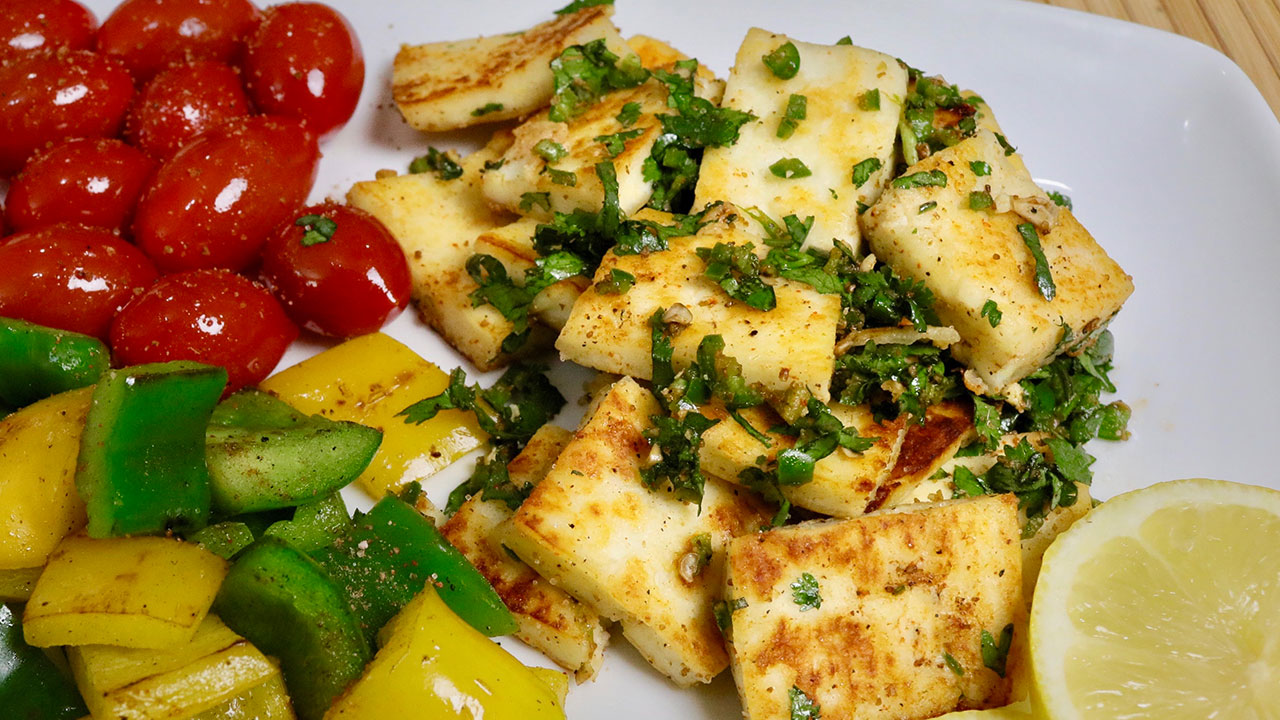
Keto Paneer Tikka

Paneer tikka is a popular Indian appetizer. For a keto-friendly version, marinate paneer cubes in full-fat yogurt, spices, and grill them to perfection. This dish is high in fat and protein, making it perfect for the keto diet.

Keto Methi Malai Paneer

Methi malai paneer is a creamy dish made with fenugreek leaves, paneer, and a rich cream sauce. By using full-fat cream and ghee, this dish becomes a perfect keto meal that is both satisfying and nutritious.

Keto Coconut Ladoo

For those with a sweet tooth, keto coconut ladoo is a delightful dessert made with coconut, ghee, and a keto-friendly sweetener like stevia. It’s a simple and quick treat that fits well within the keto guidelines.

Keto Avocado Chutney

Avocado is a great source of healthy fats, and when combined with traditional Indian spices and herbs, it makes a delicious keto-friendly chutney that can be paired with grilled vegetables or paneer.

Tips for Cooking Indian Keto Recipes

Use Full-Fat Ingredients: Always opt for full-fat versions of dairy products like cream, yogurt, and paneer to increase the fat content of your meals.

Avoid High-Carb Ingredients: Stay away from ingredients like potatoes, peas, and lentils, which are high in carbs and can kick you out of ketosis.

Embrace Spices: Indian spices are naturally keto-friendly and add depth to your dishes. Don’t shy away from using them generously.

Experiment with Low-Carb Alternatives: Cauliflower rice, almond flour, and coconut flour are excellent low-carb substitutes for rice and wheat-based products.

Conclusion

Maintaining a keto diet doesn’t mean you have to give up your favorite Indian flavors. With a little creativity and the right ingredients, you can enjoy a variety of delicious Indian keto recipes that will keep you in ketosis while satisfying your taste buds. 

From rich curries to flavorful snacks, these recipes are perfect for anyone looking to explore the keto lifestyle with a touch of Indian spice.

For more detailed recipes and to explore additional options, visit Manjula’s Kitchen – Keto Recipes.

  • Coconut Dream Dessert

    Coconut Dream Dessert

    Coconut Dream Dessert

    Coconut Dream Dessert

    Coconut Dream is a vegan delight, it is flavored with cardamom and saffron, very soothing and refreshing. Adding Agar-agar sets this dessert like jelly. It is super easy to make and taste great. I like to serve Coconut Dream chilled.
    5 from 1 vote
    Course Dessert
    Cuisine Indian
    Servings 8

    Ingredients
      

    • 1 cup coconut milk
    • 2 cup soy milk
    • ¾ cup sugar
    • 2 tbsp agar-agar powder, available in Indian and Asian grocery stores
    • ¼ tbsp cardamom crushed
    • ¼ cup coconut shredded
    • Approx. 20 crushed pistachios
    • Pinch of saffron crushed

    Instructions
     

    • Boil coconut milk, soy milk, coconut, pistachios, and sugar over medium high heat. After milk comes to boil let it boil for about 7-8 minutes, stir occasionally.
    • Mix agar-agar, saffron, and cardamom powder with ¼ cup of lukewarm water making sure agar-agar is dissolved.
    • Add the agar-agar mixture to the milk and mix it well, let it boil for 3-4 minutes. Stir occasionally otherwise agar-agar can become lumpy. Turn off the heat.
    • Pour it into either flat dish or molds, while it is still hot. Note: As milk mixture will cool it will start getting firm.
    • Refrigerate for about 2-3 hours or until set. Serve chill.

    Notes

    Notes
    Agar-agar is a vegetarian gelatin substitute made from seaweed vegetation. This works as a stabilizing and thickening agent for many recipes like custard and pudding. As this comes to room temperature it starts solidifying. Coconut Dream can be served at room temperature as it maintains its shape. But it taste best when it is served chilled.
    Tried this recipe?Let us know how it was!

    Indulge in Tropical Bliss with Our Creamy Coconut Dream Dessert Recipe

    Indulge in the tropical bliss of Coconut Dream Dessert, a heavenly creation that combines the rich, creamy texture of coconut with the delightful flavors that transport you to a paradise of taste. This dessert is perfect for any occasion, whether you’re hosting a dinner party or simply satisfying your sweet tooth. The Coconut Dream Dessert Recipe is easy to follow and promises to deliver a treat that is both refreshing and indulgent.

    The Essence of Coconut Dream Dessert

    The star of this dessert is the coconut, a versatile ingredient that lends a rich, creamy texture and a naturally sweet flavor. The Coconut Cream Lush is a layered dessert that combines different textures and flavors, making every bite an exciting experience. The base is typically made from a buttery crust, followed by a luscious coconut cream layer, and topped with whipped cream and toasted coconut flakes for an added crunch.

    Origin and Popularity

    Coconut-based desserts have been enjoyed for centuries in tropical regions where coconuts are abundant. The Coconut Dream Dessert draws inspiration from these traditional recipes, adding a modern twist to create a dessert that is both timeless and contemporary. Its popularity has spread globally, loved by those who appreciate the unique flavor of coconut and the creamy, dreamy texture that this dessert offers.

    Why You’ll Love This Recipe

    • Easy to Make: The recipe is straightforward, making it perfect for both novice and experienced bakers.
    • Flavorful and Creamy: The combination of coconut and cream creates a rich, indulgent flavor.
    • Versatile: Can be adapted to suit different dietary needs by using plant-based alternatives.
    • Impressive Presentation: The layered look of the dessert makes it a show-stopper at any gathering.

    How to Make Coconut Dream Dessert

    The Coconut Dream Dessert Recipe involves a few simple steps to create a multi-layered delight. Here’s a basic outline of the process:

    1. Prepare the Crust: Combine crushed biscuits or graham crackers with melted butter to form the base. Press this mixture into the bottom of your serving dish and refrigerate to set.
    2. Coconut Cream Layer: Mix coconut milk with a thickening agent like cornstarch or agar-agar to create a creamy filling. Sweeten with sugar or a natural sweetener, and add a touch of vanilla extract for extra flavor. Pour this mixture over the set crust and refrigerate until firm.
    3. Whipped Topping: Top the set coconut cream layer with whipped cream. For a lighter option, use whipped coconut cream.
    4. Garnish: Sprinkle toasted coconut flakes over the top for a crunchy finish.

    Variations of Coconut Recipes

    Exploring Manjula’s Kitchen reveals a treasure trove of other delicious recipes that you might enjoy. Here are some related coconut-based desserts that you might find interesting:

    1. Coconut Ladoo: These sweet coconut balls are made with condensed milk and shredded coconut, offering a quick and delicious treat.
    2. Coconut Barfi: A traditional Indian sweet made with coconut and condensed milk, perfect for festive occasions.
    3. Coconut Chutney: Coconut chutney is a typical condiment that is served with South Indian dishes, especially Idlis and Dosas. It has great texture and a unique taste that compliments many dishes..
    4. Coconut Pancakes: These fluffy pancakes are made with coconut milk and shredded coconut, perfect for a tropical breakfast.
    5. Sweet Coconut Rice: Nariyal Bhat is a traditional Maharashtrian recipe cooked on Raksha Bandhan.

    Serving Suggestions

    The Coconut Dream Dessert can be served in various ways to enhance your dining experience:

    • As a Standalone Dessert: Serve chilled, straight from the refrigerator.
    • With Fresh Fruits: Pair with tropical fruits like mango, pineapple, or papaya for an extra burst of flavor.
    • As Part of a Dessert Platter: Combine with other small desserts for a delightful tasting experience.

    Tips and Tricks

    To perfect your Coconut Dream Dessert, consider these helpful tips:

    • Use Fresh Coconut: Freshly grated coconut can enhance the flavor and texture of your dessert.
    • Chill Properly: Ensure each layer is properly set before adding the next to maintain the structure of the dessert.
    • Toast the Coconut: Toasting the coconut flakes for the garnish adds a delicious crunch and enhances the coconut flavor.

    FAQs Frequently Asked Queries

    Is Coconut Dream Dessert Vegan?

    Yes, it can be made vegan by using plant-based alternatives for butter and whipped cream.

    Can I Make It Ahead of Time?

    Yes, this dessert can be made ahead of time. It actually tastes better when it has had time to chill and the flavors meld together.

    What Can I Serve with This Dessert?

    This dessert pairs well with fresh fruits or a light, refreshing drink like coconut water.

    How Long Does It Take to Make?

    The preparation time is about 30 minutes, but you will need additional time for chilling each layer.

  • Grilled Paneer

    Grilled Paneer

    Grilled Paneer

    Grilled Paneer (Indian Cottage Cheese Appetizer)

    Grilled Paneer makes for a great appetizer that compliments any main course dish. Grilled paneer is quick and easy to put together, making it the perfect party appetizer. I will be preparing this appetizer a lot this holiday season because it is perfect to serve at get together and bring to potlucks.
    5 from 1 vote
    Prep Time 5 minutes
    Cook Time 15 minutes
    Total Time 20 minutes
    Course Appetizer
    Cuisine Indian
    Servings 4 people

    Ingredients


    • 1 1/2 cup paneer cubed in 1” square and 1/2” thick
    • 1/2 cup bell pepper cubed, yellow and green to give the color
    • 1/2 cup cherry tomatoes
    • 2 tsp oil
    • 1 Tbsp green chili finely chopped, optional
    • 2 Tbsp cilantro finely chopped, hara dhania
    • 1 tsp fresh lemon juice

    Spice Mix

    • 1/2 tsp salt
    • 1/2 tsp black salt
    • 1/2 tsp roasted cumin seed powder
    • 1/8 tsp black pepper
    • 1/8 tsp red chili powder

    Instructions
     

    • Mix the spice mix and keep aside. you can make this spice mix in a large quantity and keep it ready to go whenever you need it.
    • Heat heavy flat frying pan on low medium heat, add the oil in to warm frying pan. Spread the paneer cubes don’t over lap them. Grill the paneer from both sides, this should take about 2 minutes. Take them out from frying pan.
    • Use the same pan and grill the bell pepper, for about 2 minutes stirring occasionally, bell pepper will have some brown spots. Take them out from frying pan.
    • Use the same pan and grill the tomatoes for about 1-2 minutes, tomatoes will have some blisters. Take them out from frying pan.
    • In a bowl toss the paneer with spice mix, use the spice mix about in half the quantity, adjust for you taste, cilantro, green chili and lemon juice.
    • Serve the grilled paneer with side of bell pepper and tomatoes and sprinkle little spice mix over bell pepper and tomatoes.
    • A healthy and delicious appetizer is ready to serve.

    Notes

    Note: This spice mix known as chaat masala can also be used to spice up any food. It especially tastes good when it is sprinkled over sliced cucumber and tomato or over pakoras. You can make the chaat masala in a larger quantity and keep it ready to go whenever you need it.
    Keyword Appetizer, Grilled Paneer and Veggies, Masala Paneer, Party Food
    Tried this recipe?Let us know how it was!

    Grilled Paneer Recipe 

    Grilled paneer recipe is a delightful way to enjoy the rich flavors of Indian cuisine. Grilled paneer is a versatile dish that is kid friendly, quick & easy, party recipe that can be served as an appetizer, side dish, or even a main course. This recipe combines the creaminess of paneer with the smoky char of the grill, resulting in a dish that is both flavorful and satisfying. Whether you’re hosting a backyard barbecue or simply craving a taste of India, this Indian grilled paneer recipe is sure to please your palate.

    Indian Grilled Paneer: A Flavorful Delight 

    When it comes to Indian cuisine, grilled paneer holds a special place in the hearts of many food enthusiasts. The process of grilling adds a depth of flavor to the paneer, while still allowing its creamy texture to shine through. This paneer grilled recipe is perfect for those looking to add a touch of Indian flair to their meals. By marinating the paneer in a blend of spices and yogurt, you’ll create a dish that is bursting with flavor from the very first bite.

    Preparation 

    To begin, place the cubed paneer in a large bowl and set aside. In a separate bowl, whisk together the yogurt, olive oil, lemon juice,  ground cumin, ground coriander, turmeric, salt, and pepper. Pour the marinade over the paneer, making sure to coat each piece evenly. Cover the bowl and let the paneer marinate in the refrigerator for at least 30 minutes, allowing the flavors to meld together.

    Grilling the Paneer 

    Once the paneer has finished marinating, preheat your grill to medium-high heat. Thread the paneer cubes onto skewers, leaving a small amount of space between each piece. This will allow the heat to circulate evenly around the paneer, ensuring that it cooks evenly on all sides. Place the skewers on the grill and cook for 2-3 minutes per side, or until the paneer is lightly charred and heated through.

    Tips for Perfect Grilled Paneer 

    Use firm or extra-firm paneer for grilling, as softer varieties may crumble on the grill.

    Soak wooden skewers in water for at least 30 minutes before threading the paneer to prevent them from burning.

    Experiment with different marinade ingredients, such as ginger, chili powder, or garam masala, to customize the flavor of your grilled paneer.

    Variations on Grilled Paneer

    While this Indian grilled paneer recipe is delicious as is, feel free to get creative with your marinade and seasoning choices. For a spicy kick, add chopped green chilies or a dash of cayenne pepper to the marinade. You can also incorporate fresh herbs like cilantro or mint for a burst of freshness. Serve the grilled paneer with a side of mint chutney or tamarind sauce for an extra layer of flavor.

    Benefits of Grilled Paneer

    Grilled paneer is not only delicious, but it also offers several health benefits. Paneer is a good source of protein, calcium, and phosphorus, making it an excellent addition to a balanced diet. Grilling the paneer helps to retain its nutrients while adding a smoky flavor that enhances its overall taste. Additionally, paneer is low in carbohydrates, making it a suitable option for those following a low-carb or keto diet.

    Frequently Asked Questions (FAQs)

    Can I grill paneer without skewers?

    Yes, you can grill paneer directly on the grill grates or use a grill basket to prevent it from falling through.

    How long does grilled paneer last?

    Grilled paneer can be stored in the refrigerator for up to 3-4 days. Simply reheat it in the microwave or on the grill before serving.

    Can I freeze grilled paneer?

    While you can freeze grilled paneer, its texture may change slightly upon thawing. It’s best to freeze the paneer before grilling and marinating it.

    Can I make grilled paneer in the oven?

    Yes, you can bake paneer in the oven at 400°F for 15-20 minutes, or until it is lightly browned and heated through.

    Other Recipes on Manjula’s Kitchen

    If you’re looking to explore more Indian recipes, appetizers, beverages, and desserts, be sure to check out the following links on Manjula’s Kitchen. Here are some links to recipes on Manjula’s Kitchen official website: Paneer Tikka Masala, Chana Chaat (Spicy Chickpea Salad), Pav Bhaji (Spicy Vegetable Hash with Buns), Raj Kachori (Crunchy Chaat), Vegetable Biryani. These recipes should offer you a flavorful experience straight from Manjula’s Kitchen.

  • Stuffed Karela (Bitter Melon)

    Stuffed Karela (Bitter Melon)

    Stuffed Karela (Bitter Melon)

    Stuffed Karela (Bitter Melon)

    Stuffed karela makes a great side dish to any meal. Karelas have many health benefits including a home remedy for diabetes.
    5 from 3 votes
    Prep Time 10 minutes
    Cook Time 20 minutes
    Marinating Time 1 hour
    Total Time 30 minutes
    Course Side Dish
    Cuisine Indian
    Servings 4 people

    Ingredients
      

    For the Marinate:

    • 4 karela bitter melon
    • 1 tbsp salt
    • 1 tbsp lemon juice

    For the Filling

    • 2 tbsp oil
    • 1 tsp cumin seeds jeera
    • 1/8 tsp asafetida hing
    • 2 tbsp besan gram flour
    • 1 tbsp coriander powder dhania
    • 1 tbso fennel seed powder saunf
    • 1-1/2 tsp salt
    • 1/2 tsp turmeric haldi
    • 1/2 tsp red chili powder
    • 1-1/2 tbsp mango powder amchoor

    For Cooking

    • 2 tbsp oil
    • 1/2 tsp salt
    • also need thread to wrap

    Instructions
     

    Preparing the Kerala

    • Wash karelas thoroughly and using a knife, scrape the skin. Set the scrapes aside.
    • Make a slit in the karelas length wise and remove the seeds. Add karelas and the skin scrapings to a bowl. Mix and sprinkle with salt and lemon juice. Let it marinate for at least an hour.
    • Squeeze the karelas to remove all the marinade. Wash karelas twice with hot water and then squeeze out all the water. Separate the scrapings from the whole karelas.

    Preparing the Filling:

    • Heat the oil in a saucepan. Test the heat by adding one cumin seed to the oil; if the seed cracks right away, the oil is ready. Add the cumin seeds and asafetida to the oil. After the cumin seeds crack, add the karela scrapings and stir fry for about 2 minutes.
    • Add gram flour (besan) and stir-fry for another minute.
    • Add all the remaining dry spices: coriander powder, fennel powder, turmeric, chili powder, and mango powder. Sauté for a minute and then turn off the heat.
    • Stuff the split karelas with this spice mixture (there should be some spice mix remaining, which will be used later). Tie the karelas with a thread so that the stuffing does not come out while cooking.

    Cooking the Stuffed karelas:

    • Add 2 tablespoons of oil in a sauce pan over medium heat. Spread the stuffed karelas in the pan and sprinkle with salt. Cover the pan and let it cook for about 2 minutes.
    • Turn the karelas over to the uncooked side and cook for about 1 minute. Repeat until all four sides of the karelas are cooked.
    • Sprinkle 2 tablespoons of water and the remaining spice mixture over the karelas. Cover the pan and let it cook for 2 more minutes.
    • Remove the lid to see if the karelas are tender. Gently turn them over a few more times, making sure they are covered with the spice mixture.

    Notes

    Notes
    Stuffed karela can be served hot or cold and can be refrigerated up to a week.
    Variations
    For a slightly sweeter taste add 2 tablespoons of sugar to the cooked spice filling, prior to stuffing the karela.
    I like to Serve Karela with Urad Dal Tadka, Mixed Dal, Dal Makhini and Rice
    Keyword Bitter Melon, Diabetic Friendly, Healthy Side Dish
    Tried this recipe?Let us know how it was!

  • Aloo Gobi | Potato & Cauliflower

    Aloo Gobi | Potato & Cauliflower

    Aloo Gobi

    Aloo Gobi – Potatoes With Cauliflower

    Aloo Gobi is a delicious main dish made with potatoes, cauliflower, and a great blend of spices. Aloo Gobi can be served with various breads, such as rotis, parathas, and puris.
    4.37 from 11 votes
    Prep Time 10 minutes
    Cook Time 20 minutes
    Total Time 30 minutes
    Course Main Course
    Cuisine Indian
    Servings 2 people

    Ingredients
      

    • 2 cups cauliflower, cut into small florets
    • 2 medium potatoes, cubed into bite sized pieces
    • 1/2 inch shredded ginger
    • 3 tsp coriander powder dhania
    • 1/4 tsp turmeric haldi
    • 1/4 tsp red chili powder
    • 3 tbsp water
    • 3 tbsp oil
    • 1/8 tsp asafetida hing
    • 1/2 tsp cumin seeds jeera
    • 2 green chilies, sliced in long pieces
    • 2 bay leaves
    • 1 tsp salt
    • 1 tsp mango powder amchoor
    • 2 tbsp chopped cilantro hara dhania

    1/4 cup water use as needed

    Instructions
     

    • In a small bowl, mix the shredded ginger, coriander powder, cayenne pepper, turmeric, and 3 tablespoons of water to make a paste.
    • Heat the oil in a pan. Test the heat by adding one cumin seed to the oil; if seed crack right away oil is ready. Add hing and cumin seeds to the oil after seeds crack add the bay leaves and green chilies and stir for a few seconds.
    • Next, add the spice paste and stir for a minute until spices start leaving the oil.
    • Add cauliflower, potatoes, 2 tablespoons of water and salt. Mix well. Cover the pan and let it cook on medium heat for about 15 to 20 minutes until the vegetables are tender. Make sure to stir gently every 3 to 4 minutes.
    • Lastly, add the mango powder and fresh cilantro (green coriander). Mix everything and cover for a minute. Adjust the salt to your taste.

    Notes

    Variations:
    Add some green peas and/or sliced red bell peppers. The red bell peppers should be added at the end of the recipe as they cook quickly.
    Tips:
    Making a paste with the spices will prevent the spices from burning.
    Serve with Paratha, Puri 
    Tried this recipe?Let us know how it was!

  • Palak Paneer (Spinach)

    Palak Paneer (Spinach)

    Palak Paneer

    Palak (Spinach) Paneer

    Palak Paneer is creamy spinach dish with paneer . This is a popular dish with youngsters and served in every indian resturant. The creamy texture of spinach with paneer is a good combination. I like to serve Palak Paneer with Naan or Tandoori Roti.
    4.72 from 7 votes
    Prep Time 10 minutes
    Cook Time 30 minutes
    Total Time 40 minutes
    Course Main Course
    Cuisine Indian
    Servings 4 people

    Ingredients
      

    • 1 10 oz packet of chopped frozen spinach or 4 cups of fresh finely chopped spinach
    • 1/3 lb paneer
    • 2 med tomato pureed
    • 1 tsp chopped ginger
    • 1 tsp corinader powder dhania
    • 1/2 tsp turmeric haldi
    • 1/2 tsp red chili powder lal mirch
    • 1 tbs oil canola or vegetable oil
    • 1/2 tsp cumin seed jeera
    • 1/8 tsp asafetida hing
    • 1/2 tsp salt
    • 2 tbs whole wheat flour
    • 1/3 cup heavy cream
    • 1/2 tomato thinly sliced for garnishing

    Instructions
     

    • If using frozen spinach thaw and blend it just for a minute so spinach has a creamy texture but without becoming pasty.
    • blend the tomatoes and ginger to make puree.
    • Mix coriander, turmeric, and red chili with tomato puree and set aside.
    • Mix whole-wheat flour with heavy cream and set aside.
    • Cube the paneer in about half inch pieces and deep fry them on medium high heat just for few minutes so paneer become very light gold in color, take paneer out on paper towel so extra oil can be absorbed.
    • Heat the oil in a saucepan. Test the heat by adding one cumin seed to the oil; if it cracks right away it is ready.
    • Add hing and cumin seed. After cumin seeds crack, add the tomato puree mixture, and let it cook for a few minutes until the tomato puree is about half in volume.
    • Add the spinach, and let it cook on low medium heat for about 10 minutes covered.
    • Add heavy cream mixture and let this cook another four to five minutes.
    • Add paneer and fold it gently with spinach and let it simmer for a 2-3 minutes. Pot should remain covered until the cooking is finished, otherwise the spinach will splatter.
    • Transfer the spinach to a serving dish and spread the tomato slices over the top, and cover the dish so tomato slices get tender with the steam from the spinach.

    Notes

    You can replace the heavy cream with 1 1/2 cups of milk.
    serve Palak Paneer with Naan or Tandoori Roti
    Tried this recipe?Let us know how it was!

    How to Make Palak Paneer Masala by Manjula’s Kitchen

    Paneer Palak, a beloved North Indian dish, epitomizes the perfect party recipe with its creamy spinach and delectable paneer in rich gravy. This is not merely a culmination but a convergence, as the paneer becomes an integral part of the spinach symphony.

    1. Blanch the Spinach: Bring a large pot of water (6 cups) to a boil. Add the spinach and cook for precisely one minute. Drain the water immediately and immerse the spinach in ice-cold water for two minutes. This step preserves the vibrant green color of the spinach.
    2. Create the Palak Paneer Base: Prepare a smooth puree by blending the blanched spinach with ginger and green chili. Aim for a creamy consistency, avoiding an overly thick paste.
    3. Soften the Paneer: Soak the cubed paneer in hot water (3 cups) for at least five minutes. This step softens the paneer, allowing it to absorb the flavors of the masala.
    4. Temper the Spices: Heat oil in a large saucepan over medium-high heat. Add cumin seeds and asafetida. Once the cumin seeds crackle, introduce the chopped tomatoes and cook for 1-2 minutes.
    5. Incorporate the Spices: Add coriander powder, turmeric powder, red chili powder, salt, and a hint of sugar to the simmering tomato mixture. Stir well to combine and allow the spices to release their aroma.
    6. Cook the Spinach Puree: Reduce heat to low and add the prepared spinach puree. Simmer for 5-6 minutes without a lid to retain the vibrant green color of the spinach.
    7. Thicken the Gravy: For a thicker consistency and richer flavor, create a slurry by mixing flour with water. Gradually whisk the slurry into the simmering palak paneer mixture. Additionally, incorporate cream for a touch of silkiness.
    8. Incorporate the Paneer: Gently fold in the softened paneer cubes and simmer for another five minutes. This allows the paneer to absorb the flavors of the masala.

    Serving: Enjoy your Palak Paneer hot with rice or naan bread.

    Tips:

    Spinach Selection: Use fresh, young spinach for the best color and flavor. Wash thoroughly to remove any dirt or grit.

    Blanching Technique: Don’t overcook the spinach during blanching (step 1). One minute is sufficient to preserve the vibrant green color and prevent mushiness.

    Creamy Texture: For a richer and creamier gravy, add a dollop of heavy cream or cashew paste at the end.

    Spice Level: Adjust the amount of green chili or red chili powder to suit your preference.

    Flavor Boost: Include a bay leaf or a green cardamom pod while tempering the spices for a deeper flavor profile.

    Suggestions:

    Serving: Pair your Palak Paneer with basmati rice, jeera rice, naan, or roti for a complete and satisfying meal.

    Garnish: For a fresh touch, garnish your Palak Paneer with chopped cilantro or a dollop of plain yogurt.

    Leftovers: Store leftover Palak Paneer in an airtight container in the refrigerator for up to 2-3 days. Reheat gently on the stovetop before serving.

    Variations:

    Vegetable Palak Paneer: Add chopped vegetables like carrots, peas, or bell peppers for extra color, texture, and nutrients.

    Mushroom Palak Paneer: Substitute paneer with sliced mushrooms for a vegetarian twist.

    Coconut Palak Paneer: Stir in a can of coconut milk for a creamy and tropical twist.

    Dry Palak Paneer: Reduce the amount of water or simmer for a longer duration to create a thicker, dryer gravy.

    FAQs:

    Can I substitute spinach with another green leafy vegetable?

    Yes, you can use Swiss chard or kale, but the color and flavor will be slightly different.

    Can I use paneer alternatives?

    Yes, firm tofu can be used as a vegetarian substitute for paneer.

    Is Palak Paneer healthy?

    Yes, Palak Paneer is a healthy dish packed with protein from paneer, iron from spinach, and fiber from both ingredients.

    How long does it take to make Palak Paneer?

    The total preparation time is typically around 30-40 minutes.

    Enjoy making and savoring this delicious and versatile Palak Paneer recipe!

    If you liked this recipe. You must also try: Masala Bell Pepper Curry, Gulab Jamun, Pineapple Kulfi Ice Cream, Makhana Mutter Curry, and Ragda Puri Chaat