Thank you, I had a good laugh reading through all of the blunders. It’s good to know that some of you were able to save the day from total disaster. Whatever was the case, I am sure it was a lesson well learned. I selected two winners randomly. Here they are:
1st Place: shwetha0388
2nd Place: babli kaur
Congratulations to both of you.
Thank you to everyone else that also participated in the contest.
Everyone including myself makes big cooking mistakes from time to time. Sometimes I feel they always happen on important occasions. For this month’s contest, I would like to hear your cooking blunders. Maybe you were preparing for a big dinner party and things went very wrong. What did you do? Were you able to save the day? What did you learn from that day?
You needn’t send any photos for the contest. All you have to do is post your story to the disucussion forum on the Cooking Blunders topic that I have created.
The winners will be selected randomly from all the forum post entries.
Below is my checklist:
You will not have email me anything this time. You can simply leave a posting on the Cooking Blunders topic.
If you are creating a new account for the forum, please enter your email address so that I can contact you after the contest is over. Don’t worry, your email address will not be public (only I will be able to see it).
The deadline is May 31st.
The winner will be featured on the homepage and a link to their website (if available).
1st Prize: $100 gift certificate from Amazon.com 2nd Prize: $25 gift certificate from Amazon.com
I am frequently asked about cooking with a pressure cooker. Pressure cookers are convenient and can save you a lot of time in the kitchen! Lentils and dry beans are cooked much quicker with a pressure cooker.
However, if you are not using a pressure cooker, here are some pointers:
1. Soak the lentil and dry beans for few hours before cooking. They will cook quicker.
2. Add salt after lentil or dry beans are cooked.
3. When you are cooking lentils, white cloudy foam will form as they are coming to a boil. Add one tablespoon of oil to the water. This will help to break up some of the foam. Also to prevent the foam from spilling out, use a larger pot to cook. Also remove the foam from the top as it is building.
4. After the beans come to a boil, reduce the heat to medium.
5. If you have a slow cooker, you can use it for cooking lentil and dry beans.
I know rasgullas can be made without a pressure cooker, but I feel most comfortable making them with a pressure cooker.
Please do keep the questions coming and I will try my best to answer them!
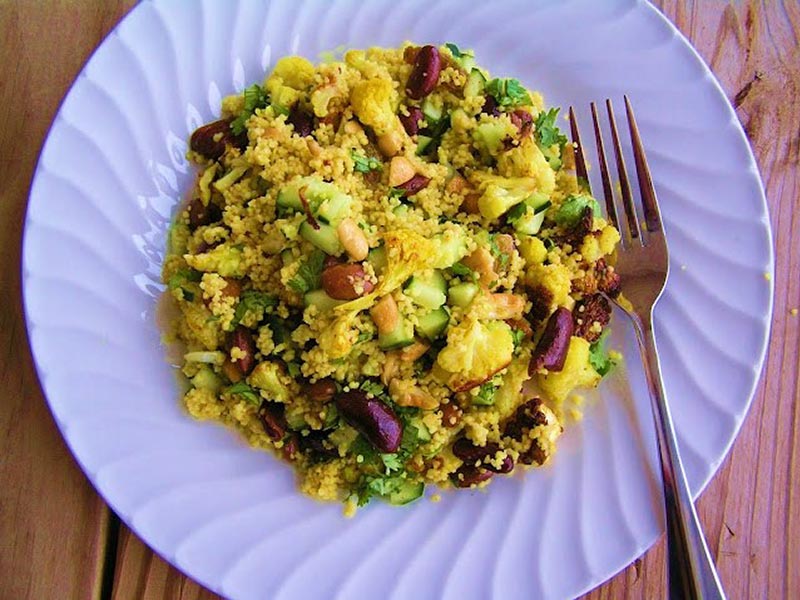
Curried Quinoa Salad with Roasted Cauliflower is very filling and nutritious. Its a healthyappetizer for those trying to cut down on their meal and find a comforting solace in salad option.
1/2 Cup Red Kidney Beans cooked (if using canned beans, drain and wash well with water)
1/2 Cup Cucumber chopped
Parsley / Cilantro – a couple of sprigs, chopped
Roasted Cashew nuts – a handful
Dried Cranberries / Raisins – a handful
For dressing :
1 Tbsp Olive Oil
1/4 Cup Plain Greek Yogurt
1 Tbsp Lemon Juice
Lemon Zest – of half a lemon
Salt
Pepper
Instructions
Method
Place the quinoa in a strainer and wash well under running water for 2 minutes. Place the quinoa along with vegetable stock in a pan and add turmeric, coriander powder, cumin powder, red chili powder and salt. Bring it to boil. Then simmer and cook till all the liquid is absorbed and the quinoa looks transparent. Keep aside.
Preheat oven to 400F. Place the cauliflower florets on a aluminium foil lined baking tray. Sprinkle salt and turmeric on top. Drizzle olive oil and bake for 30 minutes till the florets are cooked and slightly brown and caramelized.
In a serving bowl, place the quinoa, roasted cauliflower, red kidney beans, chopped cucumber, parsley, cashew nuts, cranberries and mix together.
Whisk the yogurt and olive oil together. Then make a simple dressing by mixing it with lemon juice, lemon zest, salt and pepper. Pour the dressing over the top of the salad and serve.
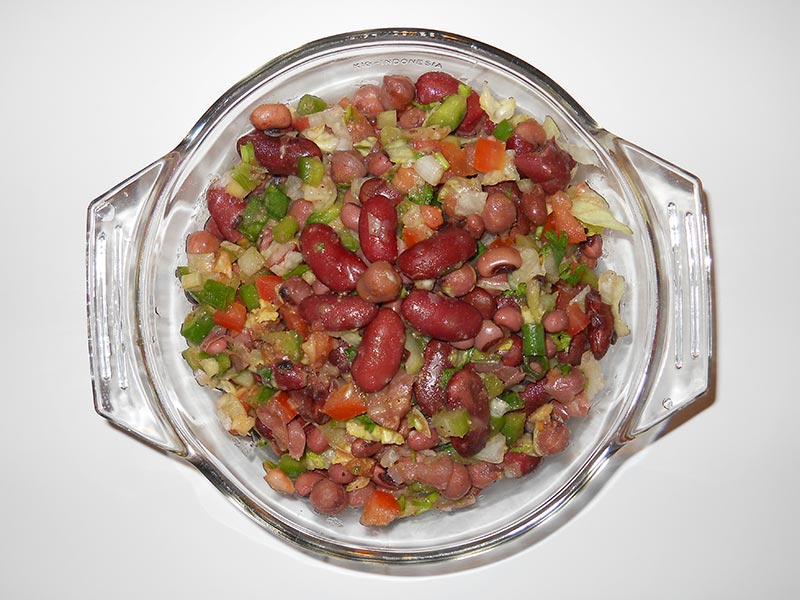
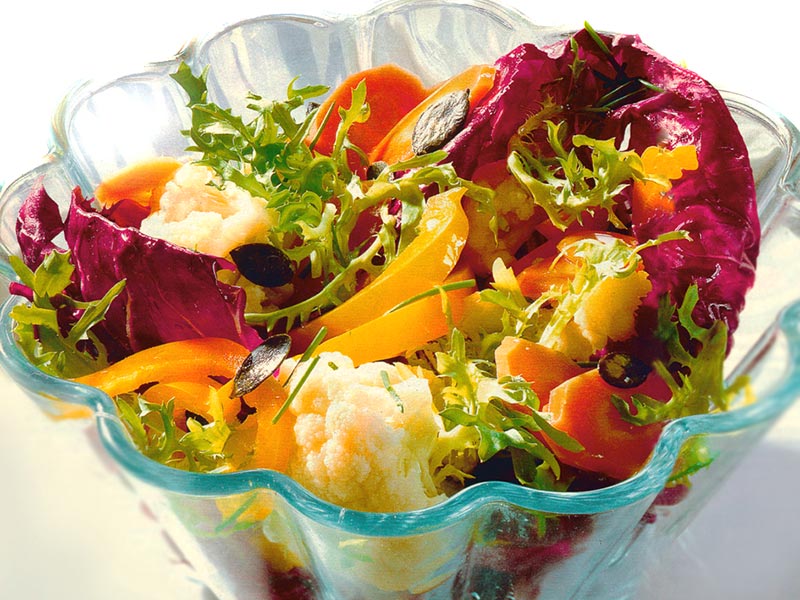
Ayurveda identifies 6 Tastes by which all foods can be categorized: sweet, sour, salty, bitter, pungent, and astringent. Ideally one should have a mix of all of them, when one is in good health. Lately my husband has seriously been exploring this field and I have taken this as a task: making food to serve as medicine.It is so easy to get into a salad boredom by mixing the same old lettuce and tomatoes…and that's where I found myself for a while. The salad I am submitting for the contest is a beautiful balance of the above listed tastes, apart from being nutritious, tasty and pleasing to the eye.I thought of thinking outside the lettuce head- and here I came up with a different salad that turned out excellent- and oh, so colorful! All of the ingredients are available at the produce section of any large grocery store. Even better, try your luck with local farmer's markets to assure freshness and quality. This recipe is a healthy, low fat, low calorie, gluten free
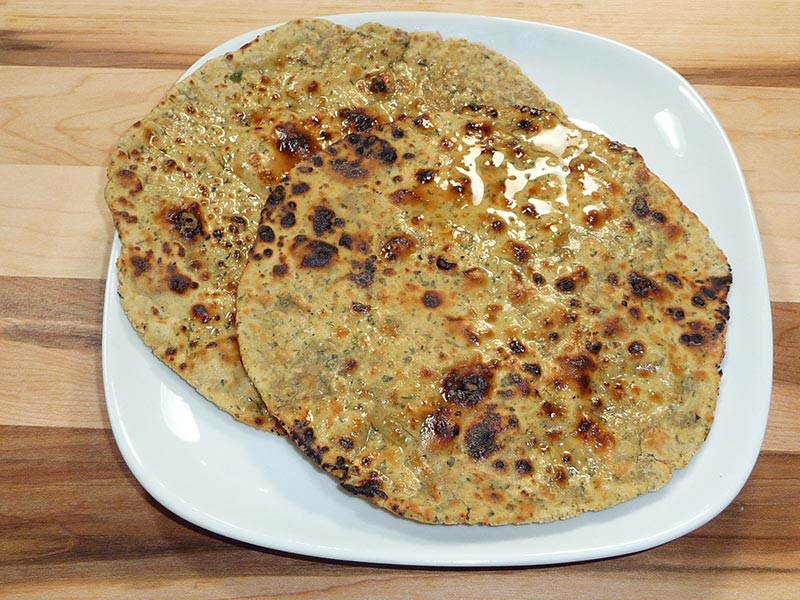
Besan Roti is very flavorful and healthy flat bread, high in protein and gluten free. Besan roti can be served with dal and leafy green vegetables like spinach or with yogurt.
Approx. 2 tablespoons butter or ghee (clarified butter)
Instructions
Method
Combine all the dry ingredients in a bowl mix it well. Add oil and yogurt to the mixture and mix. This will become very crumbly. Oil the palm to make the dough as it will be very sticky. Add water as needed to make the firm dough.
Keep the dough aside and cover with damp cloth. Let the dough rest for at least ten minutes or more.
Divide the dough in 6 equal parts. Make them in smooth balls.
Take one ball press it in rice flour from both sides and roll into about 6-inch circle. If the dough sticks to the rolling pin or rolling surface, lightly dust the roti with rice flour.
Heat the skillet over medium high heat. Note: Heavy skillet works best.
Place the rolled roti on skillet. In few seconds roti will start changing color, turn roti over, both sides of roti will have few light brown spots.
Next place the roti on open burner using tong. The top part of roti should be down. Note: if you have gas stove you can put roti directly over high flames but if you have electric stove use cake cooling rack or similar over the burner so roti does not touch burner coil directly.
Grill the roti from both sides using tong until roti has golden brown spots both sides. Bottom part of roti should be up for serving brush the roti with ghee or butter.
Keep Besan Roti’s in a covered container or wrap them in aluminum foil. (Besan Roti becomes dry when they come to room temperature)
Crispy papad topped with spicy salad makes a very refreshing appetizer. Masala Papad is full of flavors and very tempting. This is a very simple and easy recipe to make.Papad is a round, flat, dry cracker made with a variety of lentils. They are sold uncooked in Indian grocery stores. You can deep-fry them or dry-roast them.
2 plain papad, (available in Indian grocery stores)
2 medium tomatoes, seeded and diced very small to make a approx. 1cup
1/2 English or deseeded cucumber, cut in very small pieces to make it about ½ cup
2 tablespoons cilantro finely chopped
1 teaspoon ginger finely shredded, optional
1 green chili finely chopped, optional
½ lemon
2 teaspoon2 teaspoon oil
Spice Mix for Garnishing
1/2 teaspoon salt
1/4 teaspoon black salt
1/2 teaspoon dry roasted cumin seeds powder
1/8 teaspoon black pepper
Pinch red chili
Instructions
Method
Mix all the dry ingredients to make a spice mix, set aside.
Mix tomatoes, cucumbers, cilantro, ginger, and green chili, set aside
Lightly oil the papads from both sides, set aside.
Preheat the skillet over medium high heat. Roast the papads on both sides in the skillet one at a time, pressing with spatula. The papads will change to a light yellow with a few brown spots. Be careful not to over-roast. Fold the Papads in quarters while they are hot, making triangles right on the skillet.
Remove the papads from the skillet and break on the folds, creating four triangles from each one.
Take one piece of papad and top it with cucumber, tomato, ginger, green chili, and cilantro. Drizzle with lemon juice and sprinkle the spice mix on top.
Notes
Notes
Removing the seeds from the tomatoes keeps the papads crunchy.
English cucumber is crisper on the outside and tender on the inside.
You can prepare the masala papad in advance, and add the toppings just before serving.
Crunchy Delight: How to Make Delicious Masala Papad at Home
Masala Papad is a flavorful appetizer perfect for parties, offering a low-fat, vegan option that delights snack enthusiasts with its crunchy texture and spicy seasoning. Masala Papad is a delightful Indian appetizer that combines the crunchiness of papad with a burst of spicy, tangy flavors. If you’re wondering how to make masala papad, you’re in for a treat! This masala papad recipe brings together a harmonious blend of ingredients to create a dish that’s not only delicious but also incredibly easy to prepare at home. Let’s dive into the steps to prepare this mouthwatering delicacy.
1. Making the Spice Mix:
First, we’ll create a flavorful spice blend to add a kick to your masala papad. Gather all the dry ingredients like cumin, coriander powder, chili powder, and maybe even some chaat masala (a tangy and savory spice blend commonly used in Indian street food). In a bowl, carefully measure and combine these dry spices. Once everything is incorporated, set the bowl aside for later.
2. Preparing the Veggie Topping:
Next, we’ll create a refreshing and vibrant topping for the papad. Start by chopping the tomatoes, cucumbers, cilantro, ginger, and green chili. Aim for a fine chop to ensure even distribution on the papad. You can remove the seeds from the tomatoes if you prefer a drier topping, as the seeds can release moisture and make the papad soggy. After chopping, combine all the veggies in a separate bowl and set it aside with the spice mix.
3. Oiling and Roasting the Papads:
Now it’s time to prepare the base of our dish – the papad itself! Take each papad and lightly brush or drizzle a thin layer of oil on both sides. This will help them crisp up nicely during roasting. Once oiled, set the papads aside on a plate.
4. Roasting and Folding the Papads:
Heat up your skillet over medium-high heat. It’s important to have the pan hot enough to ensure the papads roast quickly and evenly. Carefully place one papad at a time in the hot skillet. Use a spatula to gently press down on the papad as it cooks. You’ll see the color change from its original white to a light yellow with a few brown spots. This is your cue to flip the papad and cook the other side. Be mindful not to overcook them, as they can become burnt and brittle. While the papad is still hot and pliable, fold it in half to create a semi-circle shape. Then, fold it in half again to form a small triangle. This folding technique not only creates a nice presentation but also helps cradle the toppings when assembled.
5. Assembling and Serving the Masala Papad:
Finally, it’s time to put everything together! Take one of the folded papad triangles and carefully break it along the folds to create four smaller triangles. Now you have a crispy base ready for the toppings. Place a dollop of the prepared vegetable mixture on each papad triangle. Don’t forget a squeeze of fresh lemon juice for a touch of tanginess! Lastly, sprinkle the reserved spice mix over the top for a burst of flavor.
Tips for Perfect Masala Papad
Using English cucumbers is recommended for their crisp texture, but regular cucumbers will work too.
You can prepare the masala papad in advance for a quick and easy snack. Just store the roasted papad triangles in an airtight container and assemble them with fresh toppings right before serving.
Experiment with different toppings such as grated cheese, finely chopped bell peppers, or even crumbled paneer to create your own unique variations of masala papad.
For a healthier alternative, opt for baked papads instead of the traditional fried ones.
If you’re short on time, you can prepare the masala mixture in advance and store it in the refrigerator until ready to use.
Variations of Masala Papad
Paneer Masala Papad: Top your papads with a spicy paneer mixture for a creamy twist on this classic recipe. Check out the recipe here.
Corn Masala Papad: Add a sweet and savory element to your masala papad by incorporating corn kernels into the masala mixture. Find the recipe here.
Schezwan Masala Papad: Give your masala papad an Indo-Chinese twist by drizzling it with spicy Schezwan sauce. Learn how to make Schezwan sauce here.
Benefits of Masala Papad
Masala papad is a low-calorie snack that’s perfect for those watching their weight.
The combination of spices in masala papad aids digestion and stimulates the appetite.
Papads are rich in dietary fiber, making them a healthy option for snacking.
FAQs about Masala Papad
Can I make masala papad in advance?
Yes, you can prepare the masala mixture ahead of time and store it in an airtight container in the refrigerator. Simply assemble the papads right before serving.
Can I use store-bought papads for this recipe?
Absolutely! Store-bought papads work just as well as homemade ones for making masala papad.
Can I customize the spice level of masala papad?
Of course! Adjust the amount of green chilies and chaat masala according to your preference for spiciness.
With these simple steps and tips, you’ll be able to whip up a batch of delicious masala papad that’s sure to be a hit at your next gathering or as a quick snack for yourself. Enjoy experimenting with different toppings and flavors to create your own signature version of this beloved Indian appetizer!
Sorry for the delay in posting the winners for this month. There was a lot of color and variety in the recipes submitted and they all looked great. I would to thank everyone who participated. You all did a great job. Here are the top five recipes and two winners from those:
1st Place: Nav Sidhu (Quinoa Salad)
2nd Place: Adelina Srinivasan (Thinking Outside the Lettuce Head)
Congratulations to both of you!!
Thank you to everyone else that also participated in the contest:
To celebrate spring, this month’s contest is to make a colorful spring salad. It must be accompanied by a homemade dressing. The salad can include fruit as well as vegetable. The vegetables may be cooked also. Mostly, I am looking for a healthy spring salad that is colorful. The specific rules for April are the following:
Any type of salad with fruits and/or vegetables.
You must also make a homemade dressing to go with the salad.
It must be vegetarian and also egg-less.
Please submit only ONE recipe.
Please see my salad recipes for examples.
In general I will only consider recipes that I feel are complete in regards to ingredients, measurement, and instruction. From there I am looking for creativity and a recipe that my viewers would enjoy to prepare on their own. I will be judging on overall recipe and presentation also.
Below is my checklist:
Be Creative!
Ingredients should be listed with measurements.
Method must be explained clearly, so it’s easy to follow.
Please include your name along with the recipe (as you would like it to appear).
Search the web for ideas. There are many resources available.
You must also send original picture(s) of the recipe – do not simply grab a photo from the web. Otherwise your recipe will not be considered for entry.
The deadline is April 27th.
The winner will be featured on the homepage with the new recipe and a link to their website (if available).
1st Prize: $100 gift certificate from Amazon.com 2nd Prize: $25 gift certificate from Amazon.com
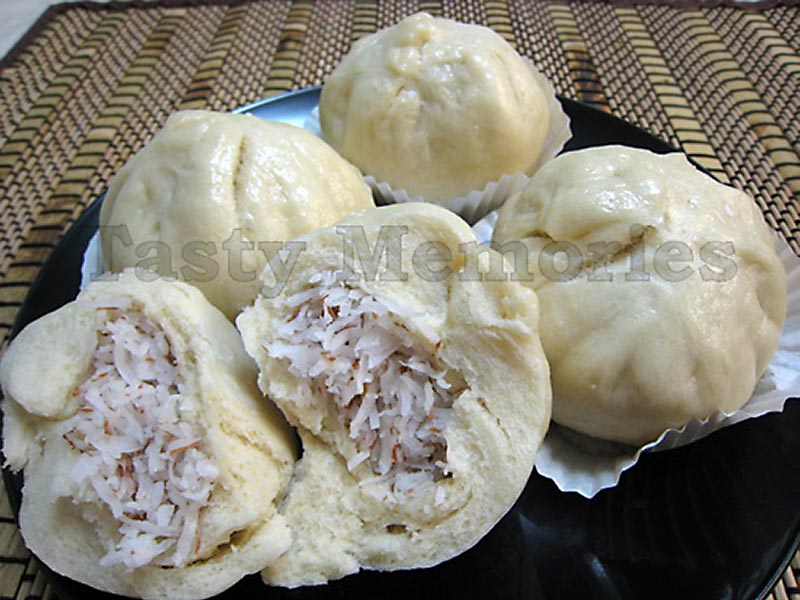
The dough recipe is quiet easy to follow and the filling used here is very simple. Dough can be filled with variety of vegetable, meat or sweet fillings. Its a good healthy, veganappetizer. This coconut filling is also very versatile and can be used to fill puff pastries or even spring roll sheets to form spring rolls or samosas. Combinations are endless and sky is the limit!
8 Standard Cupcake Liners or Parchment Paper cut into 4 inch squares
Instructions
Method
In a large bowl, combine water, yeast, oil and sugar. Mix with a spoon until well combined.
Sift in flour and salt into the liquid mixture and stir with a wooden spatula to combine. When it becomes hard to stir, start kneading dough with hands until smooth for about 2 to 3 minutes.
Lightly coat the bowl with oil spray, put dough, turn once to coat with oil, cover and leave it in warm area for about 40 minutes or until doubled in size. (For faster rising, place the bowl in a larger bowl filled with warm water)
Knead the dough for about a minute to remove air, cover and leave it again for another 30 minutes.
Meanwhile, in a medium size pan combine coconut, sugar, salt and cook over medium low heat stirring frequently until sugar is melted for about 2 to 3 minutes. Remove from heat and let it cool completely.
Place cupcake liners 1 inch apart on the rack of a steamer and keep aside.
Take dough and divide into 8 equal portions. (Keep unused dough covered to prevent from drying out.)
On lightly floured surface, roll each portion into approximately 4 inch circles leaving center thicker than edges.
Take a heap tablespoon (or 1/8) of filling and place in middle of the circle. Gather the edges of the dough and conceal the filling by pinching and sealing the edges while forming pleats. Twist ends off to seal and close; and place it in prepared steamer rack.
Continue rolling and filling rest of the dough, cover and let it rise for 20 minutes.
Steam the buns for 20 minutes, covered and undisturbed.
Turn off the heat, remove buns from steamer and serve.
Notes
Additional Notes:Steamed buns can be kept at room temperature for a day or two. Keep them in fridge for few more days after that. Before serving, wrap it with damped paper towel and microwave for 10 to 15 seconds.
This bread is called Ari Pathal (Rice bread). This is my moms recipe (from Kerala) . It is normally served for breakfast or for snack, it can be eaten as it is or with potato masala curry or with chutney.
1/2 cupCoconut Grated -( if using dried shredded ones sprinkle some warm water ,mix and keep aside for it to soften)
½ cupChopped Shallots or red onions
1 tspJeera
1/2 tspSalt – or to taste
2 cupsWater – (hot)
Instructions
Method
Roast the rice flour for about 5 minutes on medium heat . (don’t brown it)
Boil 2 cups of water on the other stove while You are roasting the rice flour
Transfer the roasted flour in to a wider bowl and make a well in the center .
Add salt and the half the water(straight from the stove) and mix with a spoon , slowly add the remaining water and give it a good mix. Keep aside for some time for it to cool
Meanwhile chop onions finely , keep the other ingredients ready
Now knead the flour with hand just like we do for chapattis
Heat oil on Medium high
Make lemon size balls( greasing hands with oil will prevent it from sticking)
Press gently each balls with palms just like we do for Kachoris. Shape the edges if needed( this is
Traditionally done on banana leaves but I shaped it on wax paper today. Zip-Loc bags can also be used)
Flip the pressed ones on hand and deep fry ( 5 min or until it turns light golden brown)
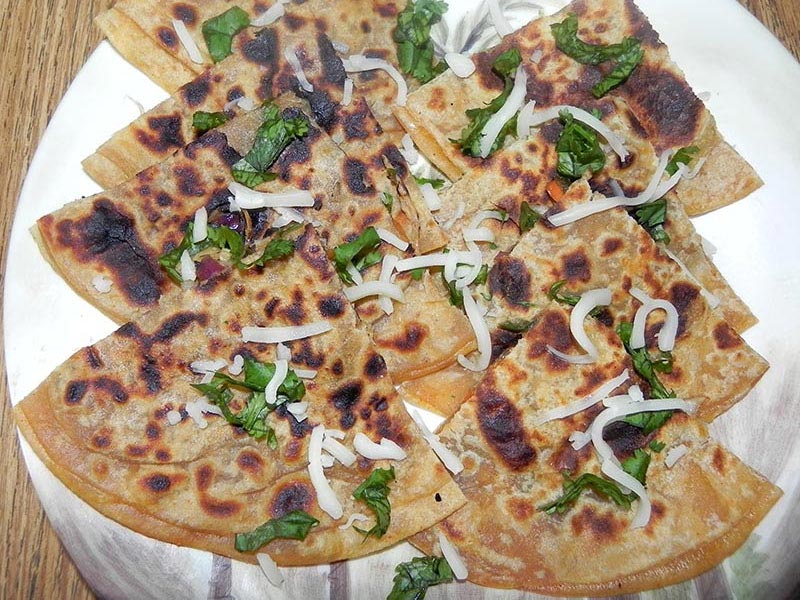
We all love Chinese food. I love it too. Actually chinese is one of my favorite cuisine. Chinese food is really healthy food and aroma of sauces used in it is also very nice. It always contains so many healthy vegetables. This time I found a new version of that. How about a chinese paratha? Give it a try. Trust me, you will fall in love with it.
1/2 Cup of very finely chopped cabbage/Patta Gobhi
1/4 Cup of very finely chopped capsicum/Shimla mirch
1/2 Cup of very finely chopped carrot
1/2 Cup of very finely chopped Green onions
2-3 very finely chopped green chillies
1 Tbsp of dark soya sauce
1 Tbsp of chilly sauce
1 & 1/2 Garlic very clove finely chopped
salt to taste
a pinch or 2 of black pepper
1 Cup of Wheat Flour
1/4th Tsp salt
1/4th Tsp 1/4th Tsp Red pepper/Lal mirch
Water as required to make the dough/around 1/2 cup
Oil or butter or Ghee[Purified butter] for paratha's
Instructions
Method
In wheat flour add salt and red pepper and mix well.
Slowly adding water to it, make the dough as same as chapati dough. Cover it and keep it aside for around 15 minutes.
All vegetables should be very finely chopped. Mix together all vegetables, green chillies, black pepper, sauces and salt as per taste. Be careful while adding salt with stuffing, because all types of sauces contains already salt.
Divide the dough in 10 equal parts. Roll 2 balls in circle shape as same as chapati with the help of rolling pin.
On one chapati, spread 2 tbsp. of vegetable mix. Cover it with another rolled chapati. Press it from all sides and pack it well, so that the stuffing will not come out.
Cook it from both sides on hot tawa, adding little oil/butter/ghee, till very small brown patches appeared on both sides.
Serve hot.
Notes
Additional:If you want to garnish it, spread some green coriander leaves and grated paneer/Indian cheese on it.
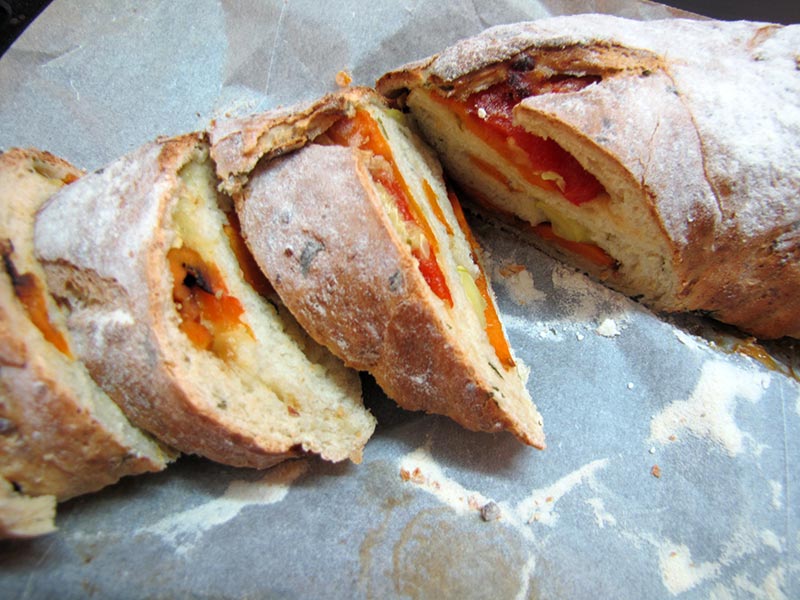
This Colorful Antipasti Bread is a delicious, beautiful, and most importantly fun, low fat and healthybread to make! (I received the original recipe from Oren Giron)
1 Kg of sifted white flour (for the best results use Bread Flour, if you can't find any, regular white flour will do the trick)
30 gr dry yeast
450-600 milliliters of lukewarm water (depending on how moist the flour is)
a bundle of fresh Basil chopped
50 gr of sugar
20 gr of salt
100 gr grated Parmesan cheese
For the filling:
3 courgettis, sliced and lightly roasted in the oven
2 red peppers, roasted and pealed
2 small sweet potatoes roasted in the oven
(you can also use an eggplant sliced and roasted, or other veggies you like roasted in the oven)
Instructions
Method
Roast and prepare the vegetable filling you intend on using in the bread.
Place all of the dough's ingredients in a mixer bowl with 450ml of water and start mixing. If dough seems a little dry add a bit more water until it forms into a smooth soft ball (but no more than 600ml), this should take about 10 minutes. you can also do this by hand.
Place the dough in a bowl, cover it and let it rise until volume has doubled. This takes about one hour, depending on the weather 🙂
Preheat the oven to 200C.
Divide the dough into 3 equal pieces and roll out each one into a rectangle (do not over knead the dough, or it will turn elastic and hard to work with).
Place a third of the vegetables on each rectangle leaving the edges empty (see photo).
Fold each vegetable topped rectangle into an oval shaped loaf (see photo).
Place loaf on baking dish lined with a baking sheet, cover and let rise until the loaf doubles in volume.
Dust the tops of the loafs with flour and make small incisions on top with a knife.
Bake for 230C for 15 minutes and then reduce to 200C for about 20 minutes.
Take a peek in the oven near the end, when the bread is nice and brown (the bottom too) its ready.
I was happy to see so many bread recipes last month, but it was a lot more work this time to review, try and select the winners. Thank you to everyone who participated and you all did a great job. However, I did have to disqualify some due to missing photo or copied recipes. Please make sure to send original photos in the email and if adapting a recipe from elsewhere, please don’t simply copy the recipe word for word. Here are the top five recipes and two winners from those: