Category: Ugadi

Ugadi: A Time for New Beginnings and Traditional Vegetarian Recipes

Ugadi, often referred to as the South Indian New Year, is a time of new beginnings, prayers, and of course, a variety of festive dishes. Celebrated primarily in the states of Karnataka, Andhra Pradesh, and Telangana, Ugadi marks the start of the Hindu lunar calendar, and the festival is filled with symbolic rituals and delicious food.

As with most Indian festivals, food plays a pivotal role during Ugadi celebrations. This article will explore some traditional Ugadi dishes, focusing on vegetarian recipes with no onion, garlic, or eggs, making them perfect for Jain and other vegetarian diets.

Ugadi Pachadi: The Essence of Ugadi

No Ugadi meal is complete without Ugadi Pachadi, a special dish symbolizing the six different emotions of life. This sweet, sour, spicy, and bitter concoction is made using tamarind, jaggery, neem flowers, salt, and raw mango, representing the different emotions that one might experience throughout the year. It is considered the most symbolic dish of the festival, representing the importance of accepting all aspects of life.

Traditional Ugadi Vegetarian Dishes

In addition to Ugadi Pachadi, the festival features a variety of wholesome vegetarian dishes. Here are a few of the must-try dishes you can prepare at home:

1. Pulihora (Tamarind Rice)

A popular dish across South India, Pulihora, also known as tamarind rice, is tangy, spicy, and a favorite during festivals. The key ingredients include tamarind, rice, green chilies, and curry leaves. This dish has the perfect balance of flavors and is usually prepared as an offering to the gods before being shared with family and friends.

2. Bobbatlu (Obbattu/Puran Poli)

This delicious sweet flatbread, known as Bobbatlu in Andhra Pradesh and Puran Poli in Maharashtra, is made from jaggery and lentil filling, stuffed inside a dough made from maida or wheat flour. This dessert is a must-have during Ugadi celebrations and pairs wonderfully with a spoonful of ghee. Bobbatlu is soft, flavorful, and perfect for adding a sweet note to the Ugadi feast.

3. Mango Rice (Mamidikaya Pulihora)

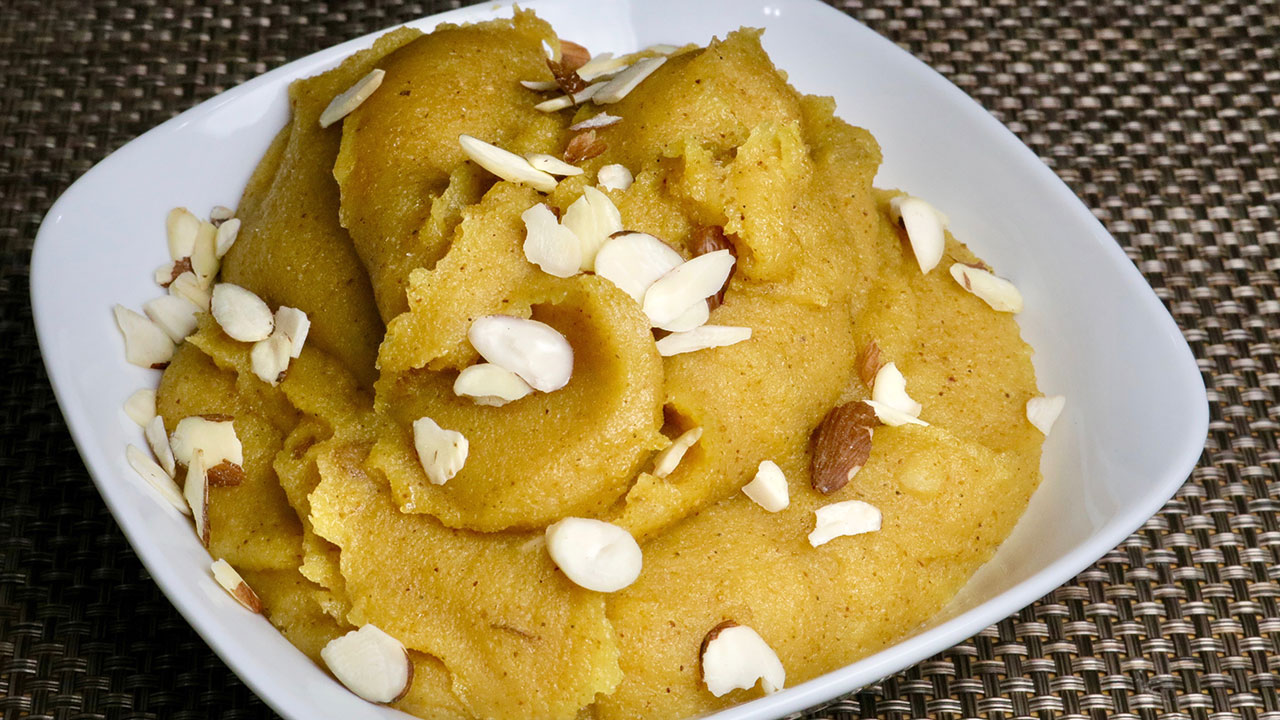
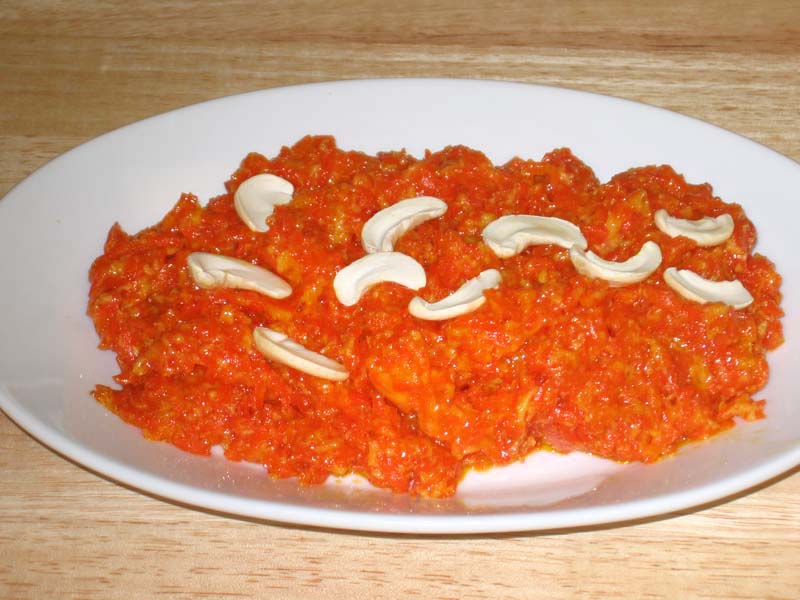
As Ugadi coincides with the beginning of the mango season, dishes featuring raw mango are a highlight of the festival. Mango Rice is one such delicacy. It’s a flavorful combination of tangy raw mango, aromatic spices, and cooked rice, making it a perfect dish for Ugadi celebrations. This is a no-fuss, easy-to-make recipe that bursts with flavor.

4. Majjiga Pulusu (Buttermilk Stew)

Majjiga Pulusu is a traditional South Indian buttermilk stew made with vegetables and spices. It’s light, tangy, and perfect for cooling down after indulging in the spicy flavors of other Ugadi dishes. The stew is made by simmering buttermilk with vegetables like bottle gourd or pumpkin, and spiced with cumin, green chilies, and curry leaves. It’s a refreshing dish that is often served with rice.

5. Vankaya Pulusu (Brinjal Stew)

A flavorful stew made from brinjals (eggplants), Vankaya Pulusu is a popular dish served during Ugadi. This dish has a tangy and spicy flavor, thanks to tamarind and an array of Indian spices. It pairs perfectly with steamed rice and is a must-have dish in the Ugadi menu for many families.

Ugadi Snacks and Sweets

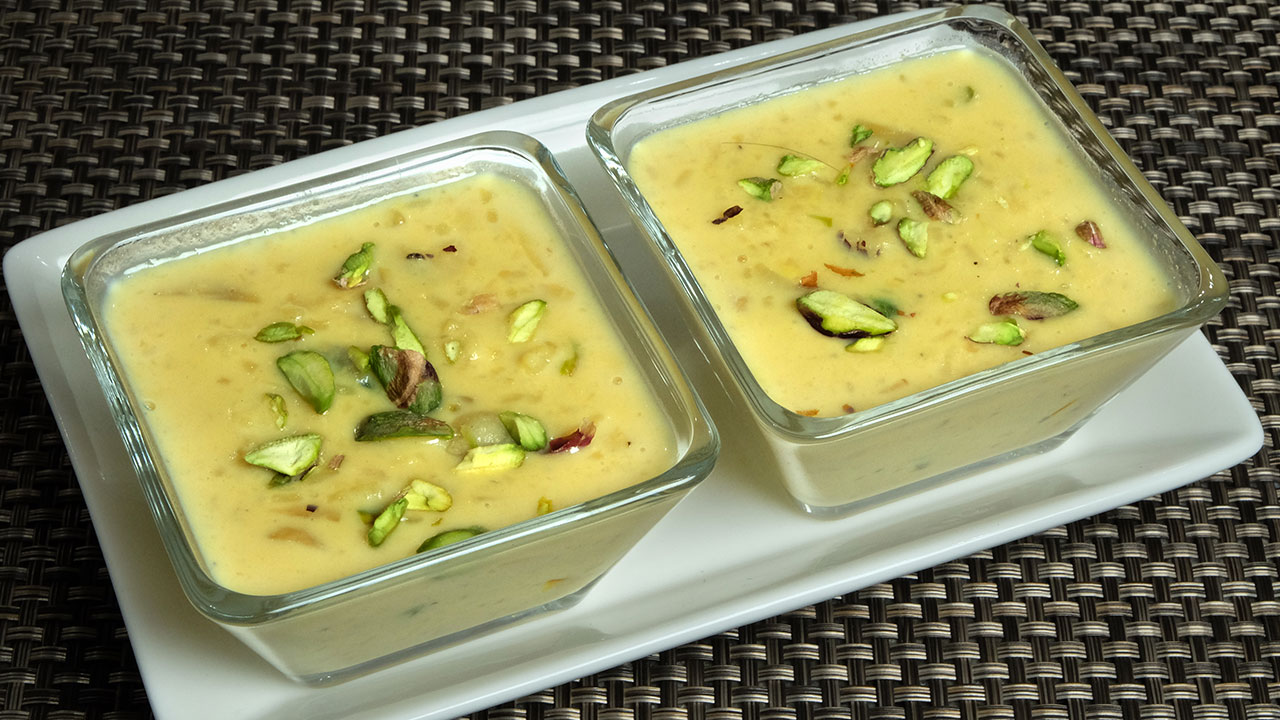
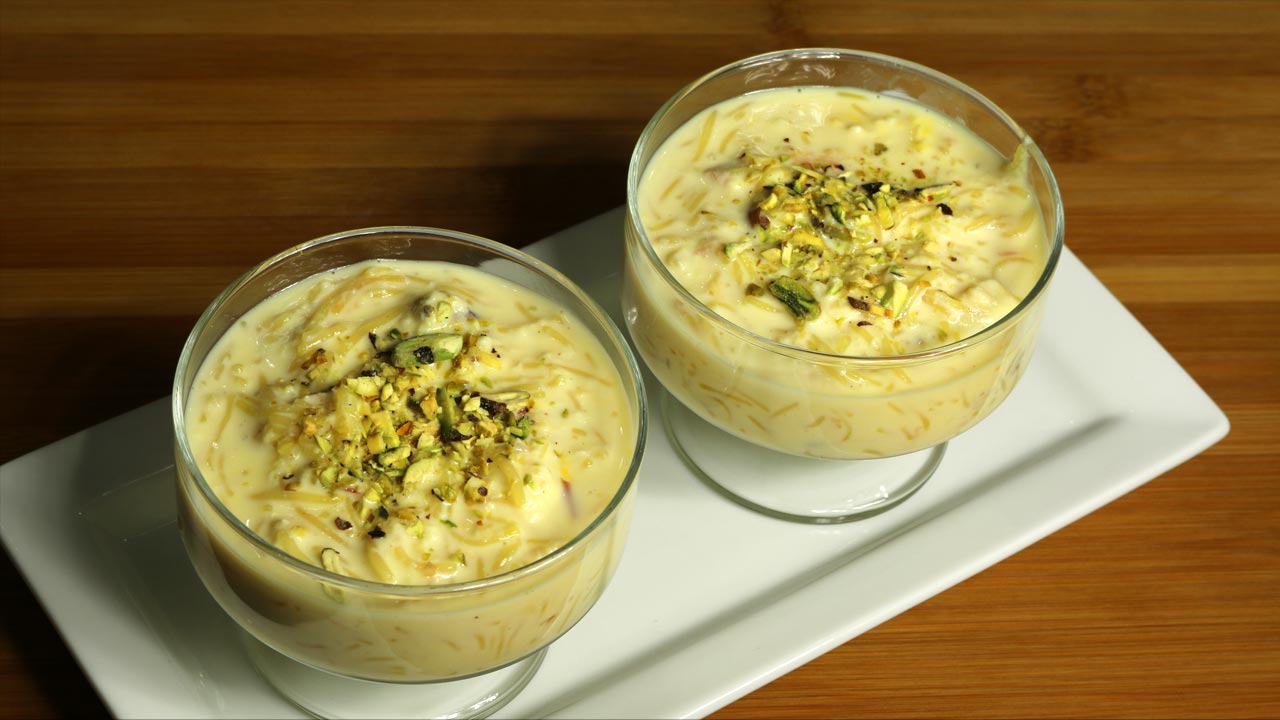
Apart from the main dishes, Ugadi also features a variety of snacks and sweets that make the festival even more special. Here are some popular ones:

6. Garelu (Medu Vada)

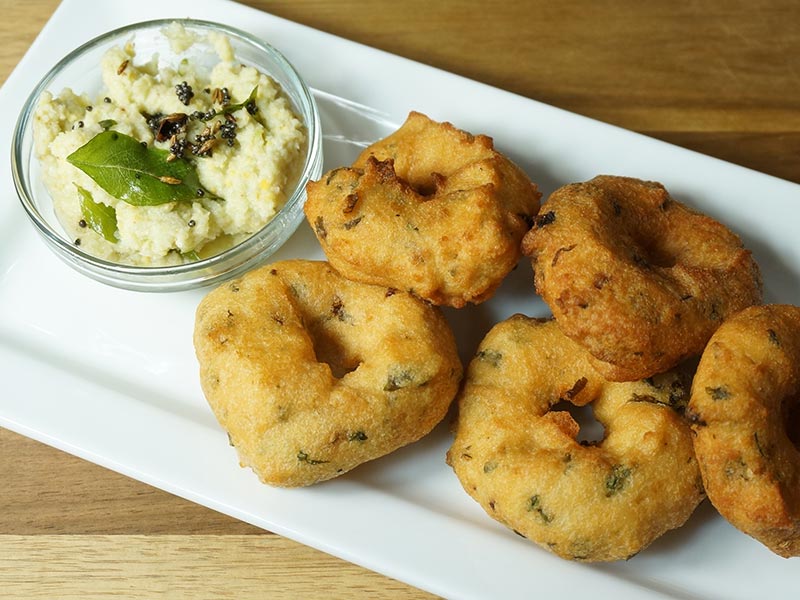
A crispy and savory snack, Garelu or Medu Vada is a must-have on Ugadi. Made from urad dal batter and deep-fried to a golden crisp, these vadas are crispy on the outside and soft on the inside. They’re often served with coconut chutney and are a perfect complement to the main course.

7. Ariselu (Rice Flour Sweet)

Ariselu is a traditional Andhra sweet made from rice flour and jaggery, deep-fried to a crispy perfection. This sweet is often prepared during festivals and is loved by both children and adults alike. It has a unique texture, and the sweetness from jaggery makes it a delightful treat for Ugadi.

8. Kajjikayalu (Sweet Dumplings)

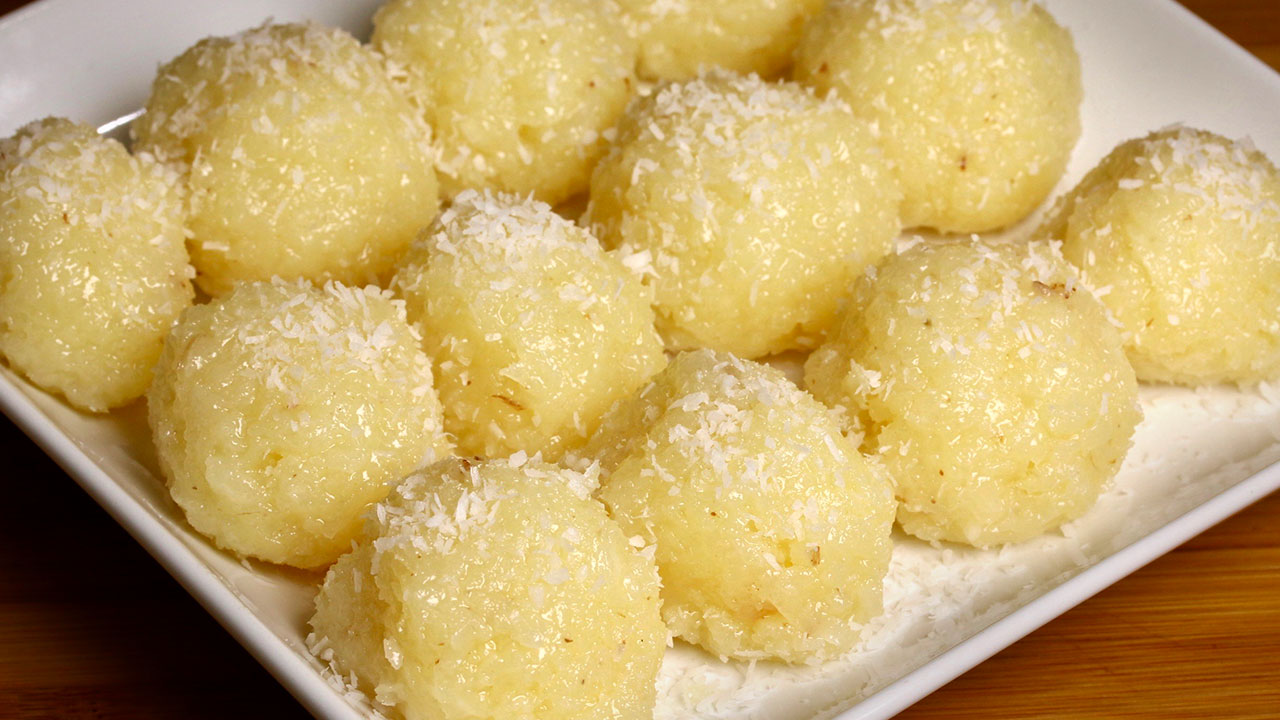
Kajjikayalu are crispy dumplings filled with a mixture of coconut, sugar, and dry fruits. These deep-fried treats are popular during festivals and are similar to North India’s Gujiya. They are crunchy on the outside and have a delicious sweet filling on the inside, making them a favorite during Ugadi celebrations.

Importance of Ugadi Food

The food prepared during Ugadi is not just about taste; it carries deep symbolism. The ingredients used, such as raw mango, jaggery, and tamarind, represent the different experiences one might encounter throughout the year—happiness, sorrow, anger, and surprise. By partaking in the Ugadi meal, individuals symbolically accept the different aspects of life, making Ugadi a festival of acceptance, joy, and hope for the future.

Preparing for Ugadi with Vegetarian Dishes

Preparing for Ugadi involves more than just cooking. It’s about cleaning the house, decorating the entrance with fresh mango leaves, and making beautiful rangolis at the doorstep. As part of the traditions, food is prepared early in the morning, with offerings made to the deities before the feast is shared with the family.

One of the best parts about Ugadi dishes is that they are primarily vegetarian, and often, they exclude ingredients like onion and garlic, making them suitable for people who follow specific dietary restrictions. The focus on fresh ingredients like tamarind, jaggery, mango, and rice makes the meal light, flavorful, and nutritious.

Conclusion

Ugadi is not just a celebration of the New Year but also a celebration of food, family, and new beginnings. From the tangy flavors of Pulihora to the sweet delight of Bobbatlu, the festival offers a variety of vegetarian dishes that reflect the culture and traditions of South India. These dishes are perfect for bringing family and friends together to enjoy a meal that symbolizes hope, prosperity, and happiness for the year ahead.

If you’re looking to celebrate Ugadi at home, these recipes will give you a taste of the tradition. Enjoy a wholesome, flavorful meal with these vegetarian recipes that will not only delight your taste buds but also honor the rich cultural heritage of this beautiful festival.

  • Besan Ka Halwa

    Besan Ka Halwa

    Besan Ka Halwa

    Besan Ka Halwa

    Besan Ka Halwa is a traditional Indian dessert and made using different flour, lentils, nuts and vegetables. Besan Ka Halwa is one of my favorite Halwas. This is delicious and also quick and easy to make. When you roast the besan, the house is full of sweet aroma. Besan Ka Halwa is also gluten free.
    3.89 from 9 votes
    Prep Time 5 minutes
    Cook Time 12 minutes
    Total Time 17 minutes
    Course Dessert
    Cuisine Indian
    Servings 4 people

    Ingredients
      

    • 1 cup coarse besan ladoo ka besan, gram flour
    • 1/2 cup clarified butter ghee
    • 1 cup sugar
    • 1/4 tsp cardamom powder ilachi
    • 2-1/2 cup water
    • 2 Tbsp almonds sliced

    Instructions
     

    • Boil the water with sugar, and cardamom powder in a sauce pan over low medium heat. Bring to a boil and Set aside.
    • Melt the clarified butter in a frying pan on low medium heat. Add besan and roast to golden brown color; stirring constantly this will take about 5 to 8 minutes. Besan will be golden brown in color and will have a light sweet aroma.
    • Add the syrup slowly, as you add the syrup to besan water will splatter.
    • Turn down the heat to low and let it cook for about 2-3 minutes.
    • Besan will absorb the water, as the Halwa cools so keep Halwa a little softer then you like.
    • Garnish with cashews.

    Notes

    Serving suggestion
    Serve hot for best taste. If you like, garnish with shaved pistachio, almonds or shredded coconut.
    Variations
    Instead of water add 1 cup of milk and 1/2 cup of water and keep Halwa a little thicker. Pour the Halwa on a greased plate, keep it about 1/2 inch thick. Garnish with shaved almonds or pistachio or shredded coconut, and let it cool for about a half an hour. Cut the Halwa in square or diamond shapes like burfi.
    Tried this recipe?Let us know how it was!

    Besan ka Halwa is a classic Indian dessert made from besan (gram flour), ghee (clarified butter), sugar, and aromatic spices. This sweet treat is loved for its rich flavor, creamy texture, and irresistible aroma. 

    Whether served warm or at room temperature, Besan ka Halwa is a delightful dessert that’s perfect for celebrating special occasions such as a party recipe or even festive occasions such as diwali, holi, ganesh chaturthi or janmashtami or simply made to satisfy one’s sweet tooth. 

    Variations of Halwa:

    Although Besan ka Halwa can be considered to be one of the most savoury and fulfilling desserts amongst all halwas, here we have a list of some halwas that can be savoured and enjoyed all along with friends and family. 

    1. Gajar ka Halwa: Gajar Ka Halwa is a classical Indian dessert, this is also known as gajraula. Gajar ka Halwa is a delicious and popular sweet made with few ingredients, carrots, milk, sugar and flavoured with cardamom.
    2. Atta Ka Halwa: Atta ka Halwa, is a delicious sweet dessert. This is easy to make and with few ingredients. Atta ka halwa is made with whole wheat flour, sugar, and clarified butter, flavoured with cardamom.
    3. Sooji ka Halwa: Sooji Halwa is a very popular sweet dish all over India and is made on religious occasions, as prasad.
    4. Sweet Potato Halwa: Sweet Potato Halwa, an eggless pudding, stands out as one of the simplest Halwa recipes to prepare. Infused with the delicate and distinctive flavors of cardamom and cinnamon, it serves as a deliciously warm dessert ideal for chilly winter evenings.

    Tips for Making Perfect Besan ka Halwa:

    Use Good Quality Gram Flour: Use fresh and high-quality gram flour (besan) to make Besan ka Halwa for the best flavor and texture. Fresh besan has a nutty aroma and a smooth texture, which enhances the taste of the halwa.

    Roast the Gram Flour Well: Roast the gram flour in ghee until it turns golden brown and fragrant. Properly roasting the gram flour is crucial for developing the rich and nutty flavor of the halwa.

    Control the Sweetness: Adjust the amount of sugar according to your taste preferences. Some people prefer Besan ka Halwa to be sweeter, while others prefer it less sweet. Start with a smaller amount of sugar and add more if needed.

    Garnish with Nuts and Saffron: Garnish Besan ka Halwa with chopped nuts such as almonds, pistachios, and cashews, as well as a few strands of saffron for a luxurious touch. The nuts add crunch and texture, while saffron adds color and aroma to the halwa.

    FAQs about Besan ka Halwa:

    Can I make Besan ka Halwa ahead of time? 

    Yes, Besan ka Halwa can be made ahead of time and stored in an airtight container in the refrigerator for up to 3-4 days. Reheat the halwa gently on the stovetop or in the microwave before serving.

    Can I freeze Besan ka Halwa? 

    While Besan ka Halwa can be frozen, its texture may change slightly upon thawing. If freezing, allow the halwa to cool completely before transferring it to a freezer-safe container. Thaw the halwa in the refrigerator overnight before reheating.

    Is Besan ka Halwa vegan-friendly? 

    Traditional Besan ka Halwa is made with ghee (clarified butter), which is not vegan. However, you can make a vegan version of Besan ka Halwa by using plant-based ghee or oil instead of dairy ghee.

    Is Besan ka Halwa gluten-free? 

    Yes, Besan ka Halwa is gluten-free as it is made from gram flour, which is naturally gluten-free. However, be cautious of cross-contamination if you have a severe gluten allergy or celiac disease.

    Besan ka Halwa is a luxurious and aromatic dessert that’s perfect for indulging in on special occasions or as a sweet treat for your loved ones. 

    With its rich flavor, creamy texture, and endless variations, Besan ka Halwa is sure to become a favorite in your dessert repertoire. Whether enjoyed warm or at room temperature, this halwa is guaranteed to satisfy your sweet cravings and leave you feeling content and happy.

    Besan ka Halwa goes best even at marriage and big events hence its often served as people’s favorite choice of sweet dessert after every celebration and is a great hit among family gatherings and unions.

  • Nariyal Ka Ladoo – Coconut Ladoo

    Nariyal Ka Ladoo – Coconut Ladoo

    Nariyal ka Ladoo

    Nariyal Ka Ladoo

    Nariyal Ka Ladoo or Coconut Ladoo, a delicious homemade sweet also can be serve as a candy. This dessert is easy to prepare. One of the simplest recipe to make with few ingredients.
    4.43 from 7 votes
    Prep Time 5 minutes
    Cook Time 20 minutes
    Total Time 25 minutes
    Course Dessert
    Cuisine Indian
    Servings 12 pieces

    Ingredients
      

    • 2 cups fresh grated coconut I am using frozen grated coconut, easily available in Indian grocery stores
    • 1 cup heavy cream
    • 1/2 cup milk
    • 1/2 cup sugar
    • 1 Tbsp coconut powder for garnishing, optional

    Instructions
     

    • In a non-stick heavy bottom frying pan add all the ingredients, cream, milk, coconut and sugar, bring it to boil over medium high heat, stir occasionally. After coconut mix comes to boil reduce the heat to medium.
    • Lower the heat to medium and let it cook for about 5 minutes stirring occasionally, scraping the sides (otherwise sides will start browning the mix), until mixture start coming together.
    • Lower the heat to low medium, and stir continually this will be consistency of soft dough. This should take about 5 minutes. Turn of the heat.
    • Transfer mixture to the plate, let the mix sit for about 10 minutes, then divide into 12 equal parts or make the size of ladoo you prefer. Roll them between you palm and shape them in round balls.

    Notes

    Suggestion
    You can also make this as burfi. To make burfi pour the coconut mix over flat plate and press it half inch thick in square shape. Let it sit for five to six hours and cut them in square shape. Nariyal burfi will be little soft in texture.
    If you like coconut you will love this delicious burfi.
    Enjoy! With your family and friends.
    Tried this recipe?Let us know how it was!
  • Shahi Kheer – Makhana Pudding

    Shahi Kheer – Makhana Pudding

    Shahi Kheer

    Shahi Kheer (Makhana Pudding)

    Shahi Kheer, also called Makahana Pudding is a very traditional pudding-like dessert. Makhana is puffed lotus flower seed and looks like popcorn. Shahi means rich and royal and this dish is a royal sweet snack. The textures of the nuts, and the creaminess of the milk makes this a super dessert. Adding the caramelize sugar with saffron and cardamom adds a very subtle and unique taste to the kheer.
    5 from 1 vote
    Prep Time 10 minutes
    Cook Time 30 minutes
    Total Time 40 minutes
    Course Dessert
    Cuisine Indian
    Servings 6 people

    Ingredients
      

    • 4 cups whole milk
    • 1 1/2 cups makhana puffed lotus seeds
    • 1/2 cup rice cooked and mashed
    • 1/2 cup sugar
    • 2 Tbsp almonds blanched and sliced, approx. 2 Tbsp
    • 2 Tbsp pistachios blanched and sliced, approx. 2 Tbsp
    • 1/4 Tsp cardamom crushed
    • saffron Few strands
    • 2 teaspoons ghee clarified butter

    Instructions
     

    • Microwave the makhana for 1/2-minute. Makhana will become crisp. After microwave slice them in 2-3 pieces.
    • In a heavy bottom pan over low medium heat melt the ghee, add the makhana and sliced almonds and roast them for about 2 minute.
    • Add the milk, and rice, turn the heat to medium high, bring the milk to boil. After milk comes to boil lower the heat to medium. let it boil for about 18-20 minutes, stir the milk and scrape the sides occasionally.
    • Add cardamom. Saffron and half the pistachios other half we will use for garnishing.
    • To caramelize the sugar, in a heavy bottom sauce pan, over medium heat grease the pan generously, add sugar. Keep stirring the sugar continuously till sugar start melting and change the color to light brown. Turn off the heat as soon it comes to golden brown in color. This should take 4-6 minutes. Note: when sugar starts melting it changes the color very quickly and it can easily burn.
    • Add the caramelize sugar to the hot kheer and put the kheer back over the low medium heat, keep stirring the kheer making sure caramelized sugar has mixed completely. Caramelizing the sugar adds a unique taste to Kheer.
    • Add the caramelize sugar to the hot kheer and put the kheer back over the low medium heat, keep stirring the kheer making sure caramelized sugar has mixed completely. Caramelizing the sugar adds a unique taste to Kheer. Boil for 2-3 more minutes, Shahi Kheer should be consistency of soft pudding. Garnish with pistachios, 
    • Serve warm.

    Notes

    You will also like, Kheer (Rice Pudding), Pineapple Coconut Kheer – Pina Colada Pudding, Laucki Kheer (Bottle Gourd Pudding)
    Tried this recipe?Let us know how it was!
  • Thattai (Rice Crackers)

    Thattai (Rice Crackers)

    Thattai (Rice Crackers)

    Thattai (Rice Crackers)

    Thattai is a popular south Indian snack. You may call them crispy rice crackers. This is made with rice flour and a few spices. It is both vegan and gluten free. Thattai is a great snack to have on hand in your pantry.
    No ratings yet
    Course Snack
    Cuisine Indian
    Servings 30 thattai

    Ingredients
      

    • 1 cup rice flour
    • 1 tablespoons sesame seeds, til
    • 1 teaspoon chana dal
    • 3/4 teaspoon salt
    • 1/8 teaspoon asafetida, hing
    • 2 tablespoons oil
    • 1/2 teaspoon ginger paste
    • 1 green chili finely chopped
    • 1/3 cup of water
    • Also need oil to fry

    Instructions
     

    • Combine all the ingredients in a bowl, except water, rice flour, salt, asafetida, sesame seeds, chana dal, ginger, green chili, and oil mix it well. Add water as needed to make the firm dough.
    • Divide the dough in about 30 equal parts.
    • Take 2 plastic sheet, I am using zip lock bags this makes it easy to roll. Place one part of the dough between two bags and flatten it thin. Heat oil in a heavy frying pan on medium heat. Check the oil temperature by dropping a small piece of dough into the oil, if it sizzle and rises to the surface slowly, without changing the color, oil is ready for frying.
    • Gently transfer the flattened dough into the oil. Do not over crowed the frying pan. Fry them until they are light golden brown both sides. This should take about four minutes.
    • Take them out over paper towed to drain the excess oil.
    • Repeat the same process for the rest of the dough.
    • Thattai should be crisp. After it cools, store it in an air tight container.
    Tried this recipe?Let us know how it was!
  • Dal Puri (Indian Fried Bread)

    Dal Puri (Indian Fried Bread)

    Dal Puri

    Dal Puri (Indian Fried Bread)

    Dal Puri (fried puffed bread), which consist of puris filled with mildly spiced moong dal. This delicacy is delicious and very festive. Dal Puri is an excellent option with any meal as it is sure to be a crowd-pleaser. Serve these incredible dal puris with spicy squash, or potato curry with yogurt gravy.
    No ratings yet
    Course Bread
    Cuisine Indian
    Servings 4 people

    Ingredients
      

    For Dough

    • 1-1/2 cups all-purpose flour – plain flour – maida
    • 1-1/2 tablespoons oil
    • 1/4 teaspoon salt
    • About 1/2 cup water

    For Filling

    • 1/2 cup moong dal
    • 1 tablespoon ginger chopped
    • 1 green chili chopped
    • 1/2 teaspoon salt
    • 1 teaspoon fennel seeds powder- saunf
    • 1/2 teaspoon cumin seeds – jeera
    • 1/2 teaspoon mango powder – amchoor
    • 1/8 teaspoon asafetida – hing
    • 2 teaspoons oil
    • Also need oil to fry

    Instructions
     

    For Dough

    • In a bowl mix the flour, salt and oil together. Add the water slowly, mixing with your fingers as you pour. Dough should be firm and smooth. I used about half cup of water. Knead the dough lightly. Cover the dough and let it sit for at least fifteen minutes.

    For Filling

    • Wash and soak dal for at least four hours. Drain the water and blend dal, with ginger, and green chili to smooth paste. While blending dal just use enough water needed to blend. I used about 3 tablespoons of water.
    • After dal is blended to smooth paste add all the ingredients fennel seeds, cumin seeds, asafetida, and mango powder except oil, blend for few seconds making all the ingredients mix well.
    • Heat the oil in a nonstick frying pan over low medium heat, add dal paste and keep stirring until it becomes consistency of soft dough. This should take about 2 minutes.
    • Remove from heat and let it cool just enough that you can knead it to make a soft dough.

    Making the Dal Puri

    • Take the dough and knead it for a minutes. Divide the dough in 18 equal parts.
    • Take the filling and divide into 18 parts, filling should be little smaller then dough ball. You may have some filling left over.
    • Take one part of the dough and with your fingers flatten the edges and make into 3-inch circle. Leaving center little thicker then edges.
    • Mold the dough into a cup and place 1 part of filling in the center. Pull the edges of the dough to wrap the dal filling. Proceed to make all the balls.
    • Let the filled ball sit for three to four minutes before rolling.
    • Lightly Oil the rolling pin and rolling surface. Roll the balls gently into 6” circles.
    • You can roll two or three puris before start frying, but do not roll all the puris at once or they will begin to dry out and fail to puff.
    • Heat the oil in frying pan over medium heat frying pan should have about one inch of oil. To check if oil is ready put a little piece of dough in the oil. Dough should sizzle, and come up slowly.
    • Fry one puri at a time. Place the puri in the frying pan and press with a skimmer. The puri should puff up. Turn puri over and cook until light golden brown on both sides. Take the puri out and place them on paper towels to absorb the excess oil. Repeat the process for remaining piries.
    Tried this recipe?Let us know how it was!
  • Seviyan (Vermicelli) Kheer Dessert

    Seviyan (Vermicelli) Kheer Dessert

    Seviyan (Vermicelli) Kheer

    Seviyan (Vermicelli) Kheer Dessert

    Seviyan or vermicelli kheer, is a traditional popular dessert. Seviyans are thin long strings that looks very much like spaghetti however process if different. Seviyan is a delicious and an easy recipe to make. Basic seviyan is made with milk, seviyan and sugar, and then flavored with cardamom. Garnish with sliced almonds and pistachios and you have a delicious dish!
    5 from 1 vote
    Prep Time 5 minutes
    Cook Time 39 minutes
    Course Dessert
    Cuisine Indian
    Servings 6 people

    Ingredients
      

    • 1/2 cup sevia roasted and broken (vermicelli) available Indian grocery stores
    • 7 cups milk
    • 1/2 cup sugar
    • 1/8 teaspoon cardamom powder (ilachi)
    • Pinch nutmeg (jaiphel)
    • About 10-12 saffron strings
    • 2 tablespoons sliced or crushed almonds
    • 1 tablespoons sliced or crushed pistachios for garnishing

    Instructions
     

    • Use a nonstick or heavy bottom frying pan to make a seviyan kheer. Add the seviyan and roast them for about two minutes on medium low heat.
    • Add the milk and increase the heat to medium high. After milk comes to boil reduce the heat to medium. Let the milk boil for about 30 minutes, until the milk is creamy and reduced to almost half. Stir often to ensure the milk does not burn in the bottom of the pan, and also keep scraping the sides of the frying pan.
    • Add the sugar, saffron, cardamom, nutmeg, and almonds. Let the seviyan kheer simmer over low heat for about 5 minutes.
    • Turn off the heat.
    • As seviyan kheer cools it will become thicker in texture.
    • Garnish with pistachios. Seviyan can be served chilled or warm.
    Tried this recipe?Let us know how it was!
  • Medu Vada

    Medu Vada

    Medu Vada

    Medu Vada

    Medu Vadas are a traditional South Indian dish which can be served as a main course, side dish, or snack. This crispy deliciousness is made with spiced urad dal batter and fried in donut shape dumplings. They are crispy on the outside and soft on the inside. They are served with Sambar and Coconut Chutney.
    No ratings yet
    Course Snack
    Cuisine Indian
    Servings 10 Vadas

    Ingredients
      

    • 1 cup split washed urad dal (available in Indian stores)
    • 1/8 teaspoon asafetida (hing)
    • 2 teaspoon whole coriander seeds (sabut dhania)
    • 1 tablespoon green chili chopped
    • 2 tablespoons cilantro chopped (hara dhania)
    • 1 teaspoon salt
    • Oil to fry

    Instructions
     

    • Wash and soak dal in about 3 cups of water for about 4-6 hours.
    • Drain the water and grind dal to smooth paste using very little water just enough to grind, food processor works good for this. Blend for another 2 minutes to whip dal to make fluffy. Take dal batter out in a wide bowl.
    • Add all the ingredients to the dal batter, cilantro, green chili, coriander, asafetida and salt, beat the batter for 2-3 minutes this will make the batter light and fluffy. To make sure batter is ready put one drop of batter in a bowl of water, batter should float.
    • Keeping the right consistency of batter is very important; add water as needed batter should not be soft but not runny. When you put the batter on your palm batter should hold its shape. Make the Vadas batter when you are ready to fry them, as the batter sit will get soft if you are not ready to fry keep batter refrigerated.
    • Heat the oil in a frying pan over medium high heat.
    • The frying pan should have about 1 inch of oil. To check if the oil is ready, put one drop of batter in oil. The batter should sizzle and come up but not change color right away. If oil is very hot Vadas will not cook through and will not be crispy.
    • Wet the palms and take golf size batter and place over your palm, flatten to round shape and make hole in the center looking like donut now with other hand wet fingers slowly slide Vada into the hot oil.
    • Fry the Vadas from both sides to golden brown. Take them out over a paper towel to drain access oil.
    • Traditionally Medu Vada is served with Coconut Chutney, and sambar (aromatic lentil soup with vegetables).

    Notes

    Notes
    1. If the Medu Vada Batter is too thick: The Vada will shape nicely but they will be hard inside after frying.
    2. If the batter is too soft: it will not be able to hold the shape and will absorb too much oil.
    3. It’s the consistency of the batter that determines how soft and shapely the Vadas turn out.
    Tried this recipe?Let us know how it was!

    Medu Vada: A South Indian Delicacy 

    Medu Vada is a South Indian delicacy often served as an appetizer or snack, especially during festive occasions like Yugadi. It is a gluten-free and vegan dish made primarily from urad dal (black gram lentils) batter, seasoned with spices like cumin seeds, black pepper, and curry leaves. The batter is shaped into round doughnuts and deep-fried until golden brown, resulting in a crispy exterior and a soft, fluffy interior. 

    Medu Vada is commonly enjoyed with coconut chutney or sambar, enhancing its flavor profile and making it a popular choice for those seeking gluten-free and vegan snack options. Medu Vada is a popular South Indian snack known for its crispy exterior and soft interior texture. Originating from the state of Tamil Nadu, it has gained widespread popularity across India and beyond. This medu vada recipe offers a step-by-step guide on how to make this delectable treat right in your kitchen.

    How to Make Medu Vada: Step-by-Step Recipe 

    Preparing the Batter 

    To start making medu vada, you’ll need to prepare the batter first. Begin by soaking urad dal in water for at least 4-5 hours or preferably overnight. The soaked dal should be soft enough to easily break when pressed between your fingers. Once soaked, drain the water and transfer the dal to a blender. Grind it to a smooth paste, adding minimal water as needed. The consistency should be thick, similar to that of a pancake batter. This step is crucial in achieving the perfect texture for your medu vada.

    Shaping the Vadas 

    Once the batter is ready, transfer it to a mixing bowl. Add finely chopped green chilies, ginger, curry leaves, cumin seeds, asafoetida, and salt to taste. Mix all the ingredients thoroughly to ensure an even distribution of flavors. Now, heat oil in a deep frying pan or kadhai on medium heat. To shape the vadas, wet your palms with water to prevent sticking. Take a small portion of the batter and flatten it slightly to form a disc shape with a hole in the center, resembling a donut. Carefully slide the shaped vada into the hot oil and fry until golden brown and crispy on both sides. Repeat the process with the remaining batter, frying a few vadas at a time to avoid overcrowding the pan.

    Frying to Perfection 

    Achieving the perfect medu vada requires frying them to crispy perfection. Make sure the oil is adequately heated before adding the vadas to ensure they cook evenly and develop a crunchy exterior. It’s essential to maintain the oil at a consistent temperature throughout the frying process. Avoid overcrowding the pan, as this can lower the oil temperature and result in soggy vadas. Fry the vadas in small batches, flipping them occasionally to ensure uniform browning on all sides. Once done, remove the vadas from the oil using a slotted spoon and drain the excess oil on paper towels.

    Serving Suggestions

    Medu vada is best enjoyed hot and crispy, served with coconut chutney and sambar. You can also pair it with a tangy tomato chutney or spicy mint chutney for added flavor. Some prefer to enjoy medu vada with a cup of hot filter coffee, making it a perfect breakfast or evening snack option. Experiment with different dipping sauces and accompaniments to find your favorite combination.

    Tips for Making Perfect Medu Vada 

    • Ensure the urad dal is soaked well to achieve a smooth batter texture.
    • Maintain the oil temperature while frying to achieve crispy vadas.
    • Wet your palms with water to prevent the batter from sticking while shaping the vadas.
    • Add chopped green chilies and ginger for an extra kick of flavor.
    • Serve medu vada hot for the best taste and texture.

    Variations of Medu Vada 

    While the traditional medu vada recipe calls for basic ingredients like urad dal, spices, and herbs, you can experiment with variations to suit your taste preferences. Some popular variations include:

    • Masala Medu Vada: Add coriander leaves and grated carrots to the batter for an extra burst of flavor.
    • Rava Medu Vada: Mix semolina (rava) with the urad dal batter to add a crunchy texture to the vadas.
    • Vegetable Medu Vada: Incorporate grated vegetables like carrots, cabbage, and spinach into the batter for a nutritious twist.
    • Cheese Medu Vada: Stuff the vadas with a cheesy filling or sprinkle grated cheese on top before frying for a gooey, indulgent treat.

    Benefits of Medu Vada 

    Medu vada is not only delicious but also offers several health benefits when consumed in moderation. Here are some of the benefits:

    • Rich in Protein: Urad dal, the main ingredient in medu vada, is a good source of protein, essential for muscle repair and growth.
    • Nutrient-Dense: It contains essential nutrients like iron, magnesium, and potassium, which are vital for overall health and well-being.
    • Gluten-Free: Since medu vada is made from urad dal, it is naturally gluten-free, making it suitable for individuals with gluten sensitivities or celiac disease.
    • Good Source of Fiber: Including medu vada in your diet can help improve digestion and promote gut health due to its fiber content.
    • Energizing Snack: It provides a quick energy boost, making it an ideal snack option for busy days or post-workout refueling.

    FAQs about Medu Vada 

    Q: Can I make the batter ahead of time?

    A: Yes, you can soak the urad dal and grind the batter ahead of time. Store it in the refrigerator for up to 1-2 days and fry the vadas when ready to serve.

    Q: Can I freeze the vadas?

    A: While it’s best to consume medu vada fresh for optimal taste and texture, you can freeze the shaped vadas and fry them directly from frozen when needed. However, freshly fried vadas are recommended for the best flavor.

    Q: Can I bake instead of frying?

    A: While traditional medu vada is deep-fried for that crispy texture, you can try baking them in a preheated oven at 375°F (190°C) for 20-25 minutes or until golden brown for a healthier alternative.

    Q: Can I use split urad dal instead of whole urad dal?

    A: Yes, you can use split urad dal (white or black) to make medu vada. However, the texture may vary slightly compared to using whole urad dal.

    Q: Can I make gluten-free medu vada?

    A: Yes, medu vada is naturally gluten-free since it’s made from urad dal. Just ensure that all ingredients used are gluten-free, especially if adding any additional flavorings or seasonings.

    Explore more Indian recipes on Manjula’s Kitchen:

    In conclusion, medu vada is a versatile and flavorful snack that can be enjoyed on its own or paired with a variety of chutneys and dips. With this detailed recipe and helpful tips, you can recreate this South Indian delicacy at home and impress your family and friends with your culinary skills. So, roll up your sleeves, gather your ingredients, and get ready to savor the crispy goodness of homemade medu vada!

  • Puran Poli – Sweet Flatbread

    Puran Poli – Sweet Flatbread

    Puran Poli

    Puran Poli – Sweet Flatbread

    Puran Poli is a sweet flat bread with a sweet dal lentil filling. This is a popular bread in the states of Gujarat and Maharashtra. Puran poli is a wonderful breakfast dish, and can also be served as a snack.
    5 from 1 vote
    Course Bread
    Cuisine Indian
    Servings 10 Puran Poli

    Ingredients
      

    Ingredients:

    • 1/2 cup of whole wheat flour (atta)
    • ¼ cup all-purpose/plain flour (Maida)
    • 2 tablespoons oil
    • Approximately 1/3 cup water

    Filling

    • ¾ cup Toor dal (Ahrar dal) (available in Indian grocery stores)
    • 1 cup sugar
    • ½ teaspoon turmeric
    • 1 teaspoon cardamom powder (elaichi)
    • ¼ teaspoon nutmeg (jaiphal)

    Also Needed

    • Approximately 3 tablespoons oil
    • Approximately ½ cup of dry whole wheat to roll the bread

    Instructions
     

    Filling

    • Wash and soak the toor dal in two cups of water for at least four hours. Dal will double in volume after soaking. Discard any remaining water.
    • Add toor dal and turmeric to two cups of water and cook in a heavy pan over medium-high heat. When dal boils, remove the yellow foam from the top. Reduce the heat to medium and cover the pan.
    • Let it cook for 25 minutes, adding more water if needed. Dal should be very soft and mushy.
    • Add sugar and cook until the dal looks like paste and starts to hold together. Add cardamom and nutmeg powder and mix well. The dal filling will be very soft and sticky.

    Dough

    • In a bowl, mix whole-wheat flour, all-purpose flour, and oil; add water slowly to make a very soft dough. The dough should not stick to your fingers. Cover the dough and set it aside. Let it rest for at least ten minutes.

    Making Puran Poli

    • Divide both the dough and the dal filling into ten equal parts. The parts of the dal filling should be about 2½ times that of the dough balls.
    • Roll the dough balls into 2½”-diameter circles. Place one part of the filling in the center of each. Seal by pulling the edges of the rolled dough together to make a ball. Proceed to make all ten balls. Let the filled balls settle for three to four minutes.
    • Heat the skillet on medium-high heat. To test, sprinkle a couple of drops of water on the skillet. The water should sizzle right away.
    • Press the filled ball lightly on both sides on a surface covered with dry whole wheat flour.
    • Lay the balls on the sealed side up and lightly press them into circles about 2” in diameter. Roll the balls gently into 5” circles. If the dough sticks to the rolling pin or rolling surface, lightly sprinkle dry whole wheat flour on both sides of the semi-rolled puran poli.
    • Place the Puran poli in the skillet. When it starts to change color, flip it over. You will notice some golden-brown spots.
    • After a few seconds, spread one teaspoon of oil on the puran poli. Flip them again and lightly press the puffed areas with a spatula. Flip again, and press with the spatula making sure the puran poli are golden-brown on both sides.
    • Repeat the same process for the remaining.
    • Puran poli is ready to be served and it tastes best when eaten hot.

    Notes

    Tips

    1. When cooking the dal, use a large pot to prevent it from boiling over, as this can happen very easily.
    2. Cooked Puran Poli can be stored for a week in the refrigerator.  Re-heat over a skillet or in the toaster oven.
    Variation
    Puran Poli can be prepared using Chana dal, however, it has to be cooked for a slightly longer time.   
    Tried this recipe?Let us know how it was!
  • Til ki Burfi (Sesame Seed Burfi)

    Til ki Burfi (Sesame Seed Burfi)

    Til Burfi (Sesame Seed Treat)

    Til ki Burfi (Sesame Seed Burfi)

    Til ki Burfi is a healthy, quick & easy way to make home-made sweet snack which can also be offered as a dessert post meal. Its a must try recipe during winters.
    4 from 1 vote
    Course Dessert
    Cuisine Indian
    Servings 24 pieces

    Ingredients
      

    Ingredients

    • 1 cup heavy milk
    • 1 cup milk powder
    • 3/4 cup sesame seeds
    • 1/2  cup sugar
    • 1/8 teaspoon cardamom powder

    Instructions
     

    Method

    • Roast sesame seeds over medium heat till they are golden in color. This should take about 3-4 minutes. Keep aside.
    • In a non-stick frying pan add heavy cream and milk powder mix it well. Cook over medium-high heat, stir continuously till the mixture starts to bubble.
    • Lower the heat to medium and keep stirring and scraping the sides and bottom of the pan, until mixture is reduced to thick paste and starts coming together. This should take 8-10 minutes.
    • Add roasted sesame seeds and mix well. Stir for another 2-3 minutes until mix start looking soft dough.
    • Lower the heat to low and add sugar and cardamom powder and mix it well. This will become soft in texture after adding sugar.
    • Keep stirring for 1-2 minutes and bring the burfi back to dough texture.
    • Spread burfi mixture onto the greased plate, approximately ½ inch thick. Let it sit for at leadt two hours at room temperature. Cut burfis to desired shape; square or diamond shape works well.
    • The burfis will store well in an airtight container, at room temperature for up to 2 weeks.
    Tried this recipe?Let us know how it was!
  • Lemon Rice

    Lemon Rice

    Lemon Rice

    Lemon Rice

    Lemon rice is a delicious south Indian dish. Lemon juice gives a very refreshing and tangy flavor to the rice.
    5 from 1 vote
    Course rice
    Cuisine Indian
    Servings 4 people

    Ingredients
      

    for Rice:

    • 1 cup rice
    • 2 tablespoons oil
    • 1 3/4  cup water
    • 1/2  teaspoon salt

    for Seasoning:

    • 2 tablespoons oil
    • 1/2 teaspoon cumin seed
    • 1/2  teaspoon mustard seed
    • 1/2  teaspoon turmeric
    • 2 red whole red chili
    • 1 green chili sliced in four long way
    • 12 to 15 fresh curry leaves
    • 2 tablespoons chana dal, pre-soaked in water for at least half an hour
    • 1/4  cup unsalted roasted peanuts
    • 1 teaspoon salt adjust to taste
    • 1/4  cup lemon juice

    Instructions
     

    Method

    • Wash rice gently changing water several times until the water appears clear.
    • For fluffier rice, the rice should be soaked for at least 15 minutes prior to cooking.
    • Drain the rice and put it into the saucepan. Add water, oil, and salt, and bring to a boil. Once the water is boiling reduce the heat to low and cover the pan.
    • Cook about 15 minutes, or until the rice is tender and the water has evaporated. Turn off the heat and fluff the rice with a fork.

    Preparing The Seasoning:

    • Heat the oil in a frying pan on medium heat; stir-fry the peanuts for about 2 minutes until peanuts changes the color to light brown.
    • Take out the peanuts from oil and use the same oil for rest of the seasoning.
    • Add cumin seeds and mustard seeds after seeds crack add red chili, curry leaves, and green chilies, and stir for a few seconds.
    • Add the chana dal, stir-fry for about a minute.
    • Add turmeric and mix it well.
    • Add the pre-cooked rice, peanuts and sprinkle salt and lemon juice over the rice.
    • Mix gently, making sure do not break the rice and stir-fry for about 2 minutes. Rice is ready, Enjoy!
    Tried this recipe?Let us know how it was!
  • Coconut Burfi

    Coconut Burfi

    Coconut Burfi

    Coconut Burfi

    Coconut Burfi is made with coconut powder combined with a cardamom flavored sugar syrup. This is a scrumptious dessert or snack. Makes 24 to 30 pieces.
    No ratings yet
    Course Dessert
    Cuisine Indian
    Servings 0 peices

    Ingredients
      

    • 1 cup heavy cream or whipping cream
    • 1 cup sugar
    • 1 cup dry milk powder
    • ½ cup coconut powder
    • ½ cup grounded walnut
    • ¼ teaspoon cardamom powder

    Instructions
     

    • Grease an 8-inch round or square plate and set aside.
    • Boil the heavy cream on medium-high heat.
    • After milk comes to a boil, turn the heat down to low-medium heat.
    • Add the sugar and Stir so sugar is dissolve.
    • Let it simmer six to seven minutes making sure to stir frequently. The milk syrup should heat until 230 degrees on candy thermometer or one thread.
    • Add the milk powder and mix well. Stir for about two to three minutes on medium heat or until the mixture should start leaving the pan.
    • Turn off the heat and add cardamom powder, coconut powder and ground walnut and mix well.
    • Spread on a greased plate about 1/2 inch thick and let it cool for about an hour. Cut the burfis in square or diamond shapes, or any desired shape.

    Notes

    If sugar syrup heats to above 230 degrees, the burfi will be dry. If the syrup is not thick enough, the burfi will take longer to cook with dry milk powder, making the burfi chewy like taffy.
    Keyword barfi, Burfi, Candy, Coconut, Cream, Gluten Free, Sweets, syrup, Walnuts
    Tried this recipe?Let us know how it was!
  • Gajar ka Halwa (Carrot Halwa)

    Gajar ka Halwa (Carrot Halwa)

    Gajar Ka Halwa recipe

    Gajar Ka Halwa, Carrot Pudding

    Gajar Ka Halwa is a classical Indian dessert, this is also known as gajrala. Gajar ka Halwa is a delicious and popular north indian sweet dish made with few ingredients, carrots, milk, sugar and flavored with cardamom. Gajar ka Halwa is a perfect dessert for any celebration. 
    5 from 1 vote
    Prep Time 10 minutes
    Cook Time 40 minutes
    Total Time 50 minutes
    Course Dessert
    Cuisine Indian
    Servings 4 people

    Ingredients
      

    • 2 cups shredded carrots
    • 2 cups milk
    • 3 tbsp unsalted butter or ghee
    • 1/4 cup sugar
    • 1/2 tsp cardamom powder
    • 6 cashew roasted and broken for garnishing

    Instructions
     

    • Roast the cashew nuts and set aside for the garnish.
    • Boil the milk on medium-high heat in a non-stick pan until it is reduced to about to 1 cup. Stir often to ensure the milk does not burn in the bottom of the pan. Set aside.
    • Melt the butter in a frying pan on medium heat. Add the shredded carrots and stir-fry for about seven to eight minutes. Carrots should be tender and slightly changed in color.
    • Add the milk and cook until the milk dries. This will take about eight to ten minutes.
    • Next add the sugar, and cardamom powder and stir-fry for another three to four minutes until the halwa starts to leave the side of frying pan.
    • Garnish with cashew nuts.

    Notes

    Tips:
    Gajar Halwa can be refrigerated for up to one week and kept in the freezer for up to two months.
    When ready to serve just warm.
    Suggestion:
    Cook the halwa a little more and pour on a greased plate.
    Spread the halwa until it is flat and 3/4 inch thick.
    After the halwa cools, cut in squares.
    Garnish with cashew nuts or sliced almonds.
     
    Keyword Carrot Halwa, Delicacy, Dessert, Gajrela, Gluten Free
    Tried this recipe?Let us know how it was!