Tag: Instant Pot

Discover the Best Instant Pot Recipes for Quick and Easy Meals
The Instant Pot has revolutionized home cooking by making it easier than ever to prepare delicious meals with minimal effort. Whether you’re new to using this kitchen gadget or a seasoned pro, having a collection of instant pot recipes can make all the difference. 

From easy instant pot recipes that are perfect for busy weeknights to some of the best instant pot recipes that will impress your family and friends, there’s something for everyone to enjoy.
Why Use an Instant Pot?
The Instant Pot is a versatile kitchen appliance that functions as a pressure cooker, slow cooker, rice cooker, steamer, sauté pan, and more. 

This all-in-one gadget allows you to cook meals quickly while locking in flavors and nutrients. 

It’s perfect for preparing a wide range of dishes, from hearty stews and soups to delicate desserts. With the right instant pot recipe, you can create restaurant-quality meals at home in a fraction of the time.
Easy Instant Pot Recipes for Beginners
If you’re new to the Instant Pot, starting with easy instant pot recipes is a great way to get comfortable with this appliance. Here are some simple and delicious recipes to try:

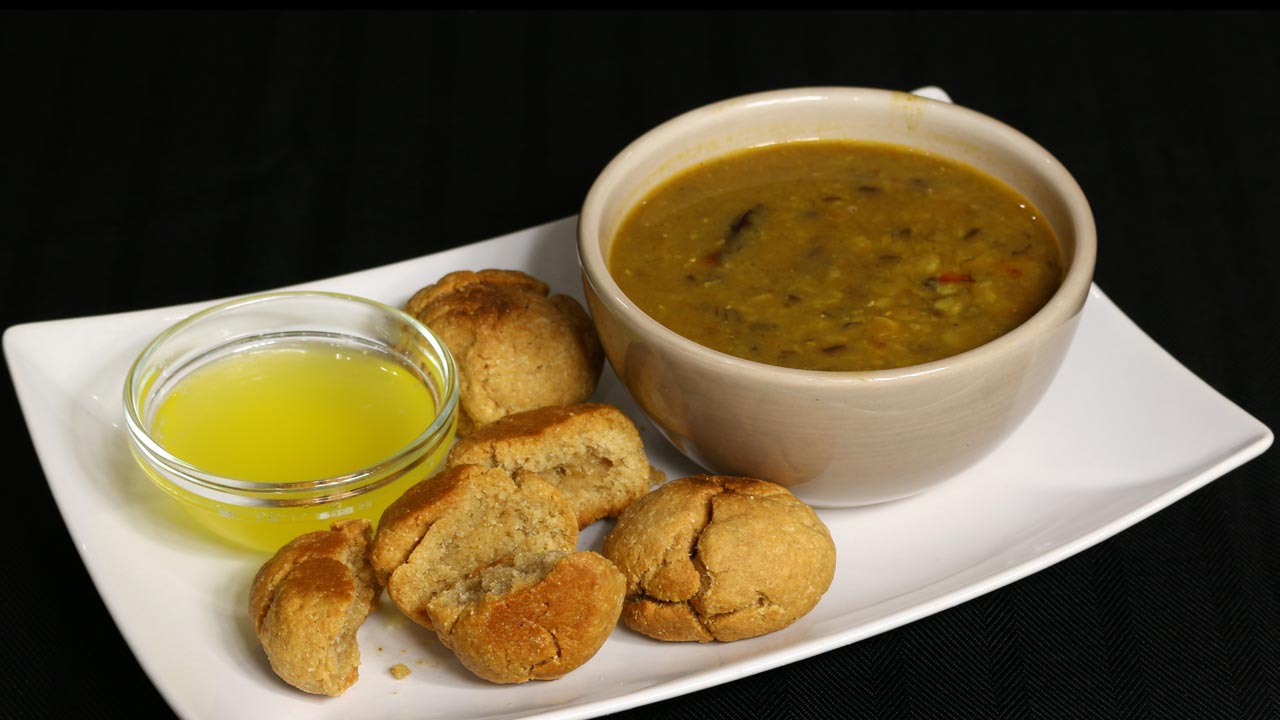
Instant Pot Lentil Soup – A nourishing Indian dal soup that’s packed with protein and flavor. This instant pot recipe is perfect for a quick and healthy dinner.
Instant Pot Rice Pudding – A creamy and comforting dessert that’s surprisingly easy to make. With just a few ingredients, you can whip up this sweet treat in no time.
Instant Pot Mashed Potatoes – Creamy and buttery mashed potatoes made effortlessly in the Instant Pot. This side dish is a must-have for holiday meals.
Instant Pot Quinoa – A healthy and versatile grain that cooks perfectly in the Instant Pot. Use it as a base for salads, bowls, or as a side dish.

The Best Instant Pot Recipes for Family Meals
Looking to create more substantial meals? These best instant pot recipes are perfect for feeding a crowd or making ahead for meal prep:

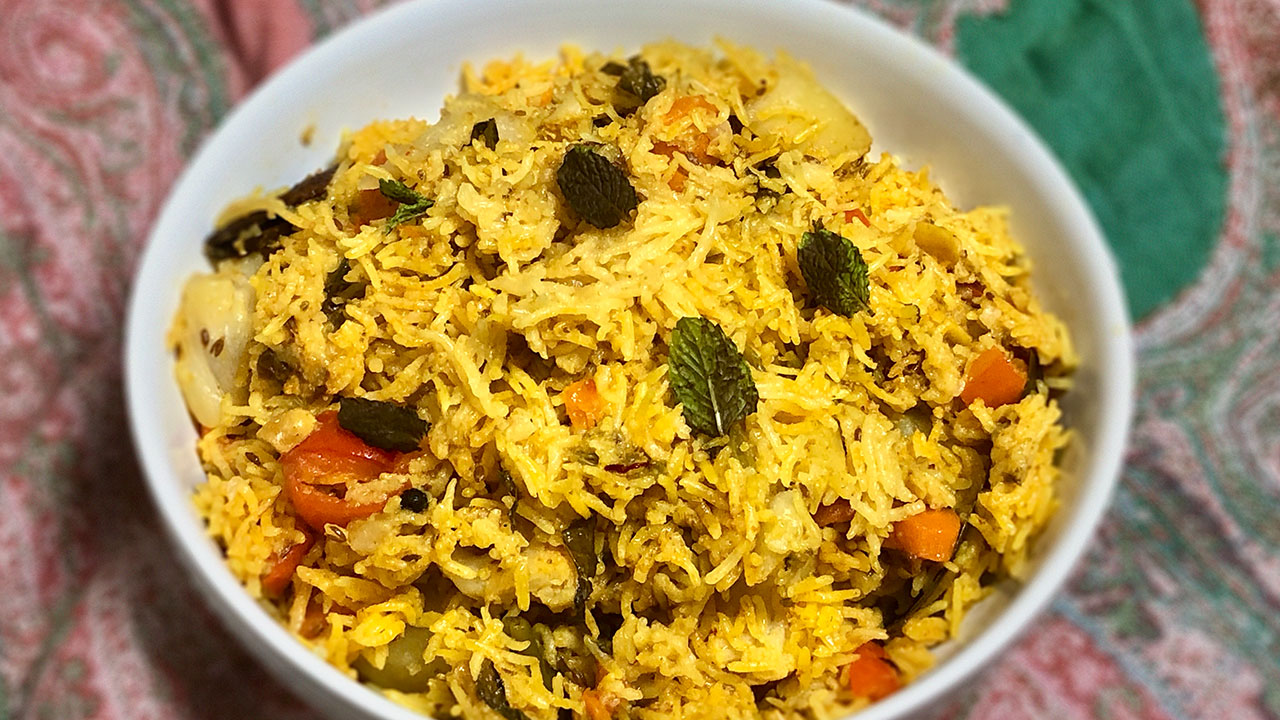
Instant Pot Biryani – A fragrant and flavorful rice dish that combines spices, vegetables, and your choice of protein. This instant pot recipe is a showstopper that’s surprisingly easy to make.
Instant Pot Chili – A hearty and comforting dish that’s perfect for cold days. Packed with beans, tomatoes, and spices, this chili is sure to be a family favorite.
Instant Pot Pasta Primavera – A quick and easy pasta dish loaded with fresh vegetables and a light, creamy sauce. This is one of the best easy instant pot recipes for a satisfying meal.
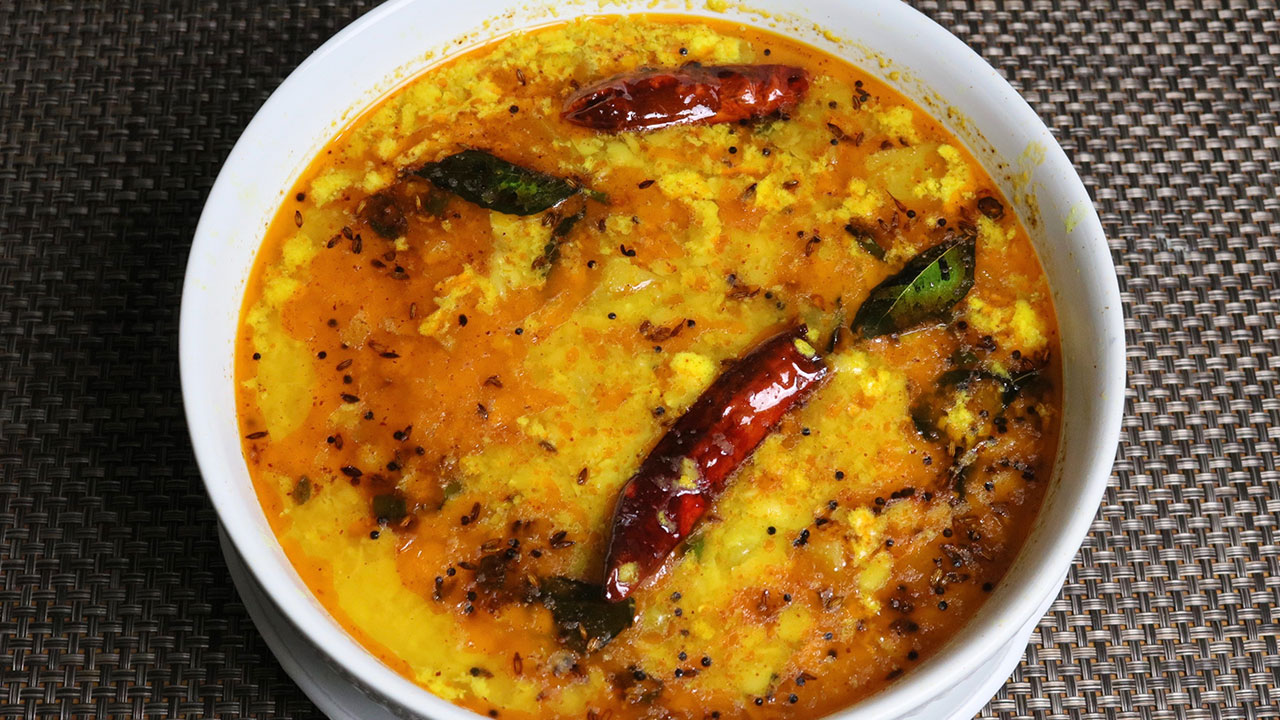
Instant Pot Dal Makhani – A rich and creamy lentil dish that’s a staple in Indian cuisine. This instant pot recipe brings out the deep flavors of the dal in a fraction of the time.
Instant Pot Stuffed Bell Peppers – Colorful bell peppers filled with a savory mixture of rice, beans, and cheese. This dish is not only delicious but also visually appealing, making it one of the best instant pot recipes for entertaining.

Tips for Perfecting Your Instant Pot Recipes

Use Fresh Ingredients: The Instant Pot enhances the flavors of your ingredients, so using fresh herbs, spices, and produce will make a noticeable difference in your dishes.
Sauté First: For many instant pot recipes, using the sauté function to brown and spices before pressure cooking can add depth to the flavor of your meal.
Natural Release vs. Quick Release: Understanding when to use natural release (letting the pressure release slowly) versus quick release (manually releasing the pressure) can affect the texture of your food. Delicate dishes like rice and pasta often benefit from natural release, while stews can handle quick release.
Adjust Cooking Times: While most instant pot recipes provide cooking times, you may need to adjust slightly based on the size of your ingredients or your specific Instant Pot model.

Explore More Instant Pot Recipes
For more ideas and inspiration, visit Manjula’s Kitchen Instant Pot Recipes. This collection offers a variety of dishes that cater to different tastes and dietary preferences, from vegetarian options to classic Indian meals. 

With these recipes, you’ll never run out of ideas for quick, healthy, and delicious meals that you can prepare with ease.
Conclusion
The Instant Pot is an invaluable tool for anyone who wants to simplify their cooking routine without sacrificing flavor or nutrition. 

Whether you’re looking for easy instant pot recipes for quick weeknight dinners or the best instant pot recipes to impress your guests, there’s something in this collection for everyone. 

So, get cooking and discover how these instant pot recipes can transform your kitchen experience.

  • Vegetable Biryani

    Vegetable Biryani

    Vegetable Biryani

    Vegetable Biryani

    Vegetable Biryani is a rich and exotic rice dish with spicy vegetables. The saffron aroma makes this dish very inviting. Biryani is a popular Mughali dish that has been adapted by Indians. Vegetable Biryani makes a great dish for a formal dinner or can be served as a main meal.
    No ratings yet
    Course rice
    Cuisine Indian
    Servings 5 people

    Ingredients
      

    • 1 cup long-grain rice, preferably Basmati
    • 2 cup water
    • 1/4 tbsp salt
    • 1 tbsp oil
    • 2 pinch saffron
    • 2 tbsp milk

    For the Vegetable gravy:

    • 2 tbsp oil
    • 1/4  tbsp asafetida (hing)
    • 1 tbsp cumin seed (jeera)
    • 4 medium chopped tomatoes
    • 1 green chili finely chopped
    • 1 tbsp fine shredded ginger
    • 1 cup yogurt
    • 1/2 tbsp red chili powder
    • 1/2 tbsp turmeric
    • 1/2 cup cubed paneer
    • 2 cup sliced cauliflower
    • 1/2 cup  sliced carrots
    • 1/2  cup chopped green beans
    • 1/2  cup chopped green bell pepper
    • 2 tbsp cashew nuts broken into pieces
    • 1 tbsp salt adjust to taste
    • 2 tbsp chopped mint leaves

    For Garnish:

    • 1 tbsp garam masala
    • 4 tbsp melted butter
    • 2 tbsp sliced almonds

    Instructions
     

    making Rice:

    • Wash rice gently changing water several times until the water appears clear.
    • For fluffier rice, the rice should be soaked for at least 15 minutes before cooking.
    • Drain the rice and put it into the saucepan. Add water, oil, and salt, and bring to a boil. Once the water is boiling reduce the heat to low and cover the pan.
    • Cook for about 15 minutes, or until the rice is tender and the water has evaporated. Turn off the heat and fluff the rice with a fork.
    • For a few minutes soak saffron in warm milk then gently fold the milk into the cooked rice.

    Vegetable And Gravy:

    • Blend tomatoes to make a puree.
    • In a bowl add yogurt, ginger, green chili, salt, turmeric, and chili powder – mix it well.
    • Add all the vegetables (cauliflower, beans, bell pepper, carrots, paneer, cashews, ginger, and green chili) to the yogurt. Mix it well then let it marinate for 10 to 15 minutes.
    • Heat the oil in a saucepan. Test the heat by adding one cumin seed to the oil; if the seed cracks right away oil is ready. Add asafetida and cumin seeds.
    • After the cumin seeds crack, add the tomato puree, and cook on medium-high heat. While cooking the tomato puree cover the pan so the gravy does not splatter all over the burner. Cook until tomato mixture starts leaving oil and reduces to about half the volume.
    • Add the marinated vegetables to tomato puree. Let it cook covered for 10 to 12 minutes on medium heat until vegetables are tender but not mushy. Stir the vegetables in between so they cook evenly.

    Prepare The Biryani:

    • Preheat the oven to 350 degrees Fahrenheit.
    • Take a baking glass dish 9" x 9" or about the same size round bowl.
    • Put half of the cooked vegetables into the baking dish.
    • Spread half of the cooked rice over vegetables. Over the rice, sprinkle with mint and garam masala.
    • Pour the remaining vegetables evenly over the rice.
    • Spread the remaining rice evenly over the vegetables.
    • Next sprinkle sliced almonds evenly over the rice, and then spread melted butter over the entire dish.
    • Cover the pan and bake for about 30 minutes.

    Notes

    Tips:
    • Cooked rice expands to about 3 times its original size, so be sure to use the proper size pan.
    Serving Suggestion:
    • Serve with mint raita. Mint raita is plain yogurt mixed with salt, black pepper, and dry mint.
    Variations:
    • Vegetables can be added and subtracted to your choice.
    • Saffron and mint are key ingredients for biryani.
    Keyword briyani
    Tried this recipe?Let us know how it was!

    A mouthwatering Recipe to make Vegetable Biryani by Manjula’s Kitchen 

    Vegetable Biryani, a gluten-free delight, is a lavish rice dish featuring spiced vegetables. Enhanced by the alluring saffron aroma, this biryani is a perfect party recipe. Originating from Mughal cuisine, it has seamlessly integrated into Indian kitchens, making it an ideal choice for formal dinners or as a satisfying main meal. Vegetable Biryani is best served with pickles, raita, chutney, and even salads

    Preparing Rice for Vegetable Biryani Recipe: A Fundamental Step 

    To kickstart the vegetable biryani recipe, meticulously wash the rice, ensuring clarity by changing the water several times. This crucial step ensures a clean base for the biryani. For optimal fluffiness, soak the rice for a minimum of 15 minutes before cooking. Once soaked, drain the rice and transfer it to a saucepan. Add water, a hint of oil, and a dash of salt, bringing the mixture to a vigorous boil. After achieving a boil, reduce the heat to low, cover the pan, and let the rice cook for approximately 15 minutes. The goal is to tender rice with evaporated water. Conclude this biryani vegetable recipe by turning off the heat and delicately fluffing the rice with a fork, creating the perfect base for your vegetable biryani.

    Recipe to make Vegetable Biryani: Marinating Vegetables 

    Begin the recipe to make vegetable biryani by preparing vegetables and blending tomatoes into a puree, laying the foundation for a rich gravy. In a separate bowl, concoct a flavorful mix by combining yogurt, ginger, green chili, salt, turmeric, and chili powder. Stir this amalgamation well before introducing a vibrant array of vegetables—cauliflower, beans, bell pepper, carrots, paneer, cashews, ginger, and green chili. Allow this vegetable medley to marinate in the yogurt-infused blend for a harmonious union of flavors, enhancing the overall taste profile of your vegetable biryani.

    Creating Flavorful Vegetable Gravy: A Crucial Element in Your Biryani Vegetable Recipe 

    To craft the delectable vegetable gravy, commence by heating oil in a saucepan. Gauge the oil’s readiness by adding a cumin seed; if it cracks right away, the oil is prepared. Infuse the oil with asafetida and cumin seeds. Once these seeds crackle, introduce the tomato puree to the pan, covering it to prevent splattering. Cook the tomato mixture on medium-high heat until it reduces by half, exuding a rich, concentrated flavor. At this point, introduce the marinated vegetables to the tomato puree, letting them simmer and meld their tastes for 10 to 12 minutes. Stirring intermittently ensures even cooking, resulting in tender yet distinct vegetables for your biryani.

    Preheating and Assembling: Recipe to make Vegetable Biryani 

    As your culinary masterpiece takes shape, preheat the oven to 350 degrees Fahrenheit, creating an ideal environment for the final melding of flavors. Choose a 9″ x 9″ baking glass dish or a similar-sized round bowl as the canvas for your biryani. Commence the assembly by placing half of the cooked vegetables into the dish, forming the first layer of your flavorful creation. Spread half of the cooked rice evenly over the vegetables, creating a balanced harmony of textures. Elevate the aromatic profile by sprinkling mint and garam masala over the rice. Repeat this process with the remaining vegetables and rice, building layers that promise a symphony of tastes in every bite.

    Baking the Perfect Vegetable Biryani: Culmination of Vegetable Biryani Recipe 

    As the assembly reaches its pinnacle, cover the pan, signifying the transition to the baking phase. Slide the dish into the preheated oven and let the magic unfold for about 30 minutes. This careful baking period allows the flavors to intermingle, creating a cohesive and mouth-watering vegetable biryani. The final touch involves sprinkling sliced almonds evenly over the rice, infusing a delightful nuttiness. Drizzle melted butter over the entire dish, ensuring a sumptuous and aromatic finish to your vegetable biryani. The result is a culinary masterpiece that delights the senses and satisfies the palate.

  • Dal Bati Recipe

    Dal Bati Recipe

    Dal Bati

    Dal Bati (Rajasthani cuisine)

    When you mention about Rajasthani food dal bati has to be on the top of the list, otherwise it is incomplete. Dal bati is a popular Rajasthani delicacy. Dal is simply soup of mixed lentils, cooked with spices. Bati is a baked, whole wheat bread rolls and the combination is known as dal bati. Traditionally bati is cooked over charcoal, but oven also works great.
    My daughter in law is from Jaipur, Rajasthan; I can entice her any time just mentioning dal bati and gatte ki kadhi.  First time I had dal bati in Jaipur, Apno Gaon a restaurant with village setting that was a memorable experience. They served dal bati with buttermilk known as chaach. I suggest having this for leisurely lunch/dinner.
    3.20 from 10 votes
    Course dal
    Cuisine Indian
    Servings 2 people

    Ingredients
      

    • 1/4 cup chana dal (split gram)
    • 1/4 cup toor dal
    • 1/4 cup moong dal (split with skin)
    • 1/4 cup urad dal (split black lentil with skin)
    • 1/4 tbsp turmeric (haldi)
    • 2 tbsp ginger grated
    • 1-1/2 tbsp salt
    • 1 tbsp coriander powder (dhania)
    • 2 tbsp mango powder (amchoor)
    • 1/2 tbsp garam masala

    For seasoning

    • 3 tbsp clarified butter (ghee)
    • 1 tbsp cumin seeds
    • 1/8 tbsp asafetida (hing)
    • 1/2 tbsp chili powder
    • 2 dried red chili broken in pieces

    For Bati

    • 1 cup whole wheat flour (roti ka atta)
    • 1/4 cup fine sooji (semolina)
    • 1/8 tbsp baking powder
    • 1/2 tbsp salt
    • 1/4 cup clarified butter (ghee)
    • 1/2 cup milk use as needed

    For serving

    • About 1/4 cup hot clarify butter (ghee)

    Instructions
     

    • Combine all dals, wash changing water few times. In a pressure cooker add dal with 4 cups of water, salt, turmeric, coriander powder, and ginger, cook on medium high.
    • After pressure cooker start steaming lower the heat to medium and cook for about eight minutes. Turn off the heat; wait until all the steam has escaped before opening the cooker.
    • Dal should be soft and mushy, consistency of the pourable batter, if needed add hot water. The consistency of the dal will thicken over time.
    • Add garam masala and amchoor, mix it well.
    • Heat ghee in a small saucepan for seasoning; after ghee is moderately hot add cumin seeds as they crack add asafetida, red chilies and red chili powder.  Stir for a few seconds. To prevent the spices from burning, you may add 1 teaspoon of water.  Pour spiced Chaunk over dhal. Mix it well and let it simmer for two to three minutes.
    • Dal is ready.

    For the Bati

    • Preheat the oven to 350 degree F.
    • In a mixing bowl mix all the dry ingredients together, flour, sooji, salt and baking soda. Add the ghee and mix with fingers, add the milk as need to make firm dough, knead the dough well. Set aside for about 10 minutes.
    • Divide the dough into 8 equal parts and roll them into balls. They will not be very smooth dough ball and will have cracks all over; this will help them to cook all the way through. Arrange the batis over cookie sheet about one inch apart and place the pan on middle oven rack and bake at 350 degree F in a preheated oven for 25 minutes. Turn them over and bake for another 30 minutes until batis are golden brown all around.
    • Break one bati from one side to make sure they have cooked through.

    Notes

    How to Serve
    1. Break the bati into two pieces and pour about one teaspoon of hot melted ghee over and serve with bowl of hot dal.
    2. If you have baked the batties earlier heat the batties in oven for about 10 minutes.
    Tried this recipe?Let us know how it was!

    How to make Dal Bati: A Flavorful Rajasthani Specialty

    Dal Bati is a quintessential Rajasthani dish that consists of two main components: dal (lentils) and bati (baked wheat flour balls). This dal bati recipe is a beloved vegan culinary delight in Rajasthan, known for its hearty flavors and wholesome ingredients. Served with a side of churma (sweetened crushed wheat) or form of bread, dal bati is a complete meal that offers a perfect balance of savory and sweet flavors, making it a favorite among food enthusiasts.

    To prepare the dal, begin by combining all the lentils and thoroughly washing them, changing the water a few times to remove any impurities. Once cleaned, transfer the lentils to a pressure cooker and add four cups of water along with salt, turmeric, coriander powder, and ginger. Place the pressure cooker on medium-high heat and allow it to come to pressure. Once pressurized, reduce the heat to medium and let the dal cook for approximately eight minutes.

    After cooking, turn off the heat and allow the pressure to release naturally before opening the cooker. The dal should have a soft and mushy consistency, resembling pourable batter. If needed, adjust the consistency by adding hot water, keeping in mind that the dal will thicken over time. Once cooked, stir in the garam masala and amchoor to enhance the flavors.

    For the seasoning, heat ghee in a small saucepan until moderately hot. Add cumin seeds and let them crackle, then add asafetida, red chilies, and red chili powder. Stir the spices for a few seconds, being careful not to burn them. If necessary, add a teaspoon of water to prevent burning. Once the spices are fragrant and well combined, pour the seasoned ghee over the dal mixture.

    Stir well to incorporate the flavors and allow the dal to simmer for two to three minutes, allowing the spices to infuse into the dish. Moving on to the preparation of the bati, preheat the oven to 350 degrees Fahrenheit. In a mixing bowl, combine all the dry ingredients including flour, sooji (semolina), salt, and baking soda. Add ghee to the dry ingredients and mix thoroughly with fingers until the mixture resembles coarse crumbs. Gradually add milk as needed to form a firm dough, and knead the dough well to ensure even distribution of ingredients. Let the dough rest for about 10 minutes to allow the gluten to relax.

    Divide the dough into eight equal portions and shape each portion into rough balls. The dough balls may have cracks, which is normal and aids in even cooking. Arrange the batis on a cookie sheet, leaving about an inch of space between each one, and place the sheet on the middle rack of the preheated oven. Bake the batis for 25 minutes, then turn them over and bake for an additional 30 minutes or until they are golden brown all around. To ensure they are cooked through, break one bati open from the side.

    To serve, break the bati into two pieces and drizzle about a teaspoon of hot melted ghee over each piece. Serve the batis alongside a bowl of hot dal for a comforting and flavorful meal. If the batis were baked earlier and have cooled, reheat them in the oven for about 10 minutes before serving to ensure they are warm and crisp.

    Tips for Perfect Dal Bati

    • Consistency of Bati Dough: Ensure that the bati dough is firm and smooth, as it will help in shaping the batis and prevent them from crumbling during baking.
    • Baking Temperature and Time: Bake the batis at a moderate temperature until they are golden brown and crispy on the outside, ensuring they are evenly cooked throughout.
    • Tempering Technique for Dal: Take care while tempering the dal to ensure the spices are well-infused and aromatic, enhancing the flavor of the dish.

    Variations of Dal Bati

    • Stuffed Batis: Add a flavorful stuffing of spiced mashed potatoes or paneer (Indian cottage cheese) inside the batis for an extra burst of flavor and texture.
    • Sweet Churma: Customize the churma by adding jaggery or gur instead of powdered sugar for a richer and more traditional sweetness.

    Benefits of Dal Bati

    • High in Protein and Fiber: Dal bati is a nutritious meal that provides a good amount of protein and fiber from the lentils and whole wheat flour, promoting satiety and aiding in digestion.
    • Rich in Essential Nutrients: Packed with essential vitamins, minerals, and antioxidants, dal bati offers a nourishing and wholesome meal option for individuals of all ages.

    Frequently Asked Questions (FAQs)

    Can I make dal bati without an oven?

    • Yes, you can cook the batis on a stovetop over an open flame or in a traditional tandoor for authentic flavor and texture.

    Can I use different types of lentils for the dal?

    • Yes, you can use a variety of lentils such as masoor dal, moong dal, or chana dal to prepare the dal according to your preference.

    Is Dal Baati a vegetarian dish?

    • Yes, Dal Baati is a vegetarian dish that’s popular among vegetarians and non-vegetarians alike for its rich flavors and wholesome ingredients.

    Explore more delightful Rajasthani recipes on Manjula’s Kitchen, such as Gatte Ki Sabji for another culinary adventure.

    Explore more appetizer recipes on Manjula’s Kitchen: Vegetable Samosas, Paneer Tikka, Crispy Spinach Pakoras, Mango Lassi, Masala Chai, Gulab Jamun, Kheer (Rice Pudding)

  • Vegetable Biryani (Instant Pot)

    Vegetable Biryani (Instant Pot)

    A bowl of Vegetable Biryani garnished with fresh mint leaves

    Vegetable Biryani (Instant Pot)

    This next recipe is due to many of you requesting I do a tasty and delicious recipe using the Instant Pot. I decided to try a recipe for "Vegetable Biryani". I have been a little hesitant to do recipes using the Instant Pot. Maybe it's because I have been cooking for so long and I'm set in my habits, or maybe it's my age! I will say I have loved using my Instant Pot more as a pressure cooker and love using it for that purpose! I make lentils and legumes using the Instant Pot and think it's great. Once I use the Instant Pot more and get used to the timings, I think it will allow me to give more precise times for my recipes.
    Vegetable Biryani is a complete, satisfying, one-dish meal. My mother would often say this dish is a fancy name for vegetable pulao. However, I think it is more than that. The secret behind this flavorful Vegetable Biryani is a spice mixture that creates the perfect balance of flavors. Basmati rice with a mix of fresh vegetables combined with this spice mixture turns into a dish of perfection! If you follow my steps, you'll see I try to make this recipe as simple as possible. Vegetable Biryani also makes a great lunch box meal. Make sure to check out the footnotes to see how you can make this dish vegan.
    Hope you enjoy!
    This recipe will serve 3
    5 from 3 votes
    Prep Time 10 minutes
    Cook Time 30 minutes
    Total Time 40 minutes
    Course Main Course
    Cuisine Indian
    Servings 3 people

    Ingredients
      

    • 1 cup long grain rice I preferred Basmati Rice
    • 3 Tbsp Milk
    • 1 pinch Saffron Kesar few strands
    • 2 Tbsp oil or ghee
    • ¼ cup cashews
    • 15 Raisins
    • 1 Tbsp ginger thinly sliced
    • 2 cup mixed vegetables cubed potatoes, carrots, bell pepper, green beans cut into 1-inch pieces, cauliflower florets
    • ¼ cup Plain Yogurt whisked
    • ¼ cup Mint leaves Pudhina finely chopped
    • 1 ¼ cup Water

    Spices

    • 3 whole Green Cardamom Elaichi
    • 6 Cloves Laung
    • 8 Black Peppercorns
    • 1 inch long cinnamon stick Dalchini
    • 2 Bay leaf Tej Patta
    • 1 tsp Cumin seeds Jeera
    • 1 tsp coriander powder
    • 1 tsp fennel seed powder
    • 1 tsp red chili powder adjust to taste
    • ¼ tsp Turmeric Haldi
    • 1 tsp Salt adjust to taste

    Instructions
     

    • In warm milk soak the saffron and keep aside.
    • Soak the rice for about 10 minutes, then drain the water and keep aside.
    • Use the instant pot on sauté mode add ghee after half a minute add cashews and raisins and sauté lightly roast them for about 1 minutes.
    • Add all the whole spices and sauté for 30 seconds, they will become aromatic.
    • Add all the dry spices, coriander powder, fennel seed powder, turmeric, red chili powder and salt stir for few seconds, add vegetables and yogurt mix it well, cleaning sides and making sure vegetable mix spread evenly in the pot.
    • Next spread the rice evenly over the veggies. Spread the mint leaves evenly over rice. Sprinkle saffron milk on top of the rice.
    • Add the water for cooking on top of the rice. Rice should be just immersed under water.
    • You are layering the ingredients do not stir in between the steps. Close the lid with vent in sealing position.
    • Change the instant pot setting to pressure cook mode. Secure the lid, close the pressure valve and cook for 9 minutes at high pressure.
    • After the instant pot beeps, on the instant pot panel you will notice keep warm mode. Cancel the keep warm mode and wait until it releases the pressure and open the pot, that will take about 12 minutes.
    • Open the pot and fluff the rice gently with a fork.

    Notes

    Serve hot with Plain yogurt, Spinach Raita, and my favorite is Salted Mint Lassi
    Making Vegan:
    This is a easy recipe to make vegan, soak saffron in water instead of milk and yogurt you can replace with vegan yogurt or tomato puree.
    Keyword Bhojan, Bondi Raita, cooking shows, Cooking Video, Delicacy, delicious, Desi Khana, Gluten Free, Gourmet food, Homemade, Instant Pot, Jain Cooking, Khana, Lunch Box, Mint Lassi, One Pot Meal, Onion Garlic Free Cooking, Recipe videos, Rice Dish, Sattvic Food, Swaminarayan
    Tried this recipe?Let us know how it was!
  • Aam Ki Dal (Toor dal With Raw Mango)

    Aam Ki Dal (Toor dal With Raw Mango)

    indian dal

    Aam Ki Dal – Toor Dal with Raw Mango – Instant Pot

    Kacche Aam Ki Dal is a very simple dal recipe but delicious. This is Toor dal with raw mango. The tanginess of raw mangoes gives a delicious flavor to dal. Today I am using Instant Pot, that’s what I have been using instead pressure cooker. 
    4.20 from 5 votes
    Prep Time 5 minutes
    Cook Time 20 minutes
    Total Time 25 minutes
    Course Main Course
    Cuisine Indian
    Servings 4 people

    Ingredients


    • 1 cup toor dal arhar dal
    • 1/2 cup raw mango peeled and cut into small pieces
    • 1 tsp salt
    • 1/2 tsp turmeric haldi
    • 3 cups water

    Seasoning

    • 2 tbsp ghee clarified butter
    • 1/2 tsp cumin seeds jeera
    • 1/2 tsp mustard seeds rai
    • 1/8 tsp asafetida hing
    • 8 curry leaves
    • 1 tbsp green chili cut into small pieces
    • 2 dry red chilies
    • 1/4 tsp red chili powder

    Instructions
     

    • Wash dal changing water few times. 
    • Put dal with 2 cups water into instant pot and add salt, turmeric, and mango. Close the cover and cook on high heat for 8 minutes. Recently I have been using instant pot instead pressure-cooker. It takes the same time as pressure cooker advantage is you don’t have to watch over when it starts steaming and when it is time to turn off. You can take care other things.
    • After dal is done it should be soft. If needed add more water, dal should not be very thick. Dal will thicken as it sits. Make it more liquid than you want it to be.

    seasoning

    • Heat ghee in a small saucepan. Test the heat by adding one cumin seed to the ghee; if it cracks immediately, the oil is ready. Turn off the heat, add the cumin seeds, and mustard seeds. When they begin to crack, add the asafetida, curry leaves, and green chilies. Stir for a few seconds. Add red chili powder and 1 tablespoon of water to prevent the spices from burning. Pour spice mix chaunk over hot dal, before serving.

    Notes

    Notes, I have been using instant pot instead of pressure-cooker. Many people think it is a time saver, no it takes the same time as pressure cooker,  but it is hassle free you start and do other things you need to do, no watching over. it is also easy to clean.
    Tried this recipe?Let us know how it was!

    Raw Mango Dal Fry Recipe: A Tangy Twist to Traditional Dal

    Raw Mango Dal Fry, also known as Aam Ki Dal, is a delightful Indian dish that combines the tangy flavor of raw mangoes with the richness of lentils. This Instant Pot Raw Mango Dal Fry recipe offers a refreshing twist to traditional dal, adding a burst of tanginess and freshness to every bite. With its perfect balance of flavors and nutritious ingredients, Raw Mango Dal Fry is gluten free during the summer months when raw mangoes are in season.

    Step 1: Preparing the Lentils

    Start by rinsing the toor dal (pigeon peas) thoroughly and soaking it in water for about 30 minutes to soften the lentils. Once soaked, drain the water and transfer the dal to a pressure cooker or a large pot. Add fresh water, turmeric powder, and salt to the dal, and cook until it becomes soft and mushy. Cooking the dal until it’s well-cooked ensures a creamy and smooth texture for the dal fry.

    Step 2: Preparing the Raw Mango

    Peel the raw mango and cut it into small pieces, discarding the seed. The raw mango adds a tangy flavor to the dal fry and brings a refreshing twist to the dish. Adjust the amount of raw mango according to your taste preferences and the tartness of the mango.

    Step 3: Tempering the Dal

    In a separate pan, heat oil or ghee over medium heat and add cumin seeds, mustard seeds, and dried red chilies. Allow the seeds to crackle and release their aroma before adding until they turn golden brown and aromatic, enhancing the flavor of the tempering.

    Step 4: Adding Aromatics and Spices

    Add minced ginger, green chilies, and chopped tomatoes to the pan, stirring to combine with the tempering. Cook the mixture until the tomatoes are soft and mushy, adding ground spices such as coriander powder, cumin powder, and red chili powder for additional flavor and depth.

    Step 5: Incorporating the Raw Mango

    Once the tempering is ready, add the chopped raw mango pieces to the pan, stirring gently to coat the mangoes with the aromatic spices. Let the raw mango cook for a few minutes until it becomes soft and releases its juices, infusing the dal fry with its tangy flavor.

    Step 6: Combining the Lentils and Mango

    Once the raw mango is cooked, add the cooked toor dal to the pan, stirring well to combine with the mango and spice mixture. Adjust the consistency of the dal fry by adding water as needed to achieve the desired thickness. Let the dal simmer for a few more minutes to allow the flavors to meld together.

    Step 7: Garnishing and Serving

    Before serving, garnish the Raw Mango Dal Fry with freshly chopped cilantro leaves for a burst of freshness and color. Serve the dal fry hot with steamed rice or roti for a wholesome and satisfying meal that’s sure to please your taste buds.

    Tips for Perfect Raw Mango Dal Fry

    Adjusting Tartness: Taste the raw mango before adding it to the dal fry and adjust the quantity according to its tartness. If the mango is too sour, you can reduce the amount used or balance it with a pinch of sugar.

    Consistency of Dal: Cook the toor dal until it’s well-cooked and soft, ensuring a creamy texture for the dal fry. If the dal is too thick, you can add more water to achieve the desired consistency.

    Balancing Flavors: Adjust the amount of spices and seasoning according to your taste preferences. You can increase or decrease the spice level to suit your palate.

    Variations of Raw Mango Dal Fry

    Coconut Mango Dal: Add grated coconut or coconut milk to the dal fry for a creamy texture and a hint of sweetness that complements the tanginess of the raw mango.

    Spicy Mango Dal: Increase the heat level of the dal fry by adding more green chilies or red chili powder for an extra kick of spice.

    Benefits of Raw Mango Dal Fry

    Rich in Vitamin C: Raw mangoes are a good source of vitamin C, which helps boost immunity and promote overall health.

    Digestive Aid: The tangy flavor of raw mangoes aids in digestion and can help alleviate digestive issues such as bloating and indigestion.

    Nutrient-Dense: Raw Mango Dal Fry is a nutritious dish that provides a good balance of protein, fiber, and essential vitamins and minerals, making it a wholesome meal option for all.

    Frequently Asked Questions (FAQs)

    Can I use other lentils for this recipe?

    Yes, you can use other lentils such as masoor dal (red lentils) or moong dal (split mung beans) instead of toor dal for variation.

    Can I make aam ki dal ahead of time?

    Yes, you can prepare the dal fry in advance and store it in the refrigerator for up to 2-3 days. Reheat it gently before serving.

    Can I freeze aam ki dal?

    Yes, you can freeze the dal fry in an airtight container for up to 1 month. Thaw it in the refrigerator overnight and reheat it before serving.

    Explore more delightful Rajasthani recipes on Manjula’s Kitchen, Explore more appetiser recipes on Manjula’s Kitchen: Vegetable Samosas, Paneer Tikka, Crispy Spinach Pakoras, Mango Lassi, Masala Chai, Gulab Jamun, Kheer (Rice Pudding)