Tag: Quick Breads

Exploring Quick Breads: A Guide to Easy, Delicious, and Fast Indian Vegetarian Breads
Quick breads are a delightful addition to any meal, offering a fast and easy way to enjoy freshly baked bread without the need for yeast or lengthy rising times. These breads rely on leavening agents like baking powder or baking soda to achieve their rise, making them perfect for spontaneous baking. 

This guide will delve into various types of easy Indian recipes on quick breads, providing an overview of quick breads recipes, and highlighting some of the best quick breads you can make at home, focusing on Indian vegetarian recipes without using onion, garlic, or eggs.
What are Quick Breads?
Quick breads are bread varieties that do not require yeast for leavening. Instead, they use baking powder or baking soda as the leavening agent. 

This method significantly reduces the preparation time, making these breads ideal for quick baking sessions. Indian cuisine offers a variety of quick breads that are both delicious and easy to prepare.
Types of Quick Breads
There are numerous types of quick breads, each with its unique flavor and texture. Some popular categories in Indian cuisine include:

Parathas: Unleavened flatbreads made with whole wheat flour and various fillings or spices. 
Bhakri: A thicker, unleavened bread made from different flours such as jowar (sorghum) or bajra (pearl millet). A traditional indian food made in parts of maharashtra. 
Thepla: A spiced flatbread from Gujarat, often made with methi (fenugreek) leaves. This bread is a popular indian bread 
Dhokla: A steamed savory cake made from fermented rice and chickpea batter.

Quick Breads Recipes
1. Methi Thepla
Methi Thepla is a popular Gujarati flatbread made with fenugreek leaves, whole wheat flour, and a blend of spices. This is one of the most beloved quick breads recipes in Indian cuisine. It’s nutritious, flavorful, and easy to make. Perfect indian breakfast ideas or as a snack, thepla can be enjoyed with yogurt or pickle.

Ingredients:

Whole wheat flour
Fresh fenugreek leaves (methi)
Spices: turmeric, red chili powder, cumin powder, coriander powder
Yogurt (dahi)
Salt
Oil for kneading and cooking

Method: Mix the flour, fenugreek leaves, spices, yogurt, and salt to form a soft dough. Roll out small balls of dough into thin circles and cook on a hot griddle with a little oil until golden brown.
2. Jowar Bhakri
Jowar Bhakri is a wholesome and nutritious flatbread made from jowar (sorghum) flour. It’s gluten-free and packed with fiber.

Ingredients:

Jowar flour
Hot water
Salt

Method: Mix the jowar flour and salt with hot water to form a soft dough. Divide the dough into small portions, roll them out into discs, and cook on a hot griddle until both sides are done. Serve hot with vegetable curry or chutney.
3. Instant Rava Dhokla
Instant Rava Dhokla is a steamed savory cake made with semolina (rava) and yogurt, spiced with ginger and green chilies. It’s a perfect example of quick breads recipes in Indian cuisine.

Ingredients:

Semolina (rava)
Yogurt
Eno fruit salt
Ginger paste
Green chilies (optional)
Mustard seeds, sesame seeds, curry leaves for tempering

Method: Mix semolina, yogurt, ginger paste, and chopped green chilies to form a batter. Add Eno fruit salt just before steaming. Pour the batter into a greased plate and steam for 15-20 minutes. Temper with mustard seeds, sesame seeds, and curry leaves. Serve with green chutney.
4. Bajra Roti
Bajra Roti is a nutritious and gluten free indian recipes flatbread made from bajra (pearl millet) flour. It is especially popular in Rajasthan and Maharashtra.

Ingredients:

Bajra flour
Hot water
Salt

Method: Mix bajra flour and salt with hot water to form a soft dough. Take small portions of the dough and pat them into thin discs using your hands. Cook on a hot griddle until both sides are done. Serve hot with ghee and jaggery or with a spicy curry.
Best Quick Breads
Choosing the best quick breads depends on personal preference and dietary needs. Here are some top picks from Indian cuisine:

Masala Paratha: Spiced with various Indian spices, these parathas are flavorful and can be enjoyed with yogurt or pickle.
Palak Thepla: Similar to methi thepla but made with spinach leaves, offering a different taste and additional nutrition.
Instant Suji Uttapam: A savory pancake made with semolina and yogurt, topped with vegetables like tomatoes and coriander.

Conclusion
Quick breads are a versatile and delightful addition to any meal. Indian cuisine offers a rich variety of quick breads that are easy to make and packed with flavor. Whether you prefer the spiced goodness of methi thepla or the wholesome nutrition of jowar bhakri, there is a quick bread recipe for everyone.

By exploring these quick breads recipes, you can enjoy freshly baked Indian breads without the lengthy preparation times, making them perfect for busy schedules or spontaneous baking sessions. If you want to find vegetarian recipes

Explore more recipes on Manjula’s Kitchen and discover the joy of cooking nutritious and delicious food.

  • Tawa Naan Recipe

    Tawa Naan Recipe

    Tawa Naan (Naan without Tandoor)

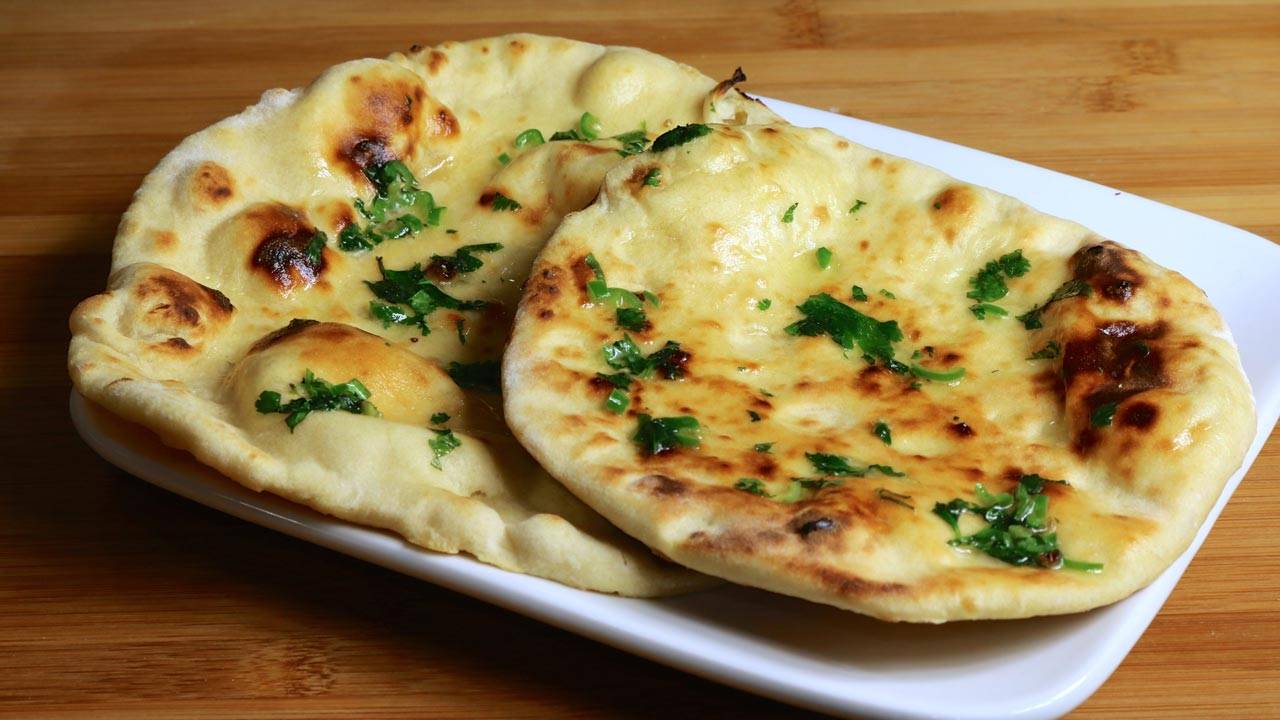
    Tawa Naan, Naan Without Tandoor

    Naan is definitely the most popular bread in Indian restaurants. Traditionally, naan is cooked in a tandoor (hot clay oven). I have already done a naan recipe using the oven and I used pizza stone to give a tandoor texture. But I find at home "tawa naan" is much easier to make. Tawa Naan turns out really soft and it tastes great. It's hassle free because you don't need a tandoor or oven. Naan Goes well with chole, palak paneer or any gravy based dish.
    4.08 from 13 votes
    Prep Time 10 minutes
    Cook Time 10 minutes
    Total Time 20 minutes
    Course Main Course
    Cuisine Indian
    Servings 2 people

    Ingredients
      

    • 1 cup all-purpose flour plain flour, Maida
    • 1/4 tsp baking soda
    • 1/4 tsp salt
    • 1/4 tsp sugar
    • 1/4 cup yogurt room temperature
    • 1-1/2 tsp oil canola, vegetable
    • 1/4 cup look warm water use as needed

    Garnishing

    • 1 tbsp clear butter or ghee
    • 1 tbsp chopped cilantro
    • 1 tbsp green chili finely chopped
    • 1/4 tsp sea salt

    Instructions
     

    • We also need tawa or skillet to make naan, nonstick skillet will not work for this recipe. Iron tawa or skiller works the best for making Tawa Naan.

    Making Naan

    • For garnishing mix all the ingredients, butter, salt, cilantro, and green chili Set aside.
    • Mix the dry ingredients together, add 1 tablespoon of oil and yogurt mix it well. Then add the water gradually to make very soft dough but not sticky. Knead the dough on a lightly floured surface, knead the dough well. Apply light oil to the dough and cover. Let the dough sit for about 3 hours in warm place.
    • Dough should be about 1-1/2 time, knead the dough again on floured surface. Divide the dough in four parts, lightly roll into the flour, cover the balls and let it sit for about five minutes before rolling.
    • Roll the naan one at a time on a lightly floured surface little less than 1/4 inch thick. Sprinkle the water lightly on one side of the naan.
    • Heat the tawa on medium heat, to check if tawa is ready sprinkle the few drops of water on tawa, water should sizzle.
    • Put water side naan over tawa, once the naan start bubbling and dough start drying, turn the tawa over flames keeping about 2 inch away from the flames to cook the naan from top. Note: yes naan will stick to tawa and will not fall of, this the reason you cannot use the nonstick skillet.
    • Once naan browned to your satisfaction, remove, and spread the butter mix over. Place in a on a plate and cover with a cloth to keep warm until serving. Naan is ready!

    Notes

    Serving Suggestion
    Taste best with Punjabi Chole or Palak Paneer
     
    Keyword 50 Favorites
    Tried this recipe?Let us know how it was!

    How to make Naan at Home on Tawa Recipe – Manjula’s Kitchen 

    Tawa or Skillet: 

    Let’s dive into crafting the perfect Tawa Naan (Indian bread) at home with this easy Tawa Naan recipe. Begin by selecting the right equipment – an essential iron tawa or skillet. Forgo the nonstick skillet; the traditional iron one is crucial for achieving that perfect stickiness in your Tawa Naan.

    Garnishing: 

    Elevate your Tawa Naan with a delightful mix of clear butter, sea salt, chopped cilantro, and finely chopped green chili. This straightforward concoction adds richness, freshness, and a hint of heat, transforming your naan into a culinary masterpiece with our special naan on the tawa recipe.

    Mixing the Dry Ingredients: 

    At the heart of our Tawa Naan recipe lies the meticulous combination of dry ingredients. In a mixing bowl, blend Maida, baking soda, salt, and sugar. Add oil and yogurt – the oil ensures a smooth integration of flavors, and the yogurt contributes a creamy richness and subtle tanginess to the dough in this How to make naan at Home on Tawa guide.

    Gradual Addition of Water: 

    As you gradually add water to the dry mixture, witness the alchemy of dough creation. Water acts as the binding agent, transforming the dry ingredients into a soft, pliable dough. Aim for a texture that is soft yet not sticky, setting the stage for a naan that strikes the perfect balance between chewiness and tenderness in our naan on tawa recipe.

    Kneading and Resting the Dough: 

    The art of kneading takes center stage. On a lightly floured surface, the dough transforms. Well-kneaded and coated with a touch of oil, it is covered and left to rest for a patient for three hours. This period of repose allows the dough to rise, making it 1-1/2 times its original size, imparting a lightness that will be evident in the final Tawa Naan.

    Division and Resting: 

    Post-resting, knead again and divide the dough into four equal parts. Lightly roll the dough balls in flour, cover them, and grant them a five-minute interlude before the next act in our naan on the tawa recipe. This resting period allows the dough to gather its composure, ensuring a smooth rolling process.

    Rolling and Sprinkling: 

    Each naan takes shape individually, rolled on a lightly floured surface to a thickness slightly less than 1/4 inch. A sprinkle of water on one side adds subtle moisture, a touch that will contribute to the naan’s characteristic texture as per our how to make naan at home on Tawa guide.

    Cooking on the Tawa: 

    The Tawa, heated to a medium temperature with a few drops of water sprinkled on the surface sizzling, signals the readiness of the Tawa. The naan, waterside down, meets the hot surface. As it begins to bubble and the dough dries, a flip of the tawa over flames cooks the naan from the top. A crucial note underscores the unique nature of this process: the naan sticks to the Tawa, a characteristic that needs the use of a traditional iron surface rather than a nonstick skillet.

    Final Touch: 

    As the naan achieves the desired golden-brown hue, it exits the stage. A generous spread of the previously prepared butter mix crowns the naan with a final change of richness and flavor. Placed on a plate and covered with a cloth, the naan awaits its moment of glory, ready to be served warm and relished in our naan on tawa recipe.

    Serving Suggestion: 

    Completing our culinary symphony, the serving suggestion recommends pairing the Tawa Naan with Dal Makhani, Punjabi Chole, Palak Paneer, Butter Paneer Masala & Malai Kofta. This is not merely a suggestion but a curated experience, inviting us to savor the naan’s texture and flavor alongside these iconic accompaniments, creating a culinary ensemble that transcends the ordinary according to our how-to-make naan at home on tawa guide. 

  • Sweet Paratha

    Sweet Paratha

    Sweet Paratha

    Sweet Paratha

    Sweet Paratha is whole wheat flat bread. This Paratha is filled with a delicious combination of nuts, cinnamon and sugar. It makes a great and easy breakfast or a snack with cup of tea or coffee!
    No ratings yet
    Course Bread
    Cuisine Indian
    Servings 4 Paratha

    Ingredients
      

    Dough

    • 1 cup whole wheat flour
    • 1/4 teaspoon salt
    • 1 tablespoon oil
    • Approx. 1/3 cup lukewarm water

    Filling

    • 1/3 cup almonds coarsely grind
    • 1/3 cup walnuts coarsely grind
    • 2 tablespoon coconut powder
    • 1 teaspoon cinnamon powder
    • 1/3 cup sugar

    Also need

    • 1/4 cup whole wheat flour for rolling the Paratha
    • Approx. 1-1/2 tablespoons oil for cooking the Paratha

    Instructions
     

    • In a bowl mix the flour, salt, and oil. Add about 1/3 cup of water to make dough add remaining water as needed to make smooth and pliable dough. Knead the dough on a lightly greased surface. Cover the dough and keep it aside for at least 15 minutes.
    • For the filling mix the almonds, walnuts coconut, cinnamon, and sugar, set aside.
    • Knead the dough again and divide into 4 equal parts.
    • Roll the dough into 3-inch diameter circles. Place about 3 tablespoons filling mix in the center. Seal by pulling the edges of the rolled dough together to make a ball. Proceed to make all four balls.
    • Let them settle for 3 to 4 minutes before rolling.
    • Heat the skillet on medium high. Note: An iron skillet works best. To check if the skillet is hot enough, sprinkle a couple of drops of water on it. When the water sizzles right away, the skillet is ready.
    • First lightly roll the filled ball in dry whole-wheat flour.
    • Lightly press the ball on the sealed side and keep it on the topside when rolling. Roll the ball lightly into about 7-inch circles. Whenever the dough sticks to the rolling pin or rolling surface, lightly sprinkle dry whole-wheat flour on both sides of the semi-rolled Paratha.
    • Place the Paratha over the skillet. After a few seconds you will see the Paratha change color and puff in different places.
    • 10. At this point flip the Paratha over. You should see some golden-brown spots on the topside. After a few seconds, spread about 1 teaspoon of oil on the Paratha. Again, flip the Paratha and lightly press the puffed areas with a spatula.
    • Flip again and press with the spatula making sure the Paratha is golden-brown on both sides.
    • Sweet Paratha can be served hot or at room temperature. Paratha can be kept at room temperature for about week.
    Keyword parantha
    Tried this recipe?Let us know how it was!

    Sweet Paratha: A Delectable Indian Dessert

    Sweet Paratha is a delightful and indulgent Indian dessert that combines the savoury goodness of paratha with the sweetness of sugar, jaggery, or other sweet fillings. 

    This versatile dish can be enjoyed as a treat on its own or paired with a dollop of yogurt, a drizzle of honey, or a sprinkle of powdered sugar. 

    Sweet Paratha is loved for its crispy exterior, soft interior, and irresistible sweetness, making it a favorite among both children and adults. 

    Benefits of Sweet Paratha:

    • Energy Boost: Sweet Paratha is a rich source of carbohydrates, which provide a quick and sustained source of energy. Whether enjoyed as a breakfast dish or a midday snack, Sweet Paratha can help fuel your body and keep you feeling energized throughout the day.
    • Comfort Food: The warm and comforting flavors of Sweet Paratha make it the perfect indulgence for chilly mornings or cozy evenings. The combination of sweet fillings and savory dough creates a satisfying and heartwarming dish that’s sure to lift your spirits and tantalize your taste buds.
    • Customizable: Sweet Paratha is incredibly versatile and can be customized to suit individual taste preferences. From traditional fillings like sugar and jaggery to more exotic options like chocolate, fruit compote, or nut butter, the possibilities for creating unique and delicious Sweet Paratha variations are endless.

    Variations of Paratha:

    • Paneer Paratha: Paneer Paratha is whole-wheat flat bread filled with mildly spiced paneer Indian Cheese). This is a good breakfast option. Paneer paratha can be served by itself or enjoyed with any gravy-based dish.
    • Pizza Paratha : Pizza has become a universal food enjoyed by all. Pizza paratha is perfect for the times when you want to enjoy homemade pizza.
    • Masala Paratha: This paratha is a combination of whole wheat flour and besan with a mix of delicious spices. Masala Paratha is a great breakfast treat and also a great lunch box option.
    • Matar Ka Paratha: Matar Ka Paratha is stuffed paratha with spicy green peas and is a delicacy. Matar Ka Paratha can be part of any main meal, making it a special treat.

    Tips for Making Perfect Sweet Paratha:

    • Knead the Dough Well: Properly kneaded dough is the key to soft and pliable parathas. Ensure that the dough is smooth, elastic, and free of lumps to achieve the perfect texture in your Sweet Paratha.
    • Roll Out Evenly: Roll out the dough into thin, even circles to ensure that the Sweet Parathas cook evenly and develop a crispy exterior. Use a rolling pin and a dusting of flour to prevent sticking and achieve uniform thickness.
    • Seal the Edges: Seal the edges of the rolled-out dough tightly to prevent the filling from spilling out during cooking. Press the edges firmly together and pinch them closed to create a secure seal.

    FAQs about Sweet Paratha:

    Can I make Sweet Paratha ahead of time?

    Yes, you can prepare the dough and filling for Sweet Paratha in advance and store them separately in the refrigerator. When ready to cook, simply assemble the parathas and cook them fresh for the best taste and texture.

    Is Sweet Paratha suitable for vegetarians?

    Yes, Sweet Paratha is vegetarian-friendly as it does not contain any meat, poultry, or fish. However, be mindful of the ingredients used in the filling, especially if using commercial products like chocolate spread that may contain animal-derived ingredients.

    Can I make Sweet Paratha without sugar?

    Yes, you can adjust the sweetness of Sweet Paratha according to your taste preferences or dietary restrictions. Substitute sugar with natural sweeteners like honey, maple syrup, or date syrup, or omit the sweet filling altogether for a less sweet version of the dish.

    Sweet Paratha is a delectable and versatile dessert that offers a perfect balance of sweetness and indulgence. Whether enjoyed on its own or paired with your favorite accompaniments, Sweet Paratha is sure to delight your taste buds and satisfy your cravings for something sweet. 

    With its simple preparation, customizable fillings, and irresistible flavor, Sweet Paratha is a must-try dish for anyone looking to explore the rich and diverse world of Indian cuisine.

  • Methi Bajra Paratha (Millet Gluten Free and Vegan Bread)

    Methi Bajra Paratha (Millet Gluten Free and Vegan Bread)

    A plate of Methi Bajra Paratha, golden and crispy, garnished with fresh fenugreek leaves

    Methi Bajra Paratha

    Parathas always have been a family-favorite treat. Lately I have been trying to make gluten-free breads. A combination of bajra and besan with methi parathas taste delicious. These spicy Methi Bajra Parathas have a biscuit texture, which makes it very enjoyable. They also pair well with gravy-based dishes like Mixed Dal, Aloo Tamatar or you can serve with plain yogurt. You can enjoy these as a proper meal, or even as a great on-the-go lunch! I also enjoy these parathas with just hot cup of chai.
    This recipe will serve 2, and make 4 Parathas.
    5 from 1 vote
    Prep Time 10 minutes
    Cook Time 10 minutes
    Total Time 20 minutes
    Course Breakfast
    Cuisine Indian
    Servings 2 people

    Ingredients
      

    • ½ cup millet flour bajra atta
    • ½ cup besan
    • ½ tsp cumin seeds jeera
    • ½ tsp salt
    • 1 tsp chili flakes
    • ¼ tsp turmeric haldi
    • tsp asafetida hing
    • 1 Tbsp sesame seeds til
    • 1 Tbsp oil
    • ¼ cup fenugreek leaves option is using dry leaves
    • ½ cup hot water use as needed

    Also Need

    • 4 tsp oil to cook the parathas

    Instructions
     

    • Mix all the ingredients for paratha together, millet flour, besan. Cumin, salt, chili flakes, turmeric, asafetida, sesame seeds, oil, and fenugreek leaves. Notes: if you don’t have fresh fenugreek leaves use dry methi known as Kasuri Methi.
    • Make the dough using hot water, you will need about 1/2 cup of water. Dough should be firm and pliable. Notes: dough should be prepare just before making paratha.
    • Dived the dough into 4 equal parts, oil your palm and roll them between your palms, to make them round petites.
    • Heat the skillet on medium high heat. To test, sprinkle a couple of drops of water on the skillet. The water should sizzle right away.
    • Roll the paratha in about 6” circle, roll them between two pieces of plastic that makes the rolling easy, I am using zip log bag.
    • Place the methi bajra paratha over the skillet. When start to change color, flip it over. You will notice some golden-brown spots.
    • After a few seconds, spread one teaspoon of oil on the aratha. Flip it again and lightly press the with a spatula. Flip again and press with the spatula making sure the paratha is golden-brown on both sides.
    • Repeat same process for the remaining.
    Tried this recipe?Let us know how it was!
  • Avocado Paratha

    Avocado Paratha

    Avocado Paratha served with potato curry, yogurt sauce, and avocado slice on a white plate

    Avocado Paratha

    Avocado Paratha, these days I'm spending a lot of time at home, so I decided to experiment in the kitchen. I had one extra avocado left after making some guacamole dip. Avocados seem to be very popular these days most often served as "Avocado Toast". I decided to put an Indian twist and use the extra avocado in delicious flavorful parathas. It actually turned out great and I enjoyed, but I think it needed a few tweaks. I added some extra spices and it turned out even better.
    Avocados have many health benefits, including being a "healthy" fat and they taste great! I like to serve Avocado Parathas as a snack with tea. It can also be served with any gravy-based dish; however, I think its complemented perfectly with "Aloo Tamatar" or "Spinach Raita". This is also a satisfying lunch box meal.
    This recipe will serve 3.
    4.67 from 6 votes
    Prep Time 10 minutes
    Cook Time 15 minutes
    Total Time 25 minutes
    Course Breakfast
    Cuisine Indian
    Servings 3 people

    Ingredients
      

    • 1 large ripe avocado
    • 1 ¼ cup whole wheat flour use as needed
    • ½ tsp salt
    • ½ tsp cumin seeds jeera
    • tsp asafoetida hing
    • 1 Tbsp green chili finely chopped
    • 1 Tbsp cilantro finely chopped
    • 1 tsp ginger finely shredded
    • ½ tsp lemon juice

    Also, need

    • ¼ cup whole wheat flour for rolling the paratha
    • 3 Tbsp oil for cooking the parathas

    Instructions
     

    • Slice avocado in half, remove the pit and skins and scoop them into a mixing bowl. Then use a fork to gently mash, (avocado should be ripe). Add green chili, salt, asafetida, cumin seeds, lemon juice, cilantro and salt, mash all the ingredients together (Lemon juice is added to prevent oxidizing of the Avocados)
    • Add the whole wheat flour gradually, how much flour you will need depends on the avocado, knead all the ingredients together and make a smooth but firm dough. Do not add any water. Grease your palm and roll the dough between your palms basically you are kneading the dough between you palms. Let the dough sit for 10 minutes before making the parathas.
    • Divide the dough into 6 equal parts and roll them into smooth balls. Flatten them with the palm of your hand and roll them in dry flour. Roll the paratha into about 6-inch diameter. Note: if paratha is sticking while rolling sprinkle little more flour this will help rolling.
    • Heat the flat skillet over medium heat. Note: heavy skillet works best. To check if the skillet is ready, put few drops of water on it. If the water sizzles right away, the skillet is ready.
    • Place the Paratha over the skillet. When you see the color change and the paratha will puff in different places. Turn the paratha over.
    • Paratha should have golden-brown spots. Wait a few seconds and put about 1 teaspoon of oil and spread with a spatula. Flip the paratha and put again half teaspoon of oil. Lightly press the paratha with a spatula.
    • Flip again and press with a spatula making sure the paratha is golden-brown on both sides. Repeat for the remaining parathas.
    • Parathas are best served hot and crispy.

    Notes

    Serve them as a snack with cup of chai, or with a meal I like to serve with Aloo Tamatar and Spinach Raita.
    Keyword Avocado Pancake, Avocado Roti, Bread, Chapati, delicious, Easy Cooking, Guacamole Bread, Healthy, Homemade, Jain Food, Lunch Box, Main Meal, Onion Garlic Free Cooking, Roti, Side Dish, Swaminarayan, Teatime Snack, Unleavened Bread, Vegan, Vegetarian, Veshno Cooking, Video Recipe
    Tried this recipe?Let us know how it was!
  • Banana Puri (Kela Ke Puri)

    Banana Puri (Kela Ke Puri)

    Banana Puri (Kela Ke Puri)

    Banana Puri (Kela Ki Puri)

    Banana Puries are delicious fried Indian puffed bread. Puries have richness of banana flavor enhanced with cardamom. Banana Puries are good for festive occasions and holidays. These can be served for breakfast or as a snack. Puries are especially good for picnic or to take for travel.
    5 from 1 vote
    Prep Time 10 minutes
    Cook Time 12 minutes
    Total Time 22 minutes
    Course Snack
    Cuisine Indian
    Servings 10 people

    Ingredients
      

    • 1/2 cup Banana mashed
    • 1/2 cup sugar
    • 1 tbsp ghee or butter melted
    • 1/8 tsp crushed cardamom seeds ilachi
    • Pinch salt
    • 3 tbsp coarsely ground almonds about 18 almonds
    • 3/4 cup whole wheat flour use as needed
    • 3/4 cup all-purpose flour use as needed

    Instructions
     

    • Peel and mash the banana, add the sugar, almond, butter, salt and cardamom mix it well. Add whole-wheat flour and all-purpose flour to the banana mix and make a firm and smooth dough. Keep it aside for about 2 hours.
    • Grease the fingers and knead the dough for a minute and divide in four equal parts
    • Roll them into 8” diameter and cut them in about 2” diameter, using a cookie cutter.
    • Heat the oil in a frying pan on medium heat. To check the heat if oil is ready put one piece of dough in oil, dough should sizzle and come up slowly.
    • Fry the puries few at a time don’t over crowd the frying pan. Puries will puff and fry them till they are dark brown from all around. It will take about 2 minutes to fry every batch.
    • Take them out over paper towel so it can absorb the extra oil.

    Notes

    Notes:
    This is good recipe for vegan by replacing the butter with oil. Puries can be served hot or eaten at room temperature. Banana Puries can be stored for a week; you don’t need to refrigerate them.
    Tried this recipe?Let us know how it was!

  • Grilled Tofu Sandwich

    Grilled Tofu Sandwich

    Grilled Tofu Sandwich

    Grilled Tofu Sandwich

    These are absolutely delicious and flavorful sandwiches that are quick and easy to make. Tofu sandwiches are healthy and appropriate for Vegans, too. The Tofu provides a great source of protein, while the Hari Cilantro chutney brings in a unique ethnic flavor to the sandwich. These sandwiches make a great “to-go” lunch.
    No ratings yet
    Course sandwich
    Cuisine Indian
    Servings 2 sandwiches

    Ingredients
      

    Ingredients:

    • French rolls or sandwich rolls
    • 4-¼ inch thick firm tofu slices (tofu usually comes in 16oz blocks soaked in water and each of these will make approx. 12 slices)
    • 1 zucchini
    • slices of tomatoes
    • Few pieces of romaine lettuce
    • 2 tablespoons olive oil
    • ¼ cup Hari Cilantro Chutney
    • 2 teaspoons  sugar
    • About 1/8 teaspoon salt

    Instructions
     

    Method

    • Prepare sandwich ingredients: Slice tofu into ¼” thickness and pat dry. Wash and remove ends of zucchini, then cut lengthwise into approx. ⅛” thick slices. Wash and slice tomatoes. Set aside.
    • Mix Hari Cilantro Chutney and sugar, set aside.
    • Generously grease a flat skillet and bring to medium heat. Add tofu and zucchini slices and lightly sprinkle with salt. Grill on both sides until they are light-brown in color. Remove from skillet and wipe skillet clean.
    • Slice rolls lengthwise through the center and lightly spread with olive oil on the inside portion. Place on medium-heat skillet to toast. Turn off the heat.
    • Assemble the sandwich over the skillet: Turn over the roll and lightly spread Hari Cilantro Chutney on the bottom half of the roll. Layer with lettuce followed by tofu slices. Spread tofu with more chutney. Layer with zucchini followed by tomatoes. Cover with the top half of the roll.

    Notes

    Variation
    Yellow Squash, eggplant, or mushrooms also taste great in this sandwich.
    Tried this recipe?Let us know how it was!

  • Puran Poli – Sweet Flatbread

    Puran Poli – Sweet Flatbread

    Puran Poli

    Puran Poli – Sweet Flatbread

    Puran Poli is a sweet flat bread with a sweet dal lentil filling. This is a popular bread in the states of Gujarat and Maharashtra. Puran poli is a wonderful breakfast dish, and can also be served as a snack.
    5 from 1 vote
    Course Bread
    Cuisine Indian
    Servings 10 Puran Poli

    Ingredients
      

    Ingredients:

    • 1/2 cup of whole wheat flour (atta)
    • ¼ cup all-purpose/plain flour (Maida)
    • 2 tablespoons oil
    • Approximately 1/3 cup water

    Filling

    • ¾ cup Toor dal (Ahrar dal) (available in Indian grocery stores)
    • 1 cup sugar
    • ½ teaspoon turmeric
    • 1 teaspoon cardamom powder (elaichi)
    • ¼ teaspoon nutmeg (jaiphal)

    Also Needed

    • Approximately 3 tablespoons oil
    • Approximately ½ cup of dry whole wheat to roll the bread

    Instructions
     

    Filling

    • Wash and soak the toor dal in two cups of water for at least four hours. Dal will double in volume after soaking. Discard any remaining water.
    • Add toor dal and turmeric to two cups of water and cook in a heavy pan over medium-high heat. When dal boils, remove the yellow foam from the top. Reduce the heat to medium and cover the pan.
    • Let it cook for 25 minutes, adding more water if needed. Dal should be very soft and mushy.
    • Add sugar and cook until the dal looks like paste and starts to hold together. Add cardamom and nutmeg powder and mix well. The dal filling will be very soft and sticky.

    Dough

    • In a bowl, mix whole-wheat flour, all-purpose flour, and oil; add water slowly to make a very soft dough. The dough should not stick to your fingers. Cover the dough and set it aside. Let it rest for at least ten minutes.

    Making Puran Poli

    • Divide both the dough and the dal filling into ten equal parts. The parts of the dal filling should be about 2½ times that of the dough balls.
    • Roll the dough balls into 2½”-diameter circles. Place one part of the filling in the center of each. Seal by pulling the edges of the rolled dough together to make a ball. Proceed to make all ten balls. Let the filled balls settle for three to four minutes.
    • Heat the skillet on medium-high heat. To test, sprinkle a couple of drops of water on the skillet. The water should sizzle right away.
    • Press the filled ball lightly on both sides on a surface covered with dry whole wheat flour.
    • Lay the balls on the sealed side up and lightly press them into circles about 2” in diameter. Roll the balls gently into 5” circles. If the dough sticks to the rolling pin or rolling surface, lightly sprinkle dry whole wheat flour on both sides of the semi-rolled puran poli.
    • Place the Puran poli in the skillet. When it starts to change color, flip it over. You will notice some golden-brown spots.
    • After a few seconds, spread one teaspoon of oil on the puran poli. Flip them again and lightly press the puffed areas with a spatula. Flip again, and press with the spatula making sure the puran poli are golden-brown on both sides.
    • Repeat the same process for the remaining.
    • Puran poli is ready to be served and it tastes best when eaten hot.

    Notes

    Tips

    1. When cooking the dal, use a large pot to prevent it from boiling over, as this can happen very easily.
    2. Cooked Puran Poli can be stored for a week in the refrigerator.  Re-heat over a skillet or in the toaster oven.
    Variation
    Puran Poli can be prepared using Chana dal, however, it has to be cooked for a slightly longer time.   
    Tried this recipe?Let us know how it was!

  • Spinach Paratha

    Spinach Paratha

    Spinach Paratha

    Spinach Paratha

    This is a great “anytime” meal. Spinach Parathas are whole-wheat Indian flat bread stuffed with a spicy spinach filling. Makes 6 Parathas.
    5 from 1 vote
    Course Bread, Breakfast
    Cuisine Indian
    Servings 6 Parathas

    Ingredients
      

    Dough

    • 1 cup whole-wheat flour
    • 1/2 cup water Add more water as needed
    • Pinch of salt

    Spinach Filling

    • 2 cups chopped spinach
    • Pinch of asafetida
    • 1/4 teaspoon salt
    • 1/2 teaspoon cumin seeds
    • 1/4 teaspoon red chilly flakes
    • 1/4 cup whole-wheat flour for rolling
    • Oil to cook

    Instructions
     

    Dough

    • Mix flour, salt and water togather to make soft dough (if needed add more water).
    • Knead the dough for a few minutes on a lightly greased surface to make soft, smooth and pliable dough.
    • Set the dough aside and cover it with a damp cloth. Let the dough rest for at least ten minutes.

    Filling

    • Heat the oil in a saucepan on medium-high heat. Oil is the right temperature when cumin cracks immedialety after being put the oil.
    • Add the asafetida and cumin seeds. After the cumin seeds crack, add the spinach.
    • Stir-fry, making sure to press the spinach down so the water can evaporate.
    • Cook the spinach until most of the water has evaporated. Spinach still should be moist and should be able to form a ball. Add the salt and pepper and mix well. Set aside until the spinach cools off.

    Making of Paratha

    • Divide the dough and spinach filling into 6 equal parts.
    • Roll the dough into 3 inch circles. Put the filling in the center. Seal by pulling the edges together and make into a ball. Procced to make all six balls.
    • Each ball needs to settle for two minutes before you start rolling. Note: If you don’t wait long enough spinach mixture will seep through the edges when rolling the paratha.
    • Heat the skillet on medium high. Note: An iron skillet works best. To see if the skillet is ready, put a couple of drops of water on it. If the water sizzles right away, the skillet is ready.
    • Press th filled ball lightly on dry whole-wheat flour from both sides.
    • Roll the ball light handed to make 6-inch circle. Note: Keep the sealed side of the ball on the top.
    • If the paratha sticks to the rolling pin or rolling surface, lightly dust the paratha with dry flour.
    • Place the paratha over the skillet.
    • After paratha start changing color and start puffing in different places flip the paratha over. You will notice some golden-brown spots.
    • After few seconds, spread 1 teaspoon of oil on the paratha. Flip the paratha and lightly press the puffed areas of the paratha with a spatula.
    • Flip again and press with the spatula making sure the paratha is golden-brown on both sides.
    • Cool the parathas on a wire rack so they don’t get soggy.
    • Parathas can be kept outside for up to 2 days wrapped in aluminum foil or in a closed container. For later use paratha can be refrigerated for 3-4 days.

    Notes

    Serving suggestions
    • Parathas can be served with plain yogurt, potatoes with gravy, and with any Indian pickle.
    • Put cheese in the middle, fold over, heat, and eat like a quesadilla.
    Keyword Bread, Cheese, Palak, Paratha, Spinach, stuffed, Vegan, Wheat
    Tried this recipe?Let us know how it was!
  • Puri, Indian Puffed Flat Bread

    Puri, Indian Puffed Flat Bread

    Puri (Flat Bread) Recipe by Manjula

    Puri, Indian Puffed Flat Bread

    Puri is whole wheat fried bread, made on special occasions. Especially popular with children. It goes well with mutter paneer and other thick gravy recipes.
    4 from 4 votes
    Prep Time 5 minutes
    Cook Time 15 minutes
    Total Time 20 minutes
    Course Main Course
    Cuisine Indian
    Servings 2 people

    Ingredients
      

    • 1 cup whole wheat flour
    • 1/2 tsp salt
    • 1 tsp oil
    • 1/3 cup water, use as needed

    Instructions
     

    • Mix whole-wheat flour and salt. Add water as needed to make firm dough. Oil your palm and knead the dough until it is pliable. Cover the dough with a damp cloth and set it aside to rest at least ten minutes.
    • Divide the dough in eight equal parts. Form these into smooth balls, rolling the dough between your greased plams.
    • Roll the dough balls into seven inch circles. If the dough sticks to the rolling pin or rolling surface, put a drop of oil on the rolling pin and on the rolling surface. Roll four or five puris before you start frying. Do not roll all the puris at once, as they will dry out and fail to puff.
    • Heat at least one inch of oil in a frying pan over medium high heat. When the oil is moderately hot, a small piece of dough dropped into the oil will float immediately to the top.
    • Place one puri at a time in the frying pan and press it with a skimmer. The puris should puff up right away. Turn the puris over. Puri should be light creamy brown on both sides. Take the puris out and place them on paper towels to absorb the excess oil.
    • Serve puri hot or store in covered container after they cool to room temperature.

    Notes

    Tips: 
    Do not roll the puris on a floured surface. If it seems that you need to flour the surface that is an indication that the dough is too moist. In this case, put a drop of oil on the surface and on the rolling pin.
    If the oil is not hot enough, the puris will not puff and will be greasy.
    Variations:
    Add your choice of spices or one or more dry herbs to the flour when making dough. Red pepper flakes, asafetida, dry mint leaves, dry fenugreek leaves, or any other dry herb can be used.
    Tried this recipe?Let us know how it was!