Gluten Free Desserts: Indian Sweets You Must Try
Gluten-free desserts are a delightful way to enjoy sweet treats without the worry of gluten. Indian cuisine offers a plethora of gluten free dessert recipes that are both delicious and easy to make. This article will explore various Indian gluten-free dessert recipes and answer the question, What kind of sweets are gluten-free? What Kind of Sweets Are Gluten-Free?
Gluten-free sweets are typically made with ingredients that do not contain gluten, such as rice flour, chickpea flour, almond flour, and naturally gluten-free grains.
These ingredients make it possible to enjoy a variety of gluten free recipes dessert without compromising on taste or texture. Here are some gluten free Indian recipes Popular Gluten-Free Ingredients in Indian Desserts 1. Rice Flour
Rice flour is a staple in many gluten free dessert recipes. It provides a light and fluffy texture to sweets. 2. Chickpea Flour (Besan)
Chickpea flour is another popular ingredient in Indian gluten-free dessert recipes. It adds a rich flavor and is perfect for making sweets like laddoos. Most of the dishes prepared using this flour turn out to be easy Indian recipes. 3. Almond Flour
Almond flour is used to add a nutty flavor and a moist texture to gluten free dessert recipes. Gluten-Free Dessert Recipes to Try 4. Besan Ladoo Besan ladoo is a classic Indian sweet made with chickpea flour, ghee, and sugar. It is one of the best gluten free dessert recipes that is both easy to make and delicious. 5. Rice Kheer Rice kheer is a traditional Indian food made using rice pudding made with rice, milk, and sugar. This gluten-free dessert recipe is creamy and satisfying. 6. Almond Halwa
Almond halwa is a rich and indulgent dessert made with almond flour, ghee, and sugar. It is one of the gluten free dessert that you must try. Easy Gluten-Free Dessert Recipes
For those looking for easy gluten free dessert recipes, here are some quick and simple options: 7. Coconut Barfi Coconut barfi is a quick and easy dessert made with coconut, sugar, and cardamom. It is a perfect example of gluten free dessert recipes easy. 8. Ragi Ladoo
Ragi ladoo is made with finger millet flour, ghee, and jaggery. This dessert is not only gluten-free but also highly nutritious. 9. Shrikhand Shrikhand is a creamy yogurt-based dessert flavored with saffron and cardamom. It is one of the easy gluten free dessert recipes that requires minimal ingredients and effort. Best Gluten-Free Dessert Recipes
When it comes to the best gluten free dessert recipes, Indian cuisine offers a variety of options that are sure to satisfy your sweet tooth: 10. Kaju Katli
Kaju katli is a popular north indian recipe that is most prepared during festival seasons such as diwali or holi. This Indian sweet is made with cashew nuts and sugar. It is a melt-in-the-mouth delicacy and one of the best gluten free dessert recipes. 11. Phirni Phirni is a creamy rice pudding made with ground rice, milk, and sugar. It is a traditional dessert that is gluten-free and absolutely delicious. 12. Moong Dal Halwa Moong dal halwa is a rich and flavorful dessert made with split green gram, ghee, and sugar. It is a must-try gluten-free dessert recipe. Health Benefits of Gluten-Free Desserts Rich in Nutrients: Gluten-free flours like chickpea flour and almond flour are often higher in protein and fiber compared to traditional flours.
Easier Digestion: Gluten-free desserts are easier to digest for those with gluten sensitivity, preventing bloating and discomfort.
Variety: Using different gluten-free ingredients allows for a variety of flavors and textures in desserts. Tips for Making the Perfect Gluten-Free Desserts Use Fresh Ingredients: Fresh ingredients enhance the flavor and nutritional value of your desserts.
Experiment with Flours: Try different gluten-free flours to find the one you like best.
Adjust Sweetness: Gluten-free flours may require different amounts of sweeteners to bring out the best flavors. Frequently Asked Questions (FAQs) What kind of sweets are gluten-free?
Gluten-free sweets are made from flours that do not contain gluten, such as rice flour, chickpea flour, and almond flour. How can I make my gluten-free desserts more flavorful?
Ensure that the ingredients are fresh and experiment with different spices and sweeteners to enhance the flavors. Exploring Indian Gluten-Free Desserts
Indian cuisine is rich with gluten-free dessert options that are both traditional and innovative. Here are a few more gluten-free dessert recipes to explore: 13. Rajgira Halwa
Rajgira halwa is made with amaranth flour, ghee, and jaggery. It is a nutritious and gluten-free sweet. 14. Sabudana Kheer Sabudana kheer is a tapioca pudding made with sabudana, milk, and sugar. It is a popular fasting dish that is naturally gluten-free. 15. Thandai Thandai is a spiced milk drink made with almonds, fennel seeds, and saffron. It is a refreshing and gluten-free beverage. Conclusion
Gluten-free desserts offer a delicious way to enjoy sweet treats without the worry of gluten. With a variety of gluten free dessert recipes available, you can indulge in your favorite Indian sweets without compromising on taste or texture. Explore these gluten free recipes and discover the joy of gluten-free cooking. For more exciting recipes and ideas, visit Manjula’s Kitchen and enjoy the delightful world of gluten-free desserts.
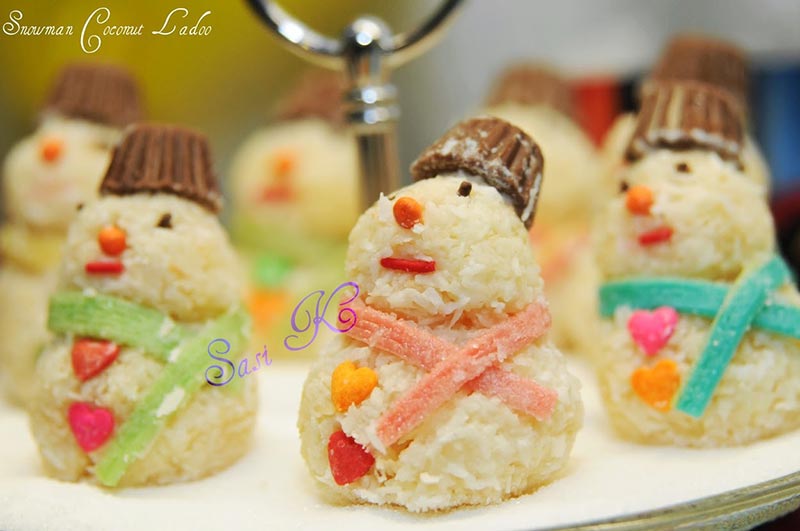
I made this beautiful kids friendly delicious snowman coconut ladoos for last year Christmasparty and it was a top hit. As soon as I placed them on the table, all I heard was “WOW!” and that’s it. They got vanished in a glimpse of a second and of course, they were generous enough to leave me with a plate at least. This was the talk for a while among my family and friends. I had so much fun decorating them and that’s the time I got the idea of recreating this with my baby nephew. He was as thrilled as I was and we had an awesome aunt-nephew time together which is ineffable. Let your precious moment begins with your little ones as well! Its a fun sweet snack that would be enjoyable to eat and treat to people of all ages.
Heat 1tsp ghee in a low-medium flame on a non-stick pan and lightly roast 1 cup of desiccated coconut in it for 5 secs. DO NOT Burn them! (Remaining ½ cup of desiccated coconut will be used to roll in the ladoos.)
Remove the ghee-coconut aromatic mixture from the fire and let it cool completely.
Notes
Snowman Edible Accessories (Refer to the picture for ideas)
Hat ———- Mini Reese’s chocolates or mini Rolo or any chocolates that look like mini hat.
Eyes ———Chocolate vermicelli candies or Oreo cookie crumbs
Nose ——– Mini bead candies
Mouth —— Mini vermicelli candies
Scarf ——– Sour belts candy (Cut them into thin strips)
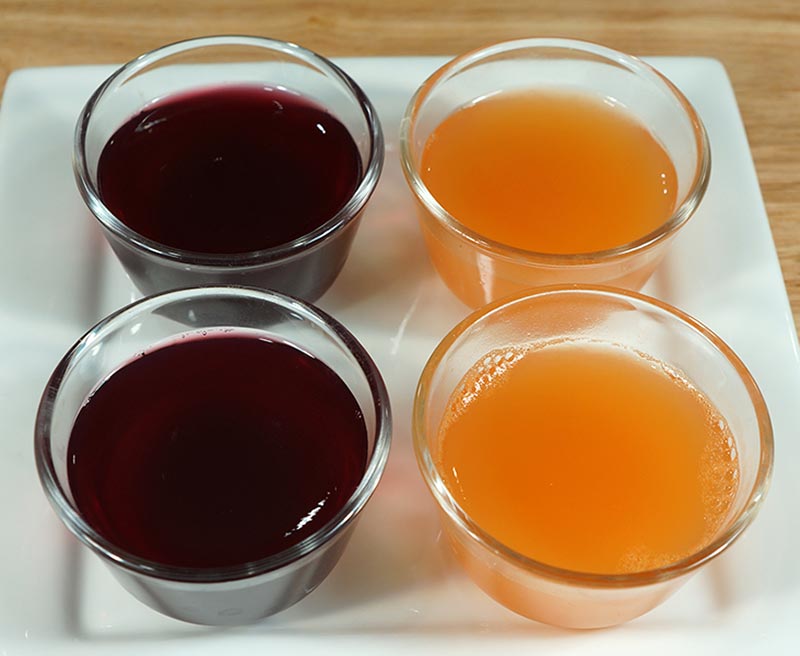
This is a great vegan recipe for Jello! Jello is a simple easysnack that most kids love. Instead of adding gelatin, I am using Agar-Agar. It is an excellent vegetarian alternative for gelatin. It's a good snack for kids and adults alike.
1/2teaspoon agar-agar powder (available in Indian and Asian stores)
Instructions
Dissolve the agar-agar in water, in saucepan combine juice, sugar, and water with agar-agar.
Bring it to boil over medium heat. Stir occasionally making sure agar-agar is mixed well. Let it boil for about 2 minutes.
Remove from the heat pour into individual cups or molds, or in a small glass tray. Refrigerate for about 3-4 hours.
Jello is ready to serve.
Notes
Notes
Pour the juice in the dish while it is hot as Jello will start getting set as it cools.
I have experimented many times to give the right texture to the Jello and this combination comes out just right. Adding more agar-agar or not adding water with the juice will make jello very firm.
Store bought orange juice did not work well for this recipe, but fresh orange juice works great.
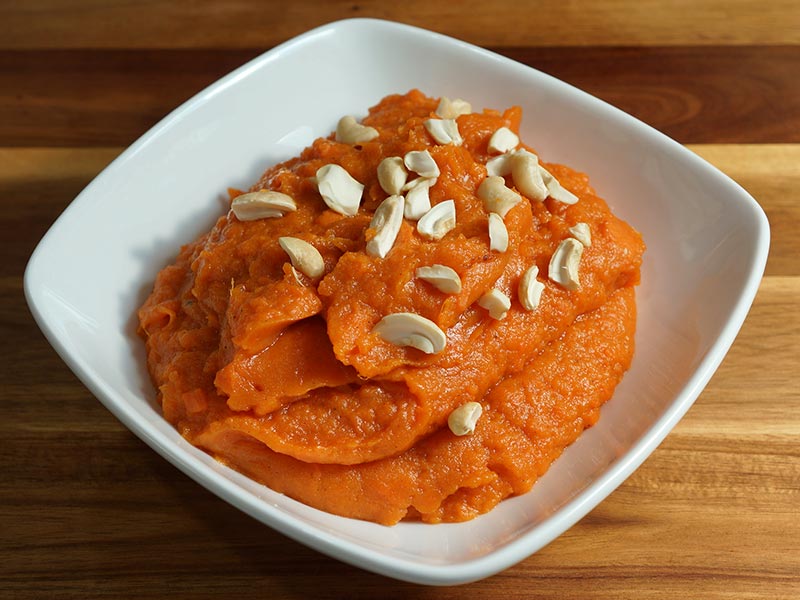
Sweet Potato Halwa (eggless pudding) is one of the easiest Halwa recipes to make. Cardamom and Cinnamon spices give it a delicate and unique flavor. This is a tasty, warm dessert for cold winter months.
5tablespoons unsalted butter or ghee clarified butter
1cup milk
1 cup sugar
1/4teaspoon freshly ground cardamom (ilachi)
1/4 teaspoon cinnamon powder (dal chini)
1/8 teaspoon of nutmeg (jaifel)
8 cashews broken in small pieces for garnishing (kaju)
Instructions
Method
Boil the sweet potato peel and mash; Sweet potatoes can be cooked in a microwave. Wrap the potatoes in wet paper towel and cook for 7-8 minutes.
Heat butter in heavy bottom pan over medium heat. Add sweet potatoes and stir fry by stirring continuously and pressing down for about 8-10 minutes.
Add milk and mix it well. After milk comes to a boil cook for 2 minutes, add sugar and cook for additional 6-8 minutes or until Halwa should start leaving the side of the pan. Halwa should be very moist.
Turn off the heat and add cardamom, cinnamon, and nutmeg. Mix it well.
Serve hot or at room temperature. Garnish with cashews. Halwa tastes best when served hot.
Notes
Serving suggestionsYou can serve this as pudding. Serve with vanilla ice cream or over a plain cookies/ biscuits.
1 store bought 8 inch gluten free, dairy free pie crust or make your own (my recipe below)
1 cup pecan pieces
3/4cup pure canned pumpkin
1/3 cup Truvia Sweetener (regular not baking blend)
1/4cup + 2 tablespoons melted vegan, dairy free margarine (I used Earth Balance Natural Buttery Spread)
1/4 cup unsweetened cocoa powder
1/4 cup gluten free flour (I used Namaste Foods Perfect Flour Blend)
1/4cup sugar
1tablespoon pumpkin pie spice
1/2tablespoon coconut oil
1teaspoon vanilla extract
1/2teaspoon ground flaxseed
1/4teaspoon nutmeg
Pie Crust Recipe (Gluten Free, Dairy Free, and Vegan)
2 cups gluten free flour (I used Namaste Foods Perfect Flour Blend)
1/2cup plain, unsweetened soy milk
1/4 cup canola oil
1/4 cup coconut oil
1/2teaspoon salt
1/2teaspoon Truvia Sweetener (regular not baking blend)
Instructions
Method
Preheat the oven to 350.
Soak ground flaxseed in the coconut oil in a small bowl.
Mix melted margarine, pumpkin, and vanilla together
Stir in sugar, Truvia, and the ground flaxseed with the coconut oil until everything is mixed together well.
Mix remaining dry ingredients together (except pecans) and slowly stir into the rest of the mixture.
Once everything is mixed together, gently stir in the pecans.
Spoon into pie crust and bake at 350 for 25-30 minutes.
Pie Crust Recipe (Gluten Free, Dairy Free, and Vegan)
Mix the milk and oil together.
Quickly mix in the rest of the ingredients.
Need together for a couple of minute (note this dough is oily).
Divide dough into 2 equal portions; each portion should be enough for a 9 inch pie pan.
Put 1 port of dough into the center of a pie pan and start pressing the dough to the edges until you have a thin layer of dough covering the bottom and sides of the pan.
Set aside in refrigerator if your pie filling is not ready yet.
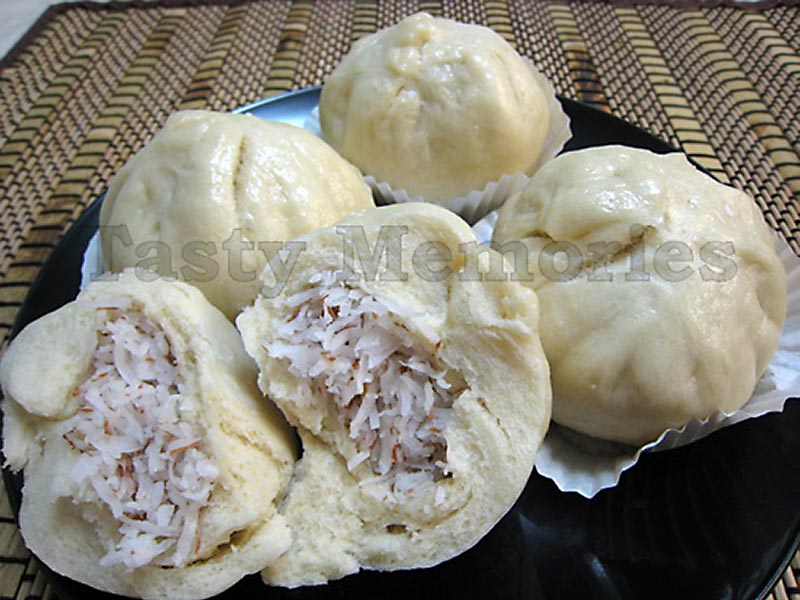
The dough recipe is quiet easy to follow and the filling used here is very simple. Dough can be filled with variety of vegetable, meat or sweet fillings. Its a good healthy, veganappetizer. This coconut filling is also very versatile and can be used to fill puff pastries or even spring roll sheets to form spring rolls or samosas. Combinations are endless and sky is the limit!
8 Standard Cupcake Liners or Parchment Paper cut into 4 inch squares
Instructions
Method
In a large bowl, combine water, yeast, oil and sugar. Mix with a spoon until well combined.
Sift in flour and salt into the liquid mixture and stir with a wooden spatula to combine. When it becomes hard to stir, start kneading dough with hands until smooth for about 2 to 3 minutes.
Lightly coat the bowl with oil spray, put dough, turn once to coat with oil, cover and leave it in warm area for about 40 minutes or until doubled in size. (For faster rising, place the bowl in a larger bowl filled with warm water)
Knead the dough for about a minute to remove air, cover and leave it again for another 30 minutes.
Meanwhile, in a medium size pan combine coconut, sugar, salt and cook over medium low heat stirring frequently until sugar is melted for about 2 to 3 minutes. Remove from heat and let it cool completely.
Place cupcake liners 1 inch apart on the rack of a steamer and keep aside.
Take dough and divide into 8 equal portions. (Keep unused dough covered to prevent from drying out.)
On lightly floured surface, roll each portion into approximately 4 inch circles leaving center thicker than edges.
Take a heap tablespoon (or 1/8) of filling and place in middle of the circle. Gather the edges of the dough and conceal the filling by pinching and sealing the edges while forming pleats. Twist ends off to seal and close; and place it in prepared steamer rack.
Continue rolling and filling rest of the dough, cover and let it rise for 20 minutes.
Steam the buns for 20 minutes, covered and undisturbed.
Turn off the heat, remove buns from steamer and serve.
Notes
Additional Notes:Steamed buns can be kept at room temperature for a day or two. Keep them in fridge for few more days after that. Before serving, wrap it with damped paper towel and microwave for 10 to 15 seconds.
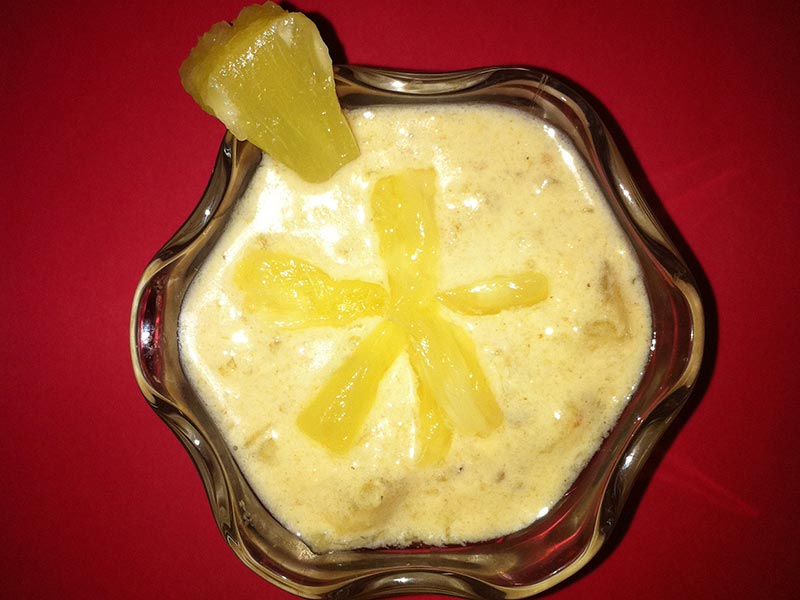
Pineapple Kheer is a very refreshing dessert made with ripened Pineapple (annanas). It is a nice healthy recipe with use of fruit and sugar can be added as per your taste and diet.
14oz Pineapple chunks in pineapple juice (1 1/2 cans)
4 Tbsp Coconut powder (finely shredded coconut)
1 Tbsp Corn flour
3/4 Cup Sugar
Instructions
Method
Boil the milk in a heavy bottom wide pan on medium high heat. Stir often to make sure the milk does not burn in the bottom of the pan. Cook until the milk is reduced to about half of its original volume.
Mix well 1 tablespoon Corn flour in 4 table spoons of water and add this in the milk, also add Coconut powder 4 table spoons in the milk and cook the milk for another 10 minutes on low heat. Then turn off the heat and let the milk cool down.
Drain 1 can pineapple using strainer let the juice dripped through without squeezing. Note: we will use juice and pineapple both.
Cut each chunk of pineapple in about 3 to 4 small pieces.
In a pan put all the pineapple juice drained from 1 can, add ¾ cup sugar and the pineapple pieces and cook on medium heat for about 30 minutes: until the pineapple pieces become soft and translucent.
Then from another pineapple can, take out half of pineapples and half of its juice- blend it blender. Add this in the cooked pineapple mixture and cook for additional 10 minutes. Then turn off the heat.
Let pineapple mixture come down to room temperature.
Once both the milk and pineapple mixture are cooled down, add the pineapple mixture in the milk and stir gently.
Serving Suggestion
Keep in the refrigerator for at least one hour before serving the desert. You can use the remaining half of pineapple chunks to decorate the kheer making floral patterns and any other way you might like.
Notes
TipsMix pineapples in the milk when both the milk and pineapples are on room temperature or cold.
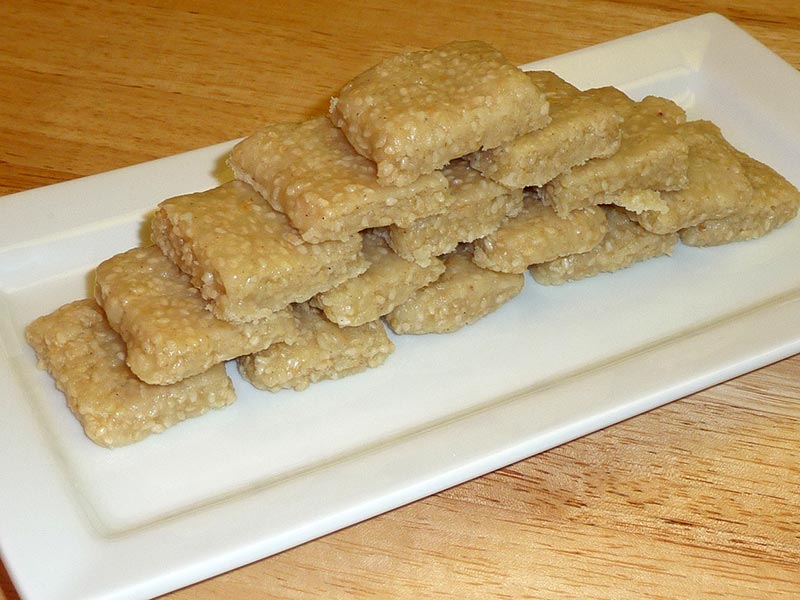
Til ki Burfi is a healthy, quick & easy way to make home-made sweet snack which can also be offered as a dessert post meal. Its a must try recipe during winters.
Roast sesame seeds over medium heat till they are golden in color. This should take about 3-4 minutes. Keep aside.
In a non-stick frying pan add heavy cream and milk powder mix it well. Cook over medium-high heat, stir continuously till the mixture starts to bubble.
Lower the heat to medium and keep stirring and scraping the sides and bottom of the pan, until mixture is reduced to thick paste and starts coming together. This should take 8-10 minutes.
Add roasted sesame seeds and mix well. Stir for another 2-3 minutes until mix start looking soft dough.
Lower the heat to low and add sugar and cardamom powder and mix it well. This will become soft in texture after adding sugar.
Keep stirring for 1-2 minutes and bring the burfi back to dough texture.
Spread burfi mixture onto the greased plate, approximately ½ inch thick. Let it sit for at leadt two hours at room temperature. Cut burfis to desired shape; square or diamond shape works well.
The burfis will store well in an airtight container, at room temperature for up to 2 weeks.
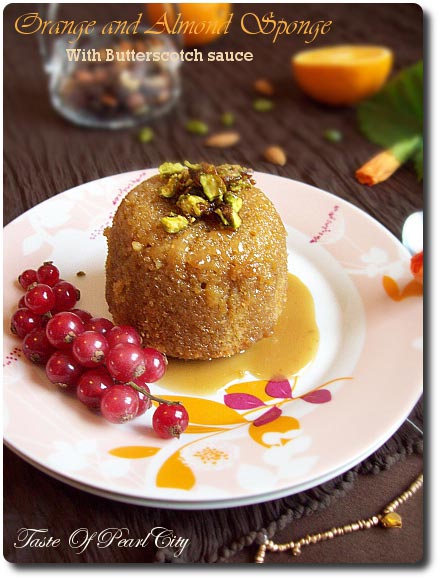
Ground Almonds( without skin)- 40 g/ just less than 2 oz
1 tspGrated zest of orange
2Eggs
3 tbspFreshly squeezed orange juice-
Butterscotch sauce:
1/2 tbspButter
2 tbspBrown sugar
75 mlCream
1 tbspHoney
1/2 tspVanilla extract
Pistachio Praline:
1 tbspPistachio without shell
2 tbspBrown sugar
1 tspLemon juice
Instructions
For the Sponge:
Melt the butter and keep it separately.
Beat the eggs and sugar in a large bowl until it looks fluffy.
Add the orange juice and zest, mix well.
Sift the flour, baking powder, bicarbonate of soda and almonds into the egg mixture.
Fold gently without any lumps.
Finally fold the butter into the mixture.
Grease 4 ramekins with butter and dust it with flour. Pour the mixture equally into the ramekins.
Preheat the oven to 180 degree Celsius.
Take a large tray, fill with boiling water and then place the ramekins inside that.
Bake it in the preheated oven for 25 minutes or until a skewer inserted comes out clean.
Note: The cooking time might vary according to the size of the dish you are using.
For Butterscotch sauce:
Heat together butter, sugar and honey in a heavy based pan in medium to low heat.
Once everything is melted completely, heat it for 2 to 3 minutes stirring continuously.
Take it off from heat, add the extract and cream little by little, stirring continuously.
For Pistachio Praline:
Heat the pistachio, sugar and lemon juice in a pan, stirring continuously.
When it reaches a consistency of 1 string consistency, take it off from heat and pour it in a baking parchment paper.
After it hardens, bash it with a rolling pin to crumble into pieces.
Note: To check the one string consistency, wet your hands with cold water. Take a small amount of syrup between your two fingers, when you press and release, you should see a small thread between your two fingers.
Notes
To Serve:Place the sponge in individual serving plates, pour the warm sauce on top. Finally top it up with pistachio praline.To enjoy the real taste of this dessert, serve while they are still warmAdditional Notes:
You can replace brown sugar with caster sugar for sponge.
For the butterscotch sauce, you can use caster sugar and brown sugar mixed.
For the praline also you can replace with caster sugar.
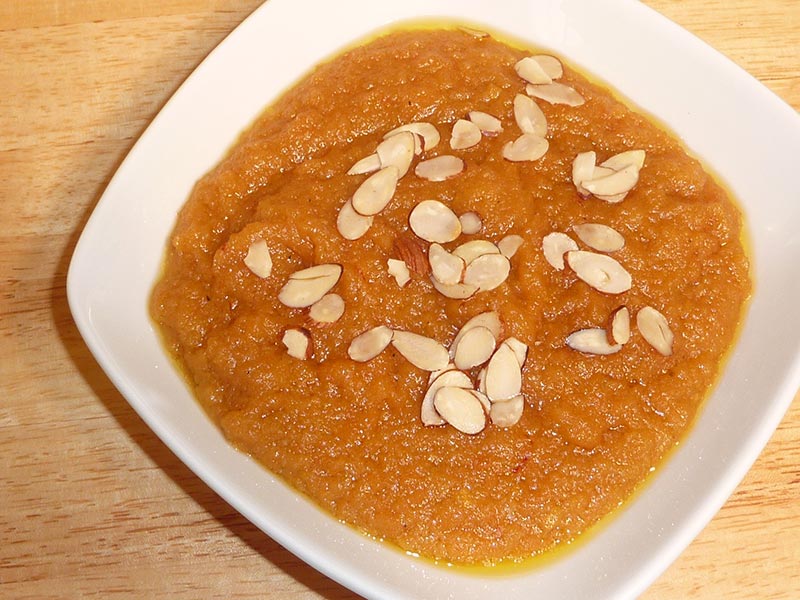
Moong Dal Halwa is a delicacy of the state of Rajasthan. It is a rich, creamy and pudding-like dessert. Made with split yellow moong dal, this is a popular and delicious dessert for the winter months.
Wash dal thoroughly and soak in 3 cups of water for at least 4 hours. Drain the water and blend dal into a thick paste, adding just enough water as needed to blend.
Boil water and sugar in a pan over medium heat, for 3-4 minutes. Remove from heat. Add cardamom powder and saffron; set aside.
In a non-stick or heavy bottom frying pan add moong dal paste and melted butter. Mix well.
Turn on the stove to medium heat and fully cook dal paste. Use spatula to gently press the paste, then fold the paste over and press again. Repeat this pressing and folding of the dal paste several times until the texture becomes grainy and light brown in color. This will take approximately 15 minutes, and will have a sweet, mild aroma when it is cooked.
Lower the heat to medium-low. Add syrup to the dal, little at a time. The syrup will splatter as you are adding. Cover and cook for an additional 2-3 minutes.
Remove cover, stir and cook for another minute. Turn off the heat. Garnish with almonds.
Notes
The halwa will thicken over time.Halwa tastes best if it is served warm.
Moong Dal Halwa: A Rich and Indulgent Vegan Dessert
Moong Dal Halwa is an Indian dessert made from moong dal (split mung beans), ghee (clarified butter), sugar, and flavoured with cardamom and saffron. This rich and aromatic dessert is a favorite during festivals and special occasions such as diwali or holi.
Tips for Making Perfect Moong Dal Halwa (Vegan):
Soak Moong Dal: To ensure a smooth texture, soak the moong dal in water for at least 4 hours overnight before cooking. Soaking helps soften the dal and reduces the cooking time, resulting in a smoother halwa.
Use a Non-Stick Pan: Use a non-stick pan or a heavy-bottomed pan to cook the Moong Dal Halwa (Vegan) to prevent it from sticking to the bottom and burning. Stir the halwa frequently to ensure even cooking and prevent lumps from forming.
Garnish with Saffron: Infuse the Moong Dal Halwa (Vegan) with the exotic aroma and vibrant color of saffron by soaking a few strands of saffron in warm water and adding it to the halwa during cooking. Garnish the halwa with additional saffron strands for a luxurious touch.
Variations of Halwa:
Gajar ka Halwa: Gajar Ka Halwa is a classical Indian dessert, this is also known as gajrala. Gajar ka Halwa is a delicious and popular sweet made with few ingredients, carrots, milk, sugar and flavored with cardamom.
Atta Ka Halwa: Atta ka Halwa, is a delicious sweet dessert. This is easy to make and with few ingredients. Atta ka halwa is made with whole wheat flour, sugar, and clarified butter, flavored with cardamom.
Sooji ka Halwa: Sooji Halwa is a very popular sweet dish all over India and is made on religious occasions, as parsad.
Sweet Potato Halwa: Sweet Potato Halwa, an eggless pudding, stands out as one of the simplest Halwa recipes to prepare. Infused with the delicate and distinctive flavors of cardamom and cinnamon, it serves as a deliciously warm dessert ideal for chilly winter evenings.
FAQs about Moong Dal Halwa (Vegan):
Can I use other lentils for Moong Dal Halwa (Vegan)?
While moong dal is traditionally used for making Moong Dal Halwa, you can experiment with other lentils such as chana dal (split chickpeas) or urad dal (black gram) for a different flavor and texture.
How long does Moong Dal Halwa (Vegan) last?
Moong Dal Halwa (Vegan) can be stored in an airtight container in the refrigerator for up to 3-4 days. Reheat the halwa gently in the microwave or on the stovetop before serving.
Can I make Moong Dal Halwa (Vegan) without sugar?
Yes, you can make Moong Dal Halwa (Vegan) without sugar by using natural sweeteners such as jaggery, maple syrup, or agave syrup. Adjust the sweetness to your taste preference and enjoy a healthier version of this classic dessert.
Is Moong Dal Halwa (Vegan) gluten-free?
Yes, Moong Dal Halwa (Vegan) is naturally gluten-free, making it suitable for those with gluten sensitivities or celiac disease. However, be sure to check the labels of any packaged ingredients to ensure they are gluten-free.
Moong Dal Halwa (Vegan) is a rich and indulgent dessert that’s perfect for special occasions or as a sweet treat to satisfy your cravings.
With its creamy texture, aromatic flavors, and wholesome ingredients, it’s sure to become a favorite among vegans and non-vegans alike.
Whether enjoyed warm or cold, on its own or with a scoop of dairy-free ice cream, Moong Dal Halwa (Vegan) is a true delight for the senses.
Wash and soak the tapioca in about 1/3 cups of water for at least two hour, Sabudana will soak up most of the water and become light and fluffy.
Boil the milk in heavy bottom pan after milk comes to boil let it boil for about another 8 to 10 minutes making sure stirring occasionally so milk does not burn in bottom of the pan.
Add the tapioca cook until tapioca is soft and has become translucent this should take about 4 minutes.
Next add sugar, cardamom, pistachios, and saffron and boil for 2 to 3 minutes. Turn off the heat. As kheer will cool become little thicker in consistency.
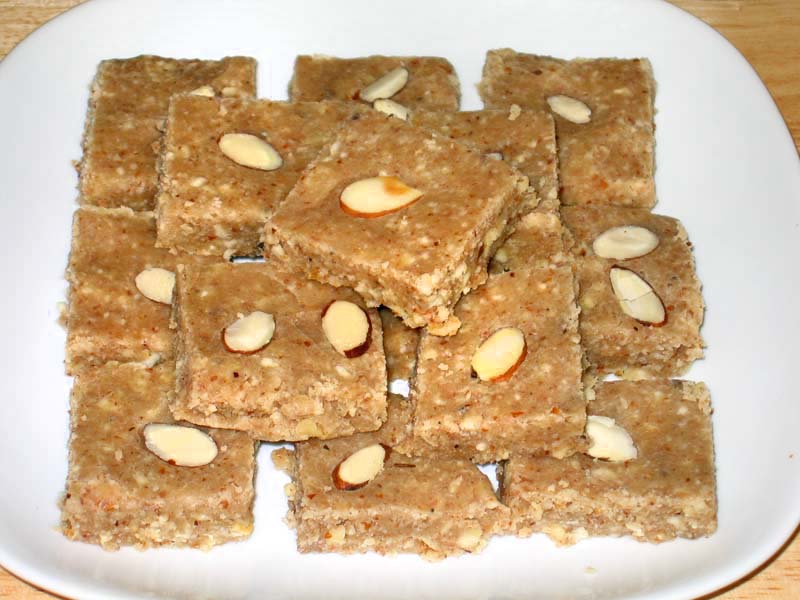
Almond Walnut Cashew Burfi is a healthy, quality substitute for candy that your entire family will enjoy. Its a nice sweet snack that is popular in north India. Recipe will make 24 pieces.
Dry grind the walnuts, cashews and almonds in a food processor.
Dry roast the groundnuts in a frying pan on low medium heat.
Roast them just enough so that the nuts start to give off an aroma. It will take about 4 to 5 minutes. Remove from heat and set aside.
Put the sugar and water together in a saucepan on medium heat. Bring to a boil to make the 1 thread syrup or on the candy thermometer it should reach 230 degrees F.
Turn off the heat and stir in the cardamom powder.
Add the nuts to the syrup and mix, and then spread over a greased 8-inch plate. Note: don’t let the syrup cool off. It must be spread while still hot.
Wait a few minutes until burfi is set but still soft.
Then cut the burfi into any shape you like (such as square, diamond, triangle).
Garnish each piece of burfi with sliced almonds while the burfi is still soft.
Allow the burfi to cool for about an hour to dry and hold its shape. Now you can remove the burfi from the plate.
Gujia is a fried pastry filled with an aromatic nuts mixture. In India, Gujia is traditionally made for the holidays like Diwali and Holi and is a must have treat.
Mix flour, sooji, and oil in a bowl, make a soft dough adding water slowley as needed. Knead the dough until the dough becomes soft and pliable.
Set the dough aside and cover it with a damp cloth. Let the dough sit for at least ten minutes.
Filling:
Mix the cream and milk powder in a frying pan. Cook on medium heat until mixture starts leaving the sides of the frying pan and becomes soft runny dough. Stir continuously so the mixture does not burn on the bottom of the pan.
Turn off the heat and add coconut, almonds, melon seeds, sugar, and cardamom powder. Mix together well. After cooling, the mixture will be lightly moist. Keep aside.
Making the Gujias:
Mix 2 tablespoons of water with 1 tablespoon of flour to make a paste. Set aside.
Knead the dough again for a minute. Divide the dough into about 20 equal parts and roll into balls with the palms of your hands.
Roll each ball into about 4-inch diameter (like a roti or chappati).
Dip your finger in the flour paste and spread it around the rim of the rolled dough, but just on the half the circle.
Take the rolled dough in your palm and put about 1-1/2 tablespoons of the filling mixture in the center and fold it into a semi-circle. Now press the edges together with your fingers. Make sure the edges are completely sealed otherwise they will open while frying and oil will get in and filling will come out. Continue filling the rest of the gujia in the same manner.
Heat about 1 inches of oil in a frying pan on medium heat. To test if the oil is hot enough, drop a small piece of dough into the oil. It should sizzle right away but come to the surface slowly.
Place the gujia in the frying pan few at a time.
After gujhias are floating on top of the oil, turn them slowly. Fry the gujias until they turn light golden-brown color on all sides. Don’t fry on high heat; the gujia crust will be too soft and not crispy.
When they are done cooking, lift them out of the oil with a slotted spoon.
Garnishing:
Boil the sugar and water on medium heat until syrup is about one thread or 230 degrees (Fahrenheit) on a candy thermometer.
Dip the gujias into the syrup making sure they are coated with syrup all around. Place the gujias on a wire rack to allow the extra syrup drain.
Garnish the gujias with sliced almonds and pistachios while the gujhias are still moist with syrup.
Gujias will be dry in an hour.
Notes
Gujia can be stored in airtight container up to a month.Gujia makes great gift idea for Holidays you may also like Besan Ladoo, Spicy Cashew, Baklava, Besan Mathri
Keyword Ghugra, Holiday Dessert, Holiday Gift, Karangi, Special Occasion
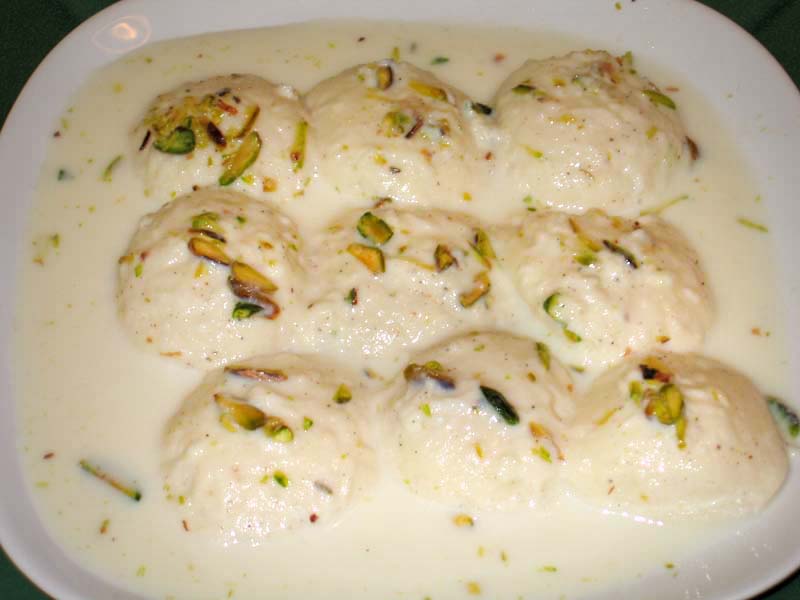
Rasmalai is a Bengali dessert consisting of soft paneer balls immersed in chilled creamy milk. Like Rasgullas, Rasmalai is also made with homemade cheese known as "paneer" or "chana". Instead of being soaked in sugar syrup like Rasgullas, Rasmalai is soaked in sweet, flavored milk.
Mix lemon juice in half a cup of hot water and keep aside.
Boil the milk in a heavy bottomed over medium-high heat, stirring frequently making sure milk do not burn on the bottom of the pan.
As the milk comes to a boil, add the lemon juice slowly and stir the milk gently. The curd will start separating from the whey, turn off the heat.
Once the milk fat has separated from the whey, drain the whey using a strainer line with cheesecloth or muslin cloth.
Wrap the curd in a muslin cloth, rince under cold water, and squeeze well. This process takes out the sourness from the lemon.
To take out the excess water squeeze the cloth, or press the wrapped paneer under a heavy pan for about one hour. Taking the right amount of water out of the paneer is the most important part of this recipe.
To check if enough water is out of the paneer, take a little piece of paneer on your palm and rub with your fingers. After rubbing the paneer for about 15-20 seconds, you should be able to make a firm but smooth ball.
Once the paneer is drained, place on a dry, clean surface and knead the paneer for 3-4 minutes until the paneer is almost rolls into smooth soft dough. Knead the paneer by dragging the palm of your hand hard on the paneer. Keep scooping it back to togather and knead more. Your palm will be little greasy.
Making the Rasmalai:
Divide the dough into 12 equal parts and roll them in smooth balls.
To make the balls apply some prassure at the first and then release when forming the balls, lightly press to make about 3/4″ patty shape.
Mix the sugar and water in a pressure cooker on medium high heat and bring to a boil.
Add the paneer balls and close the pressure cooker. After the pressure cooker starts steaming, turn the heat to medium and cook for about seven minutes.
Make sure the cooker is large enough to accommodate the finished rasgullas patties, as they will expand to about double in the volume while cooking in the syrup!
Close the heat and wait a few minutes befor opening the pressure cooker. Pour cold water over the cooker before opening. Take out the patties from the syrup and squeeze them lightly,and keep aside.
Boil the milk in a frying pan on medium heat until the milk reduce to about 2 cups. Make sure to frequently stir the milk as the milk burns easily in bottom of the pan.
Add the sugar and the Rasmalai patties in milk. Let it cook for few minutes. Add the cardamom and mix in. Garnish with sliced almonds and pistachios.
Serve the Rasmalai chilled.
Keyword Bengali Delicacy, Dessert, Made With Paneer
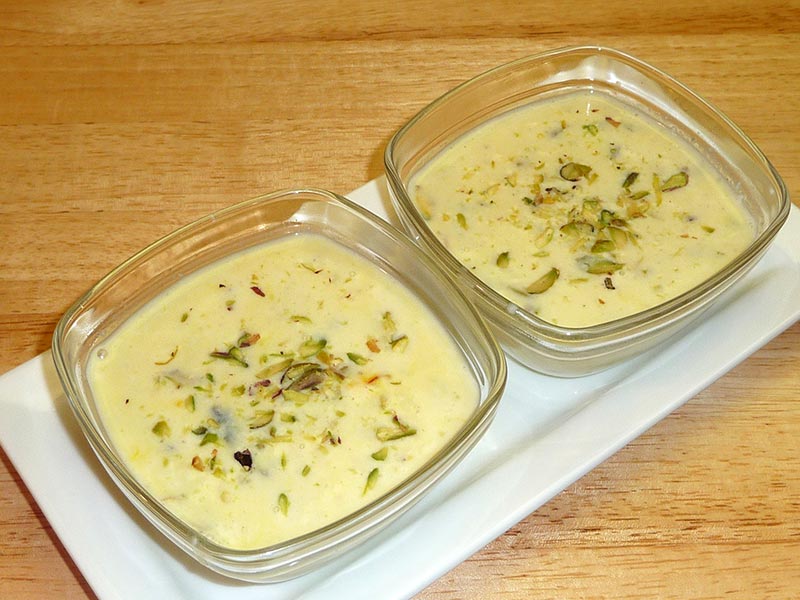
Kheer is an Indian version of rice pudding cooked with milk and sugar, flavored with nuts and saffron. Its a nice dessert that is very popular in North India. Recipe serves 4 to 6
Wash rice, changing water until the water appears clear.
Melt the butter in a frying pan on medium heat.
Add the rice and stir-fry for 2 minutes.
Add the milk, cook until the rice is tender and the milk is creamy and reduced to about half. Stir often to ensure the milk does not burn in the bottom of the pan.
Add the sugar, saffron, cardamom, almonds and pistachios and let simmer for a few more minutes.
Turn off the heat.
As kheer cools of will become thicker in texture.
Kheer can be served chilled or warm.
Notes
Variation
Saffron, almonds and pistachios are optional in this recipe.
Instead of rice, make the kheer using only almonds and pistachios and flavor with cardamom and saffron.
Rice can be replaced with Vermicelli.
Tips
If you will be serving chilled add 1 teaspoon of extra sugar.