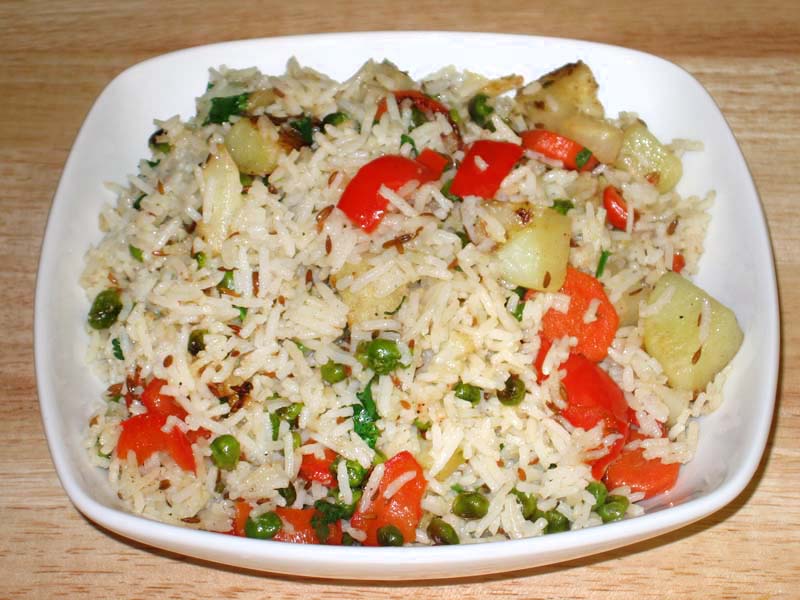
Find Vegetarian Recipes: Exploring Indian Vegetarian Cuisine
Indian cuisine is a treasure trove of delicious and nutritious vegetarian recipes. Whether you’re looking for vegetarian recipes or explore a variety of Indian vegetarian recipes, Manjula’s Kitchen offers an extensive collection of dishes that cater to every taste. Let’s delve into some mouth-watering vegetarian Indian recipes that are both easy to prepare and packed with flavor.
Why Find Vegetarian Recipes?
Health Benefits: Vegetarian recipes are often lower in saturated fats and cholesterol while being high in vitamins, minerals, and fiber.
Environmental Impact: Choosing vegetarian meals can reduce your carbon footprint, as plant-based foods typically require fewer resources than meat-based foods.
Ethical Reasons: Many people choose vegetarianism for ethical reasons, preferring not to consume animal products.
Breakfast Recipes
Aloo Paratha
Aloo Paratha is a popular Indian breakfast made with whole wheat flatbread stuffed with spiced mashed potatoes. This dish is a classic example of Indian recipes vegetarian style. It’s hearty, flavorful, and perfect for satisfyingIndian breakfast ideas. Serve it with yogurt and pickle for a complete meal.
Upma
Upma is a savory semolina porridge cooked with vegetables and tempered with mustard seeds, curry leaves, and green chilies. This dish is a staple inSouth Indian recipes and a fantastic option when you wants vegetarian recipes that are quick and nutritious. Upma is often enjoyed with a side of coconut chutney.
Lunch Recipes
Chole (Chickpea Curry)
Chole is a robust chickpea curry cooked in a rich tomato-based gravy with aromatic spices. This dish is a beloved part of Indian vegetarian recipes and is usually served with rice or bhature (deep-fried bread). It’s a hearty and comforting meal that is both satisfying and nutritious.
Paneer Butter Masala
Paneer Butter Masala is a rich and creamy curry made with paneer (Indian cottage cheese) cooked in a spiced tomato and cashew gravy. This dish is a favorite amongvegetarian Indian recipes and pairs well with naan or jeera rice. The creamy texture and flavorful sauce make it a hit at any meal.
Dinner Recipes
Baingan Bharta
Baingan Bharta is a smoky and flavorful eggplant dish that is a must-try in vegetarian recipes in Indian cuisine. The eggplants are roasted until soft, then mashed and cooked with tomatoes, and spices. It’s a delicious and nutritious dish that pairs well with roti or rice.
Dal Makhani
Dal Makhani is a rich and creamy lentil dish made with black lentils and kidney beans simmered in a buttery tomato sauce. This dish is a staple in North Indian cuisine and a perfect example of Indian vegetarian recipes. It’s best enjoyed with naan or basmati rice for a complete meal.
Snack Recipes
Samosa
Samosa is a popular Indian snack consisting of a crispy pastry filled with spiced potatoes and peas. This snack is a favorite among those who want vegetarian recipes that are both delicious and easy to make. Samosas are typically served with tamarind or mint chutney.
Bhel Puri
Bhel Puri is a tangy and spicy snack made with puffed rice, vegetables, and tamarind sauce. This dish is a quintessential part of street food in India and a great addition to your collection of vegetarian Indian recipes. It’s light, flavorful, and perfect for an evening snack.
Dessert Recipes
Gulab Jamun
Gulab Jamun are soft, deep-fried balls made from khoya (dried milk) soaked in a sweet syrup flavored with cardamom and rose water. This dessert is a beloved part ofIndian recipes vegetarian and is often served during festivals and special occasions. The melt-in-your-mouth texture and sweet flavor make it a favorite.
Kheer
Kheer is a creamy rice pudding flavored with cardamom and garnished with nuts and raisins. This dessert is a classic in vegetarian recipes in Indian cuisine and is easy to prepare. Kheer is a perfect ending to any meal and is often enjoyed during celebrations.
Enhancing Your Vegetarian Menu
To enhance your vegetarian menu, consider exploring related categories that complement these vegetarian Indian recipes. Adding Indian snacks like samosas and bhel puri can provide a variety of flavors and textures. For a sweet ending, explore Indian desserts such as gulab jamun and kheer. Incorporating healthy recipes like upma and baingan bharta can offer lighter options for your meals. Hosting a large gathering? The popular party recipe category is filled with dishes that are sure to impress your guests and make your celebration memorable. Including North Indian recipes like chole or dal makhani can add a touch of authenticity to your meal.
Tips to Find Easy Vegetarian Recipes
Online Recipe Sites: Websites like AllRecipes, Epicurious, and BBC Good Food offer a vast collection of vegetarian recipes. Use search filters to find easy vegetarian recipes that fit your time constraints and skill level.
Cooking Apps: Apps like Tasty, Yummly, and Mealime can help you find the vegetarian recipes you need. These apps often provide step-by-step instructions and video tutorials.
Social Media: Platforms like Instagram, Pinterest, and YouTube are excellent resources to find vegetarian recipes in India. Follow vegetarian chefs and influencers for inspiration and new ideas.
Cookbooks: Invest in a few good vegetarian cookbooks. Authors like Madhur Jaffrey and Meera Sodha offer fantastic collections of vegetarian recipes.
Cooking Classes: Consider taking a vegetarian cooking class to learn new techniques and find easy vegetarian recipes that you can incorporate into your routine.
FAQs About Finding Vegetarian Recipes
Q: How can I find vegetarian recipes that my whole family will enjoy?
A: Look for versatile and customizable recipes like build-your-own taco bowls, pasta dishes, and stir-fries. These can easily be adapted to suit different tastes.
Q: Are there any quick ways to find easy vegetarian recipes?
A: Yes, use cooking apps, social media platforms, and online recipe databases. These resources often have filters for easy and quick recipes.
Q: Where can I find vegetarian recipes in India?
A: To find vegetarian recipes in India, explore Indian cooking blogs, YouTube channels by Indian chefs, and cookbooks dedicated to Indian cuisine.
Q: Can I find vegetarian recipes that are also gluten-free?
A: Absolutely. Many vegetarian recipes are naturally gluten-free. You can also look for specific gluten-free vegetarian recipes online or in specialized cookbooks.
Q: What are some good sources to find easy vegetarian recipes?
A: Good sources include online recipe websites, vegetarian cookbooks, cooking apps, and social media platforms where chefs and home cooks share their recipes.
Conclusion
Embarking on a journey to find vegetarian recipes can be both exciting and rewarding. Whether you’re looking to find easy vegetarian recipes for a quick meal or seeking to vegetarian recipes India for an authentic culinary experience, there are endless possibilities to explore.
Manjula’s Kitchen is one such brand which provides authentic reference point to all kinds of vegetarian recipes and providing alternatives to even dietary plans be it vegan, high protein, low carb or low calorie. We got all the healthy recipes across various platforms from Pinterest to YouTube to Instagram to Facebook. Manjula’s kitchen recipes are available in video and blogging format allowing every one enjoy its flavorful recipes.
Fresh vegetables and whole grain pasta with savory tomato sauce makes a very colorful and delicious pasta dish. This is a simple pasta dinner. Serve with a side of salad and bread.
In a large pot boil the water with salt and oil. After water comes to the boil add the pasta.
Cook the pasta until it is just tender, not too soft. Drain the water and set pasta aside.
making Vegetables:
Heat the oil in a frying pan over medium high heat.
Add vegetables (carrot, green beans, bell pepper, mushrooms, and zucchini) to skillet and sauté until they are nearly tender.
Marinara Sauce
Mix the cornstarch in ¼ cup of water and keep aside.
Heat the olive oil in a saucepan and add the basil, Italian herbs, and chili flakes stir and add tomatoes.
Let the tomatoes cook until they become pasty.
Next add cornstarch, salt and sugar to the tomato sauce, cornstarch will give thickness to the sauce.
Next add the sauté vegetables to the sauce and cook for few minutes on medium heat until sauce come to the desirable thickness.
Prepare The Pasta
Heat the oil in a saucepan and add basil and chili flakes stir for few seconds.
Next add the drained pasta and sauté for a minute until pasta is well coated with oil.
Pour the vegetable sauce over the pasta, serve hot with slice of French bread and salad.
Notes
Variations:For this recipe you need about 5 cups of vegetable, replace the vegetables to your choice.Serving suggestion:Serve pasta with slice of toasted bread and green salad.Additional Notes:I like to serve pasta with slice toasted and spiced French bread. Before toasting the bread spread the olive oil and sprinkle basil, chili flakes and salt.
Keyword Pasta With Marinara Sauce, Pasta Without Onion Garlic
Drain the whey using a strainer line with cheesecloth, or muslin cloth. Wrap the curds in a muslin cloth, rinse under cold water, and squeeze well.
Once the paneer is drained, place on a dry, clean surface and knead the paneer until the paneer is almost rolls into smooth soft dough.
Add the sugar and cardamom into the paneer and knead the paneer again until sugar is mixed well.
Next on low heat cook the paneer mixture stirring continuously until paneer starts coming together as soft dough. This should take about 6 to 7 minutes.
Turn off the heat and keep mixing the paneer like you are making dough. This is most important step to this dish; you are just cooking paneer enough to take out the rawness. If you over cook the paneer it will become crumbly.
Mix the saffron thread in 1 teaspoon of warm milk and mix it well. Keep aside.
Divide the paneer in 24 equal parts and roll them giving a ball shape.
Garnish with crushed pineapple, or garnish them with a drop of saffron paste putting sliced pistachio over.
Refrigerate them for few hours before serving. Serve them chilled!
Notes
NotesImportant step to this dish; you are just cooking paneer enough to take out the rawness. If you over cook the paneer it will become crumbly.Sandesh can be refrigerated for a week.You will also enjoy to Rasgulla and Chumchum
Hot and spicy peanuts fried with delicious mix of spices. This makes a great snacks for sitting around watching TV or playing games with family and friends. Recipe serves 6.
In a frying pan roast the dry peanuts on medium heat for 3-4 minutes and let it cool for few minutes.
Mix all the ingredients together in a large bowl.
Add water as needed making sure the spices and flour stick to the peanuts uniformly.
Heat the oil in a frying pan on medium heat.
The frying pan should have at least 1 inch of oil. To check if the oil is ready, put one drop of batter in the oil. The batter should raise to the top but not change color right away.
put few drops of oil in your hand it helps droping the penuts before putting peanuts on the oil.
While putting the peanuts into oil, loosen them with your fingers to make sure the peanuts are separated and do not form lumps. Peanuts should be separated while frying.
Fry the peanuts until they turn light brown, turning them occasionally.
When they are done cooking, take them out of the oil with a slotted spoon. Place them on a paper towel to absorb the extra oil.
After cooling to room temperature, the peanuts should be crispy.
Notes
Masala Peanuts can be stored for a month in an airtight container.
Also see my recipe for Spicy Cashew, Almond brittle.
These make a delicious homemade gift – pack it in a jar or candy bag.
Masala Peanuts are delightful appetizers perfect for holidays and festivals, offering a crunchy, gluten-free snack option that satisfies both vegan and non-vegan palates alike. Peanut masala recipe is a beloved snack across India, offering a delightful combination of crunchy peanuts and aromatic spices. This masala peanuts recipe is a favorite among snack enthusiasts for its bold flavors and addictive crunch. Whether you’re hosting a gathering or simply craving a savory treat, learning how to make masala peanuts recipe at home is both rewarding and satisfying.
How to Make Masala Peanuts Recipe: Step-by-Step Guide
Step 1: Prepare the Peanuts
Start by selecting fresh, raw peanuts for the best results. Rinse them thoroughly under cold water to remove any dirt or debris. Then, pat them dry using a clean kitchen towel or paper towels.
Step 2: Dry Roast the Peanuts
Heat a non-stick pan over medium heat. Once the pan is hot, add the peanuts in a single layer. Dry roast them, stirring occasionally, until they turn golden brown and emit a nutty aroma. This process typically takes about 8 to 10 minutes. Keep a close eye on them to prevent burning.
Step 3: Prepare the Spice Mixture
While the peanuts are roasting, prepare the spice mixture. In a small bowl, combine masala peanuts recipe spices such as red chili powder, turmeric powder, cumin powder, chaat masala, and salt according to your taste preferences. Adjust the spice levels to suit your palate.
Step 4: Coat the Peanuts with Spices
Once the peanuts are roasted to perfection, transfer them to a large mixing bowl. While they are still warm, sprinkle the prepared spice mixture over the peanuts. Toss them gently to ensure that each peanut is evenly coated with the spices. Allow the peanuts to cool completely before serving.
Step 5: Serve and Enjoy
Your homemade masala peanuts are now ready to be enjoyed! Serve them as a standalone snack or pair them with your favorite beverages. Store any leftovers in an airtight container to maintain their freshness and crunchiness.
Tips for Making Perfect Masala Peanuts
Experiment with different spice blends to customize the flavor according to your preferences.
You can add ingredients like amchur powder for tanginess or garam masala for extra warmth.
For an extra layer of flavor, consider adding roasted garlic or curry leaves to the spice mixture.
Make sure to roast the peanuts evenly to achieve a uniform golden brown color and prevent any burnt spots.
Allow the peanuts to cool completely before storing them to maintain their crispiness.
Variations of Masala Peanuts
Sweet and Spicy: Add a touch of sweetness to your masala peanuts by incorporating a bit of powdered sugar or jaggery along with the spices.
Herb Infused: Experiment with fresh herbs like cilantro, mint, or curry leaves to add a refreshing twist to your masala peanuts.
Nutty Crunch: Enhance the texture of your masala peanuts by tossing them with a handful of toasted cashews, almonds, or pistachios.
Benefits of Masala Peanuts
Rich in Protein: Peanuts are an excellent source of plant-based protein, making masala peanuts a nutritious snack option.
Good Source of Healthy Fats: Peanuts are high in monounsaturated fats, which are beneficial for heart health when consumed in moderation.
Packed with Essential Nutrients: Peanuts are rich in essential nutrients like vitamins, minerals, and antioxidants, contributing to overall well-being.
FAQs about Masala Peanuts
Can I use pre-roasted peanuts for this recipe?
While you can use pre-roasted peanuts, roasting them yourself allows you to control the level of crunchiness and ensures that they are freshly toasted.
How long do homemade masala peanuts stay fresh?
When stored in an airtight container at room temperature, homemade masala peanuts can stay fresh for up to two weeks. However, they are best enjoyed within the first few days to maintain their crispiness.
Can I make masala peanuts without oil?
Yes, you can skip the oil and dry roast the peanuts directly in a pan for a healthier alternative. However, using a small amount of oil helps the spices adhere to the peanuts more effectively.
For more delightful Indian recipes, explore Manjula’s Kitchen, where you’ll find a treasure trove of culinary inspiration ranging from traditional dishes to modern twists on classic favorites. Be sure to check out recipes like Aloo Gobi, Palak Paneer, and Chana Masala for a taste of authentic Indian cuisine.
1medium purple eggplantbaingan, un-peeled, cut into 1/2″ cubes
2medium russet potatoesaloo, peeled and cut into 1/2″ cubes
4medium tomatoestamatar cut into 1/2″ cubes
2Tbspcilantrochopped, hara dhania
1Tbspoil
Pinchof asafetidahing
1tspcumin seed
1green chilichopped, adjust to taste
1tspginger pasteadrek
1Tbspcoriander powderdhania powder
½tspturmerichaldi
½tsppaprikadagi mirch
1tspsaltadjust to taste
2Tbspwater
Also needed
Oil to fry
Instructions
Heat the oil in a frying pan over medium high heat.
Frying pan should have at least 1 ½ inch of oil. To check if the oil is ready, put one piece of potato in the oil. The potato should sizzle right away. If vegetables are fried in low heat they will be very oily.
Fry the potatoes till they are cooked through, turn the potatoes few times while frying. Take out potatoes with a slotted spoon (this allows excess oil to drip back into the frying pan) and place on a paper towel.
Test the oil again with a piece of eggplant. Fry the eggplant pieces same way.
In a small bowl, mix the shredded ginger, green pepper, coriander powder, paprika, turmeric, and 2 tablespoons of water to make a paste.
Heat the 1 tablespoon of oil in a pan. Test the heat by adding one cumin seed to the oil; if seed cracks right away oil is ready.
Add cumin seeds and asafetida after seeds crack add the spice mixture and stir-fry for a minute until you see the oil start to separate from the spice mixture.
Add chopped tomatoes stir-fry for a minute.
Add fried potatoes and eggplant mix it gently, let it simmer for three to four minute on medium low heat.
Subji should be not very dry if needed add three to four spoons of water.
Turn off the heat and add chopped cilantro mix it well.
Papdi (papri) Chaat is my kind of food and there are so many kinds of chaat. Chaat is a popular street food all over India. Chaat is basically different varieties of snacks served with tamarind or hari (cilantro) chutney or with hot spice mix. The definition of chaat literally is "to taste".Recipe serves 4 to 6
Mix the flour, sooji, salt, and oil in a bowl. Add water to the mixture a little at a time, kneading to form firm dough.
Cover the dough and set aside for 15 minutes or more.
Divide the dough into about 3 equal parts.
Roll one section of the dough to eight inches in diameter, fairly thin – about thickness of dime. Do the same with the remaining two parts.
Prick the rolled dough firmly every quarter-inch or so with a fork to keep the papdi from puffing while frying. Using a sharp knife, cut the rolls into 1½-inch squares.
Heat the oil in about one inch of oil in a frying pan over medium heat. To test, drop a small piece of dough in the oil. The dough should sizzle but come up to the surface slowly. If the dough rises
immediately, let the oil cool slightly and try again.
Place just enough papdi to cover the oil in the frying pan in a single layer. Don’t crowd them.
Fry the papdi until both sides are a light golden brown.
Remove cooked papdi with a slotted or mesh spoon and transfer to a plate. Continue cooking the remaining papdi in batches.
After the papdi cool to room temperature they should be crisp.
Papdi can be stored in airtight container for 1 month.
Making the Garnish
Mash the chickpeas lightly and mix with hari (cilantro) chutney to your taste. Keep aside.
Put the yogurt into a bowl and whisk until smooth. Add a little milk as needed to consistency of pancake batter. Add salt to taste. Set aside
Arrange the papdi on a large plate.
Place a slice of potato on top of each papdi (does not need to be the exact size). Place ½ teaspoon of the chickpea mixture over each potatoa slice.
Drizzle yogurt over each papdi.
Sprinkle roasted cumin powder, and red chili to your taste.
Finish the papdi chat by drizzling with tamarind chutney.
Notes
To make round papdi, divide the dough in about 30 equal parts and roll them individually into 2½-inch rounds. Prick with a fork in four to five places.
Papdi Chaat, a popular street food delicacy, combines crispy papdi with a tantalizing mix of appetizers and chaat elements, creating a flavorful explosion that delights the taste buds. Papdi chat is a delightful Indian street foodsnack that tantalizes the taste buds with its crispy papdis, tangy chutneys, yogurt, and assorted toppings. This papdi chat recipe promises to deliver an explosion of flavors in every bite, making it a perfect choice for parties, gatherings, or simply as a savory indulgence.
How to Make Papdi Chat
To create this mouthwatering delicacy, start by preparing the papdis, the essential base of the dish. Combine all-purpose flour, semolina, carom seeds, and salt in a mixing bowl. Knead the ingredients into a firm dough, adding water gradually. Roll out the dough thinly and cut it into small rounds. Prick the rounds with a fork and deep fry until golden brown and crispy. Drain excess oil and set aside.
Next, prepare the tangy tamarind chutney by simmering tamarind pulp, dates, jaggery, and spices until thickened. Strain the mixture to remove any solids, resulting in a smooth, flavorful chutney. Similarly, whip up a refreshing mint chutney by blending mint leaves, coriander, green chilies, and yogurt into a smooth paste.
Now, assemble the papdi chat by arranging the crispy papdis on a serving plate. Drizzle generous amounts of both chutneys over the papdis, followed by spoonfuls of beaten yogurt. Sprinkle chaat masala, roasted cumin powder, and red chili powder for an extra kick of flavor. Top it off with tomatoes, and fresh coriander leaves.
Serve the papdi chat immediately, allowing everyone to enjoy the perfect blend of textures and tastes.
Tips for Making Papdi Chat
Crispy Papdis: Ensure the papdis are rolled out thinly and fried until crisp to achieve the perfect texture.
Chutney Consistency: Adjust the consistency of the chutneys by adding water gradually while cooking to achieve the desired thickness.
Topping Variation: Experiment with different toppings such as boiled potatoes, chickpeas, or sev to add more depth to the flavor profile.
Spice Level: Adjust the amount of green chilies and red chili powder according to your preference for spice.
Variations of Papdi Chat
Dahi Papdi Chat: For a creamier variation, substitute beaten yogurt with thick, creamy yogurt or hung curd.
Healthy Twist: Replace fried papdis with baked or air-fried versions for a healthier alternative.
Fusion Flavors: Experiment with fusion flavors by incorporating ingredients like avocado, salsa, or shredded cheese for a unique twist on the traditional recipe.
Benefits of Papdi Chat
Rich in Flavors: Papdi chat combines a variety of flavors, textures, and spices, making it a truly indulgent treat for the taste buds.
Nutrient-Rich Ingredients: Ingredients like yogurt, chickpeas, and fresh vegetables provide essential nutrients like protein, fiber, vitamins, and minerals.
Cultural Experience: Enjoying papdi chat offers a cultural experience, allowing you to savor the vibrant street food culture of India.
FAQs (Frequently Asked Questions)
Q: Can I prepare the papdis ahead of time?
A: Yes, you can prepare the papdis in advance and store them in an airtight container once cooled to maintain their crispiness.
Q: Can I make the chutneys ahead of time?
A: Absolutely, both tamarind and mint chutneys can be prepared in advance and stored in the refrigerator for several days.
Q: Can I make papdi chat without yogurt?
A: Yes, you can omit yogurt or use a dairy-free alternative like coconut yogurt for a vegan version of the dish.
Papdi chat is a versatile and beloved snack that never fails to impress with its burst of flavors and textures. Whether enjoyed as an appetizer, a snack, or a light meal, this recipe promises to be a crowd-pleaser at any gathering or occasion. So, gather your ingredients and embark on a culinary journey to recreate this iconic Indian street food delight in your own kitchen!
Besan ladoos are rich, sweet dessert–snack made from gently roasted gram flour (besan). Ladoos can be served any time of the day. Traditionally in Indian households ladoos and burfis are served as cookies and chocolate during festive seasons like Navratri, Diwali, Holi.
Put the besan (gram flour), sooji, and melted butter in a large frying pan and mix.
Turn the stove on to medium heat and begin to roast the basen mixture until basen becomes light golden brown in color. Stir the mixture continuously with a spatula to prevent burning. Cooking on high heat will not allow the mixture to fully cook.
When the color has changed you will also start to smell the sweetness of roasted besan. This should take about 7 to 10 minutes. Remove the pan from the heat and let the basen cool to a warm temperature. don’t let it become to room temperature.
While the mixture is warm add and mix cardamom seeds, almonds, and sugar.
To make the ladoos, take about 2 tablespoons of warm basen mixture into your palm. Gently press the mixture between your palms to form a smooth, round ball. The ladoos are usually about the size of a ping-pong ball, but you can adjust the as you prefer.
When you have finished making all of the ladoos, take one ladoo at a time and dip the ladoo a quarter inch into melted butter or ghee. Then lightly touch the part of the ladoo with the butter into the sliced pistachios just enough so some pistachios stick to the ladoo.
Put ladoos back on the plate with the pistachio side facing the top.
Leave the ladoos on a plate to cool to room temperature before putting into a covered container. The ladoos can be stored in an airtight container for 2 to 3 weeks.
Heat the oil in a saucepan on medium-high heat. Test the heat by adding one cumin seed to the oil. If the cumin seed cracks right away, the oil is ready.
When the cumin seeds crack, add hing, red chilies and urad dal.
Stir-fry for half a minute, stop if the urad dal changes color.
Add green beans and peas, mix it well, and cover the pan. Turn down the heat to medium.
Let it cook for five to six minutes until the peas and beans are lightly tender. Do stir once in between.
Remove the cover and add the coriander powder, salt, and turmeric.
Let beans and peas cook without cover to allow the water to evaporate, this way the beans don’t become mushy. Stir the beans occasionally. Beans and peas should be lightly moist.
After turning of the heat add lemon juice.
Notes
Suggestions
Urad dal can be replaced with washed moong or chana dal.
Malai kofta is a delicious and rich main course dish. Paneer dumplings with rich cream gravy. One of the popular paneer dishes for any special occasion. Serve with naan, roti or over the plain rice.
Mix all the ingredients together for kofta, With oiled hands, divide the mixture into 14 to 16 equal parts. Make them in round balls.
Mix flour with about 4 tablespoons of water and mix well until batter is smooth.
Heat the oil in a frying pan on medium high heat. The frying pan should have at least 1 inch of oil. To check if the oil is ready, just put one small piece of mix in the oil, it should come up right away but not change color.
Dip the paneer balls in the batter one at a time and slowly drop into the frying pan. Turn them occasionally. Fry koftas until golden-brown all around.
Gravy
Blend the tomatoes, green chilies and ginger to make a puree. If you prefer mild take the seeds out of green chili before blending.
Mix cream and flour and keep aside.
Heat the oil in a saucepan. Test the heat by adding one cumin seed to the oil; if it cracks right away oil is ready. Add the hing and cumin seeds.
Add the tomato puree, coriander powder, turmeric, red chili powder and cook for about 4 minutes on medium heat. Tomato mixture will start leaving the oil and will reduce to about half in quantity.
Add milk and flour mix, salt and one cup of water and let it cook covered for 7 to 8 minutes on medium heat.
Add the garam masala, salt and cilantro. Let it cook for another minute.
Add koftas as soon it comes to boil turn off the heat. Note: koftas will expand to about 11/2 times, if you like more gravy this is the time to add some more boiled water and adjust salt.
Notes
Koftas are very soft they should be added to the gravy when you are ready to serve, otherwise koftas will break.Serve Kofta, over plain rice, with Naan, Roti
Malai Kofta is a delectable party recipe featuring paneer dumplings bathed in a sumptuous, creamy gravy. This popular paneer-based dish is renowned for its rich flavors, making it an excellent choice for special occasions. The dish showcases the indulgence of paneer dumplings immersed in a luscious cream gravy, creating a culinary masterpiece that’s sure to elevate any celebration or special event.
Crafting the Kofta Mixture:
Aromatic Fusion: To embark on the creation of delectable koftas, begin by skillfully combining all the necessary ingredients. This includes aromatic spices and paneer, which will be the foundation for the flavorful kofta mixture.
Meticulous Shaping: Lightly oil your hands to prevent sticking. Divide the well-combined mixture into 14 to 16 equal portions. With meticulous care, shape each portion into a round and enticing ball. This ensures that each vegetarian malai kofta is infused with a harmonious blend of spices, promising a delightful culinary experience.
Protective Batter: To elevate the malai kofta recipe, create a smooth batter using flour and water. This batter will act as a protective and crispy layer around each kofta during frying.
Precise Frying: In a well-heated pan containing at least 1 inch of oil, carefully dip the paneer balls into the batter, ensuring complete coverage. To gauge the oil’s readiness, test it with a small piece of the batter mixture. If it swiftly ascends to the surface without browning, the oil is at the perfect temperature. Fry the coated koftas diligently, turning them intermittently. This allows the koftas to absorb the flavors of the hot oil, creating a desirable crisp exterior that complements the creamy texture within. The frying process ensures that every vegetarian malai kofta is a delightful balance of crunch and tenderness.
Malai Kofta Recipe:
Tempering the Base: Begin the malai kofta gravy by heating oil in a saucepan. Add a single cumin seed and observe its immediate crackling response. This initial step, known as tempering, infuses the curry base with layers of aromatic complexity through the introduction of hing (optional) and cumin seeds.
Introducing the Tomato Puree: Once the tempering is complete, introduce the vibrant tomato puree to the sizzling oil. Accompany the puree with an array of ground spices such as coriander powder, turmeric, and red chili powder. Allow this harmonious blend to simmer for approximately 4 minutes on medium heat. As the mixture dances in the pan, coax the tomatoes to release their natural oils, concentrating the flavors for a delectable malai kofta curry.
Enhancing the Opulence: To elevate the richness of the malai kofta gravy, seamlessly integrate the previously prepared cream and flour mixture. Infuse this indulgent blend with salt and a cup of water. Allow the mixture to simmer and thicken over a medium flame. This step ensures that the malai kofta curry achieves a luxurious consistency, enveloping each kofta in a velvety embrace.
Finalizing the Symphony: As the recipe for malai kofta curry nears its culmination, sprinkle in the aromatic garam masala. Adjust the salt to achieve perfect taste balance. Garnish with a handful of fresh cilantro for a touch of vibrancy. Allow these final touches to meld in the heat, creating the hallmark flavor profile of an exceptional malai kofta. This concluding step brings the malai kofta curry to a harmonious and flavorful completion.
Malai Kofta is a popular Indian dish featuring melt-in-your-mouth paneer dumplings bathed in a rich and creamy gravy. It’s a showstopper perfect for special occasions or a delicious weeknight meal.
Is Malai Kofta difficult to make?
While it has several steps, each step is straightforward. With careful planning and these handy tips, you can create restaurant-quality Malai Kofta at home.
How long does it take to make Malai Kofta?
The total preparation and cooking time can vary depending on your speed, but generally allow for around 50 min.
What are some good side dishes for Malai Kofta?
Malai Kofta pairs beautifully with fluffy basmati rice, soft naan bread, or flavorful jeera rice.
Can I use store-bought paneer?
Absolutely! Look for fresh paneer in the refrigerated section of your grocery store.
What if I don’t have green chilies?
You can omit them entirely for a milder dish. To retain a hint of spice, use red chili powder to adjust the spice level.
What kind of cream should I use?
Heavy cream or whipping cream will create the richest gravy. However, you can substitute full-fat yogurt or even low-fat cream for a lighter option.
Can I use a different nut instead of cashews?
Absolutely! Almonds, pistachios, or even a combination of nuts can add a delightful textural variation.
Wash and soak the kidney beans in about six cups of water for at least 6 hours (the beans will double in volume ).
Cut the tomatoes in small pieces, green chili slice lengthwise and take out the seeds (if you prefer mild). Blend tomatoes, green chili, and ginger and make a paste.
Heat the oil in pressure cooker. Test the heat by adding one cumin seed. If the seed cracks right away, the oil is ready. Add asafetida and cumin seeds, as the cumin seeds crack add tomato paste, coriander, turmeric, chili powder, black pepper, and paprika.
Stir-fry for two to three minutes, until the oil begins to separate from the mixture. Add kidney beans, salt, and three cups of water. Close the cooker. Cook over medium high heat.
When pressure cooker starts to steam, turn the heat down to medium and cook twelve minutes.
Turn off the heat. Wait until the steam has stopped before opening the pressure cooker.
Kidney beans should be soft and tender. Stir and mash them gently. Adjust salt and pepper to taste.
How To Make Rajma Chawal Recipe: A Jain Rajma Recipe with Tips and FAQs
Rajma Chawal, a quintessential North Indian dish, is beloved for its rich flavors and comforting texture. While traditionally made with kidney beans simmered in a tomato-based gravy, there are various regional and dietary variations to this dish. In this rendition, we present a Jain version of Rajma Chawal, devoid of onion and garlic, yet bursting with aromatic spices and wholesome goodness.
Preparation:
Wash the kidney beans thoroughly under running water to remove any dirt or impurities.
Soak the kidney beans in about six cups of water for at least 6 hours or overnight. This helps in softening the beans and reducing cooking time.
Making the Paste:
Cut the tomatoes into small pieces and slice the green chilies lengthwise, removing the seeds if you prefer a milder taste.
Peel and chop the ginger.
In a blender, combine the tomatoes, green chilies, and ginger to make a smooth paste. Set aside.
Cooking:
Heat the cooking oil in a pressure cooker over medium heat.
To test the oil temperature, add one cumin seed. If it crackles right away, the oil is ready.
Add a pinch of asafetida followed by the cumin seeds. Allow the cumin seeds to crackle.
Once the cumin seeds start crackling, add the prepared tomato paste to the cooker.
Stir in the coriander powder, turmeric powder, red chili powder, black pepper powder, and paprika. Mix well.
Stir-frying:
Stir-fry the mixture for two to three minutes or until the oil begins to separate from the sides. This step enhances the flavor of the spices and ensures a rich gravy.
Adding Kidney Beans:
Drain the soaked kidney beans and add them to the pressure cooker.
Season with salt according to taste.
Pour in three cups of water and mix well to combine all the ingredients.
Pressure Cooking:
Close the pressure cooker with its lid securely.
Cook over medium-high heat until the pressure cooker starts steaming.
Reduce the heat to medium and continue cooking for twelve minutes.
Finishing Touches:
Once the cooking time is complete, turn off the heat and allow the pressure to release naturally.
Once the steam has stopped, carefully open the pressure cooker lid.
Mashing and Adjusting Seasoning:
The kidney beans should be soft and tender. Gently stir and mash them to thicken the gravy.
Taste the Rajma and adjust the salt and pepper as per your preference.
Garnishing:
Serve the Jain Rajma hot, garnished with chopped tomatoes for a refreshing burst of flavor.
Tips and Suggestions:
Soaking the kidney beans overnight or for at least 6 hours is crucial as it helps in reducing the cooking time and ensures even cooking.
Use mustard oil for an authentic flavor, but if unavailable, any cooking oil can be substituted.
Adjust the quantity of green chilies and red chili powder according to your spice preference.
For a creamier texture, you can mash some of the kidney beans before serving.
Garnish the Rajma with freshly chopped cilantro for added freshness and aroma.
Serve Rajma Chawal with steamed rice or Indian bread like roti or naan for a wholesome meal.
Benefits of Rajma Chawal:
High in Protein: Kidney beans are an excellent source of plant-based protein, making Rajma Chawal a nutritious meal choice, especially for vegetarians and vegans.
Rich in Fiber: Rajma is loaded with dietary fiber, which aids digestion, promotes satiety, and helps maintain a healthy weight.
Essential Nutrients: This dish provides essential nutrients such as iron, potassium, and folate, which are vital for overall health and well-being.
Heart-Healthy: Consuming kidney beans regularly may help lower cholesterol levels and reduce the risk of heart disease.
Satisfying and Comforting: Rajma Chawal is not only nutritious but also deeply comforting, making it a favorite comfort food for many.
FAQs (Frequently Asked Questions):
Q: Can I use canned kidney beans instead of dried ones?
A: Yes, you can use canned kidney beans for convenience. However, dried beans are preferred for their texture and flavor.
Q: Can I skip soaking the kidney beans?
A: Soaking the kidney beans is essential as it helps in reducing cooking time and aids in digestion. Skipping this step may result in unevenly cooked beans.
Q: How do I make Jain Rajma without onion and garlic?
A: In this Rajma recipe, we have omitted onion and garlic to make it suitable for a Jain diet. The rich flavor comes from a blend of aromatic spices and tomatoes.
Q: Can I make this Rajma recipe without a pressure cooker?
A: While a pressure cooker significantly reduces the cooking time, you can cook Rajma on a stovetop in a heavy-bottomed pot. It will require longer cooking time and frequent stirring to prevent sticking.
Q: How long can I store leftover Rajma?
A: Leftover Rajma can be stored in an airtight container in the refrigerator for up to 3-4 days. Reheat thoroughly before serving.
Jain Rajma Chawal is a delicious and wholesome dish that can be enjoyed by everyone, regardless of dietary preferences. With aromatic spices, creamy kidney beans, and a rich tomato gravy, it’s a comforting meal that’s perfect for any occasion. Follow this simple rajma chawal recipe and savor the authentic flavors of North Indian cuisine right in your own kitchen. Explore more delightful Rajasthani recipes on Manjula’s Kitchen, Explore more appetiser recipes on Manjula’s Kitchen: Vegetable Samosas, Paneer Tikka, Crispy Spinach Pakoras, Mango Lassi, Masala Chai, Gulab Jamun, Kheer (Rice Pudding)
Mix flour, salt and water together to make a soft dough (add water as needed). Knead the dough for about 2 minutes on a lightly greased surface to make soft, smooth and pliable dough.
Set the dough aside and cover it with a damp cloth. Let the dough rest for at least ten minutes.
Making the Filling
Shred the cauliflower using a shredder (electric or manual). Do not use a food processor to blend the cauliflower, as it will become too moist and hard to work with.
Squeeze the cauliflower take out as much water as possible. Add all filling ingredients together, mix it well.
Making the Paratha
Divide the dough and cauliflower mixture into 6 equal parts. Roll one part of the dough into a three inch circle. Place one part of the filing in the center. To wrap, pull the edges of the rolled dough together to cover the filling. Repeat to make all six balls.
Allow each ball to settle for two minutes before rolling. (Timing is critical here. If you roll paratha just after filling, or if you leave them longer than two minutes before rolling, the cauliflower mixture will seep through the edges when rolling).
Heat an iron skillet or heavy skillet on medium high heat. Test by sprinkling it with a couple of drops of water. If the water sizzles right away, the skillet is ready.
Press the filled ball lightly on both sides on a surface covered with dry whole wheat flour. Keep the sealed side of the filled ball on top. Roll the ball with a light hand into 6” circles. When the dough sticks to the rolling pin or rolling surface, lightly dust with dry flour.
Place rolled paratha on the skillet. After a few seconds, the paratha will start to change color and puff up. Flip the paratha over. You will notice some golden-brown spots on it.
After a few seconds, spread one teaspoon of oil over the paratha. Flip the paratha again and lightly press the puffed areas with a spatula. Flip again and press with the spatula making sure the parathas are golden-brown on both sides.
Repeat for the remaining parathas. Cool the parathas on a wire rack so they don’t get soggy.
Notes
NotesAllow each ball to settle for two minutes before rolling. (Timing is critical here. If you roll paratha just after filling, or if you leave them longer than two minutes before rolling, the cauliflower mixture will seep through the edges when rolling).Parathas can be kept unrefrigerated up to two days,wrapped in aluminum foil or stored in a covered container. For later use, parathas can be refrigerated five to six days or frozen (wrapped in aluminum foil) for a month. Re-heat in a skillet or toaster oven.Serving SuggestionsGobhi Paratha goes well with Salted Mint Lassi, Carrot Pickle, Aloo Mattar.
Keyword Breakfast, Cauliflower Paratha, Homemade, Video Recipe
Corn Vegetable Soup is a creamy corn soup with vegetables is a great starter for a summerlunch. This delicious soup can be served hot or cold. Serves 4.
Chop cabbage, carrot, and string beans into very small pieces.
Chop tomato in small pieces and remove the seeds. Set aside.
Boil the corn in about 1 ½ cups of water until the corn is soft. Remove ¼ cup of corn and set aside.
Blend the rest of the corn into a paste and strain.
Mix the cornstarch with ¼ cup of water and set aside.
Heat the oil in a saucepan. Test the heat by adding one cumin seed to the oil; if seed cracks right away oil is ready.
Now add the cumin seeds. After the cumin seeds crack, add the carrot, cabbage, beans and ¼ cup of water. Cook the vegetables on medium heat until they are tender.
Next, add the corn paste, corn, cornstarch mixture, and two cups of water to the vegetables. Bring the soup to a boil add tomatoes and lower the heat to medium low. Let the soup cook for another five minutes. Add the lemon juice and serve.
Notes
Suggestions
Corn soup can be refrigerated for about a week and can be frozen for months.
If you have decided to freeze or refrigerate the soup hold the water you were adding.
Pani puris are a great snack, served as chaat and a popular street food all over India. They are served filled with spicy water, chickpeas and potatoes. Makes about 60 puris.
Blend everything except the water together to make a fine paste. While blending, add water as needed to blend.
Taste to adjust the green chilies as they can be mild or hot. Add more lemon juice, sugar, and salt as needed to your desired taste. Remember you will be adding more water to dilute so paste should be spicier. Strain the paste using water as needed.
After straining mix the paste with remaining water or adjusting to the taste.
The pani (water) will taste best if refrigerated for a day.
To make Puris:
Mix the flour and sooji. Add water as needed to make firm dough. Knead the dough until it is pliable. Cover the dough with a damp cloth for about ten minutes.
Damp two kitchen towels, spread one damp towel over a cookie sheet or plain surface, close to where you are going to fry the puris.
Divide the dough into about 60 small balls. Keep them under a damp cloth.
Start rolling each ball to about a 2-inch diameter circle. Place over a damp towel and cover with another damp towel. Do this for all 60 puris. TIP: Placing the puris between damp cloths helps the puris to puff evenly on all sides.
Heat the oil on medium high heat. Oil should be about 1 1/2 inch high in frying pan. To test the oil, put a little piece of dough in the oil. The oil is ready if the dough comes up right away and does not change color.
Start frying the puris, starting first with the puri you first rolled.
Put one puri in the oil and press lightly. When it puffs turn over and put another puri in the oil. Keep adding six to eight puris at a time. Fry the puris until they are golden-brown all around by turning a few times. You may adjust the heat as needed while frying.
Take the puris out and place over paper towel, so the excess oil is absorbed. TIP: When taking the puris out of the frying pan, make sure to tilt the skimmer so that the excess oil is drained before placing on the paper towel.
Fry all the puris. They should be crisp and puff like a ball.
Notes
Serving Suggestions
Pani puris are served by making a small hole in each puri. Fill the puris with boiled and chopped potatoes, or boiled chickpeas.
Finish by filling each puri with the spicy pani (water). Enjoy!
Pani Puri Recipe: The Ultimate Guide to Making Delicious Pani Puris
Introduction to Pani Puri
Pani Puri, also known as golgappa or phuchka, is a beloved Indian street food famous for its burst of flavors and crunchy texture. This pani puri recipe encapsulates the essence of Indian culinary tradition, offering a delightful mix of tangy, spicy, and sweet flavors. Perfect for gatherings, parties, or simply as a snack, making pani puri at home is a rewarding experience that brings friends and family together.
How to Make Pani Puri: Step-by-Step Guide
Preparing the Puris
To start this recipe for pani puri, you’ll need puris, which are hollow, crispy semolina or wheat spheres. You can either make them at home or purchase them from a store. If making at home, mix semolina or wheat flour with water and knead into a firm dough. Roll out small circles and deep fry until golden brown. Set aside to cool.
Preparing the Pani
The pani puri is incomplete without its signature spicy and tangy water. In a blender, combine mint leaves, coriander leaves, green chilies, ginger, tamarind pulp, black salt, roasted cumin powder, chaat masala, and salt. Blend until smooth. Strain the mixture and dilute it with water according to taste. Chill the pani in the refrigerator for at least an hour before serving.
Preparing the Filling
For the filling, boil potatoes until tender, then peel and mash them. Add boiled chickpeas, and a dash of chaat masala for extra flavor. Mix well and set aside.
Assembling the Pani Puris
Now comes the fun part! Take each puri and gently make a hole in the center, creating a cavity for the filling. Stuff the puris with the potato mixture and arrange them on a serving plate. Pour the chilled pani into each puri using a small spoon or a pani puri maker, ensuring they’re filled to the brim.
Garnishing and Serving
Garnish the pani puris with a drizzle of sweet tamarind chutney and a sprinkle of sev (crunchy chickpea flour noodles) for added texture. Serve immediately to enjoy the burst of flavors and textures in every bite.
Tips for Perfect Pani Puris
Fresh Ingredients: Use fresh mint, coriander, and tamarind for the pani to enhance the flavor.
Chilling Time: Allow the pani to chill for at least an hour to let the flavors meld together.
Crunchy Puris: Ensure the puris are crispy and hollow to hold the filling and pani without getting soggy.
Variations of Pani Puri
Ragda Pani Puri: Replace the potato filling with ragda (spicy chickpea curry) for a heartier version.
Fruit Pani Puri: Experiment with filling options like diced mango, pomegranate seeds, or grated pineapple for a fruity twist.
Sukha Puri: Skip the pani and serve the stuffed puris with sweet tamarind chutney and spicy mint chutney for a dry version.
Benefits of Pani Puri
Rich in Flavor: Pani puri offers a medley of flavors, from spicy and tangy to sweet and savory.
Customizable: You can adjust the spice level and filling according to your preference, making it suitable for all taste buds.
Social Experience: Making and enjoying pani puri with friends and family fosters bonding and creates lasting memories.
FAQs (Frequently Asked Questions)
Q: Can I make the puris ahead of time?
A: Yes, you can prepare the puris in advance and store them in an airtight container for up to a week.
Q: How spicy should the pani be?
A: The spice level of the pani can be adjusted according to your preference. Start with fewer green chilies and add more if desired.
Q: Can I make a healthier version of pani puri?
A: Yes, you can opt for baked puris and use less oil in the filling to make a healthier version of pani puri.
For more delightful Indian recipes, visit Manjula’s Kitchen and explore a world of culinary delights!
By following this comprehensive pani puri recipe, you’ll be able to recreate the magic of this iconic Indian street food in the comfort of your own kitchen. Whether it’s a special occasion or just a craving for something delicious, pani puri never fails to satisfy. So gather your ingredients, invite your loved ones, and embark on a flavorful journey with homemade pani puris!
Kadhi, a blend of yogurt and besan (gram flour) with besan pakoras, this is served with rice. This dish is popular throughout India specially in North India.
pinchcitric acid if needed to give more sourness to kadhi
For Pakoras
3/4 cupbesan,gram flour
2/3cupwater use as needed
For Garnish
1tspgheclarified butter
1tspred chili powder
Instructions
Making Kadhi
Mix gram flour and turmeric with yogurt until smooth. Add three cups of water slowly and mix well.
Heat the oil in a saucepan. Test the heat by adding one cumin seed to the oil. If the cumin seeds crack right away, the oil is ready. Add the asafetida, fenugreek seeds, cumin seeds, stir and add bay leaves, whole red chilies, and red chili powder. Stir for a few seconds. Add the yogurt mixture and keep stirring until the kadhi comes to a boil.
Add three cups of water and let it come to boil. Add salt. Turn the heat to medium low. Let the kadhi cook an hour and a half, stir occasionally. To adjust thickness, add boiled water.
Making Pakoras
Add water slowly to the besan to make a smooth and thick batter. Whip the besan batter two to three minutes in a circular motion using a spoon, until light and fluffy.
Fry the pakoras in ½ inch of oil in a flat frying pan over medium heat. (Don’t use enough oil to cover the pakoras; they will be softer and fluffier if fried in shallow oil.
To test, drop one drop of batter into the oil. The batter should form a ball on the surface of the pan, but not change color right away.
Place about one tablespoon of batter into the oil. Fry the pakoras in small batches until golden-brown.
After frying, soak the pakoras in room-temperature water for ten minutes. Squeeze the pakoras gently to remove the water, taking care not to break them.
Add the pakoras to the kadhi and boil on low to medium heat for ten minutes.
Making the Seasoning
Heat the ghee (clarified butter) lightly in a small saucepan. Add chili powder and/or paprika (adjust to taste). Pour over the kadhi when ready to serve.
Notes
Variations Add one cup chopped spinach to the kadhi just before adding the pakoras for extra flavor and color. Add one tablespoon dry fenugreek leaves (dry mathi leaves) to the pakora batter.My favrait way to Serve Kadhi Pakoras is with Rice, Roti, Jeera Aloo, Spicy Green Peas
Kadhi Pakora is a gluten-freesummer recipe featuring a savory vegetable curry with dal (lentils) and crispy fried pakoras, creating a delightful and flavorful dish. Kadhi Pakora, a popular North Indian dish, is a comforting and flavorful yogurt-based curry with gram flour dumplings. This traditional dish is known for its tangy and savory taste, making it a favorite among many households. In this kadhi recipe, we’ll show you how to make authentic Punjabi Kadhi Pakora step by step, so you can enjoy its deliciousness at home. Whether you’re craving a comforting meal or planning a special dinner, Kadhi Pakora is sure to satisfy your taste buds.
Step 1: Preparation of Ingredients for kadhi pakora punjabi style
Start by gathering all the necessary ingredients for making Kadhi Pakora. For the pakoras, prepare a batter using gram flour, spices, and water. Slice and chop green chilies, cilantro, and ginger for the pakora batter. For the kadhi, whisk yogurt and gram flour together until smooth, and set aside. Finely tomatoes and ginger for the kadhi gravy. Having all the ingredients ready will streamline the cooking process.
Step 2: Making Pakoras:
To make the pakoras, heat oil in a deep-frying pan. Drop Spoonfuls of the pakora batter into the hot oil and fry until golden brown and crispy. Remove the pakoras from the oil and place them on a paper towel to drain excess oil. Repeat the process until all the batter is used. The crispy pakoras will add texture and flavor to the kadhi.
Step 3: Preparing the Kadhi Base:
In a large pot or saucepan, heat oil or ghee over medium heat. Add cumin seeds, mustard seeds, and fenugreek seeds, and let them splutter. Next, add ginger, and cook until fragrant. The aromatic base will form the foundation of the kadhi gravy, imparting depth of flavor to the dish.
Step 4: Cooking the Kadhi:
Once the aromatics are sautéed, it’s time to add the chopped tomatoes to the pot. Cook the tomatoes until they soften and break down, forming a thick gravy. Then, add the whisked yogurt and gram flour mixture to the pot, stirring continuously to prevent lumps from forming. Bring the mixture to a gentle boil, then reduce the heat and let it simmer.
Step 5: Adding Pakoras:
Once the kadhi base is cooked and thickened, add the fried pakoras to the pot. Gently stir to coat the pakoras with the flavorful kadhi gravy. Allow the pakoras to simmer in the kadhi for a few minutes to absorb the flavors. The combination of soft pakoras and tangy kadhi creates a harmonious and satisfying dish.
Step 6: Finishing Touches:
Before serving, garnish the Kadhi Pakora with freshly chopped cilantro leaves for a burst of freshness and color. You can also sprinkle some roasted cumin powder on top for extra flavor. Serve the Kadhi Pakora hot with steamed rice or roti for a comforting and wholesome meal.
Tips for Making Perfect Kadhi Pakora:
Consistency: Adjust the consistency of the kadhi by adding more water if it’s too thick or simmering longer if it’s too thin.
Fresh Ingredients: Use fresh yogurt and spices for the best flavor in the kadhi gravy.
Frying Pakoras: Fry the pakoras in batches to ensure even cooking and crispiness.
Variations of Kadhi Pakora:
Vegetarian Variation: Skip the addition of pakoras and add vegetables like potatoes, carrots, or bell peppers to the kadhi for a vegetarian version.
Gluten-Free Option: Use chickpea flour (besan) instead of wheat flour for the pakora batter to make it gluten-free.
Spicy Version: Add extra green chilies or red chili powder for a spicier kadhi.
Benefits of Including Kadhi Pakora in Your Diet:
Probiotic-rich: Yogurt used in kadhi is rich in probiotics, which promote gut health and digestion.
Good Source of Protein: Gram flour used in pakoras adds protein to the dish, making it a satisfying meal option.
Balanced Meal: Kadhi Pakora is a balanced meal that provides carbohydrates, protein, and fats, along with essential vitamins and minerals.
Frequently Asked Questions (FAQs) about Kadhi Pakora:
Q: Can I make kadhi without pakoras?
A: Yes, you can skip adding pakoras and enjoy the kadhi as a creamy yogurt-based curry with a tempering of spices.
Q: How long does kadhi pakora last in the refrigerator?
A: Kadhi Pakora can be stored in the refrigerator for up to 3-4 days. Reheat gently on the stovetop before serving.
Q: Can I freeze kadhi pakora?
A: While you can freeze kadhi pakora, the texture of the pakoras may change slightly upon thawing. It’s best enjoyed fresh or stored in the refrigerator for a few days.
For more delicious Indian curry recipes, visit Manjula’s Kitchen. Explore a variety of vegetarian curry dishes featuring a range of spices, vegetables, and legumes to add flavor and variety to your meals.