Category: Gluten Free

Gluten-Free Indian Recipes: Delicious and Healthy Options

Eating gluten-free doesn’t mean sacrificing flavor, especially with the wide array of gluten free Indian recipes available. Whether you are gluten intolerant or simply looking to reduce gluten in your diet, these gluten free recipes Indian style will delight your taste buds. Let’s explore some delectable gluten free Indian food recipes that you can enjoy for every meal.

Breakfast Recipes

Besan Chilla

Besan Chilla, or chickpea flour pancake, is a high protein vegetarian meals option that fits perfectly within gluten free Indian recipes. This dish is quick to prepare and can be enjoyed with a side of yogurt or chutney. Besan Chilla is also a great example of Indian gluten free recipes that are both nutritious and delicious.

Poha

Poha is a light and flavorful dish made from flattened rice, seasoned with turmeric, mustard seeds, and curry leaves. This dish is a staple in many Indian households and is a fantastic gluten free Indian food recipe for Indian breakfast ideas. It’s easy to make and highly customizable.

Lunch Recipes

Rajma Chawal (without the wheat)

Rajma Chawal is one such beloved north indian recipes made with red kidney beans in a spiced tomato gravy, typically served with rice. By using gluten-free rice, this dish becomes a delightful addition to your collection of gluten free Indian recipes.

Bajra Roti

Bajra Roti is a traditional Indian flatbread made from pearl millet flour. This roti is a staple in the gluten free recipes Indian category and pairs well with various curries and sabzis. It’s nutritious and adds a rustic flavor to your meal.

Dinner Recipes

Paneer Tikka

Paneer Tikka is popular in paneer recipes made by marinating paneer cubes in yogurt and spices, then grilling them to perfection. This dish is not only delicious but also fits well within gluten free Indian food recipes. It’s a great starter for any dinner.

Vegetable Pulao

Vegetable Pulao is a one-pot rice dish cooked with mixed vegetables and aromatic spices. This dish is a versatile and satisfying gluten free Indian food recipe that can be enjoyed by everyone. It’s perfect for a quick and nutritious Indian dinner recipes.

Snack Recipes

Bhel Puri (without sev)

Bhel Puri is a popular Indian street food made with puffed rice, vegetables, and tamarind chutney. By omitting sev (which usually contains gluten), this snack becomes a fantastic addition to your gluten free Indian recipes. It’s tangy, spicy, and utterly delicious.

Roasted Makhana

Roasted Makhana are fox nuts that are lightly roasted and seasoned with spices. This snack is not only crunchy and addictive but also fits perfectly into the gluten free recipes Indian category. It’s a healthy option for those mid-day cravings.

Dessert Recipes

Kheer

Kheer is a creamy rice pudding flavored with cardamom and garnished with nuts. This classic Indian dessert is naturally gluten-free and is a beloved part of gluten free Indian food recipes. It’s easy to make and perfect for any festive occasion.

Coconut Ladoo

Coconut Ladoo are sweet balls made from grated coconut and condensed milk, often flavored with cardamom. These ladoos are a delightful example of Indian gluten free recipes that can be enjoyed as a dessert or a snack.

Enhancing Your Gluten-Free Menu

To make your gluten-free menu even more delightful, consider adding dishes from related categories that complement these gluten free Indian recipes. Adding Indian snacks like roasted makhana and bhel puri can provide a variety of flavors and textures. For a sweet ending, explore Indian desserts such as kheer and coconut ladoo, made with gluten-free ingredients. Incorporating healthy recipes like besan chilla and vegetable pulao can offer lighter options for your meals. Hosting a large gathering? The popular party recipe category is filled with dishes that are sure to impress your guests and make your celebration memorable. Including North Indian recipes like rajma chawal or bajra roti can add a touch of authenticity to your meal.

Frequently Asked Questions (FAQs)

Q: What are some popular gluten free Indian recipes? 

A: Some popular gluten free Indian recipes include Besan Chilla, Poha, Rajma Chawal (without wheat), Bajra Roti, Paneer Tikka, Vegetable Pulao, Bhel Puri (without sev), Roasted Makhana, Kheer, and Coconut Ladoo.

Q: How can I make traditional Indian food gluten-free? 

A: To make traditional Indian food for diabetics gluten-free, try recipes like Besan Chilla, Bajra Roti, and Kheer. These recipes are modified to exclude gluten while retaining their authentic flavors.

Q: What are some gluten-free recipes Indian style for a party? 

A: Some gluten free recipes Indian style for a party include Paneer Tikka, Vegetable Pulao, Bhel Puri (without sev), and Coconut Ladoo. These dishes are flavorful and perfect for gatherings while being gluten-free.

Q: Can I prepare gluten-free Indian food in advance? 

A: Yes, many gluten free Indian food recipes can be prepared in advance and stored. Snacks like Roasted Makhana and Bhel Puri can be made ahead of time, while dishes like Vegetable Pulao and Rajma Chawal can be prepped and refrigerated.

Q: What are some healthy options for gluten-free Indian food? 

A: Some healthy options for gluten free Indian recipes include Quinoa Salad, Vegetable Stir Fry, Oats Idli, and Besan Chilla. These dishes are high in fiber and protein, helping to manage blood sugar levels effectively.

Conclusion

Gluten free Indian recipes are a celebration of healthy and flavorful foods. Whether you’re looking for gluten free recipes Indian style or traditional gluten free Indian food recipes, these dishes will bring variety and nutrition to your meals. 

So, gather your ingredients, try out these recipes, and create delicious meals that are mindful of your health needs. Don’t forget to explore related categories for more delightful recipes from Manjula’s Kitchen!

By incorporating these dishes into your diet, you’ll be able to enjoy a wide variety of delicious and nutritious foods. Whether you’re looking for breakfast, snacks, main courses, or desserts, there’s a gluten free Indian recipe to suit every taste. Happy cooking and healthy eating!

  • Puri, Indian Puffed Flat Bread

    Puri, Indian Puffed Flat Bread

    Puri (Flat Bread) Recipe by Manjula

    Puri, Indian Puffed Flat Bread

    Puri is whole wheat fried bread, made on special occasions. Especially popular with children. It goes well with mutter paneer and other thick gravy recipes.
    4 from 4 votes
    Prep Time 5 minutes
    Cook Time 15 minutes
    Total Time 20 minutes
    Course Main Course
    Cuisine Indian
    Servings 2 people

    Ingredients
      

    • 1 cup whole wheat flour
    • 1/2 tsp salt
    • 1 tsp oil
    • 1/3 cup water, use as needed

    Instructions
     

    • Mix whole-wheat flour and salt. Add water as needed to make firm dough. Oil your palm and knead the dough until it is pliable. Cover the dough with a damp cloth and set it aside to rest at least ten minutes.
    • Divide the dough in eight equal parts. Form these into smooth balls, rolling the dough between your greased plams.
    • Roll the dough balls into seven inch circles. If the dough sticks to the rolling pin or rolling surface, put a drop of oil on the rolling pin and on the rolling surface. Roll four or five puris before you start frying. Do not roll all the puris at once, as they will dry out and fail to puff.
    • Heat at least one inch of oil in a frying pan over medium high heat. When the oil is moderately hot, a small piece of dough dropped into the oil will float immediately to the top.
    • Place one puri at a time in the frying pan and press it with a skimmer. The puris should puff up right away. Turn the puris over. Puri should be light creamy brown on both sides. Take the puris out and place them on paper towels to absorb the excess oil.
    • Serve puri hot or store in covered container after they cool to room temperature.

    Notes

    Tips: 
    Do not roll the puris on a floured surface. If it seems that you need to flour the surface that is an indication that the dough is too moist. In this case, put a drop of oil on the surface and on the rolling pin.
    If the oil is not hot enough, the puris will not puff and will be greasy.
    Variations:
    Add your choice of spices or one or more dry herbs to the flour when making dough. Red pepper flakes, asafetida, dry mint leaves, dry fenugreek leaves, or any other dry herb can be used.
    Tried this recipe?Let us know how it was!
  • Mattar Paneer (Green Peas With Cheese)

    Mattar Paneer (Green Peas With Cheese)

    Mattar Paneer

    Mattar Paneer

    Mattar Paneer is a popular main course dish, made with green peas, paneer, and a creamy blend of spices.
    4 from 13 votes
    Prep Time 5 minutes
    Cook Time 20 minutes
    Total Time 25 minutes
    Course Main Course
    Cuisine Indian
    Servings 2 people

    Ingredients
      

    • 8 oz green peas, I am using frozen peas
    • 3 tomatoes medium
    • 1/3 lb paneer
    • 2 tbsp oil
    • 1/8 tsp asafetida hing
    • 1 tsp cumin seeds jeera
    • 2 bay leaves tajpat
    • 1 inch cinnamon stick dalchini
    • 2 cloves long
    • 1 tbsp ginger chopped
    • 3 tsp coriander powder dhania
    • 1/2 tsp turmeric haldi
    • 1 tsp paprika dagi mirch
    • 1 tsp salt
    • 1/2 tsp sugar
    • 1 tbsp corn starch

    Instructions
     

    • Cube the paneer into half inch pieces and deep-fry them on medium high heat. Fry until the paneer becomes a light golden color. Take the paneer out and place on a paper towel so the extra oil is absorbed.
    • Mix cornstarch with three tablespoons of water and keep aside.
    • Blend the tomatoes and ginger to make a puree.
    • Heat the oil in a saucepan. Test the heat by adding one cumin seed to the oil. If the cumin seed cracks right away, the oil is ready. Add the asafetida (hing), cumin seeds, bay leaves and cinnamon and stir-fry for a few seconds.
    • Add the tomato paste, coriander, turmeric, chili powder and paprika. Cook until the mixture reduces to half.
    • Add the green peas and 1/4 cup of water. cook on medium heat pan should be covered. When the peas are tender, add the salt and paneer.
    • To thicken the gravy add corn starch mix. Cover the pan and let it cook for 3-4 minutes.

    Notes

    Suggestion: 
    Add 1 tablespoon fresh chopped fenugreek leaves or 1/2 tablespoon dried fenugreek leaves to the gravy when cooking.
    Tried this recipe?Let us know how it was!

    How To Make Matar Paneer – Manjula’s Kitchen

    Indulge in the perfect gluten-free, kid-friendly matar paneer recipe, specially crafted to elevate any occasion as this dish is a mouthwatering party recipe that’s popular among all individuals from children to adults. This delightful dish boasts a rich and flavorful gravy that will captivate both young and adult palates, ensuring a memorable dining experience.

    Step 1: Preparing Paneer Cubes – Matar Paneer Recipe Unveiled 

    Begin the journey of How To Make Matar Paneer by meticulously cubing the paneer into half-inch pieces. The key is to deep-fry these paneer cubes over medium-high heat until they attain a delicate golden hue. This crucial step not only imparts a delightful texture to the paneer but also sets the foundation for the indulgent experience that Matar Paneer promises. Once fried to perfection, transfer the paneer cubes onto a paper towel, allowing any excess oil to be absorbed, ensuring a balanced and flavorful outcome for this Matar Paneer sabji.

    Step 2: Creating a Thickening Agent – Essential in Matar Paneer Masala 

    In the second step of the Matar Paneer masala preparation, take a moment to mix cornstarch with three tablespoons of water, creating a thickening agent that will contribute to the luscious consistency of the dish. This clever addition enhances the overall texture of the Matar Paneer gravy, ensuring it coats the paneer cubes and green peas harmoniously. The cornstarch mix, now prepared and set aside, is a key player in perfecting the Matar Paneer sabzi.

    Step 3: Crafting a Tomato-Ginger Puree – Essence of Matar Paneer 

    Embark on the flavorful journey of Matar Paneer by crafting a tomato and ginger puree. This vibrant mixture lays the groundwork for the dish’s aromatic essence, infusing it with the natural sweetness of tomatoes and the subtle warmth of ginger. As the soul of the Matar Paneer recipe, this puree forms the base of the rich gravy that envelops the paneer and peas, creating a delightful symphony of flavors in this quintessential Matar Paneer masala.

    Step 4: Infusing Flavorful Elements – Matar Paneer Unleashed 

    Heat oil in a saucepan to initiate the fourth step in the Matar Paneer saga. The aromatic journey begins by testing the oil’s readiness with a cumin seed. Once it crackles, add a melange of flavorful elements, including asafetida (hing), cumin seeds, bay leaves, and cinnamon. This infusion of spices elevates the Matar Paneer sabzi, creating a fragrant and appetizing atmosphere that sets the stage for the subsequent layers of taste in this Matar Paneer recipe.

    Step 5: Crafting the Tomato Base – Foundation of Matar Paneer Recipe 

    As the oil embraces the aromatic symphony, introduce the tomato paste, coriander, turmeric, chili powder, and paprika to the saucepan. This marks a pivotal step where the foundation of the Matar Paneer recipe takes shape. Cook this amalgamation until it reduces to half its volume, allowing the tomatoes to release their inherent sweetness and harmonize with the array of spices. This transformative process is integral to achieving the distinctive taste that defines Matar Paneer masala.

    Step 6: Introducing Green Peas – Matar Paneer Masala Symphony 

    For the sixth step in perfecting Matar Paneer, introduce the green peas and a quarter cup of water to the pan. Let this vibrant combination simmer on medium heat, ensuring the pan is covered. The green peas, tenderized to perfection, contribute a burst of color and freshness to the Matar Paneer masala. As the peas become tender, add salt and the previously prepared paneer cubes, creating a symphony of textures that makes Matar Paneer a delightful and wholesome sabzi.

    Step 7: Thickening the Gravy – Culmination of Matar Paneer Recipe 

    Concluding the Matar Paneer journey, focus on thickening the gravy by incorporating the cornstarch mix. Cover the pan, allowing the Matar Paneer to simmer for an additional 3-4 minutes. This final step ensures that the Matar Paneer masala reaches its optimal thickness, creating a cohesive and flavorful gravy that clings to the paneer and peas. With this last flourish, the Matar Paneer recipe unfolds into a hearty and satisfying dish, ready to be savored in all its aromatic glory.

    If you liked this Recipe you must also try: Paneer Methi, Okra Tomato Curry, Lauki Vadi ki Sabji, Makhana Matar Curry & Stuffed Tomatoes with Curry

  • Besan Puda – Cheela (Gram Flour Dosa)

    Besan Puda – Cheela (Gram Flour Dosa)

    Besan Puda Dosa

    Besan Puda – Cheela – Gram Flour Cheela

    Basen Ka Puda is a tasty low fat, quick & easy, vegan dish for breakfast or a light lunch. This recipe is quick to prepare and can be served many different ways. In my house this is a favorite dish for breakfast, folded with cheese.
    4.20 from 5 votes
    Prep Time 10 minutes
    Cook Time 15 minutes
    Total Time 25 minutes
    Course Breakfast
    Cuisine Indian
    Servings 3 people

    Ingredients
      

    • 1 cup besan gram flour
    • 1/4 cup rice flour chawal ka atta
    • 1 tsp salt
    • 3/4 cup water, use as needed
    • 1/2 tsp cumin seeds jeera
    • 1 tsp green chili finely chopped
    • 1 cup zucchini shredded
    • 1 tabs cilantro finely chopped hara dhania
    • 6 tbsp oil for cooking use as needed

    Instructions
     

    • Shred the zucchini with the skin and keep aside.
    • Mix all the dry ingredients together: besan, rice flour, cumin seeds, and salt. Add the water slowly to make a smooth batter, the consistency of pancake batter or Dosa batter. Add the green chilies, cilantro, and zucchini. Mix well.
    • Use a non-stick skillet and place on medium-high heat. Test by sprinkling a few drops of water on it. Water should sizzle right away. Pour about 1/2 cup of the batter into the skillet and spread evenly with a back of spoon. Starting from the center, spiral the batter outward evenly to form a circle about 7″ in diameter.
    • When batter starts to dry, gently spread one teaspoon of oil over it. Wait about 30 seconds; flip the puda using a flat spatula.
    • Press the puda lightly all around with the spatula to make the puda cook evenly. Turn the puda three to four time, until crisp and brown on both sides.
    • Repeat for the remaining pudas.

    Notes

    Tips:
    Spread the batter quickly, or it will begin to dry and will be difficult to spread.
    Serving Suggestions:
    You can serve the puda with yogurt, hari chutney, spicy pickles.
    Pudas can also be served as quesadillas. Fold the pudda with shredded cheddar cheese, sliced tomatoes, or roasted vegetables.
    Variations
    Zucchini can be replaced with finely chopped spinach, shredded potatoes, or  finely shredded cabbage.
    If you make the puda without vegetables, do not use rice flour. This will cause the pudas to be very dry.
    Cilantro can be replaced with ground coriander powder.
    Keyword Besan Cheela, Healthy Breakfast, Quick And Easy
    Tried this recipe?Let us know how it was!

    How to Make Besan Cheela: Crafting a Delightful Indian Pancake

    Besan Cheela is a quick & easy bread based breakfast recipe ideal for those on a gluten free and looking for low fat vegan alternative.  Besan cheela, also known as chilla or besan chilla, is a savory Indian pancake that’s not only delicious but also packed with nutrients. Made primarily from gram flour (besan), this versatile dish can be customized with various ingredients to suit individual tastes. From shredded vegetables to aromatic spices, each component contributes to the overall flavor and texture of the cheela. Let’s delve deeper into the art of crafting the perfect besan cheela, step by step.

    Step 1: Shredding Zucchini for Besan Cheela

    The journey to creating the perfect besan cheela begins with the humble zucchini. Its vibrant green hue and delicate flavor make it an ideal addition to this traditional recipe. Start by carefully shredding the zucchini, ensuring to retain its nutritious skin. This step not only adds a delightful texture to the besan cheela but also enhances its nutritional value. Once the zucchini is finely shredded, set it aside, eagerly awaiting its incorporation into the besan cheela batter.

    Step 2: Preparing Dry Ingredients for Besan Chilla

    The foundation of a perfect besan chilla lies in the precise combination of dry ingredients. In a mixing bowl, amalgamate besan, rice flour, cumin seeds, and salt, creating the essential base for the besan cheela batter. Gradually introduce water, achieving a smooth consistency akin to that of pancake or dosa batter. The inclusion of finely chopped green chilies, fresh cilantro, and the shredded zucchini further enriches the mixture, imparting a burst of flavors and a harmonious medley of textures.

    Step 3: Heating the Skillet for Making Besan Cheela

    An indispensable element in the besan cheela-making process is a well-heated skillet. Place a non-stick skillet over medium-high heat and confirm its readiness by performing the quintessential water droplet test – the sizzle upon contact indicates the skillet’s optimum temperature for crafting the perfect besan chilla.

    Step 4: Pouring and Spreading Batter for Besan Chilla

    With the skillet primed and ready, it’s time to pour approximately 1/2 cup of the besan cheela batter onto its surface. Using the back of a spoon, adeptly spread the batter evenly, starting from the center and spiraling outward. This technique ensures the formation of a well-rounded besan chilla, approximately 7 inches in diameter, ready to be adorned with flavorful toppings.

    Step 5: Cooking the Besan Cheela to Perfection

    As the besan cheela begins to set on the heated skillet, delicately spread a teaspoon of oil over its surface. After a brief interval of about 30 seconds, gracefully flip the cheela using a flat spatula. Applying gentle pressure with the spatula ensures uniform cooking, and this process is repeated three to four times until the besan chilla attains a crisp, golden-brown exterior on both sides, tantalizing the senses with its aroma and visual appeal.

    Step 6: Repeating the Process for Besan Cheela

    The besan cheela-making process is a delightful rhythm that beckons for subsequent rounds. Repeat the aforementioned steps for the remaining batter, creating a succession of besan chillas, each promising a savory and gratifying experience. Whether enjoyed as a snack or a light meal, besan chillas stand as a testament to their versatility and irresistible charm.

    In conclusion, mastering the art of making besan cheela is not only a culinary feat but also a journey of exploration and creativity. With each step carefully executed and each ingredient thoughtfully incorporated, you can create a dish that delights the palate and nourishes the body. So, gather your ingredients, heat up your skillet, and embark on the flavorful adventure of making besan chillas – a dish that’s sure to become a favorite in your kitchen repertoire.

  • Palak Paneer (Spinach)

    Palak Paneer (Spinach)

    Palak Paneer

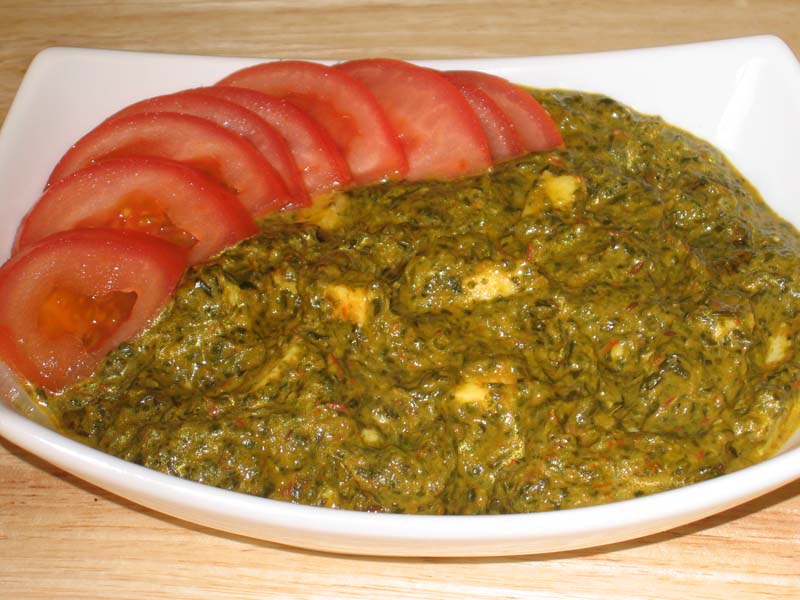
    Palak (Spinach) Paneer

    Palak Paneer is creamy spinach dish with paneer . This is a popular dish with youngsters and served in every indian resturant. The creamy texture of spinach with paneer is a good combination. I like to serve Palak Paneer with Naan or Tandoori Roti.
    4.67 from 6 votes
    Prep Time 10 minutes
    Cook Time 30 minutes
    Total Time 40 minutes
    Course Main Course
    Cuisine Indian
    Servings 4 people

    Ingredients
      

    • 1 10 oz packet of chopped frozen spinach or 4 cups of fresh finely chopped spinach
    • 1/3 lb paneer
    • 2 med tomato pureed
    • 1 tsp chopped ginger
    • 1 tsp corinader powder dhania
    • 1/2 tsp turmeric haldi
    • 1/2 tsp red chili powder lal mirch
    • 1 tbs oil canola or vegetable oil
    • 1/2 tsp cumin seed jeera
    • 1/8 tsp asafetida hing
    • 1/2 tsp salt
    • 2 tbs whole wheat flour
    • 1/3 cup heavy cream
    • 1/2 tomato thinly sliced for garnishing

    Instructions
     

    • If using frozen spinach thaw and blend it just for a minute so spinach has a creamy texture but without becoming pasty.
    • blend the tomatoes and ginger to make puree.
    • Mix coriander, turmeric, and red chili with tomato puree and set aside.
    • Mix whole-wheat flour with heavy cream and set aside.
    • Cube the paneer in about half inch pieces and deep fry them on medium high heat just for few minutes so paneer become very light gold in color, take paneer out on paper towel so extra oil can be absorbed.
    • Heat the oil in a saucepan. Test the heat by adding one cumin seed to the oil; if it cracks right away it is ready.
    • Add hing and cumin seed. After cumin seeds crack, add the tomato puree mixture, and let it cook for a few minutes until the tomato puree is about half in volume.
    • Add the spinach, and let it cook on low medium heat for about 10 minutes covered.
    • Add heavy cream mixture and let this cook another four to five minutes.
    • Add paneer and fold it gently with spinach and let it simmer for a 2-3 minutes. Pot should remain covered until the cooking is finished, otherwise the spinach will splatter.
    • Transfer the spinach to a serving dish and spread the tomato slices over the top, and cover the dish so tomato slices get tender with the steam from the spinach.

    Notes

    You can replace the heavy cream with 1 1/2 cups of milk.
    serve Palak Paneer with Naan or Tandoori Roti
    Tried this recipe?Let us know how it was!

    How to Make Palak Paneer Masala by Manjula’s Kitchen

    Paneer Palak, a beloved North Indian dish, epitomizes the perfect party recipe with its creamy spinach and delectable paneer in rich gravy. This is not merely a culmination but a convergence, as the paneer becomes an integral part of the spinach symphony.

    1. Blanch the Spinach: Bring a large pot of water (6 cups) to a boil. Add the spinach and cook for precisely one minute. Drain the water immediately and immerse the spinach in ice-cold water for two minutes. This step preserves the vibrant green color of the spinach.
    2. Create the Palak Paneer Base: Prepare a smooth puree by blending the blanched spinach with ginger and green chili. Aim for a creamy consistency, avoiding an overly thick paste.
    3. Soften the Paneer: Soak the cubed paneer in hot water (3 cups) for at least five minutes. This step softens the paneer, allowing it to absorb the flavors of the masala.
    4. Temper the Spices: Heat oil in a large saucepan over medium-high heat. Add cumin seeds and asafetida. Once the cumin seeds crackle, introduce the chopped tomatoes and cook for 1-2 minutes.
    5. Incorporate the Spices: Add coriander powder, turmeric powder, red chili powder, salt, and a hint of sugar to the simmering tomato mixture. Stir well to combine and allow the spices to release their aroma.
    6. Cook the Spinach Puree: Reduce heat to low and add the prepared spinach puree. Simmer for 5-6 minutes without a lid to retain the vibrant green color of the spinach.
    7. Thicken the Gravy: For a thicker consistency and richer flavor, create a slurry by mixing flour with water. Gradually whisk the slurry into the simmering palak paneer mixture. Additionally, incorporate cream for a touch of silkiness.
    8. Incorporate the Paneer: Gently fold in the softened paneer cubes and simmer for another five minutes. This allows the paneer to absorb the flavors of the masala.

    Serving: Enjoy your Palak Paneer hot with rice or naan bread.

    Tips:

    Spinach Selection: Use fresh, young spinach for the best color and flavor. Wash thoroughly to remove any dirt or grit.

    Blanching Technique: Don’t overcook the spinach during blanching (step 1). One minute is sufficient to preserve the vibrant green color and prevent mushiness.

    Creamy Texture: For a richer and creamier gravy, add a dollop of heavy cream or cashew paste at the end.

    Spice Level: Adjust the amount of green chili or red chili powder to suit your preference.

    Flavor Boost: Include a bay leaf or a green cardamom pod while tempering the spices for a deeper flavor profile.

    Suggestions:

    Serving: Pair your Palak Paneer with basmati rice, jeera rice, naan, or roti for a complete and satisfying meal.

    Garnish: For a fresh touch, garnish your Palak Paneer with chopped cilantro or a dollop of plain yogurt.

    Leftovers: Store leftover Palak Paneer in an airtight container in the refrigerator for up to 2-3 days. Reheat gently on the stovetop before serving.

    Variations:

    Vegetable Palak Paneer: Add chopped vegetables like carrots, peas, or bell peppers for extra color, texture, and nutrients.

    Mushroom Palak Paneer: Substitute paneer with sliced mushrooms for a vegetarian twist.

    Coconut Palak Paneer: Stir in a can of coconut milk for a creamy and tropical twist.

    Dry Palak Paneer: Reduce the amount of water or simmer for a longer duration to create a thicker, dryer gravy.

    FAQs:

    Can I substitute spinach with another green leafy vegetable?

    Yes, you can use Swiss chard or kale, but the color and flavor will be slightly different.

    Can I use paneer alternatives?

    Yes, firm tofu can be used as a vegetarian substitute for paneer.

    Is Palak Paneer healthy?

    Yes, Palak Paneer is a healthy dish packed with protein from paneer, iron from spinach, and fiber from both ingredients.

    How long does it take to make Palak Paneer?

    The total preparation time is typically around 30-40 minutes.

    Enjoy making and savoring this delicious and versatile Palak Paneer recipe!

    If you liked this recipe. You must also try: Masala Bell Pepper Curry, Gulab Jamun, Pineapple Kulfi Ice Cream, Makhana Mutter Curry, and Ragda Puri Chaat

  • Zucchini Rice

    Zucchini Rice

    Zucchini Rice

    Zucchini Rice

    Zucchini rice is a great gluten free, vegan side dish along with main course for any time of the day. Serving for 4.
    5 from 1 vote
    Course Side Dish
    Cuisine Indian
    Servings 4 people

    Ingredients
      

    • 1 cup rice
    • 2 cups water
    • 1 cup shredded zucchini with skin
    • 1 tbsp of oil
    • 1 tsp of butter
    • 1/2 tsp cumin seed jeera
    • 1/2 tsp black mustard seed rai
    • 4 red peppers whole
    • 2 Bay Leaves tajpat
    • 1/2 tsp salt
    • 1/2 inch small piece of cinnamon stick dal chini
    • 1 tsp lemon juice

    Instructions
     

    • Heat the oil and butter in a heavy saucepan over medium high heat.Test the heat by adding one cumin seed to oil; if the cumin cracks right away oil is ready.
    • Add cumin seeds and mustard seeds to the oil. After seeds crack add red pepper and bay leaves. Add rice and stir-fry for about 2 minutes.
    • Add water, zucchini, salt and lemon juice. Stir and bring to boil.
    • After rice comes to a boil turn the heat down to low and cover the pan. Cook rice for about fifteen minutes or until the rice is tender and the water has evaporated.
    • Serve as is, with soup, yogurt, and pickle.

    Suggestions

    • Melt some cheddar cheese over rice.

    Variations

    • Replace zucchini with 1 1/2 cup finally chopped spinach.
    Tried this recipe?Let us know how it was!

    Elevate Your Cooking with Zucchini Rice: A Flavorful and Nutritious Delight

    Zucchini rice offers a delightful gluten-free option for those seeking quick and easy vegan meals. Made primarily with rice and zucchini, this dish is not only flavorful but also nutritious. Zucchini, rich in vitamins and minerals, adds a refreshing crunch and subtle sweetness to the rice. With minimal ingredients and simple cooking methods, zucchini rice is perfect for busy weeknights or as a side dish for larger gatherings.

    1. Heating the Oil and Butter: Preparing for Flavorful Zucchini Rice

    Begin crafting the delightful zucchini rice by heating a combination of oil and butter in a sturdy saucepan over medium-high heat. To ensure the oil reaches the optimal temperature for sautéing, conduct a quick test by introducing a single cumin seed into the oil. If the seed crackles upon contact, it signifies that the oil is primed and ready to infuse its essence into the dish.

    2. Tempering the Spices: Enhancing Aromatics in Zucchini Rice Recipe

    Elevate the flavor profile of the rice zucchini recipe by adding a medley of aromatic spices to the heated oil and butter. Sprinkle in cumin seeds and mustard seeds, allowing them to crackle and release their enticing aroma into the culinary canvas. Follow this with the addition of red pepper and bay leaves, infusing the dish with layers of complexity and depth.

    3. Sautéing the Rice: Fostering Texture and Flavor in Zucchini Rice Recipes

    Introduce the rice to the fragrant spice blend, stirring vigorously to coat each grain with the aromatic oils. Continue to stir-fry the rice for approximately 2 minutes, coaxing out its nutty flavors and enhancing its texture in preparation for the upcoming infusion of moisture and flavor.

    4. Adding Water and Zucchini: Building Layers of Flavor in Rice Zucchini Recipe

    Elevate the zucchini rice recipe to new heights by incorporating water, fresh zucchini, salt, and a splash of invigorating lemon juice into the saucepan. Stir the mixture well, allowing the flavors to meld harmoniously as it comes to a gentle boil, infusing the rice with the vibrant essence of the zucchini and citrus.

    5. Simmering to Perfection: Achieving Tender Texture in Zucchini Rice

    Once the rice mixture reaches a rolling boil, reduce the heat to low and cover the pan, initiating the gentle simmering process. Allow the rice to cook undisturbed for approximately fifteen minutes, or until the grains are tender and have absorbed the flavorful liquid, resulting in a tantalizing medley of textures and tastes in the completed zucchini rice recipes.

    6. Serving Suggestions: Enhancing Enjoyment of Zucchini Rice

    Indulge in the delightful simplicity of zucchini rice by serving it as is, alongside comforting accompaniments such as soup, yogurt, and pickle. For a decadent twist, consider melting a generous portion of cheddar cheese over the rice, imparting a luscious richness that elevates the dish to new heights of indulgence.

    Suggestions for Variation: Experimenting with Flavors in Zucchini Rice

    For a refreshing twist on the classic recipe, consider substituting zucchini with 1 1/2 cups of finely chopped spinach, infusing the dish with vibrant green hues and the earthy essence of leafy greens. This variation offers a delightful alternative for those seeking to explore new flavor profiles while retaining the comforting appeal of zucchini rice.

    If you loved our zuchini rice recipe then you must also check out other variants of Rice: Vegetable Biryani, Masala Khichdi, Mango Rice, Quinoa Vegetable Pilaf and Lemon Rice