Bread Dahi Vada
Ingredients
- 8 slices of white bread
- 2 tablespoon oil
For Filling
- 3 tablespoons shredded coconut; I am using frozen shredded coconut, available in Indian grocery stores
- 1/4 teaspoon salt
- 2 teaspoons ginger finely chopped
- 2 teaspoons green chili finely chopped
- 2 teaspoons sliced almonds
For Serving
- 1-1/2 cups yogurt (curd, Dahi)
- 1/4 cup tamarind chutney check the recipe on my website
- 1/2 teaspoon salt
- 1/2 teaspoon red chili powder
Instructions
- Mix all the ingredients for filling coconut, salt, ginger, green chili, and almonds, set aside.
- Cut bread slices into rounds, I am using 3” cookie cutter.
- Lightly wet one side of the bread and put 2 teaspoons of filling in center and fold the bread in half, forming semi-circle. Press the edges together with your fingers. Make sure the edges are sealed.
- Continue filling rest of the vadas in the same manner.
- Brush the vadas both side lightly with oil, and toast them in toaster oven just enough that bread has become light golden brown. You can also bake them in oven.
- Serving the vadas
- Whip the yogurt until smooth. Add a little milk as needed to make the consistency similar to pancake batter or lassi. Add the salt, adjust to your taste.
- When ready to serve soak them in water for one minute and squeeze the vadas lightly between your both palms.
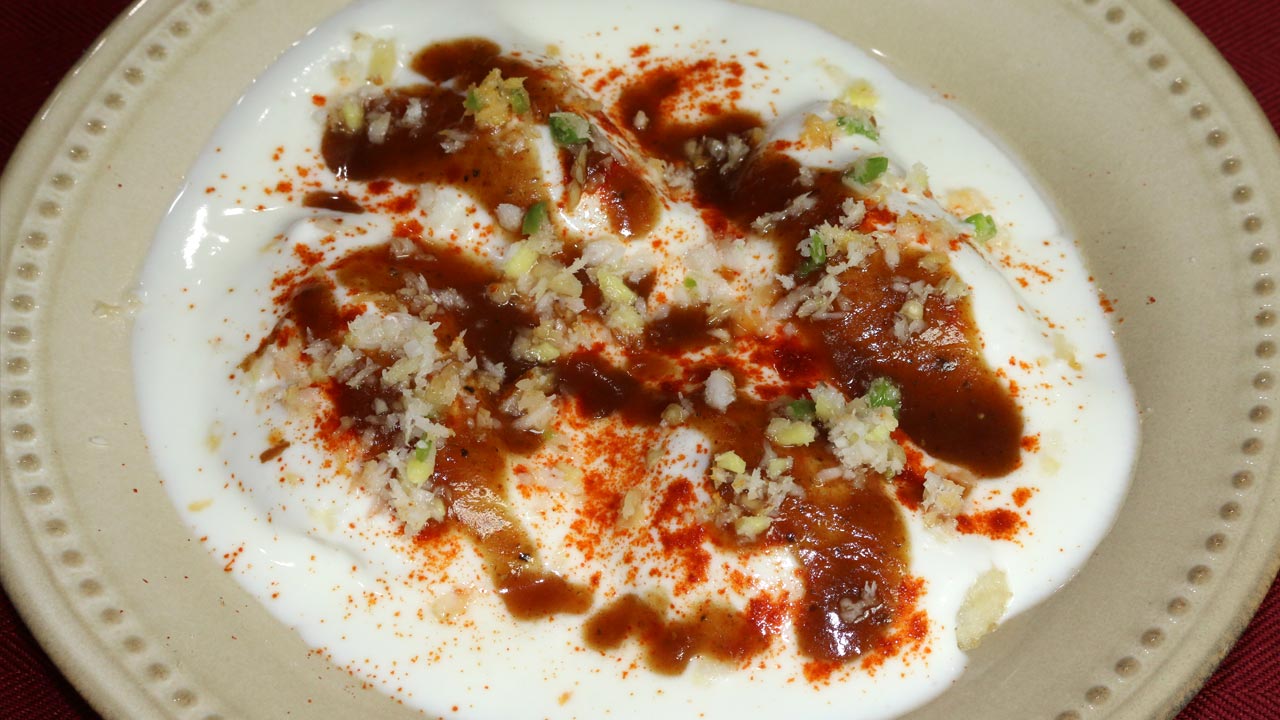
- Dip them in yogurt one at a time and arrange them in serving plate, sprinkle the red chili powder to your taste, it is optional, drizzle the tamarind chutney and few pieces of cilantro, and gives a nice color.
- Bread dahi vadas are ready to serve.
Bread Dahi Vada Recipe
Bread Dahi Vada is a delightful twist to the traditional dahi vada, offering a quicker and simpler way to enjoy this beloved Indian snack. Bread dahi vada is perfect for those who crave the flavors of dahi vada but prefer a hassle-free preparation method. This recipe is a fusion of textures and flavors, combining the softness of bread with the tanginess of yogurt and the spiciness of chutneys. Here’s how to make bread dahi vada at home.
Step 1: Preparing the Bread
To begin making bread dahi vada, start by preparing the bread slices. Trim the edges of the bread slices and then cut them into desired shapes. You can cut them into squares, rectangles, or use cookie cutters to create fun shapes like stars or hearts. This step ensures that the bread absorbs the yogurt mixture well, resulting in soft and flavorful vadas.
Step 2: Soaking the Bread
Once you’ve cut the bread into desired shapes, soak them in lukewarm water for a few seconds. Ensure that the bread slices are fully submerged in water to soften them. This step is crucial as it allows the bread to absorb moisture, making it easier to shape into vadas later. Squeeze out excess water from the soaked bread slices gently, being careful not to break them.
Step 3: Preparing the Yogurt Mixture
The next step in making bread dahi vada is to prepare the yogurt mixture. In a bowl, whisk fresh yogurt until smooth and creamy. Add a pinch of salt and sugar to the yogurt and mix well. The yogurt should have a balanced flavor, with a hint of sweetness to complement the savory elements of the dish. You can adjust the seasoning according to your taste preferences.
Step 4: Assembling the Bread Dahi Vada
Now it’s time to assemble the bread dahi vada. Take each soaked bread slice and gently squeeze out any remaining water. Place the squeezed bread slice on a serving plate or platter. Spoon a generous amount of the prepared yogurt mixture over the bread slice, covering it completely. Ensure that the yogurt coats the bread evenly, imparting its tangy flavor to every bite.
Step 5: Garnishing the Bread Dahi Vada
After assembling the bread dahi vada, it’s time to garnish it with various toppings and chutneys. Drizzle sweet tamarind chutney and spicy green chutney over the vadas, adding layers of flavor and heat. Sprinkle a pinch of chaat masala and roasted cumin powder on top for an extra burst of taste. Garnish with finely chopped cilantro leaves and pomegranate seeds for a vibrant and refreshing touch.
Tips for Making Perfect Bread Dahi Vada:
- Use Fresh Bread: Opt for fresh bread slices as they absorb moisture better, resulting in softer vadas.
- Soak Bread Just Right: Ensure that you soak the bread slices for the right amount of time. Over-soaking can make them mushy, while under-soaking can make them dry.
- Adjust Seasonings: Taste the yogurt mixture before assembling the vadas and adjust the seasonings according to your preference. You can add more salt or sugar as needed.
Variations of Bread Dahi Vada:
- Stuffed Bread Dahi Vada: For a flavorful twist, you can stuff the soaked bread slices with a mixture of chopped nuts, raisins, and spices before coating them with yogurt.
- Bread Dahi Vada Chaat: Turn bread dahi vada into a delightful chaat by adding tomatoes, sev, and a drizzle of mint chutney on top.
Benefits of Bread Dahi Vada:
- Quick and Easy: Bread dahi vada is a quick and easy recipe that can be prepared in minutes, making it perfect for busy days or sudden cravings.
- Lighter Option: Unlike traditional dahi vada made with lentils, bread dahi vada is lighter on the stomach, making it suitable for those looking for a lighter snack option.
FAQs (Frequently Asked Questions) about Bread Dahi Vada:
Can I use whole wheat bread for this recipe?
- Yes, you can use whole wheat bread instead of white bread for a healthier twist. However, keep in mind that whole wheat bread may have a denser texture.
Can I prepare bread dahi vada in advance? (H2)
- While it’s best to assemble bread dahi vada just before serving to maintain the texture of the bread, you can prepare the components in advance and assemble them when ready to serve.
For more delightful Indian recipes, more Indian recipes, appetizers, beverages, and desserts, be sure to check out the following links on Manjula’s Kitchen. Here are some links to recipes on Manjula’s Kitchen official website:
Chana Chaat (Spicy Chickpea Salad) Recipe
Pav Bhaji (Spicy Vegetable Hash with Buns) Recipe
Raj Kachori (Crunchy Chaat) Recipe
These recipes should offer you a flavorful experience straight from Manjula’s Kitchen.


Leave a Reply
You must be logged in to post a comment.